The Scope and Purpose of a Home Inspection
Purchasing property involves risk
The purpose of a home inspection is to help reduce the risk associated with the purchase of a structure by providing a professional opinion about the overall condition of the structure. A home inspection is a limited visual inspection and it cannot eliminate this risk. Some homes present more risks than others. We cannot control this, but we try to help educate you about what we don’t know during the inspection process. This is more difficult to convey in a report and one of many reasons why we recommend that you attend the inspection.
A home inspection is not an insurance policy
This report does not substitute for or serve as a warranty or guarantee of any kind. Home warranties can be purchased separately from insuring firms that provide this service.
A home inspection is visual and not destructive
The descriptions and observations in this report are based on a visual inspection of the structure. We inspect the aspects of the structure that can be viewed without dismantling, damaging or disfiguring the structure and without moving furniture and interior furnishings. Areas that are concealed, hidden or inaccessible to view are not covered by this inspection. Some systems cannot be tested during this inspection as testing risks damaging the building. For example, overflow drains on bathtubs are generally not tested because if they were found to be leaking they could damage the finishes below. Our procedures involve non-invasive investigation and non-destructive testing which will limit the scope of the inspection.
This is not an inspection for code compliance
This inspection and report are not intended for city / local code compliance. During the construction process structures are inspected for code compliance by municipal inspectors. Framing is open at this time and conditions can be fully viewed. Framing is not open during inspections of finished homes, and this limits the inspection. All houses fall out of code compliance shortly after they are built, as the codes continually change. National codes are augmented at least every three years for all of the varying disciplines. Municipalities can choose to adopt and phase in sections of the codes on their own timetables. There are generally no requirements to bring older homes into compliance unless substantial renovation is being done.
This is just our opinion
Construction techniques and standards vary. There is no one way to build a house or install a system in a house. The observations in this report are the opinions of the home inspector. Other inspectors and contractors are likely to have some differing opinions. You are welcome to seek opinions from other professionals.
The scope of this inspection
This inspection will include the following systems: exterior, roof, structure, drainage, foundation, attic, interior, plumbing, electrical and heating. The evaluation will be based on limited observations that are primarily visual and non-invasive. This inspection and report are not intended to be technically exhaustive.
Your expectations
The overall goal of a home inspection is to help ensure that your expectations are appropriate with the house you are proposing to buy. To this end we assist with discovery by showing and documenting observations during the home inspection. This should not be mistaken for a technically exhaustive inspection designed to uncover every defect with a building. Such inspections are available but they are generally cost-prohibitive to most homebuyers.
Your participation is requested
Your presence is requested during this inspection. A written report will not substitute for all the possible information that can be conveyed verbally by a shared visual observation of the conditions of the property.
How to Read This Report
Getting the Information to You
This report is designed to deliver important and technical information in a way that is easy for anyone to access and understand. If you are in a hurry, you can take a quick look at our "Summary Page” and quickly get critical information for important decision making. However, we strongly recommend that you take the time to read the full Report, which includes digital photographs, captions, diagrams, videos and hot links to additional information.
The best way to get the layers of information that are presented in this report is to read your report online. This will allow all you to expand your learning about your house. You will notice some words or series of words highlighted in blue and underlined – clicking on these will provide you with a link to additional information.
This report can also be printed on paper or to a PDF document.
Chapters and Sections
This report is divided into chapters that parcel the home into logical inspection components. Each chapter is broken into sections that relate to a specific system or component of the home. You can navigate between chapters with the click of a button on the left side margin.
Most sections will contain some descriptive information done in black font. Observation narrative, done in colored boxes, will be included if a system or component is found to be significantly deficient in some way or if we wish to provide helpful additional information about the system or the scope of our inspection. If a system or component of the home was deemed to be in satisfactory or serviceable condition, there may be no narrative observation comments in that section.
Observation Labels
All narrative observations are colored, numbered and labeled to help you find, refer to, and understand the severity of the observation. Observation colors and labels used in this report are:
- Major Concern:Repair items that may cost significant money to correct now or in the near future, or items that require immediate attention to prevent additional damage or eliminate safety hazards.
- Repair:Repair and maintenance items noted during inspection. Please note that some repair items can be expensive to correct such as re-finishing hardwood floors, but are considered simply repair items due to their cosmetic nature.
- Improve:Observations that are not necessarily defects, but which could be improved for safety, efficiency, or reliability reasons.
- Monitor:Items that should be watched to see if correction may be needed in the future.
- Due Diligence:Observation such as a buried oil tank that may require further investigation to determine the severity and / or urgency of repair.
- Future Project:A repair that may be deferred for some time but should be on the radar for repair or replacement in the near future.
- Efficiency:Denotes observations that are needed to make the home more energy efficient as well as to bring the home up to modern insulation standards. This category typically includes windows and insulation. Other items, such as lighting and appliances, are not inspected for their energy status.
- Completed:Items that were initially an issue but have since been completed.
- Note:Refers to aside information and /or any comments elaborating on descriptions of systems in the home or limitations to the home inspection.
- Description:Detailed description of various aspects of the property noted during the inspection.
Summary Page
The Summary Page is designed as a bulleted overview of all the observations noted during inspection. This helpful overview is not a substitution for reading the entire inspection report. The entire report must be read to get a complete understanding of this inspection report as the Summary Page does not include photographs or photo captions.
Moisture Meter Testing
Where moisture meter testing is indicated in this report a Protimiter Survey Master Dual Function was used.
Summary
Repairs
- RPWDO-1 Rodents, Pests and Wood Destroying Organisms:
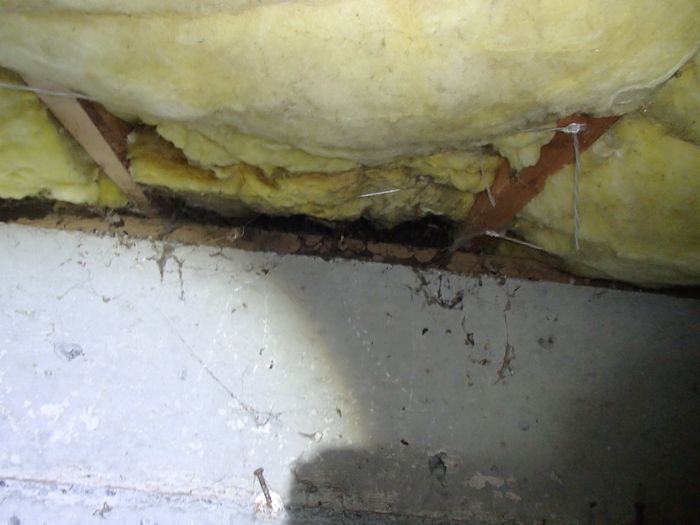
Wood and cellulose debris was noted in the crawl space. This can encourage wood destroying organisms such as subterranean termites. Removal of all cellulose debris from the crawl space is recommended to eliminate conditions conducive to wood destroying organisms.
- EG-2 Exterior/Garage:
Visual inspection of the fiber cement siding installation showed the need for repairs as well as some installation details that are not consistent with modern manufacturers installation requirements. This is typical for this age of construction. Some of the items noted can be repaired or improved, while others simply are the way they are until a larger re-siding is needed. Consult with a qualified contractor to further investigate the siding and repair as recommended to prolong the useful life of the siding. Examples of observations noted during inspection include:
- Siding run right to the horizontal flashing and sealed. This is not recommended but difficult to fix at this point. I would caulk and seal the crack in the siding - east side above door.
- Siding to concrete contact is not recommended - a minimum 1- 2 inch clearance should be maintained. This will be difficult to correct at this point.
- Siding with inadequate clearance to grade - should be 6 inches to soils - try and improve grading at the front side.
- The siding is in contact with the decking. This is not ideal and could trap moisture on the siding.
- Missing back flashings at butt joints - these flashings can be retrofit on exposed sides of the building with metal flashing tabs or maintained with caulking.
- EG-6 Exterior/Garage:
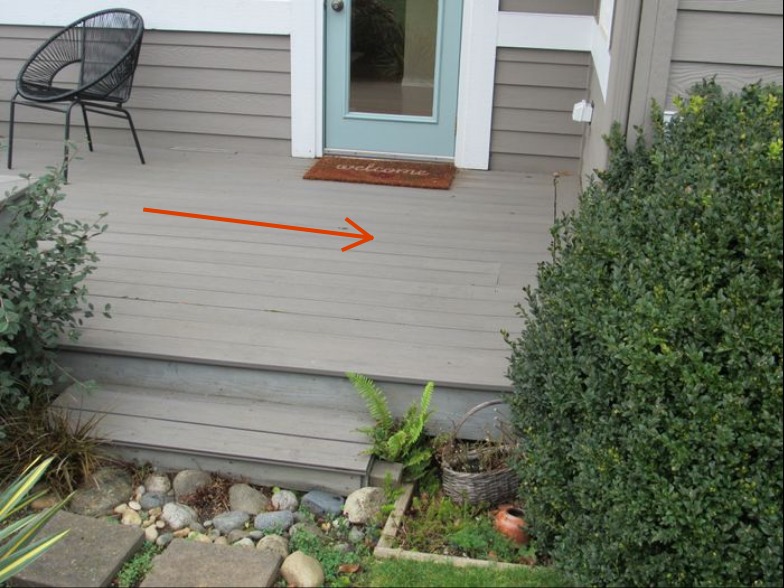
The decking for the Trex style plastic decking is showing some localized bowing - see back deck by the door. This material can be tricky to work with and often telegraphs quirks in the framing. Repair the bowing decking boards as needed / desired. This could be difficult to correct at this point. As the framing is not visible it is difficult to distinguish a cosmetic defect here from some larger issue.
- EG-7 Exterior/Garage:
The overhead garage door does not reverse under resistance to closing. Adjustment of the sensitivity is recommended for improved safety. This typically involves adjusting a small plastic screw on the opener.
- EG-8 Exterior/Garage:
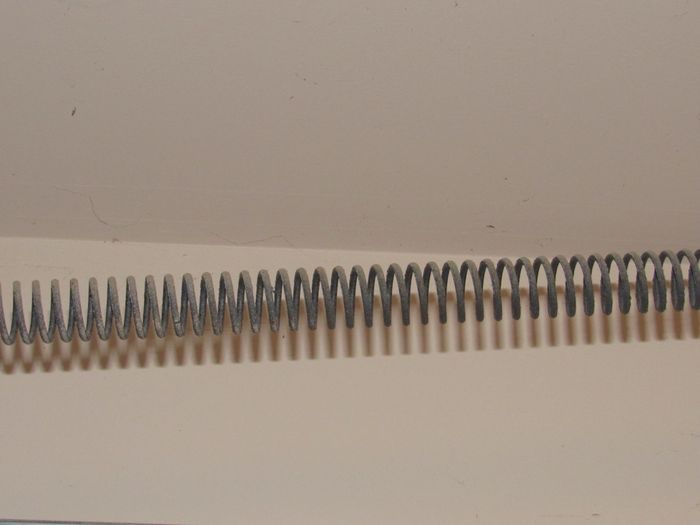
No safety wire / containment cabling was noted running inside the overhead garage door springs. This is a modern standard to prevent a broken spring from becoming a projectile. Install a wire inside these springs for improved safety.
- EG-9 Exterior/Garage:
Replace the damaged / melted cover to the overhead door opener and use a low wattage bulb to prevent over-heating.
- RA-1 Roof/Attic:
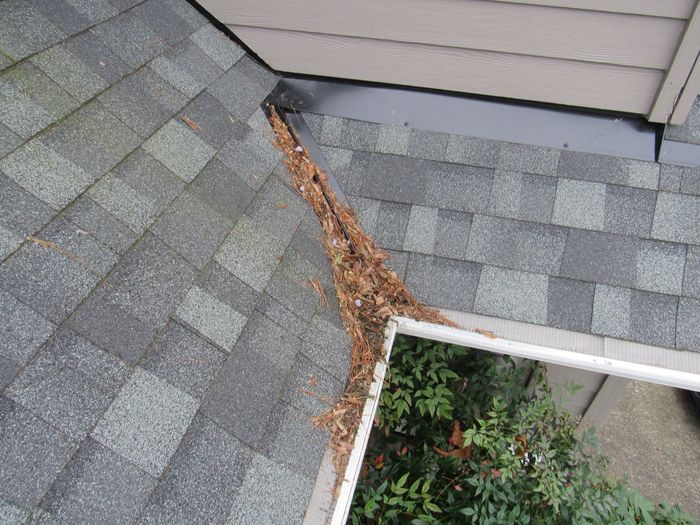
Clean organic debris from the roof to ensure unrestricted paths for roof drainage. This is routine maintenance that should be part of a regular maintenance schedule for the HOA.
- RA-2 Roof/Attic:
Signs of air leakage around the skylight chambers were found inside the attic today. Air-sealing air leakage points is recommended to reduce risks of condensation and water damage around the skylight and to conserve energy.
- RA-5 Roof/Attic:
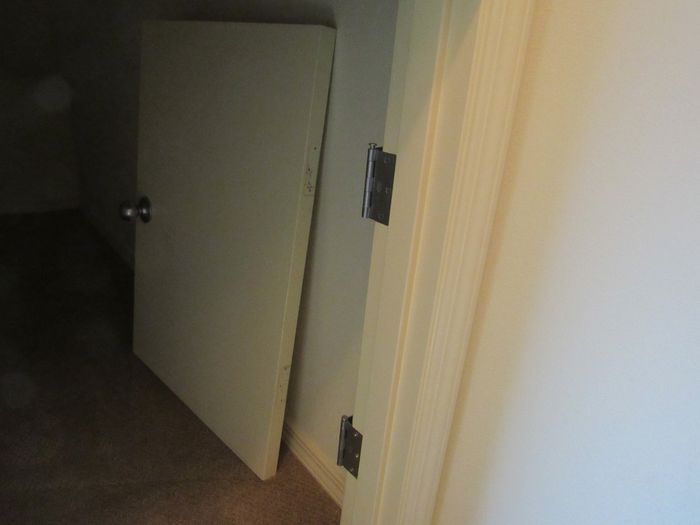
There is a small door to a storage space in the master bedroom - install the missing door as needed. This door is present but off of its hinges.
- E-3 Electrical:
Screws with sharp ends, like wood screws, are not recommended to secure the dead-front cover to the electric panel as these can puncture wiring insulation. This is a potential safety hazard. Replace the current sharp screws with the correct blunt screws that work correctly with this panel.
- E-4 Electrical:
The white conductors inside the electric panel at the 240 volt circuits are not correctly identified as hot or ungrounded conductors - these should be painted in black or red ink for correct identification and improved safety - see left side.
- E-5 Electrical:
The sheetrock wall material has not been run up flush with the electric panel cabinet. Sheetrock should be mounted flush with the cabinet with no gap exceeding 1/8th of an inch. Repair as needed. In practice, this could be a pain to correct, it is why they are using longer screws.
- E-6 Electrical:
The GFCI protected receptacle in the garage did not respond to testing and may be defective - it did not trip when tested. Have this receptacle repaired or replaced as needed.
- E-7 Electrical:
The loose receptacle in the building should be secured to prevent accidental damage to the wiring connections - see kitchen countertop. Securing loose receptacles can often be done by just tightening some set screws between the receptacle and the junction box, though sometimes it can get more complex if the box itself is loose. Repair as needed.
- P-3 Plumbing:
The supply pipe insulation is incomplete in the crawl space. Be sure all supply lines in unheated spaces have been adequately insulated to protect from freezing conditions that could damage the pipes and to prevent heat loss.
- P-9 Plumbing:
An expansion tank is recommended for the water heater; these are required if the house has a closed plumbing system. This helps reduce pressure on the plumbing system when the pipes and water expand from thermal expansion during water heating. Installation of expansion or pressure tanks is modern installation practice and will be required if a pressure reducing valve has been installed. Consult with a qualified plumber to install.
- P-10 Plumbing:
The leaky hose bib at the entry side of the house requires repair or replacement - it leaked from the faucet handle when the faucet was turned on and under pressure. This often requires tightening the packing around the handle stem.
- LAP-4 Laundry and Additional Plumbing:
The dryer exhaust ductwork should be insulated where run outside of the thermal envelope of the building; this is to prevent condensation forming inside the duct that could trap lint. Accumulation of dryer lint can be a fire hazard. Insulate this exhaust duct for improved safety and performance - see crawl space.
- HCFV-2 Heating, Cooling, Fireplaces and Ventilation:
I recommend a routine servicing of the ductless heat pump system. These systems should be cleaned and serviced annually for efficient operation and to prolong the useful service life of this equipment. Observations noted during inspection include:
- The filters at the ductless heat pump head are dirty and should be cleaned.
- The batteries for the ductless heat pump remote control are low and should be replaced - there is currently no display.
- HCFV-3 Heating, Cooling, Fireplaces and Ventilation:
The ductwork for the bathroom fans is uninsulated in the attic space. This can cause condensation during cold weather and is less energy efficient. Replace these with insulated exhaust ducts or insulate to R-8 or better.
- HCFV-4 Heating, Cooling, Fireplaces and Ventilation:
The electric wall heaters in the house require cleaning. Best practices are to turn power off to the heater and use compressed air to clean the dust from the heating elements. The fan blades can be wiped or vacuumed as needed, then restore power. Many manufacturers of these heaters recommend cleaning every six months to prevent a fire hazard. Be sure to keep all storage at least three feet away from these heaters.
- HCFV-6 Heating, Cooling, Fireplaces and Ventilation:
Annual servicing of the gas log fireplace is recommended to ensure safe and reliable performance. No recent service records were noted. Have this appliance cleaned and serviced by a qualified gas appliance specialist. Examples of observations noted during inspection include:
- Mild corrosion noted inside the fireplace
- Cloudiness noted on the glass
- I-1 Interior:
The casement window at the north side main floor is not operating correctly and requires adjustment - the window would not close on its own.
- K-1 Kitchen:
The kitchen has no provisions for ventilation. An exhaust fan that ducts to the exterior is required at least somewhere in the kitchen - in this case, all you have is the window for ventilation, which is marginal. Lack of ventilation to the exterior could be inconvenient with cooking odors. Hire a qualified contractor to further evaluate this installation and install a cooktop fan and exhaust system to the outdoors.
- K-2 Kitchen:
An air gap is recommended to protect the dishwasher from accidental contamination if the sewer line were to back up. If an air gap cannot be installed, at least run the drain line above the level of the sink drain to create a high loop. This was an older way of protecting the dishwasher. Hire a licensed plumber to install an air gap.
- K-3 Kitchen:
An anti-tip device is needed to prevent this range from tipping during operation of the oven door. This is a small clip that secured the back adjustable feet of the range to the floor.
- FB-1 Family Bathroom:
The loose toilet in the downstairs bath needs to be reset and the wax ring and flange should be replaced to prevent hidden plumbing leaks. This is a simple job unless the bolts that fasten the toilet also require repair. Sometimes, loose toilets can even be shimmed for a tight and proper seal by qualified plumbers and sometimes simply caulking can help. Hire a licensed plumber to further evaluate and repair.
- MB-1 Master Bathroom:
Clean / repair the leaky aerator in the master bathroom sink.
- MB-2 Master Bathroom:
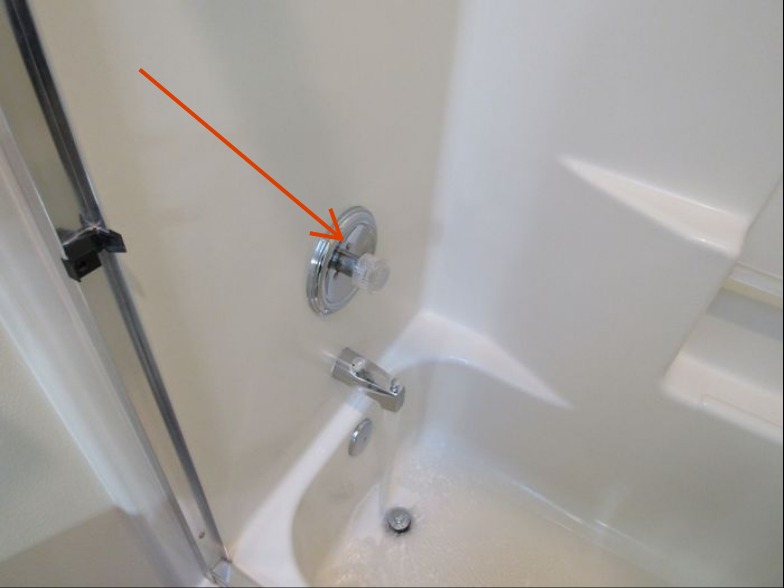
The mixing valve that controls the water flow to the shower in the master bath is stiff and requires repair or replacement; often replacing the cartridge inside the faucet and fix this. Hire a licensed plumber to further evaluate and repair.
- MB-3 Master Bathroom:
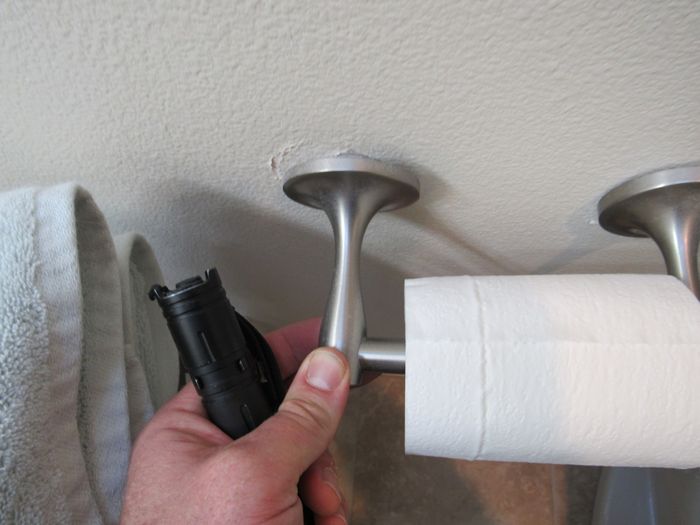
Secure / repair the loose toilet paper dispenser.
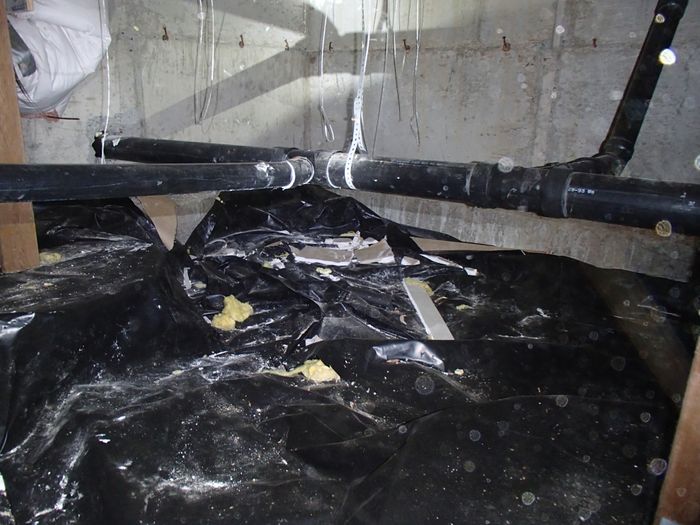
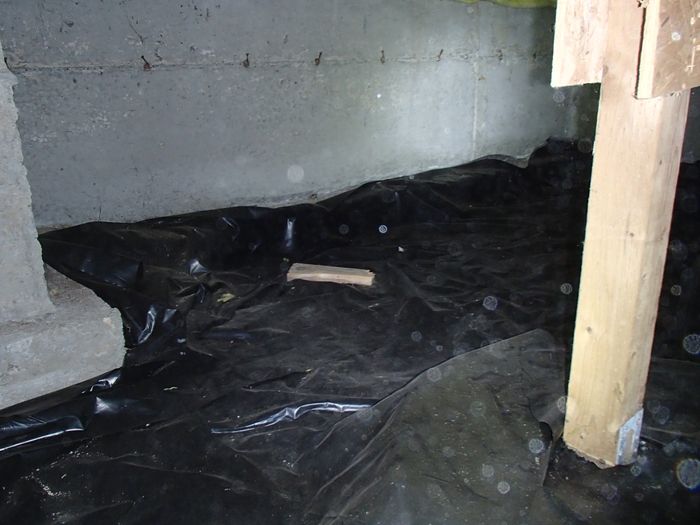
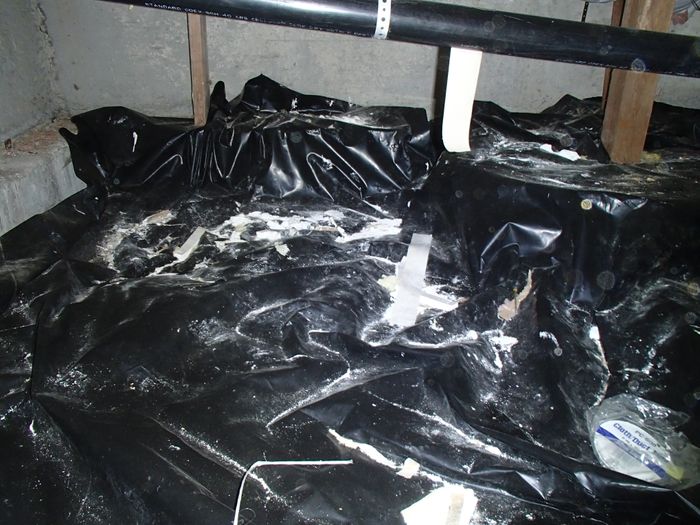
- CS-3 Crawl Space:
Crawl space vents are currently blocked by insulation in places. Implement repairs as needed to ensure vents are unobstructed. Use cardboard baffles to hold insulation up away from the vents.
Improves
- EG-3 Exterior/Garage:
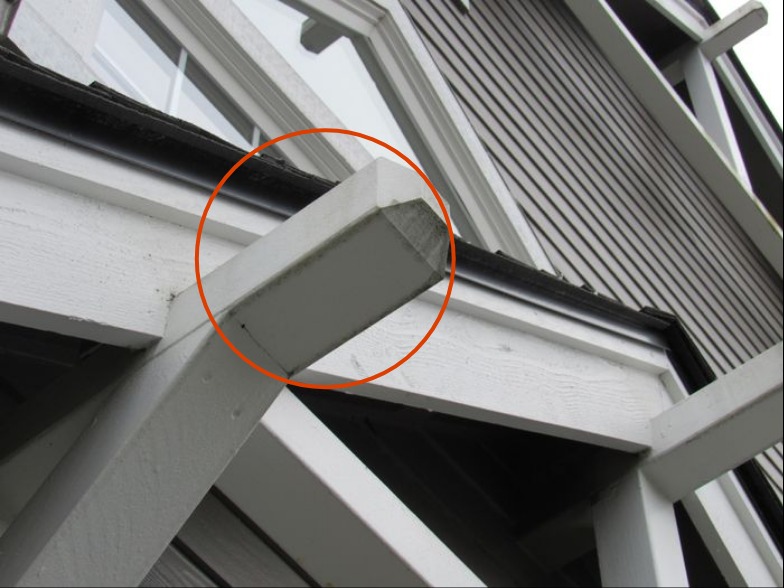
Where the wood braces or corbels for the eaves stick out past the roof frame it would be wise to build metal flashing caps to protect this wood from decay.
- P-8 Plumbing:
A drain pan is recommended under water heaters that are located in finished spaces or where a leak could damage finishes. Where a pan does not already exist, the tricky part is providing a drain to the outside. A pan without a drain is often of limited benefit / protection. For improved protection from accidental water heater leaks consider a pan or a flood-safe device such as this: http://www.watts.com/pages/_products_details.asp?pid=7683
- LAP-1 Laundry and Additional Plumbing:
A moisture alarm with water shut-off features is recommended under the washing machine to protect against accidental leaks in the supply hoses. Pans can be effective when there is a drain, but even these will not protect against a burst supply connector. A moisture alarm with automatic shut-off will. Watts is a brand I have seen installed: http://www.watts.com/pages/learnAbout/intelliflow.asp?catId
Monitors
- RA-3 Roof/Attic:
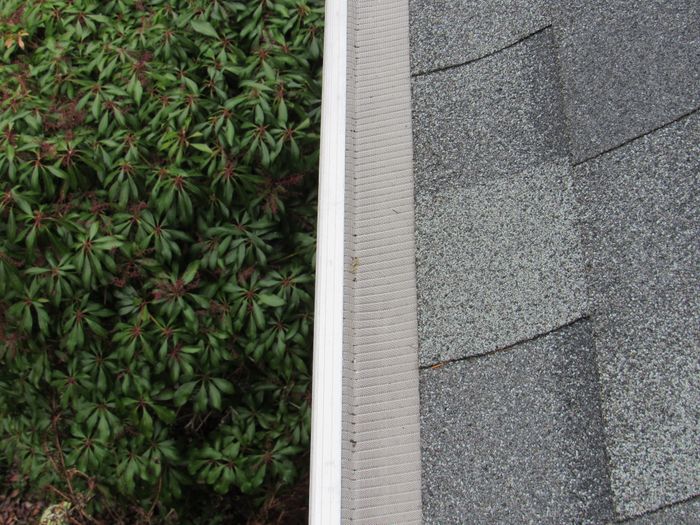
This home is employing an advanced gutter guard system. This can help to slow organic build-up in the gutters but during heavy rains I have noticed that water can shoot over the tops of the gutters. Also, these gutters can be complex to clean when they do get clogged with organic debris.
- P-6 Plumbing:
This water heater is likely close to the end of its useful service life. The average life of these water heaters is statistically 8-12 years though in practice, they can vary widely between 8-20 years depending on water quality and maintenance schedule such as frequency of flushing the tank and replacing sacrificial anodes. Budget to replace this water heater at any time. Water was hot at the time of inspection.
Due Diligences
- RA-6 Roof/Attic:
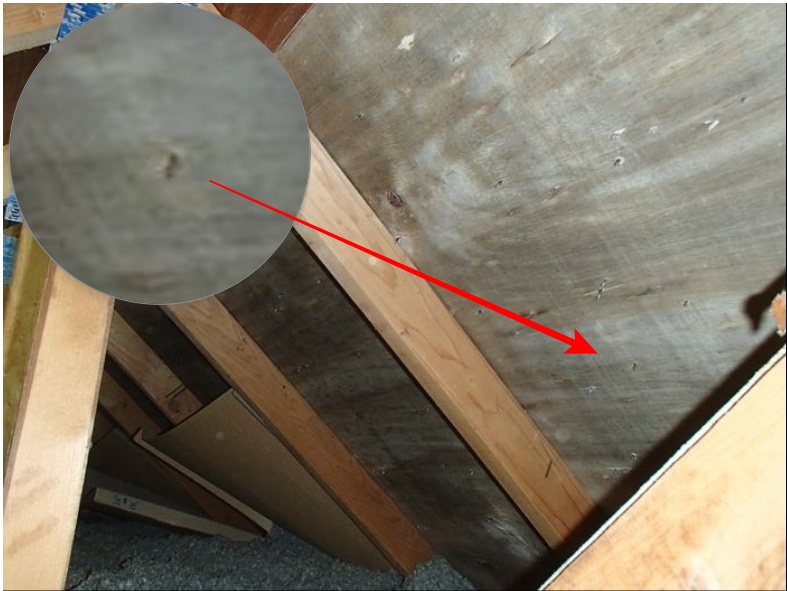
Stains were noted on the roof decking material when viewed from the attic - see only the small gable on the north side. This indicates that parts of the attic have experienced prior condensation problems during the cold weather months. Generally, the way to prevent seasonal condensation in an attic involves a 4-pronged approach:
1. Air seal the ceiling as is feasible to slow air migration from the interior into the attic.
2. Be sure all bath and kitchen fans in the attic are well-sealed and venting to the exterior.
3. Keep indoor relative humidity below 55% during cold-weather months
4. Make sure the roof cavity / attic spaces are correctly ventilated.
Options for handling this include:
- Monitor during cold weather to see if any corrective action is needed.
- Have it further investigated by a mold remediation or building performance contractor.
It is difficult to gauge during a one time inspection the degree to which this is an older or intermittent problem. This makes it difficult to make an accurate recommendation for corrective action as it can take time to determine a practical scope and urgency for repair. For more information about roof condensation problems, please see the attached hot link above. Observations noted during inspection include:
- No new staining on new roof nails - indicates no issues since the roof installation.
- Staining looks old and localized and was dry at the time of inspection.
- The whole south side of the attic looks dry and the plywood has a nice bright color.
- P-4 Plumbing:
An evaluation of the sewer line below the ground is beyond the scope of this inspection. Due to the age and location of the building, a sewer scope is recommended to further evaluate the sewer line and the below ground connections between the house and the municipal sewer line. Sewer scopes are done using video cameras and can reveal the materials, condition and reliability of the sewer line.
- LAP-2 Laundry and Additional Plumbing:
Inquire with the HOA about who is responsible for cleaning dryer exhaust ducts. This is important regular maintenance that should be performed by the association to ensure everyone's dryer exhaust ducts are clean and operating safely.
Notes
- EG-5 Exterior/Garage:
Please note that the deck framing inspection was limited - I could not see framing and deck structural components well in some places because the deck is too close to grade.
- RA-4 Roof/Attic:
I did not crawl the crawl space for the attic where there was no ramp or safe way to access the space. Crawling in the V of trusses or on top of framing risks damaging thermal barriers and ceiling finishes and is not a safe way to access an attic. This limited inspection of this space.
- E-9 Electrical:
Carbon monoxide alarms were found and noted during inspection. Be sure to check these regularly. The standard is 1/ floor and 1 outside all sleeping areas.
- HCFV-1 Heating, Cooling, Fireplaces and Ventilation:
The heat pump system was tested in heating mode only as it was too cold to test in cooling mode. This means that the switching valve and condensate collection system could not be tested during inspection.
- HCFV-5 Heating, Cooling, Fireplaces and Ventilation:
I believe the electric heaters in the main floor have been disabled. They did not respond to testing and are not really needed with the ductless heat pump. Inquire with the seller for any additional information.
- FB-2 Family Bathroom:
During inspection today I operated all plumbing fixtures in bathrooms. I ran a moisture meter around toilets and tile shower enclosures to check for concealed leaks and sounded for loose tile and finishes in shower and tub enclosures. I do not test bathtub overflow drains as this risks damaging finishes around the tub. Monitor tubs while filling and avoid pushing water into the overflow. Even well-installed overflow drains can leak as the gaskets that seal the overflow will dry out over time and may no longer provide a watertight seal. Monitor plumbing after moving into a new home as testing during inspection presents less stress on plumbing than daily use. Any defects uncovered during inspection are listed in this report.
General Comments
Building Characteristics, Conditions and Limitations
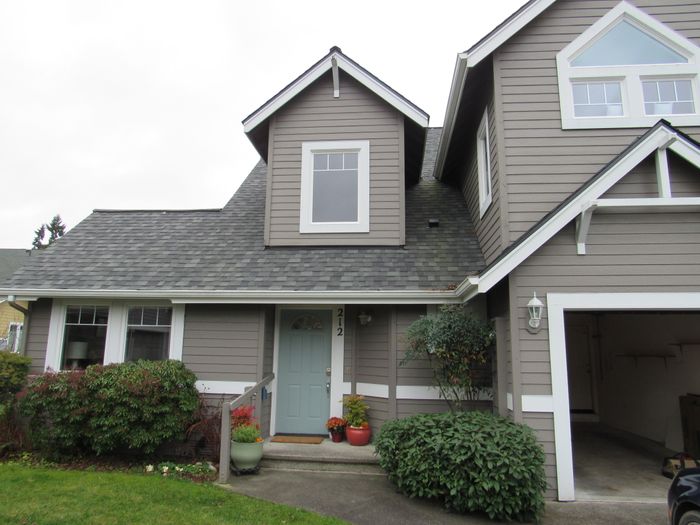
Style of Home Town home
Type of Building Condominium
Approximate Year of Original Construction 1997
Attending the Inspection Buyer's Agent
Occupancy Occupied
Animals Present No
Weather during the inspection Cloudy
Approximate temperature during the inspection Below 50[F]
Ground/Soil surface conditions Damp
For the Purposes of This Report, the Front Door Faces North
Rodents, Pests and Wood Destroying Organisms
Rodents
None noted
Other Pests
None noted
Wood Destroying Organisms
Visible Evidence of Active Wood Destroying Insects None noted
Visible Evidence of Inactive Wood Destroying Insects None noted
Visible Evidence of Damage from Wood Destroying Insects None noted
Visible Evidence of Active Wood Decay and Fungi None noted
Visible Evidence of Conditions Conducive to Wood Destroying Organisms Present, See WDO observations in this report
Wood and cellulose debris was noted in the crawl space. This can encourage wood destroying organisms such as subterranean termites. Removal of all cellulose debris from the crawl space is recommended to eliminate conditions conducive to wood destroying organisms.
 |  |
 |
Grounds
Drainage and Lot Location
Clearance to Grade Non-standard
Downspout Discharge Below grade
Site Description Flat
Driveways/Walkways/Flatwork
Driveway Concrete
Walkways Concrete
Patios None noted
Window and Stairwells
None Noted
Grounds, Trees and Vegetation
Trees/Vegetation too near building No
Exterior Stairs
Standard
Fences
Partial fencing noted
Carports and Outbuildings
None noted
Exterior/Garage
Siding and Trim
Trim Material Wood
Siding Material Fiber-cement
Manufacturers of fiber cement siding have done a poor job helping inspectors and consumers distinguish their products after installation; these products have few if any distinguishing characteristics. This report will site James Hardie manufacturers installation requirements for reference because they are the most common manufacturer of fiber cement siding and the various manufactures seem to share similar installation guidelines. However, reference of these guidelines in this report does not ensure that the fiber cement siding here is a James Hardie product.
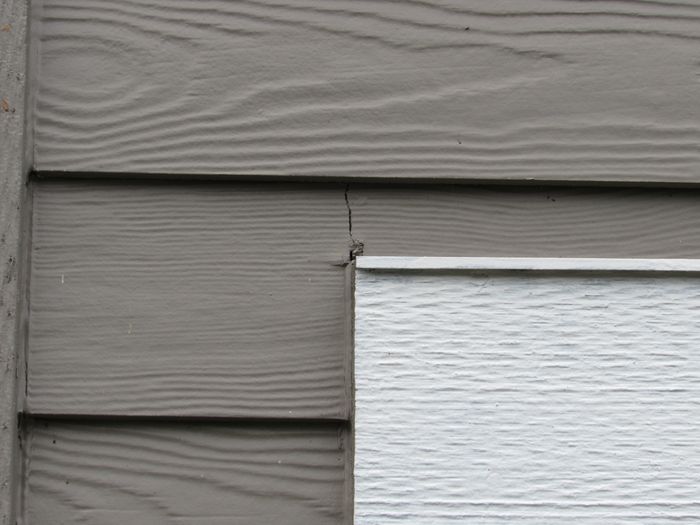
Visual inspection of the fiber cement siding installation showed the need for repairs as well as some installation details that are not consistent with modern manufacturers installation requirements. This is typical for this age of construction. Some of the items noted can be repaired or improved, while others simply are the way they are until a larger re-siding is needed. Consult with a qualified contractor to further investigate the siding and repair as recommended to prolong the useful life of the siding. Examples of observations noted during inspection include:
- Siding run right to the horizontal flashing and sealed. This is not recommended but difficult to fix at this point. I would caulk and seal the crack in the siding - east side above door.
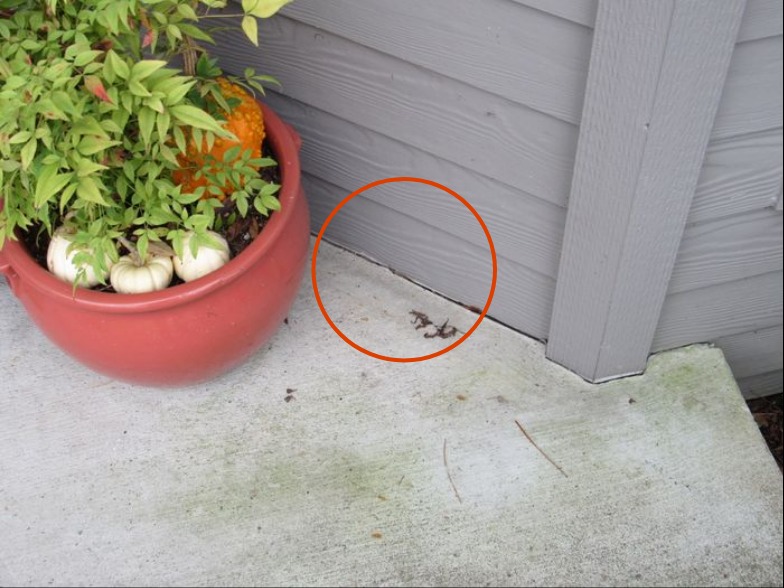
- Siding to concrete contact is not recommended - a minimum 1- 2 inch clearance should be maintained. This will be difficult to correct at this point.
- Siding with inadequate clearance to grade - should be 6 inches to soils - try and improve grading at the front side.
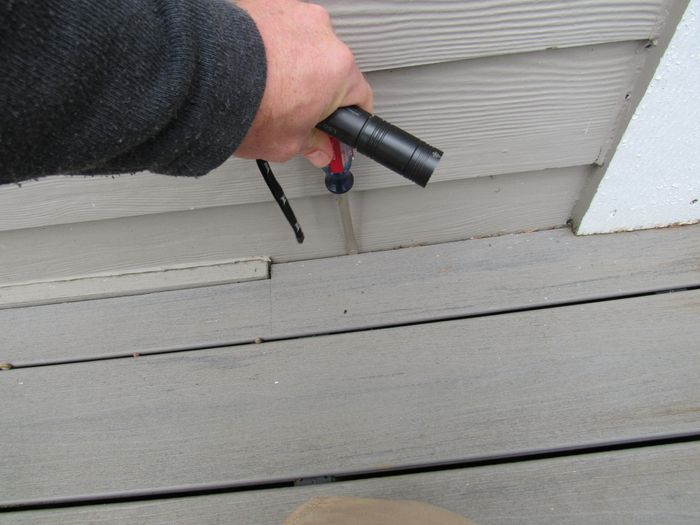
- The siding is in contact with the decking. This is not ideal and could trap moisture on the siding.
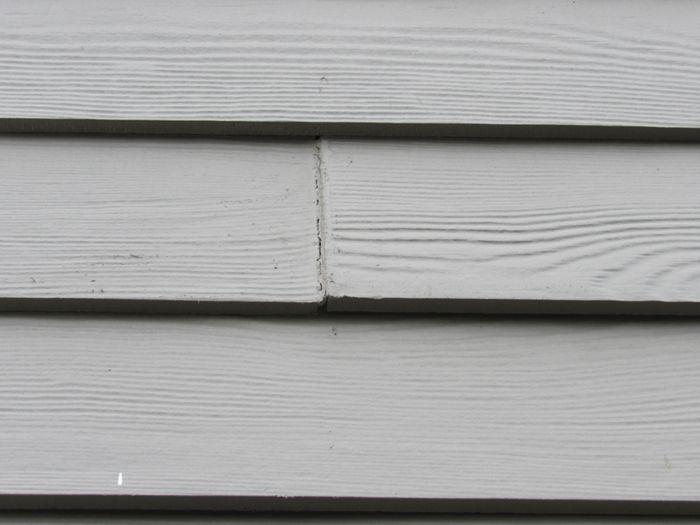
- Missing back flashings at butt joints - these flashings can be retrofit on exposed sides of the building with metal flashing tabs or maintained with caulking.
.jpg)

.jpg)
Eaves
Open rafters
Where the wood braces or corbels for the eaves stick out past the roof frame it would be wise to build metal flashing caps to protect this wood from decay.
 |  |
Exterior Doors
Solid core, Glass panel doors
Exterior Window Frames
Vinyl
Decks, Balconies and Porches
Present
To see a prescriptive guide for residential wood deck construction click this link:
Deck Structure Not visible
Deck Ledger Board Non-standard
Guardrail None needed
Decking Material Plastic/synthetic material
Please note that the deck framing inspection was limited - I could not see framing and deck structural components well in some places because the deck is too close to grade.
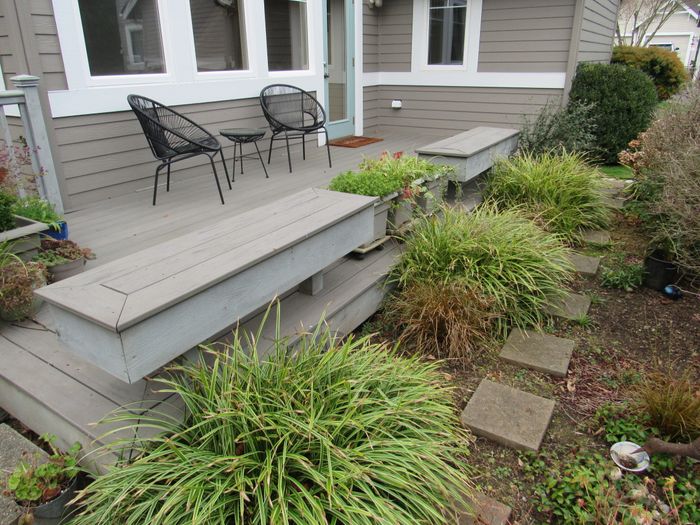 |
The decking for the Trex style plastic decking is showing some localized bowing - see back deck by the door. This material can be tricky to work with and often telegraphs quirks in the framing. Repair the bowing decking boards as needed / desired. This could be difficult to correct at this point. As the framing is not visible it is difficult to distinguish a cosmetic defect here from some larger issue.
 |
Chimneys
None noted
Garage
Attached
Automatic Garage Opener Present
Garage Door Type Wood
The overhead garage door does not reverse under resistance to closing. Adjustment of the sensitivity is recommended for improved safety. This typically involves adjusting a small plastic screw on the opener.
No safety wire / containment cabling was noted running inside the overhead garage door springs. This is a modern standard to prevent a broken spring from becoming a projectile. Install a wire inside these springs for improved safety.
 |
Replace the damaged / melted cover to the overhead door opener and use a low wattage bulb to prevent over-heating.
 |
Roof/Attic
Roof Materials
Method of Roof Inspection Walked on roof
Roof Style Gable
Roof Materials Architectural grade composition shingle
Approximate Age of Roof New
Overlay Roof No
Clean organic debris from the roof to ensure unrestricted paths for roof drainage. This is routine maintenance that should be part of a regular maintenance schedule for the HOA.
 |
Skylights
Insulated curb style
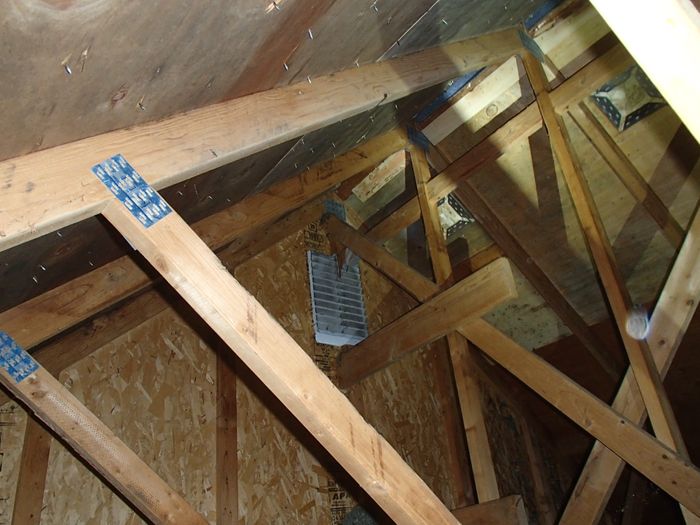
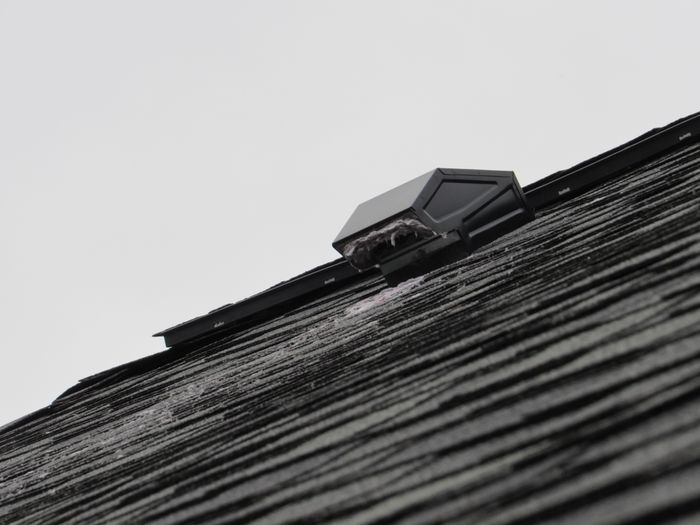
Signs of air leakage around the skylight chambers were found inside the attic today. Air-sealing air leakage points is recommended to reduce risks of condensation and water damage around the skylight and to conserve energy.
 |
Gutters and Downspouts
Gutter and Downspout Materials Aluminum
This home is employing an advanced gutter guard system. This can help to slow organic build-up in the gutters but during heavy rains I have noticed that water can shoot over the tops of the gutters. Also, these gutters can be complex to clean when they do get clogged with organic debris.
 |
Attic Access
Viewed at access
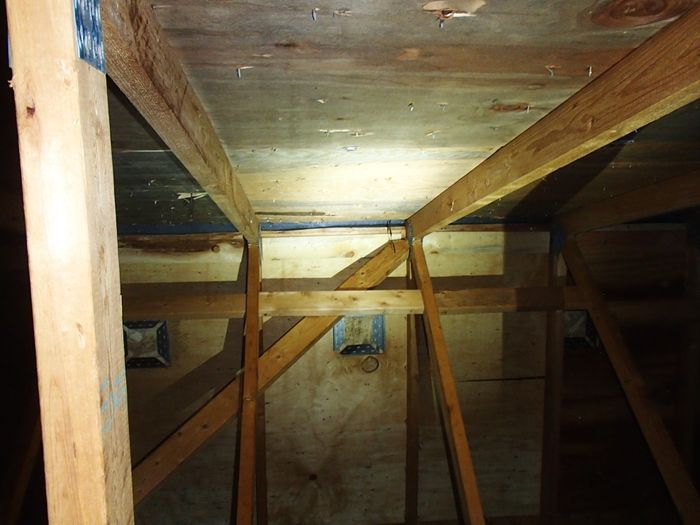
I did not crawl the crawl space for the attic where there was no ramp or safe way to access the space. Crawling in the V of trusses or on top of framing risks damaging thermal barriers and ceiling finishes and is not a safe way to access an attic. This limited inspection of this space.
There is a small door to a storage space in the master bedroom - install the missing door as needed. This door is present but off of its hinges.
 |
Roof Framing and Sheathing
Rafters Truss
Sheathing Plywood
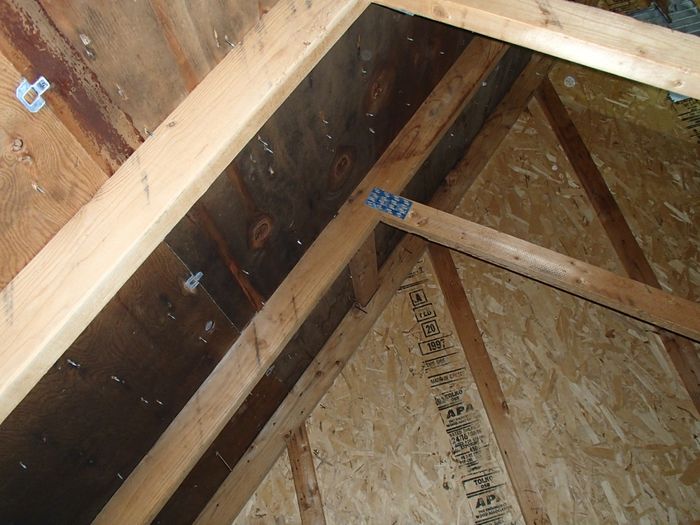
Stains were noted on the roof decking material when viewed from the attic - see only the small gable on the north side. This indicates that parts of the attic have experienced prior condensation problems during the cold weather months. Generally, the way to prevent seasonal condensation in an attic involves a 4-pronged approach:
1. Air seal the ceiling as is feasible to slow air migration from the interior into the attic.
2. Be sure all bath and kitchen fans in the attic are well-sealed and venting to the exterior.
3. Keep indoor relative humidity below 55% during cold-weather months
4. Make sure the roof cavity / attic spaces are correctly ventilated.
Options for handling this include:
- Monitor during cold weather to see if any corrective action is needed.
- Have it further investigated by a mold remediation or building performance contractor.
It is difficult to gauge during a one time inspection the degree to which this is an older or intermittent problem. This makes it difficult to make an accurate recommendation for corrective action as it can take time to determine a practical scope and urgency for repair. For more information about roof condensation problems, please see the attached hot link above. Observations noted during inspection include:
- No new staining on new roof nails - indicates no issues since the roof installation.
- Staining looks old and localized and was dry at the time of inspection.
- The whole south side of the attic looks dry and the plywood has a nice bright color.
 | |
 |  |
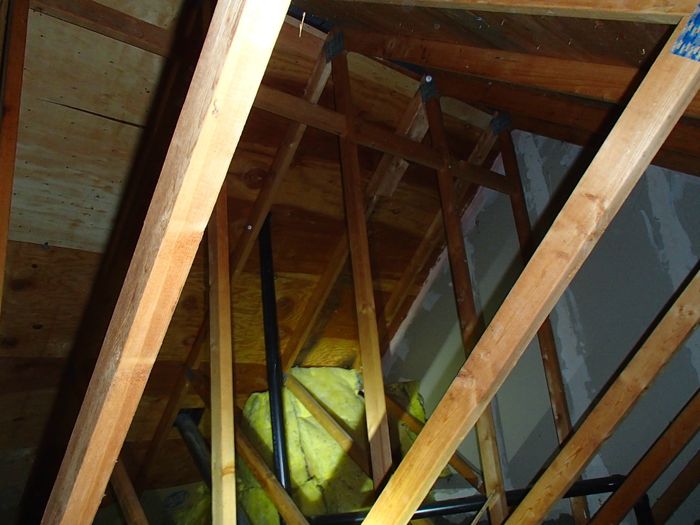 |
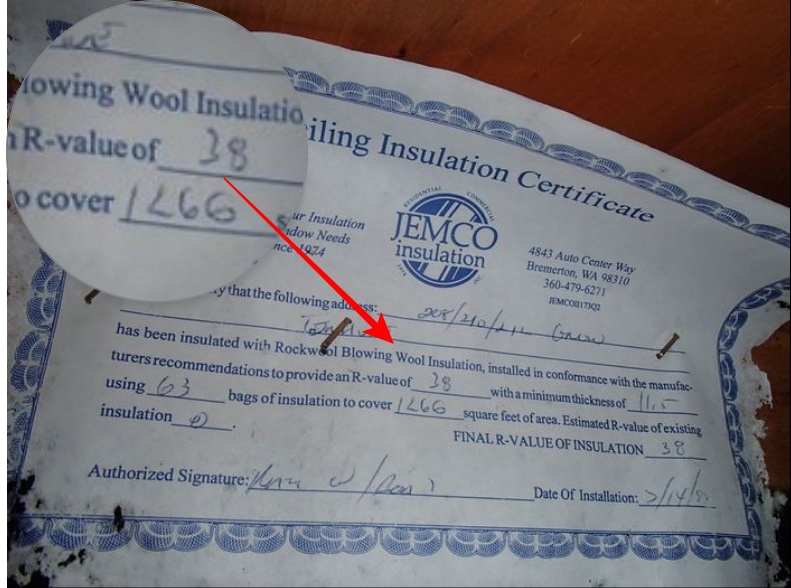
Attic Insulation
Insulation Type Rock wool
Approximate Insulation R-Value on Attic Floor 38
This shows the rock wool insulation to R-38.
 |
Attic and Roof Cavity Ventilation
Attic Ventilation Method Soffit vents, Ridge vents
Attic and roof cavity ventilation is a frequently-misunderstood element of residential construction. All roof cavities are required to have ventilation. The general default standard is 1 to 150 of the attic area and ideally, this comes from at least 60% lower roof cavity ventilation and 40% upper, but this is a wild over-simplifications of the subject. As a good guiding principle the most important elements for healthy attic spaces are:
- Make sure the ceiling between the living space and the attic is airtight
- Ventilate consistently across the whole lower part of the roof cavity with low, intake soffit venting
- Upper roof cavity venting is less important and if over-installed can exacerbate air migration into the attic from the living space.
- Avoid power ventilators which can depressurize the attic and exacerbate air migration from the house into the attic.
For more information, please see: Link
Electrical
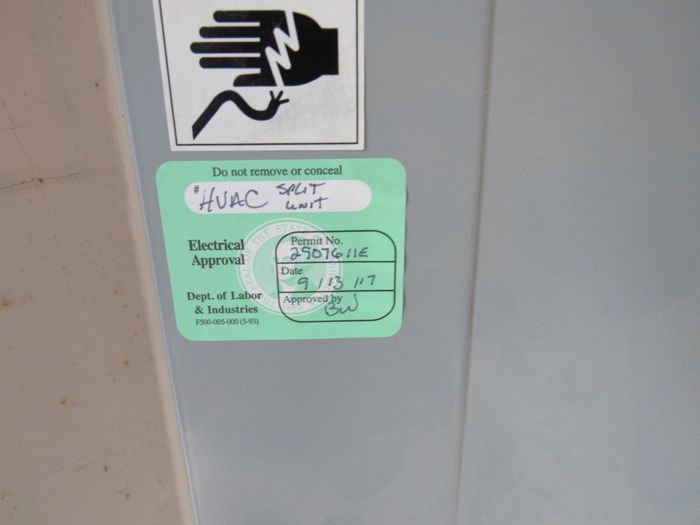
Electric Service Permits Found
These images show electric permits found during inspection - this is for the split system heat pump installed in 2017.
 |
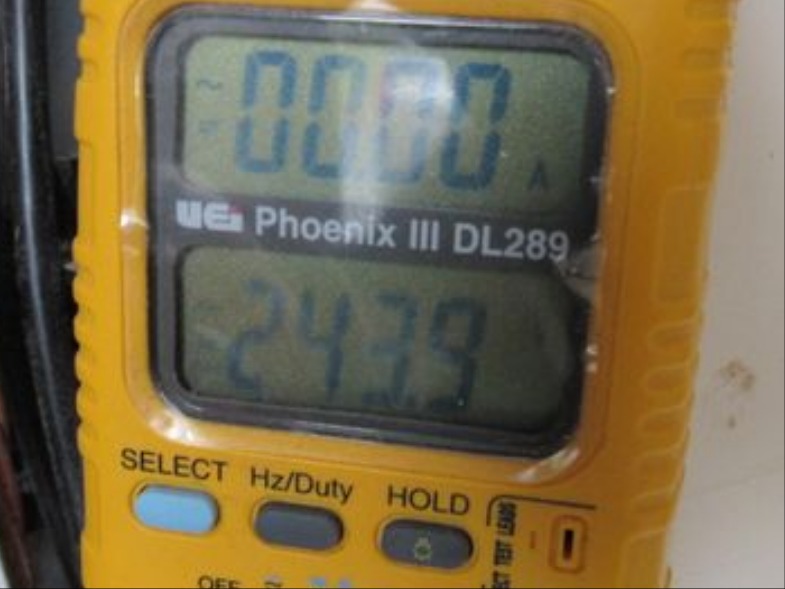
Electric Service Voltage Tested
Service Voltage 120/240
I tested the voltage at the electric panel today. It tested in a normal range of 235-245 volts. Most residential construction is listed as 120/240 volts and it is normal for some slight fluctuation.
 |
Electric Service
Service Entrance Below Ground
Meter Base Amperage 200
Service Equipment
Service Entrance (SE) conductor Size Aluminum, 4/0, 200 amps
Main Panel Amperage 200 amps
Electric Service Amperage 200 amps
Main Electric Panel Location Garage
Panel Manufacturer Cutler Hammer
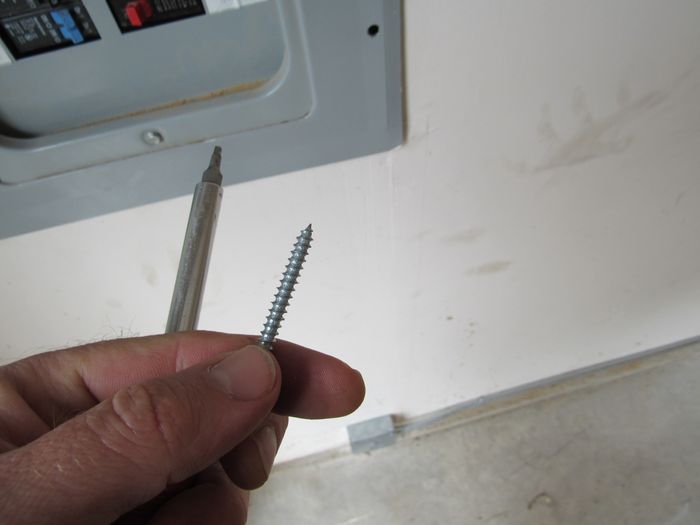
Screws with sharp ends, like wood screws, are not recommended to secure the dead-front cover to the electric panel as these can puncture wiring insulation. This is a potential safety hazard. Replace the current sharp screws with the correct blunt screws that work correctly with this panel.
 |
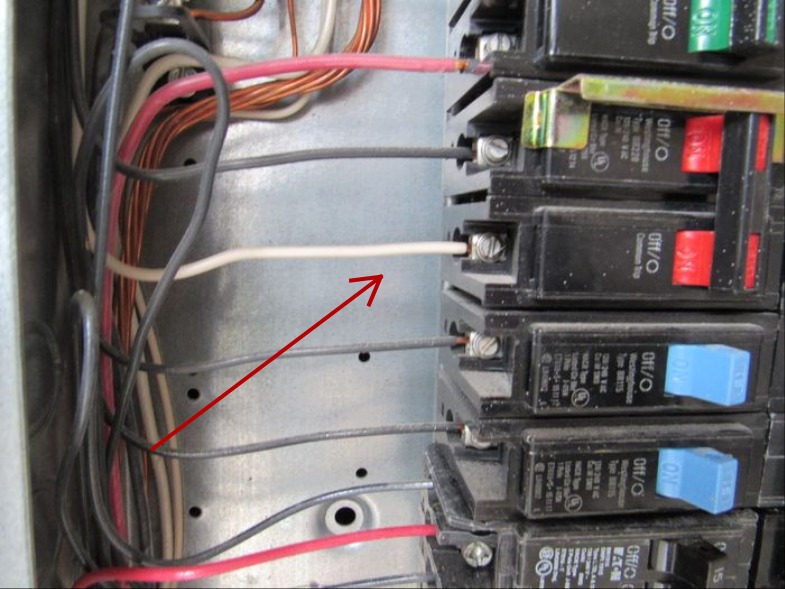
The white conductors inside the electric panel at the 240 volt circuits are not correctly identified as hot or ungrounded conductors - these should be painted in black or red ink for correct identification and improved safety - see left side.
 |
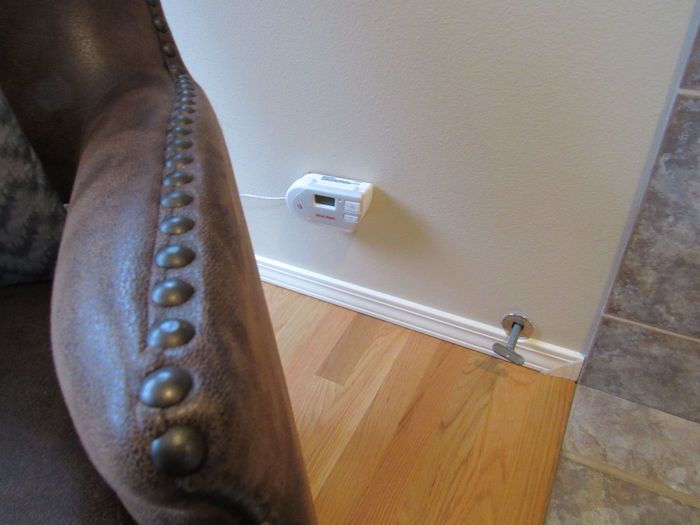
The sheetrock wall material has not been run up flush with the electric panel cabinet. Sheetrock should be mounted flush with the cabinet with no gap exceeding 1/8th of an inch. Repair as needed. In practice, this could be a pain to correct, it is why they are using longer screws.
 |
Branch Wiring
Wire Material Copper, Multi-strand Aluminum
Wiring Method Non-metallic sheathed cable
Receptacles and Fixtures
Inspection Method Random Testing
Electric Receptacles Three wire receptacles
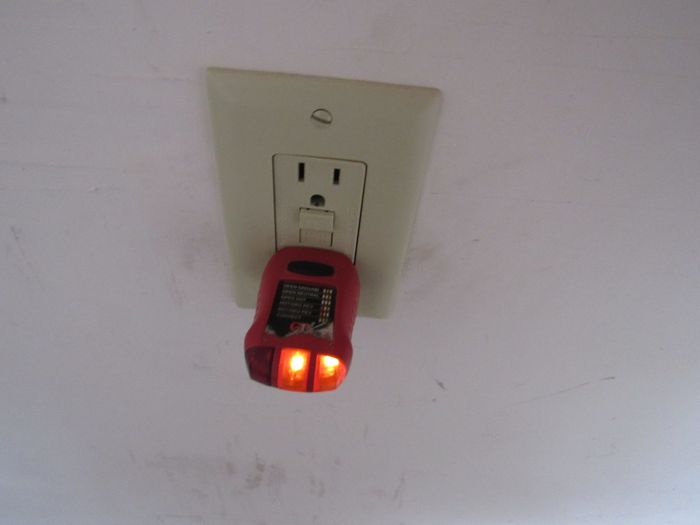
The GFCI protected receptacle in the garage did not respond to testing and may be defective - it did not trip when tested. Have this receptacle repaired or replaced as needed.
 |
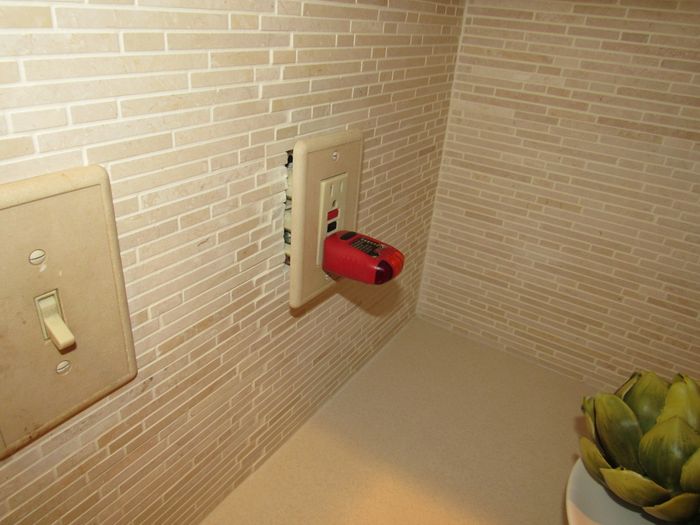
The loose receptacle in the building should be secured to prevent accidental damage to the wiring connections - see kitchen countertop. Securing loose receptacles can often be done by just tightening some set screws between the receptacle and the junction box, though sometimes it can get more complex if the box itself is loose. Repair as needed.
 |
Smoke and Carbon Monoxide Alarm Systems
CO Alarms Noted On Main FloorOn 2nd Floor
![]() In Basement
In Basement![]() On 3rd Floor
On 3rd Floor![]() In Bonus Room
In Bonus Room
CO Alarms Present
The installation of carbon monoxide alarms is recommended for all homes that have fuel burning appliances such as gas or oil furnaces, gas water heaters, gas ovens and cook-tops, gas fireplaces and wood stoves. In addition, Washington State law (WAC 51-51-0315) now requires UL 2034 approved carbon monoxide alarms in ALL homes and condominiums being sold in Washington State. The location should be: at least one alarm outside of all sleeping areas and one on each floor of the house. Best practices are to have these alarms hardwired with a battery back-up - though requirements are for the installation to meet manufacturer's specifications. Carbon monoxide is a colorless, odorless gas that can cause sickness, nausea and even death. Alarms have a useful service life of roughly 6 years, so changing them more frequently than smoke alarms is recommended.
 |  |
Smoke Alarms NotedOn Main FloorOn 2nd Floor![]() In Basement
In Basement![]() On 3rd FloorIn All Bedrooms
On 3rd FloorIn All Bedrooms![]() In Bonus Room
In Bonus Room
Smoke Alarms Present
During the home inspection, I try and test a representative sample of the smoke alarms by using the test button on the alarms. This is NOT an accurate test of the sensor just a test to see if the unit is powered. For reliability, fire marshals recommended updating smoke alarms every 10 years and changing batters bi-annually. The latest data indicate that we should be using photo-electric technology in our smoke alarms for improved fire detection and to reduce problems with false alarms which can lead to disabling of this important safety system. Unfortunately, the alarms have to be removed to determine if they are photo-electric or ionization types. It is surprisingly complex to accurately test a smoke alarm system and determine the reliability, age, and type of sensor technology used, especially as many homes can have half a dozen or more alarms throughout the house. A complete evaluation of smoke alarms is beyond the scope of this inspection. For optimal fire safety, I recommend taking control of these important safety devices and learning about how to service and maintain your smoke alarm system to keep the building occupants safe. For more information, please read this link.For more information, please read this link.
Carbon monoxide alarms were found and noted during inspection. Be sure to check these regularly. The standard is 1/ floor and 1 outside all sleeping areas.
Grounding Electrode / Conductor
Could Not Confirm
Plumbing
Water Meter
This shows the location of the water meter at the street side of the house. The meter was not identified, I recommend asking the HOA to identify the meters and clear them off of grass so they are accessible.
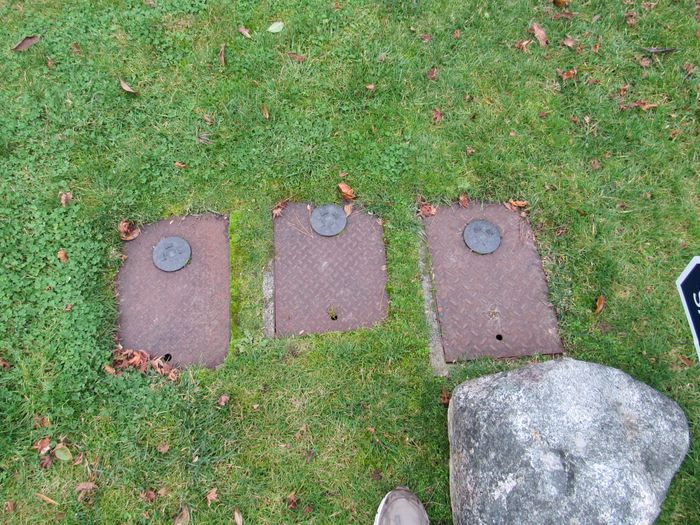 |
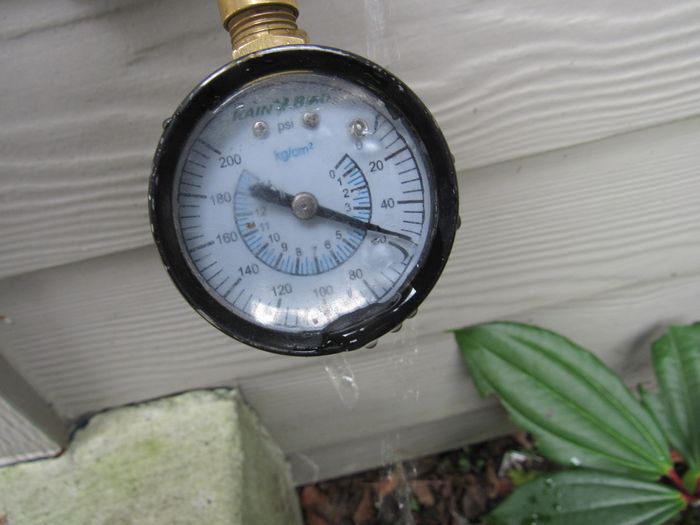
Water Pressure Tested During Inspection
This shows the water pressure tested during inspection.
 |
Water Service Supply
Pipe Material Unknown
Water Supply Public water
Water Pressure 50 PSI
Pressure Reducing Valve None noted
Main Water Shut-off Location Garage
Distribution Pipe
Pipe Insulation Missing in Crawl Space
Supply Pipe Materials Copper
Functional Flow Average
Circulation Pump None Noted
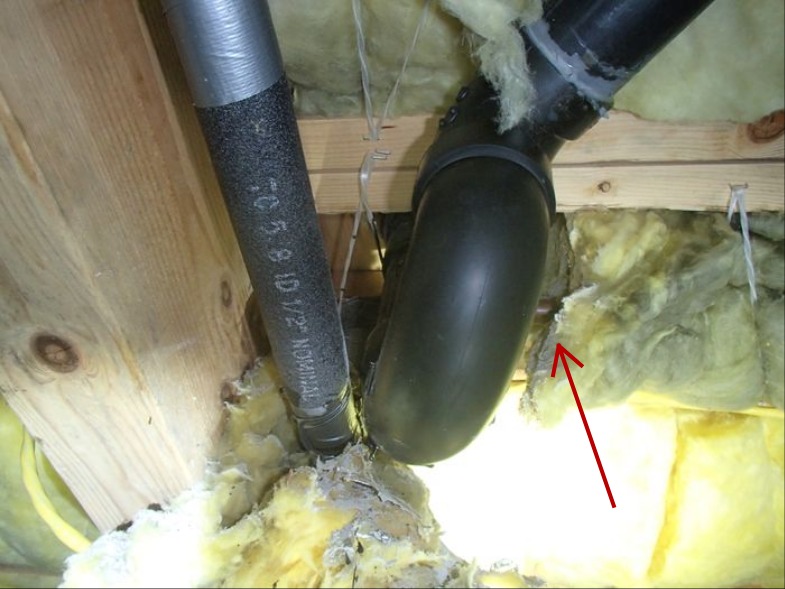
The supply pipe insulation is incomplete in the crawl space. Be sure all supply lines in unheated spaces have been adequately insulated to protect from freezing conditions that could damage the pipes and to prevent heat loss.
 |  |
Waste Pipe and Discharge
Discharge Type Public sewer
Waste and Vent Pipe Materials ABS plastic
Location of Sewer Cleanout Crawl Space
This shows the location of the sewer cleanout found during inspection - crawl space.
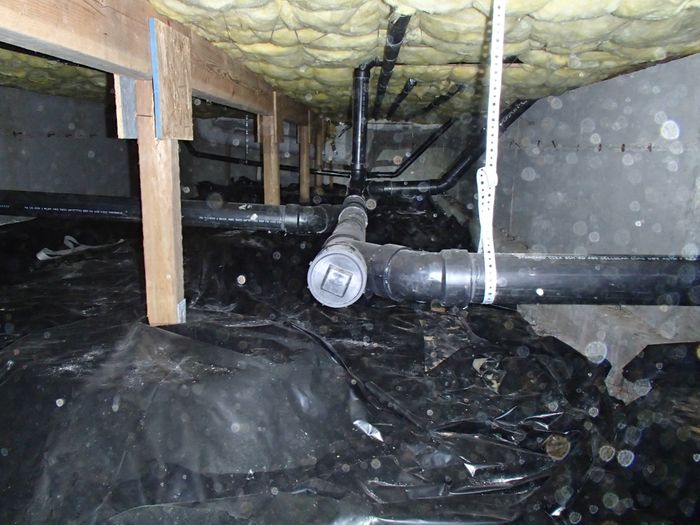 |
An evaluation of the sewer line below the ground is beyond the scope of this inspection. Due to the age and location of the building, a sewer scope is recommended to further evaluate the sewer line and the below ground connections between the house and the municipal sewer line. Sewer scopes are done using video cameras and can reveal the materials, condition and reliability of the sewer line.
Water Heater
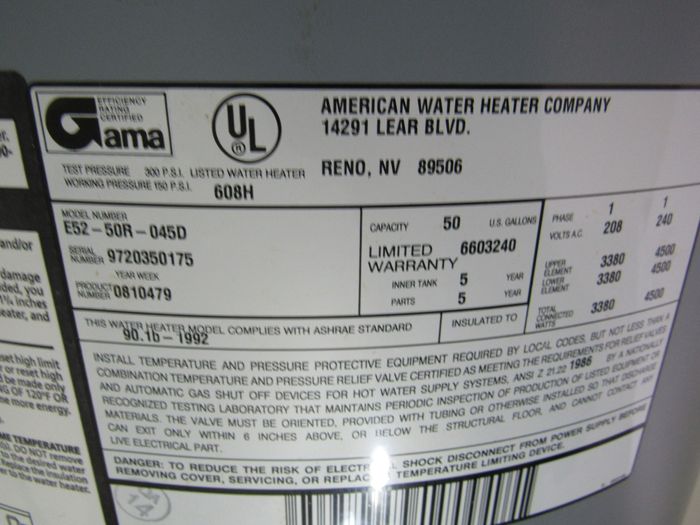
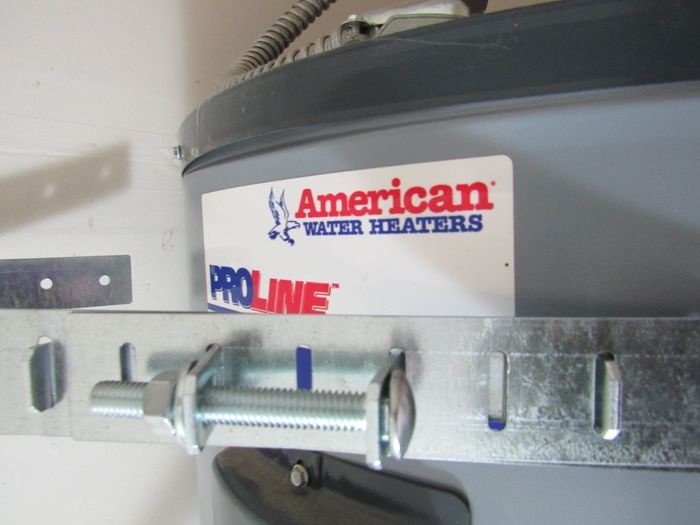
System Type Tank
Manufacturer American
Size 50 gal
Age 2008
Energy Source Electricity
Temperature Pressure Relief Value Present - Not Tested
The temperature and pressure relief valve is arguably one of the most important safety devices in your house. Should the thermostats fail inside your water heater, this allows excess pressure to "blow off," which will prevent catastrophic build up of temperature and pressure which can make water heaters explosive. I do not test the "blow off valve" during inspection as there is a risk it could stick open and testing could cause the need for a repair. It is recommended that these be inspected annually; I would at least ask for a plumber to test the device every time I had a plumber out for any other job.
Straps Present
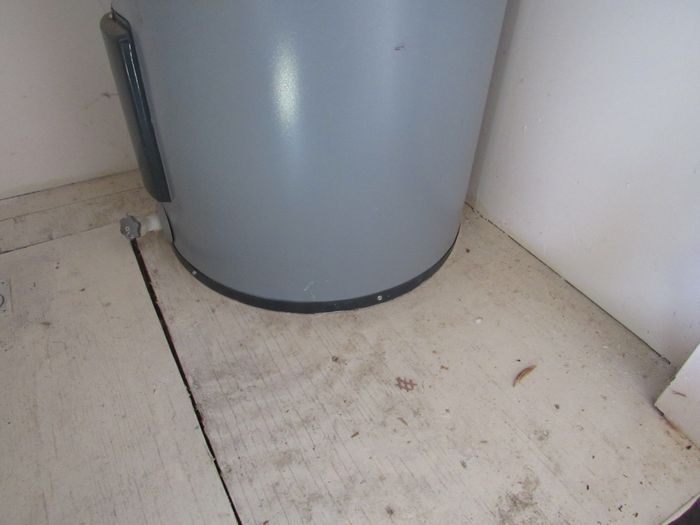
This water heater is likely close to the end of its useful service life. The average life of these water heaters is statistically 8-12 years though in practice, they can vary widely between 8-20 years depending on water quality and maintenance schedule such as frequency of flushing the tank and replacing sacrificial anodes. Budget to replace this water heater at any time. Water was hot at the time of inspection.
 |  |
A drain pan is recommended under water heaters that are located in finished spaces or where a leak could damage finishes. Where a pan does not already exist, the tricky part is providing a drain to the outside. A pan without a drain is often of limited benefit / protection. For improved protection from accidental water heater leaks consider a pan or a flood-safe device such as this: http://www.watts.com/pages/_products_details.asp?pid=7683
 |
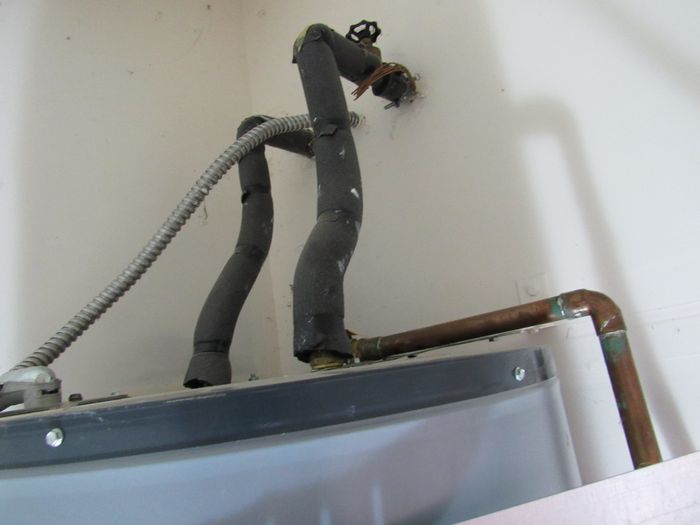
An expansion tank is recommended for the water heater; these are required if the house has a closed plumbing system. This helps reduce pressure on the plumbing system when the pipes and water expand from thermal expansion during water heating. Installation of expansion or pressure tanks is modern installation practice and will be required if a pressure reducing valve has been installed. Consult with a qualified plumber to install.
 |
Exterior Hose Bibs
Leaking (At Handle When Turned On)
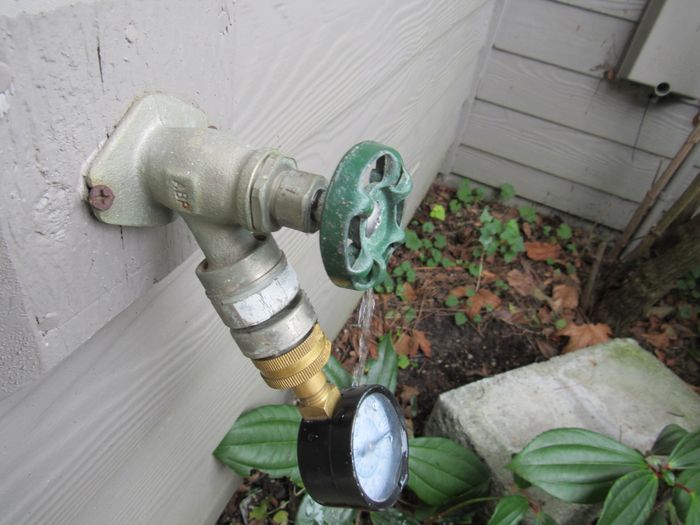
The leaky hose bib at the entry side of the house requires repair or replacement - it leaked from the faucet handle when the faucet was turned on and under pressure. This often requires tightening the packing around the handle stem.
 |
Laundry and Additional Plumbing
Washer
Tested
A moisture alarm with water shut-off features is recommended under the washing machine to protect against accidental leaks in the supply hoses. Pans can be effective when there is a drain, but even these will not protect against a burst supply connector. A moisture alarm with automatic shut-off will. Watts is a brand I have seen installed: http://www.watts.com/pages/learnAbout/intelliflow.asp?catId
.png)
Dryer
Tested
Proper dryer exhaust venting is critical for safe and reliable performance from the dryer. Here are some basic rules of thumb for dryer exhaust duct installation: Unless a vent-free appliance is being used, the dryer exhaust vent must terminate outdoors. It should be no more than 25 feet long and for every 90 degree turn subtract 5 feet and for every 45 degree bend subtract 2.5 feet. Use only smooth-wall metal vent pipe @ 4 inch pipe diameter. Do not use plastic pipe and plastic flex pipe. If a flexible connector is needed behind the dryer use a short amount of corrugated metal pipe. If the exhaust duct is getting pinched behind dryer, consider use of a dryer vent box, pictured here. Flex and corrugated pipes should never be used in concealed spaces such as through walls or in attic or crawl spaces. Insulate dryer exhaust duct where it passes through unconditioned spaces to prevent condensation that could hasten lint build-up inside the pipe. Do not use screws to connect pipe as these can trap lint. Secure duct with foil tape as needed. Be sure duct is sleeved properly so that it will not trap lint and clean the vent regularly, especially if it is a long exhaust run.
.png)
Power Source Electric
Exhaust Duct Cleaning - Inquire With HOA, Uninsulated in Unconditioned Space
Inquire with the HOA about who is responsible for cleaning dryer exhaust ducts. This is important regular maintenance that should be performed by the association to ensure everyone's dryer exhaust ducts are clean and operating safely.
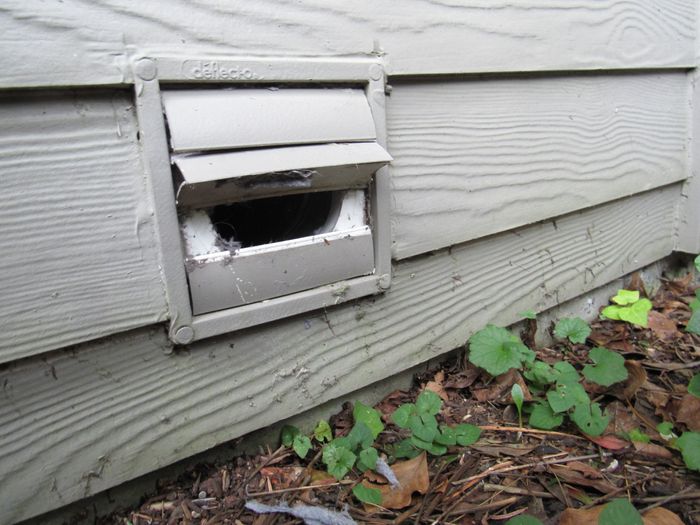 |
The dryer exhaust ductwork should be insulated where run outside of the thermal envelope of the building; this is to prevent condensation forming inside the duct that could trap lint. Accumulation of dryer lint can be a fire hazard. Insulate this exhaust duct for improved safety and performance - see crawl space.
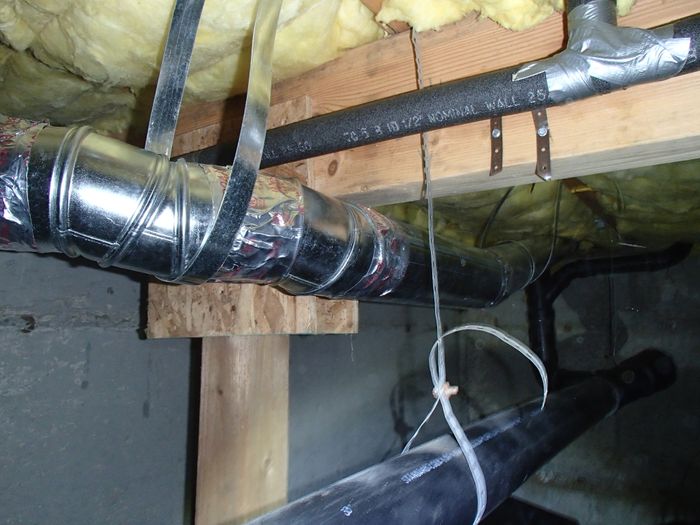 |
Laundry Sinks
None Noted
Sump Pumps and Drains
Floor Drain None noted
Sump Pumps None noted
Heating, Cooling, Fireplaces and Ventilation
Heating System
Energy Source Electricity
Heating Method Mini-split heat pump
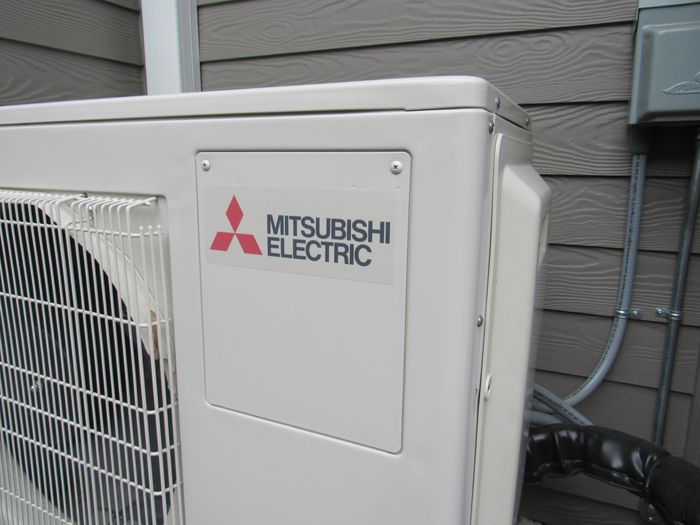
Manufacturer Mitsubishi
Age 2018
Last Service Record None
Filtration System Re-usable
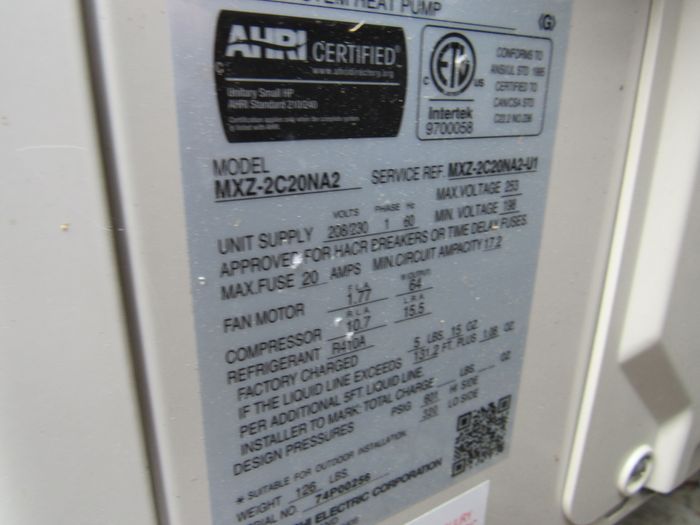
House Cooling Systems and Heat Pumps
Manufacturer Mitsubishi
Size 1.5 Tons
Energy Source Electric
Age 2018
The heat pump system was tested in heating mode only as it was too cold to test in cooling mode. This means that the switching valve and condensate collection system could not be tested during inspection.
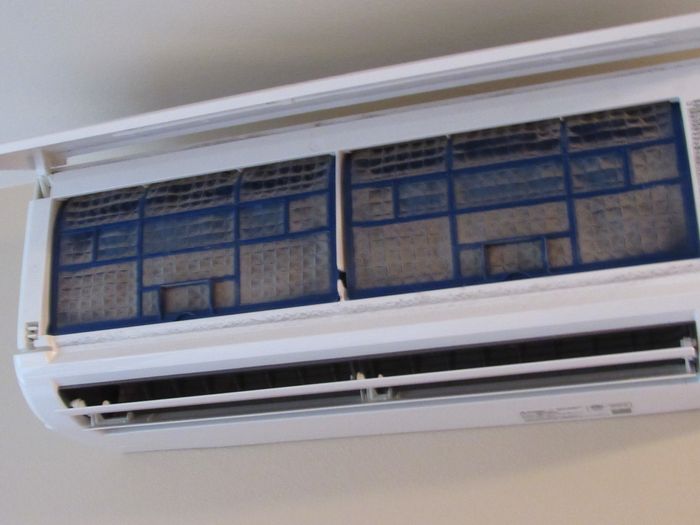
I recommend a routine servicing of the ductless heat pump system. These systems should be cleaned and serviced annually for efficient operation and to prolong the useful service life of this equipment. Observations noted during inspection include:
- The filters at the ductless heat pump head are dirty and should be cleaned.
- The batteries for the ductless heat pump remote control are low and should be replaced - there is currently no display.

 |  |
 |  |
Heating and Cooling Distribution Systems
Heat Source in Each Room Present
Distribution Method Unitary Heaters
Mechanical Ventilation Systems
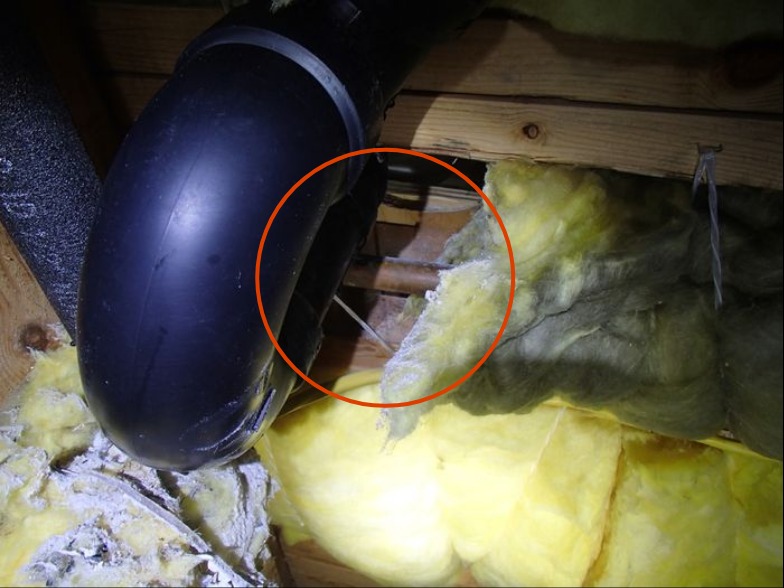
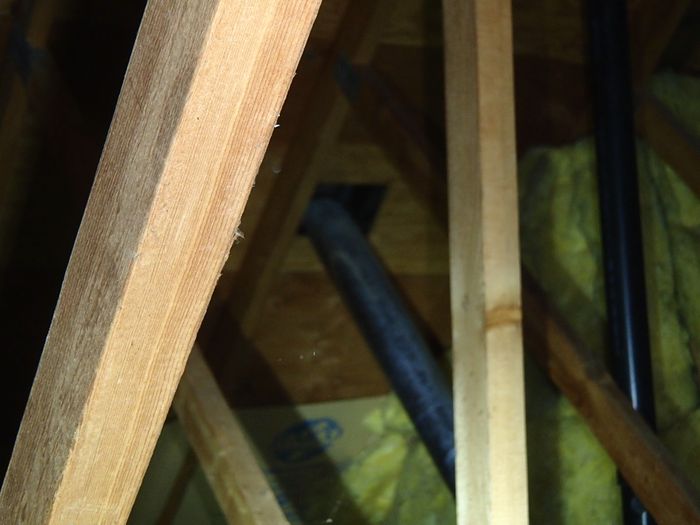
Bath Fan Ducting Ducted to exterior, Uninsulated in Attic
Kitchen Fan Ducting None noted
The ductwork for the bathroom fans is uninsulated in the attic space. This can cause condensation during cold weather and is less energy efficient. Replace these with insulated exhaust ducts or insulate to R-8 or better.

 |
Additional Heat Sources
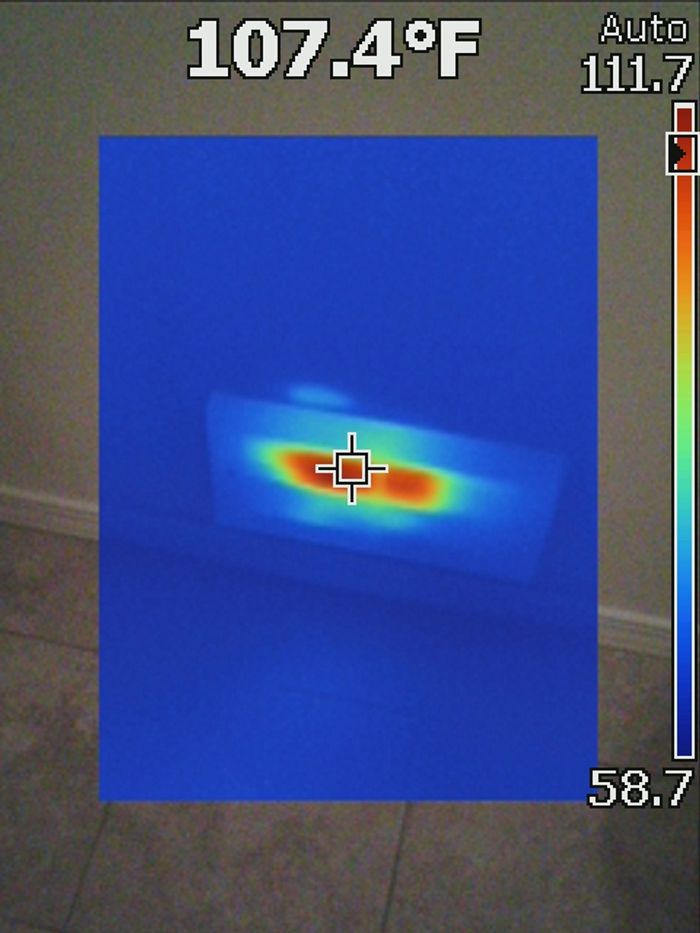
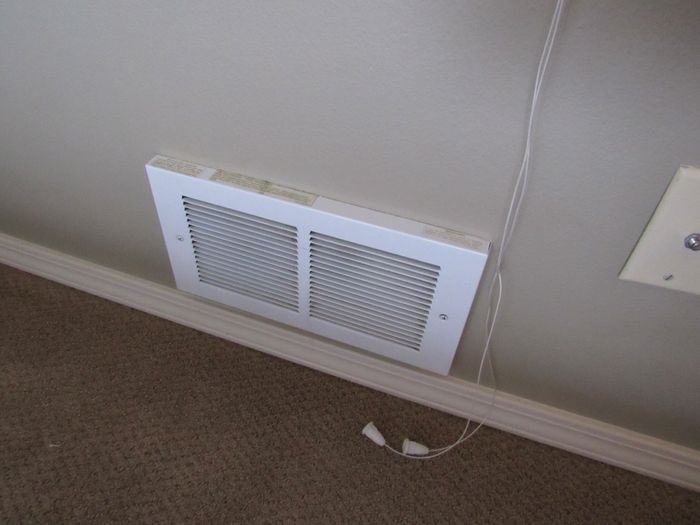
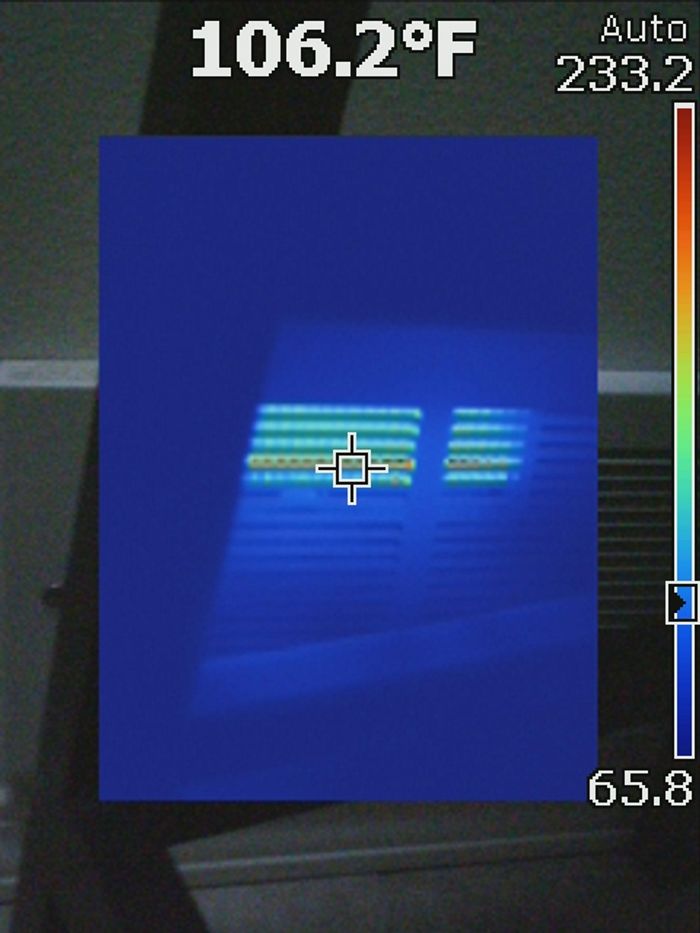
Description Wall mounted forced air heaters
The electric wall heaters in the house require cleaning. Best practices are to turn power off to the heater and use compressed air to clean the dust from the heating elements. The fan blades can be wiped or vacuumed as needed, then restore power. Many manufacturers of these heaters recommend cleaning every six months to prevent a fire hazard. Be sure to keep all storage at least three feet away from these heaters.
 | |
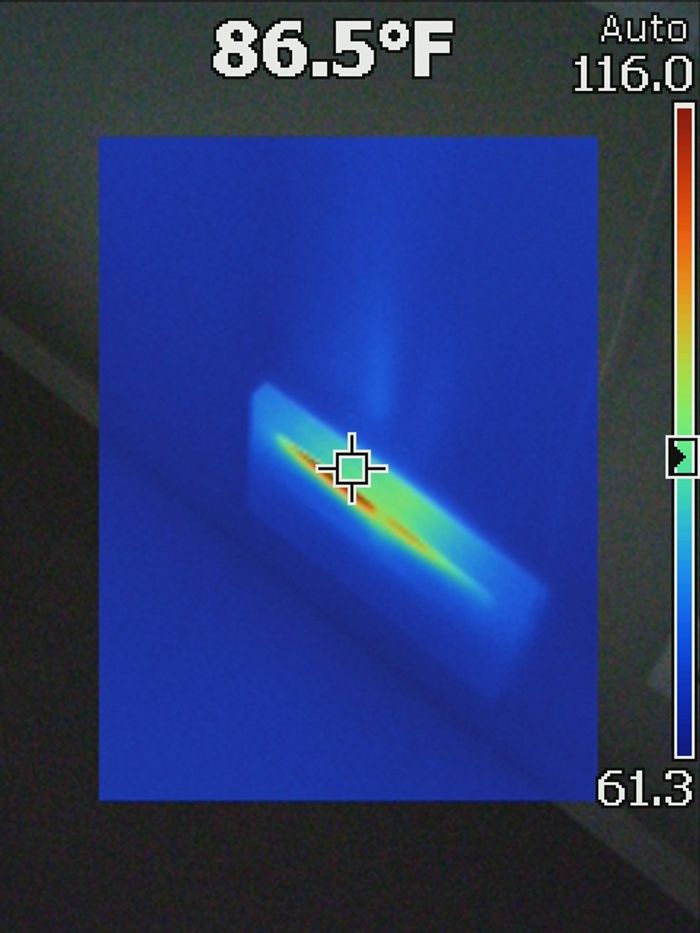 |  |
 |
I believe the electric heaters in the main floor have been disabled. They did not respond to testing and are not really needed with the ductless heat pump. Inquire with the seller for any additional information.
Gas Fireplaces
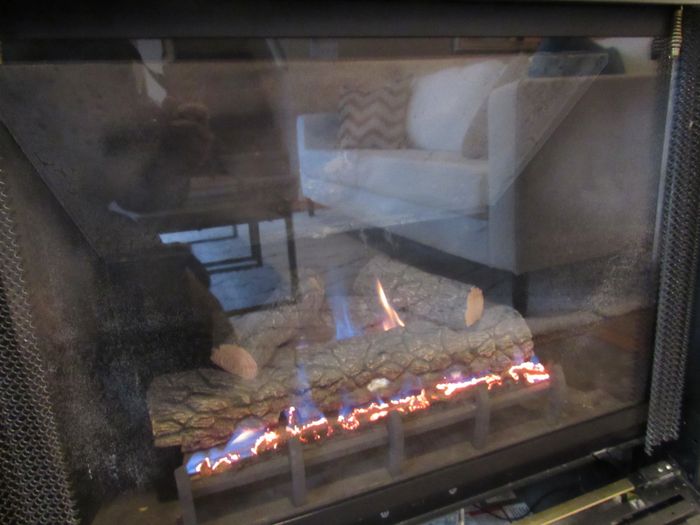
Fireplace Types Direct vent gas log fireplace
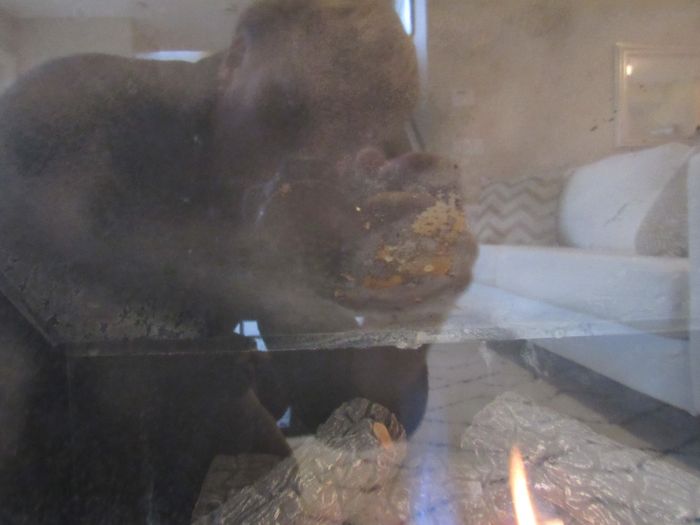
Annual servicing of the gas log fireplace is recommended to ensure safe and reliable performance. No recent service records were noted. Have this appliance cleaned and serviced by a qualified gas appliance specialist. Examples of observations noted during inspection include:
- Mild corrosion noted inside the fireplace
- Cloudiness noted on the glass
One company that services gas log fireplaces is: Kahles @ 360-475-0389.
Fuel Storage and Distribution
Oil Storage
None noted
Propane Storage
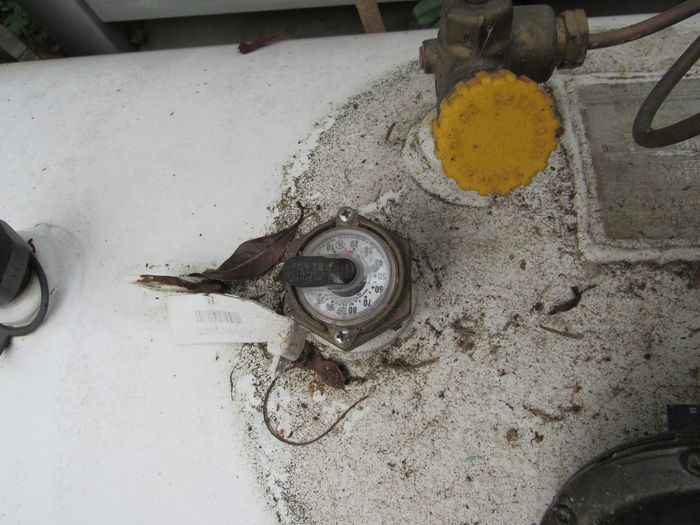
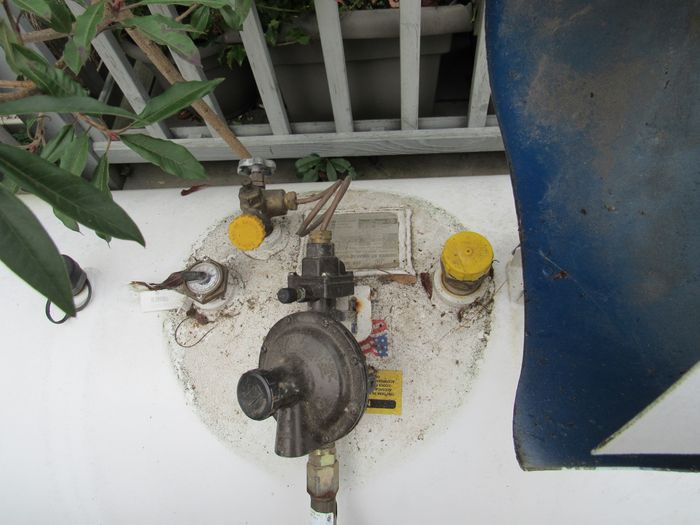
Present
Storage Type Above ground tank
Propane Tank Size 120 gallon
Propane Tank Location Exterior south side
Propane Shutoff Location At tank
This shows the fill gauge on the propane tank.
 |  |
Structure and Basement
Foundation
% of Foundation Not Visible 30%
Evidence of Seismic Protection Present
Building Configuration Crawl space, Slab on grade (garage slab)
Foundation Description Poured concrete
Floor, Wall and Ceiling Framing
Wall Framing Not visible
Wall Sheathing Not visible
Floor Framing Partly visible, 2x8
Sub-Floor Material Not visible
Ceiling Framing Not visible
Basement
None
Interior
Floors and Floor Materials
Floor Materials Hardwood, Carpet, Plastic sheet goods
Floor Settlement None noted
Walls, Ceilings, Trim and Closets
Wall and Ceiling Materials Drywall
Wall Insulation and Air Bypass
Wall Insulation Not Visible
Stairs and Railings
Standard
Interior Doors
Solid and Hollow Core
Windows
Window Glazing Double pane
Interior Window Frame Vinyl
Window Styles Casement, Sliding, Fixed pane
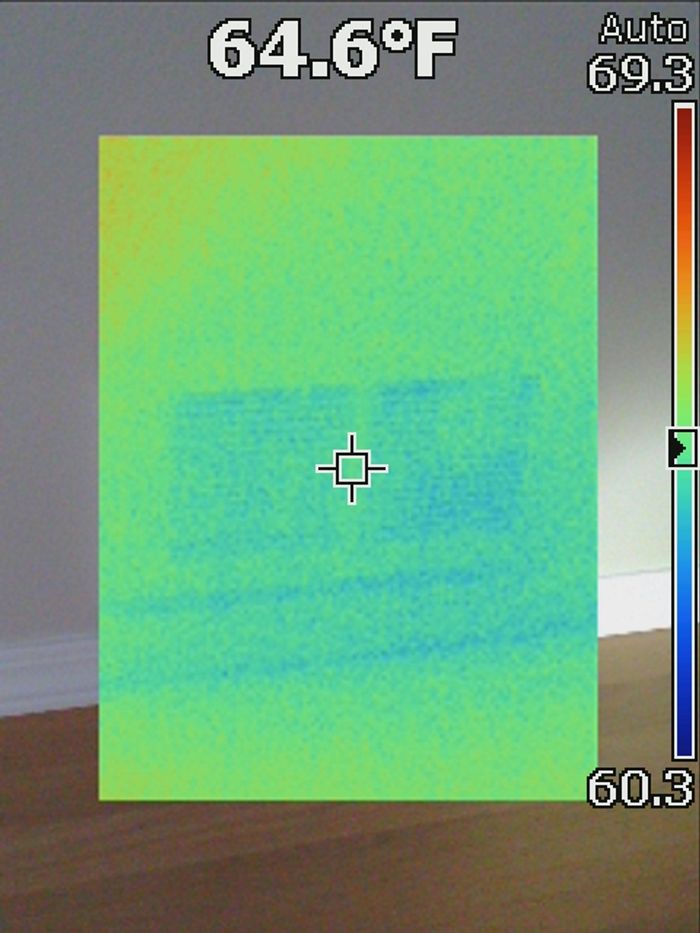
The casement window at the north side main floor is not operating correctly and requires adjustment - the window would not close on its own.
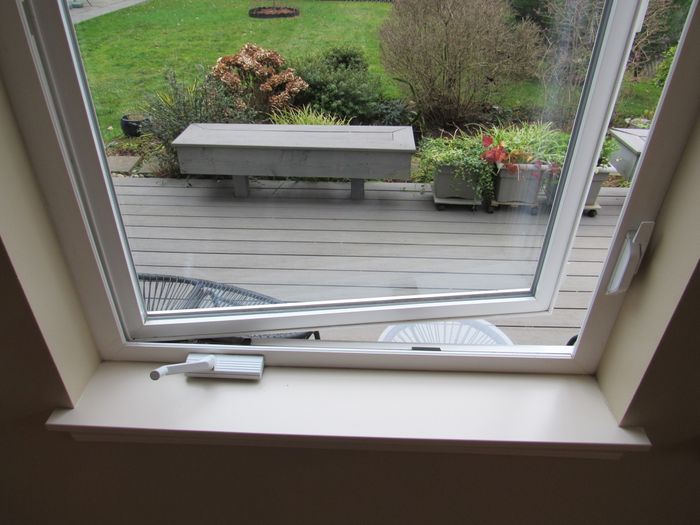 |
Kitchen
Sinks and Faucets
Tested
Cabinets and Countertops
Countertop Material Slab Surface
Cabinet Material Wood laminate
Ventilation Method
None noted
The kitchen has no provisions for ventilation. An exhaust fan that ducts to the exterior is required at least somewhere in the kitchen - in this case, all you have is the window for ventilation, which is marginal. Lack of ventilation to the exterior could be inconvenient with cooking odors. Hire a qualified contractor to further evaluate this installation and install a cooktop fan and exhaust system to the outdoors.
 |  |
Appliances
Refrigerator Operating
Dishwasher Operated
Dishwasher Air Gap None noted
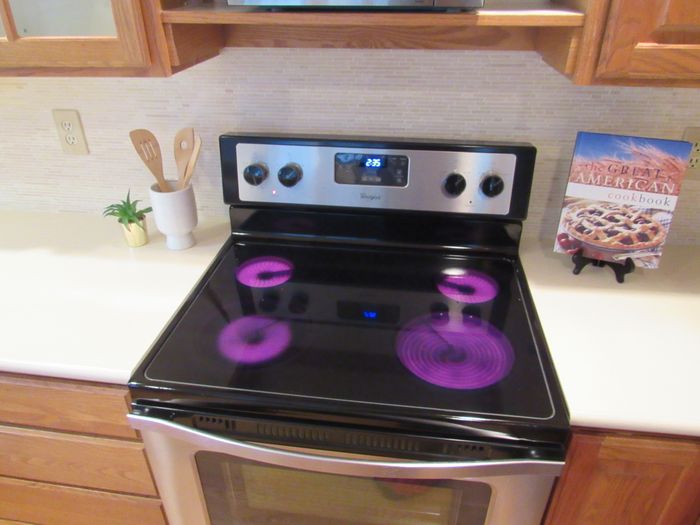
Range/ Oven /Cook-tops Electric
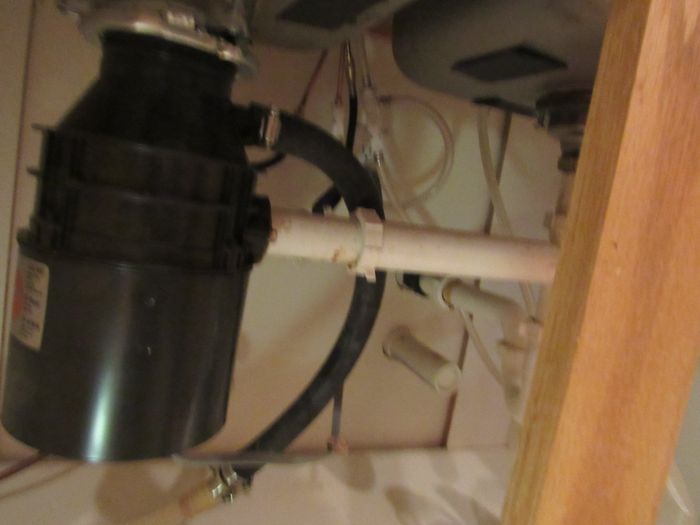
Disposer Operated
An air gap is recommended to protect the dishwasher from accidental contamination if the sewer line were to back up. If an air gap cannot be installed, at least run the drain line above the level of the sink drain to create a high loop. This was an older way of protecting the dishwasher. Hire a licensed plumber to install an air gap.
 (1).PNG)
 (1) (1).PNG)
An anti-tip device is needed to prevent this range from tipping during operation of the oven door. This is a small clip that secured the back adjustable feet of the range to the floor.
 (2).PNG) |
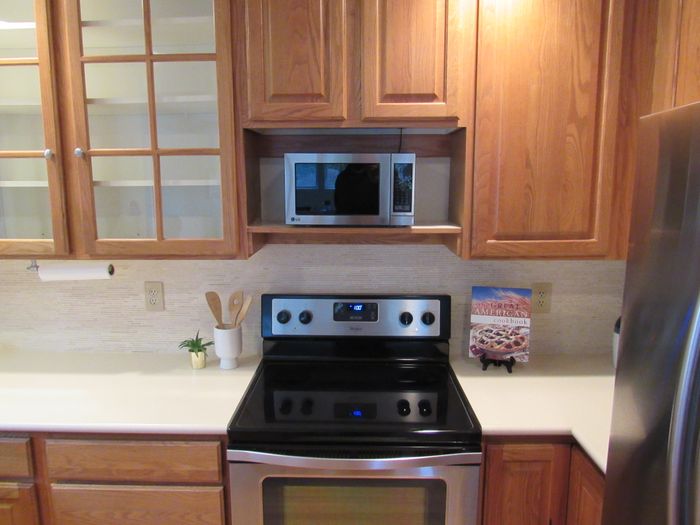
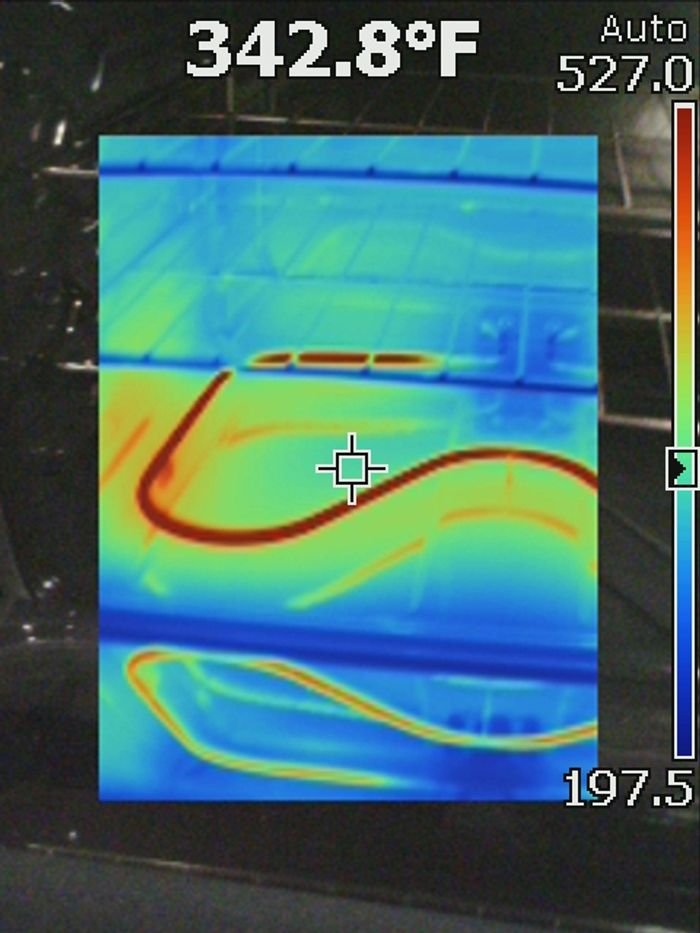
The oven was tested in bake mode and was working at the time of inspection. The electric cooktop was also working.
 |  |
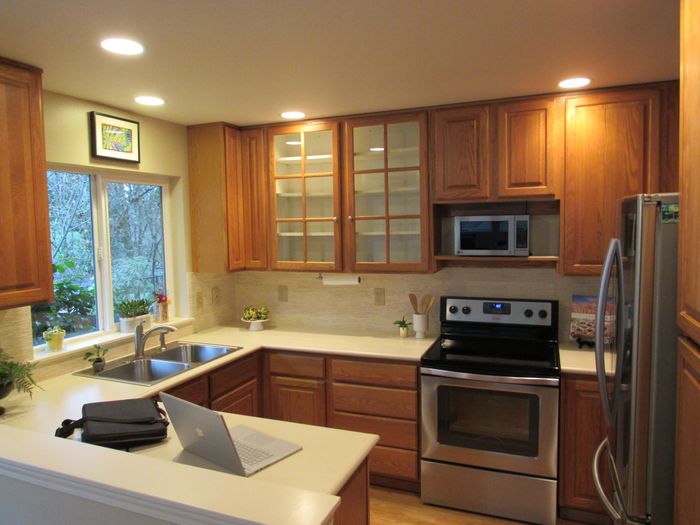
General Kitchen Condition
Standard
Family Bathroom
Sinks and Cabinets
Tested
Toilet
Tested
The loose toilet in the downstairs bath needs to be reset and the wax ring and flange should be replaced to prevent hidden plumbing leaks. This is a simple job unless the bolts that fasten the toilet also require repair. Sometimes, loose toilets can even be shimmed for a tight and proper seal by qualified plumbers and sometimes simply caulking can help. Hire a licensed plumber to further evaluate and repair.
 |
Bathtub / Shower
Tested
Bathroom Ventilation
Type Bath fan, Operable window
General Bath Condition
Standard
During inspection today I operated all plumbing fixtures in bathrooms. I ran a moisture meter around toilets and tile shower enclosures to check for concealed leaks and sounded for loose tile and finishes in shower and tub enclosures. I do not test bathtub overflow drains as this risks damaging finishes around the tub. Monitor tubs while filling and avoid pushing water into the overflow. Even well-installed overflow drains can leak as the gaskets that seal the overflow will dry out over time and may no longer provide a watertight seal. Monitor plumbing after moving into a new home as testing during inspection presents less stress on plumbing than daily use. Any defects uncovered during inspection are listed in this report.
Master Bathroom
Sinks and Cabinets
Tested
Clean / repair the leaky aerator in the master bathroom sink.
 |
Toilet
Tested
Bathtub / Shower
Tested
The mixing valve that controls the water flow to the shower in the master bath is stiff and requires repair or replacement; often replacing the cartridge inside the faucet and fix this. Hire a licensed plumber to further evaluate and repair.
 |
Bathroom Ventilation
Type Bath fan
General Bath Condition
Standard
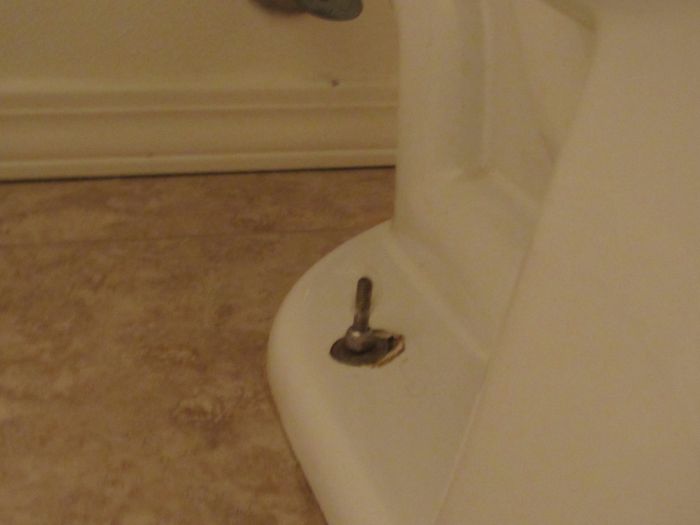
Secure / repair the loose toilet paper dispenser.
 |
Crawl Space
General Crawl Space Photos
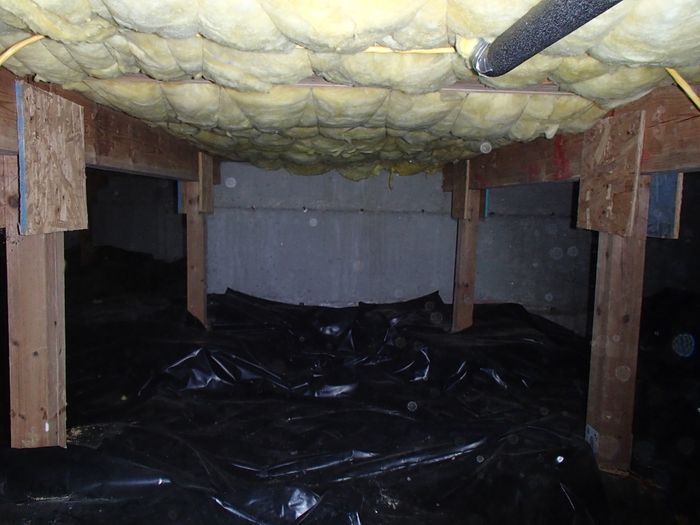
The photos provided here show representative images of this crawl space at the time of inspection.

 |
Vapor Barrier
Vapor Barrier Material Plastic on earth
Crawl Space Ventilation
Ventilation Method Exterior wall vents, Blocked Vents (General Note)
Crawl space vents are currently blocked by insulation in places. Implement repairs as needed to ensure vents are unobstructed. Use cardboard baffles to hold insulation up away from the vents.
 |
Posts and Footings
Standard
Insulation
Insulation Type Fiberglass
Approximate R-Value R-30
Moisture Conditions
None Noted
Checking Out Procedure
Check Out List
OvenOff
Lights![]() OffClient and Realtor Still In House
OffClient and Realtor Still In House
Heating and CoolingRestored to Pre-inspection temperatures
AppliancesOff / finishing cycle
Receipt -- Orca Residential Inspection
6529 Sample Townhome Lane Seattle, WA
| Inspection with digital report | $595.00 |
| $595.00 | |
| PAID |
Orca Inspection Services LLC
C/O Dylan Chalk
5761 NE Tolo RdBainbridge Island, WA , WA 98110
(206) 713-5715
Signed Contracts
Orca Inspection Services LLC
(206) 713-5715
orcainspect@gmail.com
http://www.orcainspect.com
Inspected by Dylan Chalk
WA State Pest License #: 65540
WA State Home Inspector #: 365