
The Scope and Purpose of a Building Inspection
Purchasing property involves risk
The purpose of a building inspection is to help reduce the risk associated with the purchase of a structure by providing a professional opinion about the overall condition of the structure. A building inspection is a limited visual inspection and it cannot eliminate this risk. Some buildings present more risks than others. We cannot control this, but we try to help educate you about areas of uncertainty and risk as part of our inspection.
A building inspection is not an insurance policy
This report does not substitute for or serve as a warranty or guarantee of any kind. Warranties can be purchased separately from insuring firms that provide this service.
A building inspection is visual and not destructive
The descriptions and observations in this report are based on a visual inspection of the structure. We inspect the aspects of the structure that can be viewed without dismantling, damaging or disfiguring the structure and without moving furniture and interior furnishings. Areas that are concealed, hidden or inaccessible to view are not covered by this inspection. Some systems cannot be tested during this inspection as testing risks damaging the building. For example, overflow drains on bathtubs are generally not tested because if they were found to be leaking they could damage the finishes below. Our procedures involve non-invasive investigation and non-destructive testing which will limit the scope of the inspection.
This is not an inspection for code compliance
This inspection and report are not intended for city / local code compliance. During the construction process structures are inspected for code compliance by municipal inspectors. Framing is open at this time and conditions can be fully viewed. Framing is not open during inspections of finished homes, and this limits the inspection. All houses fall out of code compliance shortly after they are built, as the codes continually change. National codes are augmented at least every three years for all of the varying disciplines. Municipalities can choose to adopt and phase in sections of the codes on their own timetables. There are generally no requirements to bring older homes into compliance unless substantial renovation is being done.
This is just our opinion
Construction techniques and standards vary. There is no one way to construct a building. The observations in this report are the opinions of the inspector. Other inspectors and contractors are likely to have some differing opinions. You are welcome to seek opinions from other professionals.
The scope of this inspection
This inspection will include the following systems: exterior, roof, structure, drainage, foundation, attic, interior, plumbing, electrical and heating. The evaluation will be based on limited observations that are primarily visual and non-invasive. This inspection and report are not intended to be technically exhaustive.
Your expectations
The overall goal of this inspection is to help ensure that your expectations are appropriate with the building you are proposing to buy, sell or lease. To this end we assist with discovery by showing and documenting observations during the home inspection. This should not be mistaken for a technically exhaustive inspection designed to uncover every defect with a building. Such inspections are available but they are generally cost-prohibitive and time-prohibitive.
Your participation is requested
Your presence is requested during this inspection. A written report will not substitute for all the possible information that can be conveyed verbally by a shared visual observation of the conditions of the property.
How to Read This Report
Getting the Information to You
This report is designed to deliver important and technical information in a way that is easy for anyone to access and understand. If you are in a hurry, you can take a quick look at our "Summary Page” and quickly get critical information for important decision making. However, we strongly recommend that you take the time to read the full Report, which includes digital photographs, captions, diagrams, descriptions, videos and hot links to additional information.
The best way to get the layers of information that are presented in this report is to read your report online (the HTML version), which will allow you to expand your learning about your house. You will notice some words or series of words highlighted in blue and underlined – clicking on these will provide you with a link to additional information. The HTML version of this report also contains streaming videos. Short video clips often contain important information and critical context and sounds that can be difficult to capture in words and still pictures.
For the most reliable viewing experience, I recommend viewing the report on as large a screen as practical, as much detail can be lost on small devices like smart phones. For similar reasons, reports should only be printed in color to retain as much detail as possible and minimize misinterpretation of photographs.
This report can also be saved to a PDF file and printed to paper as desired.
Chapters and Sections
This report is divided into chapters that parcel the building into logical inspection components. Each chapter is broken into sections that relate to a specific system or component of the home. You can navigate between chapters with the click of a button on the left side margin.
Most sections will contain some descriptive information done in black font. Observation narrative, done in colored boxes, will be included if a system or component is found to be significantly deficient in some way or if we wish to provide helpful additional information about the system or the scope of our inspection. If a system or component of the home was deemed to be in satisfactory or serviceable condition, there may be no narrative observation comments in that section and it may simply say “tested,” or “inspected.”
Observation Labels
All narrative observations are colored, numbered and labeled to help you find, refer to, and understand the severity of the observation. Observation colors and labels used in this report are:
- Major Concern:Repair items that may cost significant money to correct now or in the near future, or items that require immediate attention to prevent additional damage or eliminate safety hazards.
- Repair:Repair and maintenance items noted during inspection. Please note that some repair items can be expensive to correct such as re-finishing hardwood floors, but are considered simply repair items due to their cosmetic nature.
- Recommended Maintenance:These are repair items that should be considered "routine home ownership items," such as servicing the furnace, cleaning the gutters or changing the air filters in the furnace.
- Due Diligence:Observation such as a buried oil tank that may require further investigation to determine the severity and / or urgency of repair.
- Monitor:Items that should be watched to see if correction may be needed in the future.
- Improve or Upgrade:Observations that are not necessarily defects, but which could be improved for safety, efficiency, or reliability reasons. These are often items which reflect changes in building codes or standards.
- Inspection Notes:Aside information and /or comments elaborating on descriptions of systems in the home that the inspector might find useful to purchase decisions or home ownership. .
- Limitations:Conditions present at the time of inspection which limited the scope of this visual inspection
Pest Inspection
All items with the bug logo (![]() ) are part of a structural pest inspection. If your inspector included a structural pest inspection as a part of the scope of your home inspection, you can distinguish pest inspection items by this logo. You can also go to the pest inspection summary page to see a summary of the items that are part of a pest inspection.
) are part of a structural pest inspection. If your inspector included a structural pest inspection as a part of the scope of your home inspection, you can distinguish pest inspection items by this logo. You can also go to the pest inspection summary page to see a summary of the items that are part of a pest inspection.
Summary Page
The Summary Page is designed as a bulleted overview of all the observations noted during inspection. This helpful overview is not a substitution for reading the entire inspection report. The entire report must be read to get a complete understanding of this inspection report as the Summary Page does not include photographs or photo captions.
Moisture Meter Testing
Where moisture meter testing is indicated in this report a Protimiter Survey Master Dual Function was used.
Summary
Major Concerns
- ESDW-2 Exterior Siding, Doors and Windows:
The exterior siding system here is in poor condition, especially where exposed to the weather. Funds should be reserved for extensive siding repairs in the near term and I would expect some concealed water damage in places. I would loosely plan on re-siding the south and west faces of the green building as well as the south face of the yellow building. Hire a qualified general contractor further evaluate and re[pair the exterior siding system as needed. Examples of observations noted during inspection include:
- Missing cedar shingles noted on the south side of the yellow building
- Siding is split and vulnerable to water damage on exposed sides of the yellow building.
- Siding is split and vulnerable to water damage on exposed sides of the yellow building
- The siding at the southwest corner of the green building and below the south deck is likely to have concealed water damage.
- Damaged cedar shingle siding on exposed portions of the green building.
- DPB-1 Decks, Porches and Balconies:
Visual inspection of the decking systems indicated the need for rebuilding. There are two decks here, one for each building. I recommend consulting with a qualified general contractor about options for re-building the decking systems here. Repairs or removal should be done as soon as possible and I would consider prohibiting access to these decks as they are damaged and in exceptionally poor condition. There is a risk of collapse under live loads. Examples of specific observations noted during inspection include:
- Deck guardrails are now required to have posts every 6 feet and can no longer be all balusters.
- Significant wood decay in the deck ledger board - I would expect concealed water damage especially below the green building deck.
- The decay in the ledger is at risk of failure due to extensive wood decay.
- Badly damaged posts at the base of the yellow deck - this risks deck failure
- Wood decay developing in the west beam - yellow deck
- The saddle fitting is damaged to the base of the post at the yellow building deck
- No lateral load connections for deck to building
- Wood decaying in the decking of the yellow deck
- Blocking is missing at the joist to beam connection - these are recommended for sheer strength.
- RCG-1 Roof, Chimney and Gutters:
This roof is done in an architectural grade composition shingle. The roof looks to be close to the end of its useful service life and localized areas of failure were noted. Roof replacement can be more cost-effective than repairs depending on the scope, cost and urgency of needed repairs.
Recommendation:
Hire a qualified roofing contractor to further evaluate this roof and repair or replace as recommended. Examples of specific observations noted during inspection include:
- Buckling noted in the roofing at the north side
- Damaged roofing shingles noted on the north side. I suspect there are at least 15 or 20 damage shingles.
- Poor slope was noted where the gable roof meets the hip roof
- Physical damage noted at the South side shingles, possibly from pressure washing
- Clean wasps nests from the roof vents
- Roof patching noted on the south side
- The plumbing vent flashings are deteriorated and possibly leaking at the blue building
- Nail pops noted on the south face of the blue building roof
- RCG-2 Roof, Chimney and Gutters:
This roof is done in an architectural grade composition shingle. The roof looks to be close to the end of its useful service life and localized areas of failure were noted. Roof replacement can be more cost-effective than repairs depending on the scope, cost and urgency of needed repairs.
Recommendation:
Hire a qualified roofing contractor to further evaluate this roof and repair or replace as recommended. Examples of specific observations noted during inspection include:
- The drip edge flashing is falling out on the north side of the yellow building
- Plumbing vent flashings are deteriorating. This is from the north side of the yellow building
- A poorly sloped section of roof was noted at the northeast corner
- Several damaged shingles were noted at the north side of the yellow roof
- Nail pops were noted at the southeast ridge shingles.
- Damaged roofing shingles noted at the south end of the yellow building
- SB-1 Structure and Basement:
Moisture ant damage was noted at the north side of the green building. No live ants were found but damaged wood was noted. Visibility of this area is very limited. I suspect this is the base of the stairs where the concrete has been run over the wood frame. This is a risk design that is showing some signs of failure. I recommend having these locations further investigated by a qualified general contractor - see BOTH buildings. Repair as needed to remove damaged materials and ensure reliable moisture control and performance.
- U8-13 Unit # 801:
High humidity an odor of mold noted in this unit, especially at the NE corner bedroom. I recommend additional inspection of this unit. The tenant was complaining that they have to wipe mold from the walls and that the carpet is wet at times of year. Implement repairs as needed for moisture control and indoor air quality and also noted the stains noted on the ceiling of the unit above.
- U88-9 Unit # 803:
High moisture meter readings above the shower in 803. Note the anomalies for thermal images as well. I suspect there is a plumbing leak from above here. Repair leaking plumbing and repair damaged finishes as needed.
- U89-12 Unit # 805:
Active moisture control problems were noted around the toilet and 805. Moisture is sitting on the finished floor and bolts are corroded.
- U89-20 Unit # 805:
Mold like standing noted on the ceiling at the northeast corner of unit 805. This tested dry at the time of inspection but maybe related to moisture control issues in the northeast corner unit below here.
- U811-23 Unit # 811:
Mold like substances and moisture control problems are noted around the dryer exhaust vent.
- U812-11 Unit # 813:
High moisture meter readings and the ceiling above the bathroom shower in this unit.
- U813-9 Unit # 815:
This bathroom sink is failing and should be replaced as soon as possible. The countertop sink is cracked in this unit.
Repairs
- GC-2 General Comments:
The TPRV (water heater relief valves) in this building could not be seen discharging anywhere. It is possible they discharge into the crawl space. The discharge for these water heaters should be to a visible location that can be safely monitored. I recommend verifying where these are terminating and relocate if needed. Typically these would discharge to the exterior.
- G1-1 Grounds:
Eliminate wood /soil contact to reduce the chances for rot and pest damage and repair any hidden rot as needed. Generally, a 6-inch clearance between soils and wood is recommended. This is often not realistic on older homes, but repairs should be made to get as much clearance as is possible and all contact with the soils should be eliminated.
- G1-2 Grounds:
The grade of the yard is sloping toward the building. Standards recommend a quarter inch / foot slope away from the building or better to prevent water draining toward the house. Over time, negative grading, as this is often called, can lead to moisture and even structural problems with the house. Have this repaired as feasible by a qualified contractor. Often, a swale is used to create a low point away from the house into which water can be diverted away from and around the building.
- G1-3 Grounds:
The aluminum downspout is terminating below ground - NE corner of the yellow building. This should be corrected as the storm drain pipe should be run above ground level to prevent the pipe from becoming obstructed by soils and organic debris and to prevent corrosion at the end of the downspout.
- G1-5 Grounds:
The asphalt walkway flatwork is being damaged by mature tree roots - see outside the yellow building - east side. This has created an un-level surface that can be a trip hazard. Repair can be complicated as the tree grows and long term proper repair may necessitate removal of the trees in question as well as repair of the flatwork. Repair as needed and is cost effective and use caution on this walking surface.
- G1-6 Grounds:
The curb material near the entrance to the green building is damaged. If repairing this, consider also how drainage is performing here as this curb could help to deflect water away from the building.
- G1-9 Grounds:
The railroad ties used for garden planter perimeters are rotting, creating a condition conducive to wood destroying insects - see east side. Removal is recommended to eliminate a condition conducive to wood destroying organisms.
- G1-10 Grounds:
Overall, repairs are needed to the exterior garage stairs to ensure safe and reliable performance. I recommend additional inspection of the stairs by a qualified general contractor. Implement repairs as recommended for safety. This should be considered a priority for safety reasons.
Examples of observations noted during inspection include:
- Handrail ends do not return into the wall - this can allow clothing or accessories to catch on the handrail
- Openings between stair risers exceed 4-inches. This can pose a safety hazard for small children
- RCG-4 Roof, Chimney and Gutters:
The gutters are old and dented, damaged and leaking. I would plan of the need for constant repairs to the gutters and downspouts until updated. The logical time to updates gutters and downspouts if after re-roofing.
- ES-2 Electric Service:
Have the electrical earthing system checked by a licensed electrician. The grounding rods noted during visual inspection were not fully driven - these should be driven all the way into the ground. The earthing system is an important safety feature which is a designed electrical path to dissipate a static discharge voltage (such as Lightning) to earth. General standards are to have two grounding rods at least 6 feet apart if there is not a UFER ground employed.
- CSYB-2 Crawl Space - Yellow Building:
The openings which provide ventilation for the crawl space are obstructed by organic debris in places. I recommend implementing repairs as needed to ensure vents are unobstructed and be sure the vent openings remain reliably screened with 1/4 inch wire mesh.
*Note: General standards for ventilated crawl spaces prescribe 1 square foot of ventilation for every 150 square feet of crawl space or 1/1500 in combination with an approved class 1 vapor retarder material that covers all exposed soils in the crawl space. Vents should be located to provide adequate cross ventilation. Hire a licensed general contractor to further evaluate and repair.
- CSGB-1 Crawl Space - Green Building:
The openings which provide ventilation for the crawl space are obstructed by organic debris in places. I recommend implementing repairs as needed to ensure vents are unobstructed and be sure the vent openings remain reliably screened with 1/4 inch wire mesh.
*Note: General standards for ventilated crawl spaces prescribe 1 square foot of ventilation for every 150 square feet of crawl space or 1/1500 in combination with an approved class 1 vapor retarder material that covers all exposed soils in the crawl space. Vents should be located to provide adequate cross ventilation. Hire a licensed general contractor to further evaluate and repair.
- RPWDO-1 Rodents, Pests and Wood Destroying Organisms:
Wood and cellulose debris was noted in the crawl space. This can encourage wood-destroying organisms such as subterranean termites. Removal of all cellulose debris from the crawl space is recommended to eliminate conditions conducive to wood-destroying organisms.
- U8-2 Unit # 801:
The installation of carbon monoxide alarms is recommended for all homes that have fuel burning appliances such as gas or oil furnaces, gas water heaters, gas ovens and cook-tops, gas fireplaces and wood stoves. Carbon monoxide is a colorless, odorless gas that can cause sickness, nausea and even death. For more information, consult the Consumer Product Safety Commission at 1-800-638-2772 (C.P.S.C.) Modern standards in many states now recommend one CO alarm outside of all bedrooms and at least 1 per floor of the house.
- U8-3 Unit # 801:
Several smoke alarms were noted to be missing'. Repair / replace the missing smoke alarms in the house so that there is an operating smoke alarm in every bedroom and on every floor and one outside of all sleeping areas. I did not find a smoke alarm in the:
- The smoke and carbon monoxide alarm was noted to be missing in the hallway.
- U8-4 Unit # 801:
Install listed seismic straps to restrain the water heater in the event of an earthquake; none were noted during inspection. Two straps should be located on the water heater: one on upper 1/3rd of tank and one at the lower 1/3rd.
- U8-5 Unit # 801:
No drain pan has been installed below the water heater here. A drain pan is recommended under water heaters that are located in finished spaces or where a leak could damage finishes. Where a pan does not already exist, the tricky part is providing a drain to the outside. A pan without a drain is often of limited benefit / protection. For improved protection from accidental water heater leaks, and where a drain is difficult to install, consider a pan with a moisture alarm and a flood-safe device such as this: Watts Water Heater Leak Prevention.
- U8-6 Unit # 801:
An expansion tank is recommended for the water heater; these are required if the house has a closed plumbing system. Expansion tanks help reduce pressure on the plumbing system by creating a buffer or a place for water to expand into as water swells during thermal expansion. Installation of expansion or pressure tanks is modern installation practice and will be required if a pressure reducing valve has been installed on a public water supply. Consult with a qualified plumber to install.
- U8-7 Unit # 801:
Clean the dirty fan in 801 and set this on a 24-hour timer for improved ventilation.
- U8-11 Unit # 801:
An anti-tip device is needed to prevent this range from tipping during operation of the oven door. This is a small clip that secured the back adjustable feet of the range to the floor.
- U8-12 Unit # 801:
Unit 801. The pad supporting the outdoor condensing unit is not level. Mechanical system requirements state that equipment and appliances supported from the ground shall be level and firmly supported on a concrete slab or other approved material extending not less than 3 inches (76 mm) above the adjoining ground. Such support shall be in accordance with the manufacturer's installation instructions. I recommend a licensed HVAC contractor or other qualified workman review the condition and make corrections.~ IRC - Mechanical Code: M1305.1.4.1
- U8-14 Unit # 801:
A lost seal was noted in the glazing - west window. This has resulted in fogging between the panes of glass that cannot be cleaned without glazing repair or replacement. Hire a glazing specialist to further evaluate and repair or replace all glazing with lost seals.
✒️ - It is possible the window just needs cleaning.
- U8-16 Unit # 801:
The handle is damaged to one of the shut offs for the clothes washer and less reliable rubber hoses were noted.
- U8-17 Unit # 801:
Laundry fan:
- The fan is currently clogged
- Consider improving the fan for the laundry room and installing a 24-hour timer to control humidity.
- Damaged vent cover at the west side of the yellow building
- U88-4 Unit # 803:
This is a very old water heater. Replacement is recommended for improved reliability as this unit could fail at any point. The average life of these water heaters is 8-20 years. The service life of a water heater will depend on a variety of factors such as water quality and regular scheduled maintenance such as flushing the tank and replacing sacrificial anodes.
- U88-5 Unit # 803:
No drain pan has been installed below the water heater here. A drain pan is recommended under water heaters that are located in finished spaces or where a leak could damage finishes. Where a pan does not already exist, the tricky part is providing a drain to the outside. A pan without a drain is often of limited benefit / protection. For improved protection from accidental water heater leaks, and where a drain is difficult to install, consider a pan with a moisture alarm and a flood-safe device such as this: Watts Water Heater Leak Prevention.
- U88-6 Unit # 803:
An expansion tank is recommended for the water heater; these are required if the house has a closed plumbing system. Expansion tanks help reduce pressure on the plumbing system by creating a buffer or a place for water to expand into as water swells during thermal expansion. Installation of expansion or pressure tanks is modern installation practice and will be required if a pressure reducing valve has been installed on a public water supply. Consult with a qualified plumber to install.
- U88-7 Unit # 803:
The discharge tube for the water heater temperature and pressure relief valve (TPRV) is plumbed using a corrugated supply connector. Though this is very common, this restricts the diameter of the opening and is unsafe and not recommended - see attached link. Ideally, the discharge tube for a relief valve:
- Terminates to an exterior location or above a drain, though this is not always possible
- Terminates between 6 and 24-inches off the ground (UPC)
- Slopes to drain to prevent water pooling inside the discharge tube
- Is not made from pipe with an inside diameter less than 3/4 on an inch
- Terminates to a visible location that can be monitored for leaks and discharges
- Does not have a threaded termination point which would prevent accidental capping of this important discharge
- Does not terminate into a drain pan
I recommend having this relief valve discharge tube further investigated and repaired as recommended by a licensed plumber.
- U88-10 Unit # 803:
An anti-tip device is needed to prevent this range from tipping during operation of the oven door. This is a small clip that secured the back adjustable feet of the range to the floor.
- U89-4 Unit # 805:
Replace the damaged electric receptacle off the deck in 805.
- U89-7 Unit # 805:
Install listed seismic straps to restrain the water heater in the event of an earthquake; none were noted during inspection. Two straps should be located on the water heater: one on upper 1/3rd of tank and one at the lower 1/3rd.
- U89-8 Unit # 805:
A drain pan has been installed below the water heater, but no drain was noted for the pan. A drain pan is recommended under water heaters that are located in finished spaces or where a leak could damage finishes. A pan without a drain is often of limited benefit / protection. For improved protection from accidental water heater leaks, and where a drain is difficult to install, consider a pan with a moisture alarm and a flood-safe device such as this: Watts Water Heater Leak Prevention.
- U89-9 Unit # 805:
An expansion tank is recommended for the water heater; these are required if the house has a closed plumbing system. Expansion tanks help reduce pressure on the plumbing system by creating a buffer or a place for water to expand into as water swells during thermal expansion. Installation of expansion or pressure tanks is modern installation practice and will be required if a pressure reducing valve has been installed on a public water supply. Consult with a qualified plumber to install.
- U89-10 Unit # 805:
The discharge tube for the water heater temperature and pressure relief valve (TPRV) is plumbed using a corrugated supply connector. Though this is very common, this restricts the diameter of the opening and is unsafe and not recommended - see attached link. Ideally, the discharge tube for a relief valve:
- Terminates to an exterior location or above a drain, though this is not always possible
- Terminates between 6 and 24-inches off the ground (UPC)
- Slopes to drain to prevent water pooling inside the discharge tube
- Is not made from pipe with an inside diameter less than 3/4 on an inch
- Terminates to a visible location that can be monitored for leaks and discharges
- Does not have a threaded termination point which would prevent accidental capping of this important discharge
- Does not terminate into a drain pan
I recommend having this relief valve discharge tube further investigated and repaired as recommended by a licensed plumber.
- U89-16 Unit # 805:
An anti-tip device is needed to prevent this range from tipping during operation of the oven door. This is a small clip that secured the back adjustable feet of the range to the floor.
- U89-21 Unit # 805:
The doors in this unit are in poor condition. Updating may be needed soon.
- U89-23 Unit # 805:
Mold-like substances were noted around the windows in the west side bedroom - this is more signs of high humidity problems in this unit.
- U89-26 Unit # 805:
Dryer exhaust vent cleaning and repair of the backdraft dampers needed for the dryer exhaust fan in 805.
- U810-5 Unit # 807:
A smoke alarm was noted to be missing. Repair / replace the missing smoke alarms in the house so that there is an operating smoke alarm in every bedroom and on every floor and one outside of all sleeping areas. I did not find a smoke alarm in the:
- A missing smoke alarm was noted at the east bedroom
- U810-6 Unit # 807:
Install listed seismic straps to restrain the water heater in the event of an earthquake; none were noted during inspection. Two straps should be located on the water heater: one on upper 1/3rd of tank and one at the lower 1/3rd.
- U810-7 Unit # 807:
A drain pan has been installed below the water heater, but no drain was noted for the pan. A drain pan is recommended under water heaters that are located in finished spaces or where a leak could damage finishes. A pan without a drain is often of limited benefit / protection. For improved protection from accidental water heater leaks, and where a drain is difficult to install, consider a pan with a moisture alarm and a flood-safe device such as this: Watts Water Heater Leak Prevention.
- U810-8 Unit # 807:
An expansion tank is recommended for the water heater; these are required if the house has a closed plumbing system. Expansion tanks help reduce pressure on the plumbing system by creating a buffer or a place for water to expand into as water swells during thermal expansion. Installation of expansion or pressure tanks is modern installation practice and will be required if a pressure reducing valve has been installed on a public water supply. Consult with a qualified plumber to install.
- U810-9 Unit # 807:
The discharge tube for the water heater temperature and pressure relief valve (TPRV) is plumbed using a corrugated supply connector. Though this is very common, this restricts the diameter of the opening and is unsafe and not recommended - see attached link. Ideally, the discharge tube for a relief valve:
- Terminates to an exterior location or above a drain, though this is not always possible
- Terminates between 6 and 24-inches off the ground (UPC)
- Slopes to drain to prevent water pooling inside the discharge tube
- Is not made from pipe with an inside diameter less than 3/4 on an inch
- Terminates to a visible location that can be monitored for leaks and discharges
- Does not have a threaded termination point which would prevent accidental capping of this important discharge
- Does not terminate into a drain pan
I recommend having this relief valve discharge tube further investigated and repaired as recommended by a licensed plumber.
- U811-2 Unit # 811:
The bonding jumper above the water heater for the metal pipes is loose and requires securing.
- U811-4 Unit # 811:
Reverse polarity was noted at one of the electric receptacles. This is when the hot and the neutral wires have been wired backwards. This is a potential safety issue that should be corrected by a licensed electrical contractor the scope of other electrical repairs.
- Reverse polarity noted at the electric receptacle on the north wall of the living room.
- U811-6 Unit # 811:
Install listed seismic straps to restrain the water heater in the event of an earthquake; none were noted during inspection. Two straps should be located on the water heater: one on upper 1/3rd of tank and one at the lower 1/3rd.
- U811-7 Unit # 811:
A drain pan has been installed below the water heater, but no drain was noted for the pan. A drain pan is recommended under water heaters that are located in finished spaces or where a leak could damage finishes. A pan without a drain is often of limited benefit / protection. For improved protection from accidental water heater leaks, and where a drain is difficult to install, consider a pan with a moisture alarm and a flood-safe device such as this: Watts Water Heater Leak Prevention.
- U811-8 Unit # 811:
An expansion tank is recommended for the water heater; these are required if the house has a closed plumbing system. Expansion tanks help reduce pressure on the plumbing system by creating a buffer or a place for water to expand into as water swells during thermal expansion. Installation of expansion or pressure tanks is modern installation practice and will be required if a pressure reducing valve has been installed on a public water supply. Consult with a qualified plumber to install.
- U811-10 Unit # 811:
The toilet in this unit is in poor condition. Updating is recommended soon.
- U811-11 Unit # 811:
A slow drain was noted to the bathroom sink.
- U811-12 Unit # 811:
The bathroom in this unit is in poor condition. The finishes and fixtures are old and will be increasingly unreliable. Updating/remodeling this bathroom will be needed in the near term. The urgency of updating can be subjective but waiting will risk water damage to surrounding finishes.
- U811-15 Unit # 811:
An anti-tip device is needed to prevent this range from tipping during operation of the oven door. This is a small clip that secured the back adjustable feet of the range to the floor.
- U811-18 Unit # 811:
Secure the loose cover at the exterior compressor for this unit's heat pump.
- U811-20 Unit # 811:
The flooring in this unit is in poor condition. Updating should be anticipated soon.
- U811-24 Unit # 811:
Repair the broken control knob for the dryer.
- U812-6 Unit # 813:
This is a very old water heater. Replacement is recommended for improved reliability as this unit could fail at any point. The average life of these water heaters is 8-20 years. The service life of a water heater will depend on a variety of factors such as water quality and regular scheduled maintenance such as flushing the tank and replacing sacrificial anodes.
- U812-7 Unit # 813:
Install listed seismic straps to restrain the water heater in the event of an earthquake; none were noted during inspection. Two straps should be located on the water heater: one on upper 1/3rd of tank and one at the lower 1/3rd.
- U812-8 Unit # 813:
No drain pan has been installed below the water heater here. A drain pan is recommended under water heaters that are located in finished spaces or where a leak could damage finishes. Where a pan does not already exist, the tricky part is providing a drain to the outside. A pan without a drain is often of limited benefit / protection. For improved protection from accidental water heater leaks, and where a drain is difficult to install, consider a pan with a moisture alarm and a flood-safe device such as this: Watts Water Heater Leak Prevention.
- U812-9 Unit # 813:
An expansion tank is recommended for the water heater; these are required if the house has a closed plumbing system. Expansion tanks help reduce pressure on the plumbing system by creating a buffer or a place for water to expand into as water swells during thermal expansion. Installation of expansion or pressure tanks is modern installation practice and will be required if a pressure reducing valve has been installed on a public water supply. Consult with a qualified plumber to install.
- U812-10 Unit # 813:
The discharge tube for the water heater temperature and pressure relief valve (TPRV) is plumbed using a corrugated supply connector. Though this is very common, this restricts the diameter of the opening and is unsafe and not recommended - see attached link. Ideally, the discharge tube for a relief valve:
- Terminates to an exterior location or above a drain, though this is not always possible
- Terminates between 6 and 24-inches off the ground (UPC)
- Slopes to drain to prevent water pooling inside the discharge tube
- Is not made from pipe with an inside diameter less than 3/4 on an inch
- Terminates to a visible location that can be monitored for leaks and discharges
- Does not have a threaded termination point which would prevent accidental capping of this important discharge
- Does not terminate into a drain pan
I recommend having this relief valve discharge tube further investigated and repaired as recommended by a licensed plumber.
- U813-3 Unit # 815:
Loose connections were noted to the bonding jumper for the metal piping system. Be sure these fondant connections are well secured.
- U813-6 Unit # 815:
Install listed seismic straps to restrain the water heater in the event of an earthquake; none were noted during inspection. Two straps should be located on the water heater: one on upper 1/3rd of tank and one at the lower 1/3rd.
- U813-7 Unit # 815:
A drain pan has been installed below the water heater, but no drain was noted for the pan. A drain pan is recommended under water heaters that are located in finished spaces or where a leak could damage finishes. A pan without a drain is often of limited benefit / protection. For improved protection from accidental water heater leaks, and where a drain is difficult to install, consider a pan with a moisture alarm and a flood-safe device such as this: Watts Water Heater Leak Prevention.
- U813-8 Unit # 815:
An expansion tank is recommended for the water heater; these are required if the house has a closed plumbing system. Expansion tanks help reduce pressure on the plumbing system by creating a buffer or a place for water to expand into as water swells during thermal expansion. Installation of expansion or pressure tanks is modern installation practice and will be required if a pressure reducing valve has been installed on a public water supply. Consult with a qualified plumber to install.
- U813-10 Unit # 815:
Corrugated waste pipe was used to drain this main bathroom sink. This is not a listed plumbing product and tends to indicate plumbing work that has not been done by a licensed plumber. Use smooth wall pipe only. Hire a licensed plumber to further evaluate and repair as needed.
- U813-12 Unit # 815:
The bathroom in this unit is in poor condition. The finishes and fixtures are old and will be increasingly unreliable. Updating/remodeling this bathroom will be needed in the near term. The urgency of updating can be subjective but waiting will risk water damage to surrounding finishes.
- U813-16 Unit # 815:
Corrugated waste pipe was used to drain the kitchen sink. This in an unlisted plumbing product. Use smooth wall pipe only. Hire a licensed plumber to further evaluate and repair as needed.
- U813-21 Unit # 815:
The flooring in this unit is in poor condition. Updating should be anticipated soon. The carpeting is the biggest issue in this unit.
- U814-4 Unit # 817:
Several electric receptacles seem to be missing in the kitchen countertop. Re-install as needed so the kitchen has an adequate number of receptacles.
- U814-5 Unit # 817:
The installation of carbon monoxide alarms is recommended for all homes that have fuel burning appliances such as gas or oil furnaces, gas water heaters, gas ovens and cook-tops, gas fireplaces and wood stoves. Carbon monoxide is a colorless, odorless gas that can cause sickness, nausea and even death. For more information, consult the Consumer Product Safety Commission at 1-800-638-2772 (C.P.S.C.) Modern standards in many states now recommend one CO alarm outside of all bedrooms and at least 1 per floor of the house.
- The alarm for this unit seems to have been cut out.
- U814-6 Unit # 817:
Modern standards recommend smoke alarms in all bedrooms, in all hallways outside bedrooms and at least one on each floor of the building. At the time of inspection smoke alarms were incomplete in the bedrooms.
- U814-8 Unit # 817:
Install listed seismic straps to restrain the water heater in the event of an earthquake; none were noted during inspection. Two straps should be located on the water heater: one on upper 1/3rd of tank and one at the lower 1/3rd.
- U814-9 Unit # 817:
No drain pan has been installed below the water heater here. A drain pan is recommended under water heaters that are located in finished spaces or where a leak could damage finishes. Where a pan does not already exist, the tricky part is providing a drain to the outside. A pan without a drain is often of limited benefit / protection. For improved protection from accidental water heater leaks, and where a drain is difficult to install, consider a pan with a moisture alarm and a flood-safe device such as this: Watts Water Heater Leak Prevention.
- U814-10 Unit # 817:
An expansion tank is recommended for the water heater; these are required if the house has a closed plumbing system. Expansion tanks help reduce pressure on the plumbing system by creating a buffer or a place for water to expand into as water swells during thermal expansion. Installation of expansion or pressure tanks is modern installation practice and will be required if a pressure reducing valve has been installed on a public water supply. Consult with a qualified plumber to install.
- U814-11 Unit # 817:
The discharge tube for the water heater temperature and pressure relief valve (TPRV) is plumbed using a corrugated supply connector. Though this is very common, this restricts the diameter of the opening and is unsafe and not recommended - see attached link. Ideally, the discharge tube for a relief valve:
- Terminates to an exterior location or above a drain, though this is not always possible
- Terminates between 6 and 24-inches off the ground (UPC)
- Slopes to drain to prevent water pooling inside the discharge tube
- Is not made from pipe with an inside diameter less than 3/4 on an inch
- Terminates to a visible location that can be monitored for leaks and discharges
- Does not have a threaded termination point which would prevent accidental capping of this important discharge
- Does not terminate into a drain pan
I recommend having this relief valve discharge tube further investigated and repaired as recommended by a licensed plumber.
- U814-13 Unit # 817:
The bathroom sink and cabinet are in poor condition. Budget to update soon.
- U814-14 Unit # 817:
An anti-tip device is needed to prevent this range from tipping during operation of the oven door. This is a small clip that secured the back adjustable feet of the range to the floor.
- U814-17 Unit # 817:
Secure the loose cover to the heat pump - unit 817
Recommended Maintenance
- GC-3 General Comments:
Electric panel labeling is generally poor. There are not many circuits here so one can make educated guesses. Developing a plan for improving the circuit labeling off all units would be an excellent safety improvement. This could also be done in conjunction with adding more wiring. There should be disposer and dishwasher circuits in the kitchens that may be able to be used to at least add a dedicated microwave circuit.
- GC-4 General Comments:
Electrical Bonding Connections: I noted that electrical bonding connections were loose at water pipes by the water heater. I would develop a protocol for checking and securing these to ensure reliable performance. I have noted in the unit chapters where loose connections were found.
- GC-5 General Comments:
Dryer Exhaust Terminations: In general, with dryer exhaust vents, I recommend using covers with backdraft dampers and avoid using screens. Screens will get clogged and trap lint.
- G1-7 Grounds:
Pruning trees, branches and vegetation away from the house is recommended. Where trees, branches and large shrubs can provide rodent access to the roof, a minimum 6-foot clearance is recommended as many rodents can jump 6-feet. All vegetation, including smaller landscaping such as grasses, flowers and shrubs should be kept 1-foot off the house to eliminate contact which could trap moisture against the building.
- ESDW-3 Exterior Siding, Doors and Windows:
Loose electrical conduit was noted on the west side. Secure as needed for proper support and to protect from physical damage.
- P-2 Plumbing:
There seems to be some hoses used for irrigation. I did not see a more permanent in-ground irrigation system. Inspection of irrigation systems is beyond the scope of this inspection. I recommend eliminating these types of permanent hoses to protect against risks of backflow.
- A-2 Attics:
I recommend keeping the attic access hatches locked for improved safety.
- A-5 Attics:
The exhaust ductwork for the kitchen fan is uninsulated in the attic space. This can lead to seasonal condensation problems and is less energy efficient. Replace these exhaust vents with insulated exhaust ducts or insulate to R-8 or better.
- U8-8 Unit # 801:
Clean the kitchen fan filter - 801.
- U8-9 Unit # 801:
Mild corrosion noted on the angle stops and supply connectors made it below the kitchen sink. This is often due to chemicals being stored below the sink.
- U88-2 Unit # 803:
Since the 1970s, requirements for GFCI (Ground Fault Circuit Interruption) protection have changed, and locations requiring GFCI protection seem to get added with every code cycle. It is common for older residential buildings to have some or even many electric receptacles that do not meet modern safety standards. GFCIs have proven successful at reducing electrocutions, and it seems likely that someday, every circuit, receptacle, and appliance in the building will require GFCI protection. The first chart below shows how successful GFCIs have been at reducing risks from electrocution. The second illustration shows where GFCI protection is required as of the 2020 NEC and WAC. As a general best practice for safety. For improved safety, I always recommend bringing GFCI protection up to modern safety standards.
During inspection today, I noted that GFCI protection is inconsistent with modern minimum standards for safety in the following locations:
- The laundry receptacle is not GFCI protected
- U88-8 Unit # 803:
Mild moisture control problems between the shower and the toilet.
- U88-13 Unit # 803:
Scuffing and paint failure noted on trim.
- U88-16 Unit # 803:
Foil or Mylar transition duct was noted in use to connect the dryer to the rigid vent. This product is generally UL listed for use with a dryer, however, most dryer manufacturers do not recommend it as it has proven to be unreliable and a potential fire hazard. A corrugated metal flex duct is recommended. Repair as needed.
- U88-17 Unit # 803:
The dryer exhaust ductwork is dirty and needs to be cleaned for improved safety. This is important, regular maintenance to eliminate a potential fire hazard.
- U89-3 Unit # 805:
Since the 1970s, requirements for GFCI (Ground Fault Circuit Interruption) protection have changed, and locations requiring GFCI protection seem to get added with every code cycle. It is common for older residential buildings to have some or even many electric receptacles that do not meet modern safety standards. GFCIs have proven successful at reducing electrocutions, and it seems likely that someday, every circuit, receptacle, and appliance in the building will require GFCI protection. The first chart below shows how successful GFCIs have been at reducing risks from electrocution. The second illustration shows where GFCI protection is required as of the 2020 NEC and WAC. As a general best practice for safety. For improved safety, I always recommend bringing GFCI protection up to modern safety standards.
During inspection today, I noted that GFCI protection is inconsistent with modern minimum standards for safety in the following locations:
- No GFCI protection was noted for the laundry
- U89-6 Unit # 805:
The hot water temperature in 805 was only 110°. 120° is recommended.
- U89-11 Unit # 805:
The bathroom sink and cabinet in this unit are getting older. This should be on the radar for updating.
- U89-13 Unit # 805:
With the exception of any comments listed above, this bathroom was in serviceable condition. However, the finishes and fixtures are old and will be increasingly unreliable. Updating / remodeling this bathroom would be a logical improvement in the near term. The urgency of updating will depend on how often this bathroom is to be used and personal desired for reliability and cosmetic appearance.
- Bathroom finishes here are in generally older conditions. Mold like staining was noted on the ceiling.
- U89-14 Unit # 805:
The kitchen range is getting older. Funds should be reserved for replacement in the near term.
- U89-15 Unit # 805:
The kitchen ventilation system is in poor condition. Updating is recommended in the near term.
- U89-17 Unit # 805:
The baseboard heater in the bathroom of 805 is pretty old
- U810-3 Unit # 807:
Since the 1970s, requirements for GFCI (Ground Fault Circuit Interruption) protection have changed, and locations requiring GFCI protection seem to get added with every code cycle. It is common for older residential buildings to have some or even many electric receptacles that do not meet modern safety standards. GFCIs have proven successful at reducing electrocutions, and it seems likely that someday, every circuit, receptacle, and appliance in the building will require GFCI protection. The first chart below shows how successful GFCIs have been at reducing risks from electrocution. The second illustration shows where GFCI protection is required as of the 2020 NEC and WAC. As a general best practice for safety. For improved safety, I always recommend bringing GFCI protection up to modern safety standards.
During inspection today, I noted that GFCI protection is inconsistent with modern minimum standards for safety in the following locations:
- No GFCI protection was noted for laundry receptacles
- U810-10 Unit # 807:
The bathroom sink and cabinet in this unit are getting older. This should be on the radar for updating.
- U810-11 Unit # 807:
The kitchen ventilation system is in poor condition. Updating is recommended in the near term.
- U811-3 Unit # 811:
Since the 1970s, requirements for GFCI (Ground Fault Circuit Interruption) protection have changed, and locations requiring GFCI protection seem to get added with every code cycle. It is common for older residential buildings to have some or even many electric receptacles that do not meet modern safety standards. GFCIs have proven successful at reducing electrocutions, and it seems likely that someday, every circuit, receptacle, and appliance in the building will require GFCI protection. The first chart below shows how successful GFCIs have been at reducing risks from electrocution. The second illustration shows where GFCI protection is required as of the 2020 NEC and WAC. As a general best practice for safety. For improved safety, I always recommend bringing GFCI protection up to modern safety standards.
During inspection today, I noted that GFCI protection is inconsistent with modern minimum standards for safety in the following locations:
- No GFCI protection was noted for the laundry receptacle
- U811-9 Unit # 811:
The bathroom sink and cabinet in this unit are getting older. This should be on the radar for updating.
- U811-13 Unit # 811:
The shower/tub system in this unit is in poor condition. I would budget for updating soon.
- U811-14 Unit # 811:
The kitchen range is getting older. Funds should be reserved for replacement in the near term.
- U811-16 Unit # 811:
The refrigerator is older. Funds should be reserved for updating in the near term.
- U812-3 Unit # 813:
Since the 1970s, requirements for GFCI (Ground Fault Circuit Interruption) protection have changed, and locations requiring GFCI protection seem to get added with every code cycle. It is common for older residential buildings to have some or even many electric receptacles that do not meet modern safety standards. GFCIs have proven successful at reducing electrocutions, and it seems likely that someday, every circuit, receptacle, and appliance in the building will require GFCI protection. The first chart below shows how successful GFCIs have been at reducing risks from electrocution. The second illustration shows where GFCI protection is required as of the 2020 NEC and WAC. As a general best practice for safety. For improved safety, I always recommend bringing GFCI protection up to modern safety standards.
During inspection today, I noted that GFCI protection is inconsistent with modern minimum standards for safety in the following locations:
- GFCI protection is incomplete for the washer and dryer receptacle
- U812-5 Unit # 813:
The water temp on this unit is 111.3 degrees F. 120 degrees is recommended.
- U812-12 Unit # 813:
Recommend cleaning the heat pump filters in this unit.
- U812-14 Unit # 813:
Paint failure noted to the exterior south door.
- U812-15 Unit # 813:
Mild scuffing on some of the paint finishes on interior doors.
- U813-4 Unit # 815:
Since the 1970s, requirements for GFCI (Ground Fault Circuit Interruption) protection have changed, and locations requiring GFCI protection seem to get added with every code cycle. It is common for older residential buildings to have some or even many electric receptacles that do not meet modern safety standards. GFCIs have proven successful at reducing electrocutions, and it seems likely that someday, every circuit, receptacle, and appliance in the building will require GFCI protection. The first chart below shows how successful GFCIs have been at reducing risks from electrocution. The second illustration shows where GFCI protection is required as of the 2020 NEC and WAC. As a general best practice for safety. For improved safety, I always recommend bringing GFCI protection up to modern safety standards.
During inspection today, I noted that GFCI protection is inconsistent with modern minimum standards for safety in the following locations:
- The laundry receptacle is missing GFCI protection
- U813-11 Unit # 815:
With the exception of any comments listed above, this bathroom was in serviceable condition. However, the finishes and fixtures are old and will be increasingly unreliable. Updating / remodeling this bathroom would be a logical improvement in the near term. The urgency of updating will depend on how often this bathroom is to be used and personal desired for reliability and cosmetic appearance.
- U813-13 Unit # 815:
The kitchen range is getting older. Funds should be reserved for replacement in the near term.
- U813-14 Unit # 815:
The kitchen ventilation system is in poor condition. Updating is recommended in the near term.
- U813-15 Unit # 815:
The kitchen in this unit is getting older. Funds should be reserved to update this kitchen in the near term.
- U813-18 Unit # 815:
The doors in this unit are older. Updating should be anticipated in the near term.
- U813-19 Unit # 815:
The windows in this unit are older. Updating should be anticipated soon.
- A cracked window frame or two were noted at the living room
- U813-24 Unit # 815:
Quite a bit of dryer lint was noted behind the dryer indicating a possible week in the transition vent.
- U813-25 Unit # 815:
The dryer exhaust ductwork is dirty and needs to be cleaned for improved safety. This is important, regular maintenance to eliminate a potential fire hazard.
- U814-3 Unit # 817:
Since the 1970s, requirements for GFCI (Ground Fault Circuit Interruption) protection have changed, and locations requiring GFCI protection seem to get added with every code cycle. It is common for older residential buildings to have some or even many electric receptacles that do not meet modern safety standards. GFCIs have proven successful at reducing electrocutions, and it seems likely that someday, every circuit, receptacle, and appliance in the building will require GFCI protection. The first chart below shows how successful GFCIs have been at reducing risks from electrocution. The second illustration shows where GFCI protection is required as of the 2020 NEC and WAC. As a general best practice for safety. For improved safety, I always recommend bringing GFCI protection up to modern safety standards.
During inspection today, I noted that GFCI protection is inconsistent with modern minimum standards for safety in the following locations:
- GFCI protection is incomplete in the laundry
- U814-12 Unit # 817:
The shower/tub system in this unit is older. I would plan on the need to update in the near term.
- U814-15 Unit # 817:
The kitchen range is getting older. Funds should be reserved for replacement in the near term.
- U814-16 Unit # 817:
The air filter for the ductless heat pump needs to be cleaned in this unit.
- U814-18 Unit # 817:
The doors in this unit are older. Updating should be anticipated in the near term.
Due Diligence Items
- GC-7 General Comments:
A number of units seem to have water shut offs located next to the water heaters. These may be an older main water shut off. It is not clear how the building is plumbed but it seems that exterior shut offs have been added, perhaps making these redundant. The one shown below has been updated to a ball valve. Most of them are older and less reliable gate valves.
- G1-8 Grounds:
An arborist should be hired to further evaluate the large trees on the property and prune or remove them as recommended. Whenever large trees are located near a house, a higher level of maintenance should be expected to keep trees safe and healthy, eliminate the risks of damage to the home or building materials from falling limbs, and eliminate rodent entry points. With larger trees such as firs, pruning is recommended to reduce the sail effect and reduce strain on these tress during high winds. If an arborist has not been out in the last few years, I recommend a new consultation.
- P-1 Plumbing:
A video camera sewer scope is recommended. An evaluation of the sewer line below the ground is beyond the scope of this inspection. Due to the age and location of the building, a sewer scope is recommended to further evaluate the sewer line and the below ground connections between the house and the municipal sewer line. Sewer scopes are done using video cameras and can reveal the materials, condition and reliability of the sewer line. If that has been done recently, I recommend having a sewer scope performed.
- CSGB-3 Crawl Space - Green Building:
The crawl space was dry at the time of inspection but I did note signs of a prior moisture condition - see tide line stains on waste pipes at the east side. Mild dampness in the wet weather is pretty normal but there should be no significant standing water or pooling above the vapor barrier. The plastic vapor barrier should never be floating on water.
✒
- Note that this is the side of the building where the grade is sloping toward the building.
- A-3 Attics:
White stains were noted on the roof decking material when viewed from the attic. This indicates the attic has experienced prior condensation problems during the cold weather months. Generally, the way to prevent seasonal condensation in an attic involves a 4-pronged approach:
1. Air seal the ceiling as is feasible to slow air migration from the interior into the attic.
2. Be sure all bath and kitchen fans in the attic are well-sealed and venting to the exterior.
3. Keep indoor relative humidity below 55% during cold-weather months
4. Make sure the roof cavity / attic spaces are correctly ventilated.
Options for handling this include:
- Implement the cheapest and most obvious repairs and monitor during cold weather to make sure the space is staying dry and take additional corrective action only if needed
- Have it further investigated by a mold remediation or building performance contractor.
It is difficult to gauge during a one time inspection the degree to which this is an older or intermittent problem. This makes it difficult to make an accurate recommendation for corrective action as it can take time to determine a practical scope and urgency for repair. For more information about roof condensation problems, please see the attached hot link above. Observations noted during inspection include:
- Mild white discoloration was noted in places. This may not be worth correcting and cold be an older condition. Also note some black staining around nail heads
- This was localized and not too bad.
- A-4 Attics:
Modern condos and apartments use fire separation walls in attics to separate units. These are typically wood-framed walls with sheetrock. This is an older building that does not have a separation wall. This is less safe for fires and can also lead to security issues. Consult with a builder about adding a fire separation to the attic and crawl space as needed.
- U88-12 Unit # 803:
The ceiling in some rooms of this house contains popcorn texture. This product may contain asbestos as many of these products contained asbestos prior to 1978. After 1978, remaining stocks of material containing asbestos were sold and as the product was slowly phased out. Asbestos testing is beyond the scope of this inspection. The health risks posed by this substance are minimal unless the texture becomes friable or air borne. If you wish to remove the popcorn texture or have remodel plans that could involve cutting or removing this sheetrock, asbestos testing is recommended. Consult with an environmental lab for more information on asbestos testing. One option is always to sheetrock over this texture if you wish to have a different ceiling finish.
- U89-22 Unit # 805:
The ceiling in some rooms of this house contains popcorn texture. This product may contain asbestos as many of these products contained asbestos prior to 1978. After 1978, remaining stocks of material containing asbestos were sold and as the product was slowly phased out. Asbestos testing is beyond the scope of this inspection. The health risks posed by this substance are minimal unless the texture becomes friable or air borne. If you wish to remove the popcorn texture or have remodel plans that could involve cutting or removing this sheetrock, asbestos testing is recommended. Consult with an environmental lab for more information on asbestos testing. One option is always to sheetrock over this texture if you wish to have a different ceiling finish.
- U810-13 Unit # 807:
The ceiling in some rooms of this house contains popcorn texture. This product may contain asbestos as many of these products contained asbestos prior to 1978. After 1978, remaining stocks of material containing asbestos were sold and as the product was slowly phased out. Asbestos testing is beyond the scope of this inspection. The health risks posed by this substance are minimal unless the texture becomes friable or air borne. If you wish to remove the popcorn texture or have remodel plans that could involve cutting or removing this sheetrock, asbestos testing is recommended. Consult with an environmental lab for more information on asbestos testing. One option is always to sheetrock over this texture if you wish to have a different ceiling finish.
- U812-13 Unit # 813:
The ceiling in some rooms of this house contains popcorn texture. This product may contain asbestos as many of these products contained asbestos prior to 1978. After 1978, remaining stocks of material containing asbestos were sold and as the product was slowly phased out. Asbestos testing is beyond the scope of this inspection. The health risks posed by this substance are minimal unless the texture becomes friable or air borne. If you wish to remove the popcorn texture or have remodel plans that could involve cutting or removing this sheetrock, asbestos testing is recommended. Consult with an environmental lab for more information on asbestos testing. One option is always to sheetrock over this texture if you wish to have a different ceiling finish.
- U813-20 Unit # 815:
The ceiling in some rooms of this house contains popcorn texture. This product may contain asbestos as many of these products contained asbestos prior to 1978. After 1978, remaining stocks of material containing asbestos were sold and as the product was slowly phased out. Asbestos testing is beyond the scope of this inspection. The health risks posed by this substance are minimal unless the texture becomes friable or air borne. If you wish to remove the popcorn texture or have remodel plans that could involve cutting or removing this sheetrock, asbestos testing is recommended. Consult with an environmental lab for more information on asbestos testing. One option is always to sheetrock over this texture if you wish to have a different ceiling finish.
- U814-19 Unit # 817:
The ceiling in some rooms of this house contains popcorn texture. This product may contain asbestos as many of these products contained asbestos prior to 1978. After 1978, remaining stocks of material containing asbestos were sold and as the product was slowly phased out. Asbestos testing is beyond the scope of this inspection. The health risks posed by this substance are minimal unless the texture becomes friable or air borne. If you wish to remove the popcorn texture or have remodel plans that could involve cutting or removing this sheetrock, asbestos testing is recommended. Consult with an environmental lab for more information on asbestos testing. One option is always to sheetrock over this texture if you wish to have a different ceiling finish.
Items for Monitoring
- G1-4 Grounds:
Corrugated storm drain pipe appears to be used for sub-surface drainage work to divert roof runoff away from the building. This product is prone to failure as it is susceptible to crushing and clogging. No evidence was found during inspection that these drains are backing up and require repair. Monitor during heavy rains to ensure roof runoff is being reliably carried away from the structure.
- U814-7 Unit # 817:
This water heater is likely close to the end of its useful service life. The average life of a water heater is statistically 8-12 years though in practice, they can vary widely between 8-20 years depending on water quality and maintenance schedule such as frequency of flushing the tank and replacing sacrificial anodes. Budget to replace this water heater at any time. Water was hot at the time of inspection.
Improve Or Upgrade Items
- GC-1 General Comments:
Electric Baseboard Heaters: These units have electric baseboard heaters installed. These can get very hot during operation. Be sure to keep all drapes, curtains, furniture, electric cords and other flammable items away from these heaters when they are on. Also be careful with small children to avoid a burn hazard. Consider upgrading to a wall mounted forced air electric heater - these are a bit safer - see for example inexpensive models made by King. Or even nicer electric ceramic heaters can be found made by Convect Air.
The baseboard heaters were not tested during inspection and this poses a safety risk. Almost every unit had heaters with belongings in contact with the heaters.
The Ductless Heat Pumps: Currently the units have nice ductless heat pump systems. There were tested during inspection and are in generally above average condition with a few dirty filters. It would be interesting to know if tenants are even using the electric baseboard heaters any more? Perhaps they could be disabled?
- GC-6 General Comments:
I would consider upgrading exterior receptacle covers to modern in use covers for improved safety.
- CSYB-3 Crawl Space - Yellow Building:
No positive connections were noted connecting the posts to the footings in the floor frame of the house. This is a standard practice in older construction, but makes the home more susceptible to seismic damage. Positive connections are recommended. Hire a general contractor to further evaluate and improve.
- CSGB-2 Crawl Space - Green Building:
No positive connections were noted connecting the posts to the beams or the posts to the footings in the frame of the house. This is a standard practice in older construction, but makes the home more susceptible to seismic damage. Positive connections are recommended for improved seismic protection.
- U8-1 Unit # 801:
This building is under-wired by modern standards, which means the wiring system may not respond well to modern electrical demands. This can present safety issues as it tends to encourage overloading of circuits and use of power strips and extension cords. This can also be inconvenient - think two prong receptacles. I recommend hiring a licensed electrician to further evaluate the wiring in this building and add circuits as needed for improved safety, reliability and convenience. Consider adding more circuits for the kitchen, office and media areas in particular. The scope and extent of updating the wiring is subjective and depends on desires and expectations for the wiring system. Examples of some of the guidelines for minimum wiring standards in modern houses include:
- No point along a wall in habitable rooms should be more than 6-feet from an electric receptacle
- No point along kitchen countertops should be more than 2-feet from an electric receptacle
- Two 20-amp circuits for the kitchen receptacles
- One 20-amp circuit for the laundry receptacles
- One 20-amp circuit for the bathroom receptacles
- One separate, individual branch circuit for central heating equipment
- An electric receptacle should be provided for the exterior of the house at both the front and the back of the house
- U8-15 Unit # 801:
A moisture alarm with water shut-off features is recommended under the washing machine to protect against accidental leaks in the supply hoses. Pans can be effective when there is a drain, but even these will not protect against a burst supply connector. A moisture alarm with automatic shut-off will. Watts is a brand I have seen installed: Link.
- U88-1 Unit # 803:
This building is under-wired by modern standards, which means the wiring system may not respond well to modern electrical demands. This can present safety issues as it tends to encourage overloading of circuits and use of power strips and extension cords. This can also be inconvenient - think two prong receptacles. I recommend hiring a licensed electrician to further evaluate the wiring in this building and add circuits as needed for improved safety, reliability and convenience. Consider adding more circuits for the kitchen, office and media areas in particular. The scope and extent of updating the wiring is subjective and depends on desires and expectations for the wiring system. Examples of some of the guidelines for minimum wiring standards in modern houses include:
- No point along a wall in habitable rooms should be more than 6-feet from an electric receptacle
- No point along kitchen countertops should be more than 2-feet from an electric receptacle
- Two 20-amp circuits for the kitchen receptacles
- One 20-amp circuit for the laundry receptacles
- One 20-amp circuit for the bathroom receptacles
- One separate, individual branch circuit for central heating equipment
- An electric receptacle should be provided for the exterior of the house at both the front and the back of the house
- U88-15 Unit # 803:
A moisture alarm with water shut-off features is recommended under the washing machine to protect against accidental leaks in the supply hoses. Pans can be effective when there is a drain, but even these will not protect against a burst supply connector. A moisture alarm with automatic shut-off will. Watts is a brand I have seen installed: Link.
- U89-2 Unit # 805:
This building is under-wired by modern standards, which means the wiring system may not respond well to modern electrical demands. This can present safety issues as it tends to encourage overloading of circuits and use of power strips and extension cords. This can also be inconvenient - think two prong receptacles. I recommend hiring a licensed electrician to further evaluate the wiring in this building and add circuits as needed for improved safety, reliability and convenience. Consider adding more circuits for the kitchen, office and media areas in particular. The scope and extent of updating the wiring is subjective and depends on desires and expectations for the wiring system. Examples of some of the guidelines for minimum wiring standards in modern houses include:
- No point along a wall in habitable rooms should be more than 6-feet from an electric receptacle
- No point along kitchen countertops should be more than 2-feet from an electric receptacle
- Two 20-amp circuits for the kitchen receptacles
- One 20-amp circuit for the laundry receptacles
- One 20-amp circuit for the bathroom receptacles
- One separate, individual branch circuit for central heating equipment
- An electric receptacle should be provided for the exterior of the house at both the front and the back of the house
- U89-24 Unit # 805:
A moisture alarm with water shut-off features is recommended under the washing machine to protect against accidental leaks in the supply hoses. Pans can be effective when there is a drain, but even these will not protect against a burst supply connector. A moisture alarm with automatic shut-off will. Watts is a brand I have seen installed: Link.
- U810-2 Unit # 807:
This building is under-wired by modern standards, which means the wiring system may not respond well to modern electrical demands. This can present safety issues as it tends to encourage overloading of circuits and use of power strips and extension cords. This can also be inconvenient - think two prong receptacles. I recommend hiring a licensed electrician to further evaluate the wiring in this building and add circuits as needed for improved safety, reliability and convenience. Consider adding more circuits for the kitchen, office and media areas in particular. The scope and extent of updating the wiring is subjective and depends on desires and expectations for the wiring system. Examples of some of the guidelines for minimum wiring standards in modern houses include:
- No point along a wall in habitable rooms should be more than 6-feet from an electric receptacle
- No point along kitchen countertops should be more than 2-feet from an electric receptacle
- Two 20-amp circuits for the kitchen receptacles
- One 20-amp circuit for the laundry receptacles
- One 20-amp circuit for the bathroom receptacles
- One separate, individual branch circuit for central heating equipment
- An electric receptacle should be provided for the exterior of the house at both the front and the back of the house
- U810-14 Unit # 807:
A moisture alarm with water shut-off features is recommended under the washing machine to protect against accidental leaks in the supply hoses. Pans can be effective when there is a drain, but even these will not protect against a burst supply connector. A moisture alarm with automatic shut-off will. Watts is a brand I have seen installed: Link.
- U811-19 Unit # 811:
An older fan was noted in the laundry room.
- U811-21 Unit # 811:
A moisture alarm with water shut-off features is recommended under the washing machine to protect against accidental leaks in the supply hoses. Pans can be effective when there is a drain, but even these will not protect against a burst supply connector. A moisture alarm with automatic shut-off will. Watts is a brand I have seen installed: Link.
- U812-2 Unit # 813:
This building is under-wired by modern standards, which means the wiring system may not respond well to modern electrical demands. This can present safety issues as it tends to encourage overloading of circuits and use of power strips and extension cords. This can also be inconvenient - think two prong receptacles. I recommend hiring a licensed electrician to further evaluate the wiring in this building and add circuits as needed for improved safety, reliability and convenience. Consider adding more circuits for the kitchen, office and media areas in particular. The scope and extent of updating the wiring is subjective and depends on desires and expectations for the wiring system. Examples of some of the guidelines for minimum wiring standards in modern houses include:
- No point along a wall in habitable rooms should be more than 6-feet from an electric receptacle
- No point along kitchen countertops should be more than 2-feet from an electric receptacle
- Two 20-amp circuits for the kitchen receptacles
- One 20-amp circuit for the laundry receptacles
- One 20-amp circuit for the bathroom receptacles
- One separate, individual branch circuit for central heating equipment
- An electric receptacle should be provided for the exterior of the house at both the front and the back of the house
- U812-16 Unit # 813:
A moisture alarm with water shut-off features is recommended under the washing machine to protect against accidental leaks in the supply hoses. Pans can be effective when there is a drain, but even these will not protect against a burst supply connector. A moisture alarm with automatic shut-off will. Watts is a brand I have seen installed: Link.
- U813-2 Unit # 815:
This building is under-wired by modern standards, which means the wiring system may not respond well to modern electrical demands. This can present safety issues as it tends to encourage overloading of circuits and use of power strips and extension cords. This can also be inconvenient - think two prong receptacles. I recommend hiring a licensed electrician to further evaluate the wiring in this building and add circuits as needed for improved safety, reliability and convenience. Consider adding more circuits for the kitchen, office and media areas in particular. The scope and extent of updating the wiring is subjective and depends on desires and expectations for the wiring system. Examples of some of the guidelines for minimum wiring standards in modern houses include:
- No point along a wall in habitable rooms should be more than 6-feet from an electric receptacle
- No point along kitchen countertops should be more than 2-feet from an electric receptacle
- Two 20-amp circuits for the kitchen receptacles
- One 20-amp circuit for the laundry receptacles
- One 20-amp circuit for the bathroom receptacles
- One separate, individual branch circuit for central heating equipment
- An electric receptacle should be provided for the exterior of the house at both the front and the back of the house
- U813-22 Unit # 815:
A moisture alarm with water shut-off features is recommended under the washing machine to protect against accidental leaks in the supply hoses. Pans can be effective when there is a drain, but even these will not protect against a burst supply connector. A moisture alarm with automatic shut-off will. Watts is a brand I have seen installed: Link.
- U814-2 Unit # 817:
This building is under-wired by modern standards, which means the wiring system may not respond well to modern electrical demands. This can present safety issues as it tends to encourage overloading of circuits and use of power strips and extension cords. This can also be inconvenient - think two prong receptacles. I recommend hiring a licensed electrician to further evaluate the wiring in this building and add circuits as needed for improved safety, reliability and convenience. Consider adding more circuits for the kitchen, office and media areas in particular. The scope and extent of updating the wiring is subjective and depends on desires and expectations for the wiring system. Examples of some of the guidelines for minimum wiring standards in modern houses include:
- No point along a wall in habitable rooms should be more than 6-feet from an electric receptacle
- No point along kitchen countertops should be more than 2-feet from an electric receptacle
- Two 20-amp circuits for the kitchen receptacles
- One 20-amp circuit for the laundry receptacles
- One 20-amp circuit for the bathroom receptacles
- One separate, individual branch circuit for central heating equipment
- An electric receptacle should be provided for the exterior of the house at both the front and the back of the house
- U814-20 Unit # 817:
A moisture alarm with water shut-off features is recommended under the washing machine to protect against accidental leaks in the supply hoses. Pans can be effective when there is a drain, but even these will not protect against a burst supply connector. A moisture alarm with automatic shut-off will. Watts is a brand I have seen installed: Link.
📃 The Complete Inspection Report
Grounds
Drainage and Site
Driveways/Walkways/Flatwork
Window and Stairwells
Grounds, Trees and Vegetation
Retaining Walls
Exterior Stairs - Both Units
Fences
Outbuildings, Trellises, Storage Sheds, Barns
Exterior Siding, Doors and Windows
Exterior Elevations
Siding and Trim
Eaves
Exterior Doors
Exterior Window Frames
Decks, Porches and Balconies
Wood Decks Porches and Balconies
Concrete Decks, Stoops, Landings and Porches
Water-Resistant Decks and Balconies
Roof, Chimney and Gutters
Roof Materials Blue Building
Roof Materials Yellow Building
Chimneys
Skylights
Gutters and Downspouts
Electric Service
Electric Service Voltage Tested
Electric Service
Electric Service Equipment
Electrical Grounding System
Electrical Bonding System
Crawl Space - Yellow Building
General Crawl Space
Crawl Space Access
Vapor Barrier
Crawl Space Ventilation
Posts and Footings
Insulation
Moisture Conditions
Crawl Space - Green Building
General Crawl Space
Crawl Space Access
Vapor Barrier
Crawl Space Ventilation
Posts and Footings
Insulation
Moisture Conditions
Attics
Attic Access
Roof Framing and Sheathing
Fire Separation
Attic Insulation
Attic Fan Exhaust Vents
Attic and Roof Cavity Ventilation
Unit # 801
Sub Panel
Branch Wiring
Receptacles and Fixtures
Smoke and Carbon Monoxide Alarm Systems
Water Heater
Bathroom
Kitchen
Heating System
Cooling Systems and Heat Pumps
Interior Finishes
Washer
Dryer
Unit # 803
Sub Panel
Branch Wiring
Receptacles and Fixtures
Smoke and Carbon Monoxide Alarm Systems
Water Heater
Bathroom
Kitchen
Heating System
Cooling Systems and Heat Pumps
Interior Finishes
Washer
Dryer
Unit # 805
Sub Panel
Branch Wiring
Receptacles and Fixtures
Smoke and Carbon Monoxide Alarm Systems
Water Heater
Bathroom
Kitchen
Heating System
Cooling Systems and Heat Pumps
Interior Finishes
Washer
Dryer
Unit # 807
Sub Panel
Branch Wiring
Receptacles and Fixtures
Smoke and Carbon Monoxide Alarm Systems
Water Heater
Bathroom
Kitchen
Heating System
Cooling Systems and Heat Pumps
Interior Finishes
Washer
Dryer
Unit # 811
Sub Panel
Branch Wiring
Receptacles and Fixtures
Smoke and Carbon Monoxide Alarm Systems
Water Heater
Bathroom
Kitchen
Heating System
Cooling Systems and Heat Pumps
Interior Finishes
Washer
Dryer
Unit # 813
Sub Panel
Branch Wiring
Receptacles and Fixtures
Smoke and Carbon Monoxide Alarm Systems
Water Heater
Bathroom
Kitchen
Heating System
Cooling Systems and Heat Pumps
Interior Finishes
Washer
Dryer
General Comments
Building Characteristics, Conditions and Limitations
Type of Building : 2 four-plex buildings
Approximate Year of Original Construction: 1977
Unless the wiring in the building has been fully updated, this building likely has wiring that predates the late 1980's. Branch circuit wiring installed in buildings built prior to the late 1980s is typically rated for a maximum temperature of only 60 degrees Celsius. This includes non-metallic sheathed (Romex) wiring, and both BX and AC metal-clad flexible wiring. Knob and tube wiring, typically installed in homes built prior to 1950, may be rated for even lower maximum temperatures. Newer electric fixtures including lighting and fans typically require wiring rated for 90 degrees Celsius. Connecting newer fixtures to older, 60-degree-rated wiring is a potential fire hazard. Repairs for such conditions may involve replacing the last few feet of wiring to newer fixtures with new 90-degree-rated wire, and installing a junction box to join the old and new wiring. It is beyond the scope of this inspection to determine if any such incompatible components are installed. Based on the age of this building, be aware that such components may be present.
In 1978, federal laws were passed to prohibit use of lead and asbestos in building materials. Manufacturers of building materials were allowed to sell existing stocks of materials that were manufactured with lead and asbestos, so even buildings constructed as late as the mid-1980's could possibly contain lead or asbestos. Identification and testing for lead and asbestos and other environmental testing is beyond the scope of this home inspection. If you wish to seek additional information, I recommend contacting an environmental lab or industrial hygienist.
Solid conductor aluminum wiring was used in residential construction for 15 and 20-amp circuits in the 1960's through the 1970's. This wiring has proven to be problematic and a fire hazard, primarily due to problems with loose connections and metal fatigue. I looked hard to find any signs of solid conductor aluminum here. No signs were found. There is always a chance that solid conductor aluminum wiring exists and is concealed from view. If this wiring is ever uncovered during subsequent renovation work, I recommend removal and replacement.
Attending the Inspection: Adam Matschek
Occupancy: Occupied
Animals Present: Yes
Weather during the inspection: Clear, Dry
Approximate temperature during the inspection: Below 65[F]
Ground/Soil surface conditions: Dry
For the Purposes of This Report, the Front Door Faces: North - green building, East - yellow building
The TPRV (water heater relief valves) in this building could not be seen discharging anywhere. It is possible they discharge into the crawl space. The discharge for these water heaters should be to a visible location that can be safely monitored. I recommend verifying where these are terminating and relocate if needed. Typically these would discharge to the exterior.
Electric panel labeling is generally poor. There are not many circuits here so one can make educated guesses. Developing a plan for improving the circuit labeling off all units would be an excellent safety improvement. This could also be done in conjunction with adding more wiring. There should be disposer and dishwasher circuits in the kitchens that may be able to be used to at least add a dedicated microwave circuit.

Electrical Bonding Connections: I noted that electrical bonding connections were loose at water pipes by the water heater. I would develop a protocol for checking and securing these to ensure reliable performance. I have noted in the unit chapters where loose connections were found.
 |  |
Dryer Exhaust Terminations: In general, with dryer exhaust vents, I recommend using covers with backdraft dampers and avoid using screens. Screens will get clogged and trap lint.

A number of units seem to have water shut offs located next to the water heaters. These may be an older main water shut off. It is not clear how the building is plumbed but it seems that exterior shut offs have been added, perhaps making these redundant. The one shown below has been updated to a ball valve. Most of them are older and less reliable gate valves.

Electric Baseboard Heaters: These units have electric baseboard heaters installed. These can get very hot during operation. Be sure to keep all drapes, curtains, furniture, electric cords and other flammable items away from these heaters when they are on. Also be careful with small children to avoid a burn hazard. Consider upgrading to a wall mounted forced air electric heater - these are a bit safer - see for example inexpensive models made by King. Or even nicer electric ceramic heaters can be found made by Convect Air.
The baseboard heaters were not tested during inspection and this poses a safety risk. Almost every unit had heaters with belongings in contact with the heaters.
The Ductless Heat Pumps: Currently the units have nice ductless heat pump systems. There were tested during inspection and are in generally above average condition with a few dirty filters. It would be interesting to know if tenants are even using the electric baseboard heaters any more? Perhaps they could be disabled?

 |
I would consider upgrading exterior receptacle covers to modern in use covers for improved safety.

This home was occupied at the time of the inspection. Inspection of occupied homes presents some challenges as occupant belongings can obstruct visual inspection of and access to parts of the building. We do our best during inspection to work around belongings to discover as much as possible about the house without moving or damaging personal property, however, the presence of personal items does limit the inspection.
Grounds
Drainage and Site
Clearance to Grade: Non-standard, Siding Too Close to Soils - Repair
Downspout Discharge: Below grade
Site Description: Moderate slope, Grade Toward Building
Eliminate wood /soil contact to reduce the chances for rot and pest damage and repair any hidden rot as needed. Generally, a 6-inch clearance between soils and wood is recommended. This is often not realistic on older homes, but repairs should be made to get as much clearance as is possible and all contact with the soils should be eliminated.


 |
The grade of the yard is sloping toward the building. Standards recommend a quarter inch / foot slope away from the building or better to prevent water draining toward the house. Over time, negative grading, as this is often called, can lead to moisture and even structural problems with the house. Have this repaired as feasible by a qualified contractor. Often, a swale is used to create a low point away from the house into which water can be diverted away from and around the building.

.jpg) |  |  |
 |
The aluminum downspout is terminating below ground - NE corner of the yellow building. This should be corrected as the storm drain pipe should be run above ground level to prevent the pipe from becoming obstructed by soils and organic debris and to prevent corrosion at the end of the downspout.

Corrugated storm drain pipe appears to be used for sub-surface drainage work to divert roof runoff away from the building. This product is prone to failure as it is susceptible to crushing and clogging. No evidence was found during inspection that these drains are backing up and require repair. Monitor during heavy rains to ensure roof runoff is being reliably carried away from the structure.

Driveways/Walkways/Flatwork
Driveway: Asphalt
Walkways: Concrete, Asphalt
Patios: Concrete
The asphalt walkway flatwork is being damaged by mature tree roots - see outside the yellow building - east side. This has created an un-level surface that can be a trip hazard. Repair can be complicated as the tree grows and long term proper repair may necessitate removal of the trees in question as well as repair of the flatwork. Repair as needed and is cost effective and use caution on this walking surface.

 |
The curb material near the entrance to the green building is damaged. If repairing this, consider also how drainage is performing here as this curb could help to deflect water away from the building.

Window and Stairwells
None Noted
Grounds, Trees and Vegetation
Trees/Vegetation too near building: Yes - Prune Vegetation off House, Arborist Recommended
Pruning trees, branches and vegetation away from the house is recommended. Where trees, branches and large shrubs can provide rodent access to the roof, a minimum 6-foot clearance is recommended as many rodents can jump 6-feet. All vegetation, including smaller landscaping such as grasses, flowers and shrubs should be kept 1-foot off the house to eliminate contact which could trap moisture against the building.

An arborist should be hired to further evaluate the large trees on the property and prune or remove them as recommended. Whenever large trees are located near a house, a higher level of maintenance should be expected to keep trees safe and healthy, eliminate the risks of damage to the home or building materials from falling limbs, and eliminate rodent entry points. With larger trees such as firs, pruning is recommended to reduce the sail effect and reduce strain on these tress during high winds. If an arborist has not been out in the last few years, I recommend a new consultation.

Retaining Walls
Retaining Wall Material: None Noted
The railroad ties used for garden planter perimeters are rotting, creating a condition conducive to wood destroying insects - see east side. Removal is recommended to eliminate a condition conducive to wood destroying organisms.
 |  |
Exterior Stairs - Both Units
Exterior Stairs: Non-standard
Overall, repairs are needed to the exterior garage stairs to ensure safe and reliable performance. I recommend additional inspection of the stairs by a qualified general contractor. Implement repairs as recommended for safety. This should be considered a priority for safety reasons.
Examples of observations noted during inspection include:
- Handrail ends do not return into the wall - this can allow clothing or accessories to catch on the handrail
- Openings between stair risers exceed 4-inches. This can pose a safety hazard for small children


 | ||
 |
Fences
Exterior Fencing: None noted
Outbuildings, Trellises, Storage Sheds, Barns
Bike shed
Exterior Siding, Doors and Windows
Exterior Elevations
The exterior envelopes of these two buildings require some urgent repair. Both decks are in below average and unsafe condition and require replacement as soon as possible. In addition the south face and west face of the green building and the south face of the yellow building need to be resided as soon as possible. I would expect concealed water damage on the south face of the yellow building.
Siding and Trim
Trim Material: Wood
Siding Material: Plywood
The exterior siding system here is in poor condition, especially where exposed to the weather. Funds should be reserved for extensive siding repairs in the near term and I would expect some concealed water damage in places. I would loosely plan on re-siding the south and west faces of the green building as well as the south face of the yellow building. Hire a qualified general contractor further evaluate and re[pair the exterior siding system as needed. Examples of observations noted during inspection include:
- Missing cedar shingles noted on the south side of the yellow building
- Siding is split and vulnerable to water damage on exposed sides of the yellow building.
- Siding is split and vulnerable to water damage on exposed sides of the yellow building
- The siding at the southwest corner of the green building and below the south deck is likely to have concealed water damage.
- Damaged cedar shingle siding on exposed portions of the green building.


 | ||
 |  | |
 |  | |
 |  | |
 |  |
Loose electrical conduit was noted on the west side. Secure as needed for proper support and to protect from physical damage.

Eaves
Open rafters
Exterior Doors
Exterior Door Styles: Solid core
Exterior Window Frames
Window Frames: Metal
Decks, Porches and Balconies
Wood Decks Porches and Balconies
Present
To see a prescriptive guide for residential wood deck construction click this link:
Structure: Ground contact treated lumber
Ledger Board: Non-standard
Guardrail: Non-standard
Decking Material: Softwood
This house has cedar softwood decking installed. The recommended maintenance of this type of decking is annual cleaning and staining with transparent or semi-transparent deck stain. It is common to use decking paints when the decking is older and in the last phase of its useful life, however, painting is not recommended as this can trap moisture in the wood, facilitate wood decay and lead to higher maintenance costs when prepping peeling paint. Annual cleaning and sealing is important to prevent the deck from becoming slippery and unsafe, especially as pollen organic growth accumulate on the decking.
Posts, Beams and Footings: Inspected
Visual inspection of the decking systems indicated the need for rebuilding. There are two decks here, one for each building. I recommend consulting with a qualified general contractor about options for re-building the decking systems here. Repairs or removal should be done as soon as possible and I would consider prohibiting access to these decks as they are damaged and in exceptionally poor condition. There is a risk of collapse under live loads. Examples of specific observations noted during inspection include:
- Deck guardrails are now required to have posts every 6 feet and can no longer be all balusters.
- Significant wood decay in the deck ledger board - I would expect concealed water damage especially below the green building deck.
- The decay in the ledger is at risk of failure due to extensive wood decay.
- Badly damaged posts at the base of the yellow deck - this risks deck failure
- Wood decay developing in the west beam - yellow deck
- The saddle fitting is damaged to the base of the post at the yellow building deck
- No lateral load connections for deck to building
- Wood decaying in the decking of the yellow deck
- Blocking is missing at the joist to beam connection - these are recommended for sheer strength.


 | ||
 |  |  |
 | ||
 | ||
 |
Concrete Decks, Stoops, Landings and Porches
Concrete Structure: Concrete entry
Water-Resistant Decks and Balconies
Water Proof Surfaces: None Noted
Roof, Chimney and Gutters
Roof Materials Blue Building
Method of Roof Inspection: Walked on roof
Roof Style: Gable, Hip
Roof Covering Materials: Architectural grade composition shingle
Approximate Age of Roof Covering: 20-25 Years
Overlay Roof: No
Shingle Fastening Accessible For Inspection : No
Please note that when inspecting composition roof installations, I try and look under shingles to see how the shingles have been fastened. Proper fastening is critical for successful roof performance. Often the shingles are bonding so well, they cannot be lifted to inspect the fastening. In this case, I was unable to lift the shingles and see the fastening pattern - they are bonded well and I do not use a flat bar to pry them apart as part of a visual inspection unless there is a reason to start chasing visible leaks. While this limits my visual inspection, this is a good sign, as loose, un-bonded shingles can lead to wind damage and would be written up as a defect.
This roof is done in an architectural grade composition shingle. The roof looks to be close to the end of its useful service life and localized areas of failure were noted. Roof replacement can be more cost-effective than repairs depending on the scope, cost and urgency of needed repairs.
Recommendation:
Hire a qualified roofing contractor to further evaluate this roof and repair or replace as recommended. Examples of specific observations noted during inspection include:
- Buckling noted in the roofing at the north side
- Damaged roofing shingles noted on the north side. I suspect there are at least 15 or 20 damage shingles.
- Poor slope was noted where the gable roof meets the hip roof
- Physical damage noted at the South side shingles, possibly from pressure washing
- Clean wasps nests from the roof vents
- Roof patching noted on the south side
- The plumbing vent flashings are deteriorated and possibly leaking at the blue building
- Nail pops noted on the south face of the blue building roof


 | ||
 |  |  |
 |  | |
 | ||
 |  | |
 |
Roof Materials Yellow Building
Method of Roof Inspection: Walked on roof
Roof Style: Gable
Roof Covering Materials: Architectural grade composition shingle
Approximate Age of Roof Covering: 15-20 Years
Overlay Roof: No
Shingle Fastening Accessible For Inspection : No
Please note that when inspecting composition roof installations, I try and look under shingles to see how the shingles have been fastened. Proper fastening is critical for successful roof performance. Often the shingles are bonding so well, they cannot be lifted to inspect the fastening. In this case, I was unable to lift the shingles and see the fastening pattern - they are bonded well and I do not use a flat bar to pry them apart as part of a visual inspection unless there is a reason to start chasing visible leaks. While this limits my visual inspection, this is a good sign, as loose, un-bonded shingles can lead to wind damage and would be written up as a defect.
This roof is done in an architectural grade composition shingle. The roof looks to be close to the end of its useful service life and localized areas of failure were noted. Roof replacement can be more cost-effective than repairs depending on the scope, cost and urgency of needed repairs.
Recommendation:
Hire a qualified roofing contractor to further evaluate this roof and repair or replace as recommended. Examples of specific observations noted during inspection include:
- The drip edge flashing is falling out on the north side of the yellow building
- Plumbing vent flashings are deteriorating. This is from the north side of the yellow building
- A poorly sloped section of roof was noted at the northeast corner
- Several damaged shingles were noted at the north side of the yellow roof
- Nail pops were noted at the southeast ridge shingles.
- Damaged roofing shingles noted at the south end of the yellow building


 | ||
 | ||
 |  |  |
 |  |  |
 |  | |
 |  | |
 |  | |
 |  |  |
 |  |  |
 |  |


Chimneys
None noted
Skylights
None noted
Gutters and Downspouts
Gutter and Downspout Materials: Seamless Aluminum
The gutters are old and dented, damaged and leaking. I would plan of the need for constant repairs to the gutters and downspouts until updated. The logical time to updates gutters and downspouts if after re-roofing.


 | ||
 |
Yellow Building: Gutters were noted to be clean at the time of inspection. Be sure to clean gutters quarterly to ensure they are performing as intended.
 |  |
Electric Service
Electric Service Voltage Tested
Service Voltage: 120/240 - With Testing Note
I tested the voltage at the electric panel today. It tested in a normal range of 235-245 volts. Most residential construction is listed as 120/240 volts. Slight fluctuation is normal.

Electric Service
Service Entrance: Below Ground
Meter Base Amperage: 5 @ 125 amps
Electric Service Equipment
Each building has an electrical service of 5 meters at 125 amps each. The main disconnect is at the exterior by the meters. each panel inside the units is a sub panel.
 |  |
Electrical Grounding System
Present - Could Not Confirm
During a home or property inspection, every effort is made to inspect the visible components of the electrical system grounding. The grounding system is critical for safely discharging electrical surges, especially in the case of lightning strikes. There is no way in the context of a home inspection to verify the "effectiveness" of the grounding system as much of the system is not visible, and there are no practical tests one can perform in the way we can test a furnace or a plumbing fixture. However, many things can lead me to recommend further evaluation of the grounding system by a licensed electrical contractor and they will be documented in the observations below if discovered.
Have the electrical earthing system checked by a licensed electrician. The grounding rods noted during visual inspection were not fully driven - these should be driven all the way into the ground. The earthing system is an important safety feature which is a designed electrical path to dissipate a static discharge voltage (such as Lightning) to earth. General standards are to have two grounding rods at least 6 feet apart if there is not a UFER ground employed.

Electrical Bonding System
Present - Could Not Confirm, Bonding Noted on Water Pipes
During the inspection, I attempt to visually document electrical system bonding. There is no way in the context of a home inspection to verify the "effectiveness" of system bonding. All metallic systems in the building are required to be "bonded" (connected) to the the building's electrical grounding system. Bonding creates a pathway to shunt static charges (that would otherwise build up on the system) to earth, and to provide a pathway to trip a breaker in the event that these bonded metallic components became energized. There are many things that can lead me to recommend further evaluation of this system by a licensed electrical contractor and they will be documented as repair items in the observations below if discovered.
Bonding connections were noted on the water pipes.

Plumbing
Water Service Supply
Pipe Material: Unknown
Water Supply: Public water
Water Pressure: Water Pressure Tested, 65 PSI
This shows the water pressure tested during inspection. Generally, "normal water pressure," should be between 30-80 PSI, though pressures near or below 30 can result in poor functional flow to fixtures. Water pressures in excess of 80 PSI risk damaging supply piping components and should be controlled with a pressure reducing valve.

Pressure Reducing Valve: None noted
Main Water Shut-off Location: Water Shut Off Location Noted
It appears that main water shut offs have been located at the exteriors in he ground.
 |  |  |
Distribution Pipe
Pipe Insulation: Present, Not visible
The visible portions of the supply piping appear to be insulated. However, prior to freezing weather it is always a good idea to check pipes and hose bibs for adequate insulation and freeze protection to protect pipes from cold weather and freezing conditions. Hose bibs can often be winterized prior to cold weather.
Supply Pipe Materials: Copper, Not visible
Copper water supply pipes were installed. Copper pipes installed prior to the late 1980's may be joined with solder that contains lead, which is a known health hazard especially for children. Laws were passed in 1985 prohibiting the use of lead in solder, but prior to that solder normally contained approximately 50% lead. Note that testing for toxic materials such as lead, is beyond the scope of this inspection. Consider having a qualified lab test for lead, and if necessary take steps to reduce or remove lead from the water supply. Various solutions include:
- Flush water taps or faucets. Do not drink water that has been sitting in the plumbing lines for more than 6 hours
- Install appropriate filters at points of use
- Use only cold water for cooking and drinking, as hot water dissolves lead more quickly than cold water
- Treat well water to make it less corrosive
- Have a qualified plumber replace supply pipes and/or plumbing components as necessary
Please note that the supply pipes are concealed behind insulation and finishes are were not visible to inspection. Determination of the supply piping materials used here is an educated guess based on the materials that were visible coming out of the wall and below fixtures.
Functional Flow: Average
Circulation Pump: None Noted
Waste Pipe and Discharge
Discharge Type: Public Sewer - Buyer
Waste and Vent Pipe Materials: ABS plastic
Location of Sewer Cleanout: Side Yard
This shows the location of the sewer cleanout found during inspection - side yard. 📸
A video camera sewer scope is recommended. An evaluation of the sewer line below the ground is beyond the scope of this inspection. Due to the age and location of the building, a sewer scope is recommended to further evaluate the sewer line and the below ground connections between the house and the municipal sewer line. Sewer scopes are done using video cameras and can reveal the materials, condition and reliability of the sewer line. If that has been done recently, I recommend having a sewer scope performed.


Exterior Hose Bibs
Operating
Irrigation
Hoses and Timers Noted - Inquire
There seems to be some hoses used for irrigation. I did not see a more permanent in-ground irrigation system. Inspection of irrigation systems is beyond the scope of this inspection. I recommend eliminating these types of permanent hoses to protect against risks of backflow.

 |
Crawl Space - Yellow Building
General Crawl Space
Crawl Space: Present
The photos provided here show representative images of this crawl space at the time of inspection. 801 access point.
 |  |  |
 |  |  |
 |  |  |
 |  |  |
 |  |  |
 |  |  |
Crawl Space Access
Method of Inspection: Crawled
During inspection of the crawl space, every effort is made to inspect the entire space. Visual inspection of crawl spaces is difficult and limited as access is often restricted by pipes, ducts and sub-floor insulation as well as limited clearances.
Vapor Barrier
Vapor Barrier Material: Plastic on earth
Crawl Space Ventilation
Ventilation Method: Exterior wall vents
The openings which provide ventilation for the crawl space are obstructed by organic debris in places. I recommend implementing repairs as needed to ensure vents are unobstructed and be sure the vent openings remain reliably screened with 1/4 inch wire mesh.
*Note: General standards for ventilated crawl spaces prescribe 1 square foot of ventilation for every 150 square feet of crawl space or 1/1500 in combination with an approved class 1 vapor retarder material that covers all exposed soils in the crawl space. Vents should be located to provide adequate cross ventilation. Hire a licensed general contractor to further evaluate and repair.

Posts and Footings
Standard
No positive connections were noted connecting the posts to the footings in the floor frame of the house. This is a standard practice in older construction, but makes the home more susceptible to seismic damage. Positive connections are recommended. Hire a general contractor to further evaluate and improve.

Insulation
Insulation Type: Fiberglass
Approximate R-Value: R-30
Moisture Conditions
No water was visible or present at the time of inspection
Crawl Space - Green Building
General Crawl Space
Crawl Space: Present
Crawl Space Access
Method of Inspection: Crawled
During inspection of the crawl space, every effort is made to inspect the entire space. Visual inspection of crawl spaces is difficult and limited as access is often restricted by pipes, ducts and sub-floor insulation as well as limited clearances.
Vapor Barrier
Vapor Barrier Material: Plastic on earth
Crawl Space Ventilation
Ventilation Method: Exterior wall vents, Blocked Vents (All Purpose Note)
The openings which provide ventilation for the crawl space are obstructed by organic debris in places. I recommend implementing repairs as needed to ensure vents are unobstructed and be sure the vent openings remain reliably screened with 1/4 inch wire mesh.
*Note: General standards for ventilated crawl spaces prescribe 1 square foot of ventilation for every 150 square feet of crawl space or 1/1500 in combination with an approved class 1 vapor retarder material that covers all exposed soils in the crawl space. Vents should be located to provide adequate cross ventilation. Hire a licensed general contractor to further evaluate and repair.
 |  |
Posts and Footings
Standard
No positive connections were noted connecting the posts to the beams or the posts to the footings in the frame of the house. This is a standard practice in older construction, but makes the home more susceptible to seismic damage. Positive connections are recommended for improved seismic protection.

Insulation
Insulation Type: Fiberglass
Approximate R-Value: R-30
Moisture Conditions
No water was visible or present at the time of inspection
The crawl space was dry at the time of inspection but I did note signs of a prior moisture condition - see tide line stains on waste pipes at the east side. Mild dampness in the wet weather is pretty normal but there should be no significant standing water or pooling above the vapor barrier. The plastic vapor barrier should never be floating on water.
✒
- Note that this is the side of the building where the grade is sloping toward the building.
 |  |  |
Attics
Attic Access
Viewed at access
I recommend keeping the attic access hatches locked for improved safety.

I did not crawl the crawl space for the attic where there was no ramp or safe way to access the space. Crawling in the V of trusses or on top of framing risks damaging thermal barriers and ceiling finishes and is not a safe way to access an attic. This limited inspection of this space.

Roof Framing and Sheathing
Rafters: Truss
Sheathing: Plywood, Skip sheathing
White stains were noted on the roof decking material when viewed from the attic. This indicates the attic has experienced prior condensation problems during the cold weather months. Generally, the way to prevent seasonal condensation in an attic involves a 4-pronged approach:
1. Air seal the ceiling as is feasible to slow air migration from the interior into the attic.
2. Be sure all bath and kitchen fans in the attic are well-sealed and venting to the exterior.
3. Keep indoor relative humidity below 55% during cold-weather months
4. Make sure the roof cavity / attic spaces are correctly ventilated.
Options for handling this include:
- Implement the cheapest and most obvious repairs and monitor during cold weather to make sure the space is staying dry and take additional corrective action only if needed
- Have it further investigated by a mold remediation or building performance contractor.
It is difficult to gauge during a one time inspection the degree to which this is an older or intermittent problem. This makes it difficult to make an accurate recommendation for corrective action as it can take time to determine a practical scope and urgency for repair. For more information about roof condensation problems, please see the attached hot link above. Observations noted during inspection include:
- Mild white discoloration was noted in places. This may not be worth correcting and cold be an older condition. Also note some black staining around nail heads
- This was localized and not too bad.
.jpg)

 | ||
 |
Fire Separation
Modern condos and apartments use fire separation walls in attics to separate units. These are typically wood-framed walls with sheetrock. This is an older building that does not have a separation wall. This is less safe for fires and can also lead to security issues. Consult with a builder about adding a fire separation to the attic and crawl space as needed.
 |  |
Attic Insulation
Insulation Type: Cellulose
Approximate Insulation R-Value on Attic Floor: 38
Attic Fan Exhaust Vents
The exhaust ductwork for the kitchen fan is uninsulated in the attic space. This can lead to seasonal condensation problems and is less energy efficient. Replace these exhaust vents with insulated exhaust ducts or insulate to R-8 or better.

Attic and Roof Cavity Ventilation
Attic Ventilation Method: Soffit vents, Roof jack vents
Attic and roof cavity ventilation is a frequently misunderstood element of residential construction. All roof cavities are required to have ventilation. The general default standard is 1 to 150 of the attic area and ideally, this comes from at least 60% lower roof cavity ventilation and 40% upper, but this is a wild over-simplifications of the subject. As a good guiding principle the most important elements for healthy attic spaces, which are traditionally insulated and ventilated are:
- Make sure the ceiling between the living space and the attic is airtight
- Ventilate consistently across the whole lower part of the roof cavity with low, intake soffit venting
- Upper roof cavity venting is less important and if over-installed can exacerbate air migration into the attic from the living space.
- Avoid power ventilators which can depressurize the attic and exacerbate air migration from the house into the attic.
For more information, please see: Link
Structure and Basement
Foundation
% of Foundation Not Visible: 30%
Evidence of Seismic Protection: Some Signs
Building Configuration: Crawl space
Foundation Description: Poured concrete
Floor, Wall and Ceiling Framing
Wall Framing: Not visible
Wall Sheathing: Not visible
Floor Framing: Partly visible, 2x6
Sub-Floor Material: Not visible
Ceiling Framing: Not visible
Moisture ant damage was noted at the north side of the green building. No live ants were found but damaged wood was noted. Visibility of this area is very limited. I suspect this is the base of the stairs where the concrete has been run over the wood frame. This is a risk design that is showing some signs of failure. I recommend having these locations further investigated by a qualified general contractor - see BOTH buildings. Repair as needed to remove damaged materials and ensure reliable moisture control and performance.


 |  | |
 |  | |
 |
Basement
None
Rodents, Pests and Wood Destroying Organisms
Rodents
Some signs
Other Pests
None noted
Wood Destroying Organisms
Visible Evidence of Active Wood Destroying Insects: None noted
Visible Evidence of Inactive Wood Destroying Insects: Present, Moisture Ants
Visible Evidence of Damage from Wood Destroying Insects: None noted, Moisture Ants
Moisture ants are a wood destroying organism that indicate there is a problem with wet wood and moisture control in the building. Moisture ants will often form nests and tunnels and can exacerbate water damage in wood. When dealing with moisture ants, repairs need to be made to eliminate moisture sources and wet wood and repair all hidden damage to the building. Once the source of moisture is removed and all wood is repaired the ants should go away.
.png)
Visible Evidence of Active Wood Decay and Fungi: Present, See WDO Comments in this report
Visible Evidence of Conditions Conducive to Wood Destroying Organisms: Present, See WDO observations in this report
Wood and cellulose debris was noted in the crawl space. This can encourage wood-destroying organisms such as subterranean termites. Removal of all cellulose debris from the crawl space is recommended to eliminate conditions conducive to wood-destroying organisms.

Unit # 801
Sub Panel
Sub Panel: Present
Service Conductor Size: Aluminum, 1/0, 125 amps
Sub Panel Amperage: 125 amps
Sub Panel Location: Kitchen
Sub Panel Manufacturer: Cutler Hammer
Branch Wiring
Wire Material: Copper, Multi-strand Aluminum
Wiring Method: Non-metallic sheathed cable
This building is under-wired by modern standards, which means the wiring system may not respond well to modern electrical demands. This can present safety issues as it tends to encourage overloading of circuits and use of power strips and extension cords. This can also be inconvenient - think two prong receptacles. I recommend hiring a licensed electrician to further evaluate the wiring in this building and add circuits as needed for improved safety, reliability and convenience. Consider adding more circuits for the kitchen, office and media areas in particular. The scope and extent of updating the wiring is subjective and depends on desires and expectations for the wiring system. Examples of some of the guidelines for minimum wiring standards in modern houses include:
- No point along a wall in habitable rooms should be more than 6-feet from an electric receptacle
- No point along kitchen countertops should be more than 2-feet from an electric receptacle
- Two 20-amp circuits for the kitchen receptacles
- One 20-amp circuit for the laundry receptacles
- One 20-amp circuit for the bathroom receptacles
- One separate, individual branch circuit for central heating equipment
- An electric receptacle should be provided for the exterior of the house at both the front and the back of the house


Receptacles and Fixtures
Inspection Method: Representative Testing
A representative number of receptacles and switches were tested during inspection. Any defects found during inspection are noted in this report. Only visible and accessible receptacles and switches were tested during inspection and personal items and furnishings are not moved to access any receptacles or fixtures. Inspection/testing of the electrical system can be challenging. It should be anticipated that not all defects will be discovered and that some issues found may actually not be defects at all. Tools used to verify proper wiring and function can vary wildly in reliability/consistency. The kinds of tools that could be used to confidently analyze the system and its function cannot typically be done in the context of a Standard Home Inspection. I look for indications of issues, based on the age of the home, types of wiring systems used etc, as well as personal experience and by testing with a variety of common tools. Issues identified, will be further discussed with recommendations in the electrical section below.
Electric Receptacles: Three wire receptacles
Smoke and Carbon Monoxide Alarm Systems
CO Alarms: None Noted
The installation of carbon monoxide alarms is recommended for all homes that have fuel burning appliances such as gas or oil furnaces, gas water heaters, gas ovens and cooktops, gas fireplaces and wood stoves. In addition, Washington State law (WAC 51-51-0315) now requires UL 2034 approved carbon monoxide alarms in ALL homes and condominiums being sold in Washington State. The location should be: at least one alarm outside of all sleeping areas and one on each floor of the house. Best practices are to have these alarms hardwired with a battery back-up - though requirements are for the installation to meet manufacturer's specifications. Carbon monoxide is a colorless, odorless gas that can cause sickness, nausea and even death. Alarms have a useful service life of roughly 6 years, so changing them more frequently than smoke alarms is recommended.
Smoke Alarms Noted: In All Bedrooms
Smoke Alarms: One Missing
During the home inspection, I try and test a representative sample of the smoke alarms by using the test button on the alarms. This is NOT an accurate test of the sensor, just a test to see if the unit is powered. For reliability, fire marshals recommended updating smoke alarms every ten years and changing batteries bi-annually. The latest data indicate that we should be using photoelectric technology in our smoke alarms for improved fire detection and reducing problems with false alarms, which can lead to disabling of this critical safety system. Unfortunately, the alarms must be removed to determine if they are photo-electric or ionization types. It is surprisingly complex to accurately test a smoke alarm system and determine the reliability, age, and type of sensor technology used, especially as many homes can have half a dozen or more alarms throughout the house. A complete evaluation of smoke alarms is beyond the scope of this inspection. For optimal fire safety, I recommend taking control of these critical safety devices and learning about how to service and maintain your smoke alarm system to keep the building occupants safe. For more information, please read this link. For more information, please read this link.
The installation of carbon monoxide alarms is recommended for all homes that have fuel burning appliances such as gas or oil furnaces, gas water heaters, gas ovens and cook-tops, gas fireplaces and wood stoves. Carbon monoxide is a colorless, odorless gas that can cause sickness, nausea and even death. For more information, consult the Consumer Product Safety Commission at 1-800-638-2772 (C.P.S.C.) Modern standards in many states now recommend one CO alarm outside of all bedrooms and at least 1 per floor of the house.
Several smoke alarms were noted to be missing'. Repair / replace the missing smoke alarms in the house so that there is an operating smoke alarm in every bedroom and on every floor and one outside of all sleeping areas. I did not find a smoke alarm in the:
- The smoke and carbon monoxide alarm was noted to be missing in the hallway.

Water Heater
System Type: Tank
Manufacturer: Bradford-White
Data Plate: Shown Here
This shows the data plate for this water heater.

Size: 50 gal
Age: Bradford White (Z = 2003)
Energy Source: Electricity
Straps : None Found
Pad: None Needed
Drain Pan: None Noted - Recommended
Expansion Tank: None Noted - Recommended
Relief Valve: Present - Not Tested
A temperature and pressure relief valve (TPRV) is required on all water heaters to discharge any excessive pressure within the tank. A discharge pipe should be attached to the valve and directed to a safe location away from body contact. Newer installations must be directed to the building exterior or to an approved indoor drain receptor. Most manufacturers suggest that homeowners test these valves at least once a year by lifting the lever to ensure the valve discharges properly and also recommend inspection of these safety devices every three years. The picture here shows a typical TPRV. They may also be found on the side of the heater on some models. I do not test these valves due to the possibility that they may leak after testing. A leaking or inoperative TPRV should be replaced immediately by a licensed plumber.
Due to inconsistencies between both UPC and IPC Plumbing codes, and water heater manufacturer's instructions, and TPRV manufacturer instructions, it is not actually possible to install the drain from the Water Heater TPRV "properly." There are conflicts with distance of termination to the floor/ground, types of pipes approved, and diameters of pipes approved. Additional confusion is added when jurisdictional inspectors approve installations/materials specifically not allowed by both codes and manufacturers. My recommendations will vary depending on the installation and will be included in the applicable narratives below.
Most codes defer to manufacturer instructions and I favor those recommendations. The yellow tag on the valve states clearly the termination should be 6" above the floor which is more consistent with the UPC code requirements.
 (1) (1).jpg)
Install listed seismic straps to restrain the water heater in the event of an earthquake; none were noted during inspection. Two straps should be located on the water heater: one on upper 1/3rd of tank and one at the lower 1/3rd.
No drain pan has been installed below the water heater here. A drain pan is recommended under water heaters that are located in finished spaces or where a leak could damage finishes. Where a pan does not already exist, the tricky part is providing a drain to the outside. A pan without a drain is often of limited benefit / protection. For improved protection from accidental water heater leaks, and where a drain is difficult to install, consider a pan with a moisture alarm and a flood-safe device such as this: Watts Water Heater Leak Prevention.

An expansion tank is recommended for the water heater; these are required if the house has a closed plumbing system. Expansion tanks help reduce pressure on the plumbing system by creating a buffer or a place for water to expand into as water swells during thermal expansion. Installation of expansion or pressure tanks is modern installation practice and will be required if a pressure reducing valve has been installed on a public water supply. Consult with a qualified plumber to install.
Bathroom
Bathroom Photos: 📸
This shows photos of the bathroom for this unit.

Sink and Cabinet: Mid Life
Toilet: Mid Life
Shower and Tub: Mid Life
Ventilation: Newer
General Condition:![]() NewerMid Life
NewerMid Life![]() Older - Renovation needed In near term
Older - Renovation needed In near term![]() Poor - Renovation needed soon
Poor - Renovation needed soon![]() Urgent Renovation needed
Urgent Renovation needed
Clean the dirty fan in 801 and set this on a 24-hour timer for improved ventilation.

Kitchen
General Kitchen Photos: 📸
This shows general kitchen condition photos
 |  |
Cabinets and Counter Condition: Mid Life
Sink: Mid Life
Flooring, Walls, Ceilings Condition: Mid life
Refrigerator Condition: 📸
This shows the refrigerator for this unit
 |  |
Range Condition: 📸
This shows the range for this unit.

Kitchen Ventilation: Mid Life
General Kitchen Comments:![]() NewerMid Life
NewerMid Life![]() Older
Older![]() Poor
Poor![]() Failing
Failing
An anti-tip device is needed to prevent this range from tipping during operation of the oven door. This is a small clip that secured the back adjustable feet of the range to the floor.
 (2).PNG)
Clean the kitchen fan filter - 801.

Mild corrosion noted on the angle stops and supply connectors made it below the kitchen sink. This is often due to chemicals being stored below the sink.

There is a kitchen fan here that is venting out.

Heating System
Energy Source: Electricity
Heating Method: Electric unitary heaters, Mini-split heat pump
Age: 2017
Manufacturer: Daikin
Heating System Condition: Newer, Baseboard heater warning
This building has electric baseboard heaters. These can get very hot during operation. Be sure to keep all drapes, curtains, furniture, electric cords and other flammable items away from these heaters when they are on. Also be careful with small children as baseboard heaters can present a burn hazard if left accessible. If you are concerned about the safety or efficiency of these heaters, consider upgrading the system.
- Ceramic electric heaters are a bit safer and run at lower temperatures - see one made by Convect Air
- A ductless heat pump system is safer, more energy efficient and has the benefit of cooling. These are expensive to install but will save on heating costs over the long run and will likely provide superior comfort.
General Capacity of Electric Heaters: 250 watts / foot for electric baseboard heaters
Cooling Systems and Heat Pumps
Heat Pump Present
The following list is a minimum set of requirements to be expected of heat pump or air conditioning servicing. I provide these as a courtesy to show they types of check-ups that should be expected from a professional servicing.
- Check compressor efficiency
- Check refrigerant level
- Clean the condenser coil
- Change or clean air filters
- Inspect contactors and wiring
- Inspect drive-sheaves, pulleys and belts
- Check and adjust for proper air flow
- Clean the blower motor as needed
- Lubricate all motors and shaft bearings
- Check, calibrate and program the thermostats and be sure the thermostat has adequate batteries as needed
- Check unit smoke detector, clean filter if applicable
- Check safety disconnect, laser-temp -- check across contacts
Manufacturer: Daikin
Data Plate: Shown here
This shows the data plate from the exterior compressor. 📸

 |
System Type: Air Source
Listed Nominal Capacity: 1 Ton
Energy Source: Electric
Age: 2017
Unit 801. The pad supporting the outdoor condensing unit is not level. Mechanical system requirements state that equipment and appliances supported from the ground shall be level and firmly supported on a concrete slab or other approved material extending not less than 3 inches (76 mm) above the adjoining ground. Such support shall be in accordance with the manufacturer's installation instructions. I recommend a licensed HVAC contractor or other qualified workman review the condition and make corrections.~ IRC - Mechanical Code: M1305.1.4.1

Interior Finishes
Interior Photos: 📸
This shows interior photos.
 |  |  |
Doors Condition: Mid Life
Windows Condition:![]() NewerMid Life
NewerMid Life![]() Older
Older![]() Poor
Poor![]() Completely Failed
Completely Failed
Flooring Condition: Mid Life
Wall and Ceiling Condition: Mid Life
Trim and Millwork: Mid Life
Interior Ventilation: Tested, Located in Bathroom, Laundry fan noted but not working well
High humidity an odor of mold noted in this unit, especially at the NE corner bedroom. I recommend additional inspection of this unit. The tenant was complaining that they have to wipe mold from the walls and that the carpet is wet at times of year. Implement repairs as needed for moisture control and indoor air quality and also noted the stains noted on the ceiling of the unit above.


 |
A lost seal was noted in the glazing - west window. This has resulted in fogging between the panes of glass that cannot be cleaned without glazing repair or replacement. Hire a glazing specialist to further evaluate and repair or replace all glazing with lost seals.
✒️ - It is possible the window just needs cleaning.

Washer
Tested
During inspection I try and run the clothes washing machine. This is mostly so that I can push water down the drain to test the waste piping system. Running the clothes washer during an inspection is not a reliable test of the appliance. I am not actually doing a load of laundry, so please note the limitations of this test.
The handle is damaged to one of the shut offs for the clothes washer and less reliable rubber hoses were noted.

Laundry fan:
- The fan is currently clogged
- Consider improving the fan for the laundry room and installing a 24-hour timer to control humidity.
- Damaged vent cover at the west side of the yellow building


A moisture alarm with water shut-off features is recommended under the washing machine to protect against accidental leaks in the supply hoses. Pans can be effective when there is a drain, but even these will not protect against a burst supply connector. A moisture alarm with automatic shut-off will. Watts is a brand I have seen installed: Link.
.png)
Dryer
Tested
Proper dryer exhaust venting is critical for safe and reliable performance from the dryer. Here are some basic rules of thumb for dryer exhaust duct installation: Unless a vent-free appliance is being used, the dryer exhaust vent must terminate outdoors. It should be no more than 25 feet long and for every 90 degree turn subtract 5 feet and for every 45 degree bend subtract 2.5 feet. Use only smooth-wall metal vent pipe @ 4 inch pipe diameter. Do not use plastic pipe and plastic flex pipe. If a flexible connector is needed behind the dryer use a short amount of corrugated metal pipe. If the exhaust duct is getting pinched behind dryer, consider use of a dryer vent box, pictured here. Flex and corrugated pipes should never be used in concealed spaces such as through walls or in attic or crawl spaces. Insulate dryer exhaust duct where it passes through unconditioned spaces to prevent condensation that could hasten lint build-up inside the pipe. Do not use screws to connect pipe as these can trap lint. Secure duct with foil tape as needed. Be sure duct is sleeved properly so that it will not trap lint and clean the vent regularly, especially if it is a long exhaust run.
.png)
Power Source: Electric
Exhaust Duct: Ducted to Exterior
Unit # 803
Sub Panel
Sub Panel: Present
Service Conductor Size: Aluminum, 1/0, 125 amps
Sub Panel Amperage: 125 amps
Sub Panel Location: Kitchen
Sub Panel Manufacturer: Murray
Branch Wiring
Wire Material: Copper, Multi-strand Aluminum
Wiring Method: Non-metallic sheathed cable
This building is under-wired by modern standards, which means the wiring system may not respond well to modern electrical demands. This can present safety issues as it tends to encourage overloading of circuits and use of power strips and extension cords. This can also be inconvenient - think two prong receptacles. I recommend hiring a licensed electrician to further evaluate the wiring in this building and add circuits as needed for improved safety, reliability and convenience. Consider adding more circuits for the kitchen, office and media areas in particular. The scope and extent of updating the wiring is subjective and depends on desires and expectations for the wiring system. Examples of some of the guidelines for minimum wiring standards in modern houses include:
- No point along a wall in habitable rooms should be more than 6-feet from an electric receptacle
- No point along kitchen countertops should be more than 2-feet from an electric receptacle
- Two 20-amp circuits for the kitchen receptacles
- One 20-amp circuit for the laundry receptacles
- One 20-amp circuit for the bathroom receptacles
- One separate, individual branch circuit for central heating equipment
- An electric receptacle should be provided for the exterior of the house at both the front and the back of the house


Receptacles and Fixtures
Inspection Method: Representative Testing
Electric Receptacles: Three wire receptacles
Since the 1970s, requirements for GFCI (Ground Fault Circuit Interruption) protection have changed, and locations requiring GFCI protection seem to get added with every code cycle. It is common for older residential buildings to have some or even many electric receptacles that do not meet modern safety standards. GFCIs have proven successful at reducing electrocutions, and it seems likely that someday, every circuit, receptacle, and appliance in the building will require GFCI protection. The first chart below shows how successful GFCIs have been at reducing risks from electrocution. The second illustration shows where GFCI protection is required as of the 2020 NEC and WAC. As a general best practice for safety. For improved safety, I always recommend bringing GFCI protection up to modern safety standards.
During inspection today, I noted that GFCI protection is inconsistent with modern minimum standards for safety in the following locations:
- The laundry receptacle is not GFCI protected

.png) | 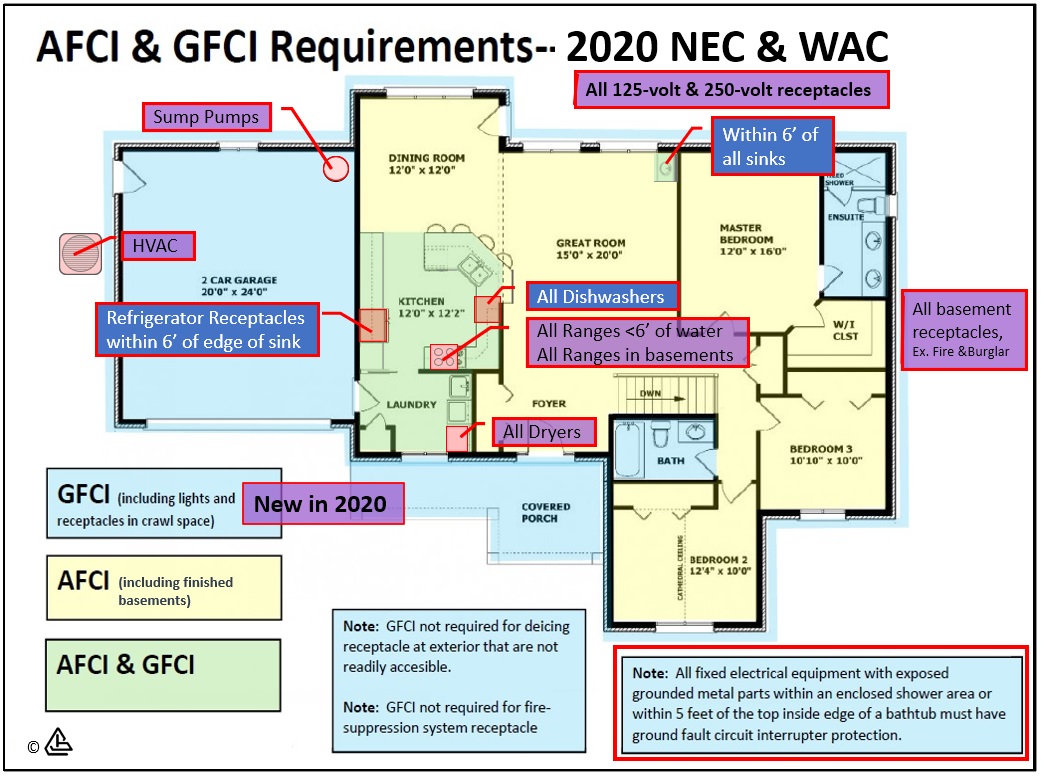 |
Smoke and Carbon Monoxide Alarm Systems
CO Alarms Noted:Outside all Sleeping Areas
CO Alarms: Present
The installation of carbon monoxide alarms is recommended for all homes that have fuel burning appliances such as gas or oil furnaces, gas water heaters, gas ovens and cooktops, gas fireplaces and wood stoves. In addition, Washington State law (WAC 51-51-0315) now requires UL 2034 approved carbon monoxide alarms in ALL homes and condominiums being sold in Washington State. The location should be: at least one alarm outside of all sleeping areas and one on each floor of the house. Best practices are to have these alarms hardwired with a battery back-up - though requirements are for the installation to meet manufacturer's specifications. Carbon monoxide is a colorless, odorless gas that can cause sickness, nausea and even death. Alarms have a useful service life of roughly 6 years, so changing them more frequently than smoke alarms is recommended.
Smoke Alarms Noted:In All Bedrooms
Smoke Alarms: Present
During the home inspection, I try and test a representative sample of the smoke alarms by using the test button on the alarms. This is NOT an accurate test of the sensor, just a test to see if the unit is powered. For reliability, fire marshals recommended updating smoke alarms every ten years and changing batteries bi-annually. The latest data indicate that we should be using photoelectric technology in our smoke alarms for improved fire detection and reducing problems with false alarms, which can lead to disabling of this critical safety system. Unfortunately, the alarms must be removed to determine if they are photo-electric or ionization types. It is surprisingly complex to accurately test a smoke alarm system and determine the reliability, age, and type of sensor technology used, especially as many homes can have half a dozen or more alarms throughout the house. A complete evaluation of smoke alarms is beyond the scope of this inspection. For optimal fire safety, I recommend taking control of these critical safety devices and learning about how to service and maintain your smoke alarm system to keep the building occupants safe. For more information, please read this link. For more information, please read this link.
Carbon monoxide alarms were found and noted during inspection. Be sure to check these regularly. The standard is 1/ floor and 1 outside all sleeping areas.
Water Heater
System Type: Tank
Manufacturer: American
Data Plate: Shown Here
This shows the data plate for this water heater.

Size: 50 gal
Age: 1998
Energy Source: Electricity
Straps : Present
Pad: None Needed
Drain Pan: None Noted - Recommended
Expansion Tank: None Noted - Recommended
Relief Valve: Present - Not Tested, Corrugated Supply Connector Used as Discharge
This is a very old water heater. Replacement is recommended for improved reliability as this unit could fail at any point. The average life of these water heaters is 8-20 years. The service life of a water heater will depend on a variety of factors such as water quality and regular scheduled maintenance such as flushing the tank and replacing sacrificial anodes.
No drain pan has been installed below the water heater here. A drain pan is recommended under water heaters that are located in finished spaces or where a leak could damage finishes. Where a pan does not already exist, the tricky part is providing a drain to the outside. A pan without a drain is often of limited benefit / protection. For improved protection from accidental water heater leaks, and where a drain is difficult to install, consider a pan with a moisture alarm and a flood-safe device such as this: Watts Water Heater Leak Prevention.

An expansion tank is recommended for the water heater; these are required if the house has a closed plumbing system. Expansion tanks help reduce pressure on the plumbing system by creating a buffer or a place for water to expand into as water swells during thermal expansion. Installation of expansion or pressure tanks is modern installation practice and will be required if a pressure reducing valve has been installed on a public water supply. Consult with a qualified plumber to install.
The discharge tube for the water heater temperature and pressure relief valve (TPRV) is plumbed using a corrugated supply connector. Though this is very common, this restricts the diameter of the opening and is unsafe and not recommended - see attached link. Ideally, the discharge tube for a relief valve:
- Terminates to an exterior location or above a drain, though this is not always possible
- Terminates between 6 and 24-inches off the ground (UPC)
- Slopes to drain to prevent water pooling inside the discharge tube
- Is not made from pipe with an inside diameter less than 3/4 on an inch
- Terminates to a visible location that can be monitored for leaks and discharges
- Does not have a threaded termination point which would prevent accidental capping of this important discharge
- Does not terminate into a drain pan
I recommend having this relief valve discharge tube further investigated and repaired as recommended by a licensed plumber.

Bathroom
Bathroom Photos: 📸
This shows photos of the bathroom for this unit.

Sink and Cabinet: Mid Life
Toilet: Mid Life
Shower and Tub: Newer
Ventilation: Newer
General Condition:![]() NewerMid Life
NewerMid Life![]() Older - Renovation needed In near term
Older - Renovation needed In near term![]() Poor - Renovation needed soon
Poor - Renovation needed soon![]() Urgent Renovation needed
Urgent Renovation needed
High moisture meter readings above the shower in 803. Note the anomalies for thermal images as well. I suspect there is a plumbing leak from above here. Repair leaking plumbing and repair damaged finishes as needed.

 |
Mild moisture control problems between the shower and the toilet.

Kitchen
General Kitchen Photos: 📸
This shows general kitchen condition photos
 |  |
Cabinets and Counter Condition: Mid Life
Sink: Mid Life
Flooring, Walls, Ceilings Condition: Mid life
Refrigerator Condition: 📸
This shows the refrigerator for this unit

Range Condition: 📸
This shows the range for this unit.
Kitchen Ventilation: Mid Life
General Kitchen Comments:![]() NewerMid Life
NewerMid Life![]() Older
Older![]() Poor
Poor![]() Failing
Failing
An anti-tip device is needed to prevent this range from tipping during operation of the oven door. This is a small clip that secured the back adjustable feet of the range to the floor.
|  |
Heating System
Energy Source: Electricity
Heating Method: Electric unitary heaters, Mini-split heat pump
Age: 2017
Manufacturer: Daikin
Heating System Condition: Newer
General Capacity of Electric Heaters: 250 watts / foot for electric baseboard heaters
Cooling Systems and Heat Pumps
Heat Pump Present
Manufacturer: Daikin
Data Plate: Shown here
This shows the data plate from the exterior compressor. 📸

 |
System Type: Air Source
Listed Nominal Capacity: 1 Ton
Energy Source: Electric
Age: 2017
The air filters are nice and clean for the unit.

Interior Finishes
Interior Photos: 📸
This shows interior photos.
 |  |  |
 |
Doors Condition: Mid Life
Windows Condition:![]() NewerMid Life
NewerMid Life![]() Older
Older![]() Poor
Poor![]() Completely Failed
Completely Failed
Flooring Condition: Mid Life
Wall and Ceiling Condition: Mid Life
Trim and Millwork: Mid Life
Interior Ventilation: Located in Bathroom
Scuffing and paint failure noted on trim.
 |  |
The ceiling in some rooms of this house contains popcorn texture. This product may contain asbestos as many of these products contained asbestos prior to 1978. After 1978, remaining stocks of material containing asbestos were sold and as the product was slowly phased out. Asbestos testing is beyond the scope of this inspection. The health risks posed by this substance are minimal unless the texture becomes friable or air borne. If you wish to remove the popcorn texture or have remodel plans that could involve cutting or removing this sheetrock, asbestos testing is recommended. Consult with an environmental lab for more information on asbestos testing. One option is always to sheetrock over this texture if you wish to have a different ceiling finish.

For its age this unit is in above average condition.
Washer
Tested
During inspection I try and run the clothes washing machine. This is mostly so that I can push water down the drain to test the waste piping system. Running the clothes washer during an inspection is not a reliable test of the appliance. I am not actually doing a load of laundry, so please note the limitations of this test.
A moisture alarm with water shut-off features is recommended under the washing machine to protect against accidental leaks in the supply hoses. Pans can be effective when there is a drain, but even these will not protect against a burst supply connector. A moisture alarm with automatic shut-off will. Watts is a brand I have seen installed: Link.
|  |
Dryer
Tested
Power Source: Electric
Exhaust Duct: Ducted to Exterior, Behind Dryer (Foil / Mylar Transition Duct)
Foil or Mylar transition duct was noted in use to connect the dryer to the rigid vent. This product is generally UL listed for use with a dryer, however, most dryer manufacturers do not recommend it as it has proven to be unreliable and a potential fire hazard. A corrugated metal flex duct is recommended. Repair as needed.

The dryer exhaust ductwork is dirty and needs to be cleaned for improved safety. This is important, regular maintenance to eliminate a potential fire hazard.

Unit # 805
Sub Panel
Sub Panel: Present
Service Conductor Size: Aluminum, 1/0, 125 amps
Sub Panel Amperage: 125 amps
Sub Panel Location: Kitchen
Sub Panel Manufacturer: Murray
This unit has the original old Murray brand panel.
 |  |
Branch Wiring
Wire Material: Copper, Multi-strand Aluminum
Wiring Method: Non-metallic sheathed cable
This building is under-wired by modern standards, which means the wiring system may not respond well to modern electrical demands. This can present safety issues as it tends to encourage overloading of circuits and use of power strips and extension cords. This can also be inconvenient - think two prong receptacles. I recommend hiring a licensed electrician to further evaluate the wiring in this building and add circuits as needed for improved safety, reliability and convenience. Consider adding more circuits for the kitchen, office and media areas in particular. The scope and extent of updating the wiring is subjective and depends on desires and expectations for the wiring system. Examples of some of the guidelines for minimum wiring standards in modern houses include:
- No point along a wall in habitable rooms should be more than 6-feet from an electric receptacle
- No point along kitchen countertops should be more than 2-feet from an electric receptacle
- Two 20-amp circuits for the kitchen receptacles
- One 20-amp circuit for the laundry receptacles
- One 20-amp circuit for the bathroom receptacles
- One separate, individual branch circuit for central heating equipment
- An electric receptacle should be provided for the exterior of the house at both the front and the back of the house

Receptacles and Fixtures
Inspection Method: Representative Testing
Electric Receptacles: Three wire receptacles
Replace the damaged electric receptacle off the deck in 805.

Since the 1970s, requirements for GFCI (Ground Fault Circuit Interruption) protection have changed, and locations requiring GFCI protection seem to get added with every code cycle. It is common for older residential buildings to have some or even many electric receptacles that do not meet modern safety standards. GFCIs have proven successful at reducing electrocutions, and it seems likely that someday, every circuit, receptacle, and appliance in the building will require GFCI protection. The first chart below shows how successful GFCIs have been at reducing risks from electrocution. The second illustration shows where GFCI protection is required as of the 2020 NEC and WAC. As a general best practice for safety. For improved safety, I always recommend bringing GFCI protection up to modern safety standards.
During inspection today, I noted that GFCI protection is inconsistent with modern minimum standards for safety in the following locations:
- No GFCI protection was noted for the laundry

| |
Smoke and Carbon Monoxide Alarm Systems
CO Alarms Noted:Outside all Sleeping Areas
CO Alarms: Present
The installation of carbon monoxide alarms is recommended for all homes that have fuel burning appliances such as gas or oil furnaces, gas water heaters, gas ovens and cooktops, gas fireplaces and wood stoves. In addition, Washington State law (WAC 51-51-0315) now requires UL 2034 approved carbon monoxide alarms in ALL homes and condominiums being sold in Washington State. The location should be: at least one alarm outside of all sleeping areas and one on each floor of the house. Best practices are to have these alarms hardwired with a battery back-up - though requirements are for the installation to meet manufacturer's specifications. Carbon monoxide is a colorless, odorless gas that can cause sickness, nausea and even death. Alarms have a useful service life of roughly 6 years, so changing them more frequently than smoke alarms is recommended.
Smoke Alarms Noted:In All Bedrooms
Smoke Alarms: Present
During the home inspection, I try and test a representative sample of the smoke alarms by using the test button on the alarms. This is NOT an accurate test of the sensor, just a test to see if the unit is powered. For reliability, fire marshals recommended updating smoke alarms every ten years and changing batteries bi-annually. The latest data indicate that we should be using photoelectric technology in our smoke alarms for improved fire detection and reducing problems with false alarms, which can lead to disabling of this critical safety system. Unfortunately, the alarms must be removed to determine if they are photo-electric or ionization types. It is surprisingly complex to accurately test a smoke alarm system and determine the reliability, age, and type of sensor technology used, especially as many homes can have half a dozen or more alarms throughout the house. A complete evaluation of smoke alarms is beyond the scope of this inspection. For optimal fire safety, I recommend taking control of these critical safety devices and learning about how to service and maintain your smoke alarm system to keep the building occupants safe. For more information, please read this link. For more information, please read this link.
Carbon monoxide alarms were found and noted during inspection. Be sure to check these regularly. The standard is 1/ floor and 1 outside all sleeping areas.
Water Heater
System Type: Tank
Manufacturer: Rheem
Data Plate: Shown Here
This shows the data plate for this water heater.

Size: 40 gal
Age: 2017
Energy Source: Electricity
Straps : None Found
Pad: None Needed
Drain Pan: Present without drain
Expansion Tank: None Noted - Recommended
Relief Valve: Present - Not Tested, Corrugated Supply Connector Used as Discharge
Install listed seismic straps to restrain the water heater in the event of an earthquake; none were noted during inspection. Two straps should be located on the water heater: one on upper 1/3rd of tank and one at the lower 1/3rd.
A drain pan has been installed below the water heater, but no drain was noted for the pan. A drain pan is recommended under water heaters that are located in finished spaces or where a leak could damage finishes. A pan without a drain is often of limited benefit / protection. For improved protection from accidental water heater leaks, and where a drain is difficult to install, consider a pan with a moisture alarm and a flood-safe device such as this: Watts Water Heater Leak Prevention.

An expansion tank is recommended for the water heater; these are required if the house has a closed plumbing system. Expansion tanks help reduce pressure on the plumbing system by creating a buffer or a place for water to expand into as water swells during thermal expansion. Installation of expansion or pressure tanks is modern installation practice and will be required if a pressure reducing valve has been installed on a public water supply. Consult with a qualified plumber to install.
The discharge tube for the water heater temperature and pressure relief valve (TPRV) is plumbed using a corrugated supply connector. Though this is very common, this restricts the diameter of the opening and is unsafe and not recommended - see attached link. Ideally, the discharge tube for a relief valve:
- Terminates to an exterior location or above a drain, though this is not always possible
- Terminates between 6 and 24-inches off the ground (UPC)
- Slopes to drain to prevent water pooling inside the discharge tube
- Is not made from pipe with an inside diameter less than 3/4 on an inch
- Terminates to a visible location that can be monitored for leaks and discharges
- Does not have a threaded termination point which would prevent accidental capping of this important discharge
- Does not terminate into a drain pan
I recommend having this relief valve discharge tube further investigated and repaired as recommended by a licensed plumber.

The hot water temperature in 805 was only 110°. 120° is recommended.

Bathroom
Bathroom Photos: 📸
This shows photos of the bathroom for this unit.
 |  |
Sink and Cabinet: Older
Toilet: Mid Life
Shower and Tub: Mid Life
Ventilation: Newer
General Condition:![]() Newer
Newer![]() Mid LifeOlder - Renovation needed In near term
Mid LifeOlder - Renovation needed In near term![]() Poor - Renovation needed soon
Poor - Renovation needed soon![]() Urgent Renovation needed
Urgent Renovation needed
Active moisture control problems were noted around the toilet and 805. Moisture is sitting on the finished floor and bolts are corroded.

The bathroom sink and cabinet in this unit are getting older. This should be on the radar for updating.


 |
With the exception of any comments listed above, this bathroom was in serviceable condition. However, the finishes and fixtures are old and will be increasingly unreliable. Updating / remodeling this bathroom would be a logical improvement in the near term. The urgency of updating will depend on how often this bathroom is to be used and personal desired for reliability and cosmetic appearance.
- Bathroom finishes here are in generally older conditions. Mold like staining was noted on the ceiling.

Kitchen
General Kitchen Photos: 📸
This shows general kitchen condition photos
 |  |
Cabinets and Counter Condition: Mid Life
Sink: Mid Life
Flooring, Walls, Ceilings Condition: Mid life
Refrigerator Condition: 📸, Newer
This shows the refrigerator for this unit

Range Condition: Older
Kitchen Ventilation: Older
General Kitchen Comments:![]() NewerMid Life
NewerMid Life![]() Older
Older![]() Poor
Poor![]() Failing
Failing
An anti-tip device is needed to prevent this range from tipping during operation of the oven door. This is a small clip that secured the back adjustable feet of the range to the floor.
|  |
The kitchen range is getting older. Funds should be reserved for replacement in the near term.

The kitchen ventilation system is in poor condition. Updating is recommended in the near term.

Heating System
Energy Source: Electricity
Heating Method: Electric unitary heaters
Age: 2017
Manufacturer: Daikin
Heating System Condition: Newer
General Capacity of Electric Heaters: 250 watts / foot for electric baseboard heaters
The baseboard heater in the bathroom of 805 is pretty old

Cooling Systems and Heat Pumps
Heat Pump Present
Manufacturer: Daikin
Data Plate: Shown here
This shows the data plate from the exterior compressor. 📸


System Type: Air Source
Listed Nominal Capacity: 1 Ton
Energy Source: Electric
Age: 2017
The air filter for the ductless heat pump head is clean.

Interior Finishes
Interior Photos: 📸
This shows interior photos.
 |  |  |
 |
Doors Condition: Poor
Windows Condition:![]() NewerMid Life
NewerMid Life![]() Older
Older![]() Poor
Poor![]() Completely Failed
Completely Failed
Flooring Condition: Mid Life
Wall and Ceiling Condition: Mid Life
Trim and Millwork: Mid Life
Interior Ventilation: Located in Bathroom, Tested
Mold like standing noted on the ceiling at the northeast corner of unit 805. This tested dry at the time of inspection but maybe related to moisture control issues in the northeast corner unit below here.

 |
The doors in this unit are in poor condition. Updating may be needed soon.

Mold-like substances were noted around the windows in the west side bedroom - this is more signs of high humidity problems in this unit.

The ceiling in some rooms of this house contains popcorn texture. This product may contain asbestos as many of these products contained asbestos prior to 1978. After 1978, remaining stocks of material containing asbestos were sold and as the product was slowly phased out. Asbestos testing is beyond the scope of this inspection. The health risks posed by this substance are minimal unless the texture becomes friable or air borne. If you wish to remove the popcorn texture or have remodel plans that could involve cutting or removing this sheetrock, asbestos testing is recommended. Consult with an environmental lab for more information on asbestos testing. One option is always to sheetrock over this texture if you wish to have a different ceiling finish.

A newer bathroom fan was noted.

Washer
Tested
During inspection I try and run the clothes washing machine. This is mostly so that I can push water down the drain to test the waste piping system. Running the clothes washer during an inspection is not a reliable test of the appliance. I am not actually doing a load of laundry, so please note the limitations of this test.
A moisture alarm with water shut-off features is recommended under the washing machine to protect against accidental leaks in the supply hoses. Pans can be effective when there is a drain, but even these will not protect against a burst supply connector. A moisture alarm with automatic shut-off will. Watts is a brand I have seen installed: Link.
|  |
 |  |
Dryer
Tested
Power Source: Electric
Exhaust Duct: Ducted to Exterior
Dryer exhaust vent cleaning and repair of the backdraft dampers needed for the dryer exhaust fan in 805.

Unit # 807
Sub Panel
Sub Panel: Present
Service Conductor Size: Aluminum, 1/0, 125 amps
Sub Panel Amperage: 125 amps
Sub Panel Location: Kitchen
Sub Panel Manufacturer: Murray
This is the original Murray brand panel. A permit sticker was noted from 2018 for the heat pump.

 |  |
Branch Wiring
Wire Material: Copper, Multi-strand Aluminum
Wiring Method: Non-metallic sheathed cable
This building is under-wired by modern standards, which means the wiring system may not respond well to modern electrical demands. This can present safety issues as it tends to encourage overloading of circuits and use of power strips and extension cords. This can also be inconvenient - think two prong receptacles. I recommend hiring a licensed electrician to further evaluate the wiring in this building and add circuits as needed for improved safety, reliability and convenience. Consider adding more circuits for the kitchen, office and media areas in particular. The scope and extent of updating the wiring is subjective and depends on desires and expectations for the wiring system. Examples of some of the guidelines for minimum wiring standards in modern houses include:
- No point along a wall in habitable rooms should be more than 6-feet from an electric receptacle
- No point along kitchen countertops should be more than 2-feet from an electric receptacle
- Two 20-amp circuits for the kitchen receptacles
- One 20-amp circuit for the laundry receptacles
- One 20-amp circuit for the bathroom receptacles
- One separate, individual branch circuit for central heating equipment
- An electric receptacle should be provided for the exterior of the house at both the front and the back of the house

Receptacles and Fixtures
Inspection Method: Representative Testing
Electric Receptacles: Three wire receptacles
Since the 1970s, requirements for GFCI (Ground Fault Circuit Interruption) protection have changed, and locations requiring GFCI protection seem to get added with every code cycle. It is common for older residential buildings to have some or even many electric receptacles that do not meet modern safety standards. GFCIs have proven successful at reducing electrocutions, and it seems likely that someday, every circuit, receptacle, and appliance in the building will require GFCI protection. The first chart below shows how successful GFCIs have been at reducing risks from electrocution. The second illustration shows where GFCI protection is required as of the 2020 NEC and WAC. As a general best practice for safety. For improved safety, I always recommend bringing GFCI protection up to modern safety standards.
During inspection today, I noted that GFCI protection is inconsistent with modern minimum standards for safety in the following locations:
- No GFCI protection was noted for laundry receptacles

| |
Smoke and Carbon Monoxide Alarm Systems
CO Alarms Noted:Outside all Sleeping Areas
CO Alarms: Present
The installation of carbon monoxide alarms is recommended for all homes that have fuel burning appliances such as gas or oil furnaces, gas water heaters, gas ovens and cooktops, gas fireplaces and wood stoves. In addition, Washington State law (WAC 51-51-0315) now requires UL 2034 approved carbon monoxide alarms in ALL homes and condominiums being sold in Washington State. The location should be: at least one alarm outside of all sleeping areas and one on each floor of the house. Best practices are to have these alarms hardwired with a battery back-up - though requirements are for the installation to meet manufacturer's specifications. Carbon monoxide is a colorless, odorless gas that can cause sickness, nausea and even death. Alarms have a useful service life of roughly 6 years, so changing them more frequently than smoke alarms is recommended.
Smoke Alarms Noted:In All Bedrooms
Smoke Alarms: Present, One Missing
During the home inspection, I try and test a representative sample of the smoke alarms by using the test button on the alarms. This is NOT an accurate test of the sensor, just a test to see if the unit is powered. For reliability, fire marshals recommended updating smoke alarms every ten years and changing batteries bi-annually. The latest data indicate that we should be using photoelectric technology in our smoke alarms for improved fire detection and reducing problems with false alarms, which can lead to disabling of this critical safety system. Unfortunately, the alarms must be removed to determine if they are photo-electric or ionization types. It is surprisingly complex to accurately test a smoke alarm system and determine the reliability, age, and type of sensor technology used, especially as many homes can have half a dozen or more alarms throughout the house. A complete evaluation of smoke alarms is beyond the scope of this inspection. For optimal fire safety, I recommend taking control of these critical safety devices and learning about how to service and maintain your smoke alarm system to keep the building occupants safe. For more information, please read this link. For more information, please read this link.
A smoke alarm was noted to be missing. Repair / replace the missing smoke alarms in the house so that there is an operating smoke alarm in every bedroom and on every floor and one outside of all sleeping areas. I did not find a smoke alarm in the:
- A missing smoke alarm was noted at the east bedroom

Carbon monoxide alarms were found and noted during inspection. Be sure to check these regularly. The standard is 1/ floor and 1 outside all sleeping areas.
Water Heater
System Type: Tank
Manufacturer: Rheem
Data Plate: Shown Here
This shows the data plate for this water heater.

Size: 50 gal
Age: 2020
Energy Source: Electricity
Straps : None Found
Pad: None Needed
Drain Pan: Present without drain
Expansion Tank: None Noted - Recommended
Relief Valve: Present - Not Tested, Corrugated Supply Connector Used as Discharge
Install listed seismic straps to restrain the water heater in the event of an earthquake; none were noted during inspection. Two straps should be located on the water heater: one on upper 1/3rd of tank and one at the lower 1/3rd.

A drain pan has been installed below the water heater, but no drain was noted for the pan. A drain pan is recommended under water heaters that are located in finished spaces or where a leak could damage finishes. A pan without a drain is often of limited benefit / protection. For improved protection from accidental water heater leaks, and where a drain is difficult to install, consider a pan with a moisture alarm and a flood-safe device such as this: Watts Water Heater Leak Prevention.

An expansion tank is recommended for the water heater; these are required if the house has a closed plumbing system. Expansion tanks help reduce pressure on the plumbing system by creating a buffer or a place for water to expand into as water swells during thermal expansion. Installation of expansion or pressure tanks is modern installation practice and will be required if a pressure reducing valve has been installed on a public water supply. Consult with a qualified plumber to install.
The discharge tube for the water heater temperature and pressure relief valve (TPRV) is plumbed using a corrugated supply connector. Though this is very common, this restricts the diameter of the opening and is unsafe and not recommended - see attached link. Ideally, the discharge tube for a relief valve:
- Terminates to an exterior location or above a drain, though this is not always possible
- Terminates between 6 and 24-inches off the ground (UPC)
- Slopes to drain to prevent water pooling inside the discharge tube
- Is not made from pipe with an inside diameter less than 3/4 on an inch
- Terminates to a visible location that can be monitored for leaks and discharges
- Does not have a threaded termination point which would prevent accidental capping of this important discharge
- Does not terminate into a drain pan
I recommend having this relief valve discharge tube further investigated and repaired as recommended by a licensed plumber.

Bathroom
Bathroom Photos: 📸
This shows photos of the bathroom for this unit.

Sink and Cabinet: Older
Toilet: Mid Life
Shower and Tub: Mid Life
Ventilation: Newer
General Condition:![]() NewerMid Life
NewerMid Life![]() Older - Renovation needed In near term
Older - Renovation needed In near term![]() Poor - Renovation needed soon
Poor - Renovation needed soon![]() Urgent Renovation needed
Urgent Renovation needed
The bathroom sink and cabinet in this unit are getting older. This should be on the radar for updating.

Kitchen
General Kitchen Photos: 📸
This shows general kitchen condition photos
 |  |
Cabinets and Counter Condition: Mid Life
Sink: Mid Life
Flooring, Walls, Ceilings Condition: Mid life
Refrigerator Condition: Newer, 📸
This shows the refrigerator for this unit

Range Condition: 📸, Mid Life
This shows the range for this unit.

Kitchen Ventilation: Older
General Kitchen Comments:![]() NewerMid Life
NewerMid Life![]() Older
Older![]() Poor
Poor![]() Failing
Failing
The kitchen ventilation system is in poor condition. Updating is recommended in the near term.

 |
Heating System
Energy Source: Electricity
Heating Method: Electric unitary heaters
Age: 2007
Manufacturer: Daikin
Heating System Condition: Mid Life
General Capacity of Electric Heaters: 250 watts / foot for electric baseboard heaters
Cooling Systems and Heat Pumps
Heat Pump Present
Manufacturer: Daikin
Data Plate: Shown here
This shows the data plate from the exterior compressor. 📸
 |  |
System Type: Air Source
Listed Nominal Capacity: 1 Ton
Energy Source: Electric
Age: 2017
The air filters are clean at the ductless heat pump head.

Interior Finishes
Interior Photos: 📸
This shows interior photos.
 |  |  |
 |
Doors Condition: Mid Life
Windows Condition:![]() NewerMid Life
NewerMid Life![]() Older
Older![]() Poor
Poor![]() Completely Failed
Completely Failed
Flooring Condition: Mid Life
Wall and Ceiling Condition: Mid Life
Trim and Millwork: Mid Life
Interior Ventilation: Located in Bathroom
The ceiling in some rooms of this house contains popcorn texture. This product may contain asbestos as many of these products contained asbestos prior to 1978. After 1978, remaining stocks of material containing asbestos were sold and as the product was slowly phased out. Asbestos testing is beyond the scope of this inspection. The health risks posed by this substance are minimal unless the texture becomes friable or air borne. If you wish to remove the popcorn texture or have remodel plans that could involve cutting or removing this sheetrock, asbestos testing is recommended. Consult with an environmental lab for more information on asbestos testing. One option is always to sheetrock over this texture if you wish to have a different ceiling finish.

Washer
Tested
During inspection I try and run the clothes washing machine. This is mostly so that I can push water down the drain to test the waste piping system. Running the clothes washer during an inspection is not a reliable test of the appliance. I am not actually doing a load of laundry, so please note the limitations of this test.
A moisture alarm with water shut-off features is recommended under the washing machine to protect against accidental leaks in the supply hoses. Pans can be effective when there is a drain, but even these will not protect against a burst supply connector. A moisture alarm with automatic shut-off will. Watts is a brand I have seen installed: Link.
|  |
 |  |
Dryer
Tested
Proper dryer exhaust venting is critical for safe and reliable performance from the dryer. Here are some basic rules of thumb for dryer exhaust duct installation: Unless a vent-free appliance is being used, the dryer exhaust vent must terminate outdoors. It should be no more than 25 feet long and for every 90 degree turn subtract 5 feet and for every 45 degree bend subtract 2.5 feet. Use only smooth-wall metal vent pipe @ 4 inch pipe diameter. Do not use plastic pipe and plastic flex pipe. If a flexible connector is needed behind the dryer use a short amount of corrugated metal pipe. If the exhaust duct is getting pinched behind dryer, consider use of a dryer vent box, pictured here. Flex and corrugated pipes should never be used in concealed spaces such as through walls or in attic or crawl spaces. Insulate dryer exhaust duct where it passes through unconditioned spaces to prevent condensation that could hasten lint build-up inside the pipe. Do not use screws to connect pipe as these can trap lint. Secure duct with foil tape as needed. Be sure duct is sleeved properly so that it will not trap lint and clean the vent regularly, especially if it is a long exhaust run.
Power Source: Electric
Exhaust Duct: Ducted to Exterior
Unit # 811
Sub Panel
Sub Panel: Present
Service Conductor Size: Aluminum, 1/0, 125 amps
Sub Panel Amperage: 125 amps
Sub Panel Location: Kitchen
Sub Panel Manufacturer: Murray
This is the original subpanel.

Branch Wiring
Wire Material: Copper, Multi-strand Aluminum
Wiring Method: Non-metallic sheathed cable
The bonding jumper above the water heater for the metal pipes is loose and requires securing.

Receptacles and Fixtures
Inspection Method: Representative Testing
Electric Receptacles: Three wire receptacles
Reverse polarity was noted at one of the electric receptacles. This is when the hot and the neutral wires have been wired backwards. This is a potential safety issue that should be corrected by a licensed electrical contractor the scope of other electrical repairs.
- Reverse polarity noted at the electric receptacle on the north wall of the living room.

Since the 1970s, requirements for GFCI (Ground Fault Circuit Interruption) protection have changed, and locations requiring GFCI protection seem to get added with every code cycle. It is common for older residential buildings to have some or even many electric receptacles that do not meet modern safety standards. GFCIs have proven successful at reducing electrocutions, and it seems likely that someday, every circuit, receptacle, and appliance in the building will require GFCI protection. The first chart below shows how successful GFCIs have been at reducing risks from electrocution. The second illustration shows where GFCI protection is required as of the 2020 NEC and WAC. As a general best practice for safety. For improved safety, I always recommend bringing GFCI protection up to modern safety standards.
During inspection today, I noted that GFCI protection is inconsistent with modern minimum standards for safety in the following locations:
- No GFCI protection was noted for the laundry receptacle

| |
Smoke and Carbon Monoxide Alarm Systems
CO Alarms Noted:Outside all Sleeping Areas
CO Alarms: Present
The installation of carbon monoxide alarms is recommended for all homes that have fuel burning appliances such as gas or oil furnaces, gas water heaters, gas ovens and cooktops, gas fireplaces and wood stoves. In addition, Washington State law (WAC 51-51-0315) now requires UL 2034 approved carbon monoxide alarms in ALL homes and condominiums being sold in Washington State. The location should be: at least one alarm outside of all sleeping areas and one on each floor of the house. Best practices are to have these alarms hardwired with a battery back-up - though requirements are for the installation to meet manufacturer's specifications. Carbon monoxide is a colorless, odorless gas that can cause sickness, nausea and even death. Alarms have a useful service life of roughly 6 years, so changing them more frequently than smoke alarms is recommended.
Smoke Alarms Noted:In All Bedrooms
Smoke Alarms: Present
During the home inspection, I try and test a representative sample of the smoke alarms by using the test button on the alarms. This is NOT an accurate test of the sensor, just a test to see if the unit is powered. For reliability, fire marshals recommended updating smoke alarms every ten years and changing batteries bi-annually. The latest data indicate that we should be using photoelectric technology in our smoke alarms for improved fire detection and reducing problems with false alarms, which can lead to disabling of this critical safety system. Unfortunately, the alarms must be removed to determine if they are photo-electric or ionization types. It is surprisingly complex to accurately test a smoke alarm system and determine the reliability, age, and type of sensor technology used, especially as many homes can have half a dozen or more alarms throughout the house. A complete evaluation of smoke alarms is beyond the scope of this inspection. For optimal fire safety, I recommend taking control of these critical safety devices and learning about how to service and maintain your smoke alarm system to keep the building occupants safe. For more information, please read this link. For more information, please read this link.
Carbon monoxide alarms were found and noted during inspection. Be sure to check these regularly. The standard is 1/ floor and 1 outside all sleeping areas.
Water Heater
System Type: Tank
Manufacturer: Rheem
Data Plate: Shown Here
This shows the data plate for this water heater.

Size: 40 gal
Age: 2017
Energy Source: Electricity
Straps : None Found
Pad: None Needed
Drain Pan: Present without drain
Expansion Tank: None Noted - Recommended
Relief Valve: Present - Not Tested
Install listed seismic straps to restrain the water heater in the event of an earthquake; none were noted during inspection. Two straps should be located on the water heater: one on upper 1/3rd of tank and one at the lower 1/3rd.
A drain pan has been installed below the water heater, but no drain was noted for the pan. A drain pan is recommended under water heaters that are located in finished spaces or where a leak could damage finishes. A pan without a drain is often of limited benefit / protection. For improved protection from accidental water heater leaks, and where a drain is difficult to install, consider a pan with a moisture alarm and a flood-safe device such as this: Watts Water Heater Leak Prevention.

An expansion tank is recommended for the water heater; these are required if the house has a closed plumbing system. Expansion tanks help reduce pressure on the plumbing system by creating a buffer or a place for water to expand into as water swells during thermal expansion. Installation of expansion or pressure tanks is modern installation practice and will be required if a pressure reducing valve has been installed on a public water supply. Consult with a qualified plumber to install.
Bathroom
Bathroom Photos: 📸
This shows photos of the bathroom for this unit.

Sink and Cabinet: Older
Toilet: Poor
Shower and Tub: Poor
Ventilation: Newer
General Condition:![]() Newer
Newer![]() Mid Life
Mid Life![]() Older - Renovation needed In near termPoor - Renovation needed soon
Older - Renovation needed In near termPoor - Renovation needed soon![]() Urgent Renovation needed
Urgent Renovation needed
The toilet in this unit is in poor condition. Updating is recommended soon.

A slow drain was noted to the bathroom sink.

The bathroom in this unit is in poor condition. The finishes and fixtures are old and will be increasingly unreliable. Updating/remodeling this bathroom will be needed in the near term. The urgency of updating can be subjective but waiting will risk water damage to surrounding finishes.
The bathroom sink and cabinet in this unit are getting older. This should be on the radar for updating.

The shower/tub system in this unit is in poor condition. I would budget for updating soon.
 |  |
Kitchen
General Kitchen Photos: 📸
This shows general kitchen condition photos
 |  |
Cabinets and Counter Condition: Mid Life
Sink: Mid Life
Flooring, Walls, Ceilings Condition: Mid life
Refrigerator Condition: Older
Range Condition: Older
Kitchen Ventilation: Mid Life
General Kitchen Comments:![]() NewerMid Life
NewerMid Life![]() Older
Older![]() Poor
Poor![]() Failing
Failing
An anti-tip device is needed to prevent this range from tipping during operation of the oven door. This is a small clip that secured the back adjustable feet of the range to the floor.
|  |
The kitchen range is getting older. Funds should be reserved for replacement in the near term.

The refrigerator is older. Funds should be reserved for updating in the near term.

Heating System
Energy Source: Electricity
Heating Method: Electric unitary heaters
Age: 2017
Manufacturer: Daikin
Heating System Condition: Mid Life
Cooling Systems and Heat Pumps
Heat Pump Present
Manufacturer: Daikin
Data Plate: Shown here
This shows the data plate from the exterior compressor. 📸
 |  |
System Type: Air Source
Listed Nominal Capacity: 1 Ton
Energy Source: Electric
Age: 2017
Secure the loose cover at the exterior compressor for this unit's heat pump.

The ductless heat pump head is clean in this unit

Interior Finishes
Interior Photos: 📸
This shows interior photos.
 |  |  |
 |  |
Doors Condition: Mid Life
Windows Condition:![]() NewerMid Life
NewerMid Life![]() Older
Older![]() Poor
Poor![]() Completely Failed
Completely Failed
Flooring Condition: Poor
Wall and Ceiling Condition: Mid Life
Trim and Millwork: Mid Life
Interior Ventilation: Located in Bathroom
The flooring in this unit is in poor condition. Updating should be anticipated soon.

An older fan was noted in the laundry room.

Washer
Tested
During inspection I try and run the clothes washing machine. This is mostly so that I can push water down the drain to test the waste piping system. Running the clothes washer during an inspection is not a reliable test of the appliance. I am not actually doing a load of laundry, so please note the limitations of this test.
A moisture alarm with water shut-off features is recommended under the washing machine to protect against accidental leaks in the supply hoses. Pans can be effective when there is a drain, but even these will not protect against a burst supply connector. A moisture alarm with automatic shut-off will. Watts is a brand I have seen installed: Link.
|  |
 |  |
Dryer
Tested
Proper dryer exhaust venting is critical for safe and reliable performance from the dryer. Here are some basic rules of thumb for dryer exhaust duct installation: Unless a vent-free appliance is being used, the dryer exhaust vent must terminate outdoors. It should be no more than 25 feet long and for every 90 degree turn subtract 5 feet and for every 45 degree bend subtract 2.5 feet. Use only smooth-wall metal vent pipe @ 4 inch pipe diameter. Do not use plastic pipe and plastic flex pipe. If a flexible connector is needed behind the dryer use a short amount of corrugated metal pipe. If the exhaust duct is getting pinched behind dryer, consider use of a dryer vent box, pictured here. Flex and corrugated pipes should never be used in concealed spaces such as through walls or in attic or crawl spaces. Insulate dryer exhaust duct where it passes through unconditioned spaces to prevent condensation that could hasten lint build-up inside the pipe. Do not use screws to connect pipe as these can trap lint. Secure duct with foil tape as needed. Be sure duct is sleeved properly so that it will not trap lint and clean the vent regularly, especially if it is a long exhaust run.
Power Source: Electric
Exhaust Duct: Ducted to Exterior
Mold like substances and moisture control problems are noted around the dryer exhaust vent.

 |
Repair the broken control knob for the dryer.

Unit # 813
Sub Panel
Sub Panel: Present
Service Conductor Size: Aluminum, 1/0, 125 amps
Sub Panel Amperage: 125 amps
Sub Panel Location: Kitchen
Sub Panel Manufacturer: Murray
This is the original Murray panel.

Branch Wiring
Wire Material: Copper, Multi-strand Aluminum
Wiring Method: Non-metallic sheathed cable
This building is under-wired by modern standards, which means the wiring system may not respond well to modern electrical demands. This can present safety issues as it tends to encourage overloading of circuits and use of power strips and extension cords. This can also be inconvenient - think two prong receptacles. I recommend hiring a licensed electrician to further evaluate the wiring in this building and add circuits as needed for improved safety, reliability and convenience. Consider adding more circuits for the kitchen, office and media areas in particular. The scope and extent of updating the wiring is subjective and depends on desires and expectations for the wiring system. Examples of some of the guidelines for minimum wiring standards in modern houses include:
- No point along a wall in habitable rooms should be more than 6-feet from an electric receptacle
- No point along kitchen countertops should be more than 2-feet from an electric receptacle
- Two 20-amp circuits for the kitchen receptacles
- One 20-amp circuit for the laundry receptacles
- One 20-amp circuit for the bathroom receptacles
- One separate, individual branch circuit for central heating equipment
- An electric receptacle should be provided for the exterior of the house at both the front and the back of the house

Receptacles and Fixtures
Inspection Method: Representative Testing
Electric Receptacles: Three wire receptacles
Since the 1970s, requirements for GFCI (Ground Fault Circuit Interruption) protection have changed, and locations requiring GFCI protection seem to get added with every code cycle. It is common for older residential buildings to have some or even many electric receptacles that do not meet modern safety standards. GFCIs have proven successful at reducing electrocutions, and it seems likely that someday, every circuit, receptacle, and appliance in the building will require GFCI protection. The first chart below shows how successful GFCIs have been at reducing risks from electrocution. The second illustration shows where GFCI protection is required as of the 2020 NEC and WAC. As a general best practice for safety. For improved safety, I always recommend bringing GFCI protection up to modern safety standards.
During inspection today, I noted that GFCI protection is inconsistent with modern minimum standards for safety in the following locations:
- GFCI protection is incomplete for the washer and dryer receptacle

| |
Smoke and Carbon Monoxide Alarm Systems
CO Alarms Noted:Outside all Sleeping Areas
CO Alarms: Present
The installation of carbon monoxide alarms is recommended for all homes that have fuel burning appliances such as gas or oil furnaces, gas water heaters, gas ovens and cooktops, gas fireplaces and wood stoves. In addition, Washington State law (WAC 51-51-0315) now requires UL 2034 approved carbon monoxide alarms in ALL homes and condominiums being sold in Washington State. The location should be: at least one alarm outside of all sleeping areas and one on each floor of the house. Best practices are to have these alarms hardwired with a battery back-up - though requirements are for the installation to meet manufacturer's specifications. Carbon monoxide is a colorless, odorless gas that can cause sickness, nausea and even death. Alarms have a useful service life of roughly 6 years, so changing them more frequently than smoke alarms is recommended.
Smoke Alarms Noted:In All Bedrooms
Smoke Alarms: Present
During the home inspection, I try and test a representative sample of the smoke alarms by using the test button on the alarms. This is NOT an accurate test of the sensor, just a test to see if the unit is powered. For reliability, fire marshals recommended updating smoke alarms every ten years and changing batteries bi-annually. The latest data indicate that we should be using photoelectric technology in our smoke alarms for improved fire detection and reducing problems with false alarms, which can lead to disabling of this critical safety system. Unfortunately, the alarms must be removed to determine if they are photo-electric or ionization types. It is surprisingly complex to accurately test a smoke alarm system and determine the reliability, age, and type of sensor technology used, especially as many homes can have half a dozen or more alarms throughout the house. A complete evaluation of smoke alarms is beyond the scope of this inspection. For optimal fire safety, I recommend taking control of these critical safety devices and learning about how to service and maintain your smoke alarm system to keep the building occupants safe. For more information, please read this link. For more information, please read this link.
Carbon monoxide alarms were found and noted during inspection. Be sure to check these regularly. The standard is 1/ floor and 1 outside all sleeping areas.
Water Heater
System Type: Tank
Manufacturer: American
Data Plate: Shown Here
This shows the data plate for this water heater.

Size: 50 gal
Age: 1974
Energy Source: Electricity
Straps : None Found
Pad: None Needed
Drain Pan: None Noted - Recommended
Expansion Tank: None Noted - Recommended
Relief Valve: Present - Not Tested, Corrugated Supply Connector Used as Discharge
This is a very old water heater. Replacement is recommended for improved reliability as this unit could fail at any point. The average life of these water heaters is 8-20 years. The service life of a water heater will depend on a variety of factors such as water quality and regular scheduled maintenance such as flushing the tank and replacing sacrificial anodes.
Install listed seismic straps to restrain the water heater in the event of an earthquake; none were noted during inspection. Two straps should be located on the water heater: one on upper 1/3rd of tank and one at the lower 1/3rd.
No drain pan has been installed below the water heater here. A drain pan is recommended under water heaters that are located in finished spaces or where a leak could damage finishes. Where a pan does not already exist, the tricky part is providing a drain to the outside. A pan without a drain is often of limited benefit / protection. For improved protection from accidental water heater leaks, and where a drain is difficult to install, consider a pan with a moisture alarm and a flood-safe device such as this: Watts Water Heater Leak Prevention.

An expansion tank is recommended for the water heater; these are required if the house has a closed plumbing system. Expansion tanks help reduce pressure on the plumbing system by creating a buffer or a place for water to expand into as water swells during thermal expansion. Installation of expansion or pressure tanks is modern installation practice and will be required if a pressure reducing valve has been installed on a public water supply. Consult with a qualified plumber to install.
The discharge tube for the water heater temperature and pressure relief valve (TPRV) is plumbed using a corrugated supply connector. Though this is very common, this restricts the diameter of the opening and is unsafe and not recommended - see attached link. Ideally, the discharge tube for a relief valve:
- Terminates to an exterior location or above a drain, though this is not always possible
- Terminates between 6 and 24-inches off the ground (UPC)
- Slopes to drain to prevent water pooling inside the discharge tube
- Is not made from pipe with an inside diameter less than 3/4 on an inch
- Terminates to a visible location that can be monitored for leaks and discharges
- Does not have a threaded termination point which would prevent accidental capping of this important discharge
- Does not terminate into a drain pan
I recommend having this relief valve discharge tube further investigated and repaired as recommended by a licensed plumber.

The water temp on this unit is 111.3 degrees F. 120 degrees is recommended.

Bathroom
Bathroom Photos: 📸
This shows photos of the bathroom for this unit.
 |  |
Sink and Cabinet: Newer
Toilet: Newer
Shower and Tub: Newer
Ventilation: Newer
General Condition:Newer![]() Mid Life
Mid Life![]() Older - Renovation needed In near term
Older - Renovation needed In near term![]() Poor - Renovation needed soon
Poor - Renovation needed soon![]() Urgent Renovation needed
Urgent Renovation needed
High moisture meter readings and the ceiling above the bathroom shower in this unit.

 |
Kitchen
General Kitchen Photos: 📸
This shows general kitchen condition photos
 |  |
Cabinets and Counter Condition: Mid Life
Sink: Mid Life
Flooring, Walls, Ceilings Condition: Mid life
Refrigerator Condition: 📸, Newer
This shows the refrigerator for this unit

Range Condition: Newer, 📸
This shows the range for this unit.

Kitchen Ventilation: Newer
General Kitchen Comments:![]() NewerMid Life
NewerMid Life![]() Older
Older![]() Poor
Poor![]() Failing
Failing
Heating System
Energy Source: Electricity
Heating Method: Electric unitary heaters, Mini-split heat pump
Age: 2017
Manufacturer: Daikin
Heating System Condition: Mid Life
General Capacity of Electric Heaters: 250 watts / foot for electric baseboard heaters
Cooling Systems and Heat Pumps
Heat Pump Present
Manufacturer: Daikin
Data Plate: Shown here
This shows the data plate from the exterior compressor. 📸
 |  |
System Type: Air Source
Listed Nominal Capacity: 1 Ton
Energy Source: Electric
Age: 2017
Recommend cleaning the heat pump filters in this unit.

Interior Finishes
Interior Photos: 📸
This shows interior photos.
 |  |  |
 |
Doors Condition: Mid Life
Windows Condition:![]() NewerMid Life
NewerMid Life![]() Older
Older![]() Poor
Poor![]() Completely Failed
Completely Failed
Flooring Condition: Mid Life
Wall and Ceiling Condition: Mid Life
Trim and Millwork: Mid Life
Interior Ventilation: Located in Bathroom
Paint failure noted to the exterior south door.

Mild scuffing on some of the paint finishes on interior doors.

The ceiling in some rooms of this house contains popcorn texture. This product may contain asbestos as many of these products contained asbestos prior to 1978. After 1978, remaining stocks of material containing asbestos were sold and as the product was slowly phased out. Asbestos testing is beyond the scope of this inspection. The health risks posed by this substance are minimal unless the texture becomes friable or air borne. If you wish to remove the popcorn texture or have remodel plans that could involve cutting or removing this sheetrock, asbestos testing is recommended. Consult with an environmental lab for more information on asbestos testing. One option is always to sheetrock over this texture if you wish to have a different ceiling finish.

Washer
Tested
During inspection I try and run the clothes washing machine. This is mostly so that I can push water down the drain to test the waste piping system. Running the clothes washer during an inspection is not a reliable test of the appliance. I am not actually doing a load of laundry, so please note the limitations of this test.
A moisture alarm with water shut-off features is recommended under the washing machine to protect against accidental leaks in the supply hoses. Pans can be effective when there is a drain, but even these will not protect against a burst supply connector. A moisture alarm with automatic shut-off will. Watts is a brand I have seen installed: Link.
|  |
 |  |  |
Dryer
Tested
Proper dryer exhaust venting is critical for safe and reliable performance from the dryer. Here are some basic rules of thumb for dryer exhaust duct installation: Unless a vent-free appliance is being used, the dryer exhaust vent must terminate outdoors. It should be no more than 25 feet long and for every 90 degree turn subtract 5 feet and for every 45 degree bend subtract 2.5 feet. Use only smooth-wall metal vent pipe @ 4 inch pipe diameter. Do not use plastic pipe and plastic flex pipe. If a flexible connector is needed behind the dryer use a short amount of corrugated metal pipe. If the exhaust duct is getting pinched behind dryer, consider use of a dryer vent box, pictured here. Flex and corrugated pipes should never be used in concealed spaces such as through walls or in attic or crawl spaces. Insulate dryer exhaust duct where it passes through unconditioned spaces to prevent condensation that could hasten lint build-up inside the pipe. Do not use screws to connect pipe as these can trap lint. Secure duct with foil tape as needed. Be sure duct is sleeved properly so that it will not trap lint and clean the vent regularly, especially if it is a long exhaust run.
Power Source: Electric
Exhaust Duct: Ductwork Not Visible
Unit # 815
Sub Panel
Sub Panel: Present
Service Conductor Size: Aluminum, 1/0, 125 amps
Sub Panel Amperage: 125 amps
Sub Panel Location: Kitchen
Sub Panel Manufacturer: Murray
It looks like the original sub panel. A permit sticker was noted for 2018 heat pump.
 |  |  |
Branch Wiring
Wire Material: Copper, Multi-strand Aluminum
Wiring Method: Non-metallic sheathed cable
Loose connections were noted to the bonding jumper for the metal piping system. Be sure these fondant connections are well secured.

This building is under-wired by modern standards, which means the wiring system may not respond well to modern electrical demands. This can present safety issues as it tends to encourage overloading of circuits and use of power strips and extension cords. This can also be inconvenient - think two prong receptacles. I recommend hiring a licensed electrician to further evaluate the wiring in this building and add circuits as needed for improved safety, reliability and convenience. Consider adding more circuits for the kitchen, office and media areas in particular. The scope and extent of updating the wiring is subjective and depends on desires and expectations for the wiring system. Examples of some of the guidelines for minimum wiring standards in modern houses include:
- No point along a wall in habitable rooms should be more than 6-feet from an electric receptacle
- No point along kitchen countertops should be more than 2-feet from an electric receptacle
- Two 20-amp circuits for the kitchen receptacles
- One 20-amp circuit for the laundry receptacles
- One 20-amp circuit for the bathroom receptacles
- One separate, individual branch circuit for central heating equipment
- An electric receptacle should be provided for the exterior of the house at both the front and the back of the house

Receptacles and Fixtures
Inspection Method: Representative Testing
Electric Receptacles: Three wire receptacles
Since the 1970s, requirements for GFCI (Ground Fault Circuit Interruption) protection have changed, and locations requiring GFCI protection seem to get added with every code cycle. It is common for older residential buildings to have some or even many electric receptacles that do not meet modern safety standards. GFCIs have proven successful at reducing electrocutions, and it seems likely that someday, every circuit, receptacle, and appliance in the building will require GFCI protection. The first chart below shows how successful GFCIs have been at reducing risks from electrocution. The second illustration shows where GFCI protection is required as of the 2020 NEC and WAC. As a general best practice for safety. For improved safety, I always recommend bringing GFCI protection up to modern safety standards.
During inspection today, I noted that GFCI protection is inconsistent with modern minimum standards for safety in the following locations:
- The laundry receptacle is missing GFCI protection

| |
Smoke and Carbon Monoxide Alarm Systems
CO Alarms Noted:Outside all Sleeping Areas
CO Alarms: Present
The installation of carbon monoxide alarms is recommended for all homes that have fuel burning appliances such as gas or oil furnaces, gas water heaters, gas ovens and cooktops, gas fireplaces and wood stoves. In addition, Washington State law (WAC 51-51-0315) now requires UL 2034 approved carbon monoxide alarms in ALL homes and condominiums being sold in Washington State. The location should be: at least one alarm outside of all sleeping areas and one on each floor of the house. Best practices are to have these alarms hardwired with a battery back-up - though requirements are for the installation to meet manufacturer's specifications. Carbon monoxide is a colorless, odorless gas that can cause sickness, nausea and even death. Alarms have a useful service life of roughly 6 years, so changing them more frequently than smoke alarms is recommended.
Smoke Alarms Noted:In All Bedrooms
Smoke Alarms: Present
During the home inspection, I try and test a representative sample of the smoke alarms by using the test button on the alarms. This is NOT an accurate test of the sensor, just a test to see if the unit is powered. For reliability, fire marshals recommended updating smoke alarms every ten years and changing batteries bi-annually. The latest data indicate that we should be using photoelectric technology in our smoke alarms for improved fire detection and reducing problems with false alarms, which can lead to disabling of this critical safety system. Unfortunately, the alarms must be removed to determine if they are photo-electric or ionization types. It is surprisingly complex to accurately test a smoke alarm system and determine the reliability, age, and type of sensor technology used, especially as many homes can have half a dozen or more alarms throughout the house. A complete evaluation of smoke alarms is beyond the scope of this inspection. For optimal fire safety, I recommend taking control of these critical safety devices and learning about how to service and maintain your smoke alarm system to keep the building occupants safe. For more information, please read this link. For more information, please read this link.
Carbon monoxide alarms were found and noted during inspection. Be sure to check these regularly. The standard is 1/ floor and 1 outside all sleeping areas.
Water Heater
System Type: Tank
Manufacturer: Rheem
Data Plate: Shown Here
This shows the data plate for this water heater.

Size: 50 gal
Age: 2017
Energy Source: Electricity
Straps : None Found
Pad: None Needed
Drain Pan: Present without drain
Expansion Tank: None Noted - Recommended
Relief Valve: Present - Not Tested
Install listed seismic straps to restrain the water heater in the event of an earthquake; none were noted during inspection. Two straps should be located on the water heater: one on upper 1/3rd of tank and one at the lower 1/3rd.
A drain pan has been installed below the water heater, but no drain was noted for the pan. A drain pan is recommended under water heaters that are located in finished spaces or where a leak could damage finishes. A pan without a drain is often of limited benefit / protection. For improved protection from accidental water heater leaks, and where a drain is difficult to install, consider a pan with a moisture alarm and a flood-safe device such as this: Watts Water Heater Leak Prevention.

An expansion tank is recommended for the water heater; these are required if the house has a closed plumbing system. Expansion tanks help reduce pressure on the plumbing system by creating a buffer or a place for water to expand into as water swells during thermal expansion. Installation of expansion or pressure tanks is modern installation practice and will be required if a pressure reducing valve has been installed on a public water supply. Consult with a qualified plumber to install.
Bathroom
Bathroom Photos: 📸
This shows photos of the bathroom for this unit.
 |  |
Sink and Cabinet: Failing
Toilet: Mid Life
Shower and Tub: Mid Life
Ventilation: Newer
General Condition:![]() Newer
Newer![]() Mid LifeOlder - Renovation needed In near termPoor - Renovation needed soon
Mid LifeOlder - Renovation needed In near termPoor - Renovation needed soon![]() Urgent Renovation needed
Urgent Renovation needed
This bathroom sink is failing and should be replaced as soon as possible. The countertop sink is cracked in this unit.

Corrugated waste pipe was used to drain this main bathroom sink. This is not a listed plumbing product and tends to indicate plumbing work that has not been done by a licensed plumber. Use smooth wall pipe only. Hire a licensed plumber to further evaluate and repair as needed.

The bathroom in this unit is in poor condition. The finishes and fixtures are old and will be increasingly unreliable. Updating/remodeling this bathroom will be needed in the near term. The urgency of updating can be subjective but waiting will risk water damage to surrounding finishes.
With the exception of any comments listed above, this bathroom was in serviceable condition. However, the finishes and fixtures are old and will be increasingly unreliable. Updating / remodeling this bathroom would be a logical improvement in the near term. The urgency of updating will depend on how often this bathroom is to be used and personal desired for reliability and cosmetic appearance.
 |  |  |
 |
Kitchen
General Kitchen Photos: 📸
This shows general kitchen condition photos
 |  |  |
Cabinets and Counter Condition: Mid Life
Sink: Mid Life
Flooring, Walls, Ceilings Condition: Mid life
Refrigerator Condition: 📸, Mid-Life
This shows the refrigerator for this unit
 |  |
Range Condition: Older
Kitchen Ventilation: Older
General Kitchen Comments:![]() Newer
Newer![]() Mid LifeOlder
Mid LifeOlder![]() Poor
Poor![]() Failing
Failing
Corrugated waste pipe was used to drain the kitchen sink. This in an unlisted plumbing product. Use smooth wall pipe only. Hire a licensed plumber to further evaluate and repair as needed.

The kitchen range is getting older. Funds should be reserved for replacement in the near term.

The kitchen ventilation system is in poor condition. Updating is recommended in the near term.

The kitchen in this unit is getting older. Funds should be reserved to update this kitchen in the near term.
Heating System
Energy Source: Electricity
Heating Method: Electric unitary heaters, Mini-split heat pump
Age: 2017
Manufacturer: Daikin
Heating System Condition: Mid Life
General Capacity of Electric Heaters: 250 watts / foot for electric baseboard heaters
Cooling Systems and Heat Pumps
Heat Pump Present
Manufacturer: Daikin
Data Plate: Shown here
This shows the data plate from the exterior compressor. 📸
 |  |
System Type: Air Source
Listed Nominal Capacity: 1 Ton
Energy Source: Electric
Age: 2017
The air filter for the ductless heat pump head was clean at the time of the inspection.

Interior Finishes
Interior Photos: 📸
This shows interior photos.
 |  |  |
 |
Doors Condition: Older
Windows Condition:![]() Newer
Newer![]() Mid LifeOlder
Mid LifeOlder![]() Poor
Poor![]() Completely Failed
Completely Failed
Flooring Condition: Poor
Wall and Ceiling Condition: Mid Life
Trim and Millwork: Mid Life
Interior Ventilation: Located in Bathroom
The flooring in this unit is in poor condition. Updating should be anticipated soon. The carpeting is the biggest issue in this unit.
 |  |
The doors in this unit are older. Updating should be anticipated in the near term.
 |  |  |
The windows in this unit are older. Updating should be anticipated soon.
- A cracked window frame or two were noted at the living room

 |
The ceiling in some rooms of this house contains popcorn texture. This product may contain asbestos as many of these products contained asbestos prior to 1978. After 1978, remaining stocks of material containing asbestos were sold and as the product was slowly phased out. Asbestos testing is beyond the scope of this inspection. The health risks posed by this substance are minimal unless the texture becomes friable or air borne. If you wish to remove the popcorn texture or have remodel plans that could involve cutting or removing this sheetrock, asbestos testing is recommended. Consult with an environmental lab for more information on asbestos testing. One option is always to sheetrock over this texture if you wish to have a different ceiling finish.

Washer
Tested
During inspection I try and run the clothes washing machine. This is mostly so that I can push water down the drain to test the waste piping system. Running the clothes washer during an inspection is not a reliable test of the appliance. I am not actually doing a load of laundry, so please note the limitations of this test.
A moisture alarm with water shut-off features is recommended under the washing machine to protect against accidental leaks in the supply hoses. Pans can be effective when there is a drain, but even these will not protect against a burst supply connector. A moisture alarm with automatic shut-off will. Watts is a brand I have seen installed: Link.
|  |
 |  |  |
Dryer
Tested
Proper dryer exhaust venting is critical for safe and reliable performance from the dryer. Here are some basic rules of thumb for dryer exhaust duct installation: Unless a vent-free appliance is being used, the dryer exhaust vent must terminate outdoors. It should be no more than 25 feet long and for every 90 degree turn subtract 5 feet and for every 45 degree bend subtract 2.5 feet. Use only smooth-wall metal vent pipe @ 4 inch pipe diameter. Do not use plastic pipe and plastic flex pipe. If a flexible connector is needed behind the dryer use a short amount of corrugated metal pipe. If the exhaust duct is getting pinched behind dryer, consider use of a dryer vent box, pictured here. Flex and corrugated pipes should never be used in concealed spaces such as through walls or in attic or crawl spaces. Insulate dryer exhaust duct where it passes through unconditioned spaces to prevent condensation that could hasten lint build-up inside the pipe. Do not use screws to connect pipe as these can trap lint. Secure duct with foil tape as needed. Be sure duct is sleeved properly so that it will not trap lint and clean the vent regularly, especially if it is a long exhaust run.
Power Source: Electric
Exhaust Duct: Ducted to Exterior
Quite a bit of dryer lint was noted behind the dryer indicating a possible week in the transition vent.

The dryer exhaust ductwork is dirty and needs to be cleaned for improved safety. This is important, regular maintenance to eliminate a potential fire hazard.

Unit # 817
Sub Panel
Sub Panel: Present
Service Conductor Size: Aluminum, 1/0, 125 amps
Sub Panel Amperage: 125 amps
Sub Panel Location: Kitchen
Sub Panel Manufacturer: Murray
This is the original subpanel.
 |  |
Branch Wiring
Wire Material: Copper, Multi-strand Aluminum
Wiring Method: Non-metallic sheathed cable
This building is under-wired by modern standards, which means the wiring system may not respond well to modern electrical demands. This can present safety issues as it tends to encourage overloading of circuits and use of power strips and extension cords. This can also be inconvenient - think two prong receptacles. I recommend hiring a licensed electrician to further evaluate the wiring in this building and add circuits as needed for improved safety, reliability and convenience. Consider adding more circuits for the kitchen, office and media areas in particular. The scope and extent of updating the wiring is subjective and depends on desires and expectations for the wiring system. Examples of some of the guidelines for minimum wiring standards in modern houses include:
- No point along a wall in habitable rooms should be more than 6-feet from an electric receptacle
- No point along kitchen countertops should be more than 2-feet from an electric receptacle
- Two 20-amp circuits for the kitchen receptacles
- One 20-amp circuit for the laundry receptacles
- One 20-amp circuit for the bathroom receptacles
- One separate, individual branch circuit for central heating equipment
- An electric receptacle should be provided for the exterior of the house at both the front and the back of the house

Receptacles and Fixtures
Inspection Method: Tested All Accessible
Electric Receptacles: Three wire receptacles
Several electric receptacles seem to be missing in the kitchen countertop. Re-install as needed so the kitchen has an adequate number of receptacles.

 |
Since the 1970s, requirements for GFCI (Ground Fault Circuit Interruption) protection have changed, and locations requiring GFCI protection seem to get added with every code cycle. It is common for older residential buildings to have some or even many electric receptacles that do not meet modern safety standards. GFCIs have proven successful at reducing electrocutions, and it seems likely that someday, every circuit, receptacle, and appliance in the building will require GFCI protection. The first chart below shows how successful GFCIs have been at reducing risks from electrocution. The second illustration shows where GFCI protection is required as of the 2020 NEC and WAC. As a general best practice for safety. For improved safety, I always recommend bringing GFCI protection up to modern safety standards.
During inspection today, I noted that GFCI protection is inconsistent with modern minimum standards for safety in the following locations:
- GFCI protection is incomplete in the laundry

| |
Smoke and Carbon Monoxide Alarm Systems
CO Alarms: None Noted
The installation of carbon monoxide alarms is recommended for all homes that have fuel burning appliances such as gas or oil furnaces, gas water heaters, gas ovens and cooktops, gas fireplaces and wood stoves. In addition, Washington State law (WAC 51-51-0315) now requires UL 2034 approved carbon monoxide alarms in ALL homes and condominiums being sold in Washington State. The location should be: at least one alarm outside of all sleeping areas and one on each floor of the house. Best practices are to have these alarms hardwired with a battery back-up - though requirements are for the installation to meet manufacturer's specifications. Carbon monoxide is a colorless, odorless gas that can cause sickness, nausea and even death. Alarms have a useful service life of roughly 6 years, so changing them more frequently than smoke alarms is recommended.
Smoke Alarms: None In Bedrooms
During the home inspection, I try and test a representative sample of the smoke alarms by using the test button on the alarms. This is NOT an accurate test of the sensor, just a test to see if the unit is powered. For reliability, fire marshals recommended updating smoke alarms every ten years and changing batteries bi-annually. The latest data indicate that we should be using photoelectric technology in our smoke alarms for improved fire detection and reducing problems with false alarms, which can lead to disabling of this critical safety system. Unfortunately, the alarms must be removed to determine if they are photo-electric or ionization types. It is surprisingly complex to accurately test a smoke alarm system and determine the reliability, age, and type of sensor technology used, especially as many homes can have half a dozen or more alarms throughout the house. A complete evaluation of smoke alarms is beyond the scope of this inspection. For optimal fire safety, I recommend taking control of these critical safety devices and learning about how to service and maintain your smoke alarm system to keep the building occupants safe. For more information, please read this link. For more information, please read this link.
The installation of carbon monoxide alarms is recommended for all homes that have fuel burning appliances such as gas or oil furnaces, gas water heaters, gas ovens and cook-tops, gas fireplaces and wood stoves. Carbon monoxide is a colorless, odorless gas that can cause sickness, nausea and even death. For more information, consult the Consumer Product Safety Commission at 1-800-638-2772 (C.P.S.C.) Modern standards in many states now recommend one CO alarm outside of all bedrooms and at least 1 per floor of the house.
- The alarm for this unit seems to have been cut out.

 |
Modern standards recommend smoke alarms in all bedrooms, in all hallways outside bedrooms and at least one on each floor of the building. At the time of inspection smoke alarms were incomplete in the bedrooms.

 |
Water Heater
System Type: Tank
Manufacturer: Bradford-White
Data Plate: Shown Here
This shows the data plate for this water heater.

Size: 50 gal
Age: Bradford White (Y = 2002), 2002
Energy Source: Electricity
Straps : None Found
Pad: None Needed
Drain Pan: None Noted - Recommended
Expansion Tank: None Noted - Recommended
Relief Valve: Present - Not Tested, Corrugated Supply Connector Used as Discharge
Install listed seismic straps to restrain the water heater in the event of an earthquake; none were noted during inspection. Two straps should be located on the water heater: one on upper 1/3rd of tank and one at the lower 1/3rd.
No drain pan has been installed below the water heater here. A drain pan is recommended under water heaters that are located in finished spaces or where a leak could damage finishes. Where a pan does not already exist, the tricky part is providing a drain to the outside. A pan without a drain is often of limited benefit / protection. For improved protection from accidental water heater leaks, and where a drain is difficult to install, consider a pan with a moisture alarm and a flood-safe device such as this: Watts Water Heater Leak Prevention.

An expansion tank is recommended for the water heater; these are required if the house has a closed plumbing system. Expansion tanks help reduce pressure on the plumbing system by creating a buffer or a place for water to expand into as water swells during thermal expansion. Installation of expansion or pressure tanks is modern installation practice and will be required if a pressure reducing valve has been installed on a public water supply. Consult with a qualified plumber to install.
The discharge tube for the water heater temperature and pressure relief valve (TPRV) is plumbed using a corrugated supply connector. Though this is very common, this restricts the diameter of the opening and is unsafe and not recommended - see attached link. Ideally, the discharge tube for a relief valve:
- Terminates to an exterior location or above a drain, though this is not always possible
- Terminates between 6 and 24-inches off the ground (UPC)
- Slopes to drain to prevent water pooling inside the discharge tube
- Is not made from pipe with an inside diameter less than 3/4 on an inch
- Terminates to a visible location that can be monitored for leaks and discharges
- Does not have a threaded termination point which would prevent accidental capping of this important discharge
- Does not terminate into a drain pan
I recommend having this relief valve discharge tube further investigated and repaired as recommended by a licensed plumber.

This water heater is likely close to the end of its useful service life. The average life of a water heater is statistically 8-12 years though in practice, they can vary widely between 8-20 years depending on water quality and maintenance schedule such as frequency of flushing the tank and replacing sacrificial anodes. Budget to replace this water heater at any time. Water was hot at the time of inspection.
Bathroom
Bathroom Photos: 📸
This shows photos of the bathroom for this unit.

Sink and Cabinet: Poor
Toilet: Mid Life
Shower and Tub: Older, Newer
Ventilation: Newer
General Condition:![]() NewerMid Life
NewerMid Life![]() Older - Renovation needed In near term
Older - Renovation needed In near term![]() Poor - Renovation needed soon
Poor - Renovation needed soon![]() Urgent Renovation needed
Urgent Renovation needed
The bathroom sink and cabinet are in poor condition. Budget to update soon.

The shower/tub system in this unit is older. I would plan on the need to update in the near term.
 |  |  |
 |
Kitchen
General Kitchen Photos: 📸
This shows general kitchen condition photos
 |  |
Cabinets and Counter Condition: Mid Life
Sink: Mid Life
Flooring, Walls, Ceilings Condition: Mid life
Refrigerator Condition: Mid-Life, 📸
This shows the refrigerator for this unit

Range Condition: Older
Kitchen Ventilation: Mid Life
General Kitchen Comments:![]() NewerMid Life
NewerMid Life![]() Older
Older![]() Poor
Poor![]() Failing
Failing
An anti-tip device is needed to prevent this range from tipping during operation of the oven door. This is a small clip that secured the back adjustable feet of the range to the floor.
|  |
The kitchen range is getting older. Funds should be reserved for replacement in the near term.

Heating System
Energy Source: Electricity
Heating Method: Electric unitary heaters, Mini-split heat pump
Age: 2017
Manufacturer: Daikin
Heating System Condition: Mid Life
Cooling Systems and Heat Pumps
Heat Pump Present
Manufacturer: Daikin
Data Plate: Shown here
This shows the data plate from the exterior compressor. 📸

System Type: Air Source
Listed Nominal Capacity: 1 Ton
Energy Source: Electric
Age: 2017
Secure the loose cover to the heat pump - unit 817

The air filter for the ductless heat pump needs to be cleaned in this unit.

Interior Finishes
Interior Photos: 📸
This shows interior photos.
 |  |  |
 |  |
Doors Condition: Older
Windows Condition:![]() NewerMid Life
NewerMid Life![]() Older
Older![]() Poor
Poor![]() Completely Failed
Completely Failed
Flooring Condition: Mid Life
Wall and Ceiling Condition: Mid Life
Trim and Millwork: Mid Life
Interior Ventilation: Located in Bathroom
The doors in this unit are older. Updating should be anticipated in the near term.
 |  |  |
 |
The ceiling in some rooms of this house contains popcorn texture. This product may contain asbestos as many of these products contained asbestos prior to 1978. After 1978, remaining stocks of material containing asbestos were sold and as the product was slowly phased out. Asbestos testing is beyond the scope of this inspection. The health risks posed by this substance are minimal unless the texture becomes friable or air borne. If you wish to remove the popcorn texture or have remodel plans that could involve cutting or removing this sheetrock, asbestos testing is recommended. Consult with an environmental lab for more information on asbestos testing. One option is always to sheetrock over this texture if you wish to have a different ceiling finish.

Washer
Tested
During inspection I try and run the clothes washing machine. This is mostly so that I can push water down the drain to test the waste piping system. Running the clothes washer during an inspection is not a reliable test of the appliance. I am not actually doing a load of laundry, so please note the limitations of this test.
A moisture alarm with water shut-off features is recommended under the washing machine to protect against accidental leaks in the supply hoses. Pans can be effective when there is a drain, but even these will not protect against a burst supply connector. A moisture alarm with automatic shut-off will. Watts is a brand I have seen installed: Link.
|  |
 |  |  |
 |  |
Dryer
Tested
Proper dryer exhaust venting is critical for safe and reliable performance from the dryer. Here are some basic rules of thumb for dryer exhaust duct installation: Unless a vent-free appliance is being used, the dryer exhaust vent must terminate outdoors. It should be no more than 25 feet long and for every 90 degree turn subtract 5 feet and for every 45 degree bend subtract 2.5 feet. Use only smooth-wall metal vent pipe @ 4 inch pipe diameter. Do not use plastic pipe and plastic flex pipe. If a flexible connector is needed behind the dryer use a short amount of corrugated metal pipe. If the exhaust duct is getting pinched behind dryer, consider use of a dryer vent box, pictured here. Flex and corrugated pipes should never be used in concealed spaces such as through walls or in attic or crawl spaces. Insulate dryer exhaust duct where it passes through unconditioned spaces to prevent condensation that could hasten lint build-up inside the pipe. Do not use screws to connect pipe as these can trap lint. Secure duct with foil tape as needed. Be sure duct is sleeved properly so that it will not trap lint and clean the vent regularly, especially if it is a long exhaust run.
Power Source: Electric
Exhaust Duct: Ducted to Exterior
Invoice -- 📃 The Complete Inspection Report
6543 Sample lane Bainbridge Island, WA 98110
| Inspection Fee | $2600.00 |
| 2600.00 | |
| DUE |
Orca Inspection Services LLC
C/O Dylan Chalk
5761 NE Tolo Rd
Bainbridge Island, WA 98110
206-713-5715
Signed Contracts
Orca Inspection Services LLC
206-713-5715
www.orcainspect.com
Inspector: Dylan Chalk, WA State Inspector License
No. 365, WA State Pest License
No. 65540
orcainspect@gmail.com
.jpg)