
The Scope and Purpose of a Home Inspection
Purchasing property involves risk
The purpose of a home inspection is to help reduce the risk associated with the purchase of a structure by providing a professional opinion about the overall condition of the structure. A home inspection is a limited visual inspection and it cannot eliminate this risk. Some homes present more risks than others. We cannot control this, but we try to help educate you about what we don’t know during the inspection process. This is more difficult to convey in a report and one of many reasons why we recommend that you attend the inspection.
A home inspection is not an insurance policy
This report does not substitute for or serve as a warranty or guarantee of any kind. Home warranties can be purchased separately from insuring firms that provide this service.
A home inspection is visual and not destructive
The descriptions and observations in this report are based on a visual inspection of the structure. We inspect the aspects of the structure that can be viewed without dismantling, damaging or disfiguring the structure and without moving furniture and interior furnishings. Areas that are concealed, hidden or inaccessible to view are not covered by this inspection. Some systems cannot be tested during this inspection as testing risks damaging the building. For example, overflow drains on bathtubs are generally not tested because if they were found to be leaking they could damage the finishes below. Our procedures involve non-invasive investigation and non-destructive testing which will limit the scope of the inspection.
This is not an inspection for code compliance
This inspection and report are not intended for city / local code compliance. During the construction process structures are inspected for code compliance by municipal inspectors. Framing is open at this time and conditions can be fully viewed. Framing is not open during inspections of finished homes, and this limits the inspection. All houses fall out of code compliance shortly after they are built, as the codes continually change. National codes are augmented at least every three years for all of the varying disciplines. Municipalities can choose to adopt and phase in sections of the codes on their own timetables. There are generally no requirements to bring older homes into compliance unless substantial renovation is being done.
Environmental/Mold Exclusions
The reported or actual health effects of many potentially harmful, toxic or environmentally hazardous elements that may be found in building materials or in the air, soil, water in and/or around any house are varied, and, in some cases controversial. A home inspection does not include the detection, identification or analysis of any such elements or related concerns such as, but not limited to, mold, allergens, legal/illegal drugs and other biological contaminants, radon, , bed bugs, cockroaches, fleas, lice, formaldehyde, asbestos, lead, electromagnetic fields, carbon monoxide, insecticides, Chinese drywall, refrigerants and fuel oils. Furthermore, no evaluations are performed to determine the effectiveness or appropriateness of any method or system (e.g., water filter, radon mitigation, etc.), designed to prevent or remove any hazardous or unwanted materials or elements. An environmental health specialist should be contacted for evaluation of any potential health or environmental concerns. The noting of the presence of materials commonly considered to contain asbestos, formaldehyde, lead, mold etc in the inspection report, should not be construed to mean the inspector is inspecting for these things but instead should be seen as a "heads-up" regarding these materials and further evaluation by qualified professional may be warranted.
This is just our opinion and just for you
The contents of this report are for the sole use of the client named above and no other person or party may rely on this report for any reason or purpose whatsoever without the prior written consent of the inspector who authored the report. Any person or party who chooses to rely on this report for any reason or purpose whatsoever without the express written consent of the inspector does so at their own risk and by doing so without the prior written consent of the inspector waives any claim of error or deficiency in this report.
Construction techniques and standards vary. There is no one way to build a house or install a system in a house. The observations in this report are the opinions of the home inspector. Other inspectors and contractors are likely to have some differing opinions. You are welcome to seek opinions from other professionals.
The scope of this inspection
The inspection and report are intended to provide the client with information regarding the condition of the systems and components of the property as observed at the time of the inspection. The inspector examines the readily accessible systems and components using normal operating controls. The inspection is not technically exhaustive and will not identify concealed conditions or latent defects. Any comments offered by the INSPECTOR that could be construed as over or beyond the standards of practice or the language of this contract, are offered as a professional courtesy. Refer to the Washington State, Standards of Practice and/or Pre-Inspection Agreement for additional information regarding the scope and limitations of the inspection. The Standards of Practice are linked below and describe the "minimum" standards a Licensed Washington State Home Inspector must adhere to: http://app.leg.wa.gov/RCW/default.aspx?cite=18.280.030.
All homes are likely to have some faults which may range from cosmetic defects to major safety hazards. Not all defects will be found. While some minor deficiencies may be mentioned, the emphasis of this report is to inform the buyer of the property condition by detecting deficiencies or circumstances that may affect the structural integrity of the building and its components and its safe use as a residence.
You are encouraged to obtain competitive estimates for major repair needs. Safety and health issues should be addressed promptly. It is recommended that all corrective work, other than routine maintenance activities, be performed by qualified licensed contractors.
It is beyond the scope of the Standard Home Inspection to identify components within the home that may have been part of a "manufacturer's recall". Mention of specific recalls within this report must not be construed to mean that all such items have been identified, or that such identification is part of a Standard Home Inspection. When possible, appliance Model Numbers and Serial Numbers are included in the report and can be used to check for recall related issues. If you have any question about specific appliances, information can be found at the CPSC (Consumer Products Safety Commission) website: https://www.cpsc.gov, or contact the manufacturer directly.
It is recommended that you obtain as much history as is available concerning this property. This historical information may include copies of any seller's disclosures, previous inspection or engineering reports, reports performed for or by relocation companies, municipal inspection departments, lenders, insurers and appraisers. You should attempt to determine whether repairs, renovation, remodeling, additions or other such activities have taken place at this property, and this report will attempt to identify such items when possible.
Ranges, Dish Washers, and Refrigerators (and the like) are typically tested for basic function (Do they turn on). No assertions are made as to how well they function. Microwave ovens, clothes washers/dryers are not operated.
Throughout this report, comments will be made as to the presence or absence of components or parts of components. This must not be construed to mean that these components or parts of components exist (or don't exist) in concealed areas or behind finished surfaces. For example: if foundation bolting was seen in one area, it does not mean that the bolting exists (or doesn't exist) in areas that are concealed. Also if an item was noted as "not being visible," that should not be construed to mean that none of whatever was "not visible" does not exist on the premises---it just means none was noted at the time of inspection and should be seen as a "heads-up" that the concern or condition might be present but hidden, or that the conditions that would allow its presence to be known was not replicated at the time of inspection.
Many of the non-narrative observations/documentation detailed in the report that are related to more "cosmetic" issues should not be construed as "all inclusive" but should instead be seen in as "suggestive" or a "guideline" of conditions that may exist elsewhere in the home. It is not the focus of the report to comment extensively on cosmetic issues, but I do make note of them at times to help complete the "snap-shot" of the home at the time of inspection. For example, "nail-pops" seen in one room are likely to be seen (and should be anticipated) in other rooms even though I may not have noted them in the report.
Throughout the report I may make recommendations as to possible repairs. These recommendations are not intended to be substitutes or construed to be more appropriate than the recommendations of the professionals making the repairs. Conflicts in recommendations should be resolved prior to repairs being made.
Who should make repairs and what should their qualifications be?
Contractor qualifications: In the text of the report, in some instances, I recommend that work be done by a "qualified" person or "qualified" parties. I consider qualified parties, in licensed trades, to be those individuals who hold the necessary licenses to legally work in their profession -- licensed electricians, licensed pest control applicators, licensed plumbers, licensed HVAC professionals, licensed engineers, licensed general contractors, etc. In instances where a task may not, typically, need to be done by a person with a license, my recommendation is to hire an individual to do the work who is, based on past training, experience or expertise, qualified to further evaluate the condition or problem listed in the report and to then make appropriate repairs.
Photography/Infrared and Moisture meters used
Digital photographs, thermographs and illustrations may be included in this report. If included, their purpose is to better illustrate an observation or recommendation. No degree of importance should be inferred by the presence or absence of photos and illustrations. Some pictures will undergo lightening, darkening, cropping and have callouts and other "overlays" present, but the image itself will not be altered unless specifically noted on the picture. The use of infrared thermography (IR) must not be construed to mean that a full thermal survey of the structure was done. The use of IR is primarily for recording thermal differences to show the function or lack of function of heating and cooling of HVAC equipment; and, anomalies associated with temperature differences sometimes produced by water leaks, air infiltration etc. IR during a home inspection is mainly a qualitative evaluation and, in most cases, "thermal tuning" will not have been performed and therefor temperatures present on any thermal images in the report should not be seen as an absolute temperature but only "relative temperature."
Throughout the report, reference may be made to moisture conditions and percentages of moisture content. These moisture readings are obtained by the use of a Protimeter Surveymaster Moisture Meter.
Your participation is requested
Your presence is requested during this inspection. A written report will not substitute for all the possible information that can be conveyed verbally by a shared visual observation of the conditions of the property. If you were not present during the inspection, you are urged to contact the inspector for a verbal consultation. I am happy to speak on the phone or a similar method to go through areas of concern in the report. If you choose not to consult with the inspector, West Inspect LLC cannot be responsible for misinterpretation of the report.
How to Read This Report
Getting the Information to You
This report is designed to deliver important and technical information in a way that is easy for anyone to access and understand. If you are in a hurry, you can take a quick look at our "Summary Page” and quickly get critical information for important decision making. However, we strongly recommend that you take the time to read the full Report, which includes digital photographs, captions, diagrams, descriptions, videos and hot links to additional information.
The best way to get the layers of information that are presented in this report is to read your report online, which will allow you to expand your learning about your house. You will notice some words or series of words highlighted in blue and underlined – clicking on these will provide you with a link to additional information.
This report can also be printed on paper or to a PDF document.
Chapters and Sections
This report is divided into chapters that parcel the home into logical inspection components. Each chapter is broken into sections that relate to a specific system or component of the home. You can navigate between chapters with the click of a button on the left side margin.
Most sections will contain some descriptive information done in black font. Observation narrative, done in colored boxes, will be included if a system or component is found to be significantly deficient in some way or if we wish to provide helpful additional information about the system or the scope of our inspection. If a system or component of the home was deemed to be in satisfactory or serviceable condition, there may be no narrative observation comments in that section and it may simply say “tested,” or “inspected.”
Observation Labels
All narrative observations are colored, numbered and labeled to help you find, refer to, and understand the severity of the observation. Observation colors and labels used in this report are:
- Repair/Replace:Repair and maintenance items noted during inspection. Please note that some repair items can be expensive to correct such as re-finishing hardwood floors, but are considered simply repair items due to their cosmetic nature.
- Recommended Maintenance:These are repair items that should be considered "routine home ownership items," such as servicing the furnace, cleaning the gutters or changing the air filters in the furnace.
- Improvements & Upgrades:Observations that are not necessarily defects, but which could be improved for safety, efficiency, or reliability reasons.
- Minor Repair:Items or components of the home that are defective and, in the opinion of the inspector, may be considered minor concerns or are typical for the age of the home. Any recommended improvements to the home may also be in this category.
- Due Diligence:Observation such as a buried oil tank that may require further investigation to determine the severity and / or urgency of repair.
- Efficiency:Denotes observations that are needed to make the home more energy efficient as well as to bring the home up to modern insulation standards. This category typically includes windows and insulation. Other items, such as lighting and appliances, are not inspected for their energy status.
- Inspection Notes & Limitations:Refers to aside information and /or any comments elaborating on descriptions of systems in the home or limitations to the home inspection.
- Description:Detailed description of various aspects of the property noted during the inspection.
Summary Page
The Summary Page is designed as a bulleted overview of all the observations noted during inspection. This helpful overview is not a substitution for reading the entire inspection report. The entire report must be read to get a complete understanding of this inspection report as the Summary Page does not include photographs or photo captions.
Moisture Meter Testing
Where moisture meter testing is indicated in this report a Protimeter Surveymaster Dual Function was used.
Summary
Repairs
- DPB-1 Decks, Porches and Balconies:
Several conditions were noted with the decking installation - see list below. These are all very common conditions found in older deck installations, but they should be addressed going forward. Hire a licensed decking contractor for a further evaluation and to perform all needed repairs. Some of my observations include:
Framing
- A metal roof system had been installed below the deck that concealed most of the framing materials from view and inspection.
- The deck was missing areas of hardware/positive connections at some of the framing connection - see stair stinger and other areas. Hardware should be installed to ensure proper support at all needed area of framing.
- Fasteners used to secure the installed joist hangers did not appear to be rated for these types of installation.
- Lateral load connections have not been installed for this deck. This is a bolting system that connects the floor joists of the deck to the joists in the house. These are required in newer decks and will make the deck safer and less prone to pulling free from the house. Consider installing later load connections during renovations or repairs to this deck.
- The deck structure was bearing directing onto the rear concrete patio. Typically deck support such as this is installed in a way that concrete piers are poured 18 inches below the ground and then the support posts are attached to them. In this installation you are relying on the concrete patio for support that is typically not rated for this type of installation due to its thickness. No obvious damage was noted, but I recommend updating this support system in the future to conform with current standards.
Handrail/Guardrail
- The installed handrails were not graspable as needed and did not have adequate clearances from the wall covering. A 1 1/2 inch clearance is needed from the wall.
- The open riser height exceeded the 4 inch maximum requirement and will need to be modified and/or filled in.
- The guardrail installation was loose and needed to be re secured. Also some of the openings exceeded the 4 inch maximum as well.
Stairs
- The stairway was lacking mid span support at its installation and was loose overall.
Deck Planking
- The wood decking on this deck needs to be re-stained to preserve the wood and prevent the wood from becoming slippery. The most important deck maintenance for wood decks is regular cleaning to prevent the decking from becoming slippery. Additional protection can be added by using a deck stain. Painting is never recommended as this can trap water in the decking and facilitate decay.
- RCG2-1 Roof, Chimney and Gutters:
Tune up repairs are recommended to prolong the reliable and useful service life of this roof. This is an older roof, but there appears to be useful remaining service life. The roofing material on this building is done in a dimensional or architectural grade shingle composition shingle. These shingles are often rated as 30 year materials, though I find in practice, as a roof assembly, 23-28 years is more realistic depending on the quality of the installation, the amount of exposure and the pitch of the roof. Hire a licensed roofing contractor to further evaluate and repair this roof to ensure reliable roof performance. Examples of observations and repair items noted during inspection include:
Materials
- Moss growth was noted at several locations and to the roof covering should be cleaned by a professional roofing company.
- The ends of the ridge venting were missing adequate pest blocking to deny entry into the attic space. Fill these areas where needed.
Flashing
- No kick out flashing was installed at areas of the roof covering - see front and right sides. Kick out flashing should be installed to help promote water away from the sidewall and into the gutter system/off the roof.
- The chimney flashing was installed in a way that allowed moisture to run down the chase itself. Install flashing to differ water back onto the roof and into the gutter system.
Components
- The concrete chimney cap is in poor condition and requires repair to prevent water from entering and damaging the chimney. Hire a mason to further evaluate and repair the masonry chimney cap.
- Several plumbing vent flashings were damaged at the roof covering were in need of replacement. This can be due to several conditions including age, pests, mechanical damage and so on.
- G2-1 Garage:
An unprotected opening was found in the garage wall and ceiling finishes. This should be repaired to complete the fire separation between the house and the garage. Large holes should be repaired with the proper sheetrock materials. Small holes and openings should be sealed with mud or high temperature of "fire stop" caulking. Openings with doors should employ listed fire-rated doors.
- G2-2 Garage:
No safety wire / containment cabling was noted running inside the overhead garage door springs. This is a modern standard to prevent a broken spring from becoming a projectile. Install a wire inside these springs for improved safety.
- ES1-1 Electric Service:
Overall a few conditions were noted in the service equipment - see list below. I recommend additional inspection and repair by a licensed electrical contractor as additional repairs could be needed that are latent or concealed. Examples of defects found during inspection are included below:
Circuit Breakers
- Circuit breakers were of a brand different from the panel manufacture. Because circuit breakers made by different manufacturers vary in design, panel manufacturers typically require that breakers manufactured by their company be used in their panels. Breakers from one manufacturer used in the panel of another manufacturer may result in poor connections which can create a potential fire or shock/electrocution hazard.
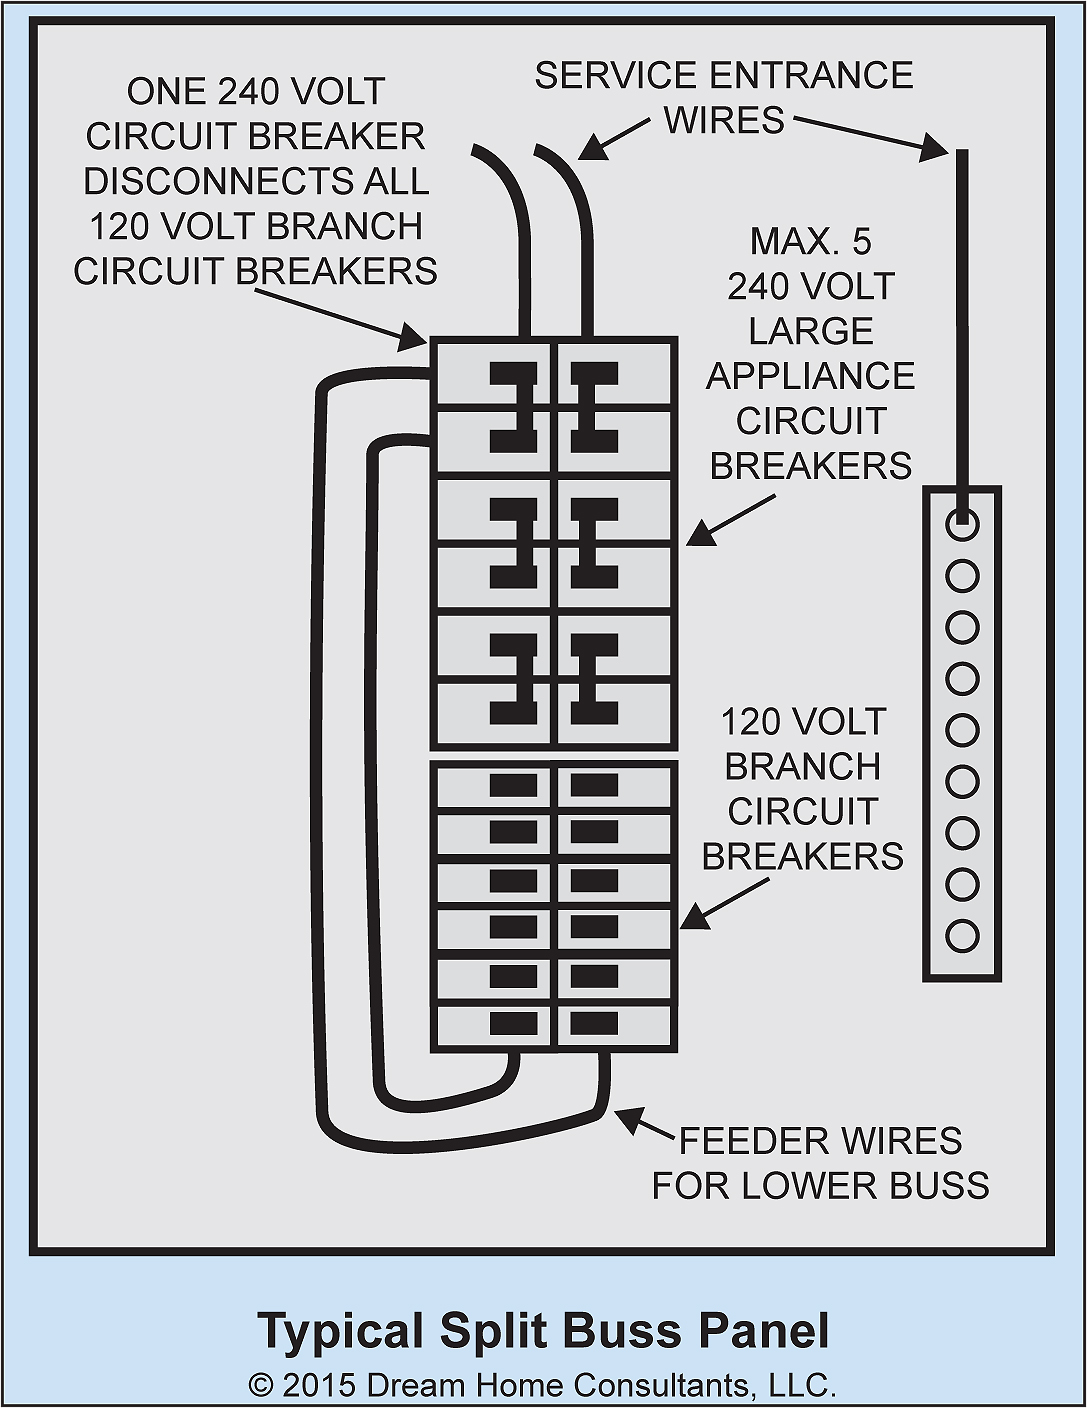
- The installed service equipment was a split bus panel. Split bus panels have a requirement for six or less hand movements to shut all power off to the home. During the inspection I observed at least 7 hand movements needed to disconnect power.
Wiring
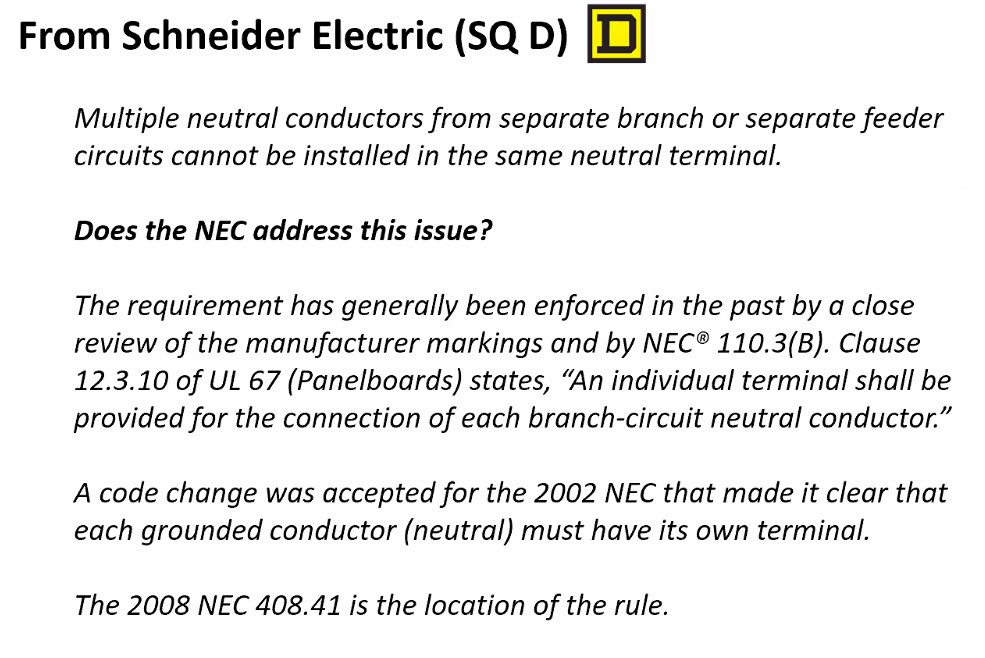
- Correct the double lugged neutral or grounded conductors in the electric panel - this is when two conductors share the same lug. Each grounded conductor shall terminate within a panelboard in an individual terminal that is not also used for another conductor. Double lugged conductors risk poorly protected conductors that are more vulnerable to arcing and overheating.
- The white conductors inside the electric panel at the 240 volt circuits are not correctly identified as hot or ungrounded conductors - these should be painted in black or red ink for correct identification and improved safety.
Enclosure
- Grommets or bushings are needed to protect the non-metallic sheathed cable where the wiring enters the electrical panel and provide strain relief.
Design & Upgrades
- This home has an older split bus electric panel installed. In general this is an obsolete load center and the circuit breakers can become increasingly unreliable due to age. Updating this service equipment is recommended in the near term for improved reliability and added safety to the home and its occupants.
- HCFV-5 Heating, Cooling, Fireplaces and Ventilation:
The hearth extension in front of the wood-burning fixture is missing. Generally, a 20-inch deep hearth is recommended in front of all fireplaces greater than 6 square feet. The hearth should extend 12 inches to the sides of the firebox. For smaller fireplaces, minimum recommended clearances are 16 inches deep and 8 inches on either side. Manufacturers tend to have similar requirements, but they can vary slightly. Hire a qualified mason or chimney sweep to further investigate and repair
- I-1 Interior:
The wood laminate floors are damaged in places - see kitchen near the dishwasher and refrigerator. This appeared to be due to a leaking dishwasher and/or improper use of it. Have all damaged flooring further evaluated and repaired by a qualified contractor as needed.
- I-8 Interior:
Modern standards recommend smoke alarms in all bedrooms, in all hallways outside bedrooms and at least one on each floor of the building. At the time of inspection no alarms were found in the bedrooms as needed. Install additional smoke detectors in all currently required areas of the home.
Carbon monoxide alarms were found and noted during inspection, but not at all required areas - see basement. Be sure to check these regularly with the test button to ensure they are operational. The standard is 1/ floor and 1 outside all sleeping areas. Install all missing CO detectors as needed in the home
- K-2 Kitchen:
The dishwasher was tested through a full cycle and was found to automatically open the door for ventilation at the end of the cycle. When doing so however, the unit allowed water to drip from the front door seal and onto the flooring below causing damage. This is more than likely why the flooring is damaged at this specific location. I recommend modifications/repair to the dishwasher to ensure a moisture tight seal.
- SB-1 Structure and Basement:
Small cracks were noted in the foundation - see right side. Have general contractor seal these areas to deny moisture and pest entry as the roof on the other side is finished space. Some amount of small cracks are common in poured concrete and typically do not require significant repair as long as they do not continue to grow. The best way to prevent on-going settlement is by controlling roof runoff and site drainage to promote dry soils around the foundation; wet soils do not bear weight well. This will also help to prevent basement or crawl space moisture problems.
Recommended Maintenance Items
- RCG2-3 Roof, Chimney and Gutters:
The gutters are dirty with organic debris and will need cleaning to ensure proper control of roof runoff. Given the nearby trees, I would plan on regular gutter cleaning. Clean the gutters and ensure they are unobstructed, leak free and properly sloped to drain. This is routine house maintenance; I would expect the need to clean gutters and downspouts regularly.
- WH2-3 Water Heater:
There is no evidence that the water heating equipment has been serviced since it was installed. Inquire with the existing homeowner as to its last servicing. Please note that most home owners are not aware that water heaters need servicing and this is partly why they only last on average of 8-12 years. To maximize the useful life of a water heater, the appliance should be serviced per the manufactures recommendations. The elements should be checked. The tank should be flushed to remove sediment in the bottom of the tank. The dip tube and sacrificial anode should be inspected and updated if necessary.
- LAP-2 Laundry and Additional Plumbing:
The dryer vent should be cleaned annually for safety purposes and proper functionality. If this service had not been done in the last year I recommend it be cleaned prior to first use. Inquire with the seller to see if they have had the dryer exhaust duct recently cleaned.
Improve & Upgrade
- G-2 Grounds:
The grade of the yard is slopping toward the building - see front side and see right side. The is can allow moisture accumulation near the foundation and other materials during periods of heavy rainfall. Standards recommend a quarter inch / foot slope away from the building or better. Have a drainage contractor improve the sloping as feasible around the home where needed.
- G-5 Grounds:
A few concerns were noted with the front entry stairs and handrail - see list below. These are very typical items found in a home of this age and I recommend hiring a licensed general contractor to update these installations as feasible.
- The handrail for the entry stairs was not graspable by current industry standards. This should be a round railing 1 and 1/4 inches - 2 inches in diameter. If the railing is not round it must have a finger groove that is 3/4 of an inch down from the tallest point of the rail. The graspable handrail should also be 1.5 inches from the wall and have returns into the wall.
- The baluster spacing was built to an older standard and was too large at the openings. The current maximum opening opening size is 4 inches.
- The framing for the entry stairs was lacking positive connections and/or metal gussets at the joist connections.
- The ledger board connection for the framing was attached to the home with nails only. I recommend the installation of additional lag screws.
- ES1-3 Electric Service:
Current regulations require an “Inter-system Bonding Terminal” to be installed as a place for the low voltage utilities to run their ground wires to. It will be attached to a #6 minimum copper ground wire run to the location from the service equipment - such a terminal was not found during inspection. Have this installed by a licensed electrician.
- EDFW1-2 Electric Distribution and Finish Wiring:
The use of GFCI (Ground Fault Circuit Interruption) protection is inconsistent with modern minimum standards for safety - see the laundry room, some areas of the kitchen, and the exterior. GFCI protection is recommended for the electrical receptacles in the following locations: the two dedicated kitchen appliance circuits, all receptacles within 6 feet of a sink, bathrooms, exterior, garage, unfinished basements, laundry and all wet and damp locations. GFCI's protect against electrocution by limiting the duration of an electrical shock. These are an important modern safety feature that have proven to save lives. Hire a licensed electrician to further evaluate and update GFCI protection for improved safety.
- WH2-2 Water Heater:
When updating the water heater you may need to modify the exhaust system. The system terminated directly above the unit, but too close to the exterior wall covering as well as an operable window - see diagram below.
- LAP-1 Laundry and Additional Plumbing:
The drain piping for the washing machine was not secured as needed. As the washer drains, the piping will pulsate and can back out over time. I recommend the piping be mechanically fastened to the nearby water piping and/or similar.
- HCFV-2 Heating, Cooling, Fireplaces and Ventilation:
The high efficiency heating equipment is venting to the exterior using PVC pipe. This vent pipe termination should be screened to prevent bird or rodent entry.
- I-6 Interior:
The bedrooms in this house have inadequate escape and rescue openings. Today, all bedrooms must have a second means of ingress and egress in case of emergency. This can be provided by a door but is typically provided by a window. Hire a licensed general contractor to further evaluate and repair / update for improved safety.
Escape and rescue openings must comply with these basic guidelines:
- Minimum width of opening: 20 inches
- Minimum height of opening: 24 inches
- Minimum net clear opening at any grade floor level escape and rescue window: 5 square feet
- Minimum net clear opening of other escape and rescue windows: 5.7 square feet
- Maximum height of base of opening above interior side floor: 44 inches
- Windows should open easily without the use of keys or tools
And for window wells below grade:
- Minimum net clear area of 9 square feet
- Minimum horizontal projection and width of 36 inches
- Wells with a vertical depth greater than 44 inches require a permanent ladder or steps usable with the window in the fully open position
- I-7 Interior:
The windows in the living room could be a safety hazard - the windows are close to the floor (less than 24") and open larger than 4 inches overall. This could allow a child to fall out of the window. Consider restricting the opening of this window to 4 inches or less. Here are some examples of possible child safety window barricades - LINK.
Minor Repairs
- G-4 Grounds:
Typical cracking was noted in driveway flatwork. Several options for sealant are available at common hardware stores that you can get to match quite well. Seal the areas with an approved material to deny water entry.
- G-6 Grounds:
Areas of the fencing were sagging and leading into the property. For the most part the fencing appeared to be in decent condition except for a few localized areas. Hire a licensed fencing contractor to perform repairs as needed.
- E-1 Exteriors:
The siding materials were in overall acceptable condition with a few localized repairs and maintenance items needed to the exterior - see list below. Hire a licensed general contractor to further evaluate and repair all areas as needed.
Wood Decay
- Two areas of moisture damaged siding materials was noted near the gutter connections at the front side of the home. These areas were visibly wet and will need further evaluation and more than likely replacement of the failed materials.
Caulking & Sealant
- Small areas of the caulking/sealant at the chimney chase to siding connection were beginning to split and will need reapplication going forward.
- G2-3 Garage:
The overhead garage door is not not fitting snug at the bottom and will need additional weather stripping or possible adjustments so the door fits well. This is to prevent moisture and rodent entry into the area.
- ES1-2 Electric Service:
The grounding rod was not fully driven and may defeat its usefulness. Have an electrical contractor fully drive the grounding rod to improve functionality.
- WH2-4 Water Heater:
Testing of the plumbing system today, I noted the water was too hot - 128 degrees F. This is a scald hazard. To prevent scalding, standards recommend indoor hot water temperatures do not exceed 120 degrees. There is some evidence that hot water temperatures should be greater than 130 degrees to prevent Legionaries' disease from developing in the water heater. If this is a concern, you can heat the water in the tank to 140 degrees F and have a tempering valve installed at the hot water tank. Have this further evaluated and repaired by a licensed plumber or simply turn down the temperature as desired to eliminate a scald hazard.
- I-5 Interior:
Doors throughout the home were in need of adjustments and general maintenance. I noted doors rubbing on their frames, doors not latching correctly and so on. I recommend a handy person adjust and repair all doors as needed.
- K-1 Kitchen:
Corrugated waste pipe was used to drain the kitchen sink. This in an unlisted plumbing product and only smooth wall piping should be used. The p trap was also tilted and may not function correctly. Hire a licensed plumber to further evaluate and repair as needed.
- K-3 Kitchen:
An anti-tip device is needed to prevent this range from tipping during operation of the oven door. This is a small clip that secured the back adjustable feet of the range to the floor.
- UHB5-1 Upstairs Hallway Bathroom:
The installation for the under mount sink was lacking support as needed. The sink itself was supported by glue only and was missing a physical restraint. Hire a general contractor/handy person to add the missing support.
- A-3 Attic:
The ductwork for the bathroom and kitchen fans are uninsulated in the attic space. This can cause condensation during cold weather and is less energy efficient. Replace these with insulated exhaust ducts or insulate to R-8 or better.
Due Diligences
- G-1 Grounds:
Corrugated storm drain pipe appeared to be used for sub-surface drainage work to divert roof runoff away from the building. This product is prone to failure as it is susceptible to crushing and clogging. No evidence was found during inspection that these drains are backing up and require repair. Monitor during heavy rains to ensure roof runoff is being reliably carried away from the structure.
- G-3 Grounds:
A large grate was noted at the front right corner of the property. This may be some sort of drainage system used for the neighborhood and/or similar. I recommend consulting with the seller as well as the city for any further information regarding this installation. There may be maintenance concerns that you need to be aware of.
- EDFW1-1 Electric Distribution and Finish Wiring:
Circuit testing was showing open grounds at some of the electric receptacles today. An open ground is often a case of never connecting a ground to the receptacle or forgetting to reconnect the ground if they had occasion to disrupt it. I did see grounding conductors in the electric panel. This house has three-wire system where I tested. Have this further investigated and repaired as recommended by a qualified electrical contractor.
- WH2-1 Water Heater:
This water heater is likely close to the end of its useful service life. The average life of these water heaters is statistically 8-12 years though in practice, they can vary widely between 8-20 years depending on water quality and maintenance schedule such as frequency of flushing the tank and replacing sacrificial anodes. Budget to replace this water heater at any time. Water was hot at the time of inspection.
- HCFV-4 Heating, Cooling, Fireplaces and Ventilation:
Wood burning fireplaces were noted in the home. The NFPA (National Fire Protection Association) recommends an annual inspection of all chimneys, fireplaces, solid fuel-burning appliances, and vents. They also recommend an NFPA 211 Standard, Level II inspection upon sale or transfer of the property. A Level II inspection includes, not only cleaning the interior of the chimney pipe, but also the use of specialized tools and testing procedures such as video cameras, etc. to thoroughly evaluate the serviceability of the entire flue lining and fireplace/chimney system. The fireplaces showed heavy use and were in need of a full cleaning/servicing. If a chimney cleaning has not been performed over the past 12 months, such an inspection/service is recommended prior to first use for fire safety reasons. Implement any repairs as recommended.
- I-2 Interior:
The ceiling in some rooms of this house contains popcorn texture. This product may contain asbestos as many of these products contained asbestos prior to 1978. After 1978, remaining stocks of material containing asbestos were sold and as the product was slowly phased out. Asbestos testing is beyond the scope of this inspection. The health risks posed by this substance are minimal unless the texture becomes friable or air borne. If you wish to remove the popcorn texture or have remodel plans that could involve cutting or removing this sheetrock, asbestos testing is recommended. Consult with an environmental lab for more information on asbestos testing. One option is always to sheetrock over this texture if you wish to have a different ceiling finish.
- K-4 Kitchen:
An air gap is recommended to protect the dishwasher from accidental contamination if the sewer line were to back up. The air gap for the dishwasher did not appear to be installed as needed. I noted what is called a Johnson T air gap at the exterior of the home, however it was missing a ventilation hole. I recommend adding the needed hole in the Johnson T airgap at the rear side of the home and/or installing a high loop system below the sink.
- A-4 Attic:
The attic and roof cavity ventilation looked to be non-standard. Proper attic ventilation is important for the roofing materials to perform as intended and to reduce chances for condensation problems and heat build-up in the attic. The problem here is the use of ridge vents and gable vents. Most ridge vent manufacturers recommend ridge and soffit vents only to get convective ventilation across the roof decking; the gable wall vents can disrupt this convective air flow. No evidence of problems from this configuration was noted to date and depending on occupant behavior this may not ever cause a problem. If you wish to correct, consult with a qualified general contractor about blocking off existing gable vents.
- SB-2 Structure and Basement:
A main support beam in the garage had been modified for the garage door opener track installation. Typically modifications to the bottom of a support beam are not recommended as they weaken the materials overall. The beam itself was covered at most areas in drywall so it was difficult to see it any visible damage and/or splitting had occurred. Hire a licensed general contractor to add additional support and/or repair this installation as feasible/needed
Efficiencies
- HCFV-3 Heating, Cooling, Fireplaces and Ventilation:
The installation of a mechanical ventilation system is recommended. As this home would have predated the requirement for this, you have several options. This includes a whole house fan on a timer exhausting air to the exterior and bringing in fresh air, a heat recovery ventilator (HRV) and so on. Consult with a licensed HVAC contractor about improvements to the homes ventilation design. Here is a link to more information - LINK.
- I-4 Interior:
The insulation was installed backwards below the stairway. The cardboard vapor barrier should always face the hot side of the home which in this case would be the interior. I recommend repairing this condition to help with efficiency in the home.
- A-2 Attic:
The attic insulation could be improved to modern standards, which recommend R-49 on the floor and R-21 on walls. R-value is the measure of resistance to heat loss; the higher the R-value the better the insulation. During insulation repairs it is best practices to implement any air seal-up repairs to seal air leakage (wiring, chimney chase penetrations and so on). Also, be sure you have completed any wiring or other projects that are needed in the attic. Then, hire an insulation contractor to improve thermal barriers.
Inspection Notes Limitations
- GC-1 General Comments:
This house was vacant / unoccupied at the time of inspection. Vacant and unoccupied houses present unique challenges for home inspection, especially the piping and wiring systems which have not be subject to regular use prior to the inspection. While these systems can be tested during inspection, this one-time test is quite different than regular use and it is difficult to know how these systems will respond to regular use after the inspection. For example, septic systems may initially function and then fail under regular daily use. Plumbing traps may operate with no signs of leaks and then let go when being actively used for a few days. Shower pans may only leak when someone is standing in the shower and taking a shower. Seals for plumbing fixtures can dry up and leak when not is use. Sewer lines with roots may allow water flow, but then fail when waste and tissue are flushed; it can take a few days for that to backup. Please understand we are trying our best to look for clues of past or existing problems to paint a realistic best-guess as to the reliability of these systems during inspection.
- G-7 Grounds:
The shed on the property appeared to be a site built design as opposed to a store bought style. This is beneficial as typically they end up being a bit higher quality when site built. I did not observe any moisture leakage or staining on the roof sheathing and the shed appeared to be functioning as designed. Some of my observations include:
- Different color paint noted at the rear side.
- The support system relied on concrete blocks however they were oriented improperly on their side.
- RCG2-2 Roof, Chimney and Gutters:
The gutter system appeared to be a somewhat newer installation.
- P-1 Plumbing:
Please note that the supply pipes are concealed behind insulation and finishes and visual inspection was limited. Determination of the supply piping materials used here is an educated guess based on the materials that were visible coming out of the wall and below fixtures.
- P-2 Plumbing:
A sewer scope had been performed at the time of our inspection by a third party inspection company. Please consult their sewer scope report for any details regarding the sewer line.
- HCFV-1 Heating, Cooling, Fireplaces and Ventilation:
Annual servicing of the gas forced air furnace is recommended for safe and reliable heat. Records indicate that this furnace was recently serviced. The furnace was tested during inspection and was operational. The design life of these forced air furnaces is around 20 years or so. I recommend keeping this furnace on a regular annual service schedule.
- I-3 Interior:
Cracks, nail pops, and minor blemishes were noted in the ceiling and walls - see mostly in the living room. These types of finish issues can be due to routine settlement or moderate seasonal expansion and contraction of the structure or even related to the workmanship of the framing or installation of the drywall. The seasonal types of cracking can be most frustrating as they will tend to re-open after repair. There are certain stress points in a house where cracking is common, for example where large beams land into a wall. Repair and paint cracks, nail pops, and other blemishes as needed and monitor. Examples of observations noted during the inspection include:
- A-1 Attic:
I did not enter the attic spaces as there was no ramp or safe way to access the space. Crawling in the V of trusses or on top of framing risks damaging thermal barriers (insulation) and ceiling finishes and is not a safe way to access an attic. This is a limited inspection of this space as viewed from the access only.
- SB-3 Structure and Basement:
As a general rule, older basements are prone to seasonal dampness and moisture issues. This is because there were no industry standards to water proof foundations at the time this home was built. Today's basements will likely be sealed on the outside with concrete sealer over the foundation. On top of this a water-proofing fabric is applied which will divert water into a footing drain system at the base of the foundation; old basements usually have none of these water-proofing systems installed. Some old basements do stay dry - typically the result of a good site and good soil drainage around the building. However with an older basement such as this, anticipating some amount of water related conditions is to be expected and is impossible to evaluate or predict during a visual home inspection.
The Full Report
General Comments
Building Characteristics, Conditions and Limitations
Approximate Square Footage: 2100
Approximate Year of Original Construction: 1976
This building likely has wiring that predates the late 1980's. Branch circuit wiring installed in buildings built prior to the late 1980s is typically rated for a maximum temperature of only 60 degrees Celsius. This includes non-metallic sheathed (Romex) wiring, and both BX and AC metal-clad flexible wiring. Knob and tube wiring, typically installed in homes built prior to 1950, may be rated for even lower maximum temperatures. Newer electric fixtures including lighting and fans typically require wiring rated for 90 degrees Celsius. Connecting newer fixtures to older, 60-degree-rated wiring is a potential fire hazard. Repairs for such conditions may involve replacing the last few feet of wiring to newer fixtures with new 90-degree-rated wire, and installing a junction box to join the old and new wiring. It is beyond the scope of this inspection to determine if any such incompatible components are installed. Based on the age of this building, be aware that such components may be present.
In 1978, federal laws were past to prohibit use of lead and asbestos in building materials. Manufacturers of building materials were allowed to sell existing stocks of materials that were manufactured with lead and asbestos, so even buildings constructed as late as the mid-1980's could possibly contain lead or asbestos. Identification and testing for lead and asbestos and other environmental testing is beyond the scope of this home inspection. If you wish to seek additional information, I recommend contacting an environmental lab or industrial hygienist.
Solid conductor aluminum wiring was used in residential construction for 15 and 20-amp circuits in the 1960's through the 1970's. This wiring has proven to be problematic and a fire hazard, primarily due to problems with loose connections and metal fatigue. I looked hard to find any signs of solid conductor aluminum here. There is always a chance that solid conductor aluminum wiring exists and is concealed from view. If this wiring is ever uncovered during subsequent renovation work, I recommend removal and replacement.
Attending the Inspection: Buyer's Agent
Occupancy: Unoccupied
Weather during the inspection: Partly cloudy
Approximate temperature during the inspection: Below 65[F]
Ground/Soil surface conditions: Damp
For the Purposes of This Report, the Front Door Faces: The Driveway (Front Side)
This house was vacant / unoccupied at the time of inspection. Vacant and unoccupied houses present unique challenges for home inspection, especially the piping and wiring systems which have not be subject to regular use prior to the inspection. While these systems can be tested during inspection, this one-time test is quite different than regular use and it is difficult to know how these systems will respond to regular use after the inspection. For example, septic systems may initially function and then fail under regular daily use. Plumbing traps may operate with no signs of leaks and then let go when being actively used for a few days. Shower pans may only leak when someone is standing in the shower and taking a shower. Seals for plumbing fixtures can dry up and leak when not is use. Sewer lines with roots may allow water flow, but then fail when waste and tissue are flushed; it can take a few days for that to backup. Please understand we are trying our best to look for clues of past or existing problems to paint a realistic best-guess as to the reliability of these systems during inspection.
Grounds
Drainage and Site Information
Clearance to Grade: Standard
Downspout Discharge: Below grade
Site Description: Grade Toward Building
Grading: Sloped Towards
Corrugated storm drain pipe appeared to be used for sub-surface drainage work to divert roof runoff away from the building. This product is prone to failure as it is susceptible to crushing and clogging. No evidence was found during inspection that these drains are backing up and require repair. Monitor during heavy rains to ensure roof runoff is being reliably carried away from the structure.
.jpeg) |
The grade of the yard is slopping toward the building - see front side and see right side. The is can allow moisture accumulation near the foundation and other materials during periods of heavy rainfall. Standards recommend a quarter inch / foot slope away from the building or better. Have a drainage contractor improve the sloping as feasible around the home where needed.
 |
A large grate was noted at the front right corner of the property. This may be some sort of drainage system used for the neighborhood and/or similar. I recommend consulting with the seller as well as the city for any further information regarding this installation. There may be maintenance concerns that you need to be aware of.
 |
Driveways/Walkways/Flatwork
Driveway: Concrete
Walkways: Gravel
Patios: Concrete
Typical cracking was noted in driveway flatwork. Several options for sealant are available at common hardware stores that you can get to match quite well. Seal the areas with an approved material to deny water entry.
 |
Exterior Stairs & Railings
A few concerns were noted with the front entry stairs and handrail - see list below. These are very typical items found in a home of this age and I recommend hiring a licensed general contractor to update these installations as feasible.
- The handrail for the entry stairs was not graspable by current industry standards. This should be a round railing 1 and 1/4 inches - 2 inches in diameter. If the railing is not round it must have a finger groove that is 3/4 of an inch down from the tallest point of the rail. The graspable handrail should also be 1.5 inches from the wall and have returns into the wall.
- The baluster spacing was built to an older standard and was too large at the openings. The current maximum opening opening size is 4 inches.
- The framing for the entry stairs was lacking positive connections and/or metal gussets at the joist connections.
- The ledger board connection for the framing was attached to the home with nails only. I recommend the installation of additional lag screws.


Fences
Exterior Fencing: Present
Areas of the fencing were sagging and leading into the property. For the most part the fencing appeared to be in decent condition except for a few localized areas. Hire a licensed fencing contractor to perform repairs as needed.
 |
Outbuildings, Trellises, Storage Sheds, Barns
The shed on the property appeared to be a site built design as opposed to a store bought style. This is beneficial as typically they end up being a bit higher quality when site built. I did not observe any moisture leakage or staining on the roof sheathing and the shed appeared to be functioning as designed. Some of my observations include:
- Different color paint noted at the rear side.
- The support system relied on concrete blocks however they were oriented improperly on their side.


Exteriors
Siding and Trim
Trim Material: Wood
Siding Material: Wood clapboard
The siding materials were in overall acceptable condition with a few localized repairs and maintenance items needed to the exterior - see list below. Hire a licensed general contractor to further evaluate and repair all areas as needed.
Wood Decay
- Two areas of moisture damaged siding materials was noted near the gutter connections at the front side of the home. These areas were visibly wet and will need further evaluation and more than likely replacement of the failed materials.
Caulking & Sealant
- Small areas of the caulking/sealant at the chimney chase to siding connection were beginning to split and will need reapplication going forward.


Eaves
Type: Open rafters
Exterior Doors
Type: Solid core, Sliding glass
Exterior Hose Bibs
Observations: Operating
Decks, Porches and Balconies
Decks, Porches and Balconies
General Information: Present - Info
For information about proper deck construction, that meets current requirements, see the following link: DCA-6 Deck Construction Guide.
WA Amendments 2020 IRC / Posts /Footings / Beams / Joists - LINK
If this deck is in Seismic zones D0, D1, D2 & D3 (most of Puget Sound) there are other requirements for construction that are better covered in this link: Deck Tip Sheet
A stoop/deck/porch that is higher than 30 inches above the ground (within 36 inches of the stoop/deck/porch ) should have a railing that is at least 36 inches in height, and baluster spaces should be no greater than 4 inches in width. This general information will not be repeated for other deck locations to minimize duplication.
Structure: Ground contact treated lumber
Posts, Beams and Footings: Inspected
Decking Material: Softwood
This house has softwood decking installed. The recommended maintenance of this type of decking is annual cleaning and staining with transparent or semi-transparent deck stain. It is common to use decking paints when the decking is older and in the last phase of its useful life, however, painting is not recommended as this can trap moisture in the wood, facilitate wood decay and lead to higher maintenance costs when prepping peeling paint. Annual cleaning and sealing is important to prevent the deck from becoming slippery and unsafe, especially as pollen organic growth accumulate on the decking.
Several conditions were noted with the decking installation - see list below. These are all very common conditions found in older deck installations, but they should be addressed going forward. Hire a licensed decking contractor for a further evaluation and to perform all needed repairs. Some of my observations include:
Framing
- A metal roof system had been installed below the deck that concealed most of the framing materials from view and inspection.
- The deck was missing areas of hardware/positive connections at some of the framing connection - see stair stinger and other areas. Hardware should be installed to ensure proper support at all needed area of framing.
- Fasteners used to secure the installed joist hangers did not appear to be rated for these types of installation.
- Lateral load connections have not been installed for this deck. This is a bolting system that connects the floor joists of the deck to the joists in the house. These are required in newer decks and will make the deck safer and less prone to pulling free from the house. Consider installing later load connections during renovations or repairs to this deck.
- The deck structure was bearing directing onto the rear concrete patio. Typically deck support such as this is installed in a way that concrete piers are poured 18 inches below the ground and then the support posts are attached to them. In this installation you are relying on the concrete patio for support that is typically not rated for this type of installation due to its thickness. No obvious damage was noted, but I recommend updating this support system in the future to conform with current standards.
Handrail/Guardrail
- The installed handrails were not graspable as needed and did not have adequate clearances from the wall covering. A 1 1/2 inch clearance is needed from the wall.
- The open riser height exceeded the 4 inch maximum requirement and will need to be modified and/or filled in.
- The guardrail installation was loose and needed to be re secured. Also some of the openings exceeded the 4 inch maximum as well.
Stairs
- The stairway was lacking mid span support at its installation and was loose overall.
Deck Planking
- The wood decking on this deck needs to be re-stained to preserve the wood and prevent the wood from becoming slippery. The most important deck maintenance for wood decks is regular cleaning to prevent the decking from becoming slippery. Additional protection can be added by using a deck stain. Painting is never recommended as this can trap water in the decking and facilitate decay.


.jpg)
.jpeg)


.jpeg)

.jpeg)
Fuel Storage and Distribution
Gas Meter
Present
Gas Shutoff Location: Right side of home
The gas meter was located on the right side of the home. The gas shut off was located on the riser pipe as outlined in this photo below.

.jpeg)
Gas Pipe Materials: Steel and flex pipe
Gas Meter Information: PSE Meter Clearances
Here is a link to all PSE installation and clearance guidelines for gas meters: LINK
Gas, Propane and Oil Piping
Gas Piping Materials Noted: Steel
Roof, Chimney and Gutters
Roof Materials
Overall Photos: Provided
Representative photos of the roof covering are found here:
 |  |
 |  |
Method of Roof Inspection: Walked on roof
Roof Style: Gable
Roof Covering Materials: Architectural grade composition shingle
Approximate Age of Roof Covering: Unknown - Consult with the seller for an exact age
Tune up repairs are recommended to prolong the reliable and useful service life of this roof. This is an older roof, but there appears to be useful remaining service life. The roofing material on this building is done in a dimensional or architectural grade shingle composition shingle. These shingles are often rated as 30 year materials, though I find in practice, as a roof assembly, 23-28 years is more realistic depending on the quality of the installation, the amount of exposure and the pitch of the roof. Hire a licensed roofing contractor to further evaluate and repair this roof to ensure reliable roof performance. Examples of observations and repair items noted during inspection include:
Materials
- Moss growth was noted at several locations and to the roof covering should be cleaned by a professional roofing company.
- The ends of the ridge venting were missing adequate pest blocking to deny entry into the attic space. Fill these areas where needed.
Flashing
- No kick out flashing was installed at areas of the roof covering - see front and right sides. Kick out flashing should be installed to help promote water away from the sidewall and into the gutter system/off the roof.
- The chimney flashing was installed in a way that allowed moisture to run down the chase itself. Install flashing to differ water back onto the roof and into the gutter system.
Components
- The concrete chimney cap is in poor condition and requires repair to prevent water from entering and damaging the chimney. Hire a mason to further evaluate and repair the masonry chimney cap.
- Several plumbing vent flashings were damaged at the roof covering were in need of replacement. This can be due to several conditions including age, pests, mechanical damage and so on.


.jpeg)
.jpg)


Chimneys
Present
Chimney Material: Masonry
Chimney Flue Liners: Present
Roof Ventilation
Type: Soffit & Ridge Vents
Gutters and Downspouts
Gutter and Downspout Materials: Metal
The gutter system appeared to be a somewhat newer installation.
The gutters are dirty with organic debris and will need cleaning to ensure proper control of roof runoff. Given the nearby trees, I would plan on regular gutter cleaning. Clean the gutters and ensure they are unobstructed, leak free and properly sloped to drain. This is routine house maintenance; I would expect the need to clean gutters and downspouts regularly.
 |
Garage
Garage General
Garage Type: Attached
An unprotected opening was found in the garage wall and ceiling finishes. This should be repaired to complete the fire separation between the house and the garage. Large holes should be repaired with the proper sheetrock materials. Small holes and openings should be sealed with mud or high temperature of "fire stop" caulking. Openings with doors should employ listed fire-rated doors.


Garage Doors and Automatic Openers
Overhead Garage Door Type: Metal
Ongoing maintenance in the form of minor adjustments, greasing of the track and rollers, visual inspections of the weather stripping, and so on will be needed. The torsion springs have a certain amount of uses built into their design and can fail during normal use.
Automatic Garage Opener: Present
Garage Occupant Door: Solid Wood
MOST COMMON: Safety Spring, Weather Strip Gaps
No safety wire / containment cabling was noted running inside the overhead garage door springs. This is a modern standard to prevent a broken spring from becoming a projectile. Install a wire inside these springs for improved safety.
 |
The overhead garage door is not not fitting snug at the bottom and will need additional weather stripping or possible adjustments so the door fits well. This is to prevent moisture and rodent entry into the area.

Garage Floor
Garage Slab: Concrete
Electric Service
Electric Service Permits Found
Observations: Found
These images show electric permits found during inspection.
 |
Electric Service Voltage Tested
Service Voltage: 120/240
Testing Note: Testing Note
I tested the voltage at the electric panel today. It tested in a normal range of 235-245 volts. Most residential construction is listed as 120/240 volts and it is normal for some slight fluctuation.

Electric Service
Service Entrance: Below Ground
Meter Base Amperage: 200
Electric Service Equipment
Service Entrance (SE) conductor Size: Aluminum, 4/0, 200 amps
Main Panel Amperage: 200 amps
Electric Service Amperage: 200 amps
Main Electric Panel Location: Garage
Panel Manufacturer: Bryant
Overall a few conditions were noted in the service equipment - see list below. I recommend additional inspection and repair by a licensed electrical contractor as additional repairs could be needed that are latent or concealed. Examples of defects found during inspection are included below:
Circuit Breakers
- Circuit breakers were of a brand different from the panel manufacture. Because circuit breakers made by different manufacturers vary in design, panel manufacturers typically require that breakers manufactured by their company be used in their panels. Breakers from one manufacturer used in the panel of another manufacturer may result in poor connections which can create a potential fire or shock/electrocution hazard.
- The installed service equipment was a split bus panel. Split bus panels have a requirement for six or less hand movements to shut all power off to the home. During the inspection I observed at least 7 hand movements needed to disconnect power.
Wiring
- Correct the double lugged neutral or grounded conductors in the electric panel - this is when two conductors share the same lug. Each grounded conductor shall terminate within a panelboard in an individual terminal that is not also used for another conductor. Double lugged conductors risk poorly protected conductors that are more vulnerable to arcing and overheating.
- The white conductors inside the electric panel at the 240 volt circuits are not correctly identified as hot or ungrounded conductors - these should be painted in black or red ink for correct identification and improved safety.
Enclosure
- Grommets or bushings are needed to protect the non-metallic sheathed cable where the wiring enters the electrical panel and provide strain relief.
Design & Upgrades
- This home has an older split bus electric panel installed. In general this is an obsolete load center and the circuit breakers can become increasingly unreliable due to age. Updating this service equipment is recommended in the near term for improved reliability and added safety to the home and its occupants.


Appliance Disconnects
Disconnects Noted: None Present
Electrical Grounding System
Information: Present - Cannot Confirm Effectiveness
During a visual inspection, every effort is made to inspect the visible components of the electrical system grounding. The grounding system is critical for safely discharging electrical surges, especially in the case of lightning strikes. There is no way in the context of a home inspection to verify the "effectiveness" of the grounding system as much of the system is not visible and there are not practical tests one can perform in the way we can test a furnace or a plumbing fixture. However, there are many things that can lead me to recommend further evaluation of the grounding system by a licensed electrical contractor and they will be documented in the observations below if discovered.
The grounding rod was not fully driven and may defeat its usefulness. Have an electrical contractor fully drive the grounding rod to improve functionality.

Electrical Bonding System
Information: Present - Cannot Confirm Effectiveness
During the inspection, I attempt to visually document electrical system bonding. There is no way in the context of a home inspection to verify the "effectiveness" of system bonding. All metallic systems in the building are required to be "bonded" (connected) to the the building's electrical grounding system. Bonding creates a pathway to shunt static charges (that would otherwise build up on the system) to earth, and to provide a pathway to trip a breaker in the event that these bonded metallic components became energized. There are many things that can lead me to recommend further evaluation by a licensed electrical contractor and they will be documented in the observations below as needed.
Current regulations require an “Inter-system Bonding Terminal” to be installed as a place for the low voltage utilities to run their ground wires to. It will be attached to a #6 minimum copper ground wire run to the location from the service equipment - such a terminal was not found during inspection. Have this installed by a licensed electrician.

Electric Distribution and Finish Wiring
Branch Wiring
Wire Material: Copper
Wiring Method: Non-metallic sheathed cable
Receptacles and Fixtures
Inspection Method: Random Testing
Electric Receptacles: Three wire receptacles, Open Grounds - Three Wire System
COMMON GFCI COMMENTS: GFCI - Testing Procedure Note, Inconsistent With Modern Standard
During inspection I test all Ground Fault Circuit Interrupter (GFCI) devices that are readily accessible. GFCI's are those receptacles with re-set buttons that you commonly see in bathrooms, kitchens and at the exterior of the home. GFCI's are important safety devices that limit the duration of electrical shocks and have demonstrably saved lives. I recommend being aware of where re-set buttons are located in the house as GFCI's can trip and disable a circuit which can not be re-energized without re-setting the button. I avoid testing to determine if a receptacle or circuit is GFCI protected if it is not clear where the re-set button can be found. This is because re-set buttons can be concealed behind stored items, so such a test risks disabling a circuit in the home. occasionally, during testing of GFCI's one can fail. This is a statistical reality that some of these devices will fail under testing and require replacement after testing.
 (1).png)
.jpg)
Circuit testing was showing open grounds at some of the electric receptacles today. An open ground is often a case of never connecting a ground to the receptacle or forgetting to reconnect the ground if they had occasion to disrupt it. I did see grounding conductors in the electric panel. This house has three-wire system where I tested. Have this further investigated and repaired as recommended by a qualified electrical contractor.


The use of GFCI (Ground Fault Circuit Interruption) protection is inconsistent with modern minimum standards for safety - see the laundry room, some areas of the kitchen, and the exterior. GFCI protection is recommended for the electrical receptacles in the following locations: the two dedicated kitchen appliance circuits, all receptacles within 6 feet of a sink, bathrooms, exterior, garage, unfinished basements, laundry and all wet and damp locations. GFCI's protect against electrocution by limiting the duration of an electrical shock. These are an important modern safety feature that have proven to save lives. Hire a licensed electrician to further evaluate and update GFCI protection for improved safety.
Low Voltage Wiring
Information: Limitations
- Low voltage wiring systems, including timers and sensors, are not part of this inspection.
- Security and alarm systems are not within the scope of this inspection.
- Evaluation of auxiliary, low voltage, electric or electronic equipment (e.g., TV, doorbell, computer, cable, lightning protection, surge protection, low voltage lighting, intercoms, site lighting, etc.,) is not performed as part of a standard home inspection.
- Unless otherwise noted no determination is made as to whether any electrical component has the proper UL Listing. Permanently installed light fixtures made in other countries sometimes do not have the proper UL Listing indicated on them.
Plumbing
Water Meter
Location: Location
This shows the location of the water meter at the street side of the house.
 |  |
Water Service Supply
Pipe Material: Copper
Water Supply: Public water
Water Pressure: Water Pressure Tested, 75 PSI
This shows the water pressure tested during inspection. Generally, "normal water pressure," should be between 30-80 PSI, though pressures near or below 30 can result in poor functional flow to fixtures. Water pressures in excess of 80 PSI risk damaging supply piping components and should be controlled with a pressure reducing valve.

Pressure Reducing Valve: None noted
Main Water Shut-off Location: Water Shut Off Location Noted
This shows the location of the main water shut off located in the garage.
 |
Distribution Pipe
Pipe Insulation: Present, Only partly visible
Supply Pipe Materials: Copper, Only Partly Visible
Functional Flow: Excellent
Circulation Pump: None Noted
Angle Stop Testing Note
Angle stops are the shut offs located below plumbing fixture such as sinks and toilets. These are designed so that water can be shut off locally to a fixture without shutting off the water to the entire house so that localized fixtures can be serviced and repaired or replaced. Home inspectors do NOT test angle stops during inspection as there is a risk of leakage.

Please note that the supply pipes are concealed behind insulation and finishes and visual inspection was limited. Determination of the supply piping materials used here is an educated guess based on the materials that were visible coming out of the wall and below fixtures.
Waste Pipe and Discharge
Discharge Type: Public sewer
Please note that when the sewage discharge type is listed here, it is listed based on public records and disclosure. It is always possible that the system is not as it is listed; for example, a property could be listed as a public sewer system when in fact it is on a private septic system. This is unlikely, but is another reason why we recommend further evaluation of all sewage discharge systems.
Waste and Vent Pipe Materials: ABS plastic
Location of Sewer Cleanout: Basement
This shows the location of the sewer cleanout found during inspection - laundry room. 📸
 |
A sewer scope had been performed at the time of our inspection by a third party inspection company. Please consult their sewer scope report for any details regarding the sewer line.
Water Heater
Water Heater
Manufacturer: A.O.Smith
Data Plate: Shown Here
This shows the data plate for this water heater.
 |
System Type: Standing Water Heater
A single-family storage water heater offers a ready reservoir -- from 20 to 80 gallons -- of hot water. It operates by releasing hot water from the top of the tank when you turn on the hot water tap. To replace that hot water, cold water enters the bottom of the tank through the dip tube where it is heated, ensuring that the tank is always full. Conventional storage water heater fuel sources include natural gas, propane, fuel oil, and electricity. Please follow this link for more information - LINK
Size: 50 gal
Age: 2012
Energy Source: Gas
Straps : Present
Expansion Tank: Present
Temperature Pressure Relief Value: Present - Not Tested
A temperature and pressure relief valve (TPRV) is required on all water heaters to discharge any excessive pressure within the tank. A discharge pipe should be attached to the valve and directed to a safe location away from body contact. Newer installations must be directed to the building exterior or to an approved indoor drain receptor. Most manufacturers suggest that homeowners test these valves at least once a year by lifting the lever to ensure the valve discharges properly and also recommend inspection of these safety devices every three years. The picture here shows a typical TPRV. They may also be found on the side of the heater on some models. I do not test these valves due to the possibility that they may leak after testing. A leaking or inoperative TPRV should be replaced immediately by a licensed plumber.
Due to inconsistencies between both UPC and IPC Plumbing codes, and water heater manufacturer's instructions, and TPRV manufacturer instructions, it is not actually possible to install the drain from the Water Heater TPRV "properly." There are conflicts with distance of termination to the floor/ground, types of pipes approved, and diameters of pipes approved. Additional confusion is added when jurisdictional inspectors approve installations/materials specifically not allowed by both codes and manufacturers. My recommendations will vary depending on the installation and will be included in the applicable narratives below.
Most codes defer to manufacturer instructions and I favor those recommendations. The yellow tag on the valve states clearly the termination should be 6" above the floor which is more consistent with the UPC code requirements.
 (1) (1).jpg)
This water heater is likely close to the end of its useful service life. The average life of these water heaters is statistically 8-12 years though in practice, they can vary widely between 8-20 years depending on water quality and maintenance schedule such as frequency of flushing the tank and replacing sacrificial anodes. Budget to replace this water heater at any time. Water was hot at the time of inspection.
When updating the water heater you may need to modify the exhaust system. The system terminated directly above the unit, but too close to the exterior wall covering as well as an operable window - see diagram below.
.jpg)
 |
There is no evidence that the water heating equipment has been serviced since it was installed. Inquire with the existing homeowner as to its last servicing. Please note that most home owners are not aware that water heaters need servicing and this is partly why they only last on average of 8-12 years. To maximize the useful life of a water heater, the appliance should be serviced per the manufactures recommendations. The elements should be checked. The tank should be flushed to remove sediment in the bottom of the tank. The dip tube and sacrificial anode should be inspected and updated if necessary.
Water Temperature
Water Temperature Information: Info
Having plenty of hot water is not just a convenience, it is considered a necessity in modern homes. However, there are competing concerns related to having plenty of hot water. On the one hand we want to prevent scalding. On the other hand it is a good idea to keep water hot enough to prevent water-borne bacteria from flourishing. It is actually quite complicated to accomplish both goals with storage-tank type water heaters.
- This is further complicated by Washington State Home Inspector Standards of practice that require us to report when the tested water temperature is above 120 degrees Fahrenheit (including a statement that the generally accepted safe temperature is 120 degrees Fahrenheit). Another complication is that some dishwashers do not have integral water heaters and prefer much hotter water coming to it from the primary water heater.
- This information however only address one of the safety concerns--and can actually make the other concern worse. Temperature below 120 degrees Fahrenheit is considered ideal for the growth of harmful bacteria inside the tank--such as Legionella. Keeping the tank temperature between 135 and 140 degrees Fahrenheit can greatly reduce the risk of growing bacteria in the tank but is not a guarantee. For example, Legionella Bacteria can survive extreme hot water and chemical treatment by forming a parasitic relationship with amoebae that are not affected by these treatments. While rare, it is still considered prudent, given the current state of knowledge, to maintain the tank water temperature between 135 and 140 degrees Fahrenheit to at least provide some degree of protection.
- While "generally-healthy-people" are fairly resistant to infection, some patient populations (organ transplants, diabetes, cancers, kidney disease etc), immunocompromised persons, heavy smokers, heavy drinkers, the elderly and infants can be expected to have higher death rates or incidence of more severe illness if the bacteria is present in sufficient numbers. Some authorities assert that an increase in incidence can be expected with an increased focus on conserving energy (lowering the thermostat on the water heater). The science around all of this is ongoing and new information should be anticipated.
But what about scalding?
Preventing scalding requires a multifaceted approach.
- We must resort to good sense: • Never leave a child or infant alone while drawing water in a bathtub, and check the water temperature before putting your child or the infirm in the tub. • Test the water temperature before bathing or showering. • Turn the cold water on first, then add hot water until the temperature is comfortable. • Teach children to turn the cold water on first, and the hot water off first.
- Provide a mechanical means (Thermostatic mixing valve) of lowering the temperature to below 120 degrees Fahrenheit at either the points of use or at the water heater itself to protect the whole house. Because these devices can fail, we must always keep #1 in mind.
For additional information on this issue please check out the links below:
Thermostatic mixing valves:
Thermostatic mixing valves located at the water heater are designed to reduce hot water temperatures in the tank to levels considered safe at points of use (sinks tubs etc). They can be adjusted and should be periodically checked to verify function. These valves are desirable so that tank temperatures can be maintained high enough to limit bacteria growth inside the water heater while at the same time providing water a safe temperature where desired.
Water Temperature Measured During Inspection: Too Hot
Testing of the plumbing system today, I noted the water was too hot - 128 degrees F. This is a scald hazard. To prevent scalding, standards recommend indoor hot water temperatures do not exceed 120 degrees. There is some evidence that hot water temperatures should be greater than 130 degrees to prevent Legionaries' disease from developing in the water heater. If this is a concern, you can heat the water in the tank to 140 degrees F and have a tempering valve installed at the hot water tank. Have this further evaluated and repaired by a licensed plumber or simply turn down the temperature as desired to eliminate a scald hazard.

 (1).jpg) |
Laundry and Additional Plumbing
Washer
Observations : Tested
The washing machine was tested through a cycle and found to be functional. My testing is not exhaustive and I cannot comment on the ability to clean clothing items.
Here is a link to washing machine maintenance tips: LINK
Common Conditions: Not Secured To Drain
The drain piping for the washing machine was not secured as needed. As the washer drains, the piping will pulsate and can back out over time. I recommend the piping be mechanically fastened to the nearby water piping and/or similar.
 |
Dryer
Observations: Tested
Dryer exhaust ducts should be independent of all other systems, should convey the moisture to the outdoors, should terminate on the outside of the building in accordance with the manufacturer’s installation instructions and should be equipped with a back-draft damper.
- Exhaust ducts (from the Laundry Room wall to the point of termination at the exterior) should be constructed of rigid metal ducts, having smooth interior surfaces with joints running in the direction of air flow. Screens should not be installed at the duct termination. Exhaust ducts should not be connected with sheet-metal screws or any means which extend into the duct more than 1/8". (Screens and screws can trap lint.)
- Every dryer should have a screen filter to help keep dryer lint from entering the vent pipe itself. This filter must be maintained clean at all times and clogging this screen will result in increased drying time as well be a fire hazard. It is recommended the filter be cleaned between every use of the dryer. Some fabric softeners, sheet or liquid types, also clog these screens and air flow is reduced even when the screen "looks" clean. Avoiding these products is recommended and using more natural alternatives is a possibility.
- The short piece of duct that connects the dryer to the pipe that runs to the exterior of the building is called the dryer transition duct or connector. This connector is required to be UL-2158A listed and be constructed of smooth wall metal, corrugated metal, or foil types that are UL-2158A listed. Dryer manufacturers do not recommend foil type connectors, and most “common” foil type air connectors do not meet the required standard. Under extreme heat (during field testing) aluminum ducts of all kinds do poorly as connectors (even when UL-2158A listed), but the common foil types perform much worse and should never be used as transition duct. All of these types of transition ducts are extremely vulnerable to mechanical damage, which results in either leaks or restriction of air flow. There is one foil type dryer transition duct, that exceeds UL-2158A standard that holds up much better under extreme heat than either smooth wall metal or corrugated metal and is the one I recommend as best practice. DryerFlex™ type of transition connector typically cannot be purchased from your local big-box stores and is sold by duct cleaning and maintenance companies--or can be ordered on line.
- Regardless of code or UL listing, the National Fire Prevention Association (NFPA) recommends only rigid metal or corrugated metal transition duct be used. NFPA Dryer Safety Tips
- Given dryers are one of the most common causes of household fires, I consider it prudent to use the best transition duct possible and to keep the vent system and dryer itself as free of lint build-up as possible. Annual professional cleaning is recommended.

.png) |
Power Source: Electric
Exhaust Duct: Ducted to Exterior
The dryer vent should be cleaned annually for safety purposes and proper functionality. If this service had not been done in the last year I recommend it be cleaned prior to first use. Inquire with the seller to see if they have had the dryer exhaust duct recently cleaned.
Heating, Cooling, Fireplaces and Ventilation
Heating System
Heating Method: Gas High Efficiency Furnace - Info
The life expectancy of a high efficiency gas furnace is approximately 20 to 25 years. This figure can vary widely depending on many factors. All such furnaces from this time period should be considered past there useful life and should be replaced for safety and efficiency reasons.
- The “heart” of a furnace is a metal chamber referred to as a heat exchanger. All or most areas of the heat exchanger are not readily accessible or visible to a home inspector. Therefore, assessment of a furnace is limited to external and operational conditions. The older the unit, the greater the probability of failure. A thorough inspection by a qualified HVAC contractor is advised for a full evaluation of heat exchanger conditions, particularly when the unit is beyond its expected useful life.
.jpg)

Manufacturer: Bryant
Capacity: 60,000 btu's
Age: 2011
Last Service Record: Service Records and Listing Plate Pics
These photos show the most recent service records on the furnace as well as the listing plate.


Annual servicing of the gas forced air furnace is recommended for safe and reliable heat. Records indicate that this furnace was recently serviced. The furnace was tested during inspection and was operational. The design life of these forced air furnaces is around 20 years or so. I recommend keeping this furnace on a regular annual service schedule.
Vents and Flues
The high efficiency heating equipment is venting to the exterior using PVC pipe. This vent pipe termination should be screened to prevent bird or rodent entry.

Air Filters
Filtration Systems: Disposable
Your heating system has disposable air filters installed. These should be changed quarterly or more to ensure proper air flow at the furnace. Be sure to install the filters with the arrows pointing in the same direction as the air flow in the furnace. Here is a link to more information regarding air filtration - LINK.

Cooling Systems and Heat Pumps
Air Conditioning / Heat Pump: None Noted
Heating & Cooling Distribution Systems
Heat Source in Each Room: Present
Distribution Method: Forced Air / Ducts
Common Testing Notes: Thermal Images Show Ducts Working
Thermal images showing approximate temperatures when testing the heating system. I use these images just to show the system was generally functioning during inspection. These are representative photos and do not indicate how well the systems are functioning.
 |  |
Mechanical Ventilation Systems
Bath Fan Ducting: Ductwork not visible
Determining proper ventilation to the exterior from kitchen, bath and laundry fans can be tricky as exhaust fan ductwork is often concealed behind finishes and fan terminations can be all over the house from the roof to the foundation, presenting difficulties for systematically checking every fan termination. During inspection, every effort is made to verify proper terminations of fan vents to the exterior, but it is possible to miss something here that is latent or concealed.
Kitchen Fan Ducting: Ducted to exterior
Whole House Fans, Ventilation and HRVs: No Mechanical Ventilation Found - Old House
The installation of a mechanical ventilation system is recommended. As this home would have predated the requirement for this, you have several options. This includes a whole house fan on a timer exhausting air to the exterior and bringing in fresh air, a heat recovery ventilator (HRV) and so on. Consult with a licensed HVAC contractor about improvements to the homes ventilation design. Here is a link to more information - LINK.
 (1).png)
Solid Fuel Fireplaces
Fireplace Types: Masonry firebox
The wood burning fireplace has a flue damper up inside. This is designed to keep cold air out of the house when the fireplace is not in use. Be sure to keep the flue damper closed during the heating season when the fireplace is not in use to prevent heat loss.
 (3).PNG) |
Wood burning fireplaces were noted in the home. The NFPA (National Fire Protection Association) recommends an annual inspection of all chimneys, fireplaces, solid fuel-burning appliances, and vents. They also recommend an NFPA 211 Standard, Level II inspection upon sale or transfer of the property. A Level II inspection includes, not only cleaning the interior of the chimney pipe, but also the use of specialized tools and testing procedures such as video cameras, etc. to thoroughly evaluate the serviceability of the entire flue lining and fireplace/chimney system. The fireplaces showed heavy use and were in need of a full cleaning/servicing. If a chimney cleaning has not been performed over the past 12 months, such an inspection/service is recommended prior to first use for fire safety reasons. Implement any repairs as recommended.


The hearth extension in front of the wood-burning fixture is missing. Generally, a 20-inch deep hearth is recommended in front of all fireplaces greater than 6 square feet. The hearth should extend 12 inches to the sides of the firebox. For smaller fireplaces, minimum recommended clearances are 16 inches deep and 8 inches on either side. Manufacturers tend to have similar requirements, but they can vary slightly. Hire a qualified mason or chimney sweep to further investigate and repair

Interior
Floors and Floor Materials
Floor Materials: Wood Laminate
The wood laminate floors are damaged in places - see kitchen near the dishwasher and refrigerator. This appeared to be due to a leaking dishwasher and/or improper use of it. Have all damaged flooring further evaluated and repaired by a qualified contractor as needed.


Walls, Ceilings, Trim and Closets
Wall and Ceiling Materials: Drywall
The ceiling in some rooms of this house contains popcorn texture. This product may contain asbestos as many of these products contained asbestos prior to 1978. After 1978, remaining stocks of material containing asbestos were sold and as the product was slowly phased out. Asbestos testing is beyond the scope of this inspection. The health risks posed by this substance are minimal unless the texture becomes friable or air borne. If you wish to remove the popcorn texture or have remodel plans that could involve cutting or removing this sheetrock, asbestos testing is recommended. Consult with an environmental lab for more information on asbestos testing. One option is always to sheetrock over this texture if you wish to have a different ceiling finish.

Cracks, nail pops, and minor blemishes were noted in the ceiling and walls - see mostly in the living room. These types of finish issues can be due to routine settlement or moderate seasonal expansion and contraction of the structure or even related to the workmanship of the framing or installation of the drywall. The seasonal types of cracking can be most frustrating as they will tend to re-open after repair. There are certain stress points in a house where cracking is common, for example where large beams land into a wall. Repair and paint cracks, nail pops, and other blemishes as needed and monitor. Examples of observations noted during the inspection include:
 |
Wall Insulation and Air Bypass
Wall Insulation: Not all visible
The insulation was installed backwards below the stairway. The cardboard vapor barrier should always face the hot side of the home which in this case would be the interior. I recommend repairing this condition to help with efficiency in the home.

Stairs and Railings
Observations: Standard
Interior Doors
Observations: Tested
Several doors were tested throughout the home and were found to be functional. Exceptions will be noted below.
Common Observations: Adjust SEV
Doors throughout the home were in need of adjustments and general maintenance. I noted doors rubbing on their frames, doors not latching correctly and so on. I recommend a handy person adjust and repair all doors as needed.


Windows
Limitations and Testing Procedures: Testing Procedures Note
During the inspection I operate (open and close, lock, and so on) a representative number of windows in the dwelling. I do my best to test all windows for functionality, but due to storage items (couches, decorations , and so on) that is not always possible. I also look closely for lost seals in the glazing. Lost seals are not always easy to spot and can change drastically with humidity and temperature changes at any time of ownership.
Problems with double pane windows are common: sash issues, condensation issues, broken hinge mechanisms, broken/missing latches, corrosion, broken thermal seals, defective thermal coatings, failed paint, failed glazing etc.
While I attempt to identify as many defects with windows as possible, not all windows are tested and/or may be obstructed from view (screens, blinds, vegetation etc). This can mean that some issues may go undetected. Typically most issues with the individual windows would not typically be considered "deal breakers" in terms of the purchase of a home/building, and therefore the focus of the inspection is generally on more substantive issues. In addition, windows are locked after testing if possible.
Window coverings and blinds are not inspected for function at the time of inspection except in the process of testing windows for function. I recommend that you test these blinds as desired.
Draw strings and slatted type coverings can be a strangulation hazard for small children. I recommend considering some of the newer types of blinds that are less dangerous to small children. For more information regarding the safety hazards of blinds, see the Consumer Product Safety Commission website at: Window Blind Safety Information
- Move all cribs, beds, furniture and toys away from windows and window cords, preferably to another wall.
- Keep all window cords out of the reach of children. Make sure that tasseled pull cords are short, and that continuous-loop cords are permanently anchored to the floor or wall.
- To prevent inner-cord hazards, lock cords into position when lowering horizontal coverings or shades.
- Repair window coverings, corded shades and draperies manufactured before 2001 with retrofit cord-repair devices, or replace them with today's safer products.
- Consider installing cordless window coverings in children's bedrooms and play areas.
Window Glazing: Double pane
Interior Window Frame: Vinyl
Window Styles: Single hung
The bedrooms in this house have inadequate escape and rescue openings. Today, all bedrooms must have a second means of ingress and egress in case of emergency. This can be provided by a door but is typically provided by a window. Hire a licensed general contractor to further evaluate and repair / update for improved safety.
Escape and rescue openings must comply with these basic guidelines:
- Minimum width of opening: 20 inches
- Minimum height of opening: 24 inches
- Minimum net clear opening at any grade floor level escape and rescue window: 5 square feet
- Minimum net clear opening of other escape and rescue windows: 5.7 square feet
- Maximum height of base of opening above interior side floor: 44 inches
- Windows should open easily without the use of keys or tools
And for window wells below grade:
- Minimum net clear area of 9 square feet
- Minimum horizontal projection and width of 36 inches
- Wells with a vertical depth greater than 44 inches require a permanent ladder or steps usable with the window in the fully open position

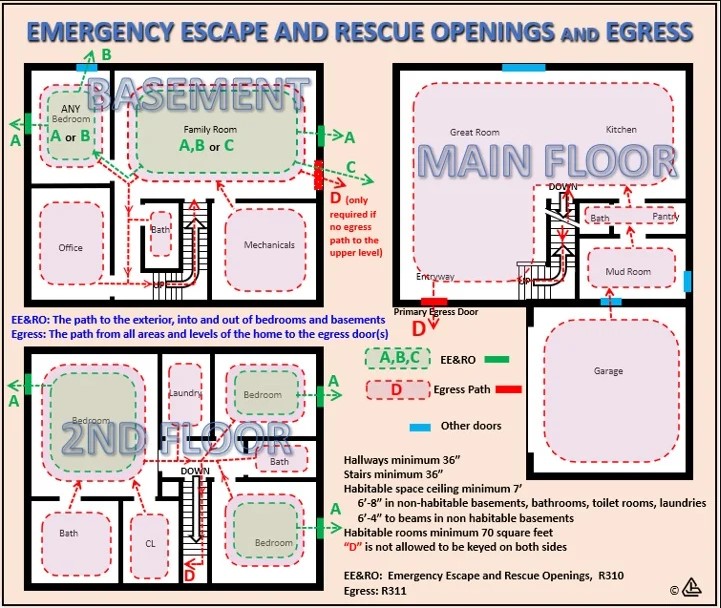

 | |
The windows in the living room could be a safety hazard - the windows are close to the floor (less than 24") and open larger than 4 inches overall. This could allow a child to fall out of the window. Consider restricting the opening of this window to 4 inches or less. Here are some examples of possible child safety window barricades - LINK.
 |
Smoke and Carbon Monoxide Alarm Systems
CO Alarms Noted: Not enough CO alarms located in the home
CO Alarms: Not Enough
At the time of inspection Carbon Monoxide alarm/detectors are not tested. I recommend that prior to move-in, that all Carbon Monoxide alarm/detectors be tested and have their batteries replaced. It is recommended that Carbon Monoxide detectors that are older than 5 years should be replaced by a licensed electrical contractor if they are hard-wired; and replaced by the homeowner/handy-person if they are battery operated. These devices are currently required, according to Washington State Law to be maintained by the tenant/homeowner according to the manufacturer's recommendations/instructions and are required in all homes.
- For optimum safety, Carbon Monoxide alarm/detectors are required in the immediate vicinity of bedrooms and on each floor level of the home and inside of any sleeping room if there is a gas appliance in the room. "Immediate vicinity" is not defined but most manufacturers recommend they be installed between 5 and 20 feet of sleeping rooms. Alarm/detectors must be maintained free of dust and debris which can interfere with operation. They should be installed per manufacturer's instructions . While it is primarily fuel burning appliances the produce carbon monoxide, CO is also produced from electric appliances like toasters and ranges (especially ovens on self clean cycle).
- Please be aware that residential Carbon Monoxide detectors are cumulative and are designed to not sound with low levels of carbon monoxide. Some people are more susceptible than others to low levels of carbon monoxide and I consider it prudent to familiarize yourself with the symptoms/warning signs of Carbon Monoxide. Detectors that meet the UL-2034 requirements for detectors installed in residential construction are not allowed to sound at continuous CO levels up to 30 ppm, 70 ppm for 4 hours, 150 ppm for up to 50 minutes and 400 ppm for up to 15 minutes. CARBON MONOXIDE
- Combination type alarms can be problematic even while meeting "legal requirements" for installation. Carbon Monoxide detectors in conjunction with Ionization type smoke detectors is problematic due to the poor ion technology (see links under smoke alarms previous to this section). The devices also can have different life spans. For best protection, combination type alarms should not be used, even though this is a standard recommendation of manufacturers. The International Association of Fire Fighters (IAFF) specifically recommends against installing combination alarms. Combination type alarms are required to be UL-217 and UL-2034 listed.
Smoke Alarms Noted: Missing in bedrooms
Smoke Alarms: None In Bedrooms
At the time of inspection smoke alarms are not tested. I recommend that prior to move-in, that all smoke alarms be tested according to manufacturer's recommendations and that their batteries be replaced. It is recommended that smoke alarms that are older than 5-7 years should be replaced by a licensed electrical contractor if they are hard-wired; and replaced by the homeowner/handy-person if they are battery operated.
- For optimum safety, hard-wired smoke alarms with backup batteries are recommended in each bedroom, and hallways outside of bedrooms. At least one smoke alarm should be installed on each floor of the home. Alarms must be maintained free of dust and debris which can interfere with operation.
- Smoke alarm technology is evolving and current wisdom is going in the direction of recommending that only Photoelectric smoke alarms be installed in the home due to the nuisance tripping and other human factors involved with misuse and maintenance associated with Ionization type smoke alarms. It is not possible in the context of the home inspection to determine why types of alarms are installed in the home. You are encouraged to install and maintain any type of alarm in the home and you are encouraged to upgrade alarms to photoelectric type alarms. See the following link for a discussion of Ionization vs. Photoelectric Alarms: Photo-Electric Smoke Alarms and Silent Alarms; Deadly Differences.
Modern standards recommend smoke alarms in all bedrooms, in all hallways outside bedrooms and at least one on each floor of the building. At the time of inspection no alarms were found in the bedrooms as needed. Install additional smoke detectors in all currently required areas of the home.
Carbon monoxide alarms were found and noted during inspection, but not at all required areas - see basement. Be sure to check these regularly with the test button to ensure they are operational. The standard is 1/ floor and 1 outside all sleeping areas. Install all missing CO detectors as needed in the home


Kitchen
General Kitchen Photos
Representative Images: Provided
Overall images of the kitchen area.
 |
Sinks and Faucets
Tested
Corrugated waste pipe was used to drain the kitchen sink. This in an unlisted plumbing product and only smooth wall piping should be used. The p trap was also tilted and may not function correctly. Hire a licensed plumber to further evaluate and repair as needed.
 |
Cabinets and Countertops
Countertop Material: Stone Slab Materials
Cabinet Material: Wood
Ventilation Method
Observations : Fan Ducted to Exterior
Appliances
Refrigerator: Operating
Dishwasher: Operated
Dishwasher Air Gap: None noted
Disposer: Operated
Microwave: Operating
Thermal Images Testing Procedure Notes: Thermal images - All
These thermal images show the appliances were tested and found to be working at the time of inspection.


Most Common Observations: Missing Anti-Tip
The dishwasher was tested through a full cycle and was found to automatically open the door for ventilation at the end of the cycle. When doing so however, the unit allowed water to drip from the front door seal and onto the flooring below causing damage. This is more than likely why the flooring is damaged at this specific location. I recommend modifications/repair to the dishwasher to ensure a moisture tight seal.

An anti-tip device is needed to prevent this range from tipping during operation of the oven door. This is a small clip that secured the back adjustable feet of the range to the floor.

 (2).PNG)
An air gap is recommended to protect the dishwasher from accidental contamination if the sewer line were to back up. The air gap for the dishwasher did not appear to be installed as needed. I noted what is called a Johnson T air gap at the exterior of the home, however it was missing a ventilation hole. I recommend adding the needed hole in the Johnson T airgap at the rear side of the home and/or installing a high loop system below the sink.


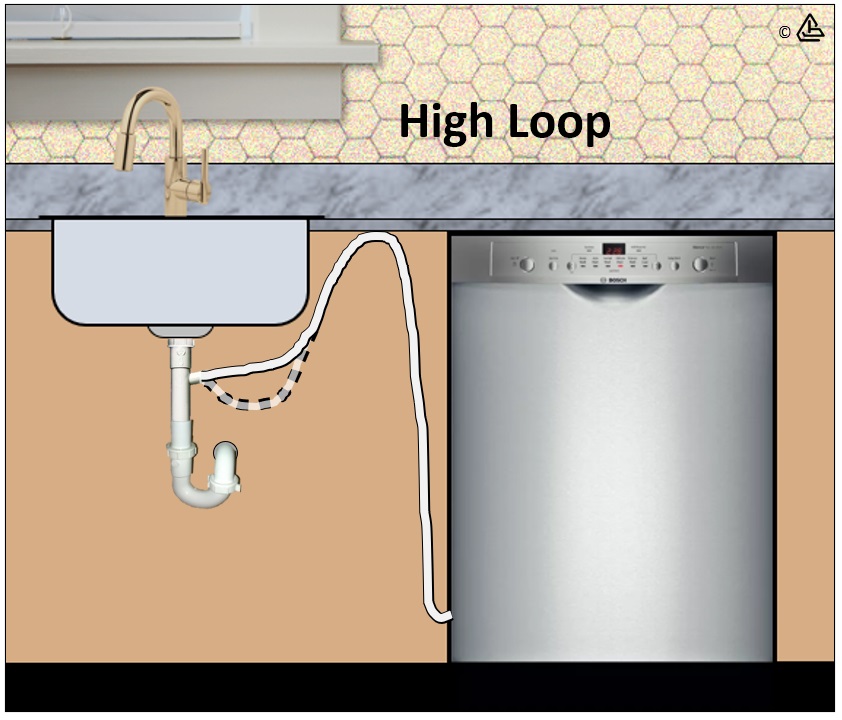

Primary Bedroom Bathroom
General Bathroom Photos
Representative Images: Provided
Representative images(s) of the bathroom.
 |
Sinks and Cabinets
Tested
Toilet
Tested
Bathtub / Shower
Tested
Bathroom Ventilation
Type: Bath fan, Operable window
General Bath Condition (Finishes, Walls, Flooring, etc)
Standard
Testing Note
During inspection today I operated all plumbing fixtures in bathrooms that I could. I ran a moisture meter around toilets and tile shower enclosures to check for concealed leaks and sounded for loose tile and finishes in shower and tub enclosures. I do not test bathtub overflow drains as this risks damaging finishes around the tub. Monitor tubs while filling and avoid pushing water into the overflow. Even well-installed overflow drains can leak as the gaskets that seal the overflow will dry out over time and may no longer provide a watertight seal. Monitor plumbing after moving into a new home as testing during inspection presents less stress on plumbing than daily use. Please note that vacant homes present additional risk as it can be difficult to distinguish how the plumbing system will respond to daily use.
Upstairs Hallway Bathroom
General Bathroom Photos
Representative Images: Provided
Representative images(s) of the bathroom.
 |
Sinks and Cabinets
Tested
The installation for the under mount sink was lacking support as needed. The sink itself was supported by glue only and was missing a physical restraint. Hire a general contractor/handy person to add the missing support.
 |
Toilet
Tested
Bathtub / Shower
Tested
Bathroom Ventilation
Type: Bath fan
General Bath Condition (Finishes, Walls, Flooring, etc)
Standard
Testing Note
During inspection today I operated all plumbing fixtures in bathrooms that I could. I ran a moisture meter around toilets and tile shower enclosures to check for concealed leaks and sounded for loose tile and finishes in shower and tub enclosures. I do not test bathtub overflow drains as this risks damaging finishes around the tub. Monitor tubs while filling and avoid pushing water into the overflow. Even well-installed overflow drains can leak as the gaskets that seal the overflow will dry out over time and may no longer provide a watertight seal. Monitor plumbing after moving into a new home as testing during inspection presents less stress on plumbing than daily use. Please note that vacant homes present additional risk as it can be difficult to distinguish how the plumbing system will respond to daily use.
Basement Bathroom
General Bathroom Photos
Representative Images: Provided
Representative images(s) of the bathroom.
 |
Sinks and Cabinets
Tested
Toilet
Tested
Bathtub / Shower
Tested
Bathroom Ventilation
Type: Bath fan, Operable window
General Bath Condition (Finishes, Walls, Flooring, etc)
Standard
Testing Note
During inspection today I operated all plumbing fixtures in bathrooms that I could. I ran a moisture meter around toilets and tile shower enclosures to check for concealed leaks and sounded for loose tile and finishes in shower and tub enclosures. I do not test bathtub overflow drains as this risks damaging finishes around the tub. Monitor tubs while filling and avoid pushing water into the overflow. Even well-installed overflow drains can leak as the gaskets that seal the overflow will dry out over time and may no longer provide a watertight seal. Monitor plumbing after moving into a new home as testing during inspection presents less stress on plumbing than daily use. Please note that vacant homes present additional risk as it can be difficult to distinguish how the plumbing system will respond to daily use.
Attic
Attic Access
Representative Photos: Provided
The photos provided here show representative images of the attic space(s) at the time of inspection.
 |  |
 |
Method of Inspection: Viewed at access
I did not enter the attic spaces as there was no ramp or safe way to access the space. Crawling in the V of trusses or on top of framing risks damaging thermal barriers (insulation) and ceiling finishes and is not a safe way to access an attic. This is a limited inspection of this space as viewed from the access only.
Roof Framing and Sheathing
Type Of Framing: Truss System
Sheathing: Decking/skip sheathing, OSB, Plywood
Attic Insulation
Insulation Type: Fiberglass, Silva wool, Cellulose
Approximate Insulation R-Value on Attic Floor: Inconsistent
The attic insulation could be improved to modern standards, which recommend R-49 on the floor and R-21 on walls. R-value is the measure of resistance to heat loss; the higher the R-value the better the insulation. During insulation repairs it is best practices to implement any air seal-up repairs to seal air leakage (wiring, chimney chase penetrations and so on). Also, be sure you have completed any wiring or other projects that are needed in the attic. Then, hire an insulation contractor to improve thermal barriers.
.jpg)
 |
Attic Fan Exhaust Vents
Common Observations: Bath and-or Kitchen - Uninsulated
The ductwork for the bathroom and kitchen fans are uninsulated in the attic space. This can cause condensation during cold weather and is less energy efficient. Replace these with insulated exhaust ducts or insulate to R-8 or better.
 |
Attic and Roof Cavity Ventilation
Attic Ventilation Method: Soffit vents
Attic and roof cavity ventilation is a frequently-misunderstood element of residential construction. All roof cavities are required to have ventilation. The general default standard is 1 to 150 of the attic area and ideally, this comes from at least 60% lower roof cavity ventilation and 40% upper, but this is a wild over-simplifications of the subject. As a good guiding principle the most important elements for healthy attic spaces, which are traditionally insulated and ventilated are:
- Make sure the ceiling between the living space and the attic is airtight
- Ventilate consistently across the whole lower part of the roof cavity with low, intake soffit venting
- Upper roof cavity venting is less important and if over-installed can exacerbate air migration into the attic from the living space.
- Avoid power ventilators which can depressurize the attic and exacerbate air migration from the house into the attic.
For more information, please see: Link
The attic and roof cavity ventilation looked to be non-standard. Proper attic ventilation is important for the roofing materials to perform as intended and to reduce chances for condensation problems and heat build-up in the attic. The problem here is the use of ridge vents and gable vents. Most ridge vent manufacturers recommend ridge and soffit vents only to get convective ventilation across the roof decking; the gable wall vents can disrupt this convective air flow. No evidence of problems from this configuration was noted to date and depending on occupant behavior this may not ever cause a problem. If you wish to correct, consult with a qualified general contractor about blocking off existing gable vents.


Structure and Basement
Foundation
% of Foundation Not Visible: 80%
Evidence of Seismic Protection: Not visible
Building Configuration: Basement
Foundation Description: Poured concrete
Small cracks were noted in the foundation - see right side. Have general contractor seal these areas to deny moisture and pest entry as the roof on the other side is finished space. Some amount of small cracks are common in poured concrete and typically do not require significant repair as long as they do not continue to grow. The best way to prevent on-going settlement is by controlling roof runoff and site drainage to promote dry soils around the foundation; wet soils do not bear weight well. This will also help to prevent basement or crawl space moisture problems.

Floor, Wall and Ceiling Framing
Wall Framing: 2x4, Partly visible
Wall Sheathing: Plywood, Partly visible
Floor Framing: Not visible
Sub-Floor Material: Not visible
Ceiling Framing: Not visible
A main support beam in the garage had been modified for the garage door opener track installation. Typically modifications to the bottom of a support beam are not recommended as they weaken the materials overall. The beam itself was covered at most areas in drywall so it was difficult to see it any visible damage and/or splitting had occurred. Hire a licensed general contractor to add additional support and/or repair this installation as feasible/needed

Basement
Information: Full
Basement Moisture
Observations: None noted
As a general rule, older basements are prone to seasonal dampness and moisture issues. This is because there were no industry standards to water proof foundations at the time this home was built. Today's basements will likely be sealed on the outside with concrete sealer over the foundation. On top of this a water-proofing fabric is applied which will divert water into a footing drain system at the base of the foundation; old basements usually have none of these water-proofing systems installed. Some old basements do stay dry - typically the result of a good site and good soil drainage around the building. However with an older basement such as this, anticipating some amount of water related conditions is to be expected and is impossible to evaluate or predict during a visual home inspection.
Checking Out Procedure
Check Out List
Oven: Off
Lights: Some lights left on
Heating and Cooling: Restored to Pre-inspection temperatures
Appliances: Off / finishing cycle
Additional Information
Helpful Links
Common Information: Washington State Standards Of Practice, Common Life Expectancy Chart
Attached here is a direct link and PDF to the Washington state standards of practice for home inspectors. These are the minimum requirements that we as home inspectors are required to observe - LINK
Here is more information regarding the typical lifespan of homes and their building materials. This is a great way to get a rough estimate of industry accepted life expectancies of different components to help plan future upgrades and maintenance - LINK
Receipt -- The Full Report
12345 67th Ave NE Bellingham, Wa 98225
| Residential Inspection Fee | $675.00 |
| $675.00 | |
| PAID |
West Inspect LLC
C/O Shay Schiefelbein on behalf of West Inspect LLC
336 36th St. Suite #201
Bellingham, WA 98225
(206)-799-6084 & (360) 303-0410
Signed Contracts
West Inspect LLC
(206)-799-6084 & (360) 303-0410
shay@westinspectllc.com
www.WestInspectllc.com
Inspected by Shay Schiefelbein on behalf of West Inspect LLC, WA State Inspector License
No. 1590


.jpg)