

How to Read This Report
This report, whether viewed digitally or in printed form, should be reviewed in full color so that photographs are clearly discernible and on a device or page width of no less than 8.5 inches. References to the right and left sides of the building are based on facing the front of the structure as shown on the report cover. The client has a duty and obligation to read the entire report. Please contact the inspector with any questions or concerns.
This inspection report is intended to identify readily observable major structural deficiencies, inoperative conditions, and noticeable moisture-related concerns in the areas inspected. The report may also note safety concerns and recommended upgrades that should be considered. Conditions may exist that were not observed or reported due to concealed, inaccessible, or obstructed areas.
Photos
Photographs included in this report are provided to help illustrate reported conditions or areas of concern. Photos are representative only and may not show the full scope of repairs required. Repairs should be based on the actual conditions observed at the property, not solely on photographs. When viewing the online report, clicking a photo will enlarge it for closer inspection.
Repairs
Any repairs or corrections should be performed by qualified and competent professionals familiar with the type of work being completed. Obtain competitive bids as appropriate and further evaluation when recommended.
Getting the Information to You
This report is designed to present technical information in an accessible format. The online HTML version allows expanded access to additional information. Some words or phrases may appear blue and underlined; clicking these provides links to supplemental resources. Other text colors, if present, have no specific meaning. Please read all written text.
This report may also be printed or saved as a PDF.
Chapters and Sections
The report is organized into chapters that represent major home systems. Each chapter contains sections addressing specific components. When viewing online, chapters can be accessed using the navigation menu on the left side of the screen.
Observation Labels
Observation labels are used to categorize findings. Not all labels appear in every report. Hazardous, Key Concerns, and Further Evaluation Needed items, when used, will appear in both the report and the summary. Other observation types appear only in the report body. Labels are numbered for reference. Colors and icons, when used, do not indicate severity.
Summary Page
For convenience, this report includes a summary listing non-routine maintenance items that the inspector believes should be addressed prior to marketing the home for sale. The summary contains limited information and does not include photos or detailed explanations. Only items classified as Key Concerns, Further Evaluation Needed, Hazardous, and when applicable New Construction Builder Punch List Items, are included.
The report body contains the most complete information, including descriptions, photographs, captions, and when applicable, diagrams, videos, and links. Refer to the full report body when planning repairs or upgrades. The client is responsible for reading the entire report.
Summary
Key Concerns
- B-1 BATHROOM:
Location 1/2 Bathroom:
Sink
Sink was loose.
Properly secure sink as needed to help prevent leaks.
- P-1 PLUMBING:
Multiple exterior hose faucets need correction.
Check all exterior hose faucets properly correcting where needed.
- Both hose faucets leaked at handle.
- P-2 PLUMBING:
Water Heater
Water heater temperature and pressure relief valve had discharge extension piping that was not rated for hot water and this pipe should be properly replaced.
- PVC piping is not rated for use with hot water and should not be used at water heater for temperature and pressure relief valve discharge piping.
Refer to discharge piping general guidelines. Proper correction is needed for correct function and safety.
- P-3 PLUMBING:
Water Heater
Questionable Installation
Water heater did not appear to meet manufacturer installation standards for proper installation when inspected.
Refer to installation instructions and have a competent contractor correct as needed for function and safety.
- Natural draft gas water heater should not be installed inside a bathroom or in a small area attached to a bathroom as the water heater may consume or displace the oxygen from the bathroom.
- Pressure temperature relief valve discharge piping was not installed properly.
- Consider relocating water heater to garage or unfinished basement. Doing so would not require a special type of gas water heater.
- CD-1 Central Ductwork:
Ductwork
Ductwork insulation observed in need of correction for some areas. Have a competent heating contractor check all ductwork properly correcting where needed.
- Ductwork insulation observed missing
- G2-1 Gas:
Furnace
Gas Piping was ready for proper correction.
Properly correct gas piping where needed.
- Sediment trap for gas piping to furnace was installed inline rather than with change of direction at gas piping.
- GAF-1 Gas Appliance Flue:
Water Heater
Gas appliance metal flue needed correction.
Gas appliance metal chimney flue did not appear to have proper clearance from combustible material. A single wall metal flue generally needs six inches clearance away from combustibles while a double wall metal flue will typically only need one full inch clearance away from combustibles. A competent heating technician should further evaluate and properly correct gas appliance metal flue as needed for safety and function.
- E-1 ELECTRICAL:
Electrical Service
The electrical service conduit was pulled loose from the electric meter enclosure.
A competent electrical contractor should properly repair or replace electrical service as needed for safety and function.
- E-2 ELECTRICAL:
Electrical Service
The electrical service conduit at the electric meter was not properly secured to the building.
The electrical service conduit should be properly secured in place where needed.
- E-3 ELECTRICAL:
Sub Breaker Panel Garage
Multiple corrections were needed at electrical distribution panel.
Refer to the full report for additional information and photos regarding obvious corrections recommended for this electrical panel. A competent electrical contractor should further evaluate this area. Make proper corrections as needed for safety and function now.
- E-4 ELECTRICAL:
Branch Wiring
Multiple corrections were needed to improve the safety of the electrical branch wiring.
These corrections are usually non-recurring once properly completed. A competent electrical contractor should review the installed branch wiring making proper corrections where needed for both safety and function.
- Representative Photos Provided
- E-5 ELECTRICAL:
Electrical Receptacle Outlets
Multiple electrical receptacles were ready for proper correction.
- Some electrical receptacle junction boxes were loose. Properly correct where needed.
- Some electrical receptacles were observed improperly installed.
- Some electrical receptacles tested hot/neutral reversed.
- Install proper cover plates where needed at interior.
- Properly correct loose electrical receptacles where needed.
A competent electrical contractor should check all receptacles, making them functional and safe where needed.
- E-6 ELECTRICAL:
Lighting/fans - Make lighting/fans functional and safe where needed.
- Some lighting was not fully functional when inspected.
- Some light fixtures were improperly installed.
- Some light fixtures were damaged.
- Some lighting was inoperative when inspected.
Check all lighting/fans making functional and safe where needed.
Representative Photos Provided
- AL-1 ATTIC LADDER:
Pull down attic ladder stairway appeared damaged. Do not climb attic ladder stairway when it is damaged. It may collapse unexpectedly. For safety, properly replace or remove damaged pull down attic ladder stairway, including the box frame.
- Attic ladder manufacturers advise to replace damaged attic ladders rather than to attempt any type of repair to the attic ladder.
- M-2 MOISTURE:
Plastic sheeting, vapor retarder, was not observed properly covering soil areas inside the underfloor crawl space.
A vapor retarder is an important measure to reduce moisture inside underfloor crawl spaces and should be properly added to cover soil areas where omitted or missing.
- D-1 DECK:
Deck areas were observed ready for corrections now and before use to improve the structure of the deck and to improve the safety aspects for the fall prevention measures installed at deck areas. Refer to the full report for additional information and photos regarding obvious corrections recommended now for any deck areas. A competent deck contractor should check all deck areas. Make deck areas functional, safe and structurally sound where needed.
- Representative Photos Provided
Further Evaluations
- S-1 STRUCTURE:
Damaged engineered roof truss was observed unrepaired at garage addition above access opening.
To repair damaged roof truss framing:
- Obtain further evaluation to verify all areas where damage is present at the roof trusses.
- Contact the roof truss manufacturer or another State Licensed Professional Engineer specializing in truss construction to design appropriate corrections.
- A competent, qualified contractor should execute engineering design where needed.
- Retain stamped engineering design drawing for your permanent records.
- S-2 STRUCTURE:
Floor Framing
The damaged engineered I-joist floor framing was observed to be unrepaired. One or more flanges were observed to be cut or damaged on the engineered I-joist. I-joist Manufacturers advise that flanges should not be modified or damaged where installed. It is possible to repair a damaged I-joist without having to replace the entire I-joist. The inspector recommends proper correction or further evaluation by a Professional Engineer.
- Damaged, unrepaired I-Joist observed beneath master bathroom.
To repair joists with damaged flanges:
A competent contractor should verify all areas where I-joists have been damaged.
Contact the I-joist manufacturer to obtain the engineering drawing for each type of damage present.
The manufacturer's repair drawing is typically provided at no cost after submitting photos of damage.
A competent, qualified contractor should then execute the engineering design where needed.
If the I-joist manufacturer is unavailable, a Professional Engineer can also design repair details for a fee.
- M-1 MOISTURE:
Crawl space area appeared to be suffering from a chronic excess moisture condition and proper corrections were needed when inspected for health safety and to protect building components.
The following describes logical steps for correction of affected areas. Your specific situation may vary. Correct or modify steps as needed.
- Further evaluation is needed to verify type of apparent fungus, if desired, to determine if apparent fungus is mold and type of mold, if present. Properly remediate including removal of floor insulation if present. This should be done in conjunction with controlling excess moisture.
- Further evaluation needed to determine all sources of moisture entry into crawl space area.
- Correct all controllable excess moisture entry into crawl space area such as plumbing leaks, condensate leaks, gutter down spouts, etc.
- Further evaluation needed to determine foundation and floor system repairs. Properly perform any structural repairs as needed.
- Clear and clean crawl space area of all unnecessary debris.
- Properly install dewatering system if needed.
- Properly encapsulate crawl space and properly condition crawl space air for all areas of crawl space or properly ventilate crawl space area, if possible.
- Ventilated crawl spaces should have crawl space floor insulation properly replaced, if removed.
- V-1 VENTILATION:
Crawl spaces either should be properly ventilated or properly encapsulated to help control high humidity and reduce moisture inside crawl space areas. Encapsulated crawl spaces must have a conditioned air space to help control moisture.
When ventilating a crawl space, it is important to have proper intake and exhaust venting to provide adequate cross ventilation.
When a properly encapsulated crawl space is desired, the airspace inside the encapsulated area should be properly conditioned to help control moisture in this space. Conditioning of the crawl space air is accomplished either by properly modifying the existing central heating/cooling ductwork or installing a properly sized dehumidifier with a system of fans. An encapsulated crawl space will also have a properly installed liner present.
Proper ventilation or proper encapsulation was not observed in the crawlspace when inspected to help prevent moisture and condensation problems. Obtain further evaluation to determine the best solution for your situation, ensuring a proper correction that meets your needs.
- Crawl space was not properly ventilated.
- Crawl space was not properly encapsulated.
- R-1 ROOF:
Flashing
A competent contractor should further evaluate areas with flashing, properly correcting or adding flashing as needed. Properly correct any affected areas if present when installing flashing.
- Irregular flashing observed above and right and left of the front door. Blowing rain may get behind the installed flashing. An appropriate upgrade is recommended. Photos Provided
The Full Report
INTERIOR
Interior Access / Ceilings / Walls / Floor Coverings
Doors
Glazing/Glass
Windows
Stairs/Railings Interior
PLUMBING
Supply Piping
Waste Piping
Apparent Vent Piping
Exterior Hose Faucets
Water Heater
Equipment Observed
ELECTRICAL
Electrical Inspection
Electrical Service
MAIN PANEL
SUB PANEL
Branch Wiring
AFCI
GFCI
Receptacle Outlets
Three Wire Receptacles
Lighting/Ceiling Fans
Lighting/Ceiling Fans
Switches
Smoke Alarms
STRUCTURE
Attic Access
Attic Area
Roof Framing
Ceiling Framing
Wall Framing
Underfloor Access
Underfloor Description
Floor System
Other Concerns
DECK
Deck or Wooden Porch Areas Overall Condition Statement
Deck or Wooden Porch Location, Attributes and Restrictions
Deck or Wooden Porch Structure
Deck or Wooden Porch Railings and Stairs
About the Inspection Process
Home Inspection: Scope and Purpose of a Home Inspection
The Scope and Purpose of a Home Inspection
Purchasing property involves risk
The purpose of a home inspection is to help reduce the risk associated with the purchase of a structure by providing a professional opinion about the overall condition of the structure. A home inspection is a limited visual inspection and it cannot eliminate this risk. Some homes present more risks than others. We cannot control this, but we try to help educate you about what we don’t know during the inspection process. This is more difficult to convey in a report and one of many reasons why we recommend that you attend the inspection.
A home inspection is not an insurance policy
This report does not substitute for or serve as a warranty or guarantee of any kind. Home warranties can be purchased separately from insuring firms that provide this service.
A home inspection is visual and not destructive.
The descriptions and observations in this report are based on a visual inspection of the structure. We inspect the aspects of the structure that can be viewed without dismantling, damaging or disfiguring the structure and without moving furniture and interior furnishings. Areas that are concealed, hidden or inaccessible to view are not covered by this inspection. Some systems cannot be tested during this inspection as testing risks damaging the building. For example, overflow drains on bathtubs are generally not tested because if they were found to be leaking they could damage the finishes below. Our procedures involve non-invasive investigation and non-destructive testing which will limit the scope of the inspection.
This is not an inspection for code compliance
This inspection and report are not intended for city / local code compliance. During the construction process structures are inspected for code compliance by municipal inspectors. Framing is open at this time and conditions can be fully viewed. Framing is not open during inspections of finished homes, and this limits the inspection. All houses fall out of code compliance shortly after they are built, as the codes continually change. National codes are augmented at least every three years for all of the varying disciplines. Municipalities can choose to adopt and phase in sections of the codes on their own timetables. There are generally no requirements to bring older homes into compliance unless substantial renovation is being done.
This is just our opinion
Construction techniques and standards vary. There is no one way to build a house or install a system in a house. The observations in this report are the opinions of the home inspector. Other inspectors and contractors are likely to have some differing opinions. You are welcome to seek opinions from other professionals.
The scope of this inspection
This inspection will include the following systems: exterior, roof, structure, drainage, foundation, attic, interior, plumbing, electrical and heating. The evaluation will be based on limited observations that are primarily visual and non-invasive. This inspection and report are not intended to be technically exhaustive.
Your expectations
The overall goal of a home inspection is to help ensure that your expectations are appropriate with the house you are proposing to buy. To this end we assist with discovery by showing and documenting observations during the home inspection. This should not be mistaken for a technically exhaustive inspection designed to uncover every defect with a building. Such inspections are available but they are generally cost-prohibitive to most home buyers.
Be Proactive Regarding Maintenance:
How much should you budget to maintain a home in the Chattanooga area?
As a general rule, a proper home maintenance budget should be about 2-5% of the value of the home annually. This maintenance budget would include periodic maintenance, general repairs, lawn care, housekeeping and saving any excess funds to budget for predictable replacement of the water heater, central heating/cooling and the roof covering. Should you choose to perform any of these tasks yourself, you should have fewer out of pocket expenditures to properly maintain your home.
General Comments
Building Characteristics, Conditions and Limitations
Type of Building : Single Family Home
Site Built, Apparent additions built after original construction were observed.
Approximate Square Footage: 2426
Approximate Year of Original Construction: 1995
Weather during the inspection: Clear
Ground/Soil surface conditions: Dry
Approximate Low Temperature During Inspection: 65[F]
Approximate High Temperature During Inspection: 75[F]
INTERIOR
Interior Access / Ceilings / Walls / Floor Coverings
Interior Access: Empty of Furnishings
Home was empty of furnishings when inspected.
________________________________________________________________________________________________________________________________________________________________
Ceilings
Interior Ceiling Materials: Drywall
Interior Ceiling Condition:
- Wear noted, properly recondition to meet your needs
________________________________________________________________________________________________________________________________________________________________
Walls
Interior Wall Materials: Drywall
Interior Wall Condition:
- Wear noted, properly recondition to meet your needs
________________________________________________________________________________________________________________________________________________________________
Flooring
Interior Flooring Materials: Carpet, Tile, and Sheet Vinyl
- Wear noted, properly recondition to meet your needs
Doors
Doors at Interior: Missing
Some doors were missing or not installed. Correct to meet your needs.
________________________________________________________________________________________________________________________________________________________________
Check All
Doors to the Exterior
Check all doors to the exterior properly, making doors functional, secure, and weather-tight to meet your needs.
- Front door operation could be improved.
- Lock function at master bedroom door to exterior could be improved.
Glazing/Glass
Insulated glass was present.
Windows
Metal framed windows were present.
Vinyl framed windows were present.
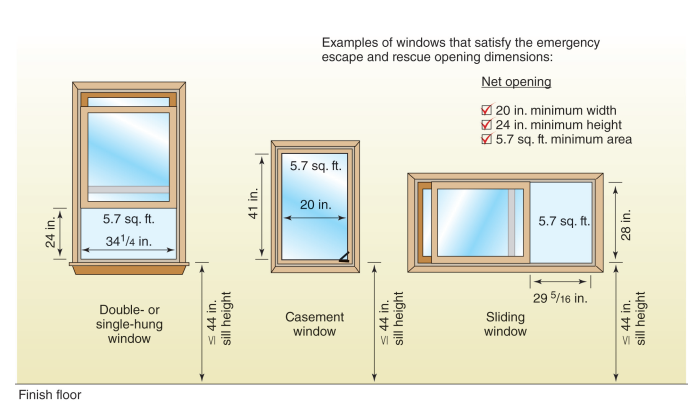
Escape and Rescue
Consider upgrading emergency escape and rescue window openings.
Window for one or more possible sleeping areas did not appear to meet modern safety standards for an emergency escape or a rescue opening from a sleeping room. Evaluate your risk exposure, correcting or making contingency measures as needed. Consider this area for appropriate upgrade or improvement.
 |  |
Original Windows, Older Windows
Older windows often have been neglected and may not operate as intended. Check all windows properly correcting where needed.
The building appeared to have at least some of the original windows installed during construction. Windows are now available that are more efficient to reduce energy usage and improve comfort level inside home. Consider upgrading if desired.
Stairs/Railings Interior
Diagram: Older Railing & Stairs
Railings and Stairs at older home as expected, did not meet current safety standards. Railings and stairs were ready for modernization for improved safety. Evaluate your risk exposure. Consider proper repair or replacement of stairs and railings where needed now for safety and function.
.jpg) | .jpg) |  |
 |
GARAGE
HINGED DOOR at GARAGE to LIVING SPACE
Door Condition: Hinged Door at Garage to Living Space with Window
A door with window glass typically should not be used as an entry door from a garage area into a living space. Evaluate your risk exposure and consider upgrade to an appropriate door rated for separation between garage and living space for improved safety.

________________________________________________________________________________________________________________________________________________________________
GARAGE
GARAGE TYPE: Attached
Garage Location: Original Attached Garage
Photos
Garage - Representative Photos
 |  |  |
 |  |
Garage Restrictions: Stored Items
Stored items were present at garage when it was inspected limiting view and access to some areas of garage.
Garage Separation from Living Space: Drywall Missing Ceiling Attic Ladder
Ceiling framing separating the garage area from the living space was exposed or not completely covered with drywall. Additionally, an attic ladder was observed at the ceiling area which means that a large opening was present through the ceiling.
Should a fire occur at an attached garage area, properly installed drywall on framing, where needed, can offer some assistance to slow the spread of fire and smoke from the garage area to living areas. Consider this area for an appropriate improvement or upgrade.

________________________________________________________________________________________________________________________________________________________________
GARAGE OVERHEAD DOOR: Two Installed
Overhead Door Material: Metal
Overhead Door Insulation: Not Insulated
Overhead Door Operation: Tested Using Operator
Overhead Door Operation: Spring Cables Missing
Original Attached Garage Both overhead doors
Cables should be properly installed inside extension springs, for safety, at garage overhead doors to prevent the springs from becoming projectiles when the spring breaks. A correctly installed cable inside the extension spring greatly reduces the risk of property damage or personal injury.
 |  |
________________________________________________________________________________________________________________________________________________________________
GARAGE OVERHEAD DOOR OPERATOR: Testing Garage Overhead Door Operators
Testing Electric Operators for Garage Overhead Doors
Garage overhead door operators require periodic maintenance to maintain safe operation. Electric overhead door operators are checked for function and safety when inspected.
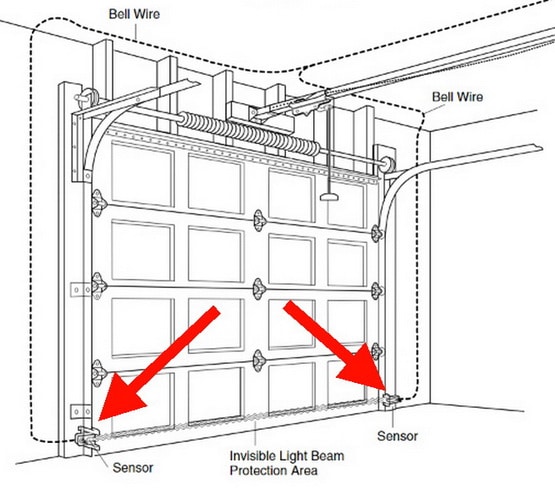
Modern garage overhead door operators have two safety reversal means; contact reversal and non-contact reversal.
Contact reversal is when the garage overhead door hits an obstruction that should cause the operator to reverse for safety.
Non-contact reversal is when the electronic eyes detect an obstruction, without the garage overhead door hitting an object, that should cause the operator to reverse for safety.
The contact reversal of the garage door operator is tested using a 1.5 inch obstruction on the floor at the center point of the overhead door. If the contact reversal requires correction, this is typically accomplished by a simple adjustment on the operator but other corrections could also be necessary. See overhead door operator owners manual for additional details.
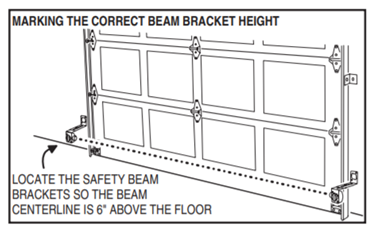
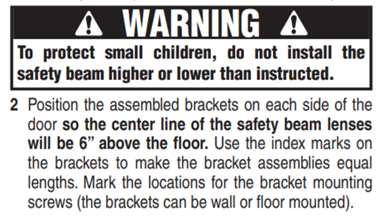
If the electronic eyes area installed properly, the non-contact reversal is tested by obstructing the path between the electronic eyes while the operator is closing the garage overhead door. The installation height of the electronic eyes varies slightly by manufacture. Most manufacturers typically advise installing the electronic eyes no more than six inches above the floor at the overhead door track. If the electronic eyes are out of alignment, the operator will not close the garage overhead door without pushing and holding the wired, wall mounted, push-button until the garage overhead door is fully closed. If the electronic eyes require adjustment, this is typically accomplished by remounting or correcting the aim of the electronic eyes but other corrections could also be needed. See overhead door operator owners manual for additional details.


Overhead Door Operator: Two Installed
Electronic Eyes / Non Contact Reversal: Eyes Installed High
Original Attached Garage Both Overhead Door Operators
The overhead door operator's electronic eyes appeared mounted too high above the floor. For improved safety, refer to the installation instructions and correct as needed.
 |  |  |
Contact Reversal: Contact Functional, Contact Failed
Original Attached Garage Right Overhead Door Operator as facing from interior of garage
Overhead door operator contact reversal means failed pinning an obstruction. It is not uncommon for the garage overhead door operators to require minor adjustment periodically. See overhead door operator owners manual for how to adjust the operator force for correct function. Correct as needed now for improved safety.

Original Attached Garage Left Overhead Door Operator as facing from interior of garage
Overhead door operator contact reversal means tested functional. This function should be rechecked periodically for safety. Correct when needed.


GARAGE cont
HINGED DOOR at GARAGE to LIVING SPACE
Door Condition: Operation
Garage Addition
Door operation could be improved. Properly correct door operation to meet your needs.
- Door drug on carpet.

________________________________________________________________________________________________________________________________________________________________
GARAGE AREA
GARAGE TYPE: Attached
Garage Floor Location: At Ground, Above Ground
Photos
Garage - Representative Photos

 |  | |
 |  |
Garage Restrictions: Excess Stored Items
Excess stored items were present at garage when it was inspected limiting view and access to most areas of garage. Obtain reasonable access and reinspect area prior to settlement. Make corrections if needed.
Garage Separation from Living Space: Drywall Missing Ceiling
Ceiling area separating the garage area from the living space area was exposed or not completely covered with drywall. Should a fire occur at an attached garage area, properly installed drywall on framing, where needed, can offer some assistance to slow the spread of fire and smoke from the garage area to living areas. Consider this area for an appropriate improvement or upgrade.

Garage Separation from Living Space: Recondition Ceiling, Recondition Wall
Garage ceiling area was ready for reconditioning. Properly repair garage ceiling to meet your needs. A properly installed garage ceiling that separates garage area from living space will help slow the spread of fire should one occur.

Garage wall area was ready for reconditioning. Properly repair garage walls to meet your needs. A properly installed garage firewall for walls that separate garage from living space will help slow the spread of fire should one occur.

Garage Overall Condition: Deferred Maintenance
Attached Garage
Garage suffered from deferred maintenance and was ready for reconditioning.
________________________________________________________________________________________________________________________________________________________________
GARAGE OVERHEAD DOOR: One Installed
Overhead Door Material: Metal
Overhead Door Insulation: Insulated
Overhead Door Operation: Tested Using Operator
________________________________________________________________________________________________________________________________________________________________
GARAGE OVERHEAD DOOR OPERATOR: Testing Garage Overhead Door Operators
Testing Electric Operators for Garage Overhead Doors
Garage overhead door operators require periodic maintenance to maintain safe operation. Electric overhead door operators are checked for function and safety when inspected.
Modern garage overhead door operators have two safety reversal means; contact reversal and non-contact reversal.
Contact reversal is when the garage overhead door hits an obstruction that should cause the operator to reverse for safety.
Non-contact reversal is when the electronic eyes detect an obstruction, without the garage overhead door hitting an object, that should cause the operator to reverse for safety.
The contact reversal of the garage door operator is tested using a 1.5 inch obstruction on the floor at the center point of the overhead door. If the contact reversal requires correction, this is typically accomplished by a simple adjustment on the operator but other corrections could also be necessary. See overhead door operator owners manual for additional details.
If the electronic eyes area installed properly, the non-contact reversal is tested by obstructing the path between the electronic eyes while the operator is closing the garage overhead door. The installation height of the electronic eyes varies slightly by manufacture. Most manufacturers typically advise installing the electronic eyes no more than six inches above the floor at the overhead door track. If the electronic eyes are out of alignment, the operator will not close the garage overhead door without pushing and holding the wired, wall mounted, push-button until the garage overhead door is fully closed. If the electronic eyes require adjustment, this is typically accomplished by remounting or correcting the aim of the electronic eyes but other corrections could also be needed. See overhead door operator owners manual for additional details.
Overhead Door Operator: One Installed
Electronic Eyes / Non Contact Reversal: Eyes Functional
Attached Garage Overhead Door Operator
Overhead door operator, non contact reversal means, electronic eyes, tested functional.


Contact Reversal: Contact Failed
Attached Garage Overhead Door Operator
Overhead door operator contact reversal means failed pinning an obstruction. It is not uncommon for the garage overhead door operators to require minor adjustment periodically. See overhead door operator owners manual for how to adjust the operator force for correct function. Correct as needed now for improved safety.

KITCHEN
Inspection Process
Kitchen Inspection Process
Kitchen Inspection Process
Kitchen inspection was of the readily accessible and visible portions of the kitchen. The kitchen inspection includes the countertops and a representative number of cabinets. Kitchen faucets, when functional, are run for longer than one minute checking for observable leaks and hot/cold orientation.
The following built-in kitchen appliances, where installed, were inspected and on/off operated testing the main function of each appliance using the normal operating controls:
- Cooktop / Oven / Range (cook surface with integral oven)
- Microwave
- Garbage Disposal
- Trash Compactor
Installed dishwashers are run through a normal cycle. Obvious functional issues and leaks observed around the dishwasher are reported, if present.
Ventilation equipment, such as range hoods, are inspected, on/off operated and are reported as ductless, ducted or recirculating. It is beyond the scope of this inspection to determine the effectiveness of the kitchen exhaust fan, such as to verify air flow quantity or discharge location.
Appliance inspection does not cover clocks, timers, self cleaning function, calibration, automatic functions or optional equipment on appliances.
Refrigerators are considered personal property and are not evaluated. Refrigerator presence or absence is noted. Faucets for refrigerator ice makers are not tested whether the refrigerator is present or not as there is no basin to catch the water from the ice maker faucet.
Equipment that appears to be shut down, inoperable or intentionally taken out of service is noted but will not be operated by the inspector. Shut down equipment may be unplugged, breaker off, water off, gas off or otherwise taken out of service.
Installation conditions and functional issues for this area requiring correction should be performed by a competent qualified contractor.
Kitchen
Kitchen Area: Main Level
Kitchen
Countertop: Laminate
- Wear noted, properly recondition to meet your needs
Cabinets: Wood
- Wear noted, properly recondition to meet your needs
Floor Covering: Tile
- Wear and damage observed, budget reconditioning
Sink: Double Bowl
- No leaks were observed at the faucet, the visible supply lines, or the waste drain beneath the sink.
- Signs of past leakage were observed. Maintain the area to meet your needs.
- Personal property beneath the sink restricted the view of the area.
Disposal: Present and appeared functional
Dishwasher: Present and ran through a normal cycle without incident
Range: Range (Electric Top/Oven)
Not Present
Microwave: Present and On/Off Tested functional
Kitchen Exhaust: Ductless in microwave appeared functional.
Refrigerator: Not Present
Trash Compactor: Not Present
 |  |  |
 |  |  |
 |
Cooking Appliance:
Microwave
LCD control display was faint. Properly correct where needed for safety.


BATHROOM
Inspection Process
Testing Limitations
Bathroom Inspection Process
The following opinion was based on an inspection of the readily accessible and visible portions of bathroom areas.
Hand washing faucets, when functional, are run for approximately one minute checking for observable leaks at the faucet and beneath the sink as well as checking Hot/Cold orientation.
Bathing area faucets, when functional, are run for approximately five minutes checking for observable leaks and Hot/Cold orientation.
Toilets, when functional, are flushed twice. Inspector checks for leaks around toilet, checks that toilet fills and shuts off, and checks to see if toilet appears securely mounted.
Effectiveness and discharge locations for mechanical bathroom exhaust vents are not confirmed during inspection.
Installation conditions and functional issues for this area requiring correction should be performed by a competent, qualified contractor.
Bathroom
Full Bathroom
Location Full Bathroom: Left attached to a bedroom
Bathing Area: Soaking tub and separate shower
- Tile work appeared older. Budget upgrade to help prevent leaks.
- No leaks around the tub faucet were observed, and the water containment area appeared serviceable.
Hand Washing: Two basins in vanity
- No leaks were observed at the faucet, the visible supply lines, or the waste drain beneath the sink.
- Personal property beneath the sink restricted the view of the area.
Toilet: Water tank type
- No leaks were observed around the toilet, and it appeared secured in place.
Ventilation:
- Fan on/off tested operative. Consider exhausting to exterior if needed.
- Multiple fans were present and appeared to be operative.
- A window was present to ventilate the bathroom.
Floor Covering: Tile
- Some wear noted, recondition to your standard
 |  |  |
 |  |  |
 |  |
Ventilation: Sloped Ceiling
Verify bathroom vent fan is designed for sloped ceiling installation. Properly correct if needed.

Bathroom
Full Bathroom
Location Full Bathroom: at Hall
Bathing Area: Shower
- No leaks were observed around the faucet, and the water containment area appeared serviceable.
Hand Washing: Vanity with basin
- No leaks were observed at the faucet, the visible supply lines, or the waste drain beneath the sink.
- Signs of past leakage were observed. Maintain the area to meet your needs.
Toilet: Water tank type
- No leaks were observed around the toilet, and it appeared secured in place.
Ventilation:
- Fan on/off tested operative. Consider exhausting to exterior if needed.
Floor Covering: Tile
- Wear and damage observed, budget reconditioning
 |  |  |
 |  |
Bathroom
Half Bathroom
Location 1/2 Bathroom: Right
Hand Washing: Pedestal type
Toilet: Water tank type
- No leaks were observed around the toilet, and it appeared secured in place.
Ventilation:
- Fan on/off tested operative. Consider exhausting to exterior if needed.
Floor Covering: Tile
- Wear was noted, properly recondition to meet your needs

 |  |  |
 |
Location 1/2 Bathroom:
Sink
Sink was loose.
Properly secure sink as needed to help prevent leaks.
LAUNDRY
Laundry Connections
Laundry: Connections Available
Clothes washer and dryer connections were available.
Laundry appliances were not observed connected to the laundry connections during the inspection. Laundry faucets are not operated when the basin beneath the faucets is inadequate to contain the faucet flow without a hose being connected to the faucets. Verify your clothes dryer exhaust is functional, safe, and properly installed to meet the requirements of the clothes dryer manufacturer.

Clothes Dryer: Not Rigid Sheet Metal Duct
Clothes dryer exhaust was not rigid sheet metal duct. Review your clothes dryer exhaust requirements. Upgrade exhaust as needed.

PLUMBING
Supply Piping
Supply Piping: Copper
Water Flow at Supply Piping: Adequate
Adequate functional supply water flow was observed during inspection for water outlets operated.
Waste Piping
Waste Piping: Functional Flow Plastic
Material: Plastic
Functional waste water flow observed during inspection for water outlets operated.
Apparent Vent Piping
Plastic - No Adverse
Material: Plastic
No adverse conditions were observed, maintain to meet your needs.
Exterior Hose Faucets
Multiple exterior hose faucets need correction.
Check all exterior hose faucets properly correcting where needed.
- Both hose faucets leaked at handle.


Water Heater
Water Heater
Water Heater
Size: 30 gallon / Year of Manufacture: 2016
Fuel: Natural Gas / Location: Bathroom
Water Heater was observed functional during inspection.
Typical service life of a water heater is 8-12 years.
 |  |
Discharge Piping: General Guidelines
Water Heater - Temperature and Pressure Relief Valve - Discharge Piping General Guidelines
Consult a knowledgeable, competent, qualified plumbing contractor for specific requirements in your area.
Valve Manufacturer WARNING: To avoid water damage and/or scalding due to valve operation, a properly installed discharge line must be connected to valve outlet and run to a safe place of disposal.
- Discharge line shall serve a single relief device and shall not connect to piping serving any other relief device or equipment.
- The discharge line shall be installed in a manner that does not cause personal injury or structural damage.
- The discharge line shall be installed to a termination point that is readily observable by the building occupants.
- The discharge line shall be installed to allow complete drainage of both the valve and the discharge line.
- No reducing coupling or other restriction shall be installed in the discharge line.
- The discharge line must pitch downward from the valve and terminate not more than 6 inches (152 mm) above and not less than two times the discharge pipe diameter above the floor or flood level rim of the waste receptor.
- A proper air gap should be present above the floor or flood level rim of the waste receptor where the discharge pipe drains. The discharge piping should not drain into an indirect waste receptor such as a leak pan beneath a water heater.
- The discharge line must terminate through plain (unthreaded) pipe.
- Discharge line material must conform to local plumbing code or A.S.M.E. requirements. PVC piping is not rated for hot water and shall not be used.
- Excessive length - more than 30 feet (9.14m), use of more than four elbows or bends in discharge piping, or reduction of discharge line size will cause a restriction and reduce the discharge capacity of the valve.
- No shut-off valve shall be installed between the relief valve and tank, or in the discharge line.
Check Thermostat: Over 140[f]
Water temperature from water heater was greater than 140 degrees f.
Consider lowering water thermostat setting to a safer temperature such as approximately 120 degrees f. Properly correct water heater setting as needed for safety and to meet your needs.

Water Heater
Water heater temperature and pressure relief valve had discharge extension piping that was not rated for hot water and this pipe should be properly replaced.
- PVC piping is not rated for use with hot water and should not be used at water heater for temperature and pressure relief valve discharge piping.
Refer to discharge piping general guidelines. Proper correction is needed for correct function and safety.

Water Heater
Questionable Installation
Water heater did not appear to meet manufacturer installation standards for proper installation when inspected.
Refer to installation instructions and have a competent contractor correct as needed for function and safety.
- Natural draft gas water heater should not be installed inside a bathroom or in a small area attached to a bathroom as the water heater may consume or displace the oxygen from the bathroom.
- Pressure temperature relief valve discharge piping was not installed properly.
- Consider relocating water heater to garage or unfinished basement. Doing so would not require a special type of gas water heater.


Equipment Observed
Plumbing Equipment Observed Present But Not Tested or Evaluated: ________________________________________________________________________________________________________________________________________________________________
Thermal Expansion: About Thermal Expansion
Regarding Plumbing System Thermal Expansion:
Thermal expansion occurs when a tanked water heater operates without any plumbing valves open for a period of time. If the property water meter has a check or backflow preventer valve installed it will prevent the expanding contained water from flowing backwards through the water meter. This expansion causes the water heater pressure relief valve to open briefly releasing a small amount of water if an expansion control device is not present or not working properly. If the pressure relief valve on the water heater opens and does not seal closed properly then active leaks and subsequent damage may occur.

Tank Missing
A plumbing thermal expansion tank was not observed near the water heater.
Monitor this area for leaks adding an expansion tank if needed.
.jpg)
________________________________________________________________________________________________________________________________________________________________
Pressure Reducer: About Pressure Reducing Valves
Regarding Plumbing System Pressure Reducing Valves:
The pressure reducer or pressure regulator in a plumbing system is designed to reduce the water pressure to a reasonable level in an effort to help prevent damage to the plumbing system. For most areas if the utility water pressure is greater than 80 PSI (pounds per square inch) a pressure reducer is needed. For some areas with extremely high utility pressure multiple pressure reducers may be needed installed in series. Pressure reducers are typically factory set for 50 PSI and property water pressure is expected to be between 30 PSI and 80 PSI. Inspector notes presence of pressure reducer when observed. Pressure readings for plumbing system are not part of the inspection performed.
Pressure Reducer Location: Crawl Space
Plumbing Supply Piping
Pressure Reducer
Apparent Location at Crawl Space

________________________________________________________________________________________________________________________________________________________________
Property Owner - Plumbing Supply Piping - MAIN WATER SHUT OFF VALVE - Apparent Location - Note Such Valves are Not Operated : Crawl Space
Plumbing Supply Piping
Main Water Shut Off Valve
Apparent Location at Crawl Space

CENTRAL SYSTEM
Central Heat/Cool
Package System
Central Heating/Cooling
Package, Forced Air System Served: System served entire home
Brand Furnace: Ameristar / Location: Exterior Package Unit
Size: 90K BTU / Year of Manufacture: 2017 / Fuel: Natural Gas; Forced air system
Package gas furnaces with electric cooling typically have a service life of 15-20 years when properly maintained
Filter Type: Disposable / Thermostat Type: Digital - Thermostat was located within area served.
Cooling Size: 3.5 ton / Fuel: Electric
Condensate disposal method: Gravity drain for condensate

 |  |
________________________________________________________________________________________________________________________________________________________________
Cooling Function: Functional
Cooling System Functional
The inspector adjusted the thermostat. The cooling system engaged and was found to be functional.
________________________________________________________________________________________________________________________________________________________________
Heating Function: Functional
Heating System Functional
Inspector adjusted thermostat. Heating system engaged and was found to be functional.
Central Ductwork
Distribution Ductwork
Ductwork Information: About your central heating and cooling ductwork
Regarding calculating the load of a central system:
Several factors are considered when performing a load evaluation for central heating and cooling systems to determine the appropriate size system for the area served. Factors such as installed ductwork, insulation, ceiling height, basement area served (if present), shade, climate zone, as well as the size, number, and placement of windows, must be taken into account before sizing a system. The inspector does not calculate the load of a central heating and cooling system during the performed inspection. The inspector also does not confirm that the installed ductwork is appropriately sized to serve the installed central heating and cooling equipment.
Properly maintain the ductwork system to meet your comfort needs and ensure the system operates efficiently.
Ductwork
Ductwork insulation observed in need of correction for some areas. Have a competent heating contractor check all ductwork properly correcting where needed.
- Ductwork insulation observed missing

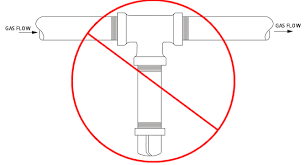
Gas
Gas Fuel Piping
Representative Photo
Representative Photo

Natural gas piping observed at inspected property. Properly maintain gas piping as needed for function and safety.
Installation Issue: Sediment Trap
Periodic Maintenance Needed: Consider Painting Gas Piping
Consider properly painting gas piping at exterior to help inhibit rust and corrosion at gas piping.

Furnace
Gas Piping was ready for proper correction.
Properly correct gas piping where needed.
- Sediment trap for gas piping to furnace was installed inline rather than with change of direction at gas piping.

 |  | |
 |
Gas Appliance Flue
Flue
Water Heater
Water Heater
Flue Type: Metal Flue, exhaust discharged through roof
Flue corrections were needed.
Flue: Clearance Metal Flue General
Water Heater
Gas appliance metal flue needed correction.
Gas appliance metal chimney flue did not appear to have proper clearance from combustible material. A single wall metal flue generally needs six inches clearance away from combustibles while a double wall metal flue will typically only need one full inch clearance away from combustibles. A competent heating technician should further evaluate and properly correct gas appliance metal flue as needed for safety and function.

Flue cont
Furnace
Furnace
Flue Type: Metal Flue Self Contained
Properly maintain flue for safety and function.
Space Heating
Fireplace
Fireplace Use Nonessential
Regarding Fireplace Use:
Fireplace use was nonessential. The installed fireplace was not the sole heating system for the inspected property and does not have to function if you do not desire to use the fireplace area. Typically, deficient fireplaces are not listed in the summary of the report. Properly repair fireplace area for function and safety if use is desired.
Type: Prefabricated or Manufactured Fireplace
Vented
Regarding Vented Fireplaces or Fireplaces with a Flue
This type of fireplace will exhaust directly to an exterior area in an effort to reduce or eliminate smoke, fumes and carbon monoxide build up in the interior living space areas. You should become familiar with care and maintenance procedures for any installed fireplace as some procedures will be specific to what type of fireplace is installed. If you choose not to learn about the care and maintenance requirements for the installed fireplace, you should have a competent qualified chimney specialist check and inspect the fireplace before initial use and then as directed by the chimney specialist thereafter. Properly maintain any fireplace as needed for proper function and safety.
Location: Photo, Keeping Room
Fireplace Photo

Firebox:
Fireplace
The fireplace glass door was in need of correction.
This area should be properly repaired correcting as needed for function and safety.
- Fireplace glass door did not stay on track.

Damper: Operated, Should be Blocked Open
Fireplace
Installed gas logs appeared to be vented type. Vented gas logs require the damper to be permanently blocked open. Refer to installation instructions and operation manual correcting as needed for function and safety.

The fireplace damper was opened and closed and functioned normally.


Gas Log Set Heater: Present
Gas Safety Isolation Valve: Not Observed
Gas Log Set Heater Gas Valve
A gas isolation valve was not viewed at or near the inspected unit at an obvious location to fully shut off the gas when servicing unit or to leave unit off for an extended period of time. The inspector recommends properly adding an accessible gas isolation valve for improved safety.
Gas Log Set Heater Function: Pilot Igniter Not Present
Gas Log Set Heater
Pilot light igniter was not present.
The gas log set heater did not have a readily visible electronic ignition system and the pilot light was off during the inspection. Gas log set heater was not viewed in operation by inspector.

Gas Log Set Heater Condition: Faux Logs Sooted
Gas Log Set Heater
Faux logs observed sooted.
Often this is due to the faux logs being out of position but this can also be related to other gas log issues. Properly service gas log heater before use correcting as needed for function and safety.

________________________________________________________________________________________________________________________________________________________________
Chimney Type: Metal Fabricated Type
Chimney Condition: Metal Chimney Maintain Older
Metal Chimney Maintain:
Properly maintain older metal fabricated chimney to meet your needs for fire safety. Properly maintain chimney chase to prevent nuisance storm water leaks.
 |  |
ELECTRICAL
Electrical Inspection
Electrical System Inspection
What is an electrical system?
The electrical system consists of an electrical service, distribution equipment, and branch wiring. The electric metering equipment is usually at the electrical service. Distribution equipment typically consists of one or more installed breaker panels, with branch wiring extending to all equipment, receptacles, lighting outlets, and devices, such as light switches. The inspection report focuses on wiring operating between 100-250 Volts. While the system's Amperage and Voltage are recorded, it is not measured during the inspection. Most low-voltage wiring is excluded from the performed inspection. Low-voltage items, such as heating and cooling thermostats, are used to determine the function of such equipment.
There are now a wide variety of lighting bulbs or lamps that will fit into lighting fixtures. Some choices may not be appropriate for some lighting fixtures. It is beyond the scope of this inspection to verify that each lamp or bulb is suitable for the installed lighting fixture. The inspector recommends reviewing the bulb or lamp installations for each fixture, making corrections as needed for safety and proper function. Common errors include installing 100-watt bulbs in fixtures rated for 60-watt maximum bulbs, and using interior-rated bulbs in exterior or damp locations. Other types of errors also exist.
The following opinion was based on an inspection of the readily accessible and visible portions of the electrical system. The Inspector is responsible for checking a representative number of installed lighting fixtures, switches, and receptacles. A competent, licensed electrical contractor should correct electrical installation issues and address any functional issues that require correction. Most, if not all, electrical corrections should be considered a safety concern.
Electrical Service
System Amperage and Voltage, identified but not measured: 200 Amps - 120/240 Volts
Electrical Service Type: Underground, Representative Photo
Electrical Service Representative Photo

Electrical Service
The electrical service conduit was pulled loose from the electric meter enclosure.
A competent electrical contractor should properly repair or replace electrical service as needed for safety and function.

Electrical Service
The electrical service conduit at the electric meter was not properly secured to the building.
The electrical service conduit should be properly secured in place where needed.

MAIN PANEL
Main Electrical Panel
Main Breaker Panel Exterior near Meter
- Breaker panel shown with cover removed by inspector.
 |  |
Service Entrance Conductors: Copper, Stranded
Index: Index
Electrical panel directory was ready for correction. Properly index or label each electrical panel circuit as needed for clarity and safety.

SUB PANEL
Sub Electrical Panel
Sub Breaker Panel Garage
Breaker panel shown with cover removed by inspector.
 |  |
Index: Index
Electrical panel directory was ready for correction. Properly index or label each electrical panel circuit as needed for clarity and safety.

Enclosure: Screws, KO Open
Correct electrical panel screws as needed for safety.

Fill open knockouts where present.

Wiring: Remark Wiring, Neutral Multiple Lugged
Remark or correct improperly colored wiring inside electrical panel where needed.

Multiple neutral wiring was observed under a single lug inside panel. Separate each neutral wire to individual lugs where needed.

Wiring Sub Panel: 4 Isolate, 4 Wire Needed
Properly isolate bare grounds from neutral conductors in sub electrical panel.

A proper four wire feed was needed at sub panel. Correction recommended.

Sub Breaker Panel Garage
Multiple corrections were needed at electrical distribution panel.
Refer to the full report for additional information and photos regarding obvious corrections recommended for this electrical panel. A competent electrical contractor should further evaluate this area. Make proper corrections as needed for safety and function now.
Branch Wiring
Material: Copper
Wiring Method: Non Metallic Sheathed Cable
Branch Wiring
Multiple corrections were needed to improve the safety of the electrical branch wiring.
These corrections are usually non-recurring once properly completed. A competent electrical contractor should review the installed branch wiring making proper corrections where needed for both safety and function.
- Representative Photos Provided


AFCI
AFCI Residential
What is Arc Fault Circuit Interrupter (AFCI) Protection?
AFCI protection is designed to break the electrical circuit when it detects electric arcs that are a signature of loose connections in home wiring. Loose connections, which can develop over time, can sometimes become hot enough to ignite house fires.
Most, but not all, homes will have a need for additional AFCI protection based on varied municipal enforcement and the numerous changes for which areas require AFCI protection. Evaluate your risk exposure. Consider adding AFCI protection where needed for improved safety, particularly where construction was completed 2002 or later.
Modern Locations Where AFCI Protection is Known to Improve Safety:
Dwelling Units. All 120-volt, single-phase, 10-, 15-, and 20-ampere branch circuits supplying outlets or devices installed in the following locations:
Kitchens,
Family Rooms,
Dining Rooms,
Living Rooms,
Parlors, Libraries,
Dens,
Bedrooms,
Sunrooms,
Recreation Rooms,
Closets,
Hallways,
Laundry Areas,
or similar areas.
Testing AFCI Function
The inspector uses push button at AFCI breakers, where installed, to confirm AFCI protection trips. Once tripped, the inspector checks indexed electrical circuits to determine where AFCI protection is present or missing.
Obvious locations lacking AFCI protection are listed in the body of the report.
Obvious broken, non working and improperly wired AFCI receptacles or breakers are listed in the summary of the report. Evaluate your risk exposure.
-2.jpg) | 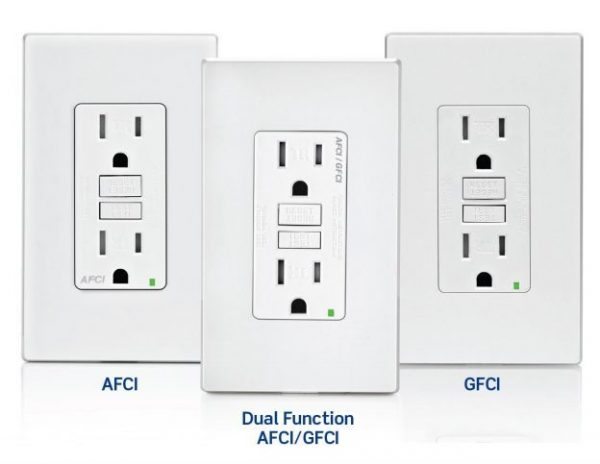 |
No AFCI Built Before 2002
Areas That Did Not Appear AFCI Protected
No AFCI protection was observed at inspected property. AFCI protection is not expected for homes built before 2002. If installation of AFCI protection is desired, consult a knowledgeable, competent, qualified electrical contractor for specific requirements in your area.
GFCI
GFCI Residential
What is Ground Fault Circuit Interrupter (GFCI) Protection?
GFCI protection is an electrical safety device that interrupts an electrical circuit when the current passing through a conductor is not equal and opposite in both directions, therefore indicating an improper flow of current such as leakage of current to ground or current flowing to another powered conductor. The device's purpose is to reduce the severity of injury caused by an electric shock.
Most, but not all, buildings will have a need for additional GFCI protection based on varied municipal enforcement and the numerous changes for which areas require this type of protection. The list below is based off the 2023 standard that may or may not have been adopted by the local municipality. Evaluate your risk exposure. Consider additional GFCI protection where needed for improved safety.
Modern Locations Where GFCI Protection is Known to Improve Safety in Dwelling Units.
(A) Dwelling Units
All 125-volt through 250-volt receptacles installed in the following locations and supplied by single phase branch circuits rated 150 volts or less to ground shall have ground-fault circuit-interrupter protection for personnel:
(1) Bathrooms
(2) Garages and also accessory buildings that have a floor located at or below grade level not intended as habitable rooms and limited to storage areas, work areas, and areas of similar use.
(3) Outdoors
(4) Crawl spaces - at or below grade level
(4) Basements
(5) Kitchens
(6) Areas with sinks and permanent provisions for food preparation, beverage preparation, or cooking
(7) Sinks - where receptacles are installed within 1.8 m (6 ft) from the top inside edge of the bowl of the sink
(8) Boathouses
(9) Bathtubs or shower stalls - where receptacles are installed within 1.8 m (6 ft) of the outside edge of the bathtub or shower stall
(10) Laundry areas
(12) Indoor damp and wet locations
Some exceptions apply, see current standard for a list of exceptions.
(B) Pertains to Other Than Dwelling Units
(C) Crawl Space Lighting Outlets. GFCI protection shall be provided for lighting outlets not exceeding 120 volts installed in crawl spaces.
(D) Specific Appliances. GFCI protection shall be provided for the branch circuit or outlet supplying the following appliances rated 150 volts or less to ground and 60 amperes or less, single- or 3-phase:
(1) Automotive vacuum machines
(2) Drinking water coolers and bottle fill stations
(3) High-pressure spray washing machines
(4) Tire inflation machines V
(5) Vending machines
(6) Sump pumps
(7) Dishwashers
(8) Electric ranges
(9) Wall-mounted ovens
(10) Counter-mounted cooking units
(11) Clothes dryers
(13) Microwave ovens
(E) Equipment Requiring Servicing. GFCI protection shall be provided for the receptacles required near Equipment Requiring Servicing.
(F) Outdoor Outlets. For dwellings, all outdoor outlets, including outlets installed in the following locations, and supplied-by single-phase branch circuits rated 150 volts or less to ground, 50 amperes or less, shall be provided with GFCI protection:
(1) Garages that have floors located at or below grade level.
(2) Accessory buildings
(3) Boathouses
Note: Some exceptions apply, see current standard for a list of all exceptions.
Testing GFCI Function
The inspector uses an electrical tester at accessible 120V electrical receptacles that simulates a remote ground fault current to confirm which areas lack proper GFCI protection at tested 120V electrical receptacles.
Obvious locations lacking GFCI protection are listed in the body of the report.
Obvious broken, non working and improperly wired GFCI receptacles or breakers are listed in the summary of the report.
 | -1.jpg) |
GFCI Older Home
GFCI protection was ready for upgrade at older inspected property. Consider modernizing electrical installation adding this shock protection for all electrical areas where GFCI protection is known to improve safety. If installation of additional GFCI protection is desired, consult a knowledgeable, competent, qualified electrical contractor for specific requirements in your area.
Receptacle Outlets
Receptacle Appeared Missing: Package System
Electrical Receptacle Outlet
An electrical receptacle was not observed near the package heating and cooling system at exterior.
Equipment requiring periodic servicing should have a permanent electrical receptacle installed close by. Consider properly adding an electrical receptacle at exterior ground level within 25 feet of the package heating and cooling system to service this equipment.
Electrical Receptacle Outlets
Multiple electrical receptacles were ready for proper correction.
- Some electrical receptacle junction boxes were loose. Properly correct where needed.
- Some electrical receptacles were observed improperly installed.
- Some electrical receptacles tested hot/neutral reversed.
- Install proper cover plates where needed at interior.
- Properly correct loose electrical receptacles where needed.
A competent electrical contractor should check all receptacles, making them functional and safe where needed.


 | ||
 |  |

Three Wire Receptacles
Three Wire 240V Receptacles Observed
Some older 240V 3 wire electrical receptacle circuits were observed. Typically, these circuits would serve electric clothes dryers or electric kitchen ranges but may also serve other areas. Evaluate your risk exposure and consider upgrade replacement of any 240V 3 wire receptacle circuits where present with a modern 240V 4 wire receptacle circuits for improved safety. Properly maintain older 240V 3 wire receptacle circuits to meet your needs and for safety, if not upgrading older circuits now.

Lighting/Ceiling Fans
Cord and Plug Connected Lighting
Cord and plug connected lighting is considered personal property and is not evaluated.

Lighting/Ceiling Fans
Correct Lighting Where Needed
Lighting/fans - Make lighting/fans functional and safe where needed.
- Some lighting was not fully functional when inspected.
- Some light fixtures were improperly installed.
- Some light fixtures were damaged.
- Some lighting was inoperative when inspected.
Check all lighting/fans making functional and safe where needed.
Representative Photos Provided
 |  |  |
 |  |  |
 |  |  |
Switches
Switch Location Informational Note
Regarding Lighting Switch Locations:
While exact placement of lighting switches is considered a design issue, installing lighting switches at appropriate locations is useful to improve safety. Generally, a light switch would be located within arms length of the entry point of a room so that the lighting for the room you are entering may be switched on from an area near the doorway. Installing a switch at an inconvenient location, such as on the hinge side of a door, would not be desirable. Where the stairway between floor levels has six risers or more, a wall switch would be located at each floor level and at each landing level that includes an entryway to control the lighting for the stairway. Evaluate your need in regard to lighting switch locations. Consider updating switch locations for improved safety if desired.
Switch Hinged Side of Door
Switches
Some switches were observed installed on the hinge side of a door. Consider for correction to improve convenience.

Smoke Alarms
Smoke Alarm Installation: Where Should Smoke Alarms be Installed?, Additional Smoke Alarms Recommended
Depending on the age and location of the home, installation of smoke alarms are either recommended or required for improved safety.
Modern smoke alarm systems typically are hardwired to the electrical system and will have battery backup so that they will function when the power is off to the building. Modern smoke alarm systems typically have all smoke alarms interconnected so that when one alarm sounds then all smoke alarms will sound simultaneously. This is useful for heavy sleepers and in larger homes.
Modern smoke alarm systems typically have smoke alarms installed at the following locations:
- In the immediate vicinity outside sleeping areas
- Inside sleeping areas
- At least one per floor level including basements
- Near stairs
- In unfinished basements
- (some installations will require additional smoke alarms)
It is important to note that a single smoke alarm can satisfy multiple areas if carefully placed.
It is common to have a single smoke alarm near the top of the stairs and just outside multiple sleeping areas.
Properly maintain smoke alarm system as needed for life safety.
Smoke alarms were not present for all areas where now recommended or required.
Installation of additional smoke alarms is recommended.
- Inside sleeping rooms
Evaluate your risk exposure. Upgrade smoke alarms to meet your needs and for life safety.
Read and follow the smoke alarm manufacturer installation and operating instructions.
Contact your local Fire Marshal if need be.
Regarding Testing Smoke Alarms:
Test smoke alarms weekly to ensure proper function for life safety. Replace batteries when needed. Properly replace smoke alarms when not functioning correctly and at least once every ten years. Smoke alarms should be at least the photoelectric type and dual sensor photoelectric and ionization smoke alarms are available, and preferred. Refer to installation and care instructions for proper locations and periodic maintenance.
The inspector does not test smoke alarms. For safety, the inspector only accesses smoke alarms from the installed flooring. To prevent damage, the inspector does not remove smoke alarms or open smoke alarm covers.
Older Smoke Alarms, Irregular Location
One or more smoke alarms appear older.
Inspector does not confirm date of manufacture or operate smoke alarms when inspecting installed smoke alarms.
Smoke alarms older than ten years should be replaced. Properly replace smoke alarms when not functioning correctly and at least once every ten years. Smoke alarms should be at least the photoelectric type and dual sensor photoelectric and ionization smoke alarms are available, and preferred. Refer to installation and care instructions for proper locations and periodic maintenance.
Irregular smoke alarm location observed. Typically smoke alarms are mounted on ceilings at least 4" from a wall or when mounted on walls they should be between 4-12" from ceiling. Additionally, smoke alarms should be three feet from duct supply vents and doorways to kitchens or bathrooms. Refer to installation instructions properly correcting where needed.
SMOKE ALARM BELOW CEILING
- Smoke alarm at wall was not 4-12" below upper ceiling.

ATTIC LADDER
Installation / Condition
Location of Attic Ladder: Garage
Overall Condition: Replace Damaged Attic Ladder
Pull down attic ladder stairway appeared damaged. Do not climb attic ladder stairway when it is damaged. It may collapse unexpectedly. For safety, properly replace or remove damaged pull down attic ladder stairway, including the box frame.
- Attic ladder manufacturers advise to replace damaged attic ladders rather than to attempt any type of repair to the attic ladder.

STRUCTURE
Attic Access
Attic Access: Pull down attic ladder stairway, properly maintain unit as needed for safety
Attic Access: Scuttle Hole
Attic Access: Not Floored
Attic area viewed from access point only due to lack of walk boards. Some areas of attic may not have been viewed.
Attic Area
Loose Panels in Attic
Properly fasten in place or remove wooden panels or boards at attic area for improved safety. Loose panels or boards could be mistaken for flooring and pose fall and injury risk.

Roof Framing
Roof Framing: Representative Photos
Representative Photos Roof Framing
 |  |  |
 |  |  |
 |
Framing: Rafters, Wooden
Framing: Trusses, Wooden
Sheathing: OSB, Plywood
Roof Framing: Older Typical
Original framing, where visible, was observed typical for age of structure and may not meet current building standards. Monitor area periodically and make corrections if condition changes.
Truss Framing: Trusses Are Engineered, Lateral Bracing Not Observed, Mixed Framing
Dimensional (two by type) lumber roof framing and Engineered truss roof framing were observed used together to frame the roof system. Engineered lumber manufacturers discourage this practice as the different types of materials react differently to moisture and temperature changes. As it is not cost effective to correct after construction, the area should be monitored correcting as necessary in future, if needed.
- Roof framing as installed appeared intentional.
- Truss roof framing is expected to be designed. Confirming design meets 'as built' condition is not part of inspection performed.

Lateral bracing was not observed at attic trusses. Consider adding proper lateral bracing where missing to improve performance during high wind conditions. Refer to truss installation instructions for proper correction. Monitor area if not adding lateral bracing now.
Truss systems are designed, engineered framing systems that are comprised of multiple components. Truss systems are accompanied by specific installation instructions that should be closely followed. Installation instructions are rarely available during a property inspection. Review of instructions, if available, is not part of the inspection performed. Obvious, visible defects are listed in the report, when encountered. Properly maintain truss system to meet your needs.
Damaged engineered roof truss was observed unrepaired at garage addition above access opening.
To repair damaged roof truss framing:
- Obtain further evaluation to verify all areas where damage is present at the roof trusses.
- Contact the roof truss manufacturer or another State Licensed Professional Engineer specializing in truss construction to design appropriate corrections.
- A competent, qualified contractor should execute engineering design where needed.
- Retain stamped engineering design drawing for your permanent records.
 |  |  |
Ceiling Framing
Ceiling Framing: Wood
Truss Framing: Ceiling framing was integral with roof framing trusses where installed.
Wall Framing
Framing Access: Finished Prevented
Finished areas prevented the view of structural components, so the inspector did not observe structural areas. Concealed areas were not part of the inspection performed.
Underfloor Access
Crawl Space: Ductwork
Visibility or access limited at crawl space due to installed ductwork.
Underfloor Description
Attributes: Crawl Space and Basement
Underfloor Area
Access:
- Crawl space entered through hinged door
- Basement walked
Construction Type:
- Crawl Space
- Basement - Unfinished
Foundation:
- Concrete Block
Columns or Piers:
- Load Bearing Wall
- Concrete Block
Floor Structure:
- Floor Joists - Engineered I Joist
- Floor Joists - Solid Wood
- Beam - Built Up Wood
- Subfloor - Plywood
Floor System
Floor Framing: Representative Photos
Representative Photo Floor Framing

 |  |
I Joist Framing: I Joist Systems Are Engineered
I Joist systems are designed engineered floor framing systems that are comprised of multiple components. I Joist systems are accompanied by specific installation instructions that should be followed. Installation instructions are rarely available during an inspection. Review of instructions, if available, is not part of the inspection performed. Obvious visible defects are listed in the report when encountered. Properly maintain I Joist system to meet your needs.
Floor Framing
The damaged engineered I-joist floor framing was observed to be unrepaired. One or more flanges were observed to be cut or damaged on the engineered I-joist. I-joist Manufacturers advise that flanges should not be modified or damaged where installed. It is possible to repair a damaged I-joist without having to replace the entire I-joist. The inspector recommends proper correction or further evaluation by a Professional Engineer.
- Damaged, unrepaired I-Joist observed beneath master bathroom.
To repair joists with damaged flanges:
A competent contractor should verify all areas where I-joists have been damaged.
Contact the I-joist manufacturer to obtain the engineering drawing for each type of damage present.
The manufacturer's repair drawing is typically provided at no cost after submitting photos of damage.
A competent, qualified contractor should then execute the engineering design where needed.
If the I-joist manufacturer is unavailable, a Professional Engineer can also design repair details for a fee.

 | 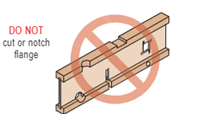 |  |
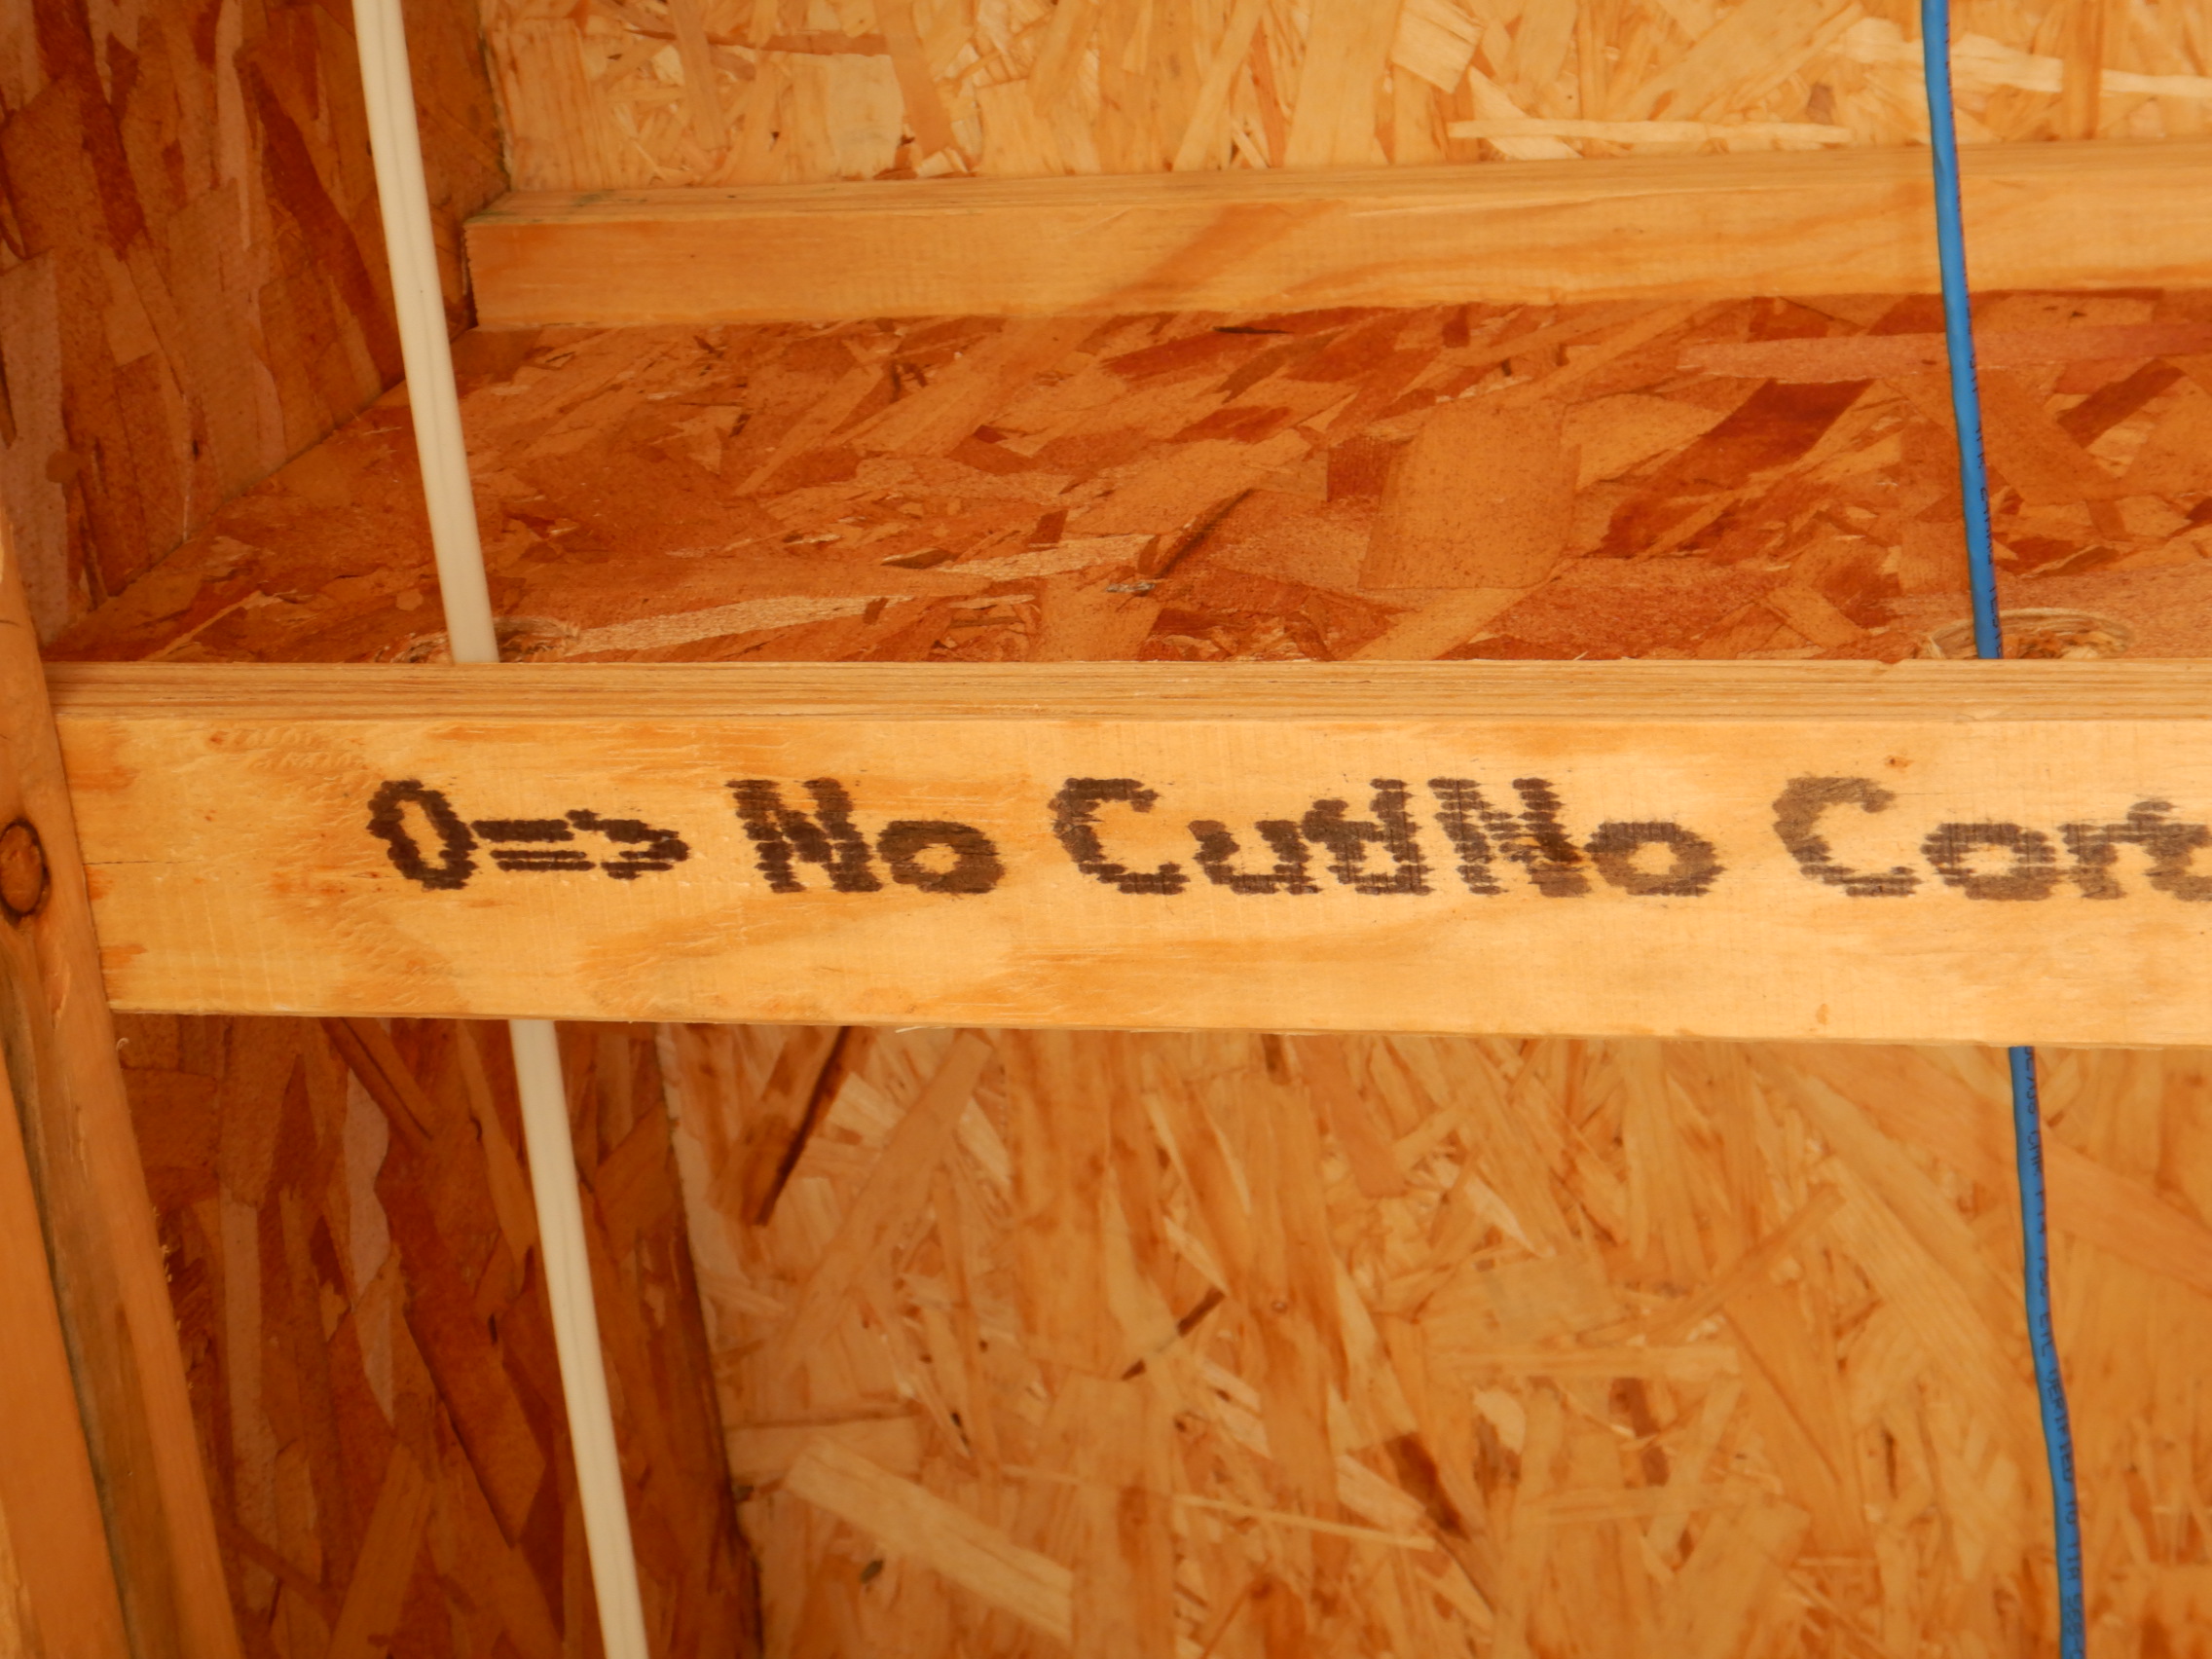 |
Other Concerns
Basement Floor Cracked
Basement concrete floor observed cracked. This is not unusual. Maintain area to your standard.

INSULATION
Above Ceiling Insulation
Recommended Insulation, Insulation Photo
Recommended attic insulation depth above living spaces for this area of the country is R-38 to R-60 to help lower utility costs. This recommendation comes from the US Department of Energy. Evaluate your comfort level and utility costs correcting insulation depth if needed.
Insulation Photo
 |  |
Insulation Type: Blown In, Roll or Batt
Observed Insulation Approximate Depth: R - 30, R - 19
Consider Improving Insulation: Energy Audit Recommended, Missing
Consider obtaining evaluation by an energy auditor for property to improve energy efficiency and comfort.
Insulation was missing at some areas. The inspector recommends that insulation be properly installed where missing to lower utility costs.

Wall Insulation
Insulation: Wall Insulation Not Observed, Undetermined
Underfloor Insulation
Insulation: None
Underfloor insulation was not observed at crawl space beneath living space.
MOISTURE
Moisture Indications
Practical Steps Basement/Crawlspace Moisture
Practical steps to better moisture condition at a typical basement and crawl space area.
- Properly divert any storm water and all gutter down spouts a minimum 10 feet away from foundation.
- Correct any exterior grading issues that prevent storm water from flowing away from foundation.
- Install proper size dehumidifier at basement, if needed, to help control high humidity.
- Properly drain any excess bulk moisture from basement or crawl space, if present, to prevent accumulation.
- Take more aggressive steps if necessary such as installing a dewatering system.
Basement
Basement: Interior Damp Proofing Observed
Interior damp proofing was observed applied to basement walls. Waterproofing should be done on exterior walls at and below soil grade at time of construction. Interior damp proofing may indicate moisture penetration. Monitor area and correct as needed.
- Interior Damp Proofing observed at basement wall.

Crawl Space Underfloor
Crawl space area appeared to be suffering from a chronic excess moisture condition and proper corrections were needed when inspected for health safety and to protect building components.
The following describes logical steps for correction of affected areas. Your specific situation may vary. Correct or modify steps as needed.
- Further evaluation is needed to verify type of apparent fungus, if desired, to determine if apparent fungus is mold and type of mold, if present. Properly remediate including removal of floor insulation if present. This should be done in conjunction with controlling excess moisture.
- Further evaluation needed to determine all sources of moisture entry into crawl space area.
- Correct all controllable excess moisture entry into crawl space area such as plumbing leaks, condensate leaks, gutter down spouts, etc.
- Further evaluation needed to determine foundation and floor system repairs. Properly perform any structural repairs as needed.
- Clear and clean crawl space area of all unnecessary debris.
- Properly install dewatering system if needed.
- Properly encapsulate crawl space and properly condition crawl space air for all areas of crawl space or properly ventilate crawl space area, if possible.
- Ventilated crawl spaces should have crawl space floor insulation properly replaced, if removed.
 |  |  |
 |  |  |
 |  |  |
 |  |  |
 |  |  |
 |  |  |
 |  |  |
 |  |  |
 |  |  |
 |  |  |
 |  |  |
 |  |
Interior Moisture Signs
Interior: Moisture Stains Observed Dry
Dry moisture stains were observed. Stains are evidence of a prior undesirable moisture condition. Monitor the area to verify that the cause of the stain is not still present. Further evaluation may be needed if the cause of the stains persists. Properly correct the cause of the stain if needed. Properly repair affected areas as needed. Some affected areas may be concealed and are not part of the inspection performed.
- Dry moisture stains were observed on the ceiling of the keeping room near the kitchen.
 |  |
Vapor Retarder
Plastic sheeting, vapor retarder, was not observed properly covering soil areas inside the underfloor crawl space.
A vapor retarder is an important measure to reduce moisture inside underfloor crawl spaces and should be properly added to cover soil areas where omitted or missing.
VENTILATION
Attic Ventilation
Attic Exhaust Vents: Ridge Roof Vent
Attic Intake Vents: Soffit Vents Where Installed
Foundation Ventilation at Underfloor Crawl Space
Not Properly Ventilated or Conditioned
Encapsulation: Guide to Closing and Conditioning Ventilated Crawlspaces 2013
Guide to Closing and Conditioning Ventilated Crawlspaces 2013 PDF
Useful information should you wish to encapsulate a crawl space.
Crawl spaces either should be properly ventilated or properly encapsulated to help control high humidity and reduce moisture inside crawl space areas. Encapsulated crawl spaces must have a conditioned air space to help control moisture.
When ventilating a crawl space, it is important to have proper intake and exhaust venting to provide adequate cross ventilation.
When a properly encapsulated crawl space is desired, the airspace inside the encapsulated area should be properly conditioned to help control moisture in this space. Conditioning of the crawl space air is accomplished either by properly modifying the existing central heating/cooling ductwork or installing a properly sized dehumidifier with a system of fans. An encapsulated crawl space will also have a properly installed liner present.
Proper ventilation or proper encapsulation was not observed in the crawlspace when inspected to help prevent moisture and condensation problems. Obtain further evaluation to determine the best solution for your situation, ensuring a proper correction that meets your needs.
- Crawl space was not properly ventilated.
- Crawl space was not properly encapsulated.
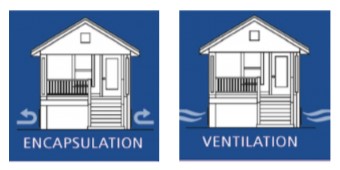
ROOF
Roof Covering
Observation: Representative Roof Covering Photos
Representative Roof Covering Photos
 |  |  |
 |  |  |
 |  |  |
 |  |  |
 |  |
Method of Roof Inspection: Walked on portions of roof
Common Limitations:
Architectural design was irregular. Monitor irregular architecture at roofing budgeting periodic maintenance as needed to help prevent unwanted water entry. Make corrections as needed, when needed.
 |  |
Roof Style: Multi Plane
Approximate Age of Roof Covering: 0-4 Years
Roofing Material: Composition Dimensional Shingle
Observation: Serviceable, Fulfilling Its Function
The roof covering overall was found generally serviceable within the parameters of its given service life. All roofing requires periodic maintenance. Properly maintain and correct roof covering as needed, when needed.
Roof Penetrations
Plumbing Vent Flashing
Plumbing Vent Flashing at Roof
Monitor this type of penetration as the flashing around the plumbing waste pipe that penetrates the roof requires periodic replacement. Budget replacement of plumbing vent flashing as the gaskets begin to deteriorate and split. This is needed each 8-10 years after a new plumbing vent flashing is installed.
Flashing
Flashing Further Evaluation
Flashing
A competent contractor should further evaluate areas with flashing, properly correcting or adding flashing as needed. Properly correct any affected areas if present when installing flashing.
- Irregular flashing observed above and right and left of the front door. Blowing rain may get behind the installed flashing. An appropriate upgrade is recommended. Photos Provided
 |  |
Gutters and Downspouts
Gutter and Downspout Materials: Metal
Best Time to Replace
The best time to replace guttering is while you are having the roof covering replaced.
Observation: Deferred Maintenance
Gutters suffered from deferred maintenance and were ready for reconditioning. Properly correct as needed for proper function.

Downspout: Near, Under, Elbow Missing
Downspout elbow was missing.
Elbow missing from bottom of one or more downspout. Check all downspouts properly replacing elbows as needed.
 |  |
One or more gutter downspouts were discharging close to the foundation.
It is recommended that all downspouts be extended to allow stormwater to flow quickly away from and around the structure. Correct as needed to meet your needs.
 |  |  |
 |  |  |
One or more gutter downspouts were discharging into a below grade drainage system. The drainage system was subterranean and inaccessible and was therefore not inspected.

Gutters: Replace or Repair
Replace or repair gutters as needed for proper function.
SIDING and TRIM
Exterior Elevations
Photos: Exterior Photos
Photos of Exterior elevations
 |  |  |
Masonry Siding
Brick Veneer
What is Brick Veneer
Brick veneer siding serves as a non-structural outer layer of masonry. In contrast to solid brick constructions, which rely on multiple layers of brick for structural support, brick veneer systems depend on the underlying structure to support the masonry. The removal of the brick veneer would not compromise the building's structural integrity.
 |  |
Brickwork: Serviceable
Brickwork
The exterior readily visible areas of the brickwork were inspected and appeared to be in overall serviceable condition, fulfilling its function. All siding requires maintenance. Properly maintain siding condition correcting when needed.
Siding - Stucco
Stucco Over Concrete Block where installed
Siding: Requires Maintenance, Upgrade or Maintain
Stucco
Stucco requires periodic maintenance and appeared ready for corrections when inspected. Check all areas properly reconditioning siding to meet your needs and to help reduce moisture transfer.

Stucco
Upgrade or maintain stucco to meet your needs.
Siding - Vinyl
Vinyl Siding, Vinyl Eaves with Metal Trim
Siding: Corrections Needed
Exterior siding/trim was ready for proper corrections when inspected.
Inspector Observations - Representative Photos Provided
- Deferred Maintenance Observed
- Vinyl Siding Was Ready to be Washed
- Physical Damage Observed
- Failing Paint Observed
What you should do.
- Properly replace or repair exterior siding and trim as needed. Properly correct any adjacent affected areas damaged by deferred maintenance. Affected adjacent areas that are concealed or not readily accessible are not part of the inspection performed.
 |  |  |
 |  |  |
 |
Trim
Trim Material: Wood where installed
Trim: Corrections Needed
Exterior trim was ready for proper corrections when inspected.
Inspector Observations - Representative Photos Provided
- Deferred Maintenance Observed
- Failing Paint Observed
- Unpainted areas were observed
- Physical Damage Observed
What you should do.
- Refurbish area before painting. A quality paint or stain job will include washing/cleaning all areas to be painted, repair/replacement of damaged siding and trim, seal all gaps, prime all unpainted areas and sufficient paint coverage to achieve desired color without bleed through.
 |  |  |
 |  |
DECK
Deck or Wooden Porch Areas Overall Condition Statement
Correct Deck and Fall Areas Before Use
Inspecting decks which are also known as wooden porches.
Decks and their attached steps are inspected for structural integrity, fall prevention and possible entrapment openings. Concealed areas such as deck footers are not included in the inspection. Most inspected decks will be ready for some correction or upgrade due to age, wear or improper construction. For any areas ready for upgrade, you should evaluate your risk exposure properly correcting as needed for improved structural integrity and improved safety.
Any deck needing correction should be further reviewed and corrections performed by a Competent Qualified Deck Contractor as the deck inspection performed in this report is not meant to discover every possible correction that a deck might need.
Each deck should be properly stained to prolong deck life. A solid deck stain is preferred as it will also protect the deck from sun light damage.
Two useful sources for deck information may be found at the following websites:
https://knoxcounty.org/codes/pdfs/construction_info/DeckInformation.pdf
Deck areas were observed ready for corrections now and before use to improve the structure of the deck and to improve the safety aspects for the fall prevention measures installed at deck areas. Refer to the full report for additional information and photos regarding obvious corrections recommended now for any deck areas. A competent deck contractor should check all deck areas. Make deck areas functional, safe and structurally sound where needed.
- Representative Photos Provided

Deck or Wooden Porch Location, Attributes and Restrictions
Deck Location: Rear
Deck Stairs: Stairs Were Present
Restrictions: Lattice
Lattice areas restricted view of structural components.
 |  |
Deck or Wooden Porch Structure
Bolts: Not Present
Deck bolts were not observed. Decks should be properly bolted to the structure every 12", 16" or 24" depending on the span of the floor joists. Deck bolts should be ½” diameter lag bolts with washers. The installed bolts should be staggered top to bottom to prevent splitting of the ledger board. Proper correction should be completed to strengthen the deck connection to the structure.

Flashing: Not Visible
Flashing was not visible. Proper flashing installation after construction completion cannot be fully confirmed as most areas will be concealed. Flashing separating the deck from the building helps prevent water penetrations, rot and wood boring insects from entering the building. Monitor area correcting if needed as adding flashing after construction completion may not be cost effective.

Footings: Questionable Footing
Column footings were questionable. Have area further evaluated and correct where needed.

Girder or Beam: Undersized, Not Properly Supported
Some observed girders or beams appeared undersized for the span between posts. Properly correct girder or beam as needed for structural integrity.

Girder or beam was not properly supported. Properly support girders or beams where needed.

Girder or Beam Illustrations: Girder Properly Supported by Column
The image below depicts a beam or girder properly resting on a notched wooden post. Beams or girders should bear directly on posts. The remainder of the notched wooden post should be at least 2 inches thick.

Joist Hangers: Missing
One or more floor joist hangers were missing at deck. Properly add joists hangers where missing for improved structural integrity.
.jpg) |  |
Performance: Deferred Maintenance
The deck area suffered from deferred maintenance and was ready for reconditioning.
Deck did not appear appropriately strengthened to support extra weight of hot tub. Properly correct deck or remove hot tub from deck.

Deck or Wooden Porch Railings and Stairs
Diagram: Correction Needed Railing & Stairs
Railings and Stairs were ready for modernization for improved safety. Evaluate your risk exposure. Consider proper repair or replacement of stairs and railings where needed now for safety and function.
| |  |
Guardrail: Low
Guardrail observed less than 36" tall was ready for proper correction.

Handrail: Wrong Height, ≥4 3/8", ≥6"
Modern handrails at steps should be 34" to 38" above toe of stair tread for safety. Installed handrails were at a different height and proper correction is recommended.

Openings at handrails, such as at balusters, were ready for correction or upgrade as they did not reject a 4 3/8" sphere for all openings.
Openings beneath handrails at steps were ready for correction or upgrade as they did not reject a 6" sphere for all openings.

Railings: Return Not Present
Handrail ends at steps should return to wall or similar area to prevent hooking coat sleeves or similar possibly causing falls. Evaluate your risk exposure properly correcting as needed for improved safety.

Stairs: Irregular, Steep 7 3/4+", Uneven, Tread <11", Stair Connection
The installed steps did not conform to modern standards for safe stairs. Use extreme caution when walking on these stairs now and consider upgrade to conforming stairs for safety.
One or more steep steps were observed. For safety modern stair risers should have a maximum height of 7 3/4" in residential construction.
Uneven steps were observed. Differing riser heights are a common cause of falls. For safety, the height between the tallest and the shortest riser on a set of stairs should be no more than 3/8". Proper correction is recommended.
Stair treads were observed shorter than 11", where no tread nose was present or nose was less than 1". Use caution when walking on steps. Consider correcting stair treads for improved safety.
Connection of stairs to platform needed improvement for safety to prevent possible separation.

Stairs Repair/Replace
Evaluate your risk exposure. Consider proper repair or replacement of steps and railings where needed now for safety and function.
LOTS and GROUNDS
Driveway
Concrete
Driveway: Monitor Cracked
Multiple cracked areas were observed when inspected. Monitor area budgeting repairs as needed.

Walkway
Concrete
Walkway: Serviceable Cracked
Walkway was cracked but serviceable, fulfilling its function.

Porch
Concrete
Porch: Serviceable
Porch was serviceable, fulfilling its function.

Stairs and Railings at Exterior
Diagram: Older Railing & Stairs
Railings and Stairs at older home as expected, did not meet current safety standards. Railings and stairs were ready for modernization for improved safety. Evaluate your risk exposure. Consider proper repair or replacement of stairs and railings where needed now for safety and function.
| |  |
Stairs: Deferred Maintenance
Stairs suffered from deferred maintenance and were ready for reconditioning.

Vegetation
Vegetation Maintenance
Properly maintain vegetation to meet your needs. Vegetation should not touch building exterior or overhang roof. Vegetation should not interfere with access or servicing of electrical, gas or heating/cooling equipment.
Site
Site: Adjust Grade
Some exterior grade work may improve storm water runoff away from foundation. Slope grade a minimum of ten feet away from and around structure so that water does not collect at foundation.
 |  |
Retaining Wall
Retaining Wall
Multiple retaining walls were present.
Retaining wall did not appear to protect foundation.
Properly maintain any retaining wall as maintenance is typically less expensive than replacement. Retaining walls close to foundation could affect building if not properly maintained.
 |  |
Monitor
Monitor retaining wall budgeting corrections if the condition worsens. Properly correct or upgrade the retaining wall as needed.

Not Evaluated
Hot Tub
A hot tub was present and not evaluated. A hot tub inspection was not requested.

 |
Awning
Awning was present and not evaluated. Such areas are outside scope of a home inspection. Maintain area as needed for safety and function. Properly remove system if use is not desired.

End of Report
Thank You Note
Thank you so much for trusting me to perform your inspection!
Please reach out if I may assist you further.
Roger Williamson
423-301-1000
HomePro Inspection Inc
Signed Contracts

HomePro Inspection Inc
423-301-1000
https://HomeProInspection.com
roger@homeproinspection.com
226 TN
.jpg)
.jpg)