

How to Read This Report
This report, whether viewed digitally or in printed form, should be reviewed in full color so that photographs are clearly discernible and on a device or page width of no less than 8.5 inches. References to the right and left sides of the building are based on facing the front of the structure as shown on the report cover. The client has a duty and obligation to read the entire report. Please contact the inspector with any questions or concerns.
This inspection report is intended to identify readily observable major structural deficiencies, inoperative conditions, and noticeable moisture-related concerns in the areas inspected. The report may also note safety concerns and recommended upgrades that should be considered. Conditions may exist that were not observed or reported due to concealed, inaccessible, or obstructed areas.
Photos
Photographs included in this report are provided to help illustrate reported conditions or areas of concern. Photos are representative only and may not show the full scope of repairs required. Repairs should be based on the actual conditions observed at the property, not solely on photographs. When viewing the online report, clicking a photo will enlarge it for closer inspection.
Repairs
Any repairs or corrections should be performed by qualified and competent professionals familiar with the type of work being completed. Obtain competitive bids as appropriate and further evaluation when recommended.
Getting the Information to You
This report is designed to present technical information in an accessible format. The online HTML version allows expanded access to additional information. Some words or phrases may appear blue and underlined; clicking these provides links to supplemental resources. Other text colors, if present, have no specific meaning. Please read all written text.
This report may also be printed or saved as a PDF.
Chapters and Sections
The report is organized into chapters that represent major home systems. Each chapter contains sections addressing specific components. When viewing online, chapters can be accessed using the navigation menu on the left side of the screen.
Observation Labels
Observation labels are used to categorize findings. Not all labels appear in every report. Hazardous, Key Concerns, and Further Evaluation Needed items, when used, will appear in both the report and the summary. Other observation types appear only in the report body. Labels are numbered for reference. Colors and icons, when used, do not indicate severity.
Summary Page
For convenience, this report includes a summary listing non-routine maintenance items that the inspector believes should be addressed prior to marketing the home for sale. The summary contains limited information and does not include photos or detailed explanations. Only items classified as Key Concerns, Further Evaluation Needed, Hazardous, and when applicable New Construction Builder Punch List Items, are included.
The report body contains the most complete information, including descriptions, photographs, captions, and when applicable, diagrams, videos, and links. Refer to the full report body when planning repairs or upgrades. The client is responsible for reading the entire report.
Summary
Key Concerns
- G-1 GARAGE:
Attached Garage Overhead Door Operator
Having to continuously hold the wall push button for the overhead door operator, so that the overhead door will close, typically means that the electronic eyes for the overhead door operator require some correction.
The overhead door operator failed to function properly when tested. Properly correct as needed for function and safety. Verify both safety reversal mechanisms are working properly correcting if needed.
- K-1 KITCHEN:
Exhaust at Microwave
The deep cabinet above the microwave restricted the exhaust opening at the top of and towards the front of the microwave, which is designed for ductless exhausting. Proper correction is recommended. A competent, qualified contractor capable of reading and following the installation instructions should properly correct the microwave exhaust installation as needed for function and safety.
Multiple corrections are possible to improve the condition or to prevent damage to the cabinet or possibly the exhaust fan.
Some options are:
- It is possible to build a proper structural spacer at least 4" deep that would be attached between the wall behind the microwave and the microwave itself so that the microwave exhaust would properly extend beyond the cabinet front.
- Consider discontinuing use of exhaust fan altogether. If the exhaust fan comes on automatically with microwave use, then consider discontinuing the use of microwave and exhaust altogether.
- Consider replacing the microwave with one that exhausts out the front rather than the top.
- Consider replacing or modifying the cabinet above the microwave to prevent the cabinet from obstructing the exhaust.
Refer to installation instructions. Properly correct as desired to meet your needs, making the system fully functional and safe.
- CS-1 CENTRAL SYSTEM:
Heating System: System served upstairs area
Corrections were needed for the heating system.
The furnace failed to properly respond to the thermostat setting when it was inspected and the system was calling for heat. Properly service heating system correcting as needed for function and safety.
- E-3 ELECTRICAL:
Branch Wiring
Improperly terminated wiring was observed at front exterior. Photo Provided
Some exposed loose ends of wiring could not be visually confirmed as being properly disconnected from all electrical systems. Properly terminate exposed wiring ends by adding junction boxes, wire nuts, and covers where needed.
- E-4 ELECTRICAL:
Electrical Receptacle Outlets
Multiple electrical receptacles were ready for proper correction.
- Multiple electrical receptacles were observed inoperative, such as at kitchen serving counter. Photo Provided
A competent electrical contractor should check all receptacles, making them functional and safe where needed.
- E-5 ELECTRICAL:
Lighting/fans - Make lighting/fans functional and safe where needed.
- Some lighting was inoperative when inspected.
- Some lighting was not fully functional when inspected.
Check all lighting/fans making functional and safe where needed.
Representative Photos Provided
- E-6 ELECTRICAL:
Switches
Three Way Switches incorrectly wired -
Two switches were installed to operate the same electrical lighting outlet. The switches appeared to be incorrectly wired or the wrong type switch as each of the two switches do not appropriately turn the area on and off as expected. Properly correct as needed for function and safety.
- Switches in the upstairs hall serving surface-mounted light appeared improperly wired.
- AL-1 ATTIC LADDER:
The attic ladder was observed ready for corrections, now and before use, to improve its function and safety. Improper attic ladder installation is the most common cause of attic ladder collapse.
Refer to the full report for additional information and photos regarding obvious corrections recommended now for the attic ladder area. A competent, qualified contractor who can read and follow the manufacturer's installation instructions should check all attic ladder areas. Make the attic ladder functional, safe, and structurally sound where needed.
- R-1 ROOF:
Roof covering was ready for corrections now.
A competent roofing contractor should check entire roof system and associated flashings. Properly repair or replace roof covering system as needed.
Roof Covering was Ready for Correction
- Representative Photos Provided
- Flashing appeared omitted at areas. Properly add flashing where needed.
- Some kick out flashings appeared omitted.
- Some roof covering observed damaged.
- Some roof covering observed worn.
- Remove construction debris from roofing where needed.
- New construction roof covering should be in new, undamaged condition and free of debris.
Further Evaluations
- S-2 STRUCTURE:
Damaged Engineered Roof Trusses were observed unrepaired.
To repair damaged roof truss framing:
- Obtain further evaluation to verify all areas where damage is present at the roof trusses.
- Contact the roof truss manufacturer or another State Licensed Professional Engineer specializing in truss construction to design appropriate corrections.
- A competent, qualified contractor should execute engineering design where needed.
- Retain stamped engineering design drawing for your permanent records.
- Seven of eight consecutive trusses located above attic ladder and furnace platform had damaged, unrepaired truss plates.
- One truss above furnace platform was observed to have a broken wooden truss member that was not properly repaired.
New Construction Builder Punch List Items
- I-1 INTERIOR:
New construction cleaning -
Final clean up typically includes washing windows inside and out, cleaning all interior surfaces including inside of cabinets, removal of any construction debris and complete any exterior clean up or landscape adjustments. Properly correct as needed, where needed.
- I-2 INTERIOR:
New Construction Interior Finishes -
Complete interior final patching, adjustments, and painting to meet your standards, if needed.
- Representative photos provided
- B-1 BATHROOM:
Location Full Bathroom: Upstairs Rear attached to a bedroom
Shower
Hair strainer or object catcher at waste drain at shower floor was ready for correction or replacement. Properly correct to meet your needs.
- CS-2 CENTRAL SYSTEM:
Cooling system served upstairs area
The cooling system refrigerant piping needed additional insulation in the attic. Sections of the insulation on the compressor refrigerant lines appeared to be missing. These lines should be suitably insulated to prevent sweating lines from dripping moisture onto finished areas and to improve the cooling system's efficiency.
- CS-3 CENTRAL SYSTEM:
Cooling system served main level.
The cooling system refrigerant piping needed additional insulation in the attic. Sections of the insulation on the compressor refrigerant lines appeared to be missing. These lines should be suitably insulated to prevent sweating lines from dripping moisture onto finished areas and to improve the cooling system's efficiency.
- E-1 ELECTRICAL:
Electrical Panel Exterior at Meter
Routine corrections were needed at the electrical distribution panel.
These corrections should be performed now or may be scheduled with other electrical work if that work is done in the near future.
- One hinge clip was not installed properly at breaker panel cover.
- E-2 ELECTRICAL:
Sub Electrical Panel Garage
Routine corrections were needed at electrical distribution panel.
These corrections should be performed now or may be scheduled with other electrical work if having that work done in the near future.
- For panel directory, properly index or label each electrical panel circuit as needed for clarity and safety.
- Properly index each electrical circuit where needed for clarity and safety. Refrigerator, smoke alarms, garage and exterior lighting was not observed on breaker panel index.
- White wires observed attached to 240V breakers. Remark or correct improperly colored wiring inside electrical panel where needed for service personnel safety.
- E-7 ELECTRICAL:
Some smoke alarms were chirping and may need new batteries. Properly correct where needed.
- S-1 STRUCTURE:
Properly install cover at scuttle hole to attic where missing at garage ceiling.
- ST-1 SIDING and TRIM:
New Construction Exterior Finishes
Complete exterior final corrections, patch, and painting to meet your standards, as needed.
The Full Report
INTERIOR
Interior Access / Ceilings / Walls / Floor Coverings
Doors
Glazing/Glass
Windows
Stairs/Railings Interior
Interior Other
PLUMBING
Supply Piping
Waste Piping
Apparent Vent Piping
Exterior Hose Faucets
Water Heater
Equipment Observed
About the Inspection Process
Home Inspection: Scope and Purpose of a Home Inspection
The Scope and Purpose of a Home Inspection
Purchasing property involves risk
The purpose of a home inspection is to help reduce the risk associated with the purchase of a structure by providing a professional opinion about the overall condition of the structure. A home inspection is a limited visual inspection and it cannot eliminate this risk. Some homes present more risks than others. We cannot control this, but we try to help educate you about what we don’t know during the inspection process. This is more difficult to convey in a report and one of many reasons why we recommend that you attend the inspection.
A home inspection is not an insurance policy
This report does not substitute for or serve as a warranty or guarantee of any kind. Home warranties can be purchased separately from insuring firms that provide this service.
A home inspection is visual and not destructive.
The descriptions and observations in this report are based on a visual inspection of the structure. We inspect the aspects of the structure that can be viewed without dismantling, damaging or disfiguring the structure and without moving furniture and interior furnishings. Areas that are concealed, hidden or inaccessible to view are not covered by this inspection. Some systems cannot be tested during this inspection as testing risks damaging the building. For example, overflow drains on bathtubs are generally not tested because if they were found to be leaking they could damage the finishes below. Our procedures involve non-invasive investigation and non-destructive testing which will limit the scope of the inspection.
This is not an inspection for code compliance
This inspection and report are not intended for city / local code compliance. During the construction process structures are inspected for code compliance by municipal inspectors. Framing is open at this time and conditions can be fully viewed. Framing is not open during inspections of finished homes, and this limits the inspection. All houses fall out of code compliance shortly after they are built, as the codes continually change. National codes are augmented at least every three years for all of the varying disciplines. Municipalities can choose to adopt and phase in sections of the codes on their own timetables. There are generally no requirements to bring older homes into compliance unless substantial renovation is being done.
This is just our opinion
Construction techniques and standards vary. There is no one way to build a house or install a system in a house. The observations in this report are the opinions of the home inspector. Other inspectors and contractors are likely to have some differing opinions. You are welcome to seek opinions from other professionals.
The scope of this inspection
This inspection will include the following systems: exterior, roof, structure, drainage, foundation, attic, interior, plumbing, electrical and heating. The evaluation will be based on limited observations that are primarily visual and non-invasive. This inspection and report are not intended to be technically exhaustive.
Your expectations
The overall goal of a home inspection is to help ensure that your expectations are appropriate with the house you are proposing to buy. To this end we assist with discovery by showing and documenting observations during the home inspection. This should not be mistaken for a technically exhaustive inspection designed to uncover every defect with a building. Such inspections are available but they are generally cost-prohibitive to most home buyers.
Be Proactive Regarding Maintenance:
How much should you budget to maintain a home in the Chattanooga area?
As a general rule, a proper home maintenance budget should be about 2-5% of the value of the home annually. This maintenance budget would include periodic maintenance, general repairs, lawn care, housekeeping and saving any excess funds to budget for predictable replacement of the water heater, central heating/cooling and the roof covering. Should you choose to perform any of these tasks yourself, you should have fewer out of pocket expenditures to properly maintain your home.
Workers Present During Inspection
Workers were present during the inspection.
The inspector records the condition of the property as each area is inspected. Conditions altered after an area is inspected or after the inspector has departed from the property are not reflected in the inspection report.

General Comments
Building Characteristics, Conditions and Limitations
Type of Building : Single Family Home
Site Built
Approximate Square Footage: 2570
Approximate Year of Original Construction: 2025
Weather during the inspection: Cloudy
Ground/Soil surface conditions: Damp
Approximate Low Temperature During Inspection: 75[F]
Approximate High Temperature During Inspection: Above 80[F]
INTERIOR
Interior Access / Ceilings / Walls / Floor Coverings
Interior Access: Empty of Furnishings
Home was empty of furnishings when inspected.
________________________________________________________________________________________________________________________________________________________________
Ceiling
Interior Ceiling Materials: Drywall
Interior Ceiling Condition:
Serviceable, fulfilling its function
________________________________________________________________________________________________________________________________________________________________
Wall
Interior Wall Materials: Drywall
Interior Wall Condition:
Serviceable, fulfilling its function
________________________________________________________________________________________________________________________________________________________________
Flooring New Construction
Interior Flooring Materials: Carpet and Engineered Flooring
Interior Flooring Condition:
- Serviceable, fulfilling its function.
Doors
Doors at Interior: Serviceable, fulfilling its function
________________________________________________________________________________________________________________________________________________________________
Doors to Exterior: Serviceable, fulfilling its function
Glazing/Glass
Insulated glass was present.
Windows
Vinyl framed windows were present.
Screens
Window screens are not required on homes with central cooling system air conditioning. Install window screens where missing, if desired.
Serviceable
A representative number of accessible windows were operated and were found generally serviceable within the parameters of their given service life.
Stairs/Railings Interior
Stairs Serviceable, fulfilling its function: For stairs to second floor
Railing Serviceable, fulfilling its function: Railing for stairs to second floor
Stair/Railing Representative Photo
Stair/Railing Representative Photo

Interior Other
New Construction: Cleaning, Interior Finishes
New construction cleaning -
Final clean up typically includes washing windows inside and out, cleaning all interior surfaces including inside of cabinets, removal of any construction debris and complete any exterior clean up or landscape adjustments. Properly correct as needed, where needed.

New Construction Interior Finishes -
Complete interior final patching, adjustments, and painting to meet your standards, if needed.
- Representative photos provided
 |  |  |
 |  |  |
 |  |  |
 |  |
GARAGE
GARAGE
GARAGE TYPE: Attached
Garage Floor Location: At Ground
Photos
Garage - Representative Photos
 |  |  |
 |  |
Garage Separation from Living Space: Drywall Missing Ceiling
Ceiling area separating the garage area from the living space area was exposed or not completely covered with drywall. Should a fire occur at an attached garage area, properly installed drywall on framing, where needed, can offer some assistance to slow the spread of fire and smoke from the garage area to living areas. Consider this area for an appropriate improvement or upgrade.

________________________________________________________________________________________________________________________________________________________________
GARAGE OVERHEAD DOOR: One Installed
Overhead Door Material: Metal
Overhead Door Insulation: Not Insulated, Heated Area Over Garage
Heated space was observed above garage area. Garage overhead door was not insulated.
Garage overhead doors are typically the largest opening in a building. Installing insulated garage overhead doors may lower utility costs as well help make the garage and the heated living space above the garage area less drafty. Consider this area for appropriate improvement or upgrade.

________________________________________________________________________________________________________________________________________________________________
GARAGE OVERHEAD DOOR OPERATOR: Testing Garage Overhead Door Operators
Testing Electric Operators for Garage Overhead Doors
Garage overhead door operators require periodic maintenance to maintain safe operation. Electric overhead door operators are checked for function and safety when inspected.
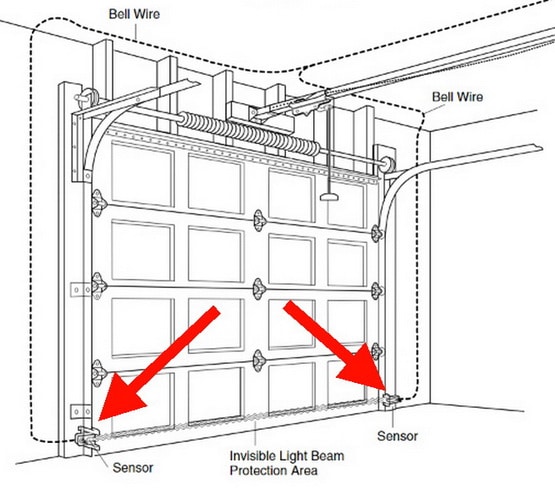
Modern garage overhead door operators have two safety reversal means; contact reversal and non-contact reversal.
Contact reversal is when the garage overhead door hits an obstruction that should cause the operator to reverse for safety.
Non-contact reversal is when the electronic eyes detect an obstruction, without the garage overhead door hitting an object, that should cause the operator to reverse for safety.
The contact reversal of the garage door operator is tested using a 1.5 inch obstruction on the floor at the center point of the overhead door. If the contact reversal requires correction, this is typically accomplished by a simple adjustment on the operator but other corrections could also be necessary. See overhead door operator owners manual for additional details.
If the electronic eyes area installed properly, the non-contact reversal is tested by obstructing the path between the electronic eyes while the operator is closing the garage overhead door. The installation height of the electronic eyes varies slightly by manufacture. Most manufacturers typically advise installing the electronic eyes no more than six inches above the floor at the overhead door track. If the electronic eyes are out of alignment, the operator will not close the garage overhead door without pushing and holding the wired, wall mounted, push-button until the garage overhead door is fully closed. If the electronic eyes require adjustment, this is typically accomplished by remounting or correcting the aim of the electronic eyes but other corrections could also be needed. See overhead door operator owners manual for additional details.


Overhead Door Operator: One Installed
Attached Garage Overhead Door Operator
Having to continuously hold the wall push button for the overhead door operator, so that the overhead door will close, typically means that the electronic eyes for the overhead door operator require some correction.
The overhead door operator failed to function properly when tested. Properly correct as needed for function and safety. Verify both safety reversal mechanisms are working properly correcting if needed.
KITCHEN
Inspection Process
Kitchen Inspection Process
Kitchen Inspection Process
Kitchen inspection was of the readily accessible and visible portions of the kitchen. The kitchen inspection includes the countertops and a representative number of cabinets. Kitchen faucets, when functional, are run for longer than one minute checking for observable leaks and hot/cold orientation.
The following built-in kitchen appliances, where installed, were inspected and on/off operated testing the main function of each appliance using the normal operating controls:
- Cooktop / Oven / Range (cook surface with integral oven)
- Microwave
- Garbage Disposal
- Trash Compactor
Installed dishwashers are run through a normal cycle. Obvious functional issues and leaks observed around the dishwasher are reported, if present.
Ventilation equipment, such as range hoods, are inspected, on/off operated and are reported as ductless, ducted or recirculating. It is beyond the scope of this inspection to determine the effectiveness of the kitchen exhaust fan, such as to verify air flow quantity or discharge location.
Appliance inspection does not cover clocks, timers, self cleaning function, calibration, automatic functions or optional equipment on appliances.
Refrigerators are considered personal property and are not evaluated. Refrigerator presence or absence is noted. Faucets for refrigerator ice makers are not tested whether the refrigerator is present or not as there is no basin to catch the water from the ice maker faucet.
Equipment that appears to be shut down, inoperable or intentionally taken out of service is noted but will not be operated by the inspector. Shut down equipment may be unplugged, breaker off, water off, gas off or otherwise taken out of service.
Installation conditions and functional issues for this area requiring correction should be performed by a competent qualified contractor.
Kitchen
Kitchen Area: Main Level
Kitchen
Countertop: Granite
- Serviceable, fulfilling its function
Cabinets: Wood and wood composition
- Serviceable, fulfilling its function
Floor Covering: Engineered Flooring
- Serviceable, fulfilling its function
Sink: Single Bowl Stainless Steel
- No leaks were observed at the faucet, the visible supply lines, or the waste drain beneath the sink.
Disposal: Present and appeared functional
Dishwasher: Present and ran through a partial normal cycle without incident
Water valve to dishwasher was closed at start of inspection.
Water valve was restored by other parties to dishwasher during home inspection allowing inspector to operate unit.
Client requested inspector cancel dishwasher cycle during operation at departure from inspection.
Range: Range (Gas Top/Oven)
Present and On/Off Tested functional
Microwave: Present and On/Off Tested functional
Kitchen Exhaust: Questionable installation observed. See Summary of report.
Refrigerator: Not Present
Trash Compactor: Not Present

 |  |  |
Exhaust at Microwave
The deep cabinet above the microwave restricted the exhaust opening at the top of and towards the front of the microwave, which is designed for ductless exhausting. Proper correction is recommended. A competent, qualified contractor capable of reading and following the installation instructions should properly correct the microwave exhaust installation as needed for function and safety.
Multiple corrections are possible to improve the condition or to prevent damage to the cabinet or possibly the exhaust fan.
Some options are:
- It is possible to build a proper structural spacer at least 4" deep that would be attached between the wall behind the microwave and the microwave itself so that the microwave exhaust would properly extend beyond the cabinet front.
- Consider discontinuing use of exhaust fan altogether. If the exhaust fan comes on automatically with microwave use, then consider discontinuing the use of microwave and exhaust altogether.
- Consider replacing the microwave with one that exhausts out the front rather than the top.
- Consider replacing or modifying the cabinet above the microwave to prevent the cabinet from obstructing the exhaust.
Refer to installation instructions. Properly correct as desired to meet your needs, making the system fully functional and safe.


BATHROOM
Inspection Process
Testing Limitations
Bathroom Inspection Process
The following opinion was based on an inspection of the readily accessible and visible portions of bathroom areas.
Hand washing faucets, when functional, are run for approximately one minute checking for observable leaks at the faucet and beneath the sink as well as checking Hot/Cold orientation.
Bathing area faucets, when functional, are run for approximately five minutes checking for observable leaks and Hot/Cold orientation.
Toilets, when functional, are flushed twice. Inspector checks for leaks around toilet, checks that toilet fills and shuts off, and checks to see if toilet appears securely mounted.
Effectiveness and discharge locations for mechanical bathroom exhaust vents are not confirmed during inspection.
Installation conditions and functional issues for this area requiring correction should be performed by a competent, qualified contractor.
Bathroom
Full Bathroom
Location Full Bathroom: Upstairs Rear attached to a bedroom
Bathing Area: Shower
- No leaks were observed around the faucet, and the water containment area appeared serviceable.
- Properly maintain tile work to meet your needs.
Hand Washing: Two basins in vanity
- No leaks were observed at the faucet, the visible supply lines, or the waste drain beneath the sink.
Toilet: Water tank type
- No leaks were observed around the toilet, and it appeared secured in place.
Ventilation:
- Fan on/off tested. The sound heard appeared to be appropriate for the fan.
Floor Covering: Tile
- Serviceable, fulfilling its function
 |  |  |
 |  |  |
 |
Bathing Area: Waste (Hair Strainer)
Location Full Bathroom: Upstairs Rear attached to a bedroom
Shower
Hair strainer or object catcher at waste drain at shower floor was ready for correction or replacement. Properly correct to meet your needs.

Bathroom
Full Bathroom
Location Full Bathroom: Upstairs at Hall
Bathing Area: Combination tub and shower
- No leaks were observed around the faucet, and the water containment area appeared serviceable.
- Properly maintain tile work to meet your needs.
- The shower was run only briefly as no shower curtain/door was present.
Hand Washing: Vanity with basin
- No leaks were observed at the faucet, the visible supply lines, or the waste drain beneath the sink.
Toilet: Water tank type
- No leaks were observed around the toilet, and it appeared secured in place.
Ventilation:
- Fan on/off tested. The sound heard appeared to be appropriate for the fan.
Floor Covering: Tile
- Serviceable, fulfilling its function
 |  |  |
 |  |  |
 |
Bathroom
Full Bathroom
Location Full Bathroom: Upstairs Front Left attached to a bedroom
Bathing Area: Combination tub and shower
- No leaks were observed around the faucet, and the water containment area appeared serviceable.
- Properly maintain tile work to meet your needs.
- The shower was run only briefly as no shower curtain/door was present.
Hand Washing: Vanity with basin
- No leaks were observed at the faucet, the visible supply lines, or the waste drain beneath the sink.
Toilet: Water tank type
- No leaks were observed around the toilet, and it appeared secured in place.
Ventilation:
- Fan on/off tested. The sound heard appeared to be appropriate for the fan.
Floor Covering: Tile
- Serviceable, fulfilling its function
 |  |  |
 |  |  |
Bathroom
Half Bathroom
Location 1/2 Bathroom: Main Level
Hand Washing: Pedestal type
- No leaks were observed at the faucet, the visible supply lines, or the waste drain beneath the sink.
Toilet: Water tank type
- No leaks were observed around the toilet, and it appeared secured in place.
Ventilation:
- Fan on/off tested. The sound heard appeared to be appropriate for the fan.
Floor Covering: Engineered Flooring
- Serviceable, fulfilling its function
 |  |  |
LAUNDRY
Laundry Connections
Laundry: Connections Available
Clothes washer and dryer connections were available.
Laundry appliances were not observed connected to the laundry connections during the inspection. Laundry faucets are not operated when the basin beneath the faucets is inadequate to contain the faucet flow without a hose being connected to the faucets. Verify your clothes dryer exhaust is functional, safe, and properly installed to meet the requirements of the clothes dryer manufacturer.

Clothes Washer: Remove Drain Plug
Removal of temporary plug needed at laundry waste drain before installing clothes washer.

PLUMBING
Supply Piping
Supply Piping: Mostly PEX with Some CPVC
Water Flow at Supply Piping: Adequate
Adequate functional supply water flow was observed during inspection for water outlets operated.
Waste Piping
Waste Piping: Functional Flow Plastic
Material: Plastic
Functional waste water flow observed during inspection for water outlets operated.
Apparent Vent Piping
Plastic - No Adverse
Material: Plastic
No adverse conditions were observed, maintain to meet your needs.
Exterior Hose Faucets
Two
Performance: Functional Multiple
Exterior Hose Faucets
Exterior hose faucets were turned on and off briefly and appeared to function normally.
Water Heater
Water Heater
Water Heater
Size: 55 gallon / Year of Manufacture: 2025
Fuel: Electric / Location: Garage
Water Heater was observed functional during inspection.
Typical service life of a water heater is 8-12 years.
 |  |
Equipment Observed
Plumbing Equipment Observed Present But Not Tested or Evaluated: ________________________________________________________________________________________________________________________________________________________________
Thermal Expansion: About Thermal Expansion
Regarding Plumbing System Thermal Expansion:
Thermal expansion occurs when a tanked water heater operates without any plumbing valves open for a period of time. If the property water meter has a check or backflow preventer valve installed it will prevent the expanding contained water from flowing backwards through the water meter. This expansion causes the water heater pressure relief valve to open briefly releasing a small amount of water if an expansion control device is not present or not working properly. If the pressure relief valve on the water heater opens and does not seal closed properly then active leaks and subsequent damage may occur.

Tank Present
A plumbing thermal expansion tank was observed near the water heater. Maintain this area as you would any other portion of the plumbing system correcting when needed.

________________________________________________________________________________________________________________________________________________________________
Pressure Reducer: About Pressure Reducing Valves
Regarding Plumbing System Pressure Reducing Valves:
The pressure reducer or pressure regulator in a plumbing system is designed to reduce the water pressure to a reasonable level in an effort to help prevent damage to the plumbing system. For most areas if the utility water pressure is greater than 80 PSI (pounds per square inch) a pressure reducer is needed. For some areas with extremely high utility pressure multiple pressure reducers may be needed installed in series. Pressure reducers are typically factory set for 50 PSI and property water pressure is expected to be between 30 PSI and 80 PSI. Inspector notes presence of pressure reducer when observed. Pressure readings for plumbing system are not part of the inspection performed.
Pressure Reducer Location: Garage
Plumbing Supply Piping
Pressure Reducer
Apparent Location at Garage

________________________________________________________________________________________________________________________________________________________________
Property Owner - Plumbing Supply Piping - MAIN WATER SHUT OFF VALVE - Apparent Location - Note Such Valves are Not Operated : Garage
Plumbing Supply Piping
Main Water Shut Off Valve
Apparent Location at Garage

CENTRAL SYSTEM
Central Heat/Cool
Split System
Central Heating/Cooling
Split, Forced Air System served: System served upstairs area
Brand Furnace: Lennox by Intertek / Location: Attic
Size: 45K BTU / Year of Manufacture: 2025 / Fuel: Natural Gas
Gas furnaces typically have a service life of 16-22 years when properly maintained
Filter Type: Disposable / Thermostat Type: Digital - Thermostat was located within area served.
Cooling Brand: Lennox by Intertek / Location: Exterior
Size: 2 ton / Year of Manufacture: 2024 / Fuel: Electric
Central cooling units typically have a service life of 12-18 years when properly maintained
Condensate disposal method: Gravity drain piping - service annually


 |  | |
 |
________________________________________________________________________________________________________________________________________________________________
Cooling Function: Functional
Cooling System Functional
The inspector adjusted the thermostat. The cooling system engaged and was found to be functional.

Refrigerant Piping: Some Insulation Missing
________________________________________________________________________________________________________________________________________________________________
Heating System: System served upstairs area
Corrections were needed for the heating system.
The furnace failed to properly respond to the thermostat setting when it was inspected and the system was calling for heat. Properly service heating system correcting as needed for function and safety.

Cooling system served upstairs area
The cooling system refrigerant piping needed additional insulation in the attic. Sections of the insulation on the compressor refrigerant lines appeared to be missing. These lines should be suitably insulated to prevent sweating lines from dripping moisture onto finished areas and to improve the cooling system's efficiency.

Central Heat/Cool
Split System
ettCentral Heating/Cooling
Split, Forced Air System served: System served main level
Brand Furnace: Lennox by Intertek / Location: Attic
Size: 70K BTU / Year of Manufacture: 2025 / Fuel: Natural Gas
Gas furnaces typically have a service life of 16-22 years when properly maintained
Filter Type: Disposable / Thermostat Type: Digital - Thermostat was located within area served.
Cooling Brand: Lennox by Intertek / Location: Exterior
Size: 2.5 ton / Year of Manufacture: 2024 / Fuel: Electric
Central cooling units typically have a service life of 12-18 years when properly maintained
Condensate disposal method: Gravity drain piping - service annually


 |  | |
 |
________________________________________________________________________________________________________________________________________________________________
Cooling Function: Functional
Cooling System Functional
The inspector adjusted the thermostat. The cooling system engaged and was found to be functional.

Refrigerant Piping: Some Insulation Missing
________________________________________________________________________________________________________________________________________________________________
Heating Function: Functional
Heating System Functional
Inspector adjusted thermostat. Heating system engaged and was found to be functional.
Cooling system served main level.
The cooling system refrigerant piping needed additional insulation in the attic. Sections of the insulation on the compressor refrigerant lines appeared to be missing. These lines should be suitably insulated to prevent sweating lines from dripping moisture onto finished areas and to improve the cooling system's efficiency.

Central Ductwork
Distribution Ductwork
Ductwork Information: About your central heating and cooling ductwork
Regarding calculating the load of a central system:
Several factors are considered when performing a load evaluation for central heating and cooling systems to determine the appropriate size system for the area served. Factors such as installed ductwork, insulation, ceiling height, basement area served (if present), shade, climate zone, as well as the size, number, and placement of windows, must be taken into account before sizing a system. The inspector does not calculate the load of a central heating and cooling system during the performed inspection. The inspector also does not confirm that the installed ductwork is appropriately sized to serve the installed central heating and cooling equipment.
Properly maintain the ductwork system to meet your comfort needs and ensure the system operates efficiently.
Gas
Gas Fuel Piping
Representative Photo
Representative Photo

Natural gas piping observed at inspected property. Properly maintain gas piping as needed for function and safety.
Space Heating
Fireplace
Type: Prefabricated or Manufactured Fireplace
Vented
Regarding Vented Fireplaces or Fireplaces with a Flue
This type of fireplace will exhaust directly to an exterior area in an effort to reduce or eliminate smoke, fumes and carbon monoxide build up in the interior living space areas. You should become familiar with care and maintenance procedures for any installed fireplace as some procedures will be specific to what type of fireplace is installed. If you choose not to learn about the care and maintenance requirements for the installed fireplace, you should have a competent qualified chimney specialist check and inspect the fireplace before initial use and then as directed by the chimney specialist thereafter. Properly maintain any fireplace as needed for proper function and safety.
Location: Living Room, Photo
Fireplace Photo
 |  |
Gas Log Set Heater: Present
Gas Log Set Heater Function: Operated
The installed gas log set heater was operated using the normal controls. Gas log set heater appeared to be functional when inspected. Read and follow the operating and safety instructions for installed gas log set heater. Maintain unit as needed for function and safety.

ELECTRICAL
Electrical Inspection
Electrical System Inspection
What is an electrical system?
The electrical system consists of an electrical service, distribution equipment, and branch wiring. The electric metering equipment is usually at the electrical service. Distribution equipment typically consists of one or more installed breaker panels, with branch wiring extending to all equipment, receptacles, lighting outlets, and devices, such as light switches. The inspection report focuses on wiring operating between 100-250 Volts. While the system's Amperage and Voltage are recorded, it is not measured during the inspection. Most low-voltage wiring is excluded from the performed inspection. Low-voltage items, such as heating and cooling thermostats, are used to determine the function of such equipment.
There are now a wide variety of lighting bulbs or lamps that will fit into lighting fixtures. Some choices may not be appropriate for some lighting fixtures. It is beyond the scope of this inspection to verify that each lamp or bulb is suitable for the installed lighting fixture. The inspector recommends reviewing the bulb or lamp installations for each fixture, making corrections as needed for safety and proper function. Common errors include installing 100-watt bulbs in fixtures rated for 60-watt maximum bulbs, and using interior-rated bulbs in exterior or damp locations. Other types of errors also exist.
The following opinion was based on an inspection of the readily accessible and visible portions of the electrical system. The Inspector is responsible for checking a representative number of installed lighting fixtures, switches, and receptacles. A competent, licensed electrical contractor should correct electrical installation issues and address any functional issues that require correction. Most, if not all, electrical corrections should be considered a safety concern.
Electrical Service
System Amperage and Voltage, identified but not measured: 200 Amps - 120/240 Volts
Electrical Service Type: Underground, Representative Photo
Electrical Service Representative Photo

No Adverse Conditions Were Observed
MAIN PANEL
Main Electrical Panel
Main Breaker Panel Exterior near Meter
- Breaker panel shown with cover removed by inspector.

Service Entrance Conductors: Aluminum, Stranded
Routine Correction Needed
Electrical Panel Exterior at Meter
Routine corrections were needed at the electrical distribution panel.
These corrections should be performed now or may be scheduled with other electrical work if that work is done in the near future.
- One hinge clip was not installed properly at breaker panel cover.

SUB PANEL
Sub Electrical Panel
Sub Breaker Panel Garage
Breaker panel shown with cover removed by inspector.
 |  |
Routine Correction Needed
Sub Electrical Panel Garage
Routine corrections were needed at electrical distribution panel.
These corrections should be performed now or may be scheduled with other electrical work if having that work done in the near future.
- For panel directory, properly index or label each electrical panel circuit as needed for clarity and safety.
- Properly index each electrical circuit where needed for clarity and safety. Refrigerator, smoke alarms, garage and exterior lighting was not observed on breaker panel index.
- White wires observed attached to 240V breakers. Remark or correct improperly colored wiring inside electrical panel where needed for service personnel safety.


Branch Wiring
Improperly Terminated
Branch Wiring
Improperly terminated wiring was observed at front exterior. Photo Provided
Some exposed loose ends of wiring could not be visually confirmed as being properly disconnected from all electrical systems. Properly terminate exposed wiring ends by adding junction boxes, wire nuts, and covers where needed.

AFCI
AFCI Residential Newer Home
What is Arc Fault Circuit Interrupter (AFCI) Protection?
AFCI protection is designed to break the electrical circuit when it detects electric arcs that are a signature of loose connections in home wiring. Loose connections, which can develop over time, can sometimes become hot enough to ignite house fires.
Modern Locations Where AFCI Protection is Known to Improve Safety:
Dwelling Units. All 120-volt, single-phase, 10-, 15-, and 20-ampere branch circuits supplying outlets or devices installed in the following locations:
Kitchens,
Family Rooms,
Dining Rooms,
Living Rooms,
Parlors, Libraries,
Dens,
Bedrooms,
Sunrooms,
Recreation Rooms,
Closets,
Hallways,
Laundry Areas,
or similar areas.
Testing AFCI Function
The inspector uses push button at AFCI breakers, where installed, to confirm AFCI protection trips. Once tripped, the inspector checks indexed electrical circuits to determine where AFCI protection is present or missing.
Obvious locations lacking AFCI protection are listed in the body of the report.
Obvious broken, non working and improperly wired AFCI receptacles or breakers are listed in the summary of the report. Evaluate your risk exposure.
.jpg) | 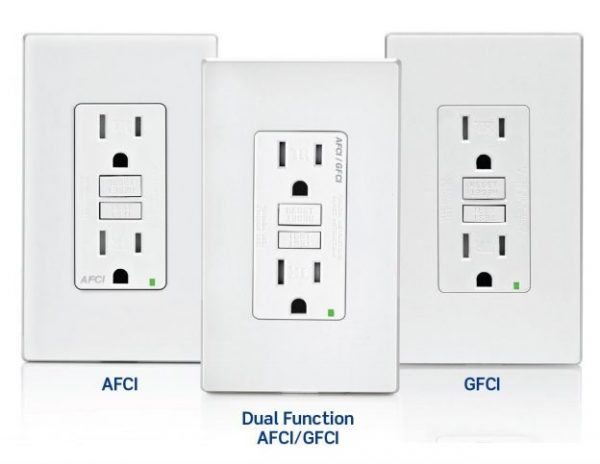 |
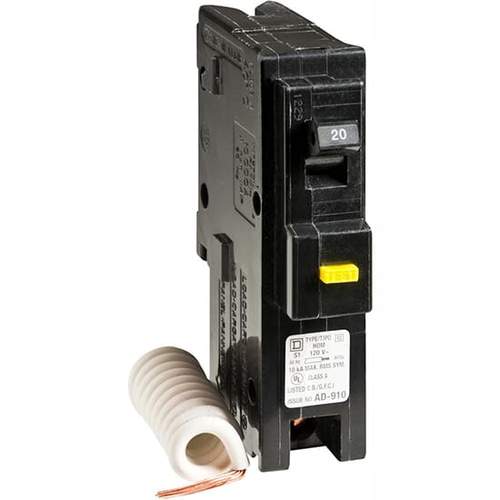
AFCI Breakers OK
Where installed, AFCI breakers were tested using the push button on the breaker. The breakers appeared to trip and reset normally. Check the AFCI function periodically as directed by the AFCI manufacturer. Correct when needed.
GFCI
GFCI Residential Newer Home
What is Ground Fault Circuit Interrupter (GFCI) Protection?
GFCI protection is an electrical safety device that interrupts an electrical circuit when the current passing through a conductor is not equal and opposite in both directions, therefore indicating an improper flow of current such as leakage of current to ground or current flowing to another powered conductor. The device's purpose is to reduce the severity of injury caused by an electric shock.
The list below is based off the 2023 standard that may or may not have been adopted by the local municipality.
Modern Locations Where GFCI Protection is Known to Improve Safety in Dwelling Units.
(A) Dwelling Units
All 125-volt through 250-volt receptacles installed in the following locations and supplied by single phase branch circuits rated 150 volts or less to ground shall have ground-fault circuit-interrupter protection for personnel:
(1) Bathrooms
(2) Garages and also accessory buildings that have a floor located at or below grade level not intended as habitable rooms and limited to storage areas, work areas, and areas of similar use.
(3) Outdoors
(4) Crawl spaces - at or below grade level
(4) Basements
(5) Kitchens
(6) Areas with sinks and permanent provisions for food preparation, beverage preparation, or cooking
(7) Sinks - where receptacles are installed within 1.8 m (6 ft) from the top inside edge of the bowl of the sink
(8) Boathouses
(9) Bathtubs or shower stalls - where receptacles are installed within 1.8 m (6 ft) of the outside edge of the bathtub or shower stall
(10) Laundry areas
(12) Indoor damp and wet locations
Some exceptions apply, see current standard for a list of exceptions.
(B) Pertains to Other Than Dwelling Units
(C) Crawl Space Lighting Outlets. GFCI protection shall be provided for lighting outlets not exceeding 120 volts installed in crawl spaces.
(D) Specific Appliances. GFCI protection shall be provided for the branch circuit or outlet supplying the following appliances rated 150 volts or less to ground and 60 amperes or less, single- or 3-phase:
(1) Automotive vacuum machines
(2) Drinking water coolers and bottle fill stations
(3) High-pressure spray washing machines
(4) Tire inflation machines V
(5) Vending machines
(6) Sump pumps
(7) Dishwashers
(8) Electric ranges
(9) Wall-mounted ovens
(10) Counter-mounted cooking units
(11) Clothes dryers
(13) Microwave ovens
(E) Equipment Requiring Servicing. GFCI protection shall be provided for the receptacles required near Equipment Requiring Servicing.
(F) Outdoor Outlets. For dwellings, all outdoor outlets, including outlets installed in the following locations, and supplied-by single-phase branch circuits rated 150 volts or less to ground, 50 amperes or less, shall be provided with GFCI protection:
(1) Garages that have floors located at or below grade level.
(2) Accessory buildings
(3) Boathouses
Note: Some exceptions apply, see current standard for a list of all exceptions.
Testing GFCI Function
The inspector uses an electrical tester at accessible 120V electrical receptacles that simulates a remote ground fault current to confirm which areas lack proper GFCI protection at tested 120V electrical receptacles.
Obvious locations lacking GFCI protection are listed in the body of the report.
Obvious broken, non working and improperly wired GFCI receptacles or breakers are listed in the summary of the report.
 | .jpg) |
GFCI Receptacles OK, GFCI Breakers OK
Using a ground fault circuit interrupter tester, GFCI protected electrical receptacles, where installed, were checked and indicated proper function.
Where installed, GFCI breakers were tested using the push button on the breaker. The breakers appeared to trip and reset normally. Check the GFCI function periodically as directed by the GFCI manufacturer. Correct when needed.
Receptacle Outlets
Electrical Receptacle Outlets
Multiple electrical receptacles were ready for proper correction.
- Multiple electrical receptacles were observed inoperative, such as at kitchen serving counter. Photo Provided
A competent electrical contractor should check all receptacles, making them functional and safe where needed.

Lighting/Ceiling Fans
Correct Lighting Where Needed
Lighting/fans - Make lighting/fans functional and safe where needed.
- Some lighting was inoperative when inspected.
- Some lighting was not fully functional when inspected.
Check all lighting/fans making functional and safe where needed.
Representative Photos Provided


Switches
Switch Location Informational Note
Regarding Lighting Switch Locations:
While exact placement of lighting switches is considered a design issue, installing lighting switches at appropriate locations is useful to improve safety. Generally, a light switch would be located within arms length of the entry point of a room so that the lighting for the room you are entering may be switched on from an area near the doorway. Installing a switch at an inconvenient location, such as on the hinge side of a door, would not be desirable. Where the stairway between floor levels has six risers or more, a wall switch would be located at each floor level and at each landing level that includes an entryway to control the lighting for the stairway. Evaluate your need in regard to lighting switch locations. Consider updating switch locations for improved safety if desired.
Switch Hinged Side of Door
Switches
Some switches were observed installed on the hinge side of a door. Consider for correction to improve convenience.

Switch Miswired Three Way
Switches
Three Way Switches incorrectly wired -
Two switches were installed to operate the same electrical lighting outlet. The switches appeared to be incorrectly wired or the wrong type switch as each of the two switches do not appropriately turn the area on and off as expected. Properly correct as needed for function and safety.
- Switches in the upstairs hall serving surface-mounted light appeared improperly wired.

Smoke Alarms
Smoke Alarm Installation: Where Should Smoke Alarms be Installed?, Smoke Alarms Were Present
Depending on the age and location of the home, installation of smoke alarms are either recommended or required for improved safety.
Modern smoke alarm systems typically are hardwired to the electrical system and will have battery backup so that they will function when the power is off to the building. Modern smoke alarm systems typically have all smoke alarms interconnected so that when one alarm sounds then all smoke alarms will sound simultaneously. This is useful for heavy sleepers and in larger homes.
Modern smoke alarm systems typically have smoke alarms installed at the following locations:
- In the immediate vicinity outside sleeping areas
- Inside sleeping areas
- At least one per floor level including basements
- Near stairs
- In unfinished basements
- (some installations will require additional smoke alarms)
It is important to note that a single smoke alarm can satisfy multiple areas if carefully placed.
It is common to have a single smoke alarm near the top of the stairs and just outside multiple sleeping areas.
Properly maintain smoke alarm system as needed for life safety.
Regarding Testing Smoke Alarms:
Test smoke alarms weekly to ensure proper function for life safety. Replace batteries when needed. Properly replace smoke alarms when not functioning correctly and at least once every ten years. Smoke alarms should be at least the photoelectric type and dual sensor photoelectric and ionization smoke alarms are available, and preferred. Refer to installation and care instructions for proper locations and periodic maintenance.
The inspector does not test smoke alarms. For safety, the inspector only accesses smoke alarms from the installed flooring. To prevent damage, the inspector does not remove smoke alarms or open smoke alarm covers.
Smoke alarms were observed at inspected property for the applicable areas listed above. Properly maintain and test smoke alarms for improved safety.
Chirping
Some smoke alarms were chirping and may need new batteries. Properly correct where needed.
ATTIC LADDER
Installation / Condition
Location of Attic Ladder: Upper Floor
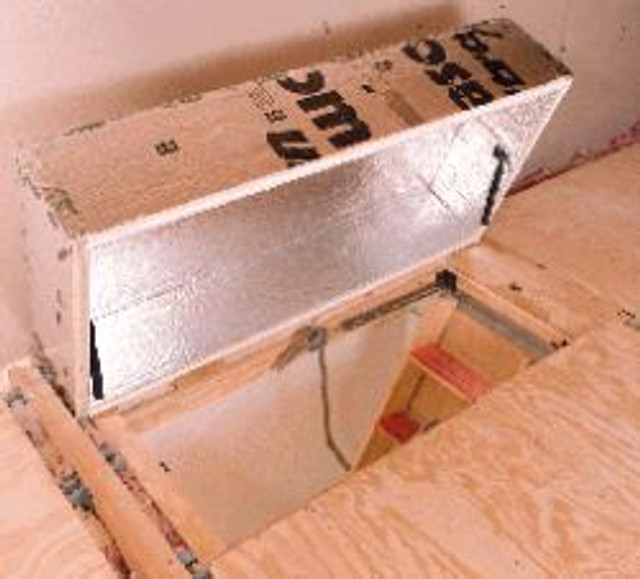
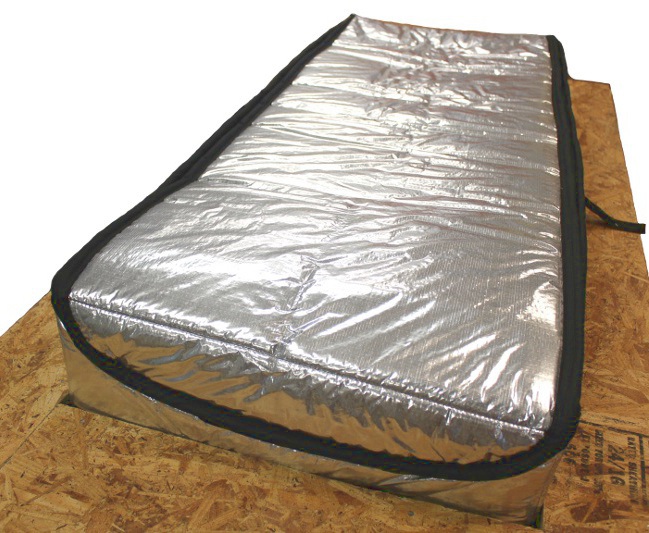
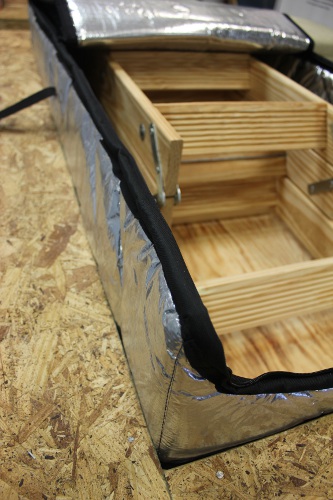
Overall Condition: Attic Ladder Correct Before Use
Box Frame Connection To Structure: Excess Gap Box Frame to Structure
The gap observed between the structural framing and the pull down attic ladder stairway box frame appeared greater than expected. Proper correction is needed to help prevent collapse of stairway.
- Gap between structure and attic ladder box frame was much greater than 1/4".
 |  |
The attic ladder was observed ready for corrections, now and before use, to improve its function and safety. Improper attic ladder installation is the most common cause of attic ladder collapse.
Refer to the full report for additional information and photos regarding obvious corrections recommended now for the attic ladder area. A competent, qualified contractor who can read and follow the manufacturer's installation instructions should check all attic ladder areas. Make the attic ladder functional, safe, and structurally sound where needed.
STRUCTURE
Attic Access
Attic Access: Pull down attic ladder stairway, properly maintain unit as needed for safety
Attic Access: Scuttle Hole
Attic Access: Floored
Attic area viewed from areas where secured, floored, continuous, walkway was present that had sufficient height to be walked. Some areas of attic may not have been viewed.
Attic Access Inadequate: Install Cover
Properly install cover at scuttle hole to attic where missing at garage ceiling.

Roof Framing
Roof Framing: Representative Photos
Representative Photos Roof Framing
 |  |  |
 |  |  |
 |  |  |
 |  |  |
Framing: Trusses, Wooden
Sheathing: OSB
Truss Framing: Trusses Are Engineered
Truss systems are designed, engineered framing systems that are comprised of multiple components. Truss systems are accompanied by specific installation instructions that should be closely followed. Installation instructions are rarely available during a property inspection. Review of instructions, if available, is not part of the inspection performed. Obvious, visible defects are listed in the report, when encountered. Properly maintain truss system to meet your needs.
Damaged Engineered Roof Trusses were observed unrepaired.
To repair damaged roof truss framing:
- Obtain further evaluation to verify all areas where damage is present at the roof trusses.
- Contact the roof truss manufacturer or another State Licensed Professional Engineer specializing in truss construction to design appropriate corrections.
- A competent, qualified contractor should execute engineering design where needed.
- Retain stamped engineering design drawing for your permanent records.
- Seven of eight consecutive trusses located above attic ladder and furnace platform had damaged, unrepaired truss plates.
- One truss above furnace platform was observed to have a broken wooden truss member that was not properly repaired.


Ceiling Framing
Truss Framing: Ceiling framing at second floor was integral with roof framing trusses.
Wall Framing
Framing Access: Finished Prevented
Finished areas prevented the view of structural components, so the inspector did not observe structural areas. Concealed areas were not part of the inspection performed.
Underfloor Access
Slab: Finished Areas
Finished areas prevented view of structural components. Structural components were not observed by inspector at such areas.
Underfloor Description
Slab: On Grade
Underfloor Area
Access:
- Slab construction no underfloor area present
Construction Type:
- Concrete Slab on Grade
Foundation:
- Poured in Place Concrete or Concrete Block
Columns or Piers:
- Not Applicable
Floor Structure:
- Concrete Slab Floor
Floor Insulation:
- Not Applicable
INSULATION
Above Ceiling Insulation
Recommended Insulation
Recommended attic insulation depth above living spaces for this area of the country is R-38 to R-60 to help lower utility costs. This recommendation comes from the US Department of Energy. Evaluate your comfort level and utility costs correcting insulation depth if needed.
Insulation Type: Blown In
Observed Insulation Approximate Depth: R - 38
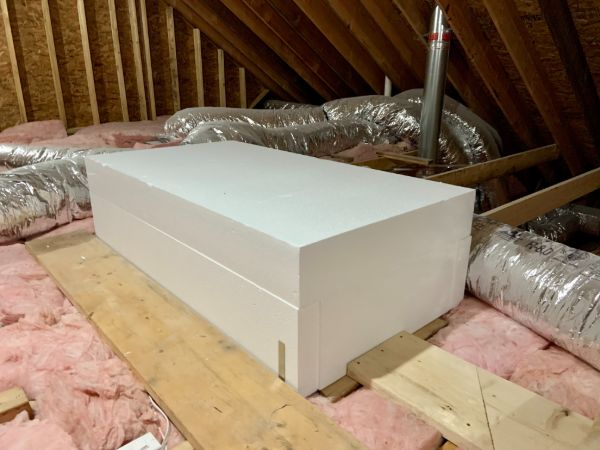
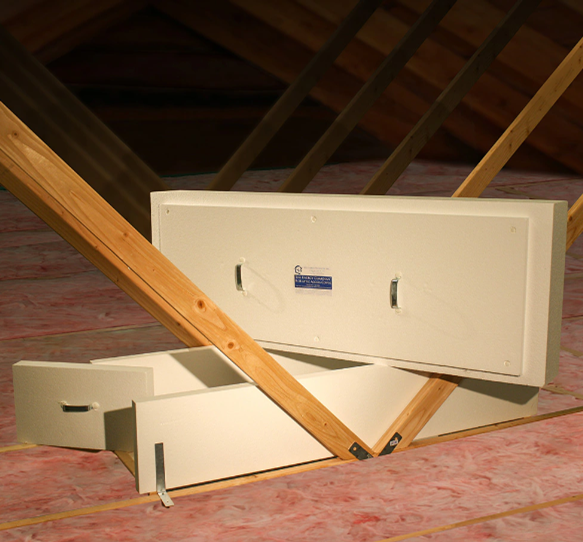
Consider Improving Insulation: Attic Ladder Access was not Insulated
Attic Ladder opening through ceiling was not insulated.
Consider properly installing an appropriate attic ladder insulation kit to reduce utilities and improve comfort that meets your needs.

Wall Insulation
Insulation: Wall Insulation Not Observed, Undetermined
VENTILATION
Attic Ventilation
Attic Exhaust Vents: Ridge Roof Vent
Attic Intake Vents: Soffit Vents Where Installed
ROOF
Roof Covering
Observation: Representative Roof Covering Photos
Representative Roof Covering Photos
 |  |  |
 |  |  |
 |
Method of Roof Inspection: Walked on portions of roof, Viewed from ground with binoculars, Portions not visible
Portions of roofing were not visible from ground and were not accessible from an 18' ladder. Such areas were not observed by inspector.

Roof Style: Multi Plane
Approximate Age of Roof Covering: 0-1 Years
Roofing Material: Composition Three Tab Shingle
Roof covering was ready for corrections now.
A competent roofing contractor should check entire roof system and associated flashings. Properly repair or replace roof covering system as needed.
Roof Covering was Ready for Correction
- Representative Photos Provided
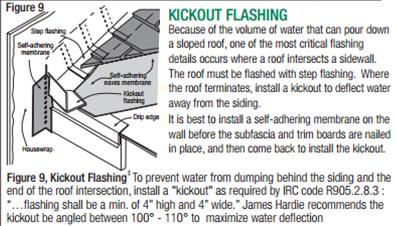
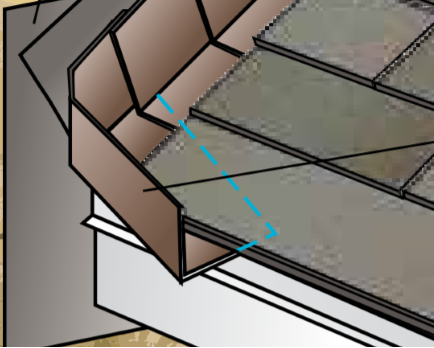
- Flashing appeared omitted at areas. Properly add flashing where needed.
- Some kick out flashings appeared omitted.
- Some roof covering observed damaged.
- Some roof covering observed worn.
- Remove construction debris from roofing where needed.
- New construction roof covering should be in new, undamaged condition and free of debris.

 |  | |
 |  |  |
 |  |  |
 |  |  |
 |  |  |
 |  |  |
 |  |  |
 |  |  |
Gutters and Downspouts
Gutter and Downspout Materials: Metal
Downspout: Near
One or more gutter downspouts were discharging close to the foundation.
It is recommended that all downspouts be extended to allow stormwater to flow quickly away from and around the structure. Correct as needed to meet your needs.
 |  |
Gutters: Maintain
Properly maintain rain gutters to meet your needs.
SIDING and TRIM
Exterior Elevations
Photos: Exterior Photos
Photos of Exterior elevations
 |  |  |
Siding - Cement Fiber
Siding Irregularities: Common Irregularities
Cement Fiber Siding/Trim -
Typical siding installation irregularities were observed. Monitor siding installation budgeting corrections when necessary. When corrections are performed, refer to the installation instructions and best installation practices, and correct as required.
Siding Irregularities:
Cement Fiber Siding/Trim -
Monitor vinyl trim used in conjunction with cement fiber siding such as around windows or other wall penetrations. Vinyl trim use differs from best installation practices for cement fiber siding. It is unknown if this practice will have unintended consequences. Budget corrections if necessary or if damage occurs.
 |  |  |
Cement Fiber Siding/Trim -
Siding/Trim should be 1-2" away from roofing shingles to facilitate shingle replacement and to prevent siding from wicking moisture from roofing causing damage to siding and adjacent areas. Monitor siding installation budgeting corrections as needed. Consider upgrading area either before painting or when replacing roofing.
 |
Cement Fiber Siding/Trim -
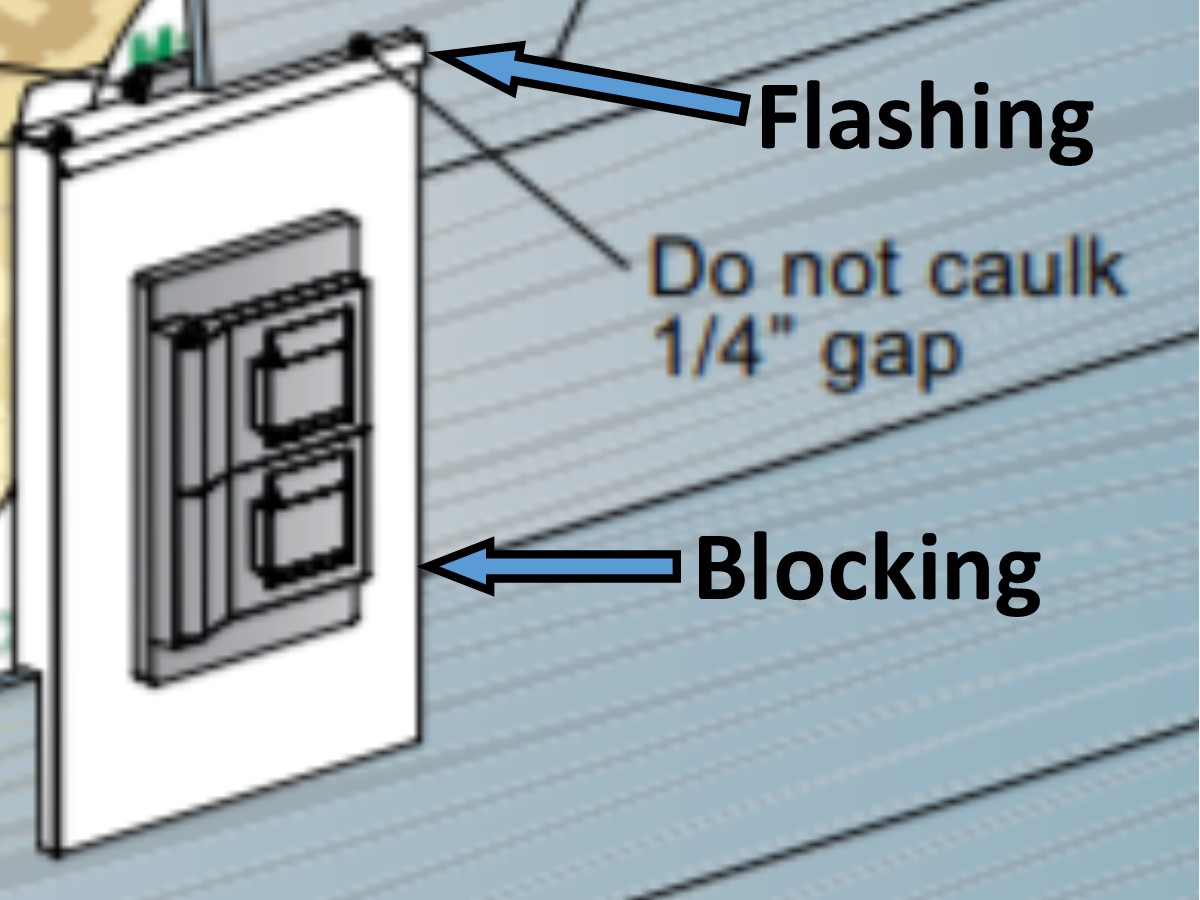
The inspector noted that blocking and flashing details did not meet the Best Practices - Installation Guide for all areas. These areas should be considered for proper correction now. Closely monitor areas if not correcting blocking and flashing details now. Budget immediate correction should negative consequences occur due to a lack of proper blocking and flashing.


 | ||
Siding - Concrete Tile
What is Concrete Tile Siding?
Concrete Tile Siding, also known as Adhered Concrete Masonry Veneer or Manufactured Masonry Veneer, is a non structural, light weight concrete product that is not made of natural stone. Concrete tile siding resembles stonework because real stone are used to make castings that are filled with light weight concrete and are stained to appear similar to natural stone. Concrete tile siding is absorbent and requires a proper moisture management system be in place before applying the concrete tile to exterior areas. Since the moisture management system is beneath the concrete tile, after the tile are installed the moisture management system is no longer readily visible. The best time to inspect the moisture management system is during installation. Most adhered concrete tile installations should follow the Masonry Veneer Manufacturers Association Installation Guide and Detailing Options for Compliance with ASTM C1780. ACMV.

Irregular Monitor
Concrete Tile Siding
Common installation irregularities were observed. Monitor siding installation budgeting corrections when necessary. Refer to installation instructions and best installation practices, correcting where needed, when performing repairs. Maintain or upgrade this siding to meet your needs.
- Siding observed too close to Soil and Pavement
- Irregular transition was observed at dissimilar materials
 |  |  |
 |  |
Exterior Area
New Construction Exterior Finishes
New Construction Exterior Finishes
Complete exterior final corrections, patch, and painting to meet your standards, as needed.
 |  |  |
 |  |  |
 |  |
LOTS and GROUNDS
Driveway
Driveway: Serviceable
Driveway was serviceable, fulfilling its function.

Walkway
The area had a partial roof structure.
Walkway: Serviceable Cracked
Walkway was cracked but serviceable, fulfilling its function.
 |  |  |
 |
Patio
Patio: Serviceable
Patio was serviceable, fulfilling its function.

 |
Vegetation
Vegetation Maintenance
Properly maintain vegetation to meet your needs. Vegetation should not touch building exterior or overhang roof. Vegetation should not interfere with access or servicing of electrical, gas or heating/cooling equipment.
Site
Site: Adjust Grade Slab
Adjust the exterior grade for concrete slab floor construction. Some exterior grade work may improve stormwater runoff away from the foundation. The slope of the grade should be at least ten feet away from and around the structure so that water does not collect near the foundation. Be sure that the exterior soil grade and landscaping are below the interior floor level at the perimeter of the foundation to help prevent unwanted moisture entry into interior areas.

Site: Maintain Storm Water Drainage
Properly maintain storm water drainage to protect building.

End of Report
Thank You Note
Thank you so much for trusting me to perform your inspection!
Please reach out if I may assist you further.
Roger Williamson
423-301-1000
HomePro Inspection Inc
Signed Contracts

HomePro Inspection Inc
423-301-1000
https://HomeProInspection.com
roger@homeproinspection.com
226 TN
.jpg)
.jpg)