

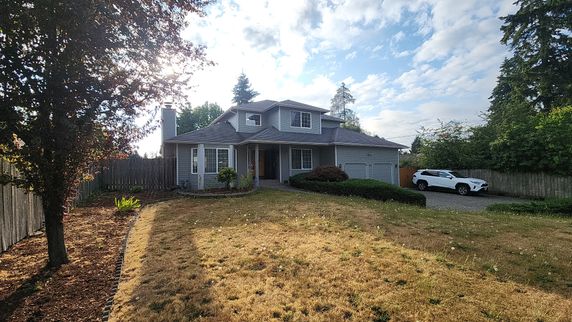

How to Read This Report
This is a limited, visual, non-invasive inspection. It is not a warranty, a code inspection, or a technically exhaustive evaluation. See the Scope & Limitations chapter at the end of this report for full details.
Getting the Information to You
This report is designed to deliver important and technical information in a way that is easy for anyone to access and understand. If you are in a hurry, you can take a quick look at our "Summary Page” and quickly get critical information for important decision making. However, we strongly recommend that you take the time to read the full Report, which includes digital photographs, captions, diagrams, descriptions, videos and hot links to additional information. This report can also be printed on paper or to a PDF document, but the best way to get the layers of information that are presented in this report is to read your report online, which will allow you to expand your learning about the inspected property.
Chapters and Sections
This report is divided into chapters that parcel the home into logical inspection components. Each chapter is broken into sections that relate to a specific system or component of the home. You can navigate between chapters with the click of a button on the left side margin.
Most sections will contain some descriptive information done in black font. Observation narrative, done in colored boxes, will be included if a system or component is found to be significantly deficient in some way or if we wish to provide helpful additional information about the system or the scope of our inspection. If a system or component of the home was deemed to be in satisfactory or serviceable condition, there may be no narrative observation comments in that section and it may simply say “tested,” or “inspected.”
Observation Labels
All narrative observations are colored, numbered and labeled to help you find, refer to, and understand the severity of the observation. Observation colors and labels used in this report are:
- Note:These are informational comments that aren't deficiencies. They describe how we inspected different components of the house, add detail about the home's systems, and explain any limitations that affected the inspection. They also include contextual photos of the house and photos of components while they were operating.
- Tier 1 - Major Concern:These represent priority items like major safety issues, active issues causing damage to the house, or items of significant expense that are looming in the near future.
- Tier 2 - Repair:These are lower priority deficiencies that may not need immediate attention, but should be addressed in the near/medium term future. These are usually improperly functioning components, deferred maintenance items, occupant safety concerns, or sub-par construction/installation problems.
- Tier 3 - Improvement:These are things that are working but could be better. They are less significant issues like nuisance repairs, minor safety updates, energy efficiency improvements, or potential reliability problems. Often these are improvements that may not have been necessary--or even have existed--when the property being inspected was constructed (e.g. changes in building standards over time.)
- Due Diligence:Observations that may require further investigation and/or clarification that could not be provided during the home inspection.
- Future Project:These are longer term considerations for the house and include things like repairs that may be deferred for some time but should be on the radar for repair or replacement in the future, optional upgrades to the house's function, and potential future hidden costs.
- Monitor:Items that should be watched to see if correction may be needed in the future.
- Maintenance:These are items that should be considered "routine home ownership," such as servicing the furnace, cleaning the gutters or changing the air filters in the furnace. Generally a house costs ~1% of the purchase price per year to maintain.
- Homeowner Info:These are pieces of "good to know" information about the house, essentially an owner's manual. For example, the location of the main water shut-off valve, gas shut-off valve(s), etc.
Summary Page
The Summary Page is a quick, bulleted overview of the observations from this inspection, grouped by category. The Tier 1, Tier 2, and Tier 3 sections list the deficiencies we found. The remaining sections, like Monitor, Due Diligence, Maintenance, and Homeowner Info, are listed for easy reference. This overview is not a substitution for reading the entire inspection report.
Summary
Tier 1 - Major Concerns
- 3.2.2 Exterior - Siding & Trim:
Damaged siding was observed on the exterior of the house, see example photos (all on the south side unless otherwise noted.) It was especially bad on the south side of the house. This can allow water to penetrate the exterior envelope of the house, which can lead to rot, mold, and wood destroying pest activity. Some siding was starting to delaminate (moisture causing the layers of wood to separate) and other areas were starting to crumble due to moisture penetration. I recommend repair by a qualified contractor.
Contractor:General Contractor - 11.10.1 Structure & Basement - Miscellaneous:
Significant rodent activity (droppings, nests, and/or tunneling) was observed, see photo(s). Rodents can damage insulation, damage electrical wiring, and create hazardous air conditions from their waste. A significant portion of the insulation was damaged, and there were a lot of droppings throughout the crawl space. I suspect that a full crawl space cleanout by a qualified contractor, which entails removing all the droppings and replacing the insulation, is needed. This can be expensive due to high labor costs.
Contractor:Exterminator - 13.9.4 Electrical - Smoke & Carbon Monoxide Detectors:
There were no visible carbon monoxide detectors on the second level. Current building standards require a carbon monoxide detector on every floor of any residential dwelling. I recommend installation by homeowner as a DIY project.
Contractor:DIY (do it yourself) - 18.1.3 Sewer Scope - Sewer Scope of Sewer Lateral:
The sewer line was obstructed with major grease buildup to the point that I could not push my camera all the way through the line, see example photo and videos in the Sewer Scope section of the full report. I could only get my camera out about 15 feet, not even through the plumbing in the crawl space. A blockage like this can lead to clogs and backups of the sewer line. I recommend cleaning of the line by a qualified contractor (hydro-jetting is preferred) then rescoping of the entire sewer by a qualified plumber or inspector once the line has been cleared.
Contractor:Plumber
Tier 2 - Repairs
- 3.2.3 Exterior - Siding & Trim:
Some areas of siding needed resealing, see example photo(s). Deteriorated or missing sealants are a conducive condition for rot and pests as they allow water to penetrate into or behind the siding. This is normally a DIY repair using exterior grade caulk, though larger gaps may need repair by a qualified contractor.
Contractor:DIY (do it yourself)General Contractor - 3.2.4 Exterior - Siding & Trim:
Some areas of trim needed repainting, see example photo(s). Worn paint is a conducive condition for rot and pests as it allows water to penetrate into, or behind, the siding. I recommend repainting by a qualified painter.
Contractor:Painter - 3.2.5 Exterior - Siding & Trim:
Rot was observed on the exterior of the house, see photo(s). I recommend repair by a qualified contractor.
Contractor:General Contractor - 3.2.6 Exterior - Siding & Trim:
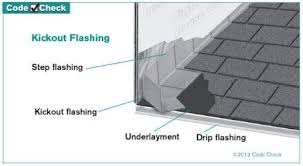
Inadequate clearances were noted between the roof and the siding, see photo(s). A 2 inch air gap is recommended here to keep the siding off the roof and prevent deterioration of the siding. This installation should be accompanied by step flashings that adequately protect the wall and roof juncture from leaks. I recommend evaluation and repair by a qualified contractor.
Contractor:General ContractorRoofer - 4.4.3 Roof - Roof Materials:
There was moss on the roof, see example photo(s). Moss growth is common in our climate, and most often grows in shady areas (mostly on north facing roof surfaces or under vegetation.) This can lead to the premature failure of the roof and subsequent leaks. I recommend regularly treating moss during its growing season (wet months) with a moss killer; do not pressure wash it as it can severely damage the roofing material. This is generally a DIY repair, though the height and pitch of the roof may require a qualified contractor.
Contractor:DIY (do it yourself) - 4.4.4 Roof - Roof Materials:
Exposed fasteners were observed, see photo(s). This can be a potential water penetration point into the roof structure, and is a conducive condition for rot and organic growth. I recommend sealing all exposed fasteners with exterior grade caulk or roofing compound. DIY repair.
Contractor:DIY (do it yourself) - 5.6.1 Common Spaces & Bedrooms - Stairs & Railings:
The lower railing was missing a middle bracket which was allowing it to significantly flex in the middle, see photo/video. I recommend installation of an additional bracket in the middle as a DIY repair to strengthen the railing.
Contractor:General Contractor - 6.3.1 Bathrooms - Sinks & Cabinets:
Sink(s) was slow to drain in the following location(s): Primary Bathroom Left Sink. I recommend cleaning as a DIY repair. If that is not successful, further evaluation and repair by a qualified plumber may be needed.
Contractor:DIY (do it yourself) - 6.4.1 Bathrooms - Toilets:
Toilet(s) in the following location(s) was/were loosely mounted to the floor: First Level Bathroom and Second Level Hall Bathroom. This can allow the toilet to rock and slide when used, which damages the wax ring seal and can allow water to seep into the floor cavity. When using a moisture meter, no evidence of a leak was observed, but this should be repaired as a proactive measure. I recommend repair by a qualified plumber.
Note: There are non-wax rings (rubber or foam) that are less likely to leak if a toilet is loosely mounted. However, wax rings are the most commonly used type of seal, and without removing the toilet, it is impossible to know which type of seal was used.
Contractor:Plumber - 6.5.2 Bathrooms - Bathtubs & Showers:
Grout/caulk was worn in tub/shower(s), see example photo(s). This can allow water to penetrate into the wall which can lead to rot and mold issues. There is no reliable way to tell what is behind the wall during a non-invasive inspection. I recommend repairing (resealing) as a preventative measure by a qualified contractor.
Contractor:DIY (do it yourself) - 7.6.4 Kitchen - Appliances:
An anti-tip bracket was missing from the range installation. Modern building standards recommend that all free-standing, slide-in ranges have an anti-tip device installed. It provides protection for the range tipping forward when excess weight is applied to an open oven door (example: kid climbing on the open door.) Anti-tip brackets are carried by any Home Depot-type store and are a DIY installation.
Contractor:DIY (do it yourself) - 9.3.1 Garage - Garage General:
The firewall barrier between the garage and home had damaged or improperly covered area(s), see photo(s). Modern building standards recommend a firewall on the side(s) of any attached garage bordering living space because garage fires can spread quickly into the living space. I recommend evaluation and repair by a qualified contractor.
Contractor:General Contractor - 10.2.3 Attic - Access:
No attic access was found to the area above the south garage bay during the inspection. This means the attic framing, sheathing, ventilation, insulation, wiring, fan terminations, etc could not be inspected. I recommend installing an access and having the attic re-inspected. Standards recommend an access opening of 30 inches x 22 inches when there is greater than 30 sq ft of attic space. I recommend installation of an attic access point by a qualified contractor.
Contractor:General Contractor - 10.6.2 Attic - Ventilation:
Vent screen was damaged/missing, see photo(s). This can allow access to the attic for pests (bird and/or rodents.) I recommend repair by a qualified contractor.
Contractor:General Contractor - 12.7.5 Plumbing - Water Heater:
Water heaters of this design are expected to last 10 to 12 years. This unit was functioning at the time of the inspection, but should be monitored because of its age (2015 manufacture date.) I recommend installing a drip sensor (something like this, though there are many different models/manufacturers) at the base of the tank. Consider proactive replacement by a qualified plumber to avoid the damage that a water heater can cause if it begins to leak.
Contractor:Plumber - 12.8.1 Plumbing - Water Temperature:
Water temperature was high, see photo of thermometer testing the water temperature. The water temperature should be set to approximately 120 degrees Fahrenheit to prevent scalding, extend water heater life, and improve energy efficiency and conservation. The temperature can be adjusted at the water heater as a DIY repair.
Contractor:DIY (do it yourself) - 13.5.1 Electrical - Branch Wiring:
Improperly performed wire splice(s) was observed, see photo(s). Splices should be done in a covered junction box to protect the wires and reduce the risk of electrical fires. I recommend repair by a qualified electrician.
Contractor:Electrician - 13.7.1 Electrical - Outlets, Switches, & Fixtures:
Outlet(s) was not functioning, see photo(s). I recommend repair by a qualified electrician.
Contractor:Electrician - 13.9.5 Electrical - Smoke & Carbon Monoxide Detectors:
Smoke detector(s) had yellowing plastic, see example photo. Smoke detectors are manufactured using plastic that turns yellow over time so homeowners know when to replace them. I recommend replacing yellowed smoke detector(s) with new units as the old ones might not be effective or reliable. DIY repair.
Contractor:DIY (do it yourself) - 15.2.4 Heating, Cooling, Fireplaces, & Ventilation - Central Furnace:
I recommend inspection and service of the furnace by a qualified HVAC company as I could not find any maintenance records. This will help ensure the furnace is operating safely and efficiently.
Contractor:HVAC Contractor - 15.4.1 Heating, Cooling, Fireplaces, & Ventilation - Central Furnace Air Filter:
No air filter was found for the heating system. A filter is critical for the furnace to perform as intended. I recommend installation of a filter by a qualified HVAC contractor. They will know the correct location to add one.
Contractor:HVAC Contractor
Tier 3 - Improvements
- 3.4.1 Exterior - Exterior Doors:
Exposed doors (those not protected by eaves) did not have a drip cap flashing installed above them. This flashing helps redirect water away from the top of the door, so water is less likely to seep into the siding at the top of the frame. At the time of the inspection, the only barrier was caulking, which can be prone to failure if not maintained. I recommend installation by a qualified contractor.
Contractor:General Contractor - 4.5.2 Roof - Chimneys:
No cricket flashing was installed above the chimney, see photo(s). This flashing helps divert water around the sides of the chimney so it does not get trapped on the uphill edge. Modern building standards recommended this flashing for any chimney wider than 30 inches. I recommend repair by a qualified roofing contractor.
Contractor:Roofer - 4.6.1 Roof - Gutters & Downspouts:
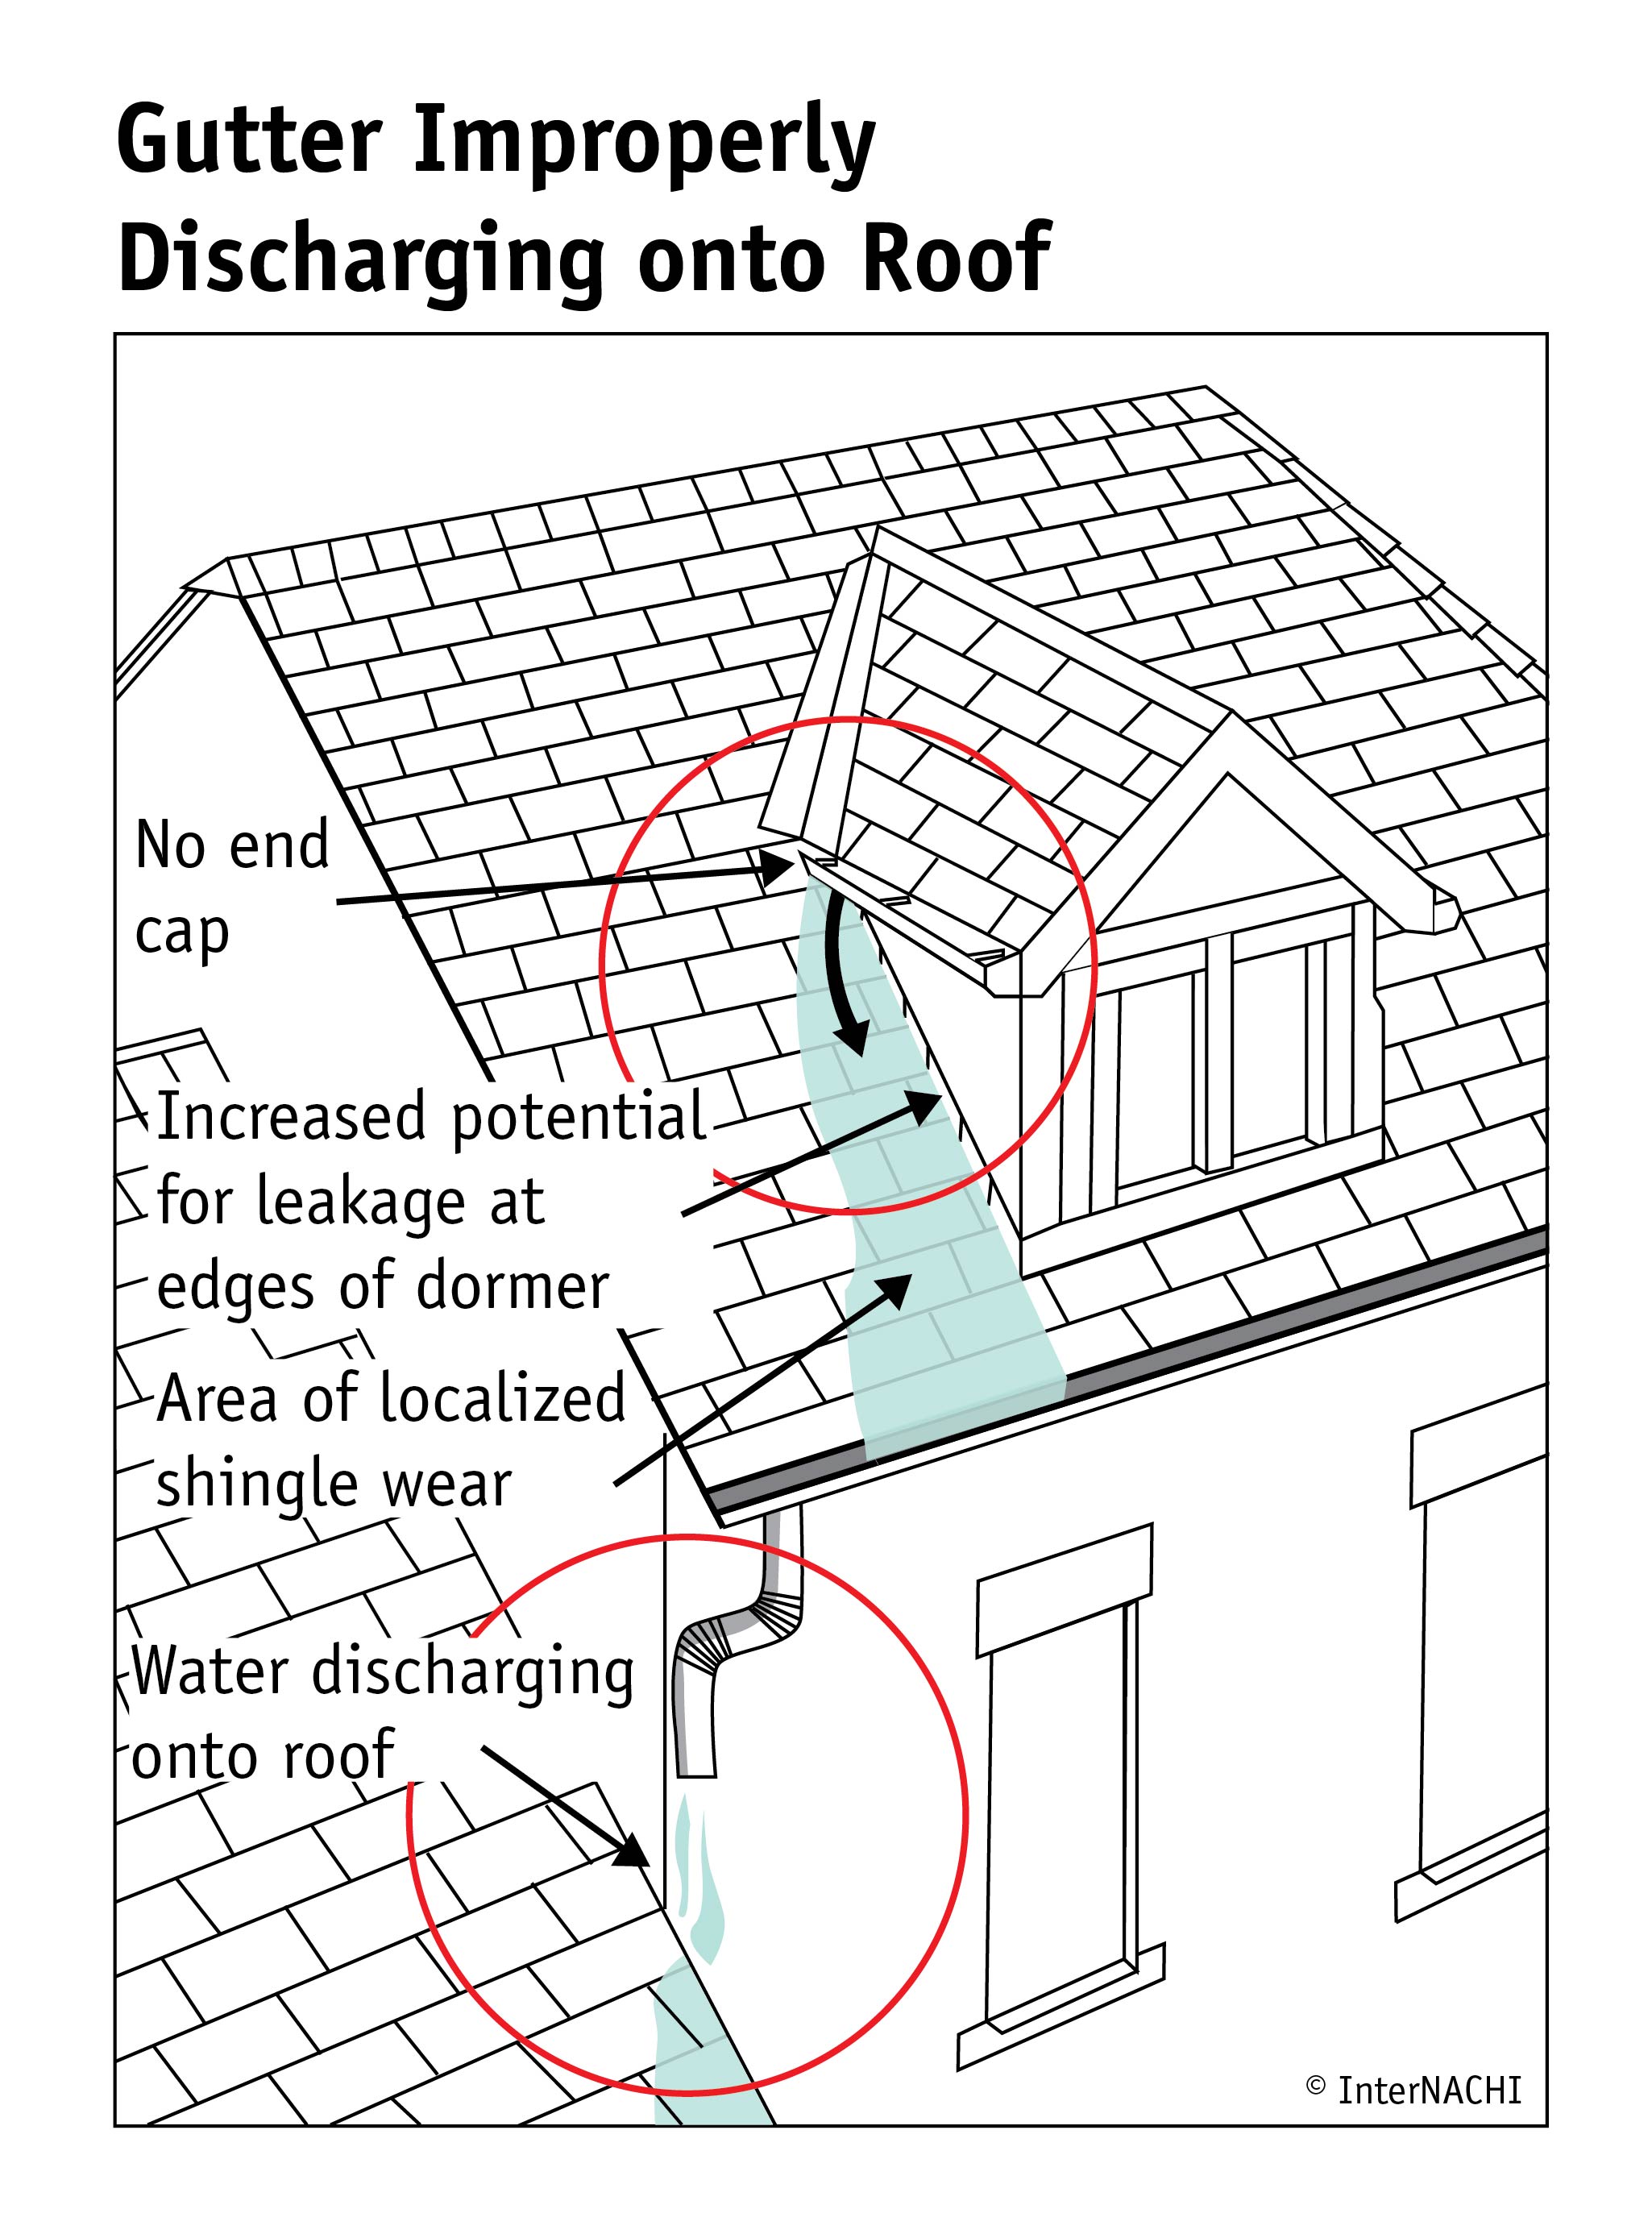
Downspout(s) and/or gutter(s) for the upper roof section drained directly on the lower roof section, see photo(s). Modern building standards allow this and it is a standard practice. However, it puts more water on certain sections of the roof, and will cause the shingles below the downspouts to wear more quickly due to extra granule loss. I recommend keeping an eye on these sections as they are likely to fail from age first due to the extra use. A roofing contractor might be able to suggest alternatives to prevent the damage this setup can cause like adding downspout extensions to direct the water runoff directly into the lower gutter.
Contractor:Roofer - 5.4.2 Common Spaces & Bedrooms - Floors:
Carpet was installed in a bathroom, see photo(s). This is a conducive condition for organic growth as bathrooms are humid spaces. I recommend having the carpet replaced with a more water resistant flooring material by a qualified contractor.
Contractor:General Contractor - 5.6.2 Common Spaces & Bedrooms - Stairs & Railings:
Railing balusters were spaced too far apart, see photo(s). Modern building standards recommend gaps between balusters be less than 4 inches. This is a safety improvement for children. I recommend repair by a qualified contractor.
Contractor:General Contractor - 5.6.3 Common Spaces & Bedrooms - Stairs & Railings:
Modern building standards recommend that staircase railings have a "return" to the wall to prevent clothing from snagging. The railing did not have a return installed, see photo(s). I recommend evaluation and repair or replacement by a qualified contractor.
Contractor:General Contractor - 5.6.4 Common Spaces & Bedrooms - Stairs & Railings:
Modern building standards recommend that open front steps have a gap no larger than 4 inches for child safety. The staircase had gaps larger than this, see photo(s). I recommend repair by a qualified contractor.
Contractor:General Contractor - 5.7.1 Common Spaces & Bedrooms - Interior Doors:
Door(s) did not latch and stay closed in the following location(s): Second Level South Bedroom Closet. I recommend repair by a qualified contractor.
Contractor:General Contractor - 6.3.2 Bathrooms - Sinks & Cabinets:
Flexible/accordion drain lines are not recommended as they can be prone to clogging, see photo(s). I recommend monitoring and cleaning these drains regularly. For a more permanent solution, recommend contacting a qualified plumber to replace the flexible drain with straight pipes, which will not clog as easily.
Contractor:Plumber - 7.5.1 Kitchen - Ventilation Method:
Vent hood light(s) was not working. Bulbs are the likely problem; I recommend replacing them as a DIY repair. If that is not successful, further evaluation and repair by a qualified contractor may be needed.
Contractor:DIY (do it yourself) - 8.3.1 Laundry / Utility Room - Washer:
No drip pan was installed under the washing machine. When installed in living space, having a drip pan underneath the washing machine (ideally that drains to the exterior) is recommended to prevent water damage from leaks. I recommend installation of a proper drip pan by a qualified contractor.
Contractor:General Contractor - 9.3.2 Garage - Garage General:
The door between the garage and the living area had disabled self closing hinges. Having a self closing device (usually self closing hinges) are required on doors between the living space and the garage in some municipalities. Regardless of the local building codes, having a door that automatically closes is a good idea to preserve the firewall barrier between the garage and living space. I recommend enabling the self closing hinges. DIY repair.
Contractor:DIY (do it yourself) - 9.4.3 Garage - Garage Doors & Openers:
The garage door(s) was using extension springs, which are an older design, see photo(s). Modern garage doors typically use torsion springs, which are much safer. I recommend upgrading to a torsion spring system as a safety improvement.
Contractor:General Contractor - 11.8.4 Structure & Basement - Insulation:
Crawl space insulation was lower than modern building standards recommend. I recommend installation of additional insulation by a qualified contractor until it reaches a minimum R-25.
Contractor:General Contractor - 11.8.5 Structure & Basement - Insulation:
The under-floor insulation in the crawl space was sagging throughout the crawl space. In order for this insulation to be effective, it needs to be in substantial contact with the surface it is insulating (the bottom of the floor.) I recommend repair by a qualified contractor.
Contractor:General Contractor - 12.5.3 Plumbing - Supply Plumbing:
Plastic angle stop valve(s) was observed under a sink, see photo(s). I am not aware of any recalls or lawsuits over these valves, but they are notorious for having a higher failure rate than similar metal valves. I recommend monitoring the valve for leaks, or ideally, having a qualified plumber replace any plastic valves with more reliable metal ones.
Contractor:Plumber - 12.7.6 Plumbing - Water Heater:
Modern building standards recommend having a bollard (a steel post bolted to the floor) installed in front of any equipment that a car could drive in to. This water heater did not have a bollard installed. I recommend installation of a bollard by a qualified contractor.
Contractor:General Contractor - 13.6.2 Electrical - Electrical Panel:
Arc Fault Circuit Interrupter (AFCI) breakers were not observed on all the recommended circuits in the panel. Modern building standards require most living spaces be protected by AFCI breakers which are a fire prevention device. The current version of the National Electrical Code states: "All 120-volt, single phase, 15- and 20-ampere branch circuits supplying outlets or devices installed in dwelling unit kitchens, family rooms, dining rooms, living rooms, parlors, libraries, dens, bedrooms, sunrooms, recreation rooms, closets, hallways, laundry areas, or similar rooms or areas shall be protected." I recommend having a qualified electrician install AFCI breakers on the recommended circuits as a safety improvement.
Contractor:Electrician - 13.6.3 Electrical - Electrical Panel:
No surge protection device was noted in the electrical panel, which started being recommended by modern building standards in 2020. I recommend installation of a surge protector by a qualified electrician.
Contractor:Electrician - 13.6.4 Electrical - Electrical Panel:
Panel cover was missing screw(s), see photo. I recommend replacing screws with approved, flat-tipped screws. These can be purchased at any Home Depot-type store, and can be installed as a DIY project. Do not use sharp tipped screws as they can puncture wires and be an electrocution hazard.
Contractor:Electrician - 13.7.2 Electrical - Outlets, Switches, & Fixtures:
Non-tamper resistant outlets were observed in the house. Tamper-resistant outlets have internal shutters that help prevent access to electrical contacts unless a plug is inserted. This helps prevent shocks when items are put into outlets by themselves. This is primarily a safety improvement for children. I recommend upgrading all outlets to tamper resistant versions by a qualified electrician.
Contractor:Electrician - 13.9.6 Electrical - Smoke & Carbon Monoxide Detectors:
Smoke detectors were not installed in all the bedrooms. According to modern building standards, every bedroom should have a smoke detector installed inside the room. Many older houses only have smoke detectors in the hallways. I recommend adding a smoke detector to each bedroom. DIY project.
Contractor:DIY (do it yourself) - 13.9.7 Electrical - Smoke & Carbon Monoxide Detectors:
Modern building standards require a heat detector in attached garages. This garage did not have one. I recommend adding a heat detector to the garage ceiling as a DIY safety improvement.
Contractor:DIY (do it yourself) - 14.2.1 Fuel Storage & Distribution - Gas Meter:
The safety of the main gas supply line could be improved with a seismic detecting gas valve (a common model is the Northridge valve, made by Seismic Safety Products). These valves can be installed at the gas meter and will automatically shut off the gas flow in the event of an earthquake. I recommend installation of a seismic detecting gas valve by a qualified plumber.
Contractor:Plumber - 14.2.2 Fuel Storage & Distribution - Gas Meter:
The main gas valve at the gas meter is tight enough to require a wrench and cannot be operated by hand alone. I recommend keeping a properly sized wrench at the gas meter in case of an emergency. Wrenches for this purpose can be purchased for less than $10 (like this one.)
Contractor:DIY (do it yourself) - 14.3.1 Fuel Storage & Distribution - Fuel Plumbing:
There was no flexible gas connector installed on the gas line to the furnace, see photo. Flexible gas connectors are recommend in seismic areas to help prevent damage to rigid pipes that can occur during an earthquake. I recommend repair by a qualified plumber.
Contractor:Plumber - 14.3.2 Fuel Storage & Distribution - Fuel Plumbing:
No sediment trap was installed on the gas supply line for the furnace, see photo(s). Sediment traps help filter out any minerals or rust in the gas supply before it enters the appliance, and can increase the lifespan of the gas burners. I recommend installation of a sediment trap by a qualified plumber.
Contractor:Plumber
Due Diligence
- 9.4.4 Garage - Garage Doors & Openers:
The garage door was equipped with an external keypad. I recommend making sure the code is available prior to closing.
- 13.8.1 Electrical - GFCI Outlets:
Outlets without an obvious reset were not tested for GFCI protection as I may not be able to re-energize them after they turn off. I recommend testing the outlets in the location(s) listed below for GFCI protection using an outlet tester (like this one.) If the outlet(s) are not GFCI protected, repair by a qualified electrician is recommended.
For this house, outlets were not tested for GFCI protection in the following location(s): Exterior (often reset in the garage), Garage (often reset in the garage) and Laundry Room
- 13.10.2 Electrical - Low Voltage Wiring:
This house was equipped with a security system. This system is outside the scope of a home inspection and was not tested. I recommend making sure information on how to use the security system is available prior to closing.
- 15.7.1 Heating, Cooling, Fireplaces, & Ventilation - Solid Fuel Fireplaces:
The NFPA (National Fire Protection Association) recommends an annual inspection of all chimneys, fireplaces, solid fuel-burning appliances, and vents. They also recommend an NFPA 211 Standard, Level II inspection upon sale or transfer of the property. A Level II inspection includes not only cleaning the interior of the chimney pipe, but also the use of specialized tools and testing procedures such as video cameras, etc. to thoroughly evaluate the serviceability of the entire flue lining and fireplace/chimney system. Level II inspections are not always needed, especially for short simple flues that can be inspected visually after a cleaning. If a chimney cleaning has not been performed over the past 12 months, such an inspection is recommended before home changes ownership---for fire safety reasons. Implement any repairs as recommended.
Future Projects
- 2.4.1 Grounds - Driveways, Walkways, & Flatwork:
Typical cracks were noted in flatwork, see example photo(s). No immediate repair appeared necessary, though water will continue to deteriorate the surface until the surface is repaired or replaced. Monitor for the development of trip hazards.
- 4.4.5 Roof - Roof Materials:
The roof looked functional at the time of the inspection, but was nearing the end of its expected life. I recommend budgeting to replace the roof in the medium term future.
- 5.4.3 Common Spaces & Bedrooms - Floors:
Squeaky floors were observed. This is most commonly caused by a loose subfloor, typically from nails working loose over time. It is a nuisance concern, not a significant defect. Fixing this is easy if the flooring is being replaced just by screwing down the subfloor. There are even some products designed to go through the existing flooring to reattach the subfloor (like this) though I do not have experience with them, and do not know if they are effective.
- 12.10.1 Plumbing - Additional Sinks:
There was roughed in plumbing in the back Living room for a wet bar sink. This would make adding one in the future easier.
- 15.2.5 Heating, Cooling, Fireplaces, & Ventilation - Central Furnace:
Furnaces are expected to last for 20 years. This furnace was beyond its life expectancy (2002 manufacture date.) While it was functioning at the time of the inspection, recommend budgeting for replacement in the near future.
Monitor
- 2.3.2 Grounds - Lot & Drainage:
Surface water needs to drain away from the house to protect the foundation. Areas of concern, if any, are photographed below. I recommend watching the grounds near the house during the rainy season. If water pools, I recommend further evaluation by a drainage specialist.
Drainage can only be judged by what was visible on the day of the inspection, and leaks in gutters and downspouts are hard to detect in dry weather.
- 2.3.3 Grounds - Lot & Drainage:
Downspouts discharged into below-grade drains, which can clog or back up. Watch them during wet weather and repair as needed.
- 2.3.4 Grounds - Lot & Drainage:
The grade of the yard was sloping toward the building on the northwest and north side(s). This can result in moisture issues in the structure, and even structural problems eventually. While no problems were noted during the inspection, I recommend monitoring this area for pooling water during the rainy season. If water is pooling against the foundation wall, I recommend further evaluation and possible repair by a qualified contractor.
- 3.2.7 Exterior - Siding & Trim:
Louisiana Pacific OSB siding had been used to side much of this house. This siding, commonly referred to as "LP siding" is installation-sensitive and is vulnerable to premature failure where poorly installed and / or exposed to the weather. Based on the age of the home it is likely LP's Inner Seal siding. This OSB siding product has been the subject of a class action law suit regarding premature failure. The suit has been settled and no more settlement funds are available. The siding on this house seemed to be performing well indicating it was well-installed, well-maintained, and not too exposed to the weather. Be sure to keep this siding well maintained: seal the bottom edges and all field cuts in the material and be sure to caulk and paint all penetrations such as over-driven fasteners and around windows and doors. This siding has a negative reputation in the industry and can impact re-sale value. It is difficult to predict the remaining useful life of the siding.
- 4.4.6 Roof - Roof Materials:
Incomplete roof flashing; no drip edge flashing was installed. This flashing helps protect the fascia and sheathing by directing water into the gutters. The current installation had shingles extending 1+ inches over the fascias and into the gutters, which is an approved installation method and does not require drip edge flashing. However, in my experience, it is not as effective as a roof installation with drip edge flashing. I recommend monitoring overhanging shingles for damage/cracking and monitoring the wood sheathing around the perimeter of the roof for water damage/deterioration. If either of these conditions are observed, I recommend contacting a roofer for repair.
- 4.4.7 Roof - Roof Materials:
The roof appeared to be done as an overlay, meaning there was another layer of shingles below the existing layer. In general, overlays are allowed but not recommended. They have less predictable service lives, often reducing the lifespan of the roof by around 40%; this is often caused by heat build-up that occurs with double layered shingles. They often suffer from non-standard installation techniques such as inadequate fastening and inadequate flashing which can lead to premature leaks, nail pops, and failure. During inspection, no red flags were found (other than what may be outlined in this section of the report), however, I would monitor the roof closely as it will likely wear faster than normal.
- 5.5.2 Common Spaces & Bedrooms - Walls & Ceilings:
Wall and/or ceiling surface cracking was observed, see photo(s). This appeared to be typical cracking, but should be monitored. If the cracking expands or worsens or starts to swell (water), recommend further evaluation and possible repair by a qualified contractor.
- 12.4.1 Plumbing - Water Pressure:
The water pressure was slightly high; see photo of a water pressure gauge on an exterior hose spigot. Normal residential water pressure is between 40 and 60 PSI. Anything over 80 PSI is considered excessive. If problems associated with high water pressure are observed (leaking faucets, bursting pipes) then a pressure regulator could be added by a qualified plumber. However, at this PSI, it's probably not necessary.
Maintenance
- 2.3.5 Grounds - Lot & Drainage:
Keep 6 to 8 inches of exposed concrete foundation between the siding and the soil below. This will help protect against moisture or pest intrusion into the siding and structure.
- 2.3.6 Grounds - Lot & Drainage:
Make sure to keep all downspouts discharging 5+ feet away from the foundation. Not doing so can cause moisture problems in the structure, or even foundation settling.
- 2.5.1 Grounds - Trees & Vegetation:
When landscaping, keep plants, even at full growth, at least a foot (preferably 18 inches) from house siding and windows. Keep trees away from the foundation and roof. Plants in contact or proximity to home can provide pathways for wood destroying insects, as well as cause rubbing damage to siding, screens, and roofs.
- 3.2.8 Exterior - Siding & Trim:
Maintain all exterior finishes, caulking, and other sealants at any dissimilar material abutments and all penetrations to the walls and roof. This inexpensive task aids in the prevention of moisture intrusion and saves on expensive repairs.
- 4.4.8 Roof - Roof Materials:
Architectural grade asphalt shingles have a life expectancy of 25 - 30 years with good maintenance. Maintenance includes removing tree debris and cleaning moss. DO NOT use a pressure washer to remove moss as it can severely damage a roof. Instead, use a moss killer treatment (spray or powdered) found at any Home Depot-type store.
- 4.6.2 Roof - Gutters & Downspouts:
Keep gutters and downspouts clear of debris. Overflowing gutters put water at the foundation, which can lead to rot, pests, and even structural settling.
- 6.5.3 Bathrooms - Bathtubs & Showers:
Ongoing maintenance of the caulk and grout around any shower or tub is important to prevent leaking. If the caulk begins to crack or the grout begins to wear down and get thin, leaks can occur.
- 6.5.4 Bathrooms - Bathtubs & Showers:
Jetted tubs can often grow mold in the air jet pipes if they are not regularly used. I recommend regular cleaning using bleach or low foaming soap (like dishwasher soap) to prevent mold growth.
- 7.5.2 Kitchen - Ventilation Method:
Kitchen vent filters need regular cleaning to prevent grease buildup which is a potential fire hazard. Most metal filters can be put in the dishwasher for easy cleaning.
- 8.4.2 Laundry / Utility Room - Dryer:
I recommend cleaning the dryer vent at least annually as lint buildup can be a fire hazard. This is usually a DIY maintenance item, but depending on the length of the dryer vent, special tools may be required. Please note that I cannot verify how clean/dirty the vent is at the time of the inspection, so it might be due for a cleaning.
- 10.2.4 Attic - Access:
I recommend that owner looks around the attic at least twice a year just to become familiar with what's up there, and see potential issues early. Many attic issues result from excess water (either roof leaks or excess humidity coming from living space) which can quickly lead to rot, mold, and pest problems. The majority of these issues can be minimized or prevented if they are caught early on.
- 11.2.2 Structure & Basement - Access:
I recommend that the owner looks around the crawlspace at least twice a year just to become familiar with what's down there, and see potential issues early. Many crawlspace issues result from excess water (foundation leaks, plumbing leaks, drainage issues, etc) which can quickly lead to rot, mold, pest problems, and even foundation failure. The majority of these issues can be minimized or prevented if they are caught early on.
- 12.7.7 Plumbing - Water Heater:
Regular scheduled maintenance is recommended for water heaters. In general, most homeowners seldom do preventative maintenance to their hot water heaters, which is why they have such short average service lives between 10 - 12 years. Generally the most important maintenance is regular draining of the tank to eliminate sludge build-up at the bottom of the tank. There are also sacrificial anode rods that need to be periodically replaced to reduce corrosion inside the tank. These are DIY maintenance items.
- 13.9.8 Electrical - Smoke & Carbon Monoxide Detectors:
Replace smoke detectors about every ten years and carbon monoxide detectors about every six years. Replace batteries every six months.
- 15.2.6 Heating, Cooling, Fireplaces, & Ventilation - Central Furnace:
Furnaces should be serviced annually to verify safe and efficient operation. With proper maintenance, the life expectancy of a furnace is 20 years.
Homeowner Info
- 1.1.3 General Comments - Building Characteristics, Conditions and Limitations:
Every part of a house wears out eventually. This chart shows typical lifespans for common materials and systems, so you can plan ahead for replacements: How Long Things Last
Not everything on the chart applies to this house, and the numbers are general estimates. Maintenance, installation quality, and weather all affect how long things actually last.
- 6.5.5 Bathrooms - Bathtubs & Showers:
This is a photo of the access panel for the jetted tub pump.
- 10.2.5 Attic - Access:
This photo shows the location of the attic access hatch.
- 11.2.3 Structure & Basement - Access:
This is a photo of the crawl space access point.
- 12.2.1 Plumbing - Water Meter:
This shows the location of the water meter. The first photo is the location of the box, the second photo is a close-up of the interior of the box. If the secondary water shut-off valve was visible, it is circled.
- 12.3.1 Plumbing - Main Water Supply:
This photo shows the location of the main water shut-off valve.
- 13.8.2 Electrical - GFCI Outlets:
During the inspection, I test all readily accessible GFCI (ground fault circuit interrupter) devices. GFCIs are important safety devices that help reduce the risk of electrical shock and save lives. These are the outlets with “test” and “reset” buttons; modern standards require them in wet areas such as kitchens, bathrooms, garages, exterior, etc.
But they can be confusing. A GFCI outlet will protect any outlets installed downstream from it; check out this video for a demonstration. If a GFCI trips, it can shut off power to multiple outlets until it is reset. If the reset location is not clear or may be obstructed, I may avoid testing that circuit to prevent leaving it disabled.
GFCI protection has also become more extensive over time. The guidelines for GFCI coverage based on the year of construction are in the image below. If the house was built prior to any of these dates, there is a decent chance that coverage is not what it should be, and I may not have been able to accurately test for it.
- 13.8.3 Electrical - GFCI Outlets:
GFCI protected outlets in the bathrooms reset in the second level hall bathroom.
- 13.8.4 Electrical - GFCI Outlets:
GFCI protected outlets in the kitchen reset in the kitchen.
- 14.2.3 Fuel Storage & Distribution - Gas Meter:
This photo shows the gas service entrance, meter, and main gas shut-off valve (circled.) The second photo is a close-up of the main gas shut-off valve. Rotating the valve to line up the holes will shut off gas flow to the house.
- 14.4.1 Fuel Storage & Distribution - Shut-Off Valve Locations:
Gas valves all operate with a handle that moves 1/4 turn to open/close them. If the handle is parallel to the pipe, the valve is open. If the handle is perpendicular to the pipe, the valve is closed.
- 14.4.2 Fuel Storage & Distribution - Shut-Off Valve Locations:
This photo shows the gas shut-off valve for the furnace.
- 14.4.3 Fuel Storage & Distribution - Shut-Off Valve Locations:
This photo shows the gas shut-off valve for the water heater.
- 15.7.2 Heating, Cooling, Fireplaces, & Ventilation - Solid Fuel Fireplaces:
The wood burning fireplace had a damper in the chimney. This is designed to keep cold air out of the house when the fireplace is not in use. Be sure to keep the flue damper closed during the heating season when the fireplace is not in use to prevent heat loss.
The Full Report
Grounds
Grounds Overview
General Grounds Photos
Lot & Drainage
Driveways, Walkways, & Flatwork
Trees & Vegetation
Retaining Walls
Exterior Stairs
Fences
Outbuildings, Carports, & Pergolas
Roof
Roof System Overview
Method of Roof Inspection
General Roof Photos
Roof Materials
Chimneys
Gutters & Downspouts
Common Spaces & Bedrooms
Interior Areas Overview
General Interior Photos
Door Bell
Floors
Walls & Ceilings
Stairs & Railings
Interior Doors
Bathrooms
Bathroom Overview
General Bathroom Photos
Sinks & Cabinets
Toilets
Bathtubs & Showers
Ventilation
Kitchen
Kitchen Overview
General Kitchen Photos
Sinks & Faucets
Cabinets & Countertops
Ventilation Method
Appliances
Laundry / Utility Room
Laundry / Utility Room Overview
General Laundry / Utility Room Photos
Washer
Dryer
Ventilation
Cabinets & Sinks
Structure & Basement
Structure and Crawl Space Overview
Access
General Crawl Space and/or Unfinished Basement Photos
Foundation
Posts, Beams, & Footings
Vapor Barrier
Crawl Space Ventilation
Insulation
Moisture Conditions
Miscellaneous
Plumbing
Overview
Water Meter
Main Water Supply
Water Pressure
Supply Plumbing
Waste Plumbing
Water Heater
Water Temperature
Hose Spigots
Additional Sinks
Electrical
Overview
Electric Service
Whole House Ground
Bonding
Branch Wiring
Electrical Panel
Outlets, Switches, & Fixtures
GFCI Outlets
Smoke & Carbon Monoxide Detectors
Low Voltage Wiring
General Comments
Building Characteristics, Conditions and Limitations
Type of Building : Detached, Single Family Home, Two Level
Approximate Year of Original Construction: 1991
Approximate Total Square Footage: 2264
Number of Bedrooms: 4
Number of Bathrooms: 2.5
Attending the Inspection: Client, Buyer's Agent's Assistant
Occupancy: Unoccupied, but staged with furniture
Weather during the inspection: Dry, Sunny
Approximate Temperature (Fahrenheit): 65
Ground/Soil surface conditions: Dry
For the Purposes of This Report, the House Faces: West
This house was vacant / unoccupied at the time of inspection. Vacant and unoccupied houses present unique challenges for home inspections, especially the piping and wiring systems which have not been subject to regular use prior to the inspection. While these systems can be tested during inspection, this one-time test is different than regular use and it is difficult to know how these systems will respond to regular use after the inspection. For example, septic systems may initially function and then fail under regular daily use. Plumbing traps may operate with no signs of leaks and then let go when being actively used for a few days. Shower pans may only leak when someone is standing in the shower and taking a shower. Seals for plumbing fixtures can dry up and leak when not in use. Sewer lines with roots may allow water flow, but then fail when waste and tissue are flushed; it can take a few days for that to backup. Please understand we are trying our best to look for clues of past or existing problems to paint a realistic best-guess as to the reliability of these systems during inspection.
This home had staging furniture at the time of the inspection. Inspections of furnished homes present some challenges as belongings can obstruct visual inspections and access to parts of the building. I do my best during the inspection to work around belongings to discover as much as possible about the house without moving or damaging personal property, however, the presence of personal items does limit the inspection.
Every part of a house wears out eventually. This chart shows typical lifespans for common materials and systems, so you can plan ahead for replacements: How Long Things Last
Not everything on the chart applies to this house, and the numbers are general estimates. Maintenance, installation quality, and weather all affect how long things actually last.
Grounds
Grounds Overview
This section covers the lot around the property: walkways, patios, driveways, vegetation, grading, surface drainage, and retaining walls that could affect the building.
General Grounds Photos
These are photos of the grounds at the time of the inspection.
 |  |  |
 |  |  |
 |  |  |
 |  |  |
 |  |  |
 |  |  |
 |  |  |
 |  |  |
 |  |  |
 |  |  |
 |  |  |
 |  |
Lot & Drainage
Inspected, appeared functional and in satisfactory condition at time of inspection other than notes, if any, below.
Site Description: Relatively Level, Grade Toward Building
Downspout Discharge: Below Grade
Siding Clearance to Grade: Standard
While performance of lot drainage and water handling systems may appear serviceable at the time of inspection, predicting drainage performance as conditions constantly change is impossible. Furthermore, items such as leakage in downspout/gutter systems are very difficult to detect during dry weather. Inspection of foundation performance and water handling systems, therefore, is limited to visible conditions and evidence of past problems.
Surface water needs to drain away from the house to protect the foundation. Areas of concern, if any, are photographed below. I recommend watching the grounds near the house during the rainy season. If water pools, I recommend further evaluation by a drainage specialist.
Drainage can only be judged by what was visible on the day of the inspection, and leaks in gutters and downspouts are hard to detect in dry weather.
Downspouts discharged into below-grade drains, which can clog or back up. Watch them during wet weather and repair as needed.
The grade of the yard was sloping toward the building on the northwest and north side(s). This can result in moisture issues in the structure, and even structural problems eventually. While no problems were noted during the inspection, I recommend monitoring this area for pooling water during the rainy season. If water is pooling against the foundation wall, I recommend further evaluation and possible repair by a qualified contractor.


Keep 6 to 8 inches of exposed concrete foundation between the siding and the soil below. This will help protect against moisture or pest intrusion into the siding and structure.
Make sure to keep all downspouts discharging 5+ feet away from the foundation. Not doing so can cause moisture problems in the structure, or even foundation settling.
Driveways, Walkways, & Flatwork
Inspected, appeared functional and in satisfactory condition at time of inspection other than notes, if any, below.
Driveway: Concrete
Walkways: Concrete
Patios: Concrete
Typical cracks were noted in flatwork, see example photo(s). No immediate repair appeared necessary, though water will continue to deteriorate the surface until the surface is repaired or replaced. Monitor for the development of trip hazards.
 |  |
Trees & Vegetation
Inspected, appeared functional and in satisfactory condition at time of inspection other than notes, if any, below.
When landscaping, keep plants, even at full growth, at least a foot (preferably 18 inches) from house siding and windows. Keep trees away from the foundation and roof. Plants in contact or proximity to home can provide pathways for wood destroying insects, as well as cause rubbing damage to siding, screens, and roofs.
Retaining Walls
Inspected, appeared functional and in satisfactory condition at time of inspection other than notes, if any, below.
Retaining Wall Material: Concrete, Block
Exterior Stairs
Inspected, appeared functional and in satisfactory condition at time of inspection other than notes, if any, below.
Fences
Inspected, appeared functional and in satisfactory condition at time of inspection other than notes, if any, below.
According to Washington State inspection standards of practice, only the fencing immediately adjacent to the house and potentially impacting the structure is inspected. I observed the fence anyway, but it wasn't an exhaustive investigation. Please note that individual boards can come loose or be rotten. Depending on your use of the yard, I recommend a more thorough investigation of the full fence line.
Outbuildings, Carports, & Pergolas
Outbuilding(s)
Detached outbuildings are not included in the scope of a standard home inspection; this inspection is limited to the house only. However, a cursory check of any installed and visible plumbing and electrical systems was performed. Any defects with these systems can be found in the Electrical and Plumbing sections of this report.
 |  |  |
 |
Exterior
Overview
This section covers the siding, flashing, trim, windows, exterior doors, steps, porches, decks, balconies, eaves, soffits, and fascias. The main job of the exterior is to keep water out.
Siding & Trim
Inspected, appeared functional and in satisfactory condition at time of inspection other than notes, if any, below.
Siding Material: LP Inner Seal, Fiber-cement
Trim Material: Wood
The chimney had been resided with newer fiber cement siding.
Damaged siding was observed on the exterior of the house, see example photos (all on the south side unless otherwise noted.) It was especially bad on the south side of the house. This can allow water to penetrate the exterior envelope of the house, which can lead to rot, mold, and wood destroying pest activity. Some siding was starting to delaminate (moisture causing the layers of wood to separate) and other areas were starting to crumble due to moisture penetration. I recommend repair by a qualified contractor.


Some areas of siding needed resealing, see example photo(s). Deteriorated or missing sealants are a conducive condition for rot and pests as they allow water to penetrate into or behind the siding. This is normally a DIY repair using exterior grade caulk, though larger gaps may need repair by a qualified contractor.


Some areas of trim needed repainting, see example photo(s). Worn paint is a conducive condition for rot and pests as it allows water to penetrate into, or behind, the siding. I recommend repainting by a qualified painter.
 |  |


Inadequate clearances were noted between the roof and the siding, see photo(s). A 2 inch air gap is recommended here to keep the siding off the roof and prevent deterioration of the siding. This installation should be accompanied by step flashings that adequately protect the wall and roof juncture from leaks. I recommend evaluation and repair by a qualified contractor.


 |
Louisiana Pacific OSB siding had been used to side much of this house. This siding, commonly referred to as "LP siding" is installation-sensitive and is vulnerable to premature failure where poorly installed and / or exposed to the weather. Based on the age of the home it is likely LP's Inner Seal siding. This OSB siding product has been the subject of a class action law suit regarding premature failure. The suit has been settled and no more settlement funds are available. The siding on this house seemed to be performing well indicating it was well-installed, well-maintained, and not too exposed to the weather. Be sure to keep this siding well maintained: seal the bottom edges and all field cuts in the material and be sure to caulk and paint all penetrations such as over-driven fasteners and around windows and doors. This siding has a negative reputation in the industry and can impact re-sale value. It is difficult to predict the remaining useful life of the siding.
-524627.jpg)
-538706.jpg)

Maintain all exterior finishes, caulking, and other sealants at any dissimilar material abutments and all penetrations to the walls and roof. This inexpensive task aids in the prevention of moisture intrusion and saves on expensive repairs.
Vents
Inspected, appeared functional and in satisfactory condition at time of inspection other than notes, if any, below.
Exterior Doors
Inspected, appeared functional and in satisfactory condition at time of inspection other than notes, if any, below.
Door Types: Solid Core, Sliding Glass
Exposed doors (those not protected by eaves) did not have a drip cap flashing installed above them. This flashing helps redirect water away from the top of the door, so water is less likely to seep into the siding at the top of the frame. At the time of the inspection, the only barrier was caulking, which can be prone to failure if not maintained. I recommend installation by a qualified contractor.

.jpg) |
Windows
Inspected, appeared functional and in satisfactory condition at time of inspection other than notes, if any, below.
Exterior Window Frame Materials: Vinyl
Interior Window Frame Materials: Vinyl
Number of Panes: Double Pane
Window Styles: Sliding
Any installed window coverings (blinds/drapes) were not systematically tested. Their operation is outside of the scope of a home inspection.
Decks, Porches, & Balconies
Inspected, appeared functional and in satisfactory condition at time of inspection other than notes, if any, below.
Deck Structure: Not visible
Deck Ledger Board: Not visible
Decking Material: Functional
Railing / Guardrail: Standard
Please note that the deck framing inspection was limited. I could not see framing and deck structural components in many places because the underside of the deck was not accessible.
Please note that the deck ledger board (how the deck attaches to the house) inspection was limited. I could not see the full ledger board because the underside of the deck was not accessible.
Roof
Roof System Overview
This section covers the roofing material, flashing, and roof penetrations.
Some roofs are not safe to walk on due to slope, access, materials, or weather. In those cases I observe the roof as best I can from the ground or other vantage points.
Method of Roof Inspection
Walked on Roof
General Roof Photos
These are photos of the roof taken to add context.
 |  |  |
 |  |  |
 |  |  |
 |  |  |
 |  |  |
 |  |  |
 |  |  |
 |
Roof Materials
Inspected, appeared functional and in satisfactory condition at time of inspection other than notes, if any, below.
Roof Covering Materials: Asphalt Composition Shingles, architectural style
Approximate Age of Roof Covering: 15 to 20 years
Flashings: Standard, No Drip Edge Flashing
Overlay Roof (Multiple Layers of Roofing): Yes
Roof flashings are used to keep a roofing system waterproof where the roofing material starts, stops, changes direction or is penetrated. During inspection, I look for standard flashing techniques that could be considered normal or standard in our region. Damaged, incomplete or non-standard flashings can be a sign of an older or less reliable roofing system and may require repair. Any non-standard flashings noted during inspection will be reported on below if found.
Typical granule loss was observed in places; the black material visible on the shingles is exposed asphalt due to granule loss. This is one way to estimate a roof's age. The granules on the shingles help reflect UV radiation from the sun. When granules are not in place, UV radiation causes the asphalt shingles to dry out and crack, eventually leading to roof failure.
 |  |  |
There was moss on the roof, see example photo(s). Moss growth is common in our climate, and most often grows in shady areas (mostly on north facing roof surfaces or under vegetation.) This can lead to the premature failure of the roof and subsequent leaks. I recommend regularly treating moss during its growing season (wet months) with a moss killer; do not pressure wash it as it can severely damage the roofing material. This is generally a DIY repair, though the height and pitch of the roof may require a qualified contractor.
 |  |
Exposed fasteners were observed, see photo(s). This can be a potential water penetration point into the roof structure, and is a conducive condition for rot and organic growth. I recommend sealing all exposed fasteners with exterior grade caulk or roofing compound. DIY repair.


The roof looked functional at the time of the inspection, but was nearing the end of its expected life. I recommend budgeting to replace the roof in the medium term future.
Incomplete roof flashing; no drip edge flashing was installed. This flashing helps protect the fascia and sheathing by directing water into the gutters. The current installation had shingles extending 1+ inches over the fascias and into the gutters, which is an approved installation method and does not require drip edge flashing. However, in my experience, it is not as effective as a roof installation with drip edge flashing. I recommend monitoring overhanging shingles for damage/cracking and monitoring the wood sheathing around the perimeter of the roof for water damage/deterioration. If either of these conditions are observed, I recommend contacting a roofer for repair.
.jpg)
The roof appeared to be done as an overlay, meaning there was another layer of shingles below the existing layer. In general, overlays are allowed but not recommended. They have less predictable service lives, often reducing the lifespan of the roof by around 40%; this is often caused by heat build-up that occurs with double layered shingles. They often suffer from non-standard installation techniques such as inadequate fastening and inadequate flashing which can lead to premature leaks, nail pops, and failure. During inspection, no red flags were found (other than what may be outlined in this section of the report), however, I would monitor the roof closely as it will likely wear faster than normal.

Architectural grade asphalt shingles have a life expectancy of 25 - 30 years with good maintenance. Maintenance includes removing tree debris and cleaning moss. DO NOT use a pressure washer to remove moss as it can severely damage a roof. Instead, use a moss killer treatment (spray or powdered) found at any Home Depot-type store.
Chimneys
Inspected, appeared functional and in satisfactory condition at time of inspection other than notes, if any, below.
Chimney Material: Metal below siding
Chimney Flue Liners: Present
These are photos of the chimney and any accessible flues.

No cricket flashing was installed above the chimney, see photo(s). This flashing helps divert water around the sides of the chimney so it does not get trapped on the uphill edge. Modern building standards recommended this flashing for any chimney wider than 30 inches. I recommend repair by a qualified roofing contractor.
.jpg)
 |  |
Gutters & Downspouts
Inspected, appeared functional and in satisfactory condition at time of inspection other than notes, if any, below.
Downspout(s) and/or gutter(s) for the upper roof section drained directly on the lower roof section, see photo(s). Modern building standards allow this and it is a standard practice. However, it puts more water on certain sections of the roof, and will cause the shingles below the downspouts to wear more quickly due to extra granule loss. I recommend keeping an eye on these sections as they are likely to fail from age first due to the extra use. A roofing contractor might be able to suggest alternatives to prevent the damage this setup can cause like adding downspout extensions to direct the water runoff directly into the lower gutter.


 | .jpg) | |
Keep gutters and downspouts clear of debris. Overflowing gutters put water at the foundation, which can lead to rot, pests, and even structural settling.
Common Spaces & Bedrooms
Interior Areas Overview
This section covers the living areas not covered elsewhere in the report, such as bedrooms, hallways, and living and dining rooms.
General Interior Photos
These are photos of the interior at the time of the inspection.
 |  |  |
 |  |  |
 |  |  |
 |  |  |
 |  |  |
Door Bell
Door Bell: Operated normally
Floors
Inspected, appeared functional and in satisfactory condition at time of inspection other than notes, if any, below.
Floor Slope: No significant slope observed
Some flooring was not accessible/visible due to stored personal items.
Carpet was installed in a bathroom, see photo(s). This is a conducive condition for organic growth as bathrooms are humid spaces. I recommend having the carpet replaced with a more water resistant flooring material by a qualified contractor.

Squeaky floors were observed. This is most commonly caused by a loose subfloor, typically from nails working loose over time. It is a nuisance concern, not a significant defect. Fixing this is easy if the flooring is being replaced just by screwing down the subfloor. There are even some products designed to go through the existing flooring to reattach the subfloor (like this) though I do not have experience with them, and do not know if they are effective.
Walls & Ceilings
Inspected, appeared functional and in satisfactory condition at time of inspection other than notes, if any, below.
Some areas were not accessible/visible due to stored personal items.
Wall and/or ceiling surface cracking was observed, see photo(s). This appeared to be typical cracking, but should be monitored. If the cracking expands or worsens or starts to swell (water), recommend further evaluation and possible repair by a qualified contractor.


Stairs & Railings
Inspected, appeared functional and in satisfactory condition at time of inspection other than notes, if any, below.
The lower railing was missing a middle bracket which was allowing it to significantly flex in the middle, see photo/video. I recommend installation of an additional bracket in the middle as a DIY repair to strengthen the railing.

 |


Railing balusters were spaced too far apart, see photo(s). Modern building standards recommend gaps between balusters be less than 4 inches. This is a safety improvement for children. I recommend repair by a qualified contractor.

Modern building standards recommend that staircase railings have a "return" to the wall to prevent clothing from snagging. The railing did not have a return installed, see photo(s). I recommend evaluation and repair or replacement by a qualified contractor.
.jpg)


 |  | |
 |  | |
Modern building standards recommend that open front steps have a gap no larger than 4 inches for child safety. The staircase had gaps larger than this, see photo(s). I recommend repair by a qualified contractor.
 |  |
Interior Doors
Inspected, appeared functional and in satisfactory condition at time of inspection other than notes, if any, below.
Door(s) did not latch and stay closed in the following location(s): Second Level South Bedroom Closet. I recommend repair by a qualified contractor.
Bathrooms
Bathroom Overview
I operated all plumbing fixtures in the bathrooms, checked tile shower enclosures with a moisture meter for concealed leaks, and sounded for loose tile in shower and tub enclosures. I do not test bathtub overflow drains, as this risks damaging finishes around the tub. Monitor tubs while filling and avoid pushing water into the overflow; the gaskets dry out over time and can leak.
Testing during an inspection puts less stress on plumbing than daily use, especially in a vacant home, so monitor the plumbing after moving in.
General Bathroom Photos
These are photos of the bathroom(s) at the time of the inspection.
 |  |  |
 |
Sinks & Cabinets
Inspected, appeared functional and in satisfactory condition at time of inspection other than notes, if any, below.
Sink(s) was slow to drain in the following location(s): Primary Bathroom Left Sink. I recommend cleaning as a DIY repair. If that is not successful, further evaluation and repair by a qualified plumber may be needed.
Flexible/accordion drain lines are not recommended as they can be prone to clogging, see photo(s). I recommend monitoring and cleaning these drains regularly. For a more permanent solution, recommend contacting a qualified plumber to replace the flexible drain with straight pipes, which will not clog as easily.

Toilets
Inspected, appeared functional and in satisfactory condition at time of inspection other than notes, if any, below.
Toilet(s) in the following location(s) was/were loosely mounted to the floor: First Level Bathroom and Second Level Hall Bathroom. This can allow the toilet to rock and slide when used, which damages the wax ring seal and can allow water to seep into the floor cavity. When using a moisture meter, no evidence of a leak was observed, but this should be repaired as a proactive measure. I recommend repair by a qualified plumber.
Note: There are non-wax rings (rubber or foam) that are less likely to leak if a toilet is loosely mounted. However, wax rings are the most commonly used type of seal, and without removing the toilet, it is impossible to know which type of seal was used.
%20(1).jpg)
Bathtubs & Showers
Inspected, appeared functional and in satisfactory condition at time of inspection other than notes, if any, below.
There was a jetted tub in the primary bathroom. The drain and water controls were inspected. Testing the jet system in the tub is outside the scope of a standard home inspection.
Grout/caulk was worn in tub/shower(s), see example photo(s). This can allow water to penetrate into the wall which can lead to rot and mold issues. There is no reliable way to tell what is behind the wall during a non-invasive inspection. I recommend repairing (resealing) as a preventative measure by a qualified contractor.


Ongoing maintenance of the caulk and grout around any shower or tub is important to prevent leaking. If the caulk begins to crack or the grout begins to wear down and get thin, leaks can occur.
Jetted tubs can often grow mold in the air jet pipes if they are not regularly used. I recommend regular cleaning using bleach or low foaming soap (like dishwasher soap) to prevent mold growth.
This is a photo of the access panel for the jetted tub pump.
 |  |
Ventilation
Inspected, appeared functional and in satisfactory condition at time of inspection other than notes, if any, below.
Kitchen
Kitchen Overview
This section covers the kitchen sink, cabinets, countertops, ventilation, and appliances. Safety concerns, water leaks, and inoperable appliances are reported.
General Kitchen Photos
These are photos of the kitchen at the time of the inspection.
 |  |  |
 |  |
Sinks & Faucets
Inspected, appeared functional and in satisfactory condition at time of inspection other than notes, if any, below.
Cabinets & Countertops
Inspected, appeared functional and in satisfactory condition at time of inspection other than notes, if any, below.
Ventilation Method
Inspected, appeared functional and in satisfactory condition at time of inspection other than notes, if any, below.
Vent Type: Exterior Vented
Vent hood light(s) was not working. Bulbs are the likely problem; I recommend replacing them as a DIY repair. If that is not successful, further evaluation and repair by a qualified contractor may be needed.
Kitchen vent filters need regular cleaning to prevent grease buildup which is a potential fire hazard. Most metal filters can be put in the dishwasher for easy cleaning.
Appliances
Inspected, appeared functional and in satisfactory condition at time of inspection other than notes, if any, below.
Refrigerator: Operated
Dishwasher: Operated
Dishwasher Air Gap: Present
Range / Oven / Cook-tops: Electric Cooktop, Electric Oven, No Anti-Tip
Garbage Diposal: Operated
Microwave: No Microwave Installed
Thermal images show the freezer and refrigerator were working during the inspection.
 |  |  |
 |
Thermal images show the oven was operated and was working at the time of inspection.
 |  |  |
 |
Thermal images show the cooktop was tested and working during the inspection.
 |  |
An anti-tip bracket was missing from the range installation. Modern building standards recommend that all free-standing, slide-in ranges have an anti-tip device installed. It provides protection for the range tipping forward when excess weight is applied to an open oven door (example: kid climbing on the open door.) Anti-tip brackets are carried by any Home Depot-type store and are a DIY installation.
.jpg)
.jpg)
Laundry / Utility Room
Laundry / Utility Room Overview
This section covers the laundry area: visible plumbing, venting, and any installed appliances.
General Laundry / Utility Room Photos
These are photos of the laundry / utility room at the time of the inspection.

Washer
Inspected, appeared functional and in satisfactory condition at time of inspection other than notes, if any, below.
No drip pan was installed under the washing machine. When installed in living space, having a drip pan underneath the washing machine (ideally that drains to the exterior) is recommended to prevent water damage from leaks. I recommend installation of a proper drip pan by a qualified contractor.
Dryer
Inspected, appeared functional and in satisfactory condition at time of inspection other than notes, if any, below.
Power Source: Electric
Vent Type: Vented
This is a thermal image of the dryer operating at the time of the inspection.
 |  |
I recommend cleaning the dryer vent at least annually as lint buildup can be a fire hazard. This is usually a DIY maintenance item, but depending on the length of the dryer vent, special tools may be required. Please note that I cannot verify how clean/dirty the vent is at the time of the inspection, so it might be due for a cleaning.
Ventilation
Inspected, appeared functional and in satisfactory condition at time of inspection other than notes, if any, below.
Ventilation Method: Exhaust Fan
Cabinets & Sinks
Inspected, appeared functional and in satisfactory condition at time of inspection other than notes, if any, below.
Garage
Garage Overview
This section covers the garage, including garage door safety features and the fire barrier between the garage and the living space.
General Garage Photos
These are photos of the garage at the time of the inspection.
 |  |  |
 |  |  |
 |
Garage General
Inspected, appeared functional and in satisfactory condition at time of inspection other than notes, if any, below.
The firewall barrier between the garage and home had damaged or improperly covered area(s), see photo(s). Modern building standards recommend a firewall on the side(s) of any attached garage bordering living space because garage fires can spread quickly into the living space. I recommend evaluation and repair by a qualified contractor.

The door between the garage and the living area had disabled self closing hinges. Having a self closing device (usually self closing hinges) are required on doors between the living space and the garage in some municipalities. Regardless of the local building codes, having a door that automatically closes is a good idea to preserve the firewall barrier between the garage and living space. I recommend enabling the self closing hinges. DIY repair.

Garage Doors & Openers
Inspected, appeared functional and in satisfactory condition at time of inspection other than notes, if any, below.
Garage Door Type: Vinyl
Spring Type: Extension Springs with safety cables
Automatic Garage Opener Type: Belt Drive Opener
Photo Eye Sensors (only applicable to garage doors with openers): Present and functioning
Auto-Reverse Sensor (only applicable to garage doors with openers): Functioning properly
The photo eye sensors are sensors that project an infrared beam across the bottom of the garage door. If something breaks the beam while the door is closing, the door should automatically stop closing and reverse to prevent it from crushing something.
The auto-pressure reverse sensor should trigger when the garage door hits something while closing. It should trigger with 10 pounds of force or less. This sensor will immediately stop the door and cause it to reverse to prevent the door from crushing something.
The garage door(s) was using extension springs, which are an older design, see photo(s). Modern garage doors typically use torsion springs, which are much safer. I recommend upgrading to a torsion spring system as a safety improvement.
 |  |  |
The garage door was equipped with an external keypad. I recommend making sure the code is available prior to closing.

Garage Floor
Inspected, appeared functional and in satisfactory condition at time of inspection other than notes, if any, below.
Attic
Attic Overview
This section covers the accessible attic: framing, insulation, ventilation, and exposed wiring. Damage such as organic growth or rodent activity is noted below.
Access
Attic Access Location: Primary Bedroom Closet
Photo of Hatch: Provided
Accessibility: No access, Walked, No access - vaulted ceiling
Full attic access/visibility was not possible due to limited clearance in the attic and surfaces blocked by insulation.
This house had vaulted ceilings in areas. With this roof design, there was no attic space and no access to inspect roof framing, thermal barriers, or fan exhaust ductwork.
No attic access was found to the area above the south garage bay during the inspection. This means the attic framing, sheathing, ventilation, insulation, wiring, fan terminations, etc could not be inspected. I recommend installing an access and having the attic re-inspected. Standards recommend an access opening of 30 inches x 22 inches when there is greater than 30 sq ft of attic space. I recommend installation of an attic access point by a qualified contractor.

I recommend that owner looks around the attic at least twice a year just to become familiar with what's up there, and see potential issues early. Many attic issues result from excess water (either roof leaks or excess humidity coming from living space) which can quickly lead to rot, mold, and pest problems. The majority of these issues can be minimized or prevented if they are caught early on.
This photo shows the location of the attic access hatch.

General Attic Photos
These are photos of the attic at the time of the inspection to provide context.
 |  |  |
 |  |  |
 |  |  |
Framing & Sheathing
Inspected, appeared functional and in satisfactory condition at time of inspection other than notes, if any, below.
Visible Roof Structure Materials: Wooden Trusses
Visible Roof Sheathing Material: OSB
Insulation
Inspected, appeared functional and in satisfactory condition at time of inspection other than notes, if any, below.
Approximate Insulation Depth: 12 to 14 inches
Insulation Type: Blown Fiberglass, Fiberglass Batts
In our climate, modern building standards recommend insulation with an R-value of between 38 and 60 in the attic. Different materials have different R-values, but in general, around 12 to 14 inches of insulation is the minimum recommended in attics.
The R-value of blown fiberglass is around 2.5 per inch of depth.
The R-value of fiberglass batts is around 3.2 per inch.
Ventilation
Inspected, appeared functional and in satisfactory condition at time of inspection other than notes, if any, below.
Upper (Exhaust) Attic Ventilation: Box vents
Lower (Intake) Attic Ventilation: Soffit vents
Attic and roof cavity ventilation is a frequently-misunderstood element of residential construction. Most traditionally insulated roof cavities are required to have ventilation. This is primarily to reduce moisture levels in the attic, which helps prevent organic growth issues, and keeps the roofing material cooler, which extends its lifespan. The general default standard is 1 to 150 of the attic area and ideally, this comes from at least 60% lower roof cavity ventilation and 40% upper, but this is a significant oversimplification of the subject. As a good guiding principle the most important elements for healthy attic spaces, which are traditionally insulated and ventilated are:
- Make sure the ceiling between the living space and the attic is airtight
- Ventilate consistently across the whole lower part of the roof cavity with low, intake soffit venting
- Upper roof cavity venting is less important and if over-installed can exacerbate air migration into the attic from the living space.
- Avoid power ventilators which can depressurize the attic and exacerbate air migration from the house into the attic.
For more information, please see here.
Vent screen was damaged/missing, see photo(s). This can allow access to the attic for pests (bird and/or rodents.) I recommend repair by a qualified contractor.


Structure & Basement
Structure and Crawl Space Overview
This section covers the foundation, framing, and any accessible crawl space. I probe structural components where deterioration is suspected, but not where probing would damage finished surfaces.
Structural problems usually develop slowly over time, so I look for evidence of structural movement. An inspection is a snapshot of one day, which makes it difficult to tell whether movement is old and stable or still ongoing.
Access
Access Location: NE Exterior
Method of Inspection: Crawled
Full crawl space access/visibility not possible due to limited clearance, surfaces blocked by insulation, and duct work.
I recommend that the owner looks around the crawlspace at least twice a year just to become familiar with what's down there, and see potential issues early. Many crawlspace issues result from excess water (foundation leaks, plumbing leaks, drainage issues, etc) which can quickly lead to rot, mold, pest problems, and even foundation failure. The majority of these issues can be minimized or prevented if they are caught early on.
This is a photo of the crawl space access point.

General Crawl Space and/or Unfinished Basement Photos
These are photos of the crawl space at the time of the inspection to provide context.
 |  |  |
 |  |  |
 |  |  |
 |  |
Foundation
Inspected, appeared functional and in satisfactory condition at time of inspection other than notes, if any, below.
Building Configuration: Crawl Space
Foundation Description: Concrete
Evidence of Seismic Protection: Present
Western Washington is in a seismic zone and earthquake resistance is an important consideration in any house. The basic idea behind earthquake retrofitting is to tie all the structural elements of the house together--especially bolting the house to the foundation--which makes each individual component stronger. Many older homes built prior to the mid 1970s were built without being bolted to their foundations. Without this anchorage, an earthquake can move the ground and the foundation right out from under the house. Earthquake resistance techniques continue to improve every year, but most houses from the mid 1970s and later have been constructed with mostly modern techniques.
.jpg)
Signs of seismic protection were noted during inspection. This inspection is not a cohesive analysis of seismic engineering, but I do look for signs of seismic protection.
Posts, Beams, & Footings
Inspected, appeared functional and in satisfactory condition at time of inspection other than notes, if any, below.
Visible Post Material: Wood
Visible Beam Material: Wood
Visible Footing Material: Poured Concrete
Vapor Barrier
Inspected, appeared functional and in satisfactory condition at time of inspection other than notes, if any, below.
Vapor Barrier Material: Plastic on Earth
Crawl Space Ventilation
Inspected, appeared functional and in satisfactory condition at time of inspection other than notes, if any, below.
Ventilation Method: Exterior wall vents
Crawl spaces ventilation is designed to keep humidity levels as low as possible. Crawl spaces are a common location for rot and mold issues, and having airflow through the space helps keep moisture levels low.
Insulation
Inspected, appeared functional and in satisfactory condition at time of inspection other than notes, if any, below.
Insulation Thickness: 4 to 6 inches
Insulation Type: Fiberglass batts
The sub-floor in this crawl space was covered with insulation in most, if not all, areas. This obstructs visual inspection as most of the framing was not able to be inspected. I did pull back insulation in places to spot check the floor frame. No defects were found.
In our climate, modern building standards recommend insulation with an R-value of at least 25 under the floor. Different materials have different R-values, but in general, that's around 8 inches of insulation.
The R-value of fiberglass batts is around 3.2 per inch.
Crawl space insulation was lower than modern building standards recommend. I recommend installation of additional insulation by a qualified contractor until it reaches a minimum R-25.
The under-floor insulation in the crawl space was sagging throughout the crawl space. In order for this insulation to be effective, it needs to be in substantial contact with the surface it is insulating (the bottom of the floor.) I recommend repair by a qualified contractor.
Moisture Conditions
No water was visible or present at the time of inspection
Miscellaneous
Significant rodent activity (droppings, nests, and/or tunneling) was observed, see photo(s). Rodents can damage insulation, damage electrical wiring, and create hazardous air conditions from their waste. A significant portion of the insulation was damaged, and there were a lot of droppings throughout the crawl space. I suspect that a full crawl space cleanout by a qualified contractor, which entails removing all the droppings and replacing the insulation, is needed. This can be expensive due to high labor costs.
 |  |  |
 |  |  |
Plumbing
Overview
This area of the report describes the exposed water plumbing materials, main water shutoff location, water pressure, the water heater, and plumbing fixtures in living spaces.
Water Meter
Location of Water Meter: West Exterior
This shows the location of the water meter. The first photo is the location of the box, the second photo is a close-up of the interior of the box. If the secondary water shut-off valve was visible, it is circled.
 |  |  |
Main Water Supply
Inspected, appeared functional and in satisfactory condition at time of inspection other than notes, if any, below.
Water Supply: Public water
Visible Pipe Material: Unknown
Main Water Shut-off Location: Garage
This photo shows the location of the main water shut-off valve.
 |  |
Water Pressure
Inspected, appeared functional and in satisfactory condition at time of inspection other than notes, if any, below.
Approximate Water Pressure: 70 PSI
Pressure Regulator: None noted
The water pressure was slightly high; see photo of a water pressure gauge on an exterior hose spigot. Normal residential water pressure is between 40 and 60 PSI. Anything over 80 PSI is considered excessive. If problems associated with high water pressure are observed (leaking faucets, bursting pipes) then a pressure regulator could be added by a qualified plumber. However, at this PSI, it's probably not necessary.

Supply Plumbing
Inspected, appeared functional and in satisfactory condition at time of inspection other than notes, if any, below.
Visible Supply Pipe Materials: Copper
Visible Pipe Insulation: Present
Angle stops are the shut offs located below plumbing fixtures such as sinks and toilets. These are designed so that water can be shut off locally to a fixture without shutting off the water to the entire house so that localized fixtures can be serviced and repaired or replaced. Home inspectors do NOT test angle stops during inspection as there is a risk of leakage which could cause damage to the home.
 (1) (1).png)
Please note that many supply pipes were concealed behind walls and were not visible during the inspection. Determination of the supply piping materials used here is an educated guess based on the materials that were visible coming out of the wall and below fixtures.
Plastic angle stop valve(s) was observed under a sink, see photo(s). I am not aware of any recalls or lawsuits over these valves, but they are notorious for having a higher failure rate than similar metal valves. I recommend monitoring the valve for leaks, or ideally, having a qualified plumber replace any plastic valves with more reliable metal ones.


Waste Plumbing
Inspected, appeared functional and in satisfactory condition at time of inspection other than notes, if any, below.
Discharge Type: Public sewer
Visible Waste and Vent Pipe Materials: ABS Plastic, PVC
Note that the waste piping system was mostly concealed behind finishes and not visible to inspection.
Note that when the sewage discharge type is listed here, it is listed based on public records and disclosure. It is always possible that the system is not as it is listed; for example, a property could be listed as a public sewer system when in fact it is on a private septic system. This is unlikely, but is possible.
Water Heater
Inspected, appeared functional and in satisfactory condition at time of inspection other than notes, if any, below.
Location: Garage
System Type: Tank
Manufacturer: Rheem
Manufacture Date: 2015
Size: 50 gallon
Energy Source: Gas
Seismic Straps : Present
Expansion Tank: Present
Temperature Pressure Relief (TPR) Value: Present - Not Tested
Combustion Gas Vent: No Issues Observed
These are context photos of the water heater.
 |  |  |
This shows the data plate on the water heater.

The temperature and pressure relief (TPR) valve is arguably one of the most important safety devices in a house. Should the thermostats fail inside your water heater, the TPRV allows excess pressure to "blow off," which will prevent catastrophic build up of temperature and pressure which can make water heaters explosive. I do not test the "blow off valve" during inspection as there is a risk it could stick open and testing could cause the need for a repair.
 (1) (1).jpg)
This water heater appeared to be using F.V.I.R technology. Prior to 2003 most gas water heaters had an open combustion system which made them a potential ignition source in places like garages where gasoline vapors could ignite. Starting in 2003, residential water heaters began using “F.V.I.R.” (Flammable Vapor Ignition Resistant) technology. This means that the combustion chamber is now sealed. In order to light the water heater, you must use the pilot mechanism and you can no longer use a match, like the old pilot lights. Effective July 1, 2003, all water heater manufacturers are required to build their 30,40 & 50 gallon atmospheric vent water heaters to new government standards. The American National Standards Institution (ANSI) have established these new standards to prevent accidental or unintended ignition of flammable vapors, such as those emitted by gasoline. By July 1, 2005, the ANSI Z21.10.1a-2002 standard will apply to virtually all gas fired residential water heaters with BTU ratings of 75,000 and below.
Water heaters of this design are expected to last 10 to 12 years. This unit was functioning at the time of the inspection, but should be monitored because of its age (2015 manufacture date.) I recommend installing a drip sensor (something like this, though there are many different models/manufacturers) at the base of the tank. Consider proactive replacement by a qualified plumber to avoid the damage that a water heater can cause if it begins to leak.
Modern building standards recommend having a bollard (a steel post bolted to the floor) installed in front of any equipment that a car could drive in to. This water heater did not have a bollard installed. I recommend installation of a bollard by a qualified contractor.

Regular scheduled maintenance is recommended for water heaters. In general, most homeowners seldom do preventative maintenance to their hot water heaters, which is why they have such short average service lives between 10 - 12 years. Generally the most important maintenance is regular draining of the tank to eliminate sludge build-up at the bottom of the tank. There are also sacrificial anode rods that need to be periodically replaced to reduce corrosion inside the tank. These are DIY maintenance items.
Water Temperature
Approximate Water Temperature Measured During Inspection (Fahrenheit): 127
Water temperature was high, see photo of thermometer testing the water temperature. The water temperature should be set to approximately 120 degrees Fahrenheit to prevent scalding, extend water heater life, and improve energy efficiency and conservation. The temperature can be adjusted at the water heater as a DIY repair.

 (1).jpg) |  | |
|
Hose Spigots
Inspected, appeared functional and in satisfactory condition at time of inspection other than notes, if any, below.
Additional Sinks
There was roughed in plumbing in the back Living room for a wet bar sink. This would make adding one in the future easier.

Electrical
Overview
This section covers the electrical service, panels, wiring, GFCI protection, and a representative number of lights, switches, and receptacles.
Electric Service
Inspected, appeared functional and in satisfactory condition at time of inspection other than notes, if any, below.
Service Entrance Location: SE Exterior
Service Entrance Description: Above Ground
Meter Base Rating: CL200 (up to 200 amp service)
Measured Voltage: 240
This is a photo of the electrical service entrance, meter, and any visible service wires.
 |  |  |
 |  |  |
Whole House Ground
Inspected, appeared functional and in satisfactory condition at time of inspection other than notes, if any, below.
During a home or property inspection, every effort is made to inspect the visible components of the electrical system whole house grounding. The whole house grounding system is primarily for safely discharging electrical surges from lightning strikes, which are rare in our area. There is no way in the context of a home inspection to verify the "effectiveness" of the grounding system as much of the system is not visible and there are not practical tests one can perform. Washington State Law requires inspectors to look for a whole house grounding system, but it plays a smaller role in day-to-day occupant safety than the grounding of the branch wiring. This is not the same thing as the grounding of wiring in the house, which is a significant safety issue to prevent shock/electrocution hazards for occupants.
Bonding
Inspected, appeared functional and in satisfactory condition at time of inspection other than notes, if any, below.
Visible Bonding Locations: Bonding Noted on Water Pipes, Bonding Noted on Gas Pipes
During the inspection, I attempt to visually document electrical system bonding. There is no way in the context of a home inspection to verify the "effectiveness" of system bonding. All metallic systems (metal water pipes and metal gas pipes) in the building are required to be "bonded" (connected) to the building's electrical grounding system. Bonding creates a pathway to shunt static charges (that would otherwise build up on the system) to earth, and to provide a pathway to trip a breaker in the event that these bonded metallic components became energized.
Branch Wiring
Inspected, appeared functional and in satisfactory condition at time of inspection other than notes, if any, below.
Visible Wire Material: Copper, Multi-strand Copper, Multi-strand Aluminum
Visible Wiring Type: Non-metallic sheathed cable (commonly called Romex. This is modern wiring.)
Improperly performed wire splice(s) was observed, see photo(s). Splices should be done in a covered junction box to protect the wires and reduce the risk of electrical fires. I recommend repair by a qualified electrician.

Electrical Panel
Inspected, appeared functional and in satisfactory condition at time of inspection other than notes, if any, below.
Main Electric Panel Location: Garage
Main Panel Amperage: 200 amps
Main Electrical Shut-off Location: Top of panel
Panel Manufacturer: GE
Photos of the electrical panel are provided for context.
 |  |  |
 |  |  |
 |  |  |
Arc Fault Circuit Interrupter (AFCI) breakers were not observed on all the recommended circuits in the panel. Modern building standards require most living spaces be protected by AFCI breakers which are a fire prevention device. The current version of the National Electrical Code states: "All 120-volt, single phase, 15- and 20-ampere branch circuits supplying outlets or devices installed in dwelling unit kitchens, family rooms, dining rooms, living rooms, parlors, libraries, dens, bedrooms, sunrooms, recreation rooms, closets, hallways, laundry areas, or similar rooms or areas shall be protected." I recommend having a qualified electrician install AFCI breakers on the recommended circuits as a safety improvement.
-700x500 (3).jpg)
No surge protection device was noted in the electrical panel, which started being recommended by modern building standards in 2020. I recommend installation of a surge protector by a qualified electrician.
Panel cover was missing screw(s), see photo. I recommend replacing screws with approved, flat-tipped screws. These can be purchased at any Home Depot-type store, and can be installed as a DIY project. Do not use sharp tipped screws as they can puncture wires and be an electrocution hazard.

Outlets, Switches, & Fixtures
Inspected, appeared functional and in satisfactory condition at time of inspection other than notes, if any, below.
Inspection Method: Random Testing, Interior Belongings Obstructing Access
Electric Receptacles: Three prong receptacles
Outlet(s) was not functioning, see photo(s). I recommend repair by a qualified electrician.

Non-tamper resistant outlets were observed in the house. Tamper-resistant outlets have internal shutters that help prevent access to electrical contacts unless a plug is inserted. This helps prevent shocks when items are put into outlets by themselves. This is primarily a safety improvement for children. I recommend upgrading all outlets to tamper resistant versions by a qualified electrician.
GFCI Outlets
Inspected, appeared functional and in satisfactory condition at time of inspection other than notes, if any, below.
Outlets without an obvious reset were not tested for GFCI protection as I may not be able to re-energize them after they turn off. I recommend testing the outlets in the location(s) listed below for GFCI protection using an outlet tester (like this one.) If the outlet(s) are not GFCI protected, repair by a qualified electrician is recommended.
For this house, outlets were not tested for GFCI protection in the following location(s): Exterior (often reset in the garage), Garage (often reset in the garage) and Laundry Room
During the inspection, I test all readily accessible GFCI (ground fault circuit interrupter) devices. GFCIs are important safety devices that help reduce the risk of electrical shock and save lives. These are the outlets with “test” and “reset” buttons; modern standards require them in wet areas such as kitchens, bathrooms, garages, exterior, etc.
But they can be confusing. A GFCI outlet will protect any outlets installed downstream from it; check out this video for a demonstration. If a GFCI trips, it can shut off power to multiple outlets until it is reset. If the reset location is not clear or may be obstructed, I may avoid testing that circuit to prevent leaving it disabled.
GFCI protection has also become more extensive over time. The guidelines for GFCI coverage based on the year of construction are in the image below. If the house was built prior to any of these dates, there is a decent chance that coverage is not what it should be, and I may not have been able to accurately test for it.
.jpg)
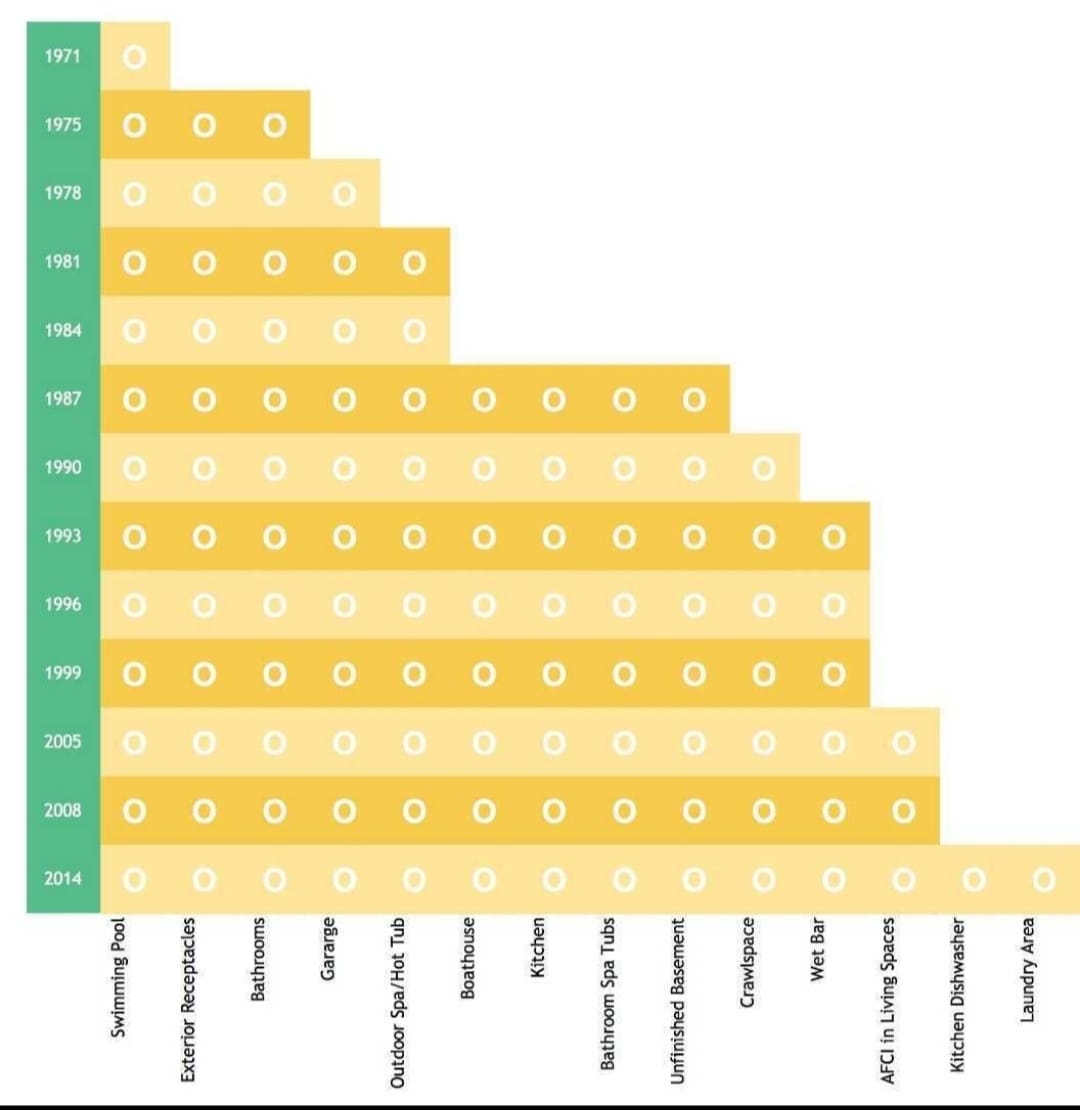 |
GFCI protected outlets in the bathrooms reset in the second level hall bathroom.
GFCI protected outlets in the kitchen reset in the kitchen.
Smoke & Carbon Monoxide Detectors
Smoke Detector Location(s), Second Level: Hall
Smoke Detector Location(s), First Level: Entry, Office, Hall
Carbon Monoxide Detector Location(s), Second Level: None Observed
Carbon Monoxide Detector Location(s), First Level: Hall
Attached Garage: Heat Detector Missing
I do not press the test button on smoke or carbon monoxide detectors. The button only confirms the detector has power, not that it can sense smoke or carbon monoxide, so it can give a false sense of security. Detectors are also sometimes connected to a home security system, and testing them can trigger an alarm response.
Smoke detectors belong in every bedroom and in a common area on every floor. Washington State requires carbon monoxide alarms outside each sleeping area, in the immediate vicinity of the bedrooms, and on each level of the home (WAC 51-51-0315). For an owner-occupied single-family home, state law requires them to be installed when the home is sold (RCW 19.27.530).
There is a common misconception that carbon monoxide (CO) detectors should be installed close to the floor because CO is heavier than air. In practice, carbon monoxide mixes readily with the surrounding air and does not typically settle near the floor. CO detectors may be installed at various heights depending on the type of detector and manufacturer requirements. Proper location within the home—particularly near sleeping areas and on each level—is more important than mounting height. Always follow the detector manufacturer’s installation instructions.
Carbon monoxide is a colorless, odorless gas that can cause sickness, nausea and even death. The installation of carbon monoxide alarms is recommended for all homes that have fuel burning appliances such as gas or oil furnaces, gas water heaters, gas ovens and cook-tops, gas fireplaces and wood stoves. In addition, Washington State law (WAC 51-51-0315) requires UL 2034 approved carbon monoxide alarms in all homes and condominiums being sold in Washington State. According to the law, at least one alarm should be installed outside of all sleeping areas (within 15 feet) and at least one on each floor of a residence.
There were no visible carbon monoxide detectors on the second level. Current building standards require a carbon monoxide detector on every floor of any residential dwelling. I recommend installation by homeowner as a DIY project.

Smoke detector(s) had yellowing plastic, see example photo. Smoke detectors are manufactured using plastic that turns yellow over time so homeowners know when to replace them. I recommend replacing yellowed smoke detector(s) with new units as the old ones might not be effective or reliable. DIY repair.

Smoke detectors were not installed in all the bedrooms. According to modern building standards, every bedroom should have a smoke detector installed inside the room. Many older houses only have smoke detectors in the hallways. I recommend adding a smoke detector to each bedroom. DIY project.
Modern building standards require a heat detector in attached garages. This garage did not have one. I recommend adding a heat detector to the garage ceiling as a DIY safety improvement.
Replace smoke detectors about every ten years and carbon monoxide detectors about every six years. Replace batteries every six months.
Low Voltage Wiring
Additional Systems: Security System
Low voltage wiring systems are outside the scope of a home inspection, and were not tested. These include systems like speaker systems, security systems, telephone wires, ethernet wires, cable wires, etc.
This house was equipped with a security system. This system is outside the scope of a home inspection and was not tested. I recommend making sure information on how to use the security system is available prior to closing.
Fuel Storage & Distribution
Overview
This section outlines the gas and/or oil source, and supply lines for appliances.
Gas Meter
Inspected, appeared functional and in satisfactory condition at time of inspection other than notes, if any, below.
Gas Service Entrance and Meter Location: NW Exterior
Main Gas Shut-off Valve Location: Left side of meter
Main Gas Shut-off Valve Location Rotation Direction: Quarter Turn Clockwise
The safety of the main gas supply line could be improved with a seismic detecting gas valve (a common model is the Northridge valve, made by Seismic Safety Products). These valves can be installed at the gas meter and will automatically shut off the gas flow in the event of an earthquake. I recommend installation of a seismic detecting gas valve by a qualified plumber.
The main gas valve at the gas meter is tight enough to require a wrench and cannot be operated by hand alone. I recommend keeping a properly sized wrench at the gas meter in case of an emergency. Wrenches for this purpose can be purchased for less than $10 (like this one.)
This photo shows the gas service entrance, meter, and main gas shut-off valve (circled.) The second photo is a close-up of the main gas shut-off valve. Rotating the valve to line up the holes will shut off gas flow to the house.
 |  |
Fuel Plumbing
Inspected, appeared functional and in satisfactory condition at time of inspection other than notes, if any, below.
There was no flexible gas connector installed on the gas line to the furnace, see photo. Flexible gas connectors are recommend in seismic areas to help prevent damage to rigid pipes that can occur during an earthquake. I recommend repair by a qualified plumber.

 |
No sediment trap was installed on the gas supply line for the furnace, see photo(s). Sediment traps help filter out any minerals or rust in the gas supply before it enters the appliance, and can increase the lifespan of the gas burners. I recommend installation of a sediment trap by a qualified plumber.
.jpg)

|
Shut-Off Valve Locations
How To: Include
Gas valves all operate with a handle that moves 1/4 turn to open/close them. If the handle is parallel to the pipe, the valve is open. If the handle is perpendicular to the pipe, the valve is closed.
This photo shows the gas shut-off valve for the furnace.
 |  |
This photo shows the gas shut-off valve for the water heater.
 |  |
Heating, Cooling, Fireplaces, & Ventilation
Overview
This section covers the heating, cooling, and ventilation equipment. I test it using its normal controls (the thermostat) when it is safe to do so. For a more thorough evaluation, I recommend contacting a licensed HVAC contractor.
Central Furnace
Inspected, appeared functional and in satisfactory condition at time of inspection other than notes, if any, below.
Location: Garage
Energy Source: Natural gas
Furnace Type: Gas forced air furnace, High Efficiency
Manufacturer: Bryant
Manufacture Date: 2002
Last Service Date: None
This house had a gas forced air furnace. A critical component to all combustion equipment like this is the heat exchanger. This is the welded clam-shell piece of metal inside the furnace that contains the products of combustion so that moisture, carbon monoxide and other products of combustion do not mix with interior air and get safely vented to the exterior. Heat exchangers on modern furnaces have an average life expectancy of 15-20 years. Unfortunately, heat exchangers are buried inside of heating equipment; they are not visible and specifically excluded from a home inspection.
 (1) (1) (1) (1) (1) (1) (1) (1) (1).PNG)
Photos of the furnace were provided for context.
 |  |  |
This shows the data plate on the furnace.

I recommend inspection and service of the furnace by a qualified HVAC company as I could not find any maintenance records. This will help ensure the furnace is operating safely and efficiently.
Furnaces are expected to last for 20 years. This furnace was beyond its life expectancy (2002 manufacture date.) While it was functioning at the time of the inspection, recommend budgeting for replacement in the near future.
Furnaces should be serviced annually to verify safe and efficient operation. With proper maintenance, the life expectancy of a furnace is 20 years.
Central Furnace Vents & Flues
Inspected, appeared functional and in satisfactory condition at time of inspection other than notes, if any, below.
Central Furnace Air Filter
Inspected, appeared functional and in satisfactory condition at time of inspection other than notes, if any, below.
Filtration Systems: None found
No air filter was found for the heating system. A filter is critical for the furnace to perform as intended. I recommend installation of a filter by a qualified HVAC contractor. They will know the correct location to add one.
Central Heat Distribution Systems
Inspected, appeared functional and in satisfactory condition at time of inspection other than notes, if any, below.
Distribution Method: Forced Air / Ducts
Heat Source in Each Required Room: Present
Thermal images show some functioning ductwork. I use these images just to show the system was generally functioning during inspection. These are representative photos; not every heat register is photographed, but all visible ones were viewed with a thermal camera while the furnace was running. If any did not appear to be operating, there will be a note in this report.
 |  |  |
 |  |  |
 |  |  |
 |  |  |
 |  |  |
 |
Central Heat Thermostat(s)
Inspected, appeared functional and in satisfactory condition at time of inspection other than notes, if any, below.
Location(s): First Level Hall
Thermostats were not checked for calibration or timed functions.
This is a photo of the thermostat.

Solid Fuel Fireplaces
Inspected, appeared functional and in satisfactory condition at time of inspection other than notes, if any, below.
Locations: Front Living Room
Fireplace Types: Prefabricated metal firebox
The NFPA (National Fire Protection Association) recommends an annual inspection of all chimneys, fireplaces, solid fuel-burning appliances, and vents. They also recommend an NFPA 211 Standard, Level II inspection upon sale or transfer of the property. A Level II inspection includes not only cleaning the interior of the chimney pipe, but also the use of specialized tools and testing procedures such as video cameras, etc. to thoroughly evaluate the serviceability of the entire flue lining and fireplace/chimney system. Level II inspections are not always needed, especially for short simple flues that can be inspected visually after a cleaning. If a chimney cleaning has not been performed over the past 12 months, such an inspection is recommended before home changes ownership---for fire safety reasons. Implement any repairs as recommended.
The wood burning fireplace had a damper in the chimney. This is designed to keep cold air out of the house when the fireplace is not in use. Be sure to keep the flue damper closed during the heating season when the fireplace is not in use to prevent heat loss.
 (3).PNG)
Mechanical Ventilation Systems
Bath Fan Ducting: Not Visible
Kitchen Fan Ducting: Not Visible
Laundry Room Fan Ducting: Not Visible
Determining proper ventilation to the exterior from ventilation fans can be tricky as exhaust fan ductwork is often concealed behind finishes and fan terminations can be all over the house from the roof to the foundation, presenting difficulties for systematically checking every fan termination. During the inspection, every effort is made to verify proper terminations of fan vents to the exterior, but it is possible to miss something that is concealed behind finished surfaces.
Scope & Limitations
Inspection Disclaimers
About This Inspection: About This Inspection
Outside the Scope of This Inspection:Outside the Scope of This Inspection
Thermal Imaging:Thermal Imaging
Appliance Testing:Appliance Testing
About This Inspection
A home inspection is a limited, visual, non-invasive evaluation of the home's condition on the day of the inspection. Its purpose is to reduce, not eliminate, the risk of buying or selling a property. We inspect the parts of the home that can be seen without dismantling or damaging anything and without moving furniture or stored items. Concealed or inaccessible areas are not included, and some systems can't be fully tested without risking damage. Where moisture readings are noted, a Protimeter Surveymaster was used.
We follow the Washington State Standards of Practice for home inspectors (WAC 308-408C) and the InterNACHI Standards of Practice and focus on whether systems are functioning and safe. This inspection is not technically exhaustive, and it is not a code-compliance inspection. Building standards change over time, so older homes typically don't meet every current standard, and there is generally no requirement to update them unless substantial renovation is done.
This report is not a warranty, guarantee, or insurance policy. Home warranties can be purchased separately. The observations in this report are our professional opinion. Other inspectors and contractors may have differing opinions, and you are welcome to seek them.
Outside the Scope of This Inspection
Square footage and bedrooms: Approximate square footage and the number of bedrooms are provided as a courtesy from public records, disclosures, or the MLS listing. Measuring square footage and verifying property lines are beyond the scope of this inspection. Any non-conforming bedrooms we observed are noted in this report.
Mold and indoor air quality: Mold testing and indoor air quality are beyond the scope of this inspection. Any suspected mold, or conditions conducive to mold, that we observed are reported. If mold or air quality is a concern, we recommend further evaluation by a specialist.
Radon: Radon testing is not included. According to the EPA, the Seattle area has a low risk for radon (see EPA map). If radon is a concern, we recommend contacting a company that provides radon testing. Accurate testing takes 48 hours or more.
Thermal Imaging
We used a thermal imaging camera to check walls and ceilings for thermal anomalies and to verify that certain appliances were working. Thermal images are paired with a regular photo of the same view. Thermal imaging can reveal clues to concealed moisture or missing insulation and air barriers, but it is limited and is not a complete thermal map of the house. Recent weather can significantly affect the results. Incomplete air and thermal barriers are common in older homes, so we only report areas that appear significantly deficient.
Appliance Testing
We tested appliances for basic function, and any operational defects we found are listed in this report. An appliance turning on and running doesn't necessarily mean it's working effectively, and testing every feature and setting isn't feasible during an inspection.
Checking Out Procedure
Check Out List
Lights Off:People Still In House
Heating and Cooling Restored to Pre-Inspection Temperatures:Yes
Doors & Windows Locked:People still in house
Appliances Off / Finishing Cycle:Yes
GFCI Outlets Reset:Yes
Sewer Scope
Sewer Scope of Sewer Lateral
Inspected, appeared functional and in satisfactory condition at time of inspection other than notes, if any, below.
Sewer Scope Access Location: Crawl Space by Entrance Hatch
Limitations: Sewer line obstructed
Sewer Lateral Materials: ABS (black plastic)
This is a photo of where I accessed the sewer line for the sewer scope.

This is the video of the sewer scope.


The sewer line was obstructed with major grease buildup to the point that I could not push my camera all the way through the line, see example photo and videos in the Sewer Scope section of the full report. I could only get my camera out about 15 feet, not even through the plumbing in the crawl space. A blockage like this can lead to clogs and backups of the sewer line. I recommend cleaning of the line by a qualified contractor (hydro-jetting is preferred) then rescoping of the entire sewer by a qualified plumber or inspector once the line has been cleared.
