

Jeffrey Howard, License #3672
The Scope and Purpose of a Home Inspection
Purchasing property involves risk
The purpose of a home inspection is to help reduce the risk associated with the purchase of a structure by providing a professional opinion about the overall condition of the structure. A home inspection is a limited visual inspection and it cannot eliminate this risk. Some homes present more risks than others. We cannot control this, but we try to help educate you about what we don’t know during the inspection process. This is more difficult to convey in a report and one of many reasons why we recommend that you attend the inspection.
A home inspection is not an insurance policy
This report does not substitute for or serve as a warranty or guarantee of any kind. Home warranties can be purchased separately from insuring firms that provide this service.
A home inspection is visual and not destructive
The descriptions and observations in this report are based on a visual inspection of the structure. We inspect the aspects of the structure that can be viewed without dismantling, damaging or disfiguring the structure and without moving furniture and interior furnishings. Areas that are concealed, hidden or inaccessible to view are not covered by this inspection. Some systems cannot be tested during this inspection as testing risks damaging the building. For example, overflow drains on bathtubs are generally not tested because if they were found to be leaking they could damage the finishes below. Our procedures involve non-invasive investigation and non-destructive testing which will limit the scope of the inspection.
This is not an inspection for code compliance
This inspection and report are not intended for city / local code compliance. During the construction process structures are inspected for code compliance by municipal inspectors. Framing is open at this time and conditions can be fully viewed. Framing is not open during inspections of finished homes, and this limits the inspection. All houses fall out of code compliance shortly after they are built, as the codes continually change. National codes are augmented at least every three years for all of the varying disciplines. Municipalities can choose to adopt and phase in sections of the codes on their own timetables. There are generally no requirements to bring older homes into compliance unless substantial renovation is being done.
This is just our opinion
Construction techniques and standards vary. There is no one way to build a house or install a system in a house. The observations in this report are the opinions of the home inspector. Other inspectors and contractors are likely to have some differing opinions. You are welcome to seek opinions from other professionals.
The scope of this inspection
This inspection will include the following systems: exterior, roof, structure, drainage, foundation, attic, interior, plumbing, electrical and heating. The evaluation will be based on limited observations that are primarily visual and non-invasive. This inspection and report are not intended to be technically exhaustive.
Your expectations
The overall goal of a home inspection is to help ensure that your expectations are appropriate with the house you are proposing to buy. To this end we assist with discovery by showing and documenting observations during the home inspection. This should not be mistaken for a technically exhaustive inspection designed to uncover every defect with a building. Such inspections are available but they are generally cost-prohibitive to most homebuyers.
Your participation is requested
Your presence is requested during this inspection. A written report will not substitute for all the possible information that can be conveyed verbally by a shared visual observation of the conditions of the property.
How to Read This Report
Getting the Information to You
This report is designed to deliver important and technical information in a way that is easy for anyone to access and understand. If you are in a hurry, you can take a quick look at our "Summary Page” and quickly get critical information for important decision making. However, we strongly recommend that you take the time to read the full Report, which includes digital photographs, captions, diagrams, descriptions, videos and hot links to additional information.
The best way to get the layers of information that are presented in this report is to read your report online (the HTML version), which will allow you to expand your learning about your house. You will notice some words or series of words highlighted in blue and underlined – clicking on these will provide you with a link to additional information. The HTML version of this report also contains streaming videos. Short video clips often contain important information and critical context and sounds that can be difficult to capture in words and still pictures.
For the most reliable viewing experience, I recommend viewing the report on as large a screen as practical, as much detail can be lost on small devices like smart phones. For similar reasons, reports should only be printed in color to retain as much detail as possible and minimize misinterpretation of photographs.
This report can also be printed on paper or to a PDF document.
Chapters and Sections
This report is divided into chapters that parcel the home into logical inspection components. Each chapter is broken into sections that relate to a specific system or component of the home. You can navigate between chapters with the click of a button on the left side margin.
Most sections will contain some descriptive information done in black font. Observation narrative, done in colored boxes, will be included if a system or component is found to be significantly deficient in some way or if we wish to provide helpful additional information about the system or the scope of our inspection. If a system or component of the home was deemed to be in satisfactory or serviceable condition, there may be no narrative observation comments in that section and it may simply say “tested,” or “inspected.”
Observation Labels
All narrative observations are colored, numbered and labeled to help you find, refer to, and understand the severity of the observation. Observation colors and labels used in this report are:
- Summary Statement:
- Major Concern:Repair items that may cost significant money to correct now or in the near future, or items that require immediate attention to prevent additional damage or eliminate safety hazards.
- Repair:Repair and maintenance items noted during inspection. Please note that some repair items can be expensive to correct such as re-finishing hardwood floors, but are considered simply repair items due to their cosmetic nature.
- Recommended Maintenance:These are repair items that should be considered "routine home ownership items," such as servicing the furnace, cleaning the gutters or changing the air filters in the furnace.
- Improve:Observations that are not necessarily defects, but which could be improved for safety, efficiency, or reliability reasons.
- Monitor:Items that should be watched to see if correction may be needed in the future.
- Due Diligence:Observation such as a buried oil tank that may require further investigation to determine the severity and / or urgency of repair.
- Efficiency:Denotes observations that are needed to make the home more energy efficient as well as to bring the home up to modern insulation standards. This category typically includes windows and insulation. Other items, such as lighting and appliances, are not inspected for their energy status.
- Note:Refers to aside information and /or any comments elaborating on descriptions of systems in the home or limitations to the home inspection.
- Description:Detailed description of various aspects of the property noted during the inspection.
Pest Inspection
All items with the bug logo (![]() ) are part of a structural pest inspection. If your inspector included a structural pest inspection as a part of the scope of your home inspection, you can distinguish pest inspection items by this logo. You can also go to the pest inspection summary page to see a summary of the items that are part of a pest inspection.
) are part of a structural pest inspection. If your inspector included a structural pest inspection as a part of the scope of your home inspection, you can distinguish pest inspection items by this logo. You can also go to the pest inspection summary page to see a summary of the items that are part of a pest inspection.
Summary Page
The Summary Page is designed as a bulleted overview of all the observations noted during inspection. This helpful overview is not a substitution for reading the entire inspection report. The entire report must be read to get a complete understanding of this inspection report as the Summary Page does not include photographs or photo captions.
This summary page is not the entire report. The complete report may include additional information of interest or concern to you. It is strongly recommended that you promptly read the complete report. For information regarding the negotiability of any item in this report under the real estate purchase contract, contact your North Carolina real estate agent or an attorney.
Moisture Meter Testing
Where moisture meter testing is indicated in this report a Flir MR160 was used.
Summary
Summary Statement
This summary page is not the entire report. The complete report may include additional information of interest or concern to you. It is strongly recommended that you promptly read the complete report. For information regarding the negotiability of any item in this report under the real estate purchase contract, contact your North Carolina real estate agent or an attorney.Major Concerns
- GC-2 General Comments:
No major concerns were found during this inspection.
Repairs
- G1-3 Grounds:
The wood fencing material can be stained as desired to better preserve the wood.
- DPB-1 Decks, Porches and Balconies:
The deck ledger board has not been bolted to the house in accordance with current code. This risks deck failure as the ledger attachment to the house could pull free. I recommend installing an attachment system that conforms to recommended minimum standards in the NC Building Code, Appendix M Wood Decks. See section AM104.1 on this Appendix. The requirements for the number of lag screws or bolts varies depending on the span of the floor joists, with a span up to 8' from the wall of the house requiring 1 bolt every 3'6", and for spans up to 16' from the wall requiring 1 bolt every 18". I recommend the installation of an additional bolt in every joist space that does not have one.
- ESDW-1 Exterior Siding, Doors and Windows:
Localized siding repairs are needed to the exterior vinyl siding system. Please note that vinyl siding is impossible to see behind and it is difficult to determine if these defects have allowed water to enter the siding envelope or not. Hire a vinyl siding specialist to further evaluate and repair. Examples of repair items and red flags found during the inspection include:
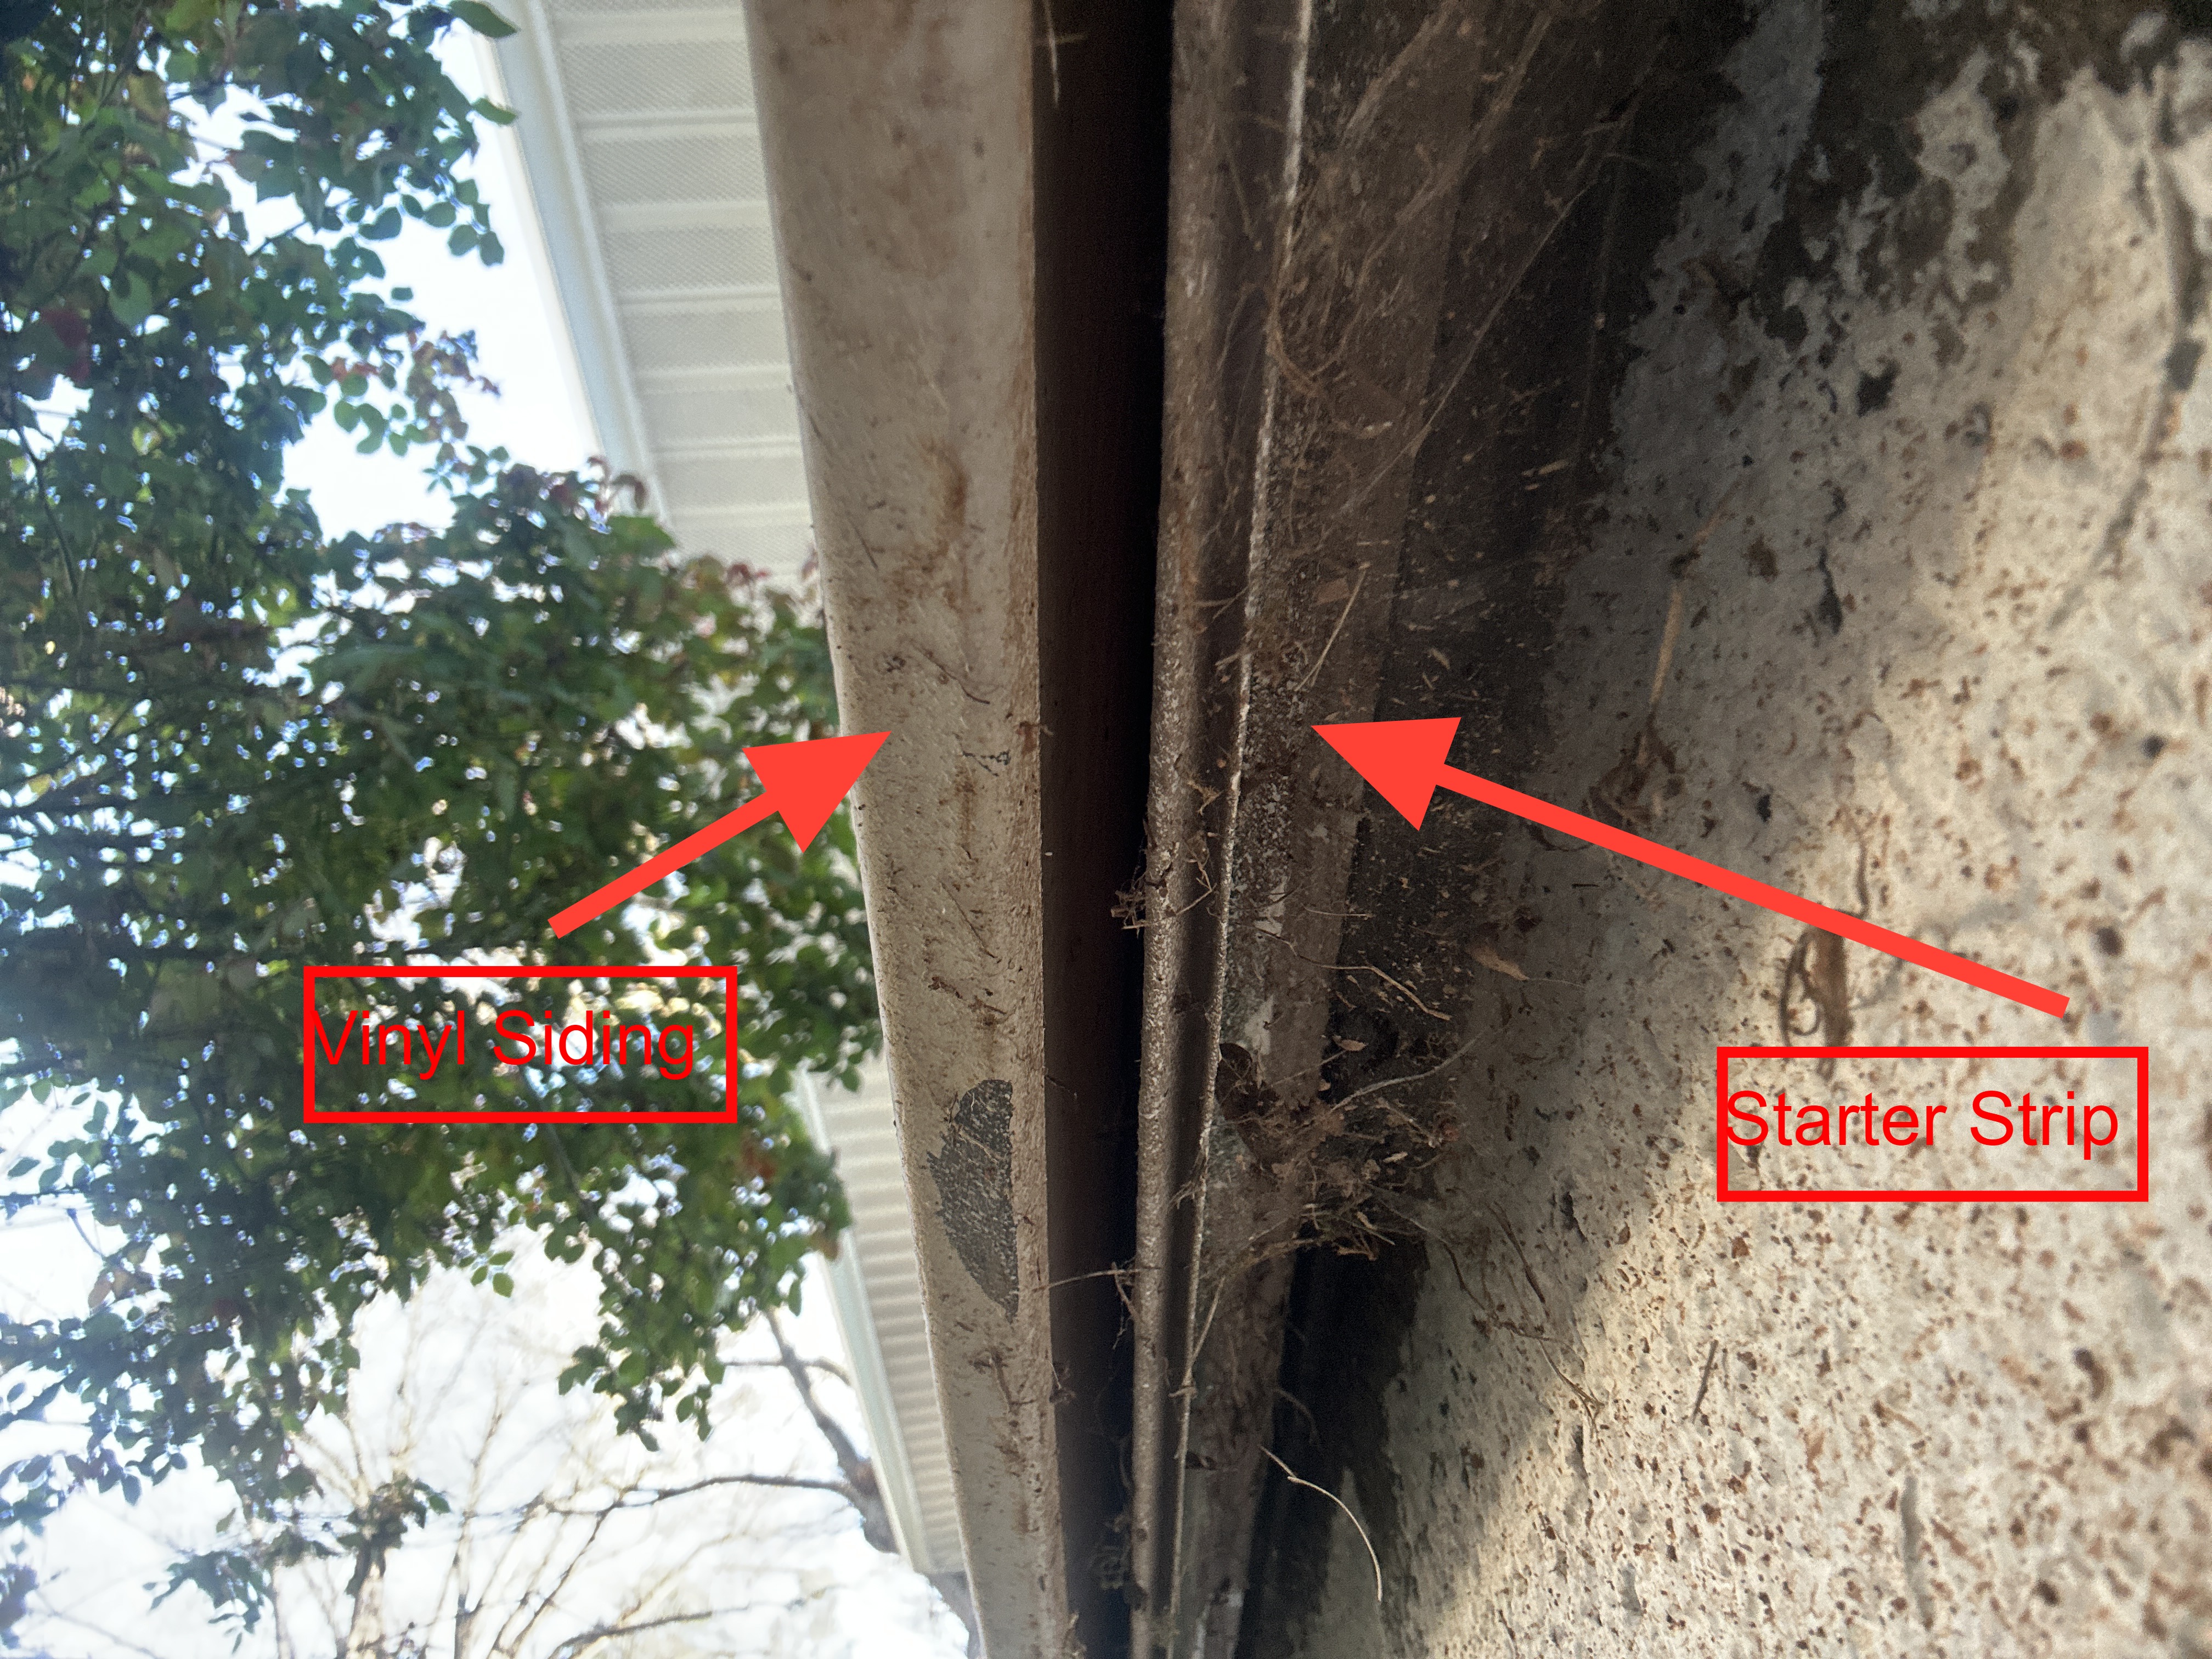
- Bottom course of the siding is loose and not connected to the starter strip on the right side and right rear portions of the residence.
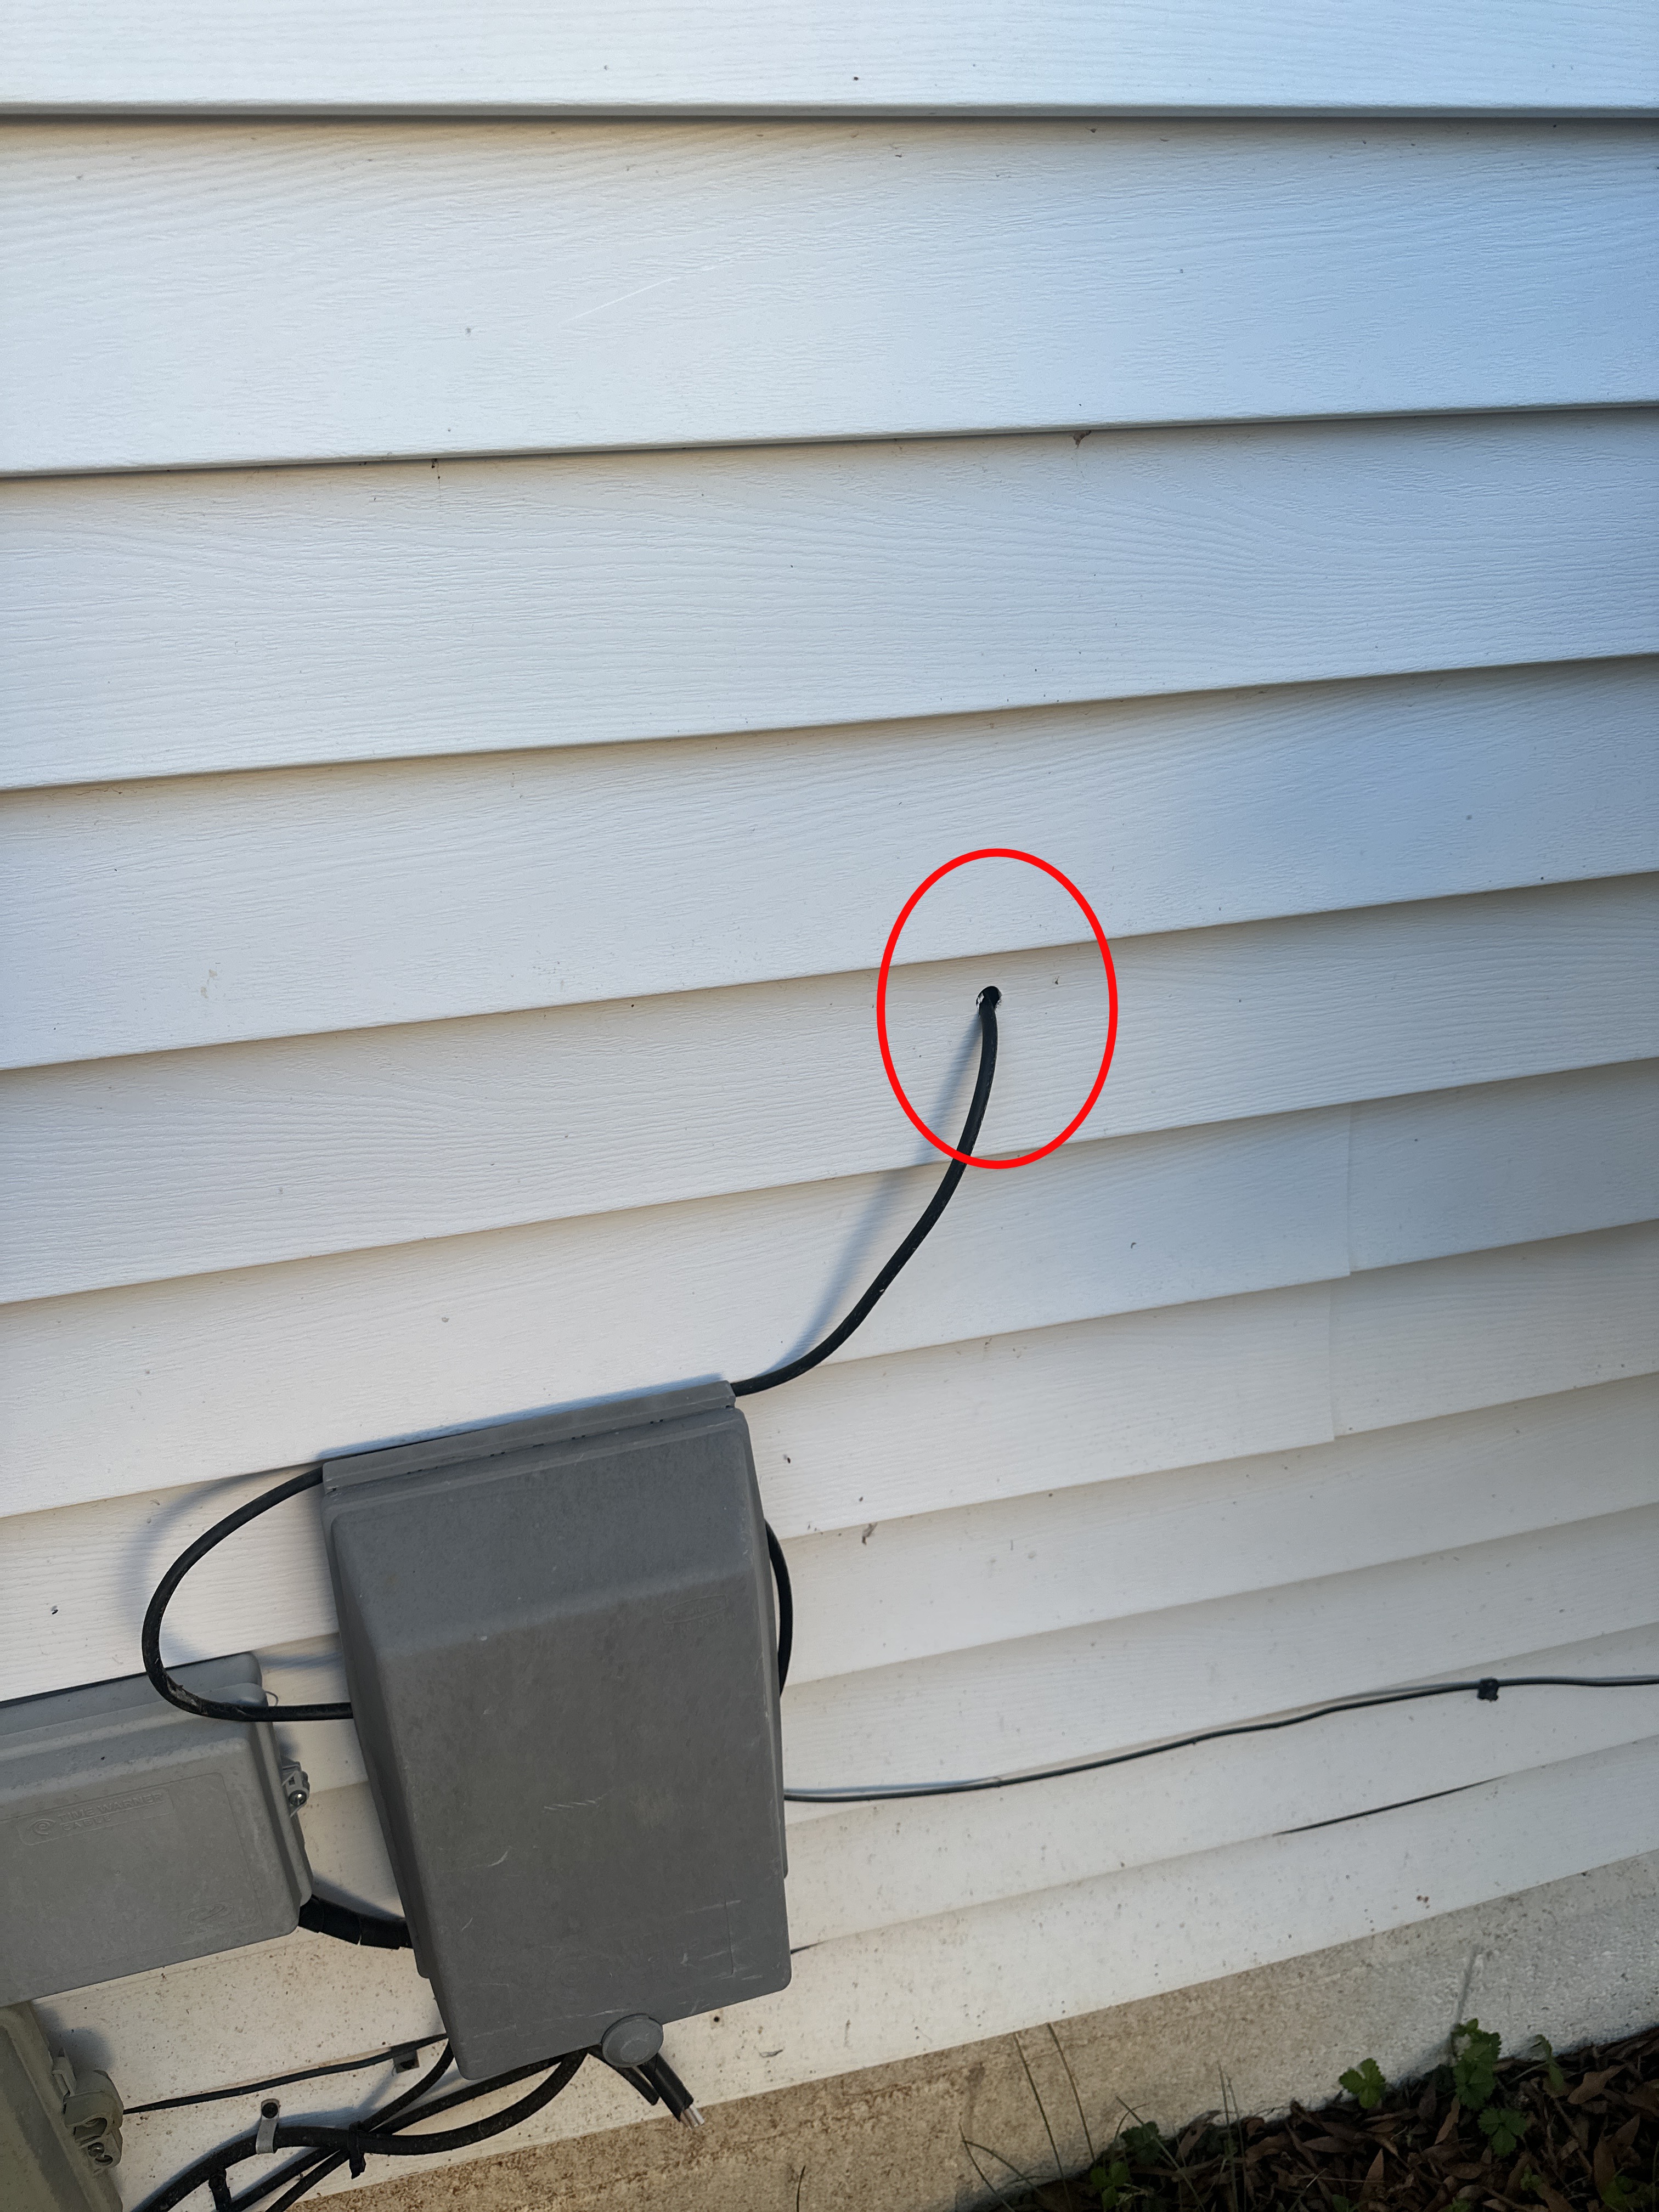
- The hole where a CATV in entering the residence should be sealed with silicone caulk.
- Siding is trimmed too high above the flashing for the water heater top. I recommend additional flashing be inserted to prevent water from splashing behind the siding and saturating the siding underneath.
- The caulk along the side of the water heater cabinet is starting to deteriorate. I recommend replacing it with clear or white silicone caulk.
- The siding on the right side of the water heater cabinet is improperly installed. I recommend reinstallation by a qualified person.
- Small holes were noted in the siding in several places as indicated in photos. I recommend these holes be covered with clear or white silicone caulk.
- ESDW-2 Exterior Siding, Doors and Windows:
The sealant used to seal the HVAC line penetration into the attic is not the proper kind of material to use, and can absorb moisture. I recommend covering this foam sealant with silicone caulk or replacing the ventilated soffit pieces with ones cut to fit properly.
- ESDW-3 Exterior Siding, Doors and Windows:
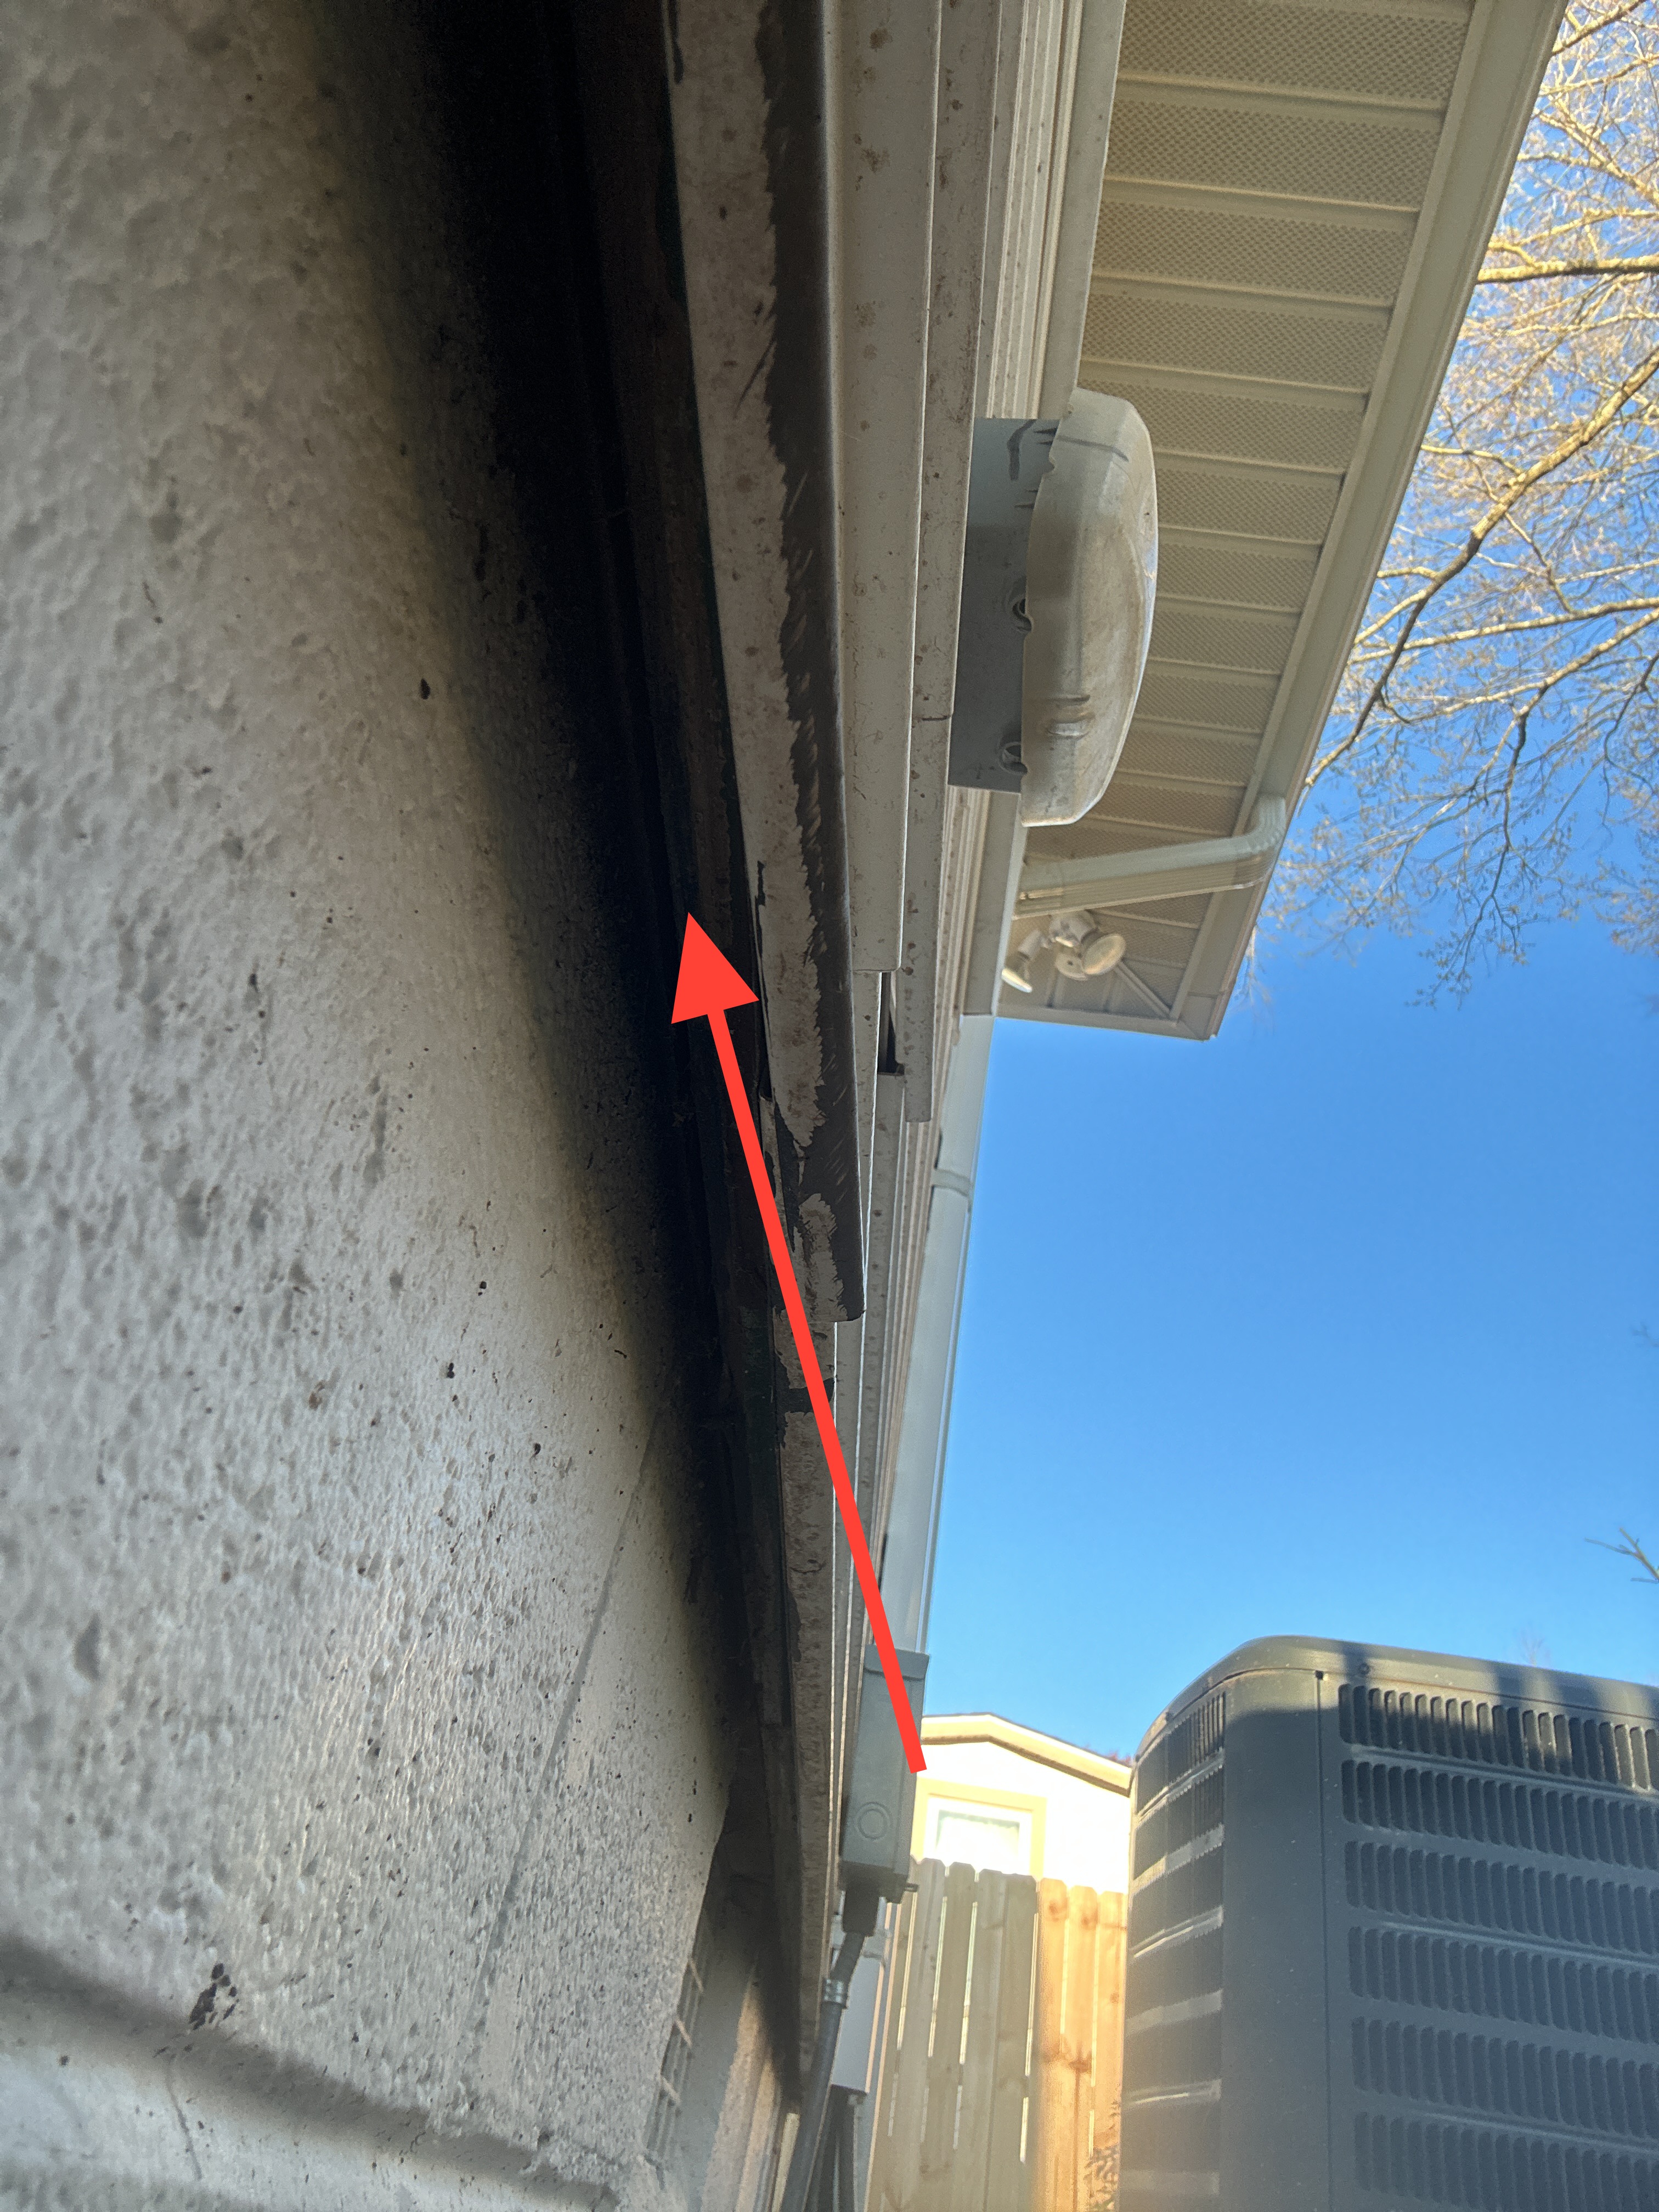
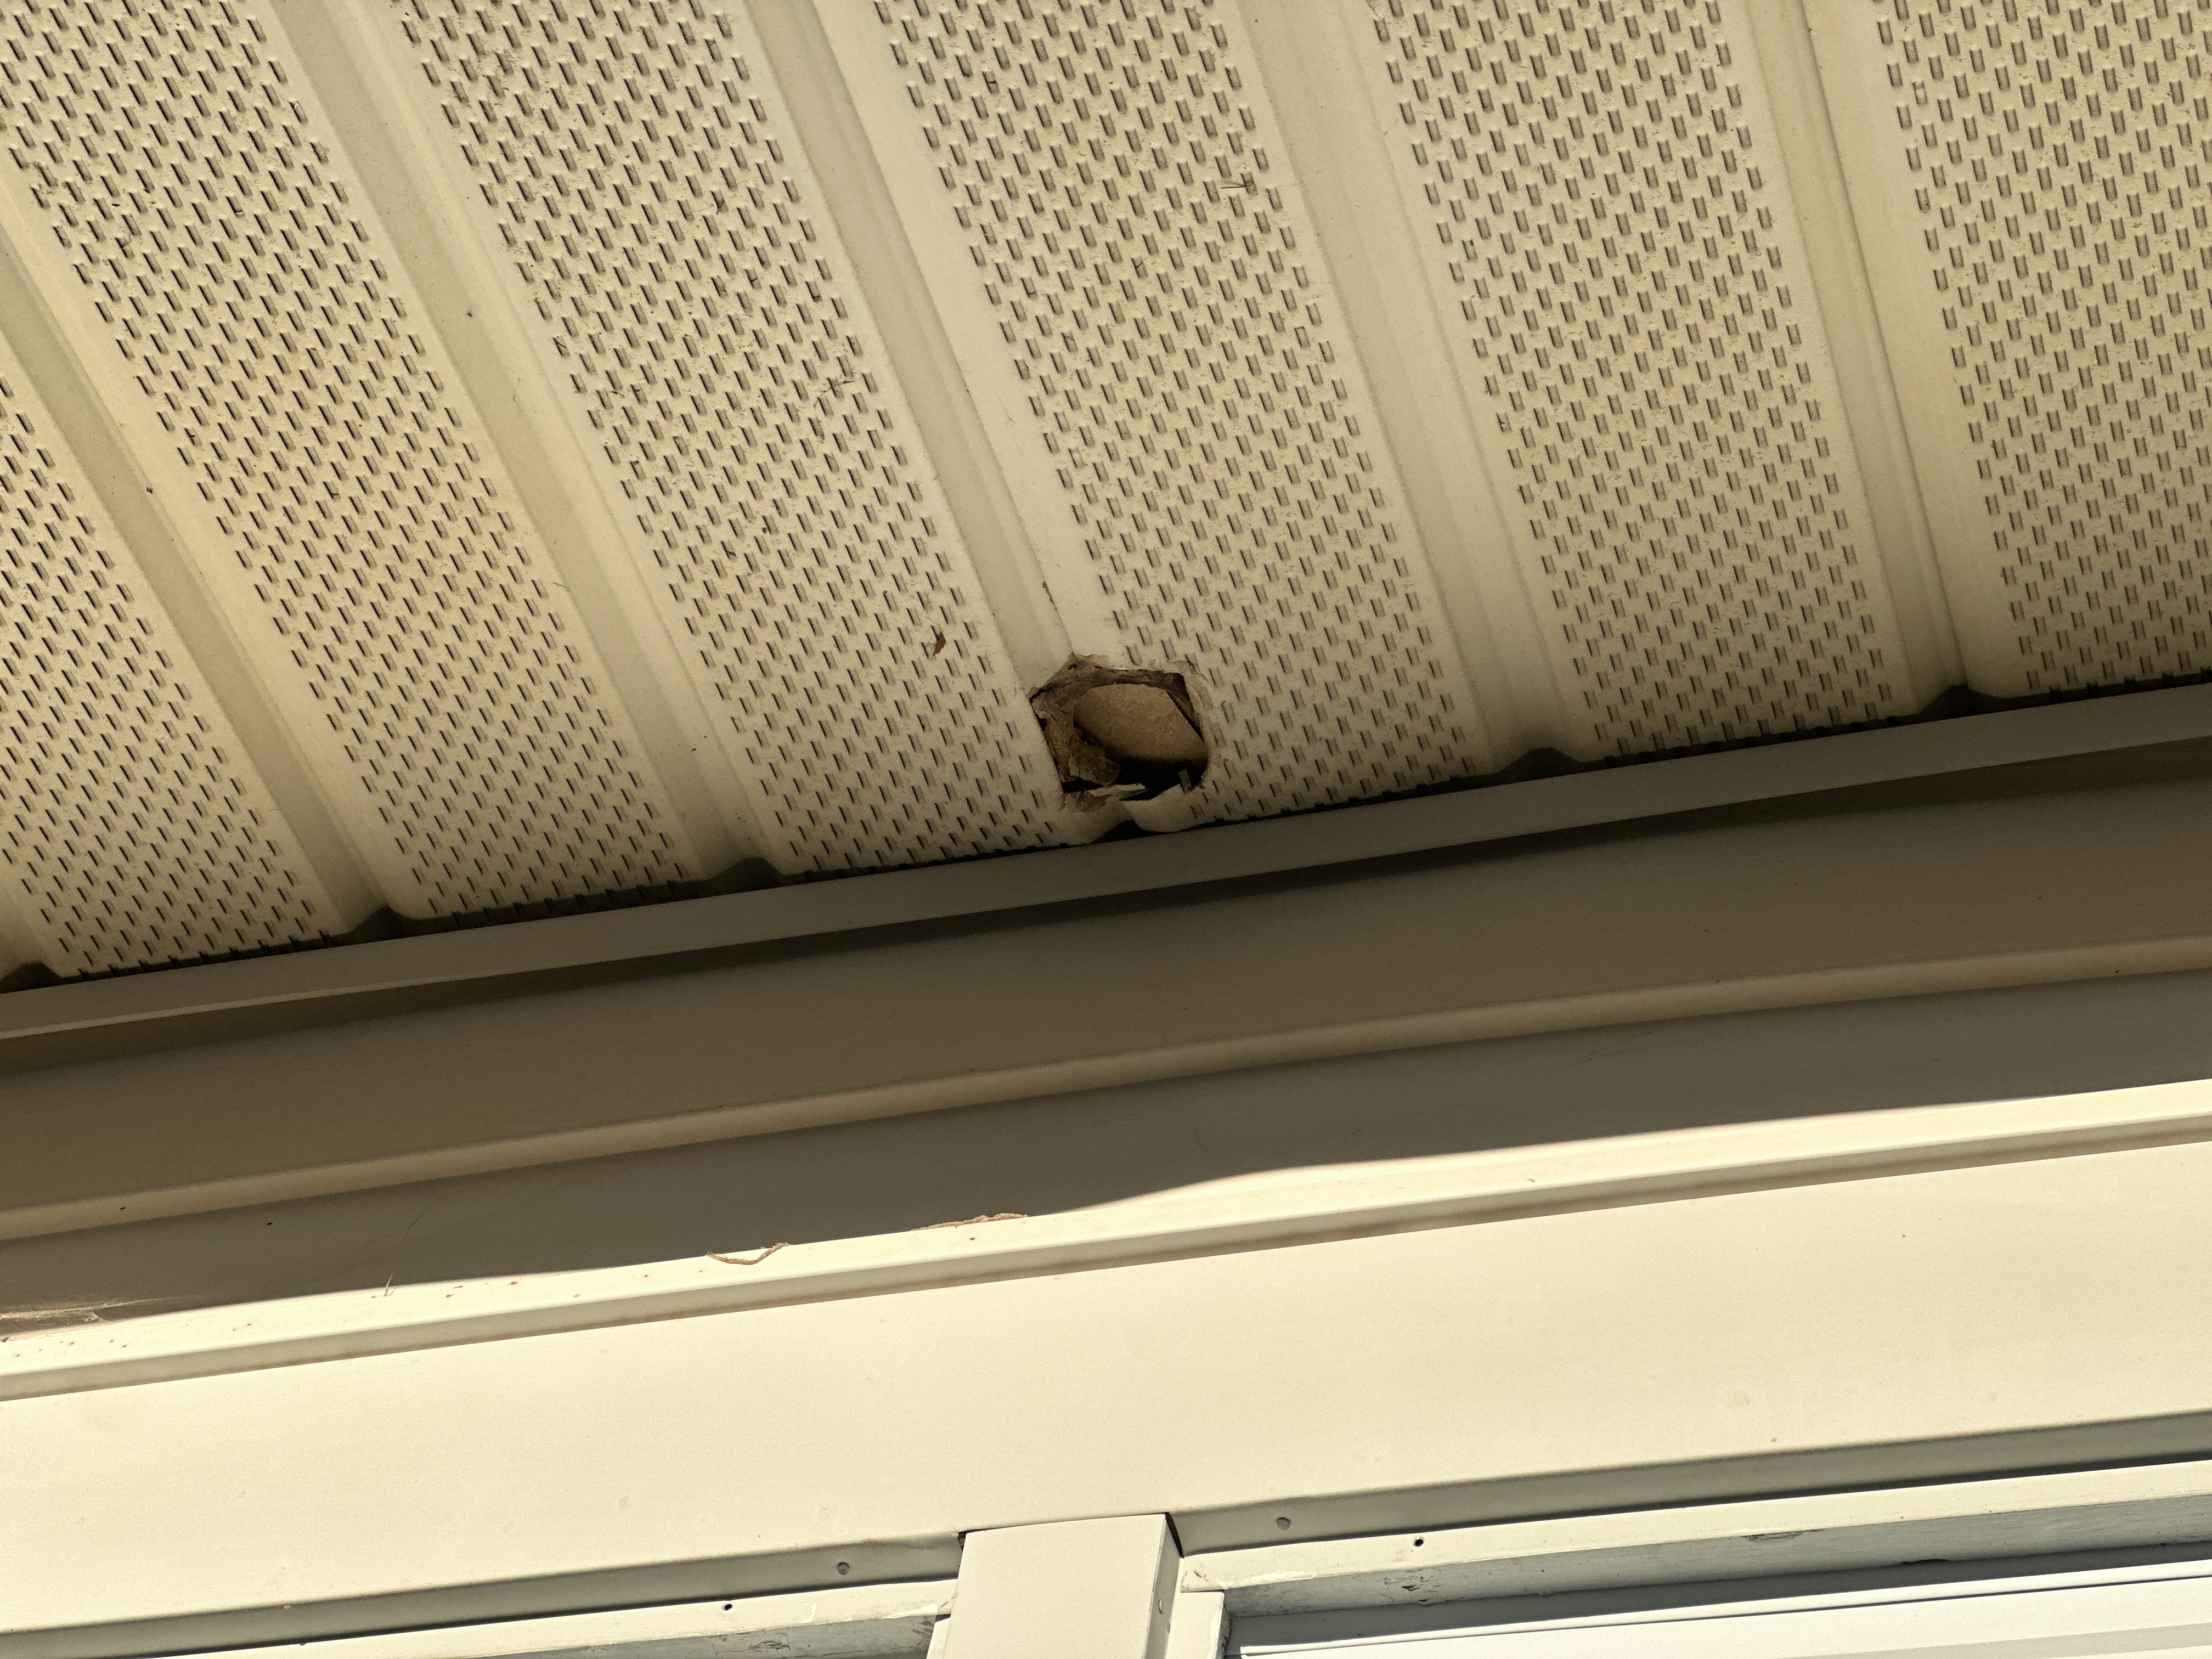
The hole in the ventilated soffit should be patched or covered to prevent bugs or birds from entering the attic space.
- ESDW-4 Exterior Siding, Doors and Windows:
The wood window frames require paint and caulking maintenance, see particularly at the exposed sills.
- RCG-1 Roof, Chimney and Gutters:
This roof is done in an architectural grade composition shingle. The roof looks does not appear to be close to the end of its useful service life, however a localized areas of concern was noted. Near the top of one of the hips, the shingles have more than normal wear, the fiberglass mat is exposed due to granule loss. The balance of the roof does not appear to have this amount of wear. This could be due to a bad pack of shingles or manufacturers defect. No evidence of a leak was found at the time of the inspection. I recommend having a roofer inspect this area and determine if limited replacement of this area is warranted.
- RCG-2 Roof, Chimney and Gutters:
One shingle was found to have a hole in it, from a roofing nail that was not fully set. I recommend the nail be fixed, and the hole filled with roofing cement.
- RCG-4 Roof, Chimney and Gutters:
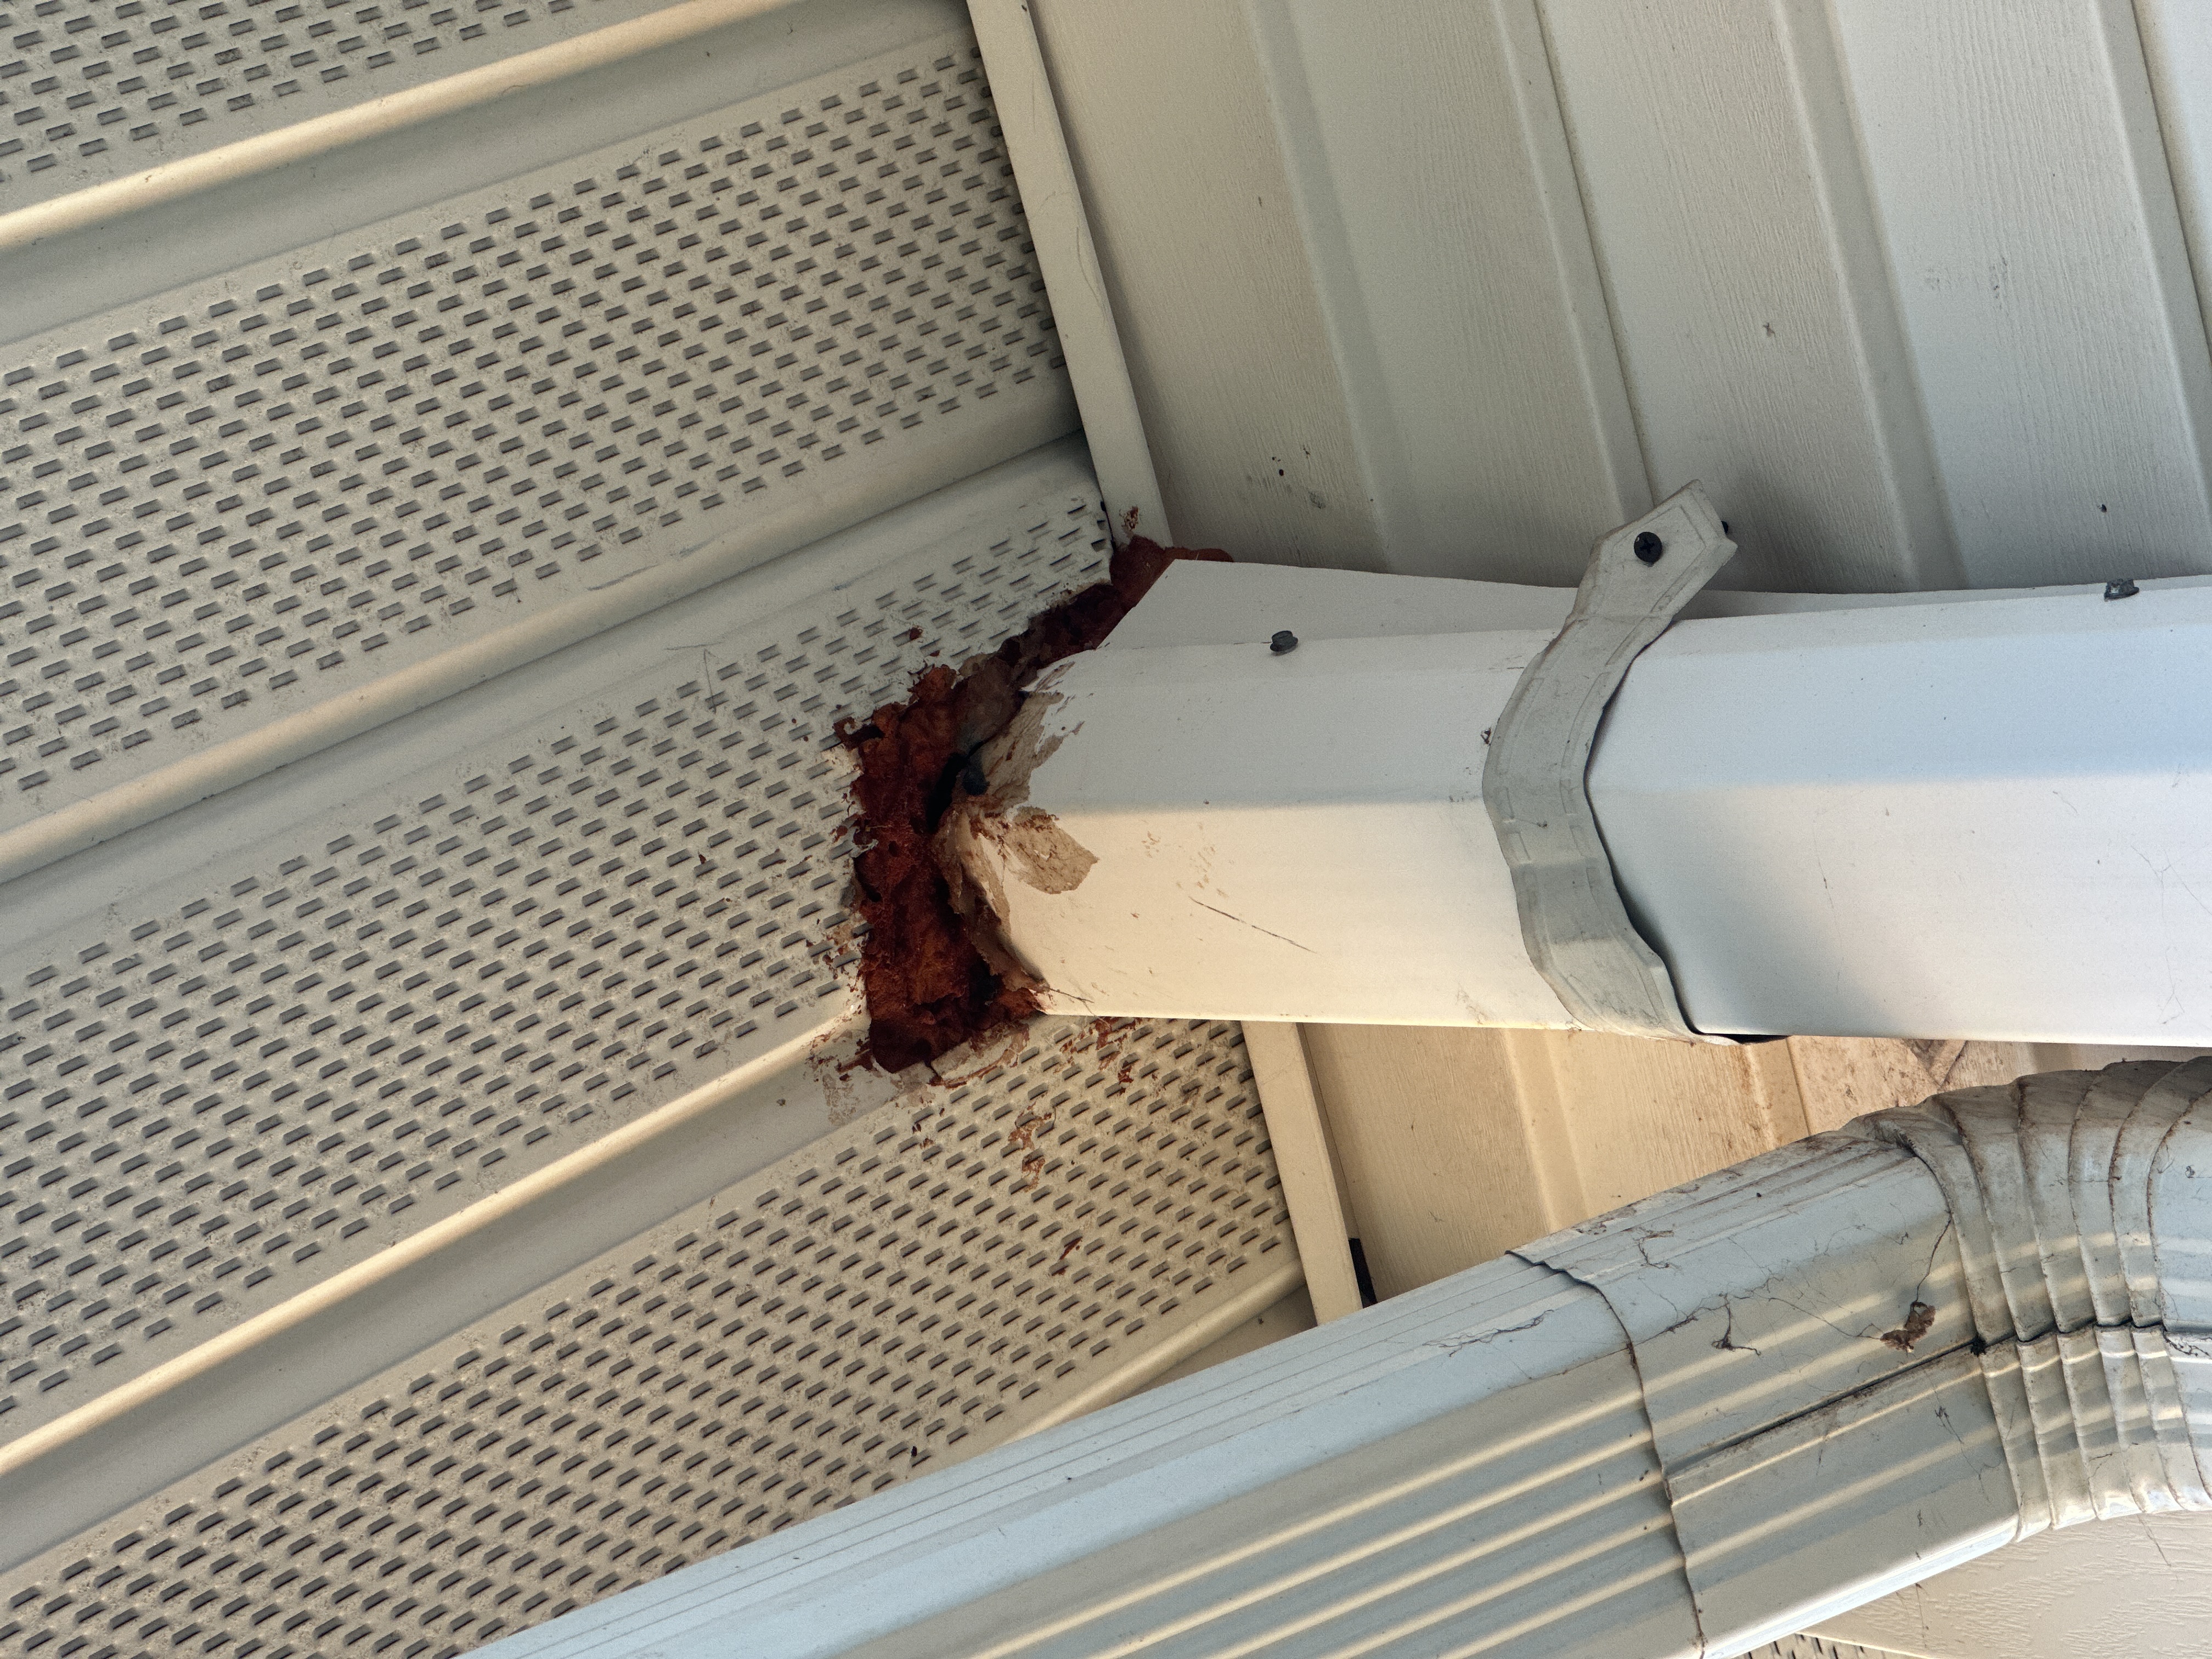
One downspout at the front of the house was found to be disconnected. I recommend the reconnection of this downspout to ensure water is carried away from the residence, and not deposited on the siding.
- FSD-1 Fuel Storage and Distribution:
There is a gas shutoff located at the meter. See the photo(s) for details.
- FSD-2 Fuel Storage and Distribution:
The piping leading to or from the gas meter was noted to have some rust on it. The piping between the meter and the residence is the responsibility of the homeowner. I recommend cleaning the rust off the pipe with a wire brush and painting the pipe a matching color. If rust is noted on the pipe before the meter or on the meter itself, contact your gas company for maintenance.
- EDFW-1 Electric Distribution and Finish Wiring:
The open electrical junction box in the crawl space needs to be covered for improved safety. This is as simple as installing a cover plate over the box to protect the wiring. Sometimes, an extension ring is needed if finishes are covering the box. Repair as needed for improved safety.
- EDFW-2 Electric Distribution and Finish Wiring:
The non-metallic sheathed cable is poorly supported and requires staples or hangers for additional support and strain relief in the attic and crawlspace. This type of wiring should be supported every 4 feet and within 2 feet of junction boxes.
- EDFW-3 Electric Distribution and Finish Wiring:
The wiring near the attic access is not protected from physical damage. All wiring within 6 feet of the access requires such protection. Use raceways or wood blocking as needed to protect this wire.
- EDFW-5 Electric Distribution and Finish Wiring:
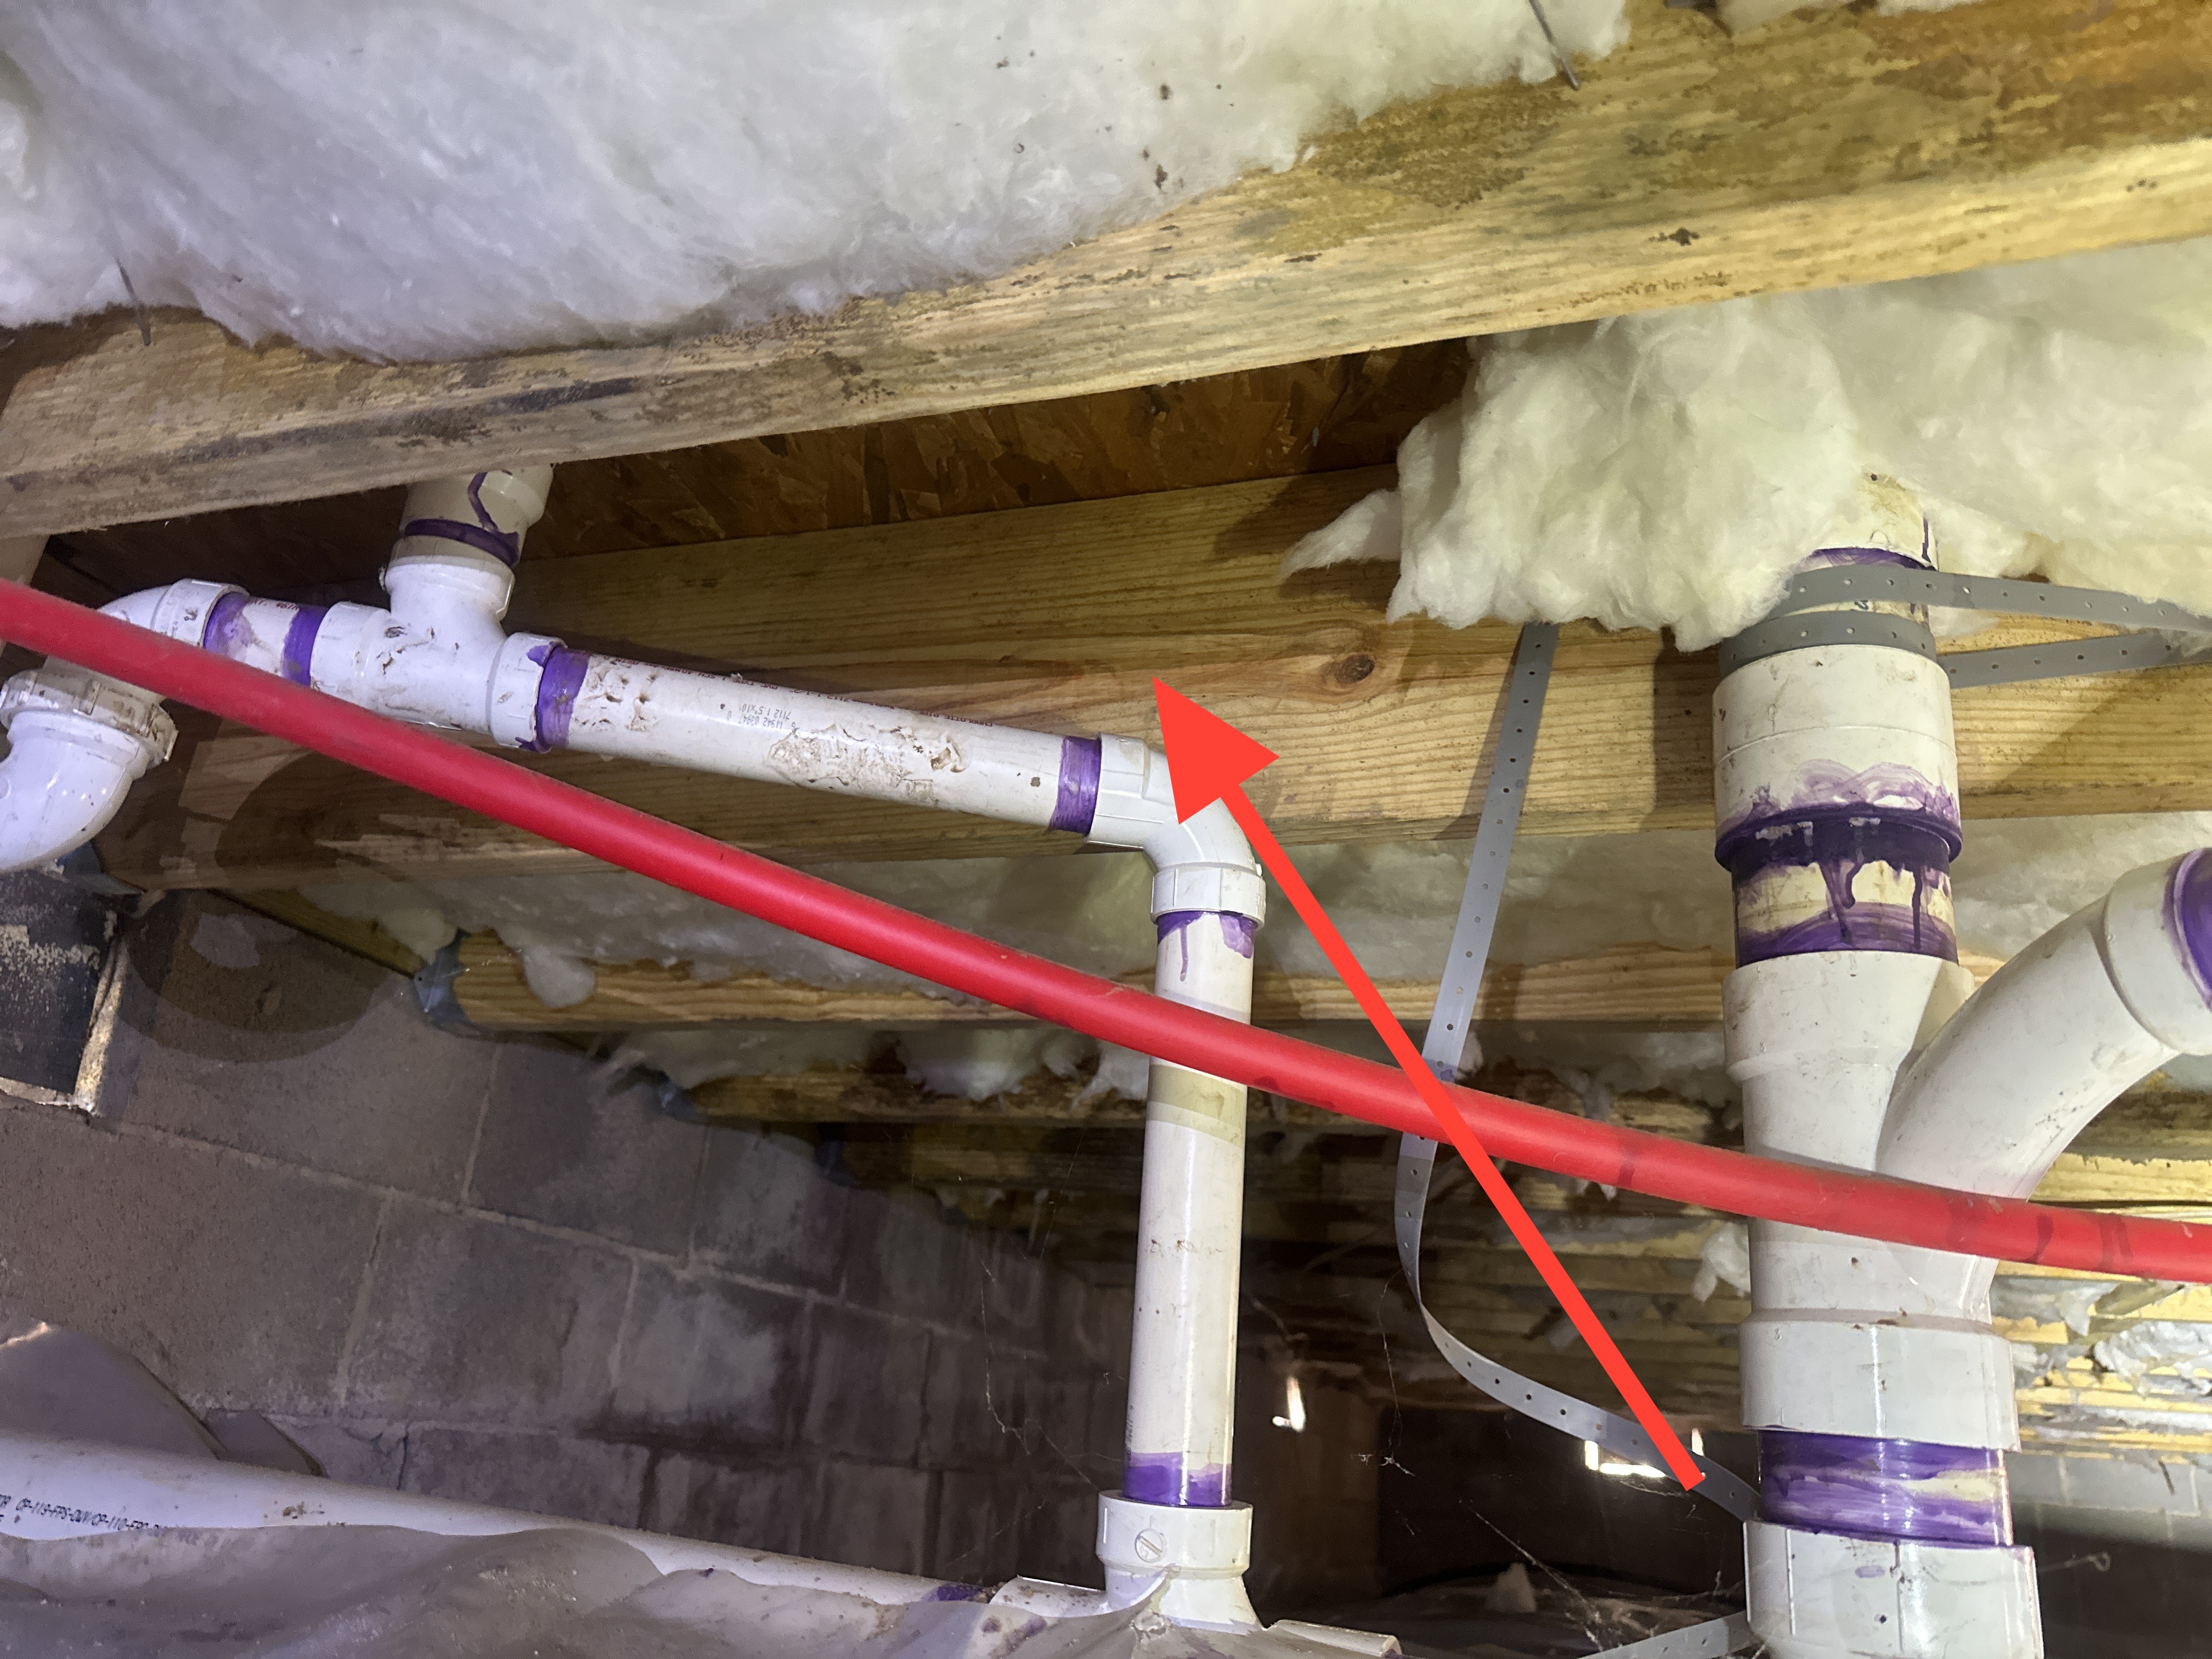
The open electrical splices in the crawl space should be further evaluated and repaired by a licensed electrical contractor. All wiring splices should be contained inside listed junction boxes. Open or running splices are a sign of amateur or incomplete electrical work and could indicate a need for additional repairs that are latent or concealed. Have this further evaluated and repaired as recommended by a licensed electrical contractor.
- EDFW-6 Electric Distribution and Finish Wiring:
The exterior receptacle cover is damaged and requires replacement. Use the modern "in-use" receptacle covers designed for outdoor use which employs large plastic water-resistant covers.
- EDFW-7 Electric Distribution and Finish Wiring:
One exterior light fixture has a halogen bulb which is missing the weatherproof lens. I recommend replacing the bulb with a new one.
- EDFW-11 Electric Distribution and Finish Wiring:
No doorbell was found during inspection. Have a doorbell installed as desired.
- ES-1 Electric Service:
Hire a licensed electrician to correct the double lugged neutral or grounded conductors in the electric panel - this is when two conductors share the same lug. Each grounded conductor shall terminate within a panelboard in an individual terminal that is not also used for another conductor. Double lugged conductors risk poorly protected conductors that are more vulnerable to arcing and overheating. This requires additional evaluation by an electrician. I would do this in the context of other electrical repairs.
- ES-2 Electric Service:
This is an older electrical panel manufacturered by Crouse Hinds, a company which is no longer operational. There are a number of different breaker types (QP, ITE, BR, CH) located in the panel. Utilizing incompatible breakers can result in overheating, inconsistent electrical output, or other issues. I recommend having an electrician inspect the breakers and ensure that all the utilized breakers are compatible with this panel.
- HCFV-4 Heating, Cooling, Fireplaces and Ventilation:
The insulation for the refrigerant lines for the AC is damaged and requires repair. This should be done to ensure reliable and efficient performance from this unit. .
- HCFV-5 Heating, Cooling, Fireplaces and Ventilation:
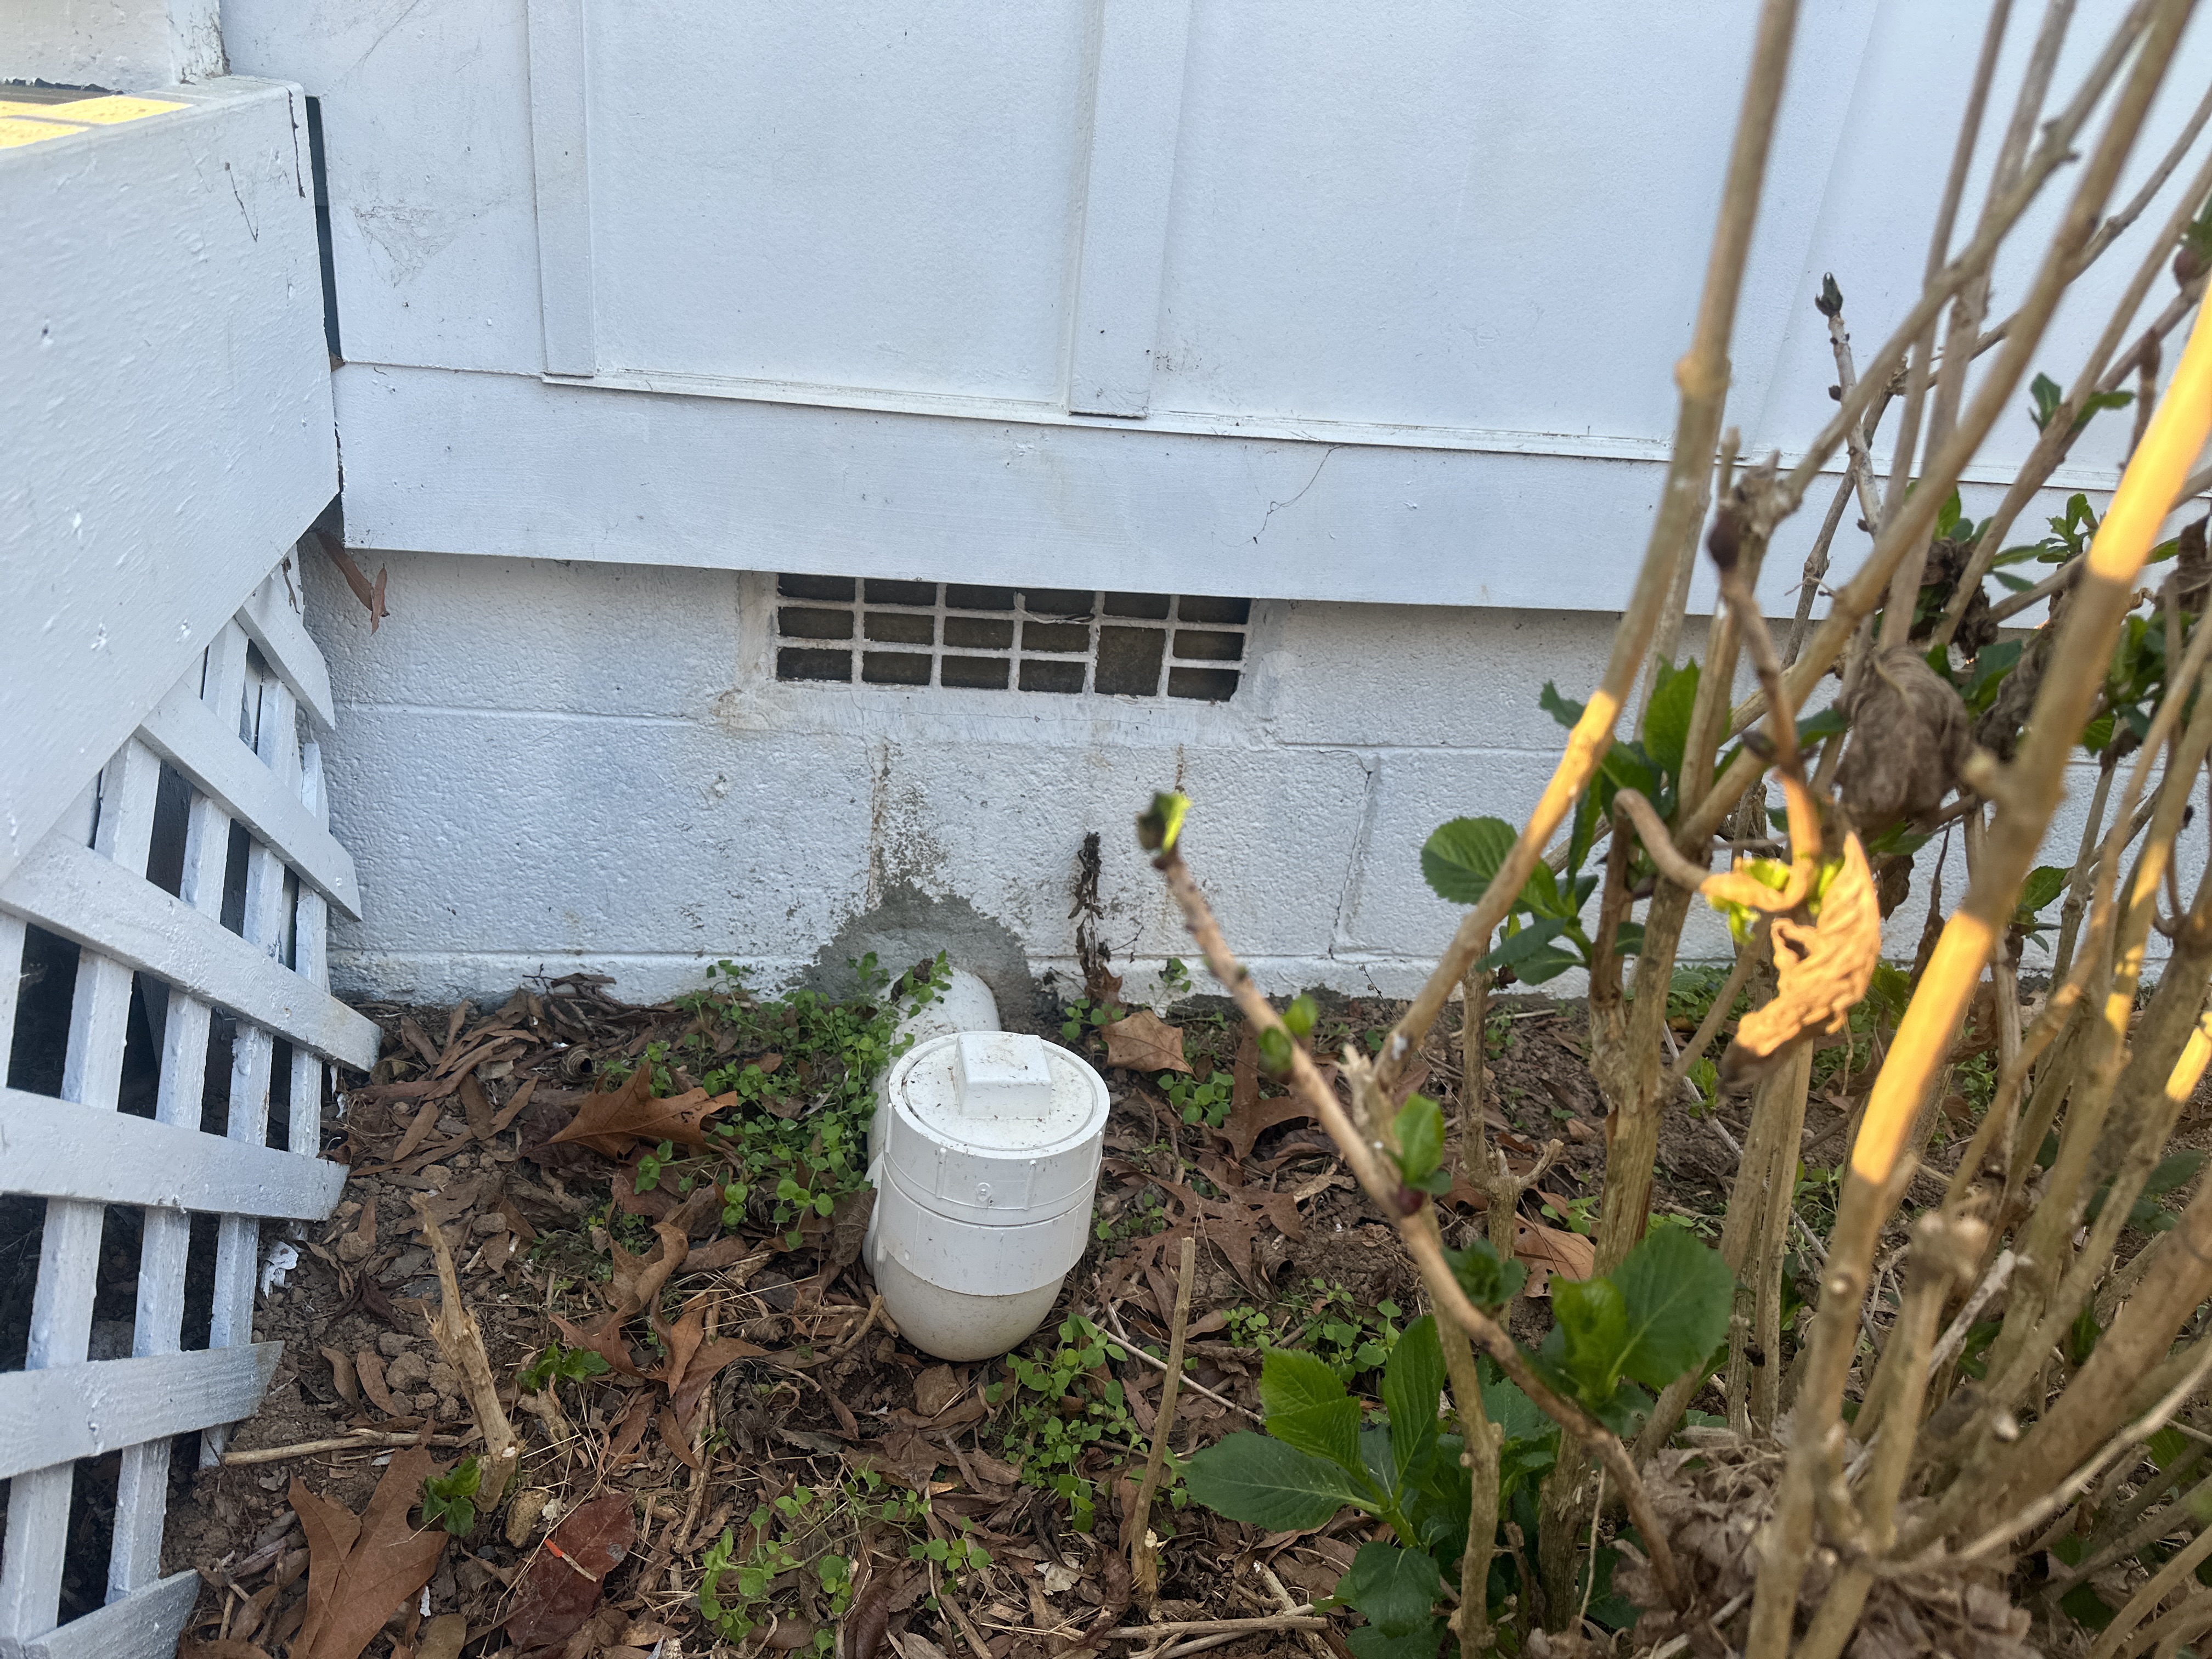
The condensation line for the air conditioner in the attic terminates against the foundation wall outside the house. I recommend extending this away from the foundation to prevent the water from seeping under the house.
- HCFV-6 Heating, Cooling, Fireplaces and Ventilation:
The bathroom fan vent are done as an exceptionally long run. This can lead to condensation inside these vents and eventually, failure as the vent material saturates and pulls free from roof jack vents. For improved reliability I recommend re-routing these vents to discharge above the bathroom to ensure reliable performance.
- P-1 Plumbing:
An expansion tank is recommended for the water heater; these are required if the house has a closed plumbing system. Expansion tanks help reduce pressure on the plumbing system by creating a buffer or a place for water to expand into as water swells during thermal expansion. Installation of expansion or pressure tanks is modern installation practice and will be required if a pressure reducing valve has been installed on a public water supply. Consult with a qualified plumber to install.
- P-2 Plumbing:
The outside steel cabinet that the water heater is located in has a hole in the top which would have been utilized with a gas water heater installation for a ventilation flue. Since this is an electric water heater, this hole should be capped to prevent rain water from entering the cabinet and causing premature deterioration to the water heater. I recommend this be completed by a qualified person.
- P-5 Plumbing:
The leaky hose bib at the east side of the house requires repair or replacement - it leaked from the faucet handle when the faucet was turned on and under pressure. This often requires tightening or replacing the packing around the handle stem.
- I-1 Interior:
Nail pops were noted in the walls. This can sometimes be from one-time framing shrinkage or settlement or it can be more persistent form seasonal truss uplift or other seasonal movements in the house frame. This latter cause can be more difficult to correct. If it is truss uplift, the truss cord needs to be better secured to the interior partition walls in the attic. I recommend repairing these nail pops and then monitoring for signs of on-going movement.
- I-2 Interior:
The door stop system for the home is incomplete. I recommend systematically installing or repaired door stops to protect doors and wall finishes. Doors missing door stops include the office French doors, pantry doors, and the entry doors.
Not all instances of this condition have been photographed for reasons of report length and space. Therefore, this condition should be considered representative of what may exist in areas other than directly represented in this report. This area should be inspected by the individual or contractor making repairs to ensure all areas requiring repairs are located.
- I-3 Interior:
A pane of glass with a divot or surface damage was noted in the front bedroom. This requires glazing replacement to repair. This window has also lost its thermal seal. See additional note.
- I-4 Interior:
Several panes of glass were presenting with a cloudy appearance which could indicate a lost or failed seal. I spot cleaned the glass and the cloudiness persisted, indicating that the seal has failed. Replace all glazing with lost seals as needed. A lost seal is a common term for when there is permanent cloudiness between the panes of glass or between the "insulated glass units," IGU's. This is a cosmetic defect that does not impact the short term performance of the window but can affect the thermal envelope of the residence. I recommend having the window glass further evaluated by a glass replacement specialist.
- I-5 Interior:
I was unable to close one sliding window enough to lock it. I recommend inspection and repair by a qualified person.
- K-2 Kitchen:
Corrugated waste pipe was used to drain the kitchen sink. This in an unlisted plumbing product. Use smooth wall pipe only. Hire a licensed plumber to further evaluate and repair as needed.
- A-3 Attic:
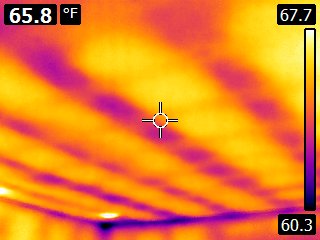
The batt insulation on the floor of the attic is the improper width for the spacing between the joists. As a result, large gaps exist between the joists and the insulation. This will reduce the efficiency of the thermal envelope, and may cause it to cost more to heat and cool this residence. The included photos taken with a thermal imaging camera also show the significant gaps between the areas of the ceiling which are thermally insulated and those that are not. This condition is present throughout the ceiling of the residence. I recommend either the replacement of this insulation, or the addition of blown insulation in the gaps to improve the thermal envelope.
- A-4 Attic:
Two powered ventilation fans were found in the attic, however both were disconnected after the thermostat. Given the design of this hip roof, and the relatively short section of ridge vent, there may not be adequate ventilation in this attic. Although powered ventilators are generally discouraged, if temperatures in the attic become excessive in the summer (over 140-150 degrees F), then one or two of the fans may need to be hooked back up for use on a thermostat. A licensed electrician would be able to assist with this, and ensure the fans operate properly. Due to the fans being disconnected, I was unable to test them for functionality.
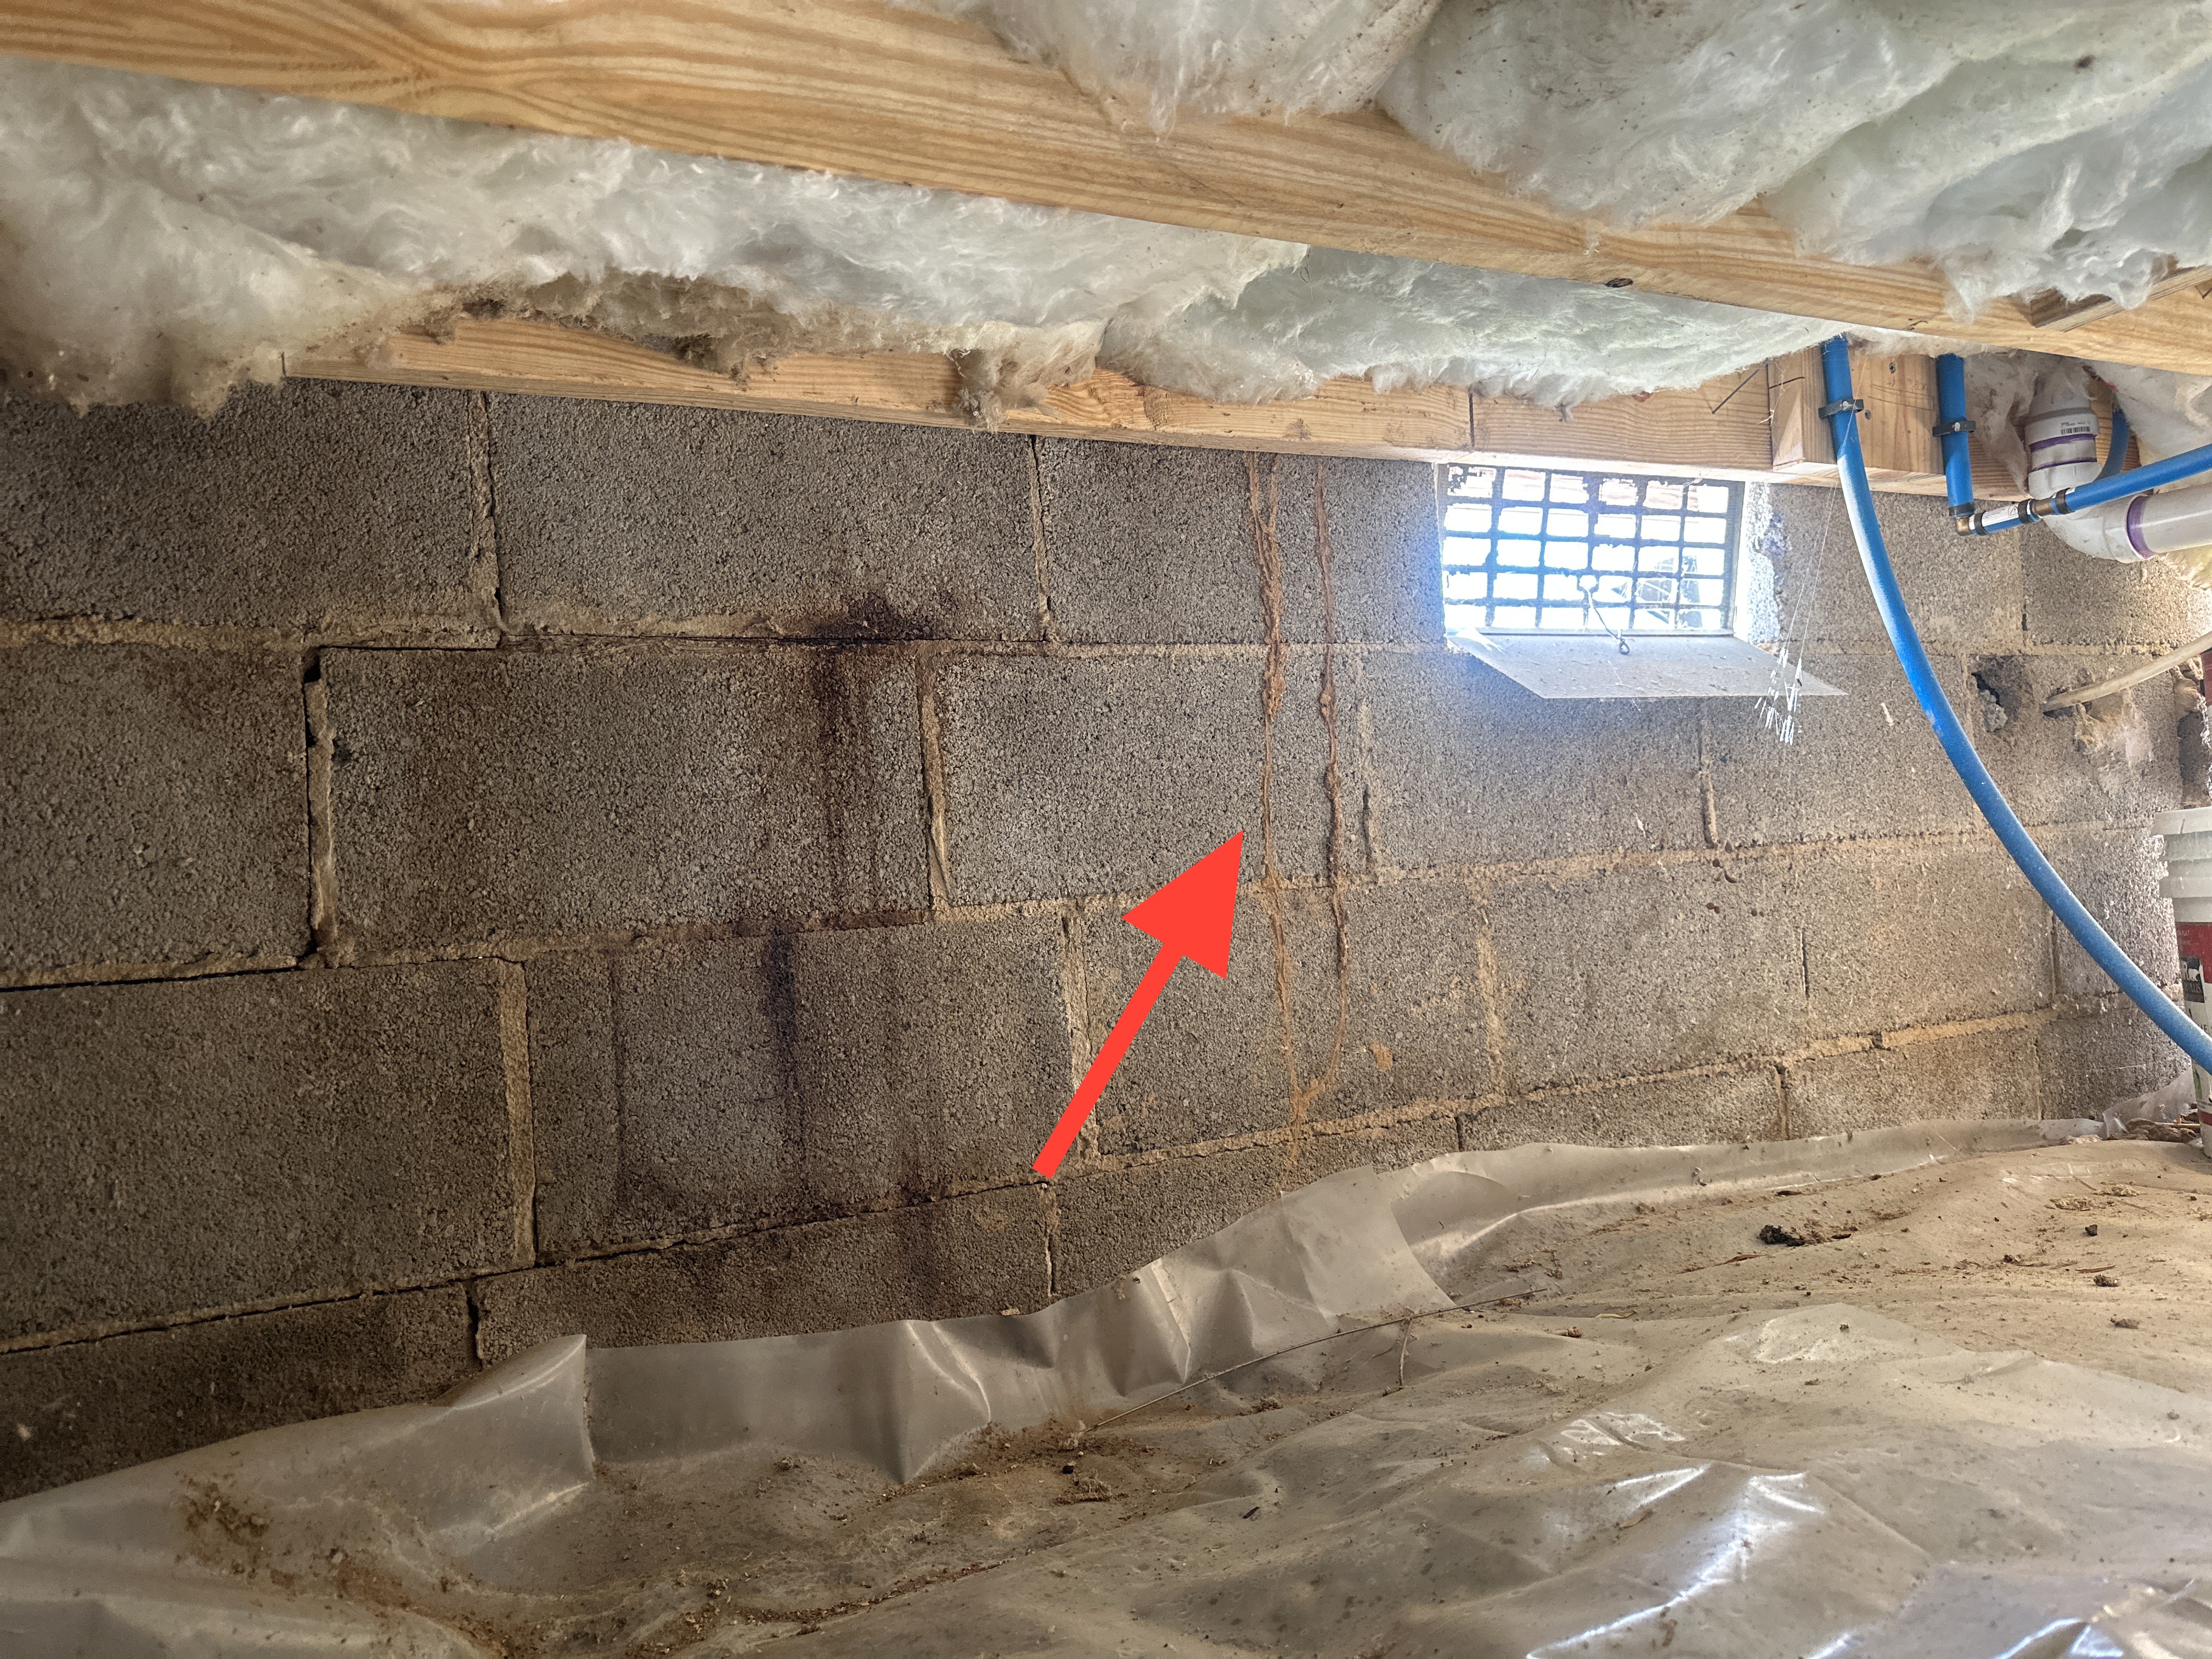
- CS-1 Crawl Space:
Mud tubs noted on crawlspace walls. See Inspect and Pest report for more information.
- CS-2 Crawl Space:
Repair the wood rot at the crawl space access door - use pressure treated lumber for repairs.
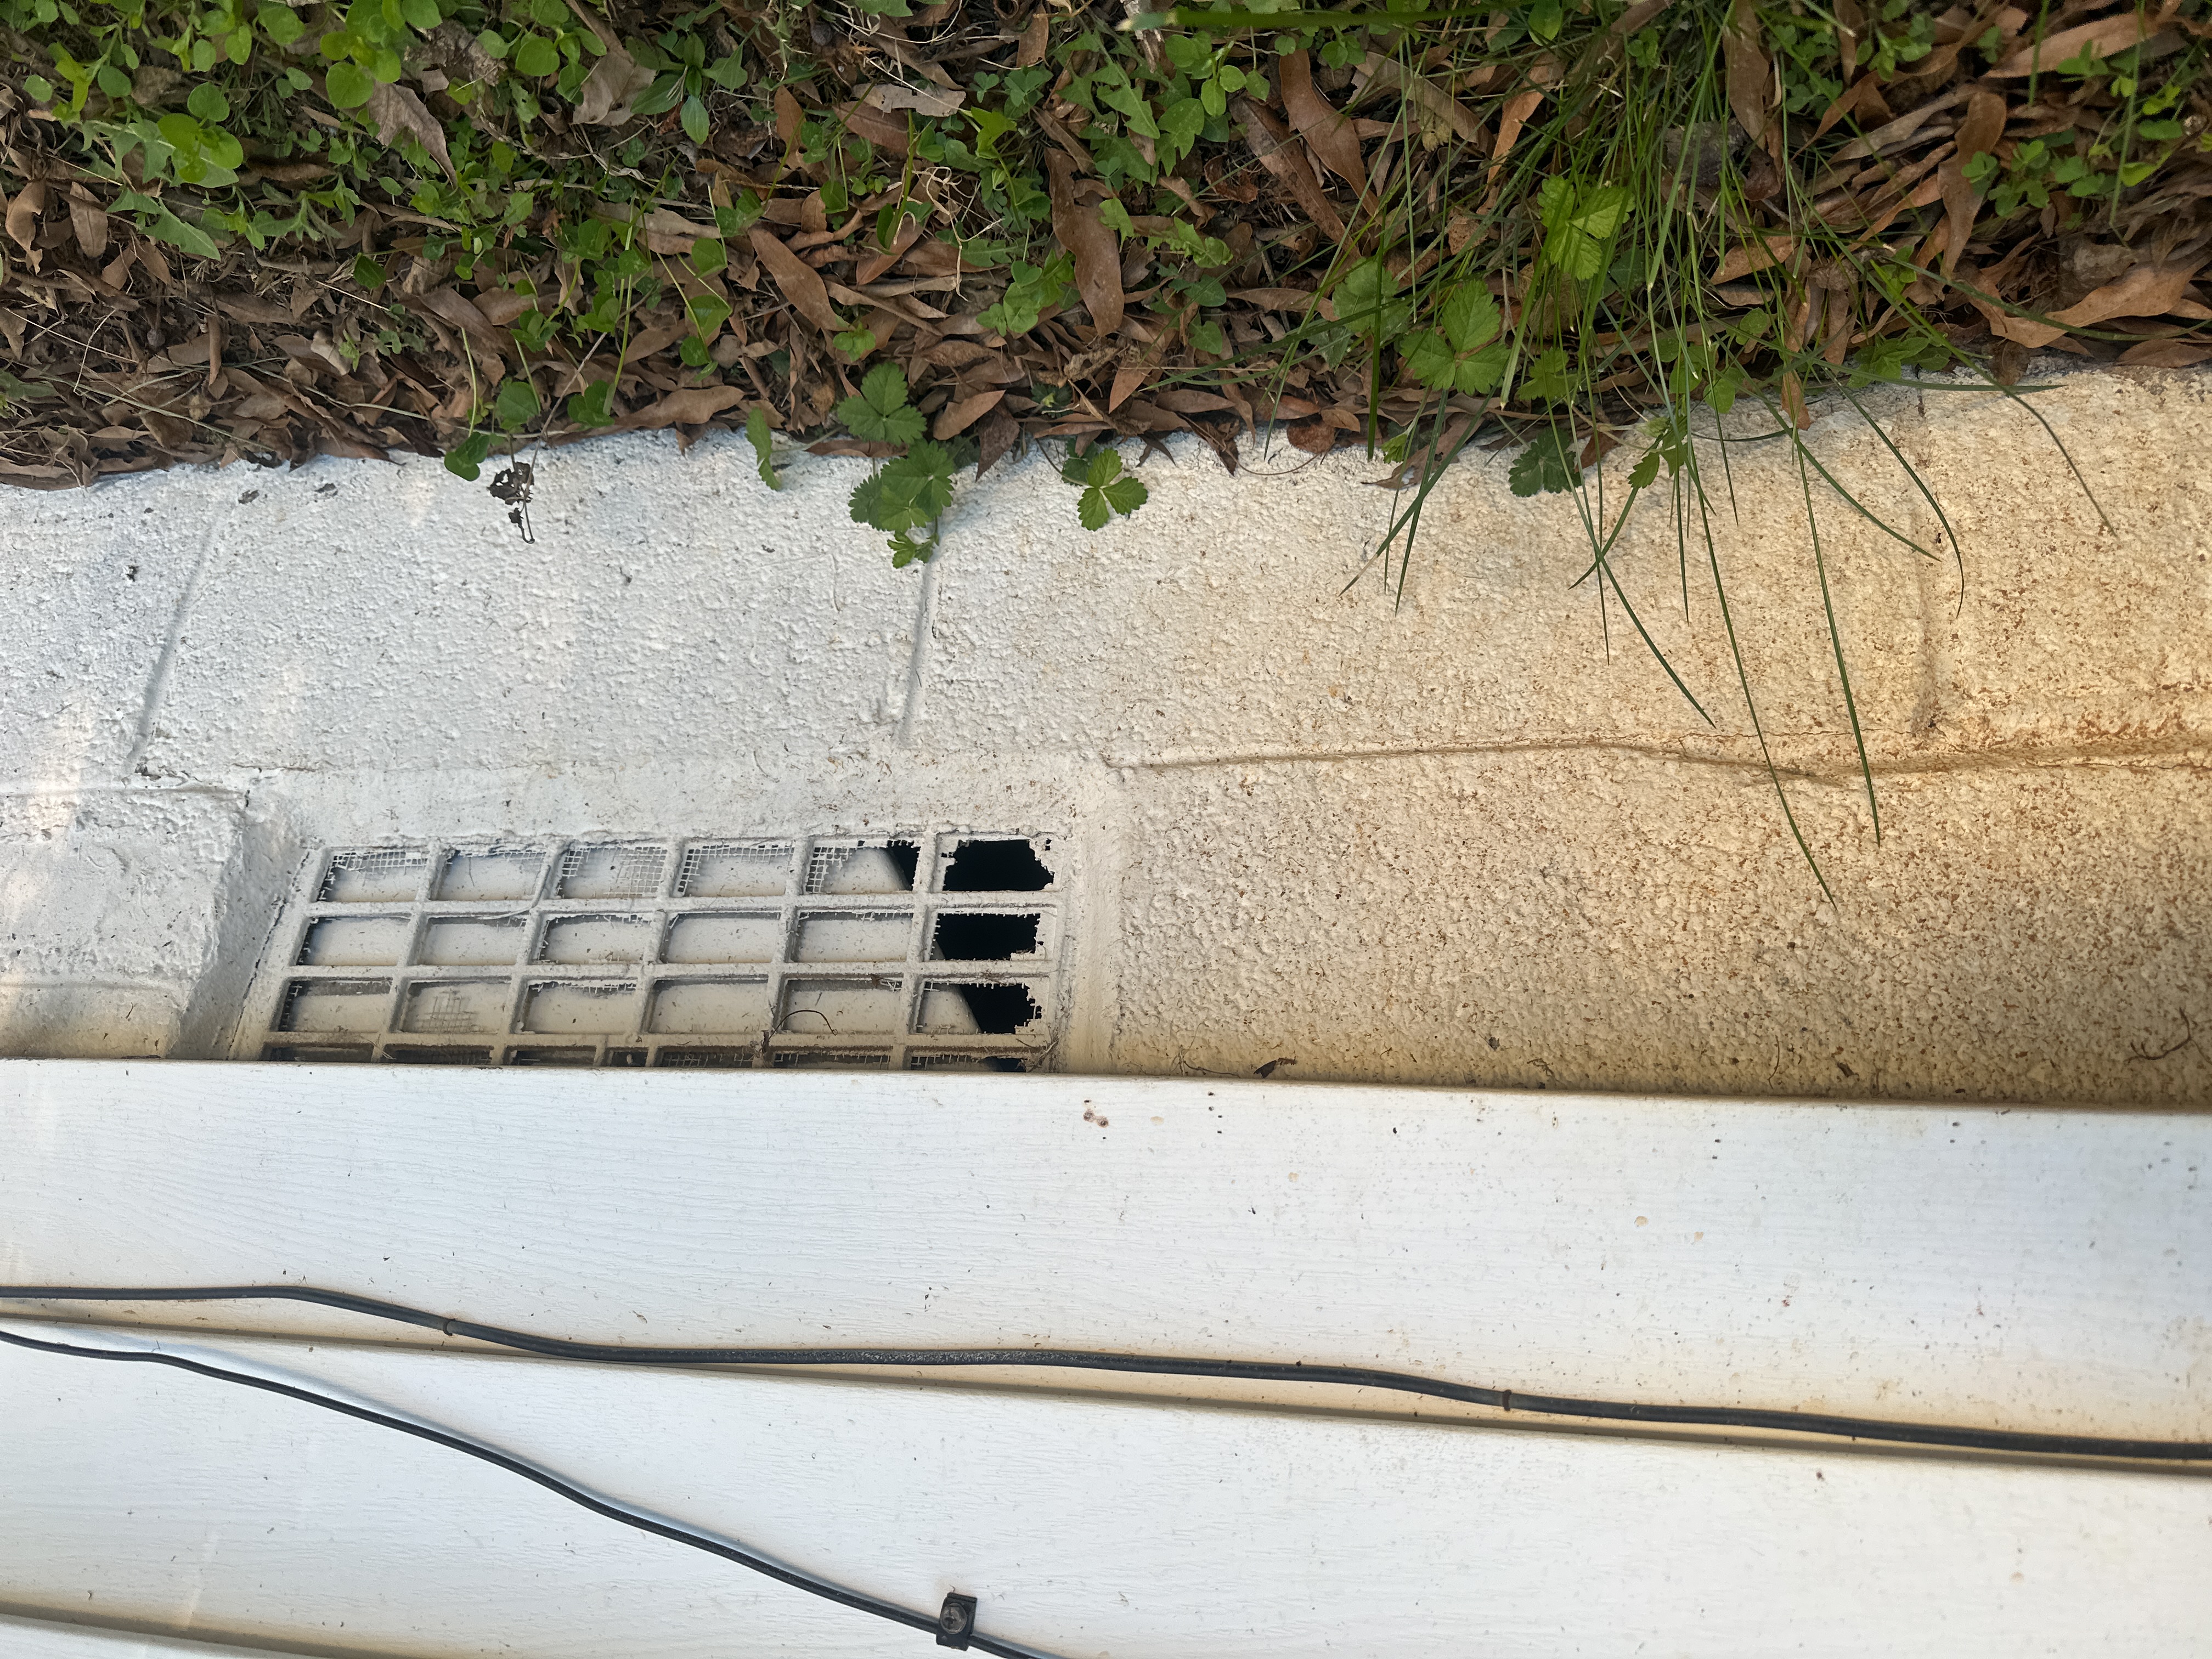
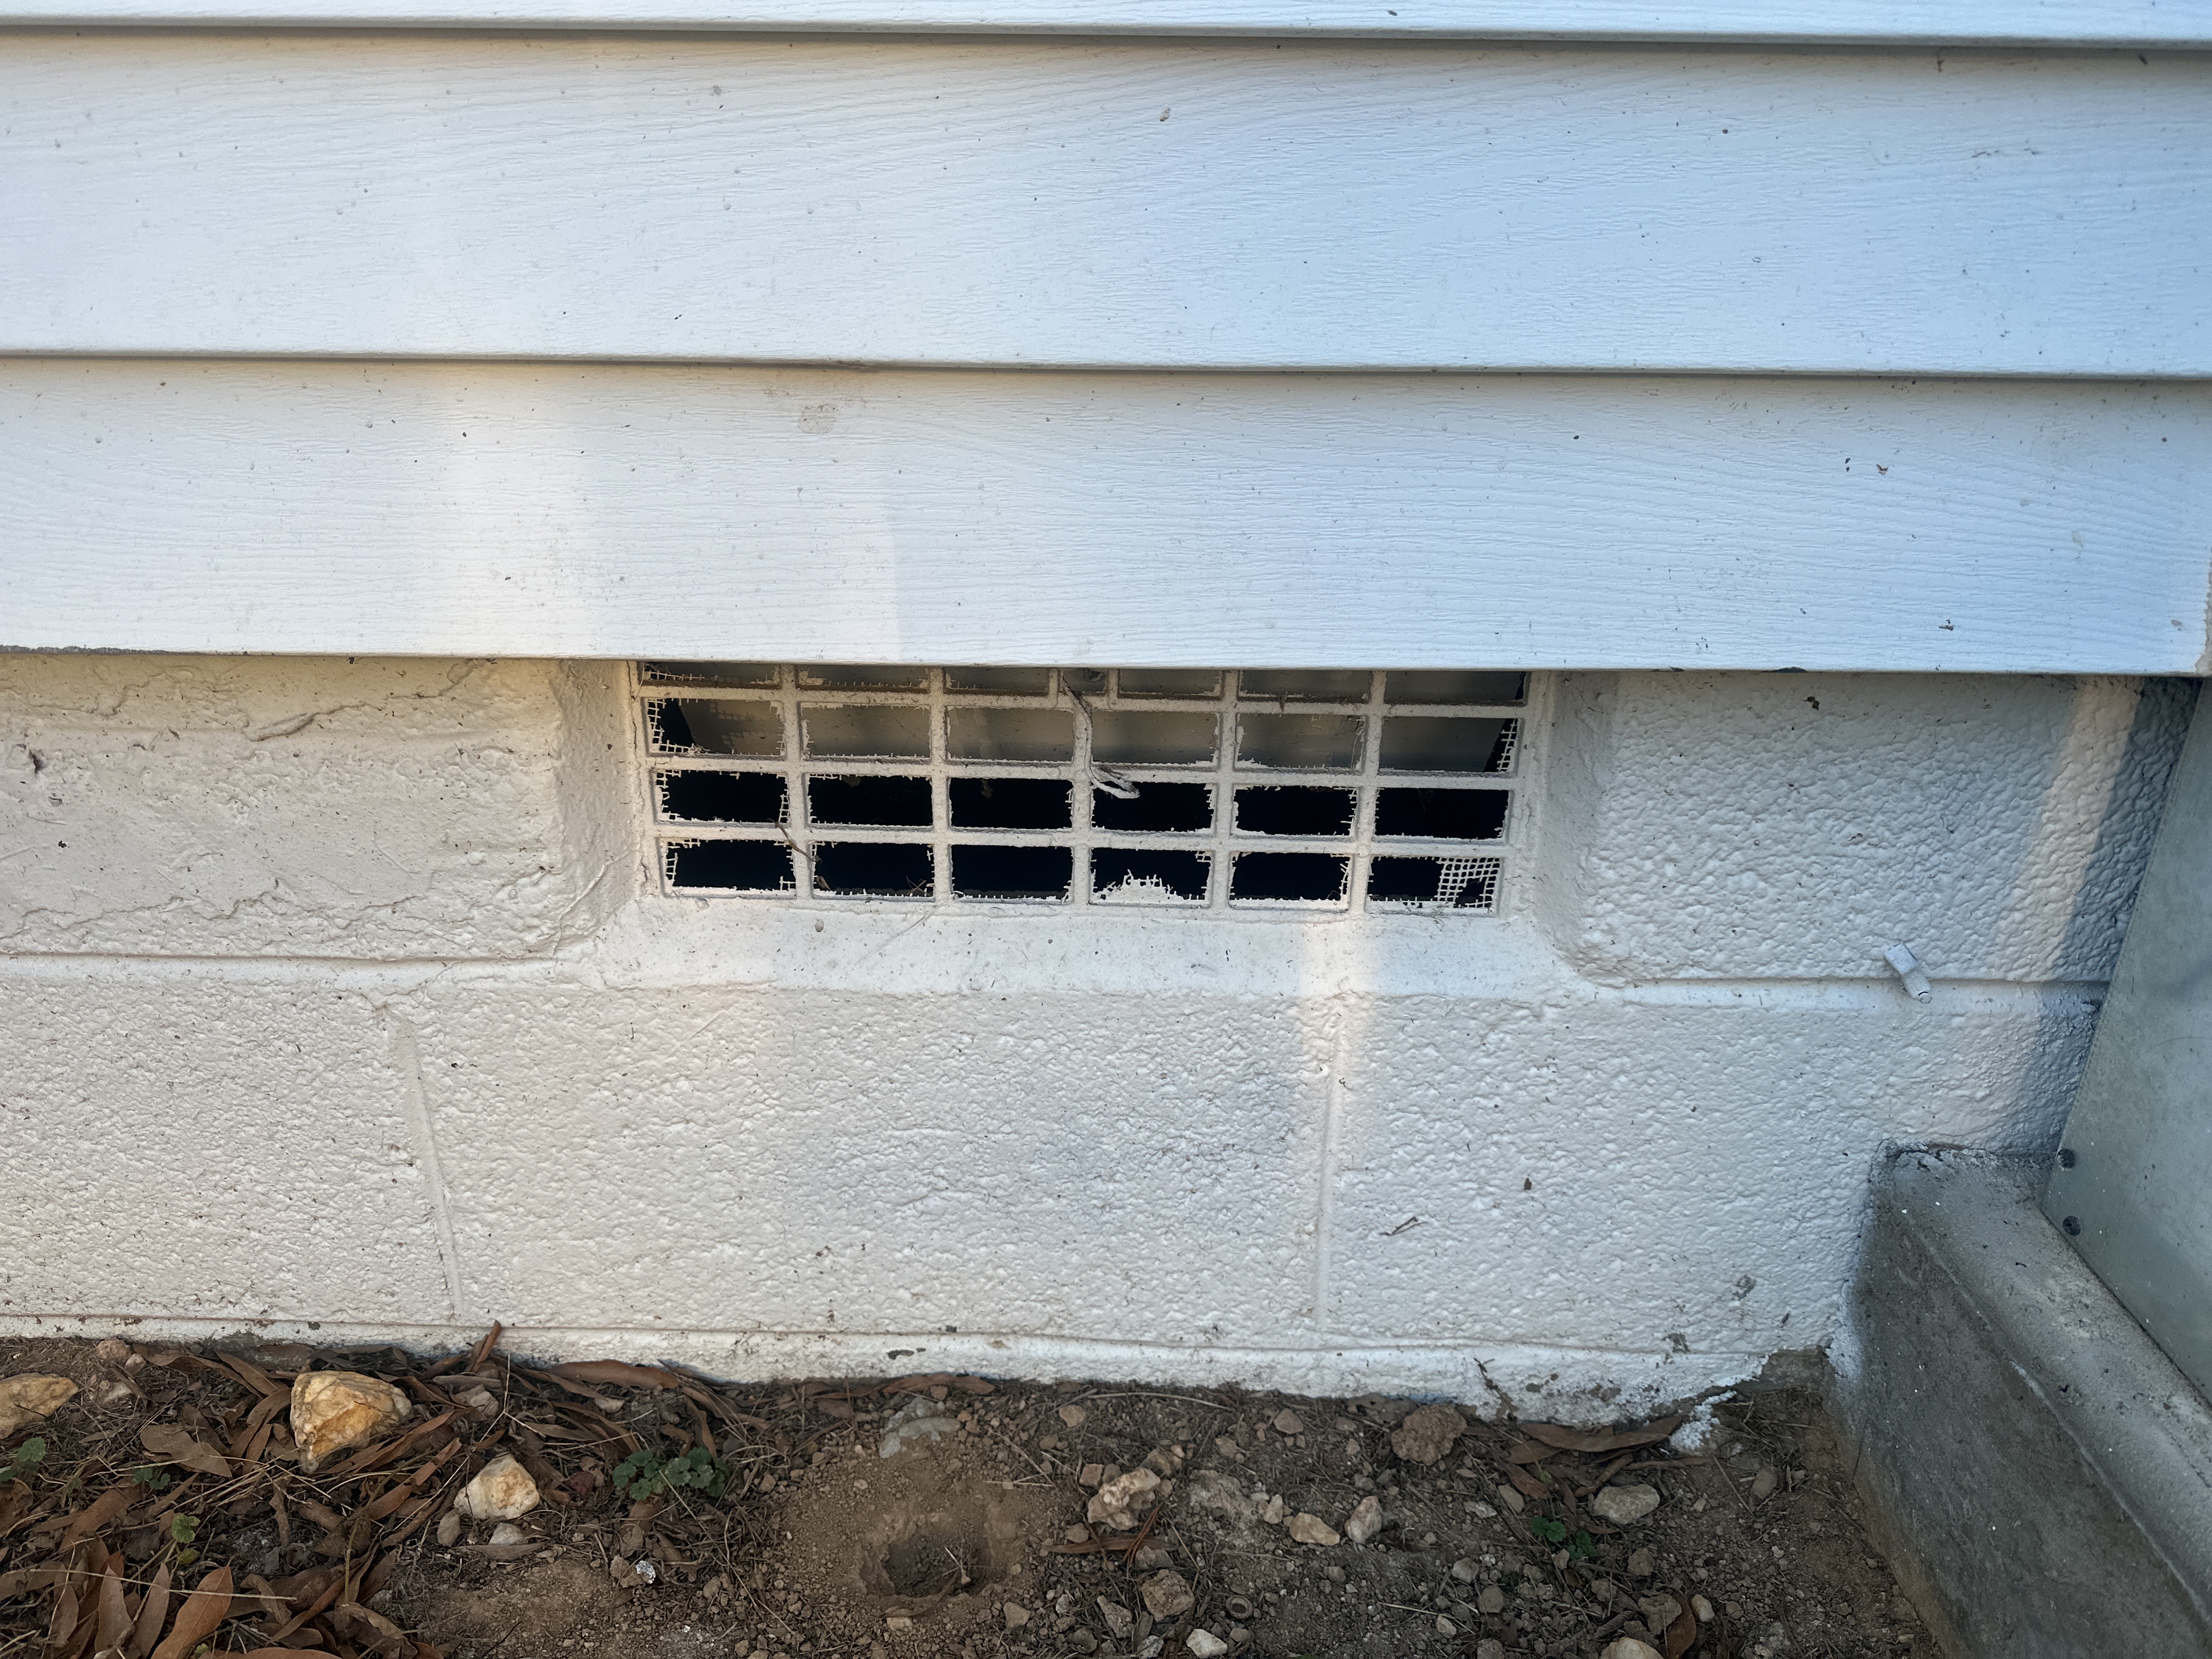
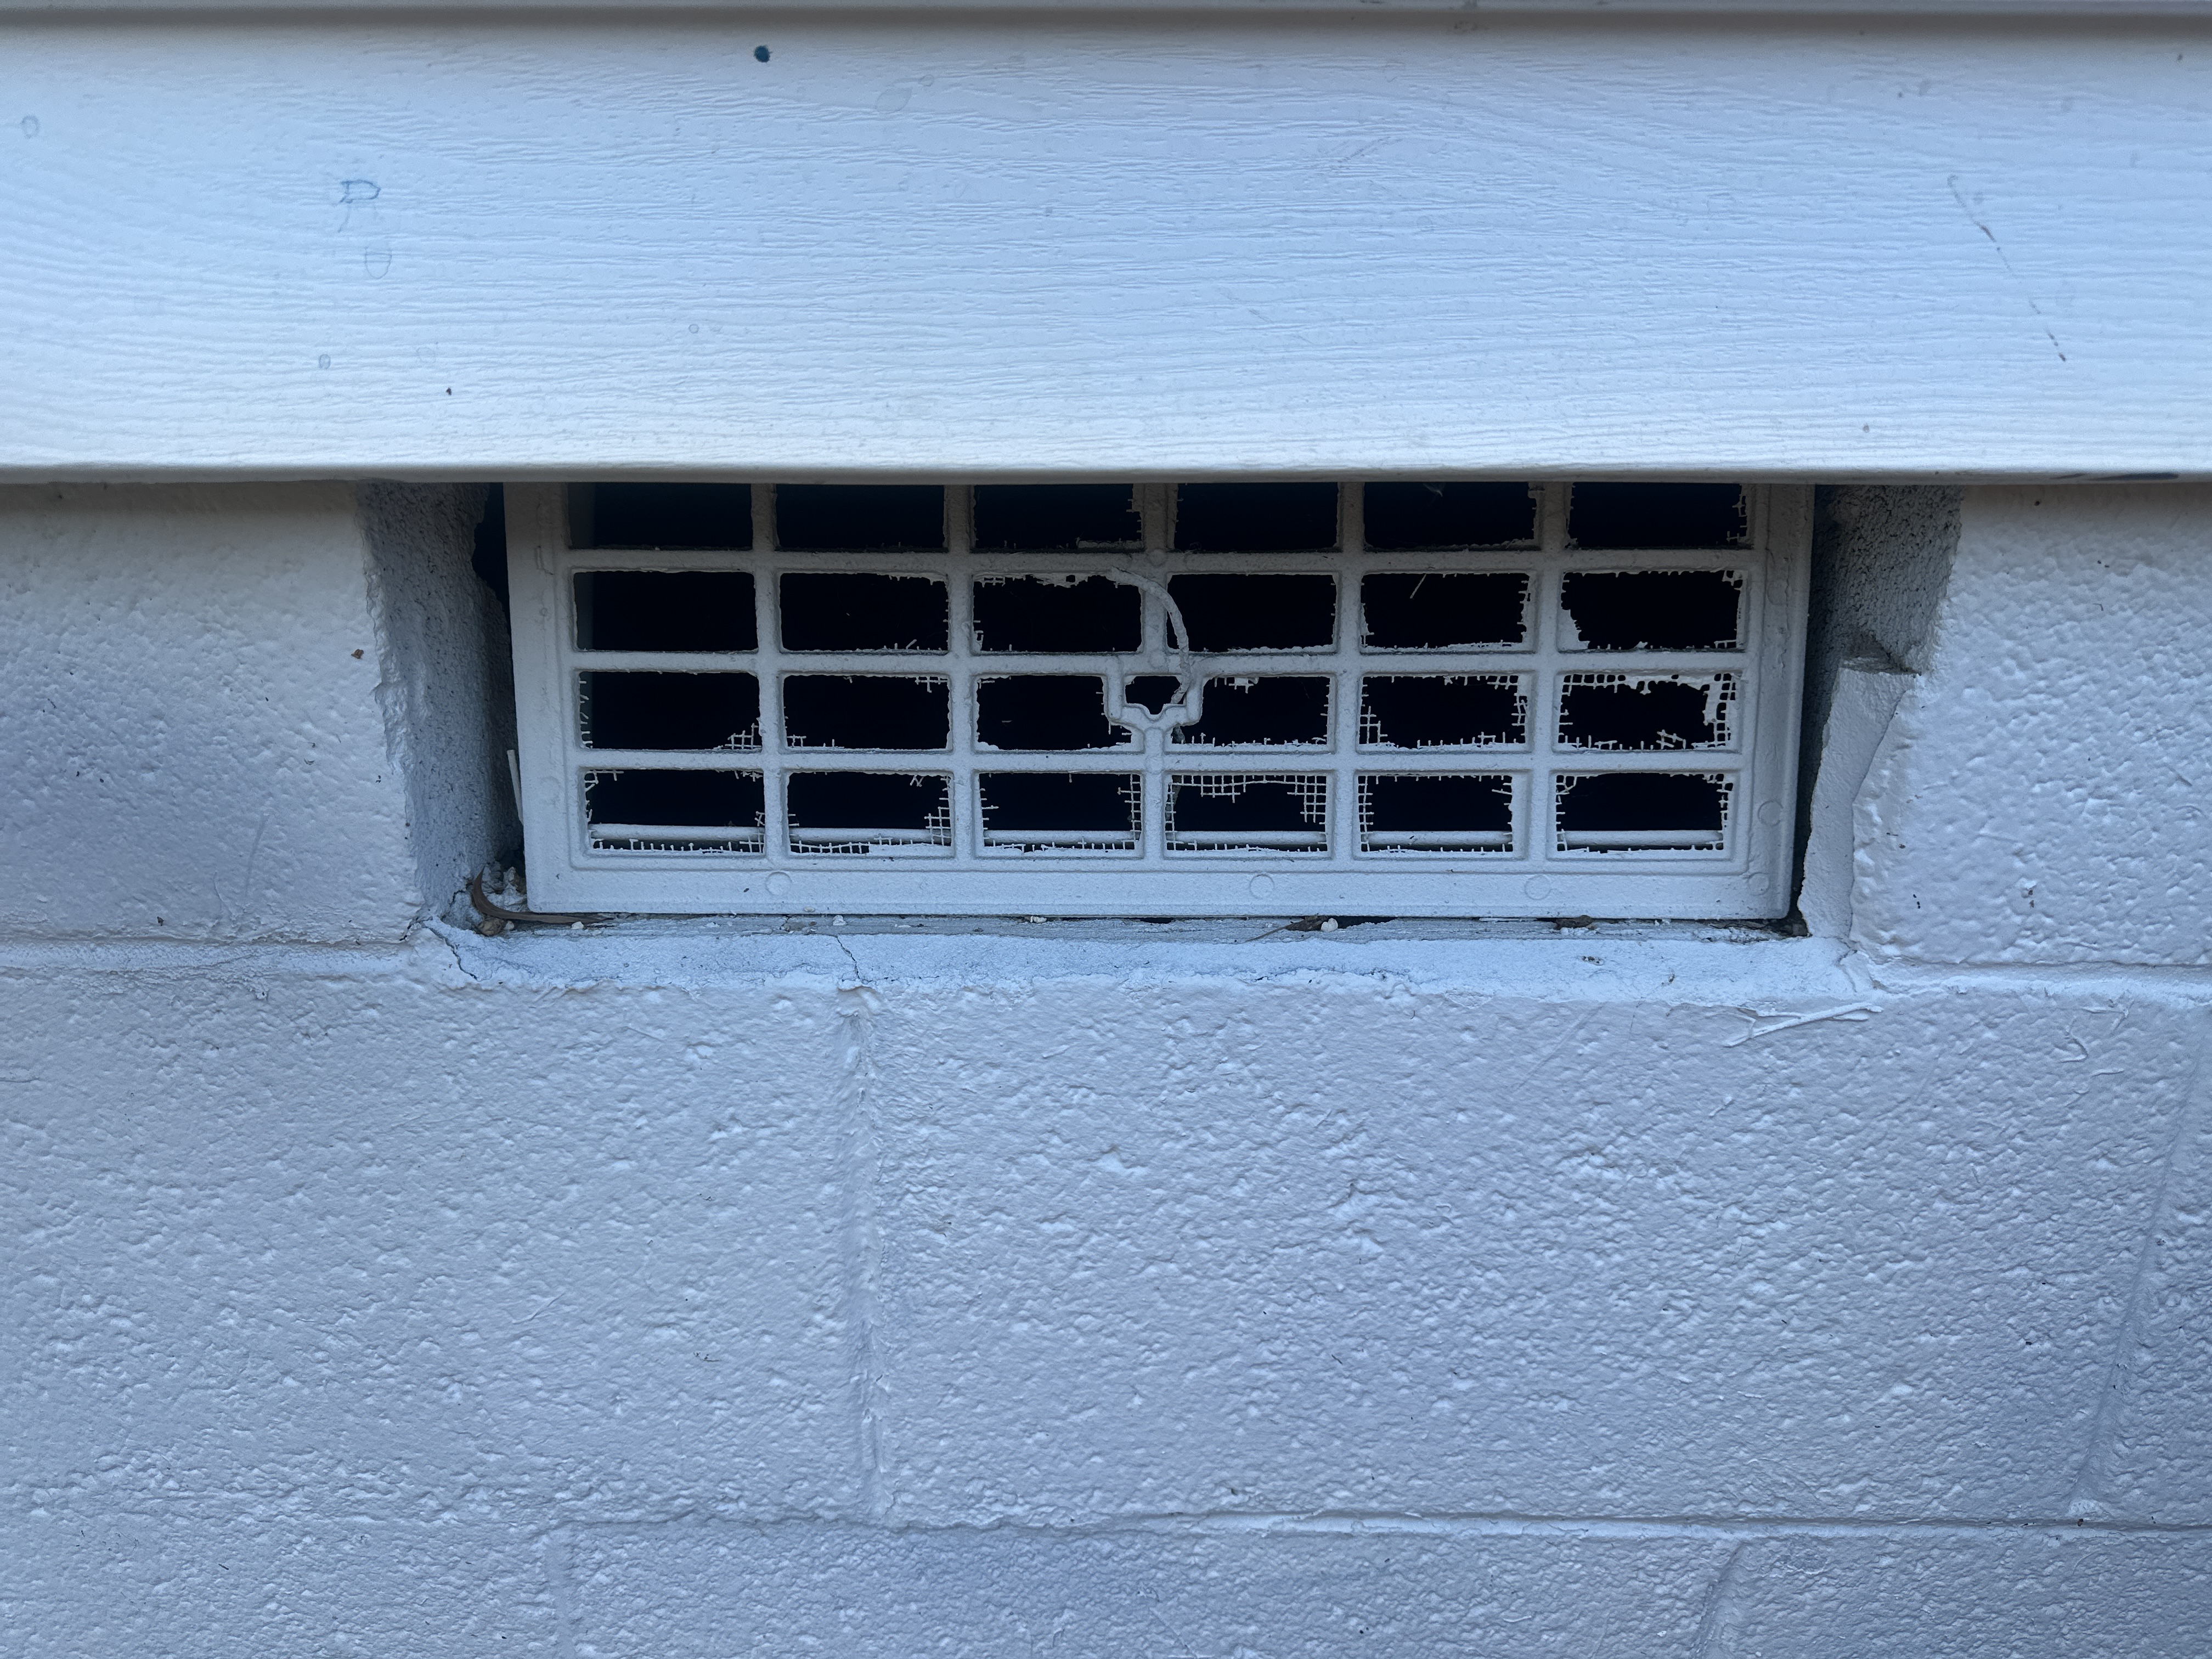
- CS-3 Crawl Space:
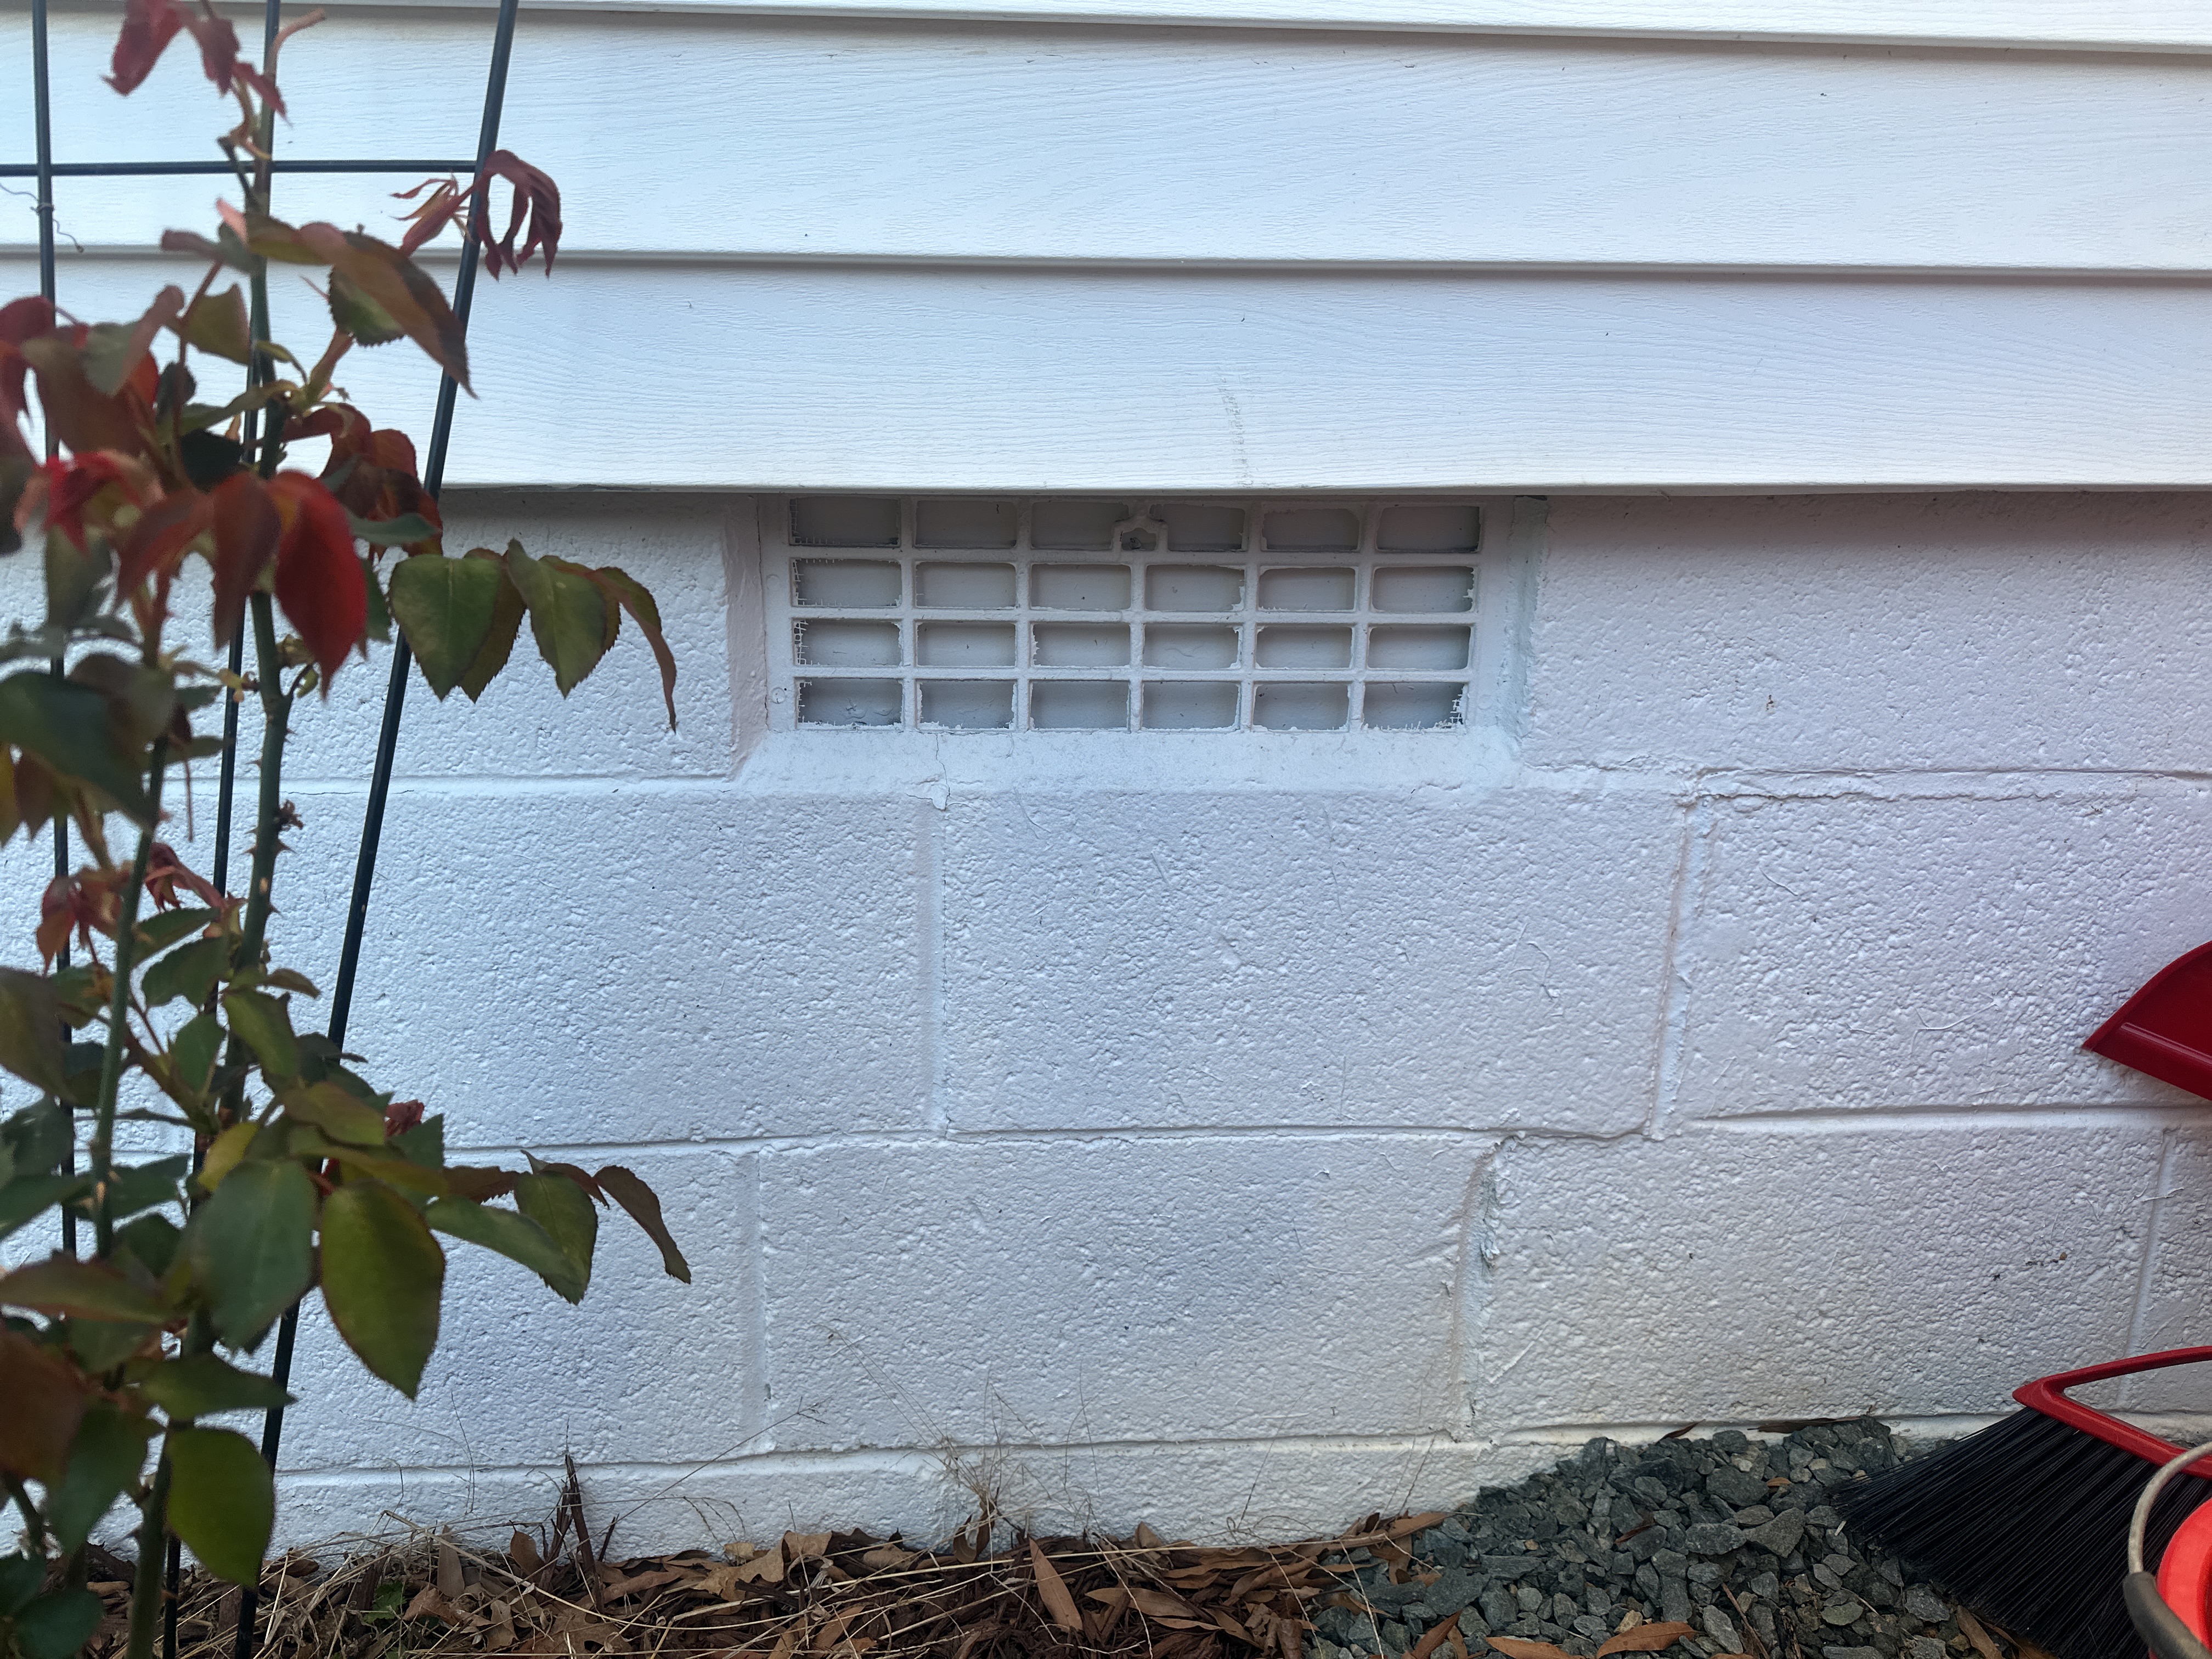
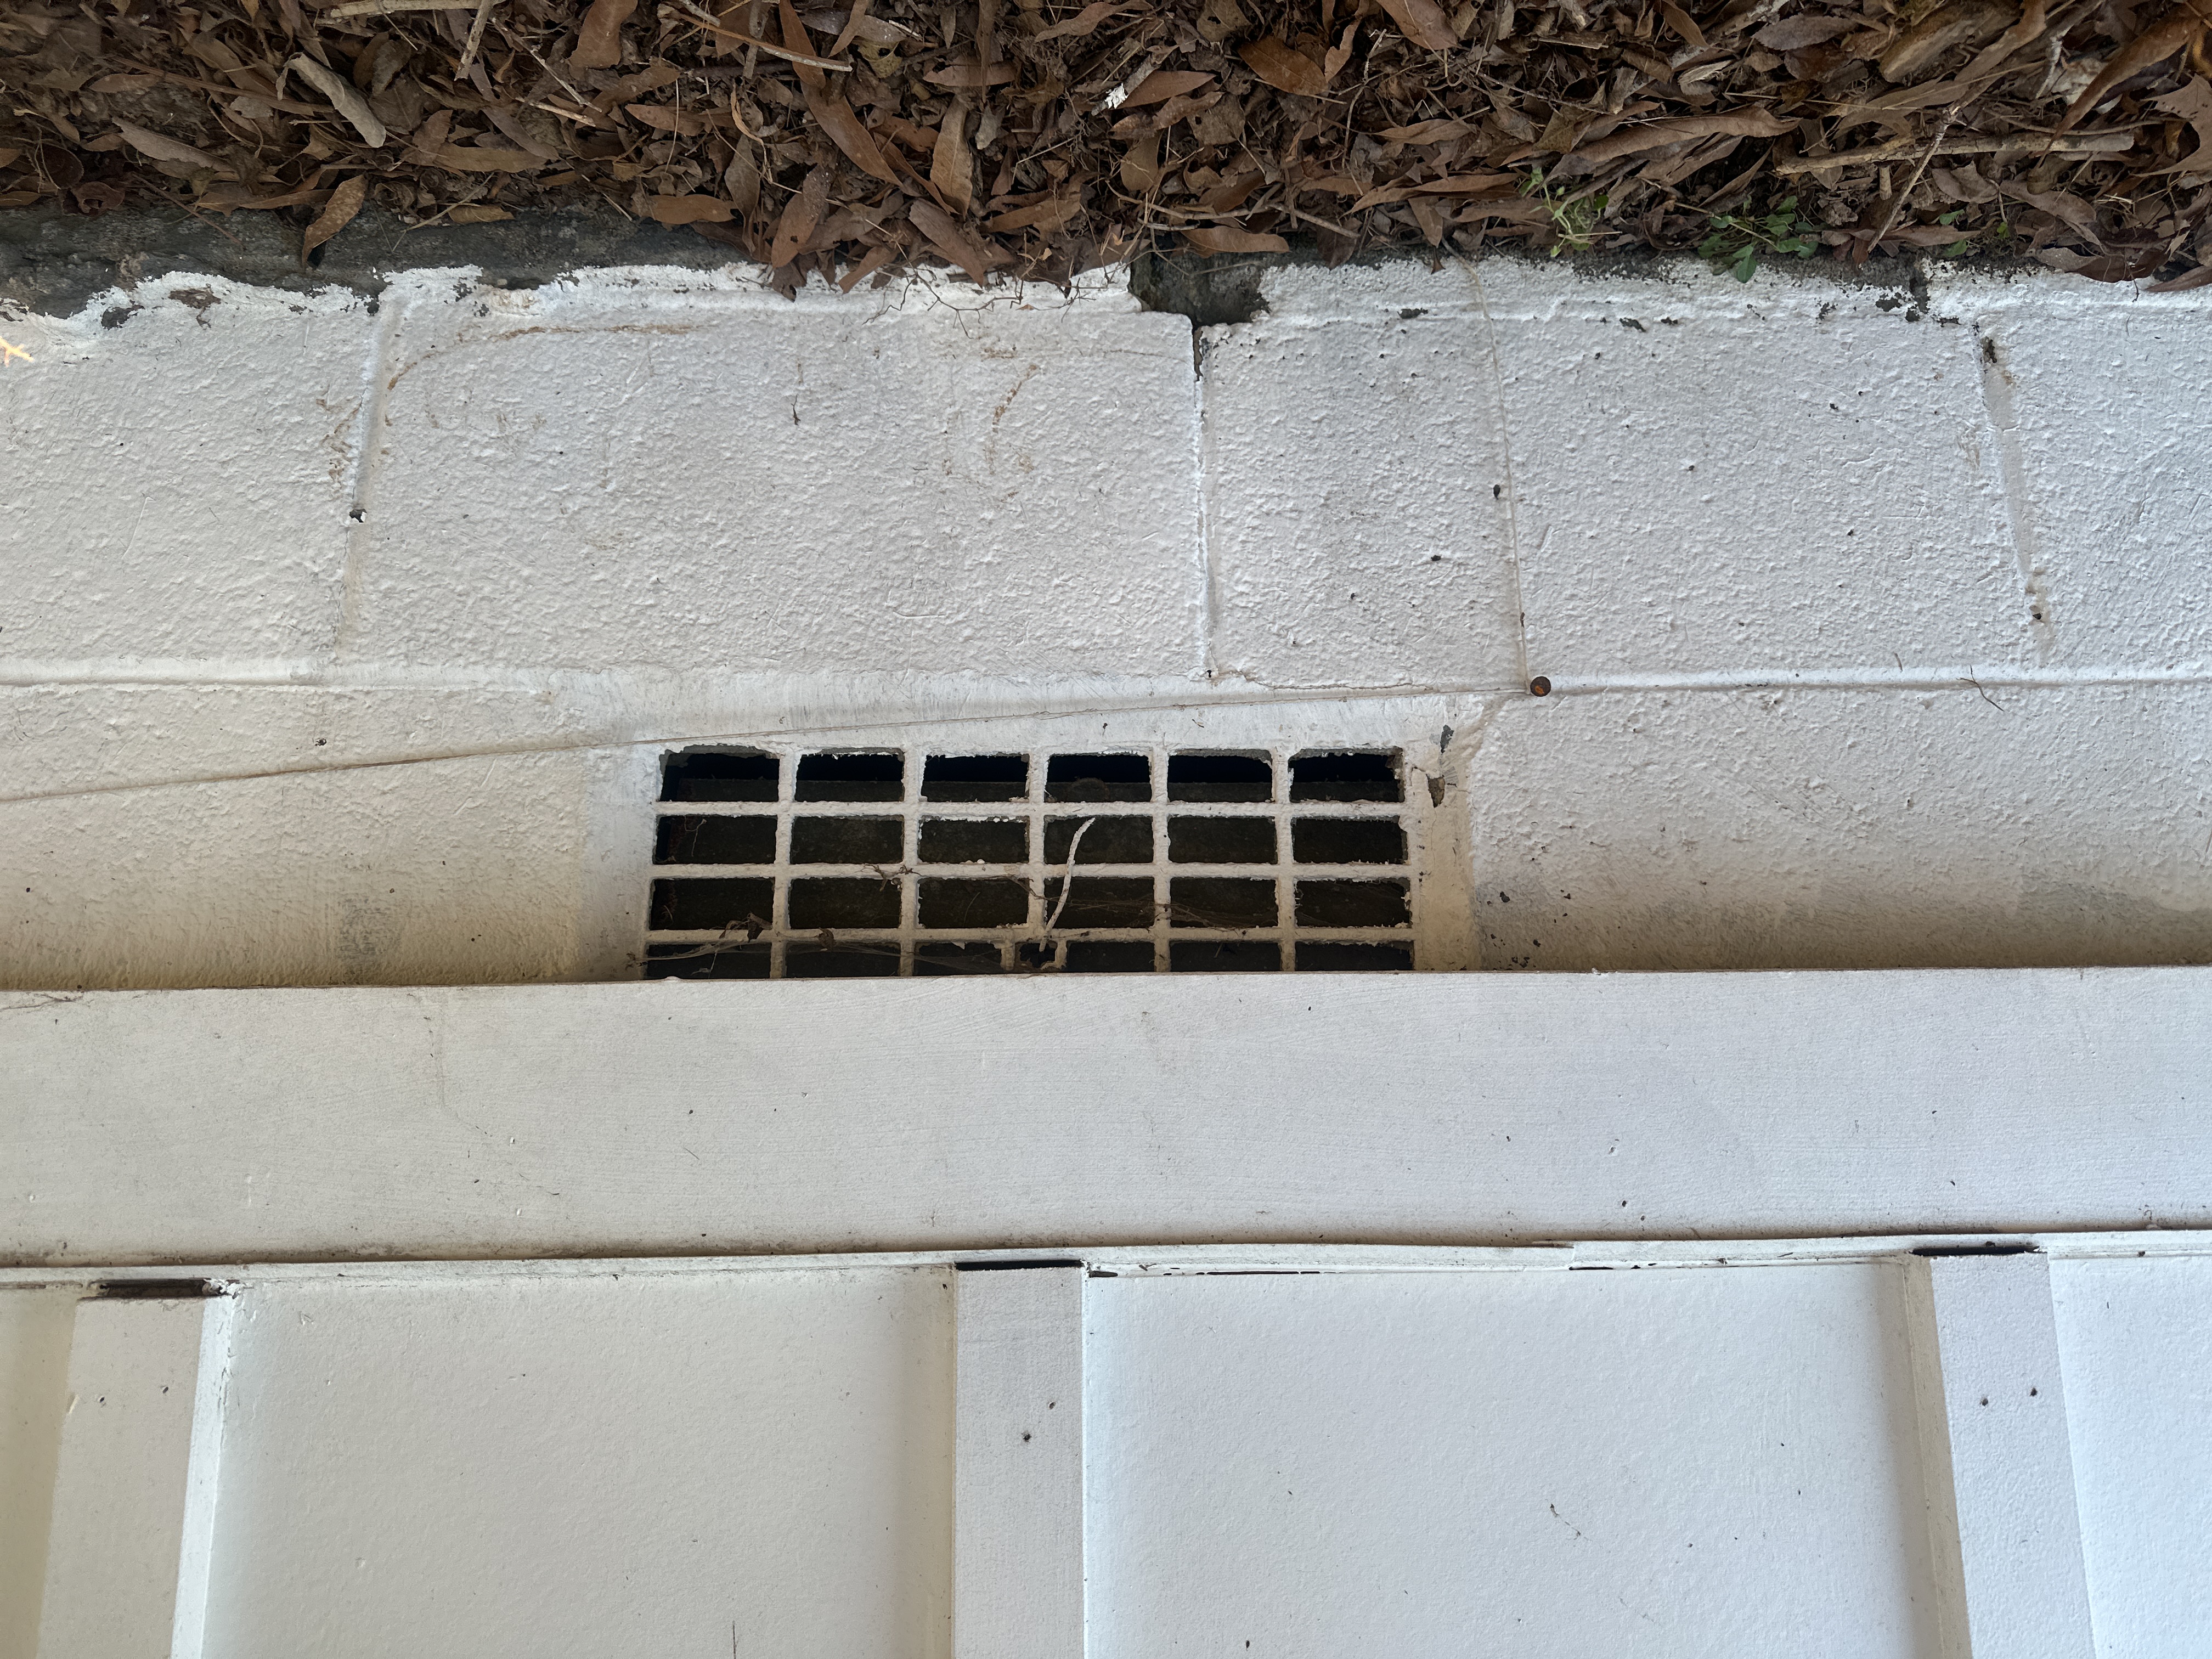
The screens for the crawl space vents are damaged and could allow rodent entry. Use 1/4 inch wire mesh screen and be sure all openings are well sealed to prevent rodent entry. Do not apply multiple layers of the screen as this will restrict airflow.
- CS-4 Crawl Space:
The sub-floor insulation in the crawl space is incomplete and requires repair. Be sure the entire sub-floor is insulated. When making repairs it is best to seal any noticeable air leaks between the crawl space and the living space. Check all penetrations through the floor.
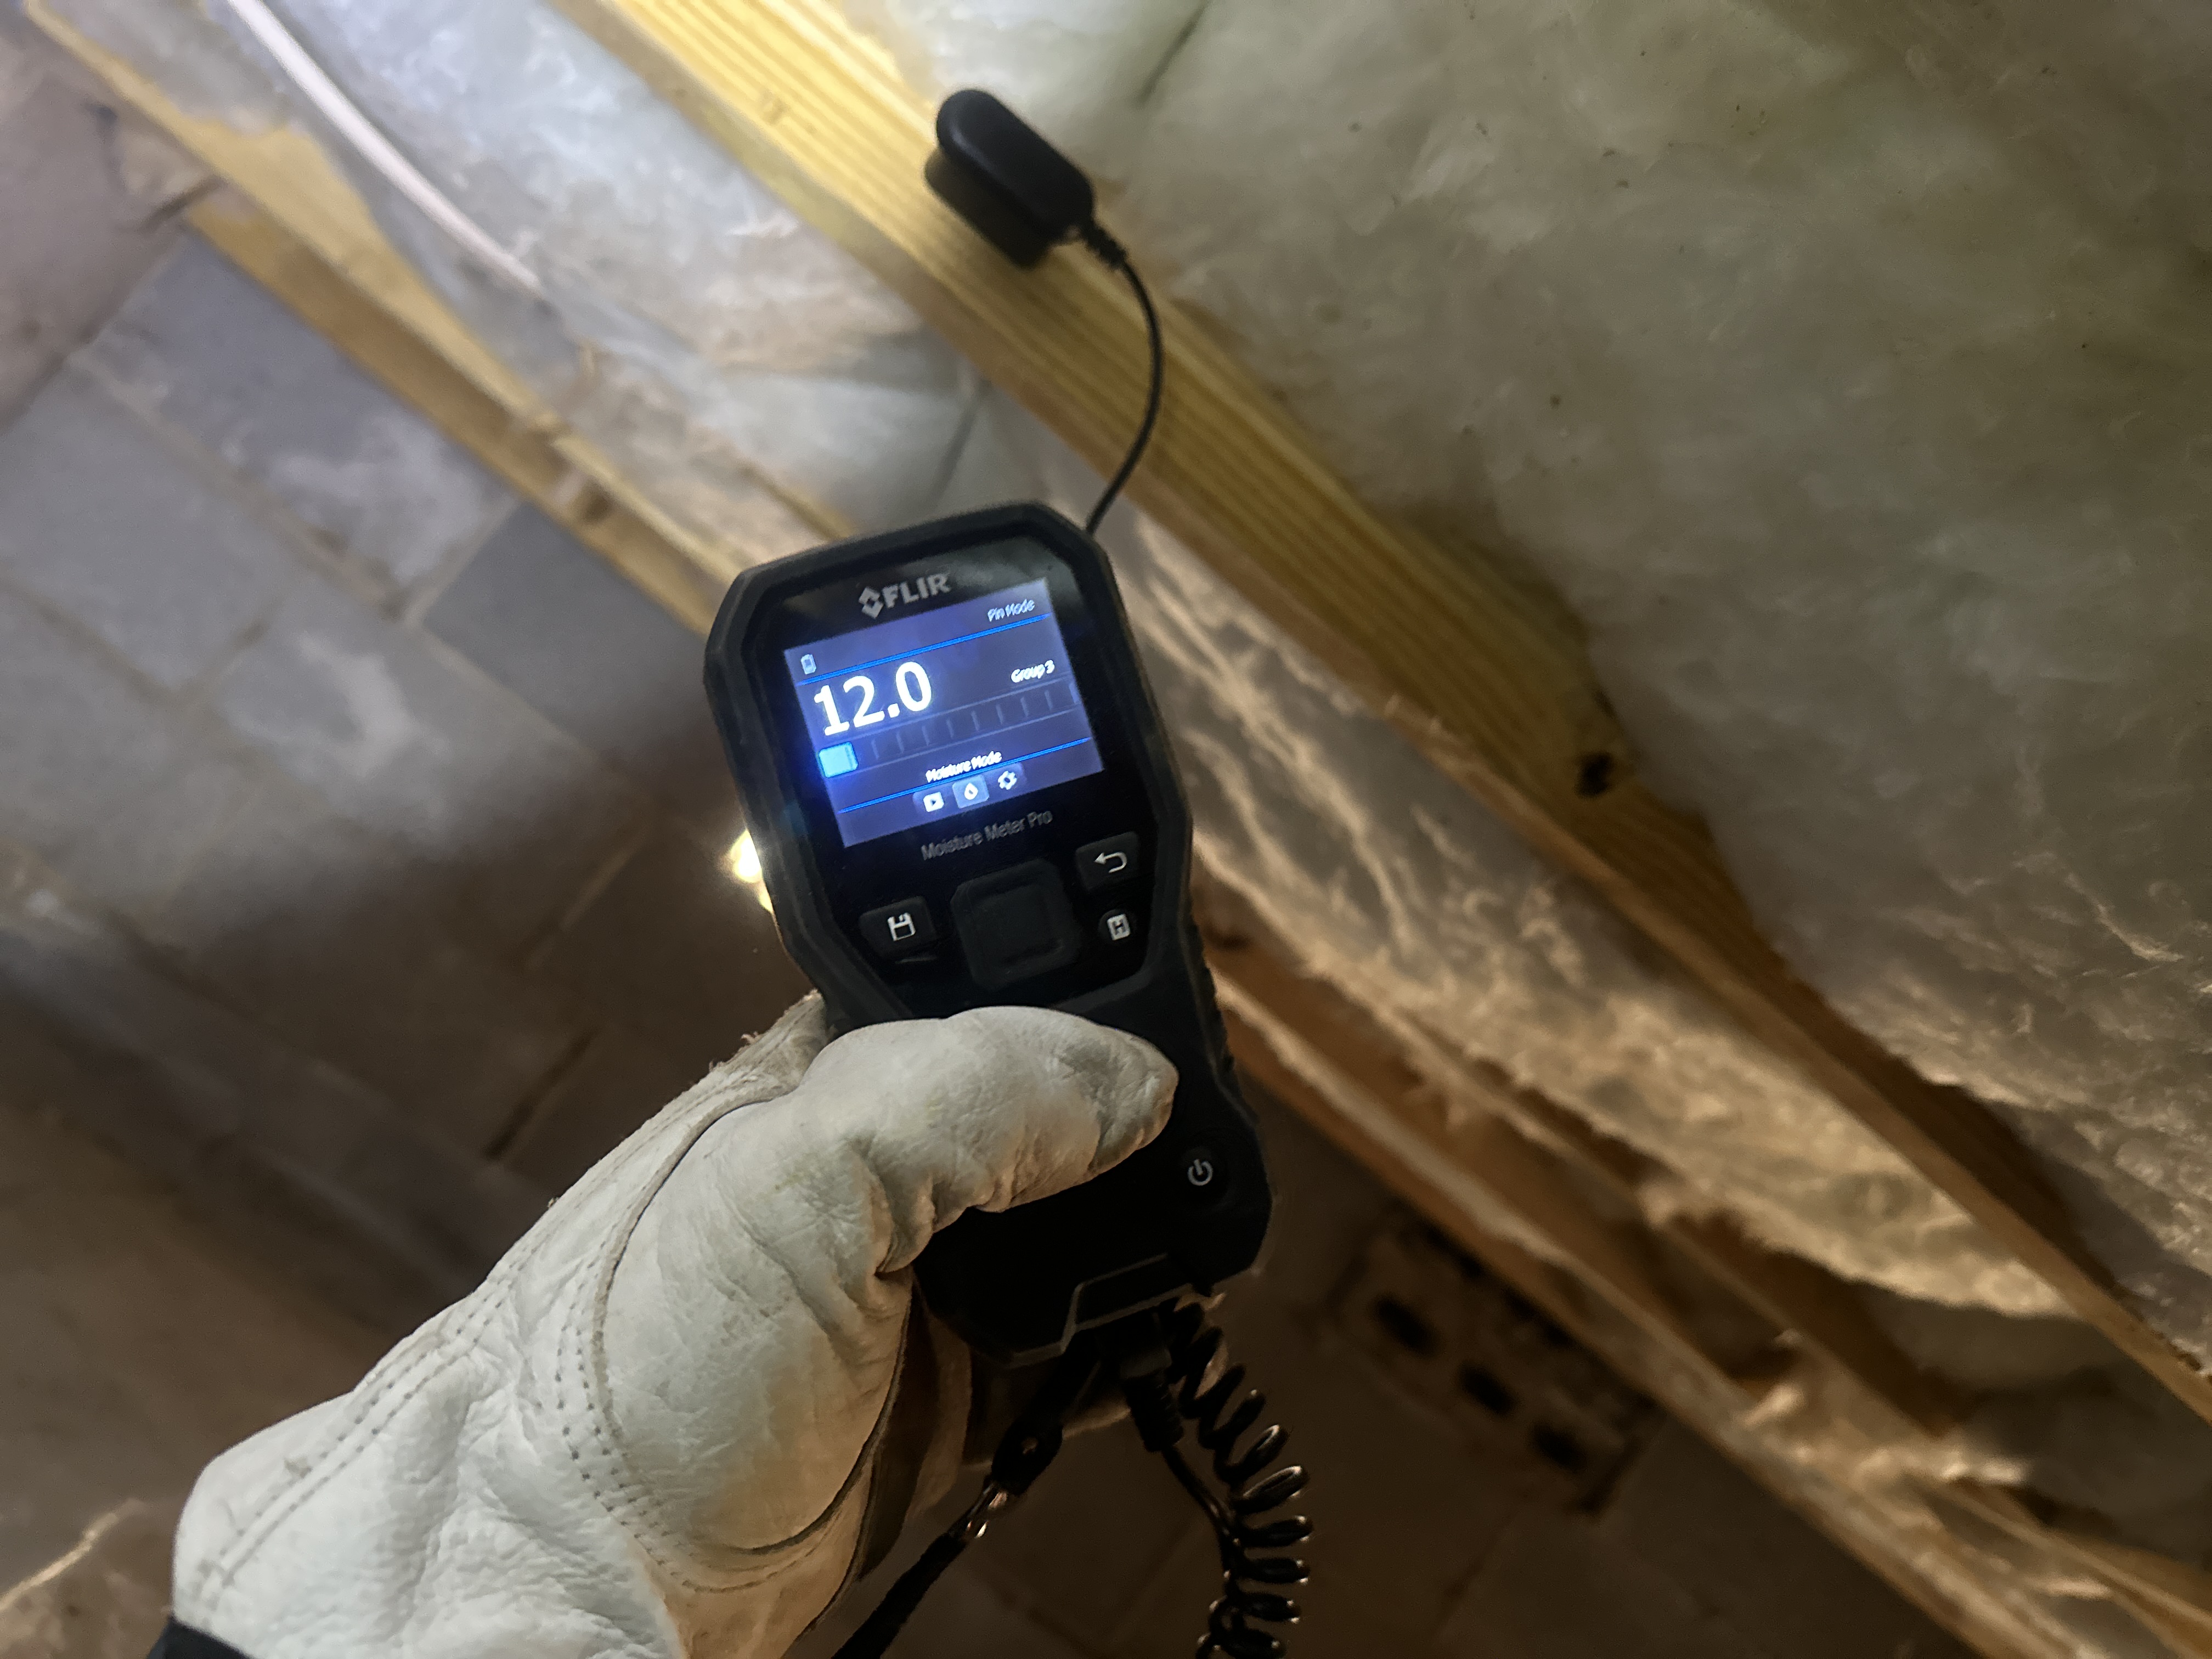
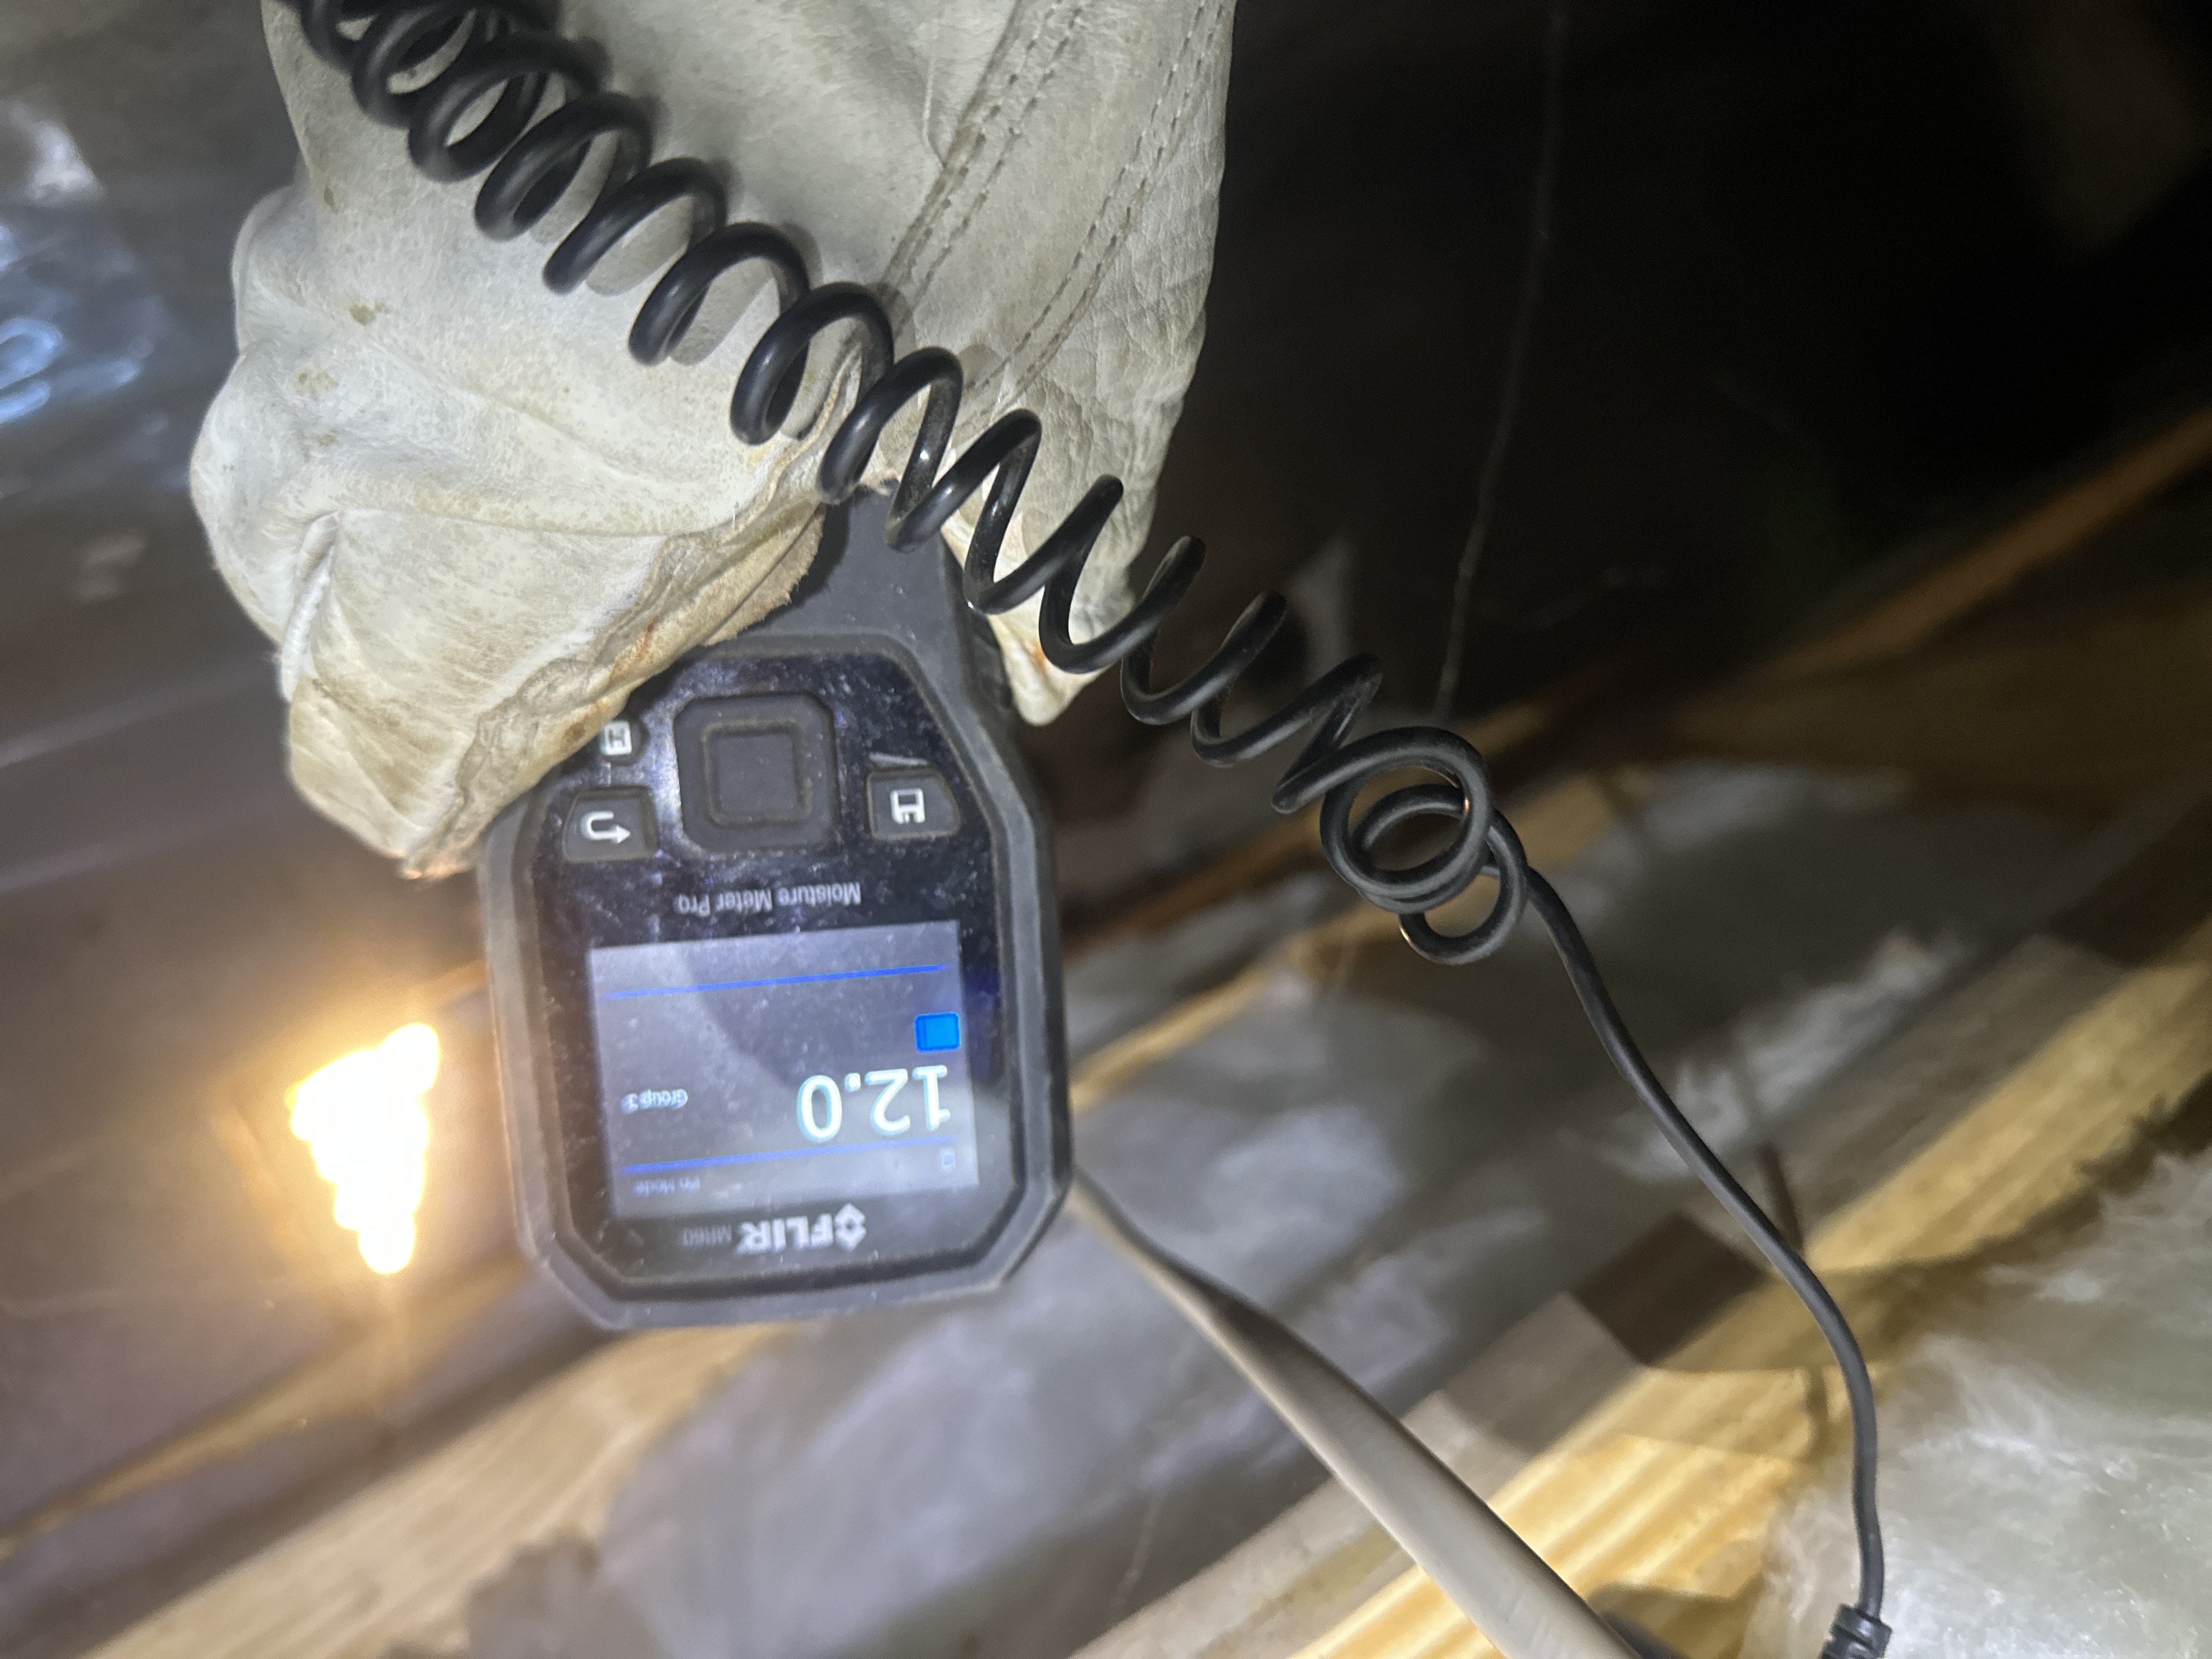
- CS-5 Crawl Space:
The moisture content of the joists was taken in the four corners of the crawlspace. The highest reading found was 12.0%. This is not an elevated moisture level and is considered acceptable. Should humidity levels in the crawlspace increase significantly in the summertime, a crawlspace repair company may want to be contacted to explore options for sealing the crawl space vents and installing a dehumidifier. I am unable to determine how humid the crawlspace will be in the summer.
Recommended Maintenance Items
- G1-2 Grounds:
Pruning trees, branches and vegetation away from the house is recommended. Where trees, branches and large shrubs can provide rodent access to the roof, a minimum 6-foot clearance is recommended as many rodents can jump 6-feet. All vegetation, including smaller landscaping such as grasses, flowers and shrubs should be kept 1-foot off the house to eliminate contact which could trap moisture against the building.
- RCG-3 Roof, Chimney and Gutters:
The gutters are clogged with organic debris and require cleaning to ensure proper control of roof runoff. Clean the gutters and ensure they are unobstructed, leak free and properly sloped to drain. This is routine house maintenance; I would expect the need to clean gutters and downspouts regularly.
- EDFW-9 Electric Distribution and Finish Wiring:
Smoke detector and Carbon Monoxide detector batteries should be changed upon moving into the residence, and every 6 months thereafter. I recommend changing smoke detector batteries every time you change your clocks for daylight savings.
- HCFV-2 Heating, Cooling, Fireplaces and Ventilation:
The dirty air filter(s) for the HVAC system should be replaced. Plan on replacing air filters every 2-3 months if not more often.
- P-4 Plumbing:
The water heater temperature seemed to be set too low at the time of inspection - just 113 degrees F In the kitchen and 115 degrees F in the bathroom. The range of 115-125 degrees F is the generally recommended temperature. This is nearly impossible to measure precisely during a home inspection as water temperature can vary between fixtures. I try and test the water temperature in several places and take the median reading. Adjust water heater temperature as needed. For best practice, set water temperature at the water heater to 120 to 125 degrees F.
- LF-1 Laundry Facilities:
The dryer exhaust ductwork is dirty and needs to be cleaned for improved safety. This is important regular maintenance to eliminate a potential fire hazard.
Improves
- HFB-2 Hall Full Bathroom:
Consider installing a 1-hour timer for bath fans so they run after use. Removal of moist air after using the shower or bath will extend the life of the wall coverings, paint, and sheetrock. This will help to keep this space dry because the fan can run for a while after use without leaving the fan on all day.
Monitors
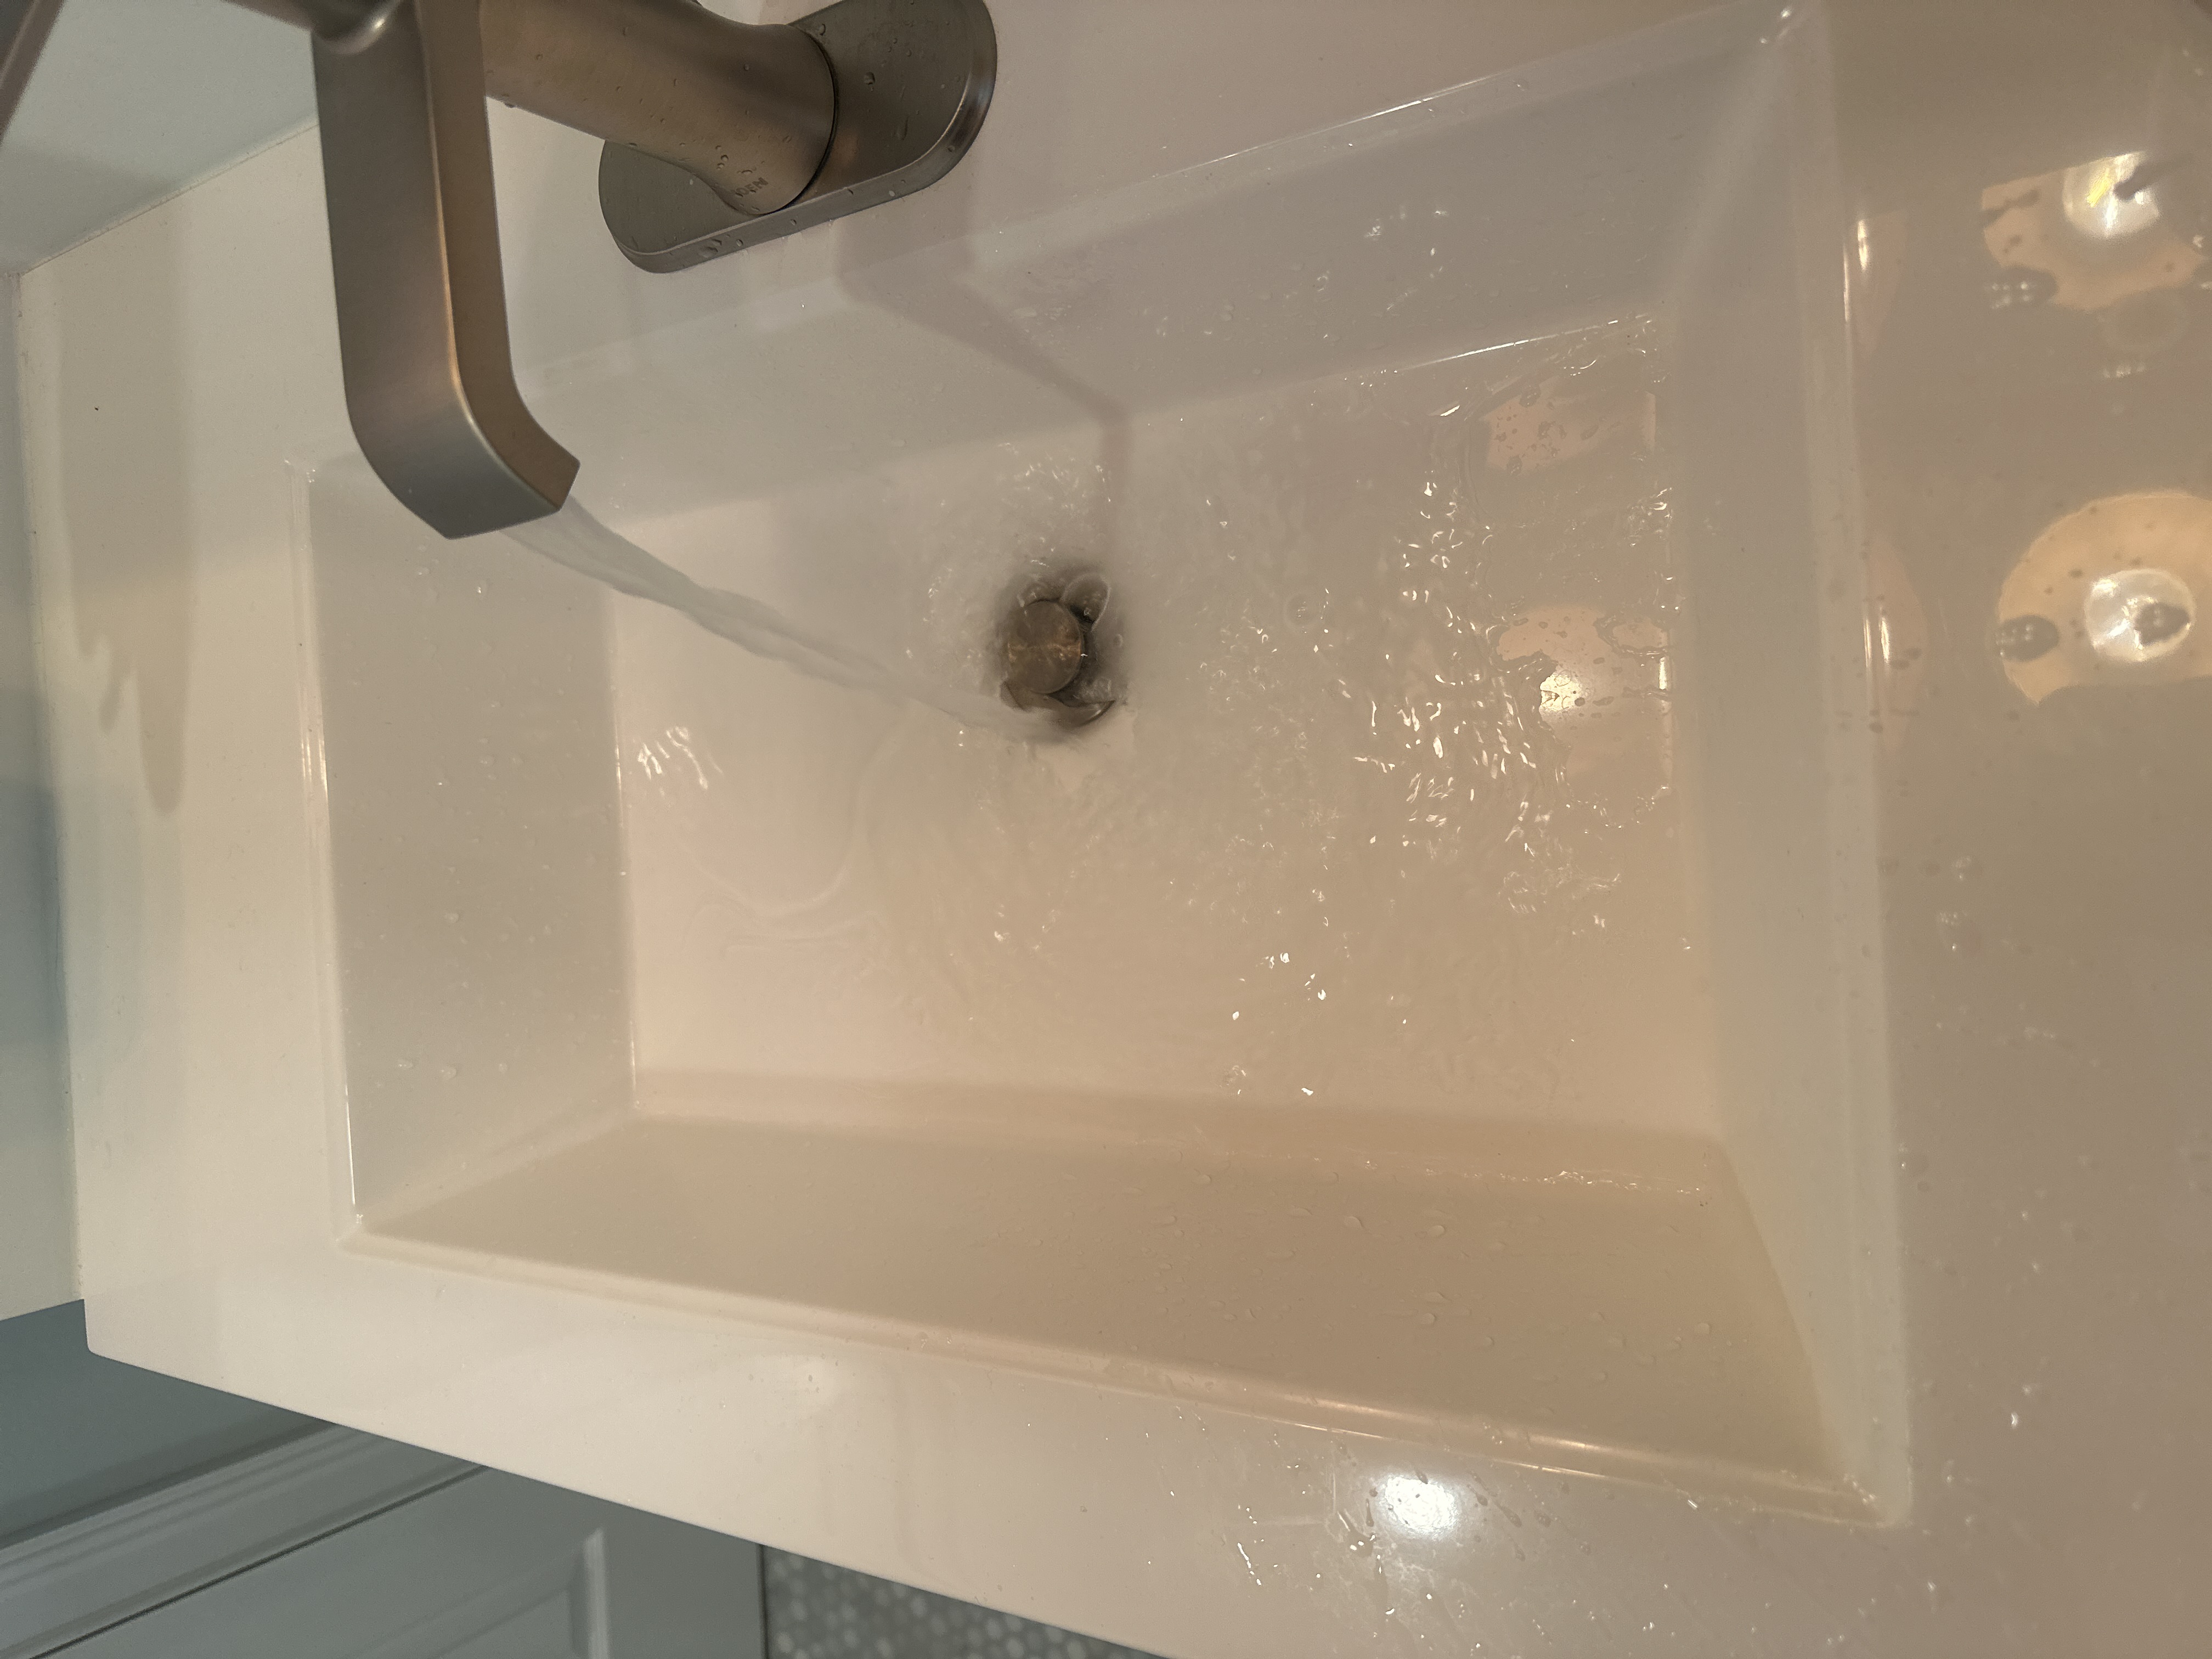
- HFB-1 Hall Full Bathroom:
This sink does not have an overflow drain. Care should be taken to ensure that the sink is not left on, because the lack of an overflow drain will allow the sink to overflow and flood the bathroom. This is for your information only.
Due Diligences
- EDFW-4 Electric Distribution and Finish Wiring:
Lots of new wiring was noted suggesting that the building has had significant wiring updates. Inquire with the seller regarding any permit history of wiring updates, receipts or the extent of the work performed.
Efficiencies
- P-3 Plumbing:
A water heater insulation wrap (also known as a water heater blanket) could be added to improve the thermal heating efficiency of the water heater. This would be especially helpful in this particular situation since the water heater is located outside.
- A-1 Attic:
This residence is not equipped with an attic stair insulating tent. An attic stair insulating tent can help reduce the thermal loss through your pull down attic door. I recommend you install an insulating tent and ensure it is fastened every time you finish in the attic to ensure maximum efficiency of the thermal envelope between the unconditioned space of your attic and the living space of your residence.
Notes
- EDFW-8 Electric Distribution and Finish Wiring:
Carbon monoxide alarms were found and noted during inspection. Be sure to check these regularly. The standard is 1/ floor and 1 outside all sleeping areas.
- EDFW-10 Electric Distribution and Finish Wiring:
While conducting the inspection, I wear a personal Carbon Monoxide (CO) monitor. This unit did not detect any Carbon Monoxide during the inspection.
- ES-3 Electric Service:
The electric panel is full, there is no more room on the bus bar to add breakers. You may be able to use tandem breakers if you want to expand the panel, but this could be tricky or impossible to also follow modern requirements for AFCI's. This could make this panel obsolete or force the need for a sub-panel depending on plans for future wiring here.
- HCFV-1 Heating, Cooling, Fireplaces and Ventilation:
The temperature was taken while the heat was running before and after the furnace. The unconditioned air was found to be 63 degrees, and the heated air was found to be 107 degrees. This shows a 44 degree increase in air temperature, indicating that the furnace is running properly
- HCFV-3 Heating, Cooling, Fireplaces and Ventilation:
The air conditioning system and condensate control system could not be tested during inspection. Outdoor temperatures should exceed 65 degrees F for at least 24-hours or the air conditioning equipment can be damaged by testing. I recommended having this system serviced and inspected prior to the next cooling season.
- K-3 Kitchen:
No air gap noted for the dishwasher waste line but they did run a high loop. Other regions in the country require an air gap device, however NC allows for a simple "high loop" installation.
- K-5 Kitchen:
Ice machine made ice during the inspection.
- HFB-3 Hall Full Bathroom:
During inspection today I operated all plumbing fixtures in bathrooms. I ran a moisture meter around toilets and tile shower enclosures to check for concealed leaks and sounded for loose tile and finishes in shower and tub enclosures. I do not test bathtub overflow drains as this risks damaging finishes around the tub. Monitor tubs while filling and avoid pushing water into the overflow. Even well-installed overflow drains can leak as the gaskets that seal the overflow will dry out over time and may no longer provide a watertight seal. Monitor plumbing after moving into a new home as testing during inspection presents less stress on plumbing than daily use. Please note that vacant homes present additional risk as it can be difficult to distinguish how the plumbing system will respond to daily use. Any defects uncovered during inspection are listed in this report.
- HFB-4 Hall Full Bathroom:
This bathroom was tested for a functional flow. A functional flow test ensures that there is adequate flow (different from pressure) to supply all the fixtures running at once. This test is performed by turning on the shower, and then opening all sinks and tubs. The toilet is then flushed, and the sinks and shower are observed for a reduction in flow. If no reduction is observed, then the functional flow passed. This bathroom passed the functional flow test.
- A-2 Attic:
Some framing and sheathing has been replaced, most likely when the roof was last replaced.
The Complete Report
General Comments
Building Characteristics, Conditions and Limitations
Style of Home: Traditional
Type of Building : Residential Single Family (1 story)
Approximate Square Footage: 905
Approximate Year of Original Construction: 1955
Unless the wiring in the building has been fully updated, this building likely has wiring that predates the late 1980's. Branch circuit wiring installed in buildings built prior to the late 1980s is typically rated for a maximum temperature of only 60 degrees Celsius. This includes non-metallic sheathed (Romex) wiring, and both BX and AC metal-clad flexible wiring. Knob and tube wiring, typically installed in homes built prior to 1950, may be rated for even lower maximum temperatures. Newer electric fixtures including lighting and fans typically require wiring rated for 90 degrees Celsius. Connecting newer fixtures to older, 60-degree-rated wiring is a potential fire hazard. Repairs for such conditions may involve replacing the last few feet of wiring to newer fixtures with new 90-degree-rated wire, and installing a junction box to join the old and new wiring. It is beyond the scope of this inspection to determine if any such incompatible components are installed. Based on the age of this building, be aware that such components may be present.
In 1978, federal laws were passed to prohibit use of lead and asbestos in building materials. Manufacturers of building materials were allowed to sell existing stocks of materials that were manufactured with lead and asbestos, so even buildings constructed as late as the mid-1980's could possibly contain lead or asbestos. Identification and testing for lead and asbestos and other environmental testing is beyond the scope of this home inspection. If you wish to seek additional information, I recommend contacting an environmental lab or industrial hygienist.
Attending the Inspection: Buyer and Buyer's Agent
Occupancy: Unoccupied, but staged with furniture
Animals Present: No
Weather during the inspection: Clear
Approximate temperature during the inspection: Below 32[F]
Ground/Soil surface conditions: Dry
For the Purposes of This Report, the Front Door Faces: North
To see how to build a custom PDF summary list, built from any number of items in this report, please review this video. The idea behind this feature is to allow the readers of this report to build their own custom lists. These could be used as a tool for inspection responses, or for requesting re-inspection of specific items or for documenting work that has been completed as part of a pre-listing inspection.
No major concerns were found during this inspection.
This house was vacant / unoccupied at the time of inspection. Vacant and unoccupied houses present unique challenges for home inspection, especially the piping and wiring systems which have not be subject to regular use prior to the inspection. While these systems can be tested during inspection, this one-time test is different than regular use and it is difficult to know how these systems will respond to regular use after the inspection. For example, septic systems may initially function and then fail under regular daily use. Plumbing traps may operate with no signs of leaks and then let go when being actively used for a few days. Shower pans may only leak when someone is standing in the shower and taking a shower. Seals for plumbing fixtures can dry up and leak when not is use. Sewer lines with roots may allow water flow, but then fail when waste and tissue are flushed; it can take a few days for that to backup. Please understand we are trying our best to look for clues of past or existing problems to paint a realistic best-guess as to the reliability of these systems during inspection.
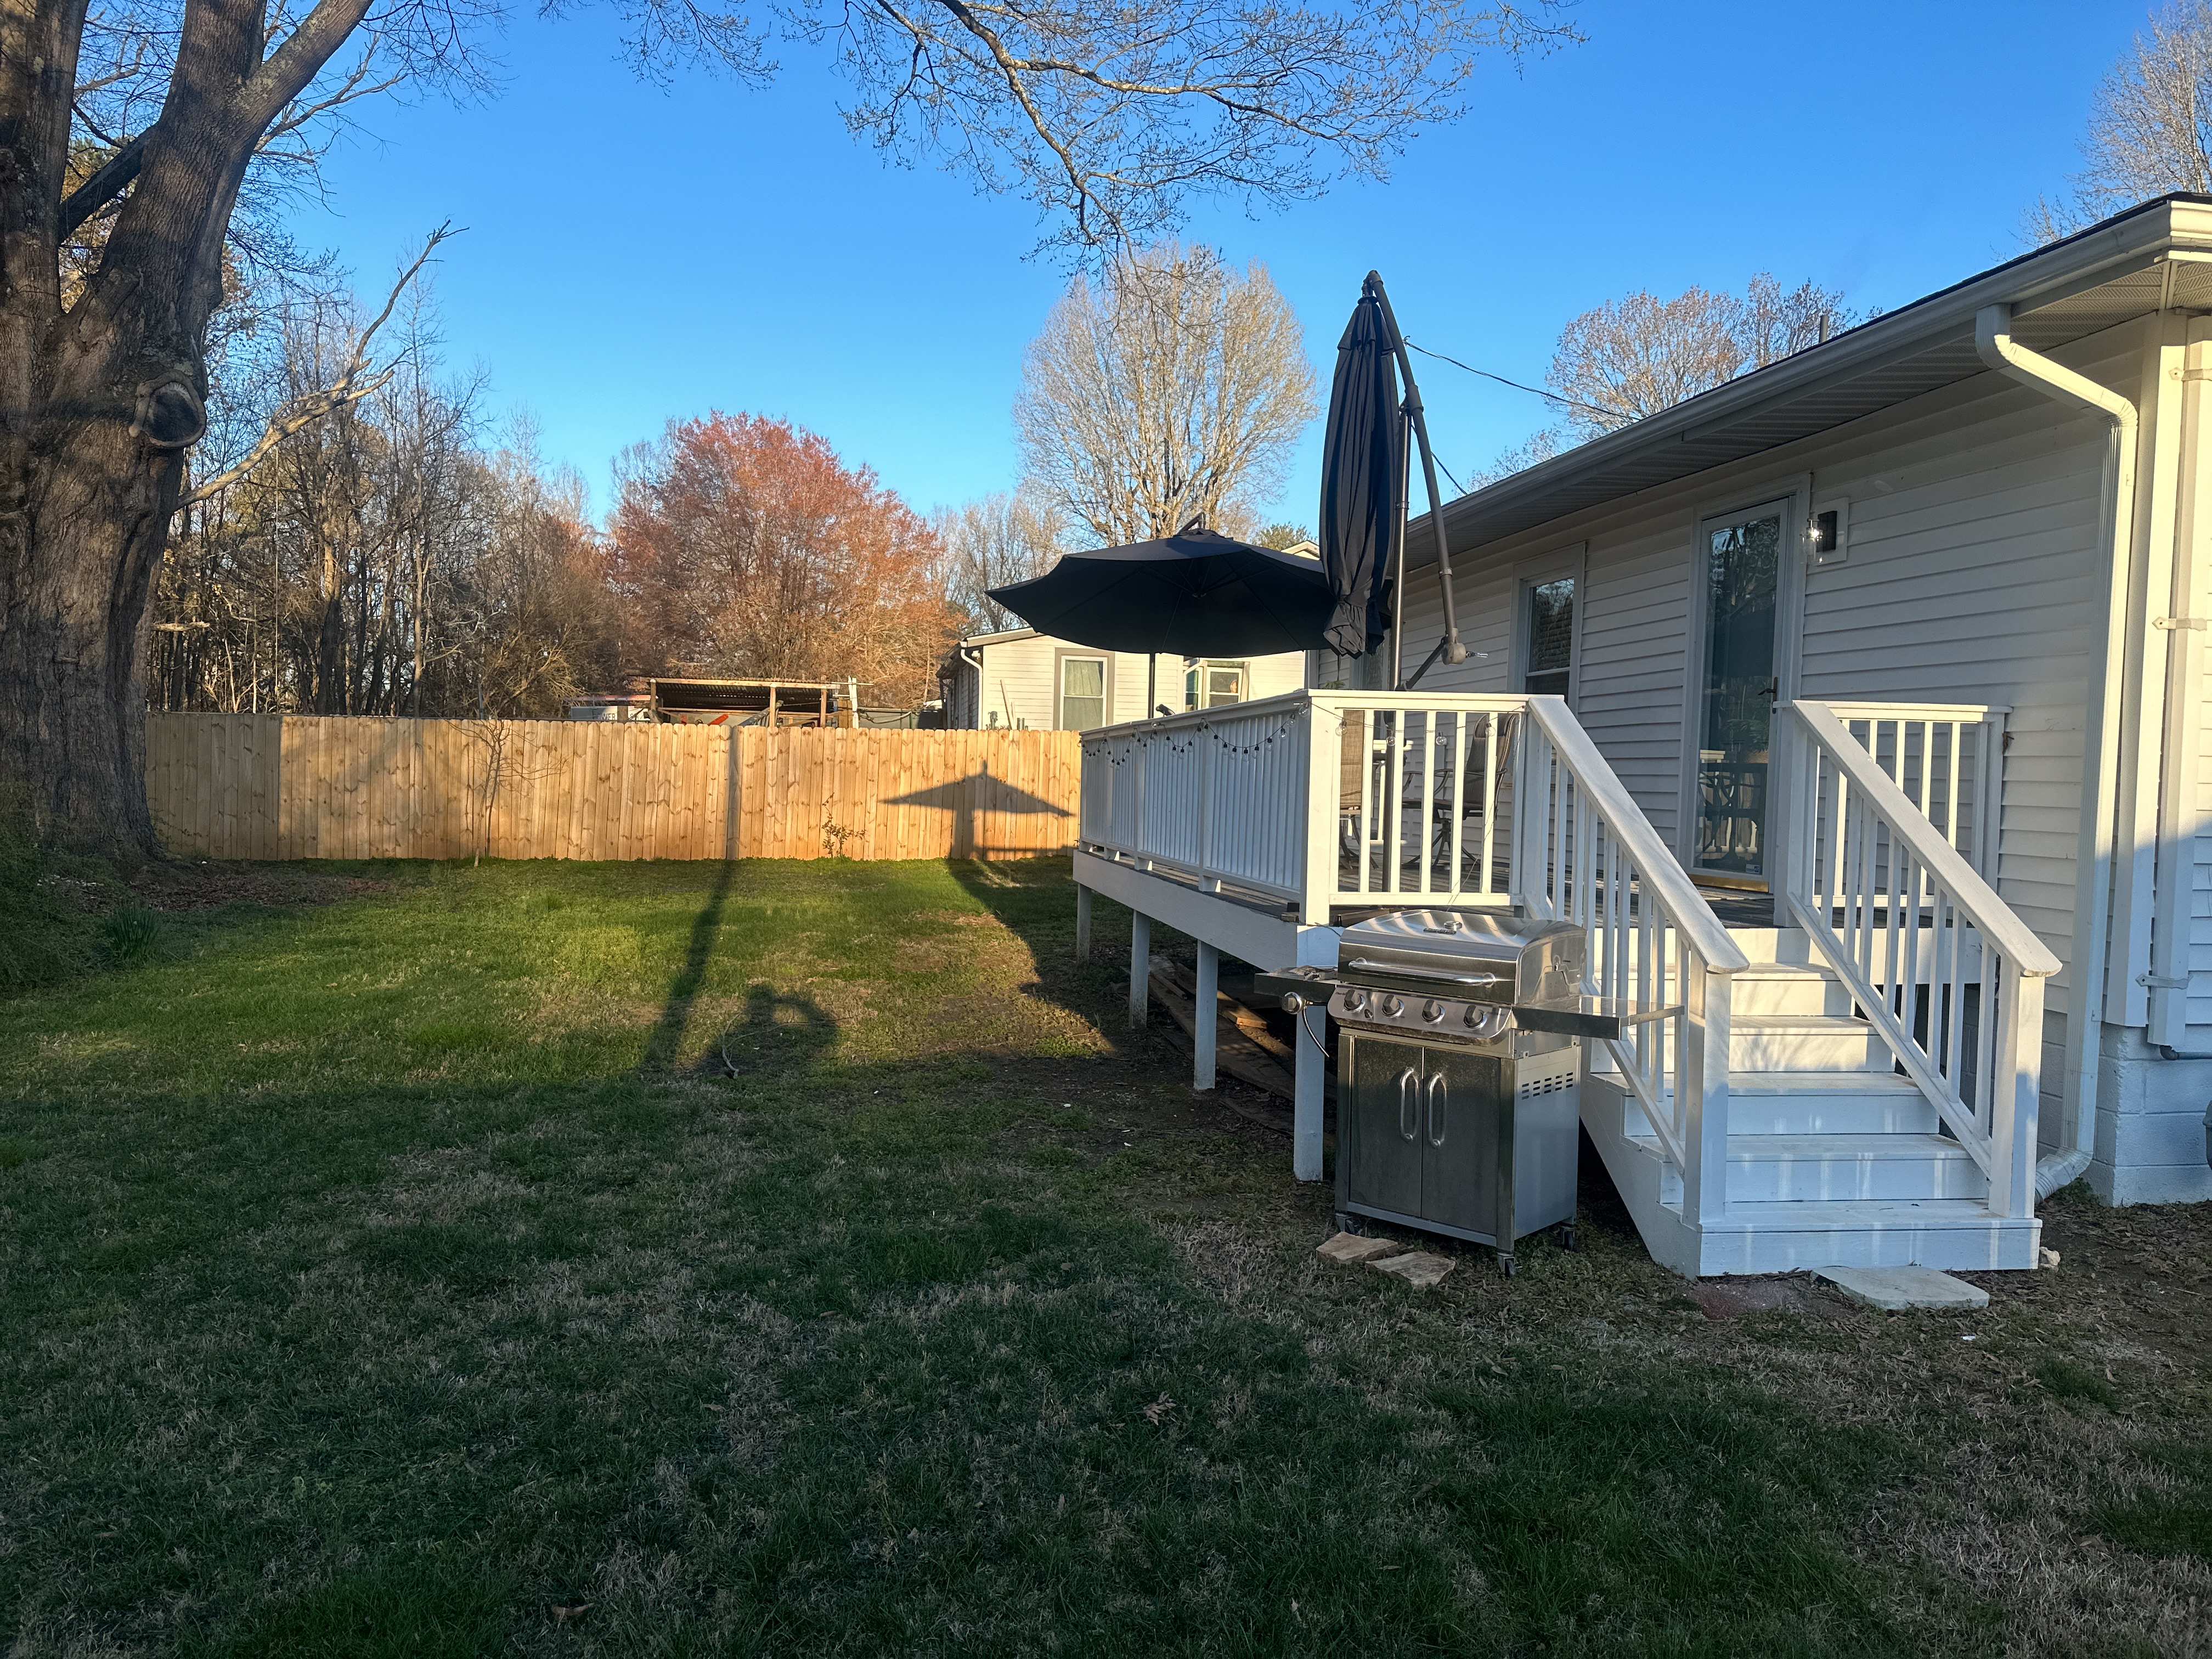
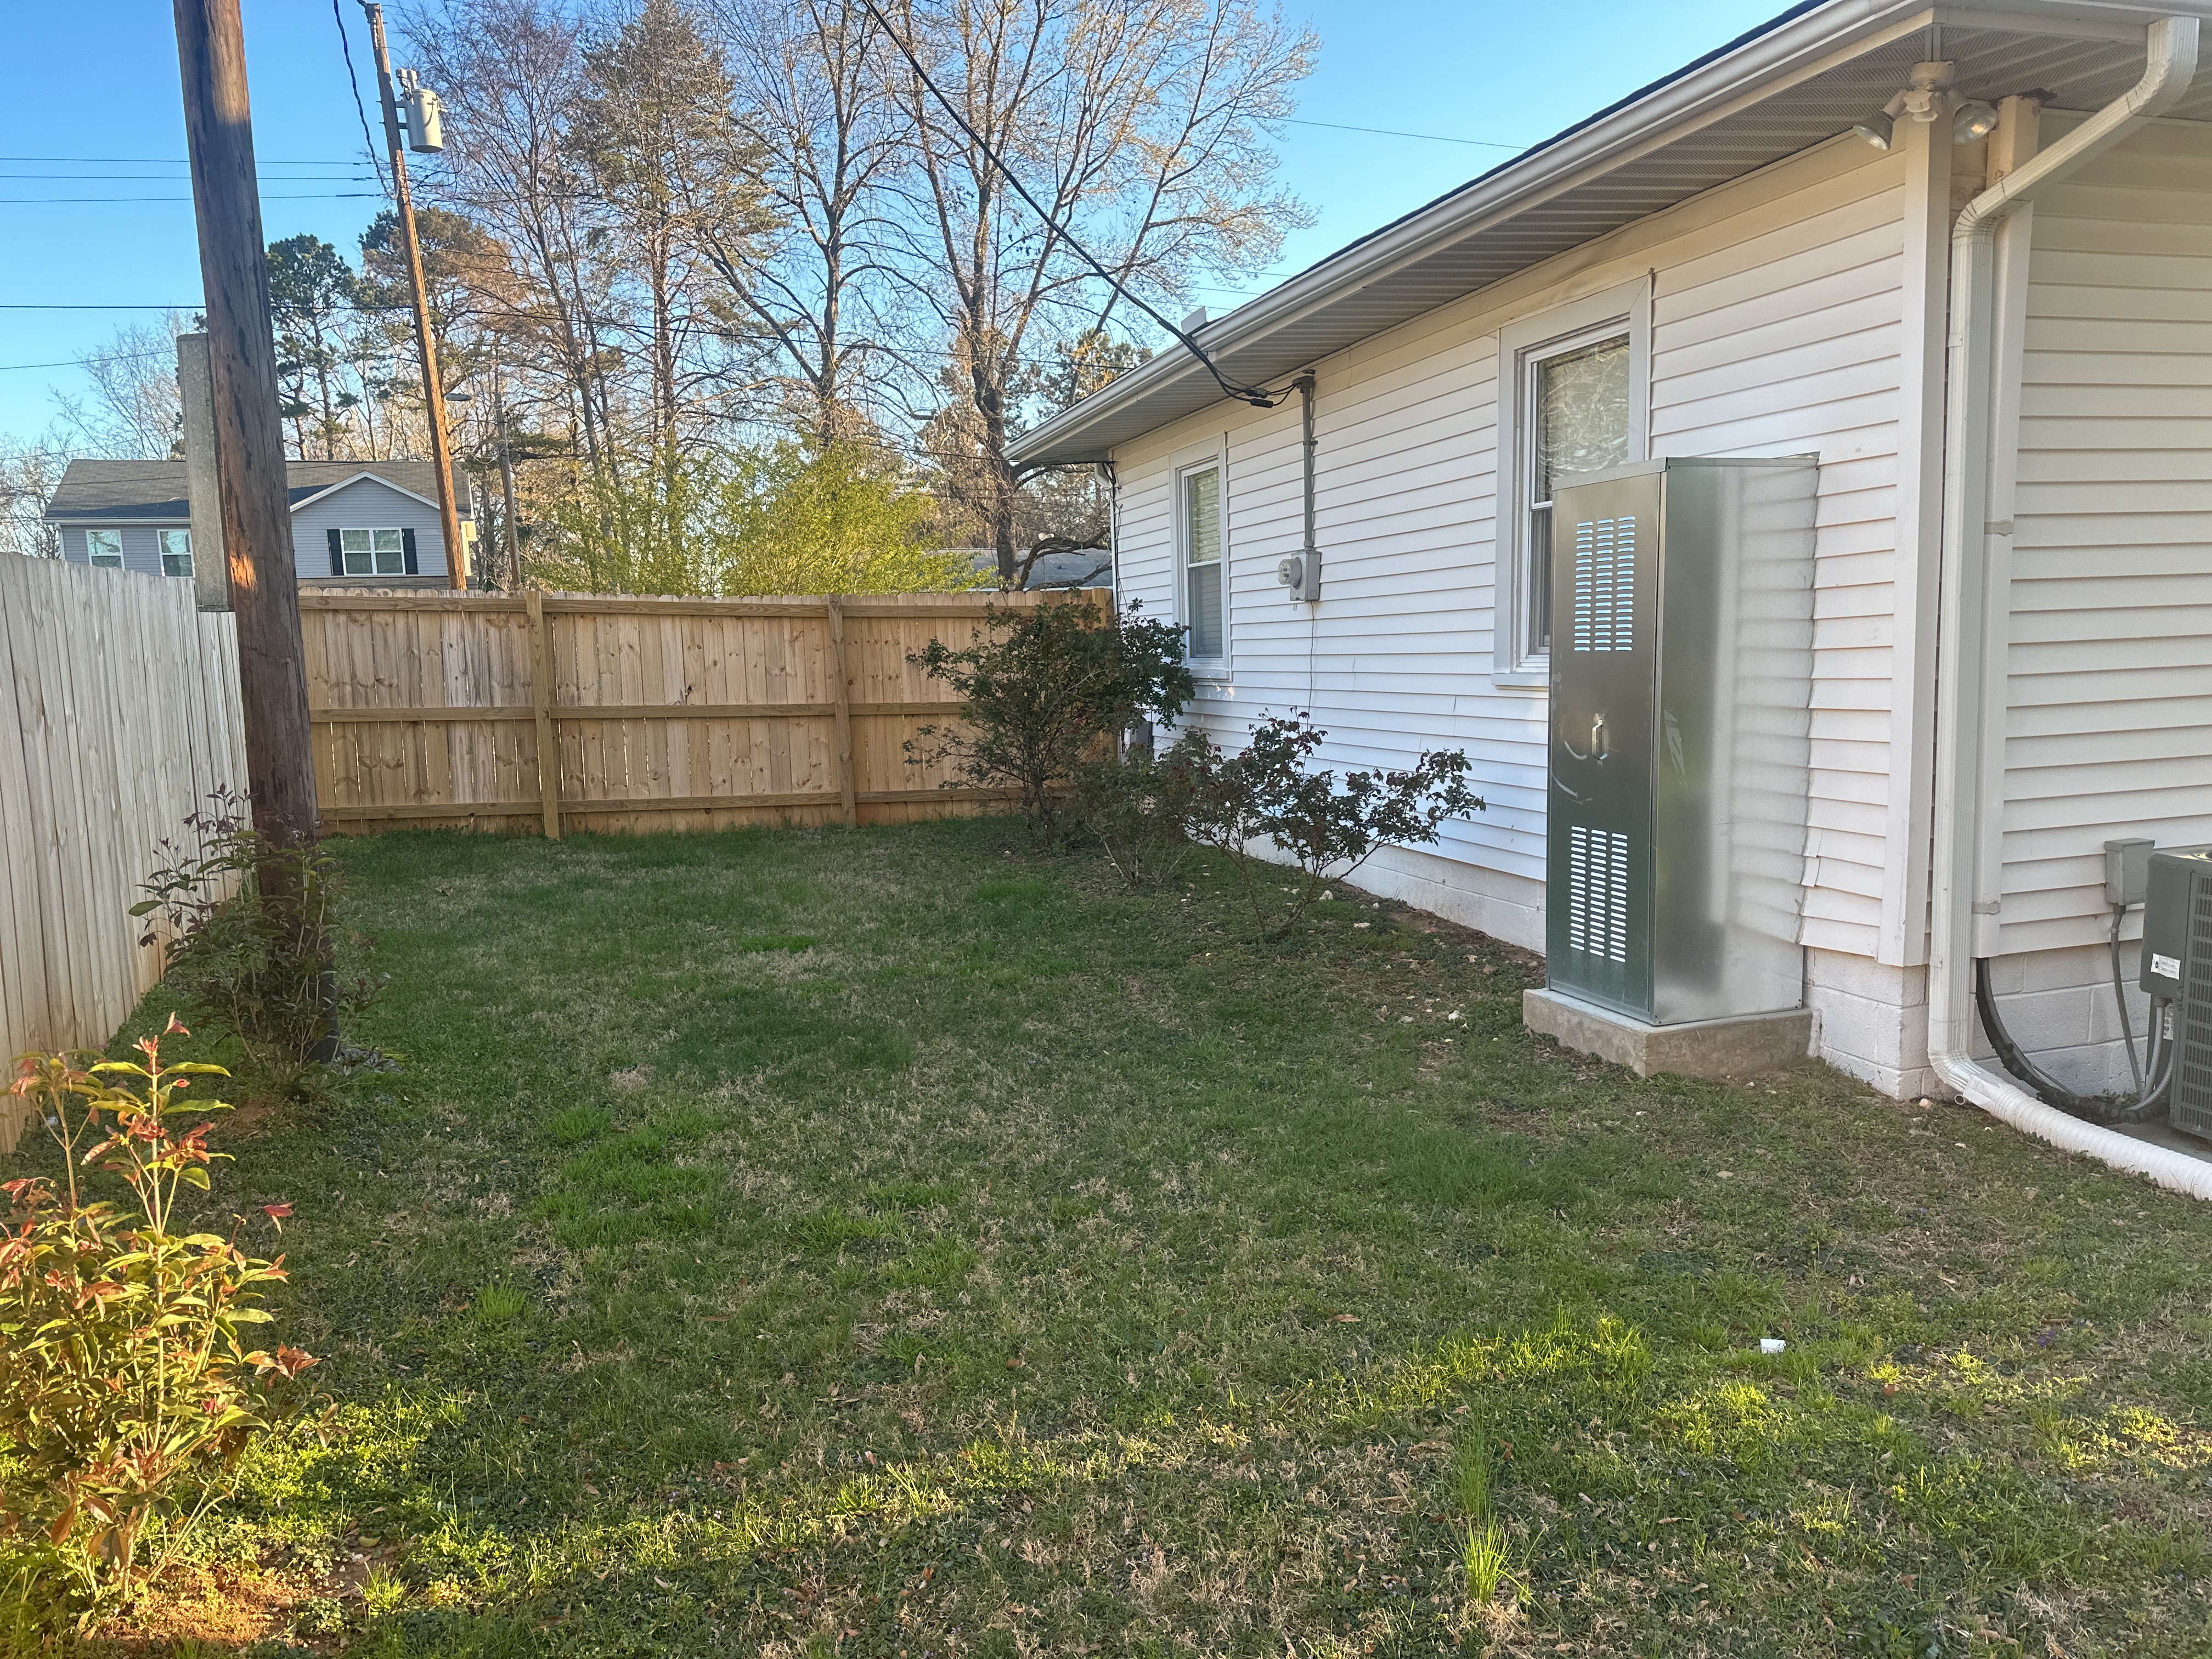
Grounds
General Grounds Photos
 |  |
 |  |
 |  |
Drainage and Site
Clearance to Grade: Standard
Downspout Discharge: Above grade
Site Description: Flat
Driveways/Walkways/Flatwork
Driveway: Gravel
Walkways: Pavers
Patios: None noted
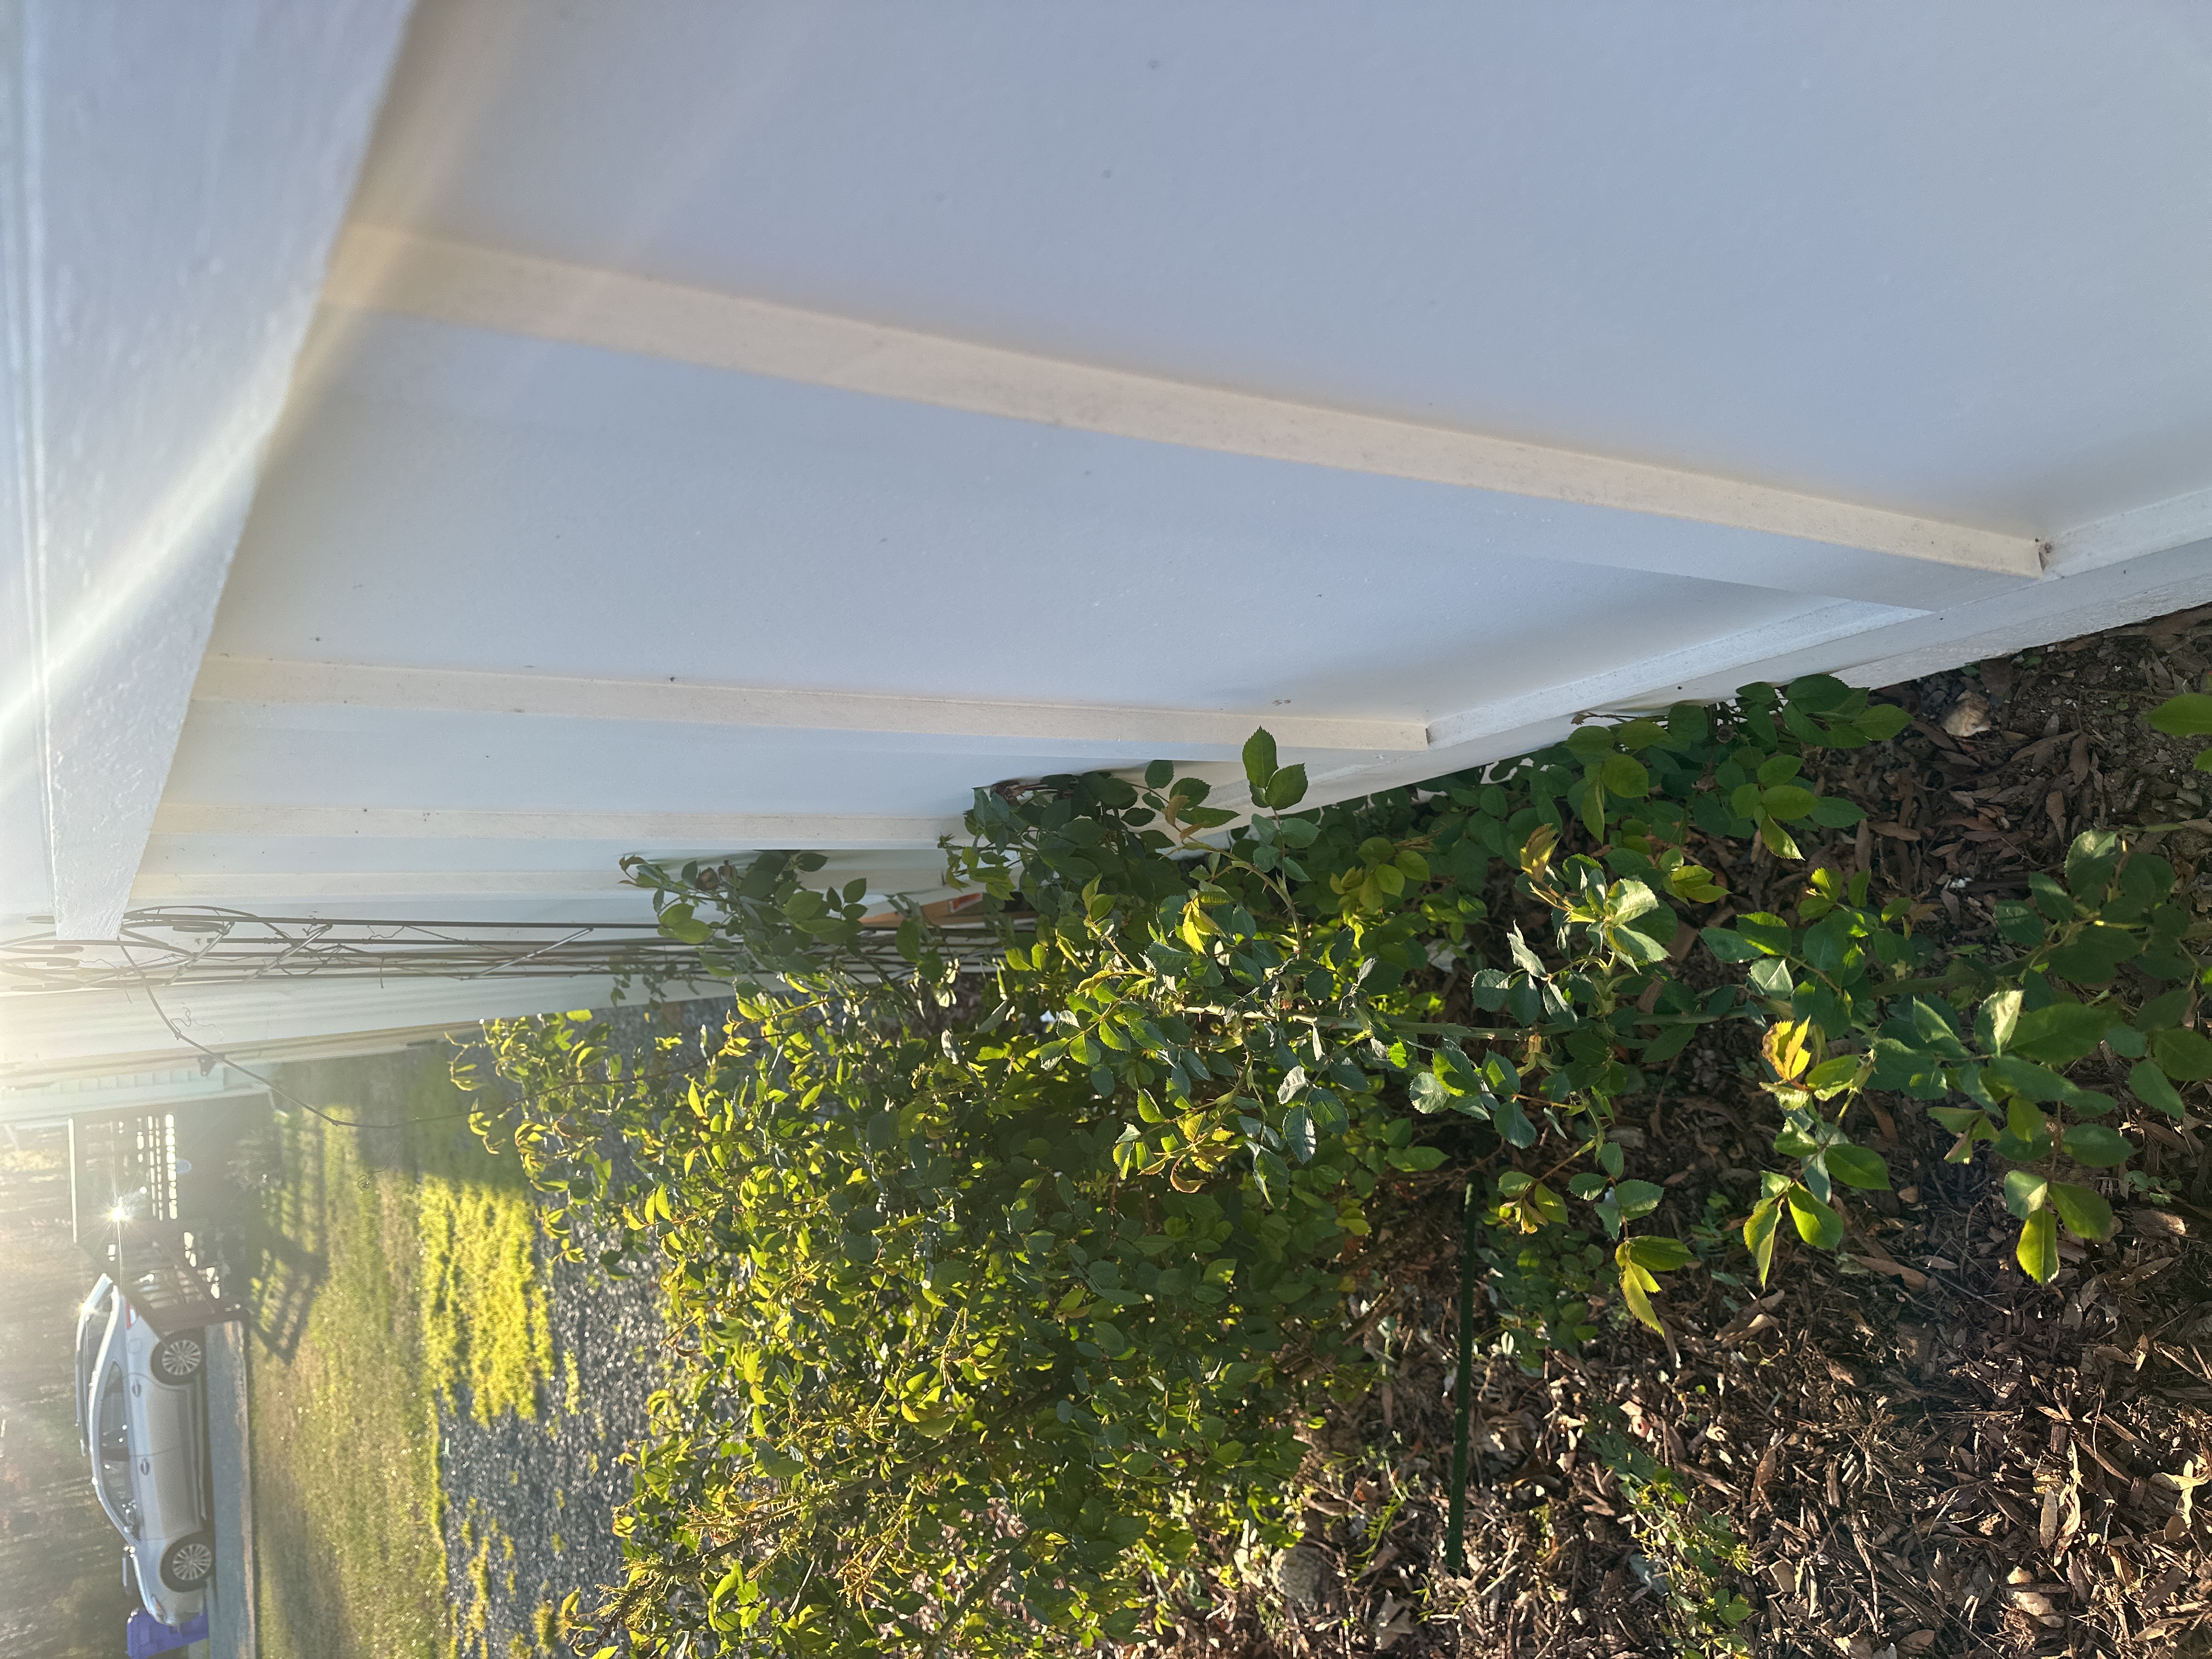
Grounds, Trees and Vegetation
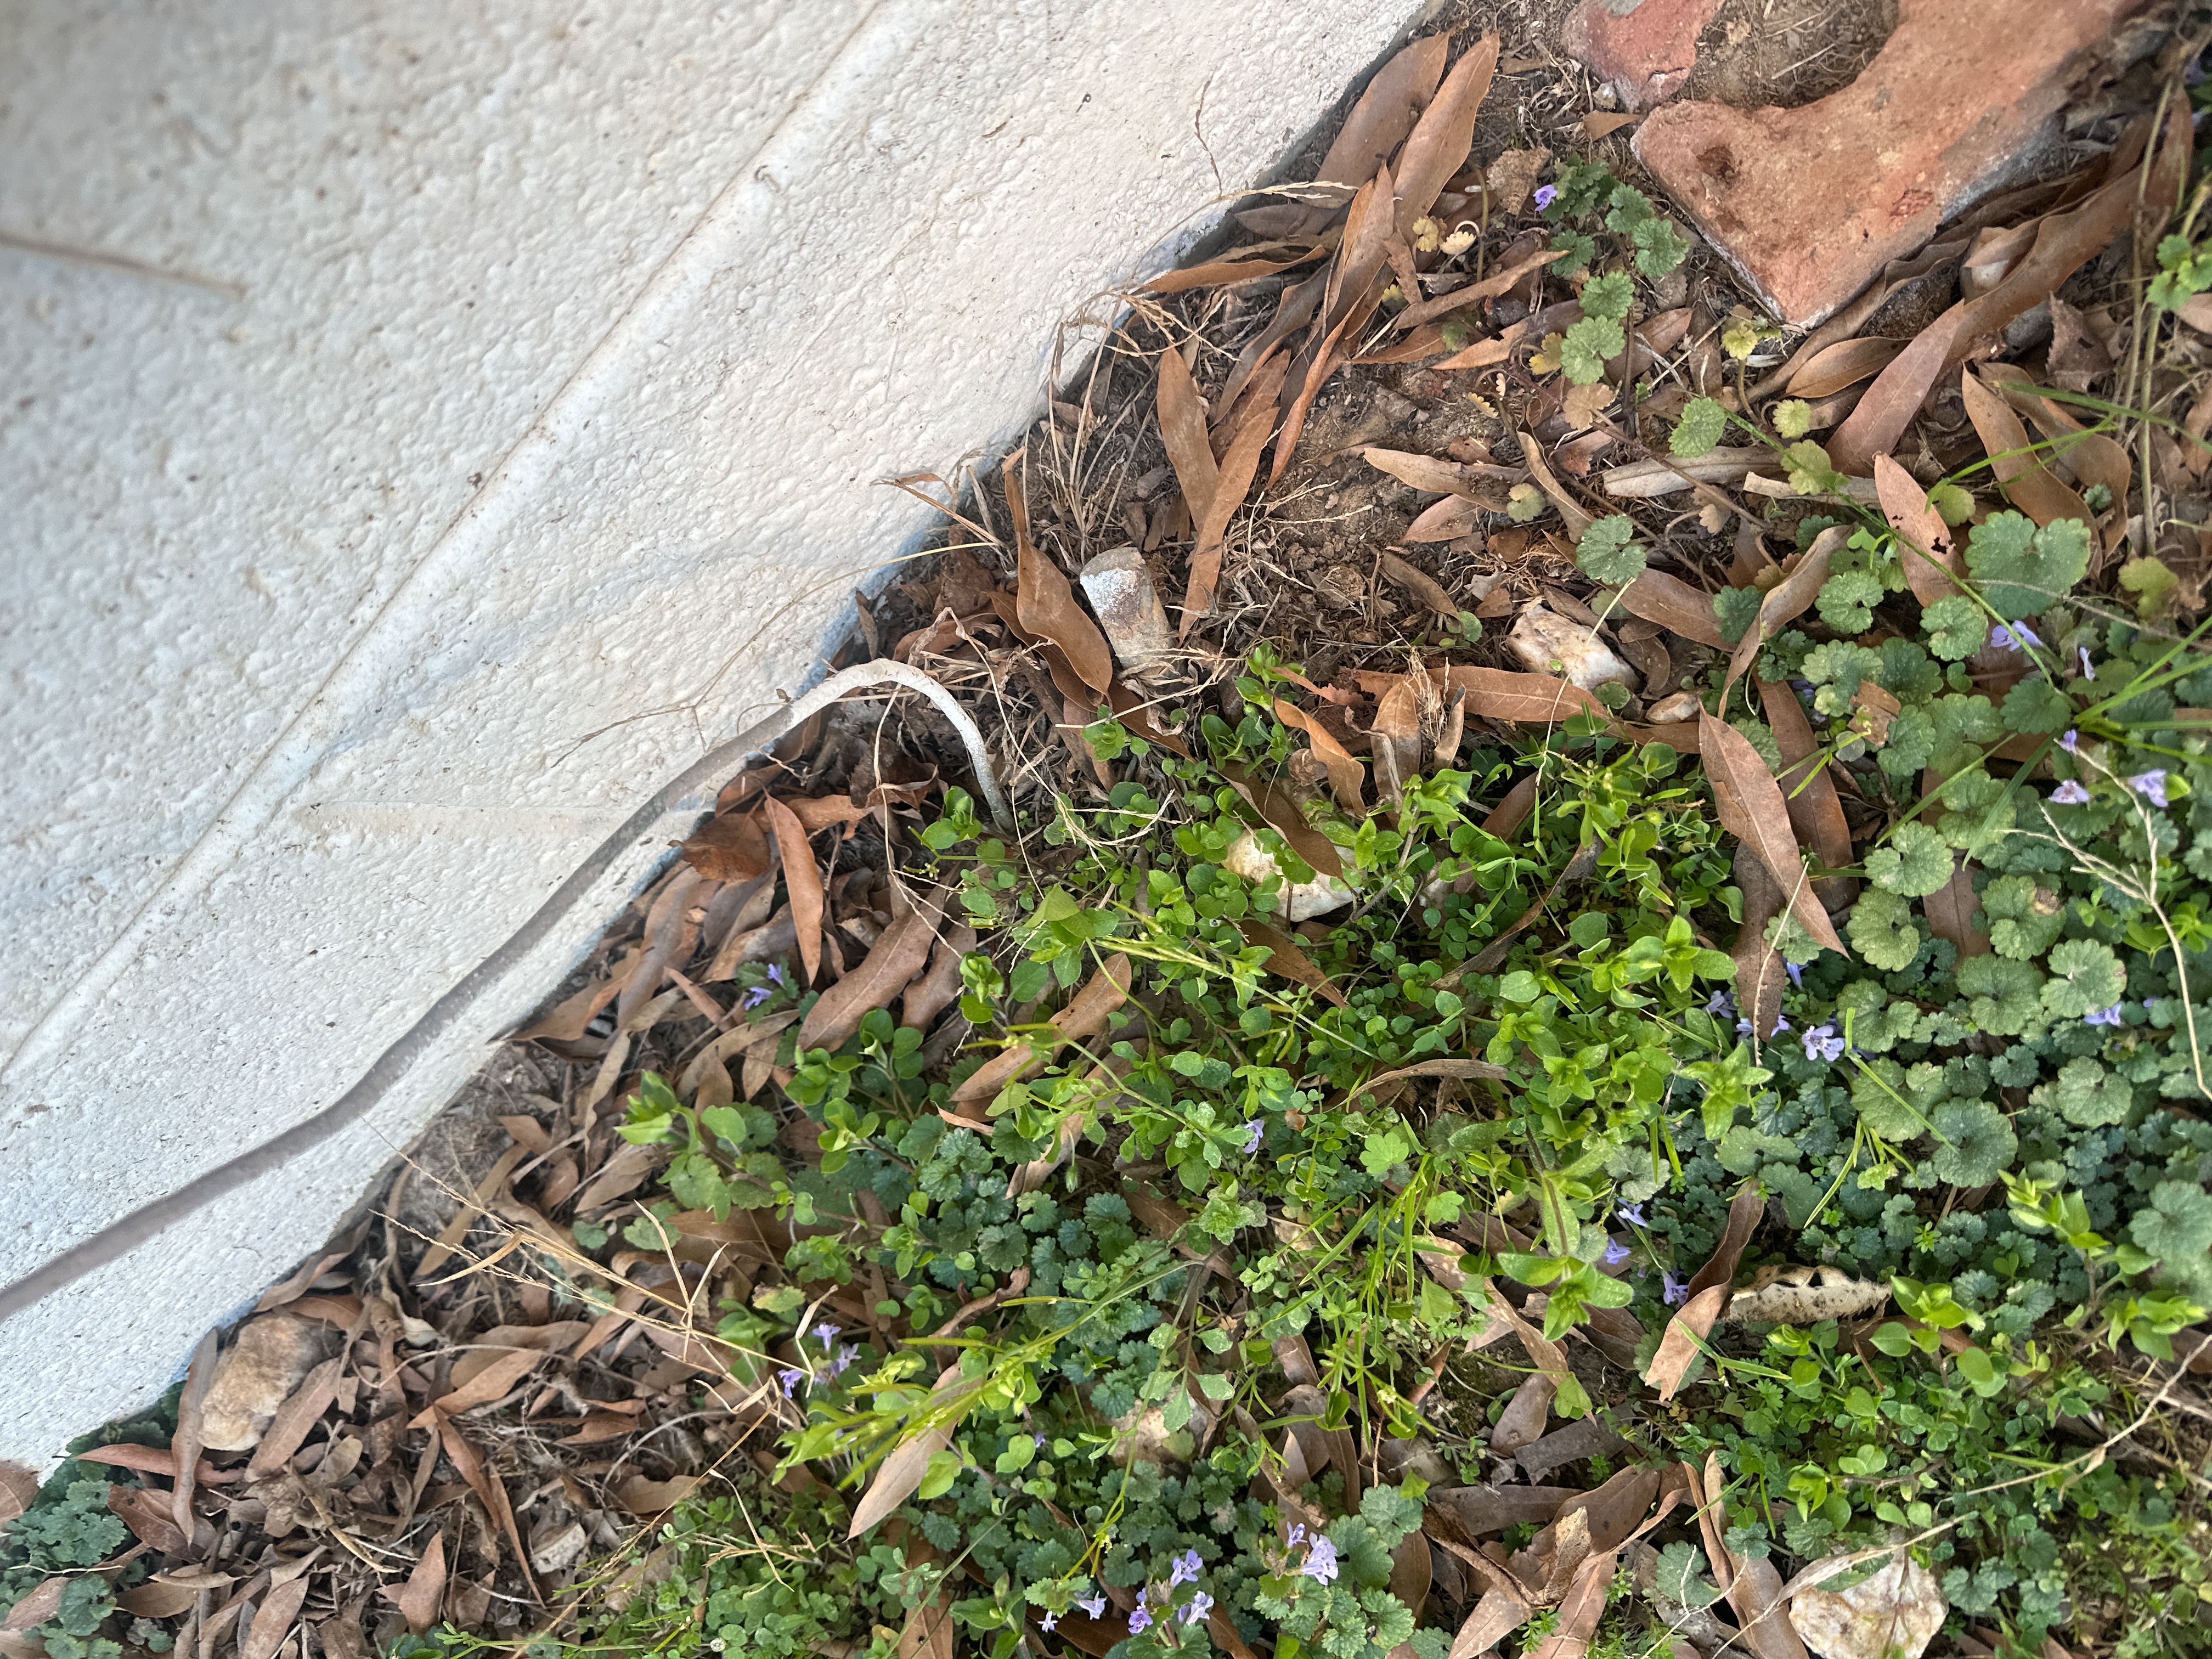
Trees/Vegetation too near building: Yes - Prune Vegetation off House
Pruning trees, branches and vegetation away from the house is recommended. Where trees, branches and large shrubs can provide rodent access to the roof, a minimum 6-foot clearance is recommended as many rodents can jump 6-feet. All vegetation, including smaller landscaping such as grasses, flowers and shrubs should be kept 1-foot off the house to eliminate contact which could trap moisture against the building.
 |
Exterior Stairs
Exterior Stairs: Standard
Fences
Exterior Fencing: Stain The Fence - Recommended, Present
The property has a fencing system in place. Inspection and evaluation of fencing is beyond the scope of a home inspection. If the fencing system is important for your use of this property, I recommended a self-examination to see how it will meet your needs. I may make cursory comments about fencing as a courtesy.
The wood fencing material can be stained as desired to better preserve the wood.
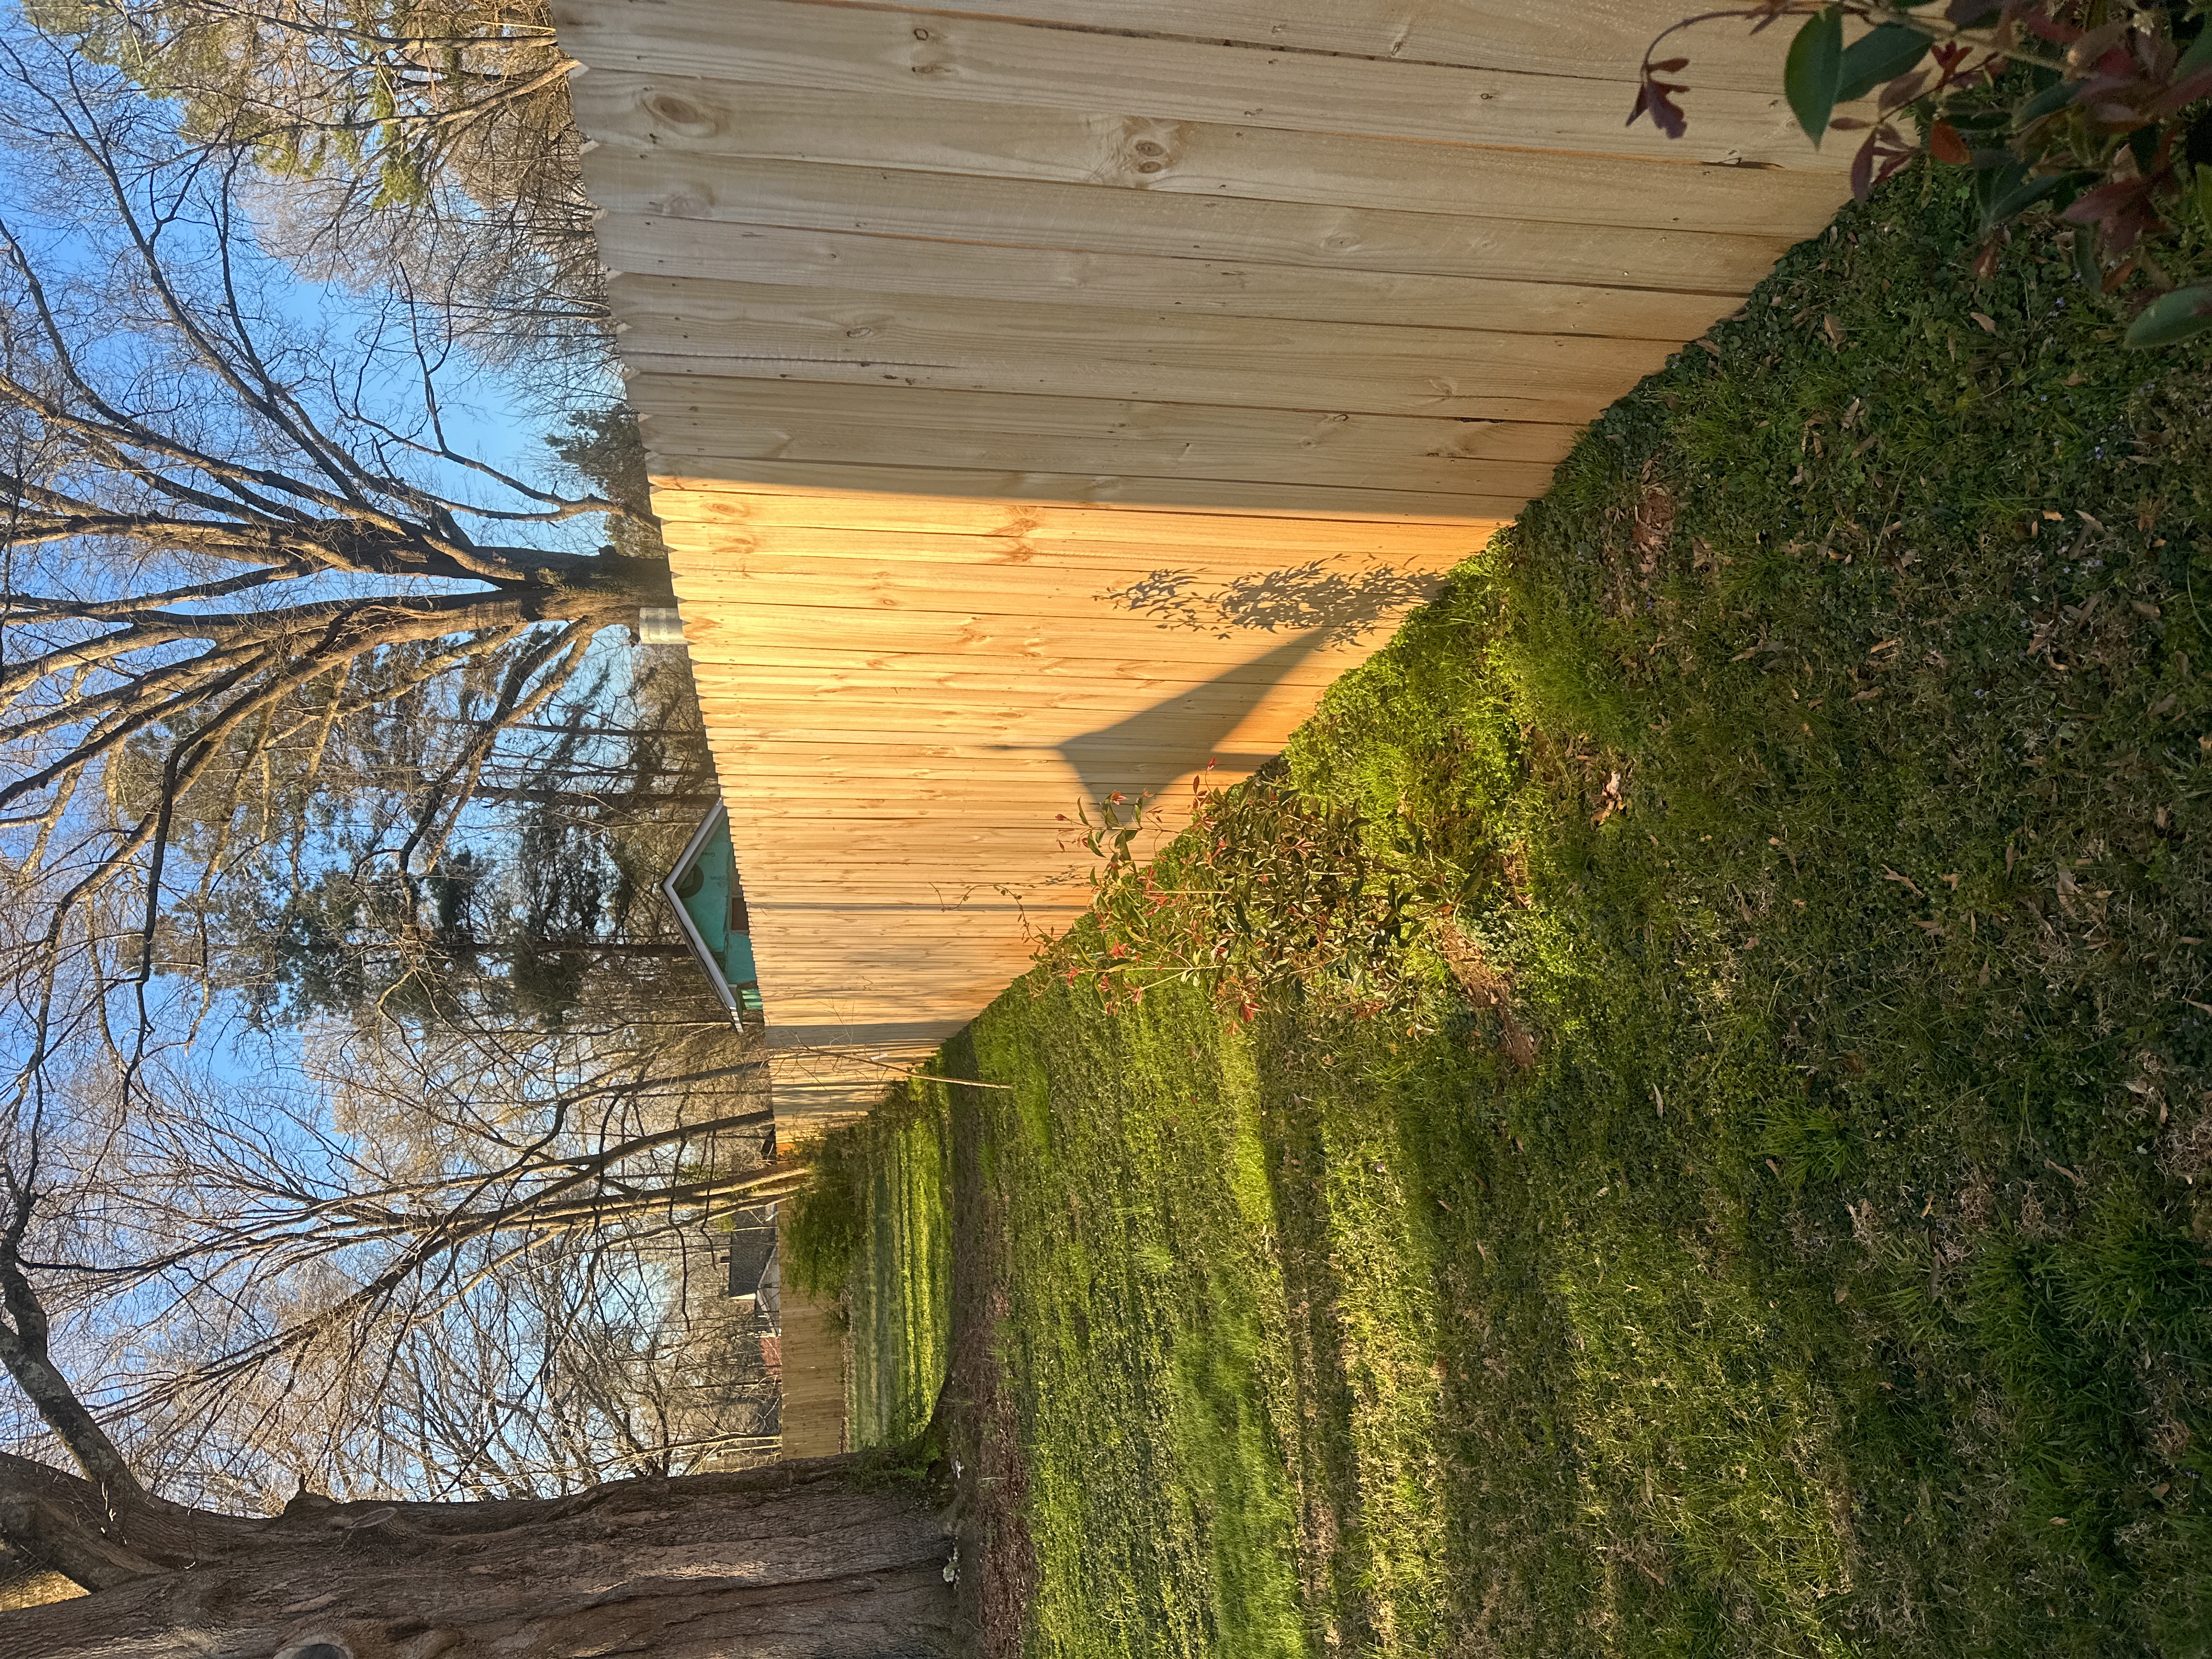 | 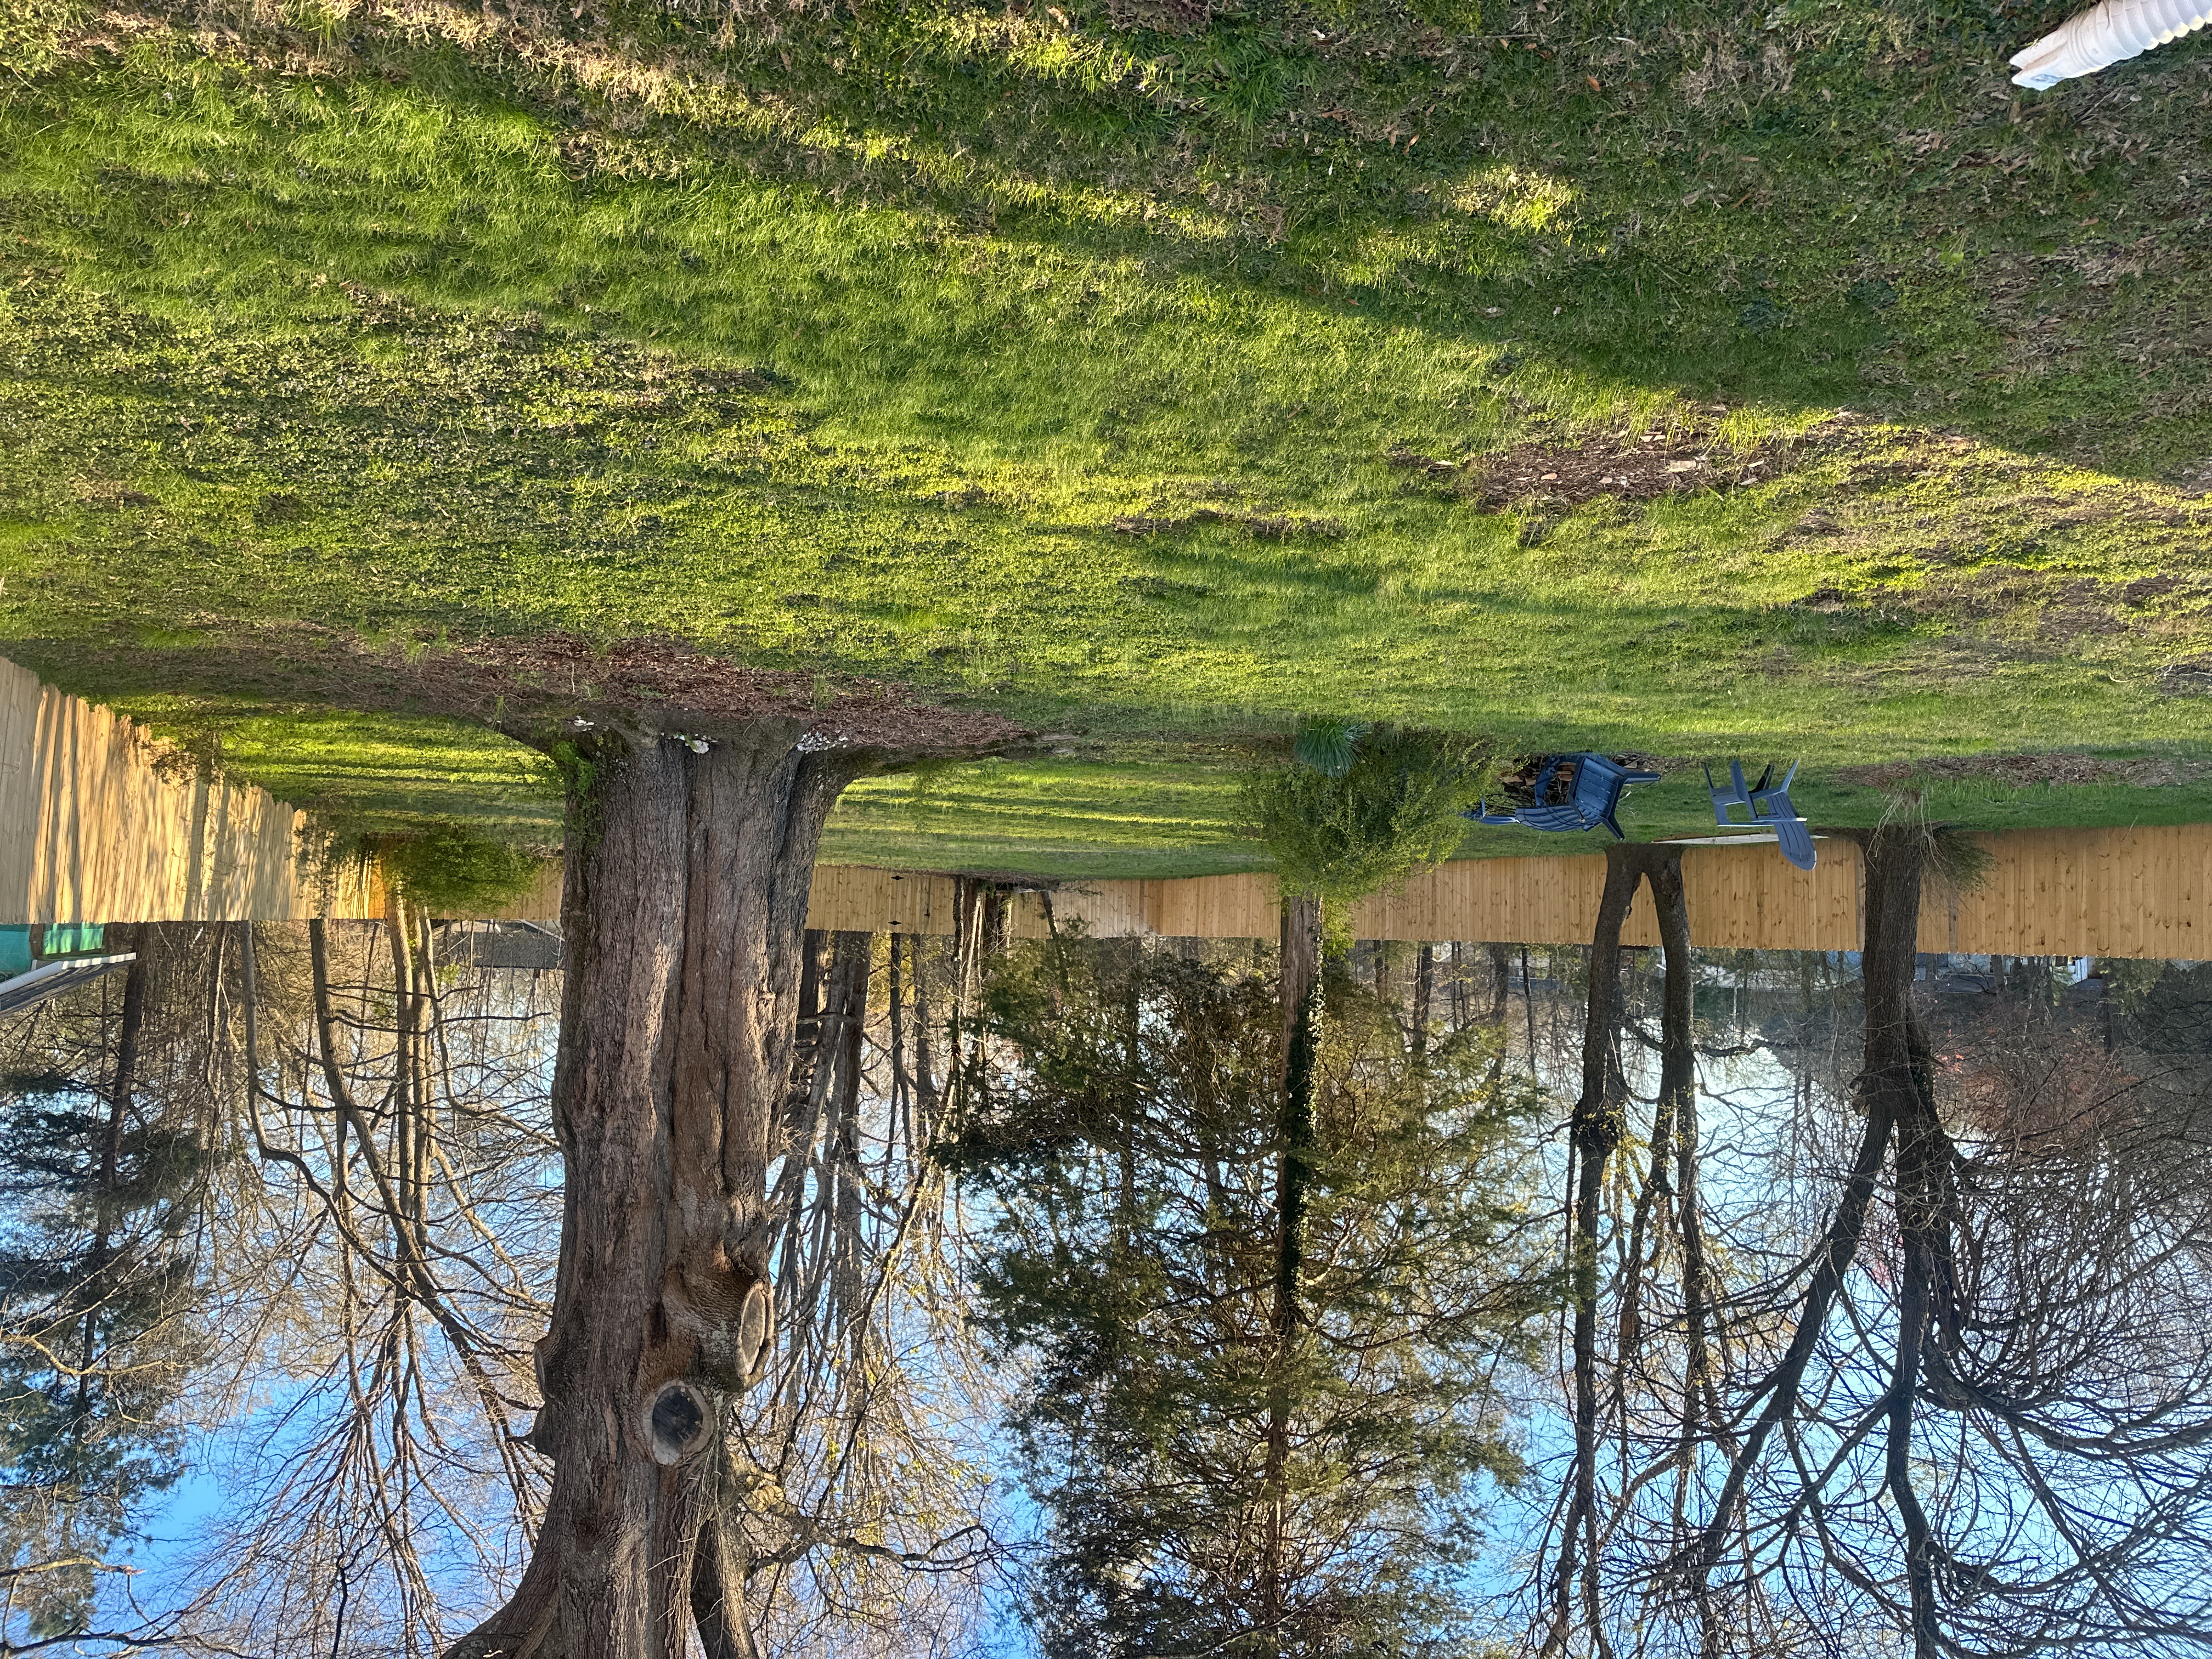 |
Decks, Porches and Balconies
Front Porch
Present
To see a prescriptive guide for residential wood deck construction click this link:
Structure: Ground contact treated lumber
Ledger Board: Standard
Guardrail: Standard
Decking Material: Treated wood
Posts, Beams and Footings: Not Fully Visible
Rear Wood Deck
Present
To see a prescriptive guide for residential wood deck construction click this link:
Structure: Ground contact treated lumber
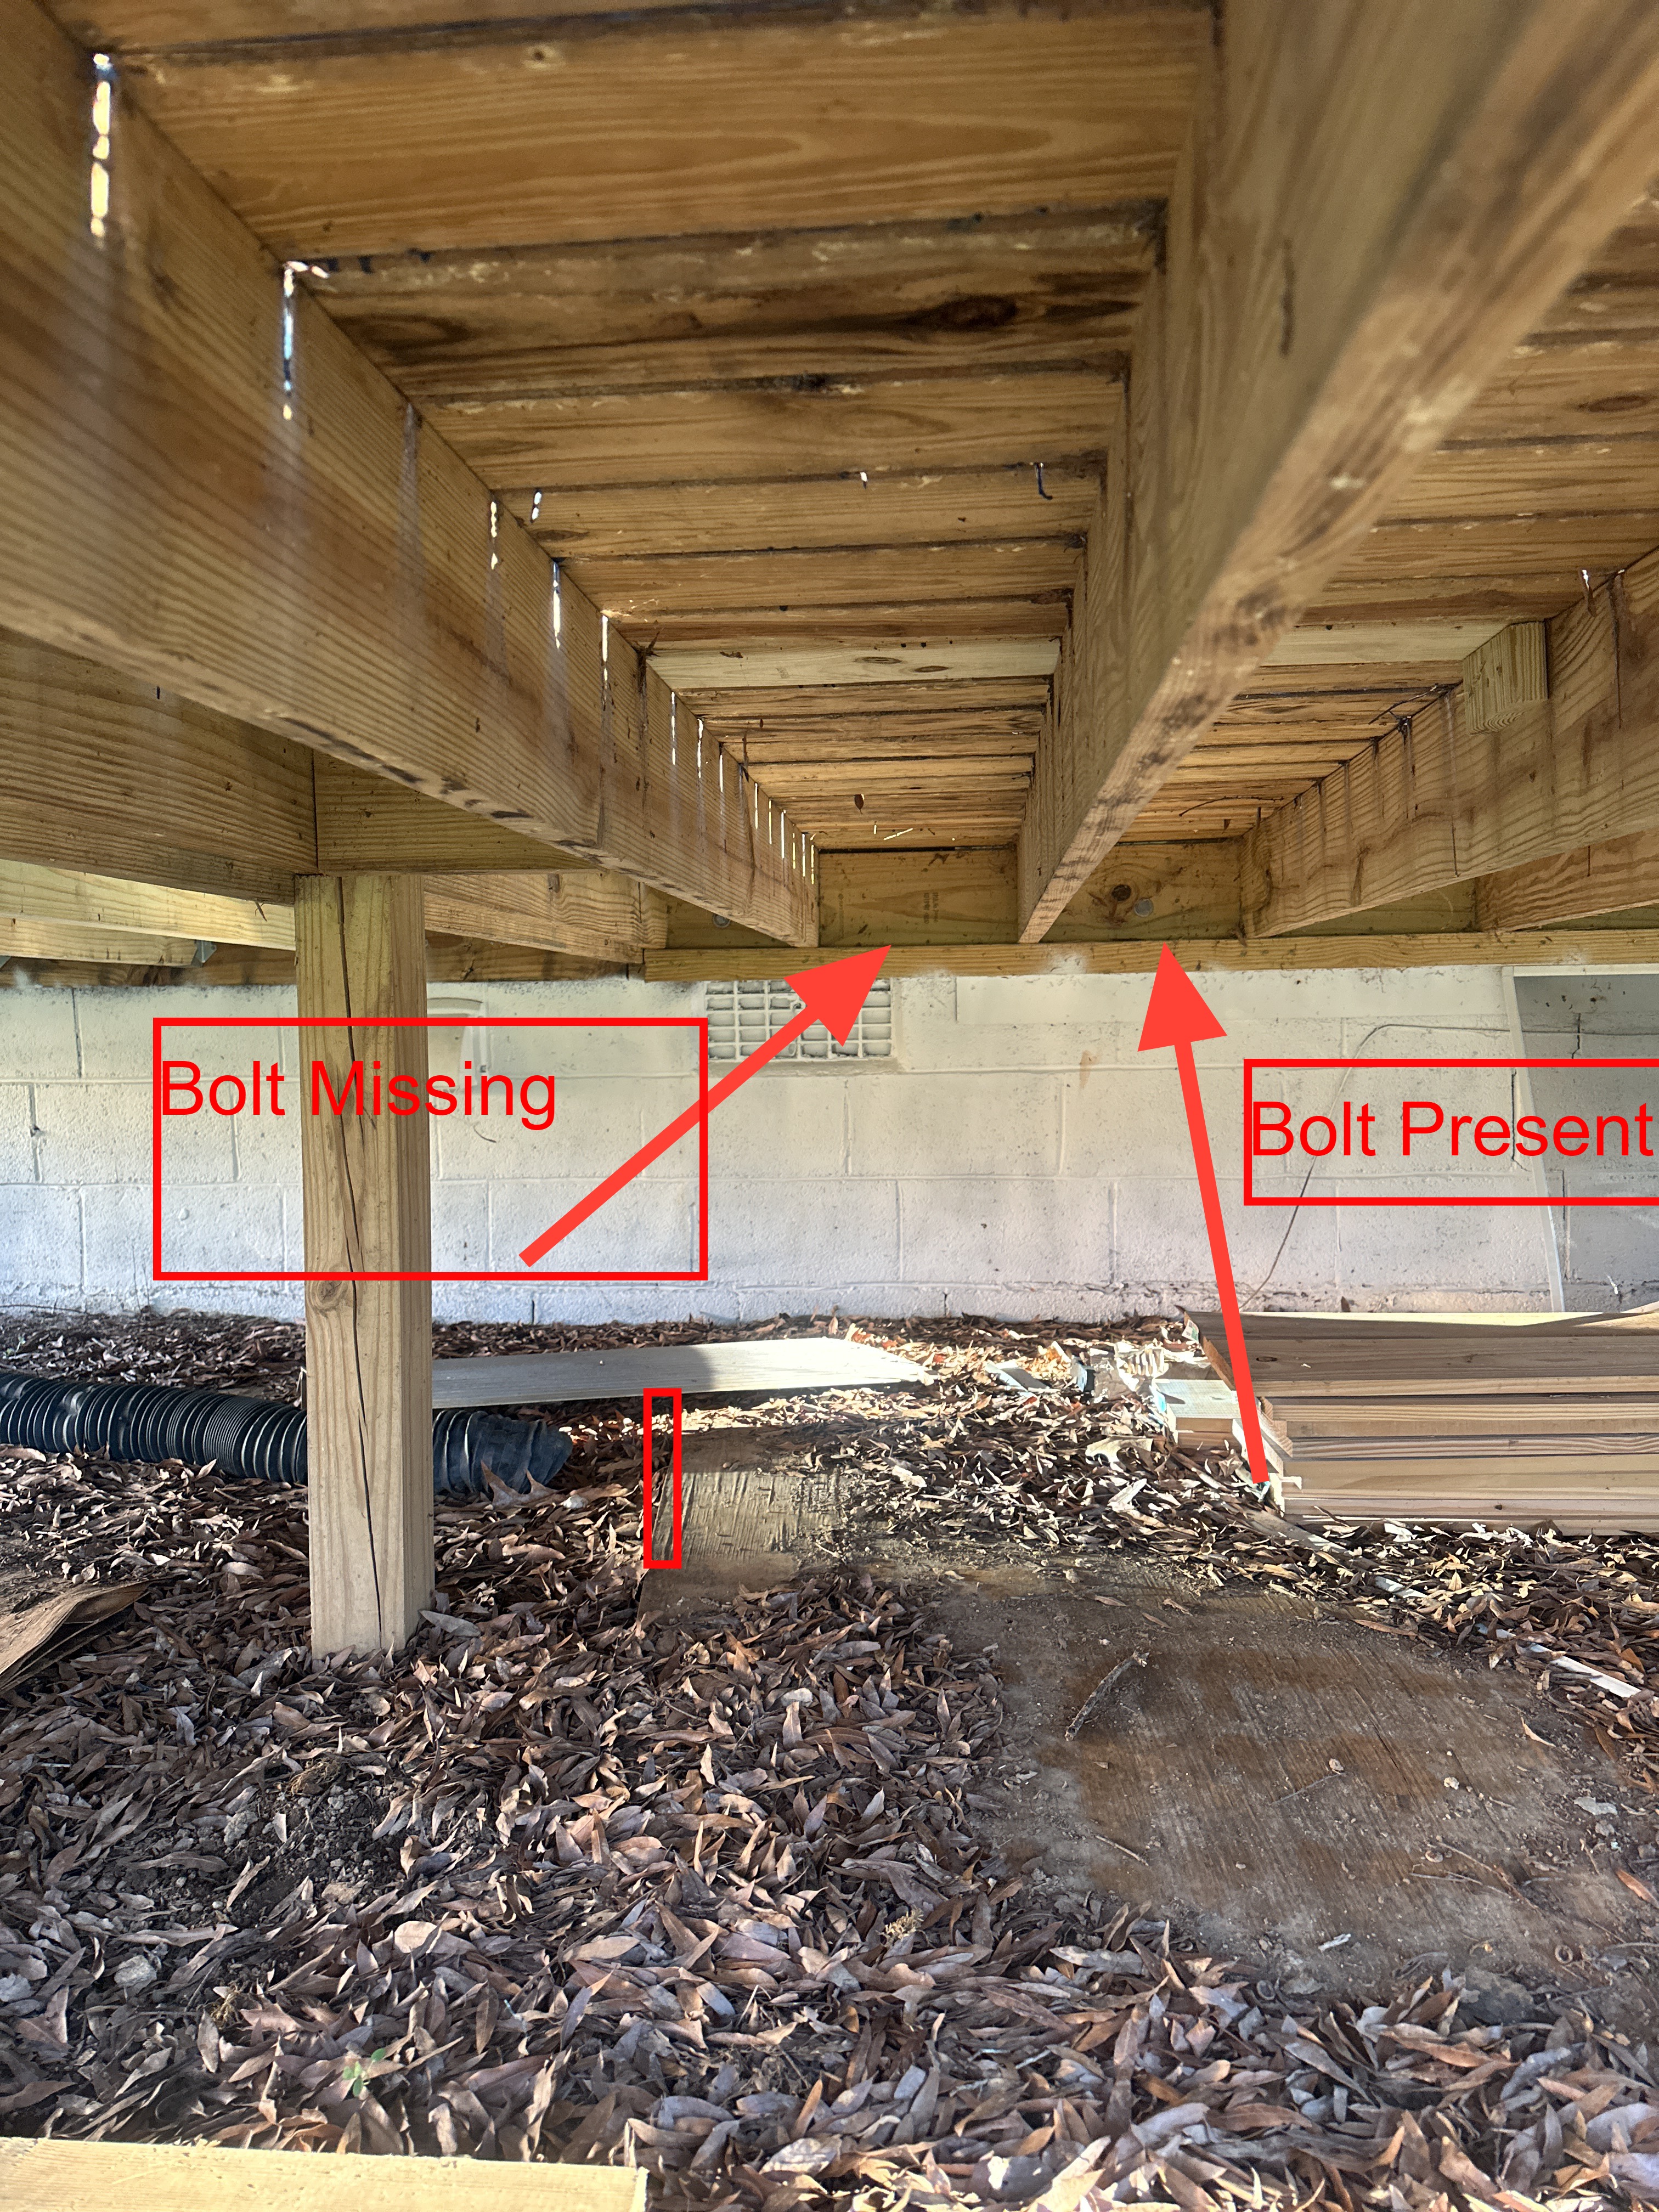
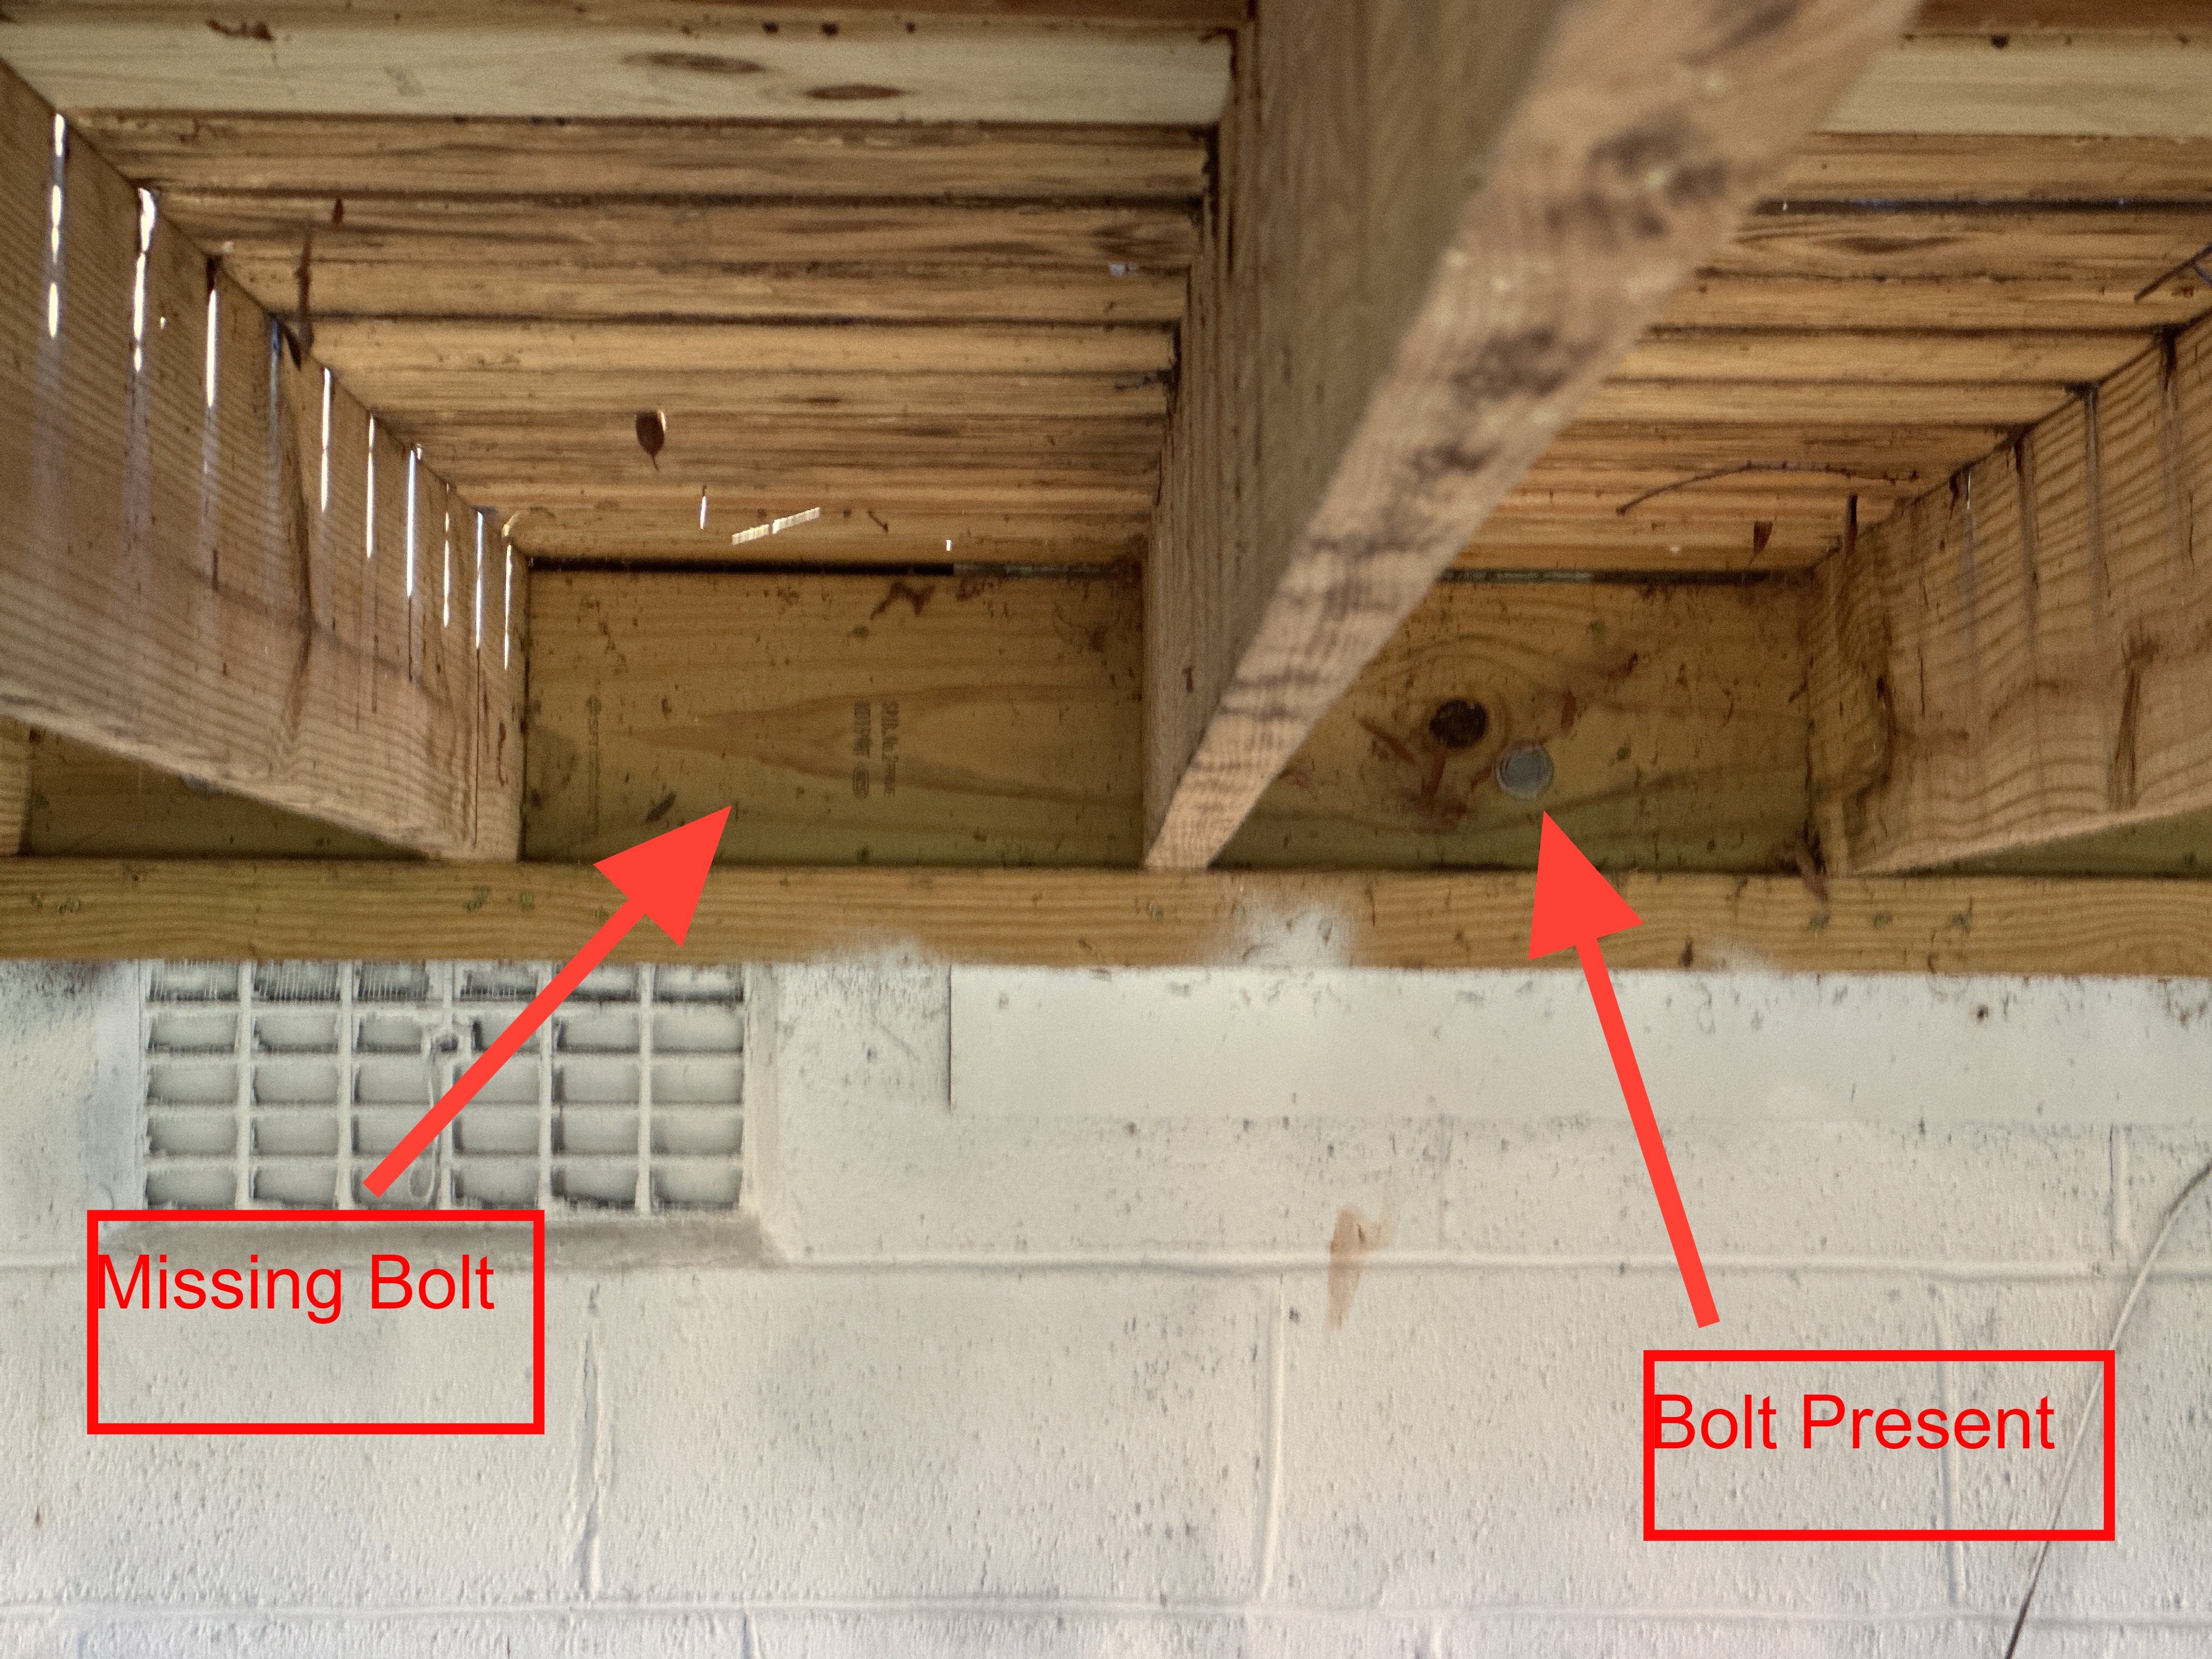
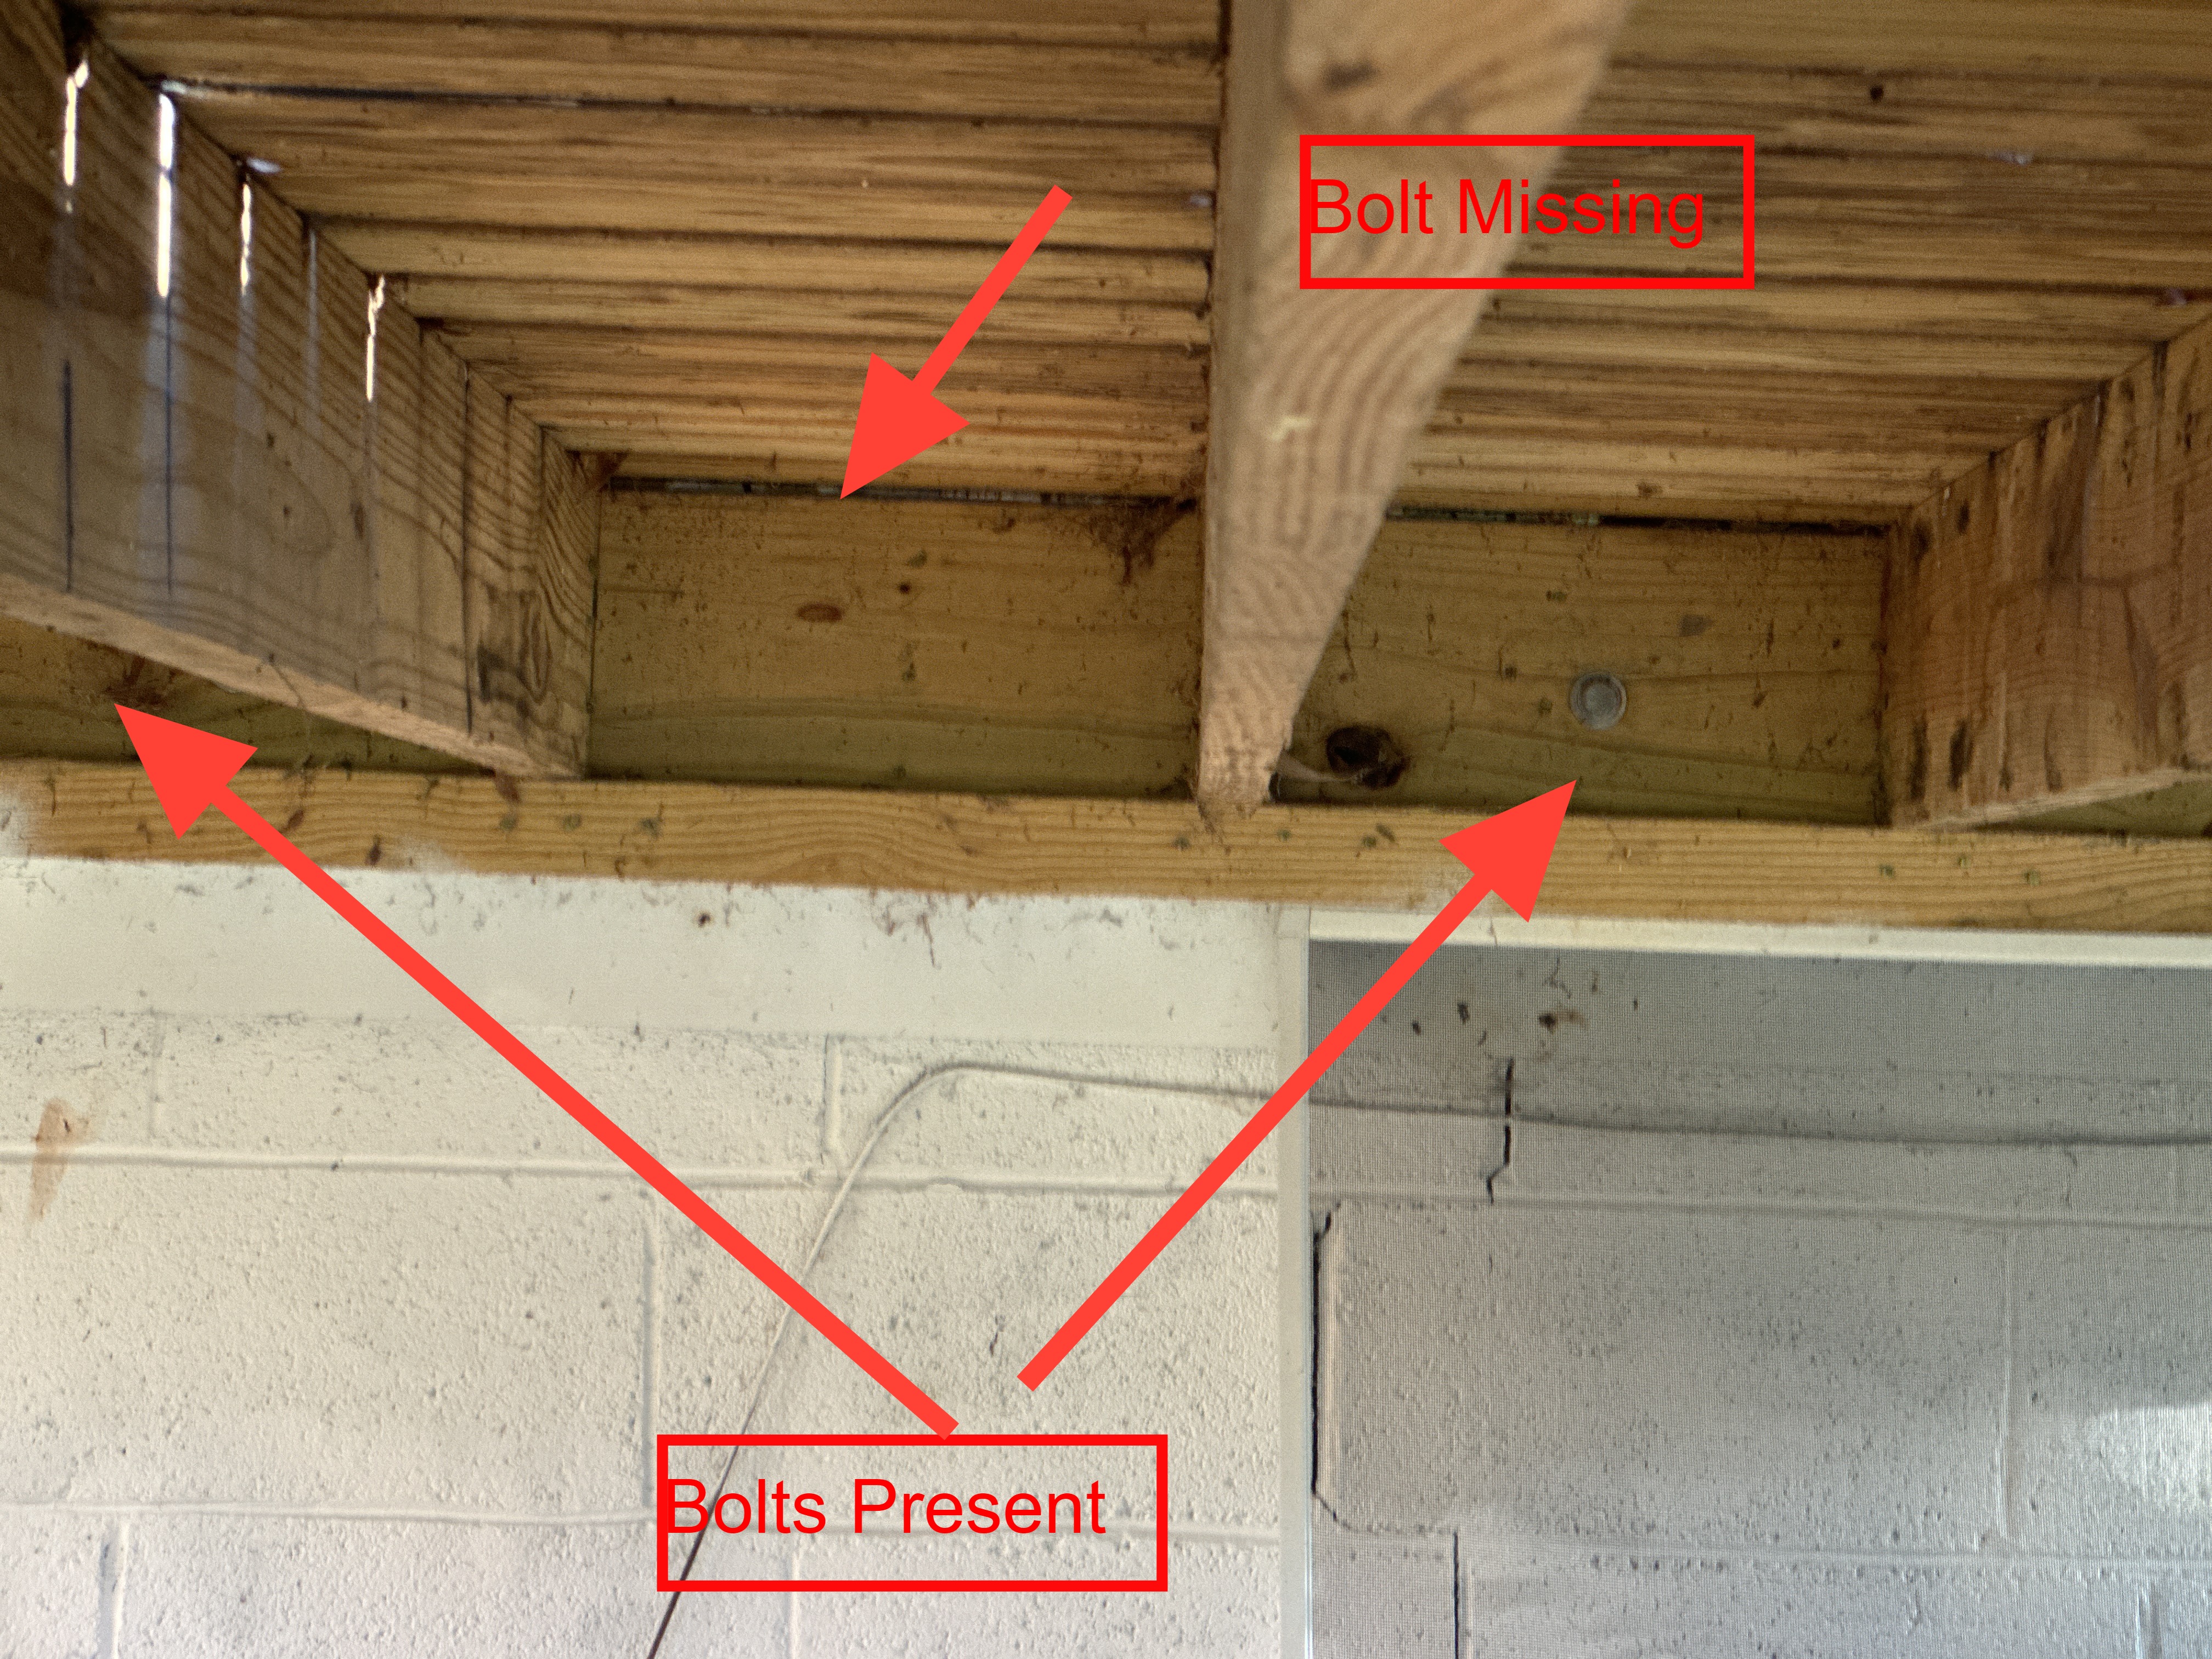
Ledger Board: Defects Noted (Bolts, Missing)
Guardrail: Standard
Decking Material: Treated wood
Posts, Beams and Footings: Inspected, Not Fully Visible
The deck ledger board has not been bolted to the house in accordance with current code. This risks deck failure as the ledger attachment to the house could pull free. I recommend installing an attachment system that conforms to recommended minimum standards in the NC Building Code, Appendix M Wood Decks. See section AM104.1 on this Appendix. The requirements for the number of lag screws or bolts varies depending on the span of the floor joists, with a span up to 8' from the wall of the house requiring 1 bolt every 3'6", and for spans up to 16' from the wall requiring 1 bolt every 18". I recommend the installation of an additional bolt in every joist space that does not have one.
.jpg)
 | |
 |  |
Exterior Siding, Doors and Windows
Siding and Trim
Trim Material: Vinyl
Siding Material: Vinyl
Localized siding repairs are needed to the exterior vinyl siding system. Please note that vinyl siding is impossible to see behind and it is difficult to determine if these defects have allowed water to enter the siding envelope or not. Hire a vinyl siding specialist to further evaluate and repair. Examples of repair items and red flags found during the inspection include:
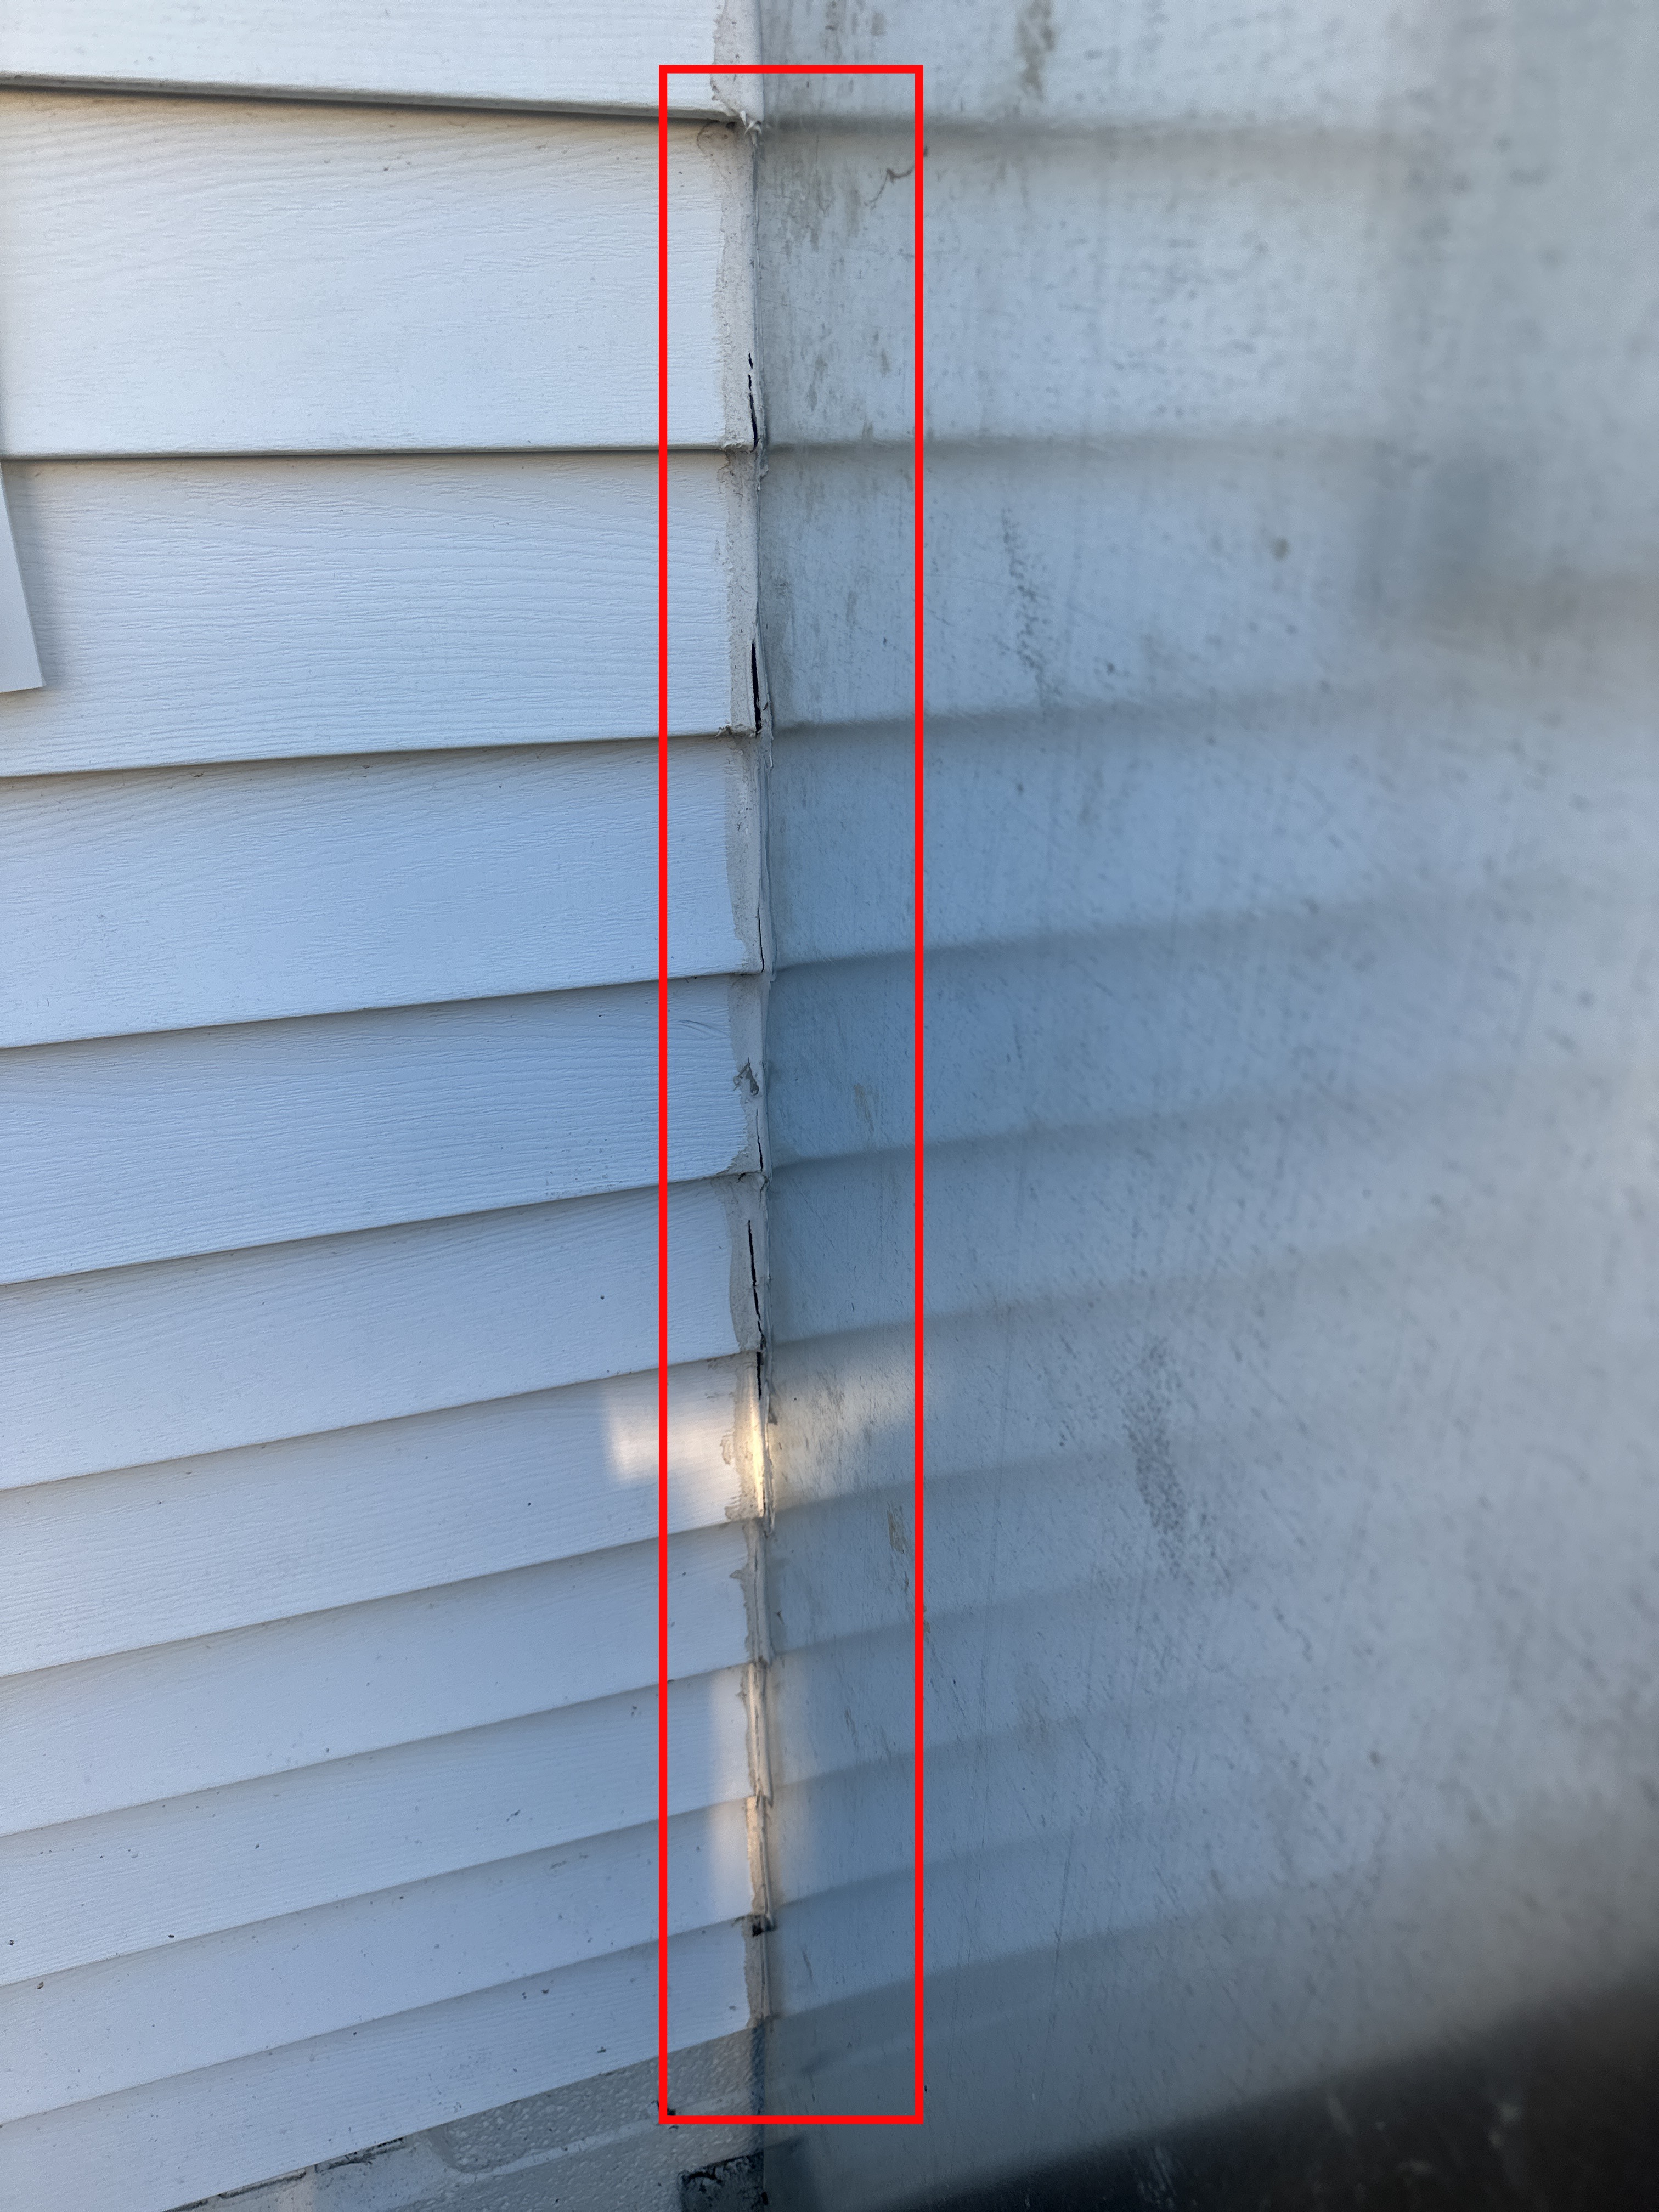
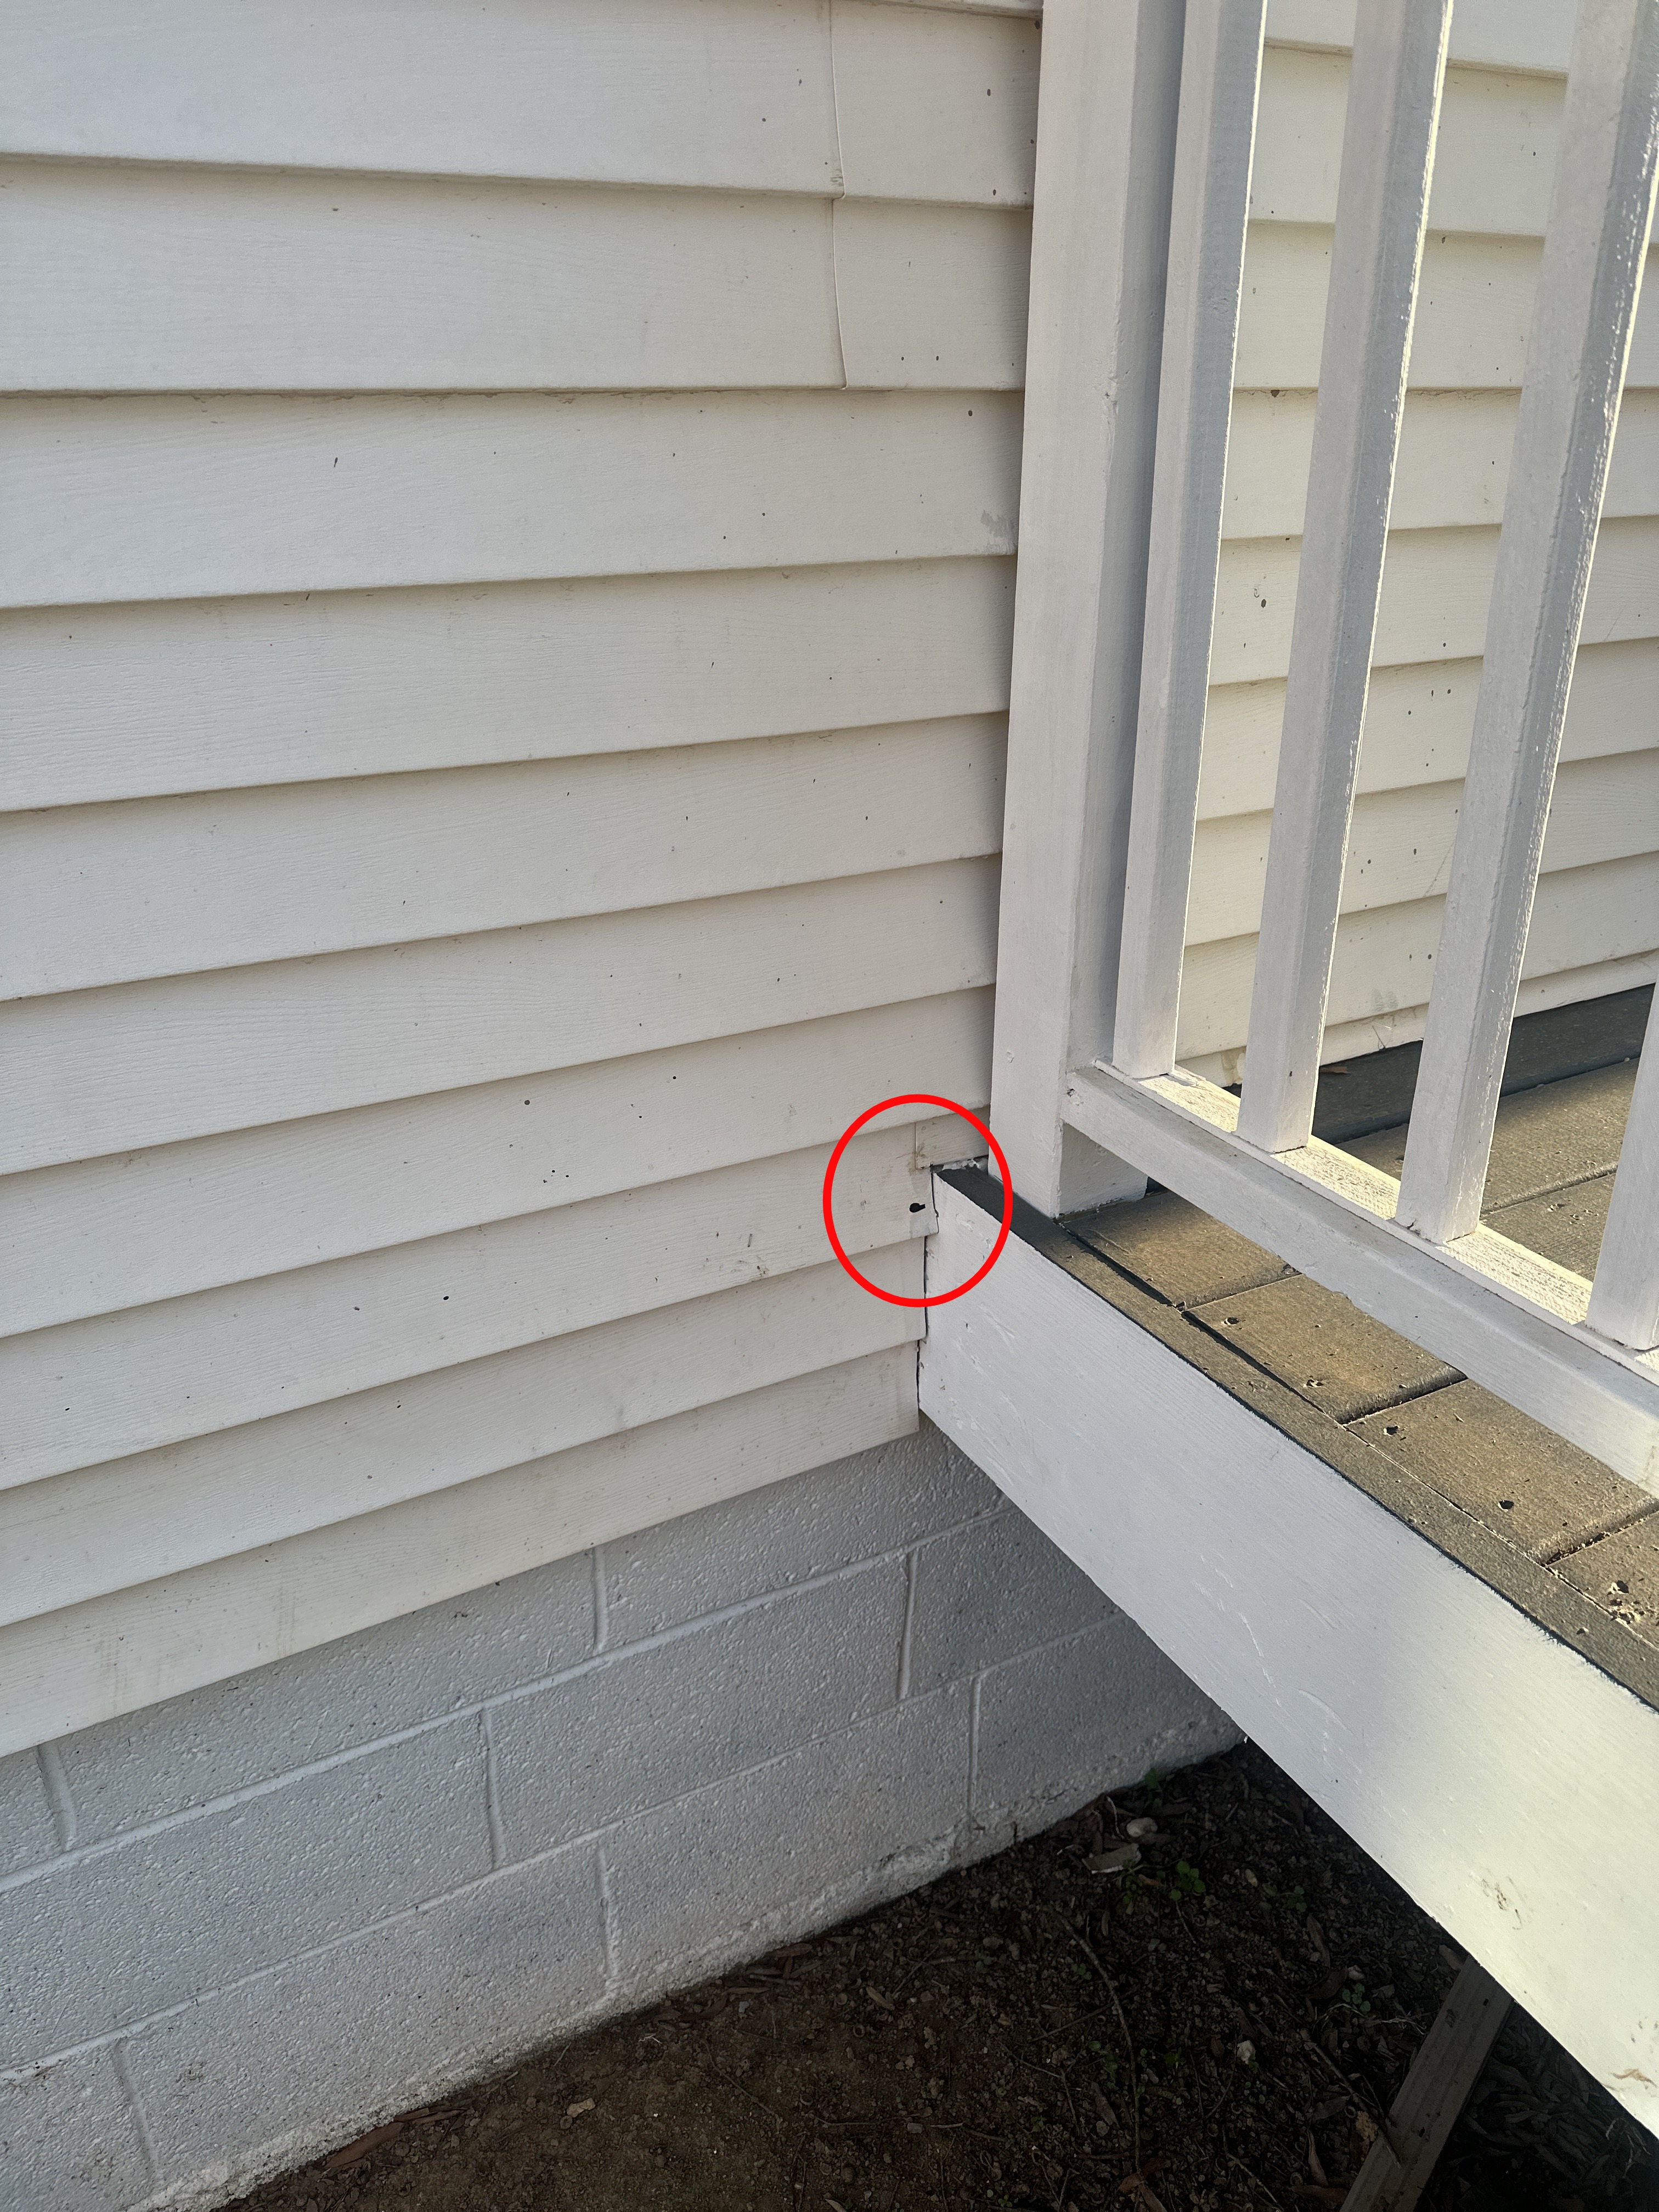
- Bottom course of the siding is loose and not connected to the starter strip on the right side and right rear portions of the residence.
- The hole where a CATV in entering the residence should be sealed with silicone caulk.
- Siding is trimmed too high above the flashing for the water heater top. I recommend additional flashing be inserted to prevent water from splashing behind the siding and saturating the siding underneath.
- The caulk along the side of the water heater cabinet is starting to deteriorate. I recommend replacing it with clear or white silicone caulk.
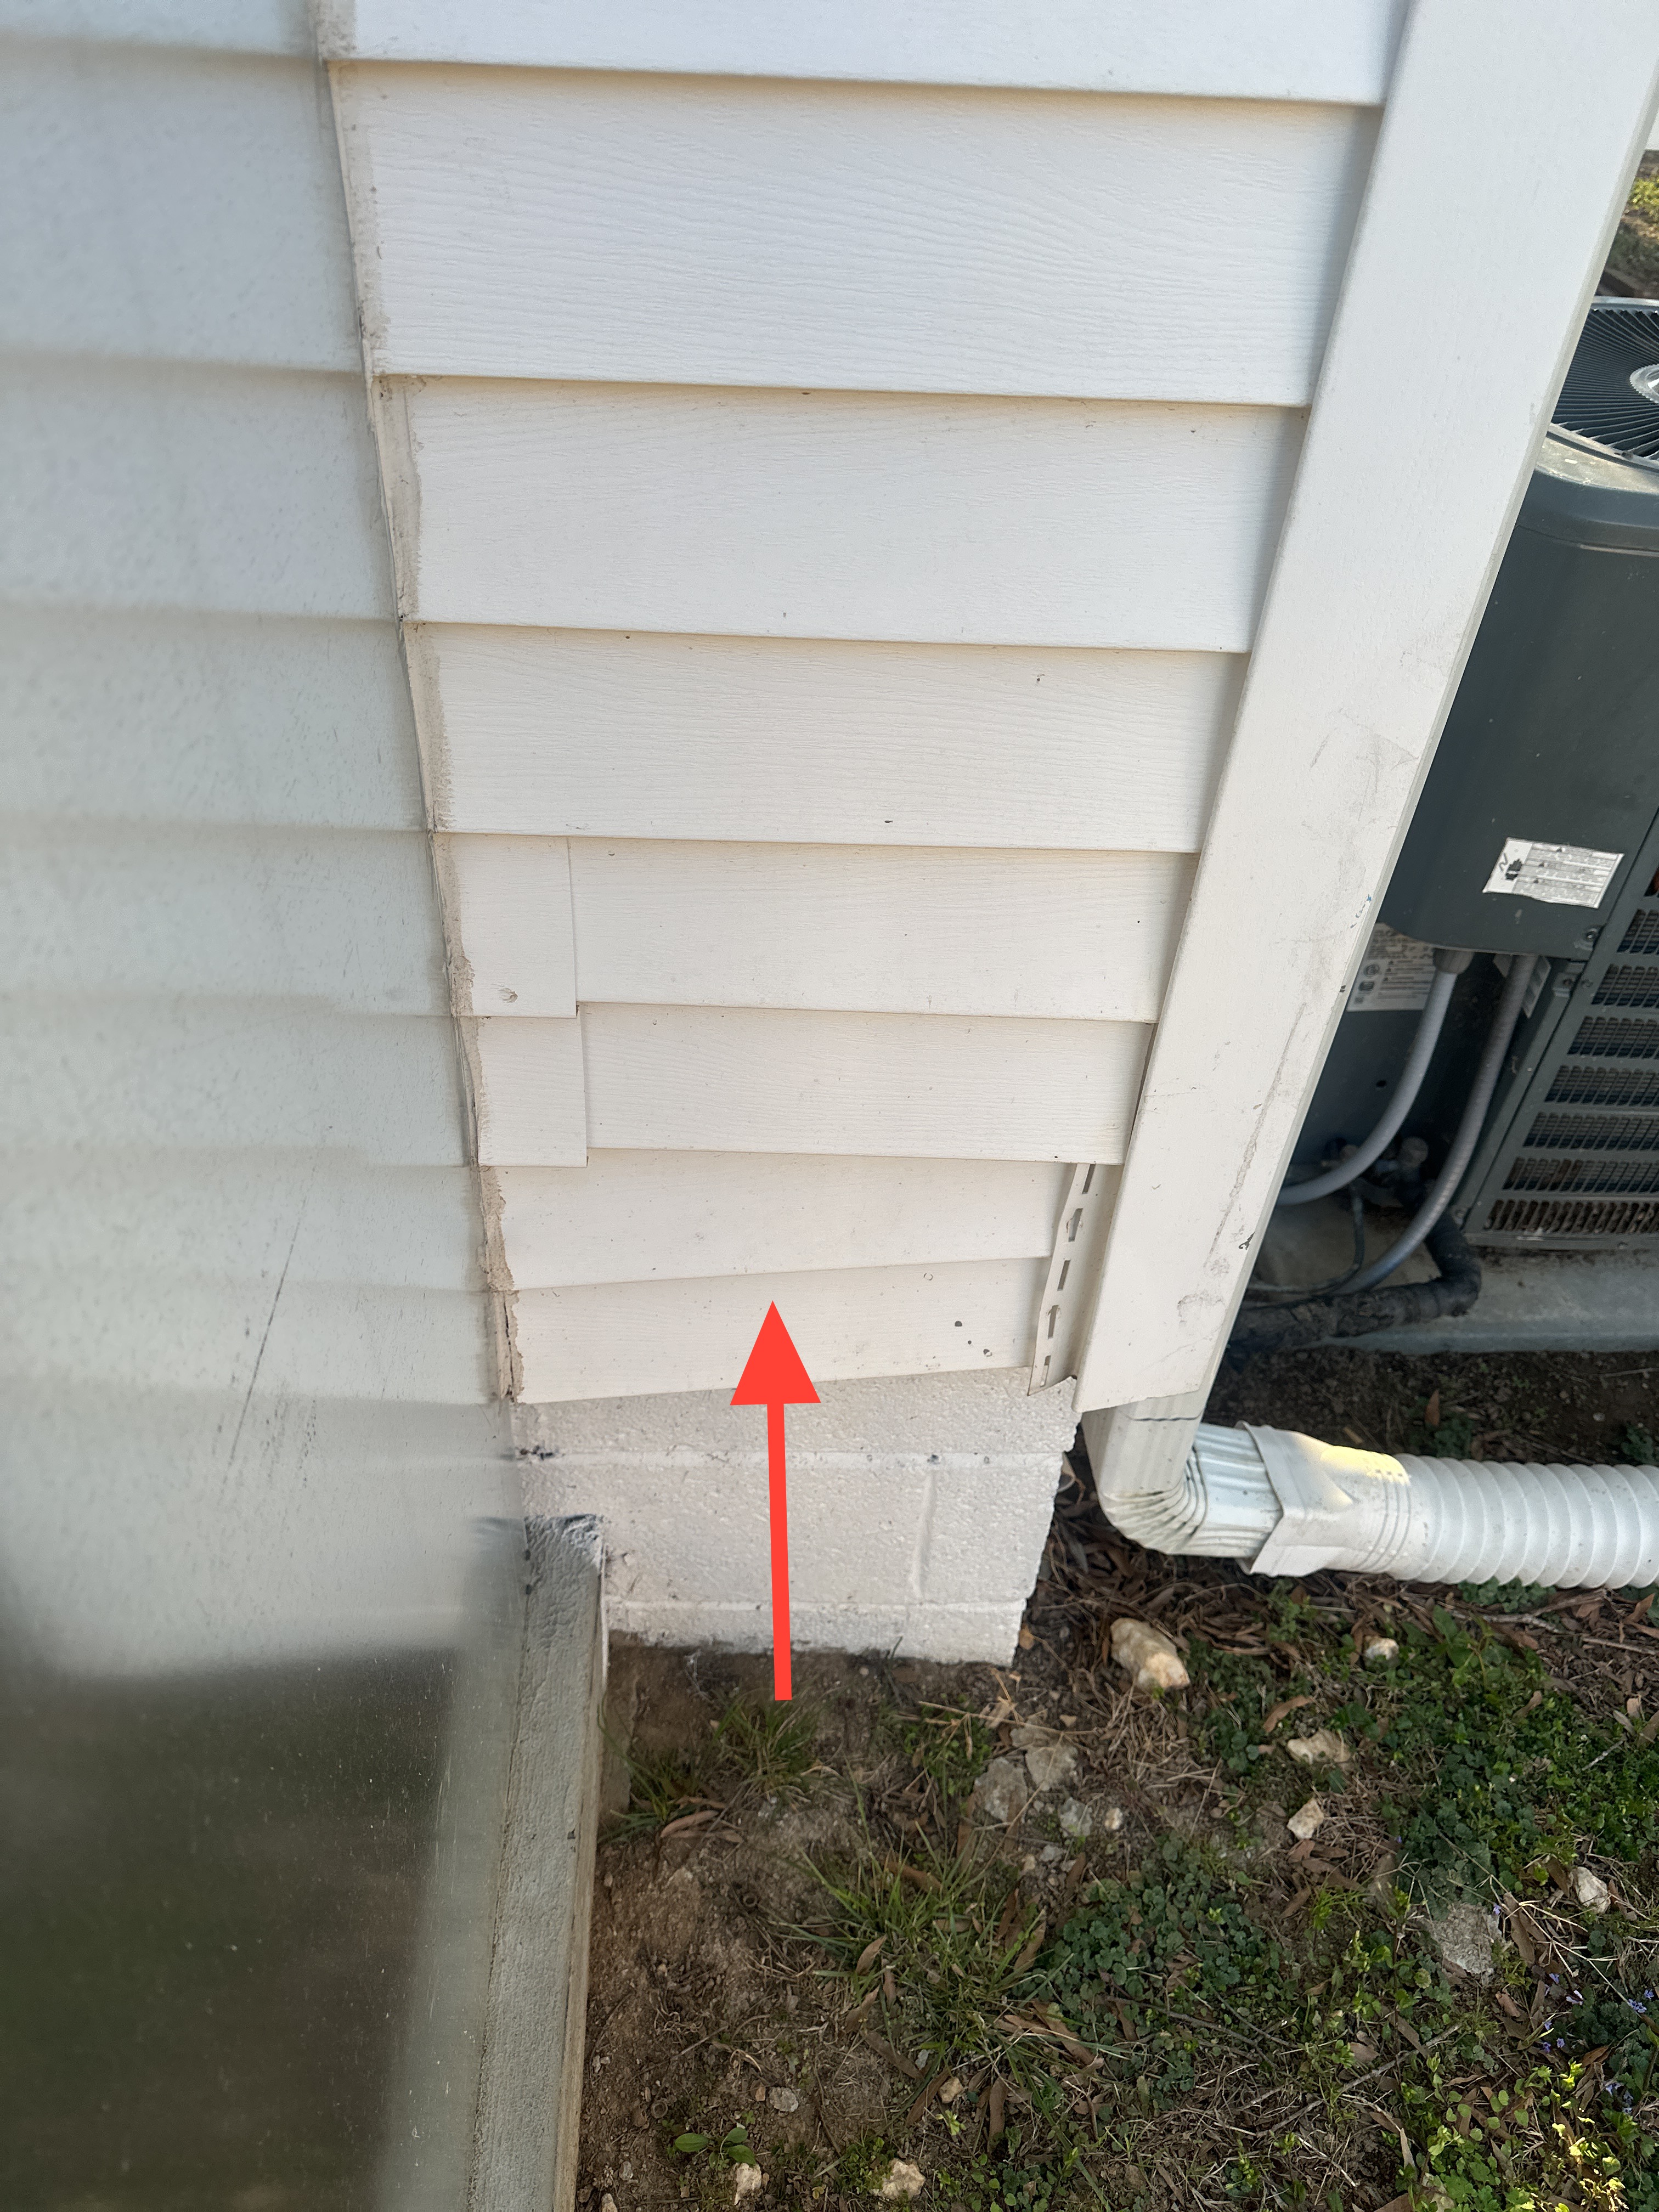
- The siding on the right side of the water heater cabinet is improperly installed. I recommend reinstallation by a qualified person.
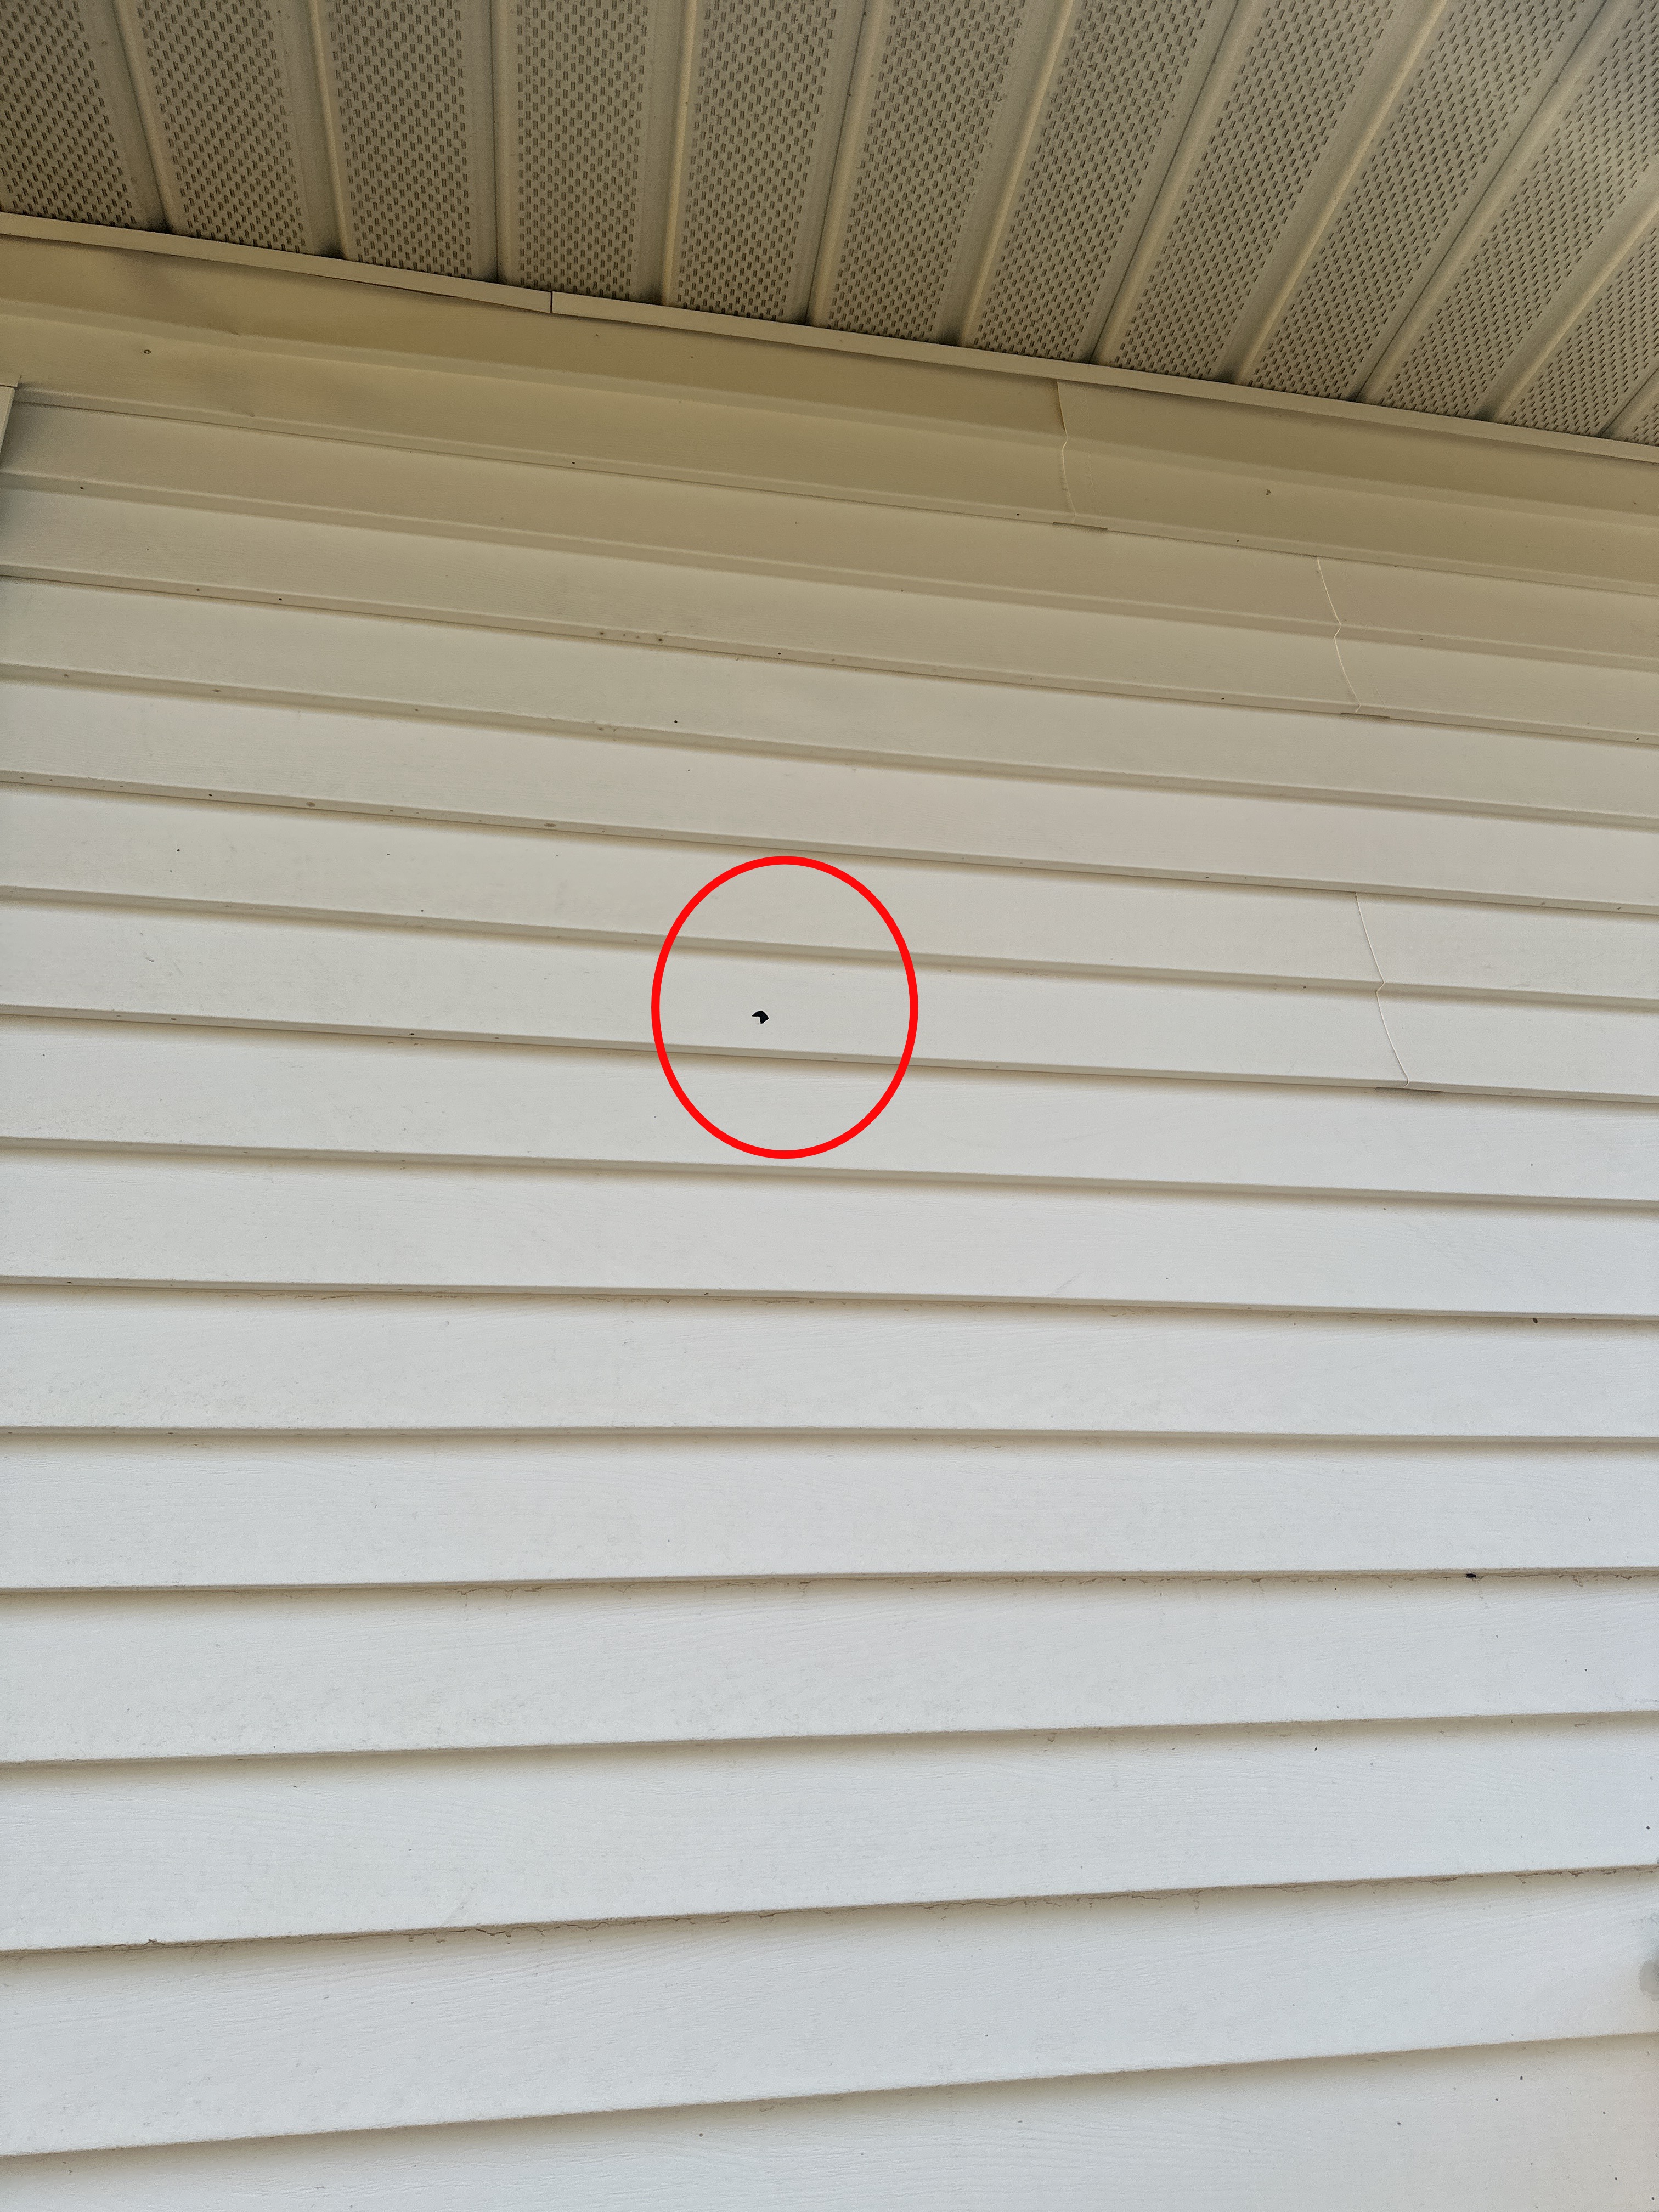
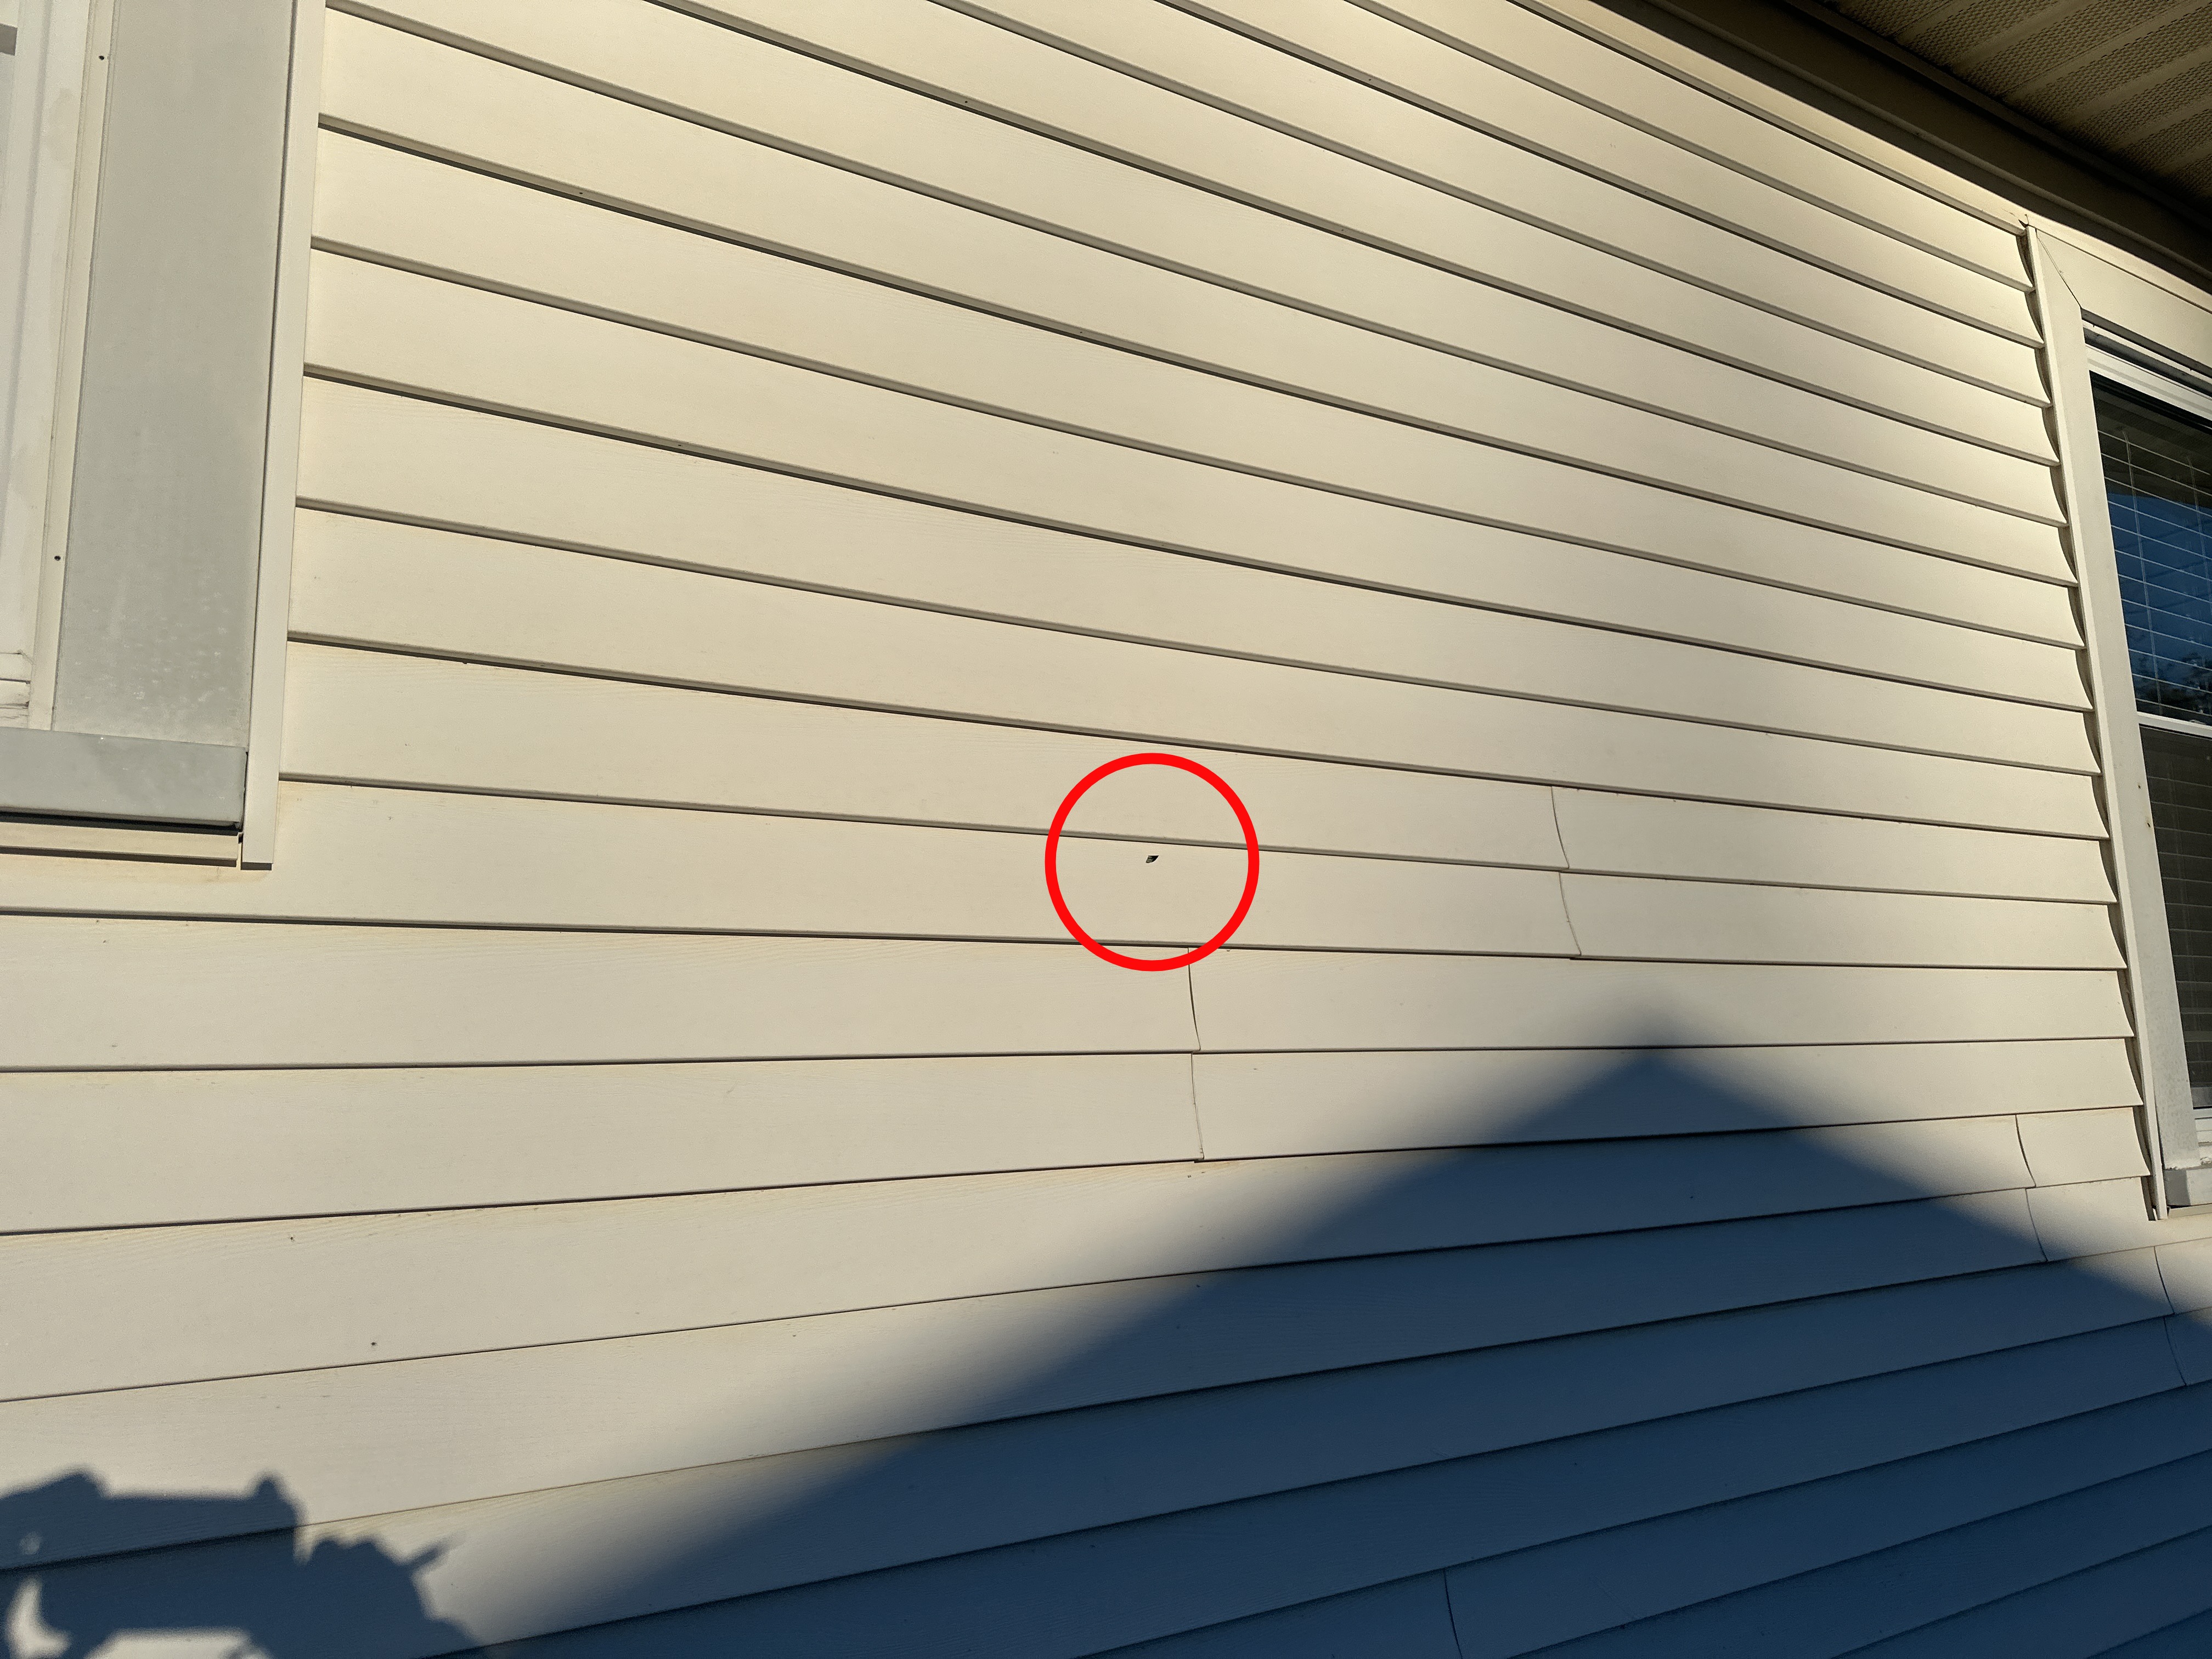
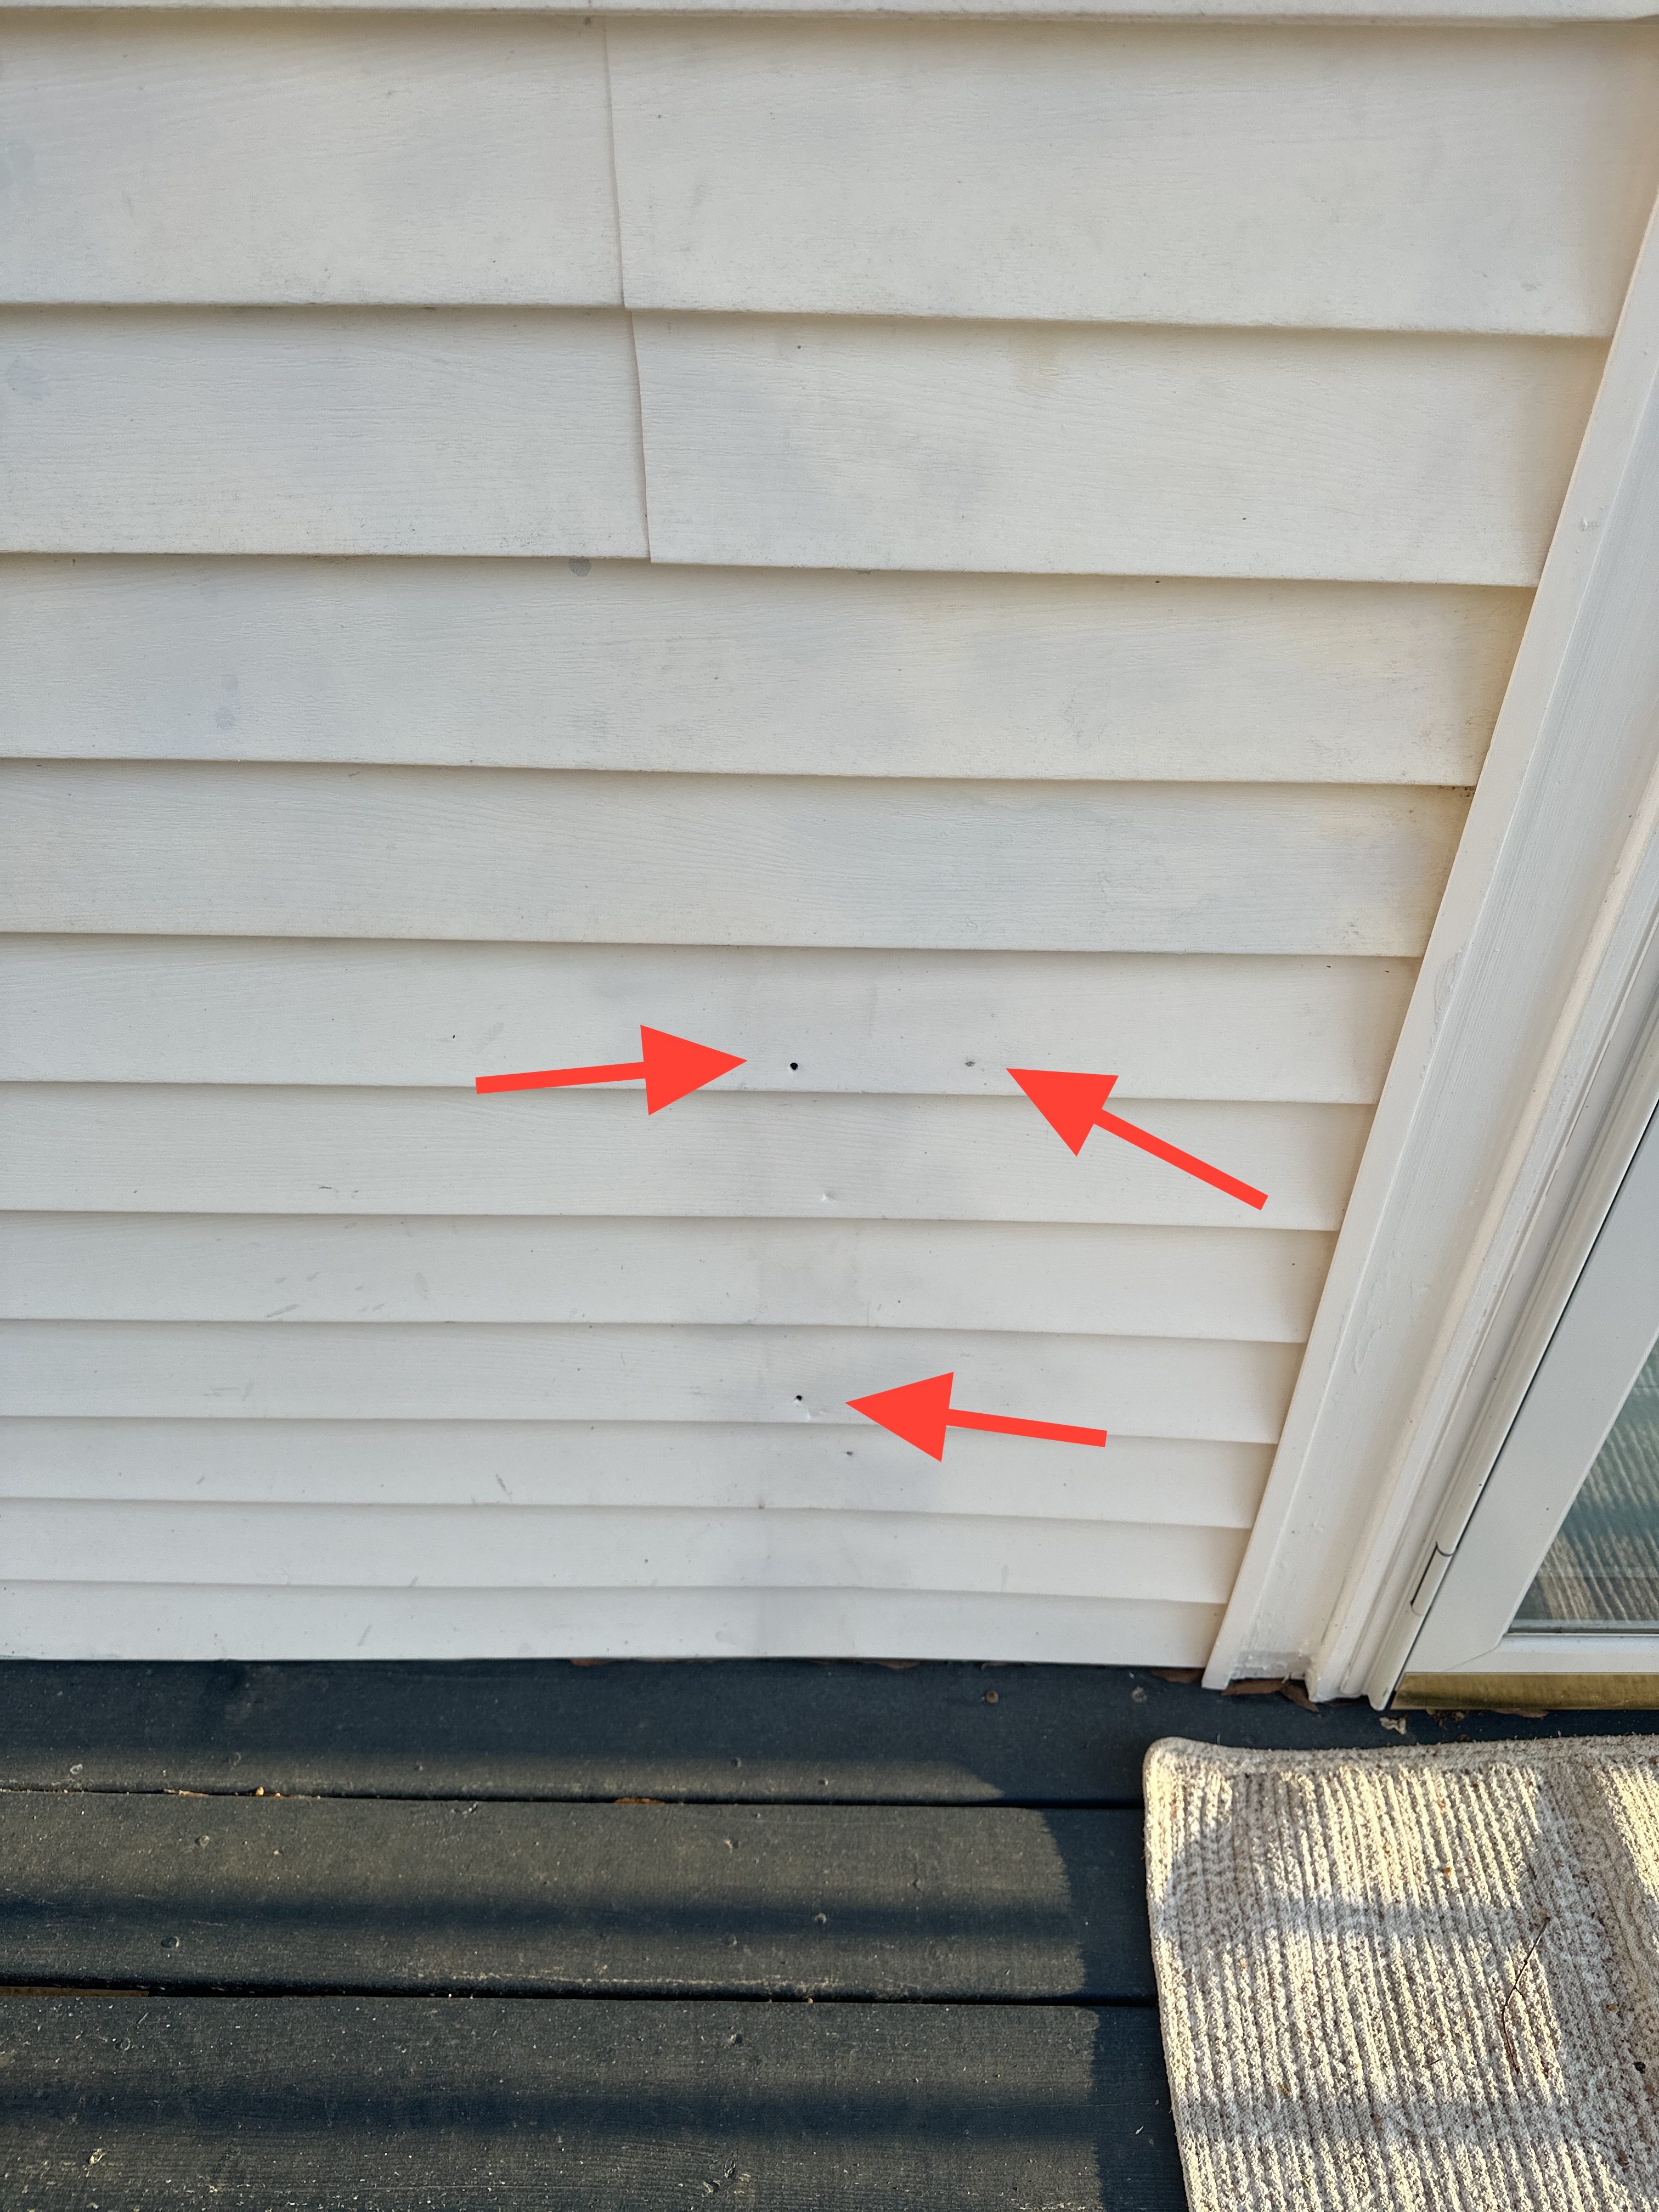
- Small holes were noted in the siding in several places as indicated in photos. I recommend these holes be covered with clear or white silicone caulk.
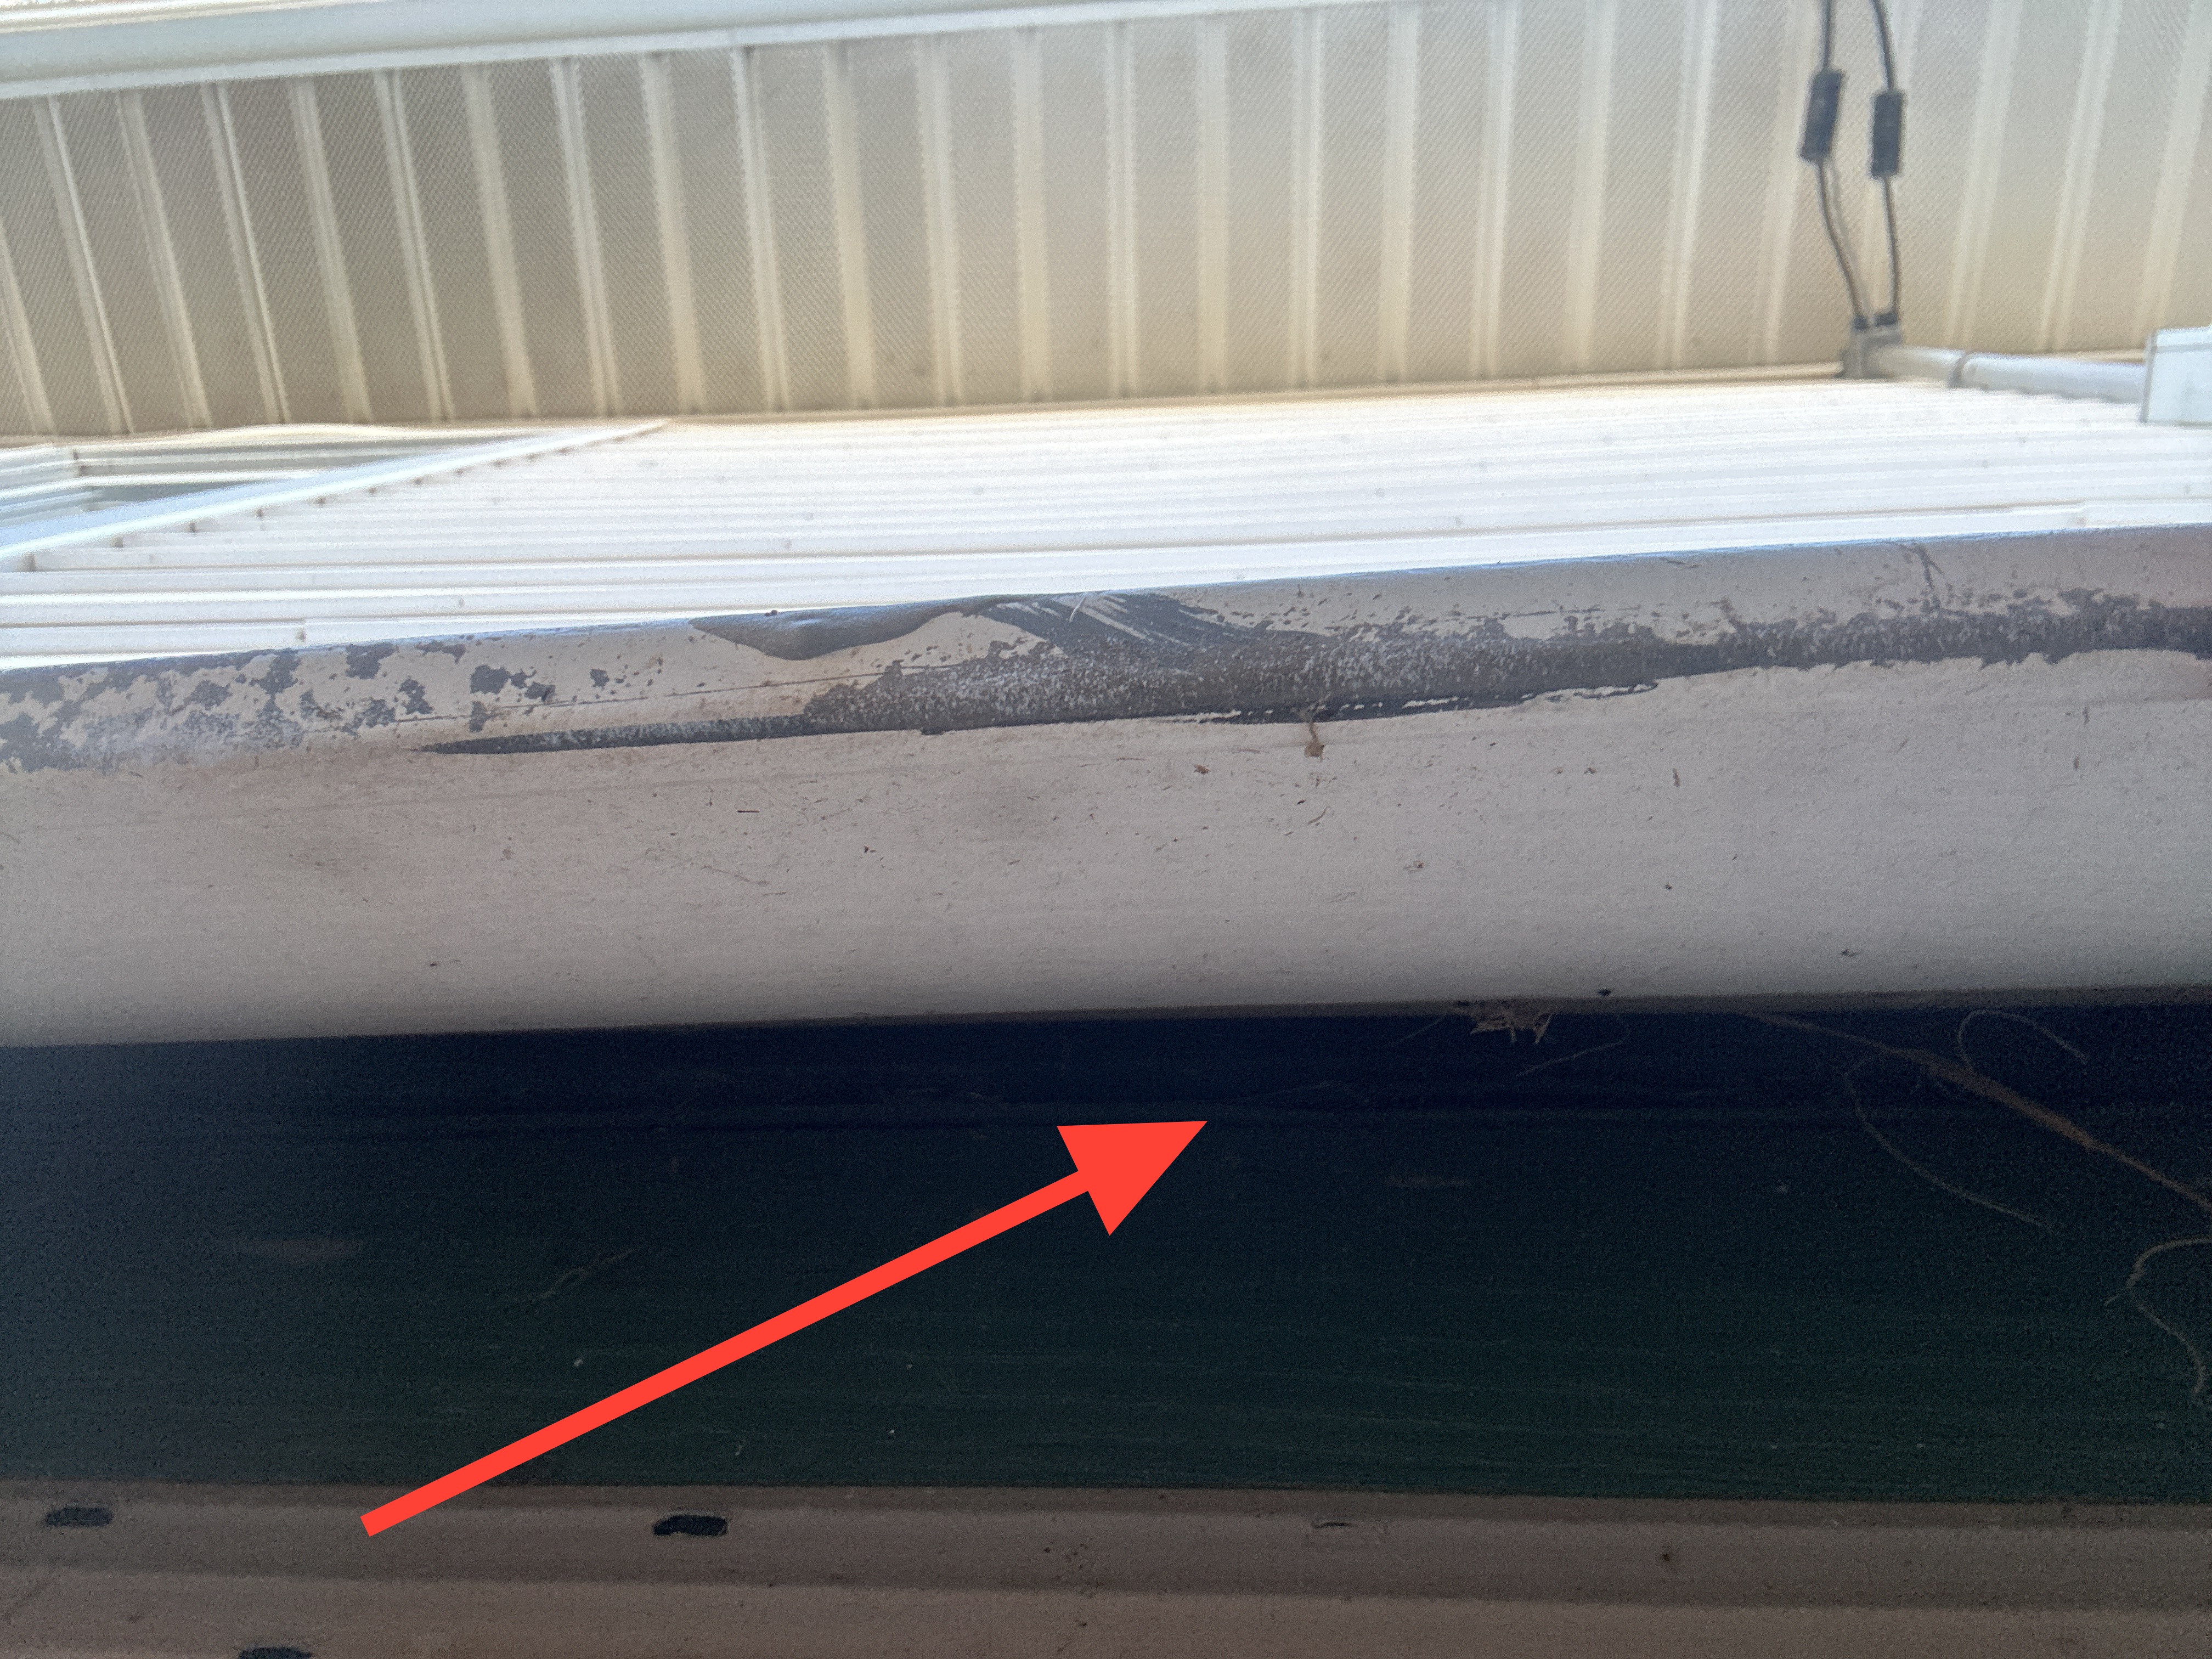
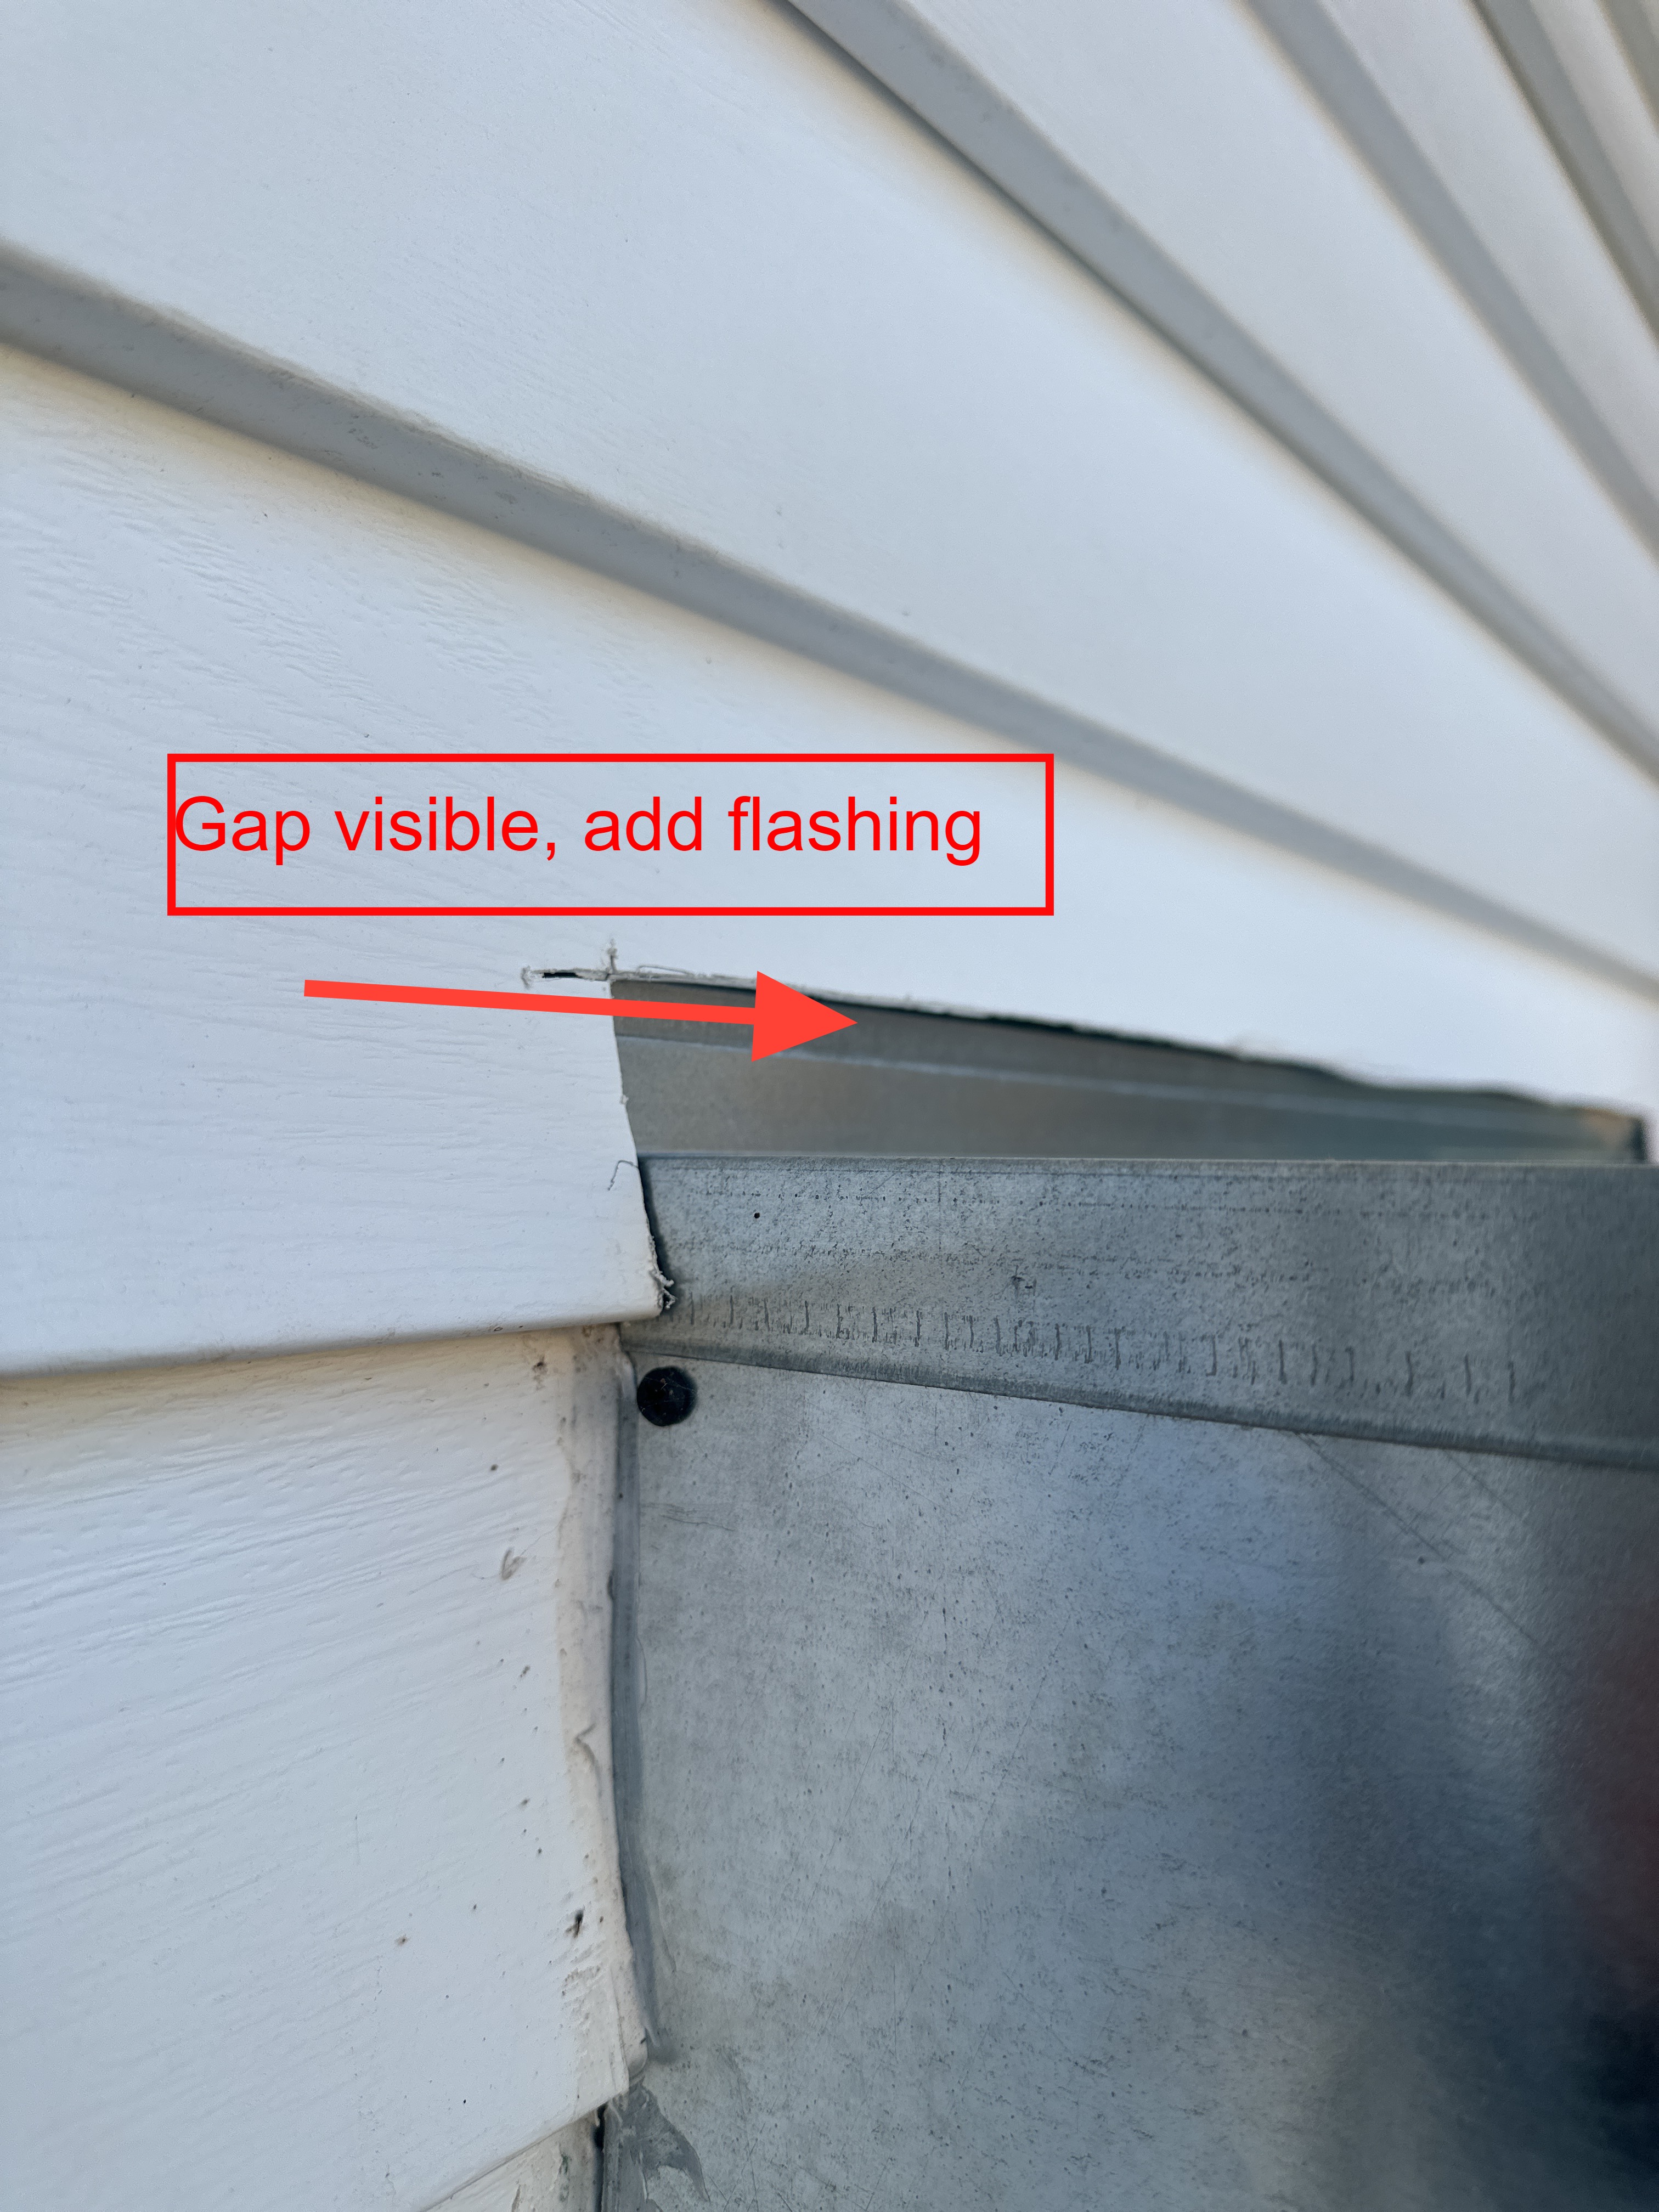
The sealant used to seal the HVAC line penetration into the attic is not the proper kind of material to use, and can absorb moisture. I recommend covering this foam sealant with silicone caulk or replacing the ventilated soffit pieces with ones cut to fit properly.
 |
The hole in the ventilated soffit should be patched or covered to prevent bugs or birds from entering the attic space.
 |
Exterior Doors
Exterior Door Styles: Steel Clad
Exterior Window Frames
Window Frames: Metal
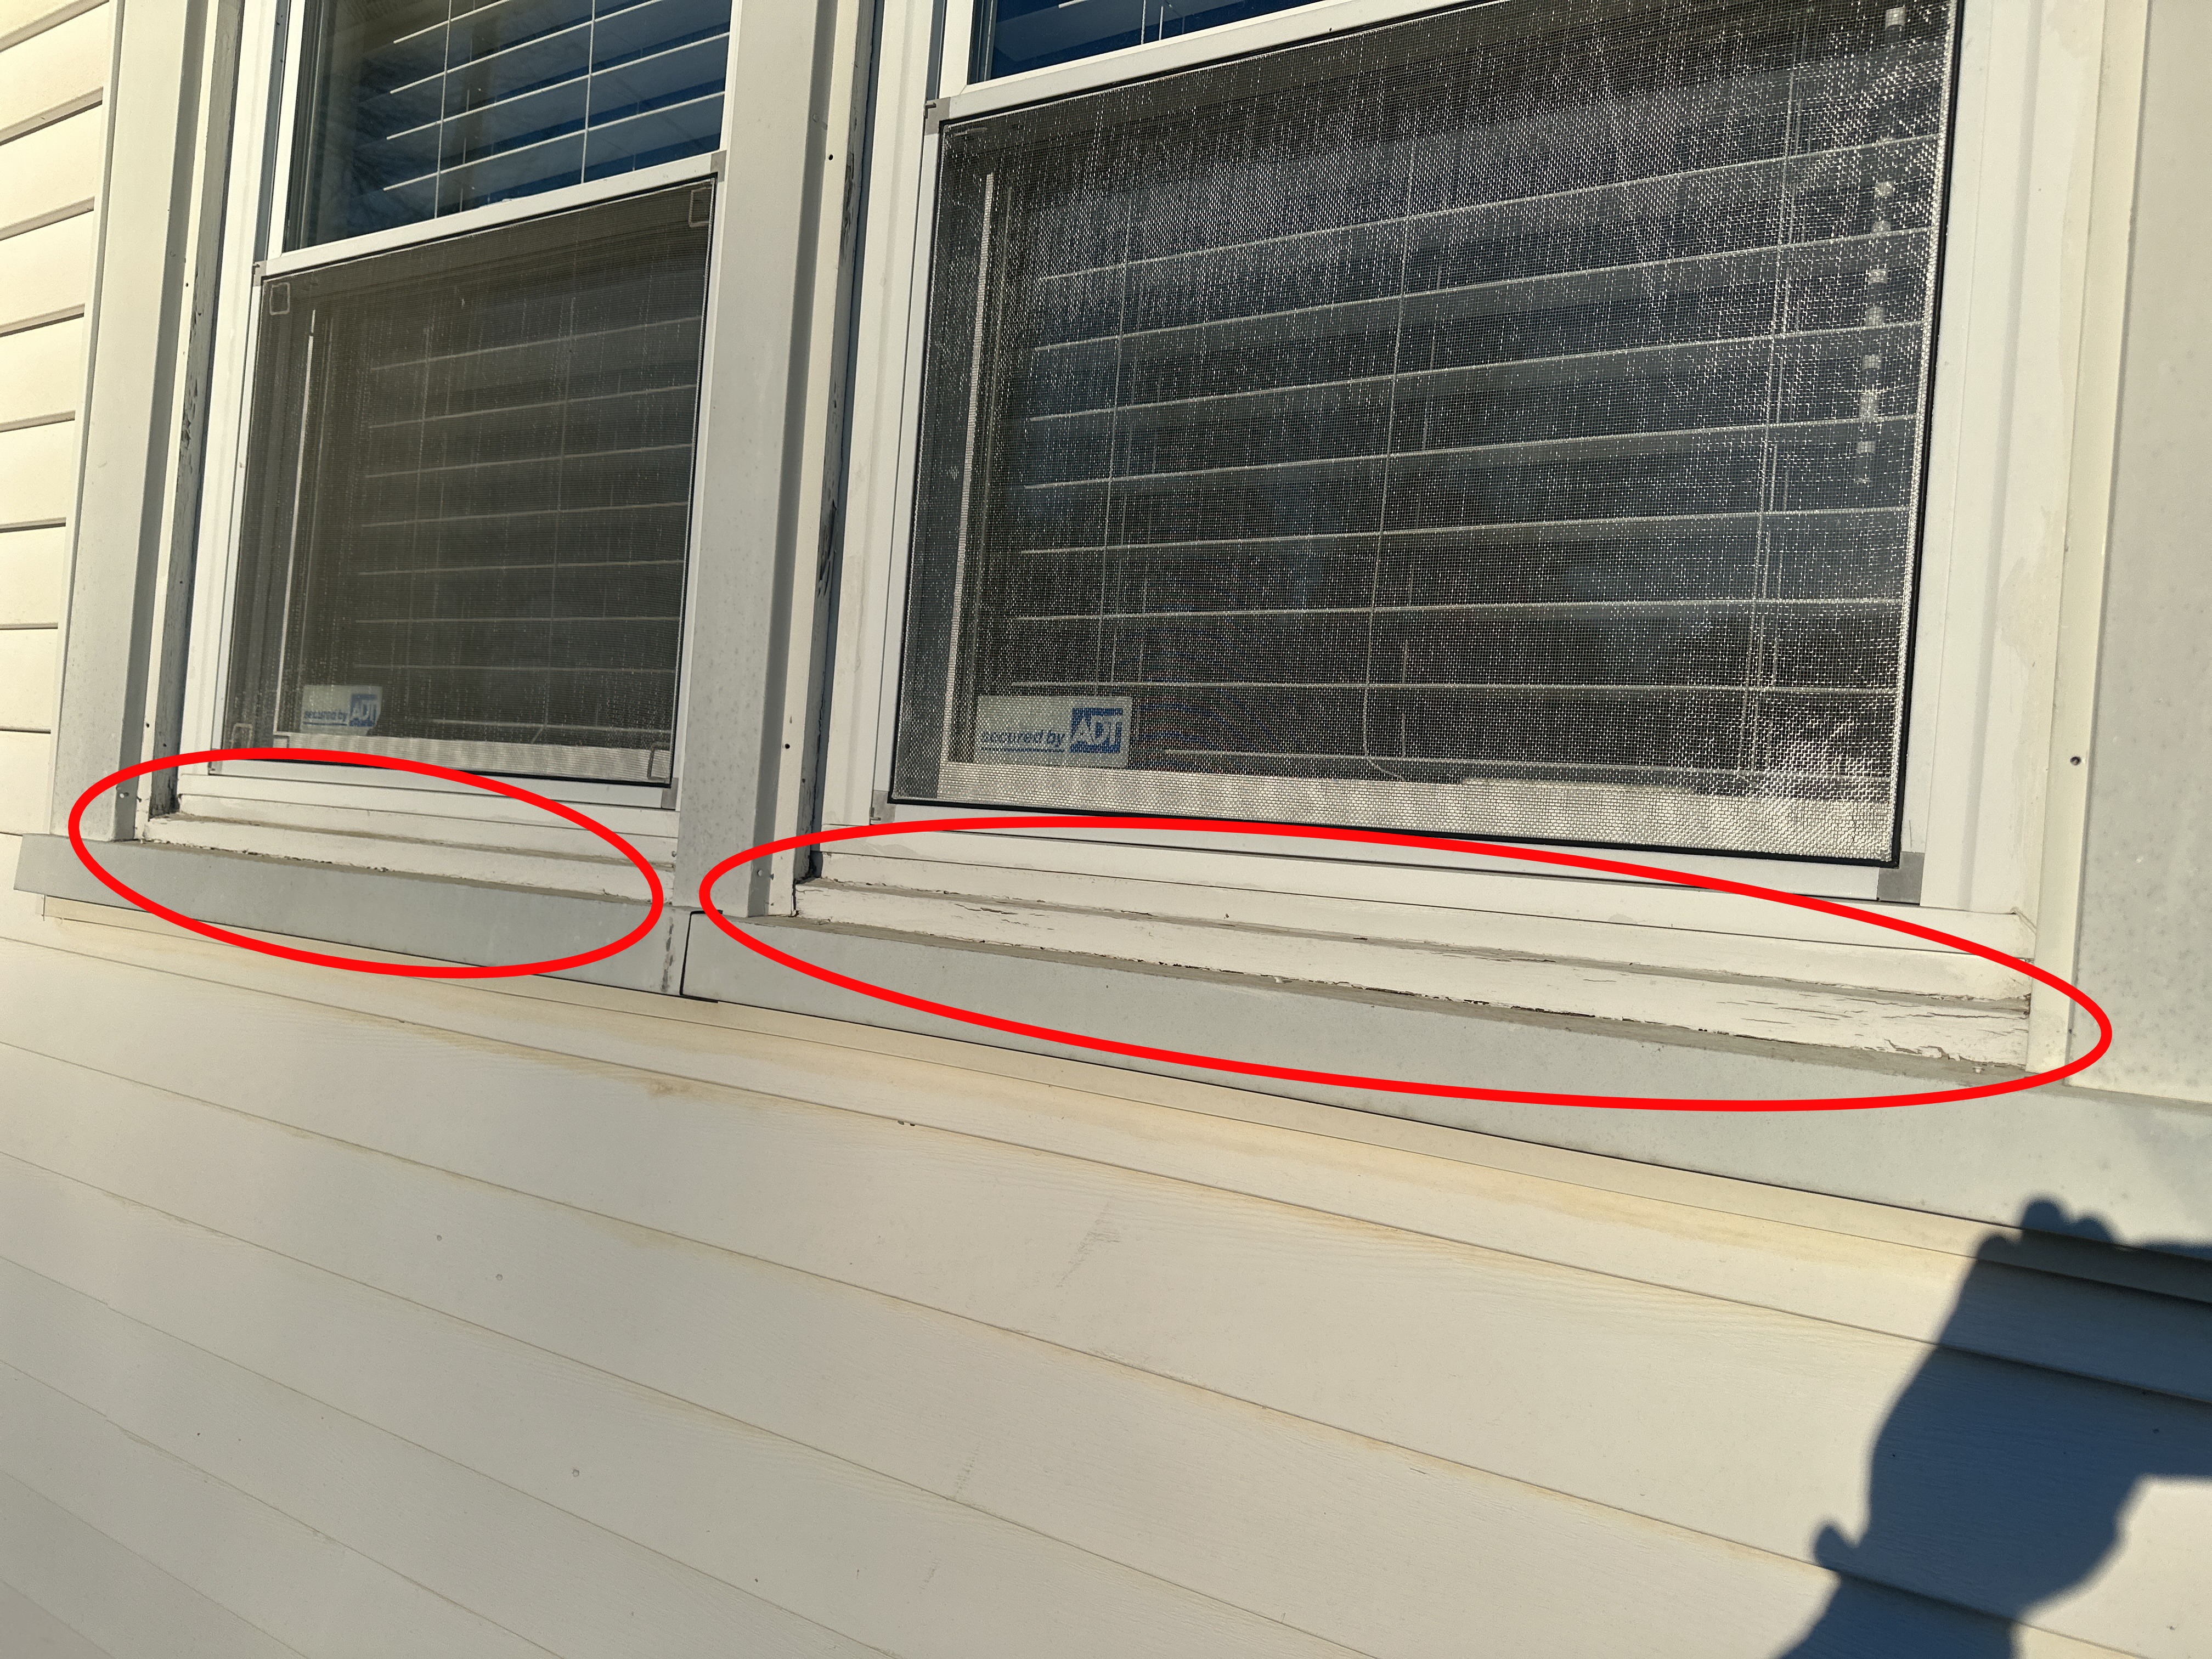
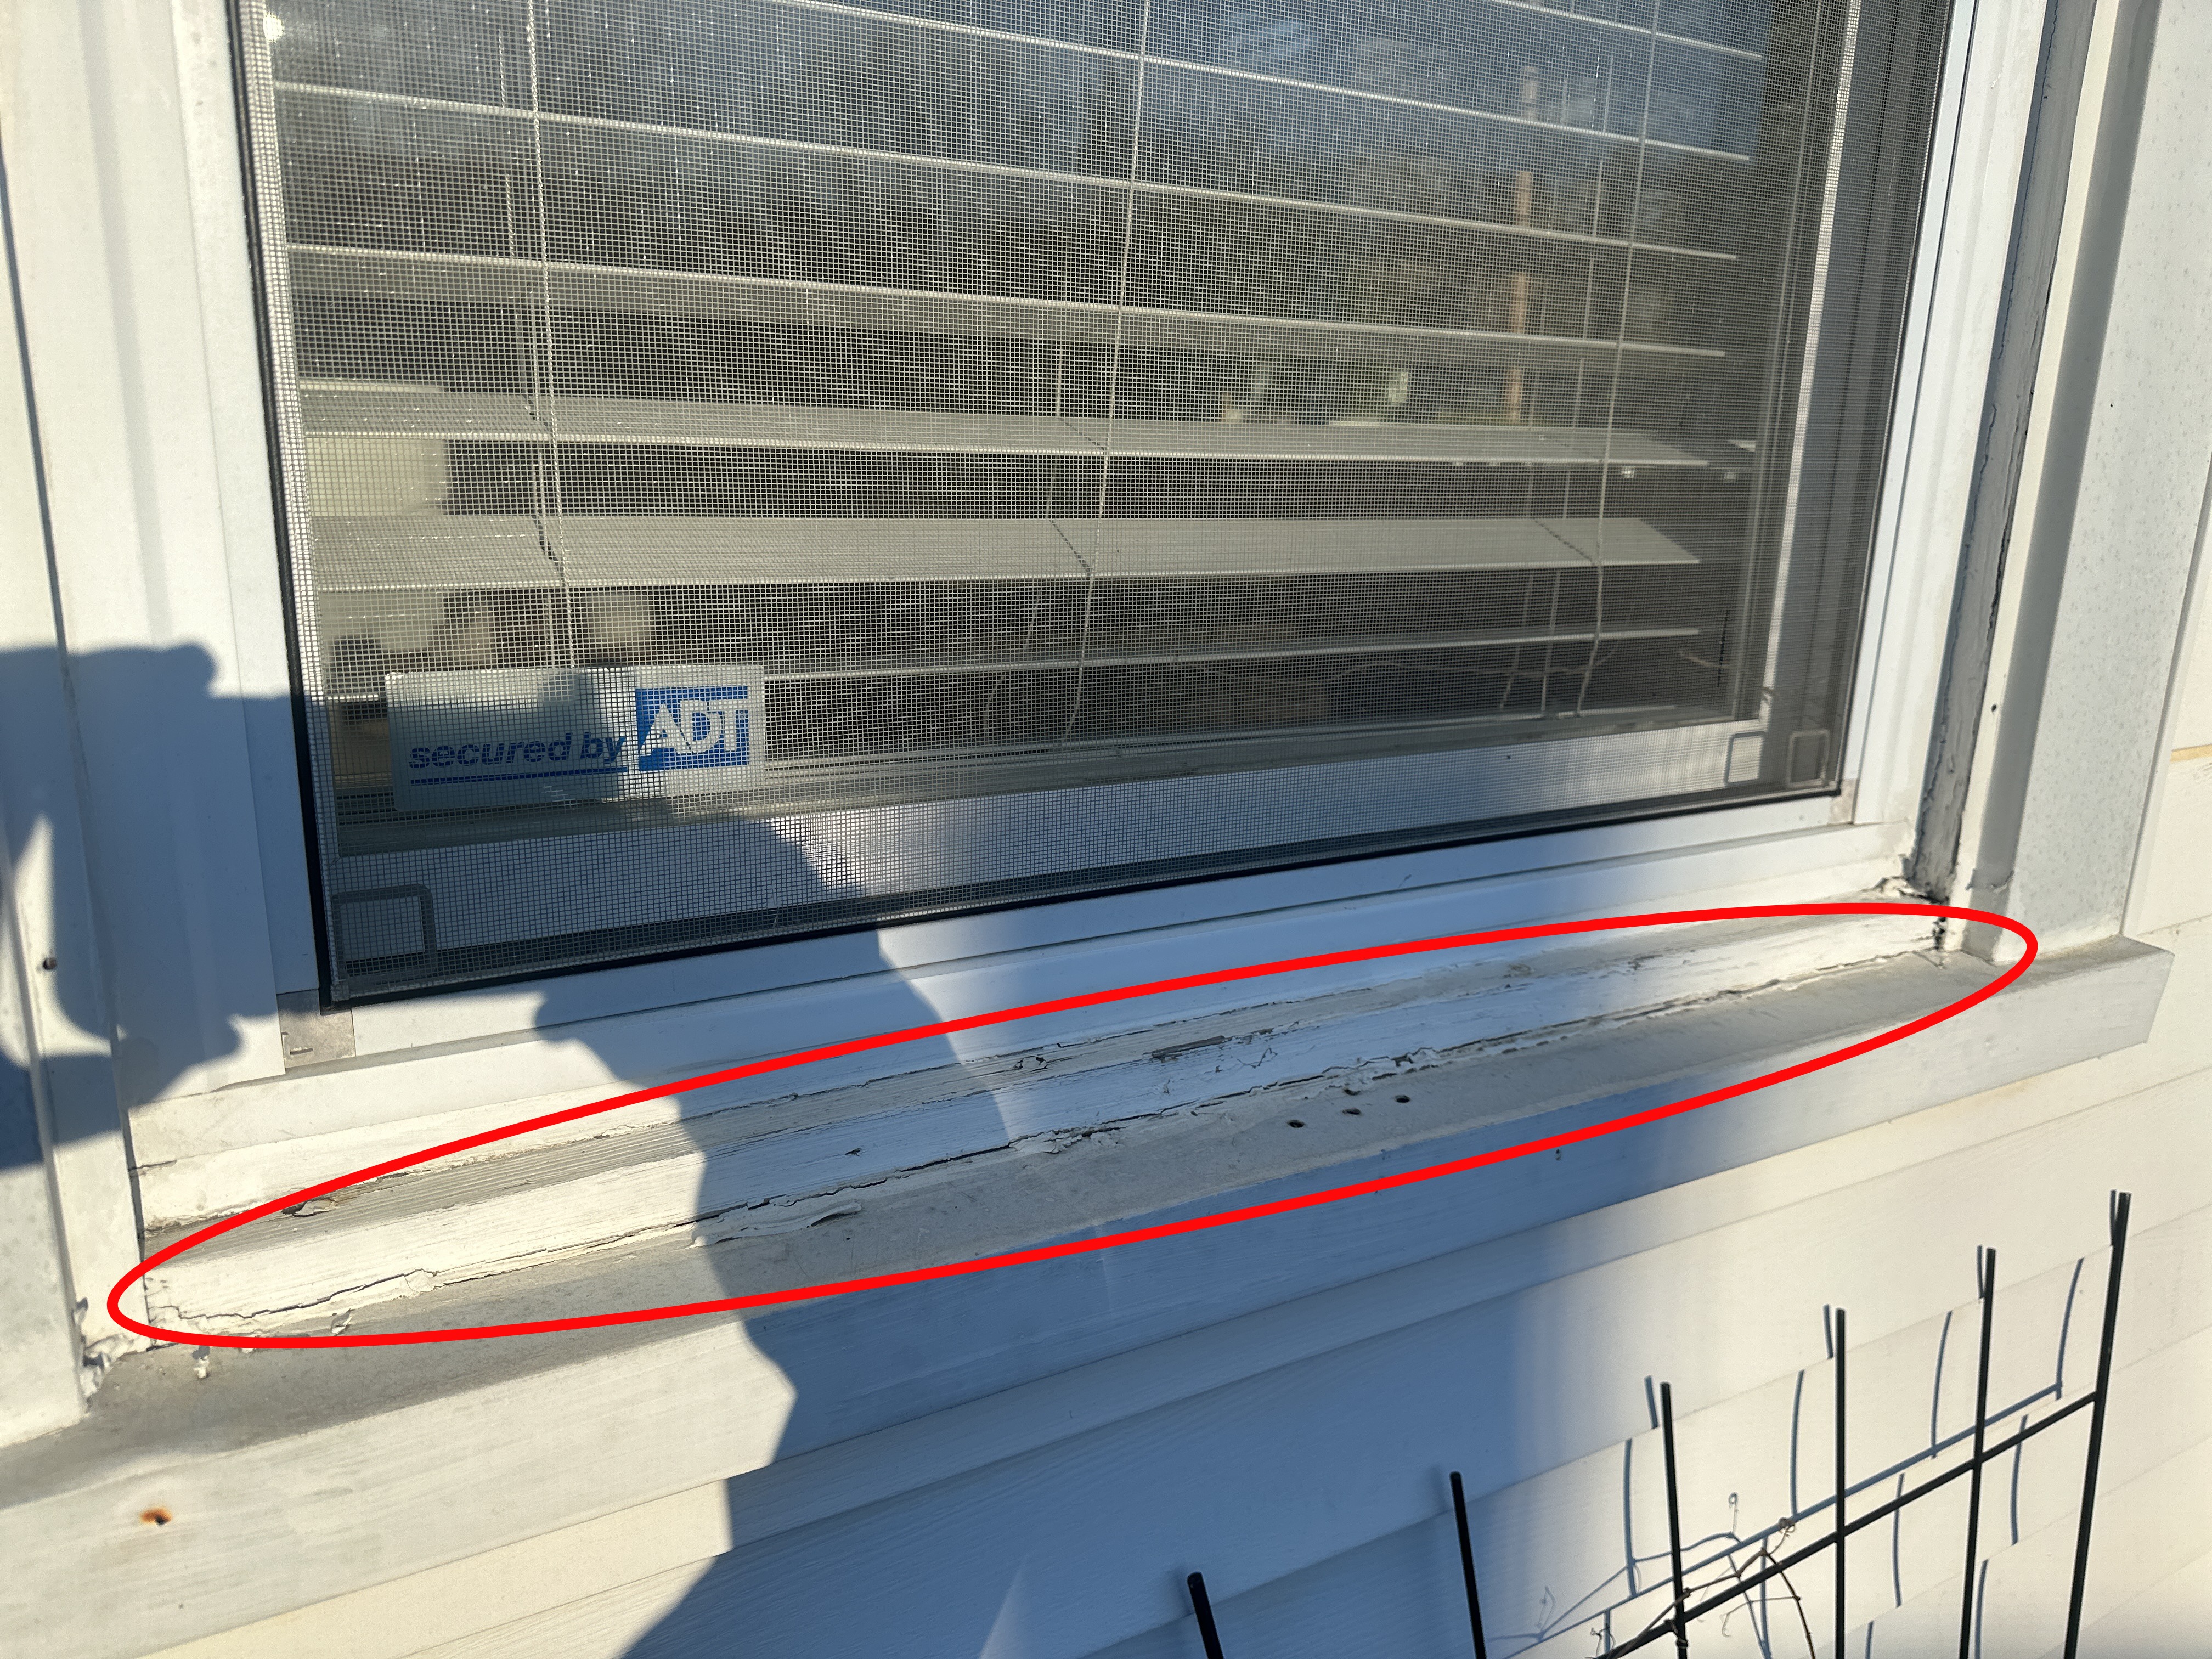
The wood window frames require paint and caulking maintenance, see particularly at the exposed sills.
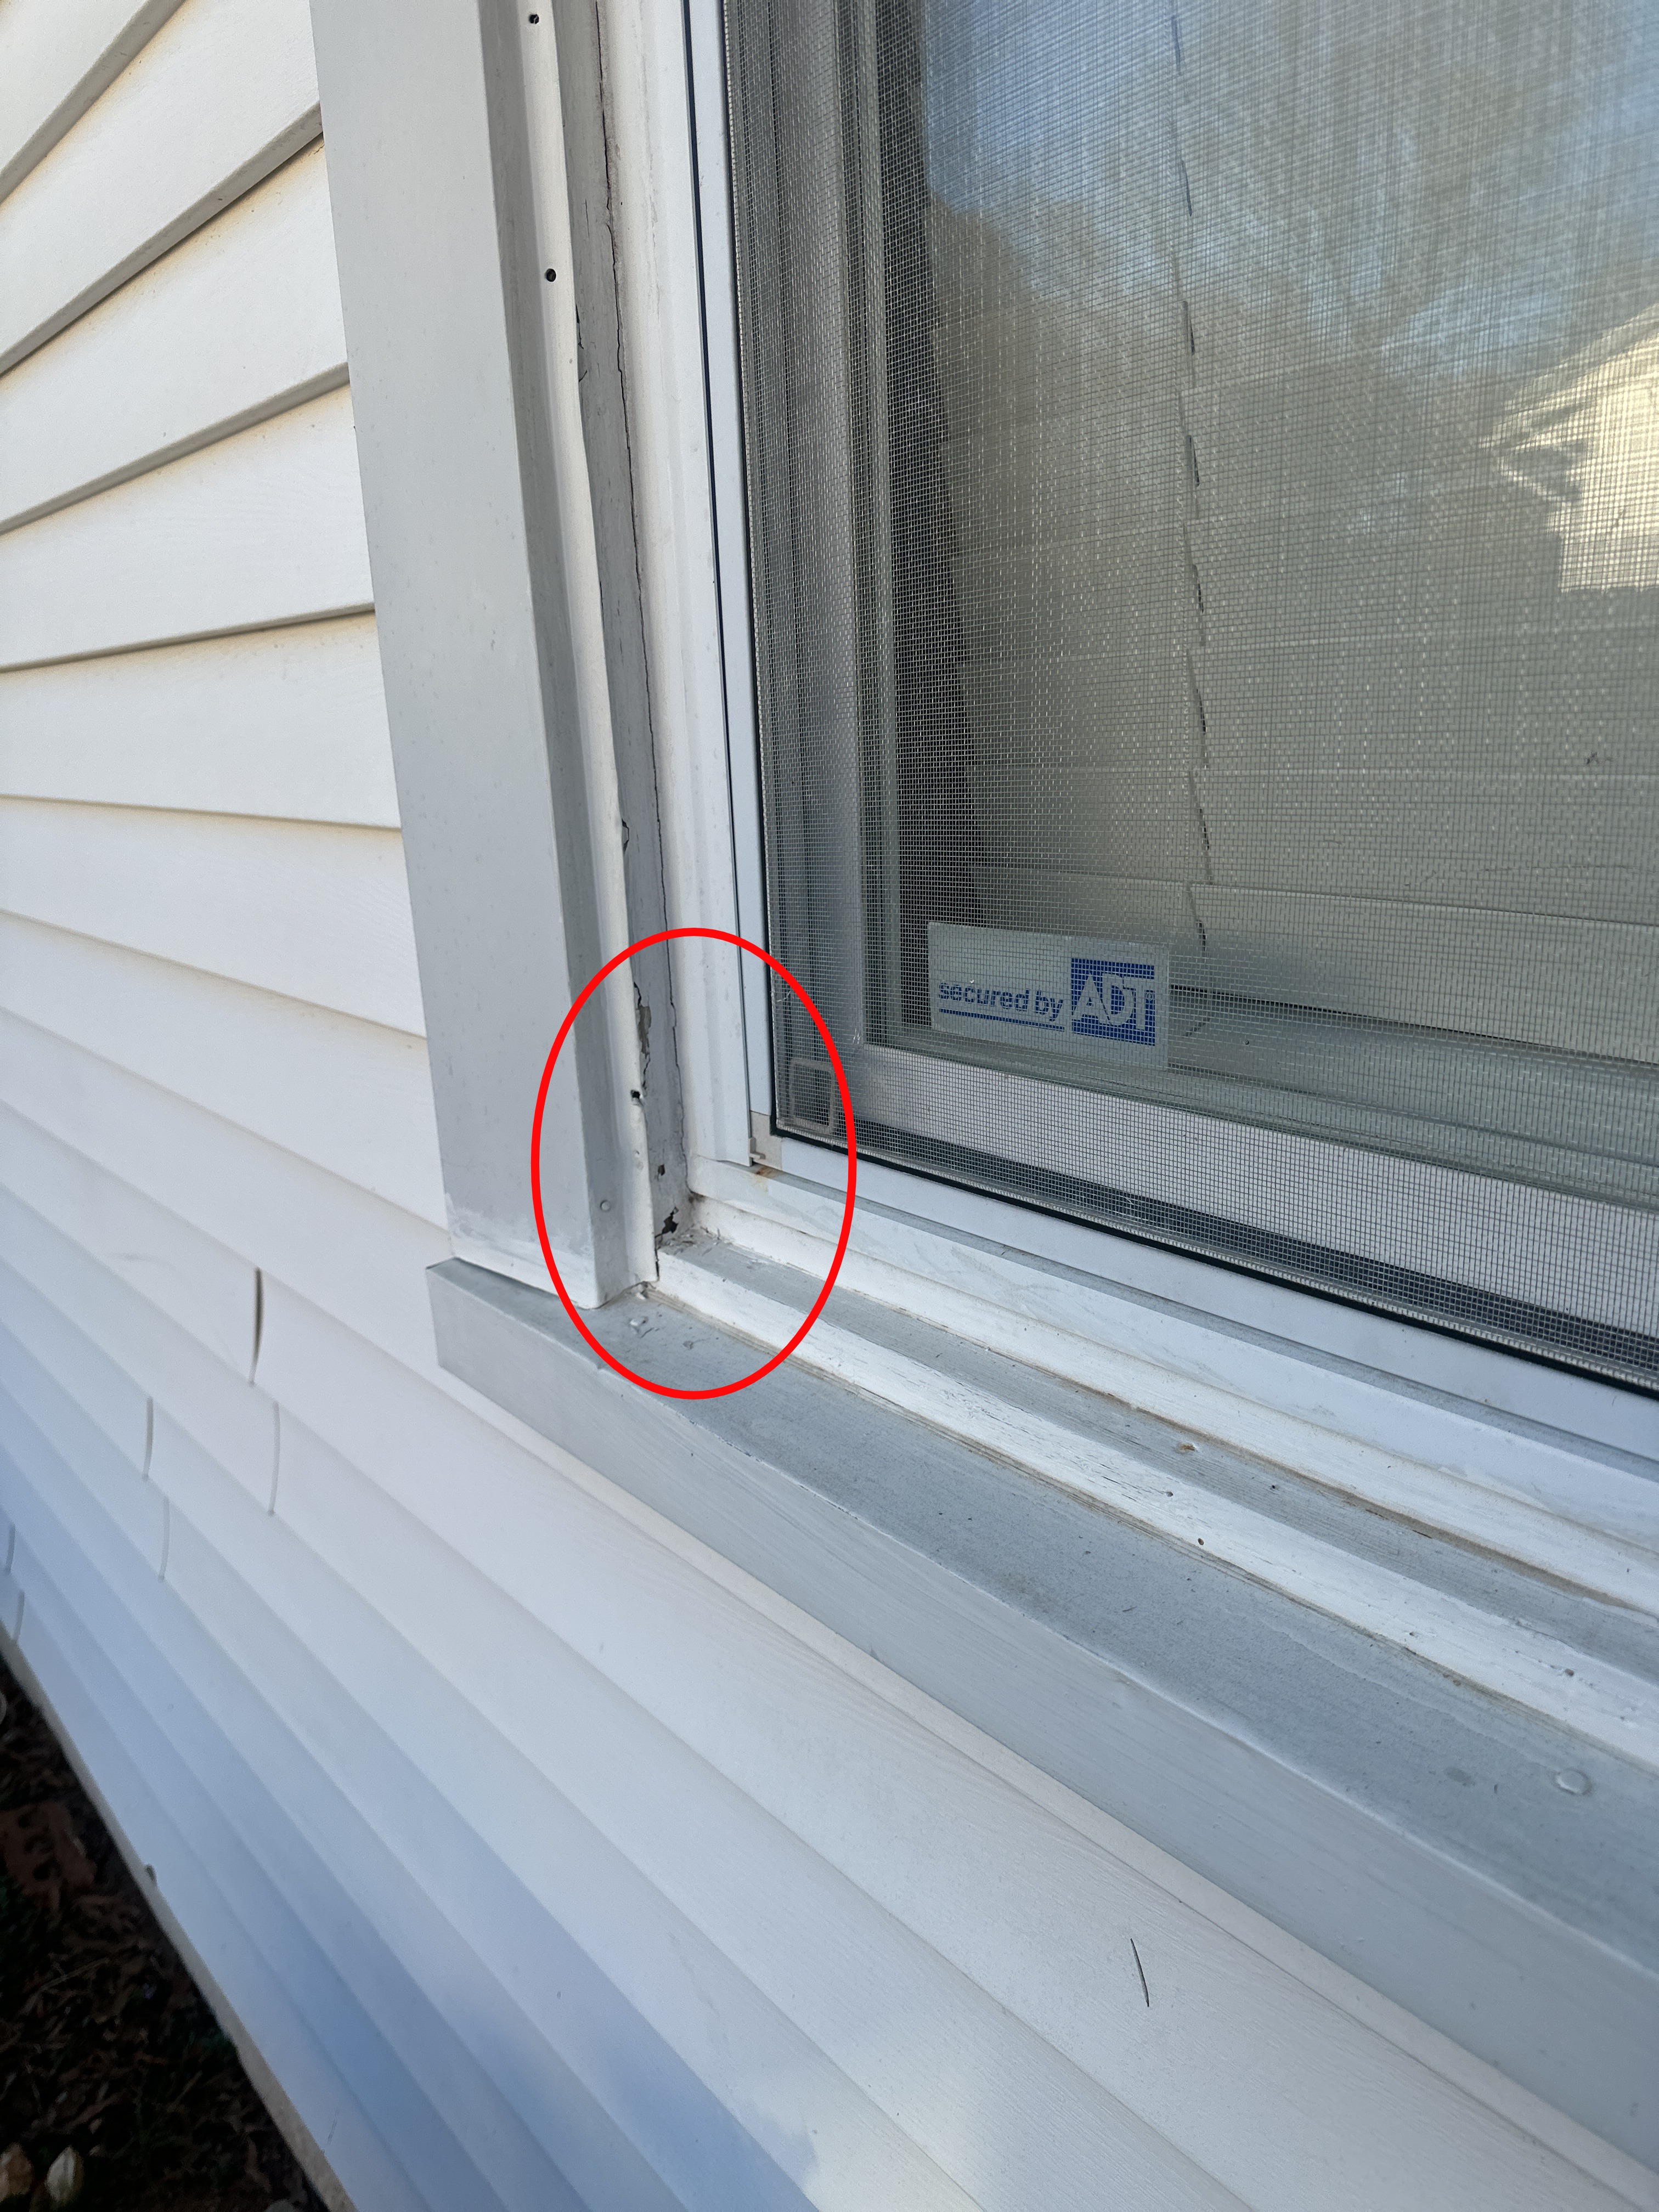 | 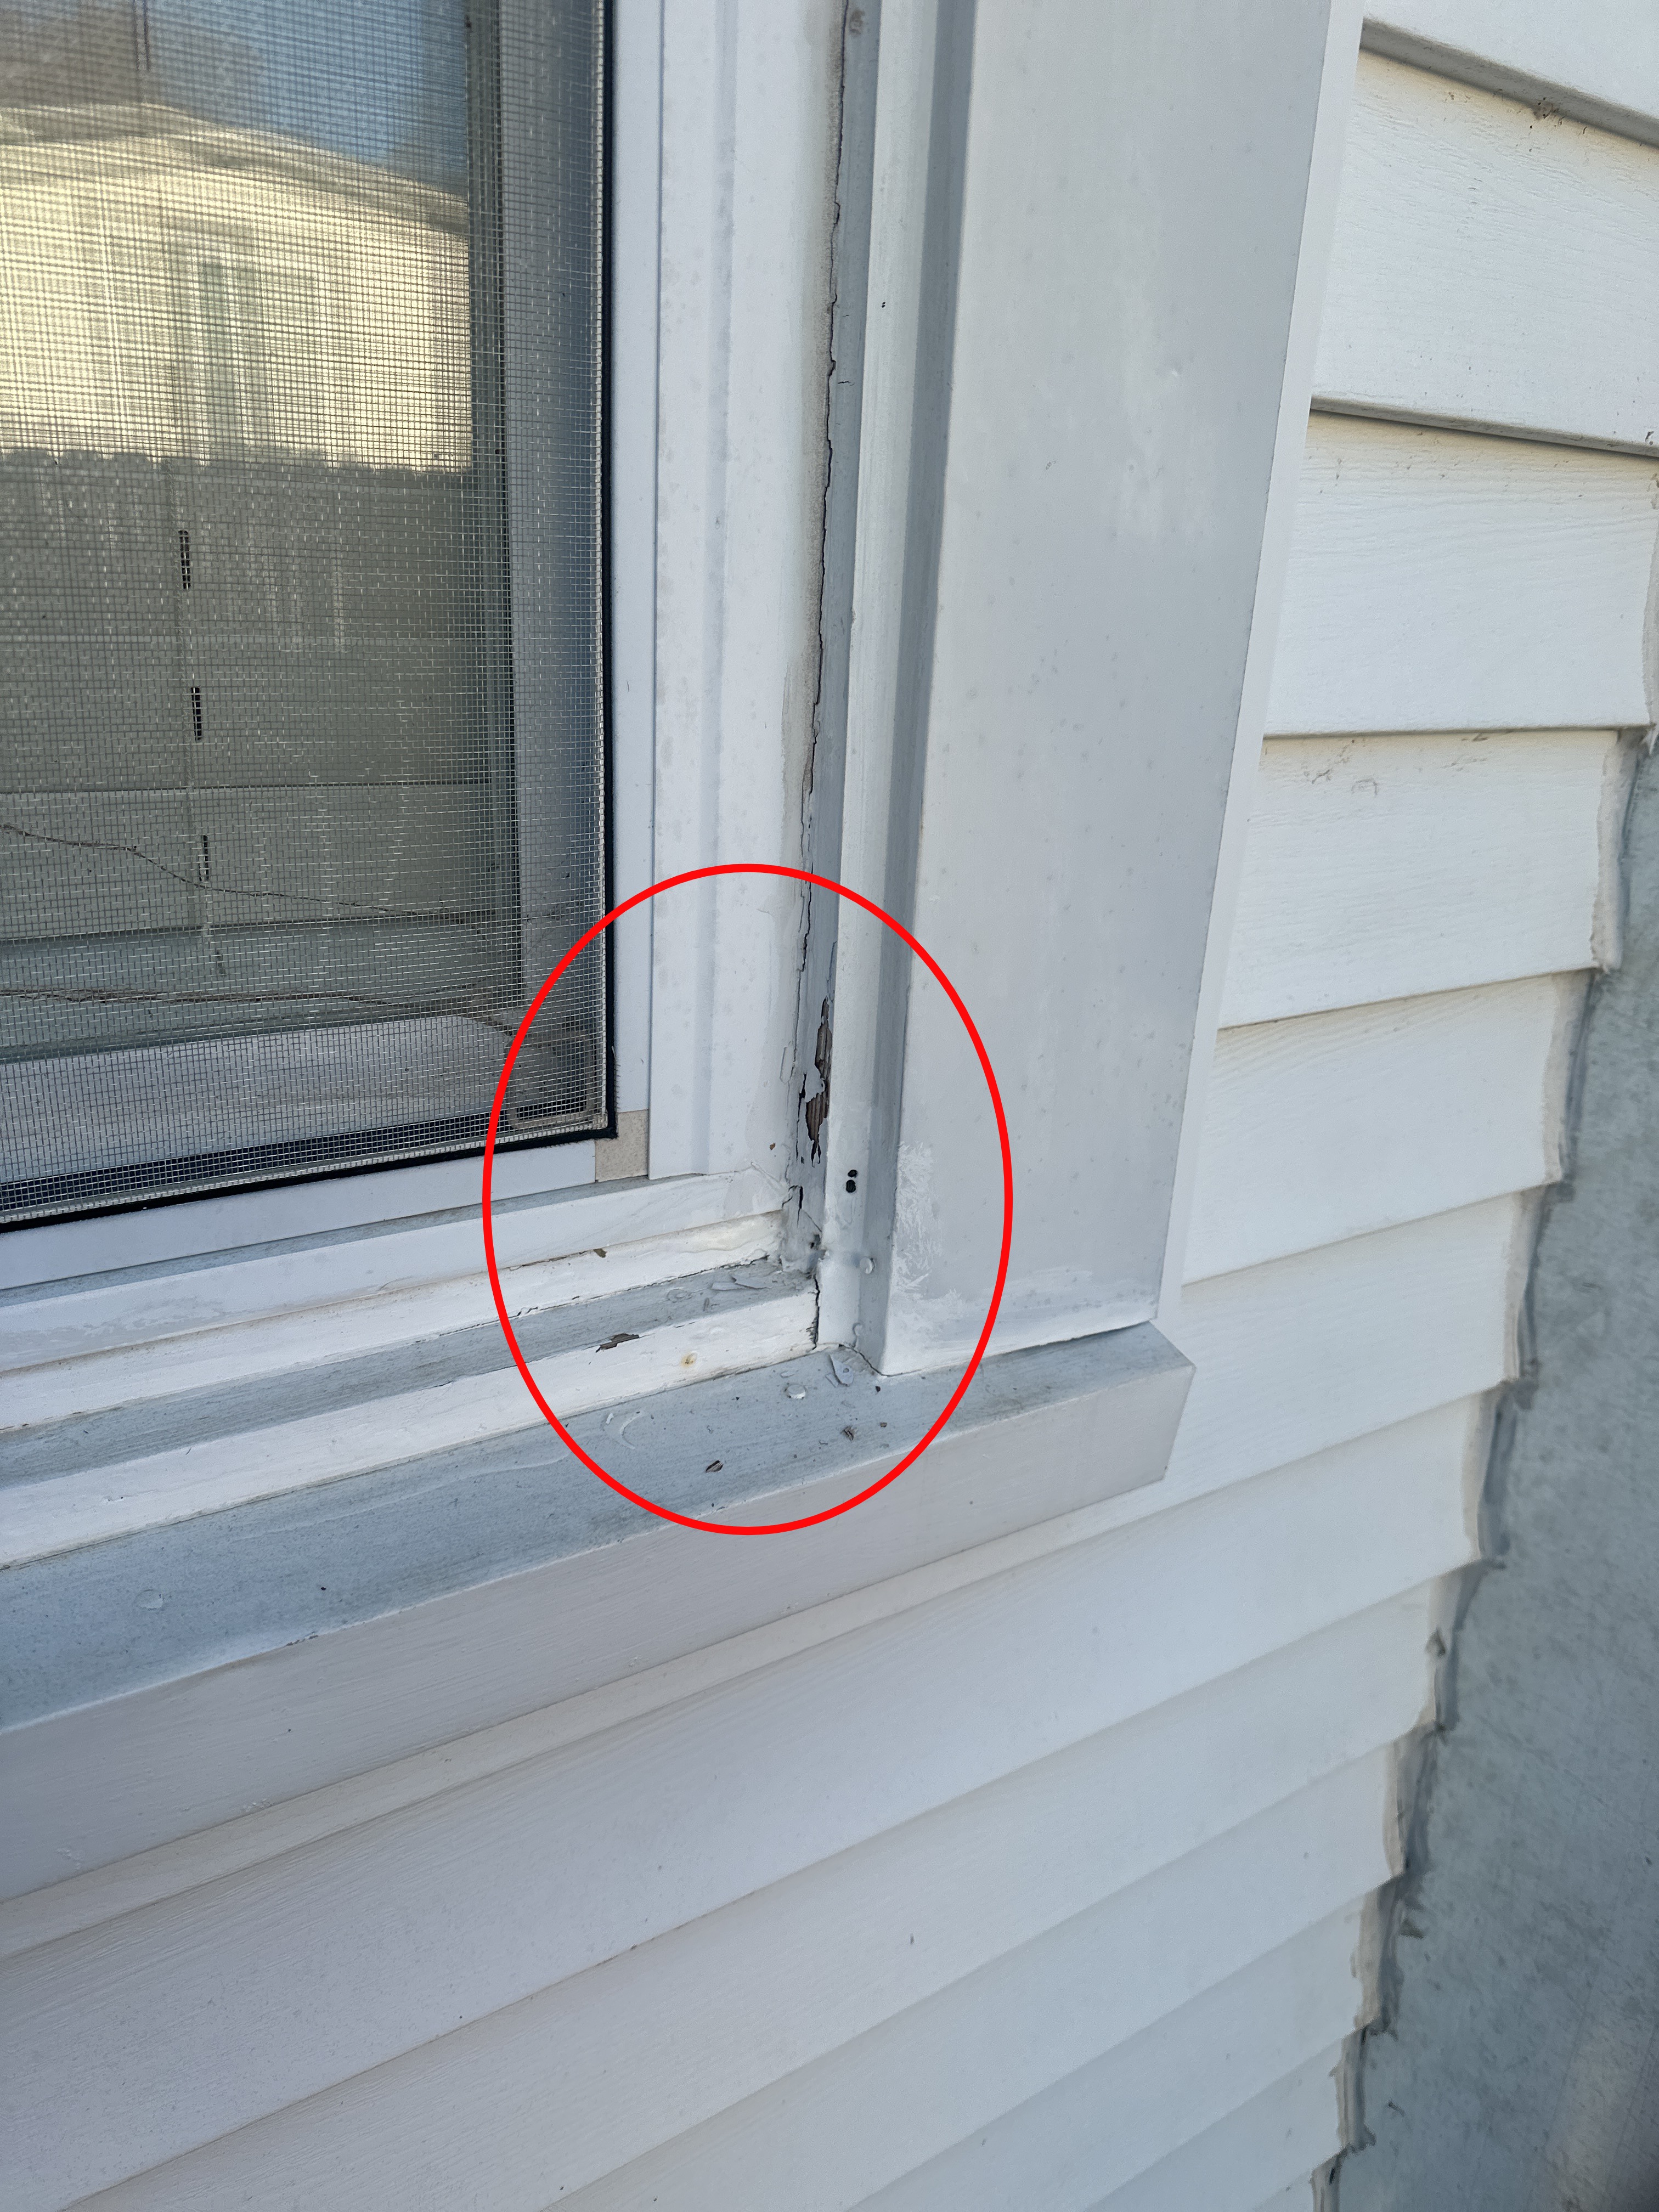 |
 |  |
 |
Roof, Chimney and Gutters
Roof Materials
Method of Roof Inspection: Walked on roof
Roof Style: Hip
Flashings, Valleys and Penetrations: Present and Visually Standard
Roof flashings are used to keep a roofing system waterproof where the roofing material starts, stops, changes direction or is penetrated. During inspection, we look for standard flashing techniques that could be considered normal or standard in our region. Damaged, incomplete or non-standard flashings can be a sign of an older or less reliable roofing system and may require repair. Any non-standard flashings noted during inspection will be reported on below if found.
Roof Covering Materials: Architectural grade composition shingle
Approximate Age of Roof Covering: 5-10 years
Overlay Roof: No
Shingle Fastening Accessible For Inspection : No
Please note that when inspecting composition roof installations, I try and look under shingles to see how the shingles have been fastened. Proper fastening is critical for successful roof performance. Often the shingles are bonding so well, they cannot be lifted to inspect the fastening. In this case, I was unable to lift the shingles and see the fastening pattern - they are bonded well and I do not use a flat bar to pry them apart as part of a visual inspection unless there is a reason to start chasing visible leaks. While this limits my visual inspection, this is a good sign, as loose, un-bonded shingles can lead to wind damage and would be written up as a defect.
This roof is done in an architectural grade composition shingle. The roof looks does not appear to be close to the end of its useful service life, however a localized areas of concern was noted. Near the top of one of the hips, the shingles have more than normal wear, the fiberglass mat is exposed due to granule loss. The balance of the roof does not appear to have this amount of wear. This could be due to a bad pack of shingles or manufacturers defect. No evidence of a leak was found at the time of the inspection. I recommend having a roofer inspect this area and determine if limited replacement of this area is warranted.
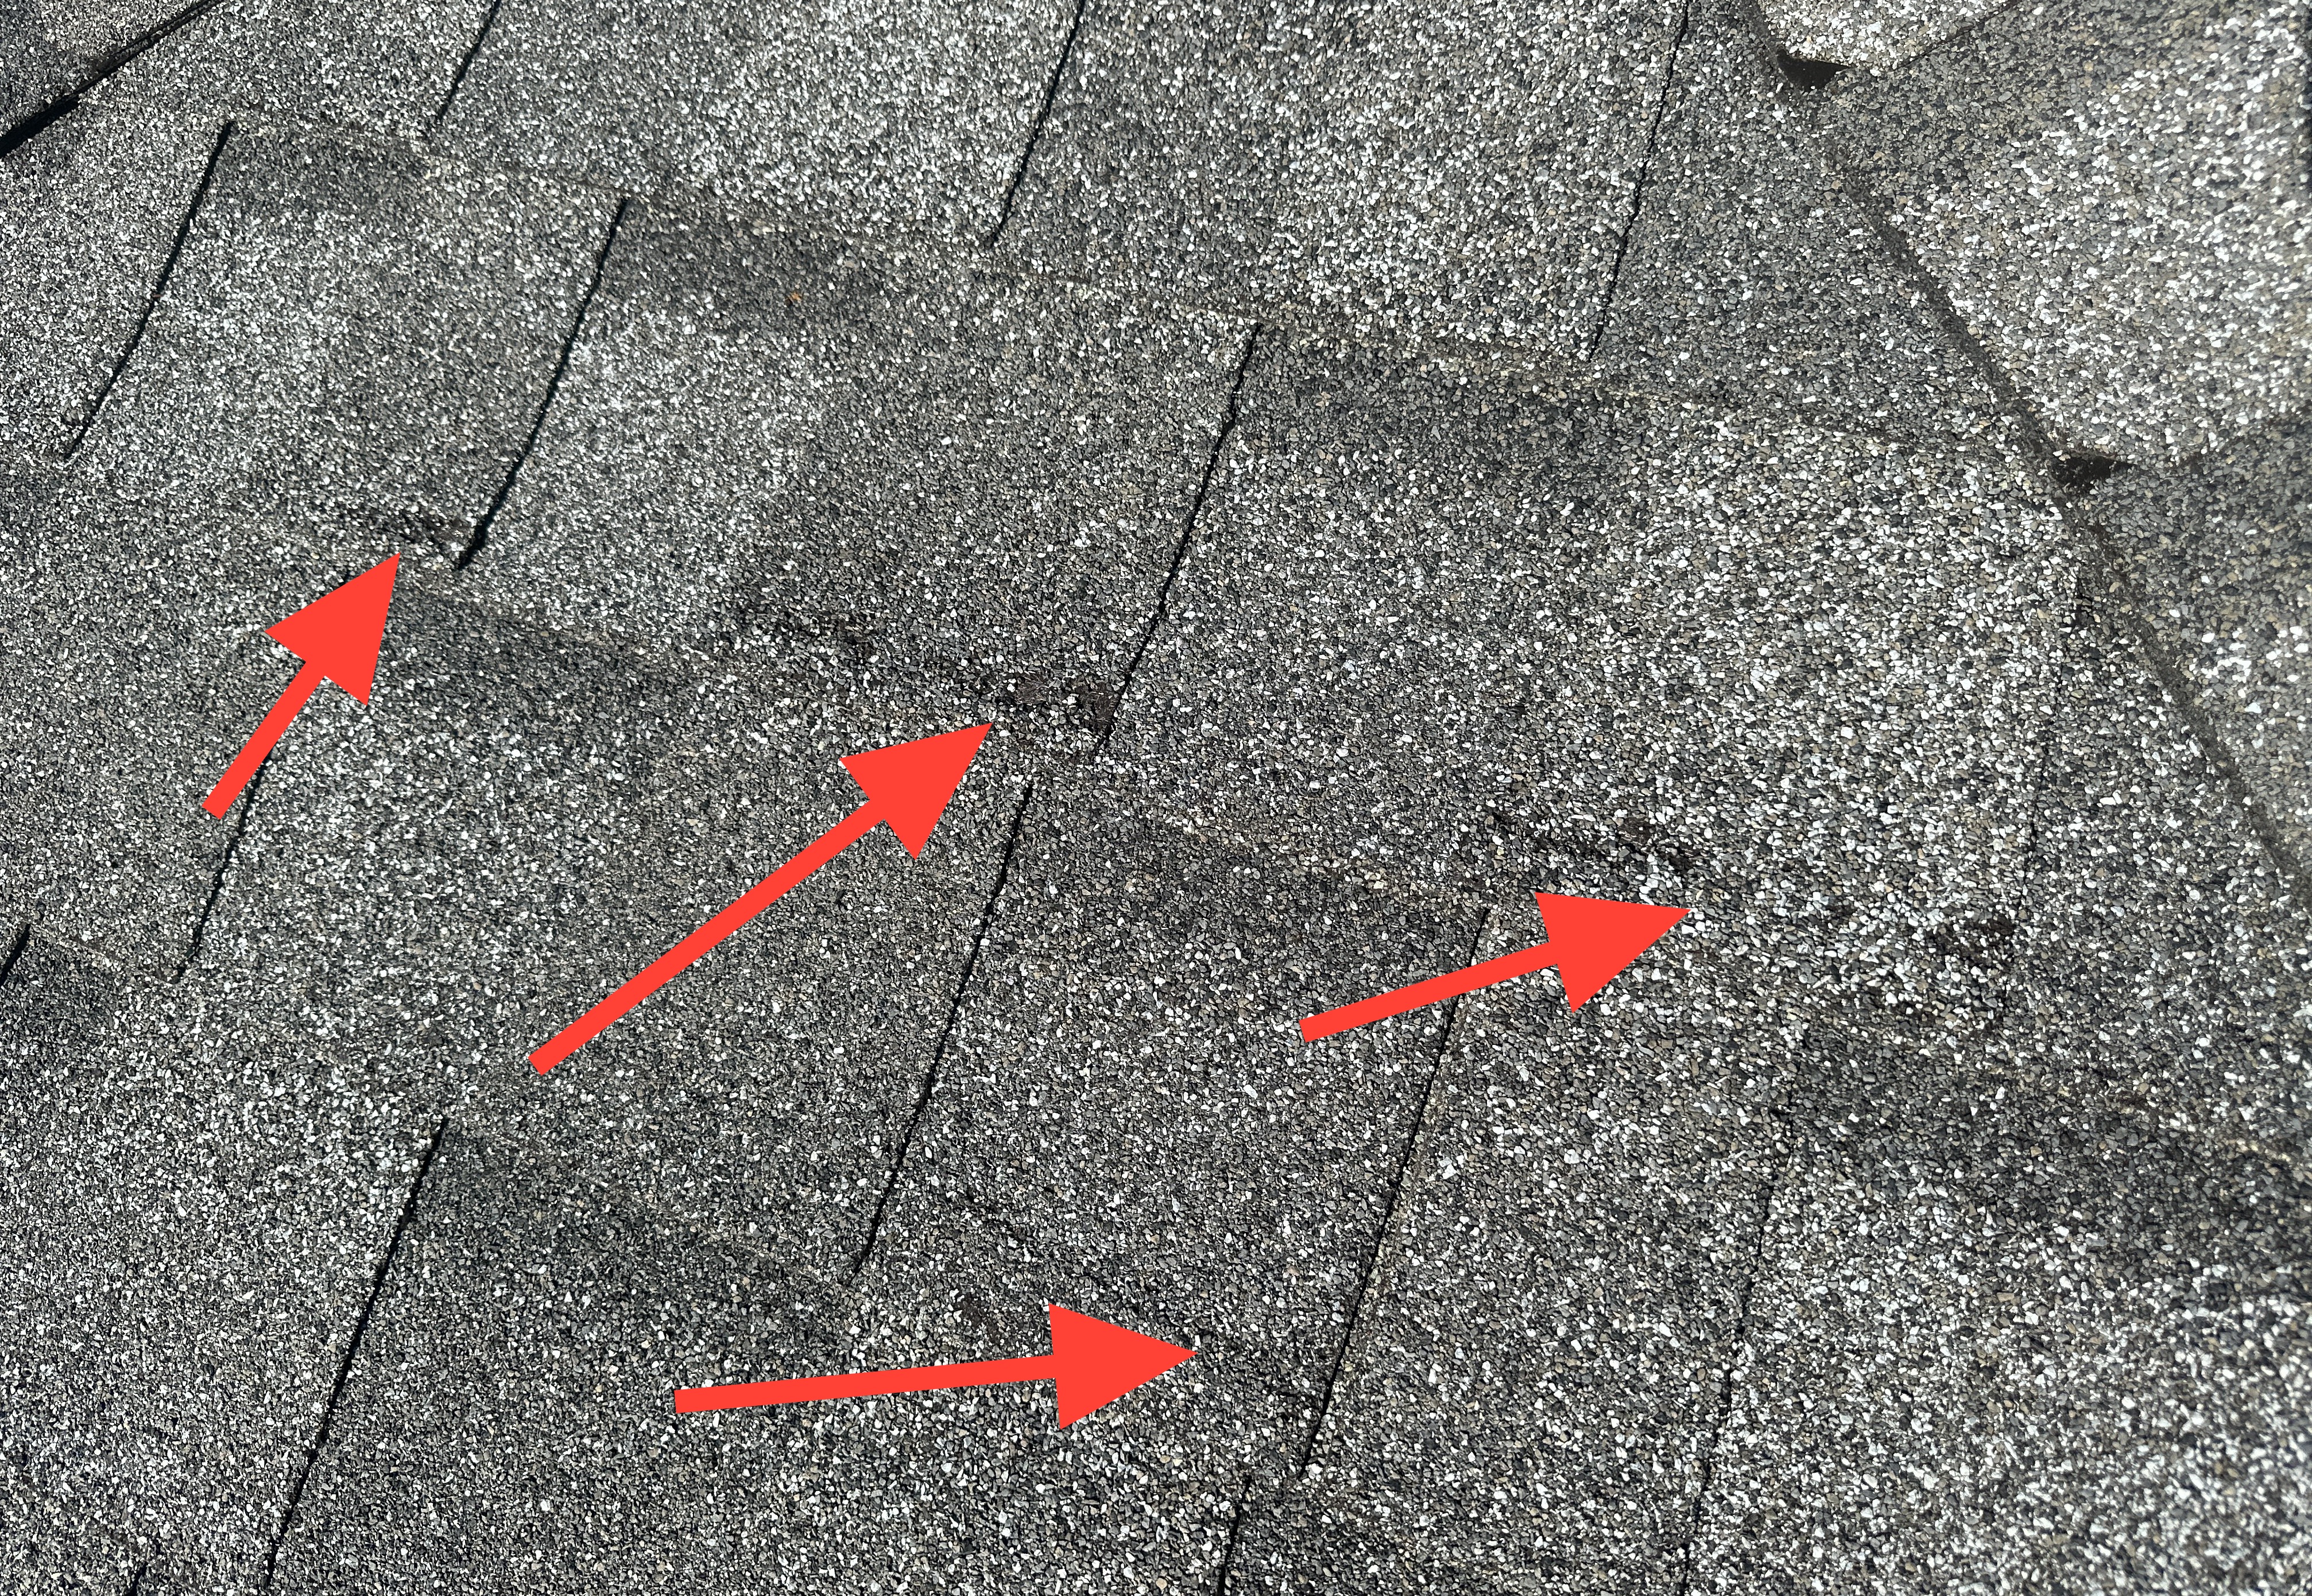 |
One shingle was found to have a hole in it, from a roofing nail that was not fully set. I recommend the nail be fixed, and the hole filled with roofing cement.
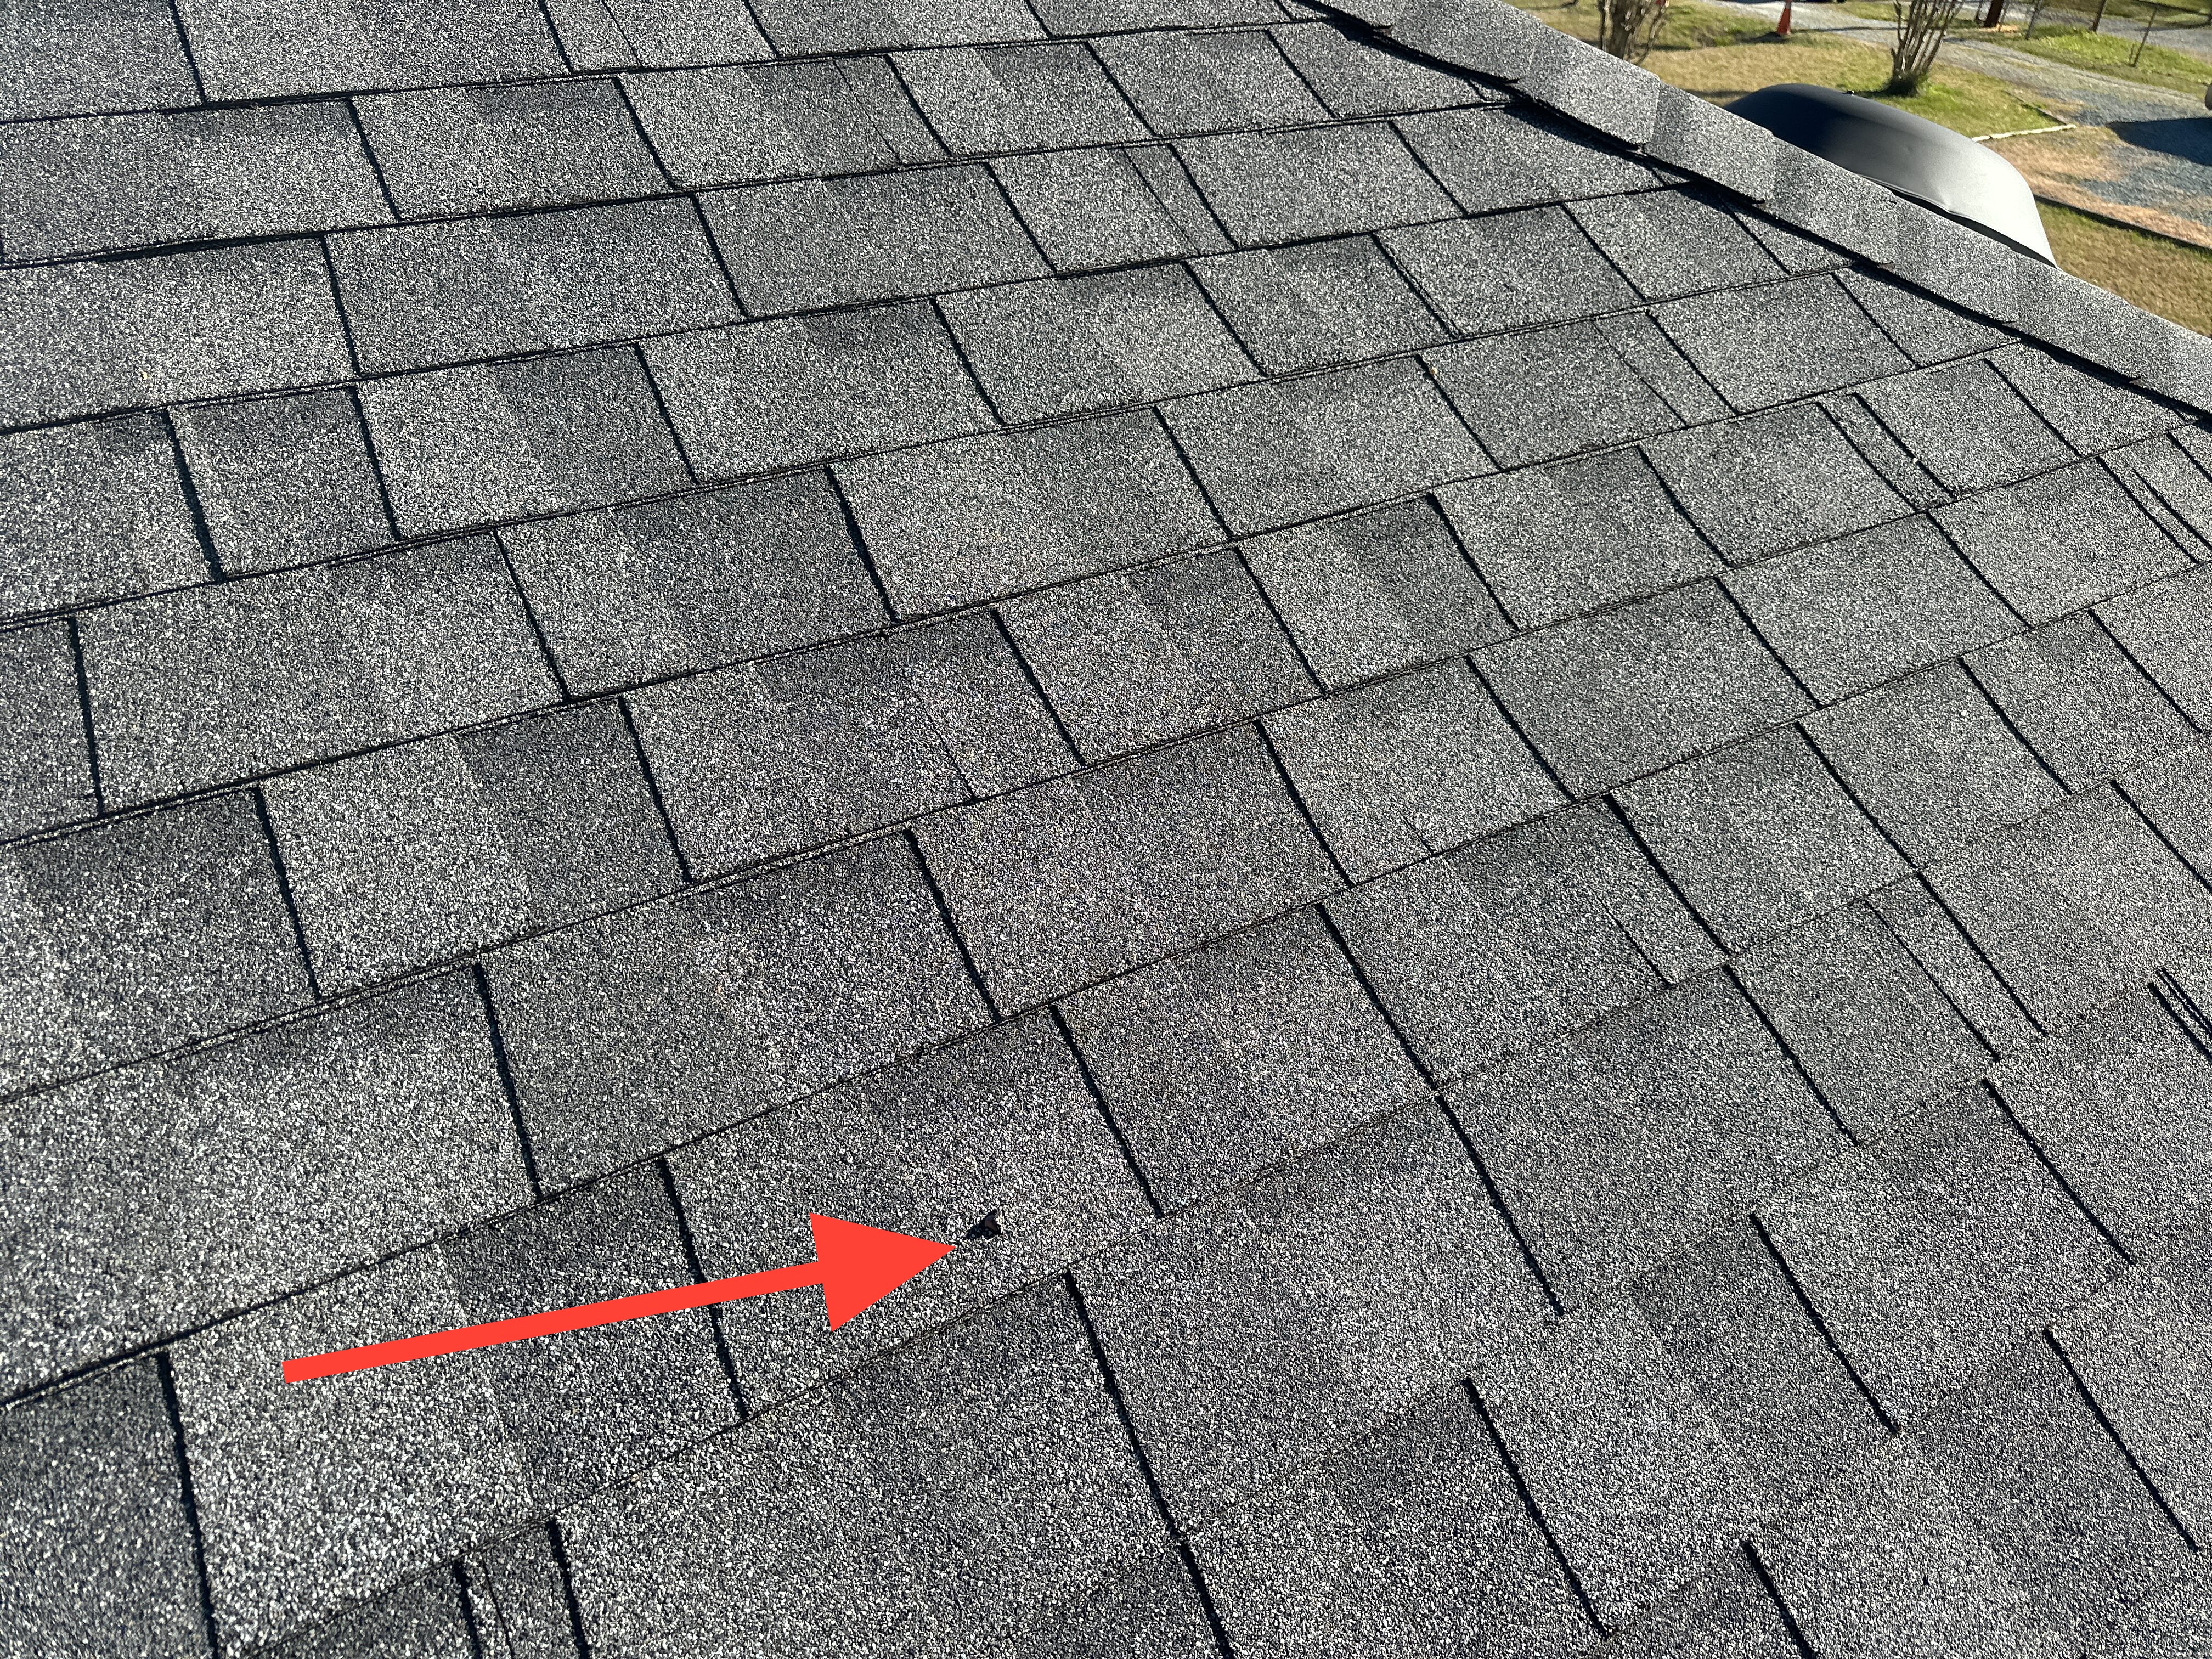 | 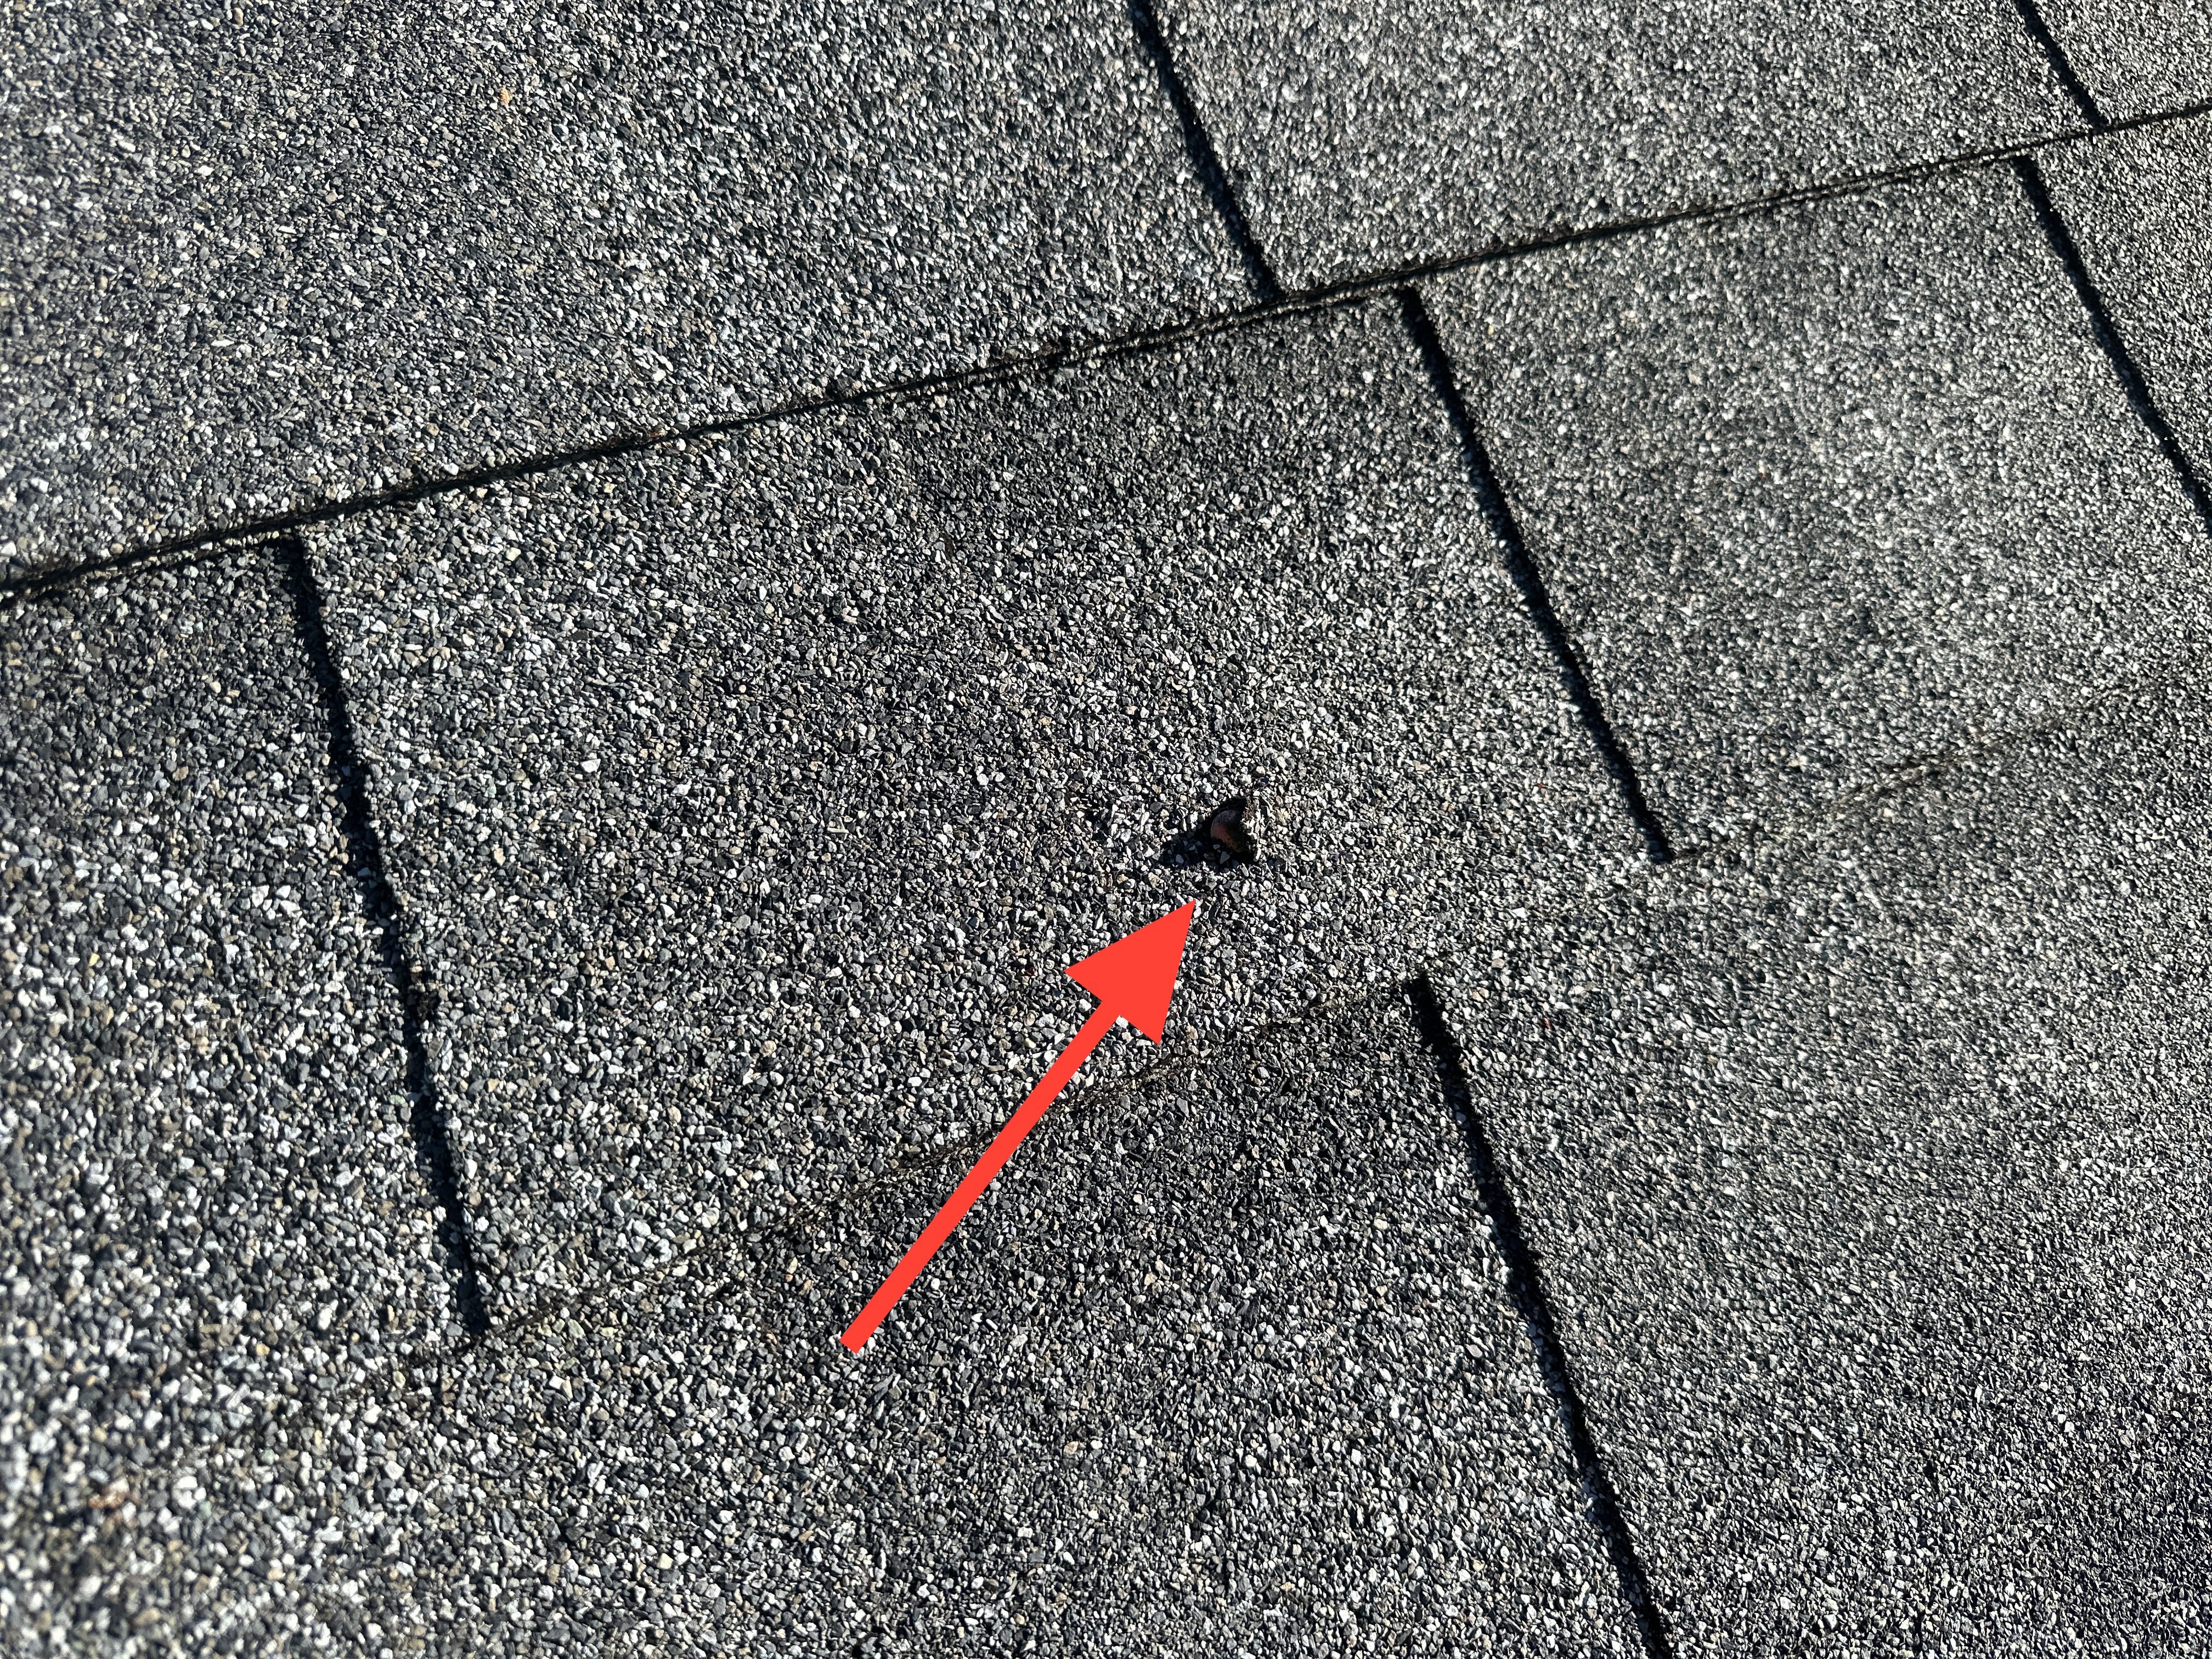 |
Gutters and Downspouts
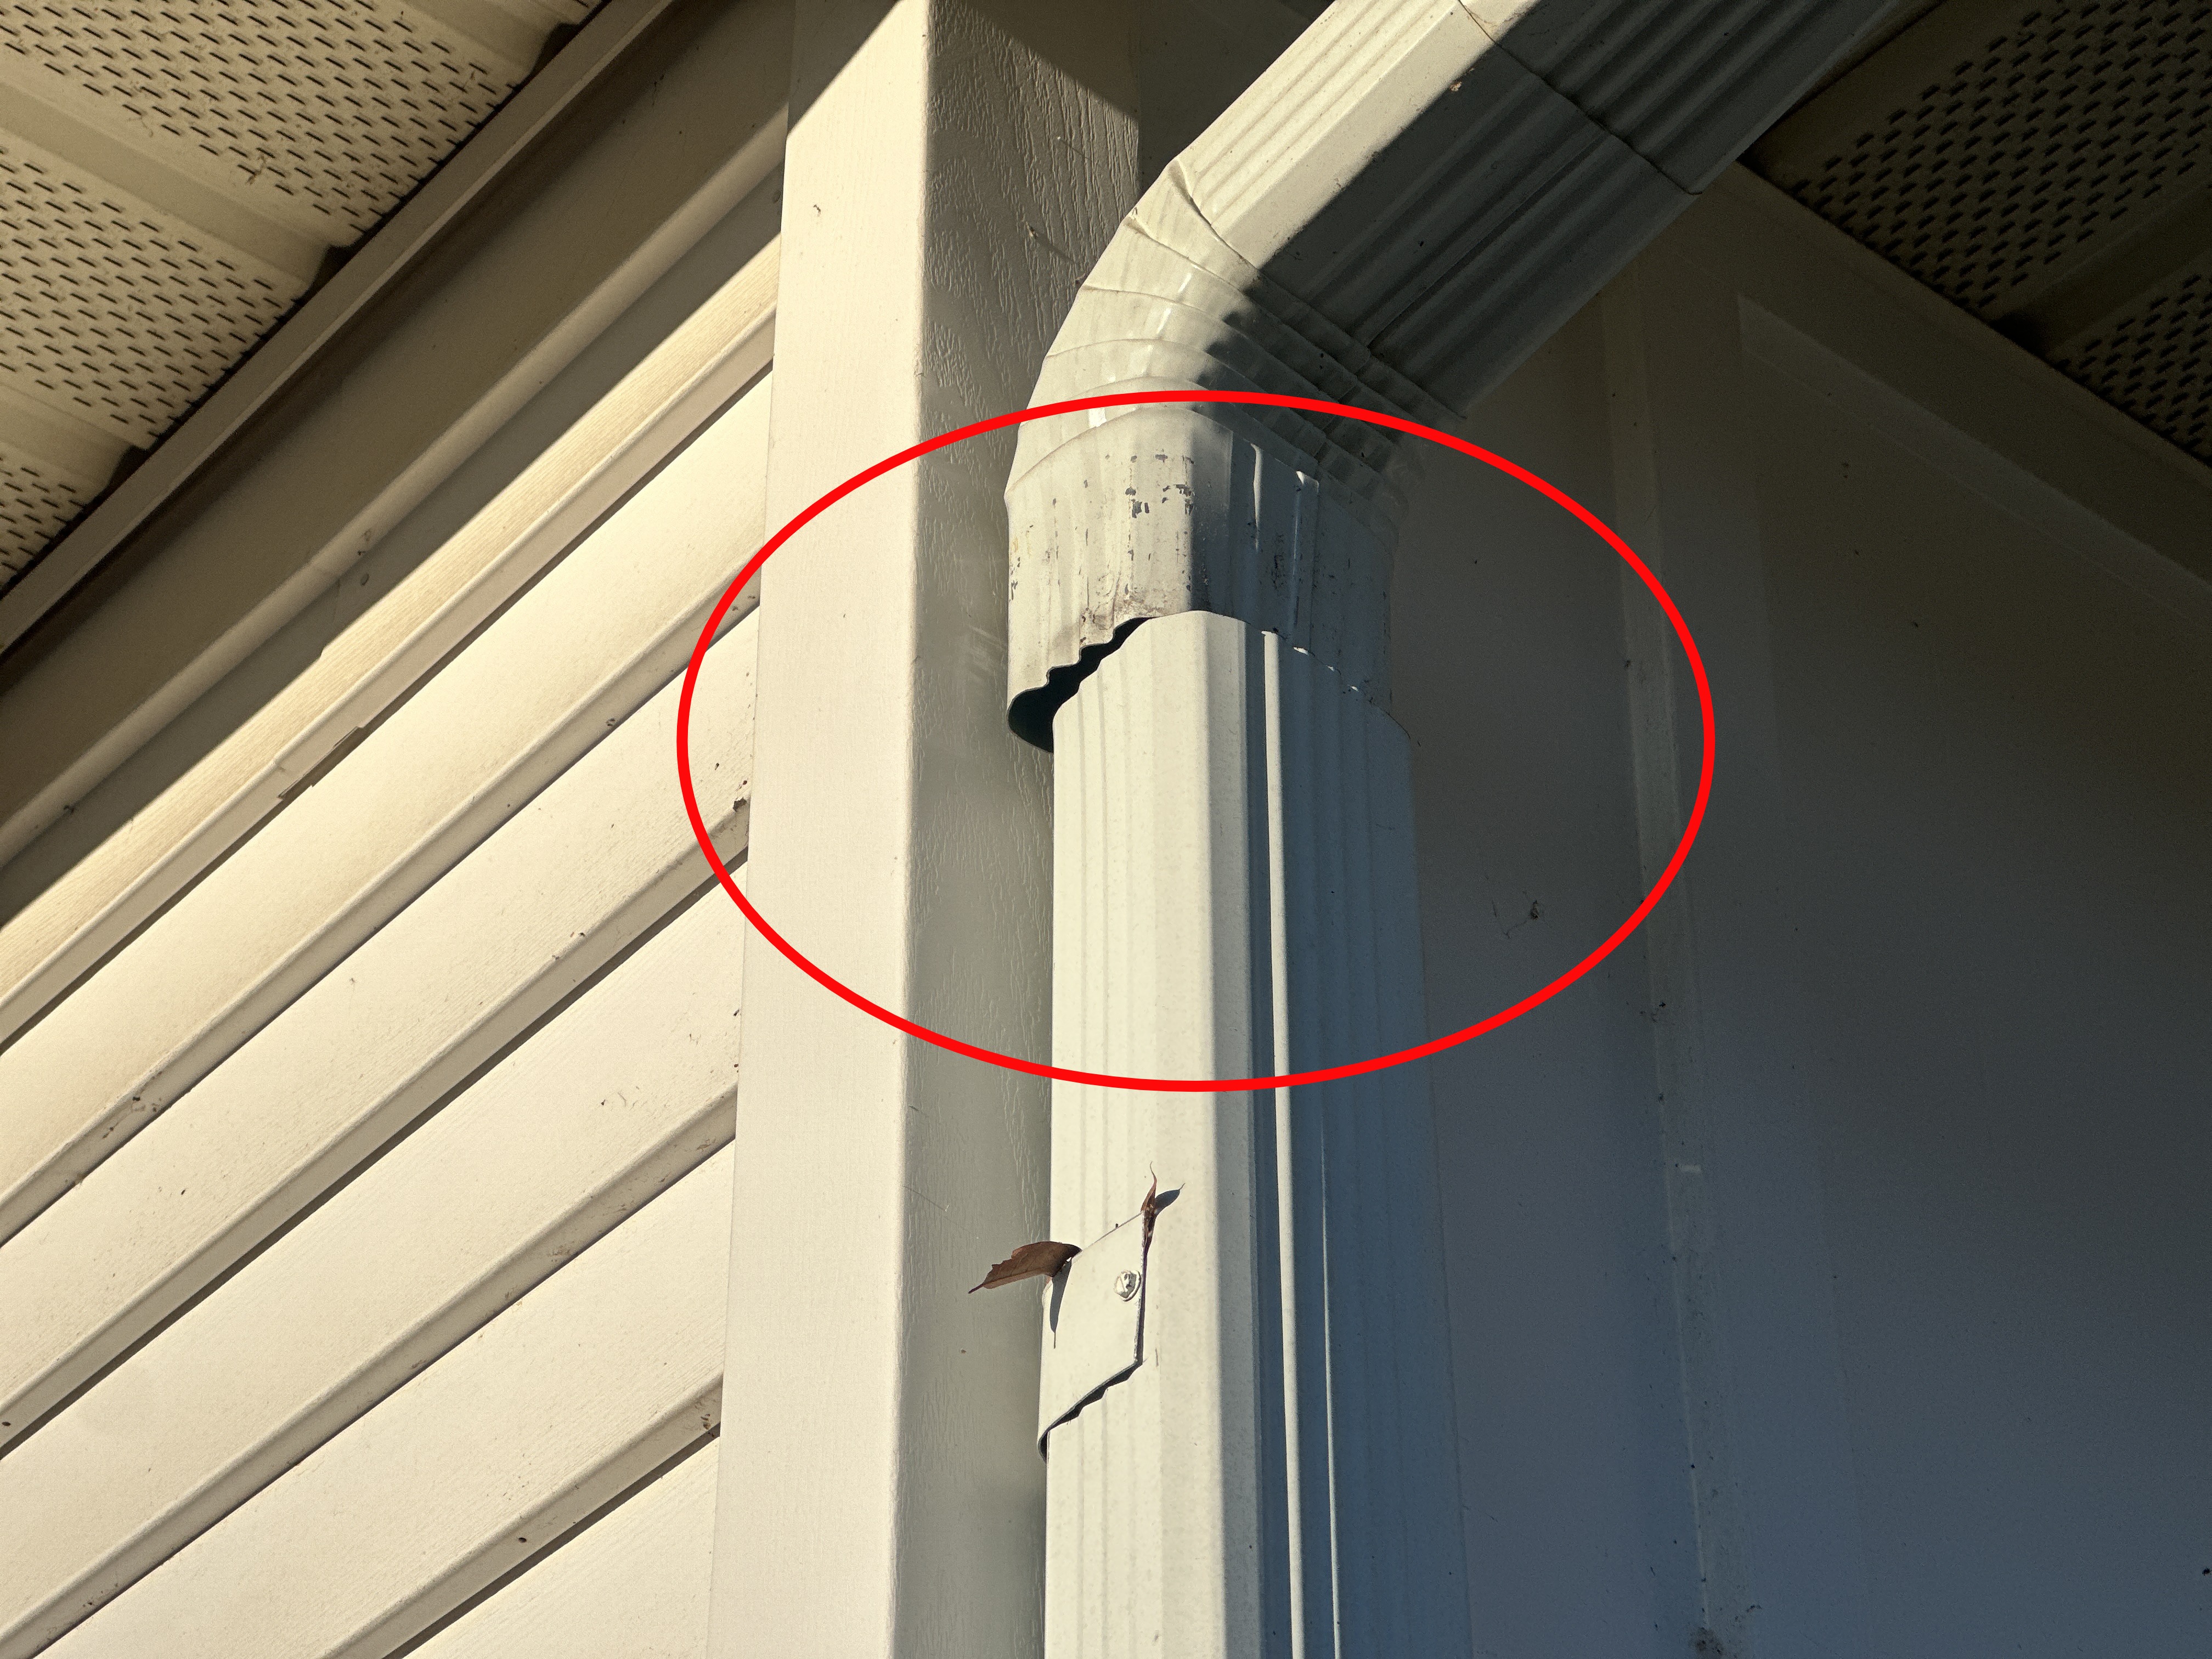
Gutter and Downspout Materials: Seamless Aluminum
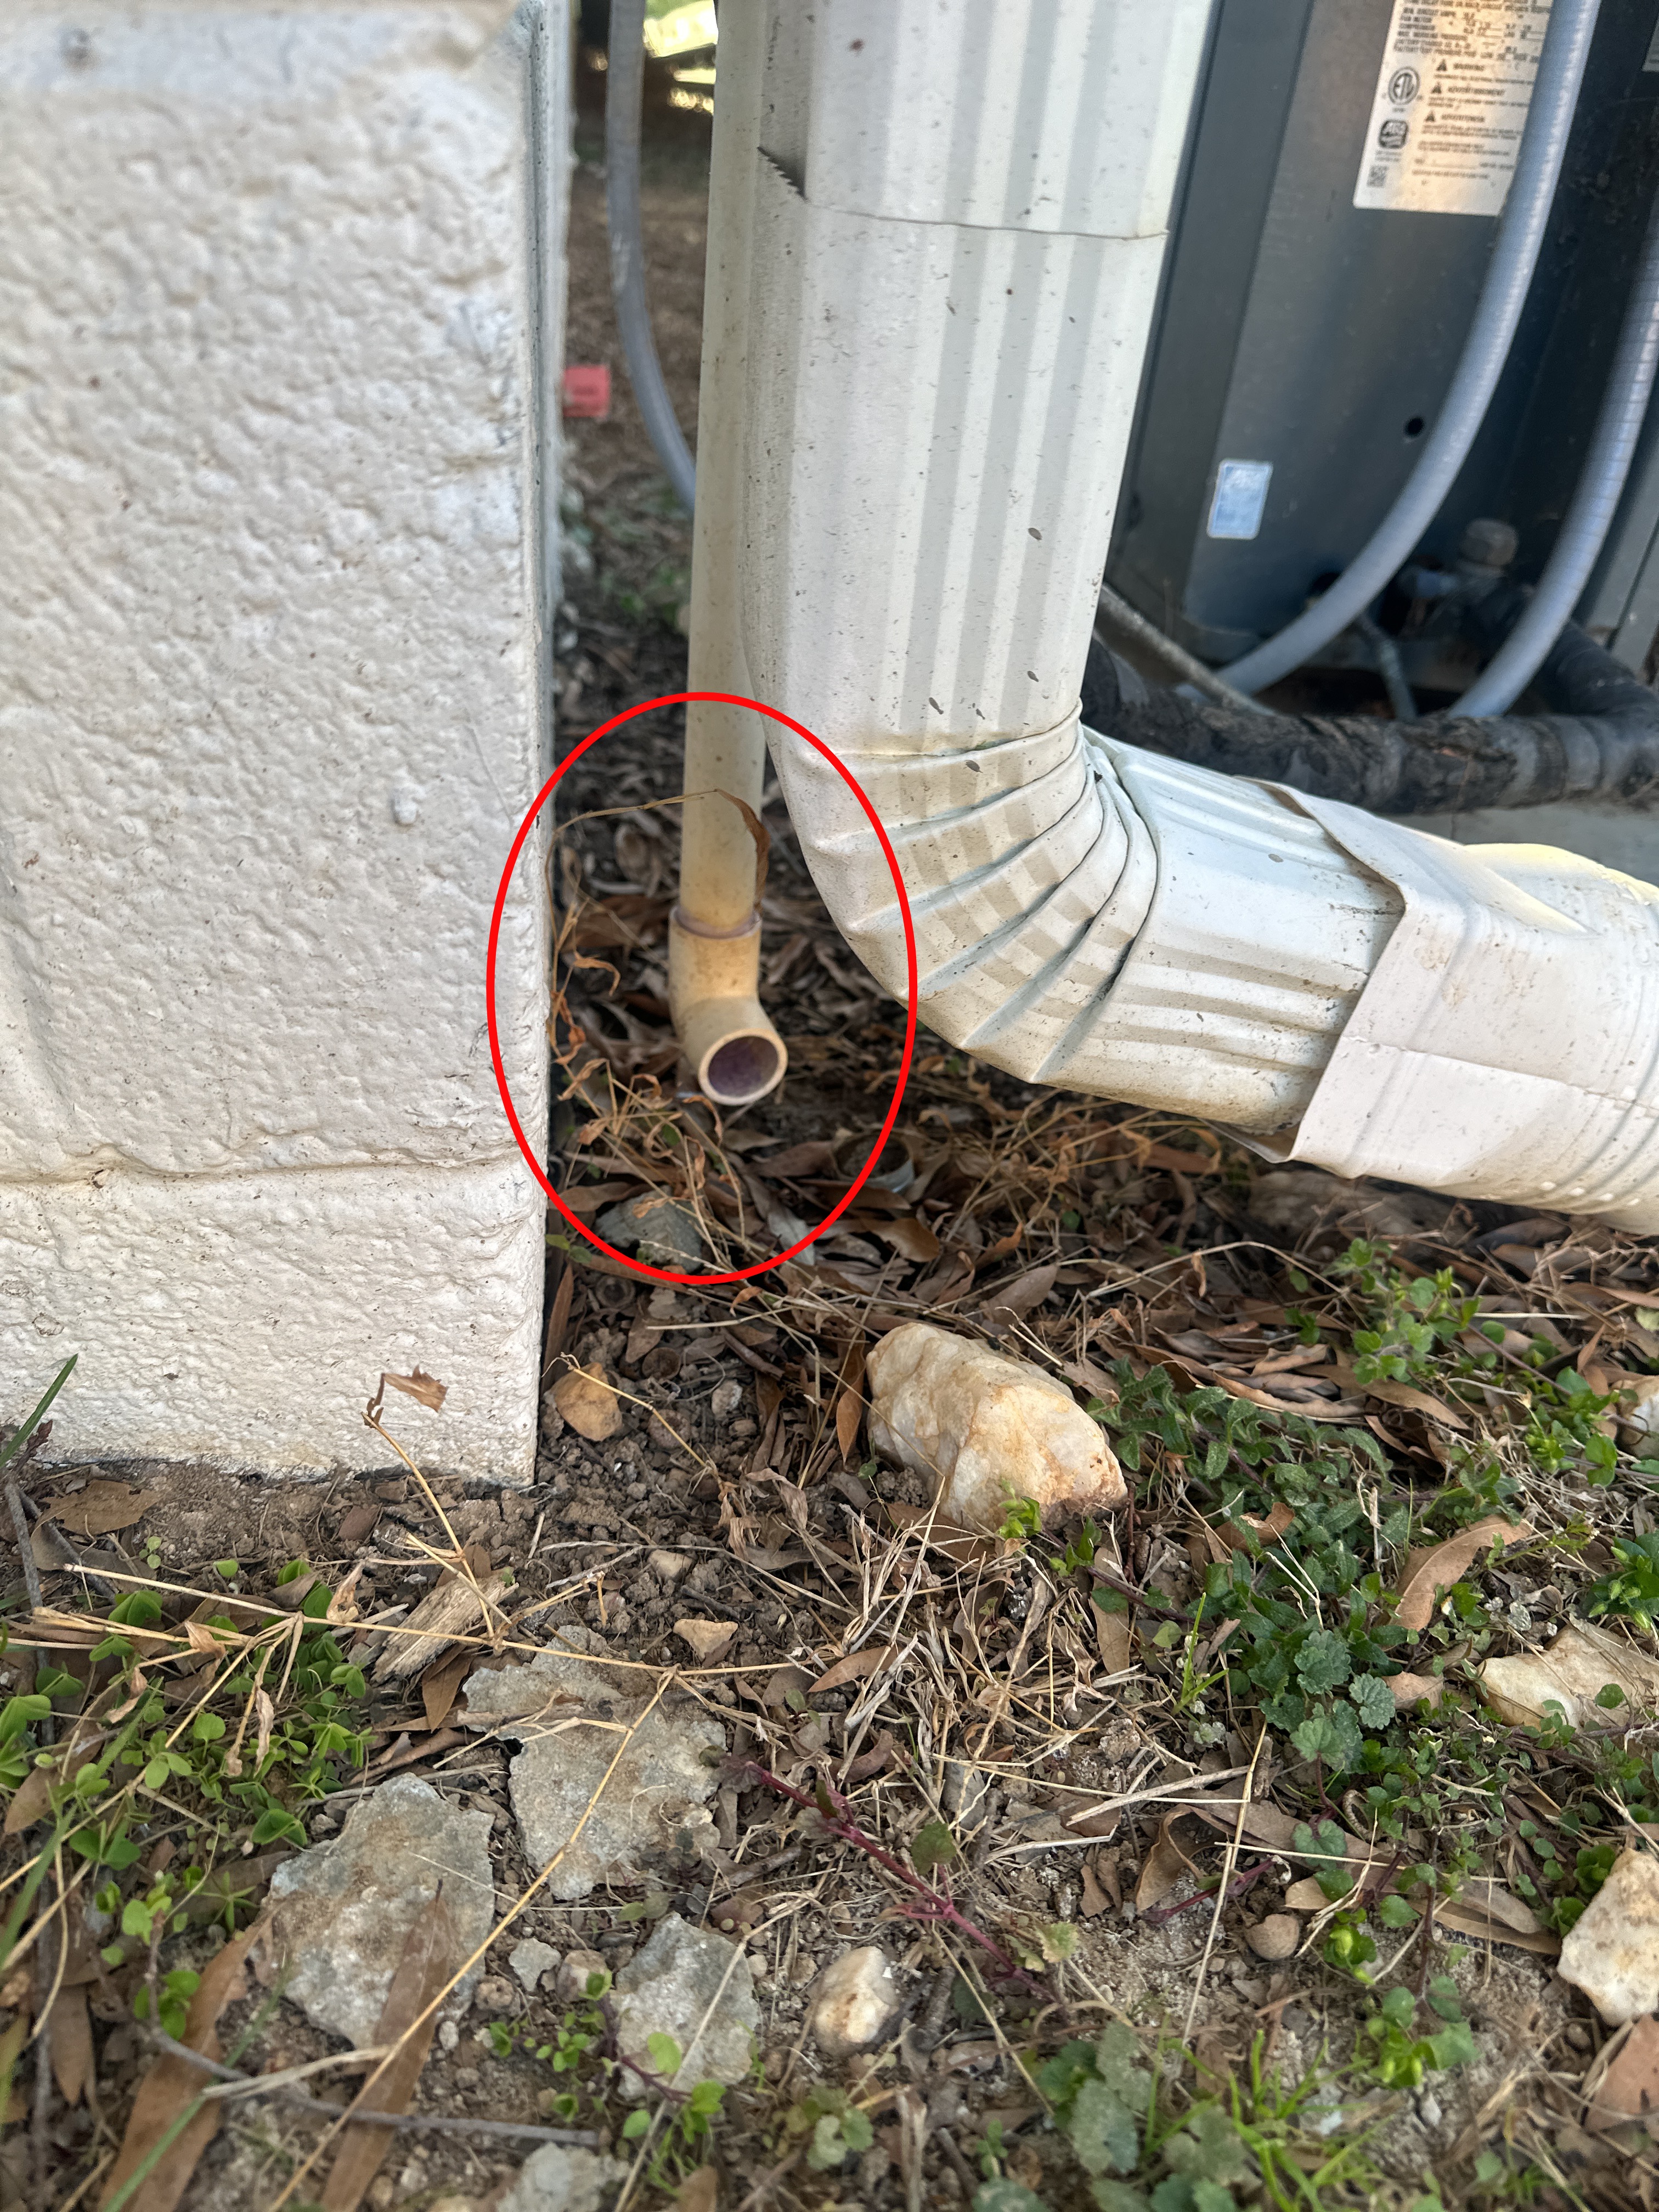
One downspout at the front of the house was found to be disconnected. I recommend the reconnection of this downspout to ensure water is carried away from the residence, and not deposited on the siding.
 |
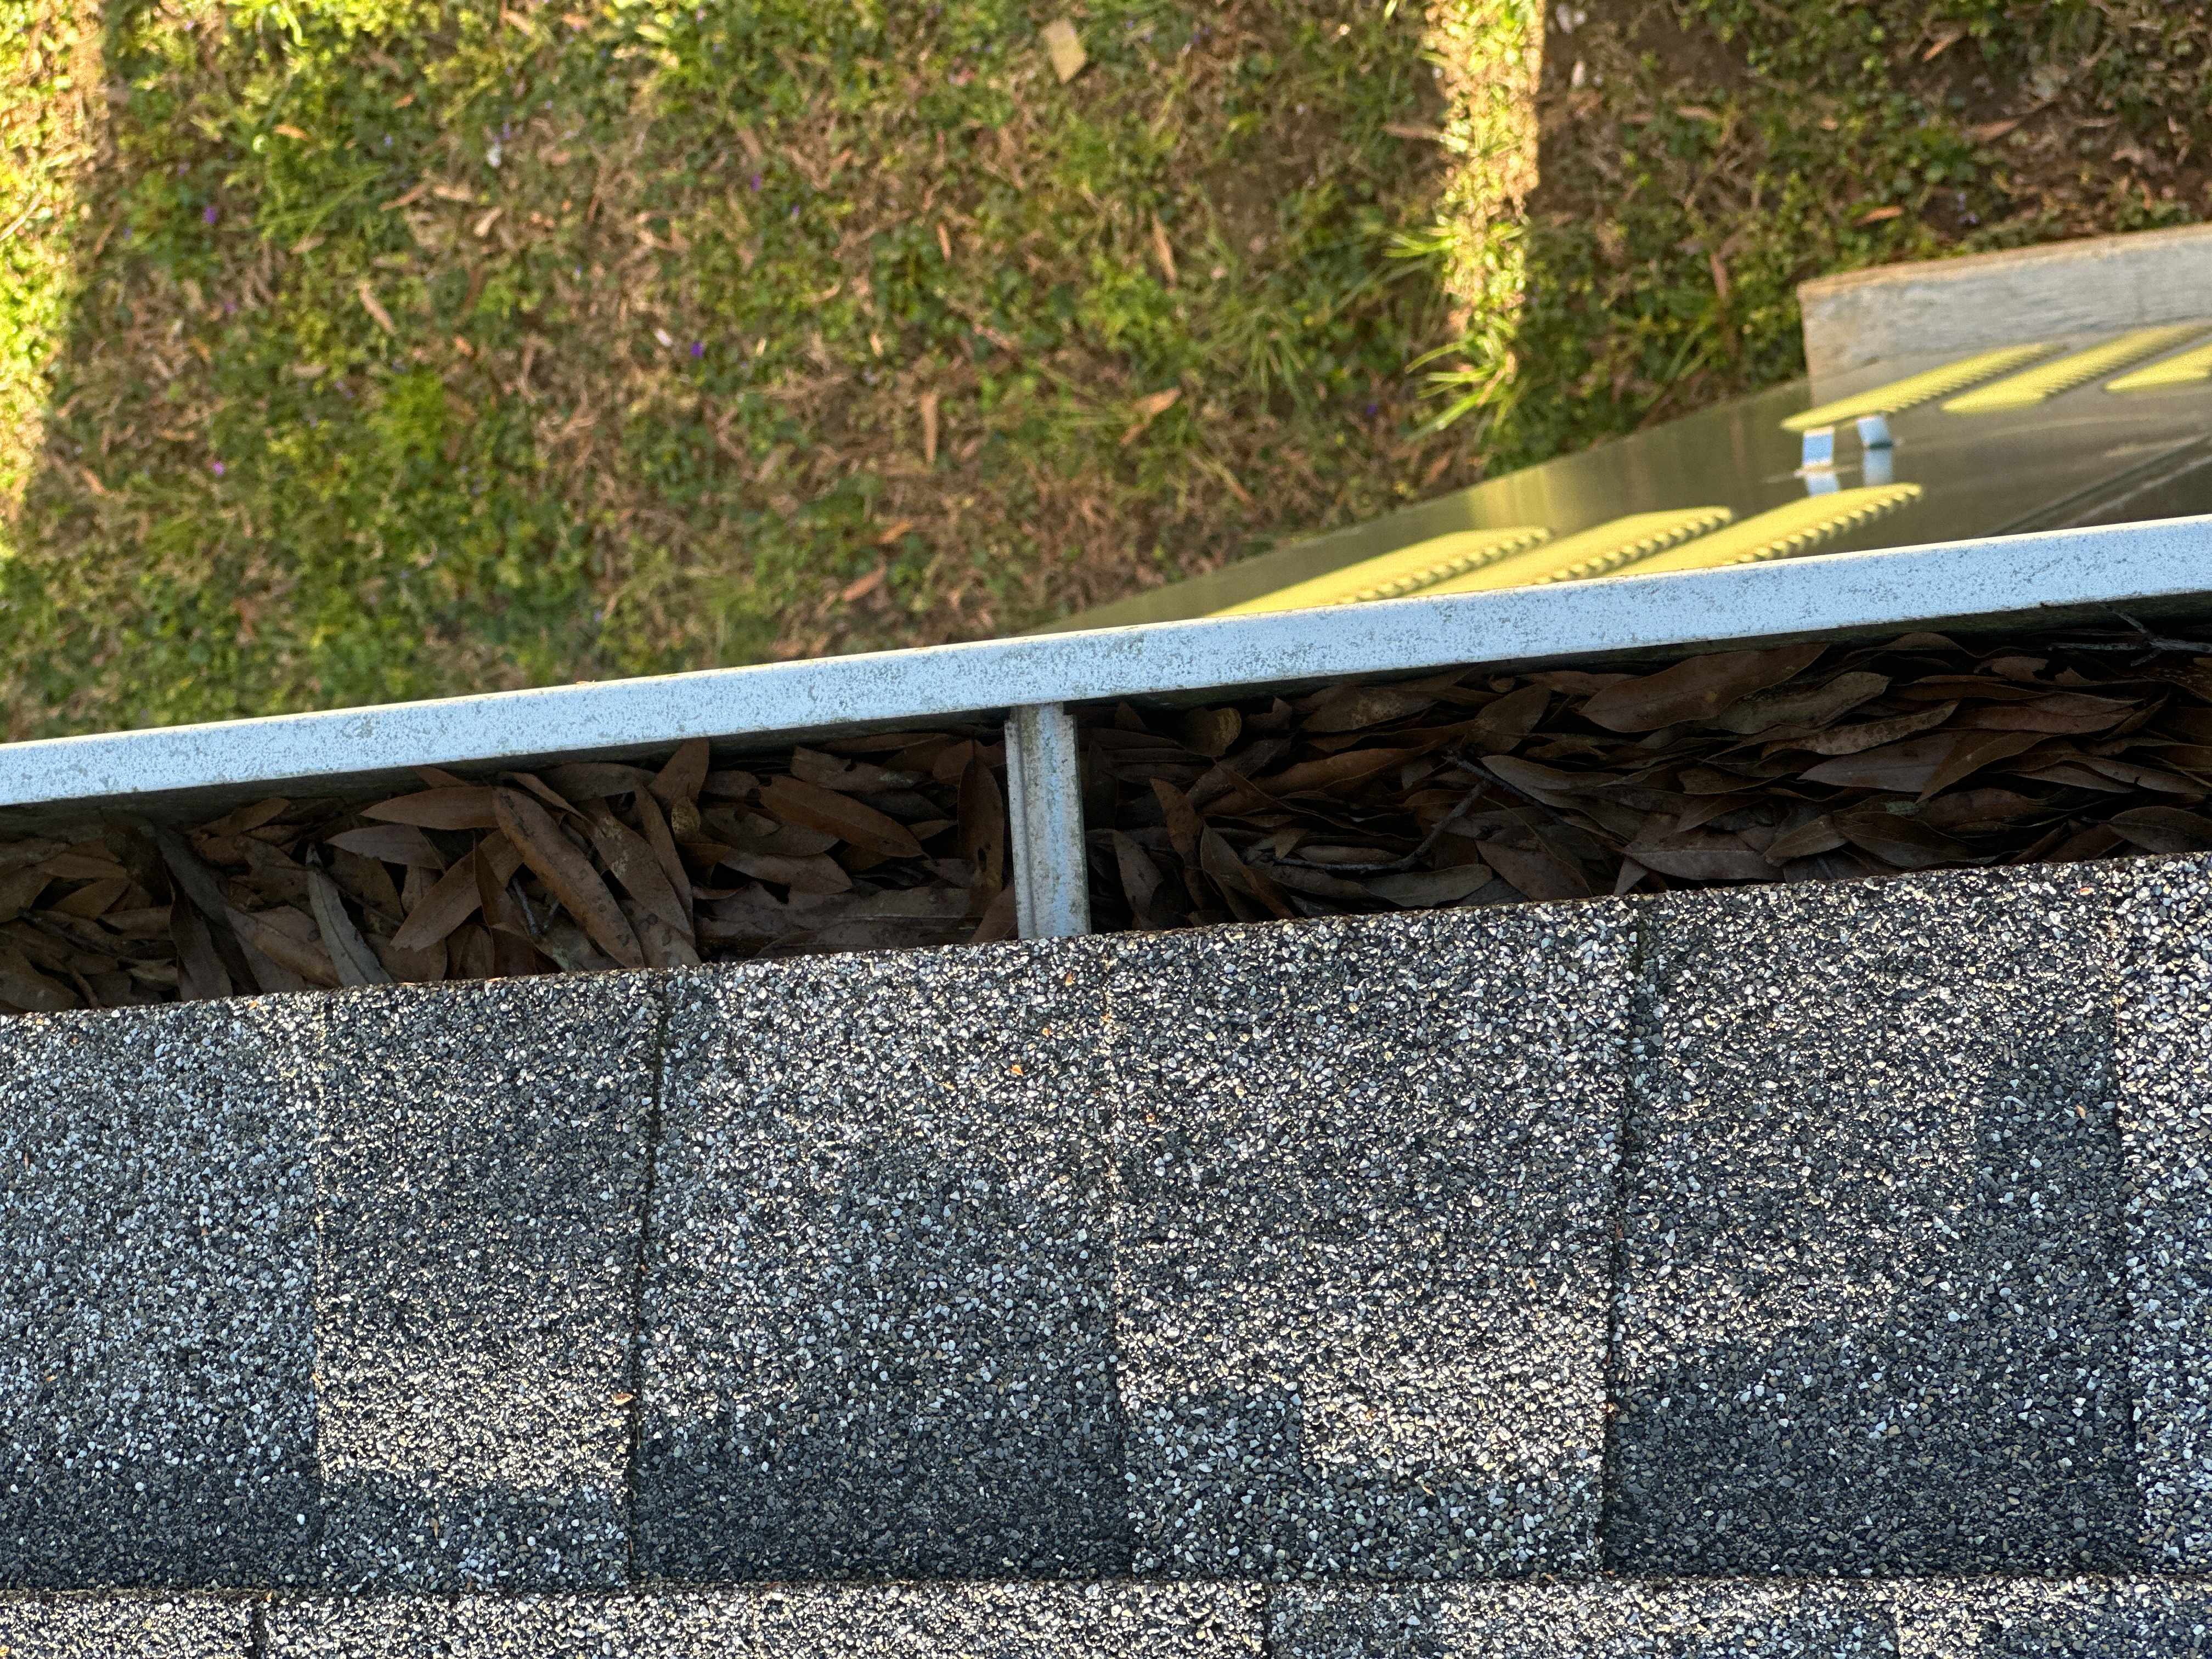
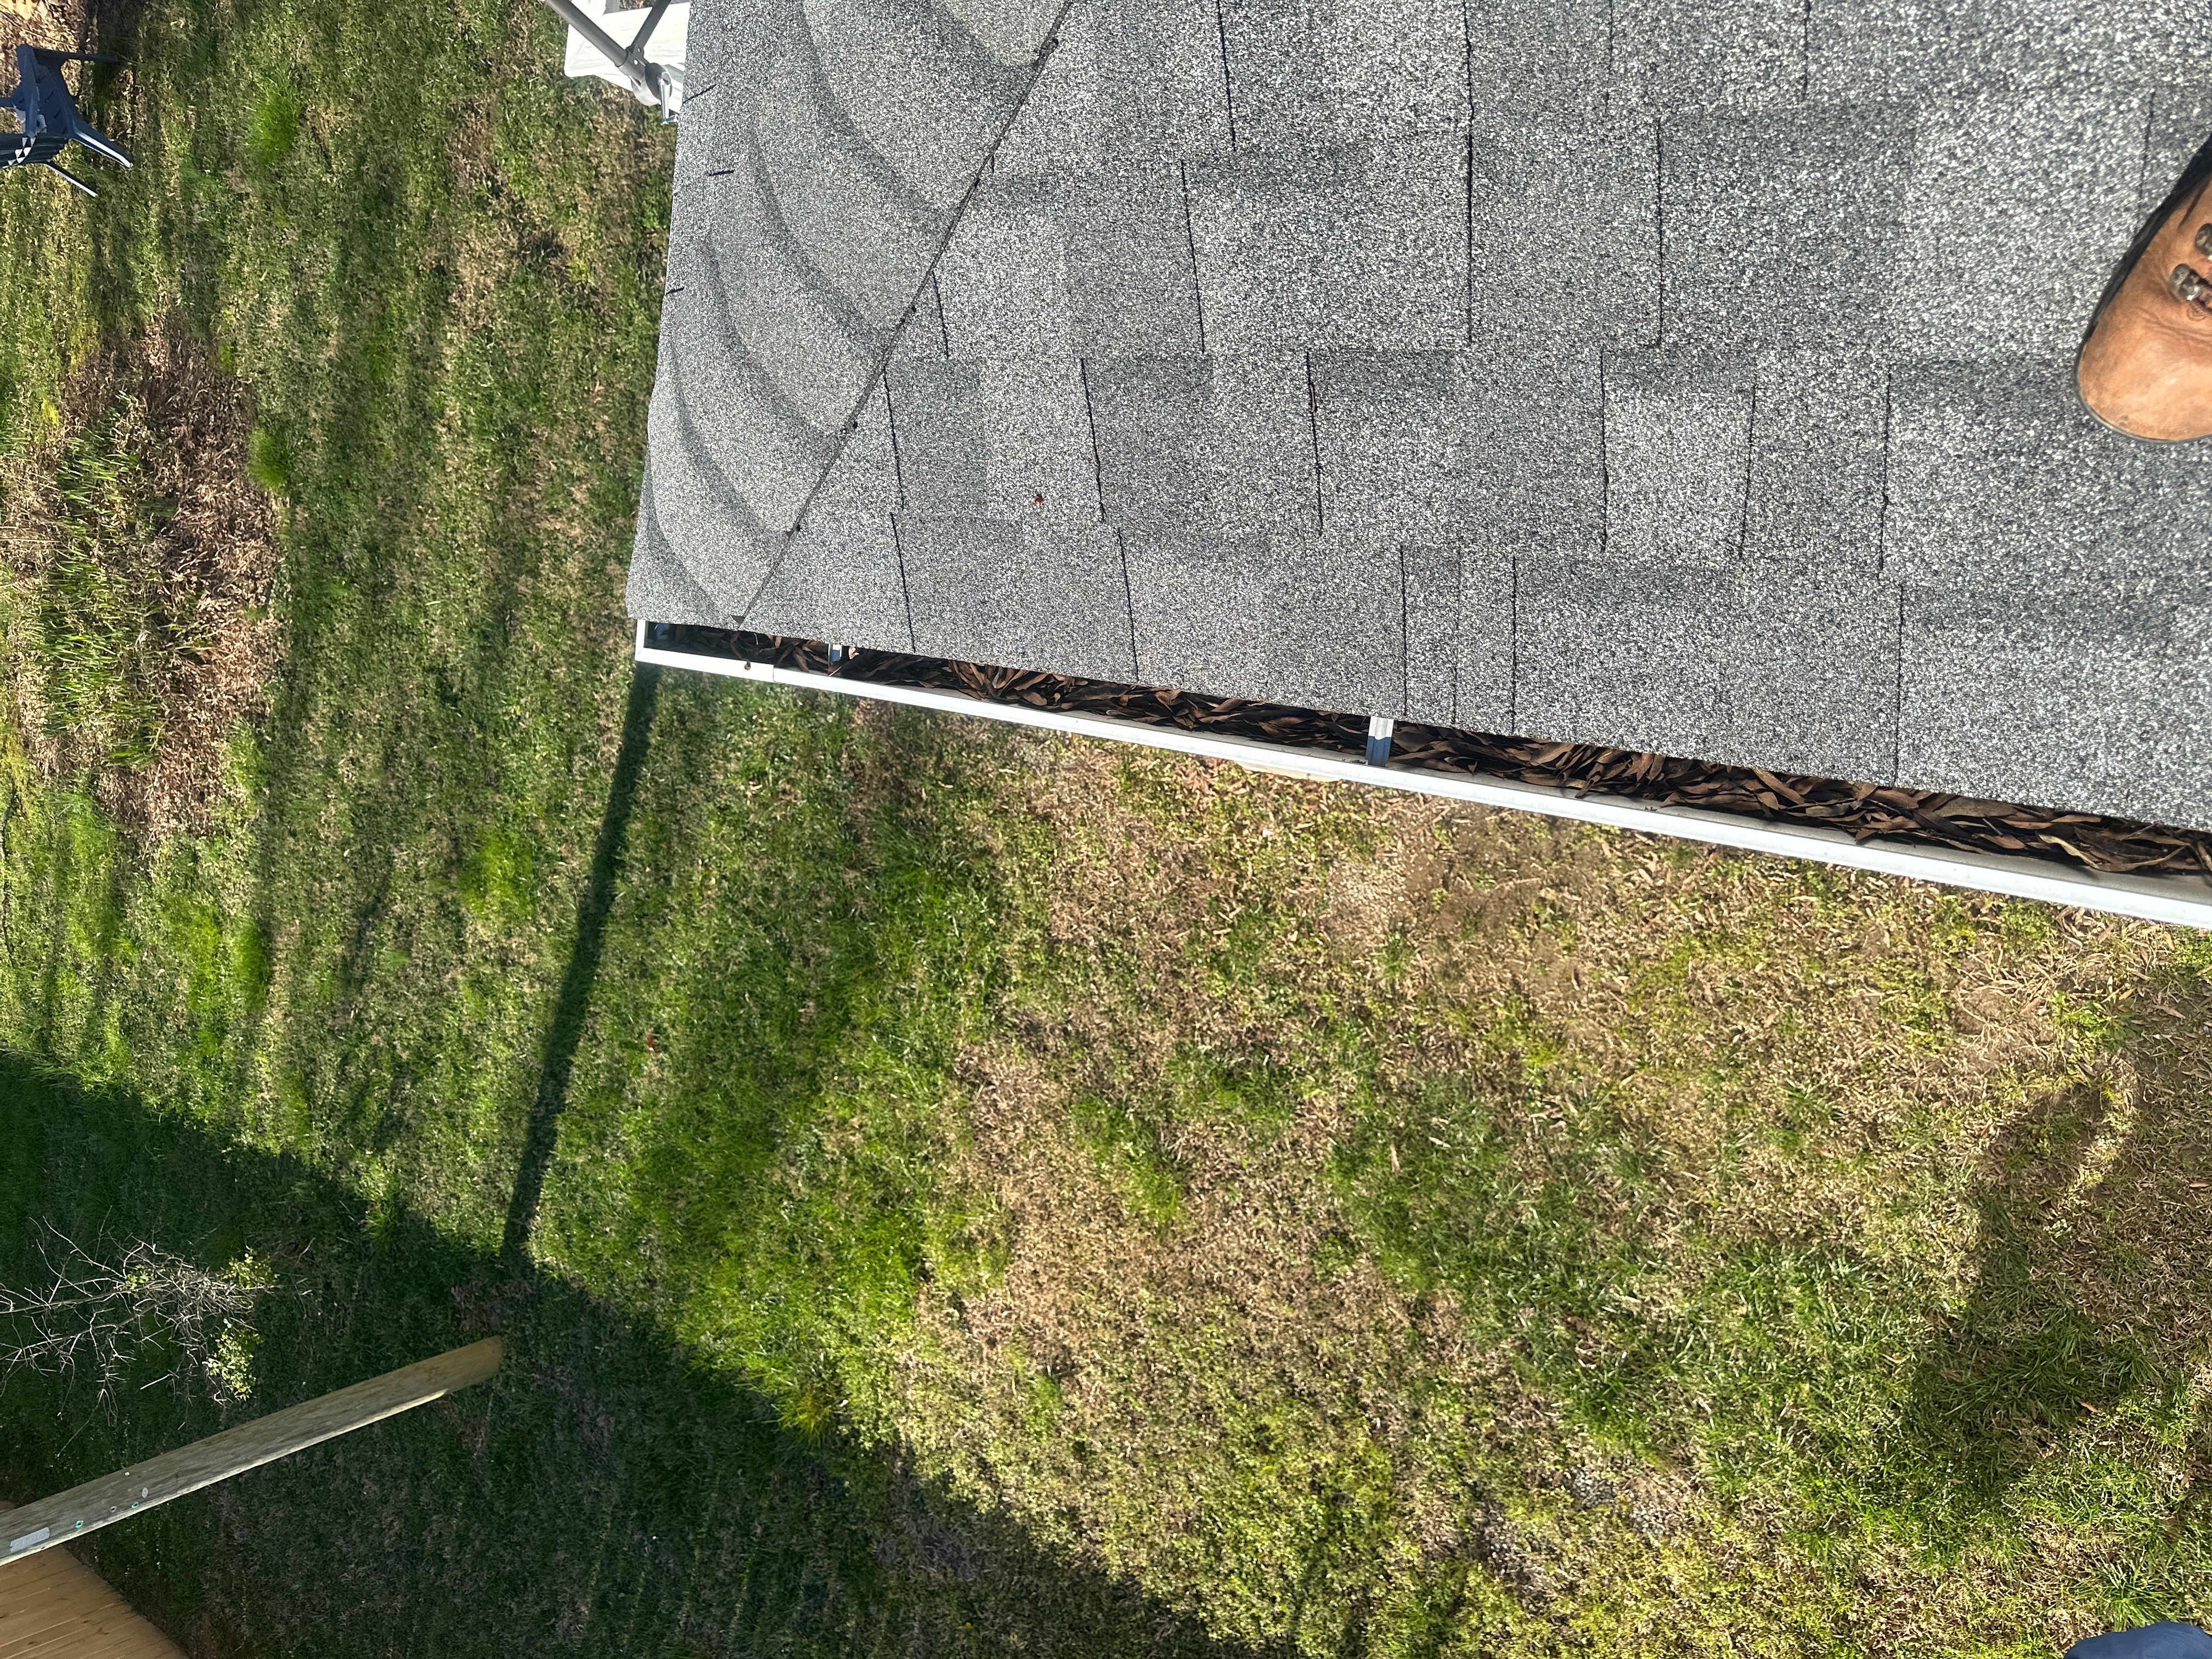
The gutters are clogged with organic debris and require cleaning to ensure proper control of roof runoff. Clean the gutters and ensure they are unobstructed, leak free and properly sloped to drain. This is routine house maintenance; I would expect the need to clean gutters and downspouts regularly.
 |  |
 |
Fuel Storage and Distribution
Oil Storage
None noted
Propane Storage
None noted
Gas Meter
Present
Gas Shutoff Location: East side of structure
Gas Pipe Materials: Steel
There is a gas shutoff located at the meter. See the photo(s) for details.
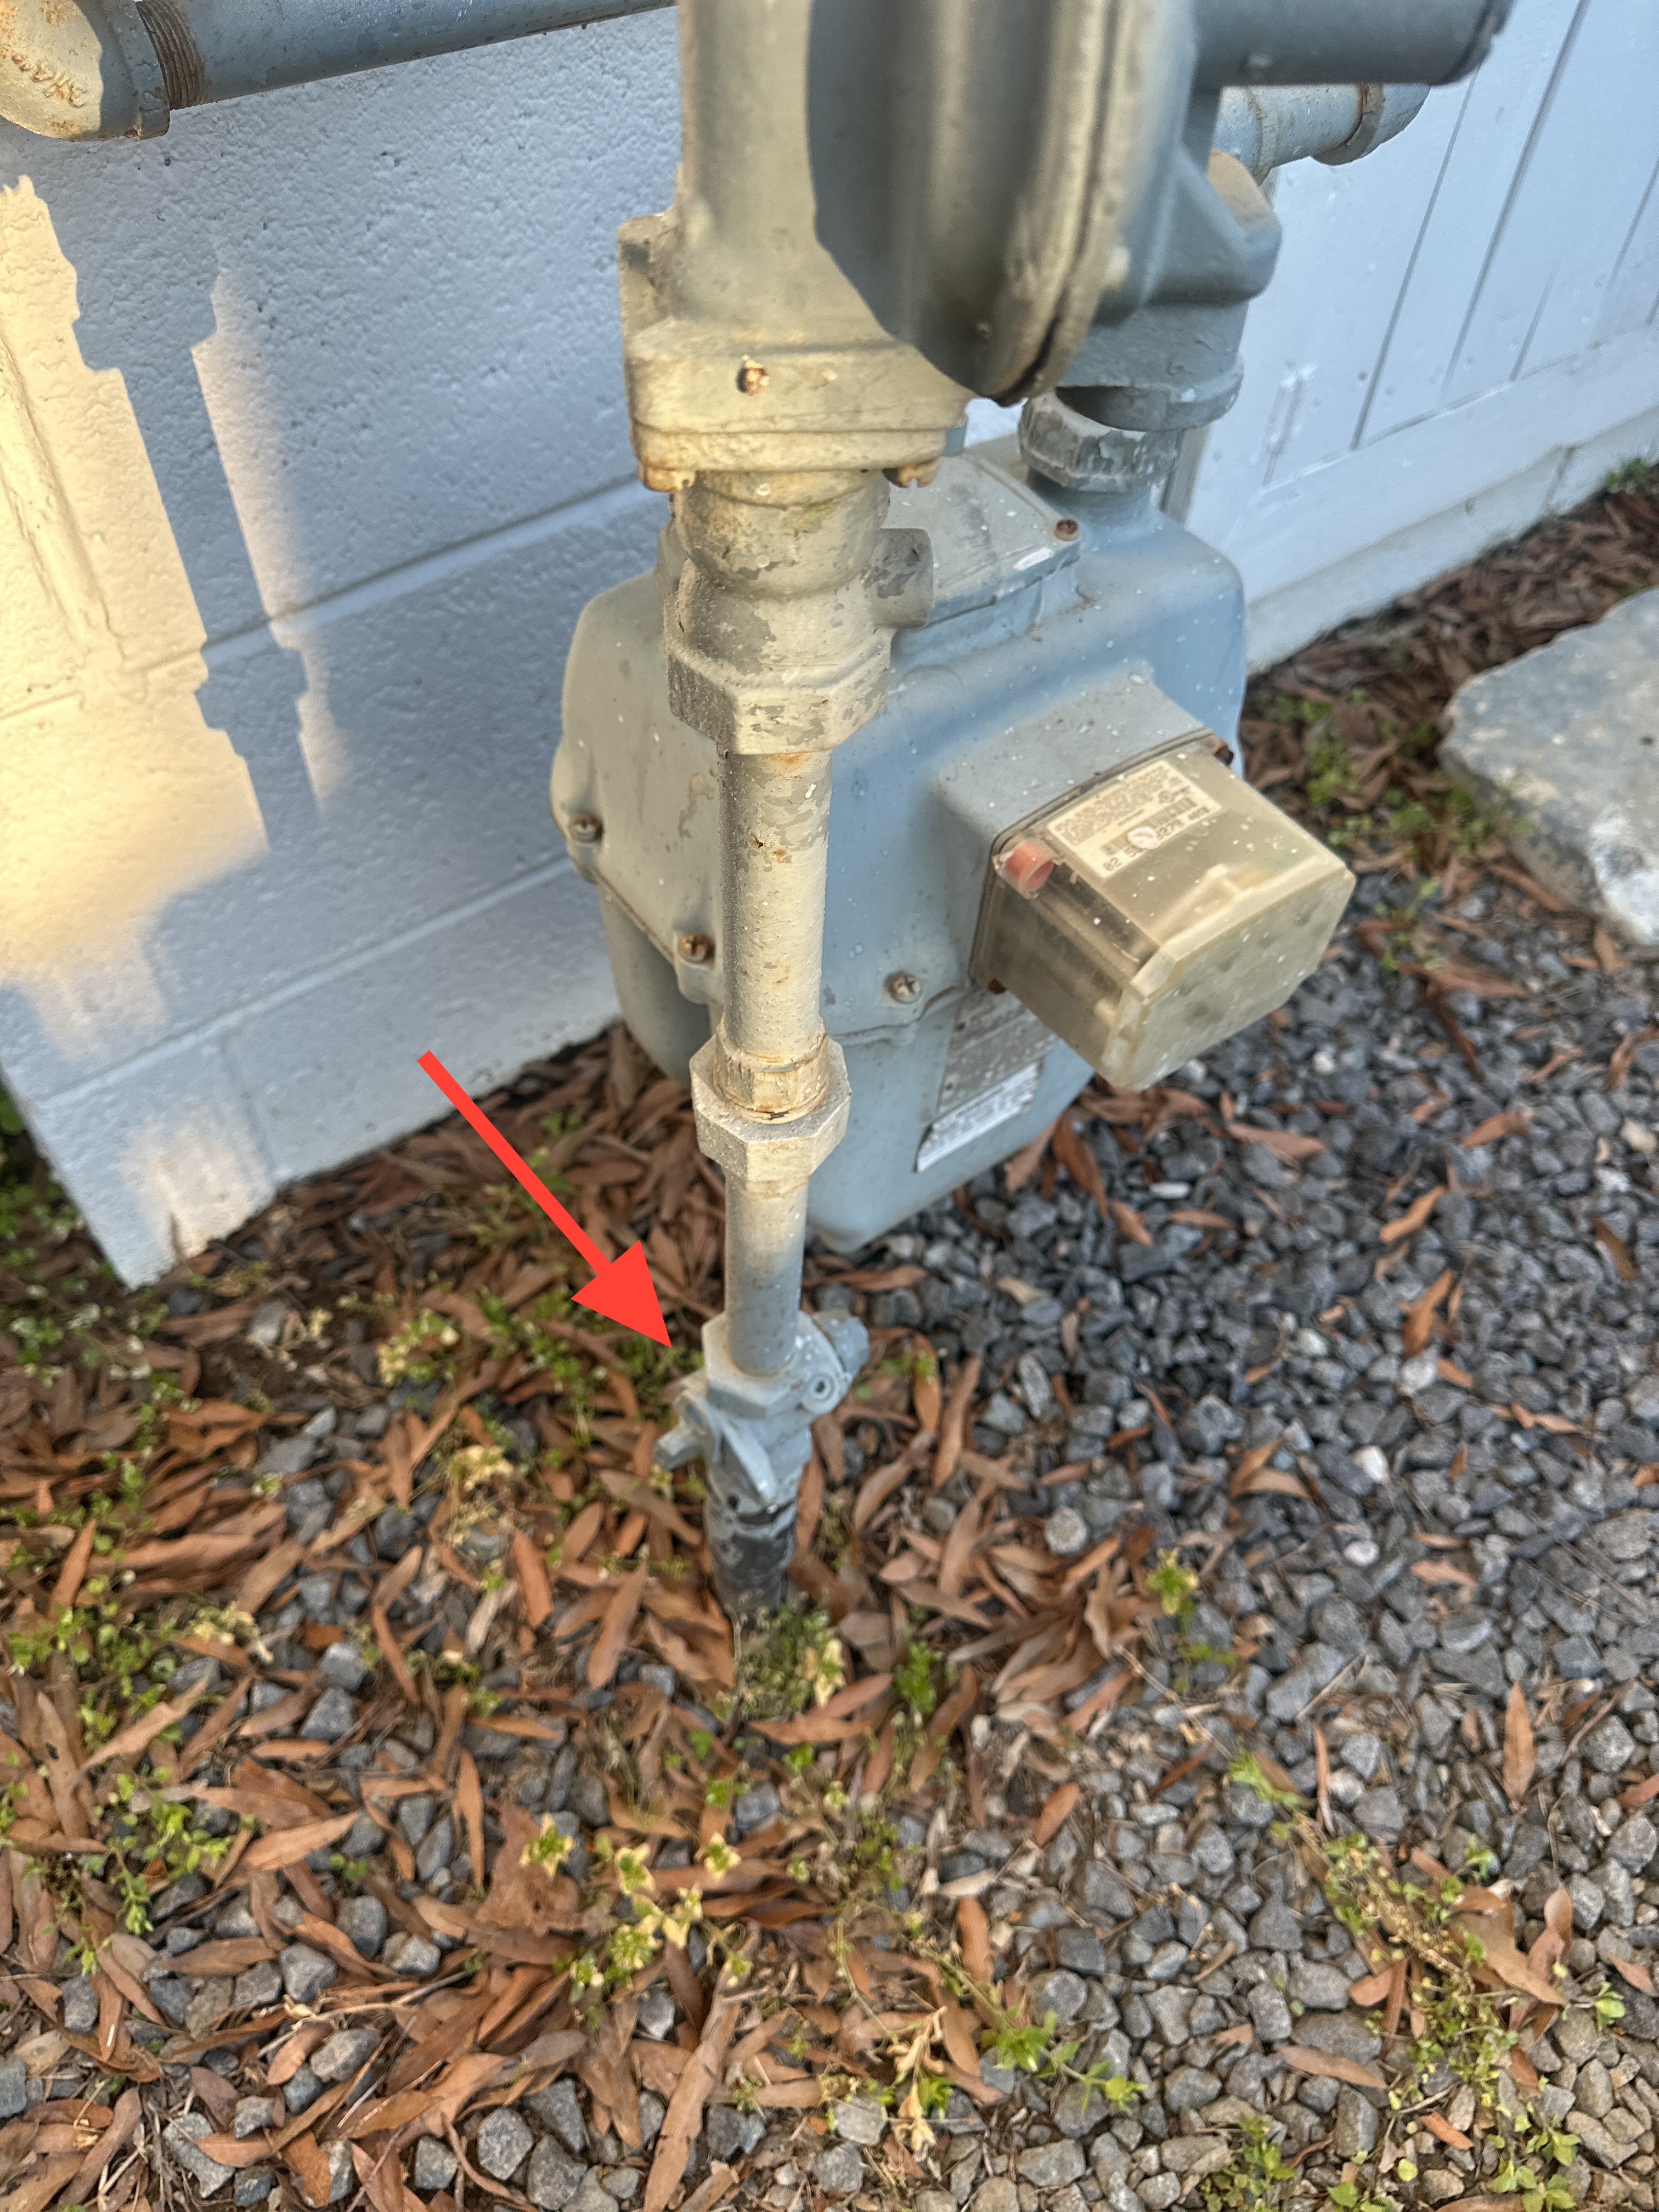 |
The piping leading to or from the gas meter was noted to have some rust on it. The piping between the meter and the residence is the responsibility of the homeowner. I recommend cleaning the rust off the pipe with a wire brush and painting the pipe a matching color. If rust is noted on the pipe before the meter or on the meter itself, contact your gas company for maintenance.
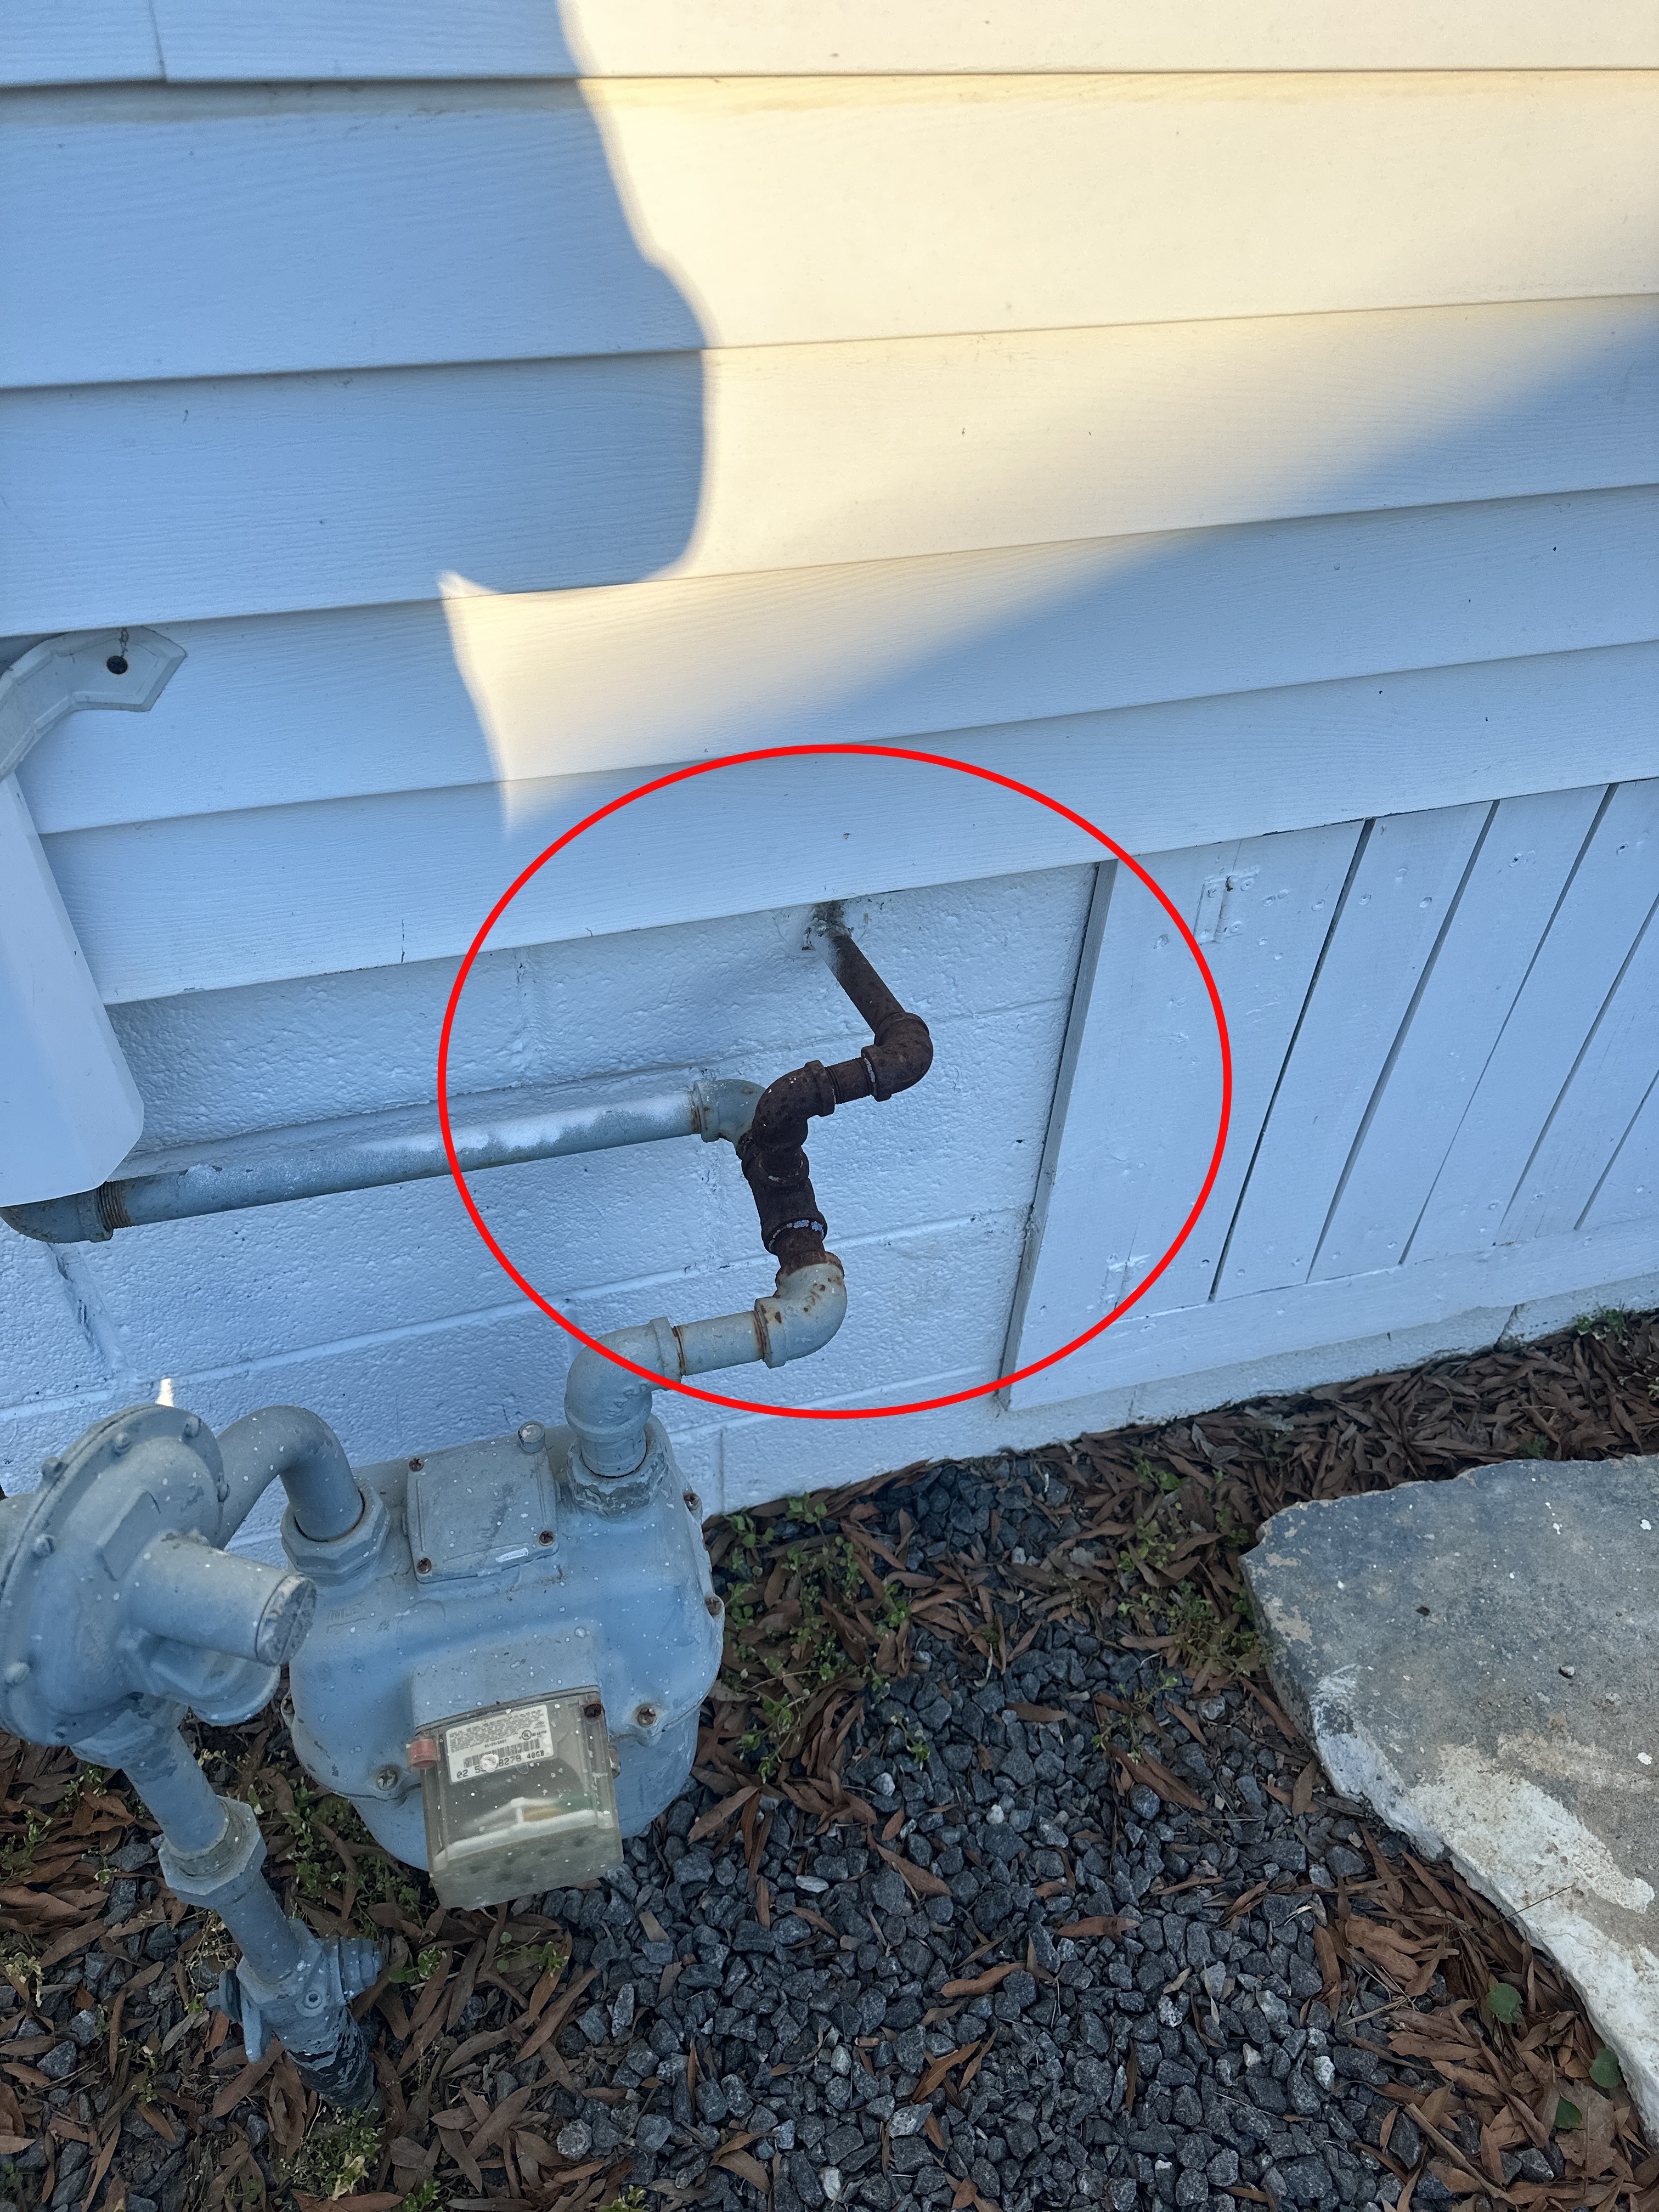 |
Gas, Propane and Oil Piping
Gas Piping Materials Noted: Steel
Electric Distribution and Finish Wiring
Branch Wiring
Wire Material: Copper
Wiring Method: Non-metallic sheathed cable
The open electrical junction box in the crawl space needs to be covered for improved safety. This is as simple as installing a cover plate over the box to protect the wiring. Sometimes, an extension ring is needed if finishes are covering the box. Repair as needed for improved safety.
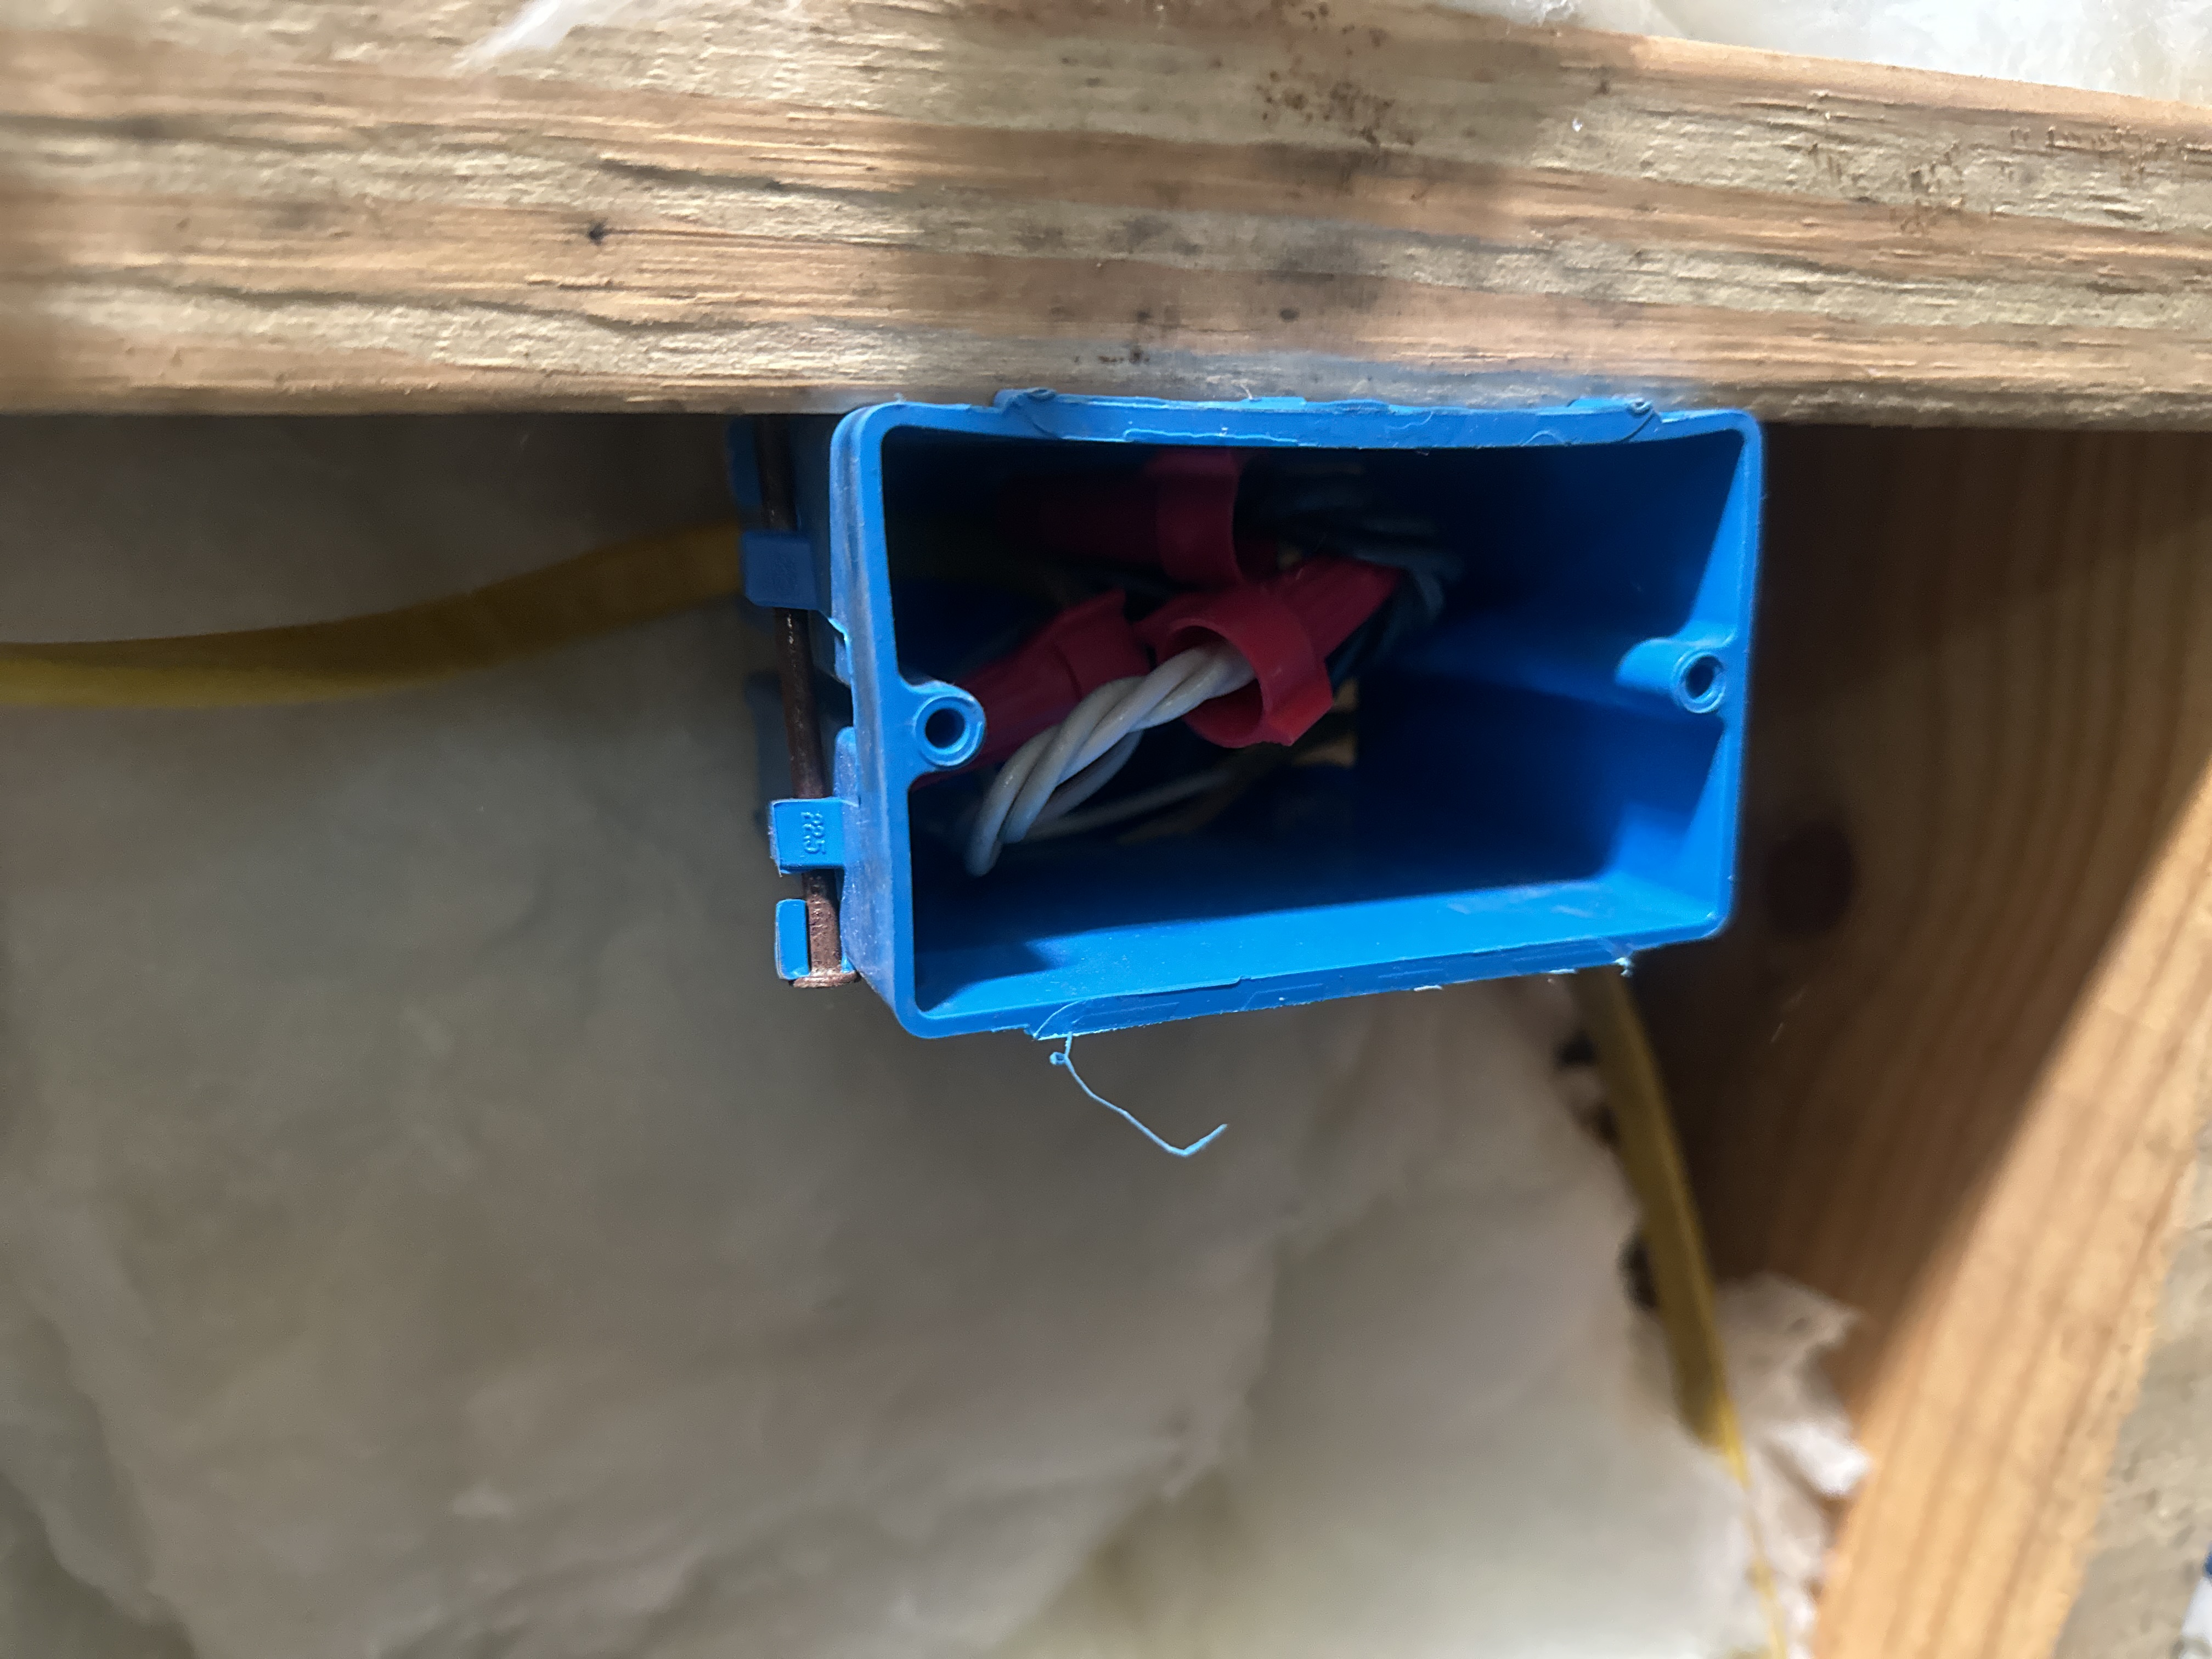 |
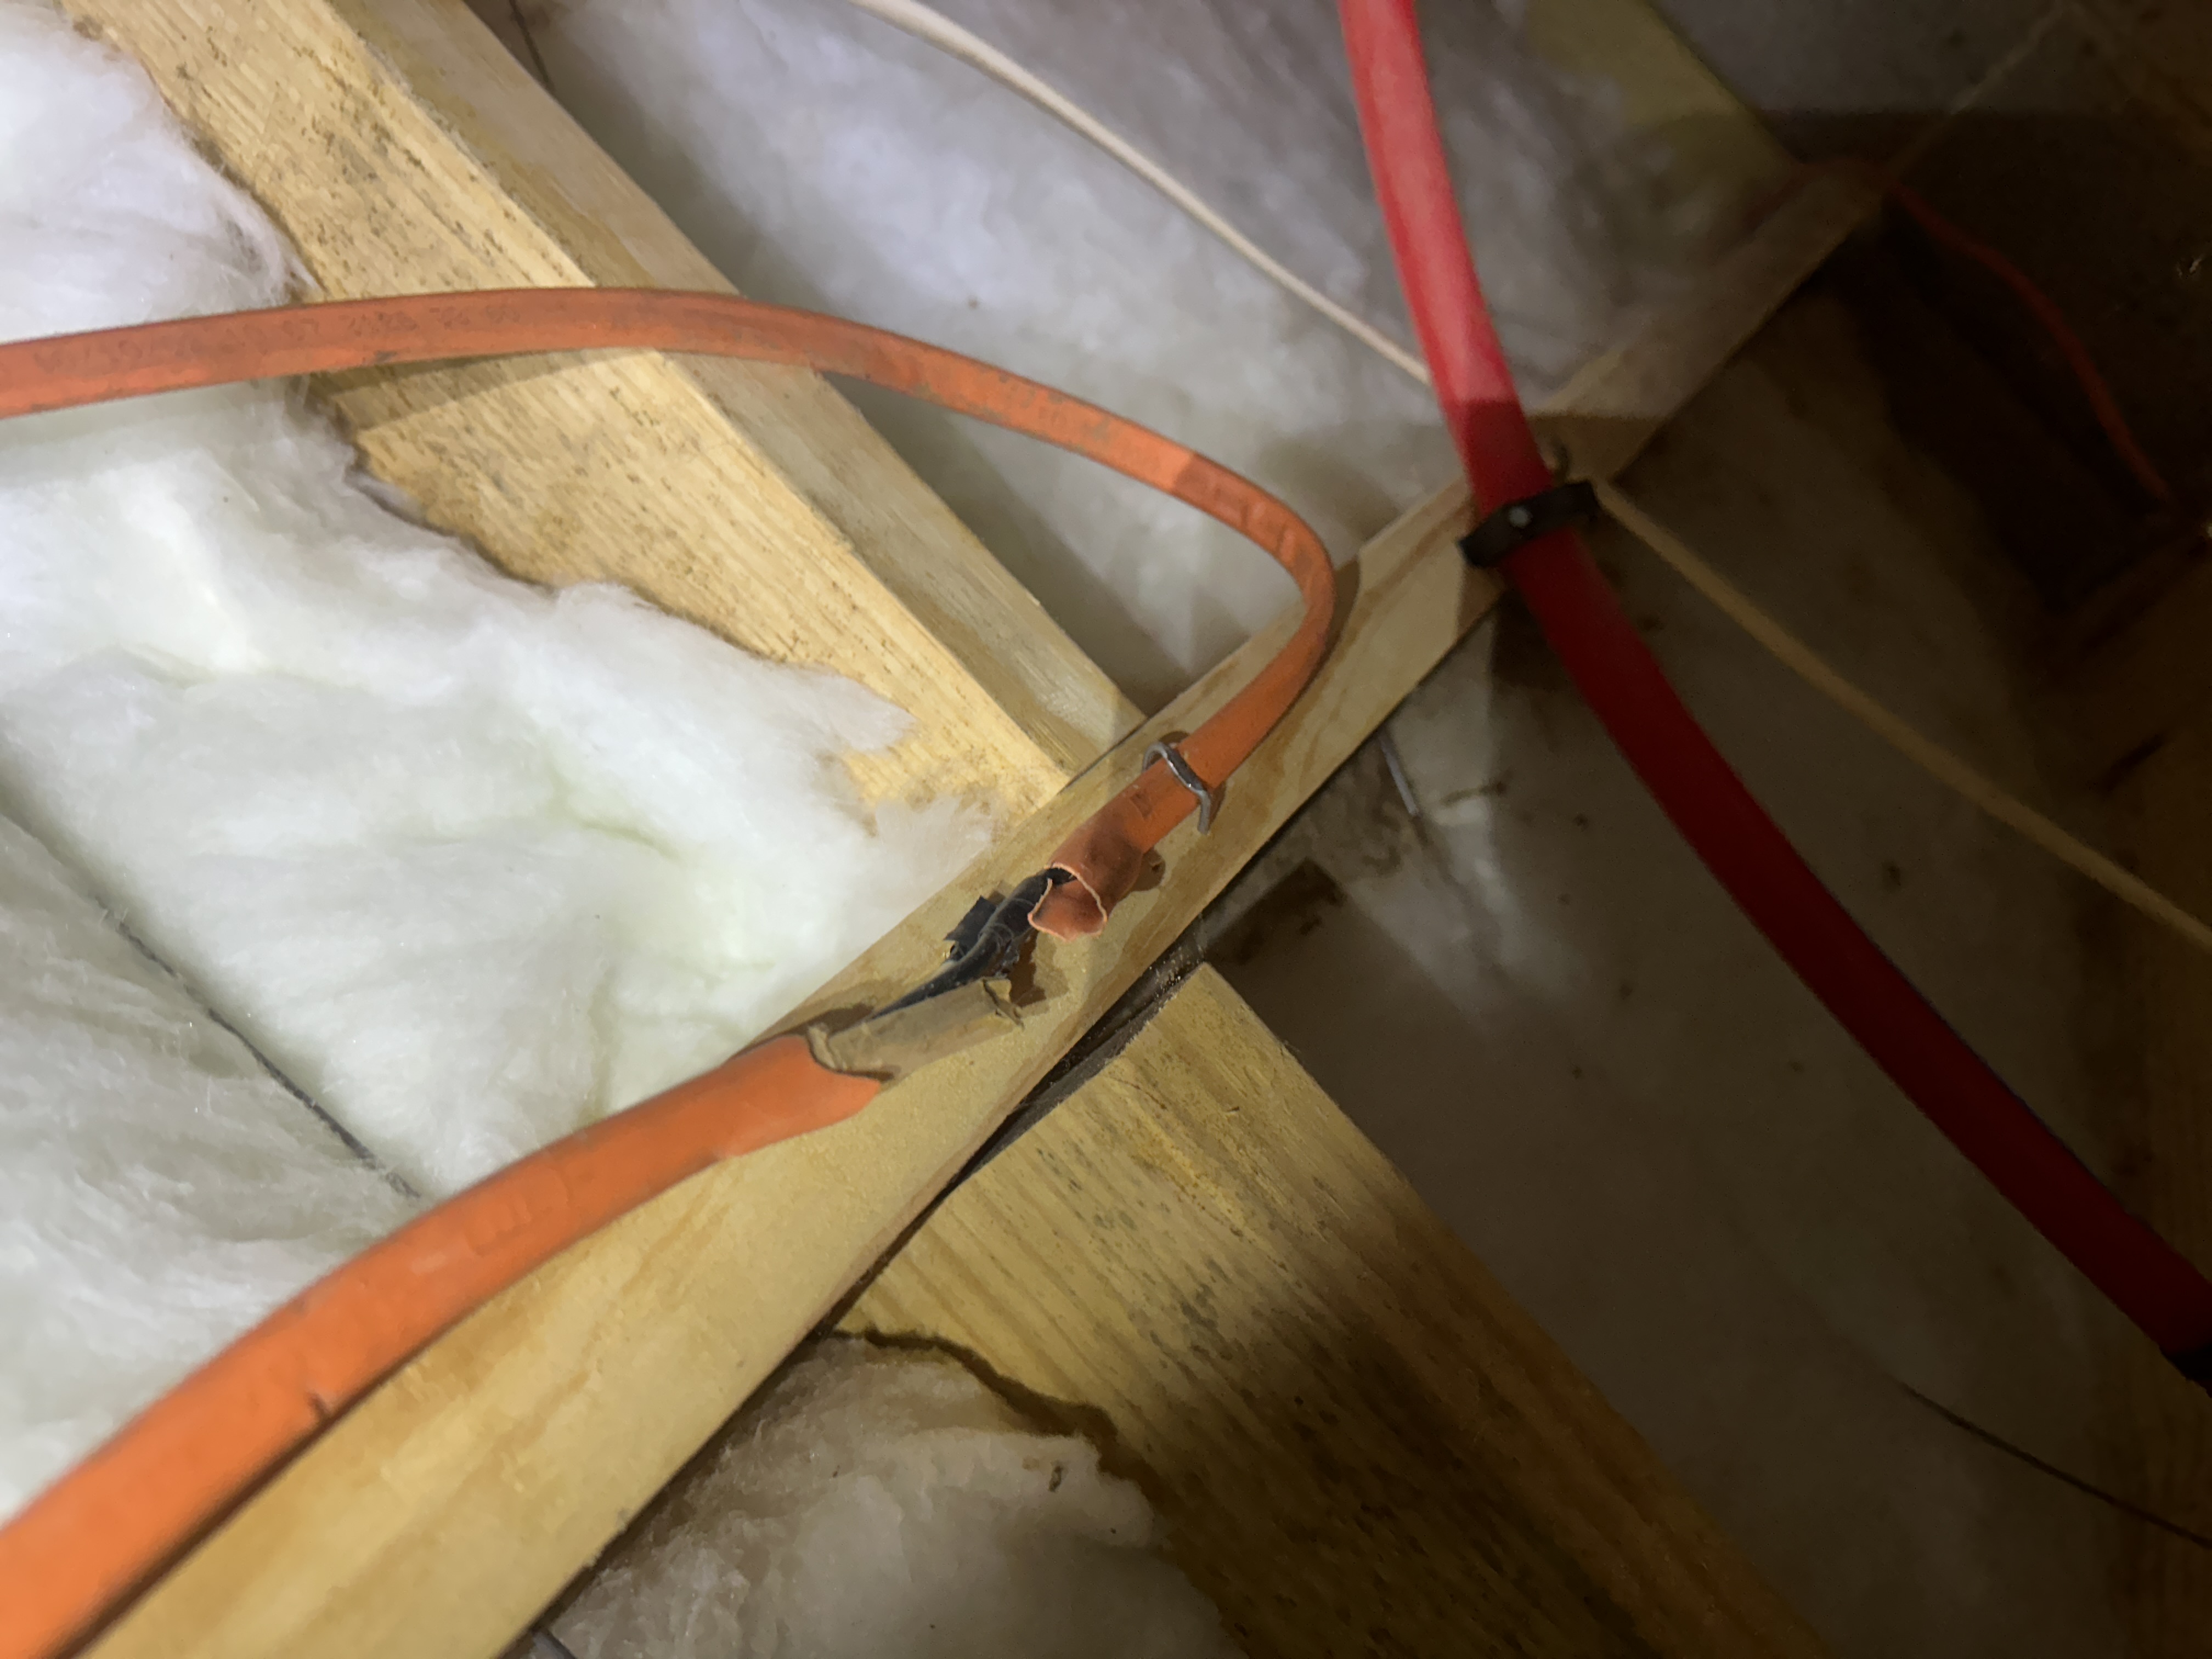
The non-metallic sheathed cable is poorly supported and requires staples or hangers for additional support and strain relief in the attic and crawlspace. This type of wiring should be supported every 4 feet and within 2 feet of junction boxes.
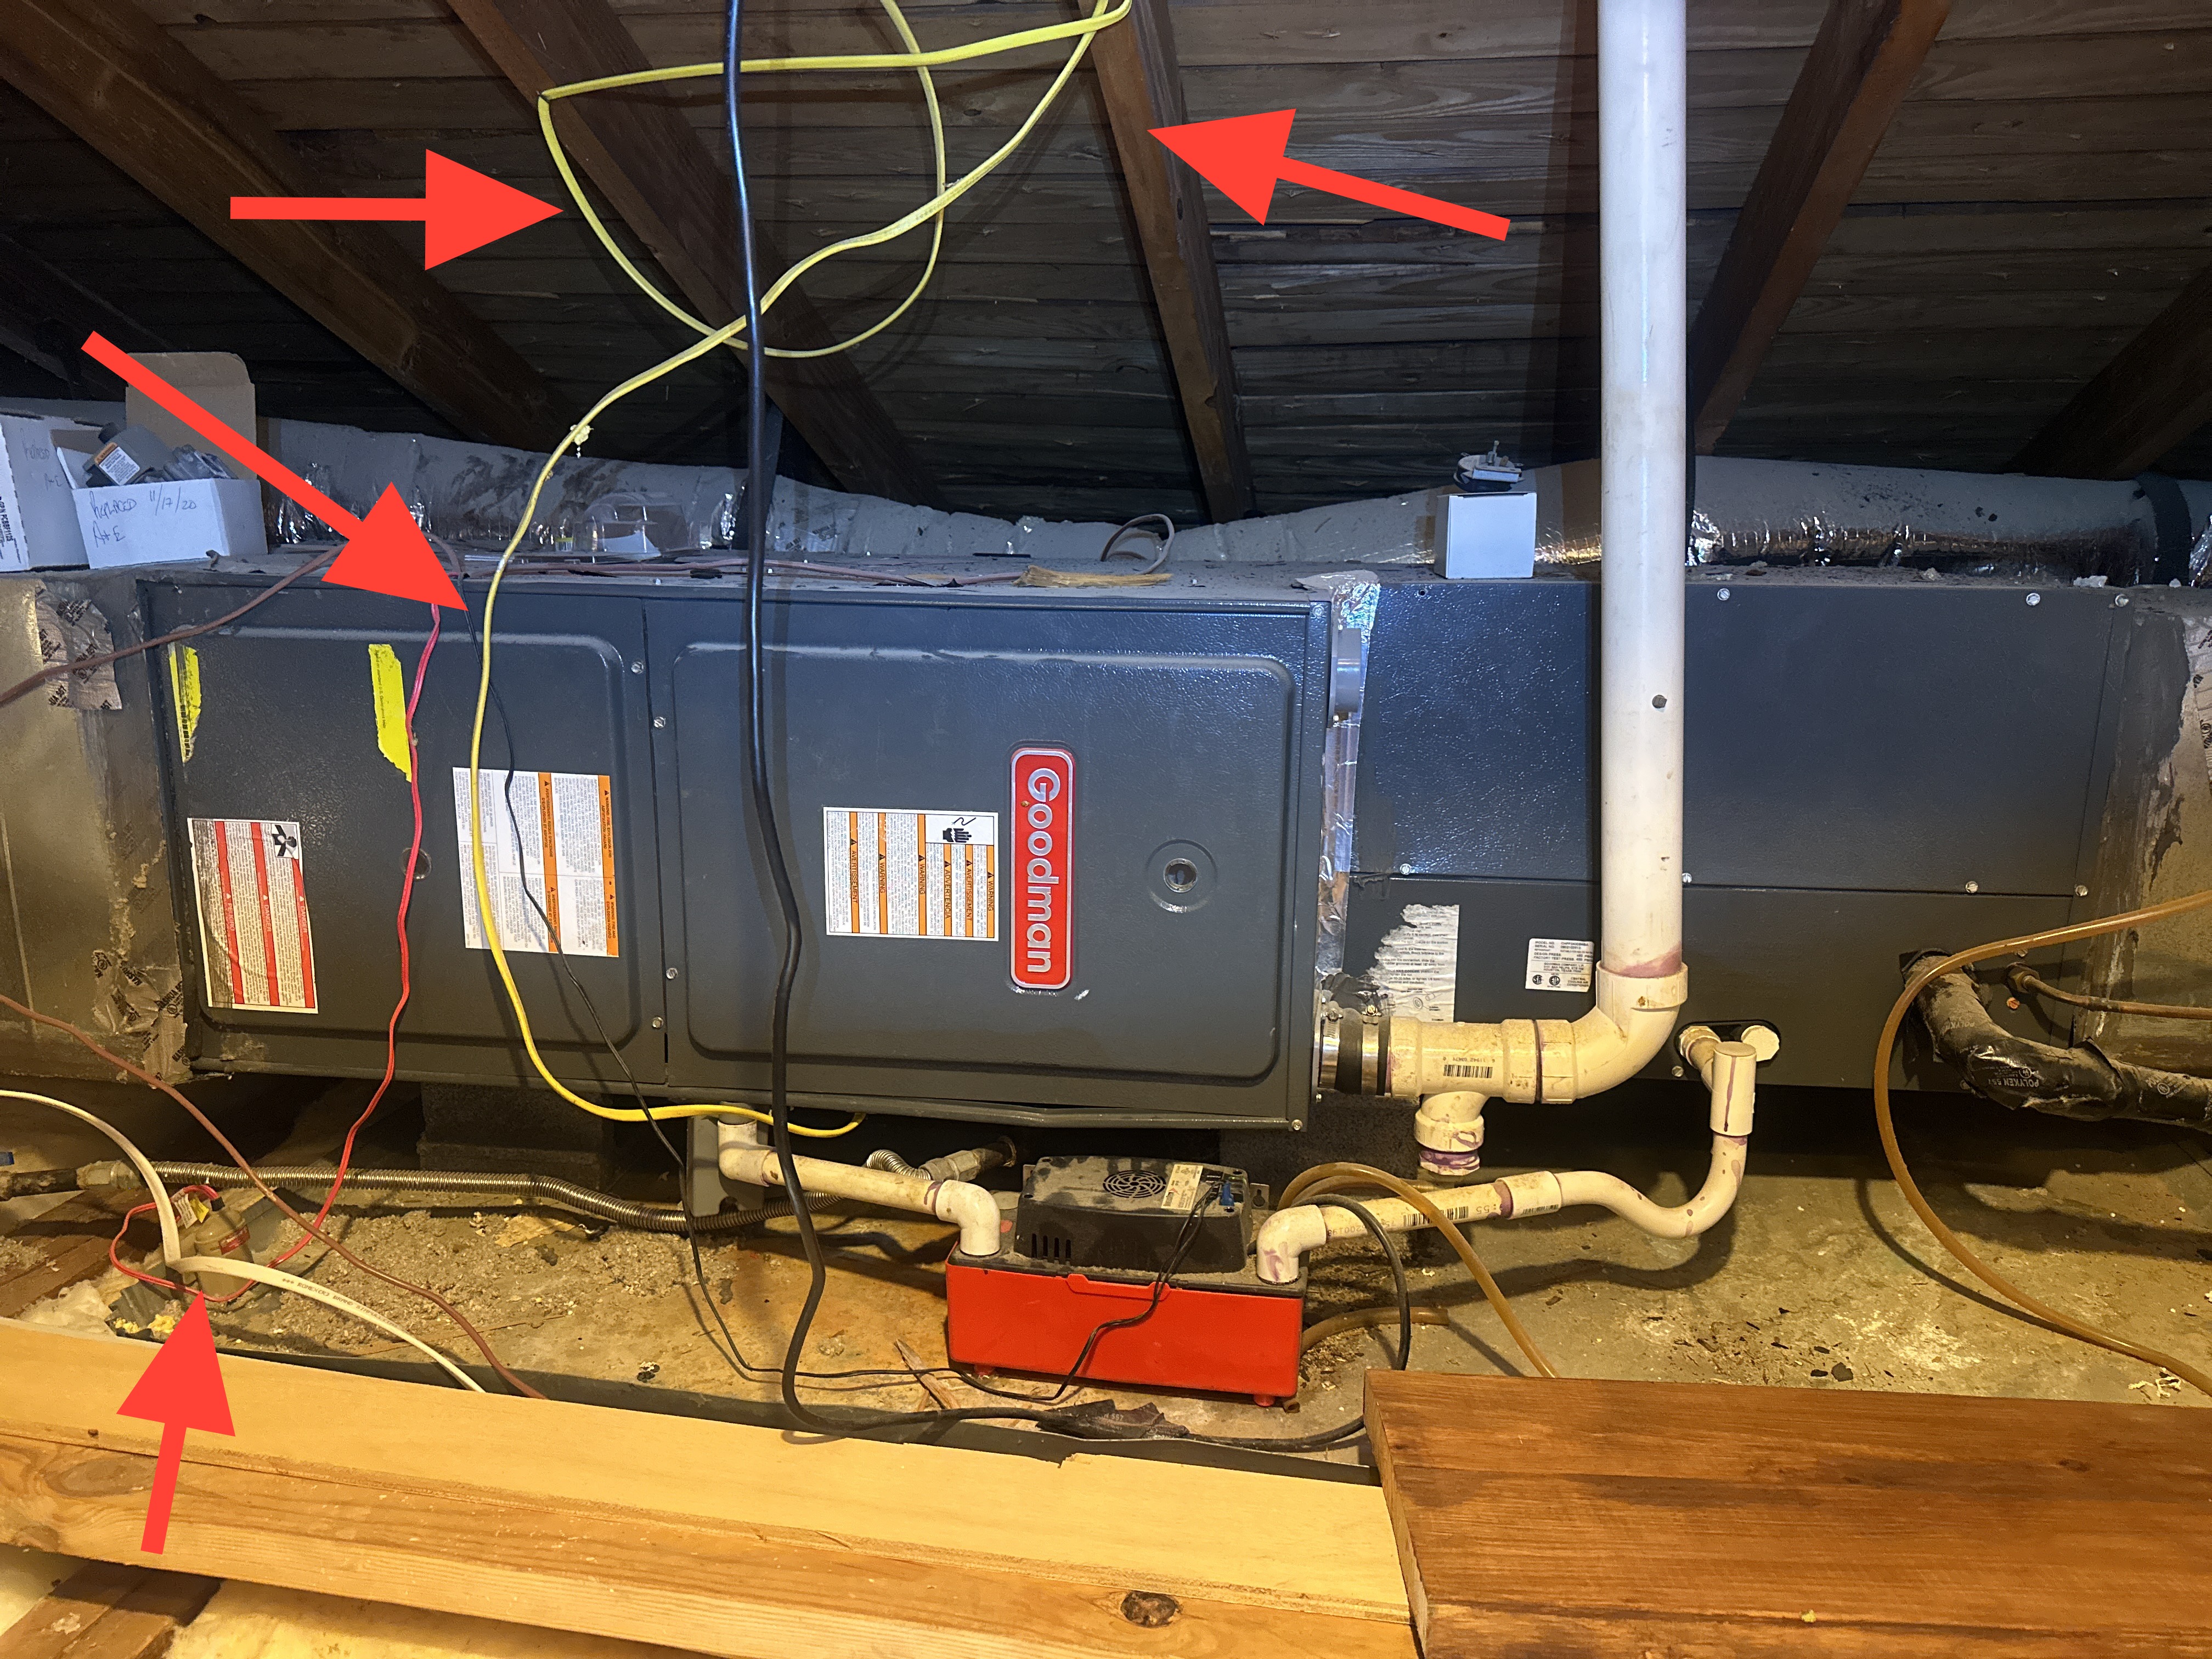 |
The wiring near the attic access is not protected from physical damage. All wiring within 6 feet of the access requires such protection. Use raceways or wood blocking as needed to protect this wire.
 |
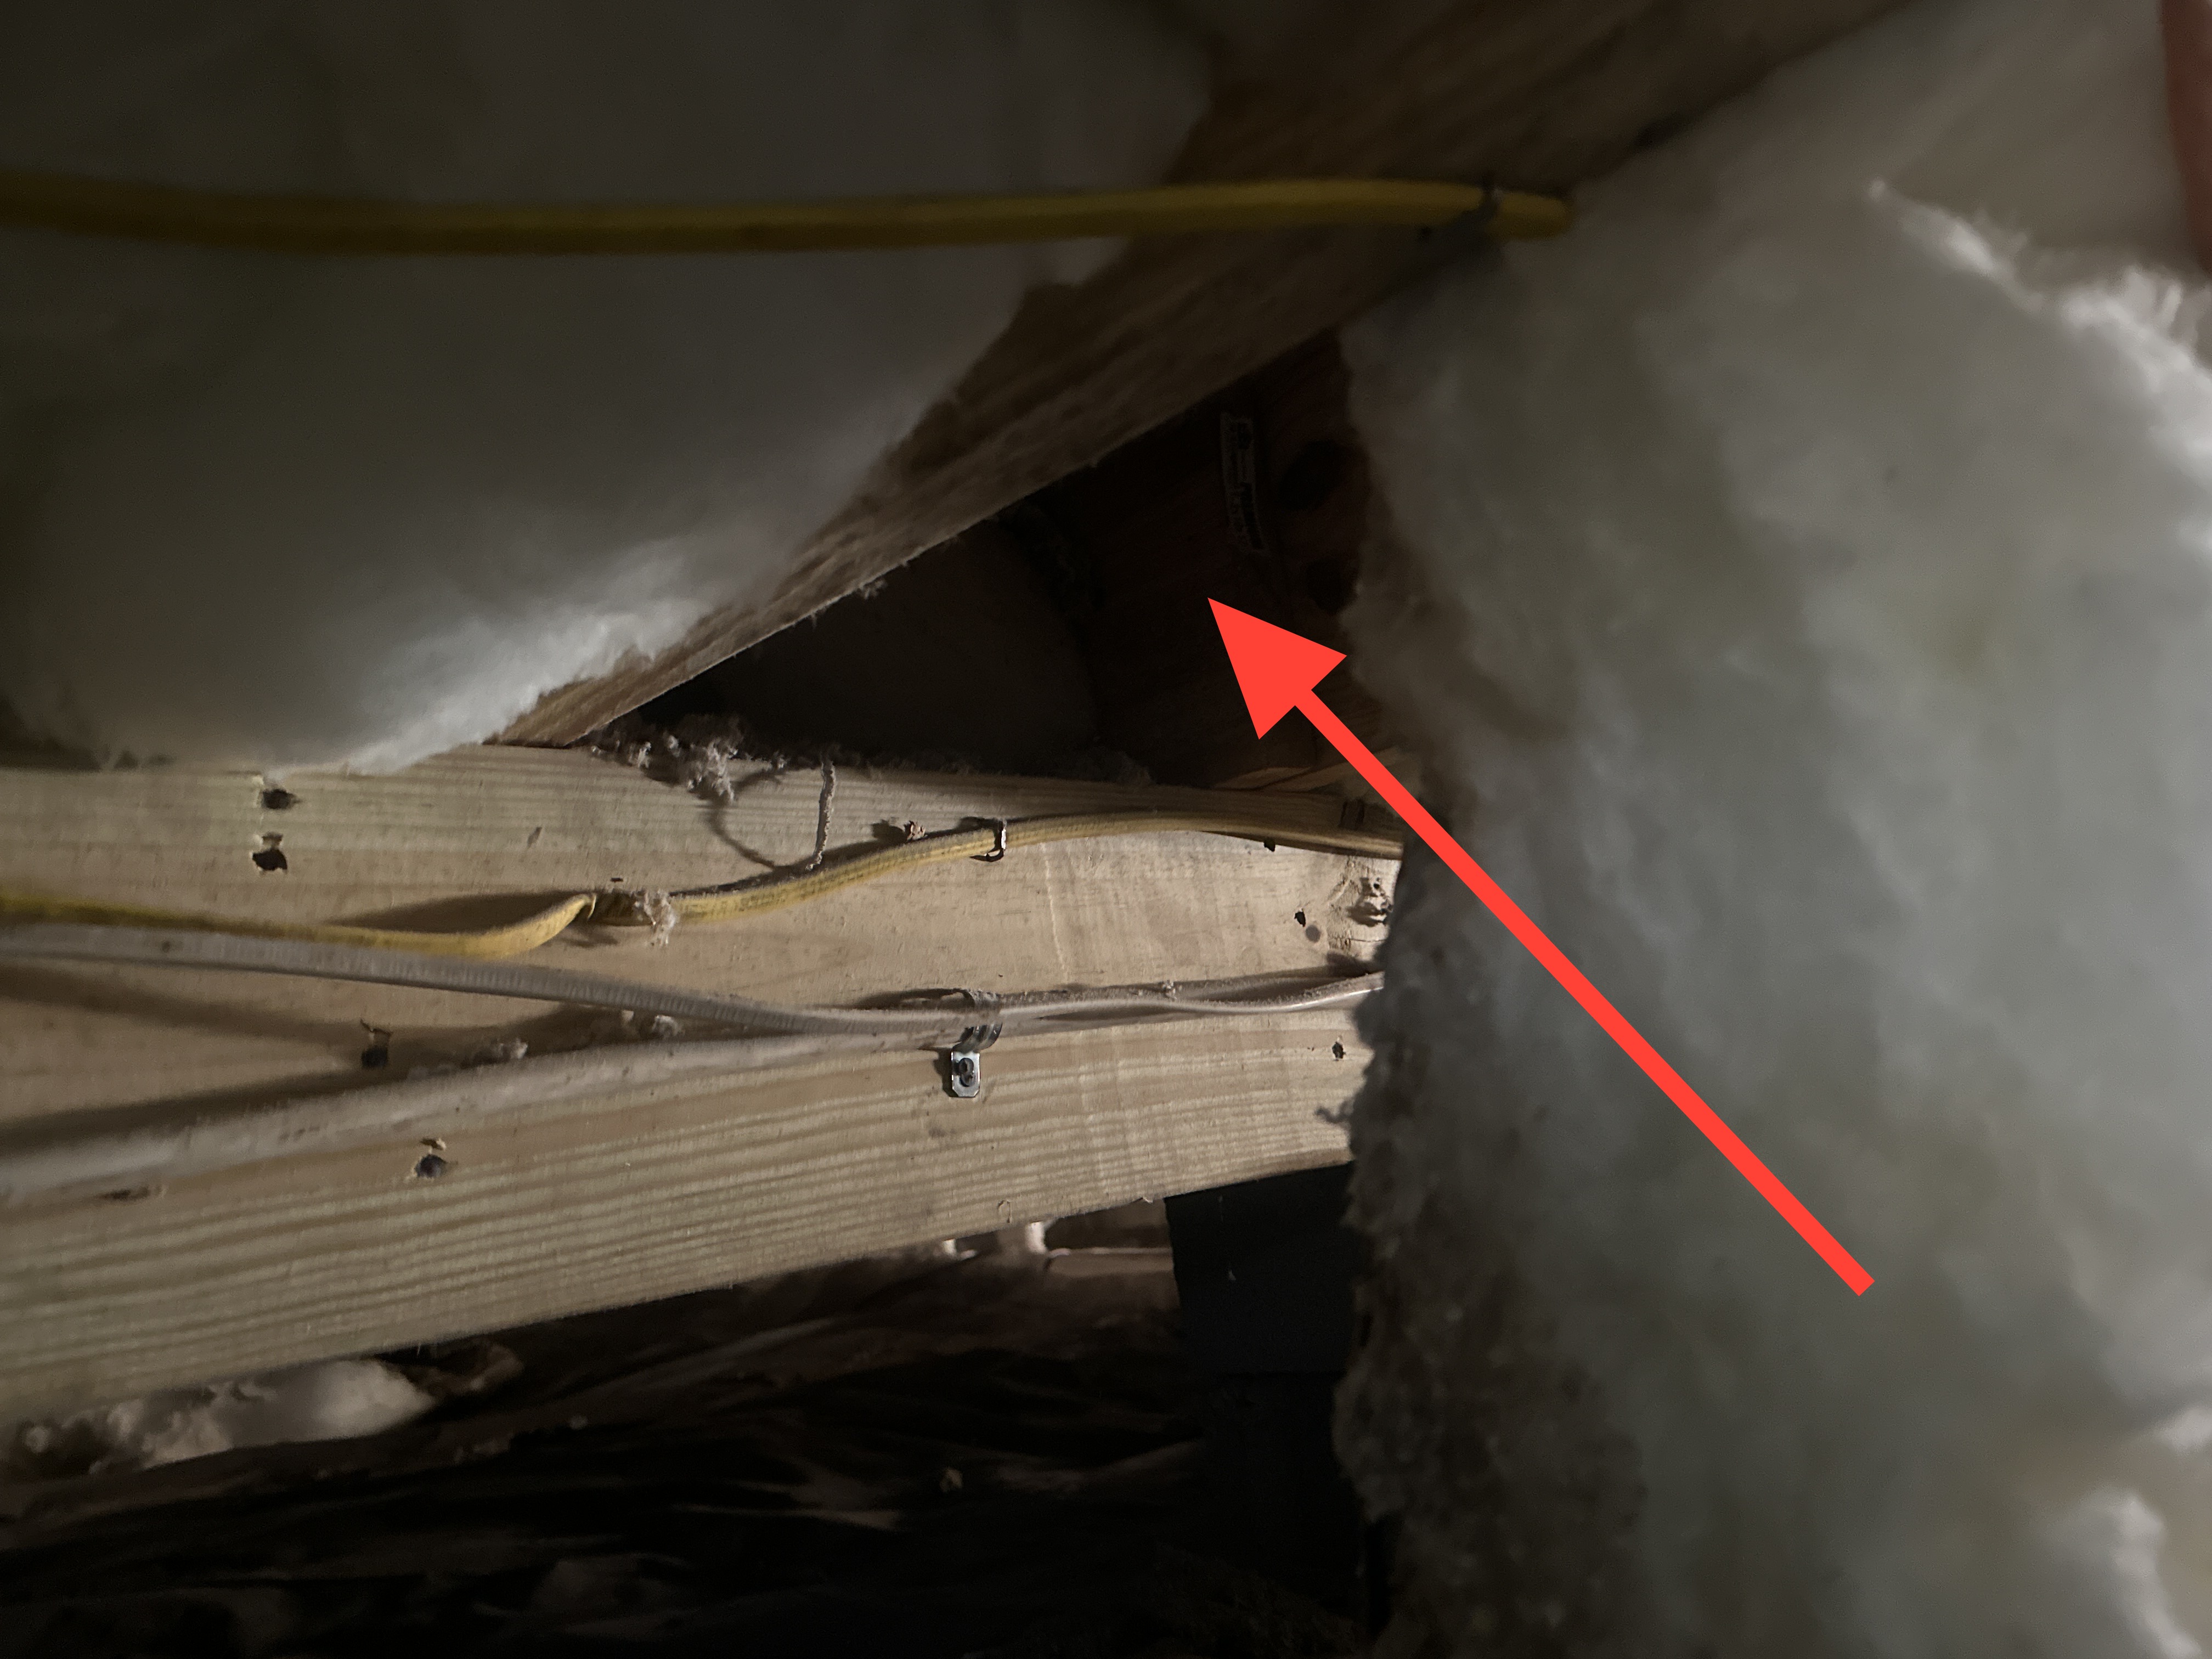
The open electrical splices in the crawl space should be further evaluated and repaired by a licensed electrical contractor. All wiring splices should be contained inside listed junction boxes. Open or running splices are a sign of amateur or incomplete electrical work and could indicate a need for additional repairs that are latent or concealed. Have this further evaluated and repaired as recommended by a licensed electrical contractor.
 |
Lots of new wiring was noted suggesting that the building has had significant wiring updates. Inquire with the seller regarding any permit history of wiring updates, receipts or the extent of the work performed.
Receptacles and Fixtures
Inspection Method: Representative Testing
A representative number of receptacles and switches were tested during inspection. Any defects found during inspection are noted in this report. Only visible and accessible receptacles and switches were tested during inspection and personal items and furnishings are not moved to access any receptacles or fixtures.
Electric Receptacles: Three wire receptacles
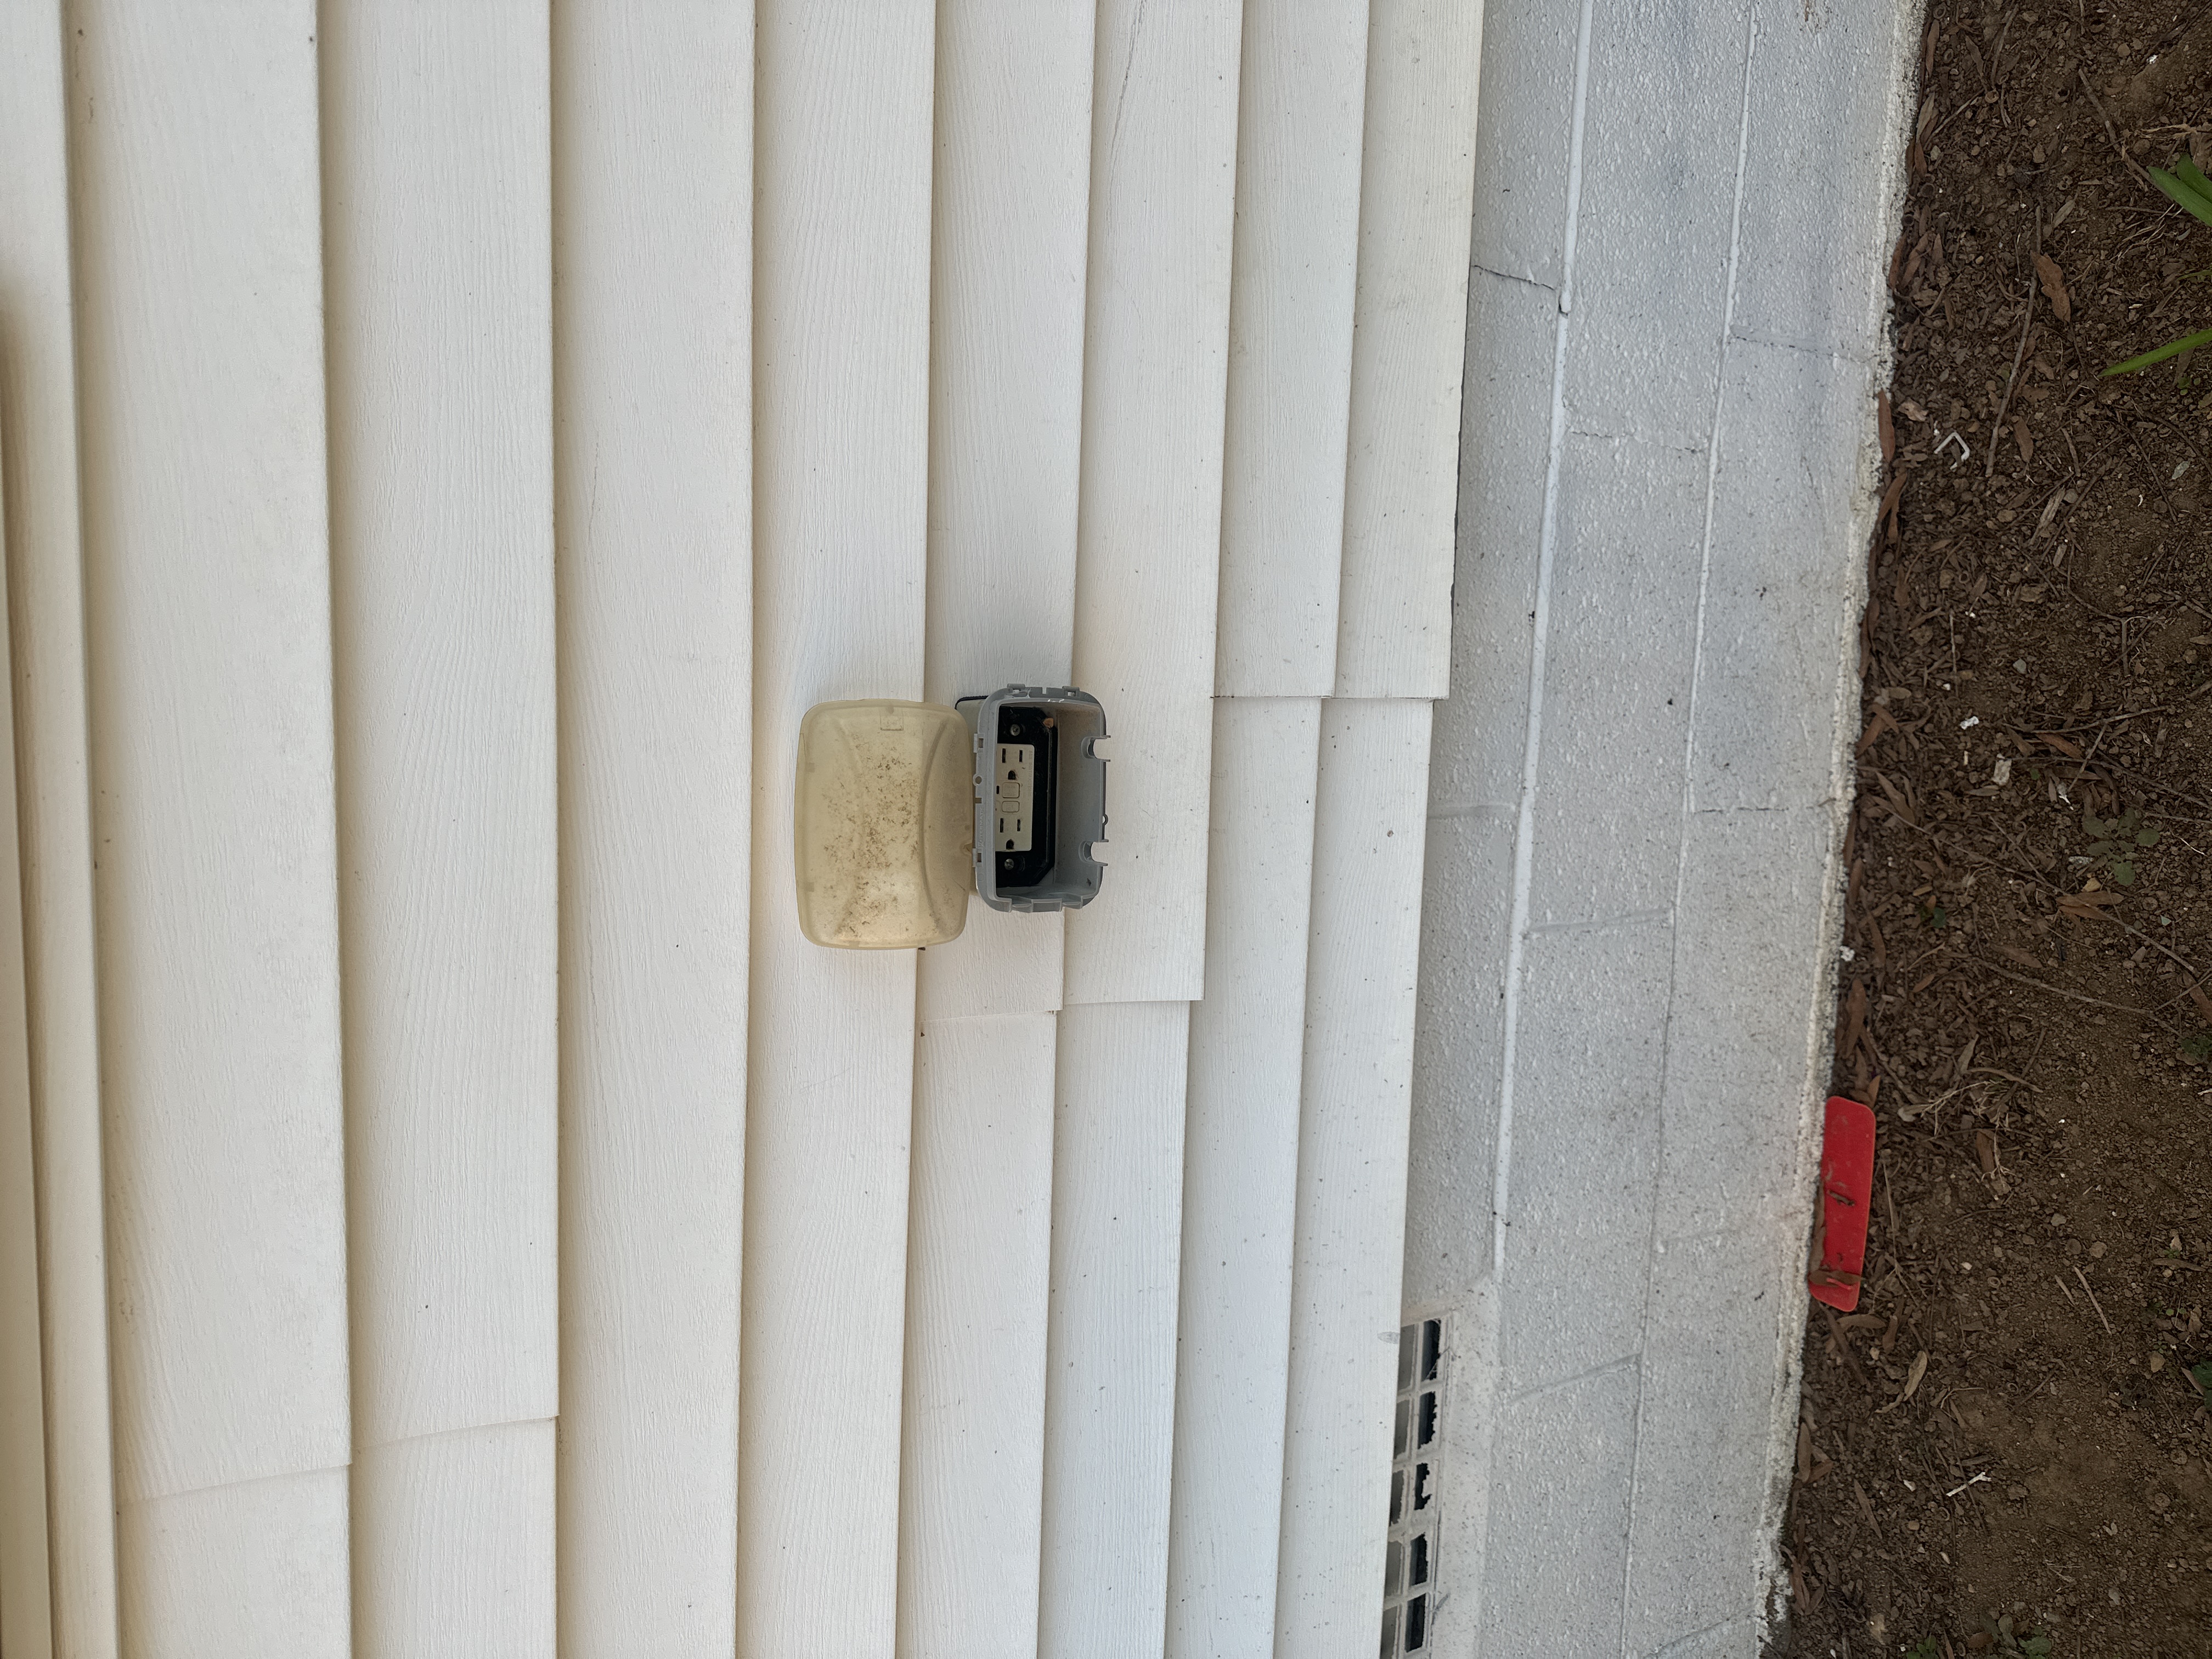
The exterior receptacle cover is damaged and requires replacement. Use the modern "in-use" receptacle covers designed for outdoor use which employs large plastic water-resistant covers.
 |
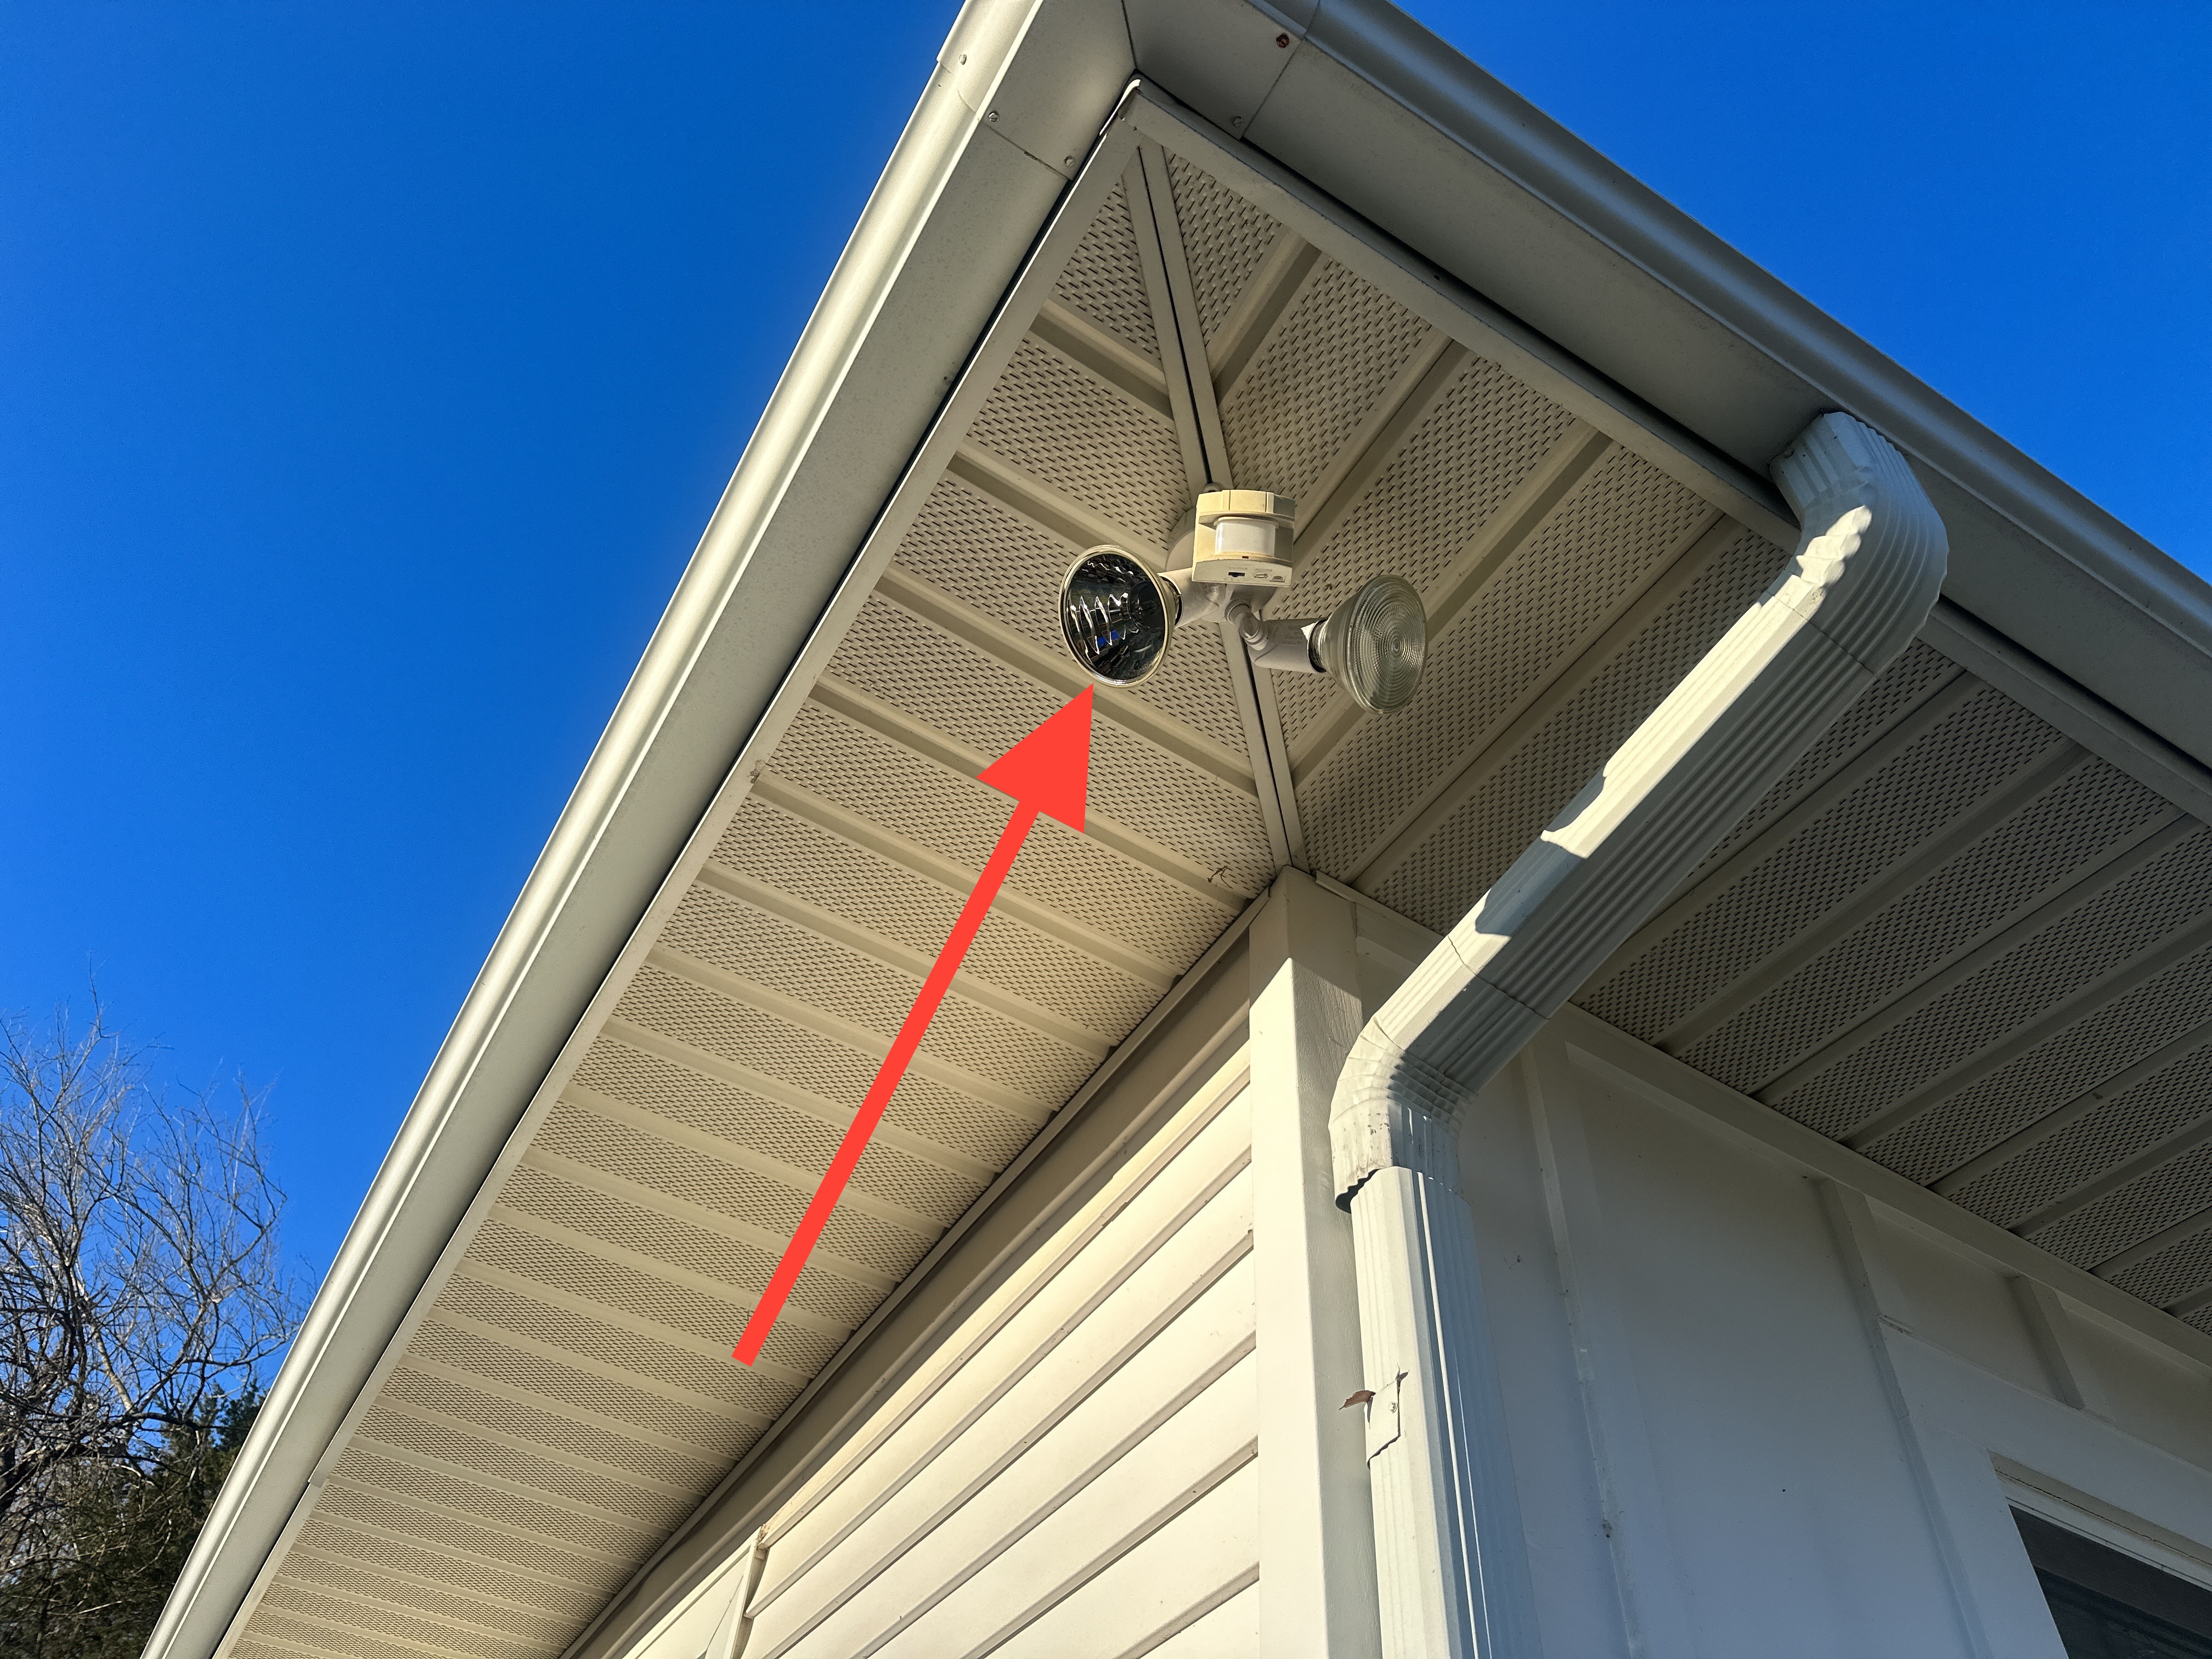
One exterior light fixture has a halogen bulb which is missing the weatherproof lens. I recommend replacing the bulb with a new one.
 |
Ceiling Fans
Ceiling Fans: None Noted
Smoke and Carbon Monoxide Alarm Systems
CO Alarms Noted: Outside all Sleeping Areas
CO Alarms: Present
The installation of carbon monoxide alarms is recommended for all homes that have fuel burning appliances such as gas or oil furnaces, gas water heaters, gas ovens and cook-tops, gas fireplaces and wood stoves. The location should be: at least one alarm outside of all sleeping areas and one on each floor of the house. Best practices are to have these alarms hardwired with a battery back-up - though requirements are for the installation to meet manufacturer's specifications. Carbon monoxide is a colorless, odorless gas that can cause sickness, nausea and even death. Alarms have a useful service life of roughly 8 years, so changing them more frequently than smoke alarms is recommended.
Smoke Alarms Noted:In All BedroomsIn Kitchen
Smoke Alarms: Present
During the home inspection, I try and test a representative sample of the smoke alarms by using the test button on the alarms. This is NOT an accurate test of the sensor just a test to see if the unit is powered. For reliability, fire marshals recommended updating smoke alarms every 10 years and changing batteries bi-annually. The latest data indicate that we should be using photoelectric technology in our smoke alarms for improved fire detection and to reduce problems with false alarms which can lead to disabling of this important safety system. Unfortunately, the alarms have to be removed to determine if they are photo-electric or ionization types. It is surprisingly complex to accurately test a smoke alarm system and determine the reliability, age, and type of sensor technology used, especially as many homes can have half a dozen or more alarms throughout the house. A complete evaluation of smoke alarms is beyond the scope of this inspection. For optimal fire safety, I recommend taking control of these important safety devices and learning about how to service and maintain your smoke alarm system to keep the building occupants safe. For more information, please read this link. For more information, please read this link.
Smoke detector and Carbon Monoxide detector batteries should be changed upon moving into the residence, and every 6 months thereafter. I recommend changing smoke detector batteries every time you change your clocks for daylight savings.
Carbon monoxide alarms were found and noted during inspection. Be sure to check these regularly. The standard is 1/ floor and 1 outside all sleeping areas.
While conducting the inspection, I wear a personal Carbon Monoxide (CO) monitor. This unit did not detect any Carbon Monoxide during the inspection.
Low Voltage Wiring
No doorbell was found during inspection. Have a doorbell installed as desired.
Electric Service
Electric Service Voltage Tested
Service Voltage: 120/240 - With Testing Note
I tested the voltage at the electric panel today. It tested in a normal range of 233-248 volts. Most residential construction is listed as 120/240 volts. Slight fluctuation is normal.
Electric Service
Service Entrance: Above Ground
Electric Service Equipment
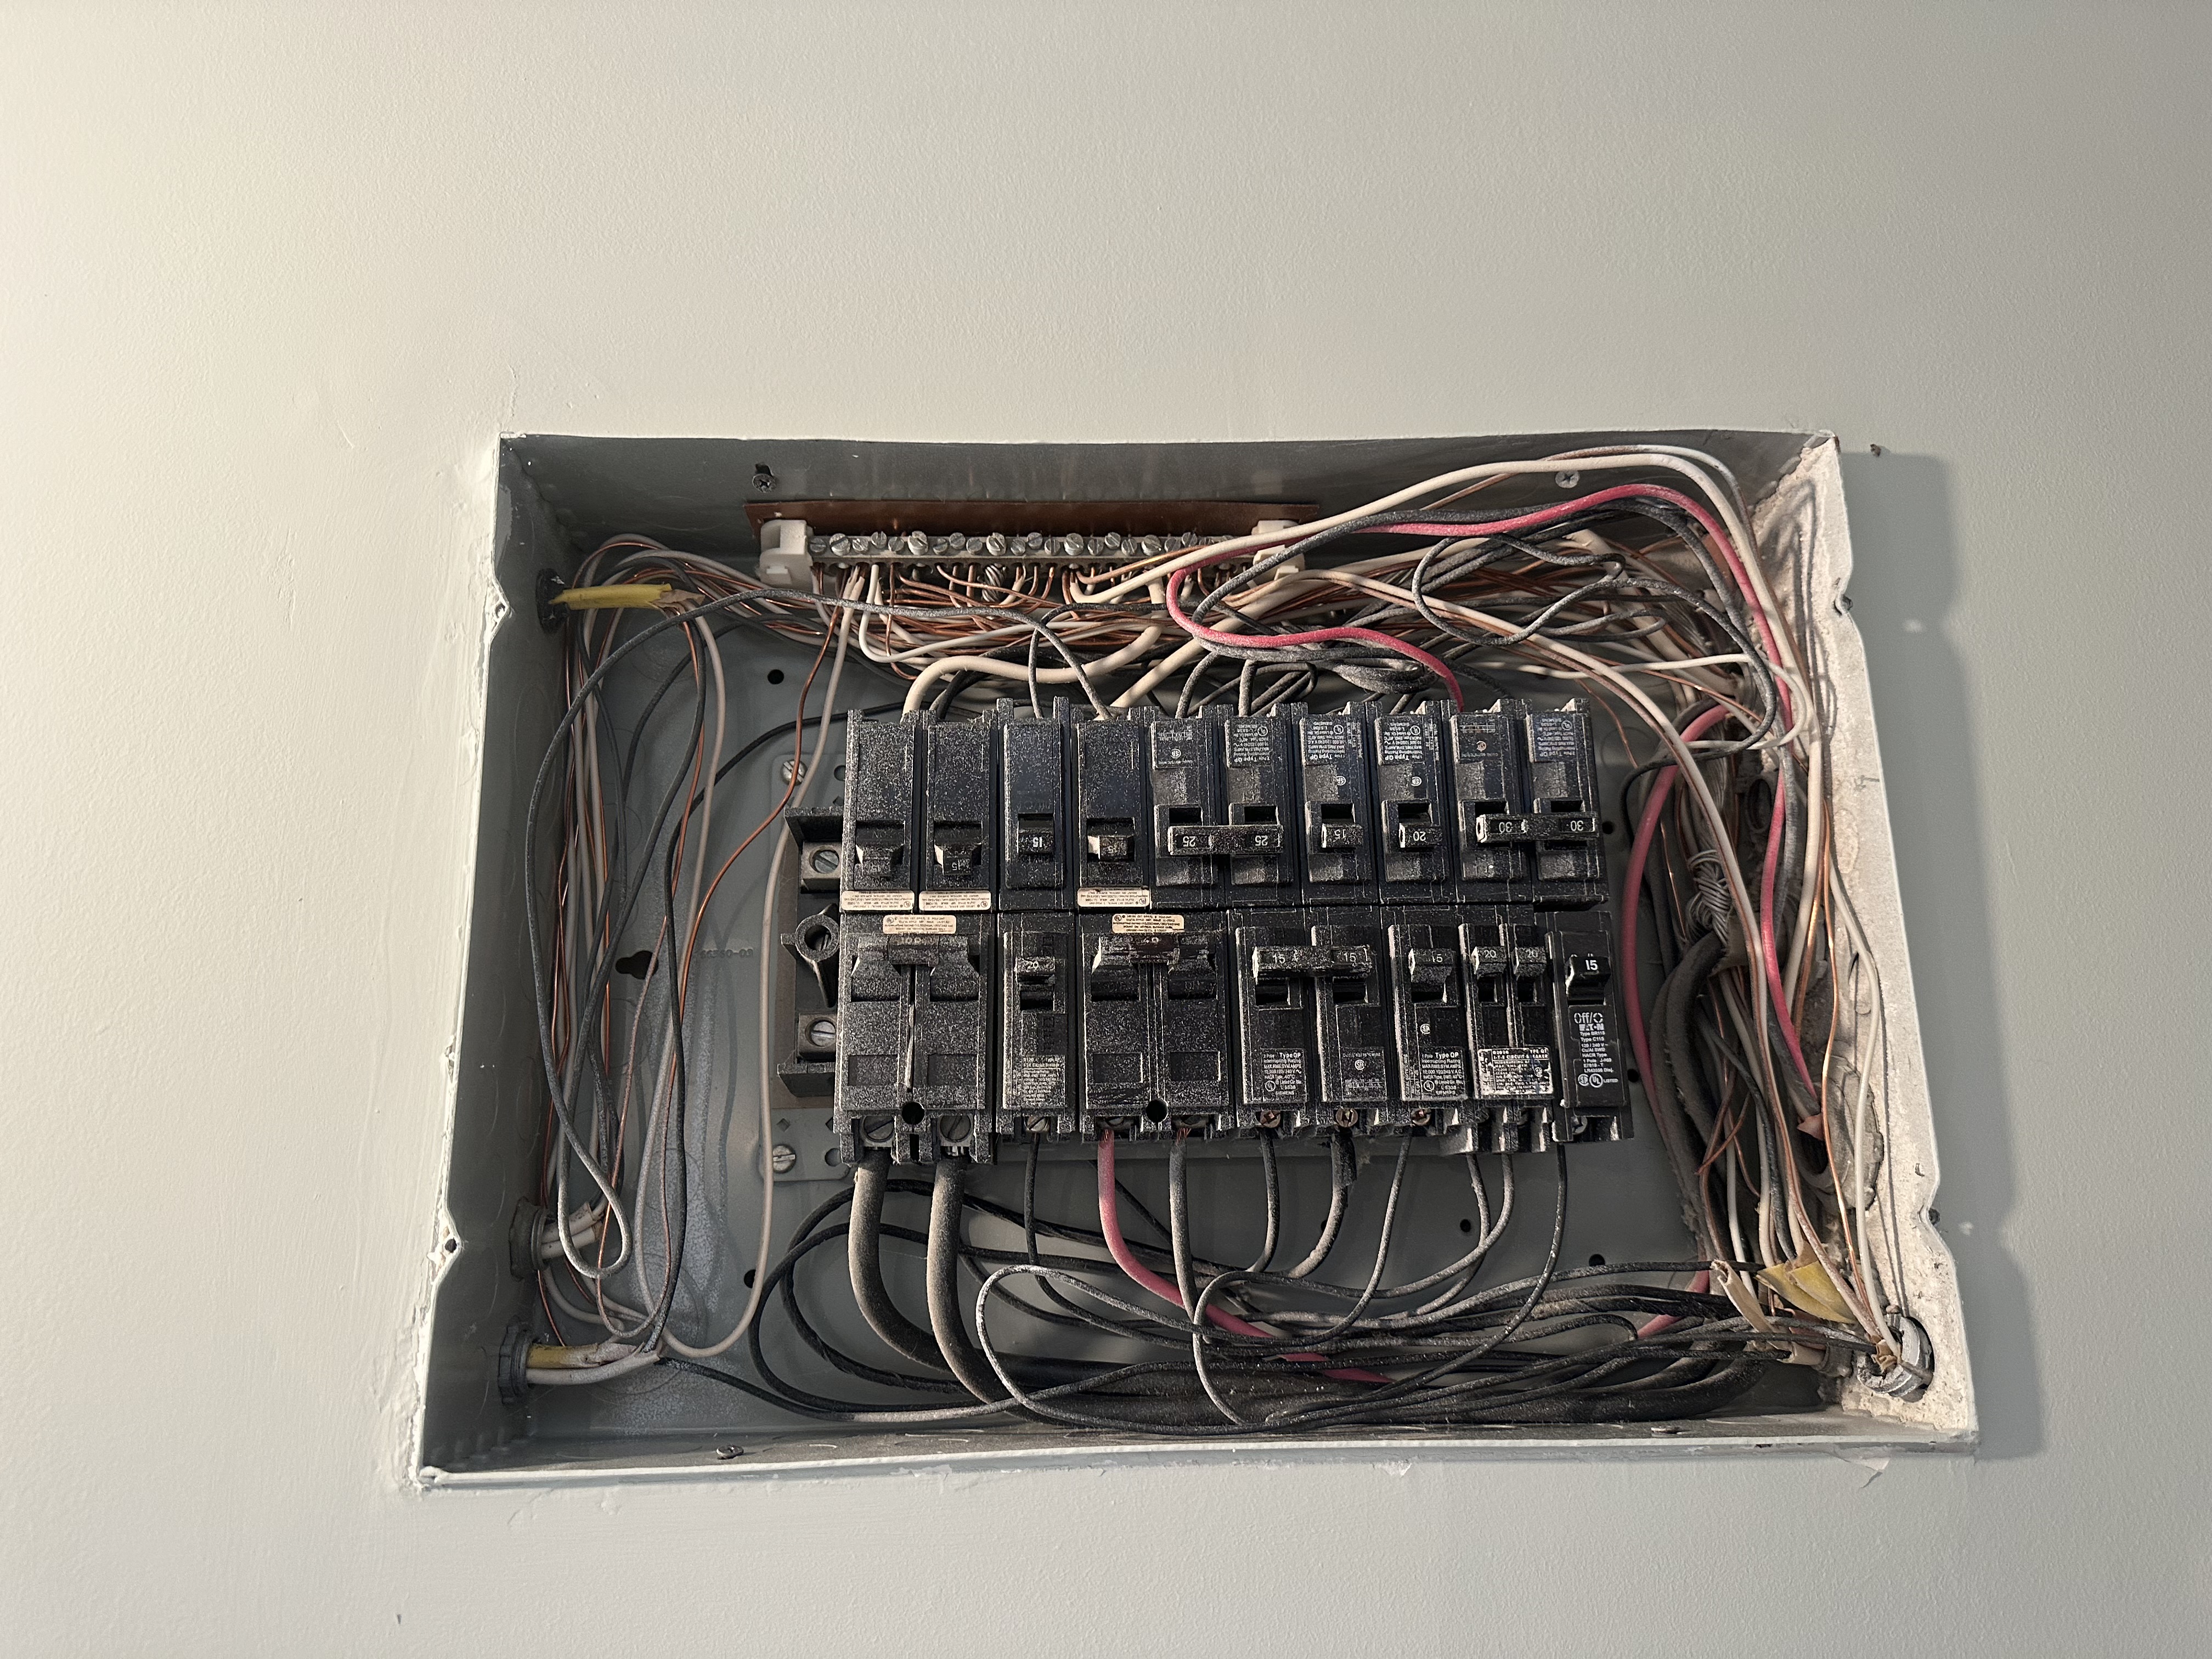
Main Panel Amperage: 125 amps
Electric Service Amperage: 100 amps
Main Electric Panel Location: Bedroom
Panel Manufacturer: Crouse Hinds
Hire a licensed electrician to correct the double lugged neutral or grounded conductors in the electric panel - this is when two conductors share the same lug. Each grounded conductor shall terminate within a panelboard in an individual terminal that is not also used for another conductor. Double lugged conductors risk poorly protected conductors that are more vulnerable to arcing and overheating. This requires additional evaluation by an electrician. I would do this in the context of other electrical repairs.
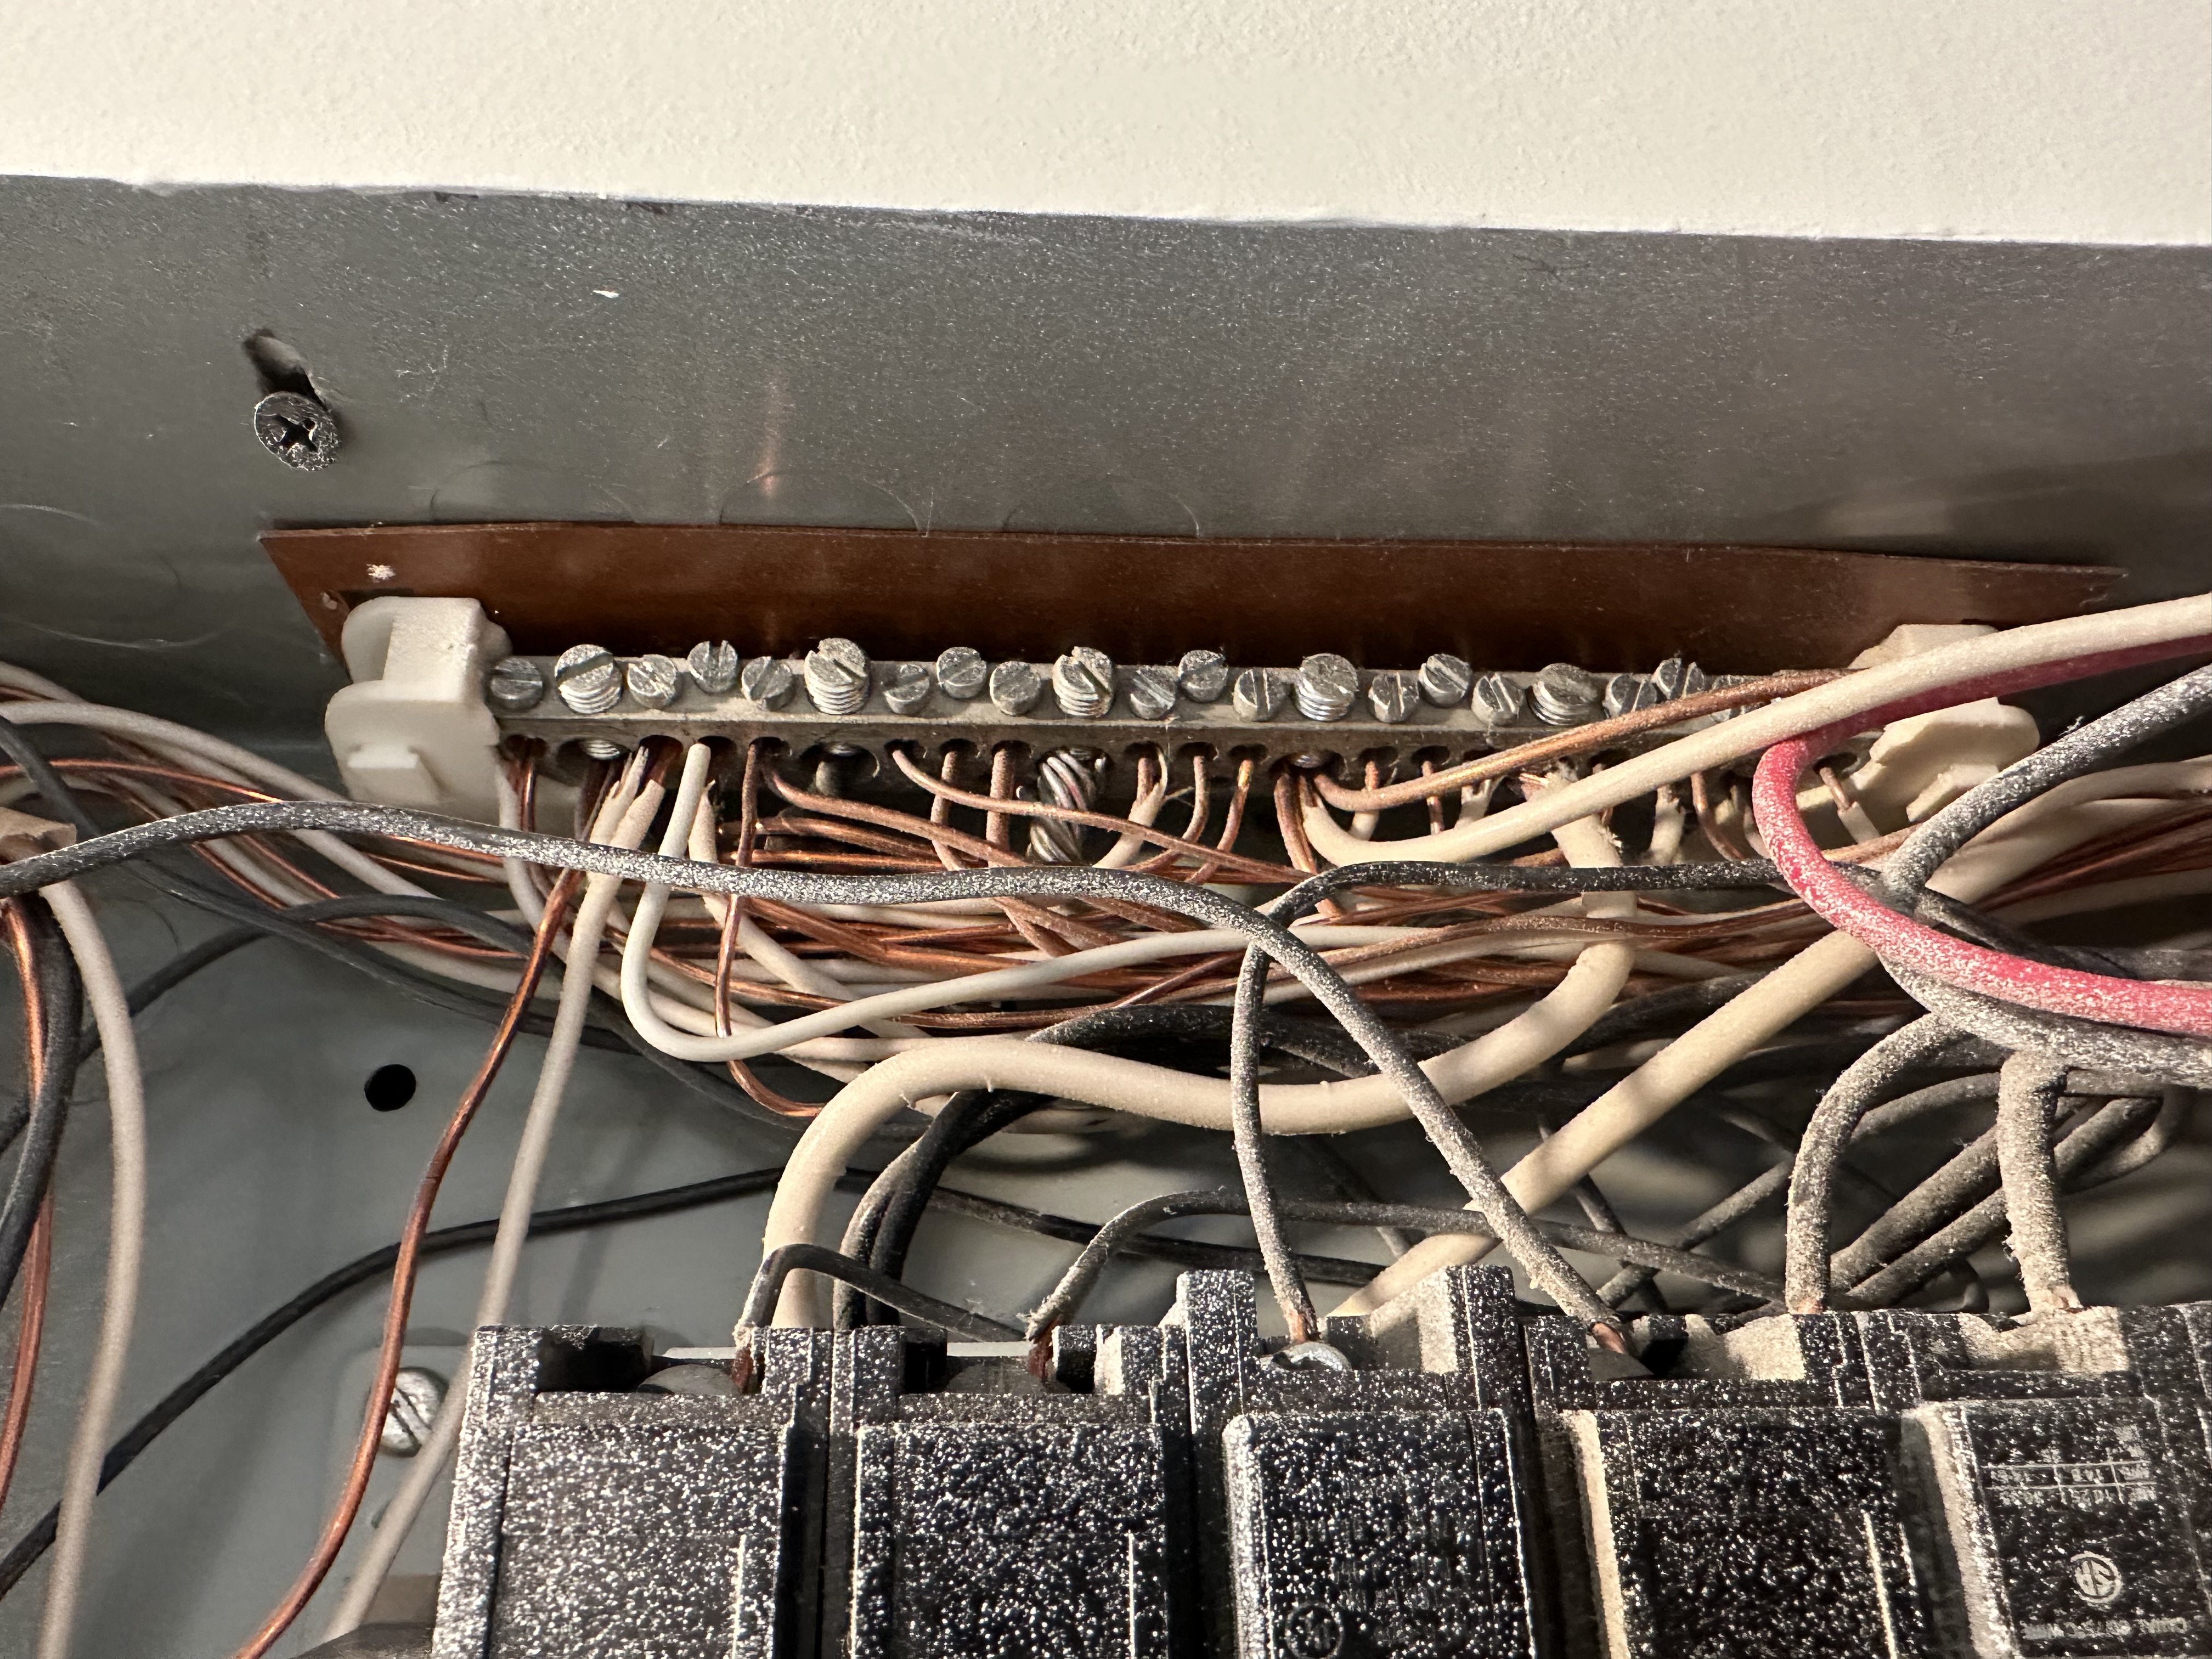 |
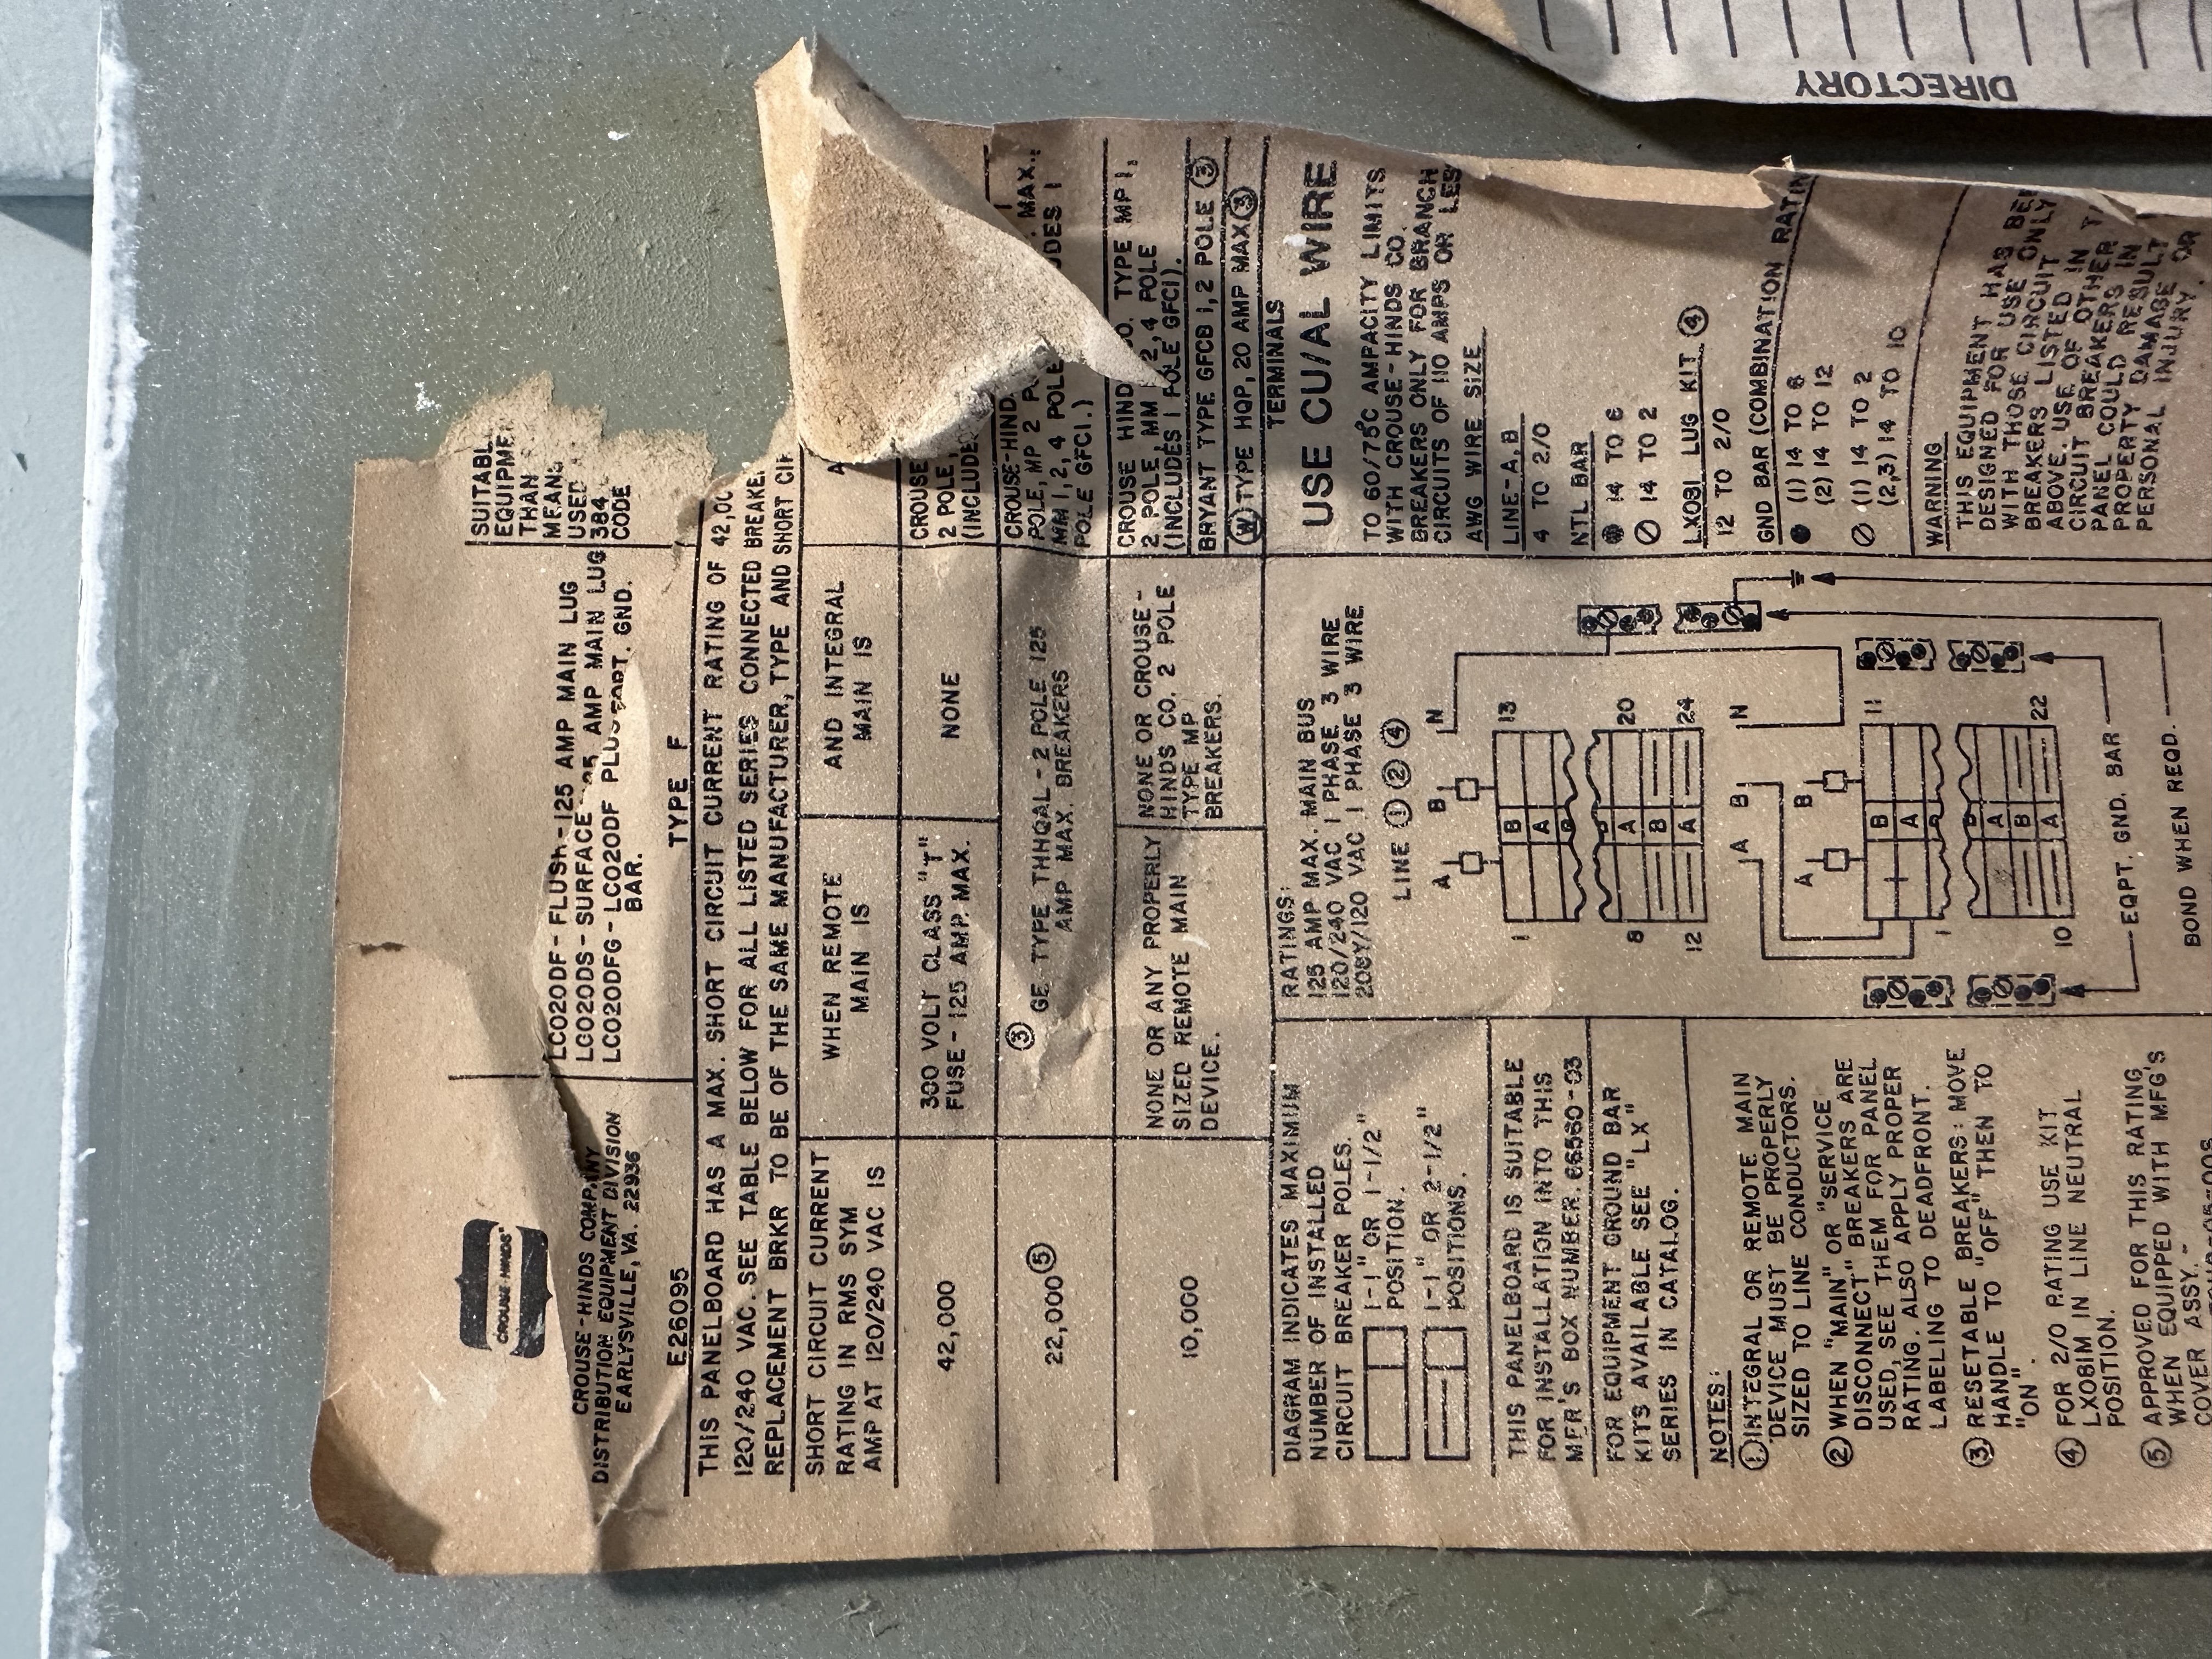
This is an older electrical panel manufacturered by Crouse Hinds, a company which is no longer operational. There are a number of different breaker types (QP, ITE, BR, CH) located in the panel. Utilizing incompatible breakers can result in overheating, inconsistent electrical output, or other issues. I recommend having an electrician inspect the breakers and ensure that all the utilized breakers are compatible with this panel.
 | 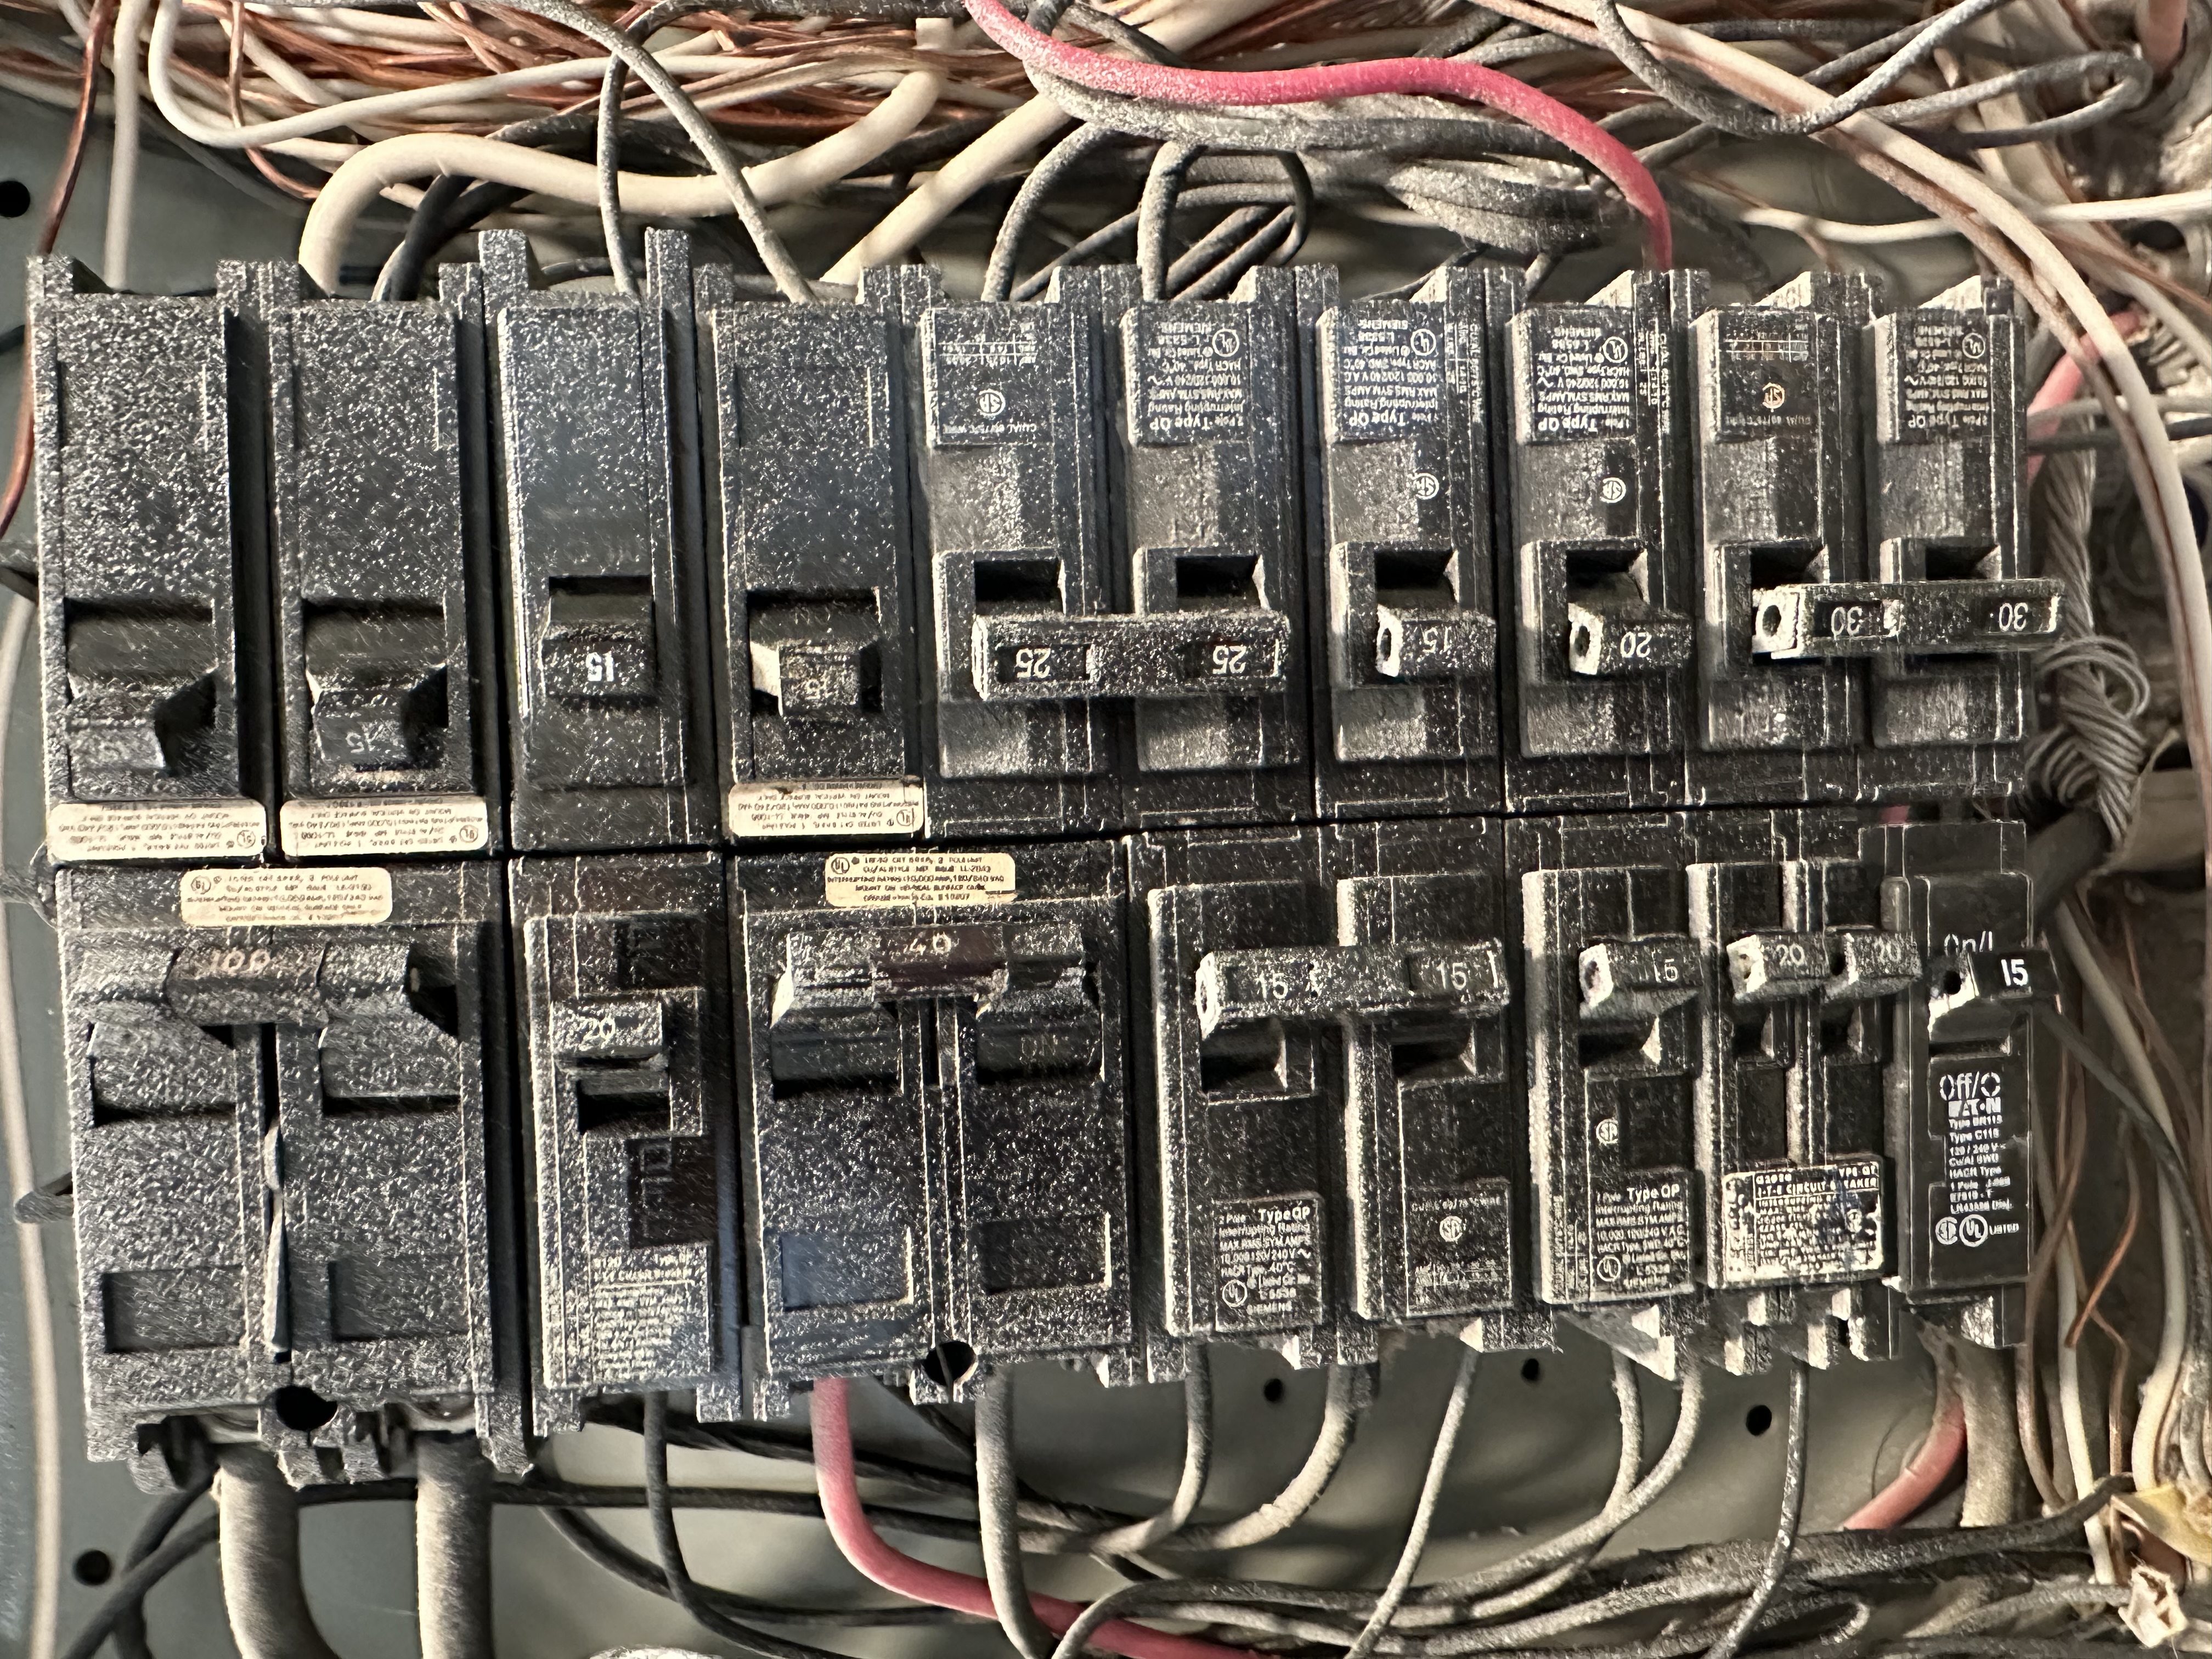 |
The electric panel is full, there is no more room on the bus bar to add breakers. You may be able to use tandem breakers if you want to expand the panel, but this could be tricky or impossible to also follow modern requirements for AFCI's. This could make this panel obsolete or force the need for a sub-panel depending on plans for future wiring here.
 |
Appliance Disconnects
Disconnects Noted: HVAC Compressor(s), Air Handler(s)
Electrical Grounding System
Grounding Rod Noted
Ground rod connections were noted at the exterior. The ground rods looked to be fully driven and connections looked standard,
 |
Electrical Bonding System
Present - Could Not Confirm
During the inspection, I attempt to visually document electrical system bonding. There is no way in the context of a home inspection to verify the "effectiveness" of system bonding. All metallic systems in the building are required to be "bonded" (connected) to the the building's electrical grounding system. Bonding creates a pathway to shunt static charges (that would otherwise build up on the system) to earth, and to provide a pathway to trip a breaker in the event that these bonded metallic components became energized. There are many things that can lead me to recommend further evaluation of this system by a licensed electrical contractor and they will be documented as repair items in the observations below if discovered.
Garage
Garage General
Garage Type: None Noted
Heating, Cooling, Fireplaces and Ventilation
Heating System
Energy Source: Natural gas
Heating Method: Gas forced air furnace
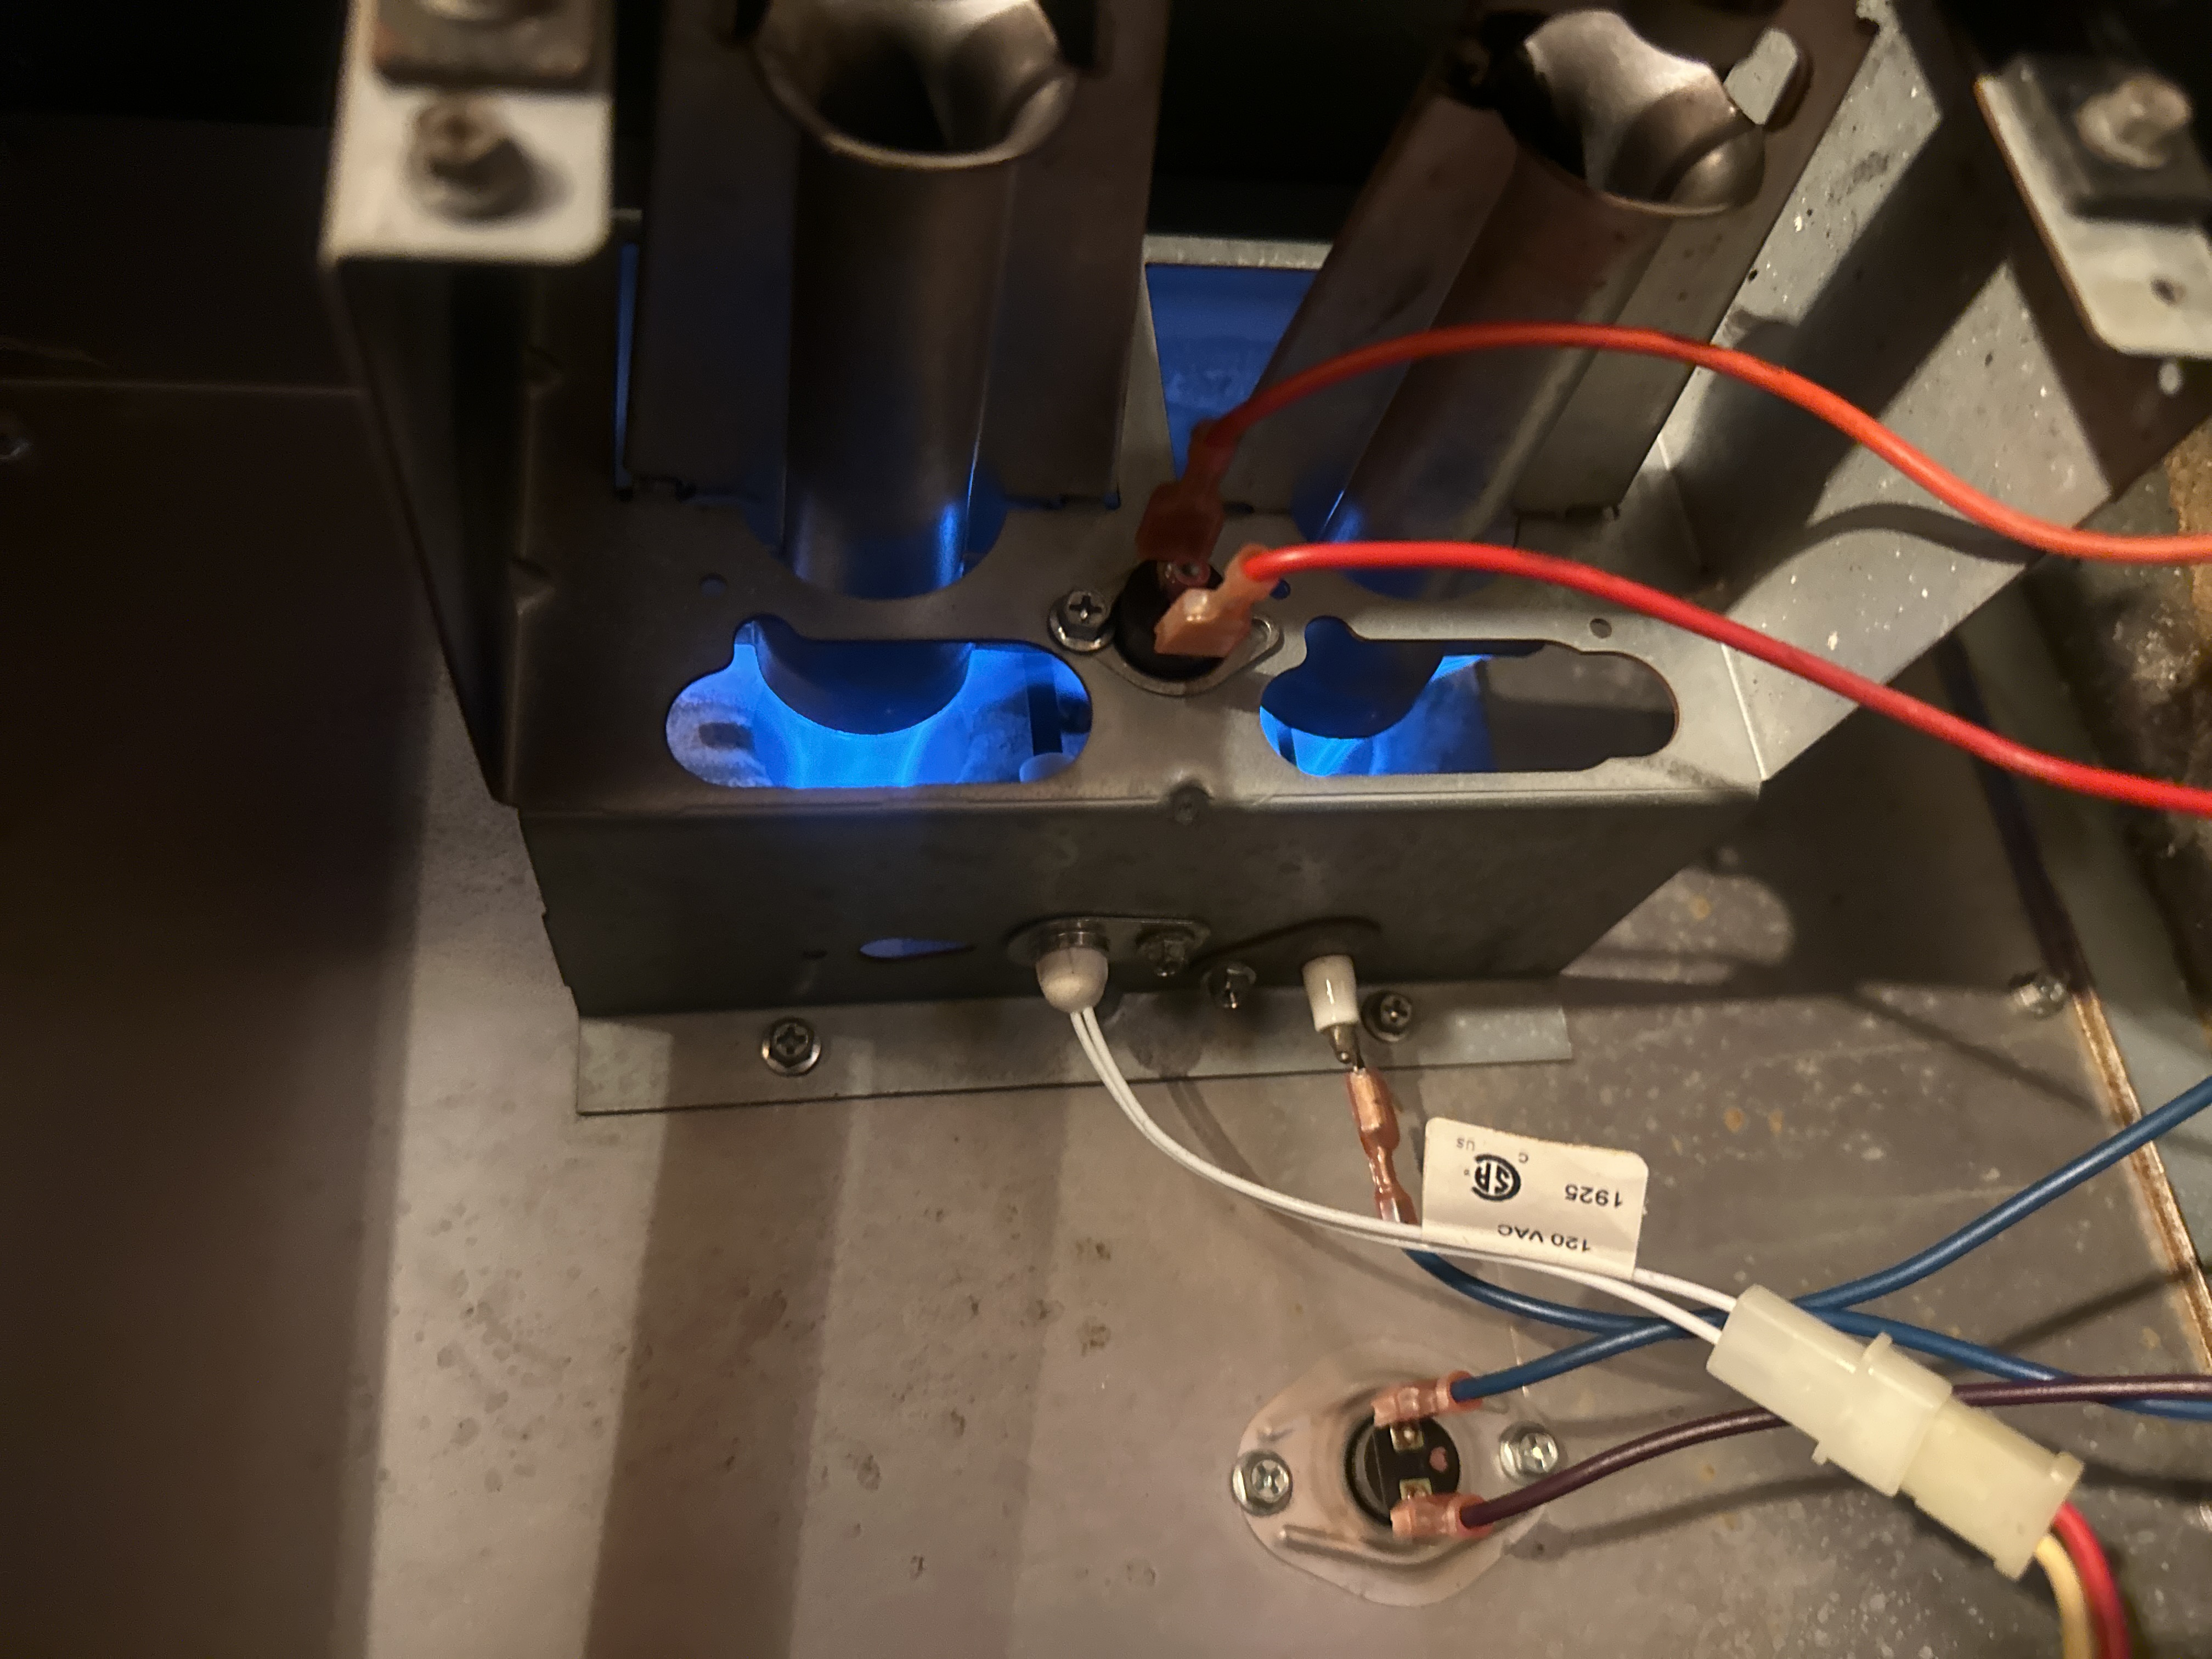
This house has a gas forced air furnace. A critical component to all combustion heating equipment is the heat exchanger. This is the welded metal assembly inside the furnace that contains the products of combustion so that moisture, carbon monoxide and other products of combustion do not mix with interior air and get safely vented to the exterior. Heat exchangers on modern furnaces have an average life expectancy of 15-20 years. Unfortunately, heat exchangers are concealed inside the heating equipment; they are not visible and specifically excluded from a home inspection. Cracks in heat exchangers may be concealed and can pose a potential safety hazard.
 (1) (1) (1) (1) (1) (1) (1) (1) (1) (1).PNG)
Manufacturer: Goodman
Data Plate: Shown Here
This shows the data plate from the furnace.
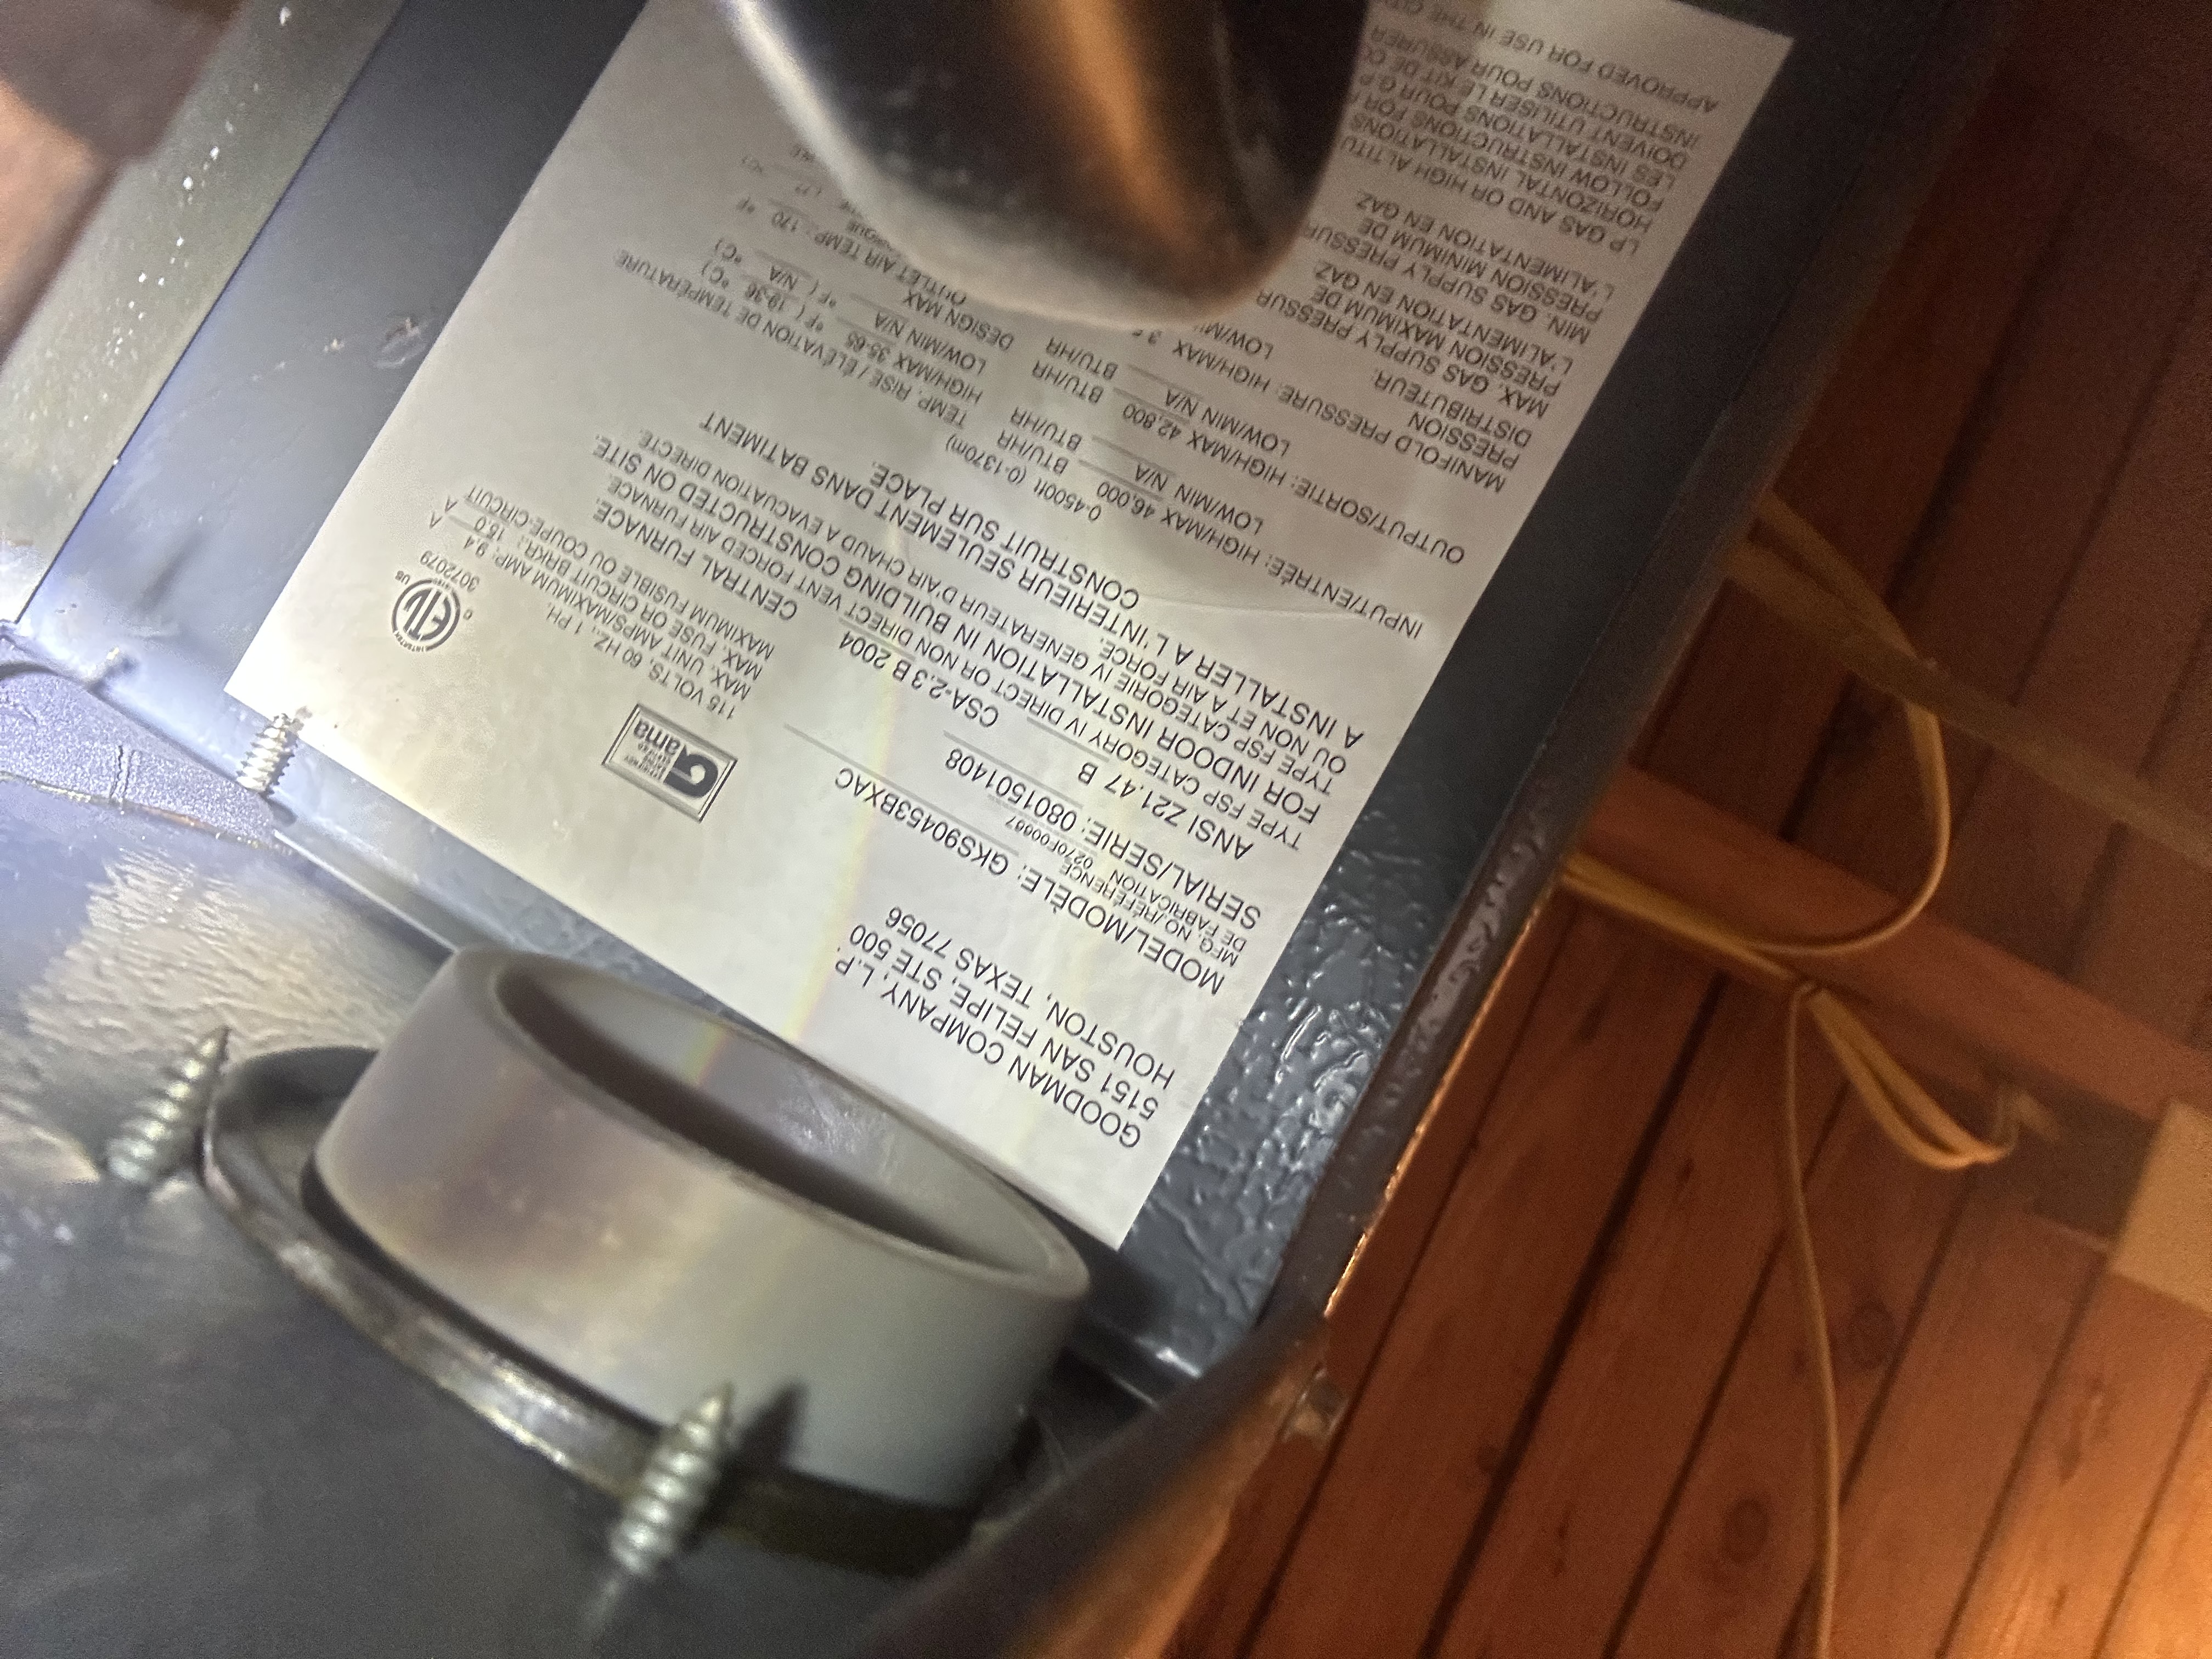 |
Capacity: 40,000 btu's
Age: 2008
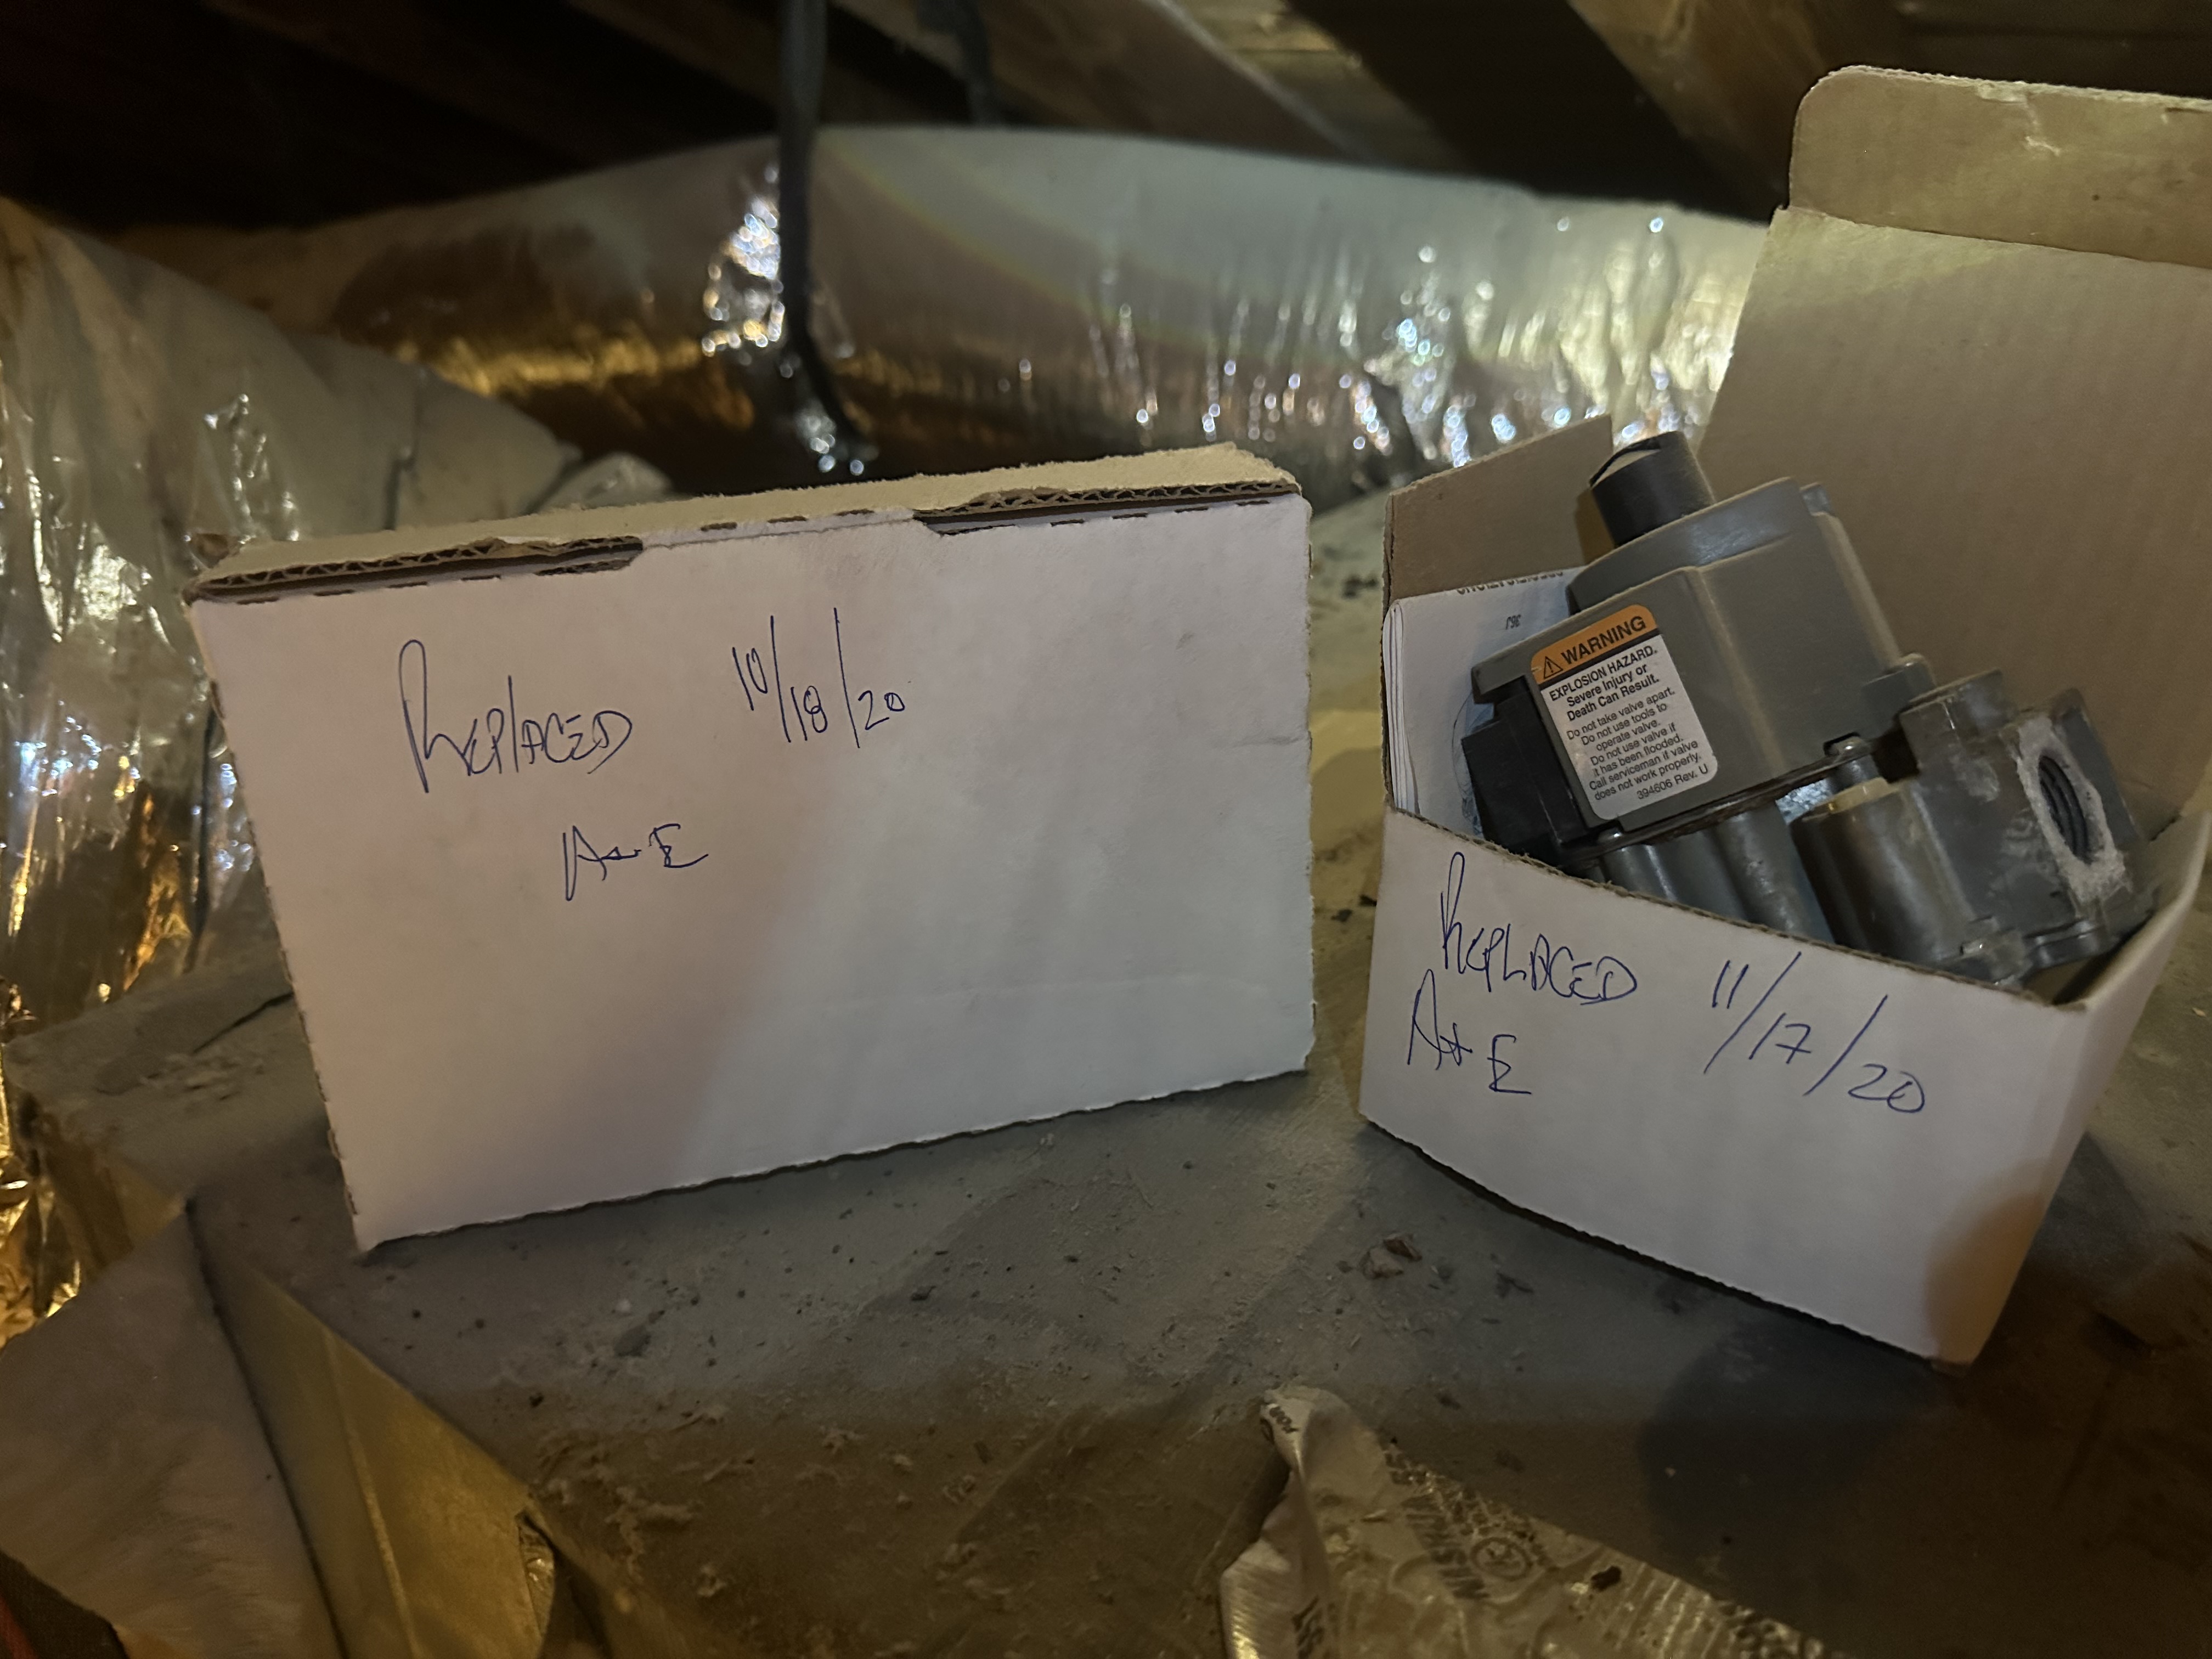
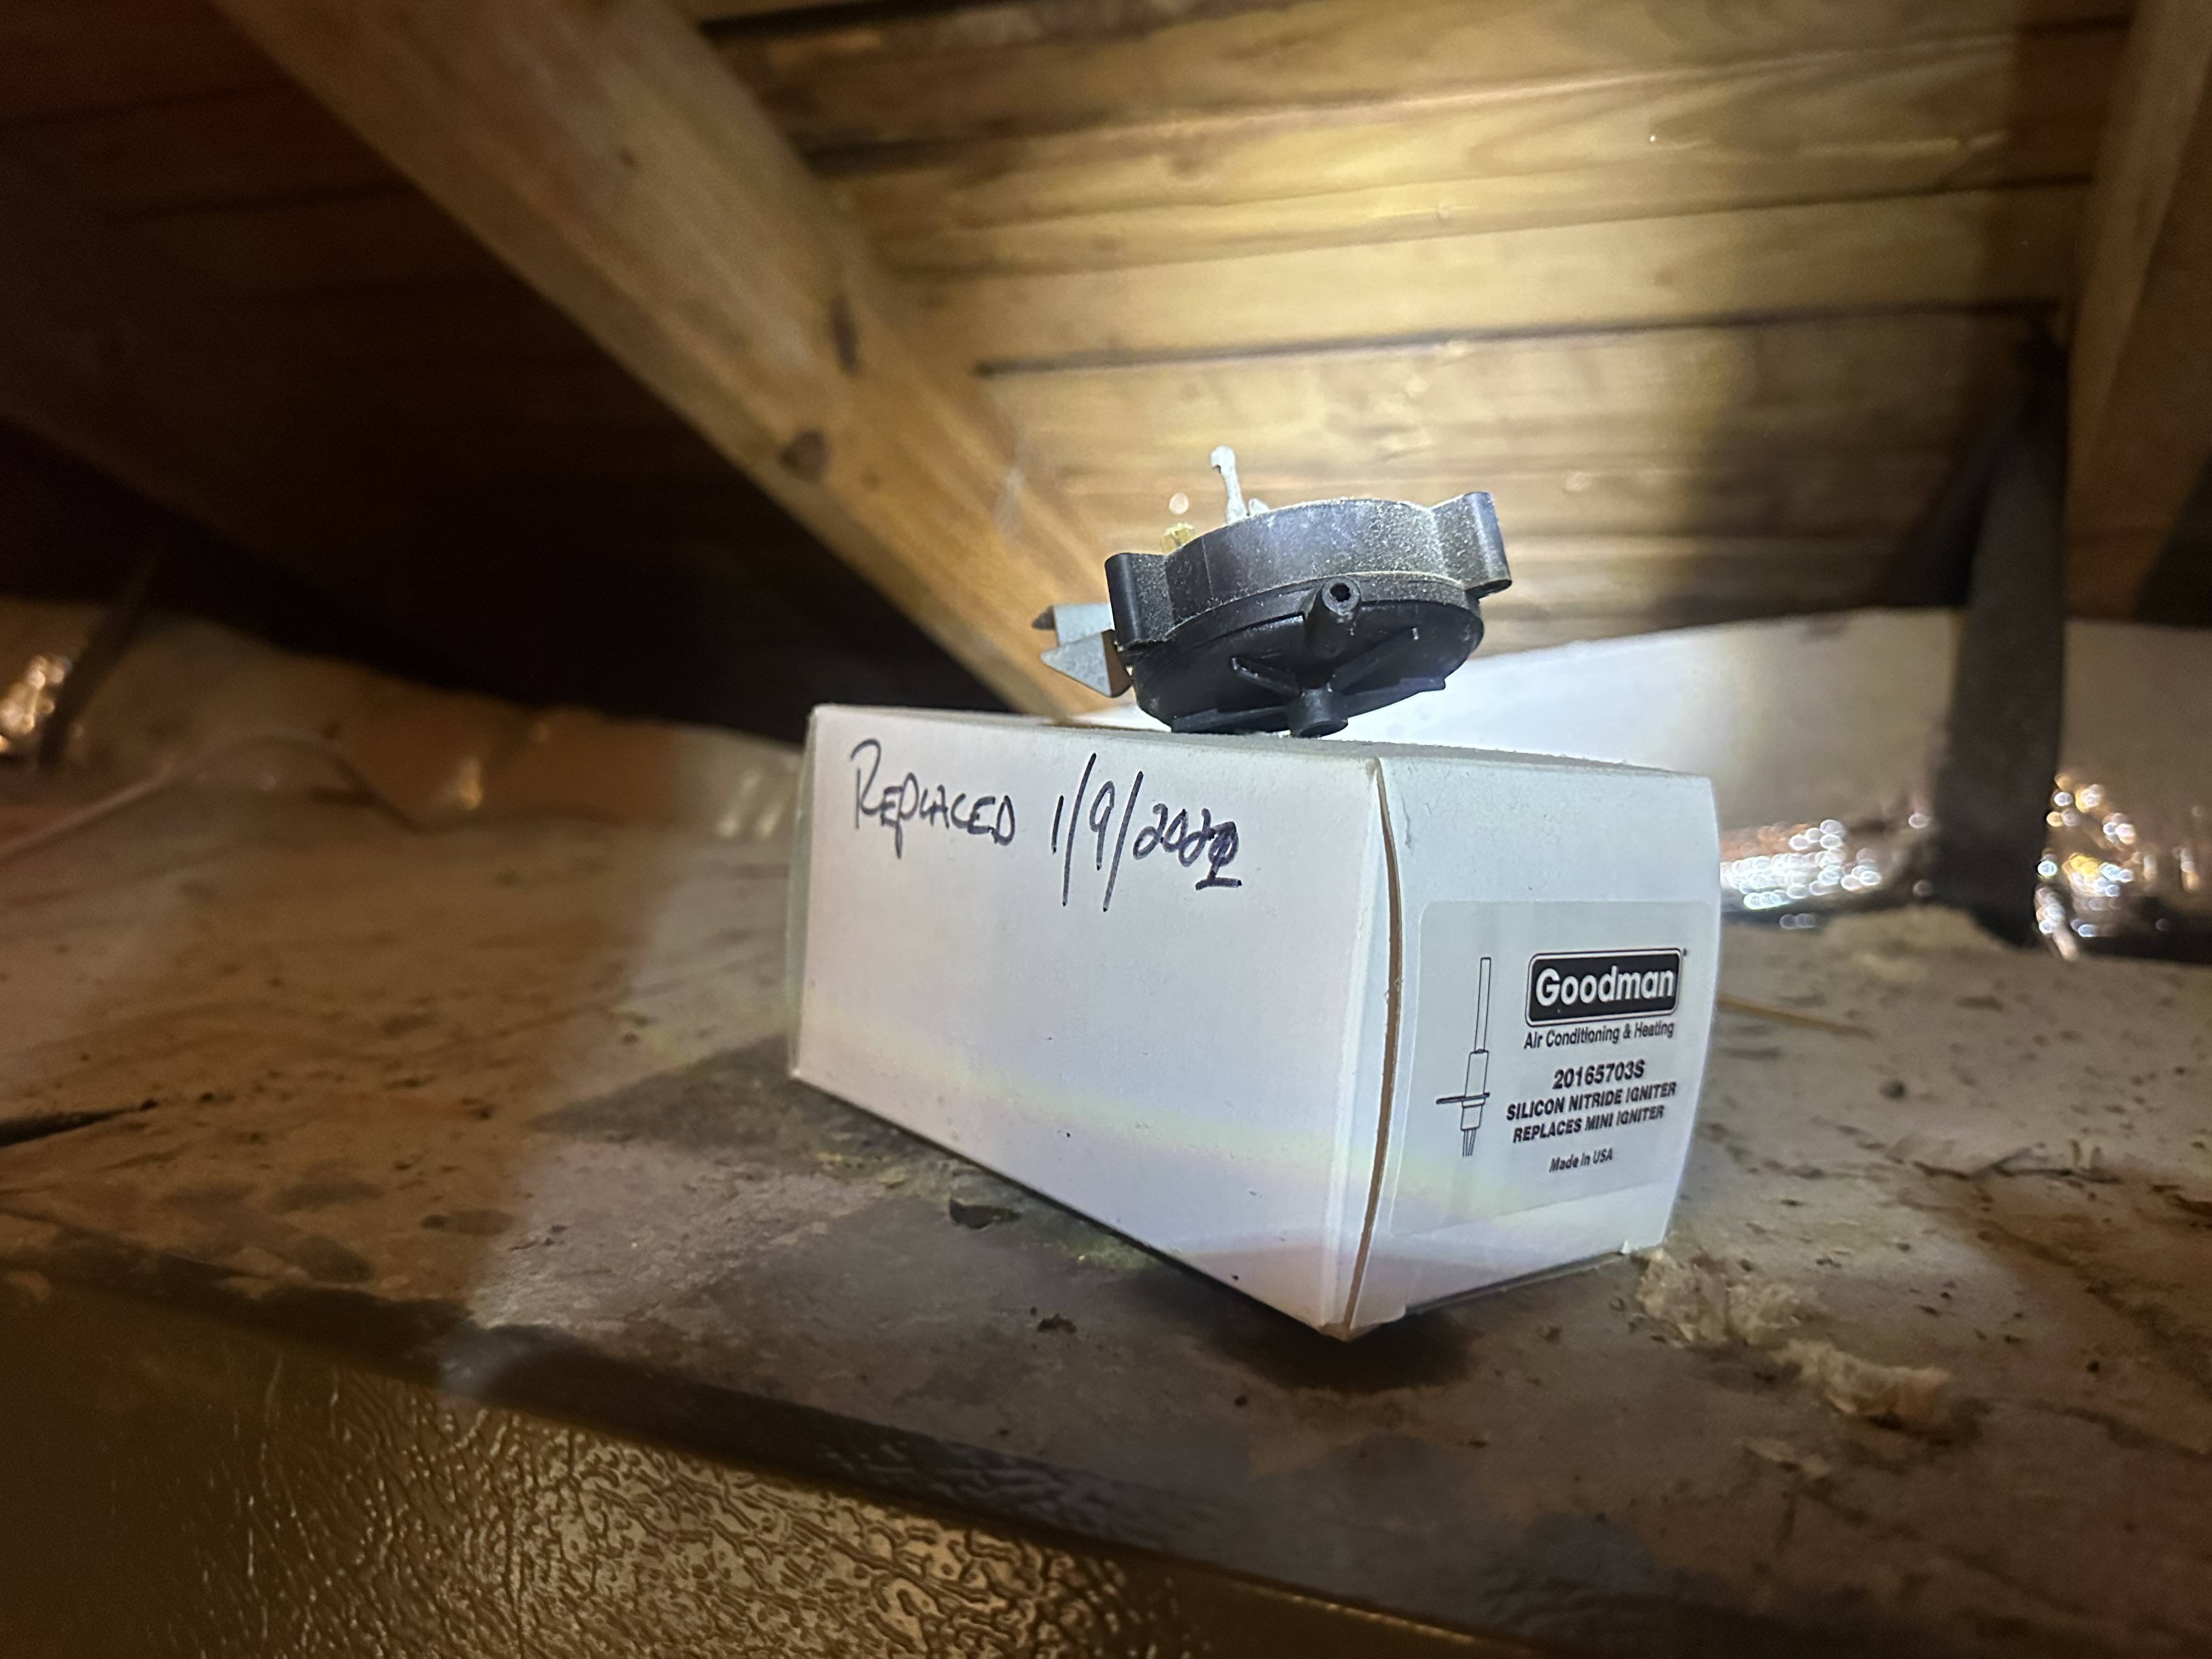
Last Service Record: Recent Service Records Noted
This photo shows the most recent service records (or replacement parts with dates replaced) found on the heating equipment during inspection.
 |  |
 |
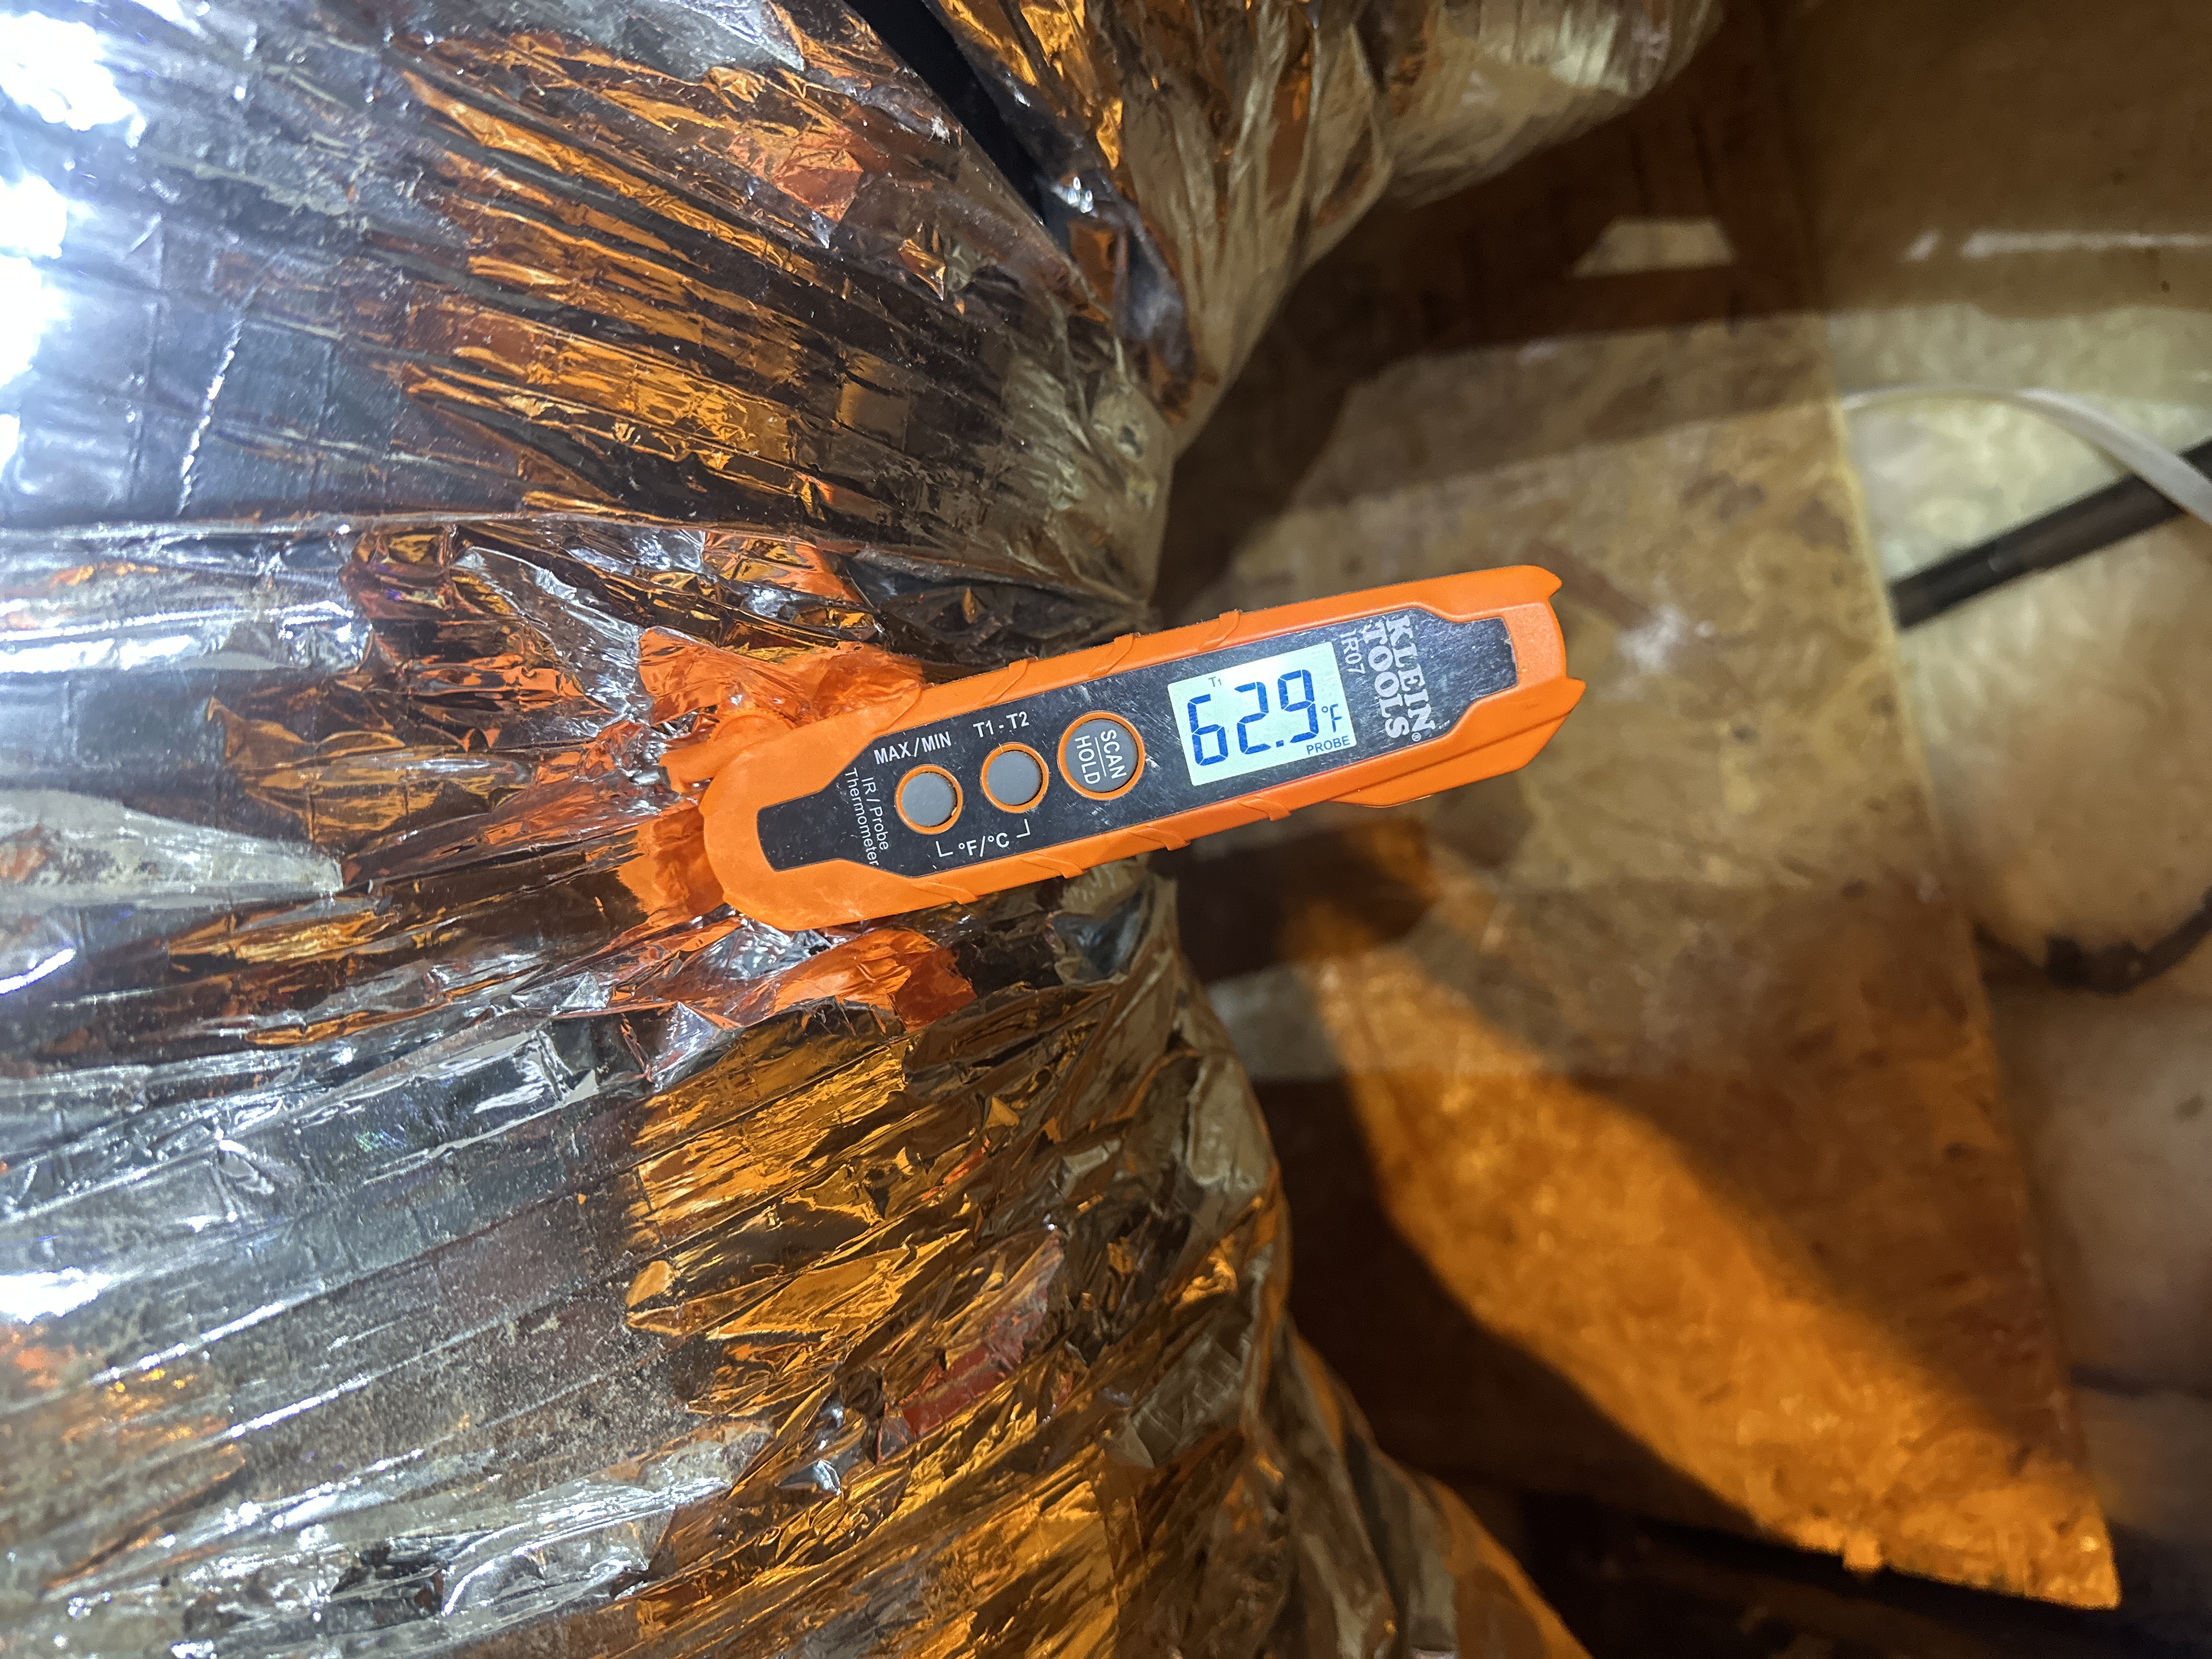
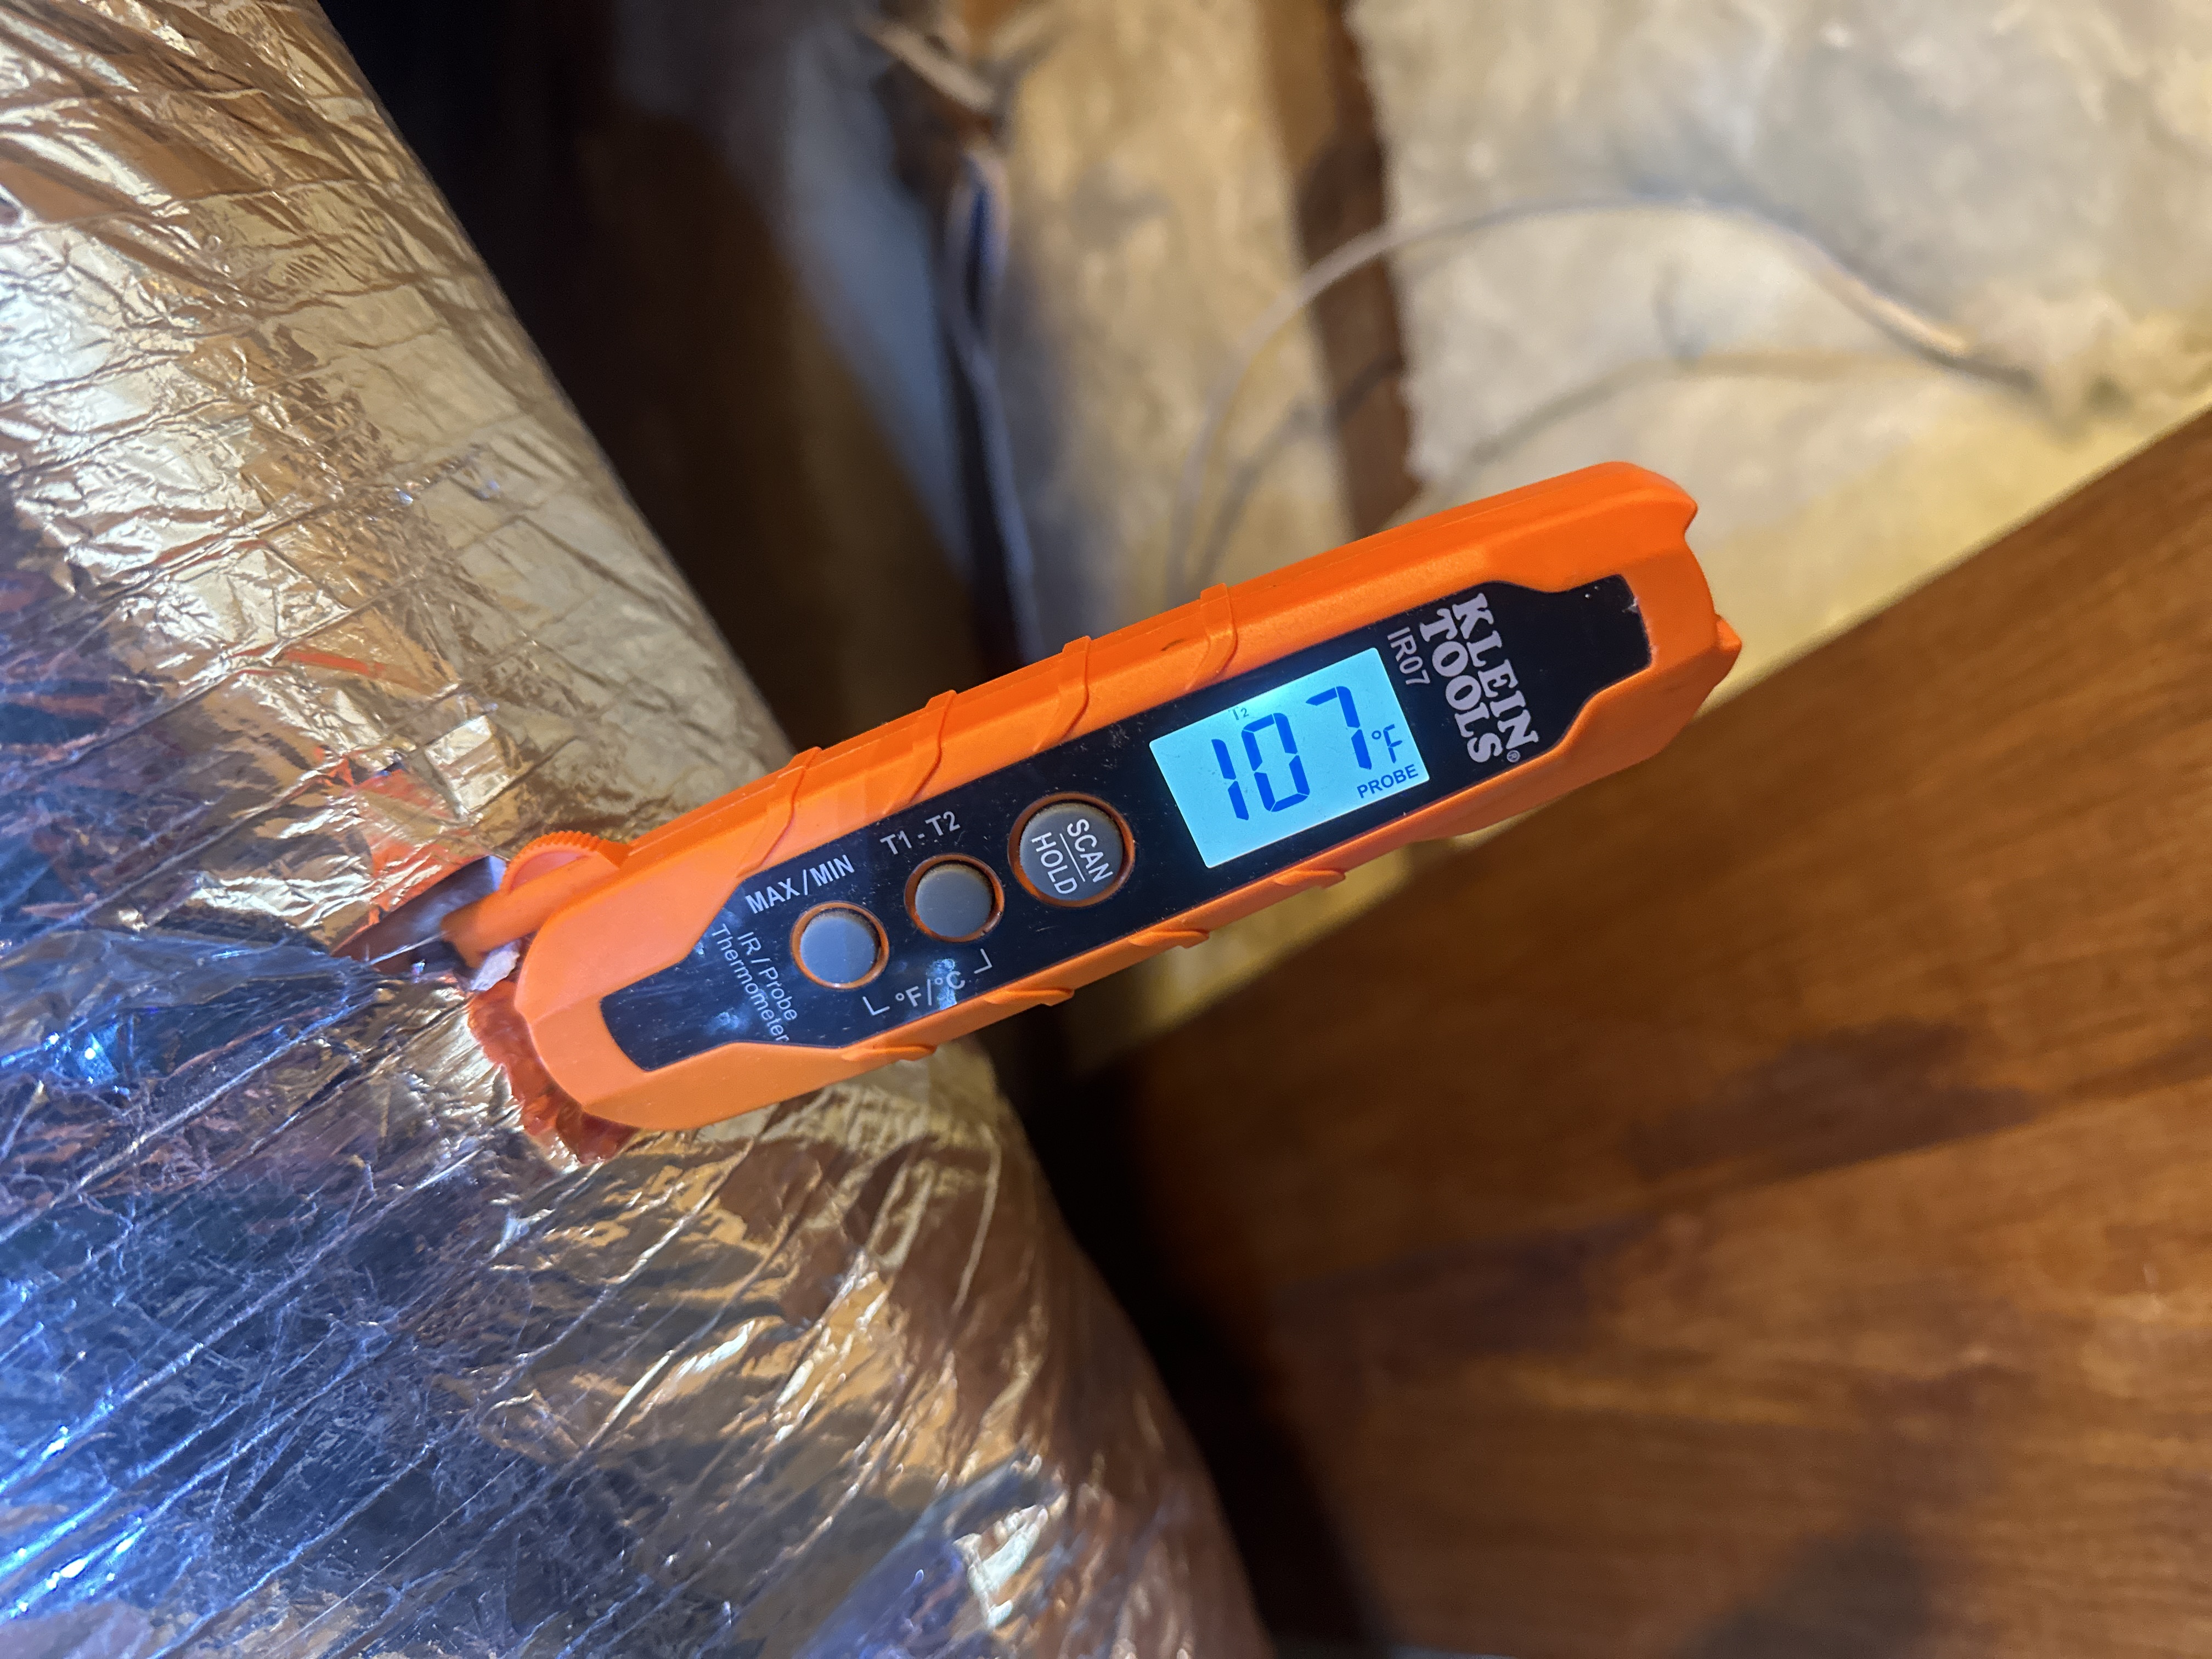
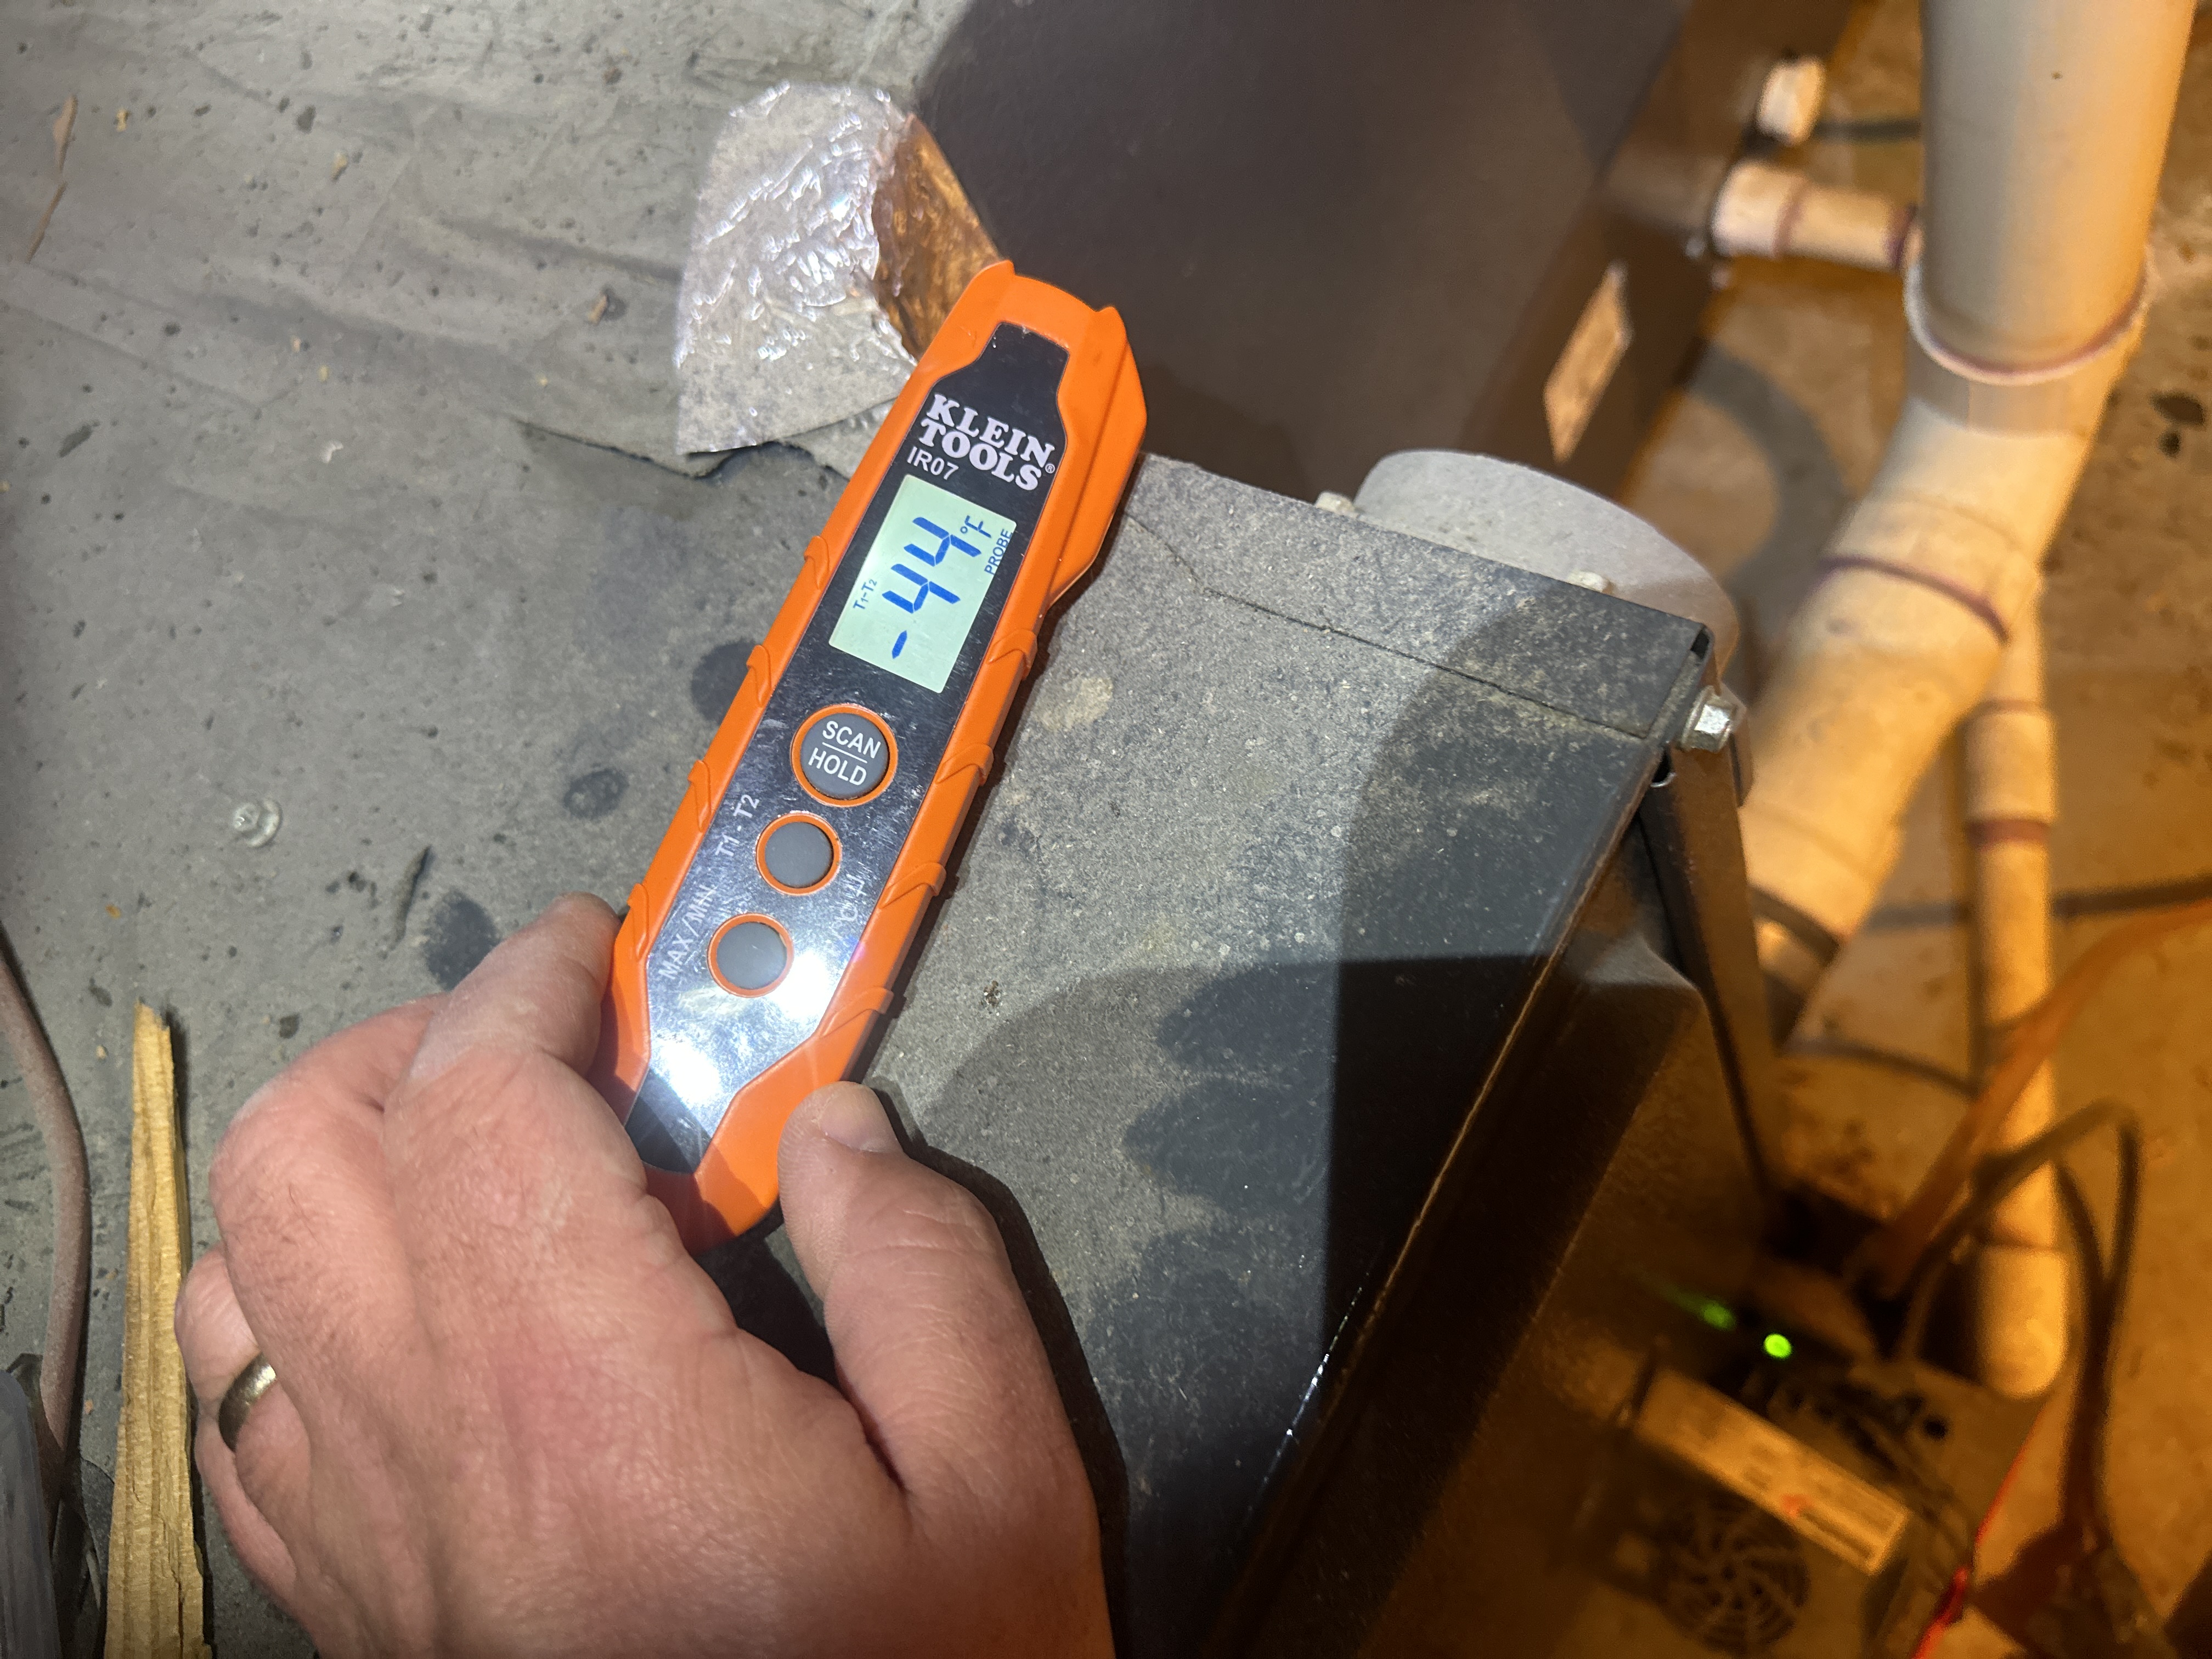
The temperature was taken while the heat was running before and after the furnace. The unconditioned air was found to be 63 degrees, and the heated air was found to be 107 degrees. This shows a 44 degree increase in air temperature, indicating that the furnace is running properly
 |  |
 |  |
Air Filters
Filtration Systems: Disposable
The heating and cooling system has disposable air filters installed. These should be changed quarterly or more to ensure proper air flow at the furnace. Be sure to install the filters with the arrows pointing in the same direction as the air flow in the furnace.
 |
The dirty air filter(s) for the HVAC system should be replaced. Plan on replacing air filters every 2-3 months if not more often.
Cooling Systems and Heat Pumps
Heat Pump Present
The following list is a minimum set of requirements to be expected of heat pump or air conditioning servicing. I provide these as a courtesy to show they types of check-ups that should be expected from a professional servicing.
- Check compressor efficiency
- Check refrigerant level
- Clean the condenser coil
- Change or clean air filters
- Inspect contactors and wiring
- Inspect drive-sheaves, pulleys and belts
- Check and adjust for proper air flow
- Clean the blower motor as needed
- Lubricate all motors and shaft bearings
- Check, calibrate and program the thermostats and be sure the thermostat has adequate batteries as needed
- Check unit smoke detector, clean filter if applicable
- Check safety disconnect, laser-temp -- check across contacts
Manufacturer: Goodman
Data Plate: Shown here
This shows the data plate from the exterior compressor and interior evaporator coils.
System Type: Air Source
Listed Nominal Capacity: 2 Tons
Efficiency: 13 Seer
Energy Source: Electric
Age: 2008
The insulation for the refrigerant lines for the AC is damaged and requires repair. This should be done to ensure reliable and efficient performance from this unit. .
 |
The condensation line for the air conditioner in the attic terminates against the foundation wall outside the house. I recommend extending this away from the foundation to prevent the water from seeping under the house.
 |
The air conditioning system and condensate control system could not be tested during inspection. Outdoor temperatures should exceed 65 degrees F for at least 24-hours or the air conditioning equipment can be damaged by testing. I recommended having this system serviced and inspected prior to the next cooling season.
Heating and Cooling Distribution Systems
Heat Source in Each Room: Present
Distribution Method: Forced Air / Ducts
Mechanical Ventilation Systems
Bath Fan Ducting: Long Duct Run - Not Recommended
Kitchen Fan Ducting: Ductwork not visible
Determining proper ventilation to the exterior from kitchen, bath and laundry fans can be tricky as exhaust fan ductwork is often concealed behind finishes and fan terminations can be all over the house from the roof to the foundation, presenting difficulties for systematically checking every fan termination. During inspection, every effort is made to verify proper terminations of fan vents to the exterior, but it is possible to miss something here that is latent or concealed.
Whole House Fans, Ventilation and HRVs: No Mechanical Ventilation Found
The bathroom fan vent are done as an exceptionally long run. This can lead to condensation inside these vents and eventually, failure as the vent material saturates and pulls free from roof jack vents. For improved reliability I recommend re-routing these vents to discharge above the bathroom to ensure reliable performance.
Plumbing
Water Service Supply
Pipe Material: Black Hose
Water Supply: Public water
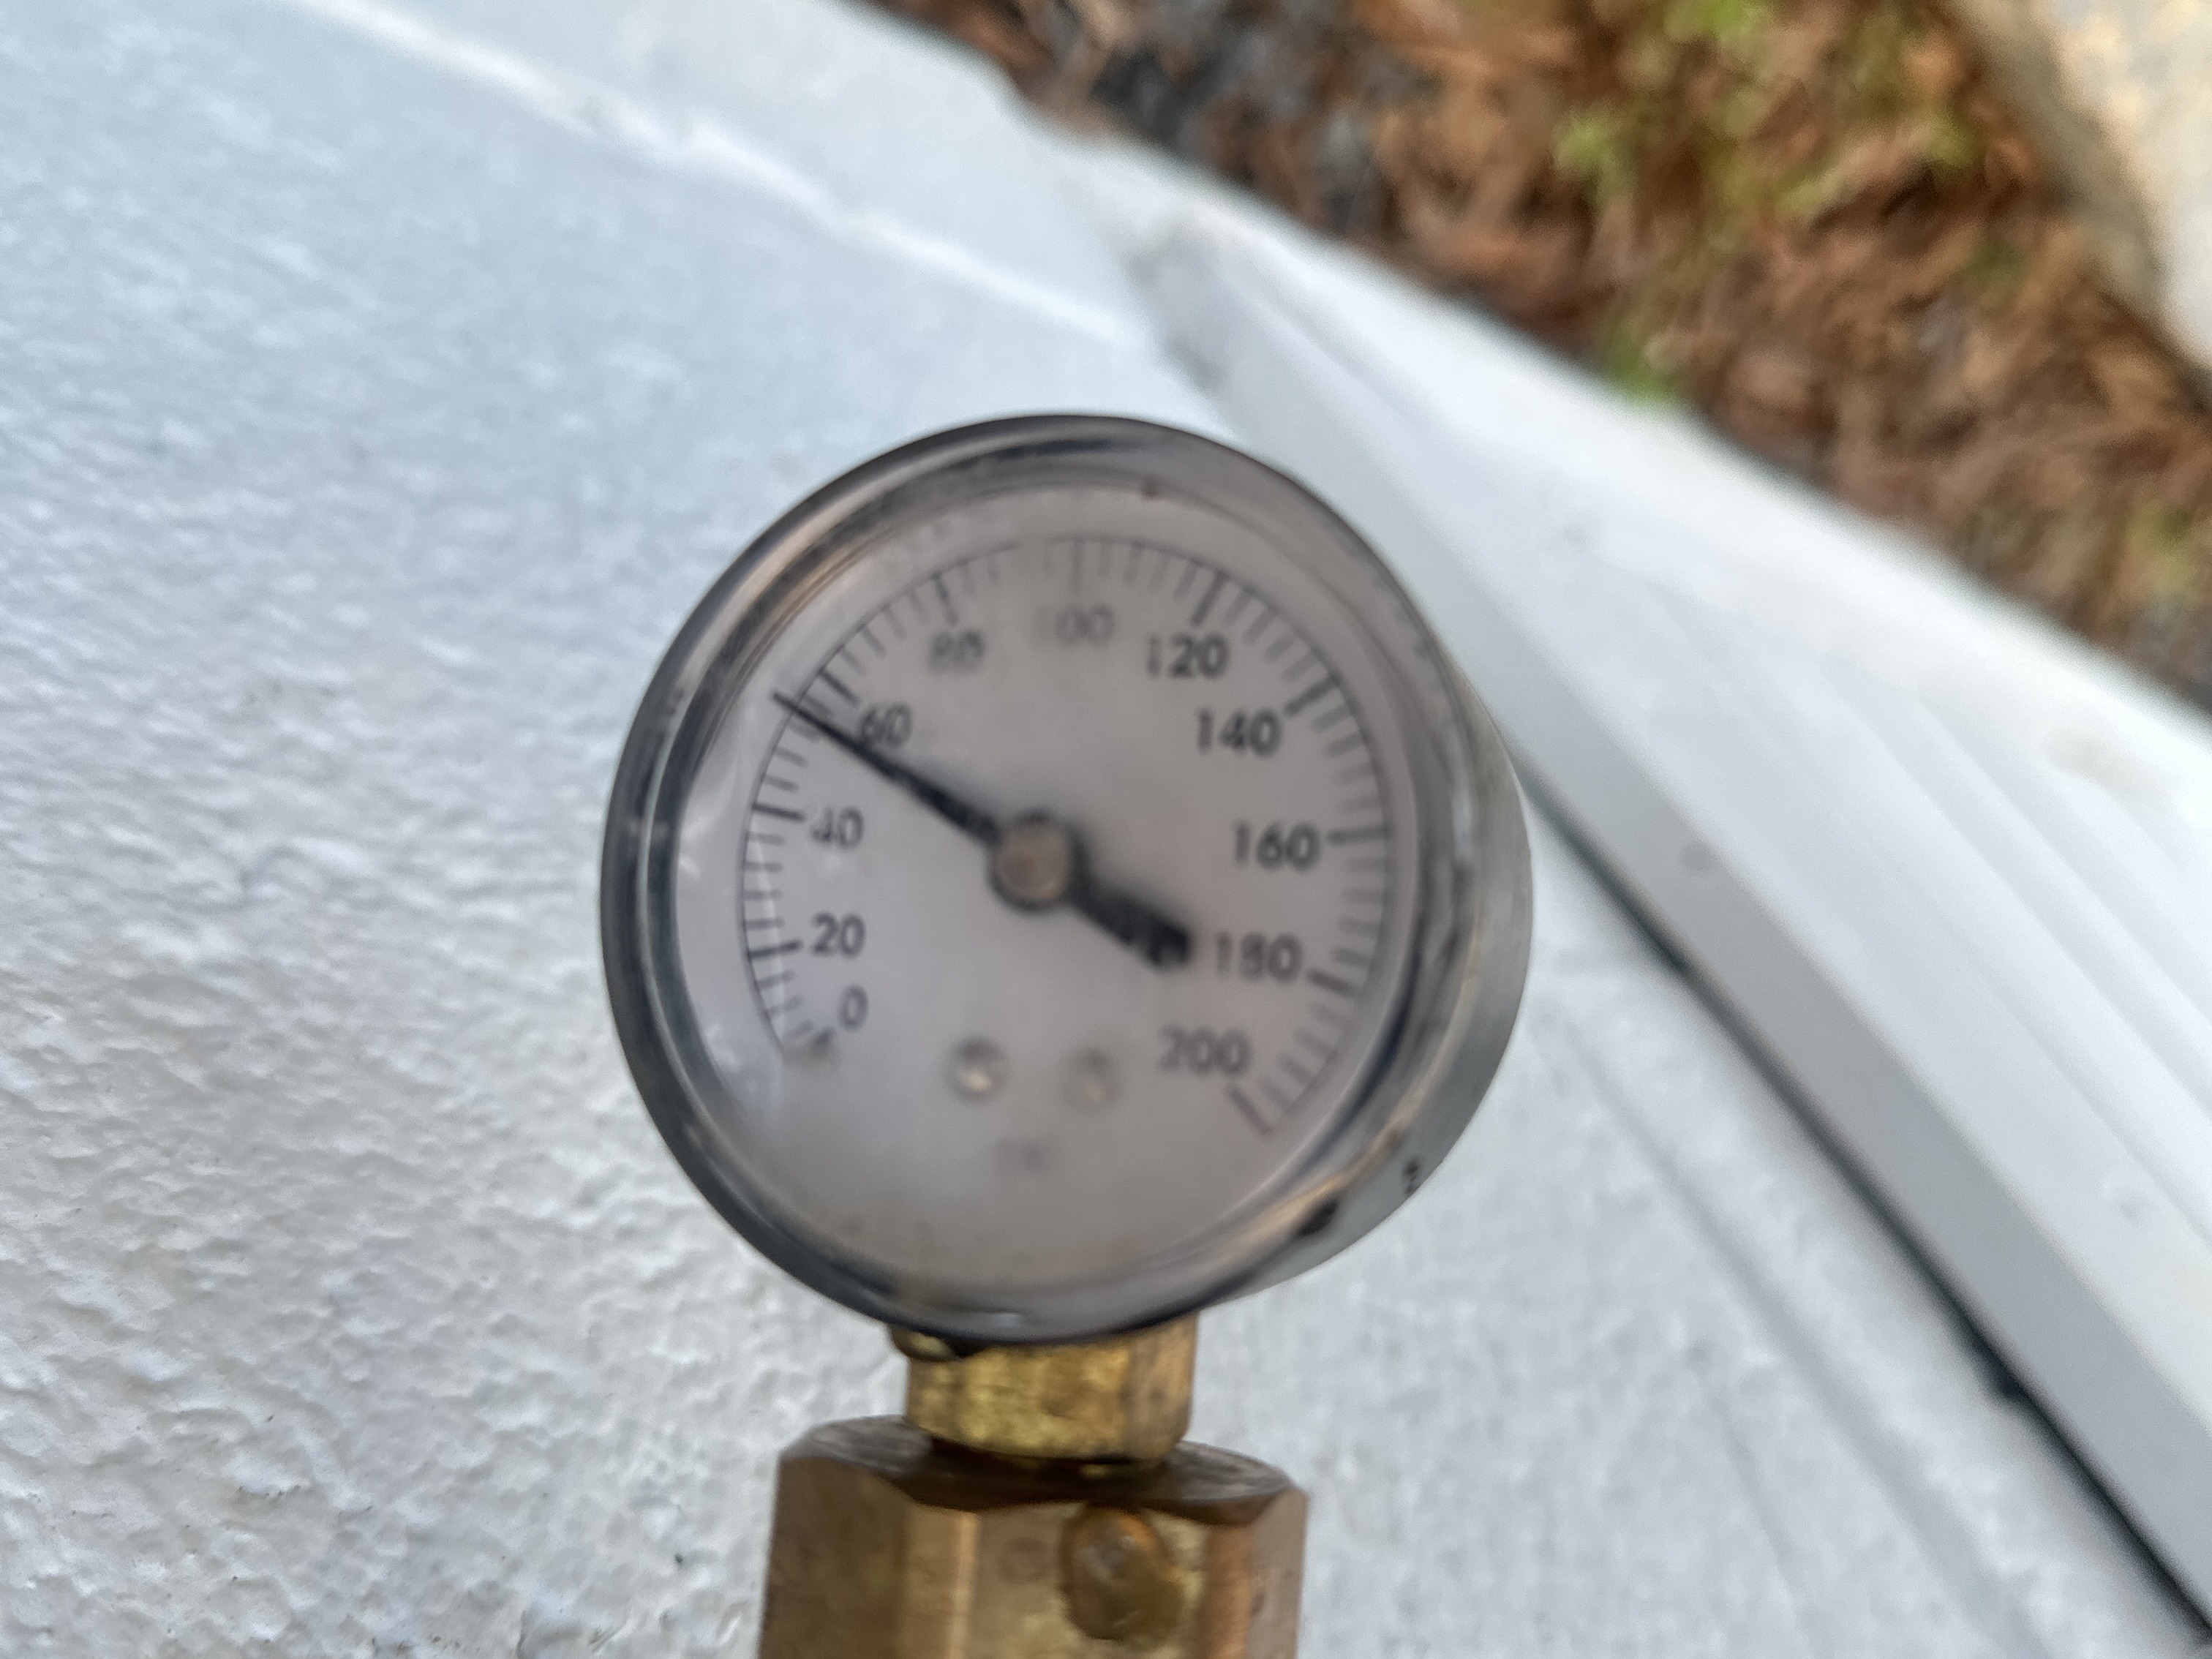
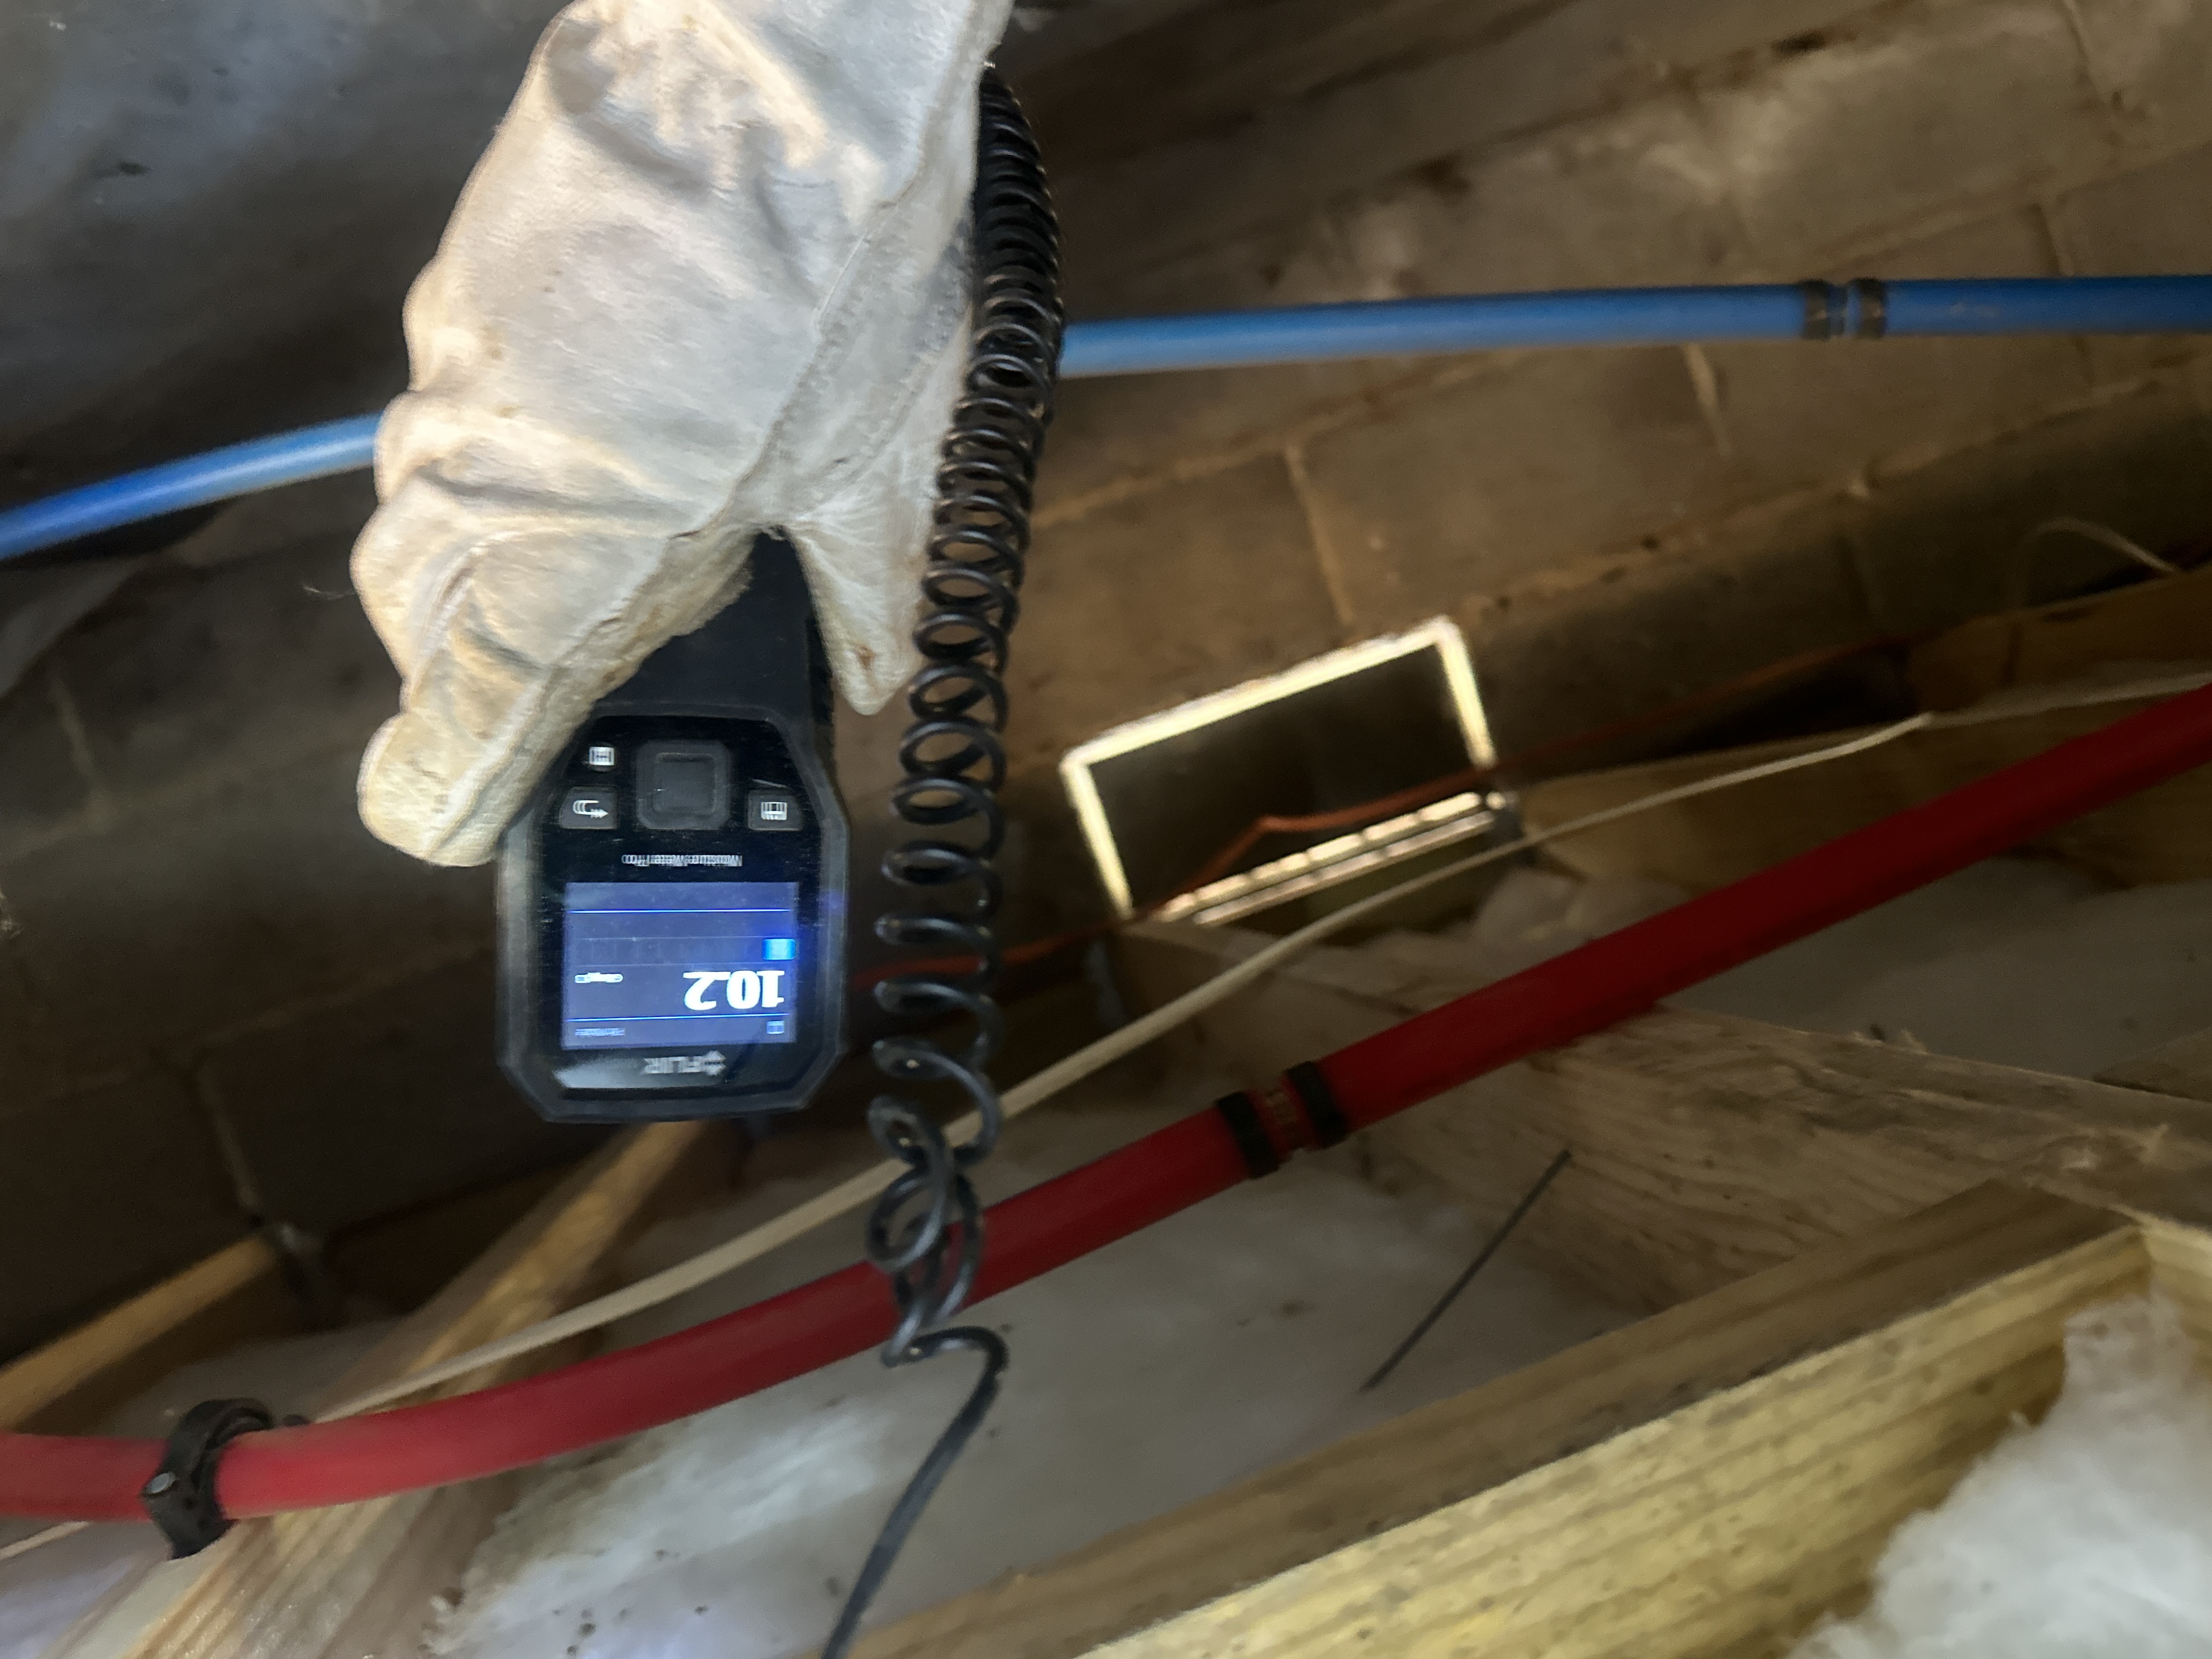
Water Pressure: 55 PSI
This shows the water pressure tested during inspection (55 PSI). Generally, "normal water pressure," should be between 50-75 PSI, though pressures below 50 may result in poor functional flow to fixtures. Water pressures in excess of 75 PSI risk damaging supply piping components and should be controlled with a pressure reducing valve.
 |
Pressure Reducing Valve: None noted
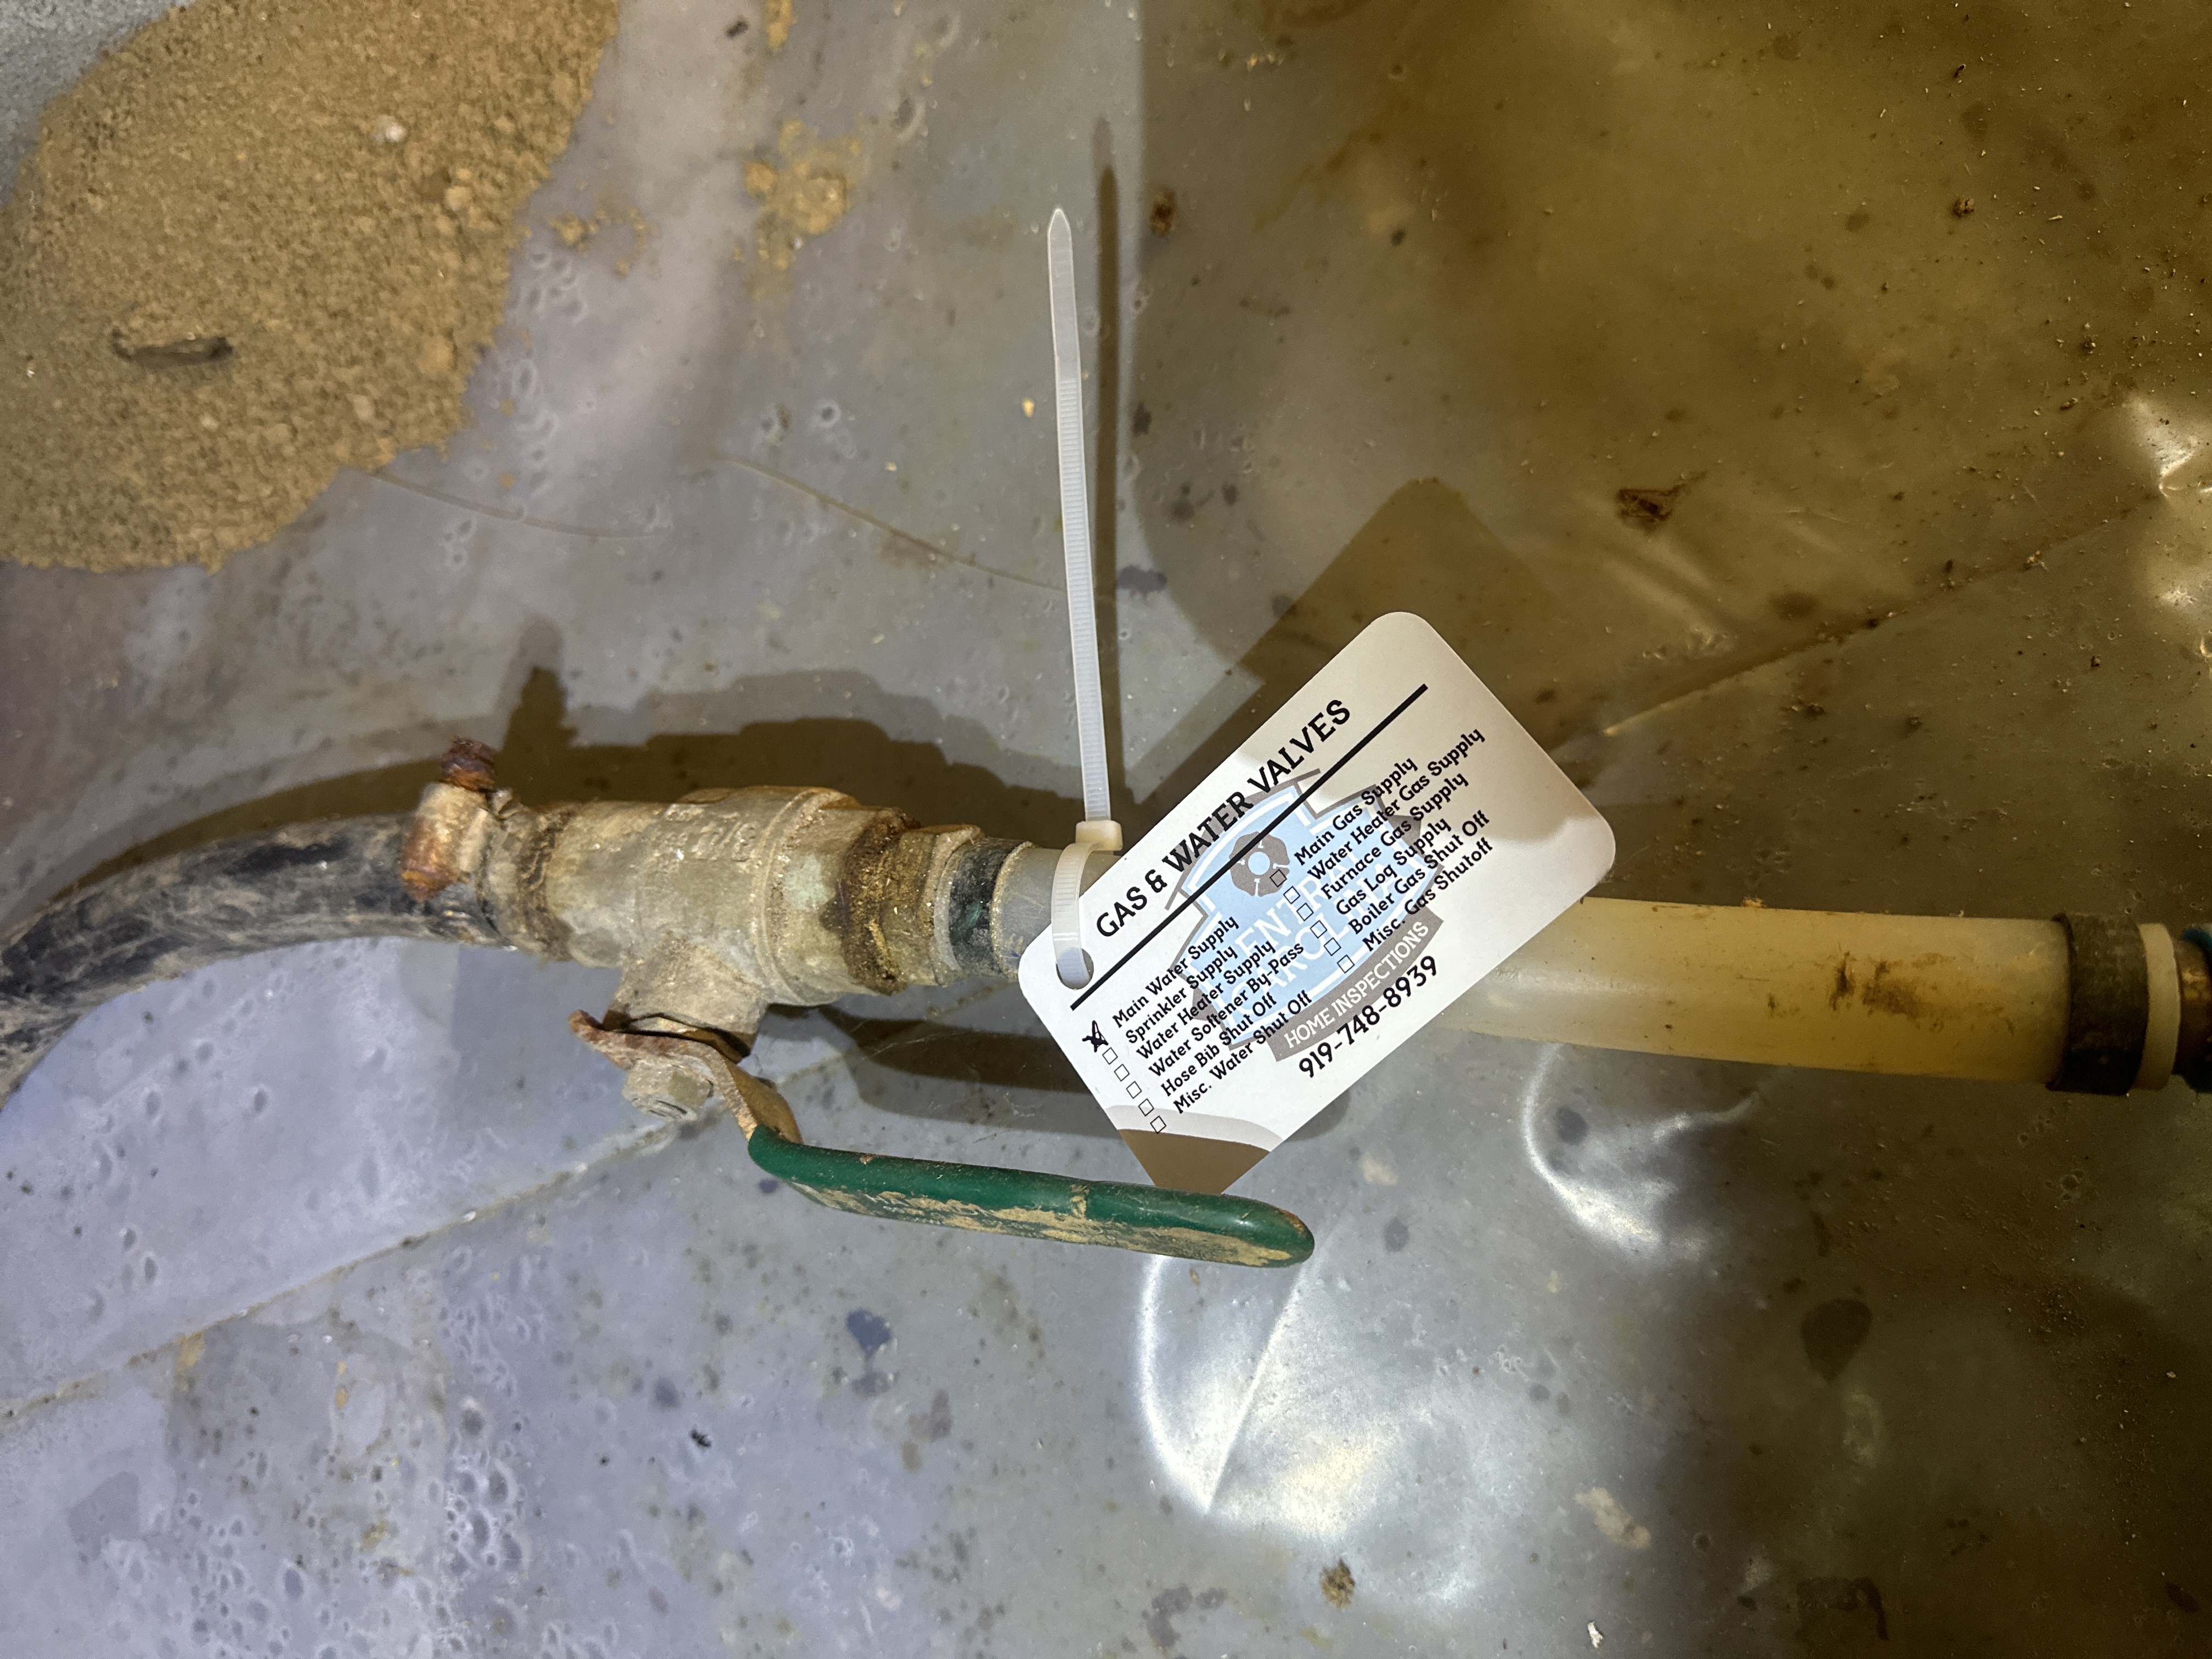
Main Water Shut-off Location: Water Shut Off Location Noted
This shows the location of the main water shut off located in the crawl space.
 |
Distribution Pipe
Pipe Insulation: None noted. Not required.
Supply Pipe Materials: PEX
This building has PEX tubing used for supply piping. Crimp ring connections on PEX pipe have very specific installation guidelines and most of these connections will not be visible at the time of inspection (just like any other type of pipe fitting). It is beyond the scope of this inspection to evaluate a significant number of these connections.. Any leaking noted at fittings should result in more careful inspection of all of the plumbing system by a licensed plumber that is experienced in the installation of these types of connections
Functional Flow: Average
Circulation Pump: None Noted
Waste Pipe and Discharge
Discharge Type: Public Sewer
Waste and Vent Pipe Materials: PVC
Location of Sewer Cleanout: Side Yard
Sewer cleanouts located in the front and back yards.
Water Heater
System Type: Tank
Manufacturer: Rheem
Data Plate: Shown Here
This shows the data plate for this water heater.
 |
Size: 40 gal
Age: 2021
Energy Source: Electricity
Drain Pan: Present with drain
Expansion Tank: None Noted - Recommended
Relief Valve: Present - Not Tested
A temperature and pressure relief valve (TPRV) is required on all water heaters to discharge any excessive pressure within the tank. A discharge pipe should be attached to the valve and directed to a safe location away from body contact. Newer installations must be directed to the building exterior or to an approved indoor drain receptor. Most manufacturers suggest that homeowners test these valves at least once a year by lifting the lever to ensure the valve discharges properly and also recommend inspection of these safety devices every three years. The picture here shows a typical TPRV. They may also be found on the side of the heater on some models. I do not test these valves due to the possibility that they may leak after testing. A leaking or inoperative TPRV should be replaced immediately by a licensed plumber.
Due to inconsistencies between both UPC and IPC Plumbing codes, and water heater manufacturer's instructions, and TPRV manufacturer instructions, it is not actually possible to install the drain from the Water Heater TPRV "properly." There are conflicts with distance of termination to the floor/ground, types of pipes approved, and diameters of pipes approved. Additional confusion is added when jurisdictional inspectors approve installations/materials specifically not allowed by both codes and manufacturers. My recommendations will vary depending on the installation and will be included in the applicable narratives below.
Most codes defer to manufacturer instructions and I favor those recommendations. The yellow tag on the valve states clearly the termination should be 6" above the floor which is more consistent with the UPC code requirements.
 (1) (1).jpg)
Bollard: None Required
Location: Outside Steel Cabinet
An expansion tank is recommended for the water heater; these are required if the house has a closed plumbing system. Expansion tanks help reduce pressure on the plumbing system by creating a buffer or a place for water to expand into as water swells during thermal expansion. Installation of expansion or pressure tanks is modern installation practice and will be required if a pressure reducing valve has been installed on a public water supply. Consult with a qualified plumber to install.
The outside steel cabinet that the water heater is located in has a hole in the top which would have been utilized with a gas water heater installation for a ventilation flue. Since this is an electric water heater, this hole should be capped to prevent rain water from entering the cabinet and causing premature deterioration to the water heater. I recommend this be completed by a qualified person.
 |
A water heater insulation wrap (also known as a water heater blanket) could be added to improve the thermal heating efficiency of the water heater. This would be especially helpful in this particular situation since the water heater is located outside.
 |
Water Temperature
Water Temperature Measured During Inspection: 113 Degrees F
The water heater temperature seemed to be set too low at the time of inspection - just 113 degrees F In the kitchen and 115 degrees F in the bathroom. The range of 115-125 degrees F is the generally recommended temperature. This is nearly impossible to measure precisely during a home inspection as water temperature can vary between fixtures. I try and test the water temperature in several places and take the median reading. Adjust water heater temperature as needed. For best practice, set water temperature at the water heater to 120 to 125 degrees F.
 (1) (4) (1).jpg) | 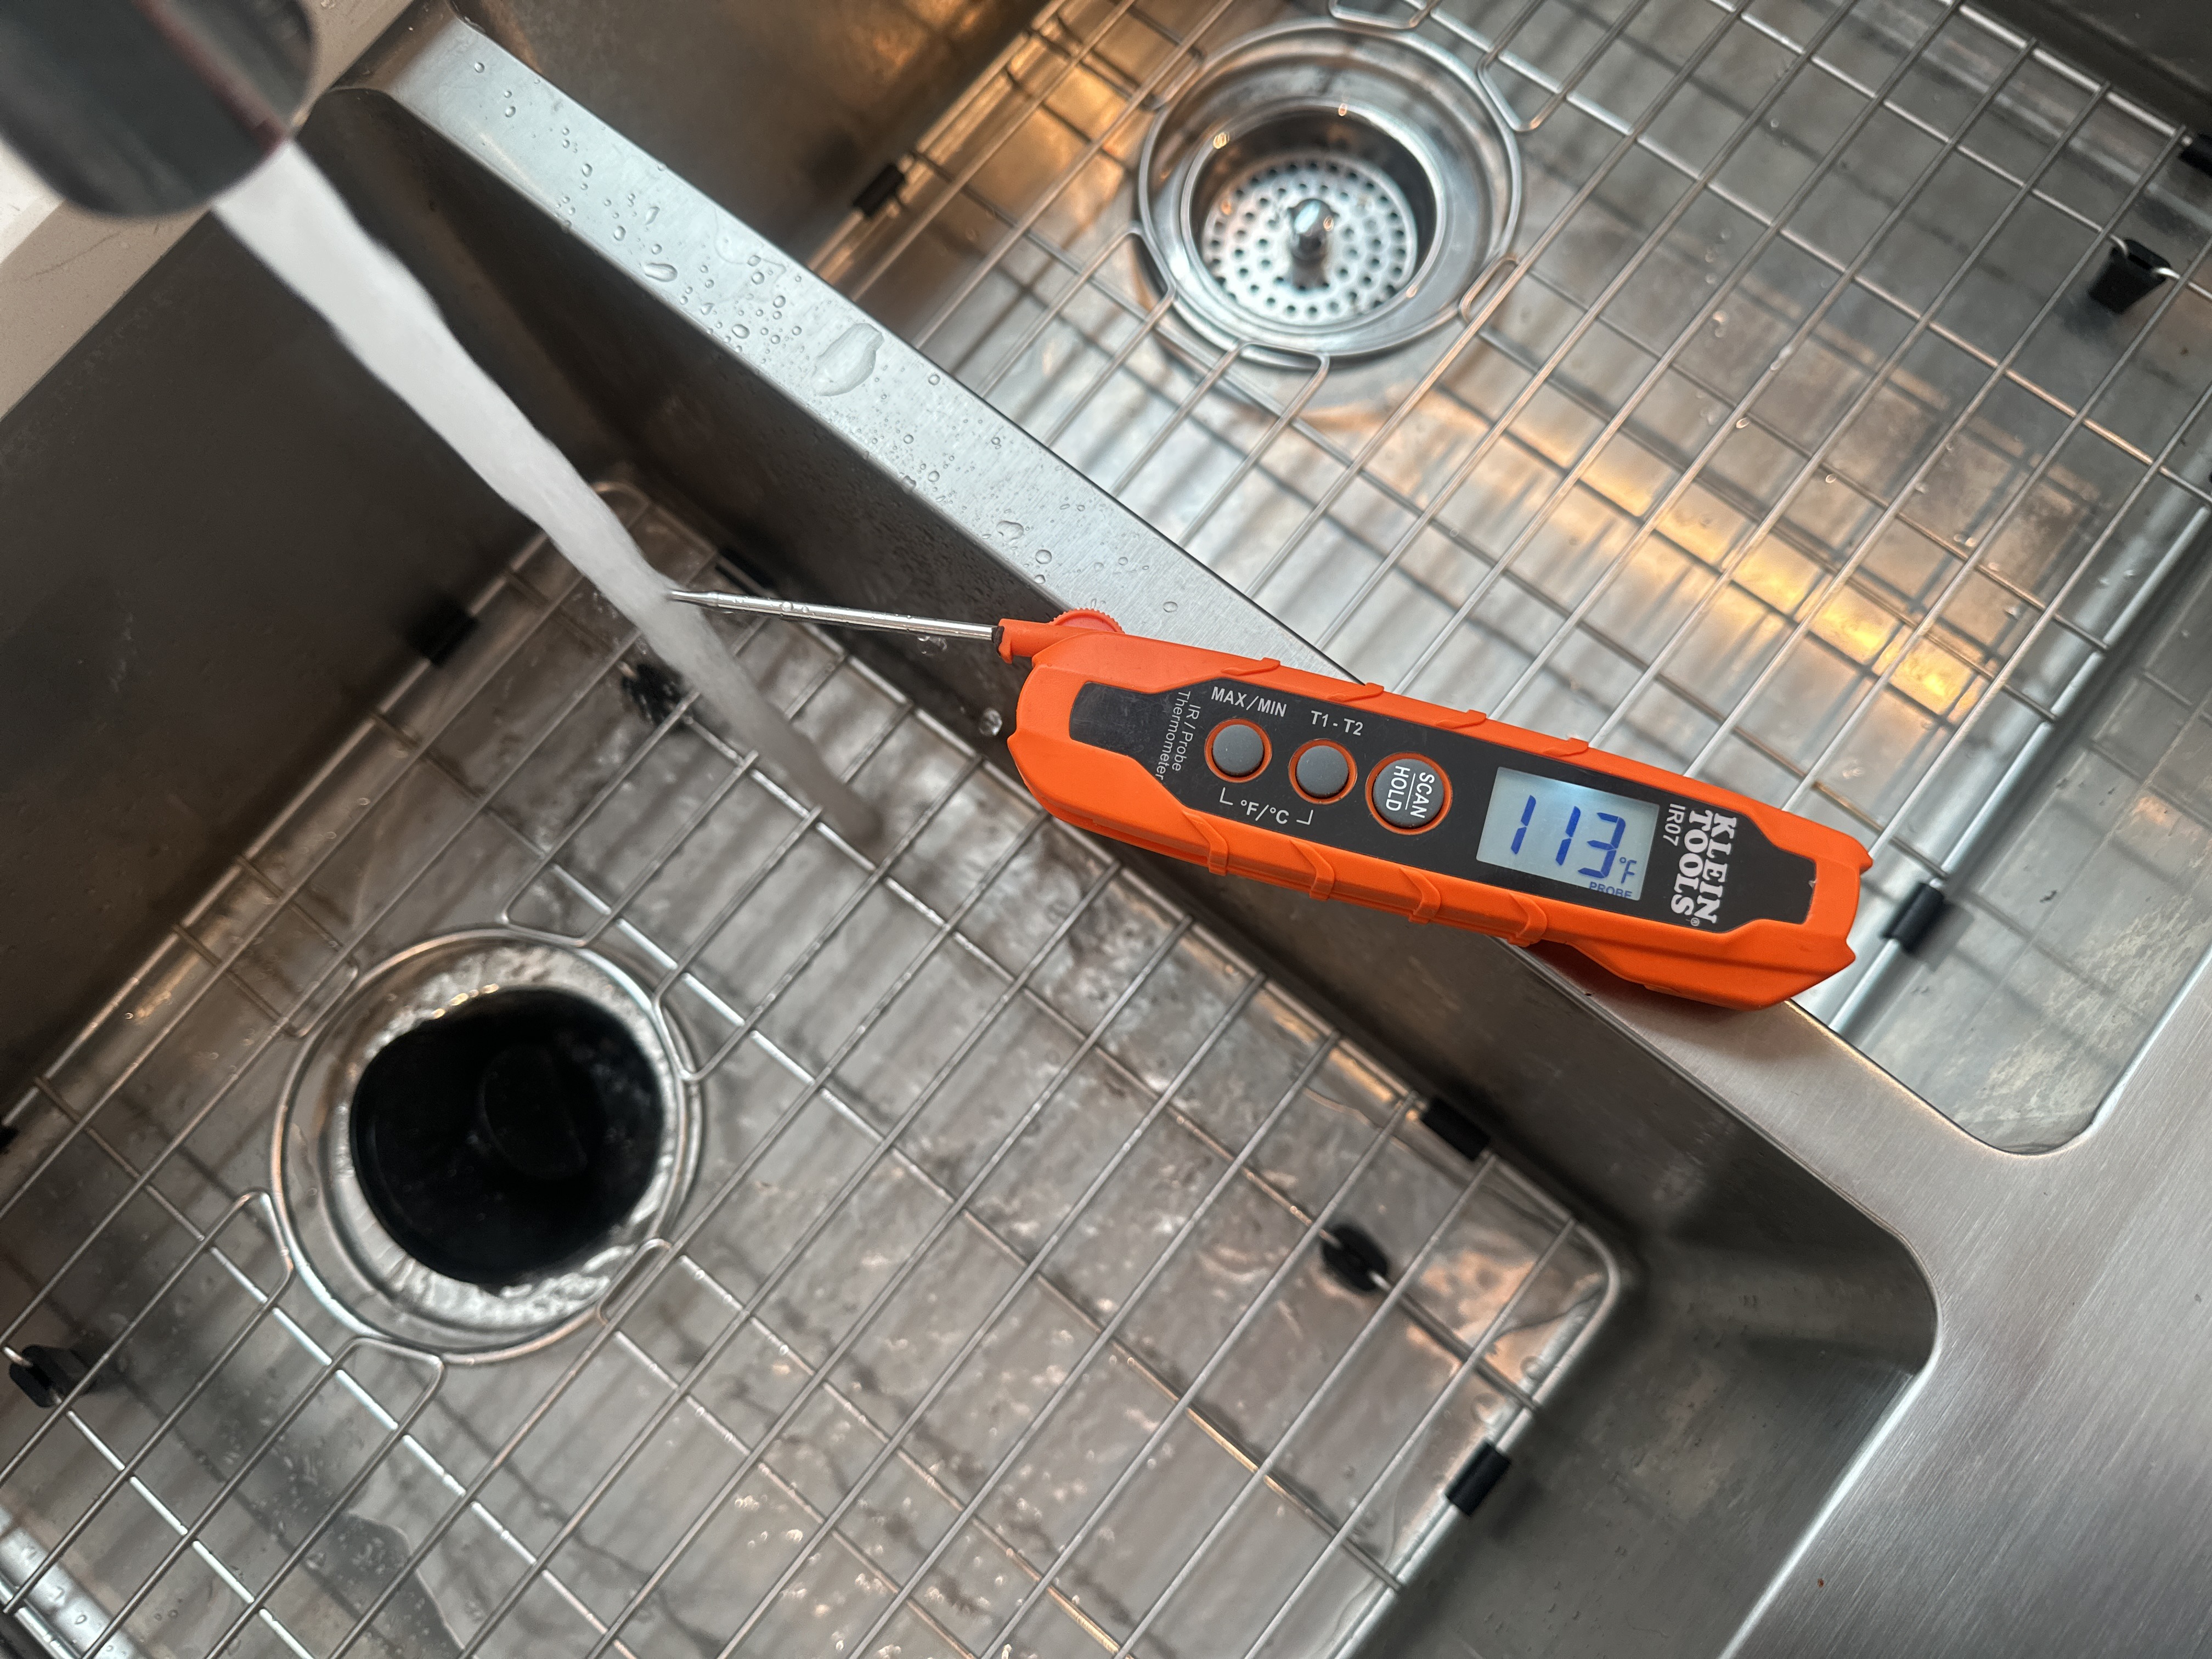 |
 |
Exterior Hose Bibs
Leaking (At Handle When Turned On)
The leaky hose bib at the east side of the house requires repair or replacement - it leaked from the faucet handle when the faucet was turned on and under pressure. This often requires tightening or replacing the packing around the handle stem.
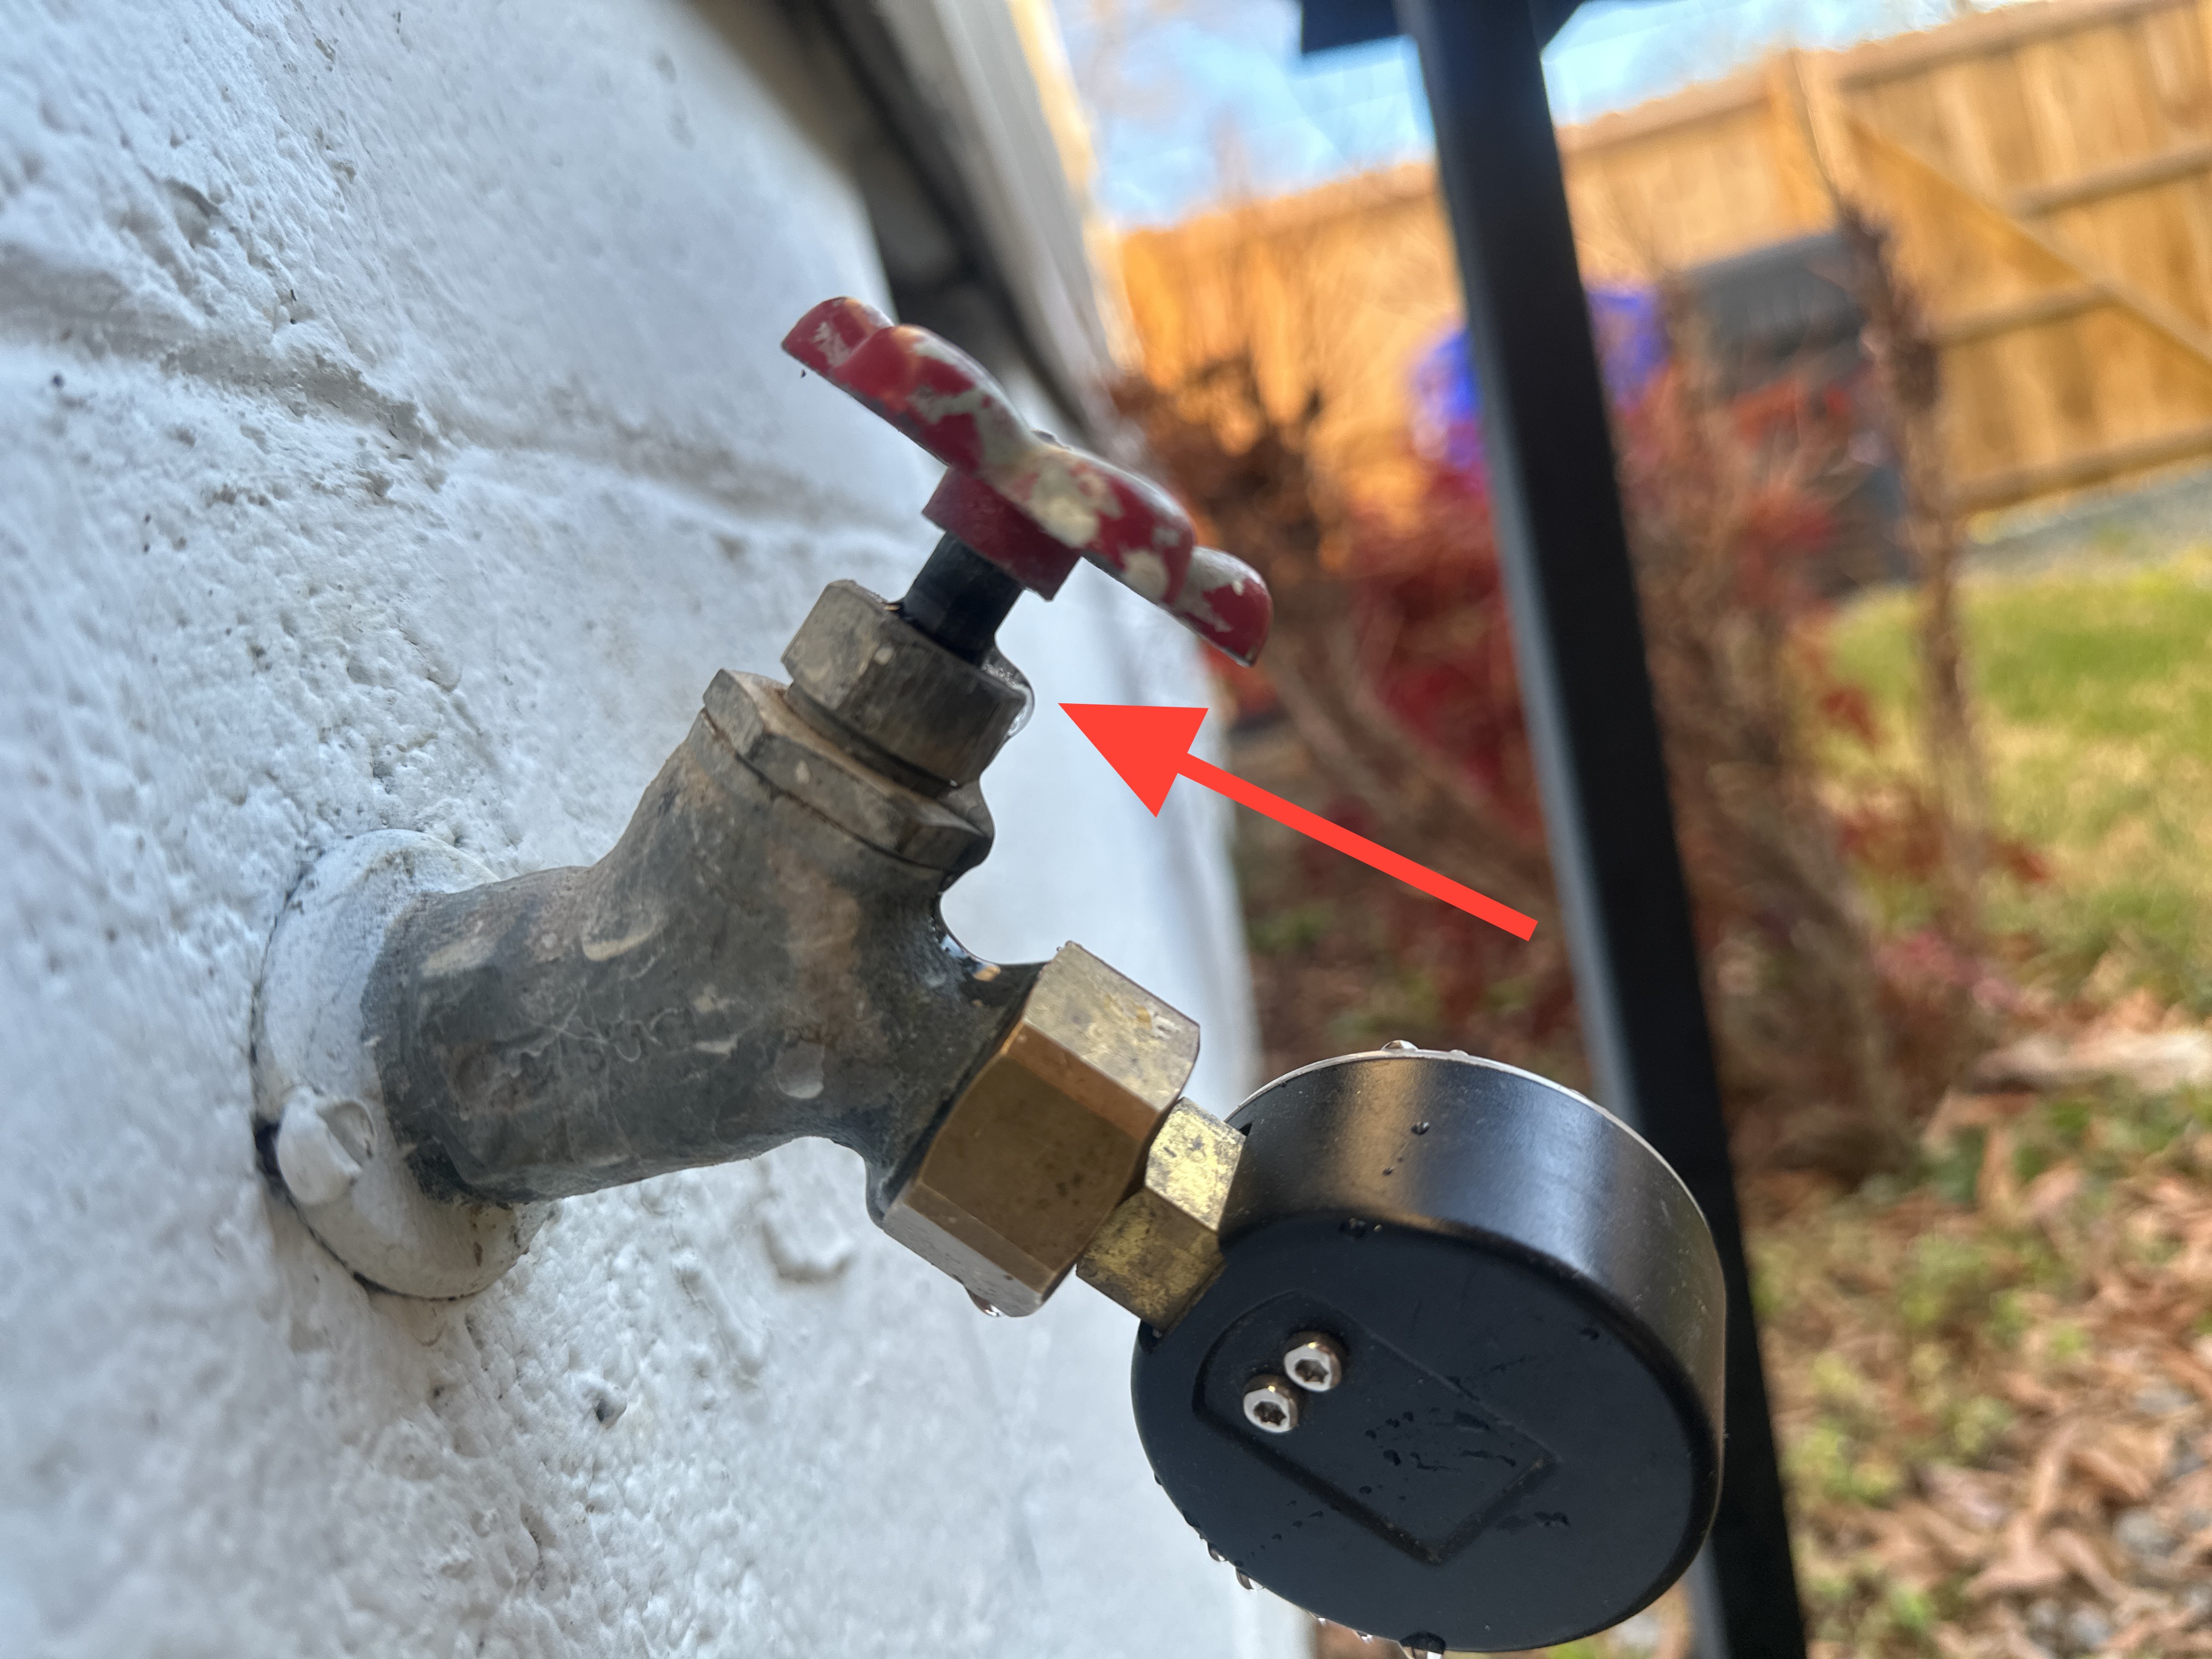 |
Interior
Floors and Floor Materials
Floor Materials: Wood Laminate, Ceramic Tile
Floor Settlement: None noted
Walls, Ceilings, Trim, Hallways and Closets
Wall and Ceiling Materials: Drywall
Nail pops were noted in the walls. This can sometimes be from one-time framing shrinkage or settlement or it can be more persistent form seasonal truss uplift or other seasonal movements in the house frame. This latter cause can be more difficult to correct. If it is truss uplift, the truss cord needs to be better secured to the interior partition walls in the attic. I recommend repairing these nail pops and then monitoring for signs of on-going movement.
Wall Insulation and Air Bypass
Wall Insulation: Not Visible
Stairs and Railings
None
Interior Doors
Interior Doors: Hollow Core
The door stop system for the home is incomplete. I recommend systematically installing or repaired door stops to protect doors and wall finishes. Doors missing door stops include the office French doors, pantry doors, and the entry doors.
Not all instances of this condition have been photographed for reasons of report length and space. Therefore, this condition should be considered representative of what may exist in areas other than directly represented in this report. This area should be inspected by the individual or contractor making repairs to ensure all areas requiring repairs are located.
 |
Windows
Window Glazing: Double pane
Interior Window Frame: Vinyl
Window Styles: Sliding, Double hung
Window Brands Noted: Unknown
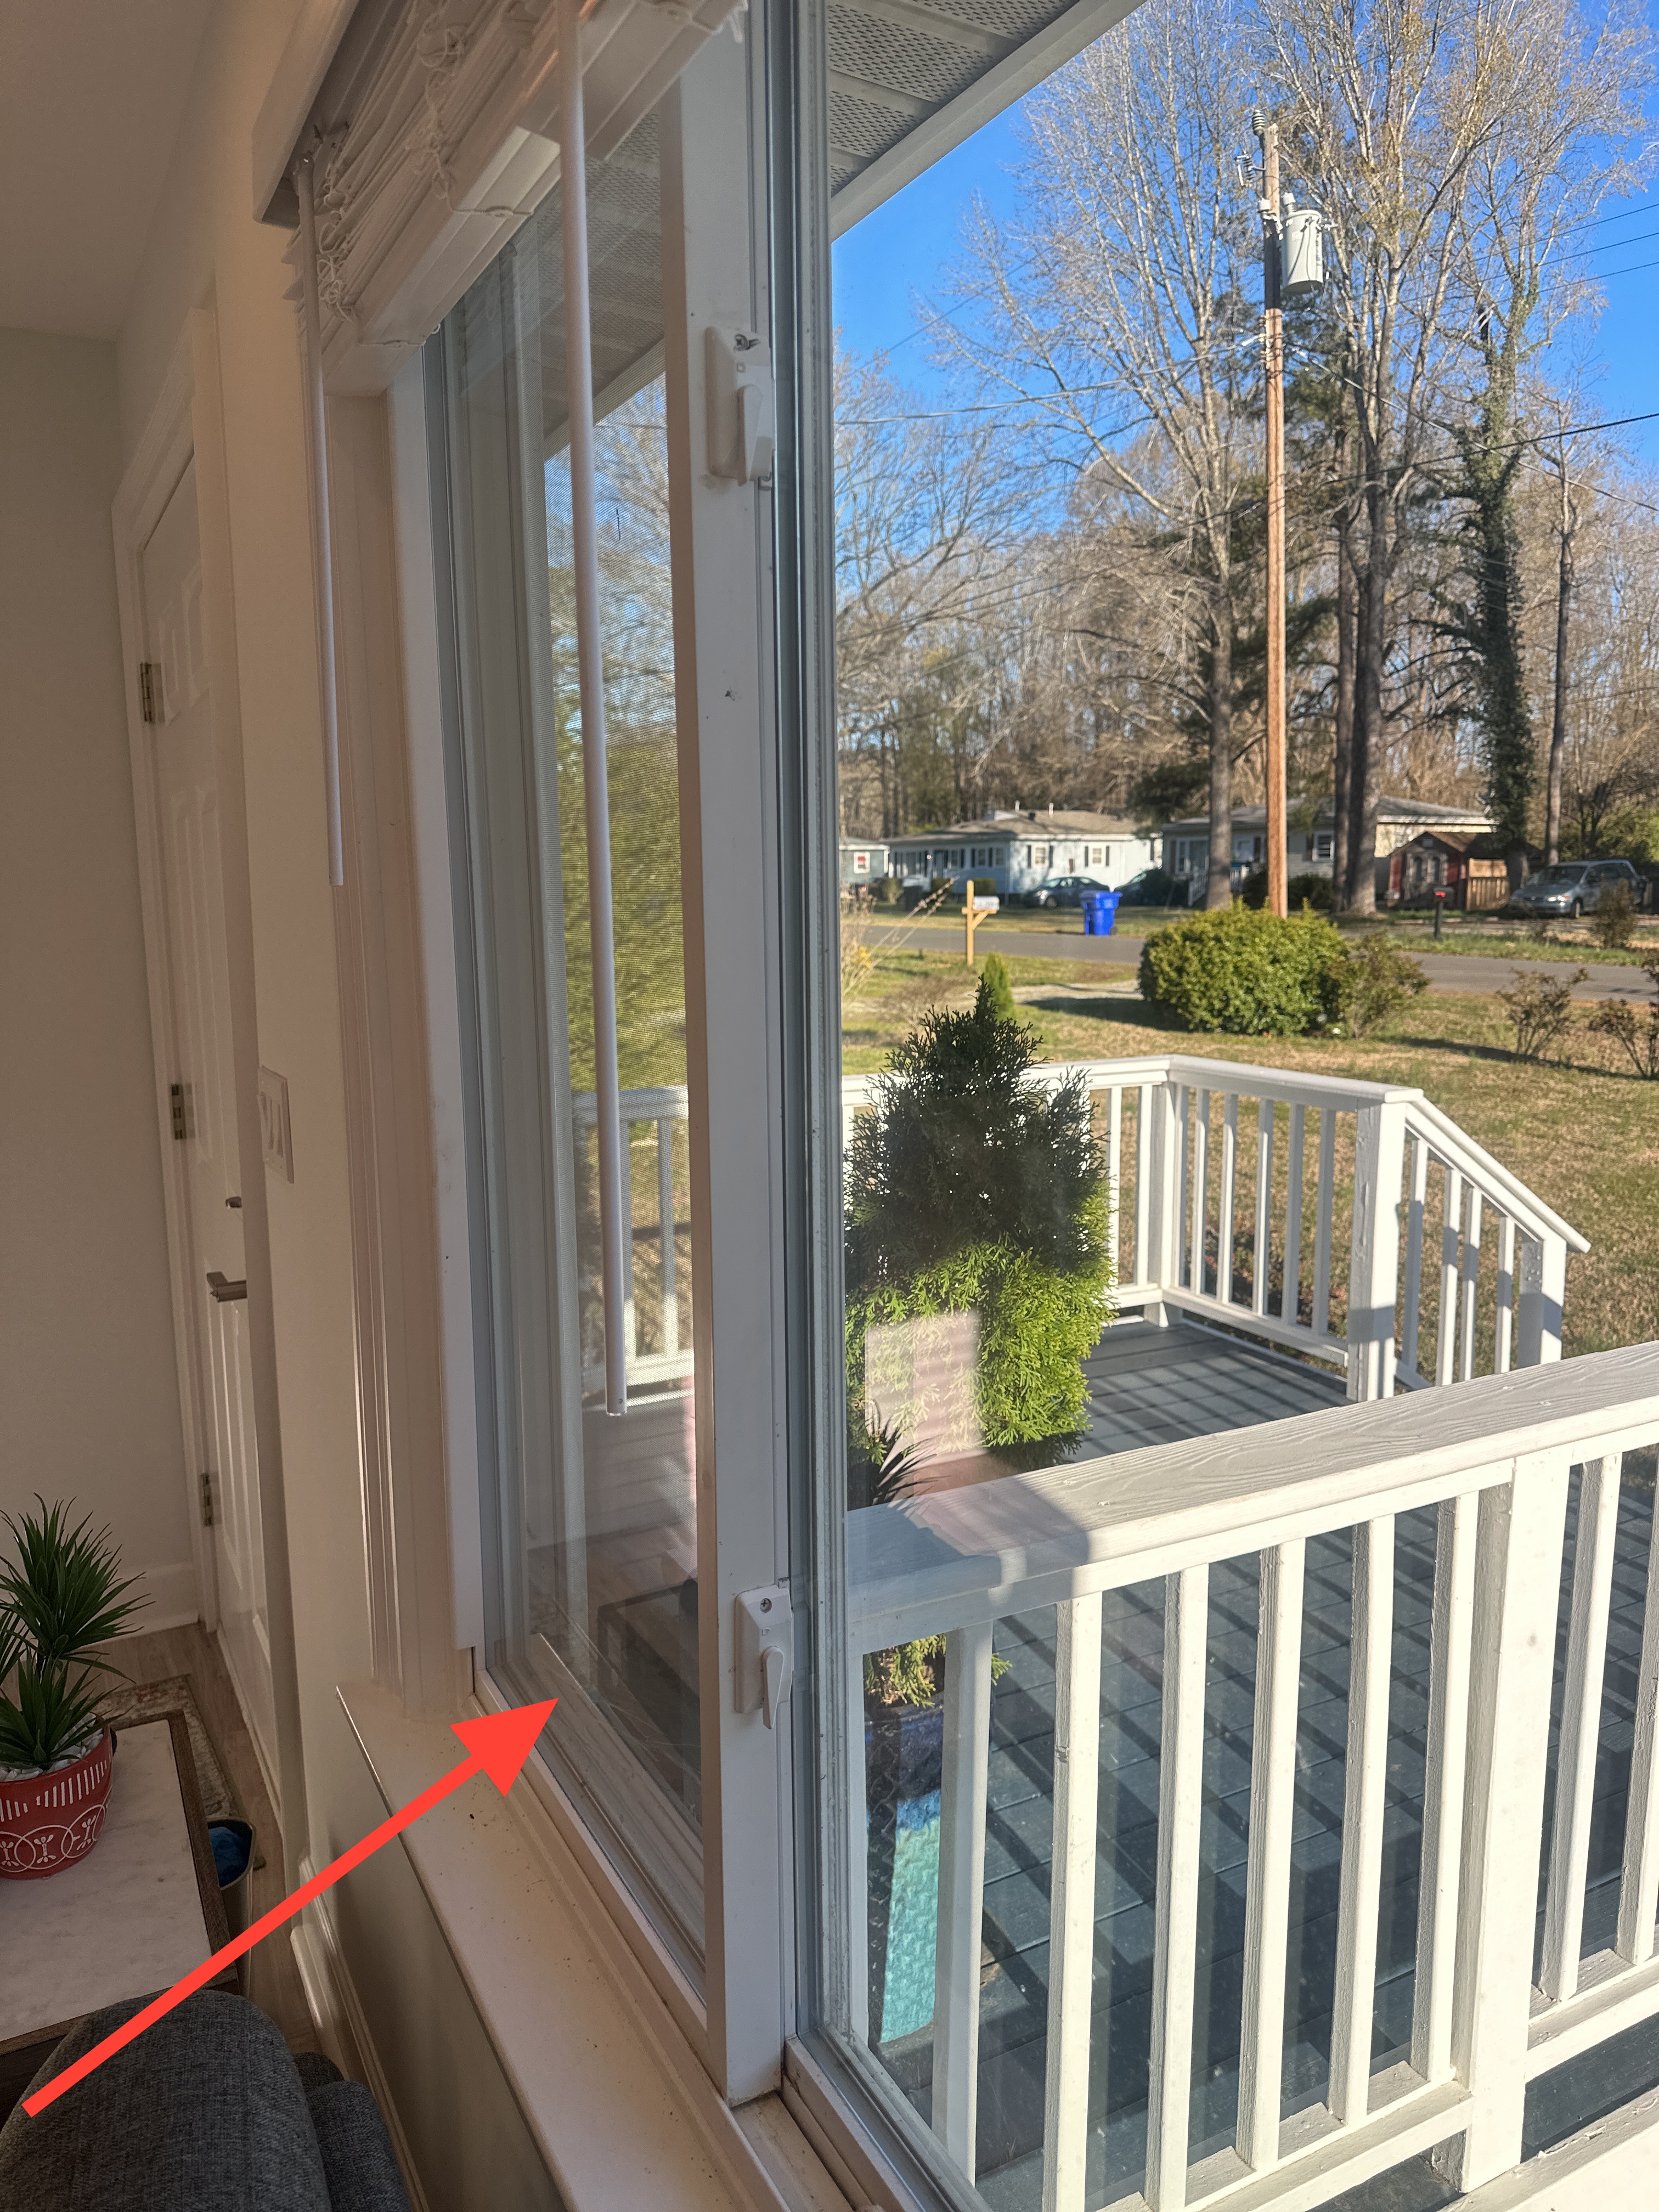
A pane of glass with a divot or surface damage was noted in the front bedroom. This requires glazing replacement to repair. This window has also lost its thermal seal. See additional note.
 |
Several panes of glass were presenting with a cloudy appearance which could indicate a lost or failed seal. I spot cleaned the glass and the cloudiness persisted, indicating that the seal has failed. Replace all glazing with lost seals as needed. A lost seal is a common term for when there is permanent cloudiness between the panes of glass or between the "insulated glass units," IGU's. This is a cosmetic defect that does not impact the short term performance of the window but can affect the thermal envelope of the residence. I recommend having the window glass further evaluated by a glass replacement specialist.
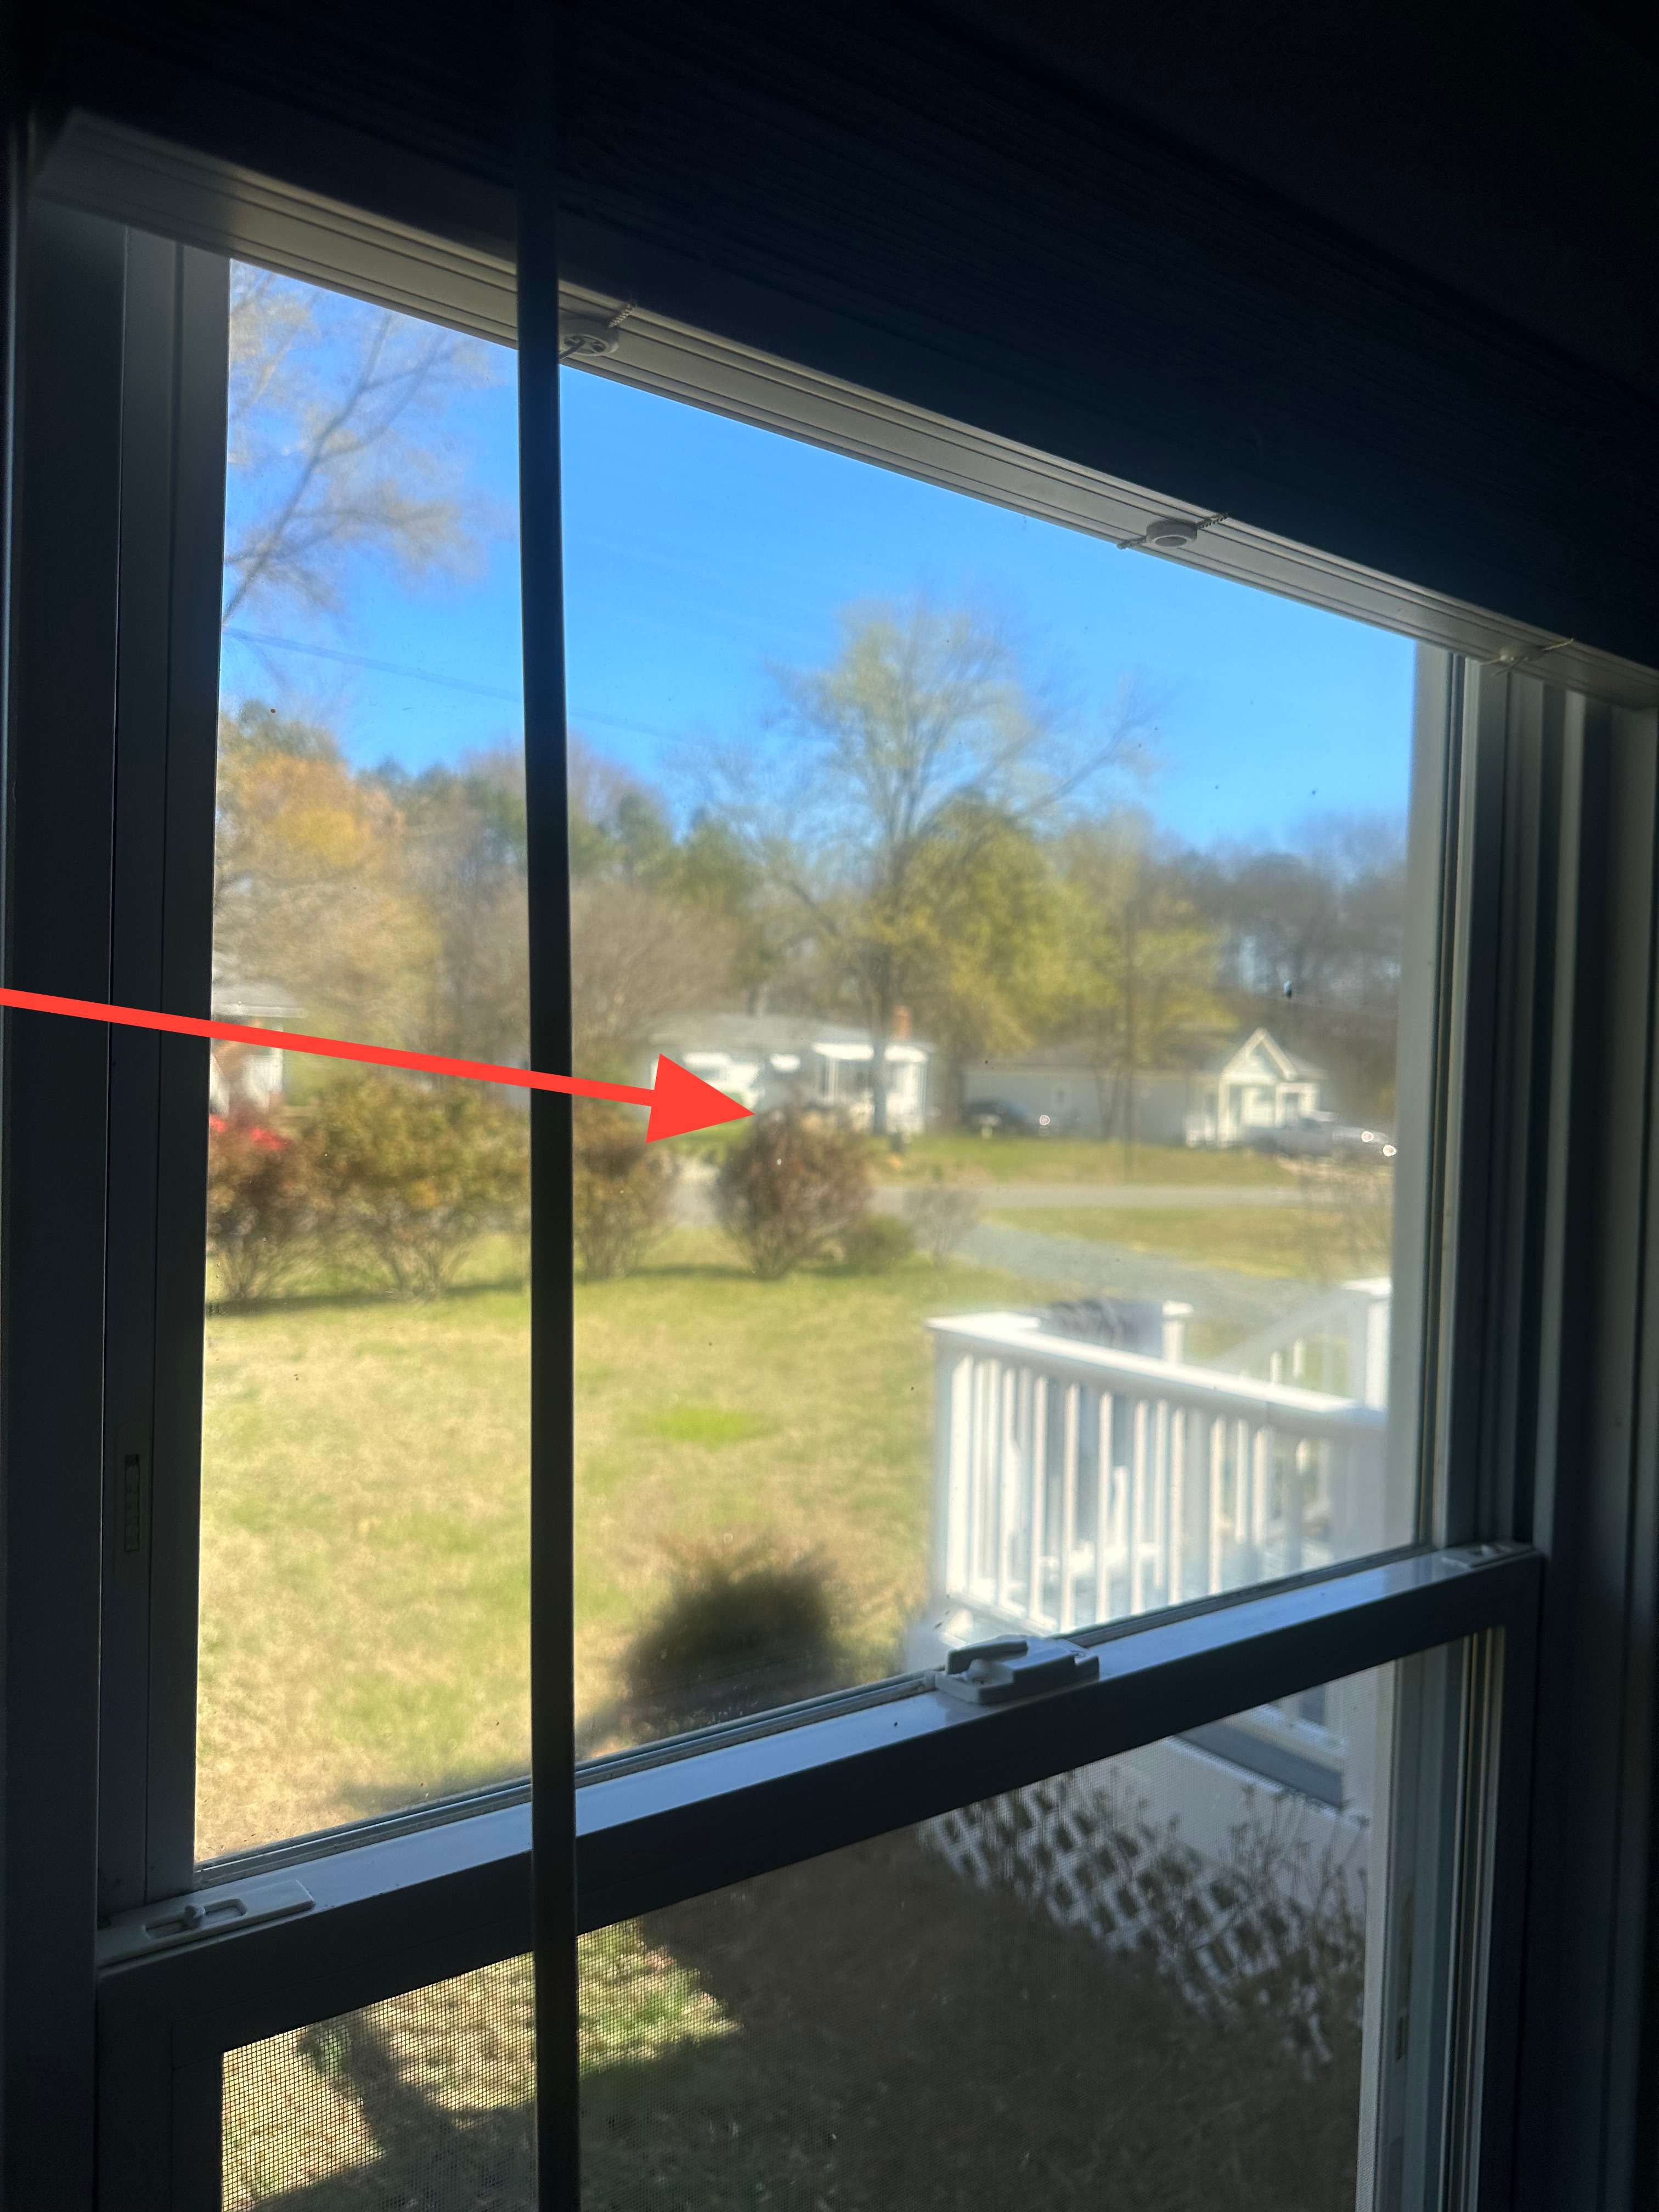
I was unable to close one sliding window enough to lock it. I recommend inspection and repair by a qualified person.
 |
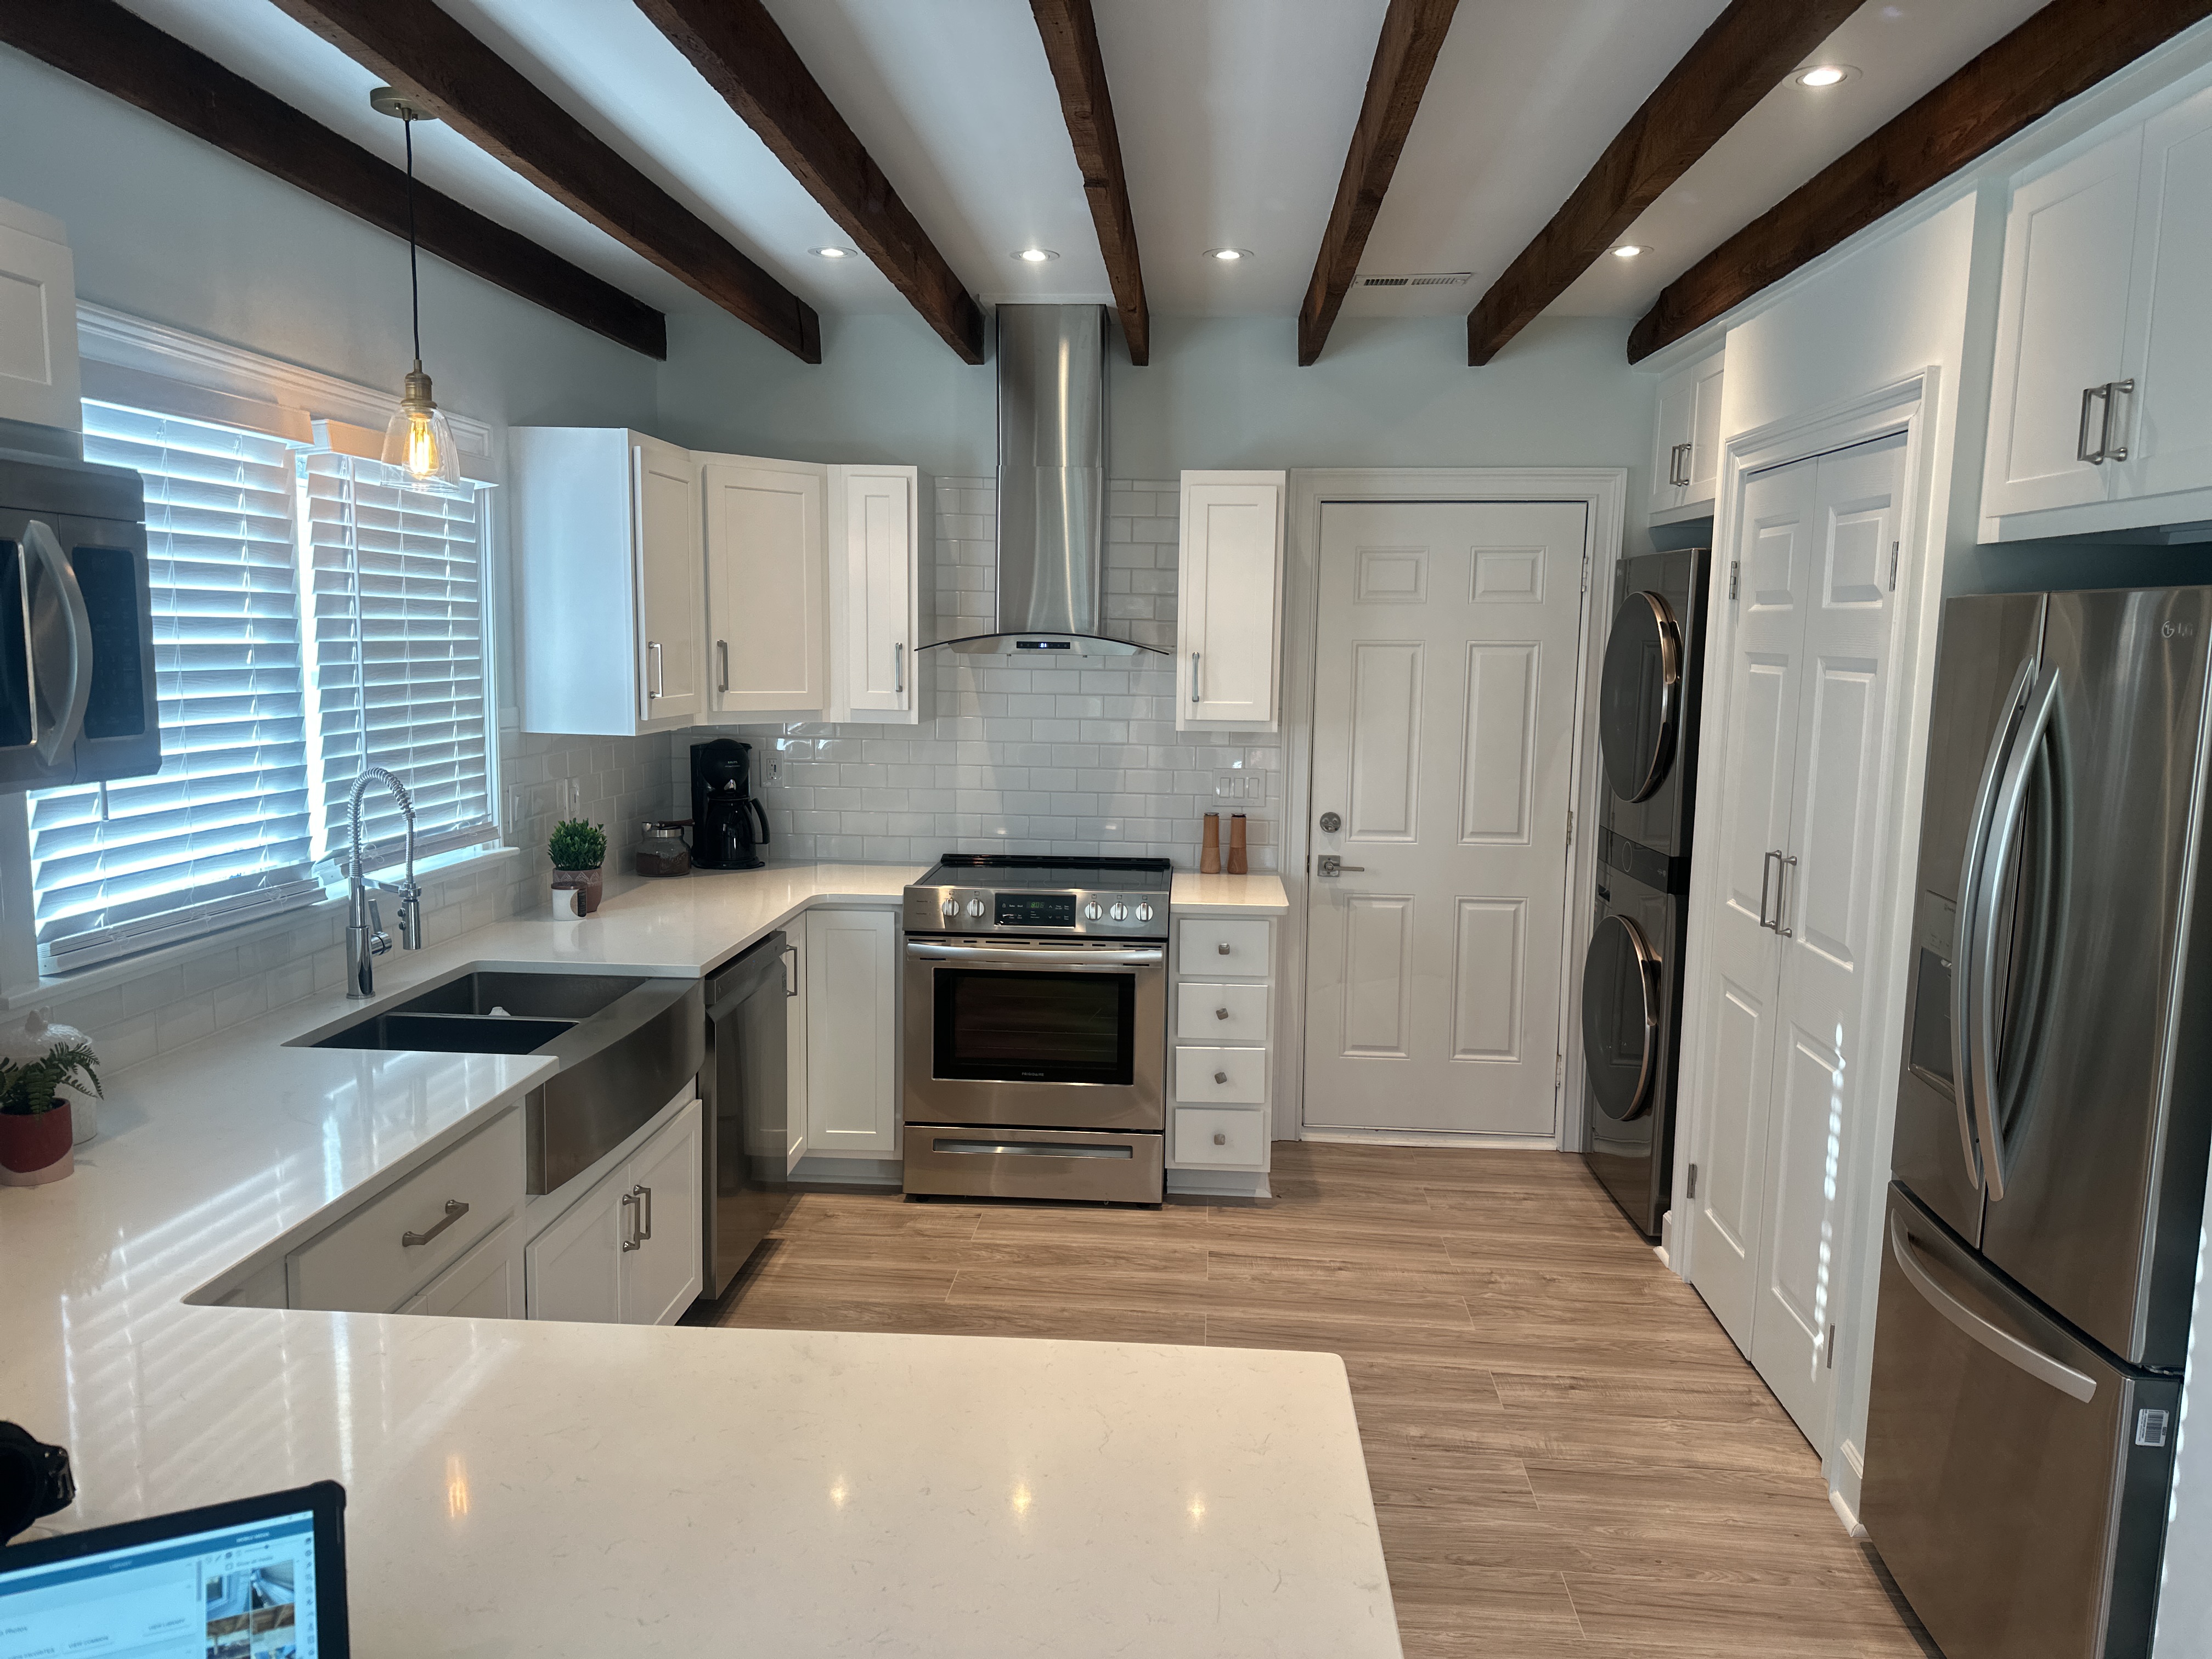
Kitchen
General Kitchen Photos
 |
Sinks and Faucets
Tested
Corrugated waste pipe was used to drain the kitchen sink. This in an unlisted plumbing product. Use smooth wall pipe only. Hire a licensed plumber to further evaluate and repair as needed.
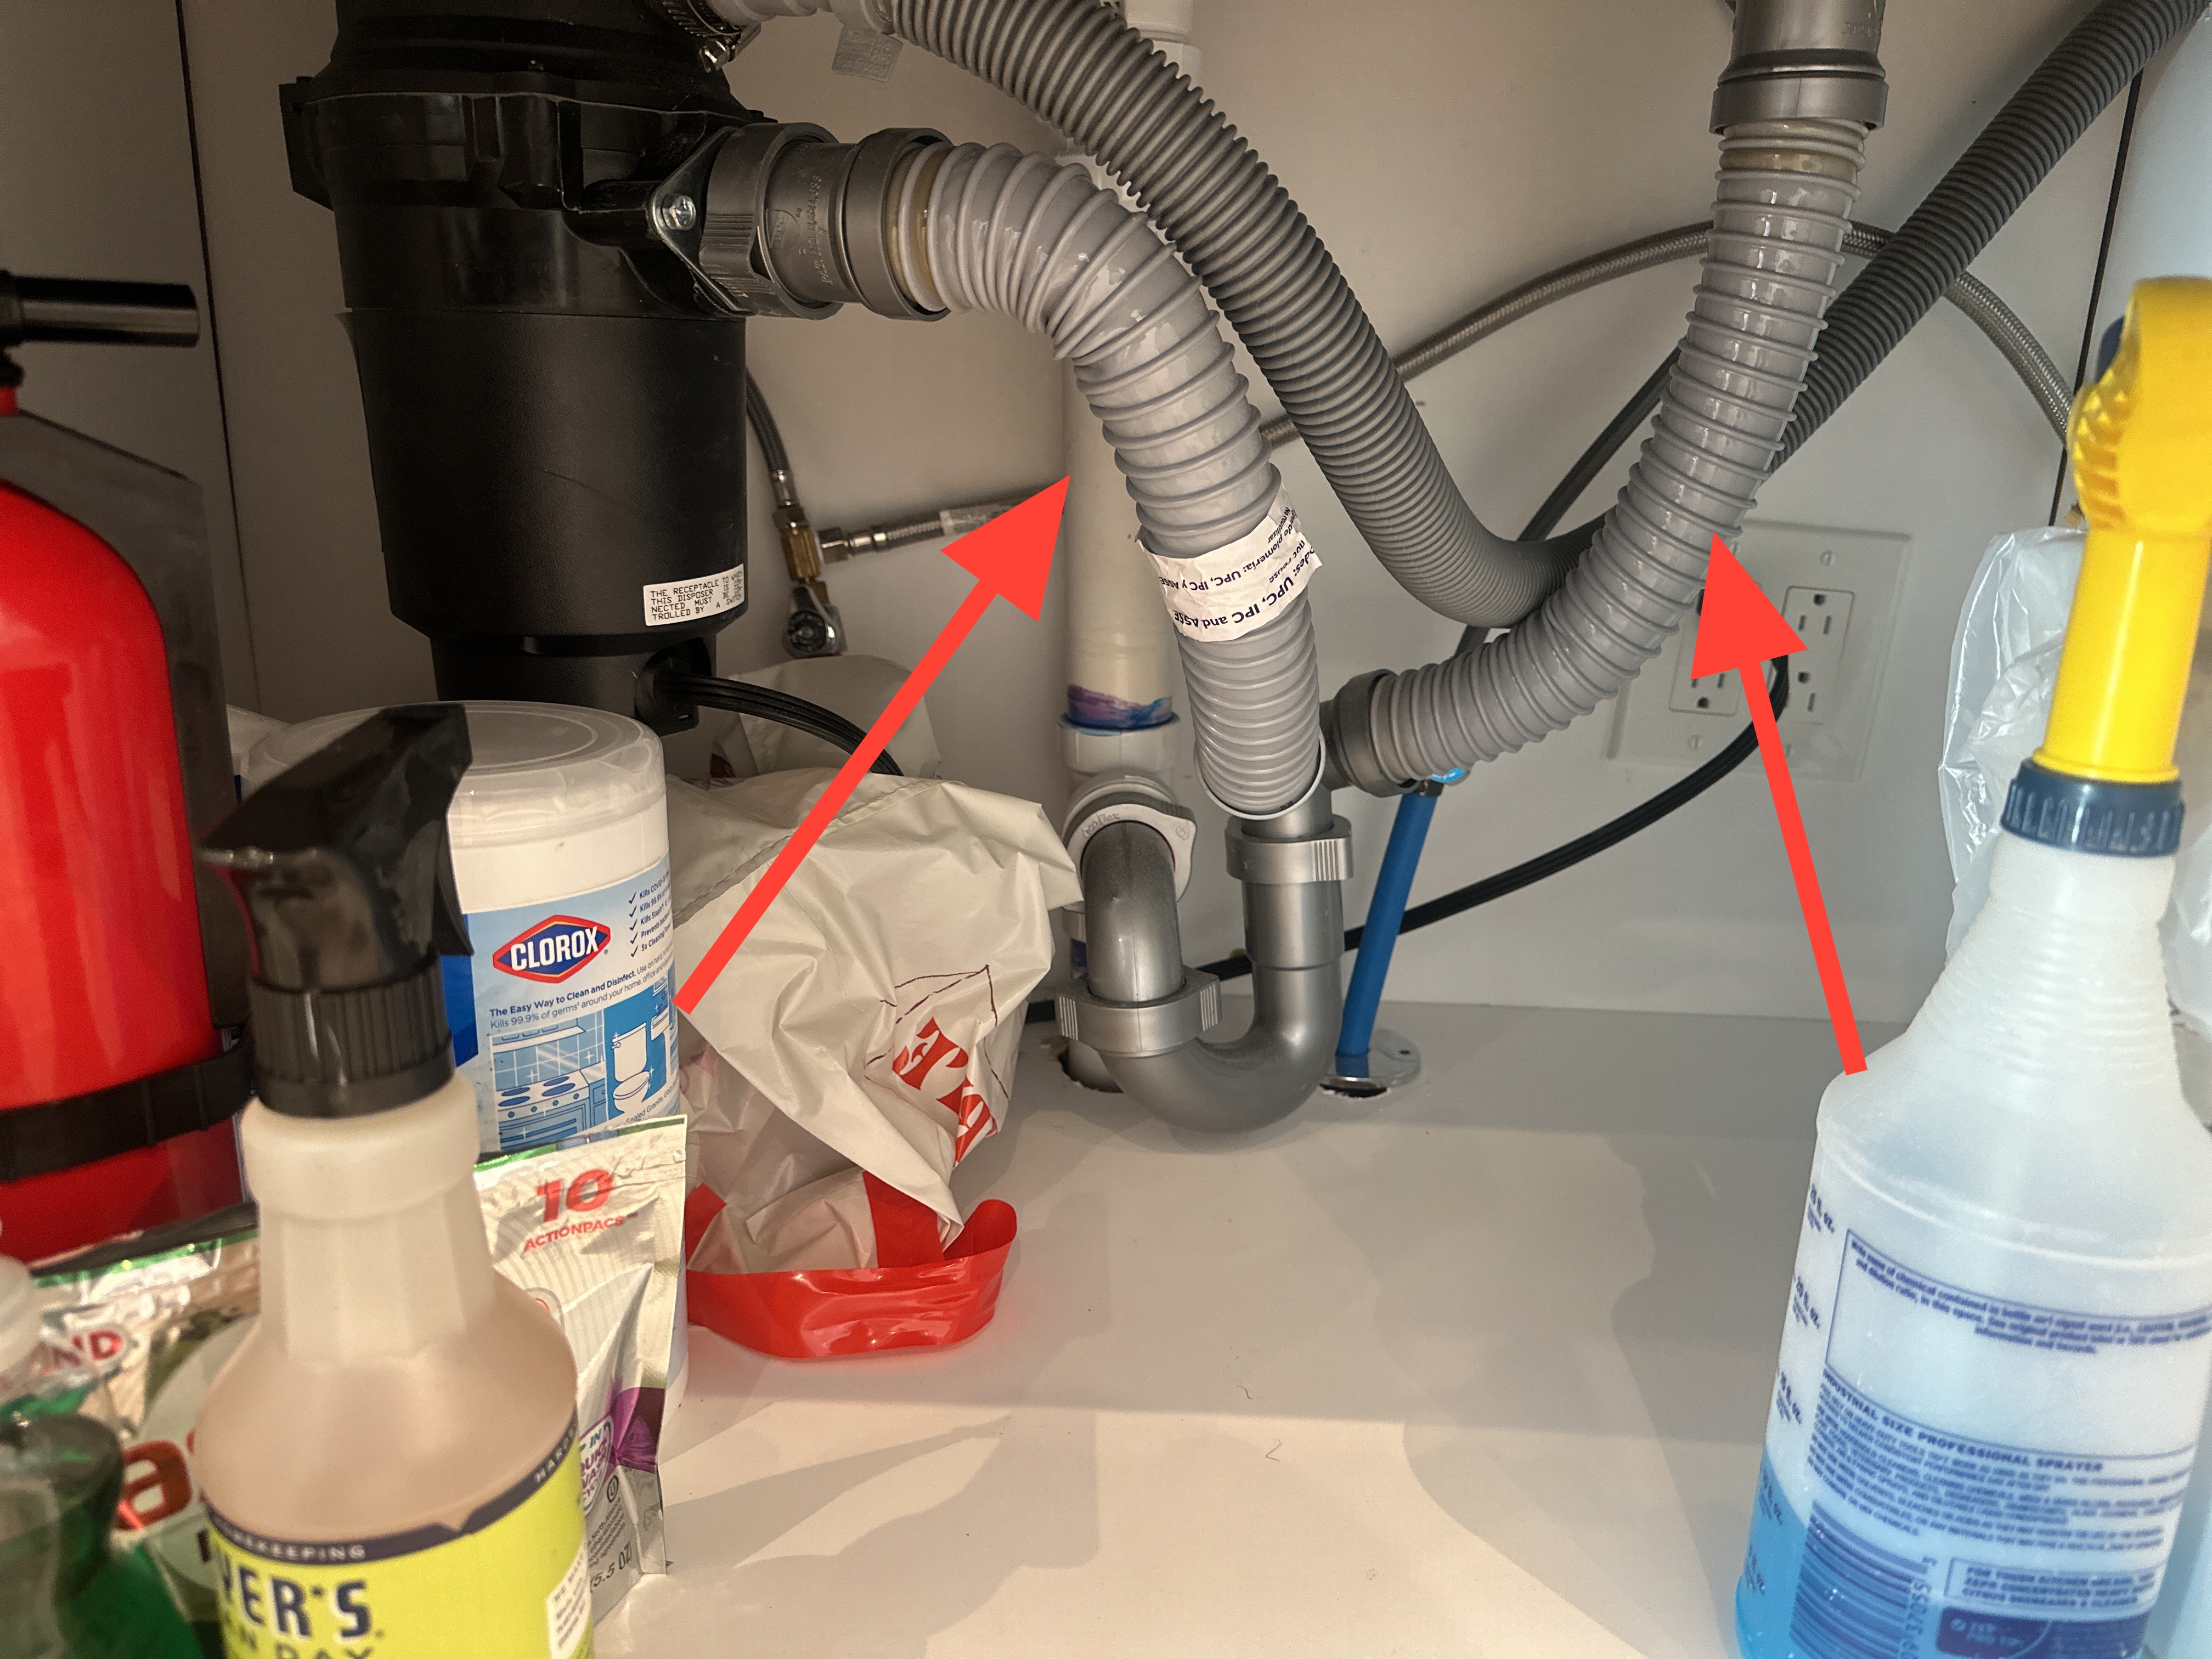 |
Cabinets and Countertops
Countertop Material: Natural Stone
This is a great document From the Natural Stone Institute that covers maintenance and installation recommendations for slab surface stone countertops.
Cabinet Material: Wood
Disposers
Disposer: Operated
Brand: Moen
Dishwasher
Dishwasher: Operated
Brand: LG
Dishwasher Air Gap: Just a high loop
No air gap noted for the dishwasher waste line but they did run a high loop. Other regions in the country require an air gap device, however NC allows for a simple "high loop" installation.
.jpg) |
Ventilation Method
Fan Ducted to Exterior
Vent Style:Stand Alone Hood Vent![]() Microwave/Hood Combination
Microwave/Hood Combination
Stand Alone Vent Brand: Cosmo
Oven
Oven: Electric
Brand: Frigidaire
Style:![]() Built-In Oven
Built-In Oven![]() Built-In Oven and Microwave
Built-In Oven and Microwave![]() Drop in Cooktop
Drop in Cooktop![]() Built-In Double OvenRange/Oven
Built-In Double OvenRange/Oven
Cooktops
Cook-tops: Electric
Brand:![]() Whirlpool
Whirlpool![]() GEFrigidaire
GEFrigidaire![]() Bosch
Bosch![]() Maytag
Maytag![]() Samsung
Samsung
Style:![]() Stand Alone Oven
Stand Alone Oven![]() Drop in CooktopRange/Oven
Drop in CooktopRange/Oven
Microwave
Brand:![]() Whirlpool
Whirlpool![]() GE
GE![]() Frigidaire
Frigidaire![]() BoschLG
BoschLG![]() Maytag
Maytag
Microwave Style:Built-InHood Microwave combo![]() Free Standing
Free Standing
Hood/Microwave combo unit installed to the left of the sink, not utilizing hood capabilities for the unit. This is for your information only.
Refrigerators
Refrigerator: Operating
Brand: LG
Ice machine made ice during the inspection.
General Kitchen Condition
Standard
Hall Full Bathroom
Sinks and Cabinets
Tested
This sink does not have an overflow drain. Care should be taken to ensure that the sink is not left on, because the lack of an overflow drain will allow the sink to overflow and flood the bathroom. This is for your information only.
 |
Toilet
Tested
Bathtub / Shower
Tested
Tub/Shower Type:Tub/Shower ComboCast Iron BaseTile Surround
Bathroom Ventilation
Type: Bath fan
Consider installing a 1-hour timer for bath fans so they run after use. Removal of moist air after using the shower or bath will extend the life of the wall coverings, paint, and sheetrock. This will help to keep this space dry because the fan can run for a while after use without leaving the fan on all day.
General Bath Condition
Standard
During inspection today I operated all plumbing fixtures in bathrooms. I ran a moisture meter around toilets and tile shower enclosures to check for concealed leaks and sounded for loose tile and finishes in shower and tub enclosures. I do not test bathtub overflow drains as this risks damaging finishes around the tub. Monitor tubs while filling and avoid pushing water into the overflow. Even well-installed overflow drains can leak as the gaskets that seal the overflow will dry out over time and may no longer provide a watertight seal. Monitor plumbing after moving into a new home as testing during inspection presents less stress on plumbing than daily use. Please note that vacant homes present additional risk as it can be difficult to distinguish how the plumbing system will respond to daily use. Any defects uncovered during inspection are listed in this report.
This bathroom was tested for a functional flow. A functional flow test ensures that there is adequate flow (different from pressure) to supply all the fixtures running at once. This test is performed by turning on the shower, and then opening all sinks and tubs. The toilet is then flushed, and the sinks and shower are observed for a reduction in flow. If no reduction is observed, then the functional flow passed. This bathroom passed the functional flow test.
Structure and Basement
Foundation
Building Configuration: Crawl space
Foundation Description: Masonry block
Floor, Wall and Ceiling Framing
Wall Framing: 2x4
Wall Sheathing: Not visible
Floor Framing: 2x10
Sub-Floor Material: Glimpsed through insulation
Ceiling Framing: Timber frame
Attic
Attic Access
Walked
This residence is not equipped with an attic stair insulating tent. An attic stair insulating tent can help reduce the thermal loss through your pull down attic door. I recommend you install an insulating tent and ensure it is fastened every time you finish in the attic to ensure maximum efficiency of the thermal envelope between the unconditioned space of your attic and the living space of your residence.
Roof Framing and Sheathing
Rafters: Timber frame
Sheathing: Plywood, Tongue and groove
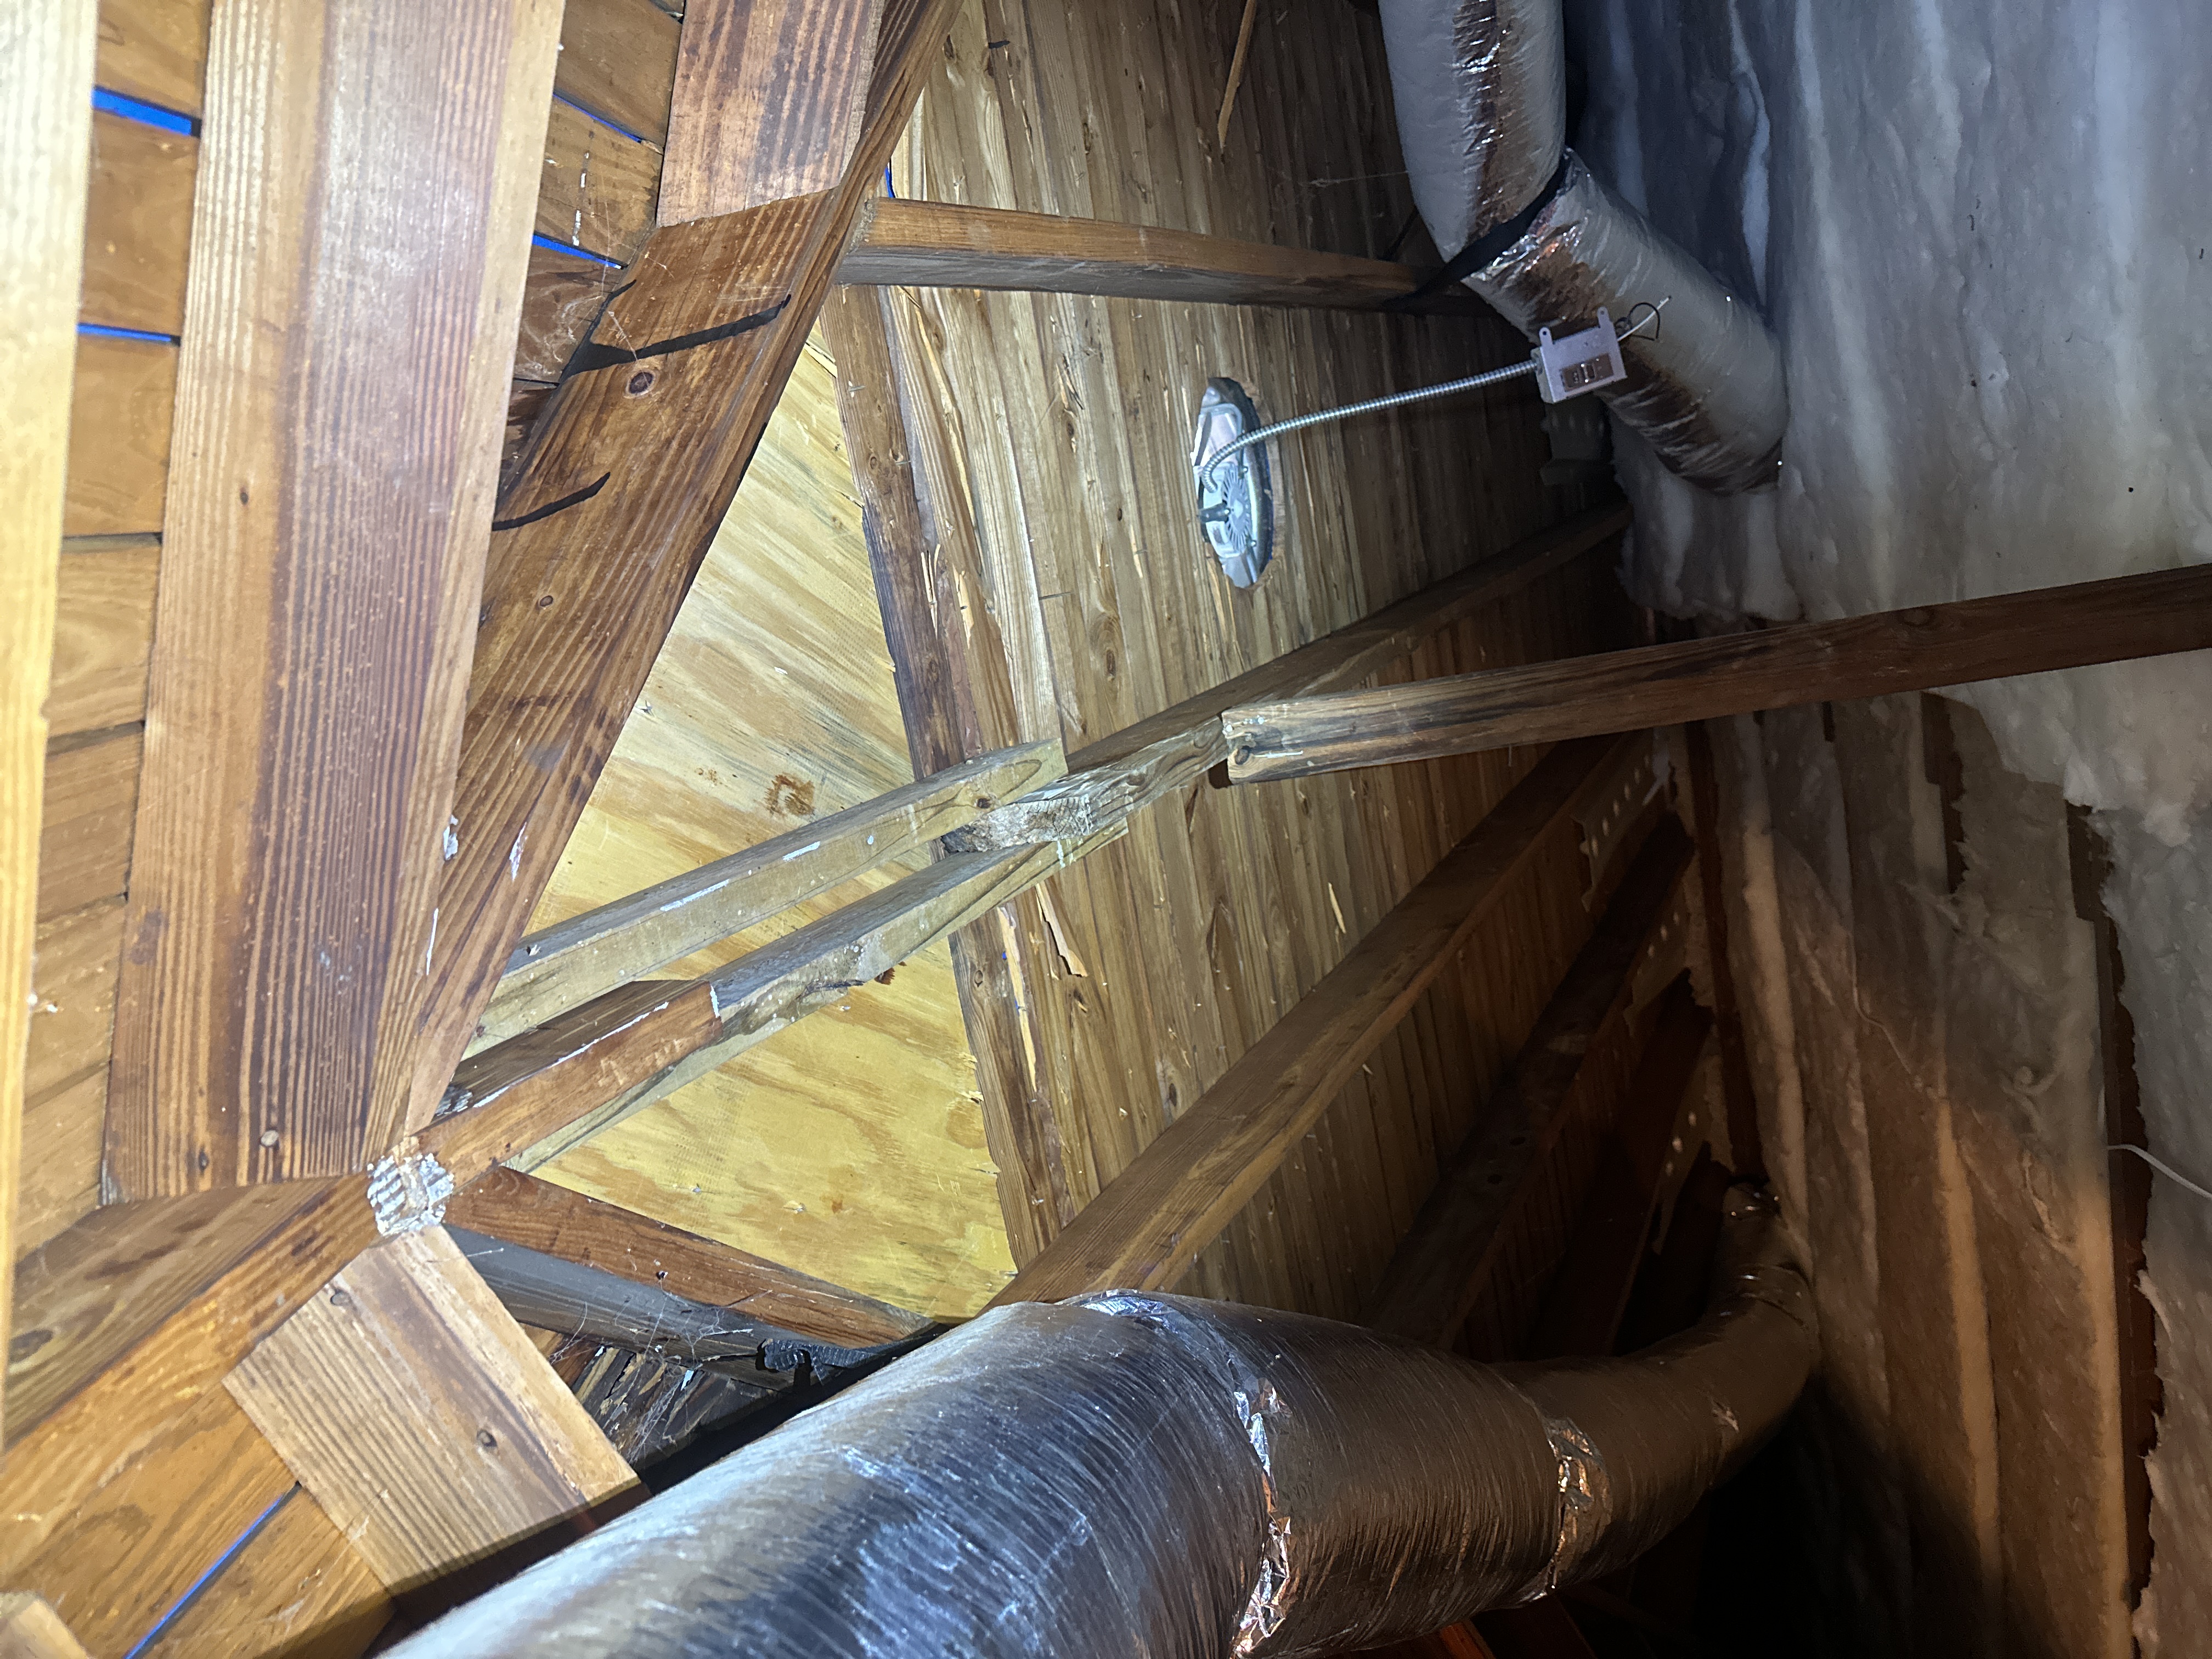
Some framing and sheathing has been replaced, most likely when the roof was last replaced.
 |
Attic Insulation
Insulation Type: Fiberglass
Approximate Insulation R-Value on Attic Floor: Inconsistent
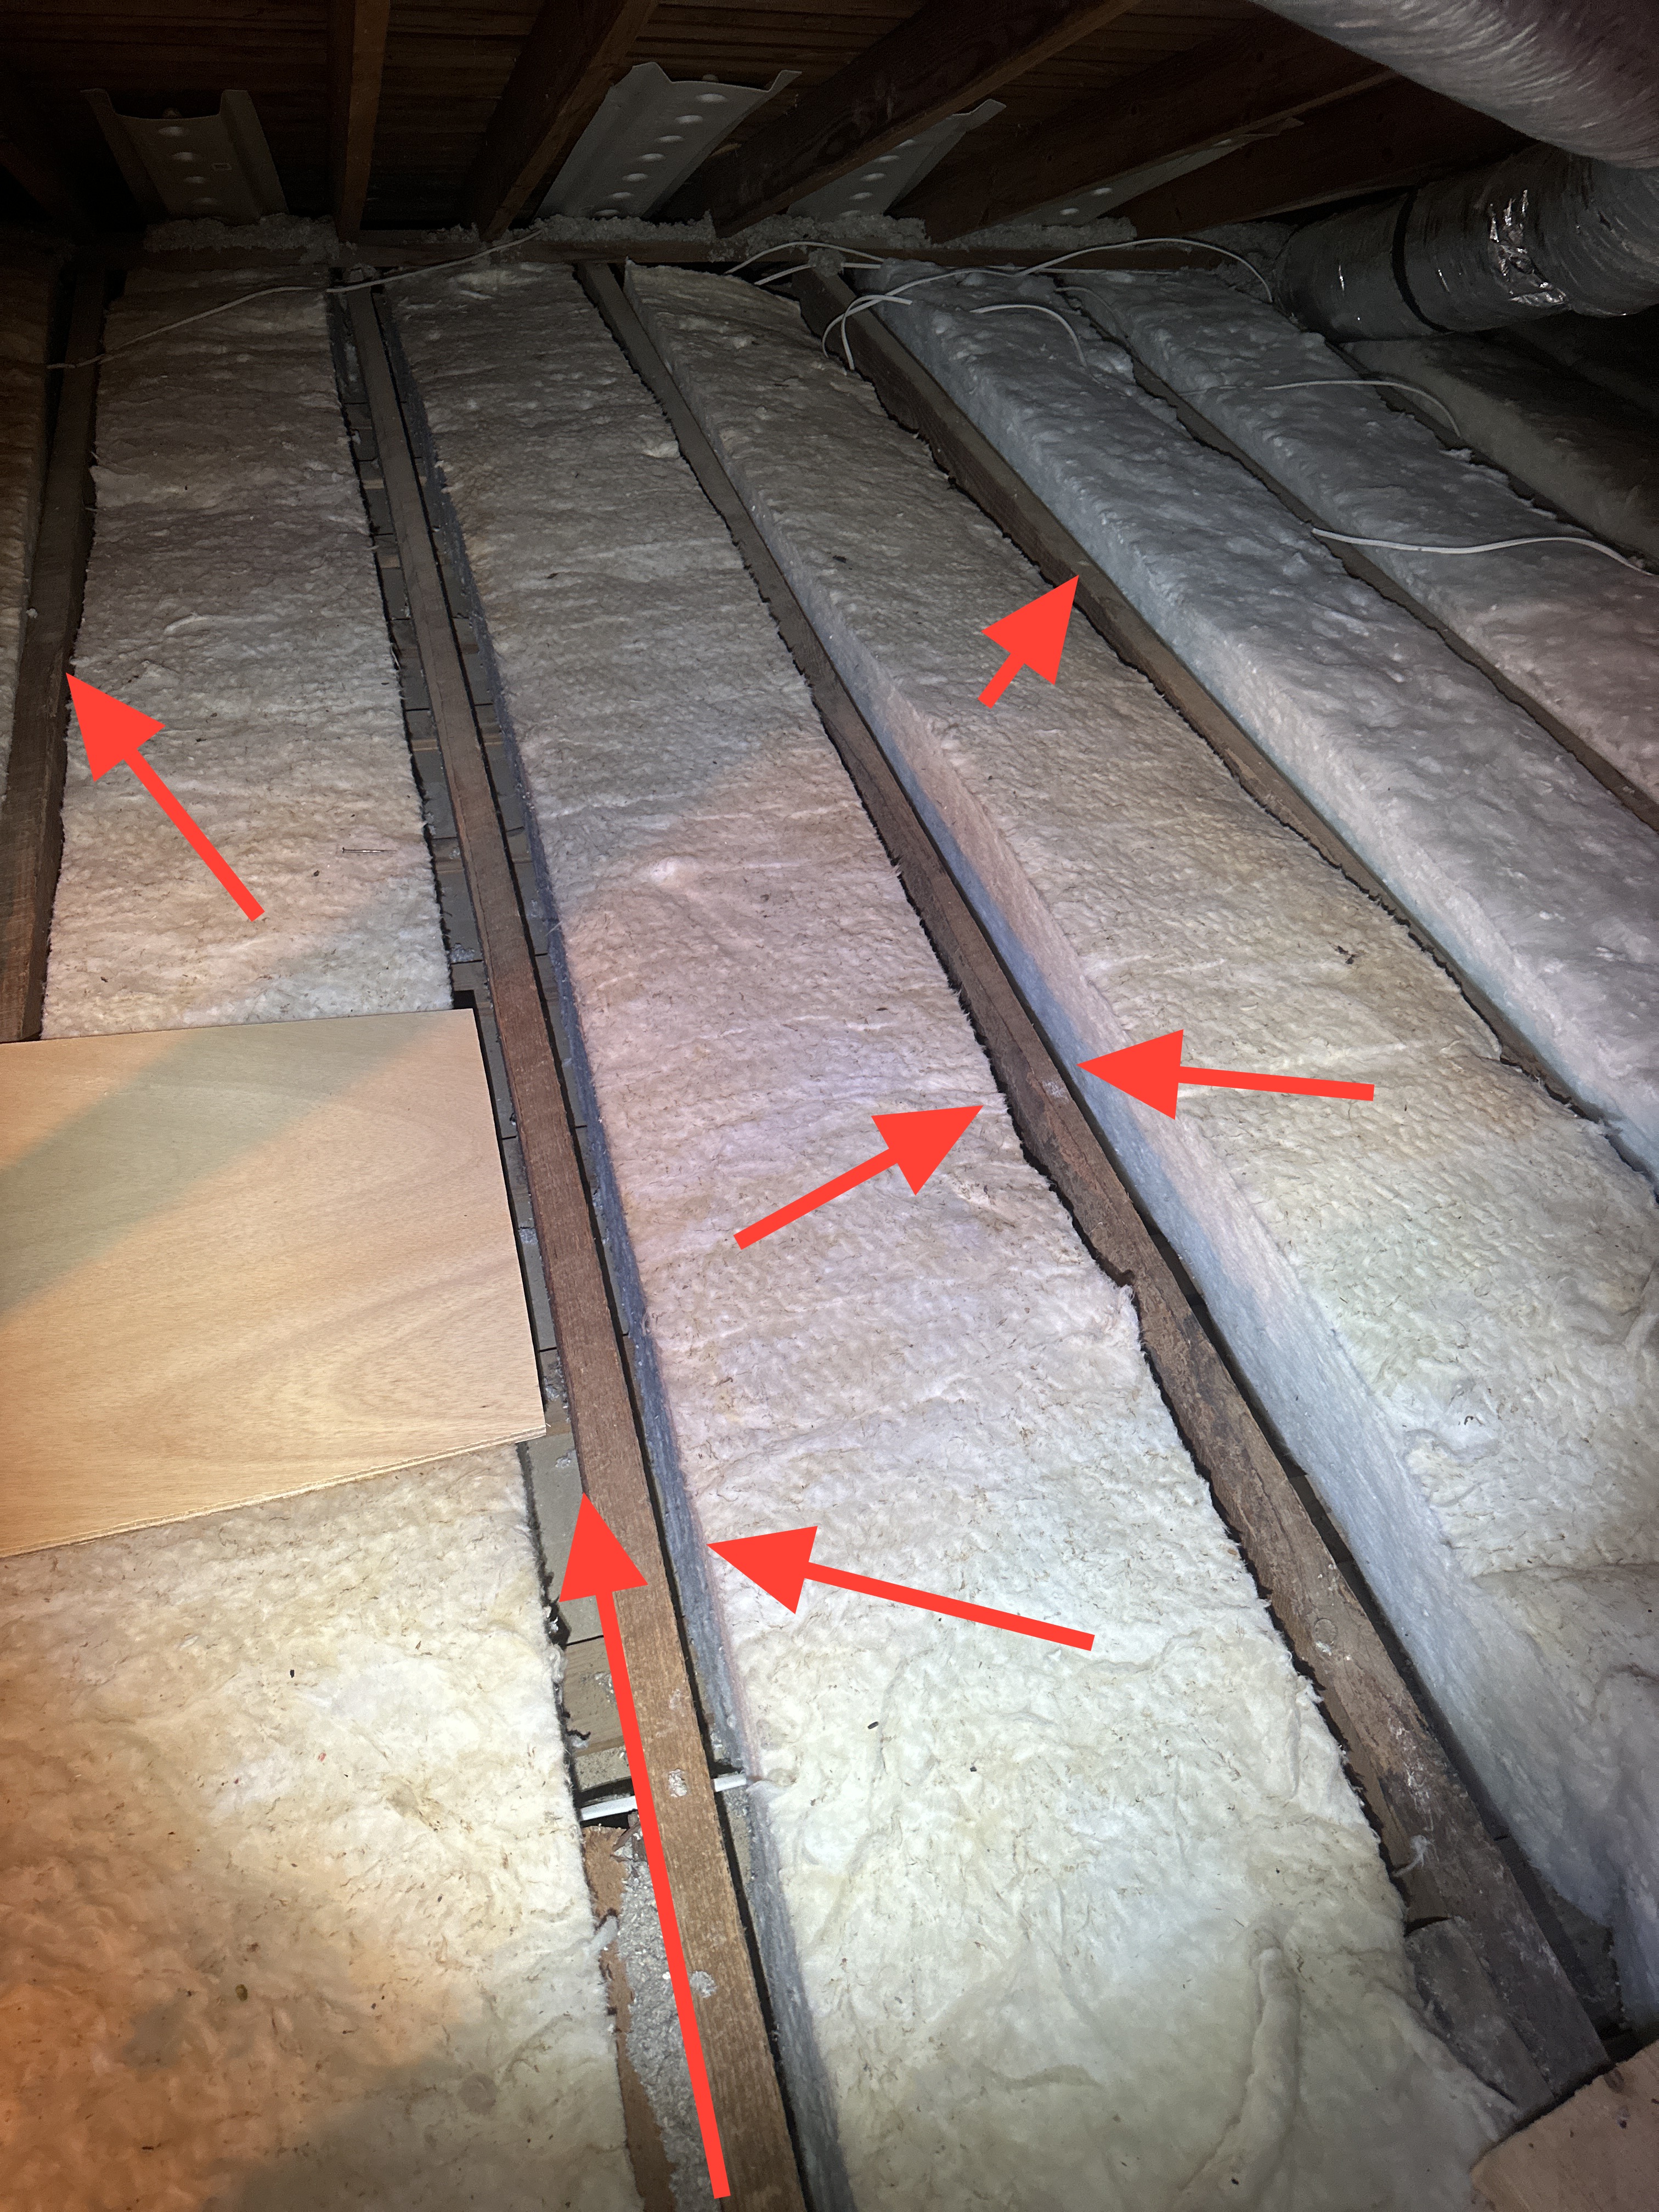
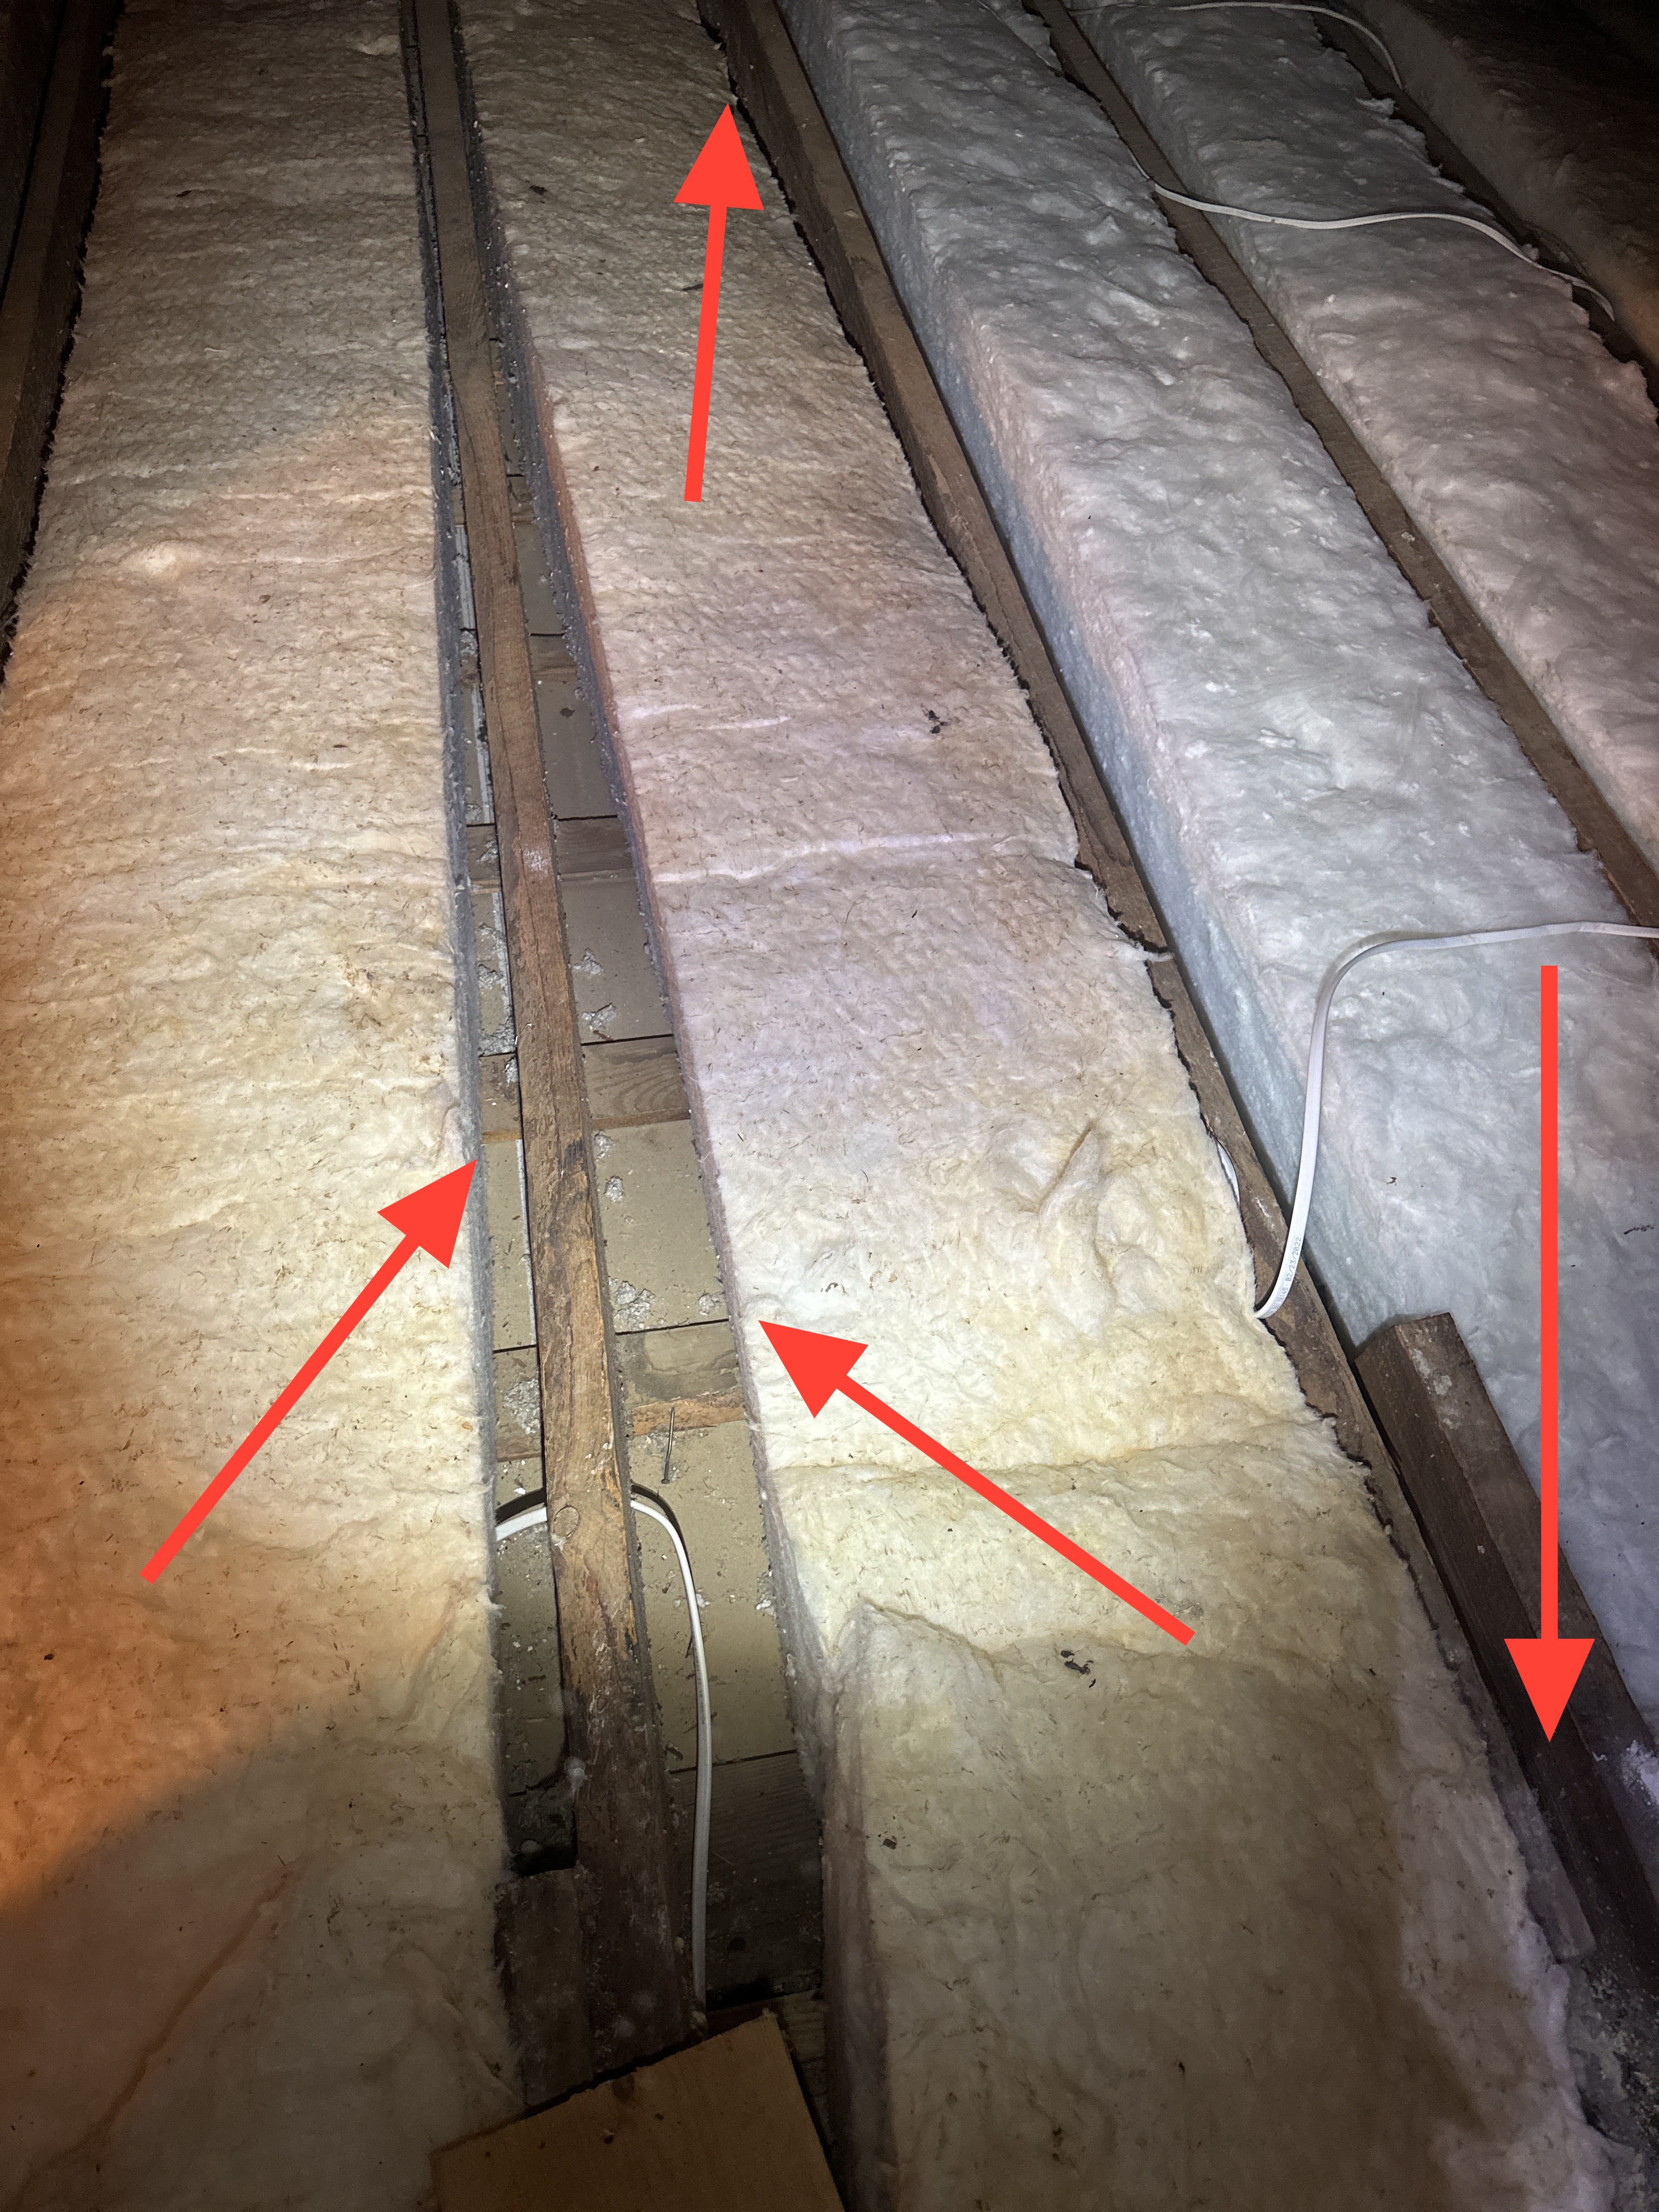
The batt insulation on the floor of the attic is the improper width for the spacing between the joists. As a result, large gaps exist between the joists and the insulation. This will reduce the efficiency of the thermal envelope, and may cause it to cost more to heat and cool this residence. The included photos taken with a thermal imaging camera also show the significant gaps between the areas of the ceiling which are thermally insulated and those that are not. This condition is present throughout the ceiling of the residence. I recommend either the replacement of this insulation, or the addition of blown insulation in the gaps to improve the thermal envelope.
 |  |
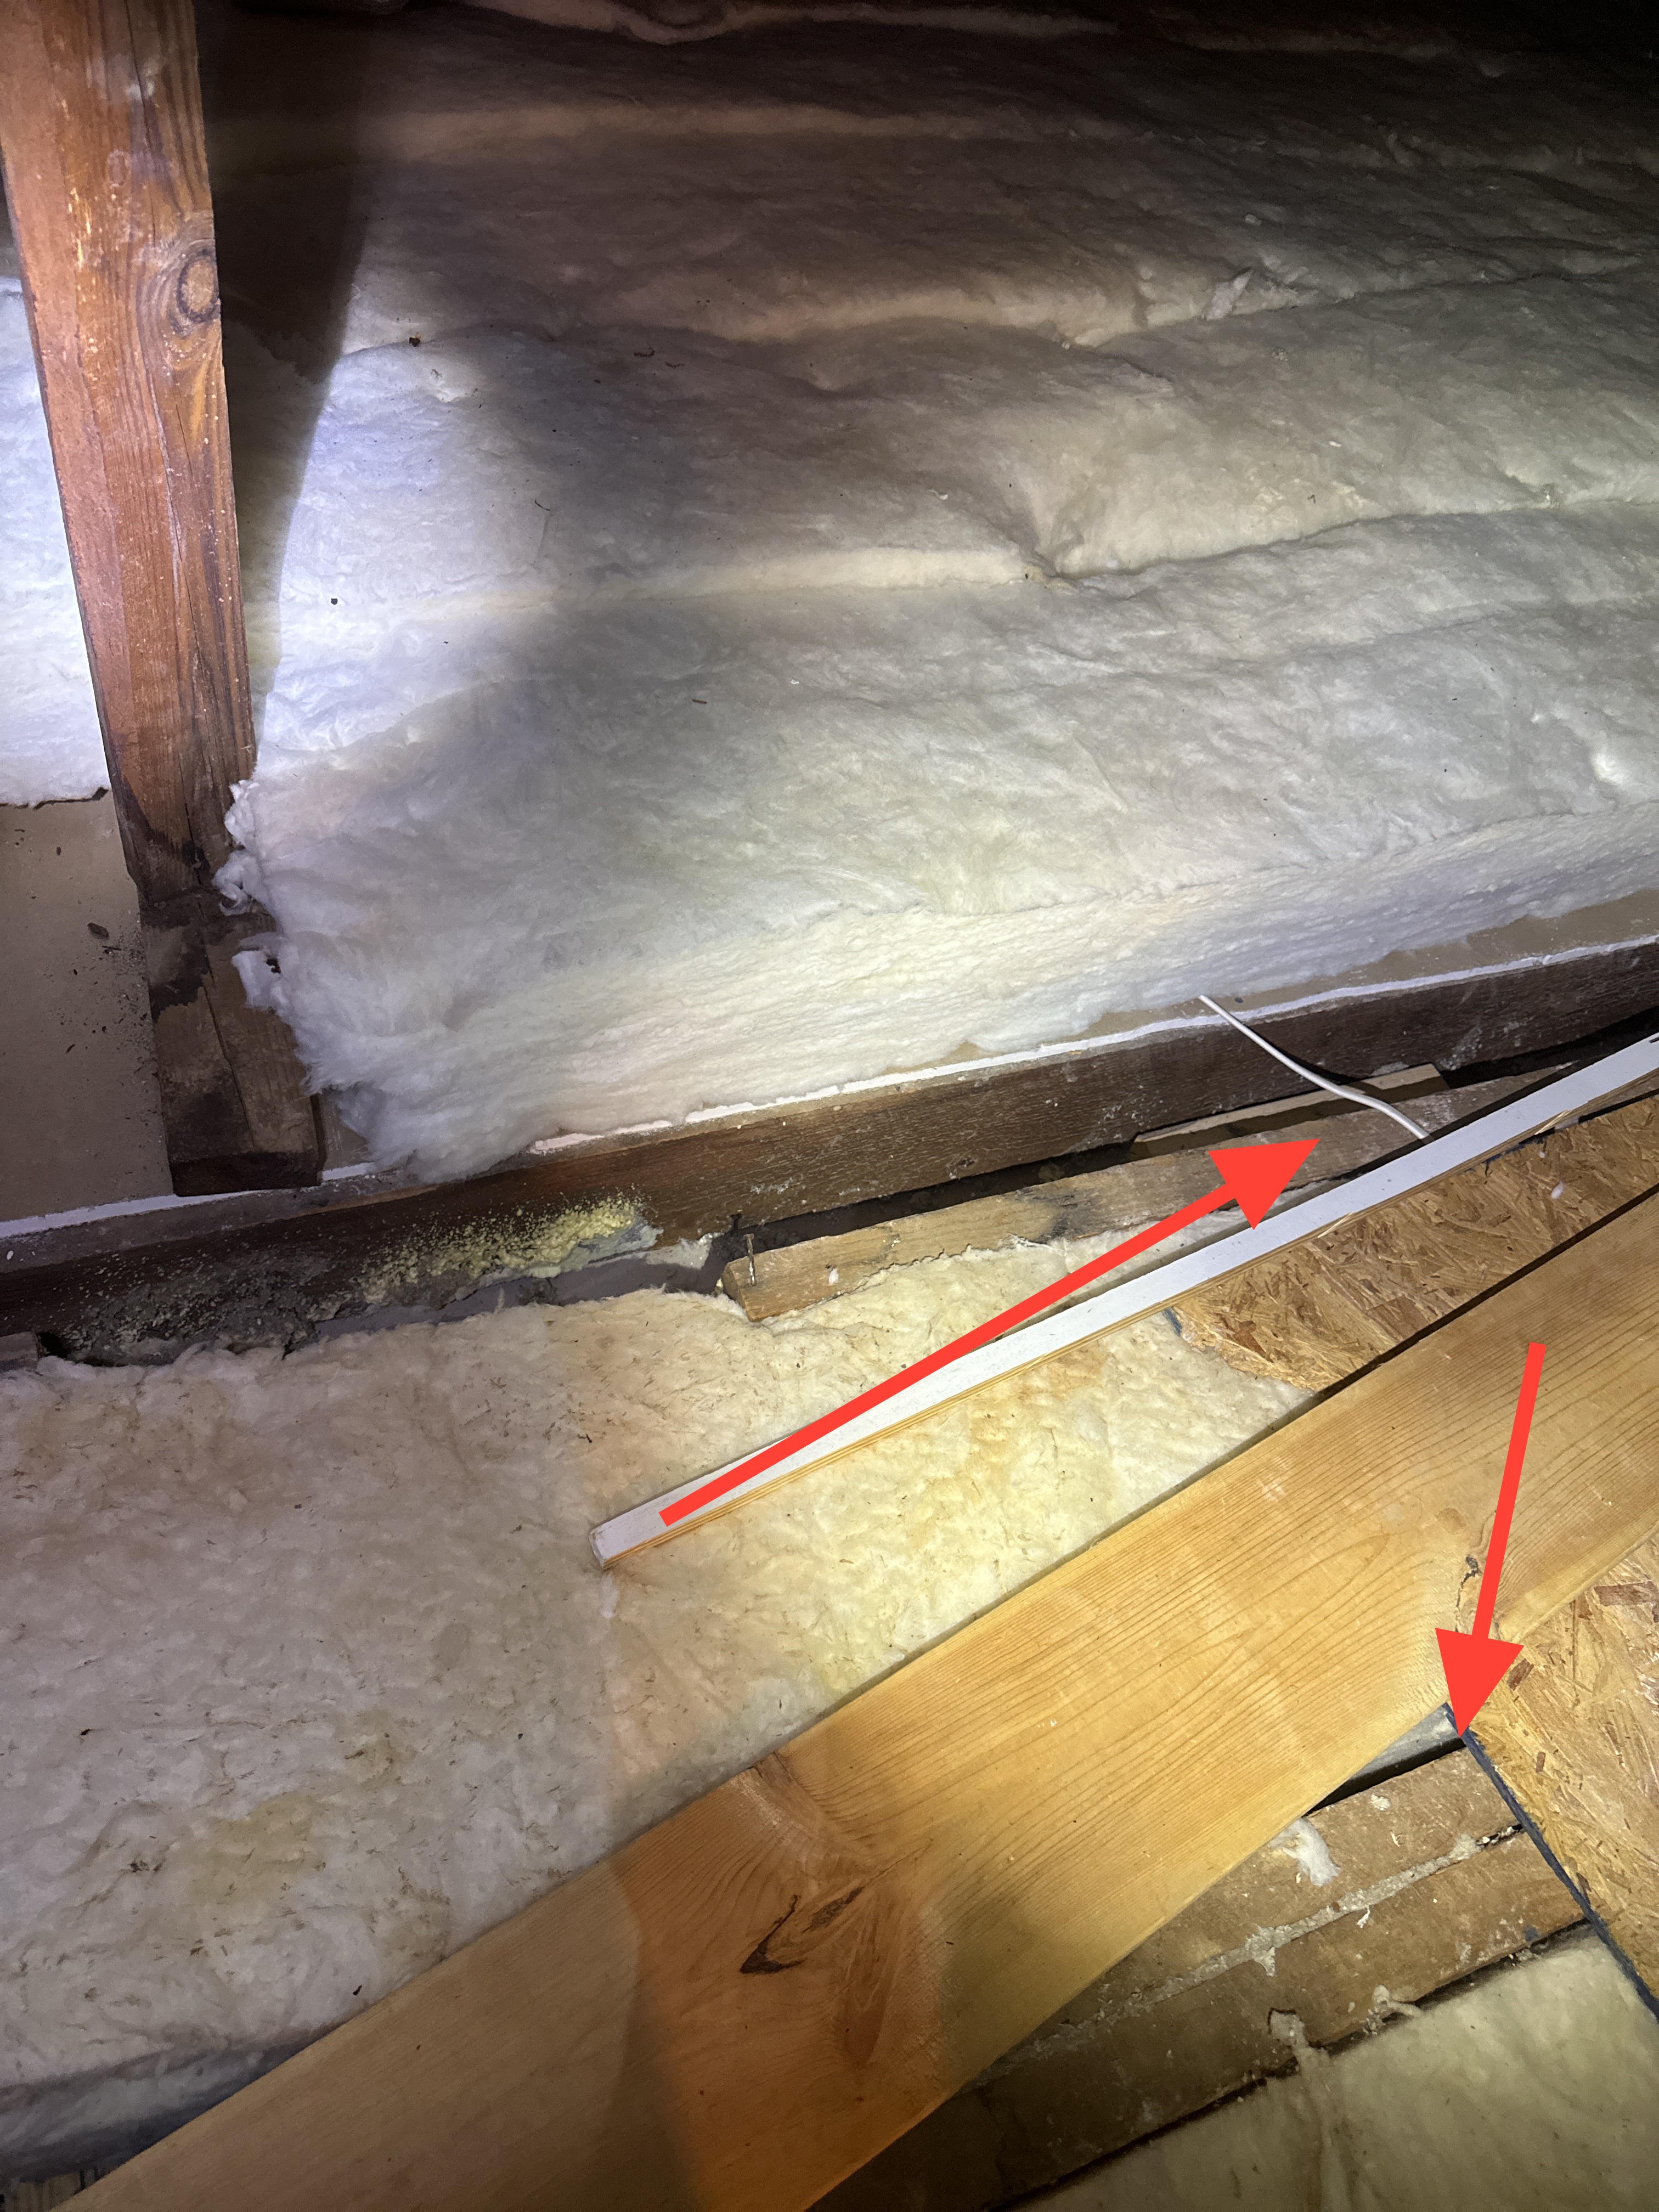 | 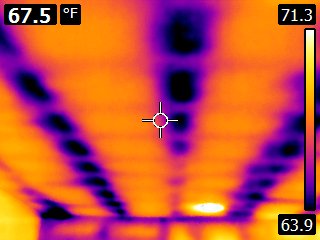 |
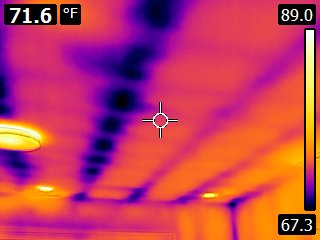 | 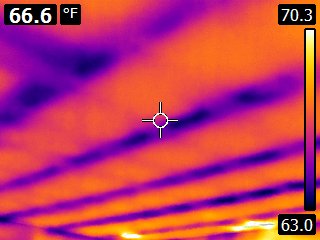 |
 |
Attic Fan Exhaust Vents
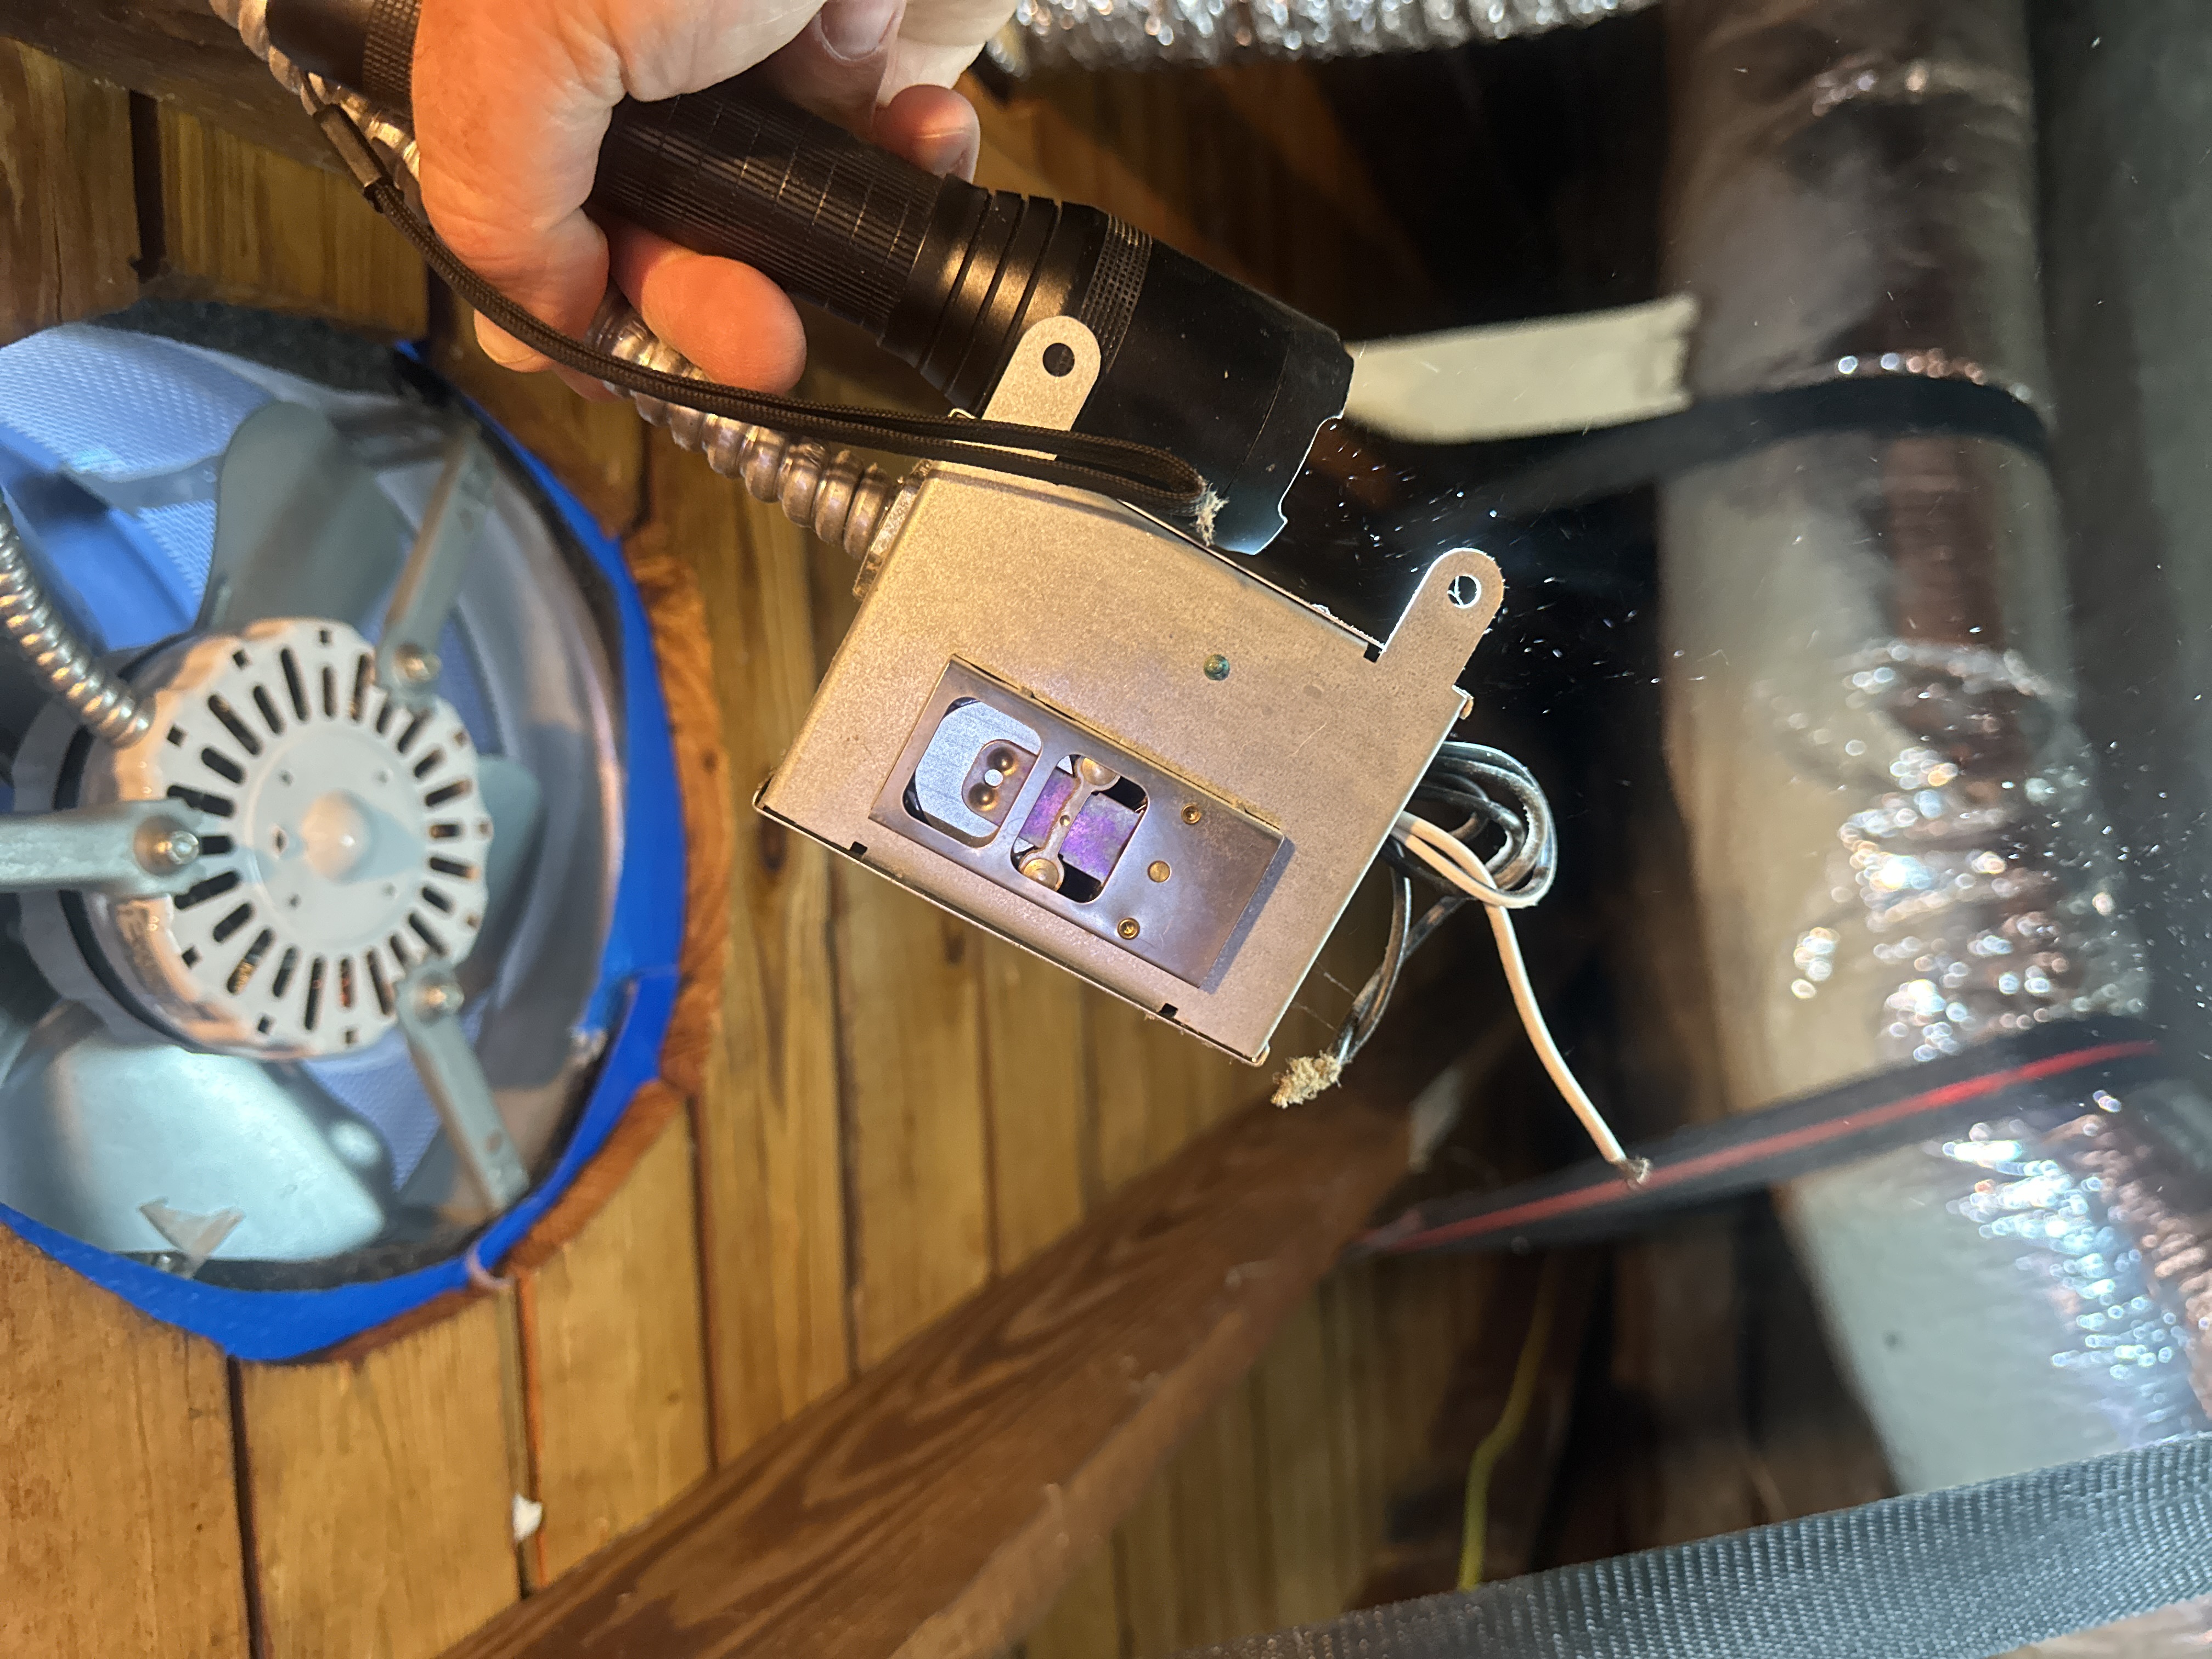
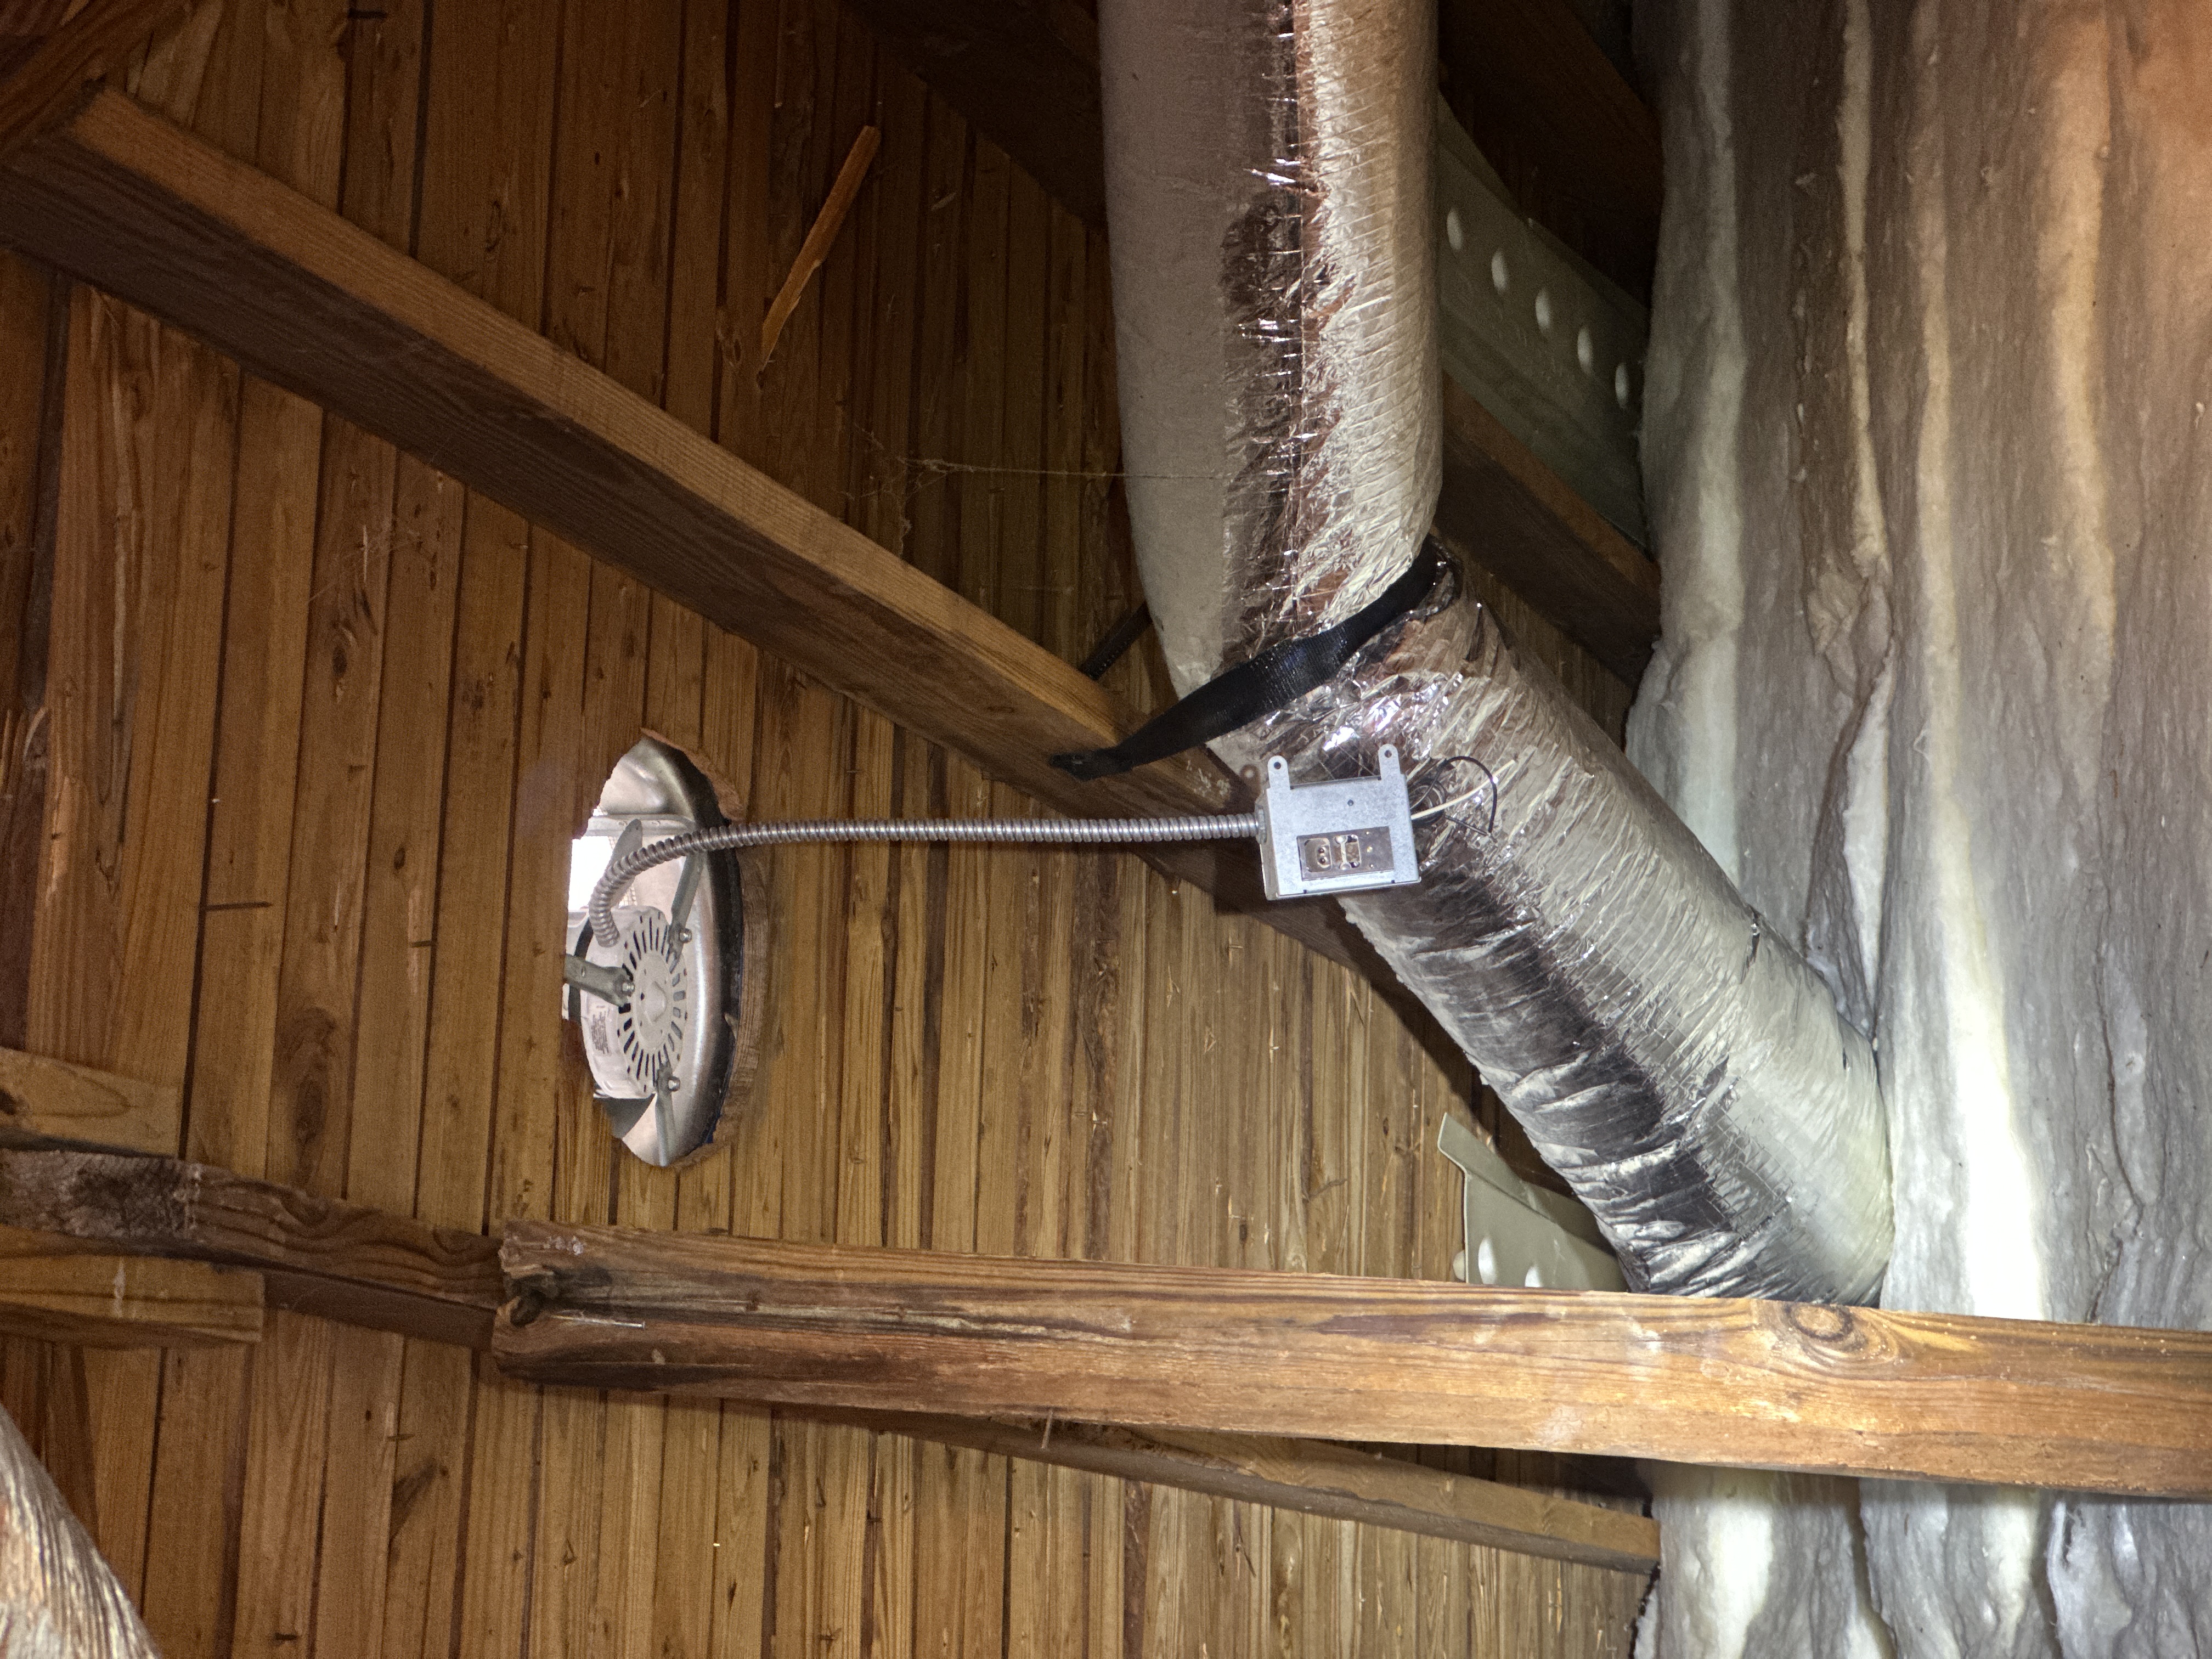
Two powered ventilation fans were found in the attic, however both were disconnected after the thermostat. Given the design of this hip roof, and the relatively short section of ridge vent, there may not be adequate ventilation in this attic. Although powered ventilators are generally discouraged, if temperatures in the attic become excessive in the summer (over 140-150 degrees F), then one or two of the fans may need to be hooked back up for use on a thermostat. A licensed electrician would be able to assist with this, and ensure the fans operate properly. Due to the fans being disconnected, I was unable to test them for functionality.
 |  |
Attic and Roof Cavity Ventilation
Attic Ventilation Method: Ridge vents, Soffit vents
Attic and roof cavity ventilation is a frequently misunderstood element of residential construction. All roof cavities are required to have ventilation. The general default standard is 1 to 150 of the attic area and ideally, this comes from at least 60% lower roof cavity ventilation and 40% upper, but this is a wild over-simplifications of the subject. As a good guiding principle the most important elements for healthy attic spaces, which are traditionally insulated and ventilated are:
- Make sure the ceiling between the living space and the attic is airtight
- Ventilate consistently across the whole lower part of the roof cavity with low, intake soffit venting
- Upper roof cavity venting is less important and if over-installed can exacerbate air migration into the attic from the living space.
- Avoid power ventilators which can depressurize the attic and exacerbate air migration from the house into the attic.
For more information, please see: Link
Laundry Facilities
Laundry Sinks
None noted
Washer
Tested
During inspection I try and run the clothes washing machine. This is mostly so that I can push water down the drain to test the waste piping system. Running the clothes washer during an inspection is not a reliable test of the appliance. I am not actually doing a load of laundry, so please note the limitations of this test.
Dryer
Tested
Proper dryer exhaust venting is critical for safe and reliable performance from the dryer. Here are some basic rules of thumb for dryer exhaust duct installation: Unless a vent-free appliance is being used, the dryer exhaust vent must terminate outdoors. It should be no more than 25 feet long and for every 90 degree turn subtract 5 feet and for every 45 degree bend subtract 2.5 feet. Use only smooth-wall metal vent pipe @ 4 inch pipe diameter. Do not use plastic pipe and plastic flex pipe. If a flexible connector is needed behind the dryer use a short amount of corrugated metal pipe. If the exhaust duct is getting pinched behind dryer, consider use of a dryer vent box, pictured here. Flex and corrugated pipes should never be used in concealed spaces such as through walls or in attic or crawl spaces. Insulate dryer exhaust duct where it passes through unconditioned spaces to prevent condensation that could hasten lint build-up inside the pipe. Do not use screws to connect pipe as these can trap lint. Secure duct with foil tape as needed. Be sure duct is sleeved properly so that it will not trap lint and clean the vent regularly, especially if it is a long exhaust run.
.png)
Power Source: Electric
Exhaust Duct: Ducted to Exterior
The dryer exhaust ductwork is dirty and needs to be cleaned for improved safety. This is important regular maintenance to eliminate a potential fire hazard.
Crawl Space
General Crawl Space
Crawl Space: Present
Mud tubs noted on crawlspace walls. See Inspect and Pest report for more information.
 |  |
Crawl Space Access
Method of Inspection: Crawled
During inspection of the crawl space, every effort is made to inspect the entire space. Visual inspection of crawl spaces is difficult and limited as access is often restricted by pipes, ducts and sub-floor insulation as well as limited clearances.
Repair the wood rot at the crawl space access door - use pressure treated lumber for repairs.
Vapor Barrier
Vapor Barrier Material: Plastic on earth
Crawl Space Ventilation
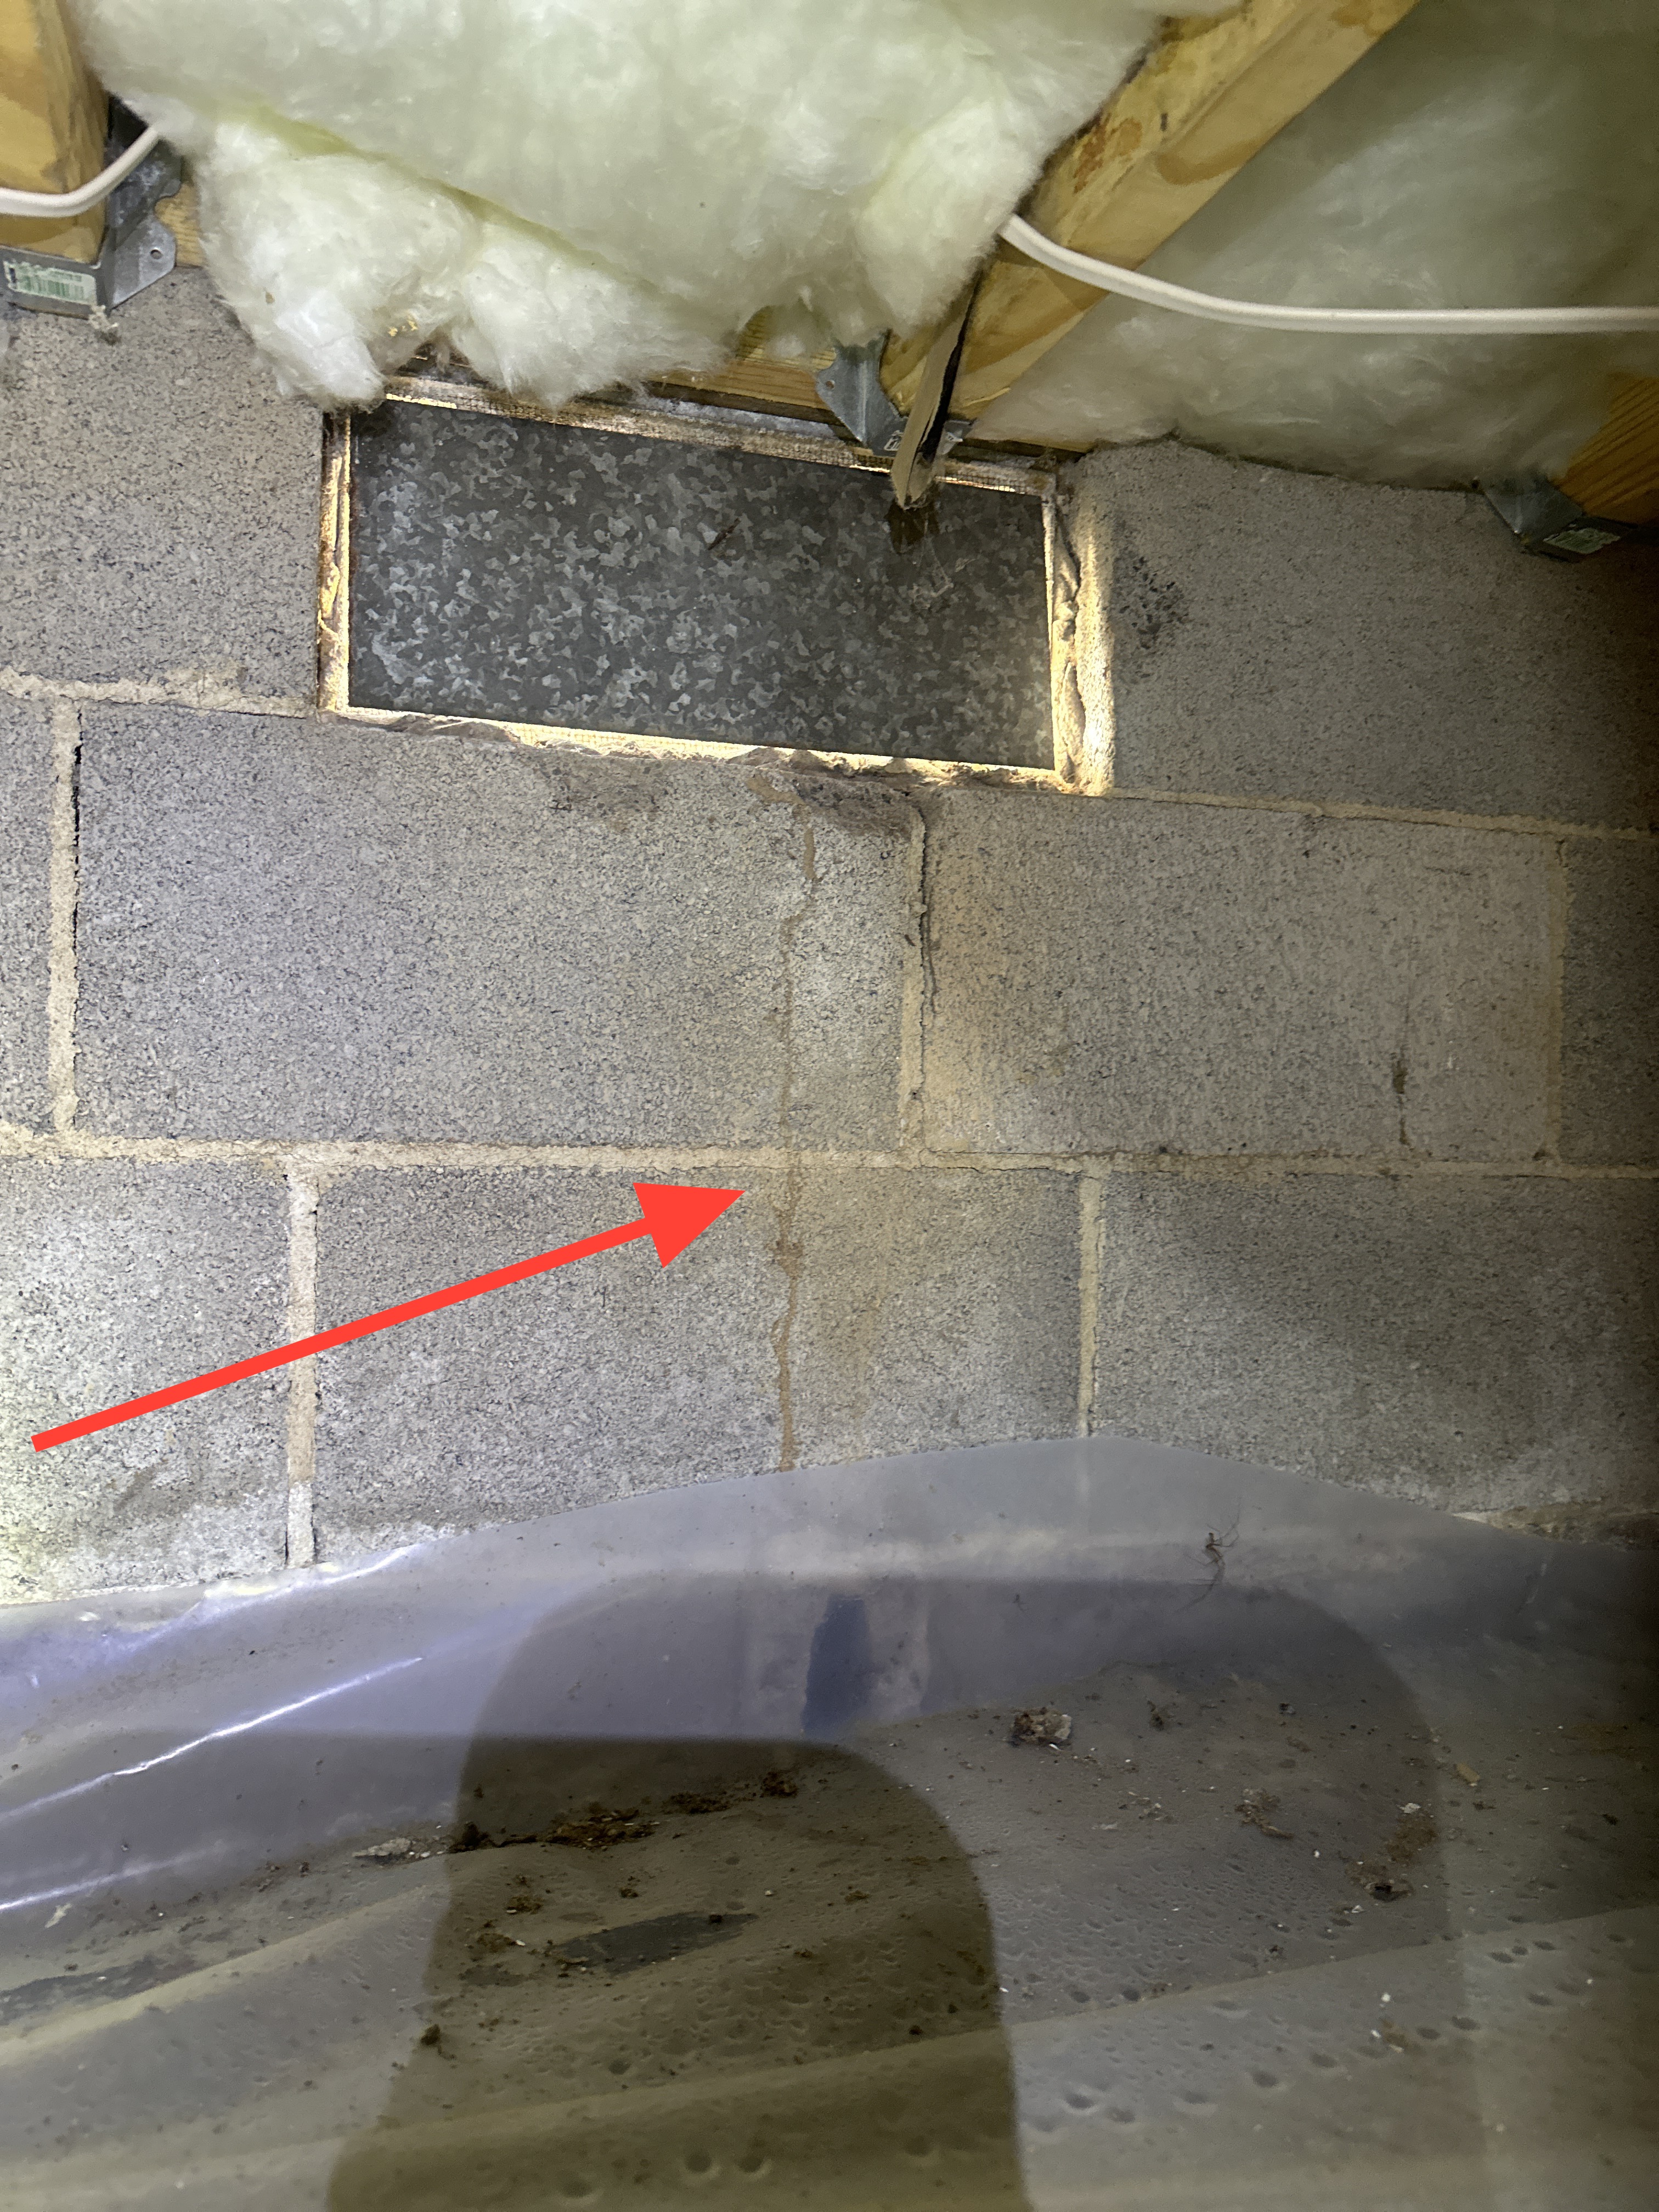
Ventilation Method: Exterior wall vents, Vent Screens (Damaged - Could Allow Rodent Entry)
The screens for the crawl space vents are damaged and could allow rodent entry. Use 1/4 inch wire mesh screen and be sure all openings are well sealed to prevent rodent entry. Do not apply multiple layers of the screen as this will restrict airflow.

Insulation
Insulation Type: Fiberglass batts
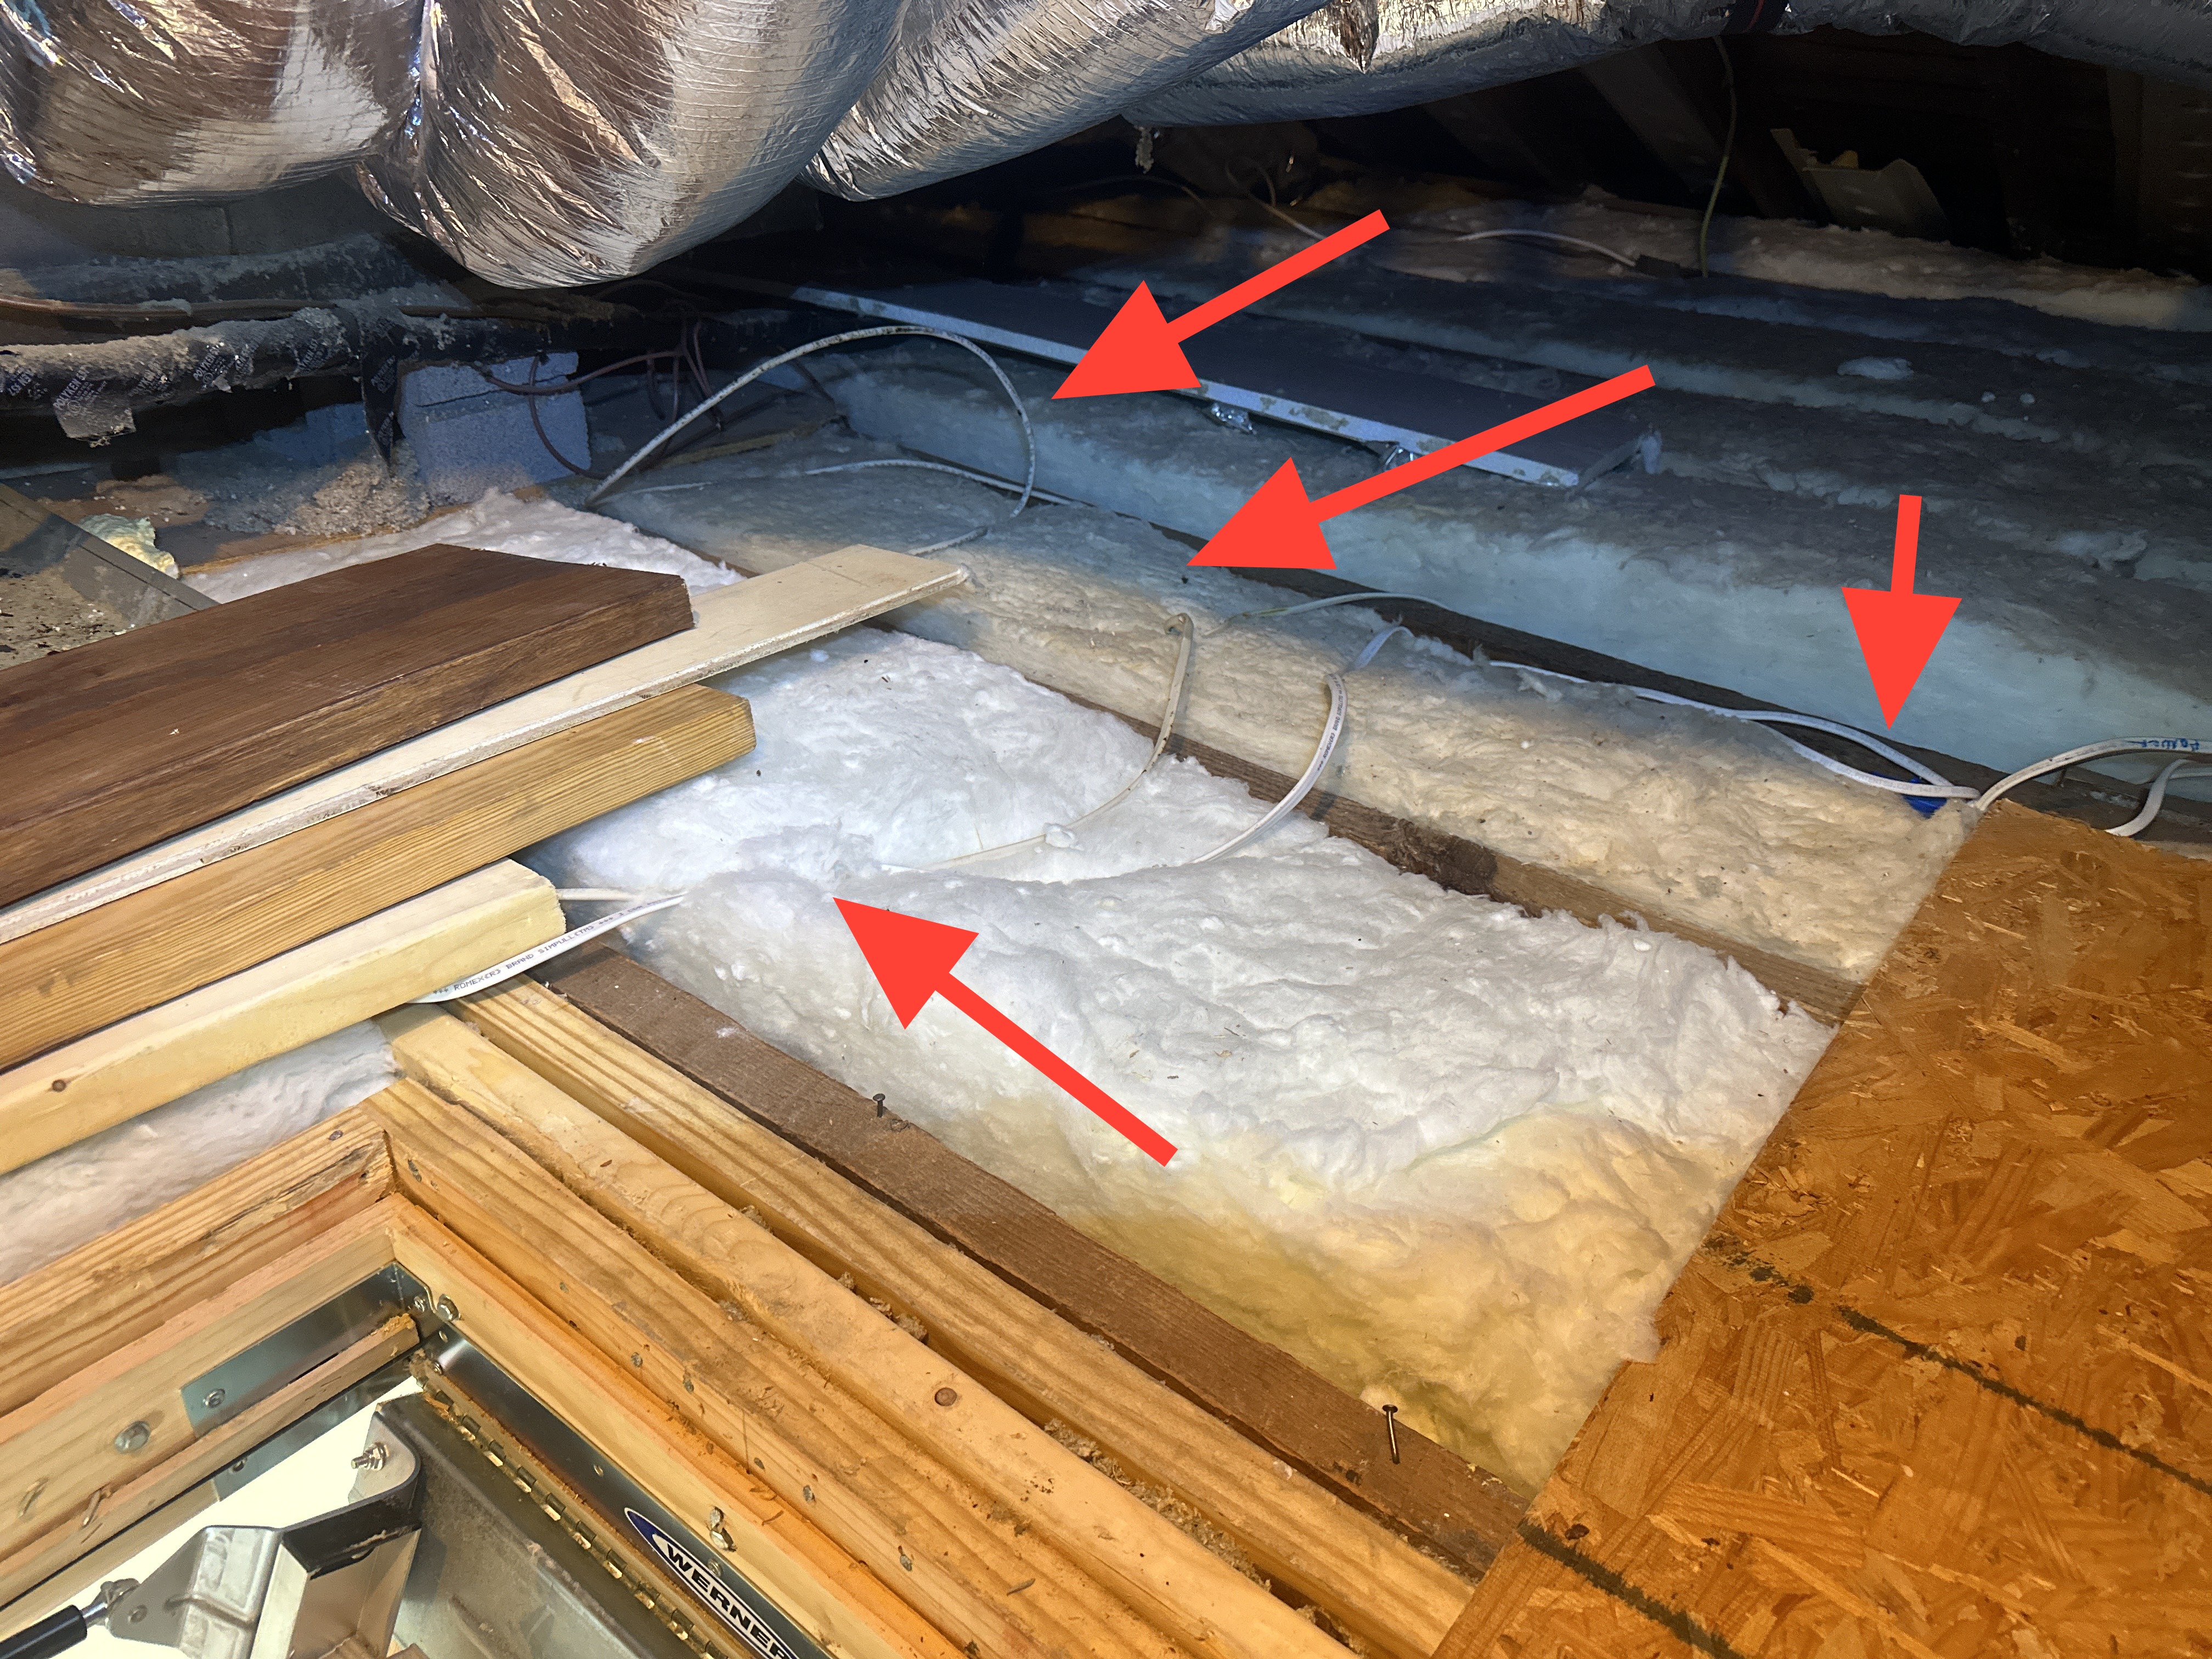
The sub-floor insulation in the crawl space is incomplete and requires repair. Be sure the entire sub-floor is insulated. When making repairs it is best to seal any noticeable air leaks between the crawl space and the living space. Check all penetrations through the floor.
 |  |
Moisture Conditions
No water was visible or present at the time of inspection
The moisture content of the joists was taken in the four corners of the crawlspace. The highest reading found was 12.0%. This is not an elevated moisture level and is considered acceptable. Should humidity levels in the crawlspace increase significantly in the summertime, a crawlspace repair company may want to be contacted to explore options for sealing the crawl space vents and installing a dehumidifier. I am unable to determine how humid the crawlspace will be in the summer.

Checking Out Procedure
Check Out List
Oven:Off
Lights:Client and Realtor Still In House
Heating and Cooling:Restored to Pre-inspection temperatures
Appliances:Off / finishing cycle
GFCIs:Reset![]() Not able to locate
Not able to locate
Signed Contracts
.png)
Central Carolina Home Inspections, LLC
919.748.8939
www.centralcarolinahomeinspections.com
Inspector: Jeffrey Howard, NC State Inspector License
No. 3672
jeff@centralcarolinahomeinspections.com