
The Scope and Purpose of a Home Inspection
Purchasing property involves risk
The purpose of a home inspection is to help reduce the risk associated with the purchase of a structure by providing a professional opinion about the overall condition of the structure. A home inspection is a limited visual inspection and it cannot eliminate this risk. Some homes present more risks than others. We cannot control this, but we try to help educate you about what we don’t know during the inspection process. This is more difficult to convey in a report and one of many reasons why we recommend that you attend the inspection.
A home inspection is not an insurance policy
This report does not substitute for or serve as a warranty or guarantee of any kind. Home warranties can be purchased separately from insuring firms that provide this service.
A home inspection is visual and not destructive
The descriptions and observations in this report are based on a visual inspection of the structure. We inspect the aspects of the structure that can be viewed without dismantling, damaging or disfiguring the structure and without moving furniture and interior furnishings. Areas that are concealed, hidden or inaccessible to view are not covered by this inspection. Some systems cannot be tested during this inspection as testing risks damaging the building. For example, overflow drains on bathtubs are generally not tested because if they were found to be leaking they could damage the finishes below. Our procedures involve non-invasive investigation and non-destructive testing which will limit the scope of the inspection.
This is not an inspection for code compliance
This inspection and report are not intended for city / local code compliance. During the construction process structures are inspected for code compliance by municipal inspectors. Framing is open at this time and conditions can be fully viewed. Framing is not open during inspections of finished homes, and this limits the inspection. All houses fall out of code compliance shortly after they are built, as the codes continually change. National codes are augmented at least every three years for all of the varying disciplines. Municipalities can choose to adopt and phase in sections of the codes on their own timetables. There are generally no requirements to bring older homes into compliance unless substantial renovation is being done.
This is just my opinion
Construction techniques and standards vary. There is no one way to build a house or install a system in a house. The observations in this report are the opinions of the home inspector. Other inspectors and contractors are likely to have some differing opinions. You are welcome to seek opinions from other professionals.
The scope of this inspection
This inspection will include the following systems: exterior, roof, structure, drainage, foundation, attic, interior, plumbing, electrical and heating. The evaluation will be based on limited observations that are primarily visual and non-invasive. This inspection and report are not intended to be technically exhaustive.
Your expectations
The overall goal of a home inspection is to help ensure that your expectations are appropriate with the house you are proposing to buy. To this end we assist with discovery by showing and documenting observations during the home inspection. This should not be mistaken for a technically exhaustive inspection designed to uncover every defect with a building. Such inspections are available but they are generally cost-prohibitive to most homebuyers.
Your participation is requested
Your presence is requested during this inspection. A written report will not substitute for all the possible information that can be conveyed verbally by a shared visual observation of the conditions of the property.
How to Read This Report
Getting the Information to You
This report is designed to deliver important and technical information in a way that is easy for anyone to access and understand. If you are in a hurry, you can take a quick look at our "Summary Page” and quickly get critical information for important decision making. However, we strongly recommend that you take the time to read the full Report, which includes digital photographs, captions, diagrams, descriptions, videos and hot links to additional information.
The best way to get the layers of information that are presented in this report is to read your report online, which will allow you to expand your learning about your house. You will notice some words or series of words highlighted in blue and underlined – clicking on these will provide you with a link to additional information.
This report can also be printed on paper or to a PDF document.
Chapters and Sections
This report is divided into chapters that parcel the home into logical inspection components. Each chapter is broken into sections that relate to a specific system or component of the home. You can navigate between chapters with the click of a button on the left side margin.
Most sections will contain some descriptive information done in black font. Observation narrative, done in colored boxes, will be included if a system or component is found to be significantly deficient in some way or if we wish to provide helpful additional information about the system or the scope of our inspection. If a system or component of the home was deemed to be in satisfactory or serviceable condition, there may be no narrative observation comments in that section and it may simply say “tested,” or “inspected.”
Observation Labels
All narrative observations are colored, numbered and labeled to help you find, refer to, and understand the severity of the observation. Observation colors and labels used in this report are:
- Safety:I visually observed a condition in the home that may pose a safety risk or hazardous condition. These conditions should be rectified before occupying the home.
- Repair:Repair and maintenance items noted during inspection. Please note that some repair items can be expensive to correct such as re-finishing hardwood floors, but are considered simply repair items due to their cosmetic nature.
- Due Diligence:Items that may require further investigation to determine the severity and / or urgency of repair.
- Completed:Items that were tested/checked and found to be in working order. No further action is needed.
- Note:Refers to aside information and /or any comments elaborating on descriptions of systems in the home or limitations to the home inspection.
Who Repairs the Items Found in this Report
As I don't know the qualifications of the seller or the buyer to conduct repairs, I always recommend that you consult a qualified licensed professional in the appropriate trade to determine all needed repairs and best repair method, to estimate costs, and to perform all repairs deemed necessary. That's what I mean when I write "Repair as necessary", "Fix it" or ANY other terms implying the need for repair/replacement.
You need to decide for yourself if you or the seller's qualifications, experience and knowledge would allow the repair to be made without using a qualified licensed trade professional.
Summary Page
The Summary Page is designed as a bulleted overview of all the observations noted during inspection. This helpful overview is not a substitution for reading the entire inspection report. The entire report must be read to get a complete understanding of this inspection report as the Summary Page does not include photographs or photo captions.
Report Summary
Safety
- DPB5-2 🏡Decks, Porches and Balconies:
The balusters along the guard rail of the deck have a decorative crosshatch pattern in the center of each section.
This pattern has violated the spacing rules. A 4" sphere should not be able to pass through the balusters.
Have the builder repair the railing as needed.
- ES-1 ⚡ Electric Service:
The white conductors inside the electric panel at the 240 volt circuit breakers were not correctly identified as 'hot' or 'ungrounded' conductors - these should be painted in black or red ink for correct identification and improved safety. Have an electrician evaluate the panel and correct the situation as needed.
- K-1 🔪 Kitchen:
The kitchen sink faucet has been plumbed backward. When faucets are turned on by the lever, pulling them forward should turn on the cold water. This keeps kids from reaching up and turning on the hot (possibly getting burned). It's an easy fix by having the supply lines for the kitchen sink swapped with each other. That should make the cold water come on when you pull the handle forward.
Repairs
- G1-1 🌳 Grounds:
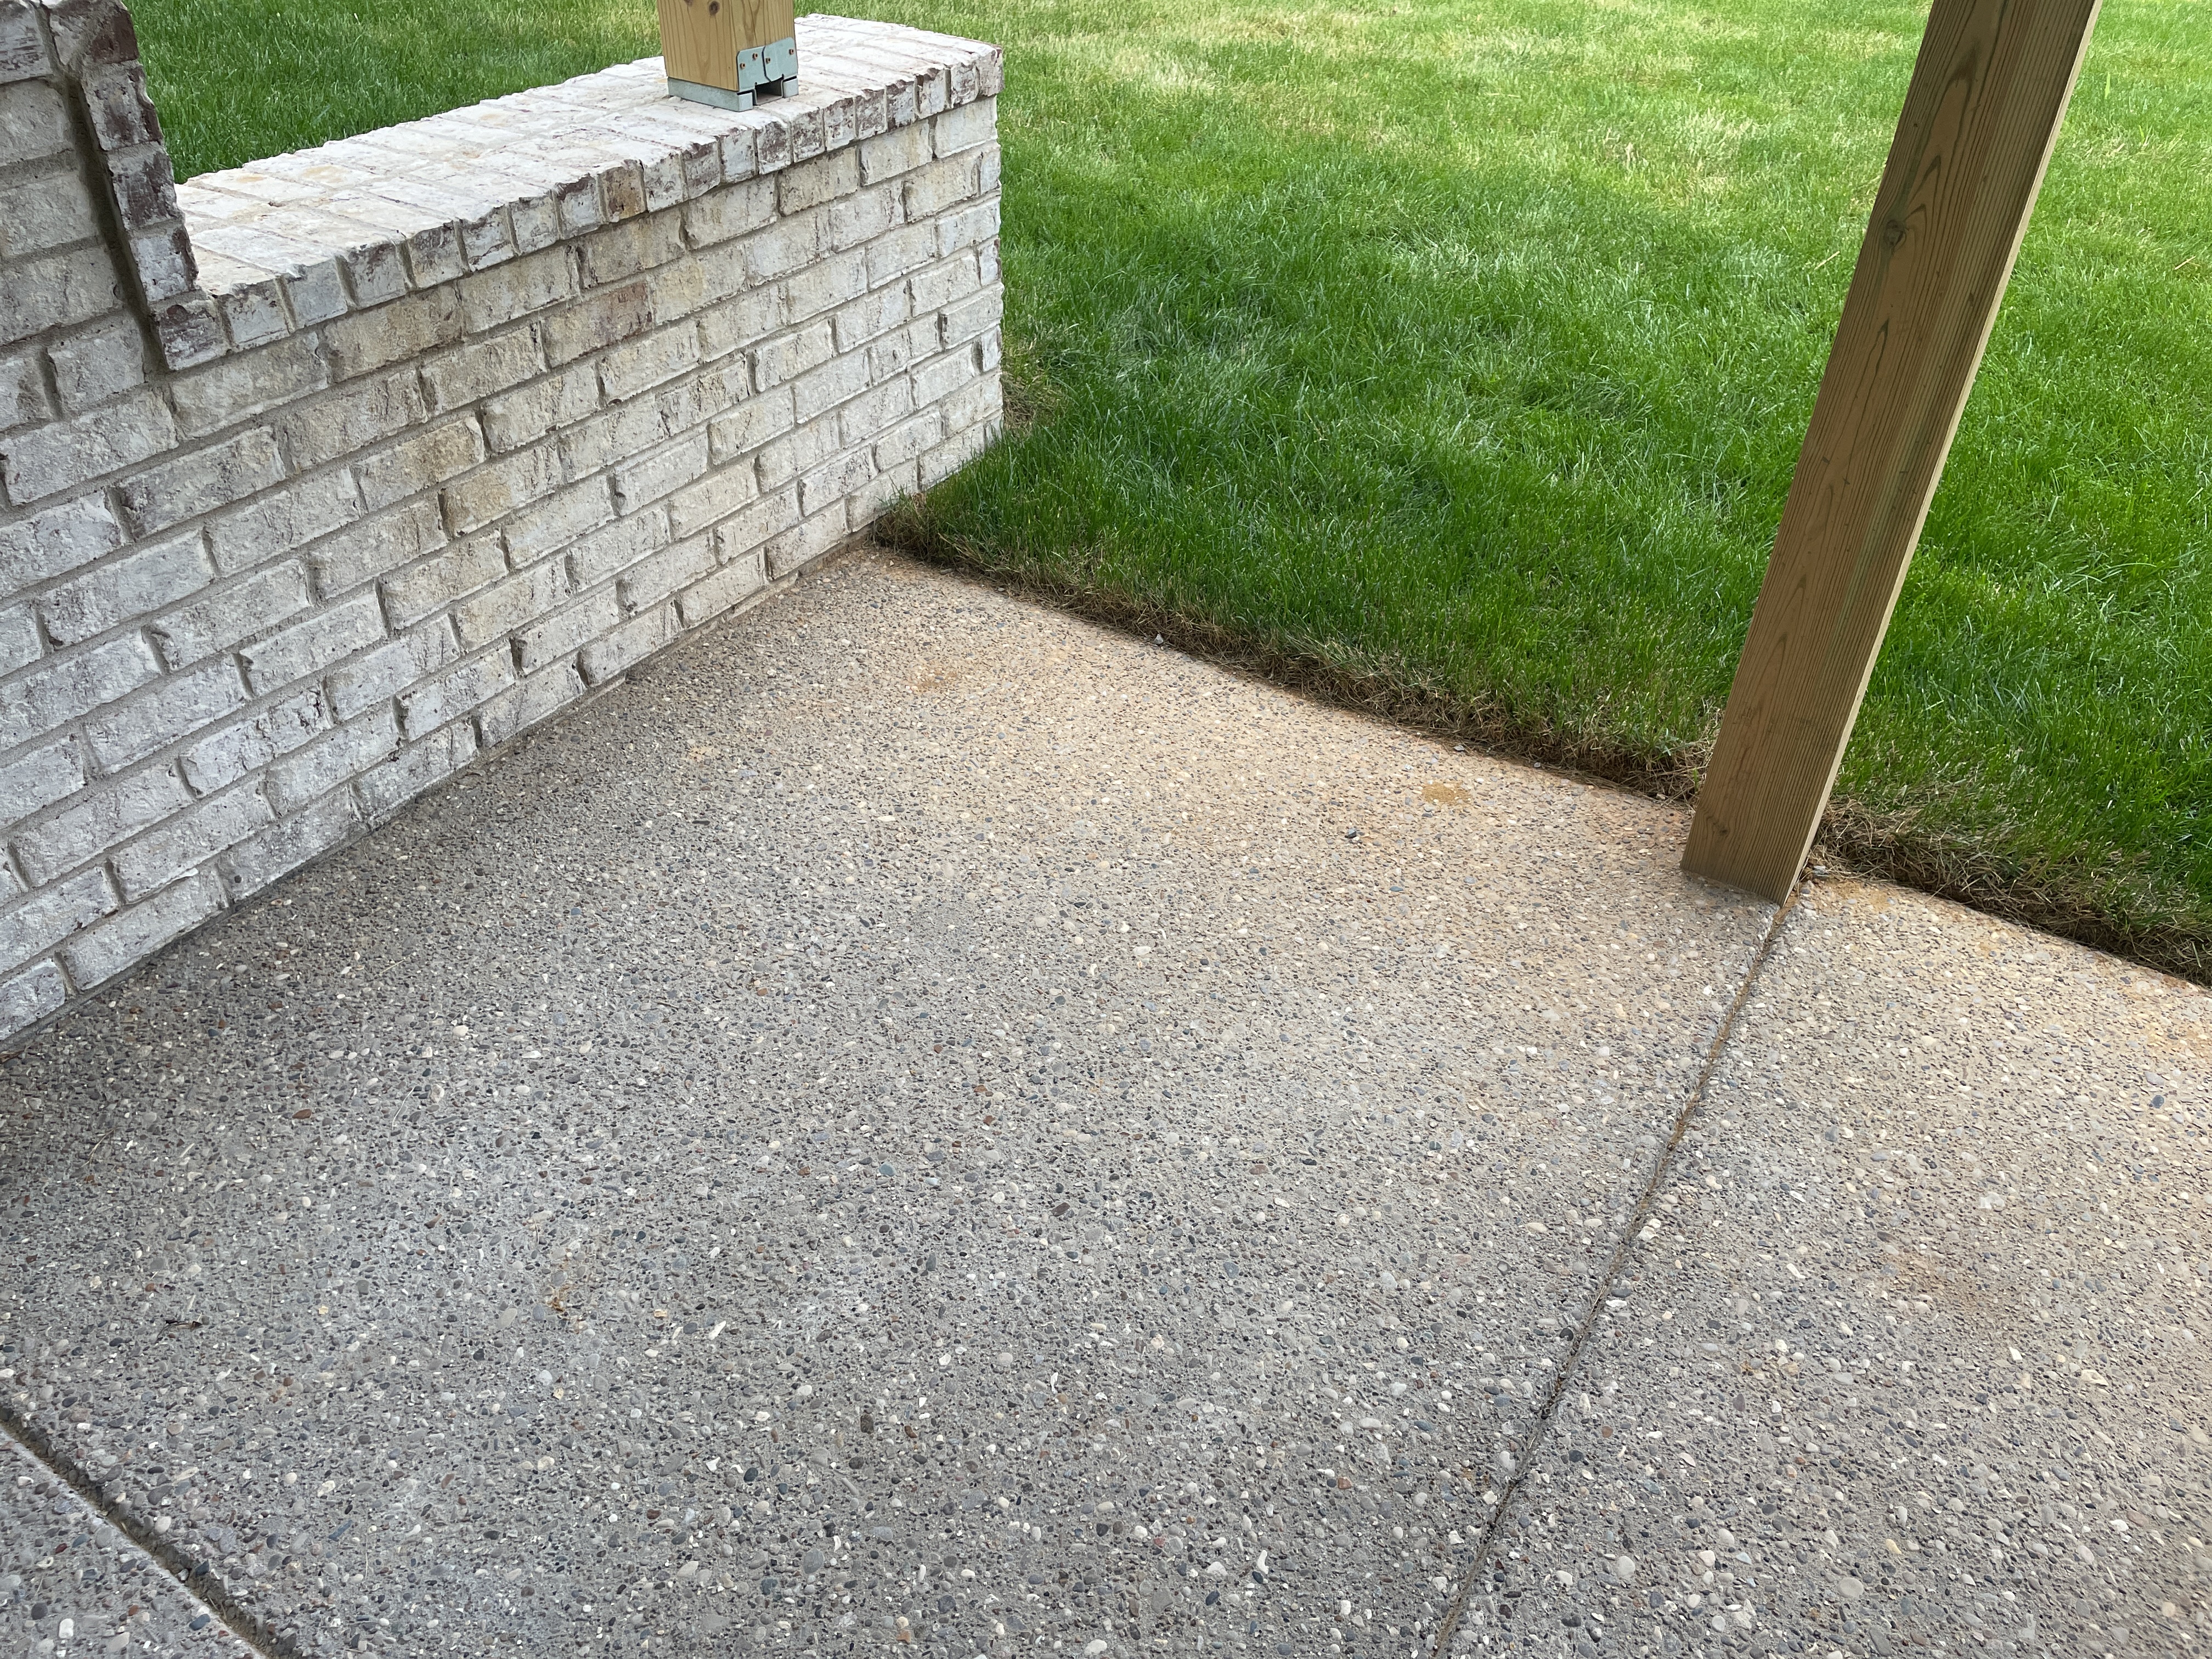
The back patio has dirt stains around the outer edge as though it is holding water in heavy rain. You won’t be able to gauge the situation until you see how it reacts to a heavy rain event.
When the grass sits higher than the concrete like this, water usually pours over onto the pavement. If the water is pooling along this outer edge you’ll need to have the builder correct the drainage or premature failure of this concrete pad will be likely.
- RCG-1 🏡 Roof, Chimney and Gutters:
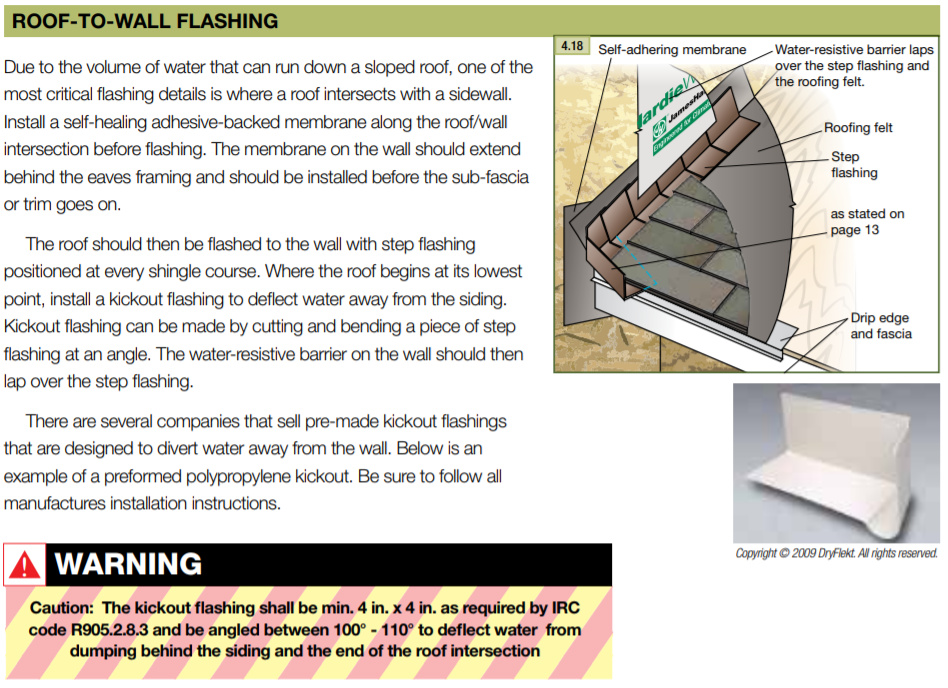
The roof/wall connection is missing the kickout flashing (front and back walls).
Kickout flashings are used where a lower roofline terminates against a vertical wall. The kickout is installed above the gutter where the roof meets the wall. It kicks out the water to the gutter and diverts it away from the lower wall.
Without a kickout flashing, the water misses the gutter and runs in behind the siding. It usually gets trapped inside the wall or rots out the soffit and siding below the gutter. I have written an article on this subject that you can read here that explains things in detail: https://abihomeservices.com/kickout-diverter-flashing/
You'll want to have the builder correct the situation to follow James Hardies' install guide linked below.
James Hardie also requires this flashing to be installed as part of their manufacturer's instructions. You can download a copy of these instructions here: https://www.https://www.jameshardiepros.com/getattachment/2510b556-ee39-416d-8ef7-198c698f4cc7/hardiepanel-single-family-hz5-us-en.pdf.com/getattachment/513223b4-054b-4112-ab6b-38974c62c9cb/hardieplank-hz5-us-en.pdf
- RCG-2 🏡 Roof, Chimney and Gutters:
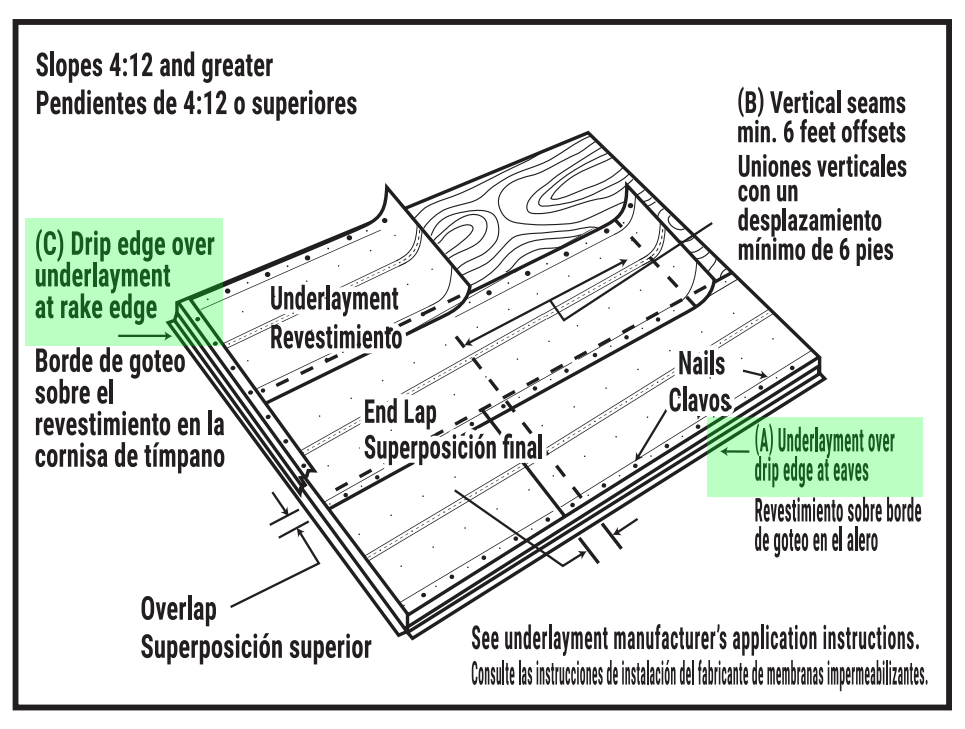
The drip edge on the roof was not installed correctly. When this flashing is properly installed, the drip edge on the eave is installed first and the underlayment lays on top of the drip edge (the gutter side of the roof slope). However, on the rake side slope, the metal is installed on top of the underlayment to seal off wind driven rain.
Please see the attached diagram for further details on how underlayment and drip edge should be installed properly. Have a roofing contractor repair the drip edge installation as needed.
- RCG-3 🏡 Roof, Chimney and Gutters:
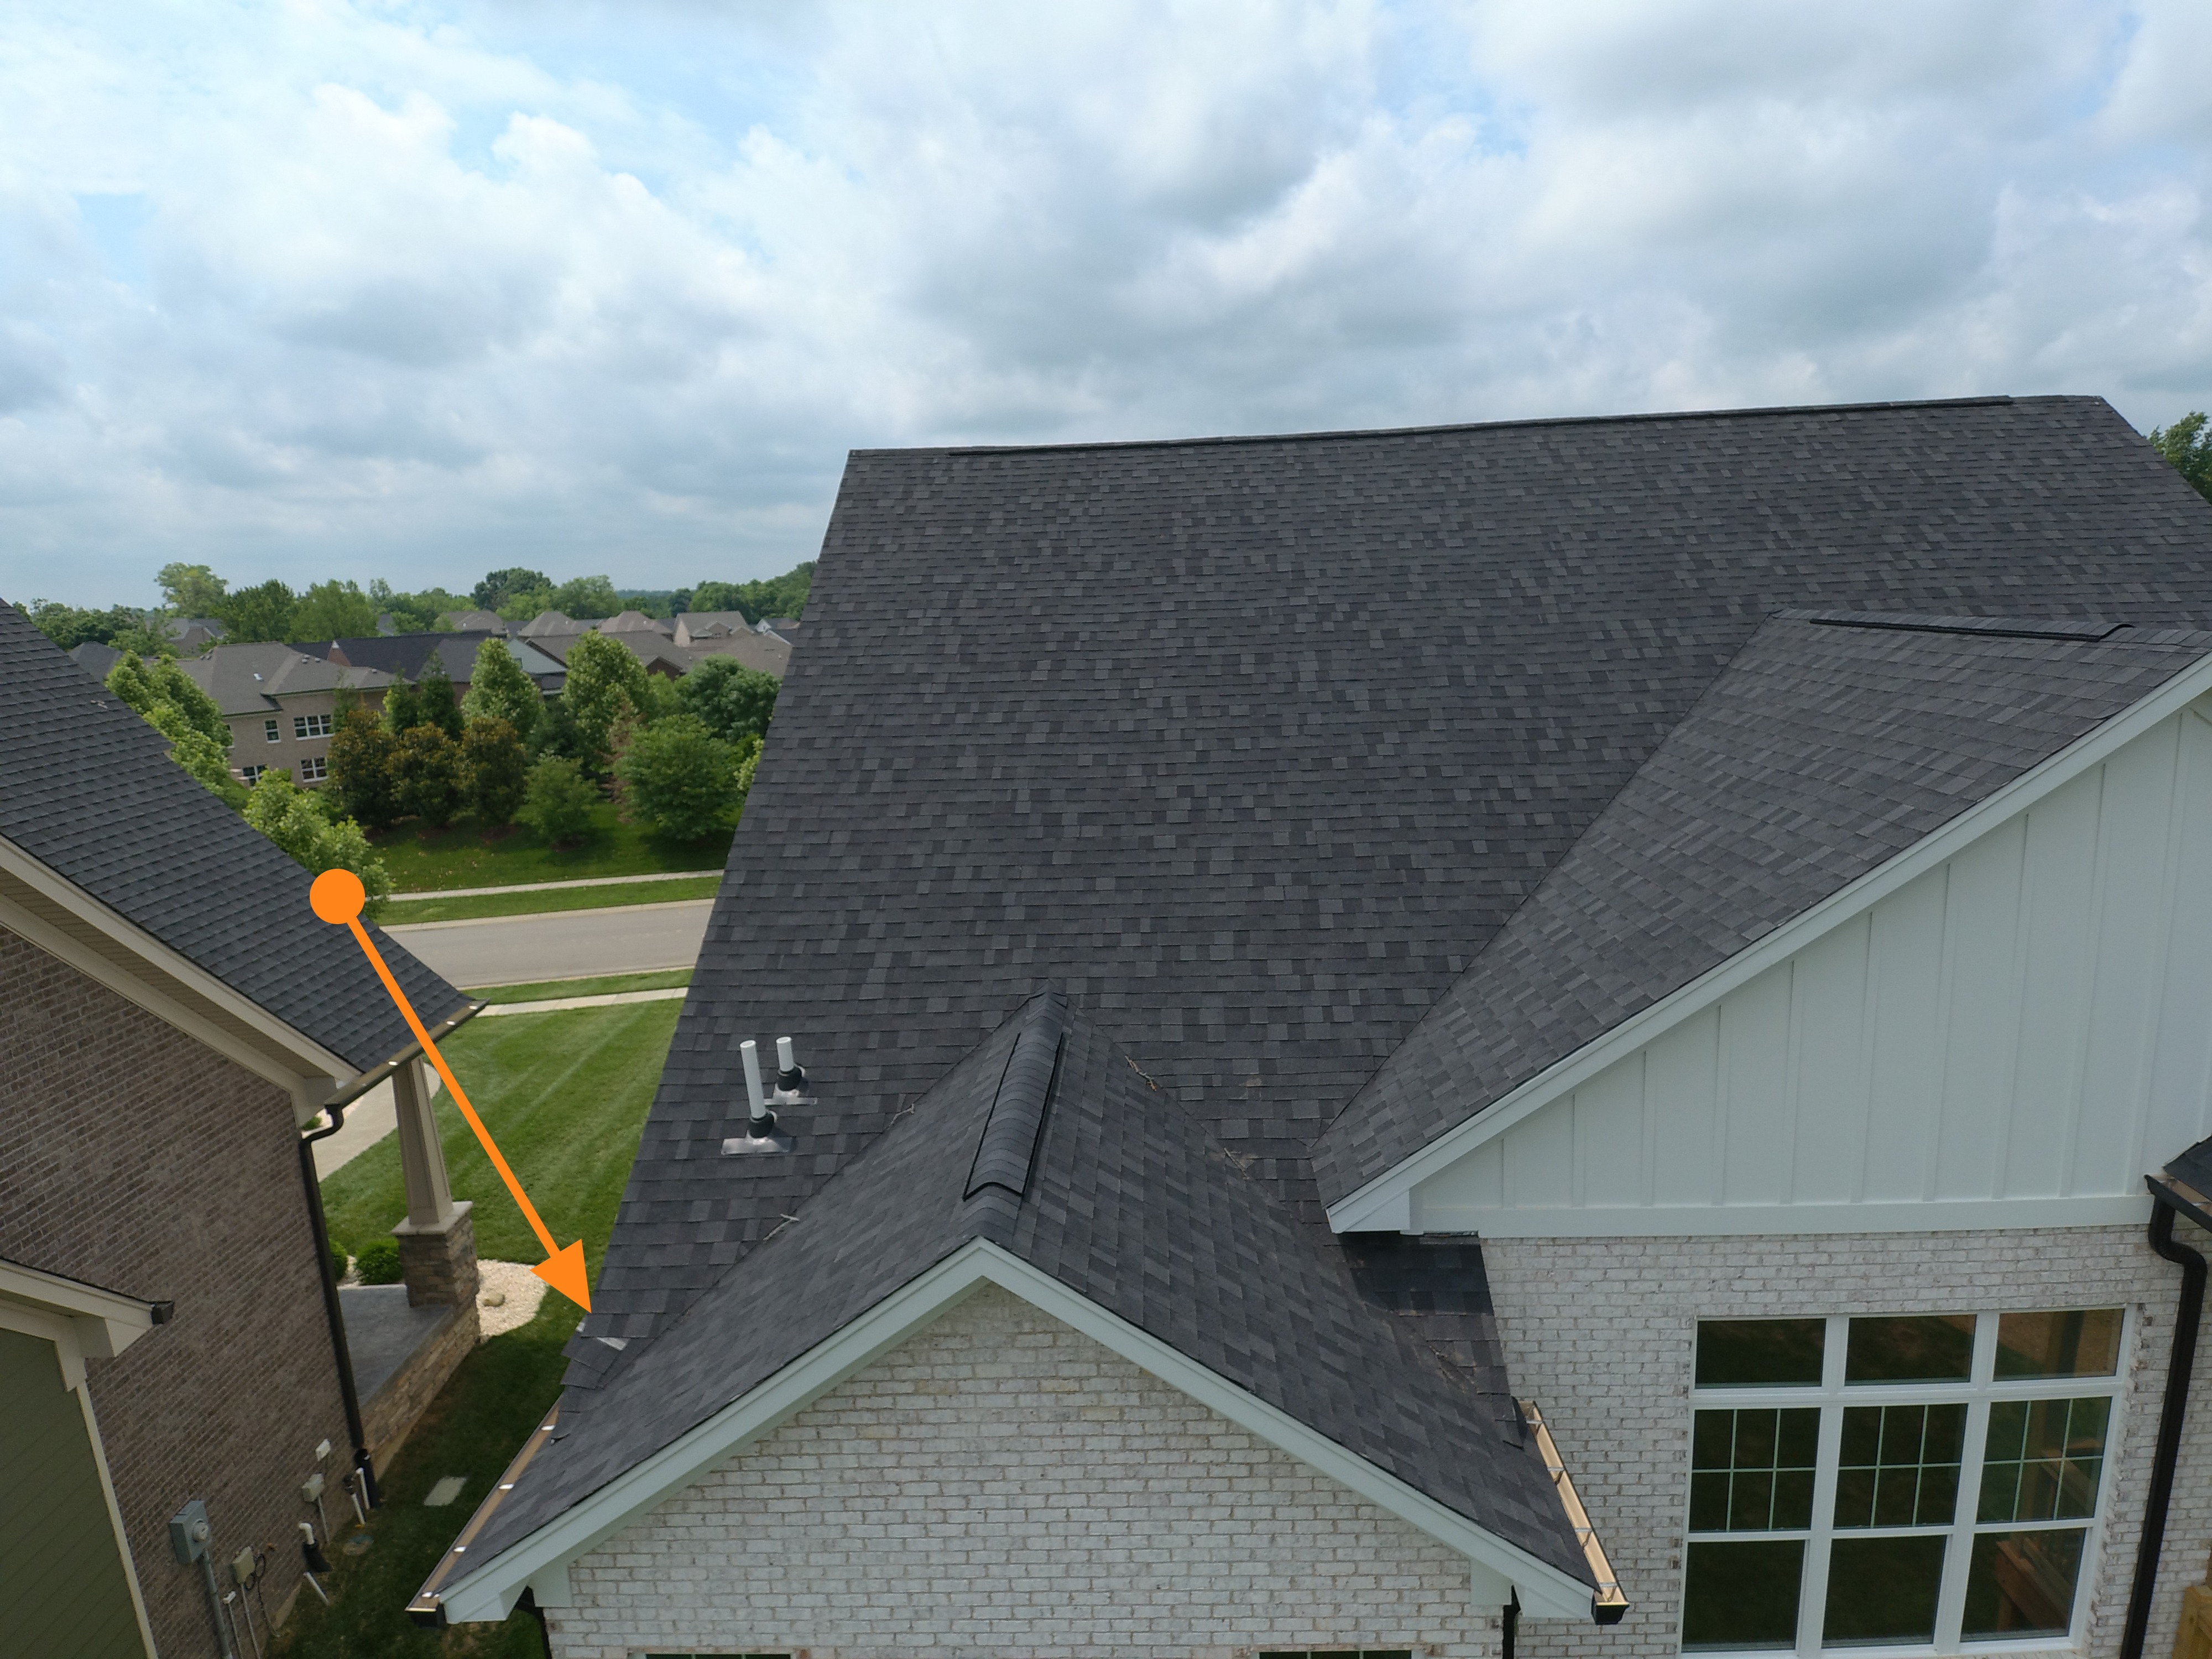
A few shingles have slipped out of place along the back left corner of the roof. More than likely these were not nailed properly and the shingles worked loose. Have a roofing contractor repair the installation as needed.
- RCG-4 🏡 Roof, Chimney and Gutters:
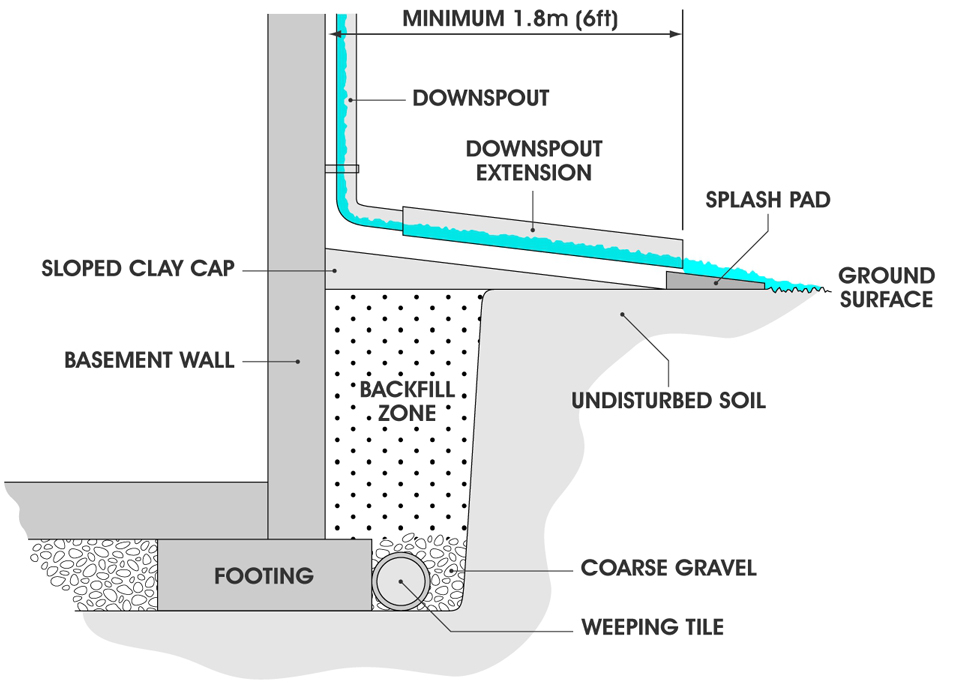
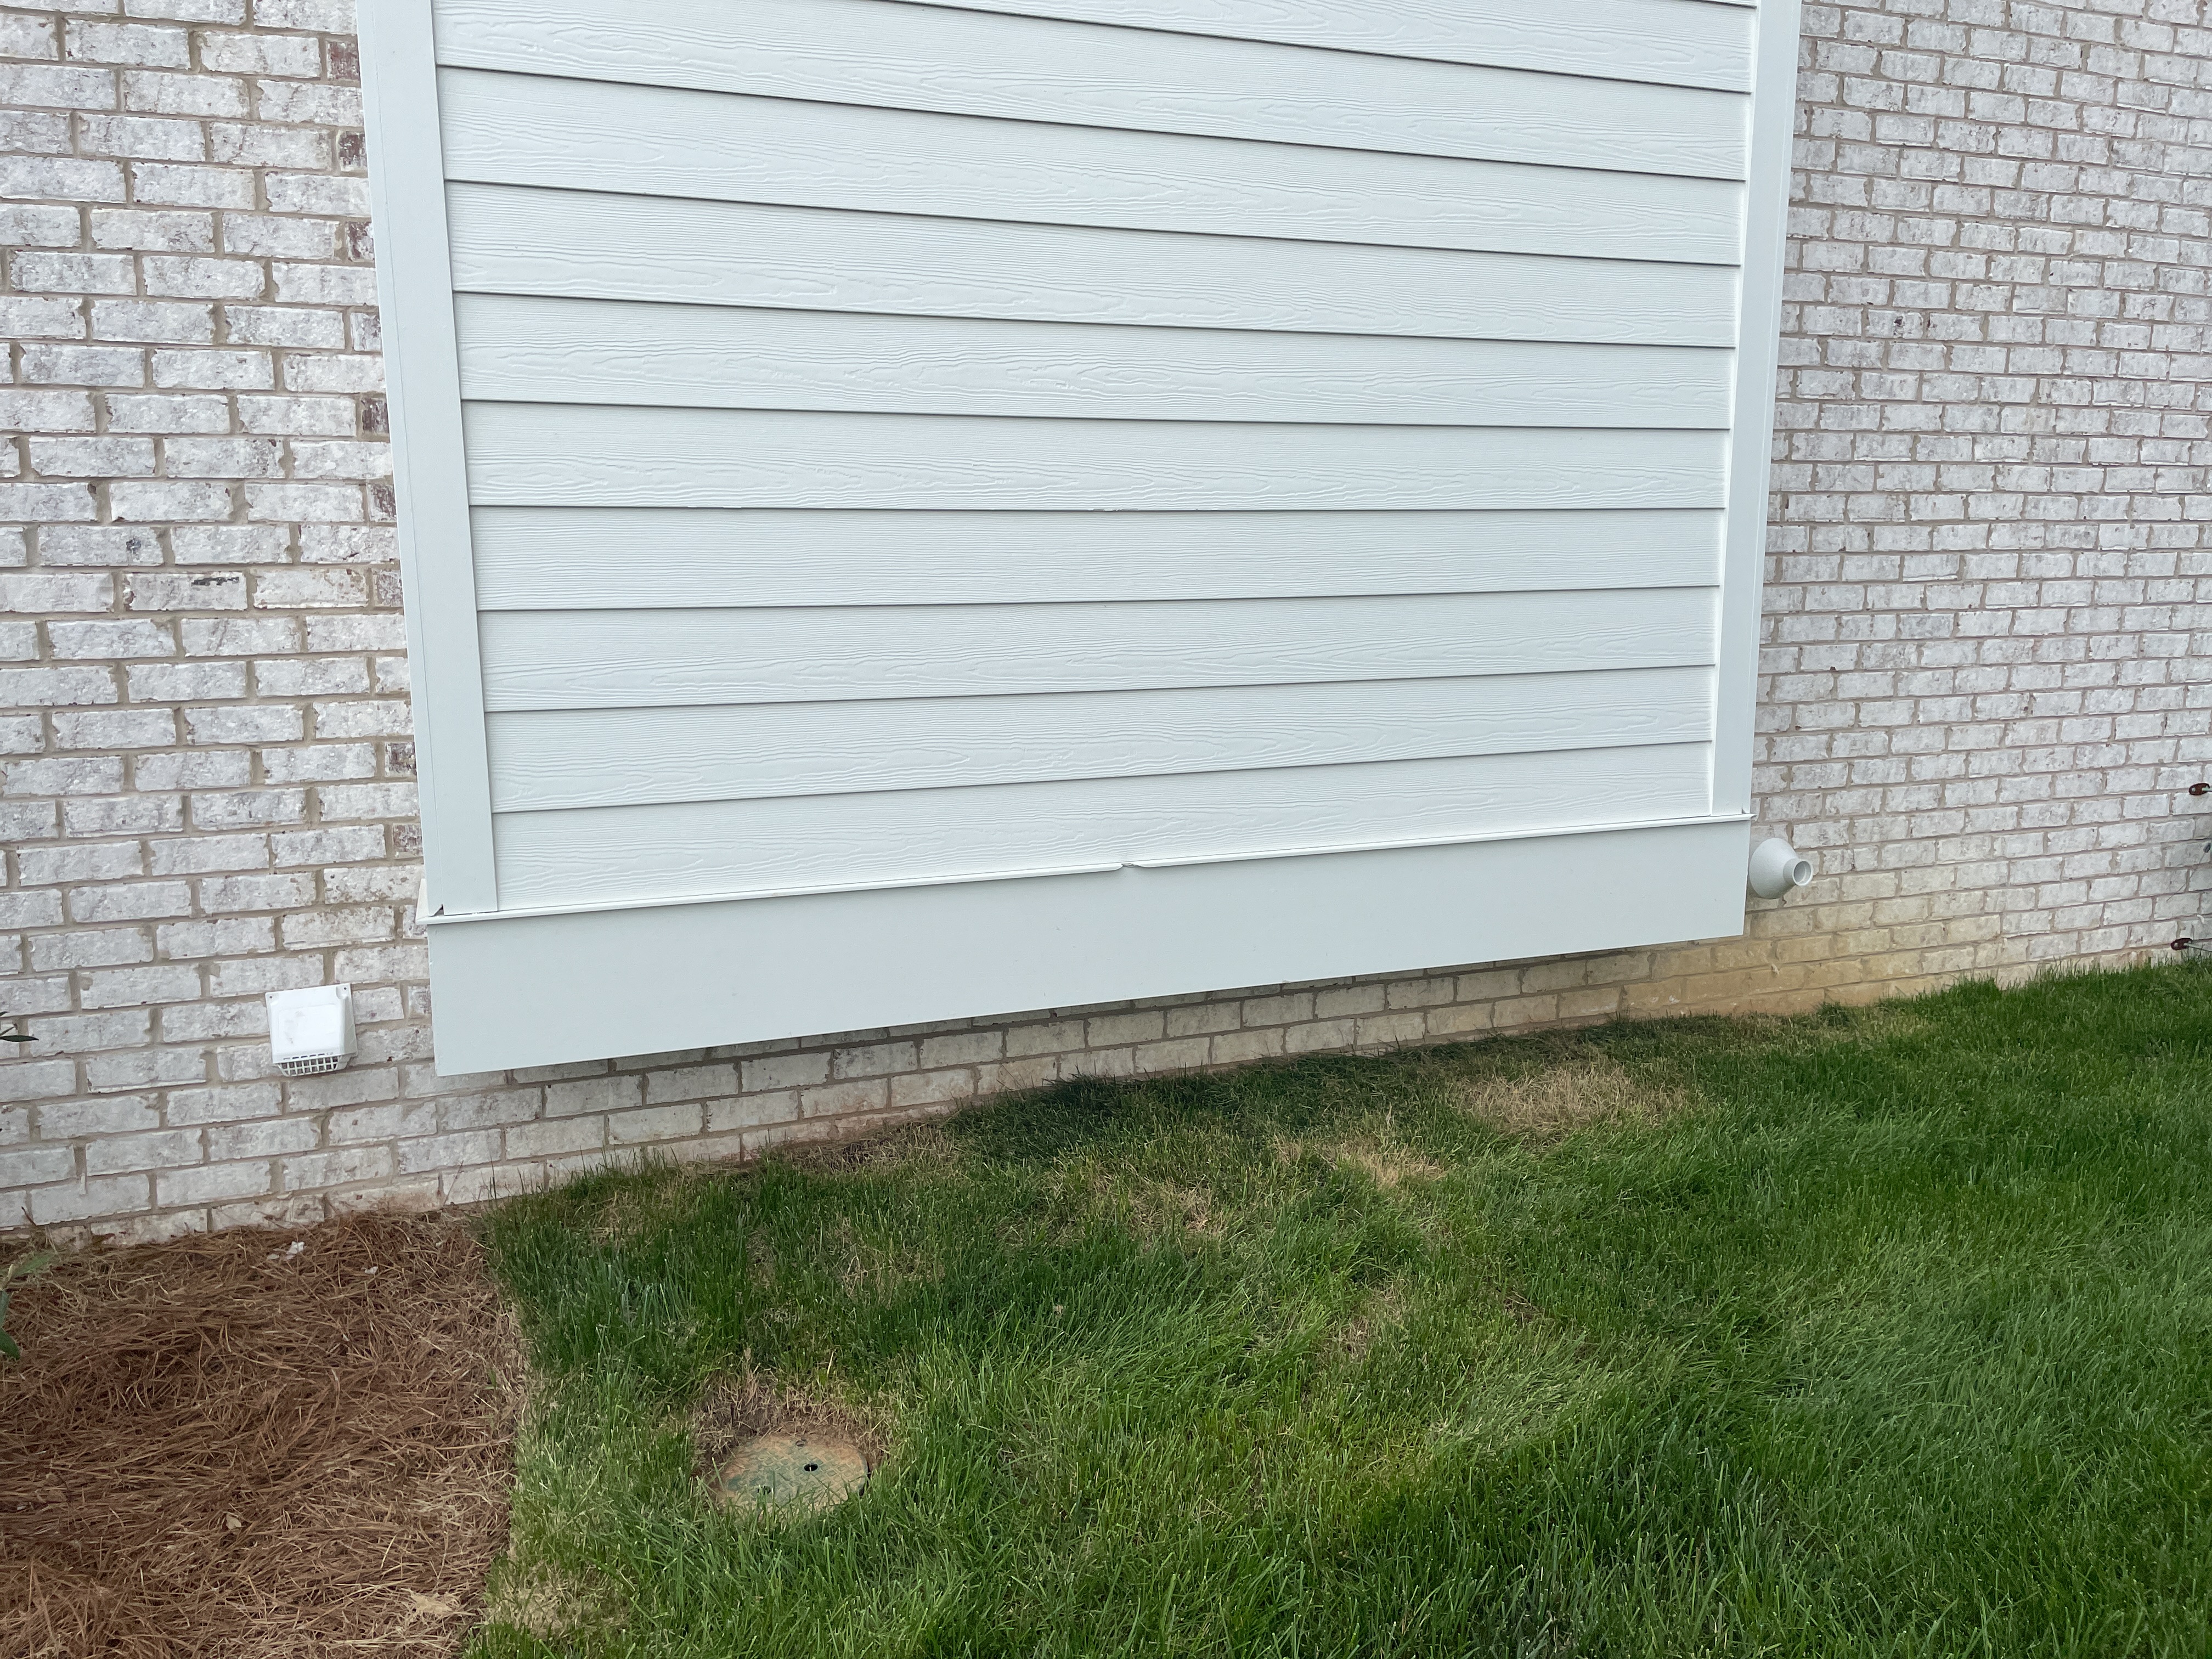
The downspouts around the home need to have extensions added to them (not just splash blocks). They are discharging water near the home's foundation, which can cause moisture issues around the house (such as foundation failure & flooding). You want to get water away from the house as much as possible, but no less than 5 feet.
- RCG-5 🏡 Roof, Chimney and Gutters:
The gutters are nestled against the Hardie Siding, which goes against their installation requirements.
James Hardie calls for a 1 inch gap between the end of the gutter and the wall. This helps promote drying and prevents trapped debris from damaging the siding over time. Have the gutters trimmed back so they meet the installation requirements of the siding manufacturer.
- ESDW-1 🧱 Exterior Siding, Doors and Windows:
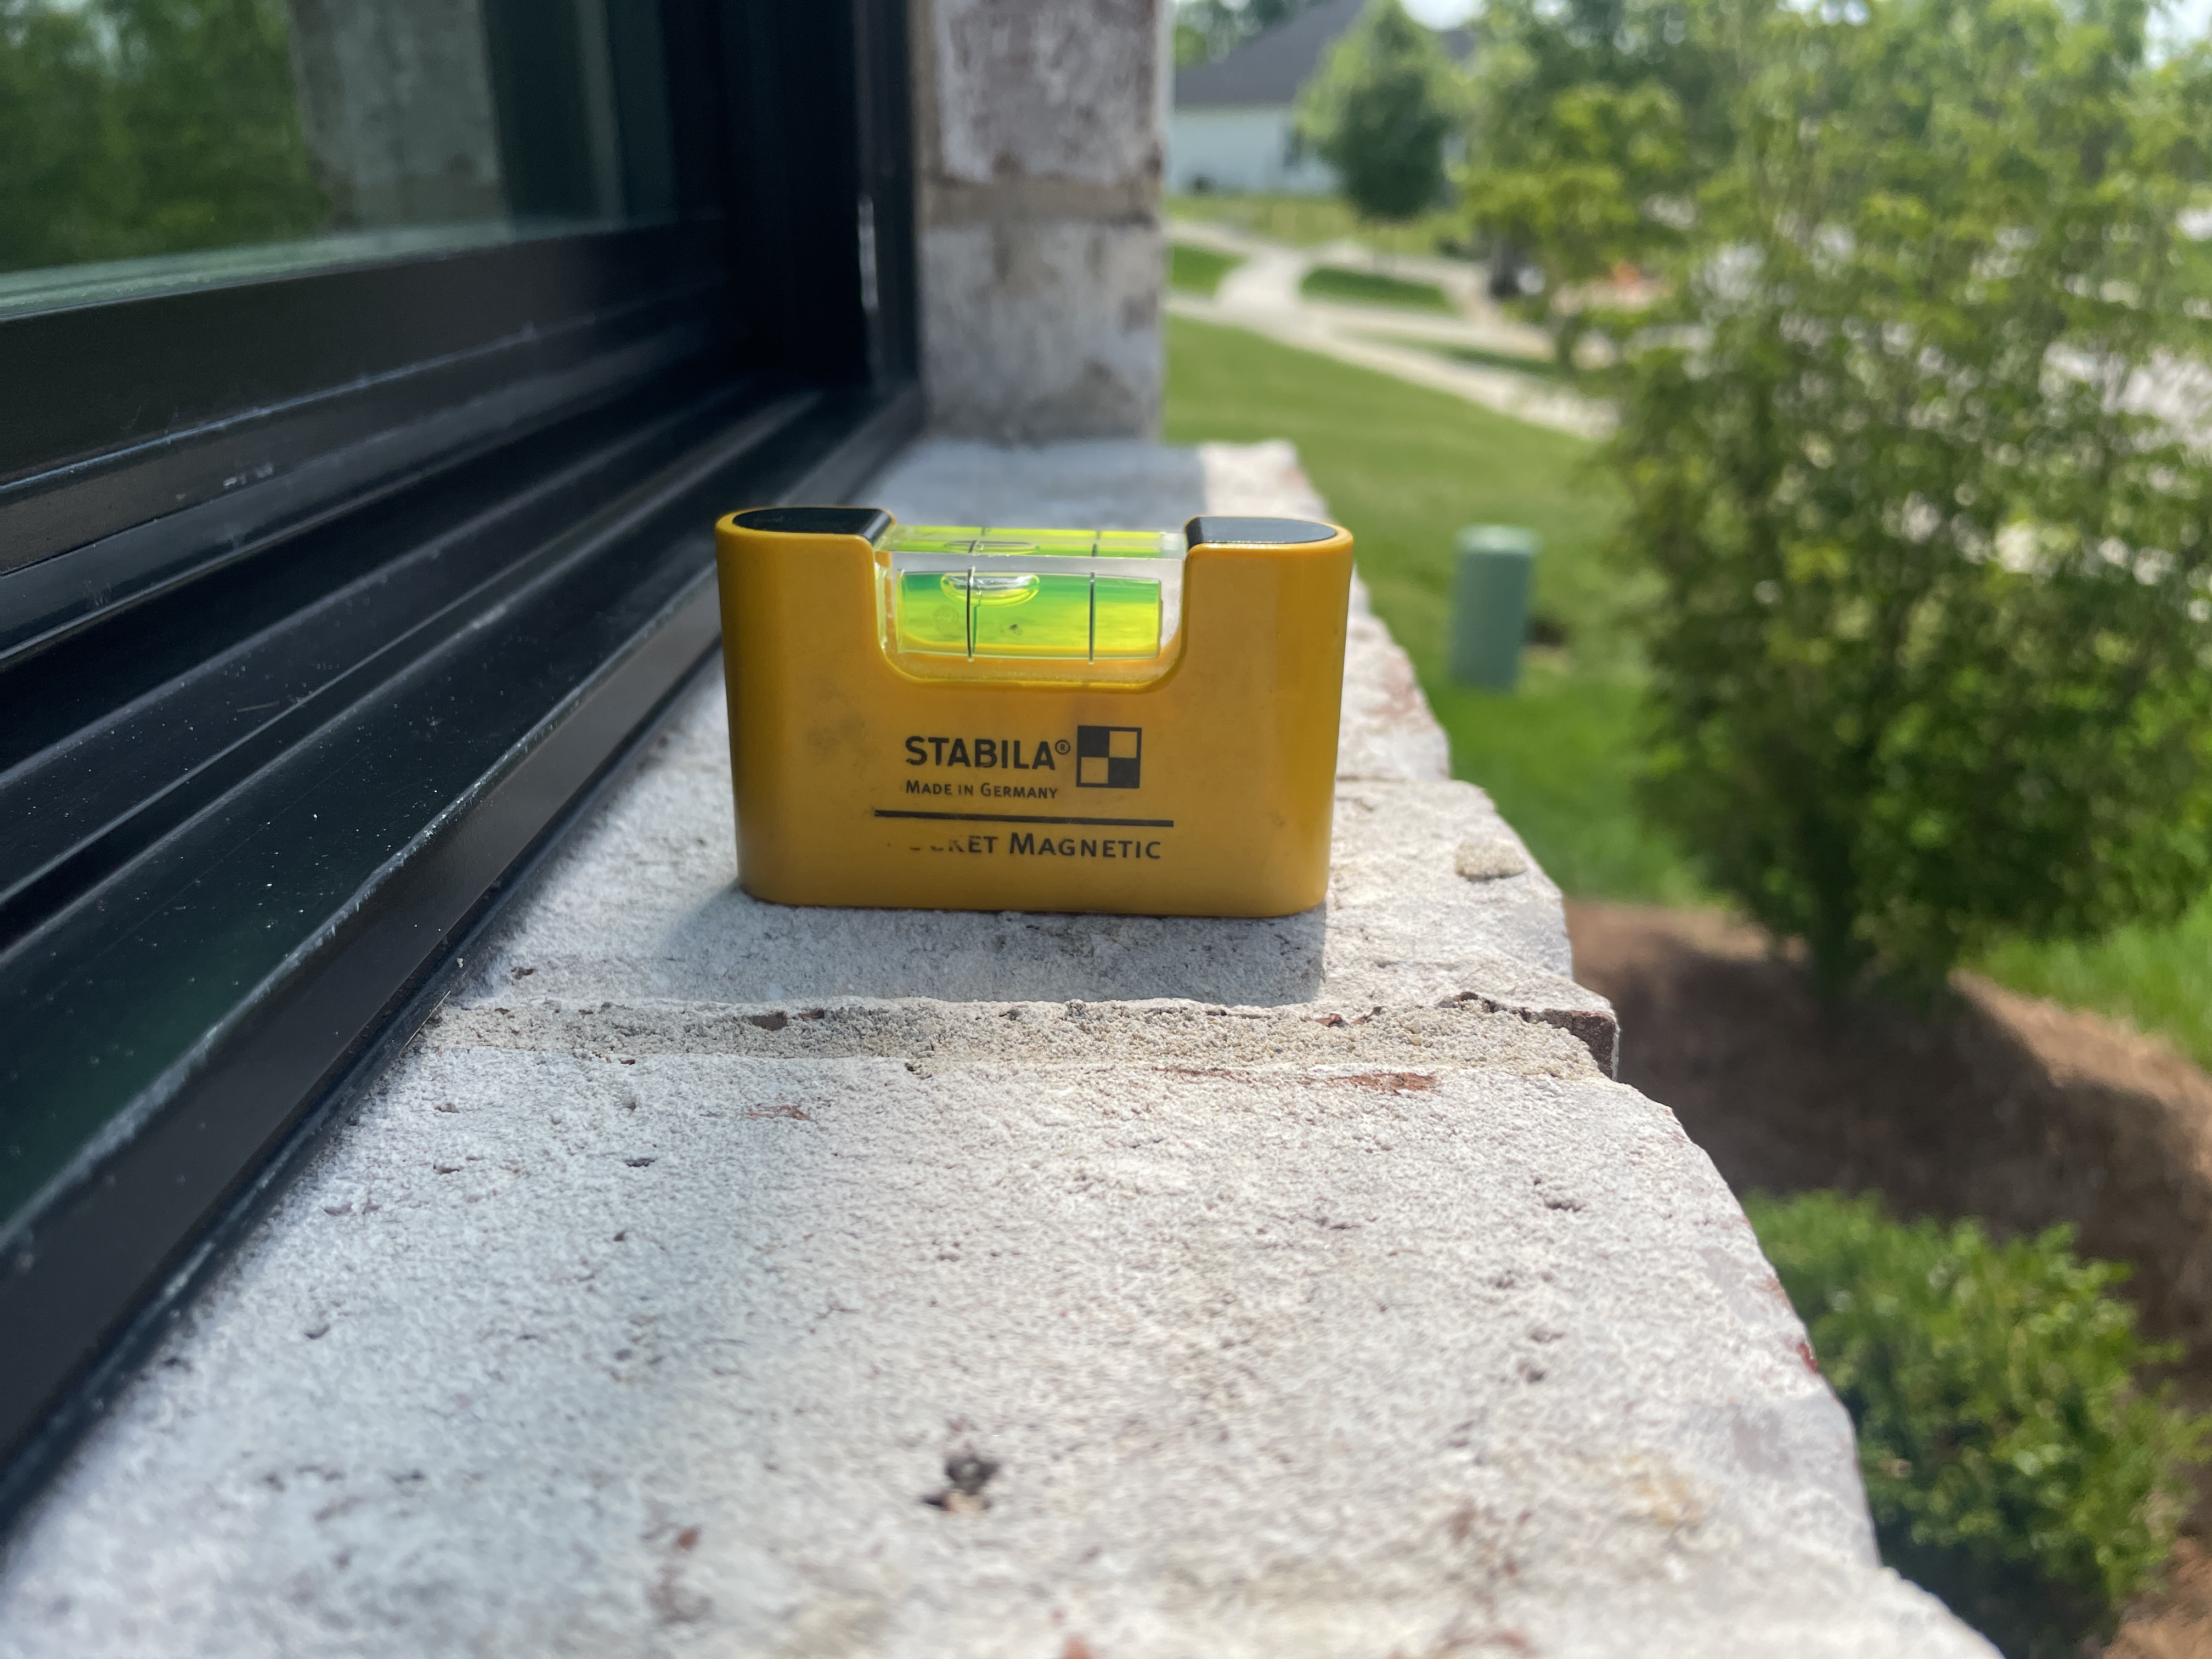
The brick window sills do not have sufficient downward slope. They are basically resting at 90 degrees to the window.
Sills should be sloped to help shed water, snow, and ice. When they are laid like this, you increase the risk of water soaking into the brick/mortar causing moisture damage to the wall below the sills. Unfortunately, there is not much that can be done now, short of removing the bricks and re-installing them to the proper slope or replacing the brick sills with solid cast concrete sills. Solid sills have less area to soak in water.
If re-installation is not an option, you'll want to be diligent with the care of the mortar on the sills, and make yearly inspections of the caulking around the window.
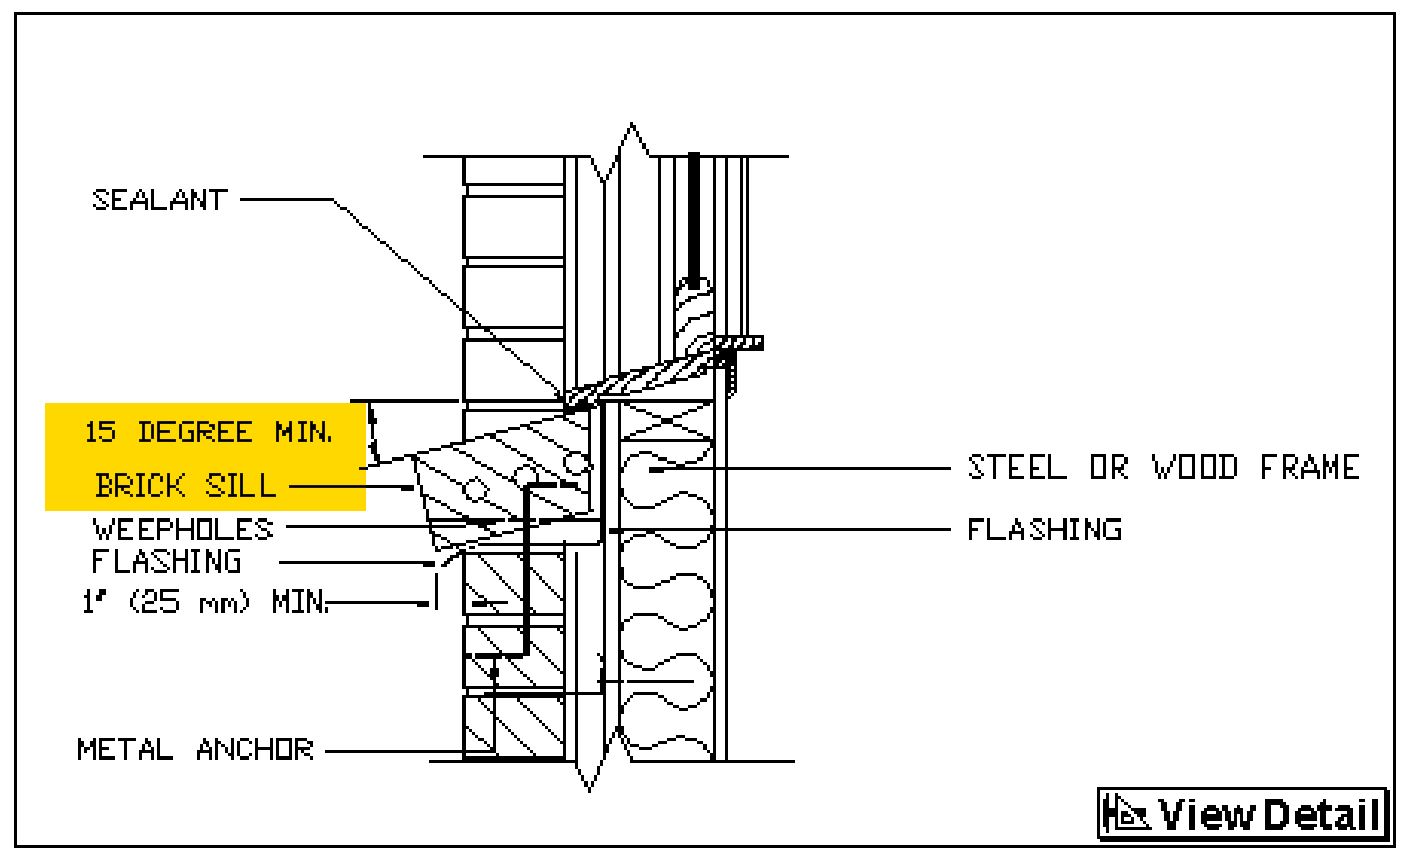
More Info: The Brick Industry Association produces a technical document with many proper details of brick construction. I pulled the detail for brick window sills and placed it below.
"Since the primary function of sills is to divert water away from the building, the top surface should slope downward and away from the building.
In the case of brick sills, see Figures 3 and 4, the slope should be at least 15 deg from horizontal. This may vary somewhat according to the sill configuration of the window unit, particularly in the case of wood windows.
The sill should extend a minimum of 1 in. (25 mm) beyond the face of the wall at its closest point to the wall, see Fig. 3. In some instances, it may be necessary that the brick units at the ends of the sills be uncored units so that no cores are exposed to view. "
You can download a copy of this here: https://abihomeservices.com/download/Brick/36-brick-masonry-details-sills-and-soffits.pdf
- ESDW-2 🧱 Exterior Siding, Doors and Windows:
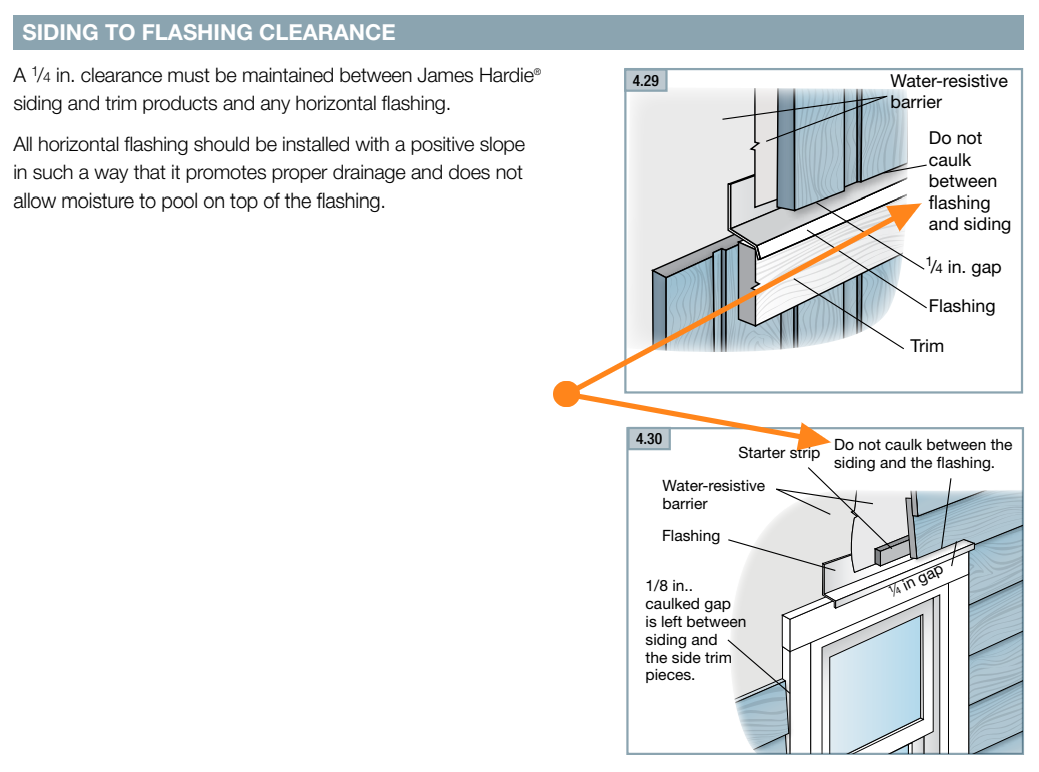
Anytime fiber cement siding stops at a transition in material, such as a horizontal piece of trim, there should be a 1/4" gap and no sealant along the top edge of the Z-flashing. Your installation has this joint sealed/caulked, which may void the product warranty. Have the siding corrected to follow the printed instructions by James Hardie to maintain your warranty on the product.
It is my understanding that any installation that deviates from their printed instructions may result in a home that doesn't have a warranty on the product.
You can download a copy of James Hardies' Best Practice Guide here for more detailed information on proper installation of fiber cement siding and trim.
- ESDW-3 🧱 Exterior Siding, Doors and Windows:
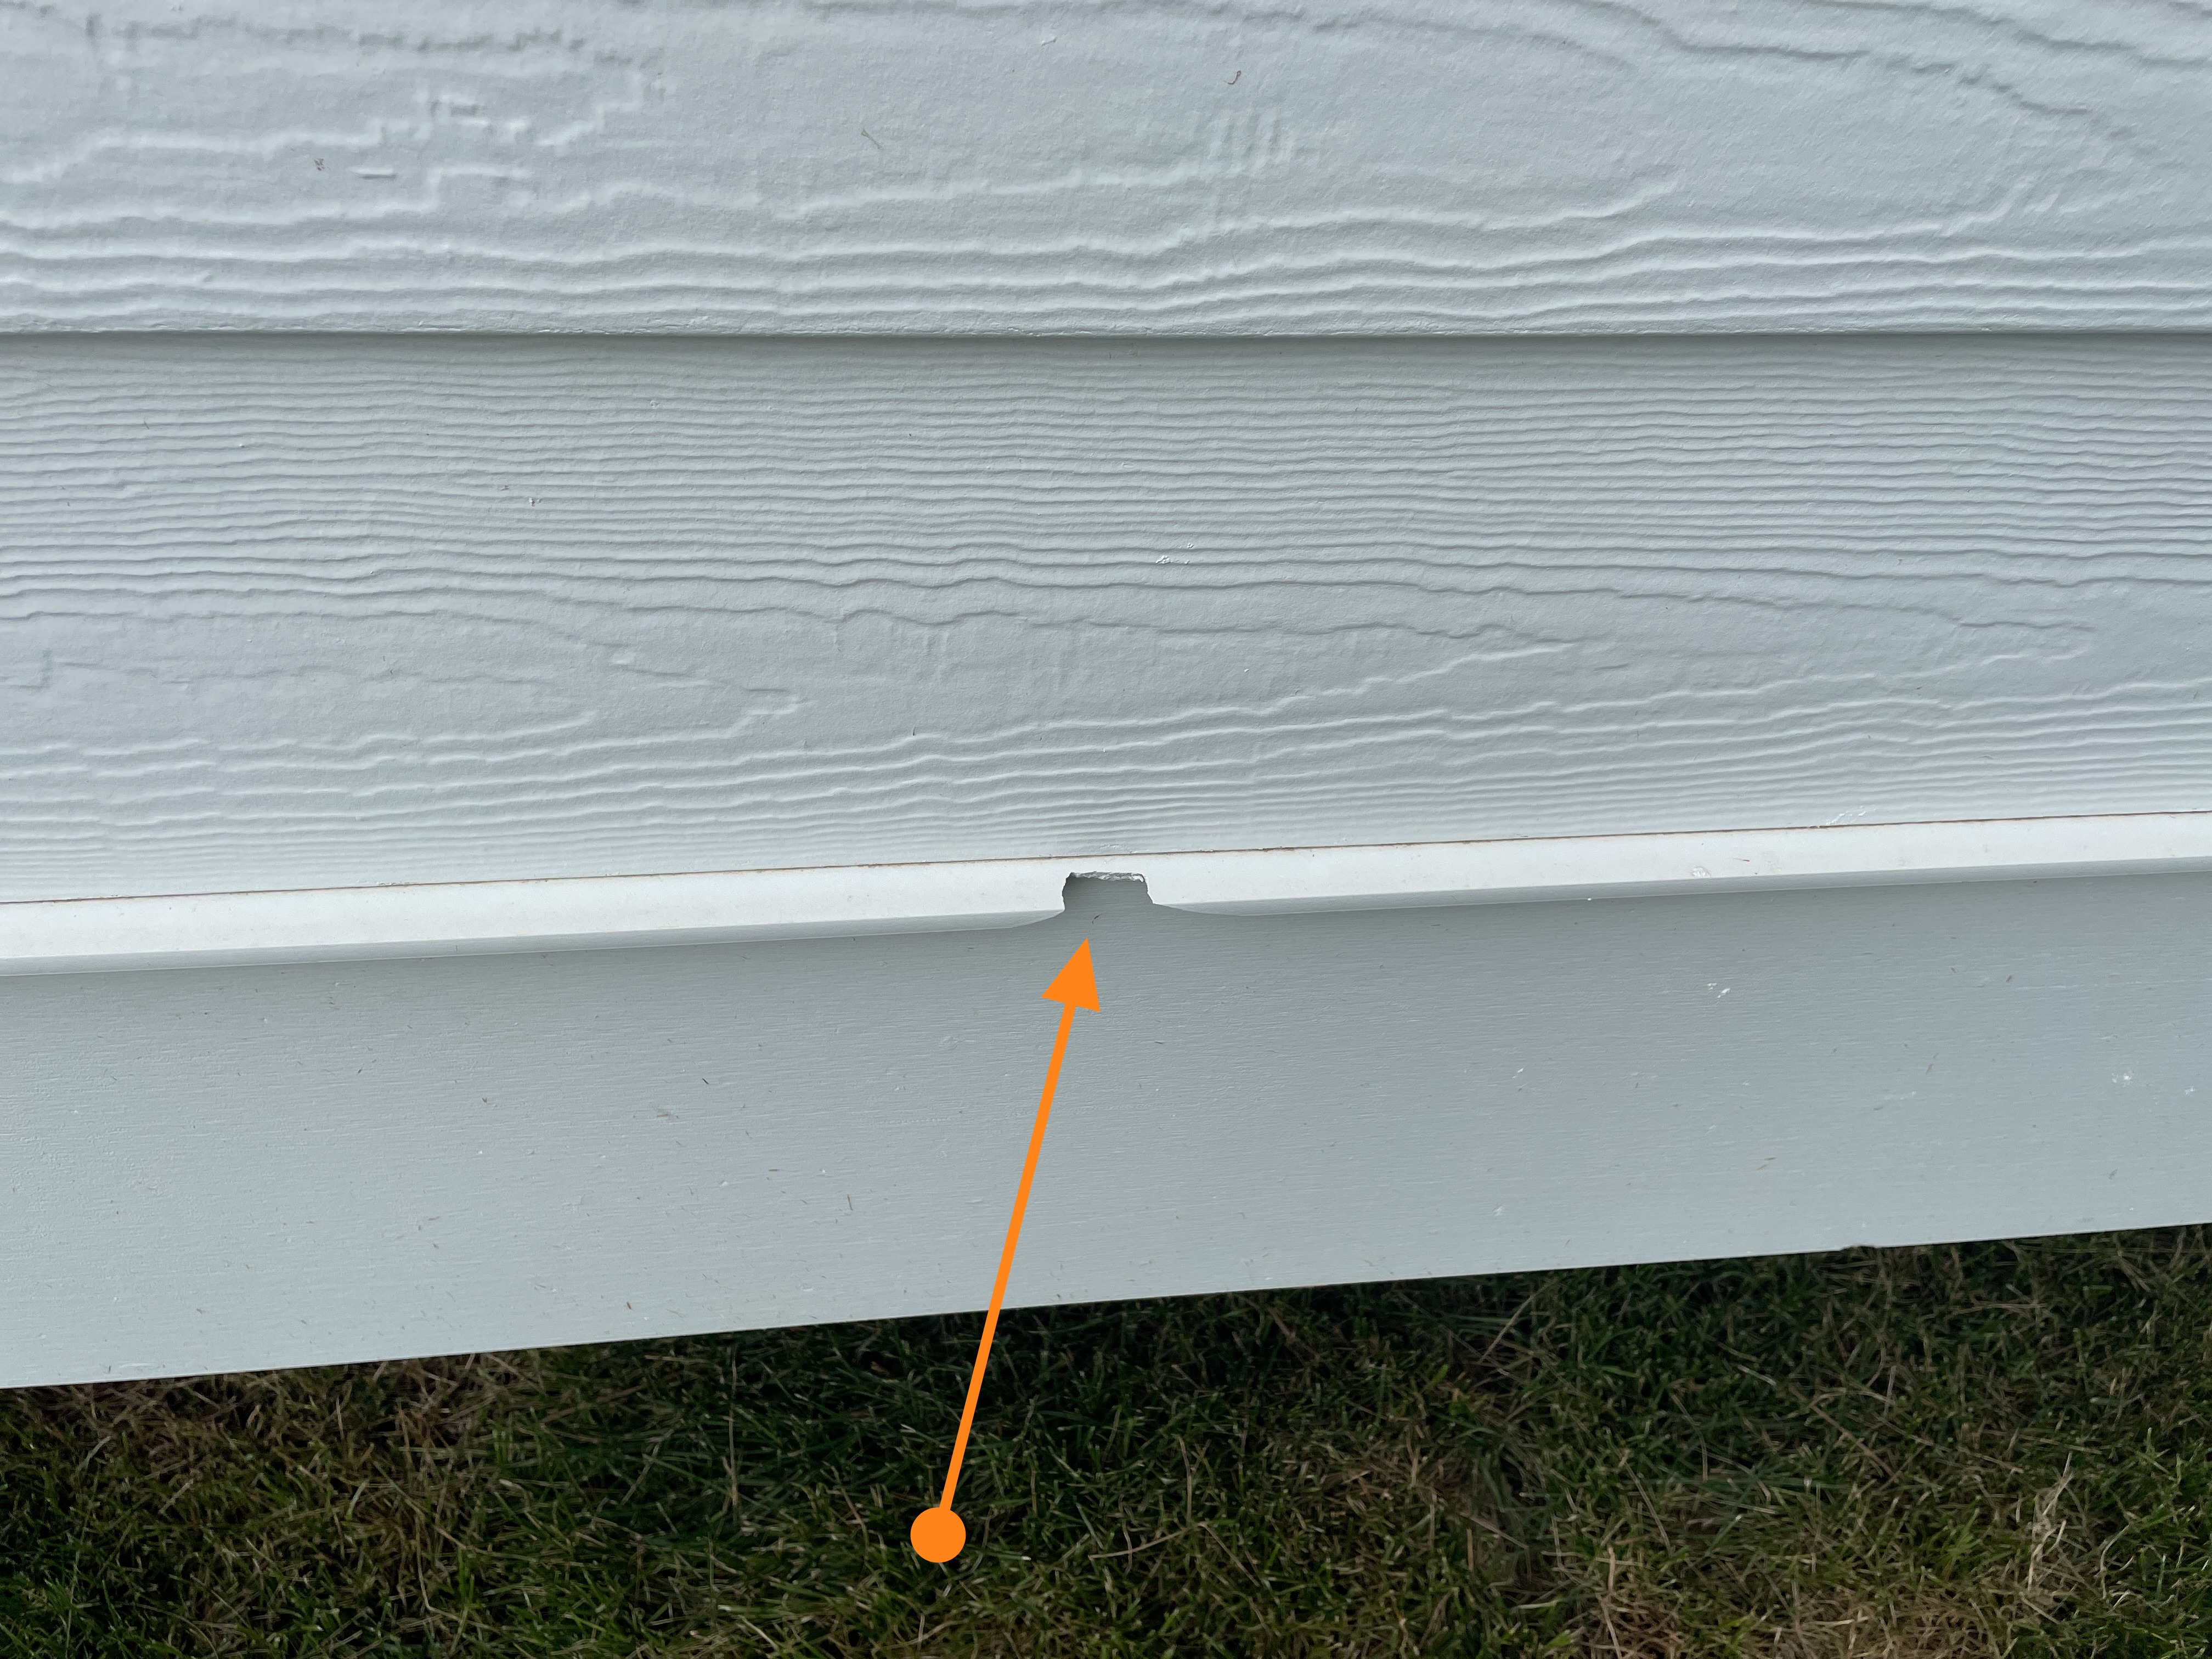
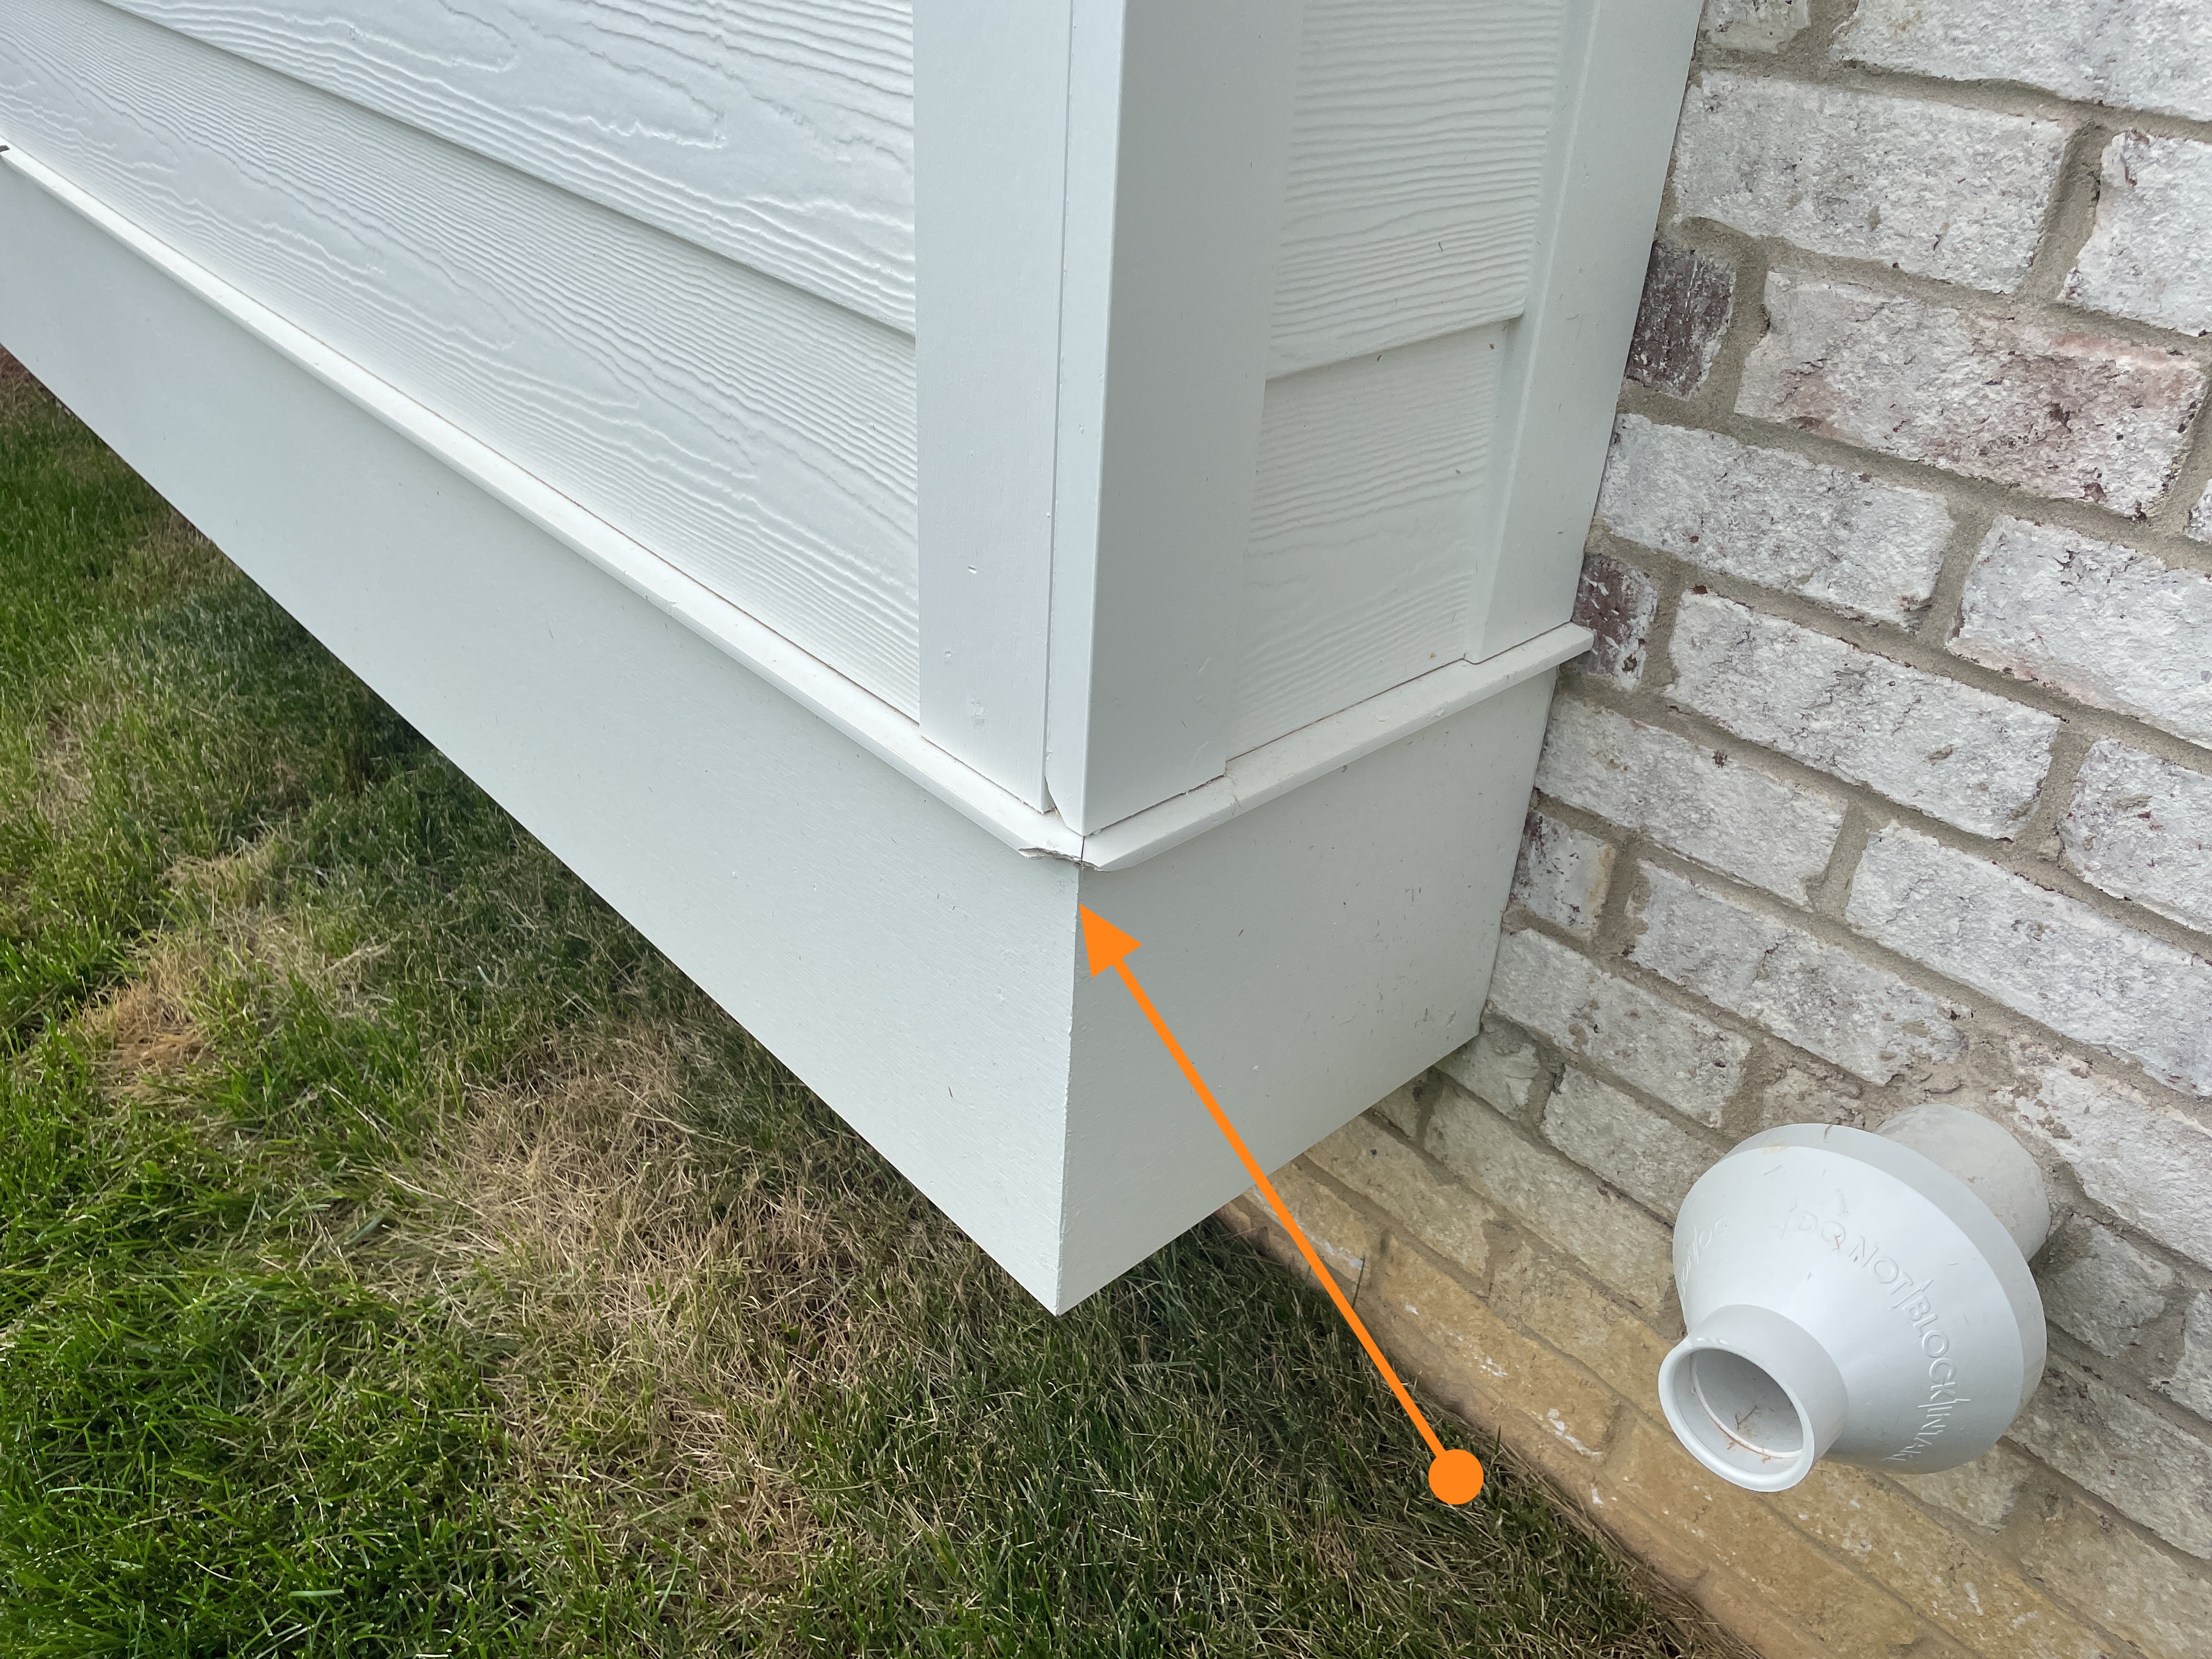
The fiber cement trim along the right hand side of the home has been damaged in multiple spots. Have the builder replace the damaged materials as needed.
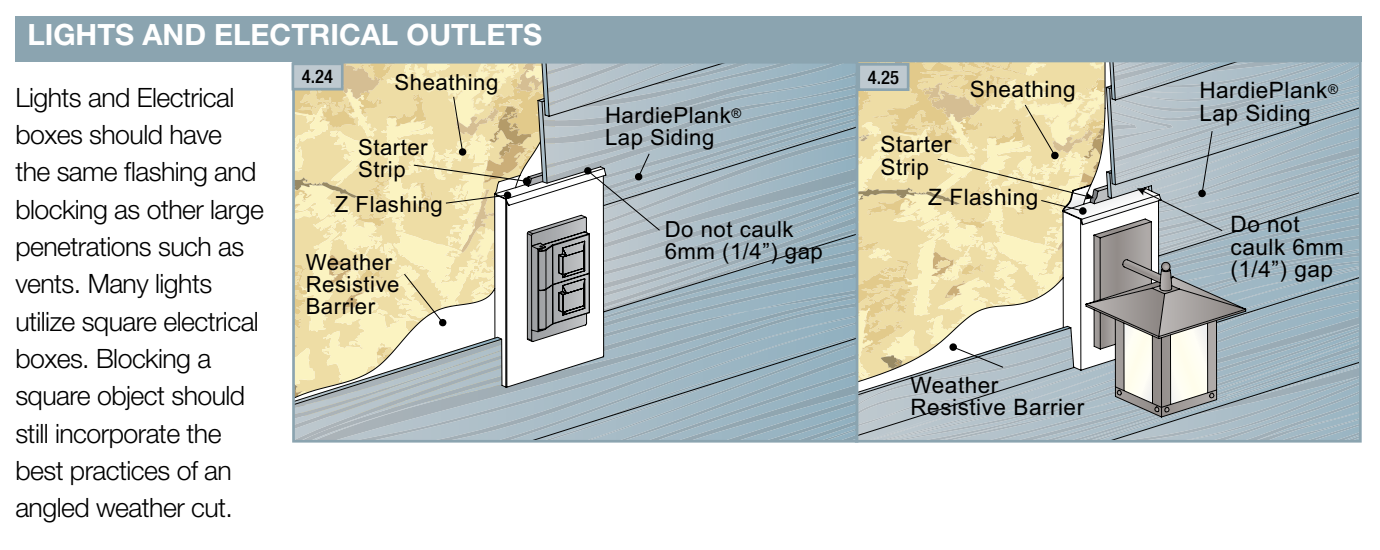
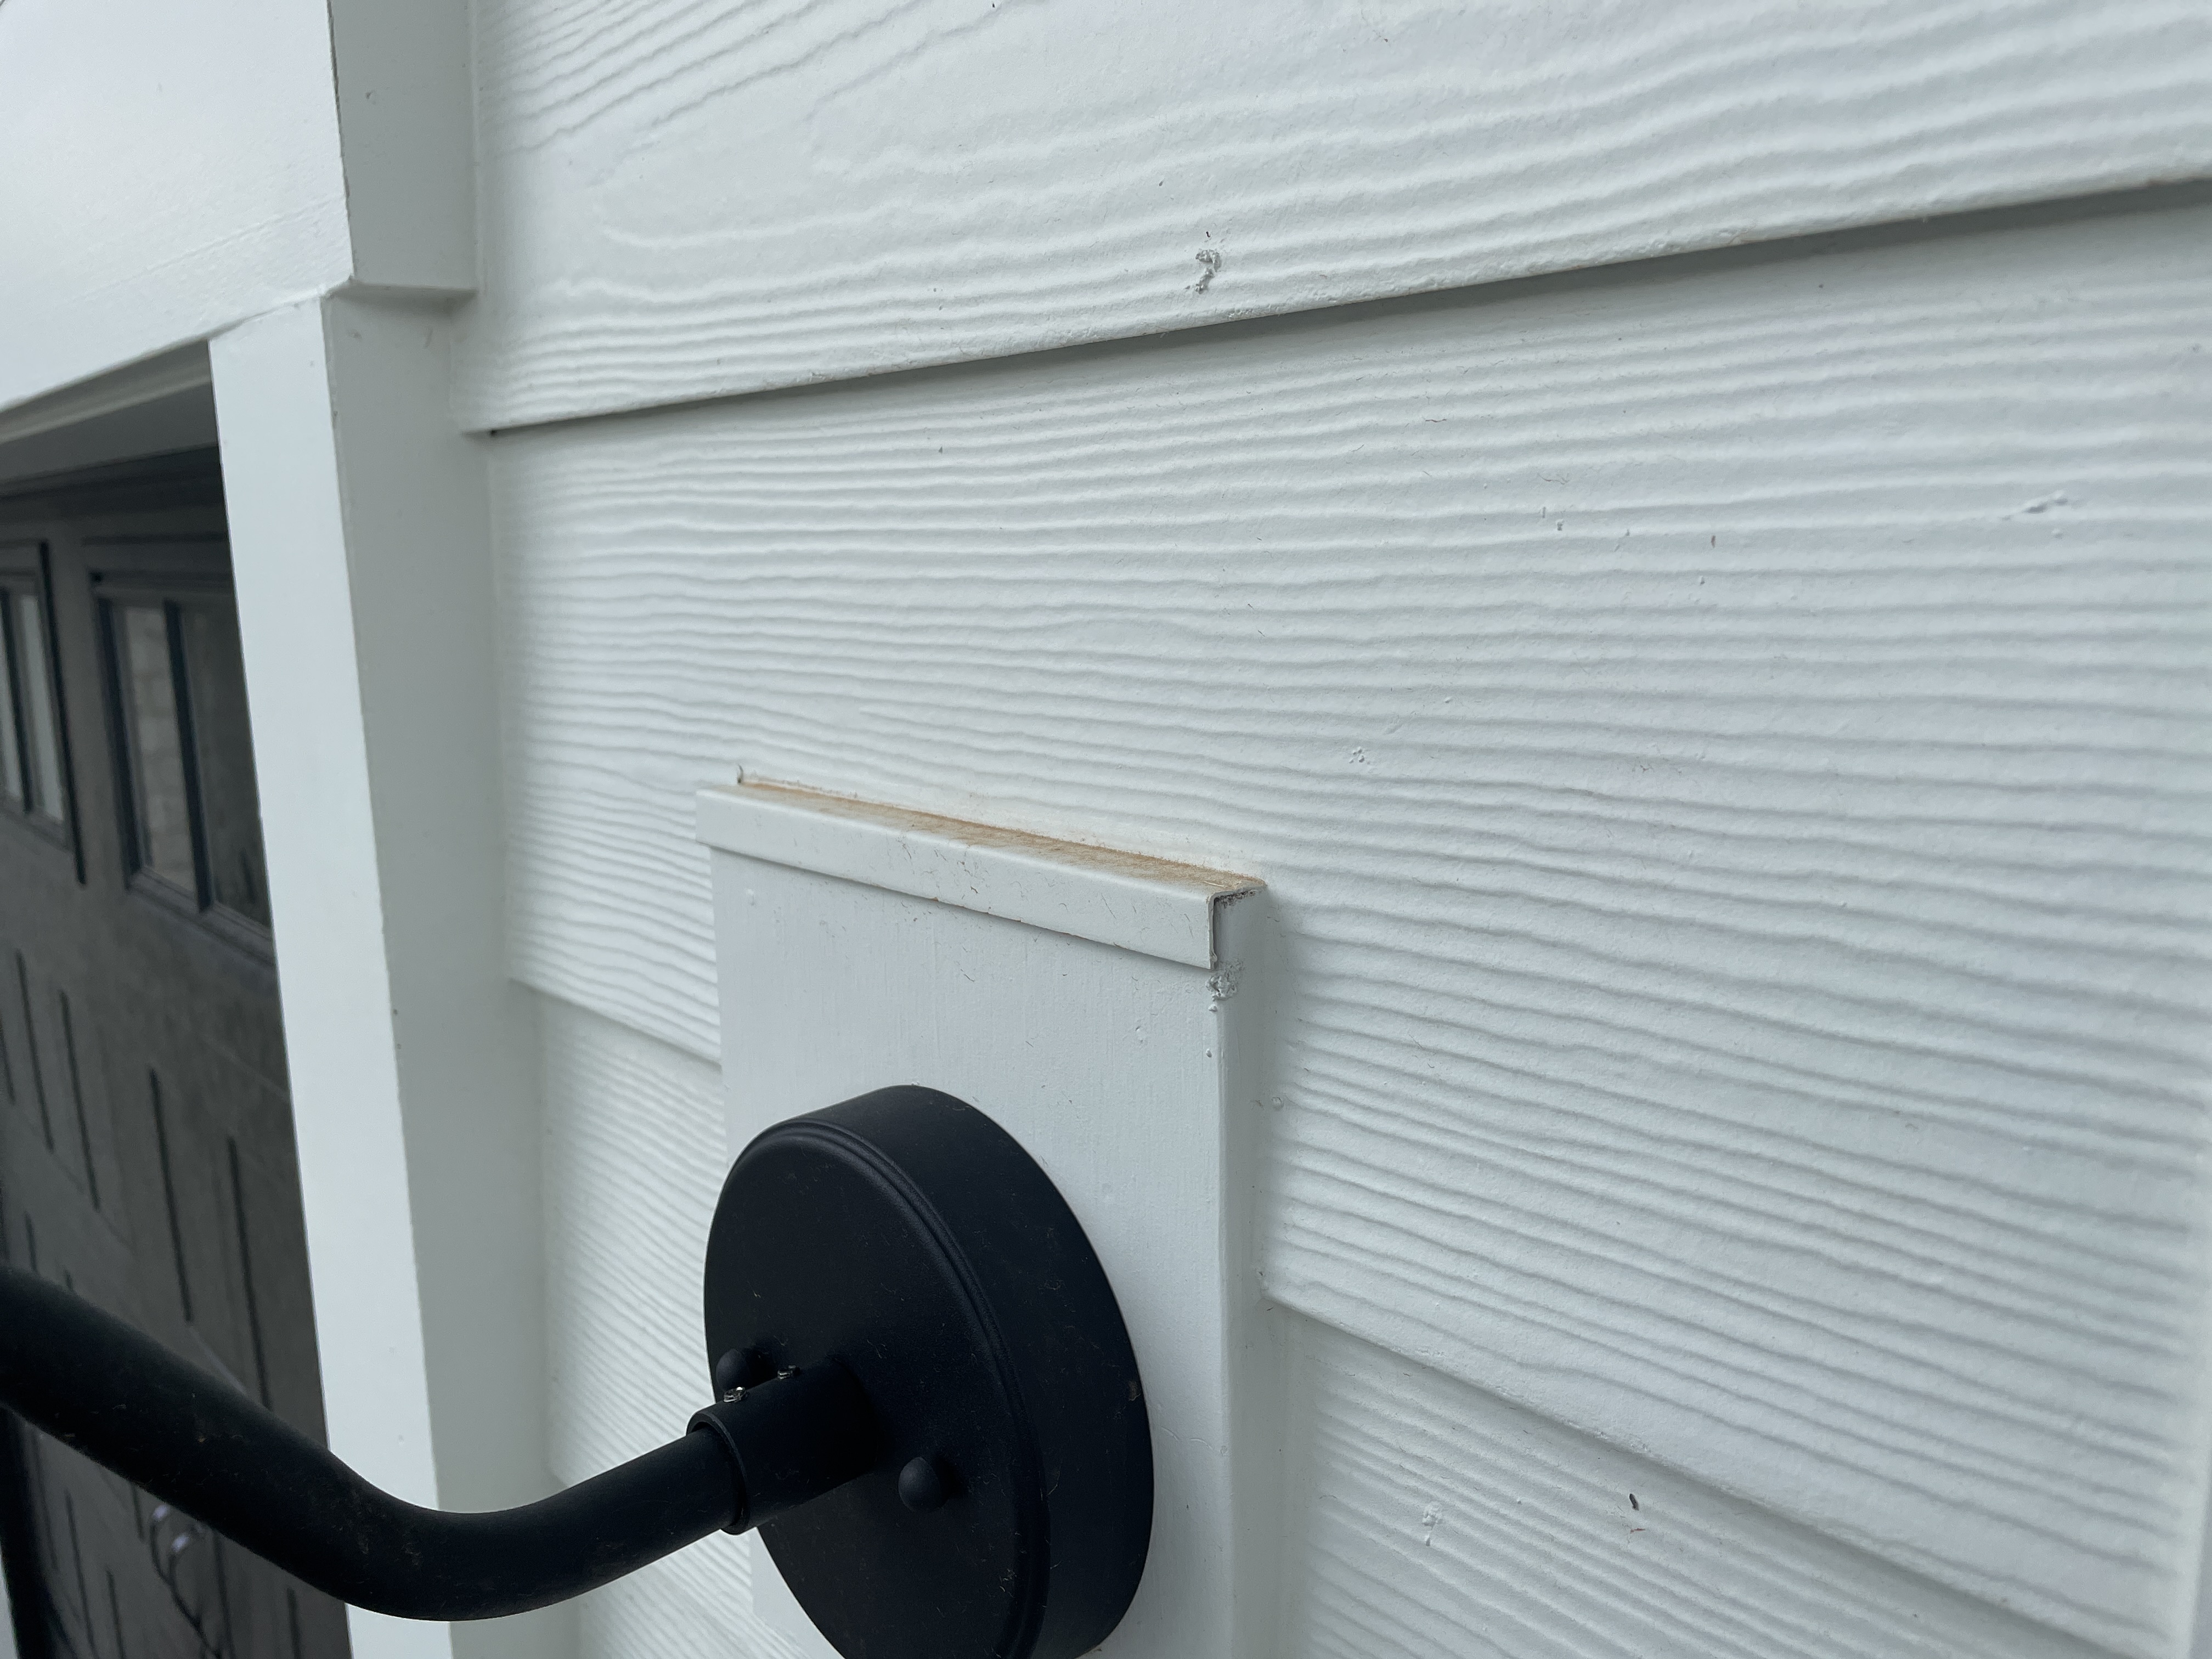
- ESDW-4 🧱 Exterior Siding, Doors and Windows:
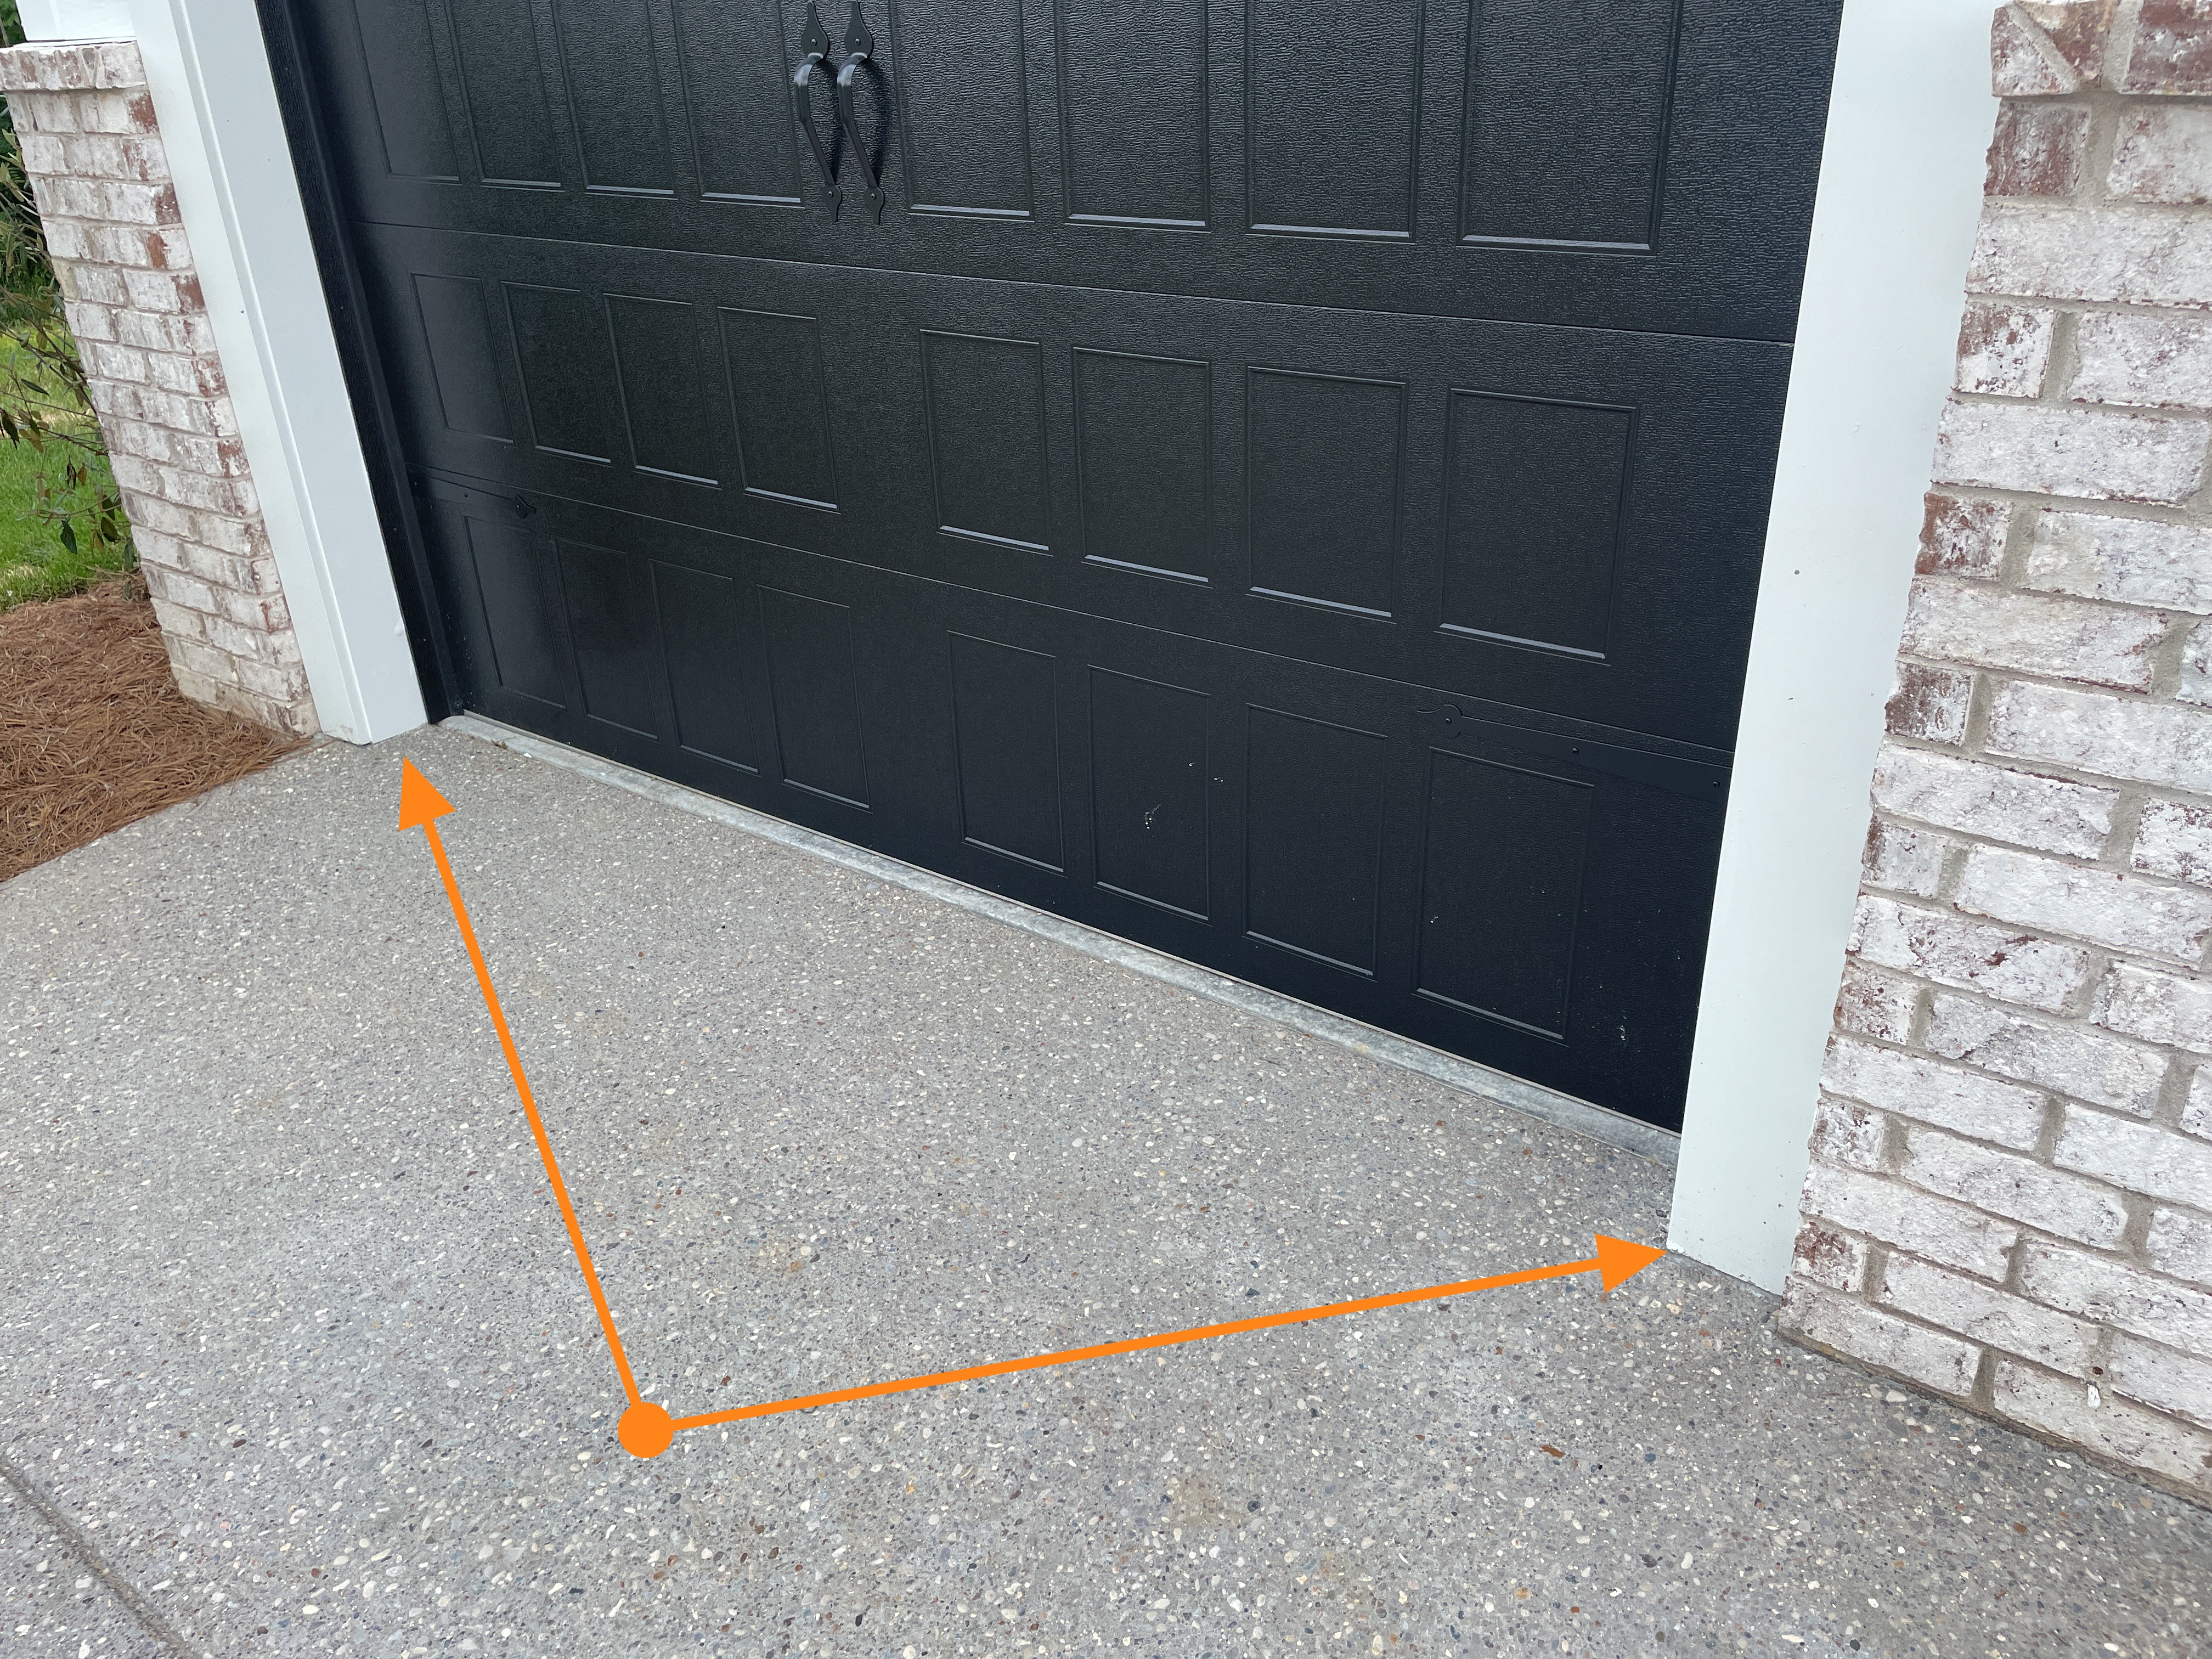
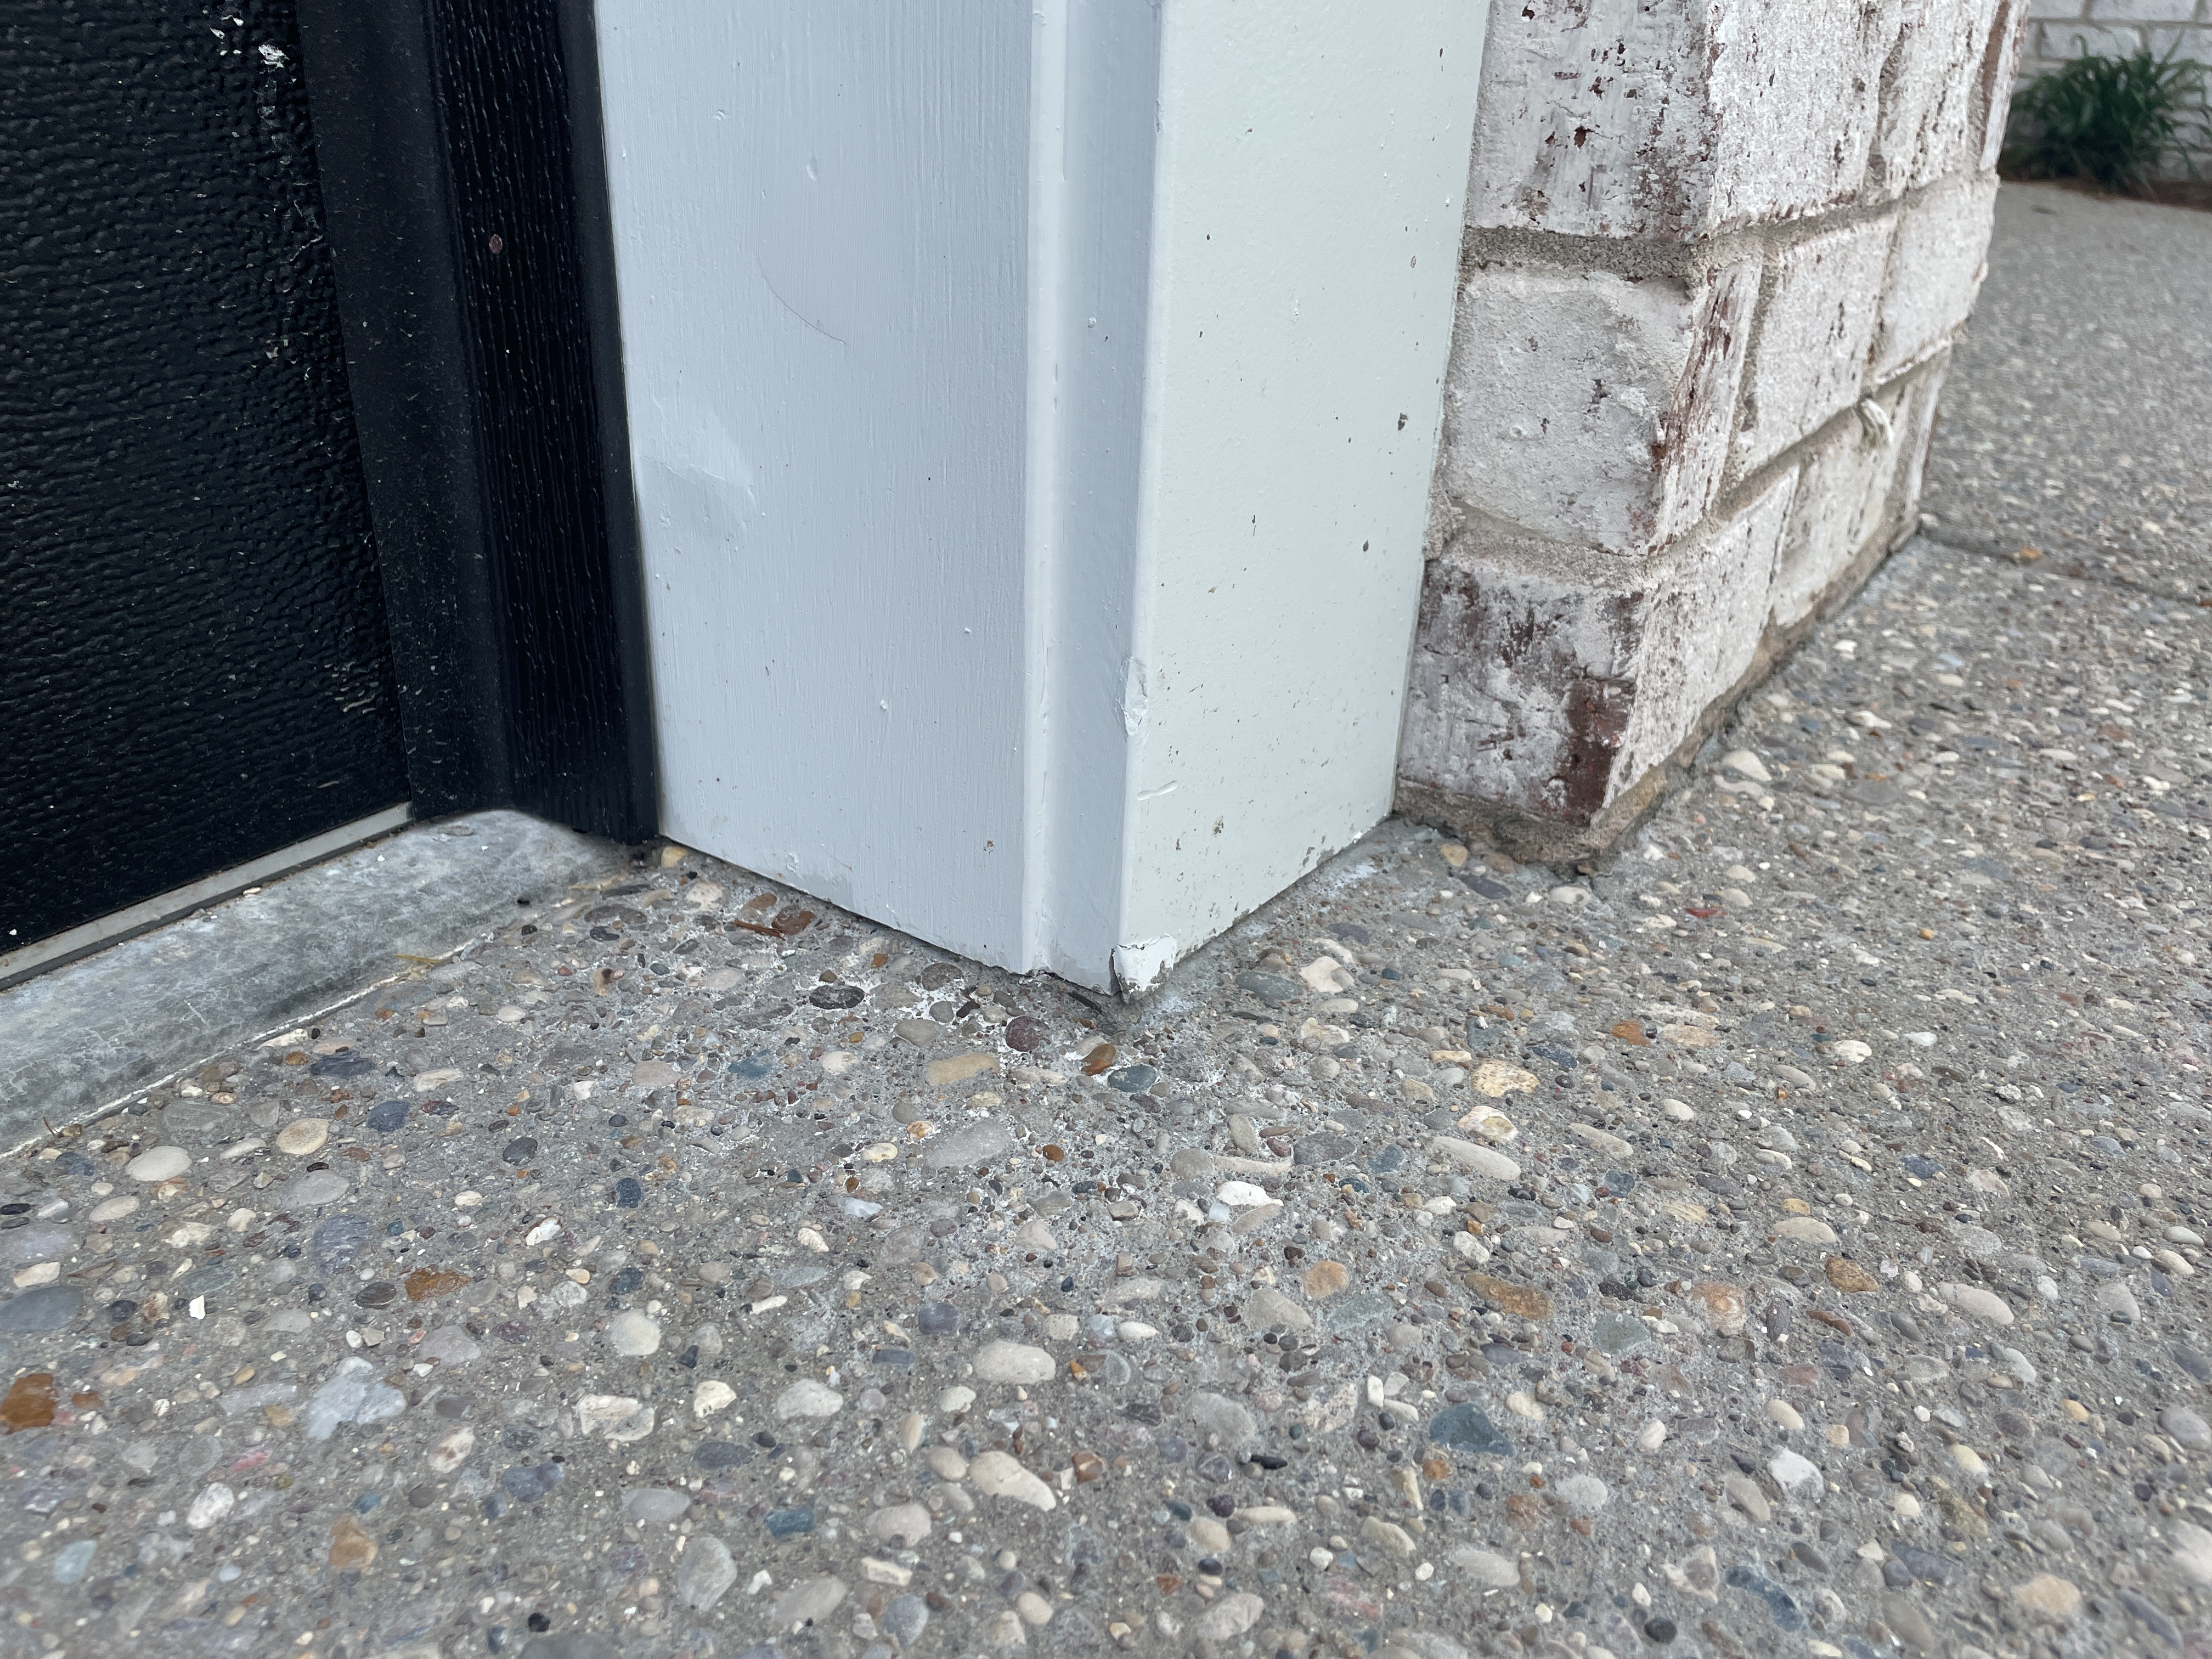
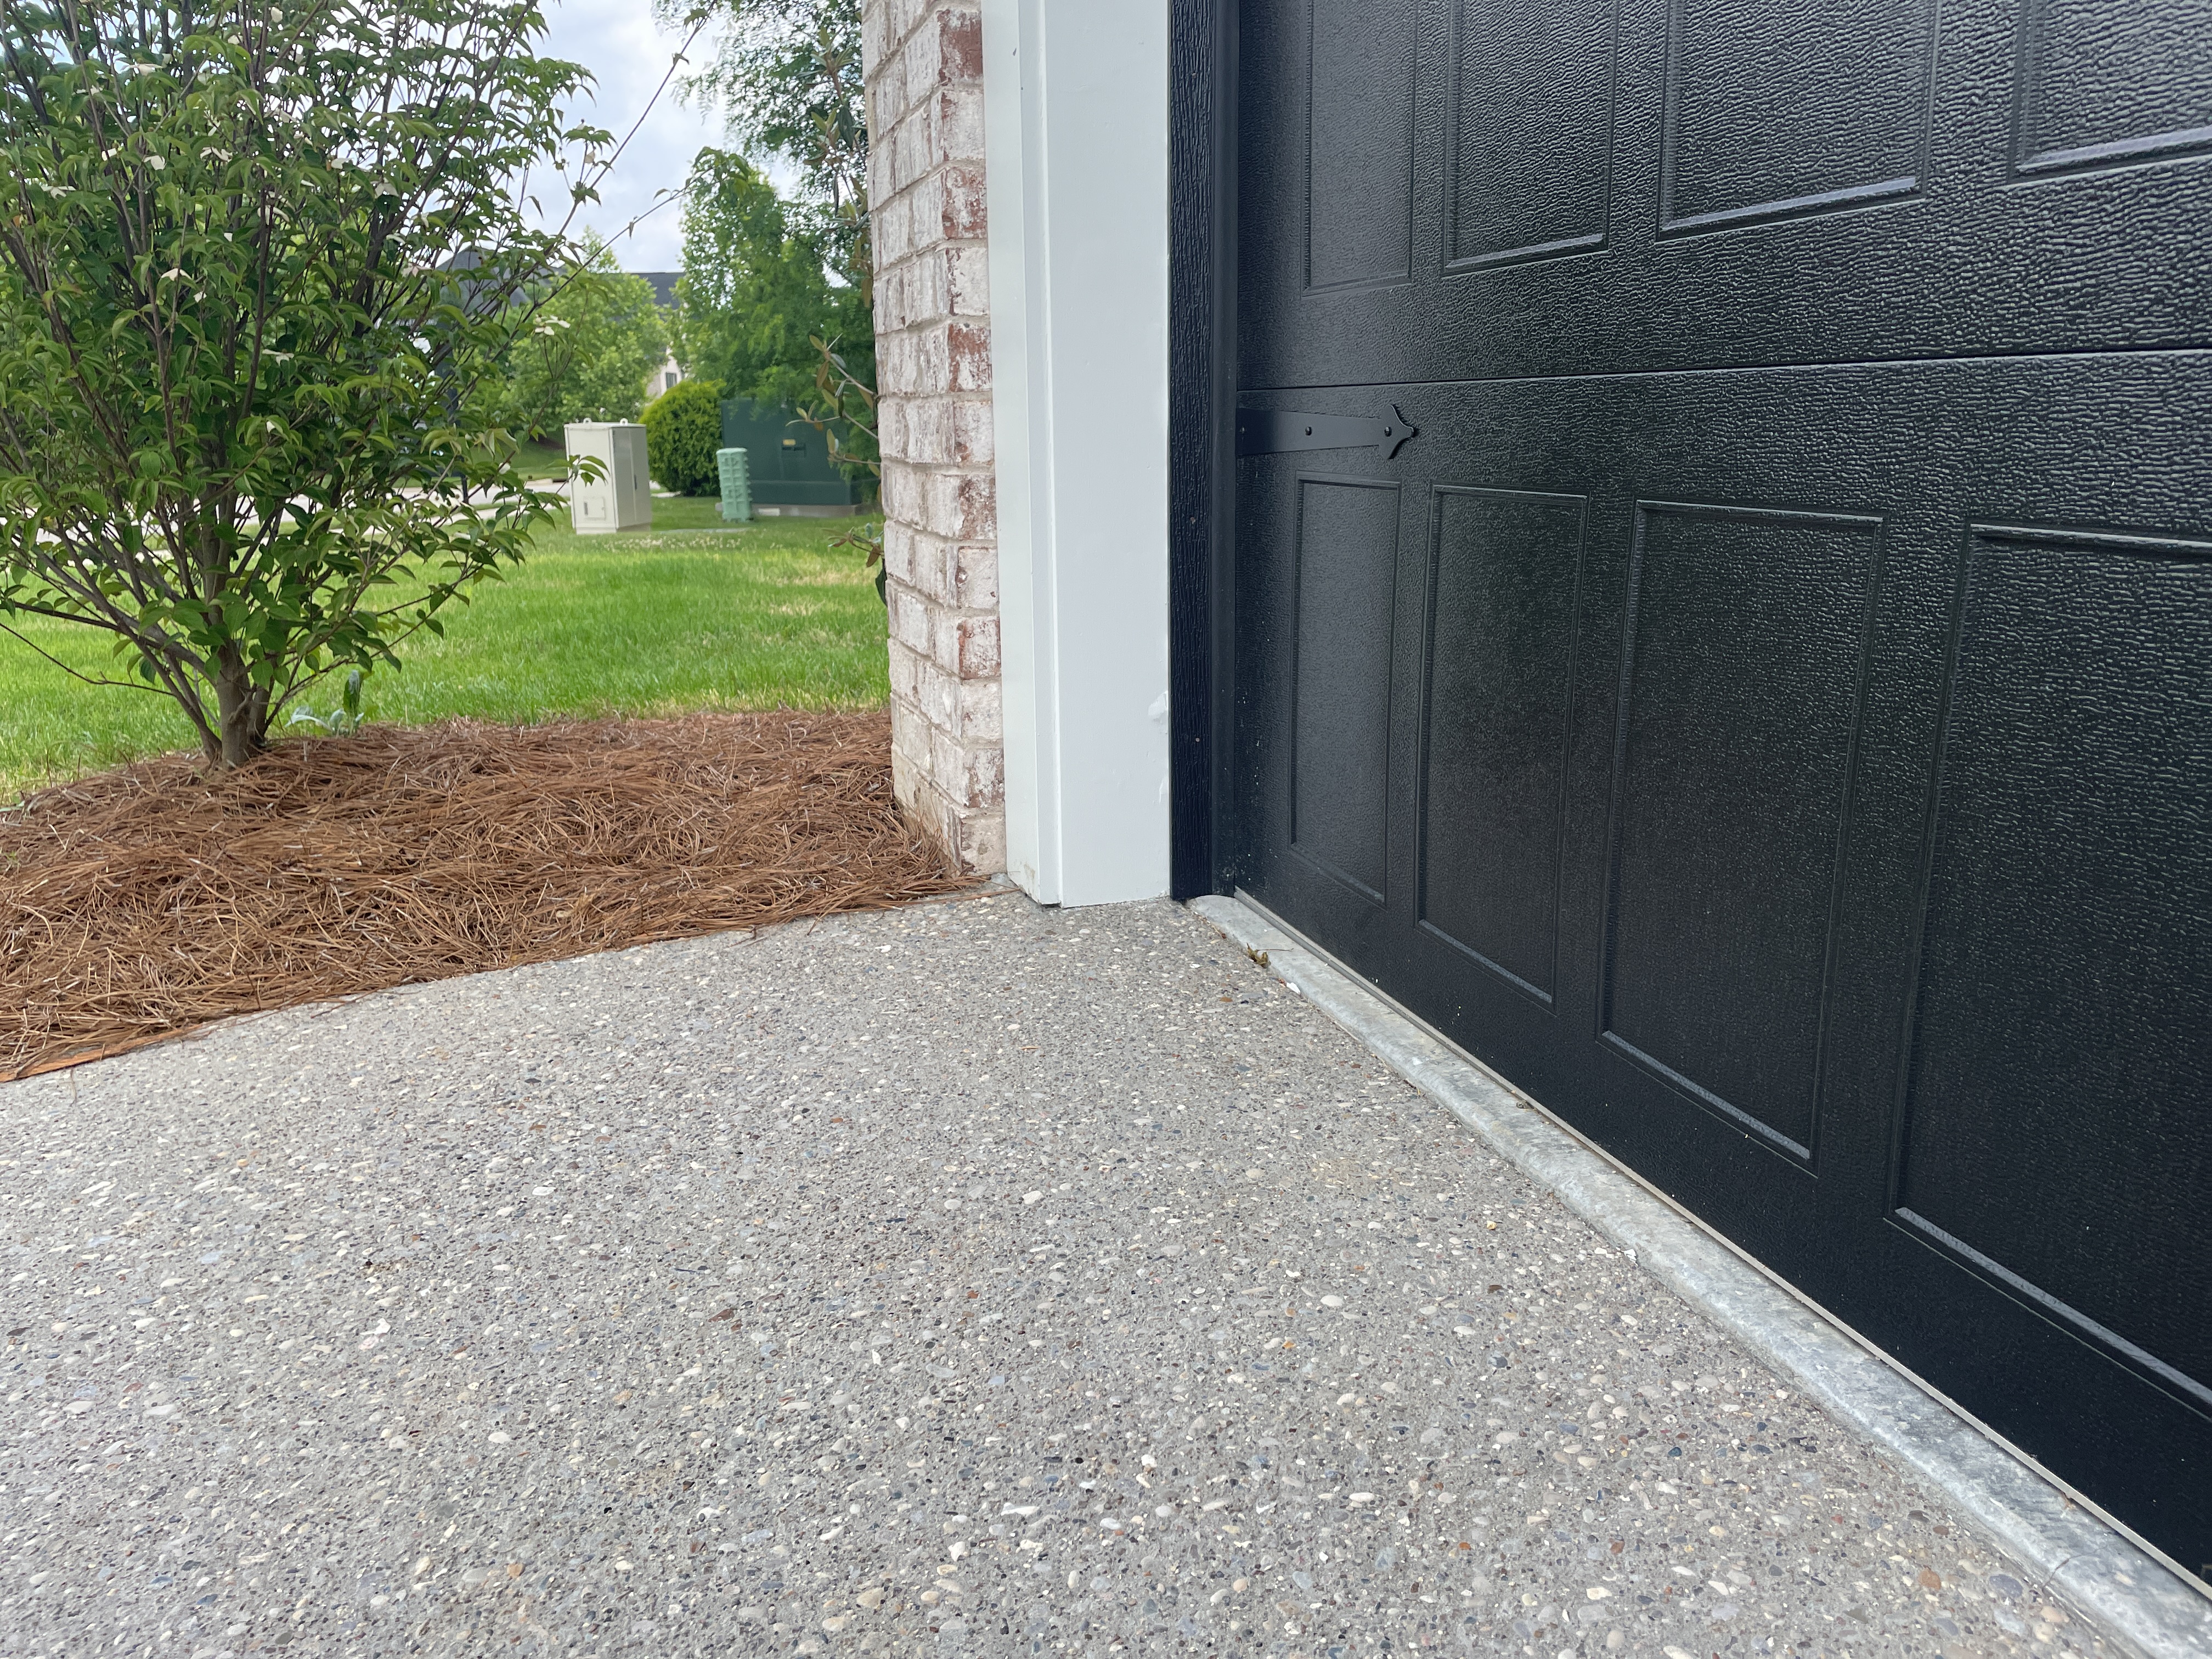
The trim around the garage doors looks to be made of fiber cement. I assume it is Hardie Trim, or something similar. The installation instructions for these materials usually call for a 2 inch gap along the ends to prevent moisture from wicking up the trim. Failure to do so could cause it to delaminate over time. Have the builder cross-check the manufacturer's recommendations for proper installation and repair the trim as needed.
- DPB5-1 🏡Decks, Porches and Balconies:
The brackets on the 6 x 6 posts for the deck are missing screws along the retaining wall. Have the proper hardware installed as needed.
Note: The screws that were installed look to be coated deck screws, which are not rated for structural brackets. Simpson Strong Ties have a listed set a fasteners that are approved for use with their products. Follow that guide and have these fasteners replaced as needed. Simpson Fastener Guide
- EDFW1-1 ⚡ Electric Distribution and Finish Wiring:
The GFCI in the guest bathroom has been painted over. Have the receptacle replaced.
- HCFV1-1 🔥 Heating, Cooling, Fireplaces and Ventilation:
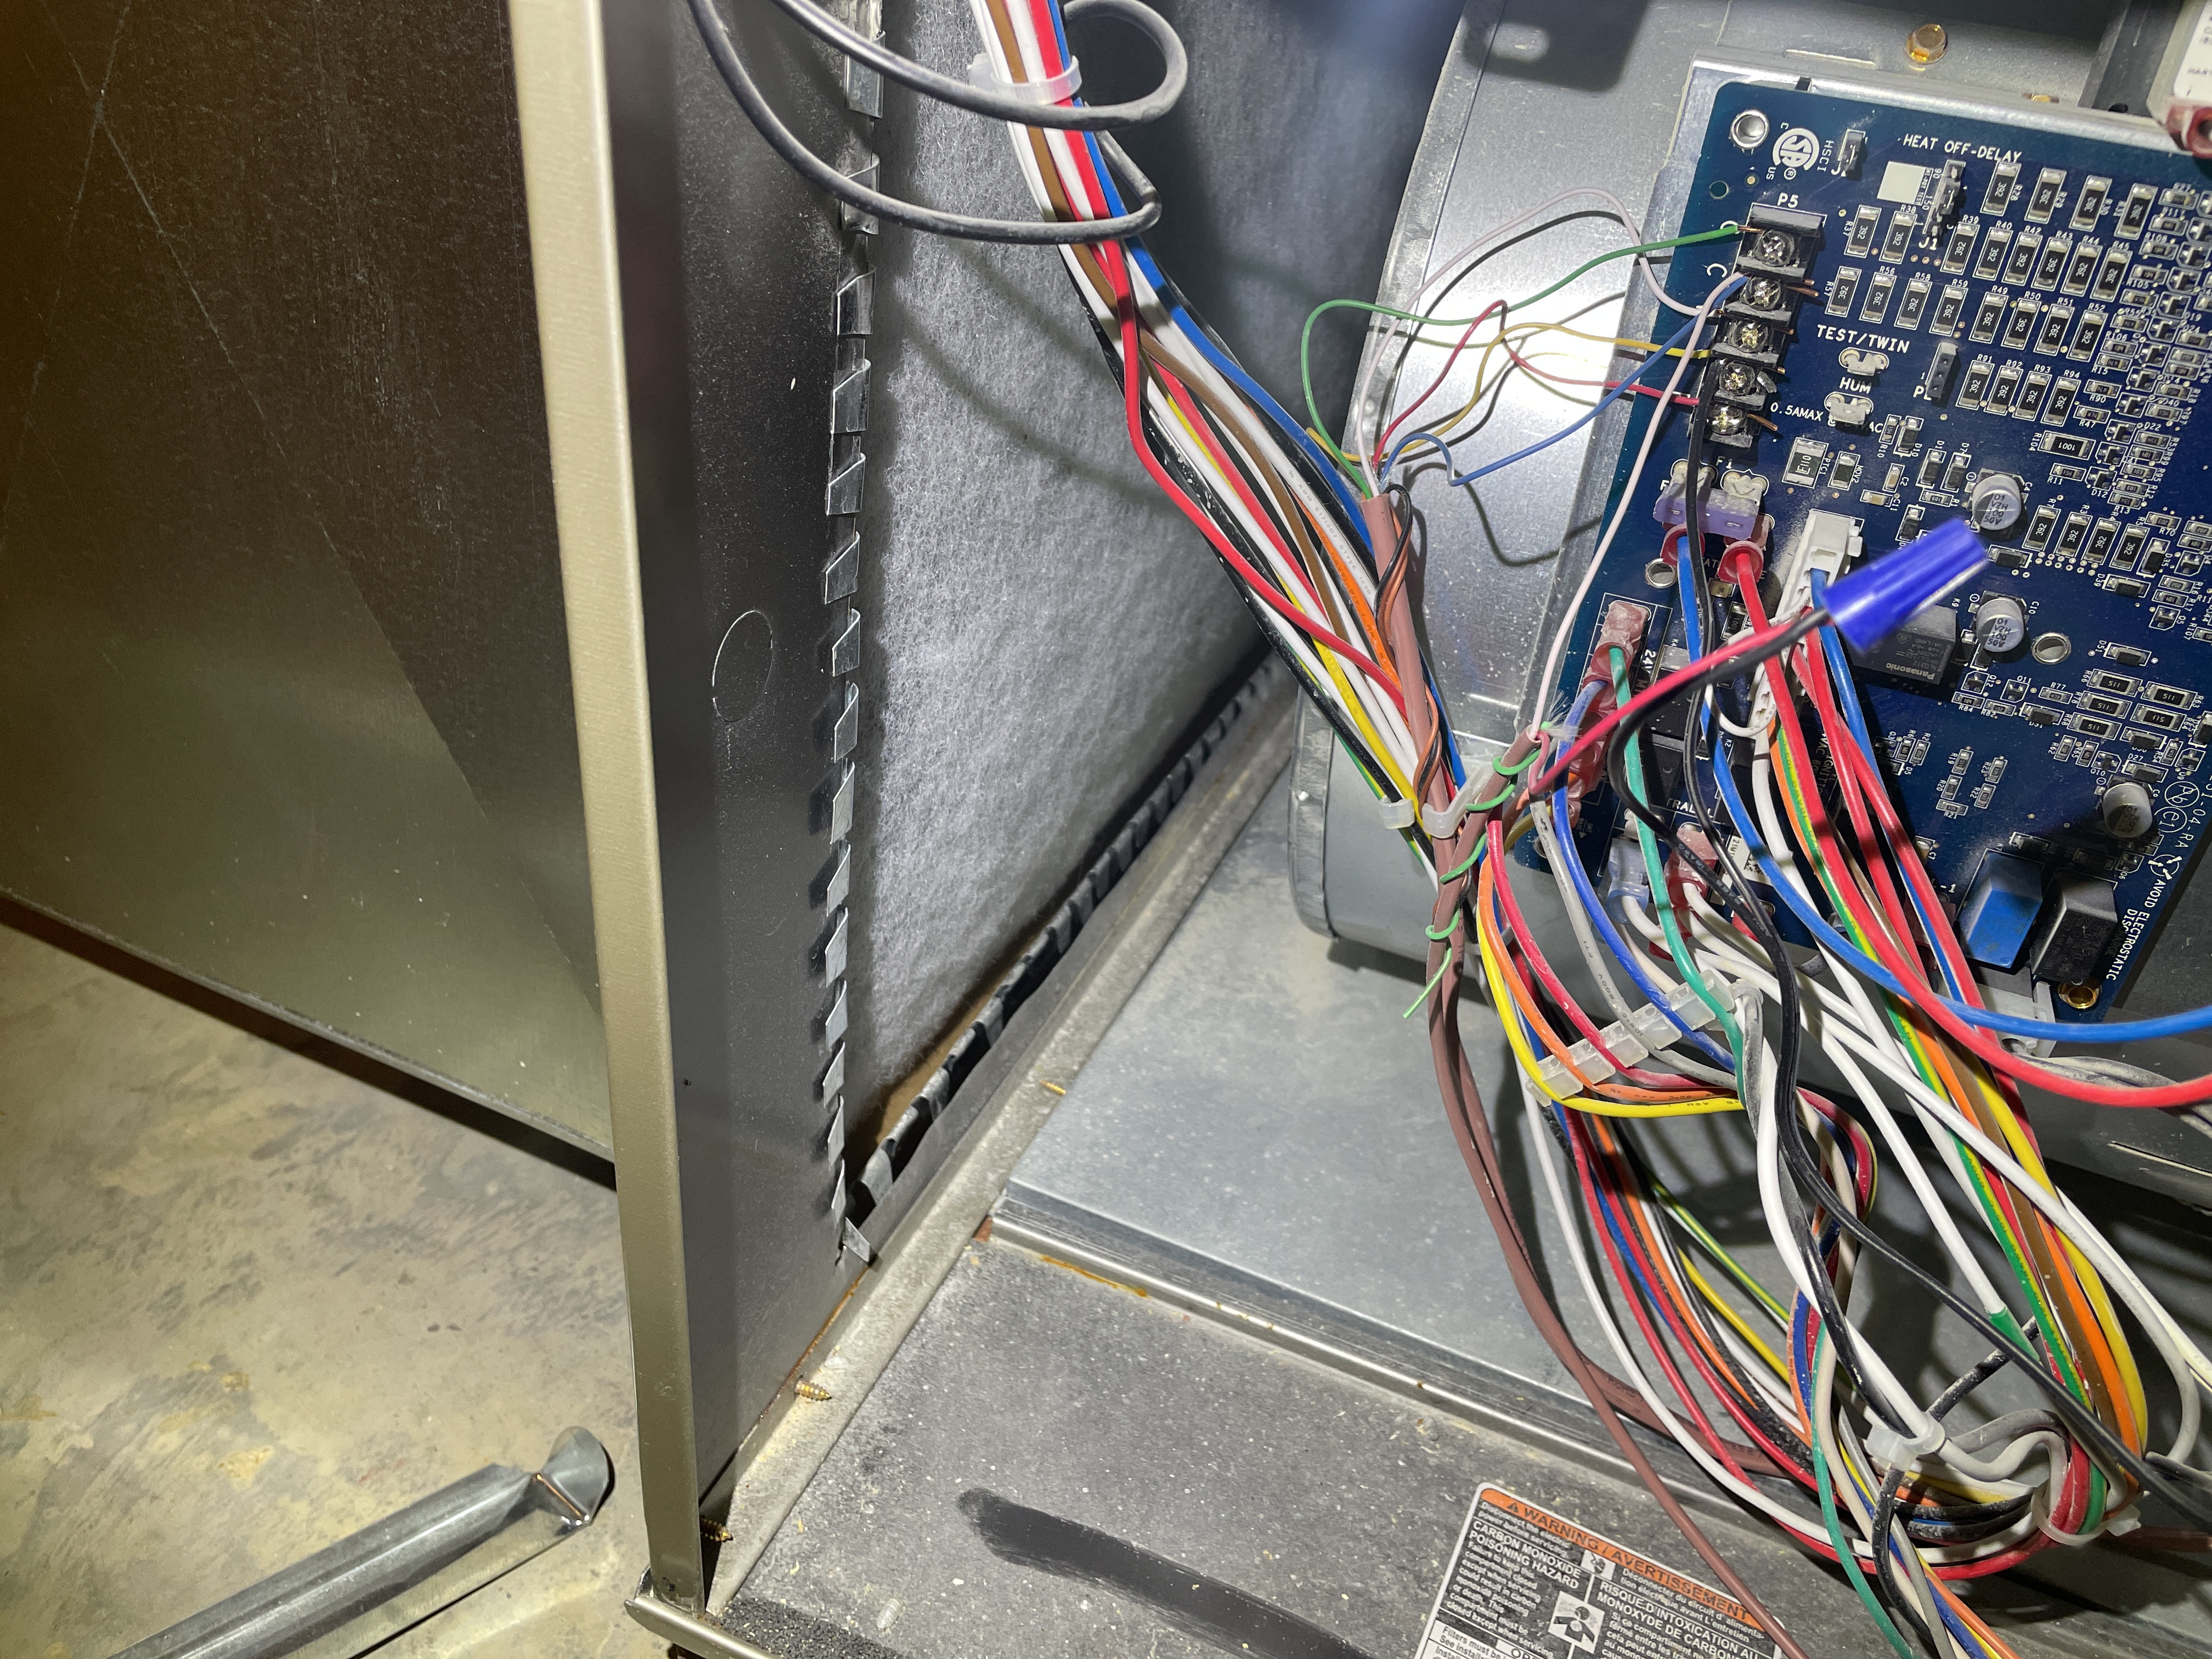
The inside of the HVAC system is dirty. More than likely the system was run without a filter during construction, and the cabinet and fan assembly is coated in dirt and dust. I can't see the inside evaporator coil, but more than likely it is coated as well. When the coil gets dirty and you turn on the air conditioning, the condensation inside the unit can cause the dirty to cake up and prevent proper airflow. You'll want to have the whole system cleaned, including the evaporator coil, to make sure things are working properly.
- HCFV1-3 🔥 Heating, Cooling, Fireplaces and Ventilation:
The supply registers in the guest bathroom and master bathroom are not sitting flush with the floor. This is usually due to the ductwork or tile not being opened wide enough for the metal grill to lay flat. Have the builder correct the installation as needed.
- HCFV1-4 🔥 Heating, Cooling, Fireplaces and Ventilation:
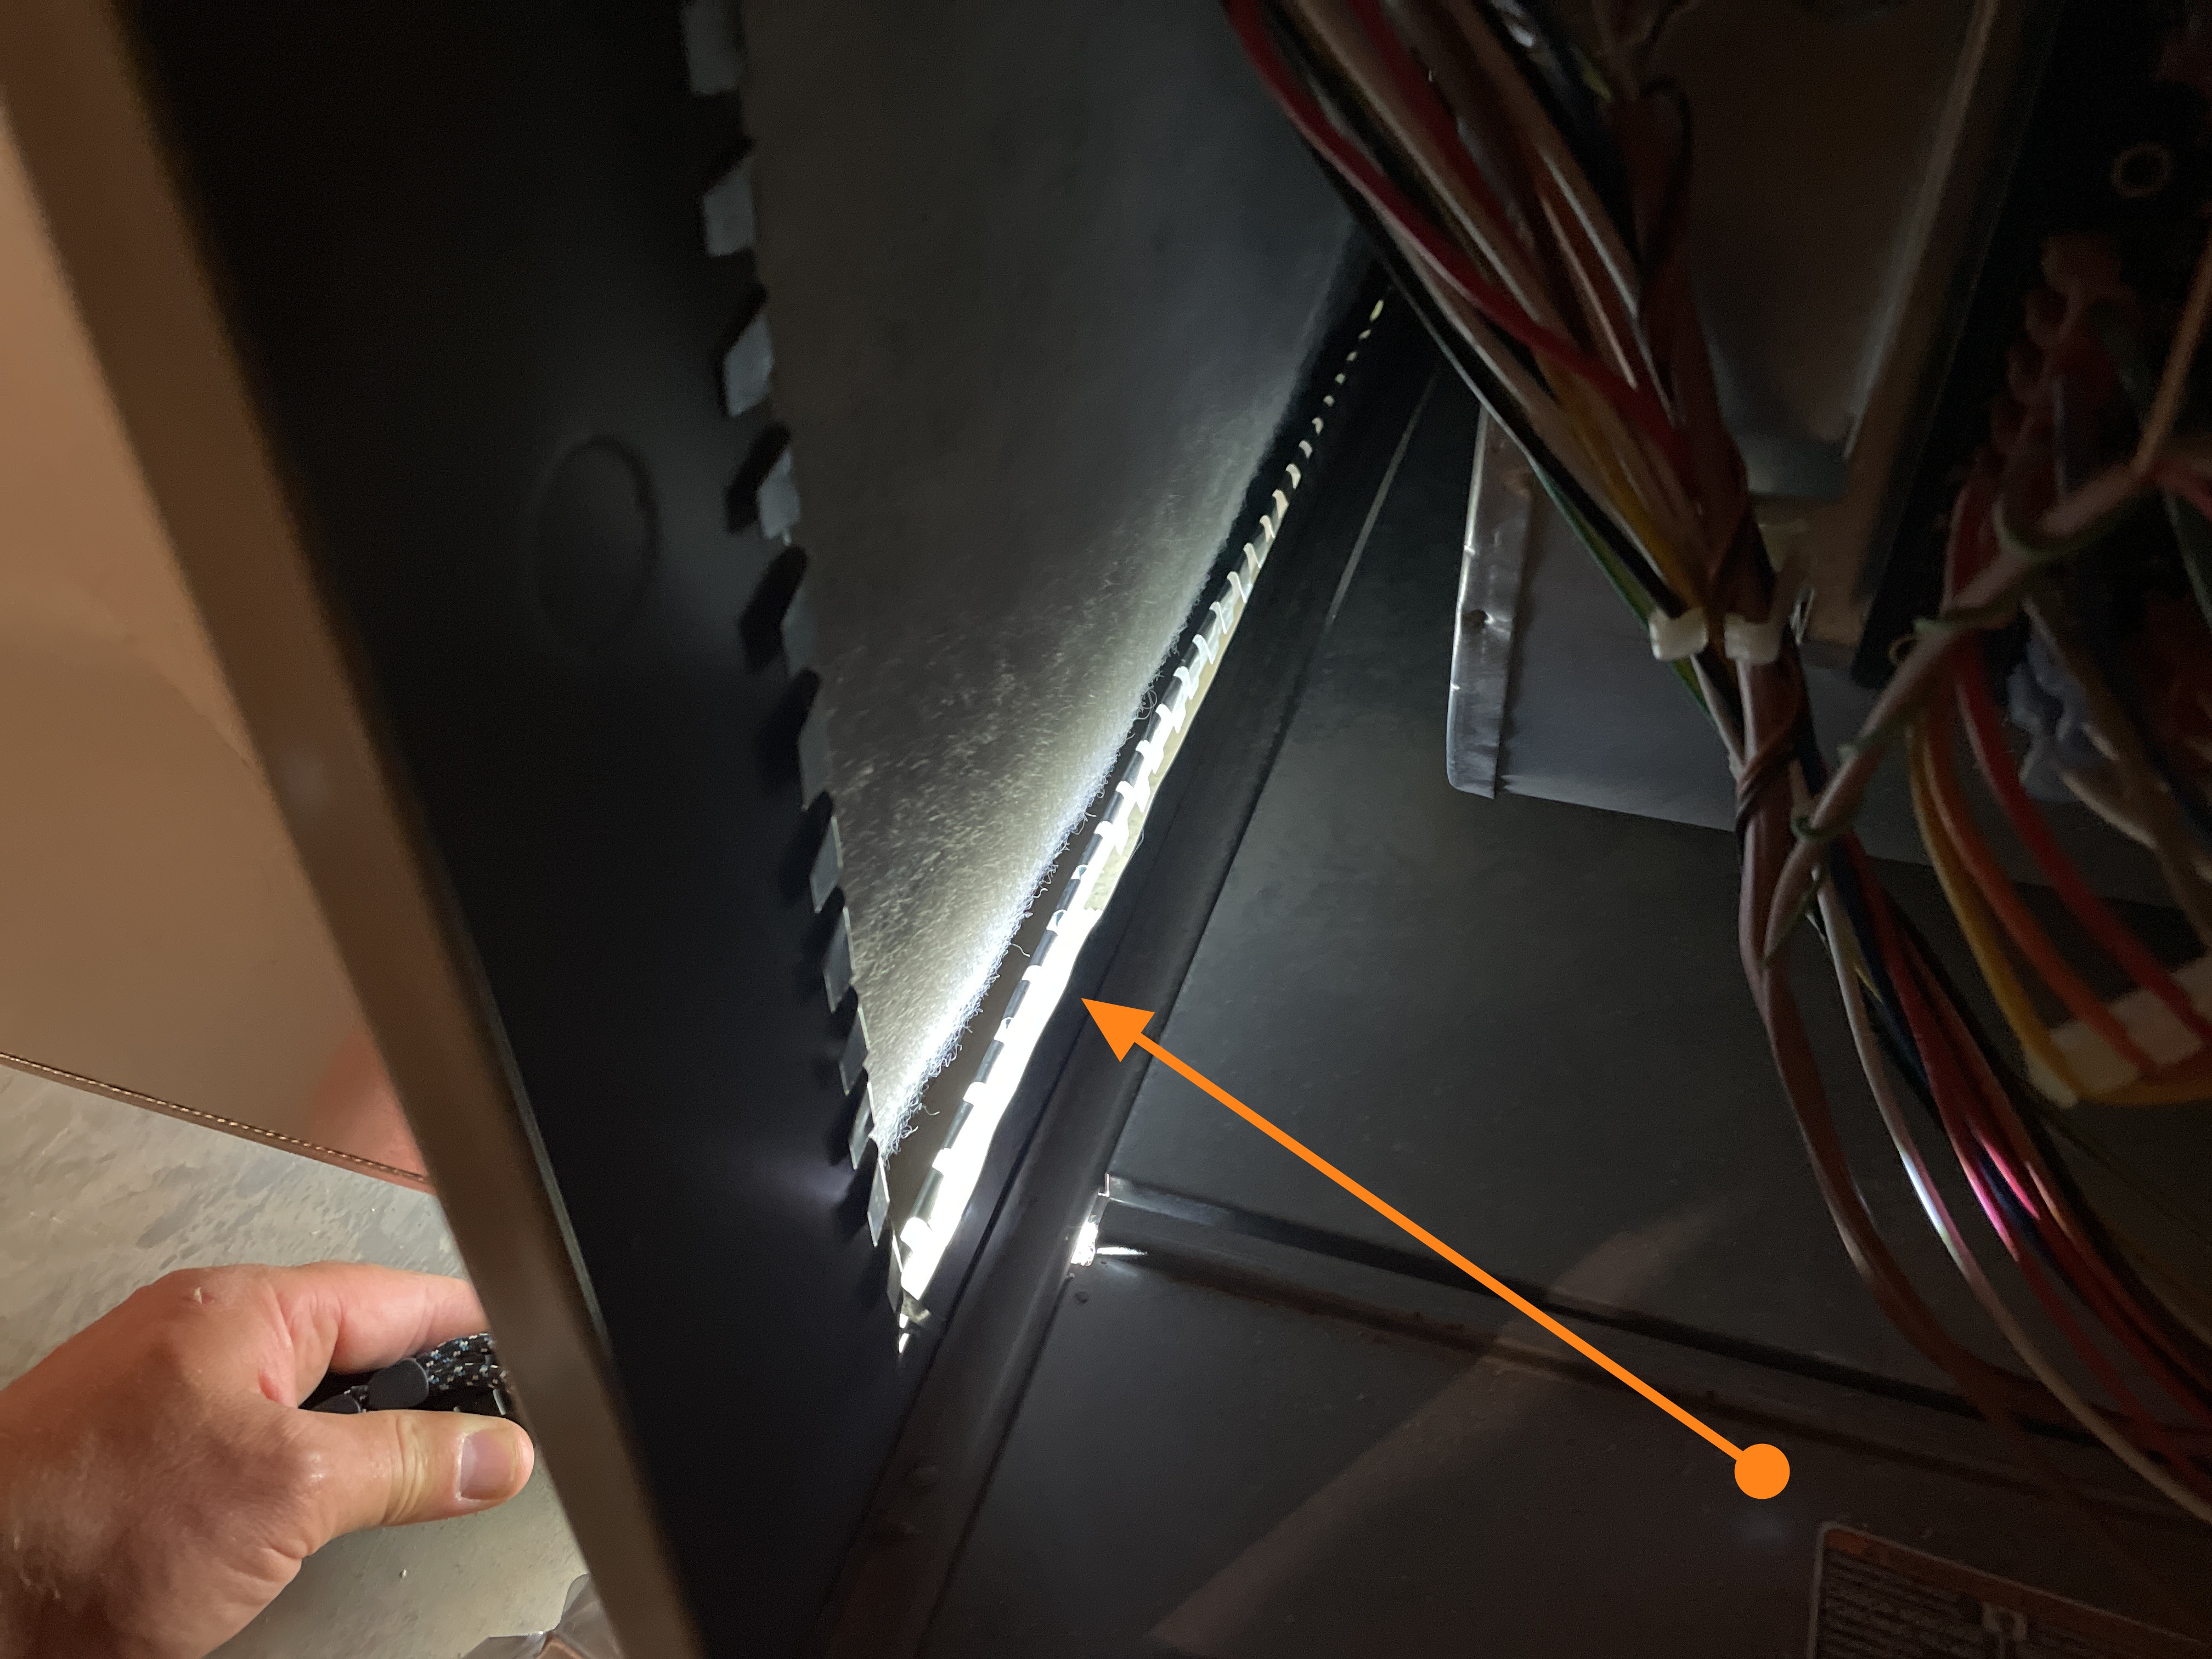
The return ductwork is not connected to the body of the furnace along the bottom edge. This large gap will allow air to be drawn in under the filter and not through the filter. This may explain why the furnace cabinet is so dirty. There is also a chance that the evaporator coil is dirty from the unfiltered air being drawn into the unit.
Have the ductwork repaired/sealed as needed so the return air will have to pass through the filter and not around it.
You will also want to have the system cleaned to eliminate the risk of a clogged evaporator.
- AP1-1 💧 Additional Plumbing:
The discharge line for the sump pump is terminating at the foundation of the home. Have this extended away from the house as much as possible. Sump pumps that discharge near the foundation usually end up causing water intrusion in the basement as they recycle the same water over and over.
- I5-1 🔑 Interior:
The interior doors were not painted along the top and bottom edge. It's printed on the doors that the "warranty is void if not sealed on all sides."
This is required to help moisture absorb evenly into the doors. If some edges are left raw, they will absorb more moisture than the adjacent painted areas which can cause the door to twist/warp out of place.
Have the builder paint the doors as the manufacturer requires so you don't develop issues in the future.
- I5-2 🔑 Interior:
The interior trim of the basement windows (both sets of windows) looks to have puddles of paint across the entire opening. I do not know how this occurred. Have the builder address the situation as needed.
- K-4 🔪 Kitchen:
There is a built-in microwave present but the unit does not have power. I was not able to test the microwave.
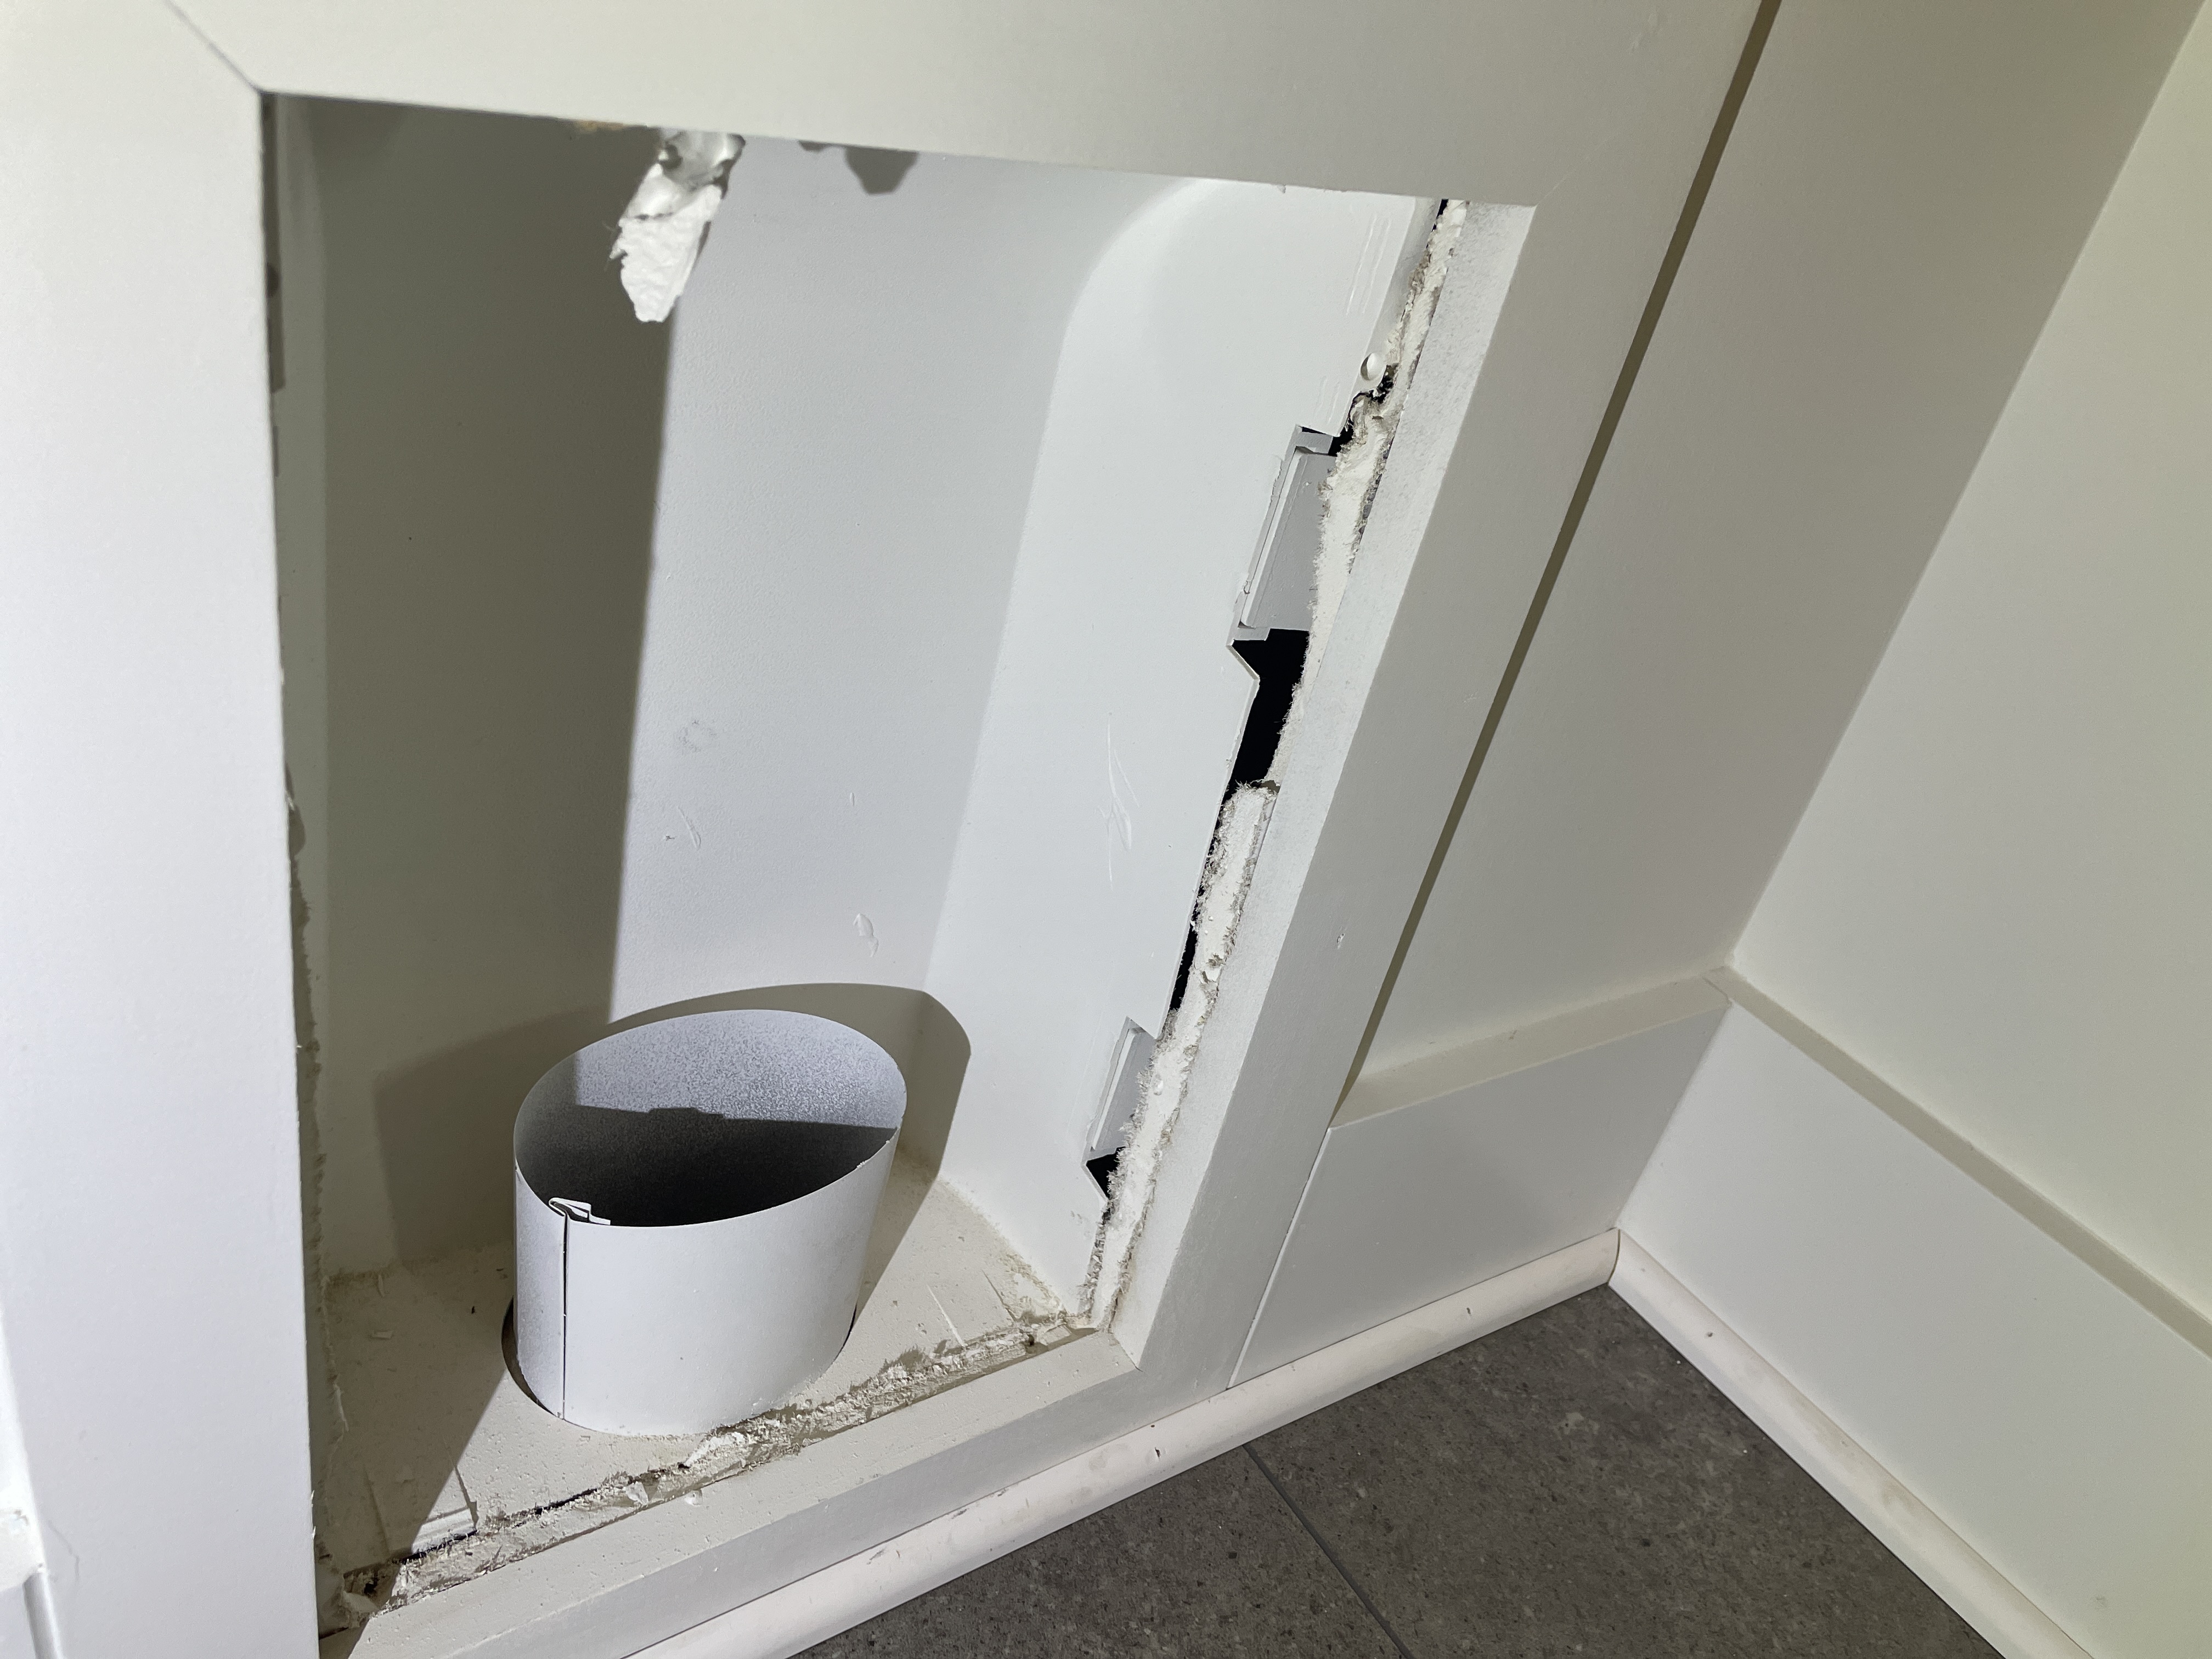
- LF6-1 🥼 Laundry Facilities:
The dryer vent box In the laundry room was poorly installed and flops inside the wall. Have the builder correct the enclosure installation as needed.
- GB-1 👨👦👦 Guest Bathroom:
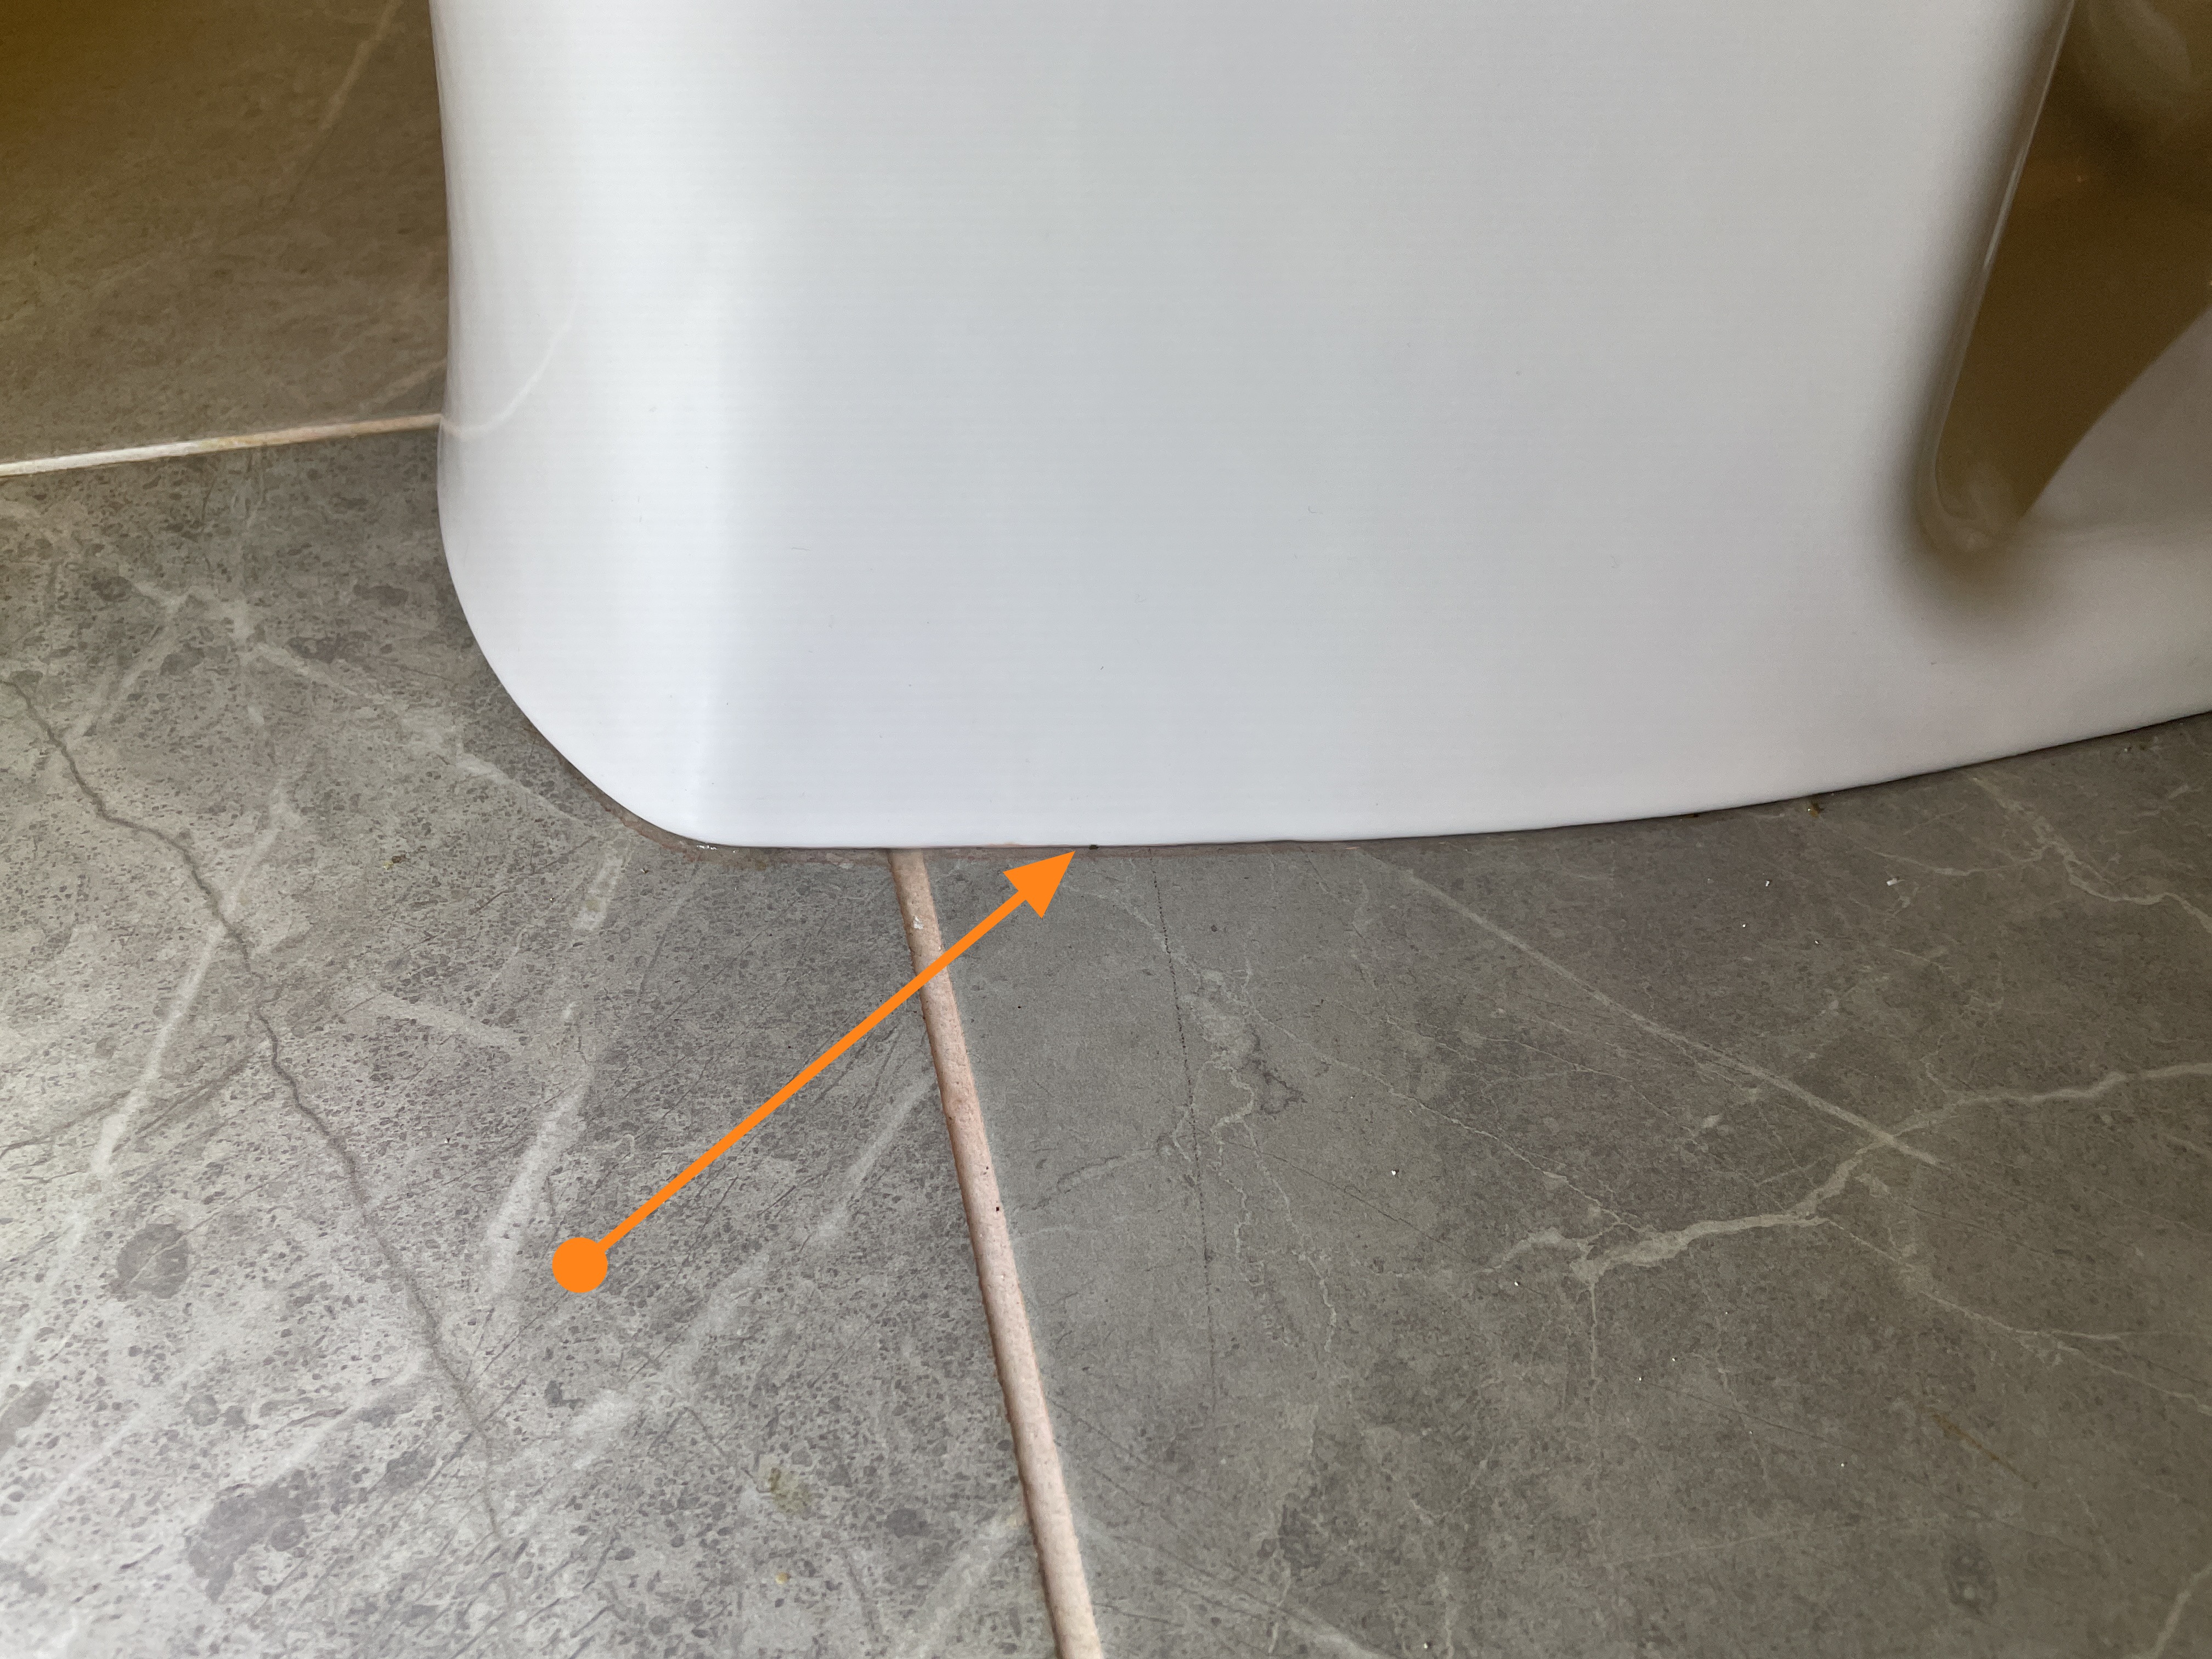
The toilet in the basement bathroom is leaking around the bottom flange. I suspect this is a leaking wax ring. Have the builders plumber investigate and repair the situation as needed.
- A2-1 🗼 Attic:
The attic access hatch cover is not air sealed and doesn't have any insulation on its backside. Areas like these can be a big ding to the efficiency of the home. You'll want to have the hatch sealed with weather stripping, and have ridged insulation placed on the back of the sheet goods that cover the hole. I've written a how-to guide on this subject that you can read here: http://abihomeservices.com/insulating-your-attic-access-hole/
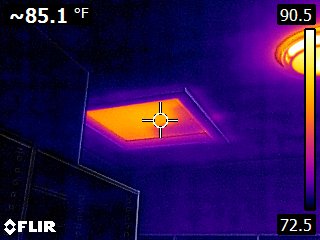
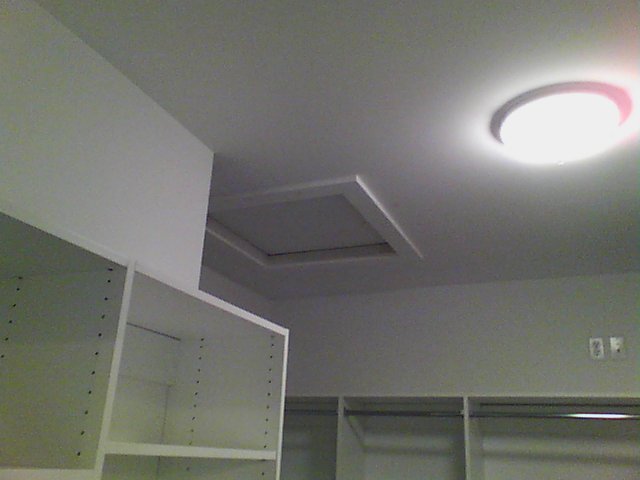
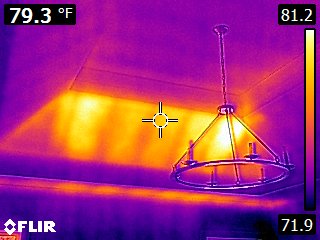
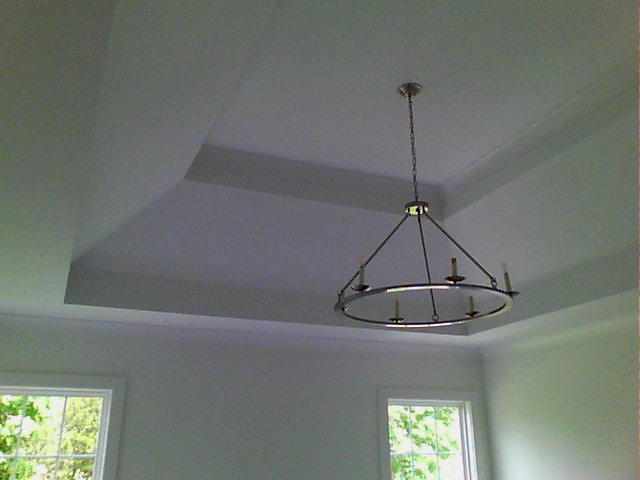
- A2-3 🗼 Attic:
The tray ceiling in the master bedroom has a section that was not insulated. You can see the heat radiating through via thermal imaging along the back wall. You’ll want to have the builders correct this missing insulation as needed. Keep in mind that if the contractors have to wade through the deep blanket of insulation that is in place, that will also need to be repaired during the process.
Due Diligences
- GC2-1 💬 General Comments:
This home inspection is not a mold inspection of any kind. According to the EPA, mold testing/sampling is NOT needed the vast majority of the time. Here is a link to more info from the EPA on mold: EPA on mold testing.
The EPA has produced a document on mold in the home which you can download here: A Brief Guide to Mold, Moisture, and Your Home
Any mold in a house is a symptom of a moisture problem and is not the actual problem itself. If I see anything during your inspection, I will say something in this report. That is strictly a courtesy for you. If this topic concerns you, you can speak with a true mold specialist, such as an industrial hygienist, about performing a test/inspection on the home. I would be very suspicious and cautious of any "mold contractor" who has a financial interest in performing any mold testing and/or mitigation work for you.
- DPB5-3 🏡Decks, Porches and Balconies:
Part of the deck was built on top of the brick retaining wall. I have no way of knowing if the wall was was engineered/built to handle the weight of the deck/roof. Check with the builder to make sure this added structure was part of the design of the wall and that the proper footings and inspections were completed during construction.
- EDFW1-2 ⚡ Electric Distribution and Finish Wiring:
In accordance with home inspection industry standards, I do not test smoke detectors as simply pressing the button doesn't give you any real data on how well the unit will work in a real fire. However, they are an important safety feature that must not be overlooked, and it is important to make sure that there are functional detectors installed at all required locations prior to occupying the premises. Unless the smoke detectors are newly installed I strongly encourage you to install new ones throughout the home when you move in. You can buy a 3-pack for around $30 on Amazon. Link to Smoke Detectors
- EDFW1-3 ⚡ Electric Distribution and Finish Wiring:
Carbon monoxide (CO) is a colorless, odorless, and tasteless gas that is poisonous to humans. It is known as the “silent killer” because humans cannot tell when they are around it, but it can be very dangerous and deadly if the levels get high enough.
The carbon monoxide detector is a safety device that can alert homeowners of a CO leak and help them escape a potentially life-threatening situation, like carbon monoxide poisoning.
What does a carbon monoxide detector do?
Carbon monoxide alarms detect the poisonous gas and provide early warning. In the event of a carbon monoxide leak, it is critical that you get to fresh air as soon as possible. Every second counts, and a detector can provide you and your family the advanced warning necessary to escape your home during an emergency.
What are the main sources of carbon monoxide leaks?
Carbon monoxide can be produced by any fuel-burning device. Three main sources are your home’s furnace, dryer vent in a drying machine, and fireplace or chimney. It is important to have these sources regularly serviced and cleaned by a professional to help prevent a CO leak that could lead to carbon monoxide poisoning.
Because of the seriousness of carbon monoxide risk, I encourage you to replace or install new carbon monoxide detectors in the recommended areas.
You should not leave old or currently installed carbon monoxide detectors in place. Most manufacturers list their life expectancy at about five years, and it's simply not worth the risk of leaving an old or pre-existing carbon monoxide detector in place.
There are several different types of CO detectors available. Some are hardwired like this one: Hardwired CO Monitor and some plug into a receptacle for easy installation like this one; Wall Mount CO Monitor
You can also get some units that will alert you of carbon monoxide at a much lower level then some of the cheaper models. While these more sensitive units do cost more, they will alert you to a potential issue much sooner. Low Level CO Monitor.
Completed Items
- K-2 🔪 Kitchen:
The dishwasher was run through a basic wash cycle. Everything seemed to work as it should. This was a basic function test and not a test of every cycle.
- K-3 🔪 Kitchen:
The range/oven was run through a basic function test. Everything seemed to work as it should. This was a basic function test and not a test of every cycle.
Notes
- HCFV1-2 🔥 Heating, Cooling, Fireplaces and Ventilation:
Understand that the primary function of the air filter is to protect the equipment--not your lungs. If a filter is too restrictive, the high static pressure may lead to a number of problems including burning out the fan motor or run capacitor, damage to the heat exchanger, poor efficiency, higher consumption of energy, etc.
The same can happen when you have no filter, an improperly sized/ fitting one, or one that is the correct size but is one in which the filter rack allows the filter to flop around, causing bypass of the filter media.
Aside from the adverse affects to a furnace, it will lead to clogging an attached evaporator coil, which inhibits airflow thus hindering performance. This often leads to overcharging and other silly attempts to "fix" the problem when the house doesn't cool or heat properly.
Keeping a clean, well fit filter is important to the health of your HVAC system. Your filter is located at the furnace. Be sure and change it every 30-60 days (or as needed).
- HCFV1-5 🔥 Heating, Cooling, Fireplaces and Ventilation:
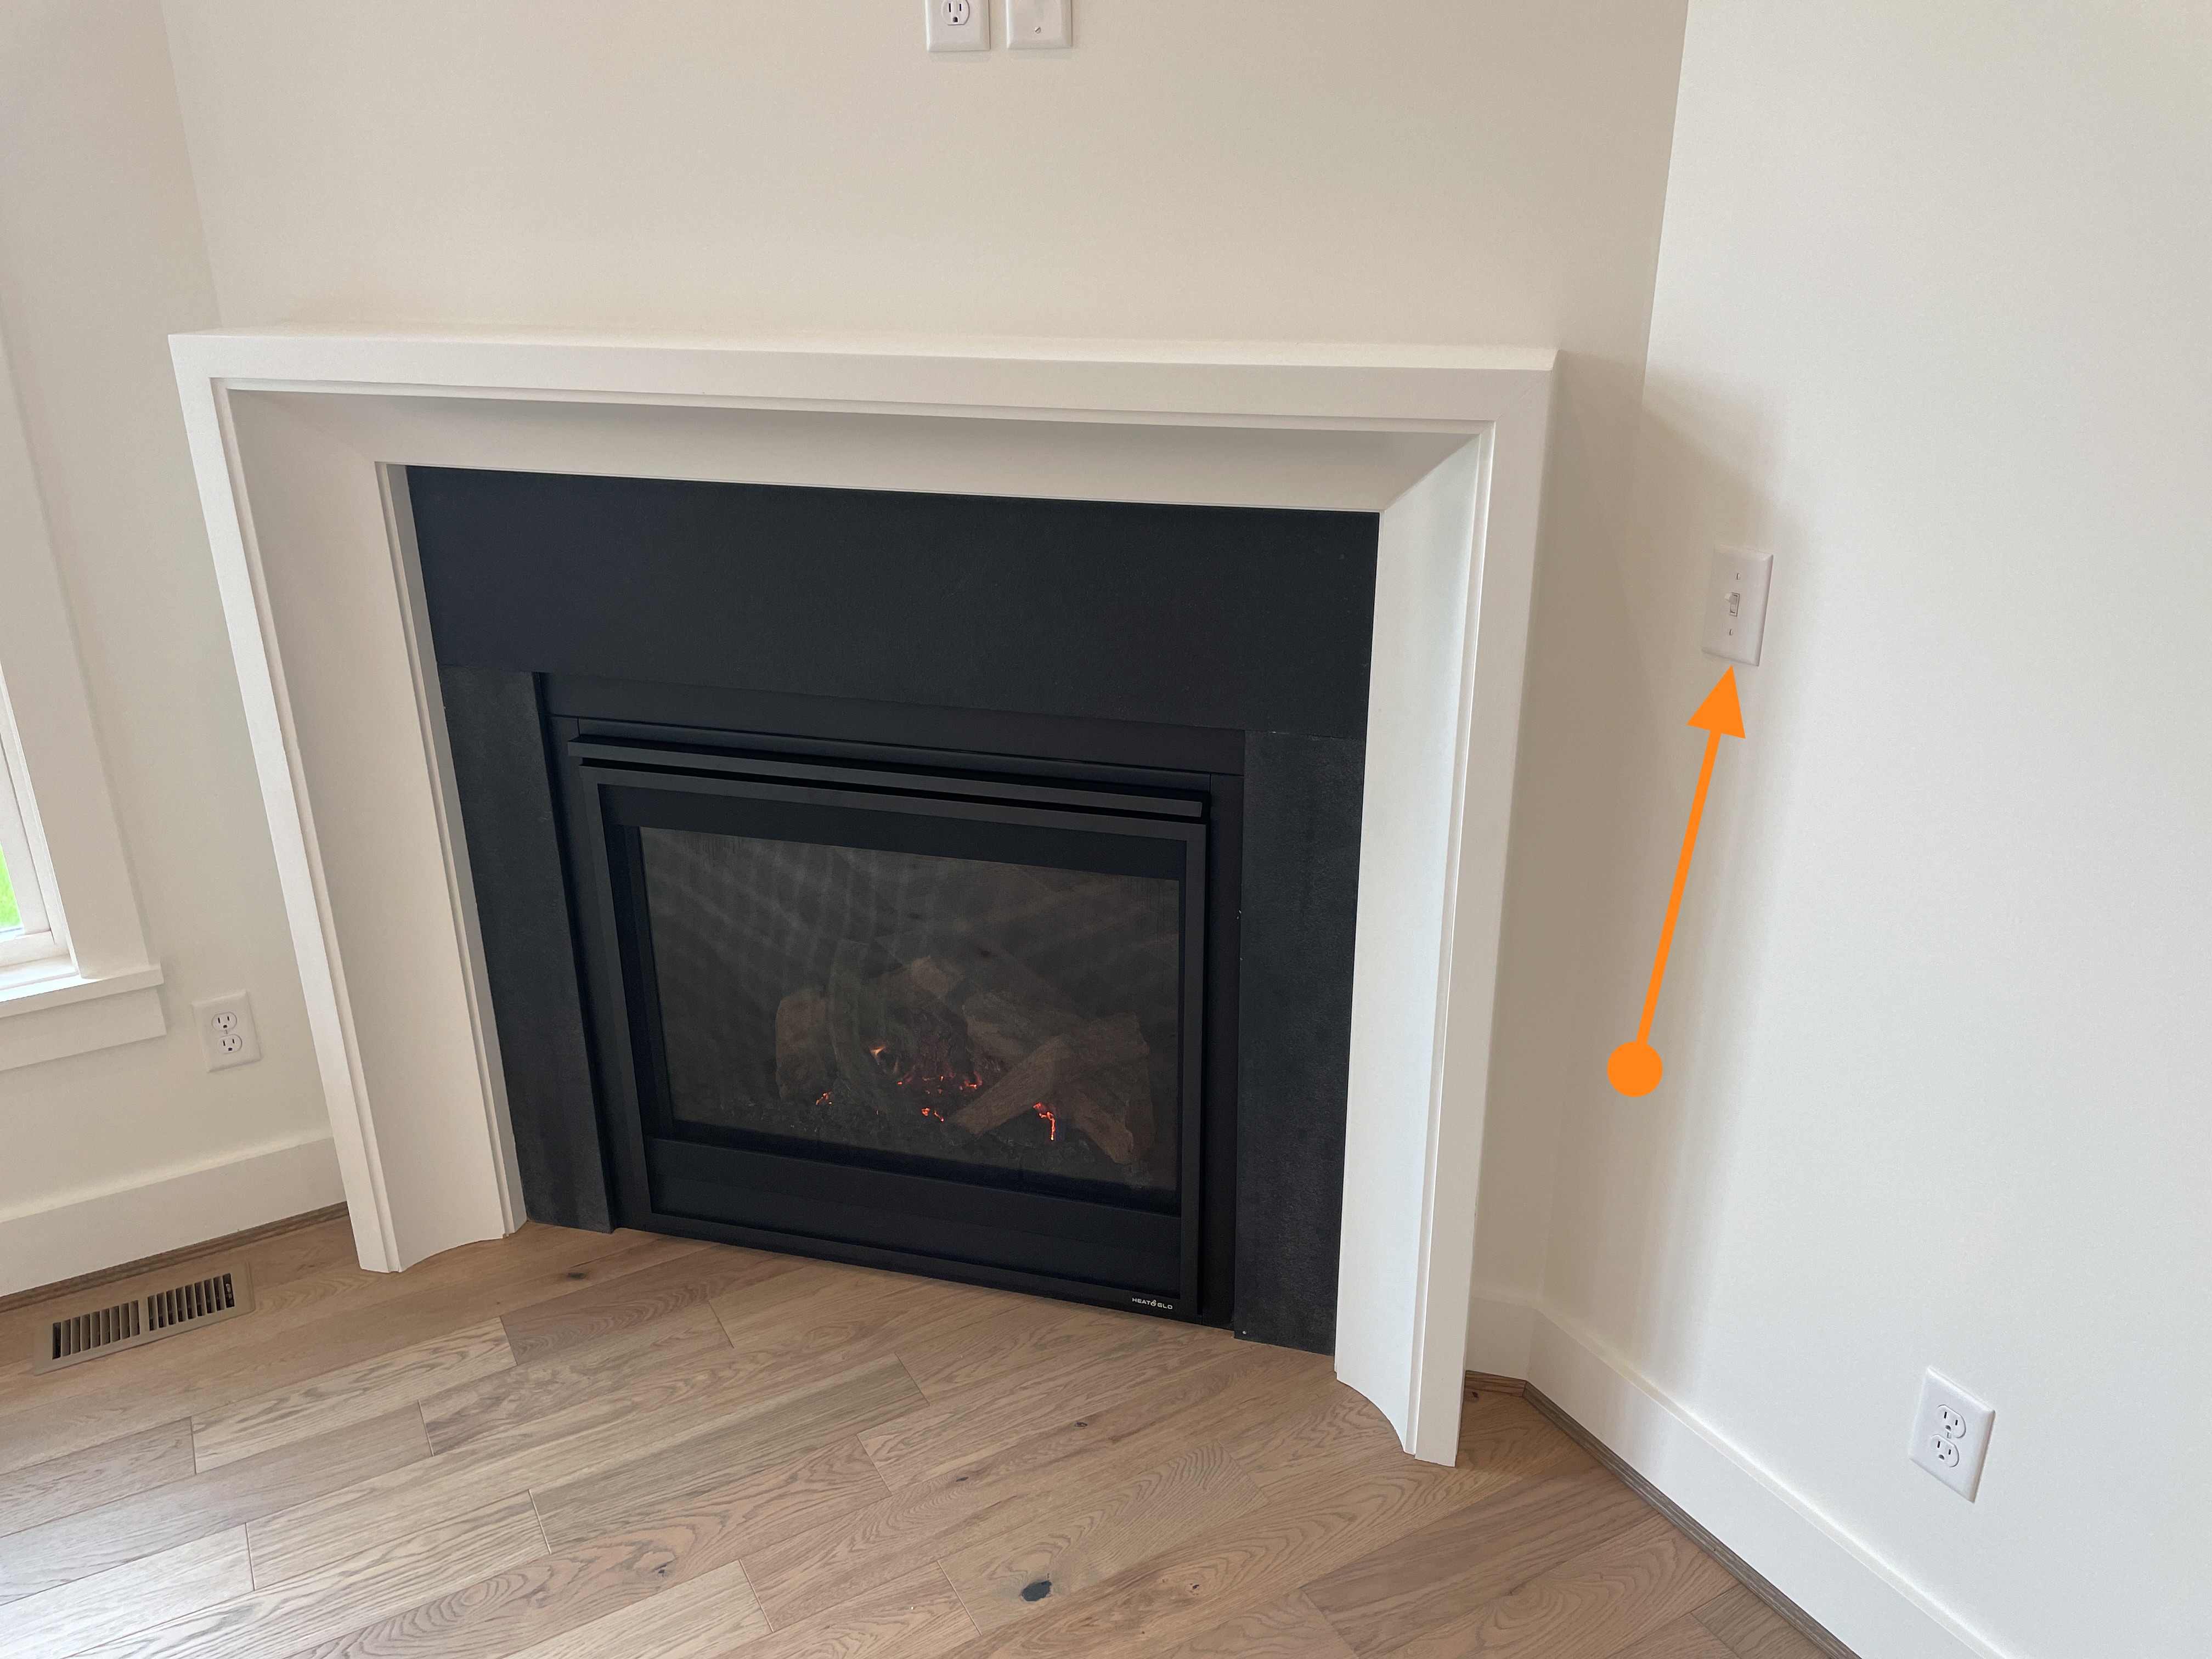
The fireplace did come on when tested. To light the unit simply flip the light switch to the right of the mantle.
- P-1 🚿 Plumbing:
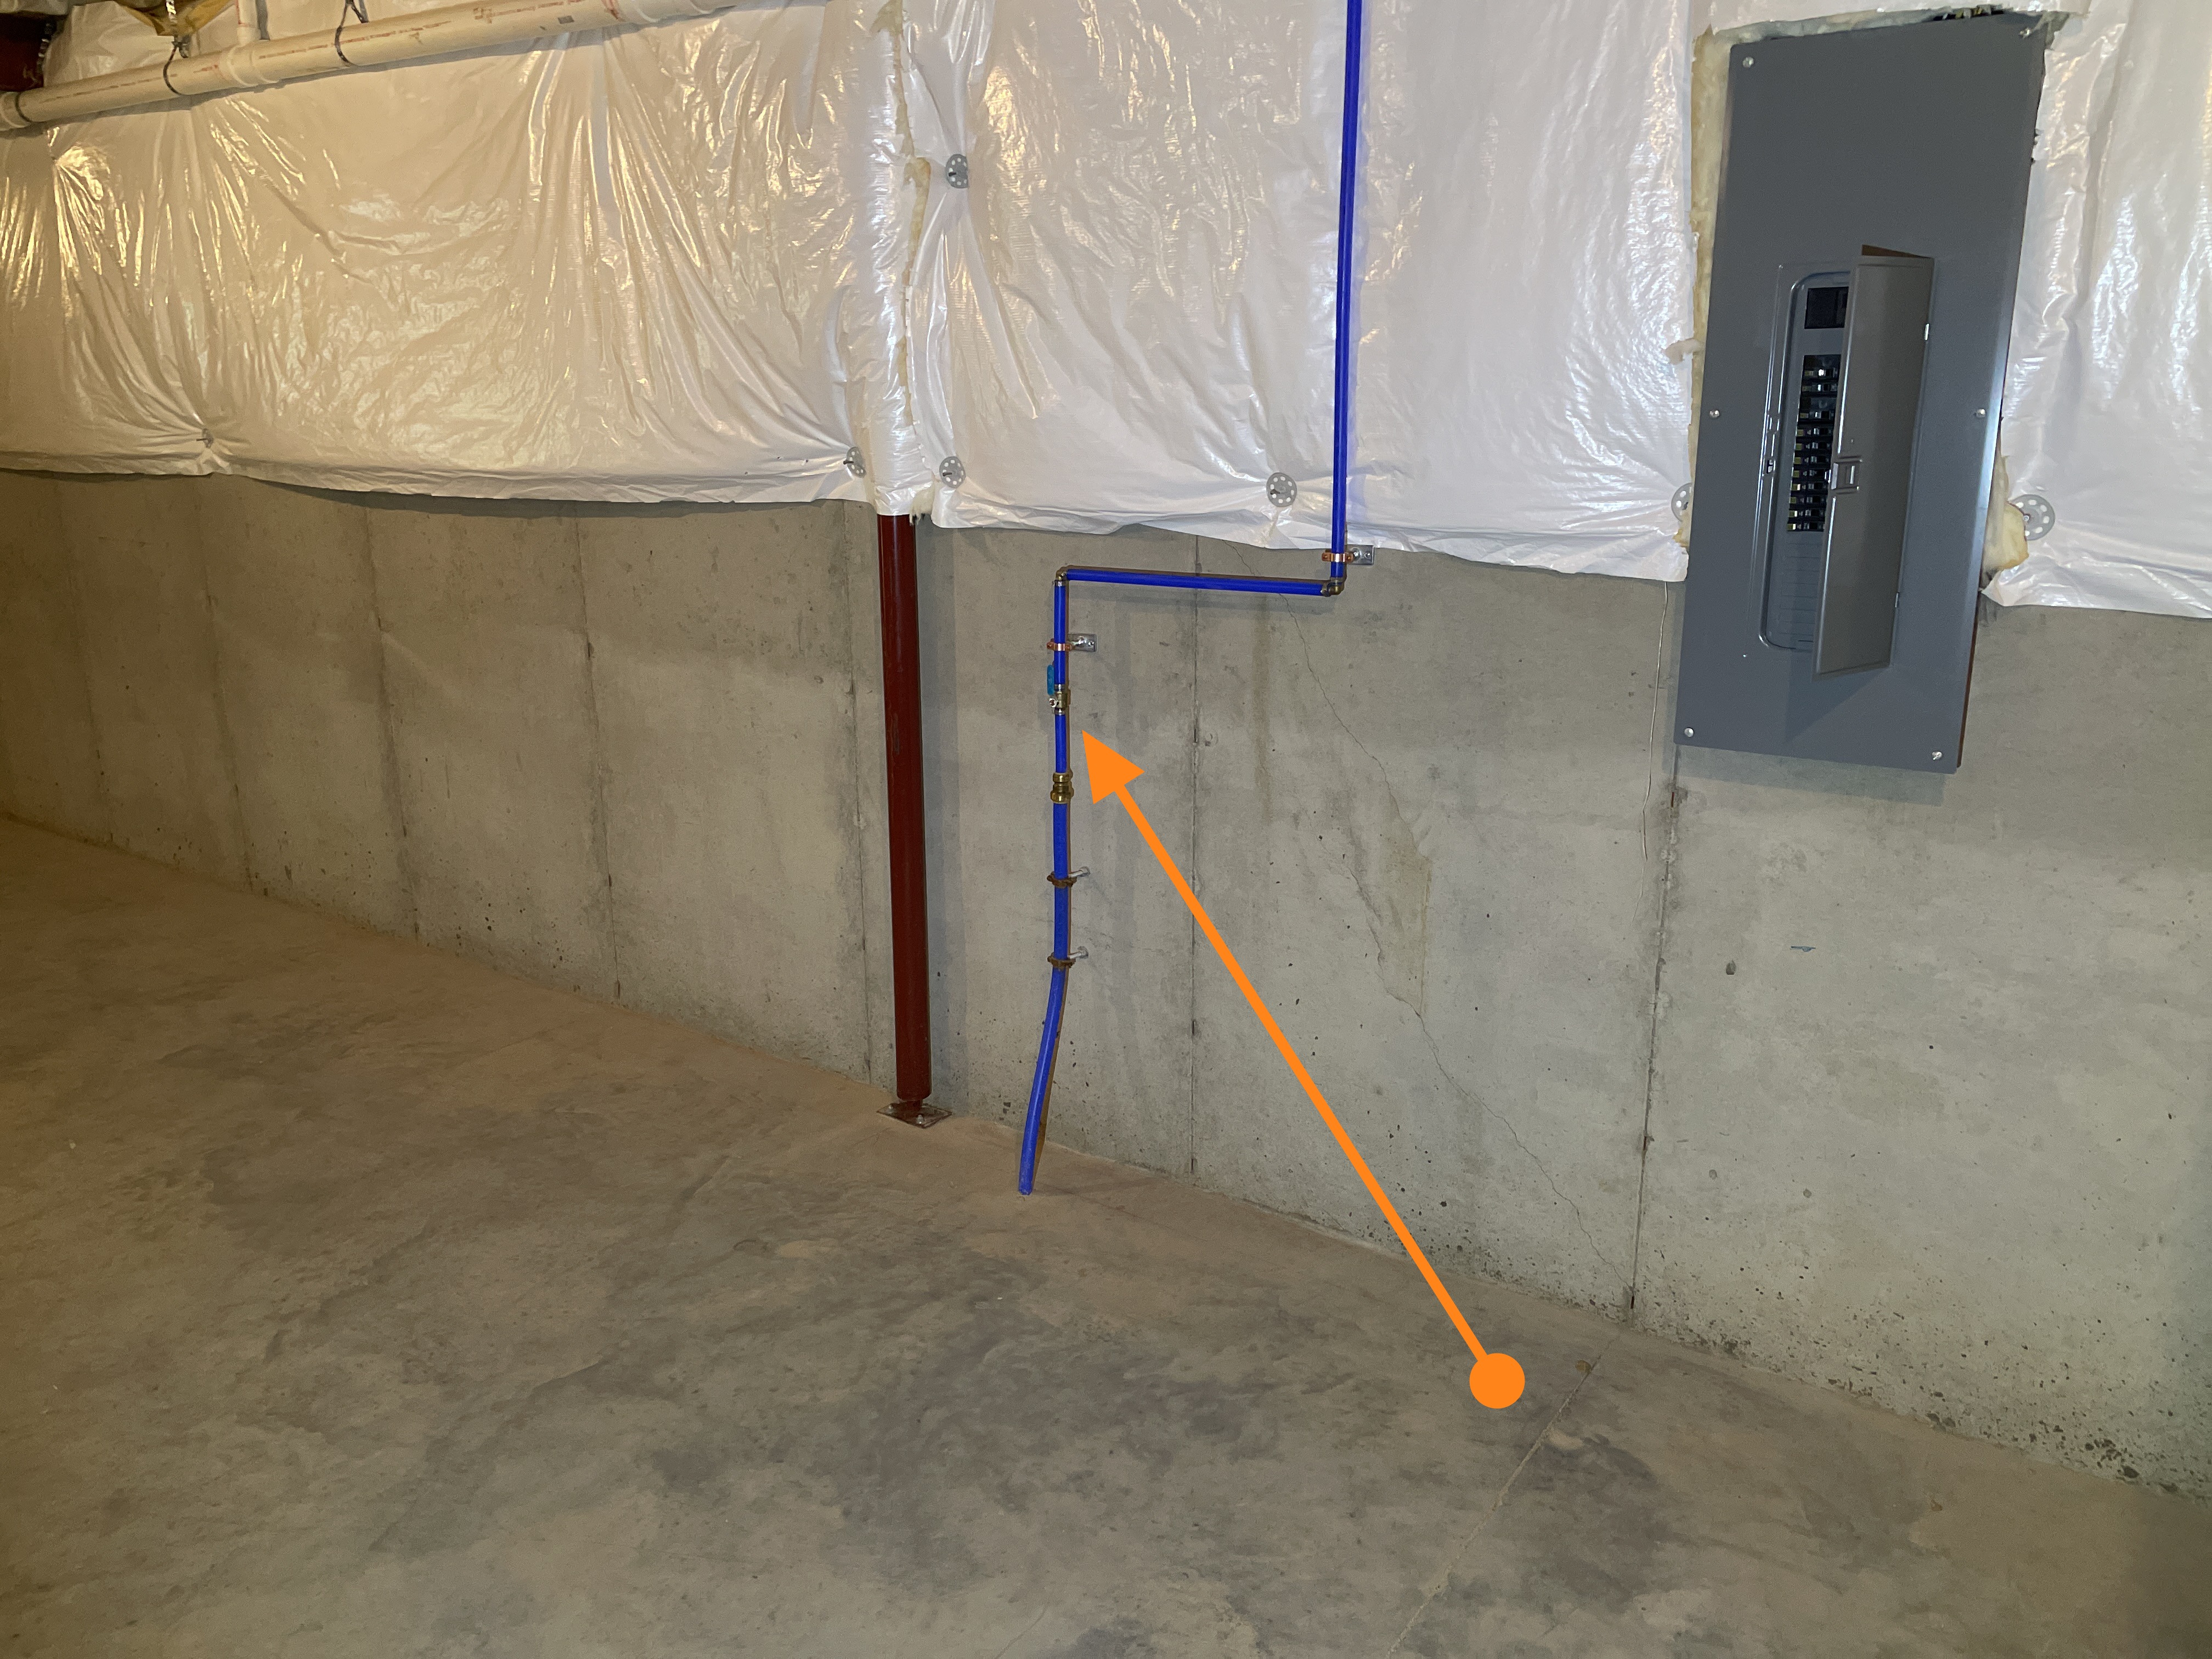
The main water shut-off is located along the side wall of the basement.
- AP1-2 💧 Additional Plumbing:
The sump pump did function when tested. This is something you will want to test once a month. If there is no water in the crock, you can pour a bucket of water in the hole to raise the water level. The pump is triggered by the float switch hanging off the side of it. To trigger the unit to come on simply lift the float vertically, or keep adding water to the pit until it turns on.
You'll want to also consider adding a water powered backup system. If the power were to ever go out, the back-up system will empty the basin, and may prevent your basement from flooding during hard rain. These can be found for here.
- AP1-3 💧 Additional Plumbing:
The basement bathroom is draining into a sewage ejector pump kit. Think of it as a sump pump with a blender built on it.
The waste water for the bathroom downstairs drains into this basin. Once the water reaches a certain level, the pump will kick on, chop the contents into a slurry, and drain the basin.
It's a good idea to run a water through the sink every month to test the pump. If the pump is not working it can back up and cause a big mess.
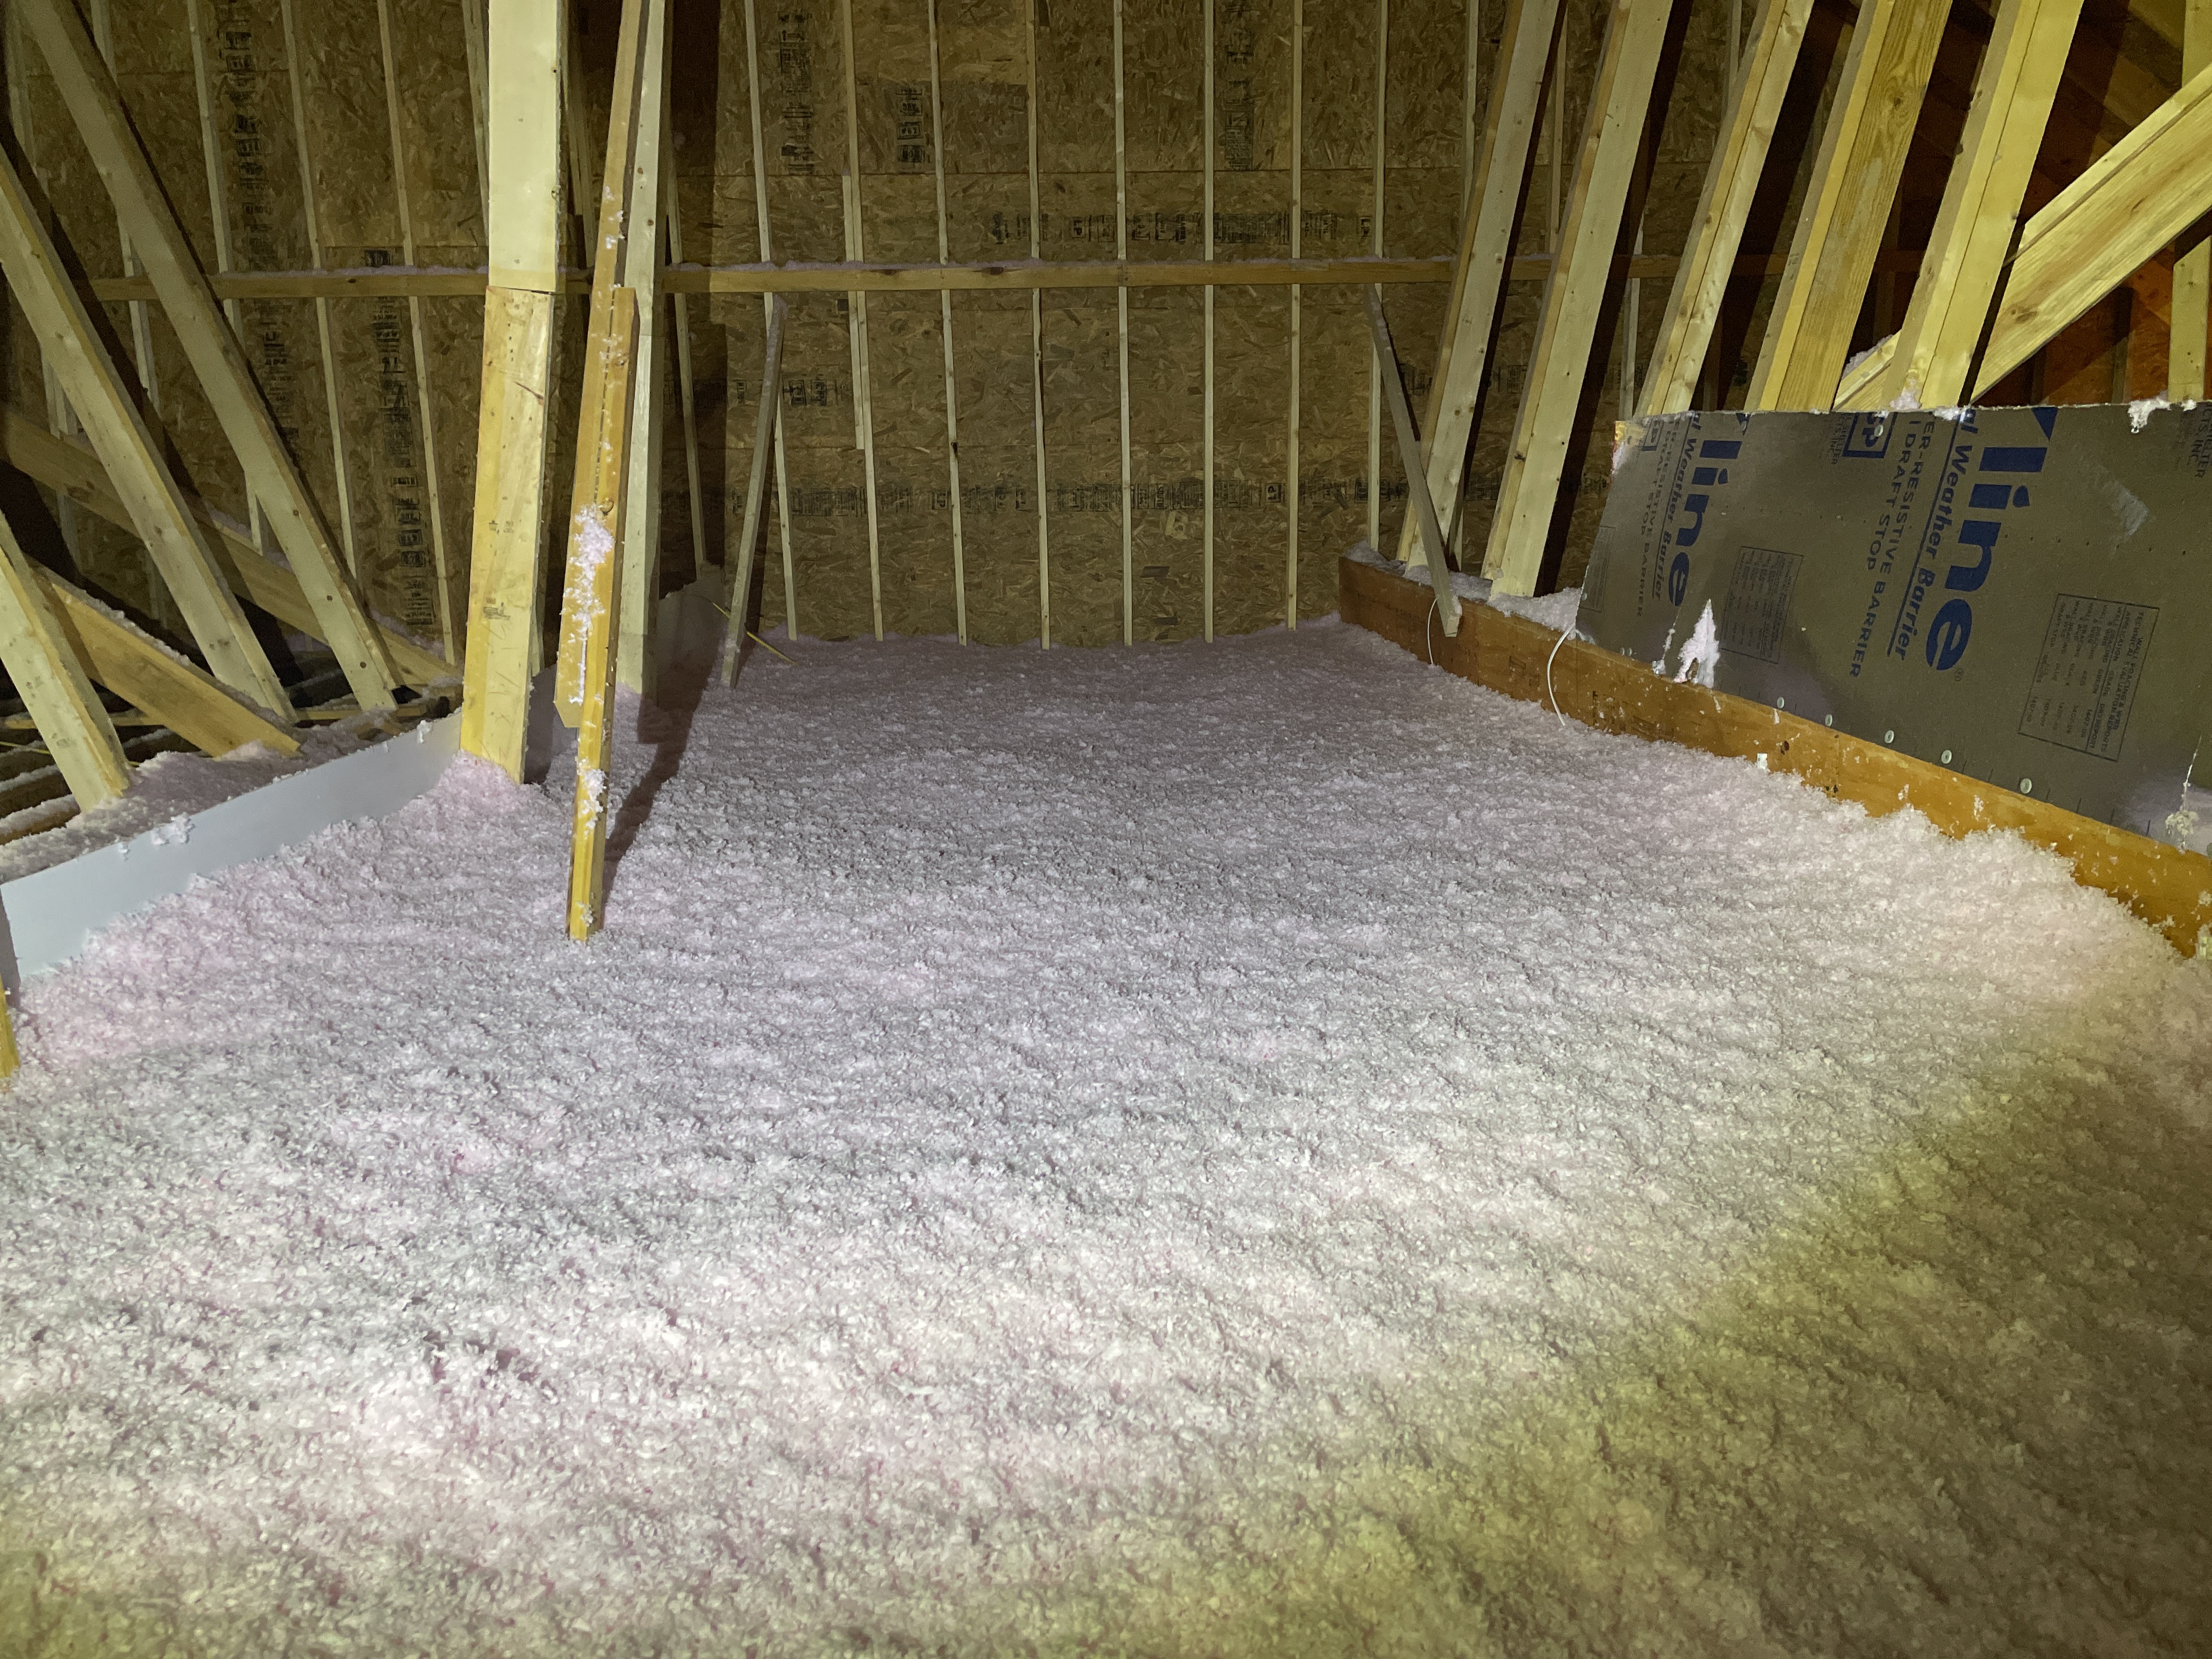
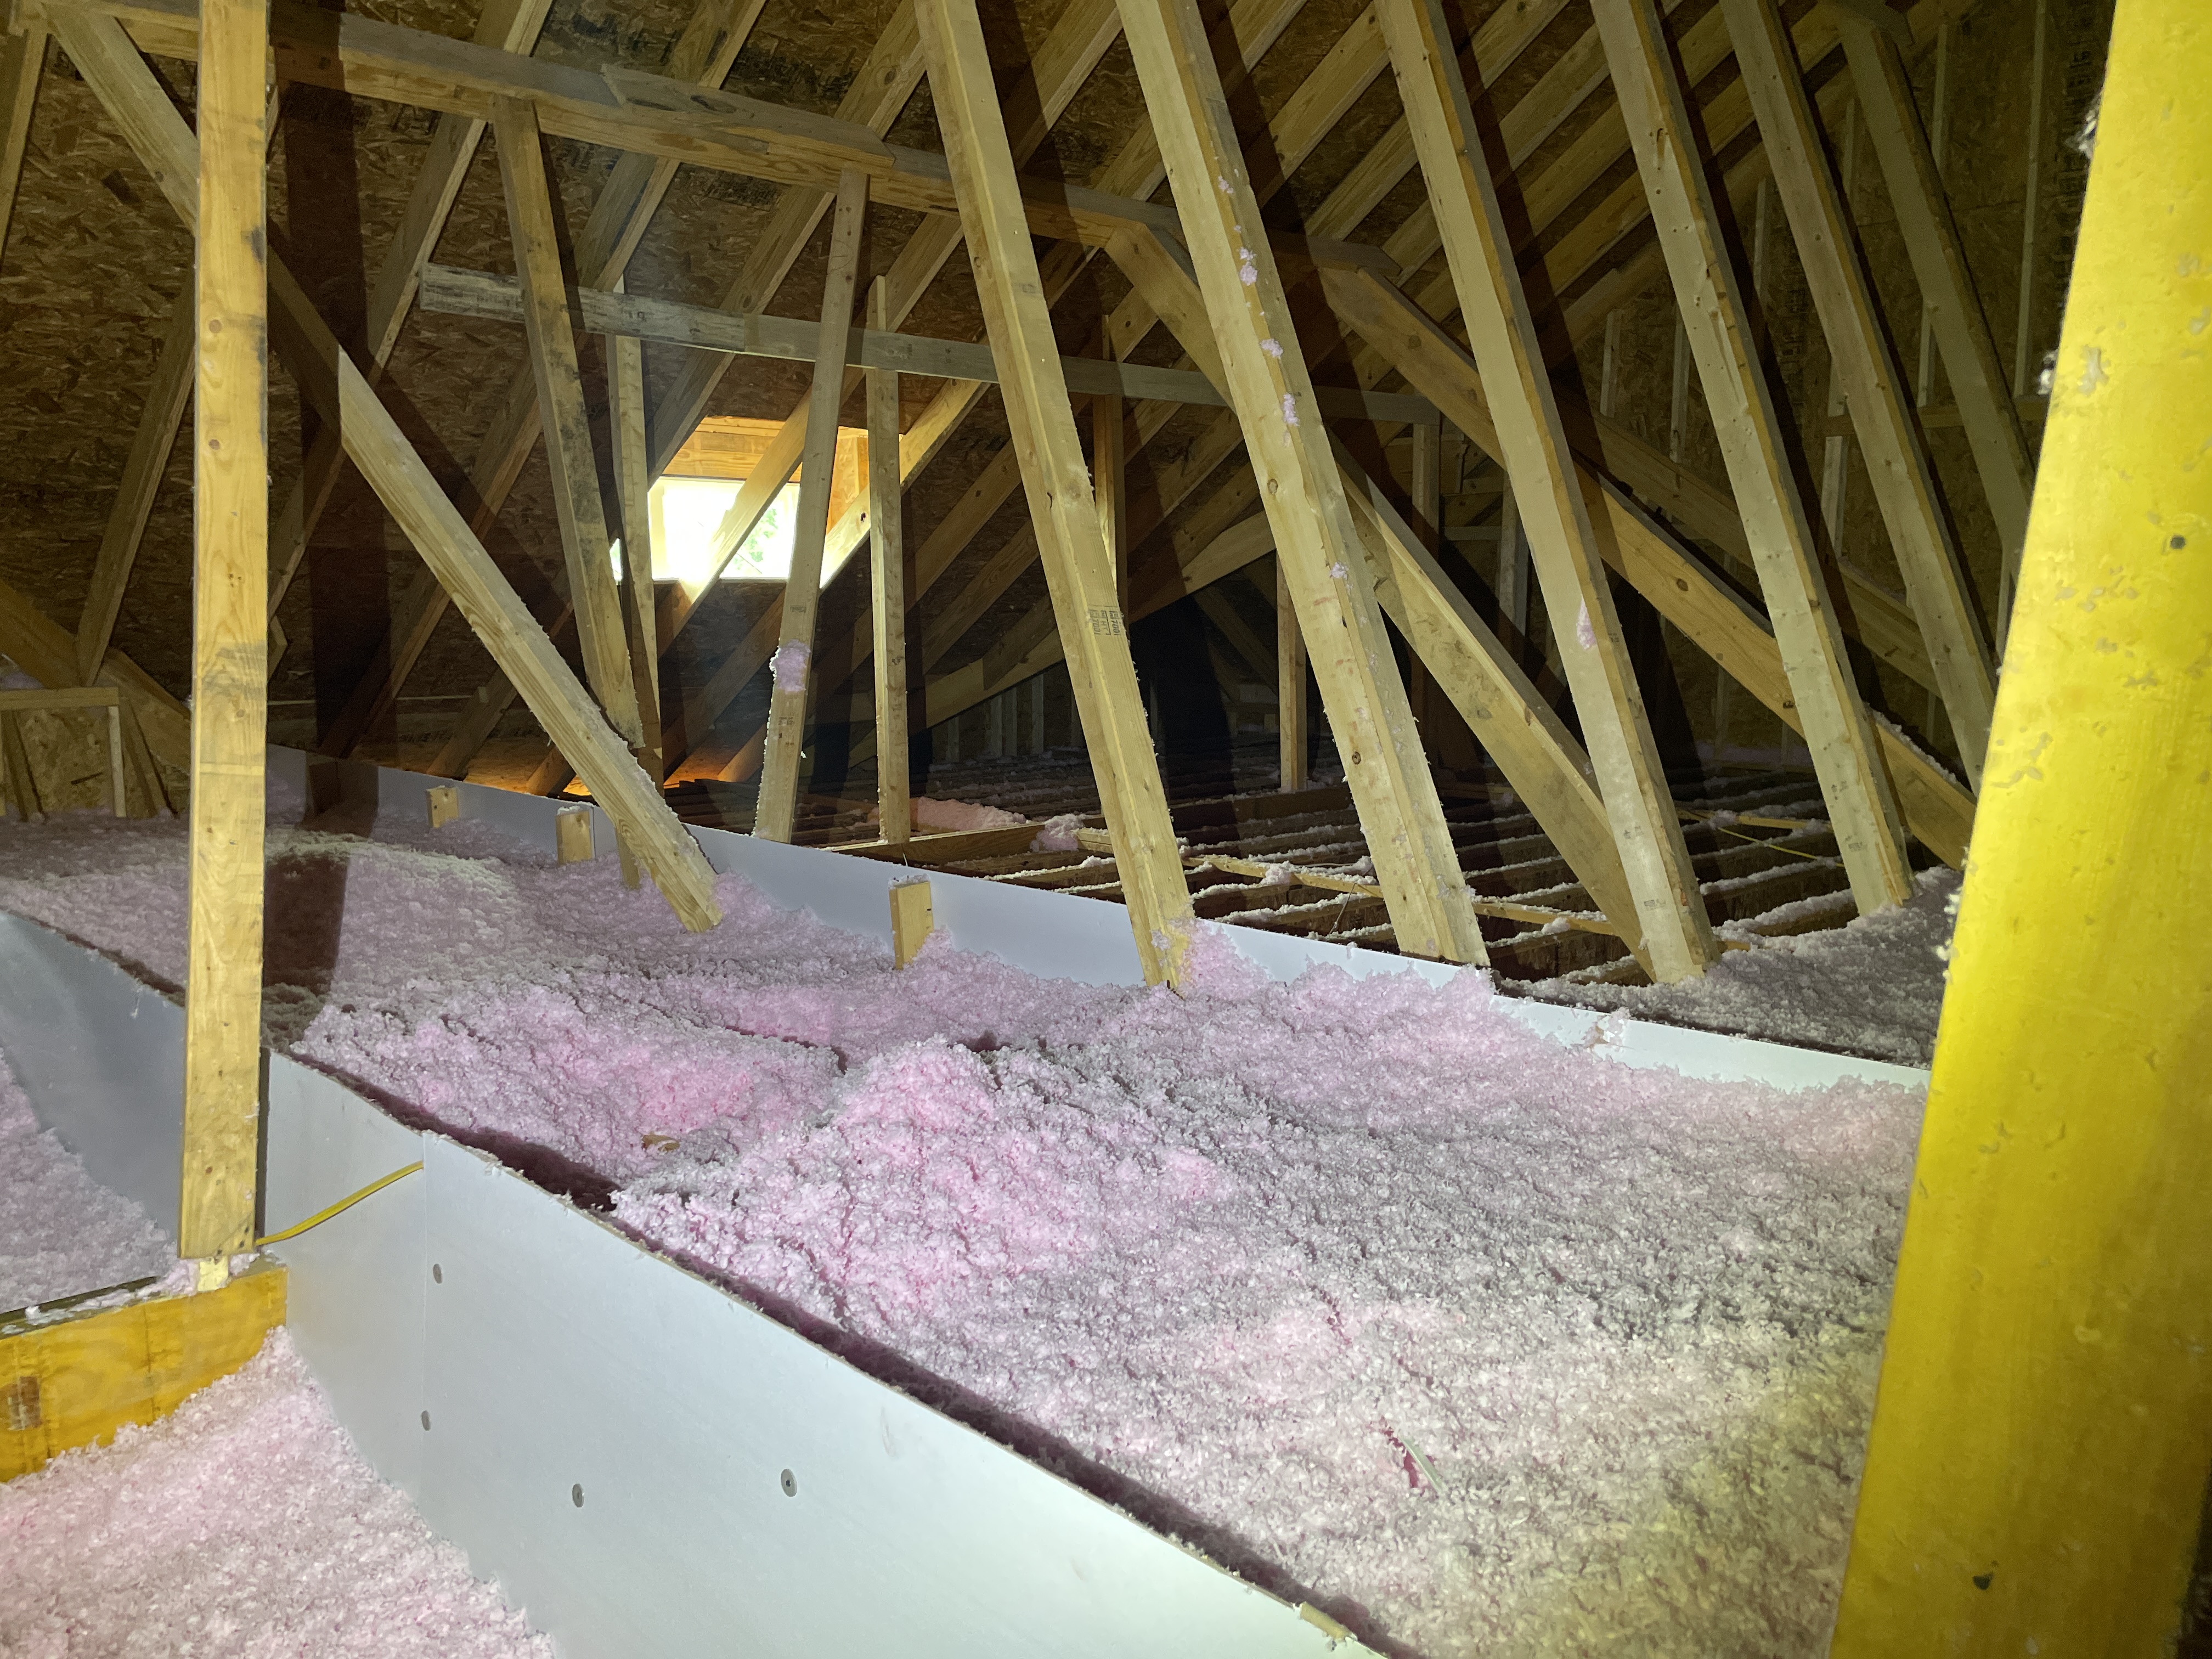
- A2-2 🗼 Attic:
The attic has about 12" of blown-in insulation installed. This is great for energy efficiency, but does prevent me from crawling/wading through it to fully inspect the attic. I would have to move a pile of insulation out of the way every step and that would ruin your nice "blanket" of insulation. I was not able to see/inspect the attic framing or ceiling joists in the attic because of this.
The Complete Inspection Report
💬 General Comments
Building Characteristics, Conditions and Limitations
Type of Building : Single Family (1 story with Basement)
Approximate Square Footage: 4000
The approximate square footage listed here is listed as a courtesy and is based off of public records and disclosure. An evaluation of square footage of the buildings and property lines is beyond the scope of this inspection.
Approximate Age of Structure: New Construction
Attending the Inspection: Buyer and Buyer's Agent, Seller and Listing Agent
Occupancy: Occupied
This home was occupied at the time of the inspection. Inspection of occupied homes presents some challenges as occupant belongings can obstruct visual inspection of and access to parts of the building. I do my best during inspection to work around belongings to discover as much as possible about the house without moving or damaging personal property, however, the presence of personal items does limit the inspection.
Animals Present: No
Weather during the inspection: Clear
Approximate temperature during the inspection: Over 80[F]
Ground/Soil surface conditions: Saturated
Mold Testing: Mold Test NOT Performed:
This home inspection is not a mold inspection of any kind. According to the EPA, mold testing/sampling is NOT needed the vast majority of the time. Here is a link to more info from the EPA on mold: EPA on mold testing.
The EPA has produced a document on mold in the home which you can download here: A Brief Guide to Mold, Moisture, and Your Home
Any mold in a house is a symptom of a moisture problem and is not the actual problem itself. If I see anything during your inspection, I will say something in this report. That is strictly a courtesy for you. If this topic concerns you, you can speak with a true mold specialist, such as an industrial hygienist, about performing a test/inspection on the home. I would be very suspicious and cautious of any "mold contractor" who has a financial interest in performing any mold testing and/or mitigation work for you.
🌳 Grounds
Driveways/Walkways/Flatwork
The back patio has dirt stains around the outer edge as though it is holding water in heavy rain. You won’t be able to gauge the situation until you see how it reacts to a heavy rain event.
When the grass sits higher than the concrete like this, water usually pours over onto the pavement. If the water is pooling along this outer edge you’ll need to have the builder correct the drainage or premature failure of this concrete pad will be likely.
.jpeg) | 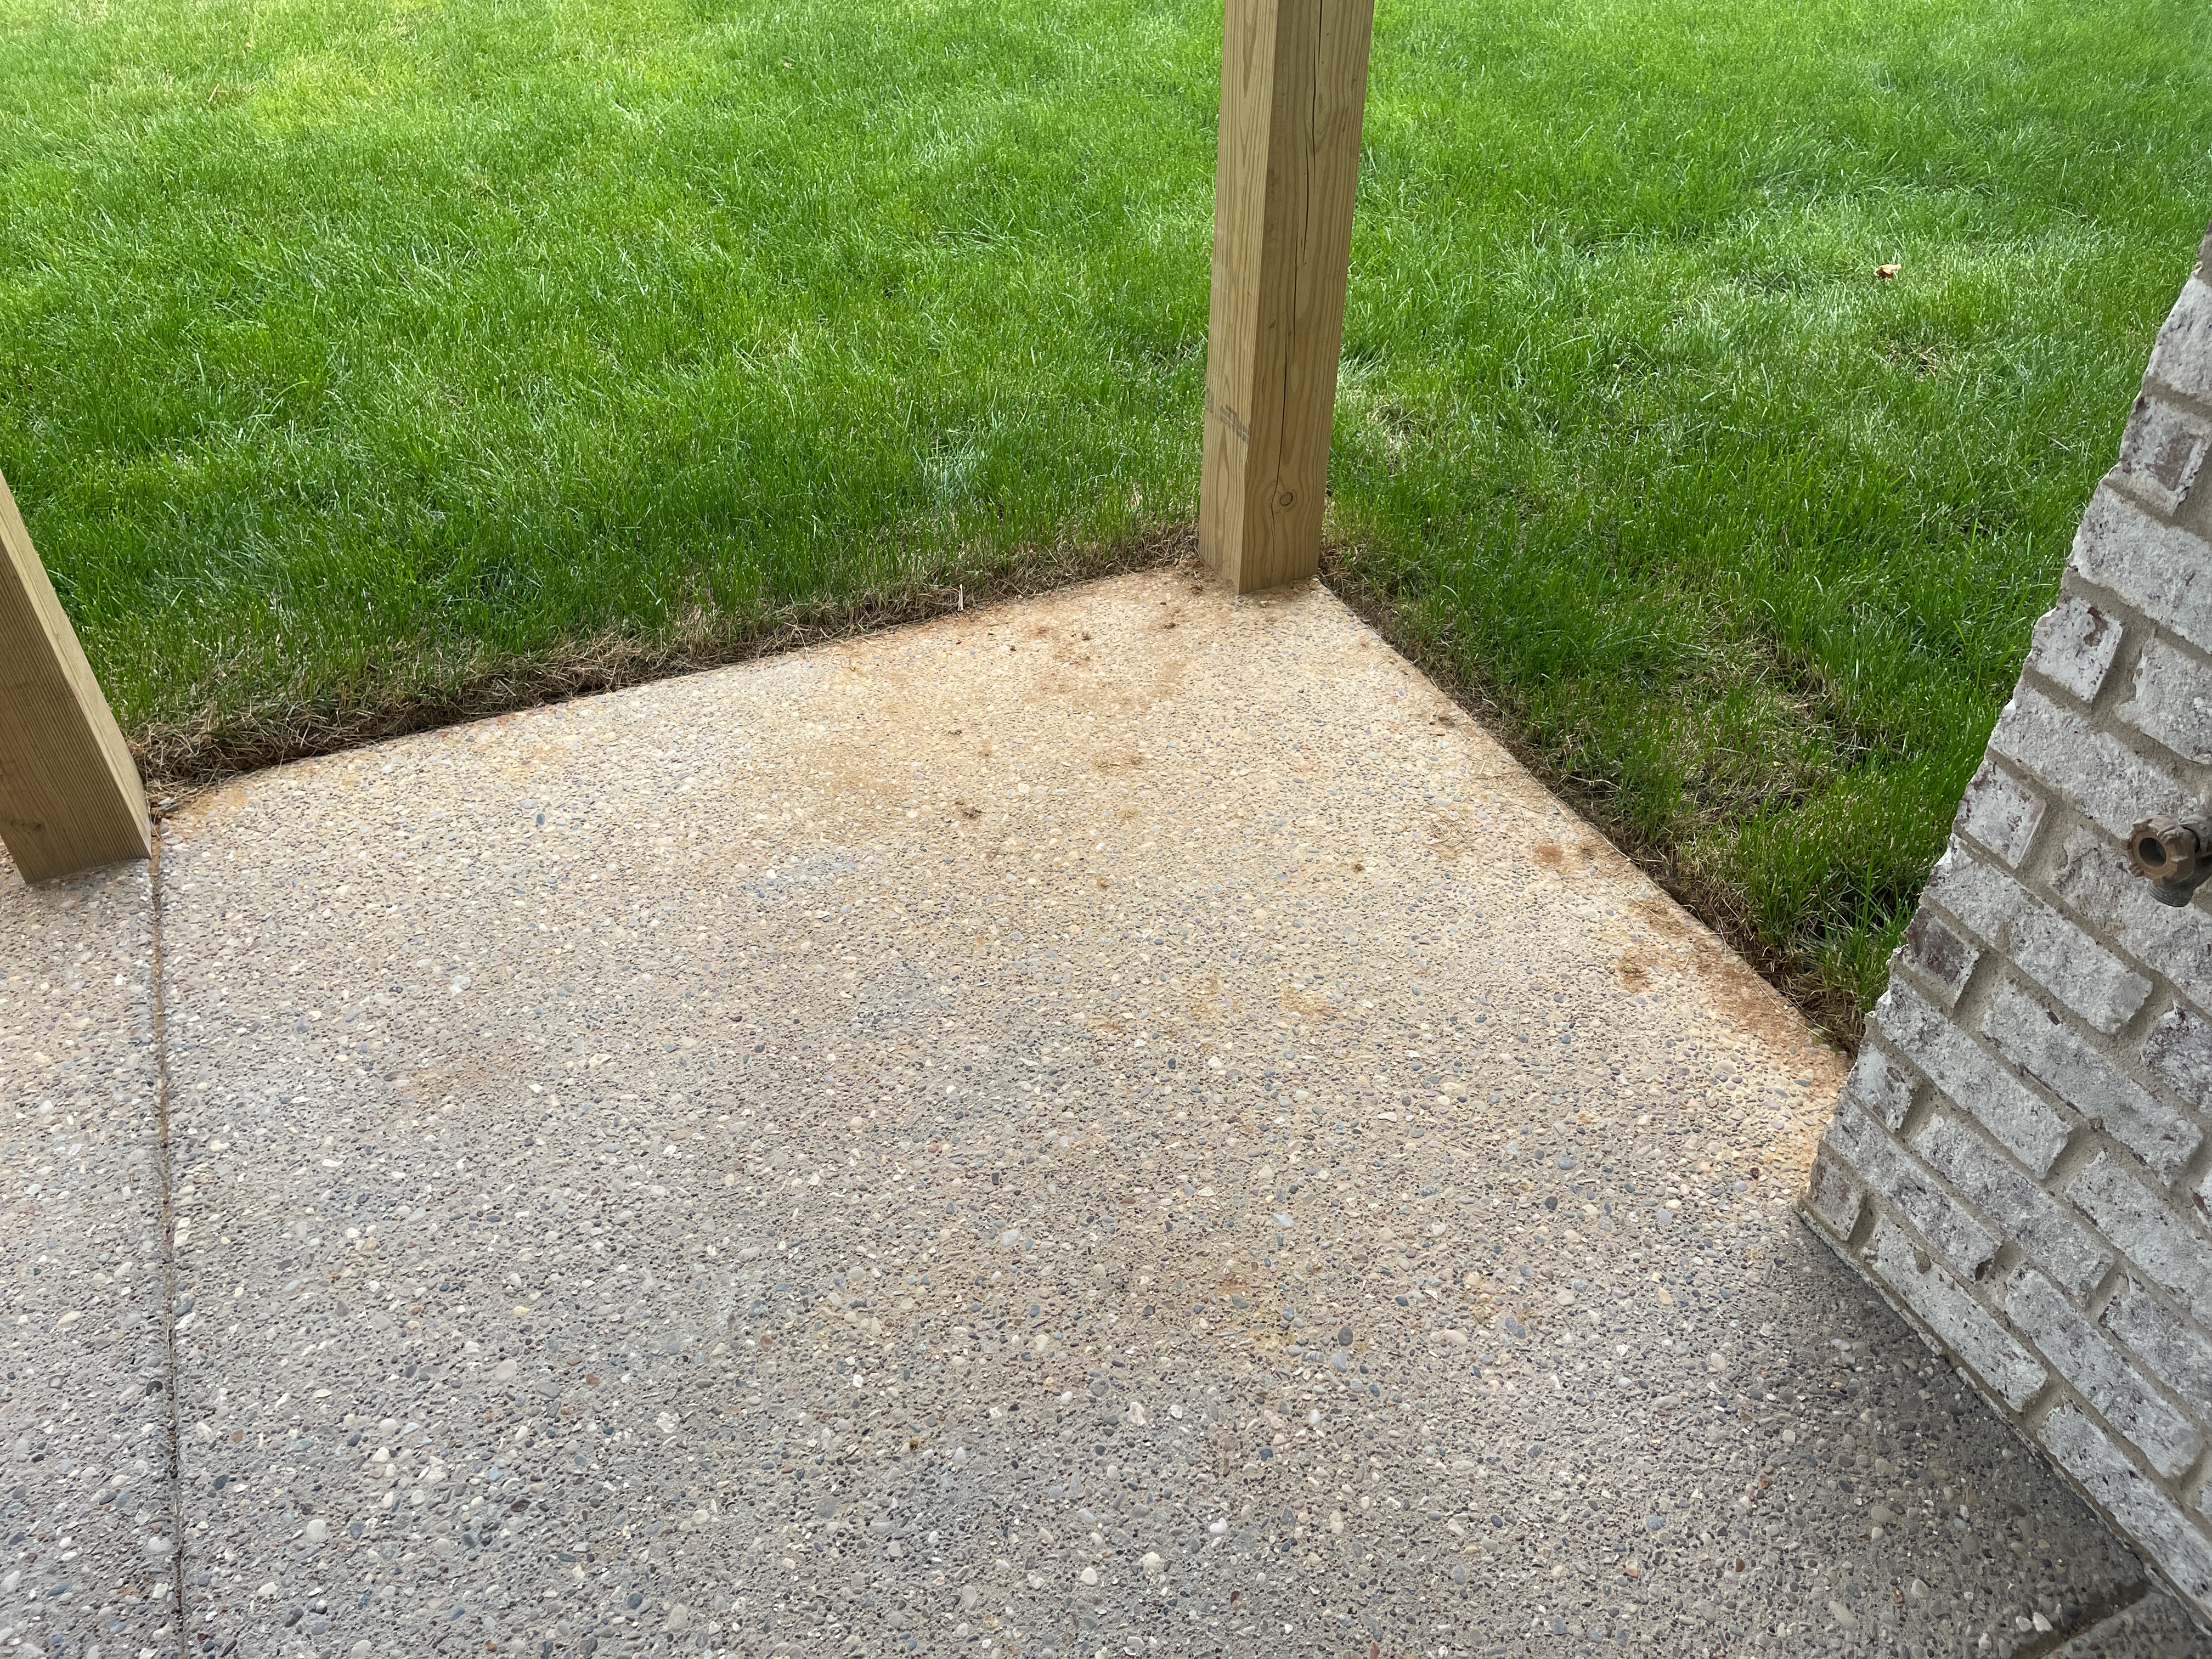 |
 |
🏡 Roof, Chimney and Gutters
Roof Materials
Method of Roof Inspection: Viewed with a drone, Viewed at top of ladder
Roof Style: Gable
Roof Covering Materials: Architectural grade composition shingle
Approximate Age of Roof Covering: New
Overlay Roof: No
The roof/wall connection is missing the kickout flashing (front and back walls).
Kickout flashings are used where a lower roofline terminates against a vertical wall. The kickout is installed above the gutter where the roof meets the wall. It kicks out the water to the gutter and diverts it away from the lower wall.
Without a kickout flashing, the water misses the gutter and runs in behind the siding. It usually gets trapped inside the wall or rots out the soffit and siding below the gutter. I have written an article on this subject that you can read here that explains things in detail: https://abihomeservices.com/kickout-diverter-flashing/
You'll want to have the builder correct the situation to follow James Hardies' install guide linked below.
James Hardie also requires this flashing to be installed as part of their manufacturer's instructions. You can download a copy of these instructions here: https://www.https://www.jameshardiepros.com/getattachment/2510b556-ee39-416d-8ef7-198c698f4cc7/hardiepanel-single-family-hz5-us-en.pdf.com/getattachment/513223b4-054b-4112-ab6b-38974c62c9cb/hardieplank-hz5-us-en.pdf
.jpeg) | .jpeg) |
 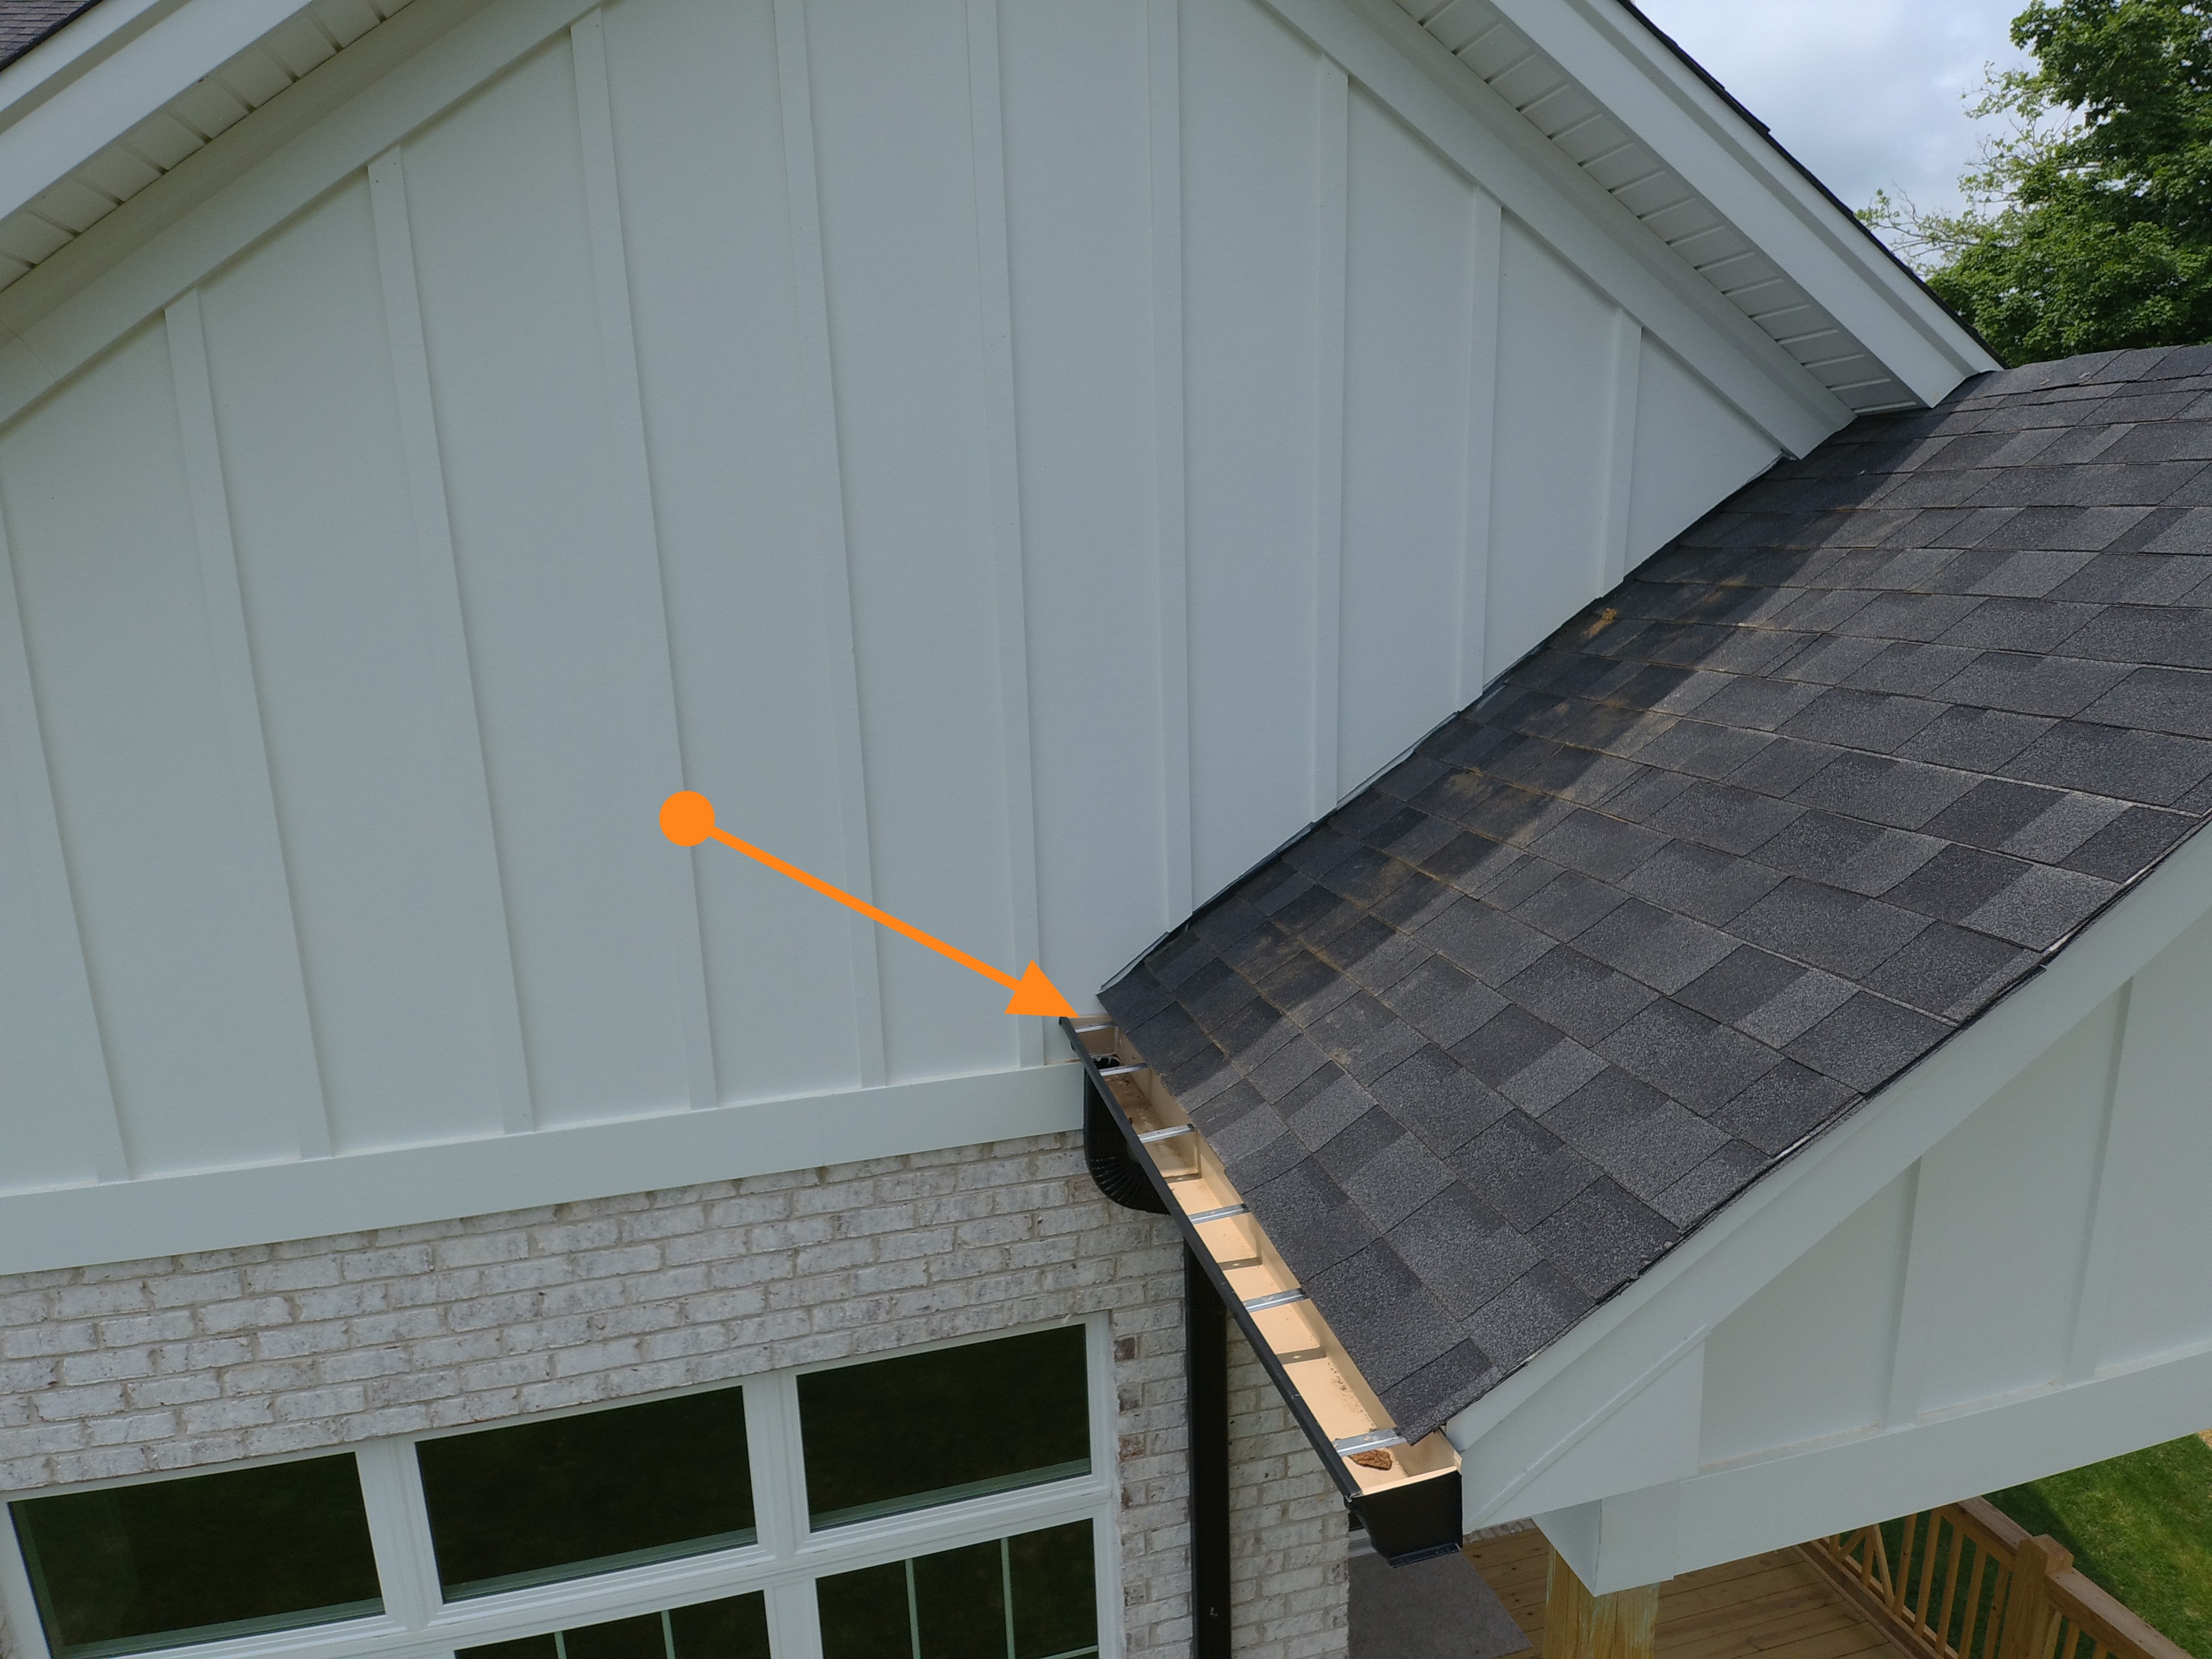 |
 |
The drip edge on the roof was not installed correctly. When this flashing is properly installed, the drip edge on the eave is installed first and the underlayment lays on top of the drip edge (the gutter side of the roof slope). However, on the rake side slope, the metal is installed on top of the underlayment to seal off wind driven rain.
Please see the attached diagram for further details on how underlayment and drip edge should be installed properly. Have a roofing contractor repair the drip edge installation as needed.
.jpeg)
 |
A few shingles have slipped out of place along the back left corner of the roof. More than likely these were not nailed properly and the shingles worked loose. Have a roofing contractor repair the installation as needed.
.jpeg)
 |
Gutters and Downspouts
Extend Downspouts
The downspouts around the home need to have extensions added to them (not just splash blocks). They are discharging water near the home's foundation, which can cause moisture issues around the house (such as foundation failure & flooding). You want to get water away from the house as much as possible, but no less than 5 feet.
 | .jpeg) |
 .jpeg) |
The gutters are nestled against the Hardie Siding, which goes against their installation requirements.
James Hardie calls for a 1 inch gap between the end of the gutter and the wall. This helps promote drying and prevents trapped debris from damaging the siding over time. Have the gutters trimmed back so they meet the installation requirements of the siding manufacturer.
.jpeg)
 |
🧱 Exterior Siding, Doors and Windows
Siding and Trim
Trim Material: Fiber cement
Siding Material: Brick, Fiber-cement
Manufacturers of fiber cement siding have done a poor job helping inspectors and consumers distinguish their products after installation; these products have few (if any) distinguishing characteristics. This report will cite the James Hardie manufacturer's installation requirements for reference because they are the most common manufacturer of fiber cement siding, and because the various manufacturers seem to share similar installation guidelines. However, reference of these guidelines in this report does not ensure that the fiber cement siding used here is a James Hardie product.
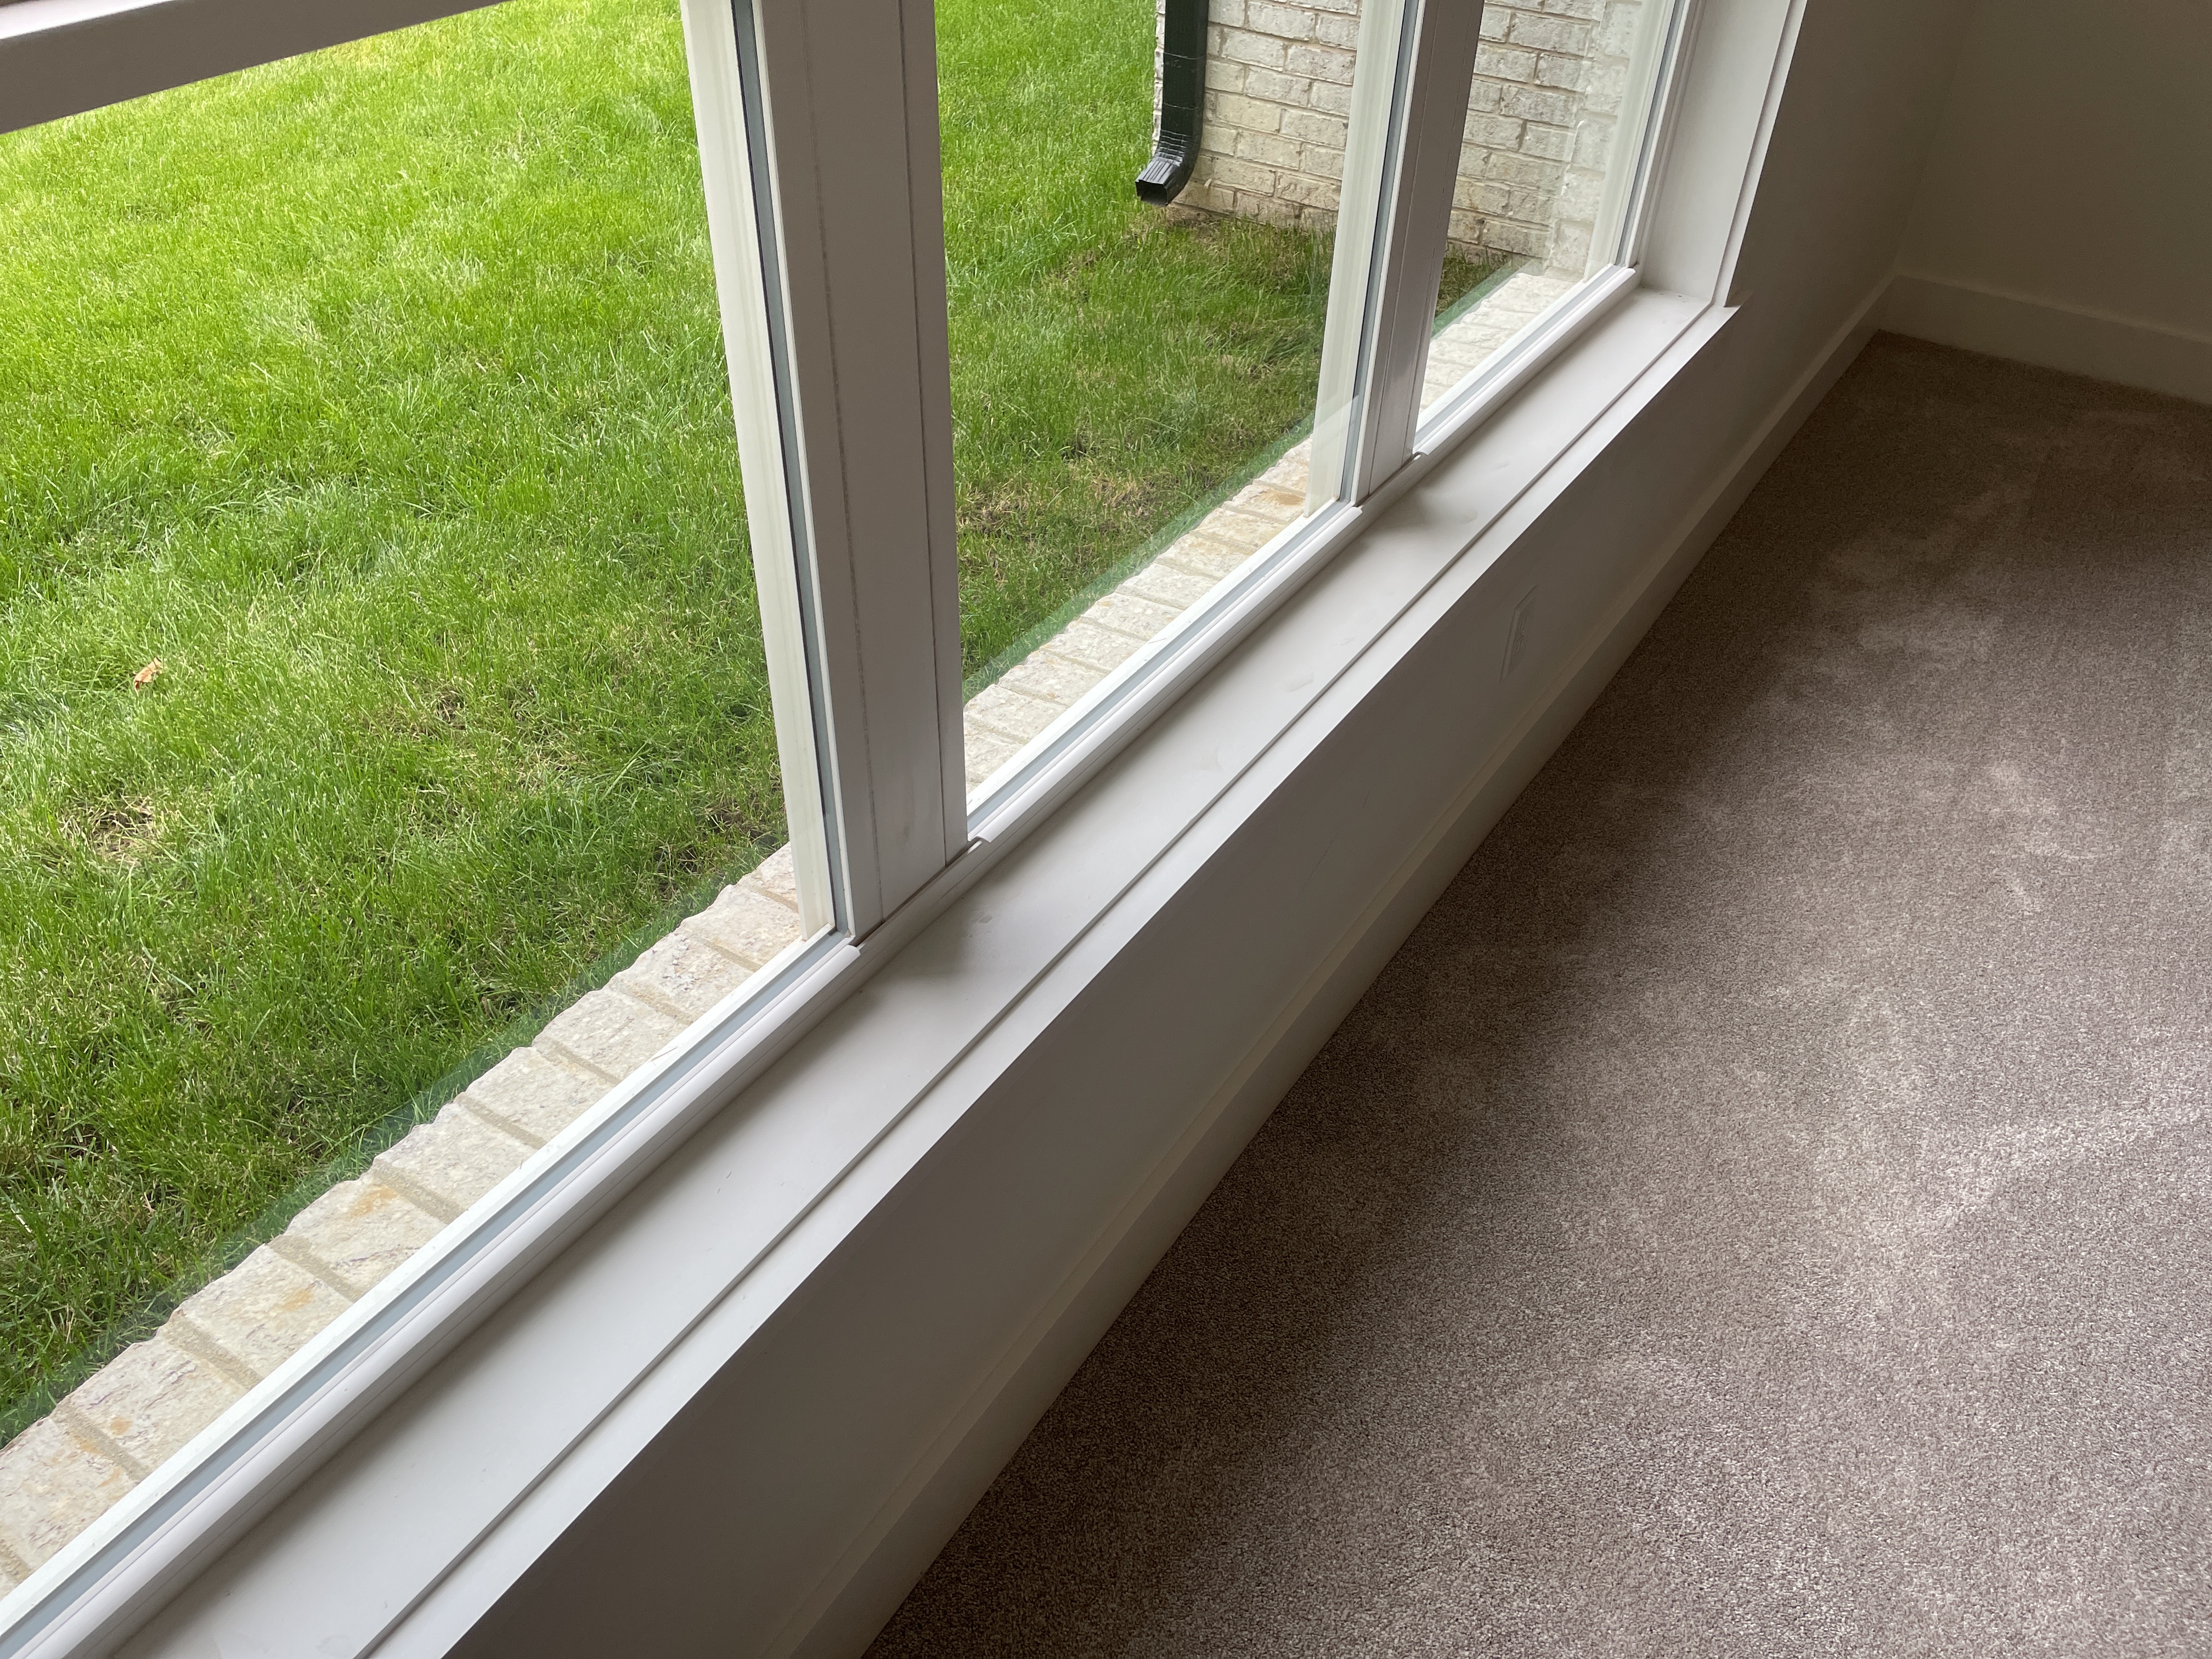
The brick window sills do not have sufficient downward slope. They are basically resting at 90 degrees to the window.
Sills should be sloped to help shed water, snow, and ice. When they are laid like this, you increase the risk of water soaking into the brick/mortar causing moisture damage to the wall below the sills. Unfortunately, there is not much that can be done now, short of removing the bricks and re-installing them to the proper slope or replacing the brick sills with solid cast concrete sills. Solid sills have less area to soak in water.
If re-installation is not an option, you'll want to be diligent with the care of the mortar on the sills, and make yearly inspections of the caulking around the window.
More Info: The Brick Industry Association produces a technical document with many proper details of brick construction. I pulled the detail for brick window sills and placed it below.
"Since the primary function of sills is to divert water away from the building, the top surface should slope downward and away from the building.
In the case of brick sills, see Figures 3 and 4, the slope should be at least 15 deg from horizontal. This may vary somewhat according to the sill configuration of the window unit, particularly in the case of wood windows.
The sill should extend a minimum of 1 in. (25 mm) beyond the face of the wall at its closest point to the wall, see Fig. 3. In some instances, it may be necessary that the brick units at the ends of the sills be uncored units so that no cores are exposed to view. "
You can download a copy of this here: https://abihomeservices.com/download/Brick/36-brick-masonry-details-sills-and-soffits.pdf
 |
Anytime fiber cement siding stops at a transition in material, such as a horizontal piece of trim, there should be a 1/4" gap and no sealant along the top edge of the Z-flashing. Your installation has this joint sealed/caulked, which may void the product warranty. Have the siding corrected to follow the printed instructions by James Hardie to maintain your warranty on the product.
It is my understanding that any installation that deviates from their printed instructions may result in a home that doesn't have a warranty on the product.
You can download a copy of James Hardies' Best Practice Guide here for more detailed information on proper installation of fiber cement siding and trim.
.jpeg)
.jpeg) | |
.jpeg) | .jpeg) |
 .jpeg) |
 | |
The fiber cement trim along the right hand side of the home has been damaged in multiple spots. Have the builder replace the damaged materials as needed.
 |  |
 |  |
The trim around the garage doors looks to be made of fiber cement. I assume it is Hardie Trim, or something similar. The installation instructions for these materials usually call for a 2 inch gap along the ends to prevent moisture from wicking up the trim. Failure to do so could cause it to delaminate over time. Have the builder cross-check the manufacturer's recommendations for proper installation and repair the trim as needed.
 |  |
 |  |
🏡Decks, Porches and Balconies
Decks, Porches and Balconies
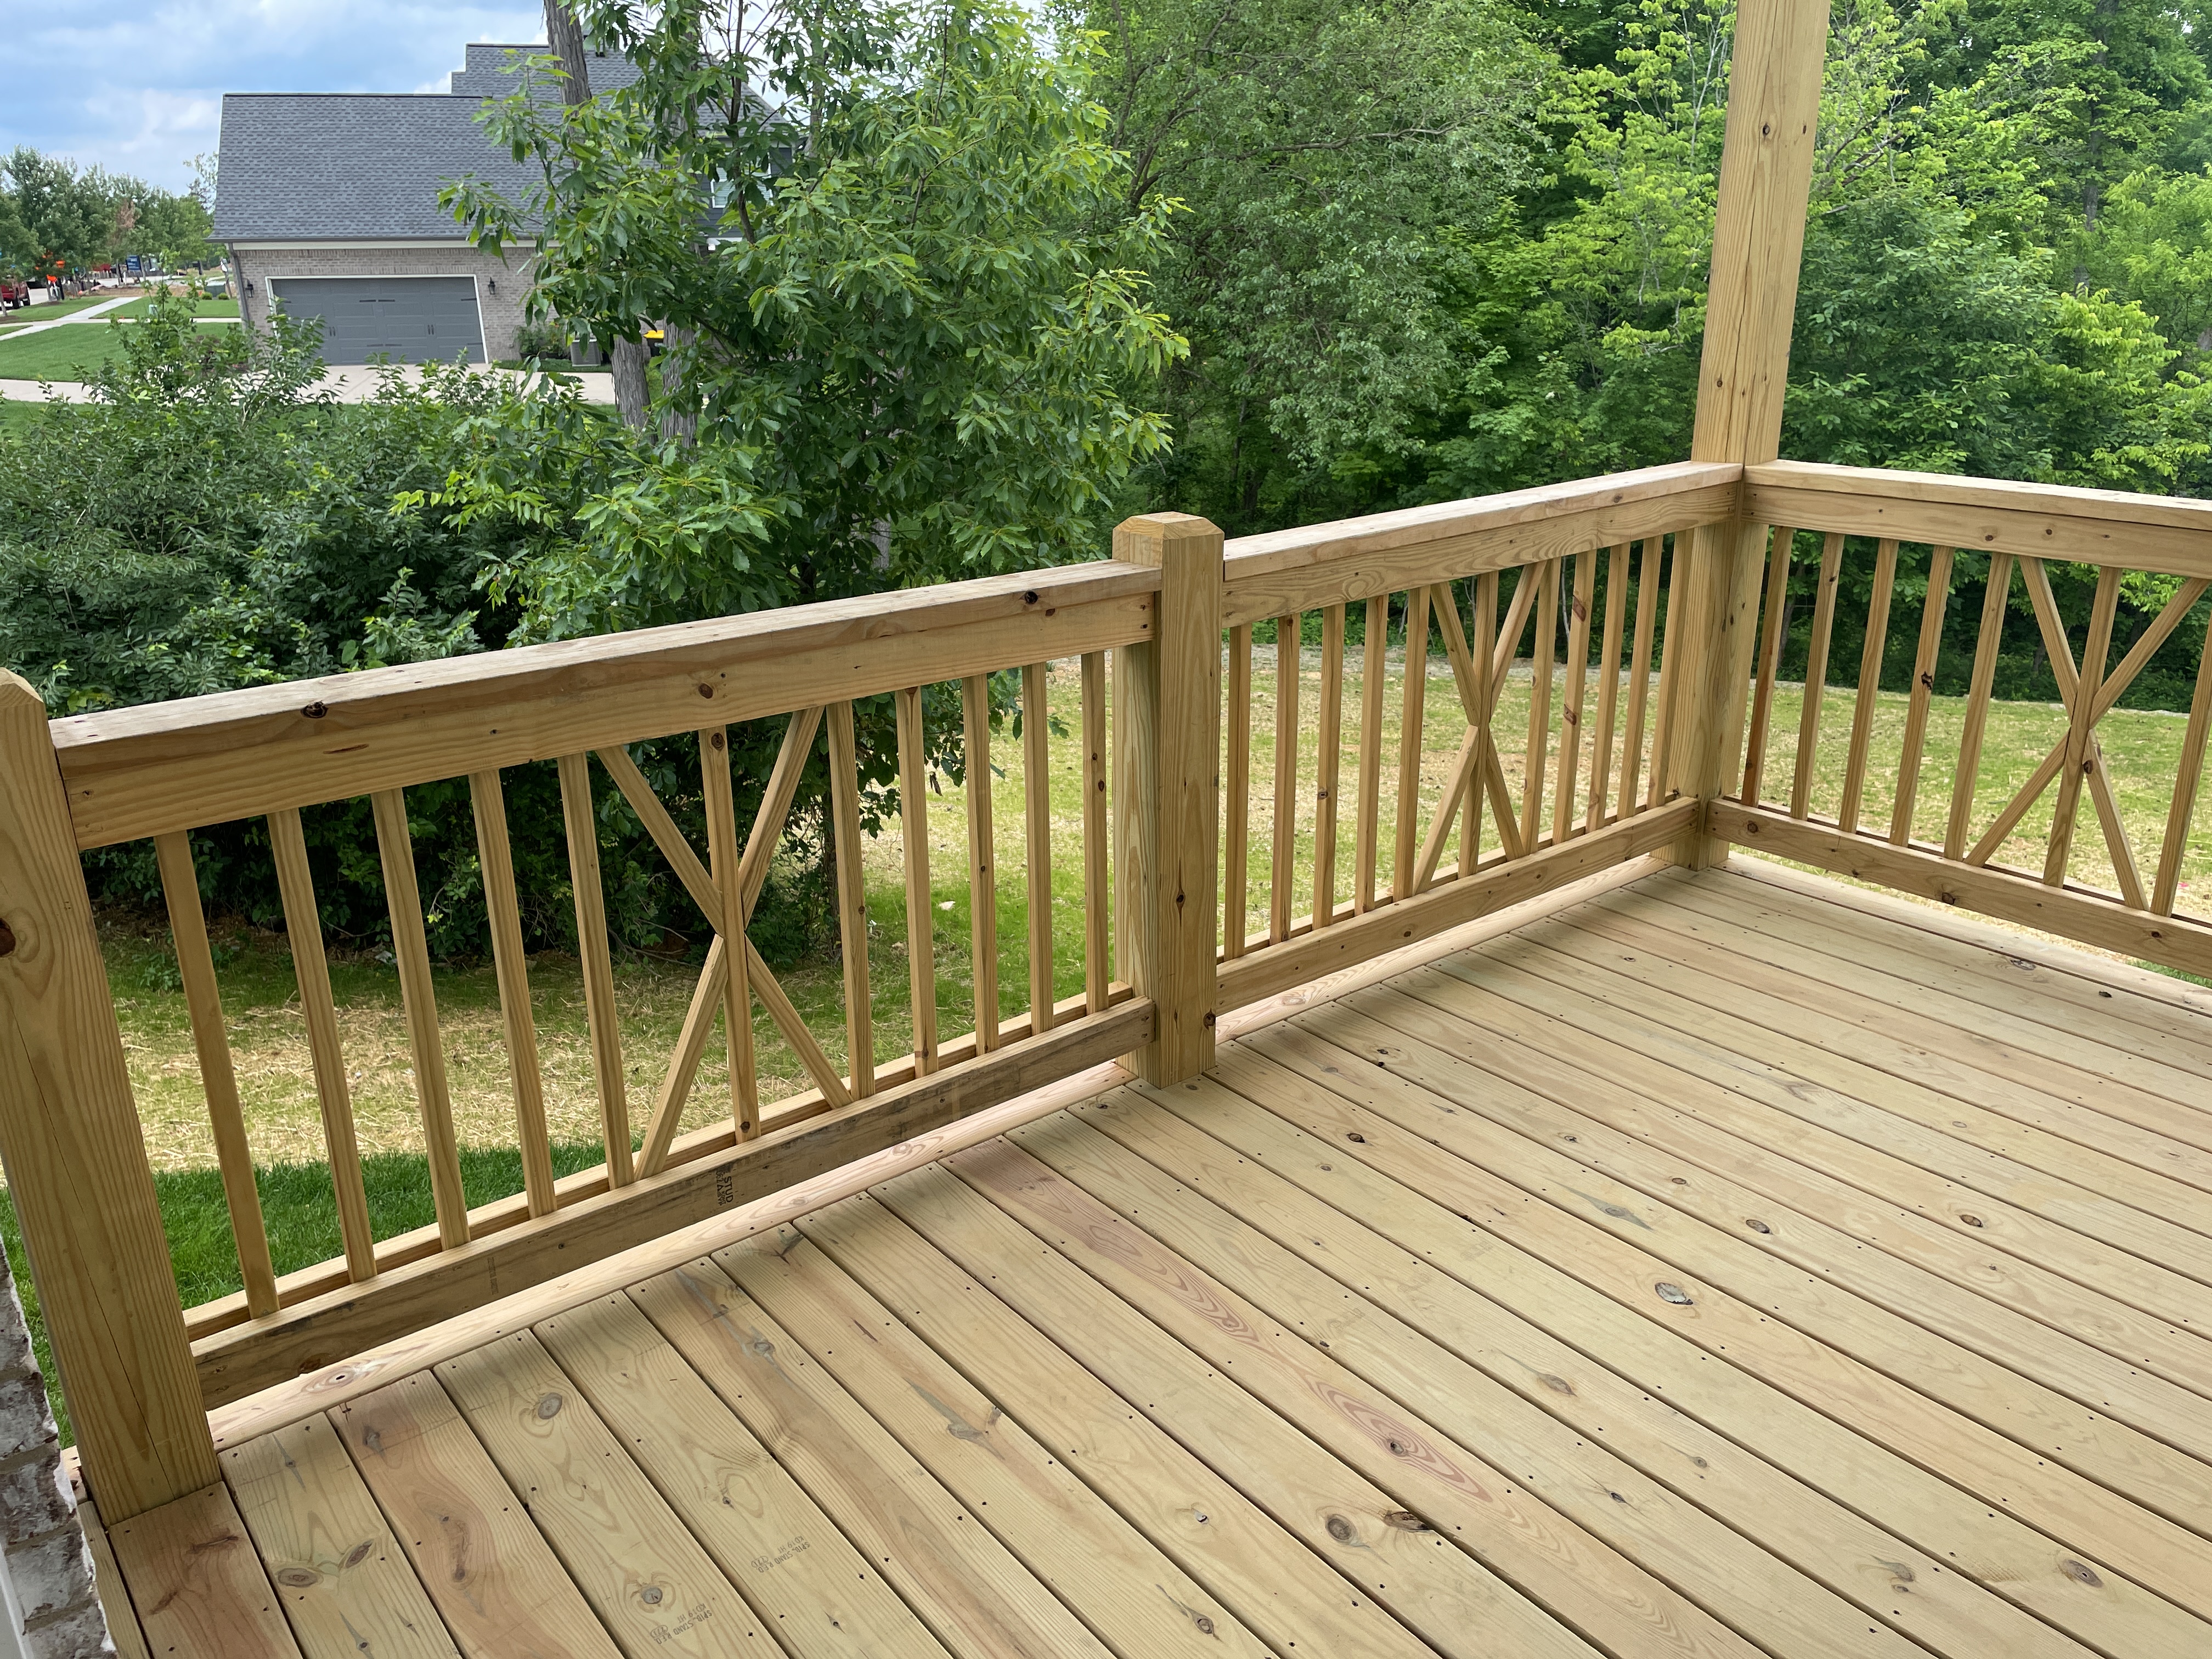
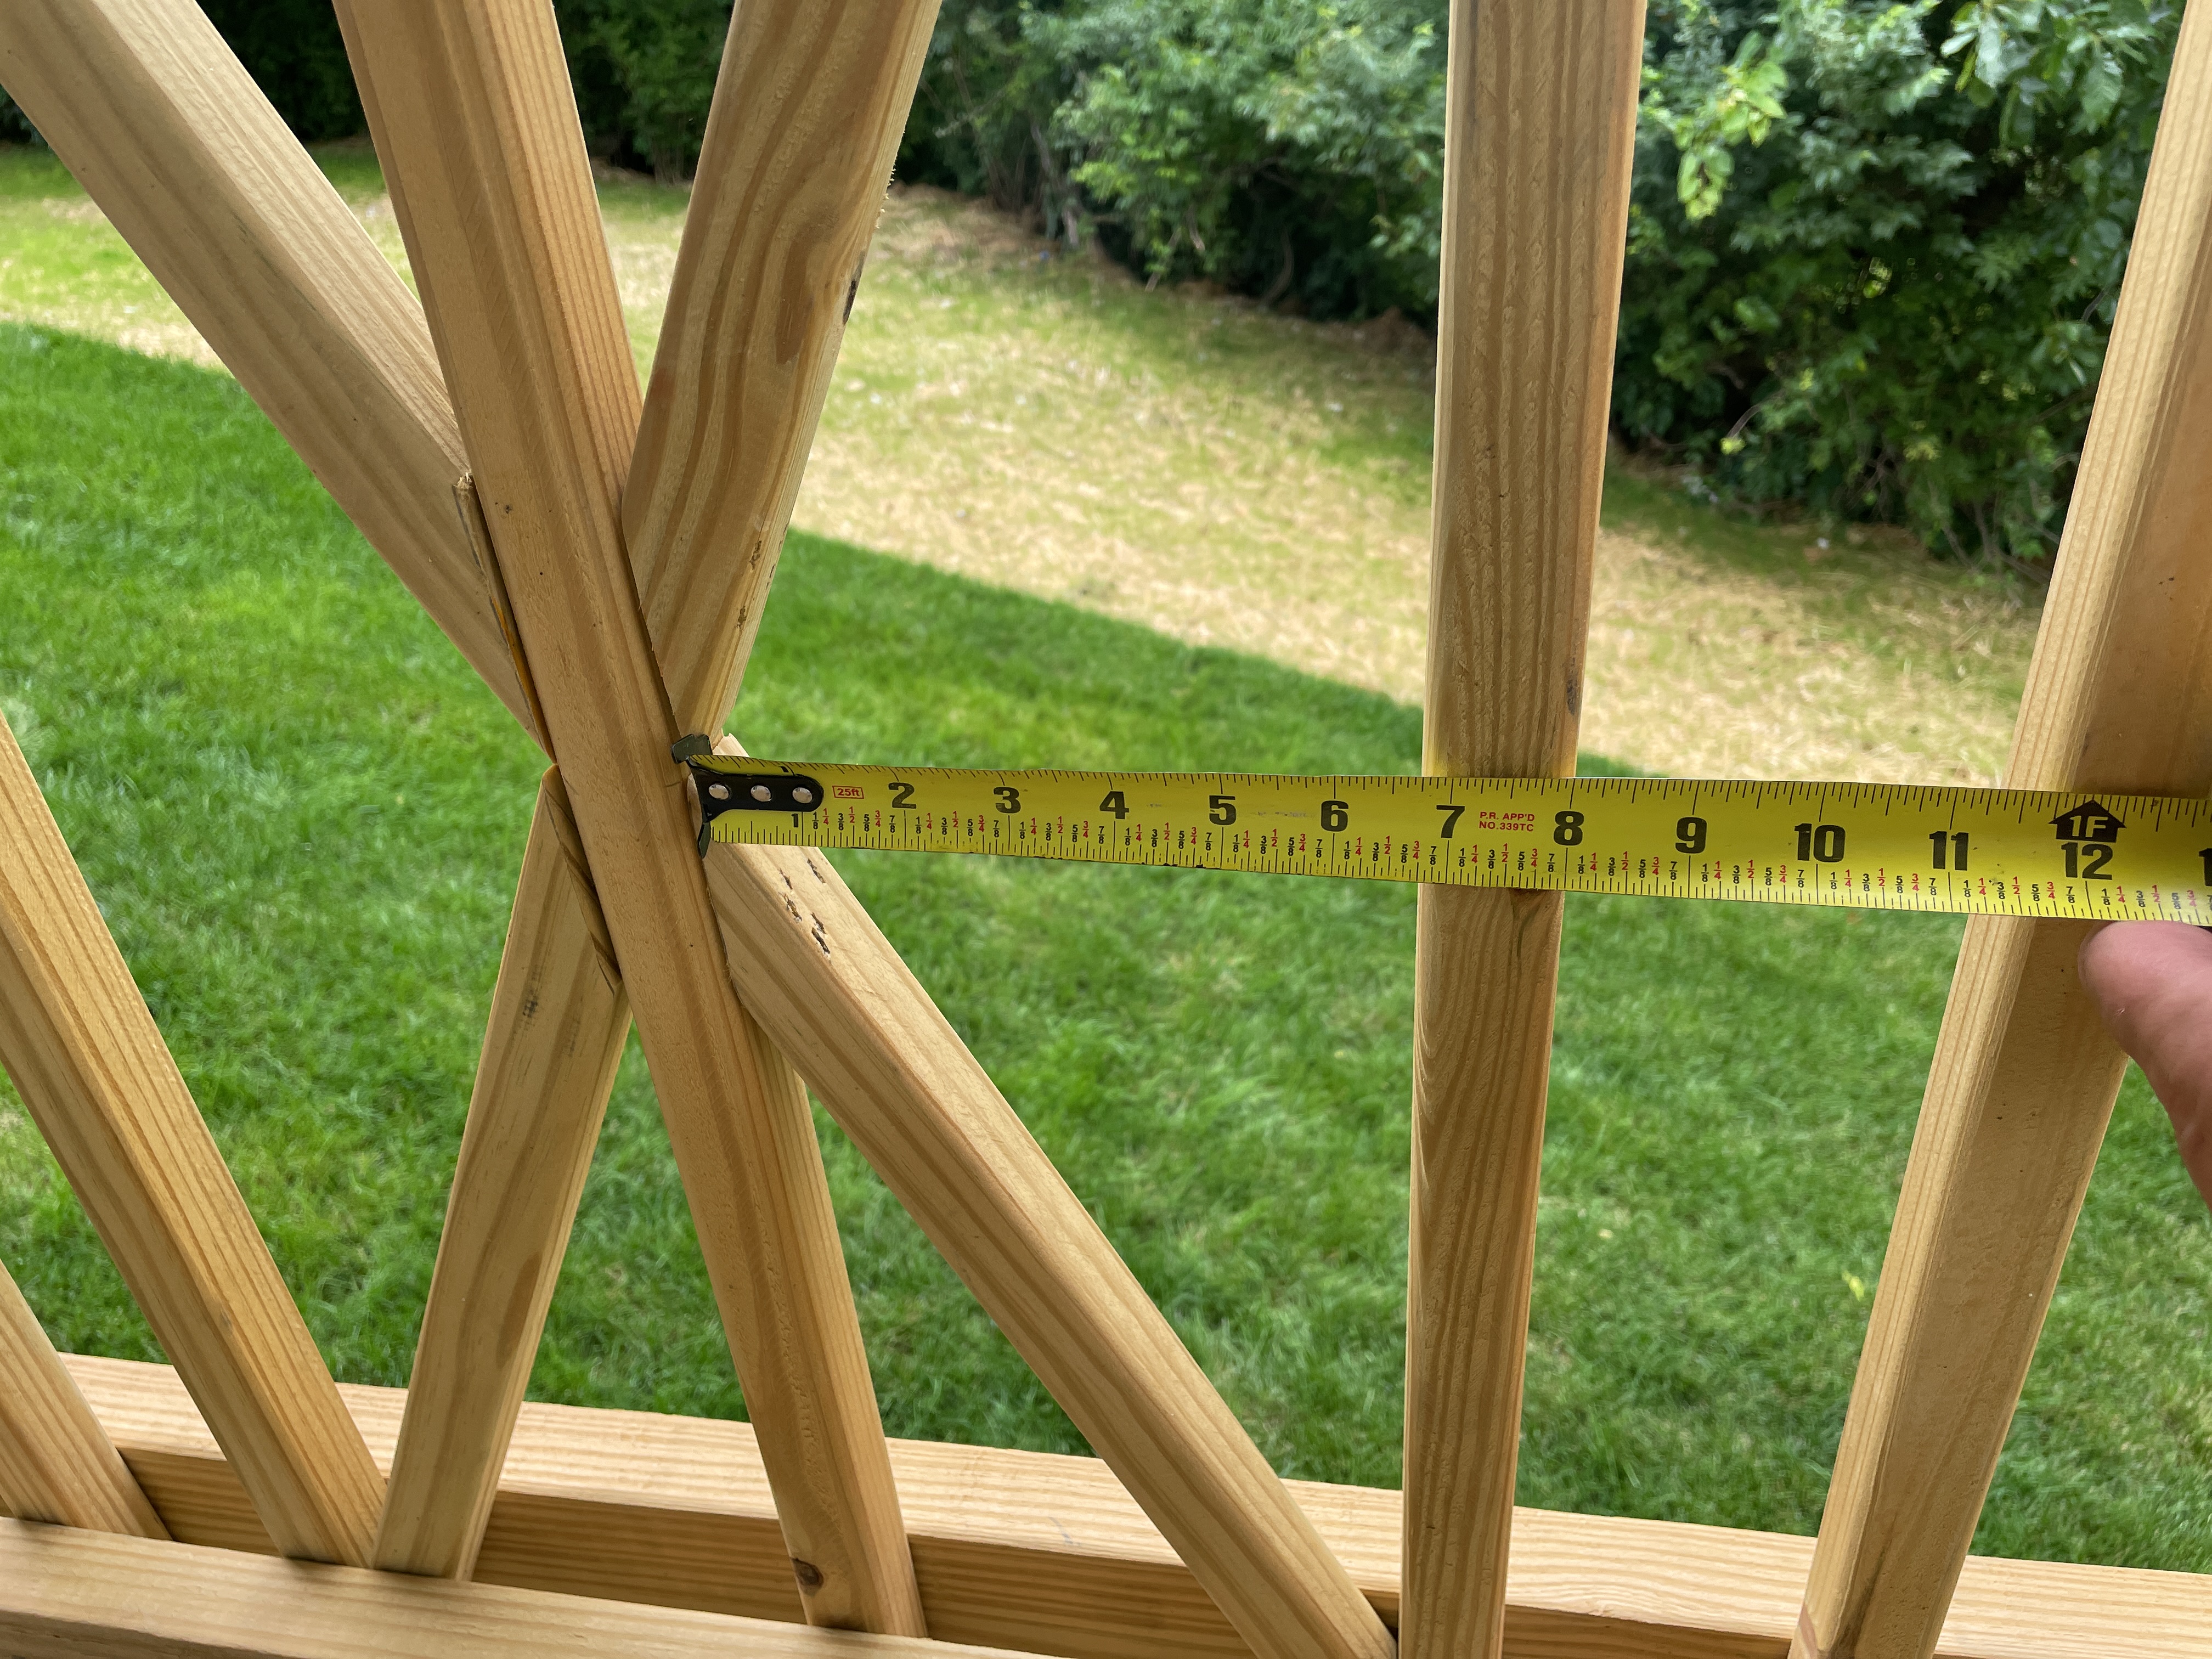
The balusters along the guard rail of the deck have a decorative crosshatch pattern in the center of each section.
This pattern has violated the spacing rules. A 4" sphere should not be able to pass through the balusters.
Have the builder repair the railing as needed.
 |  |
 |
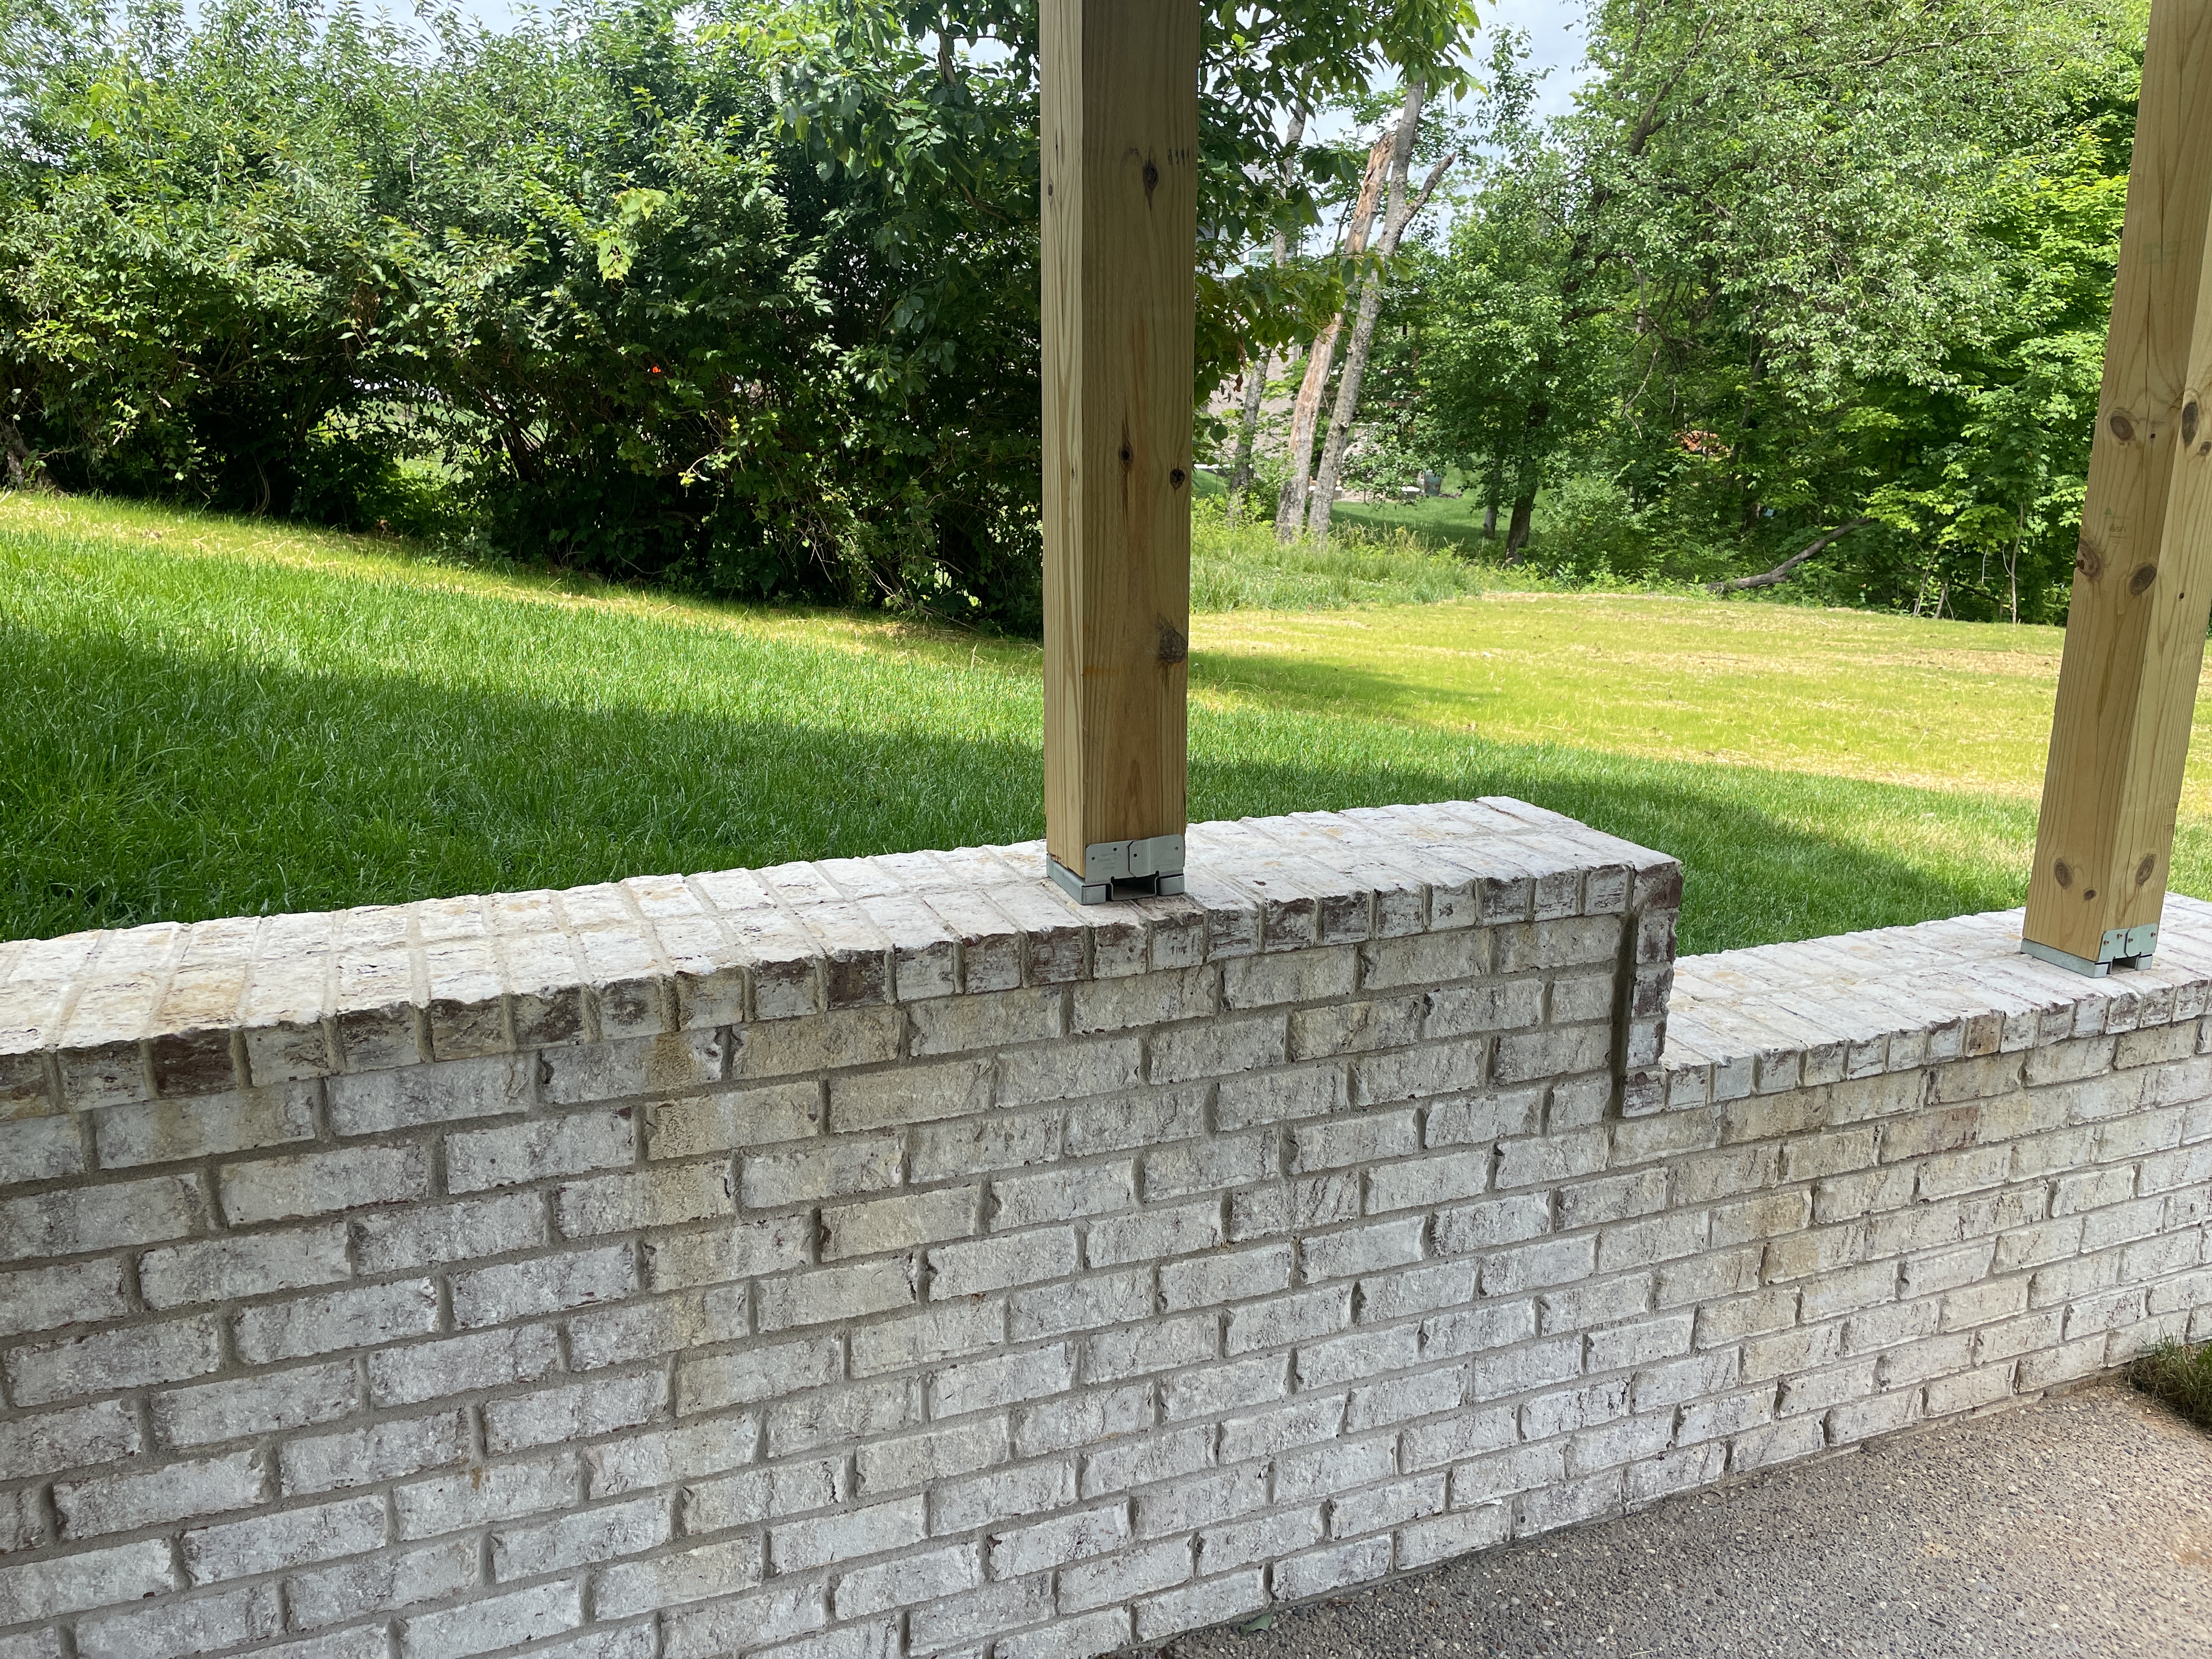
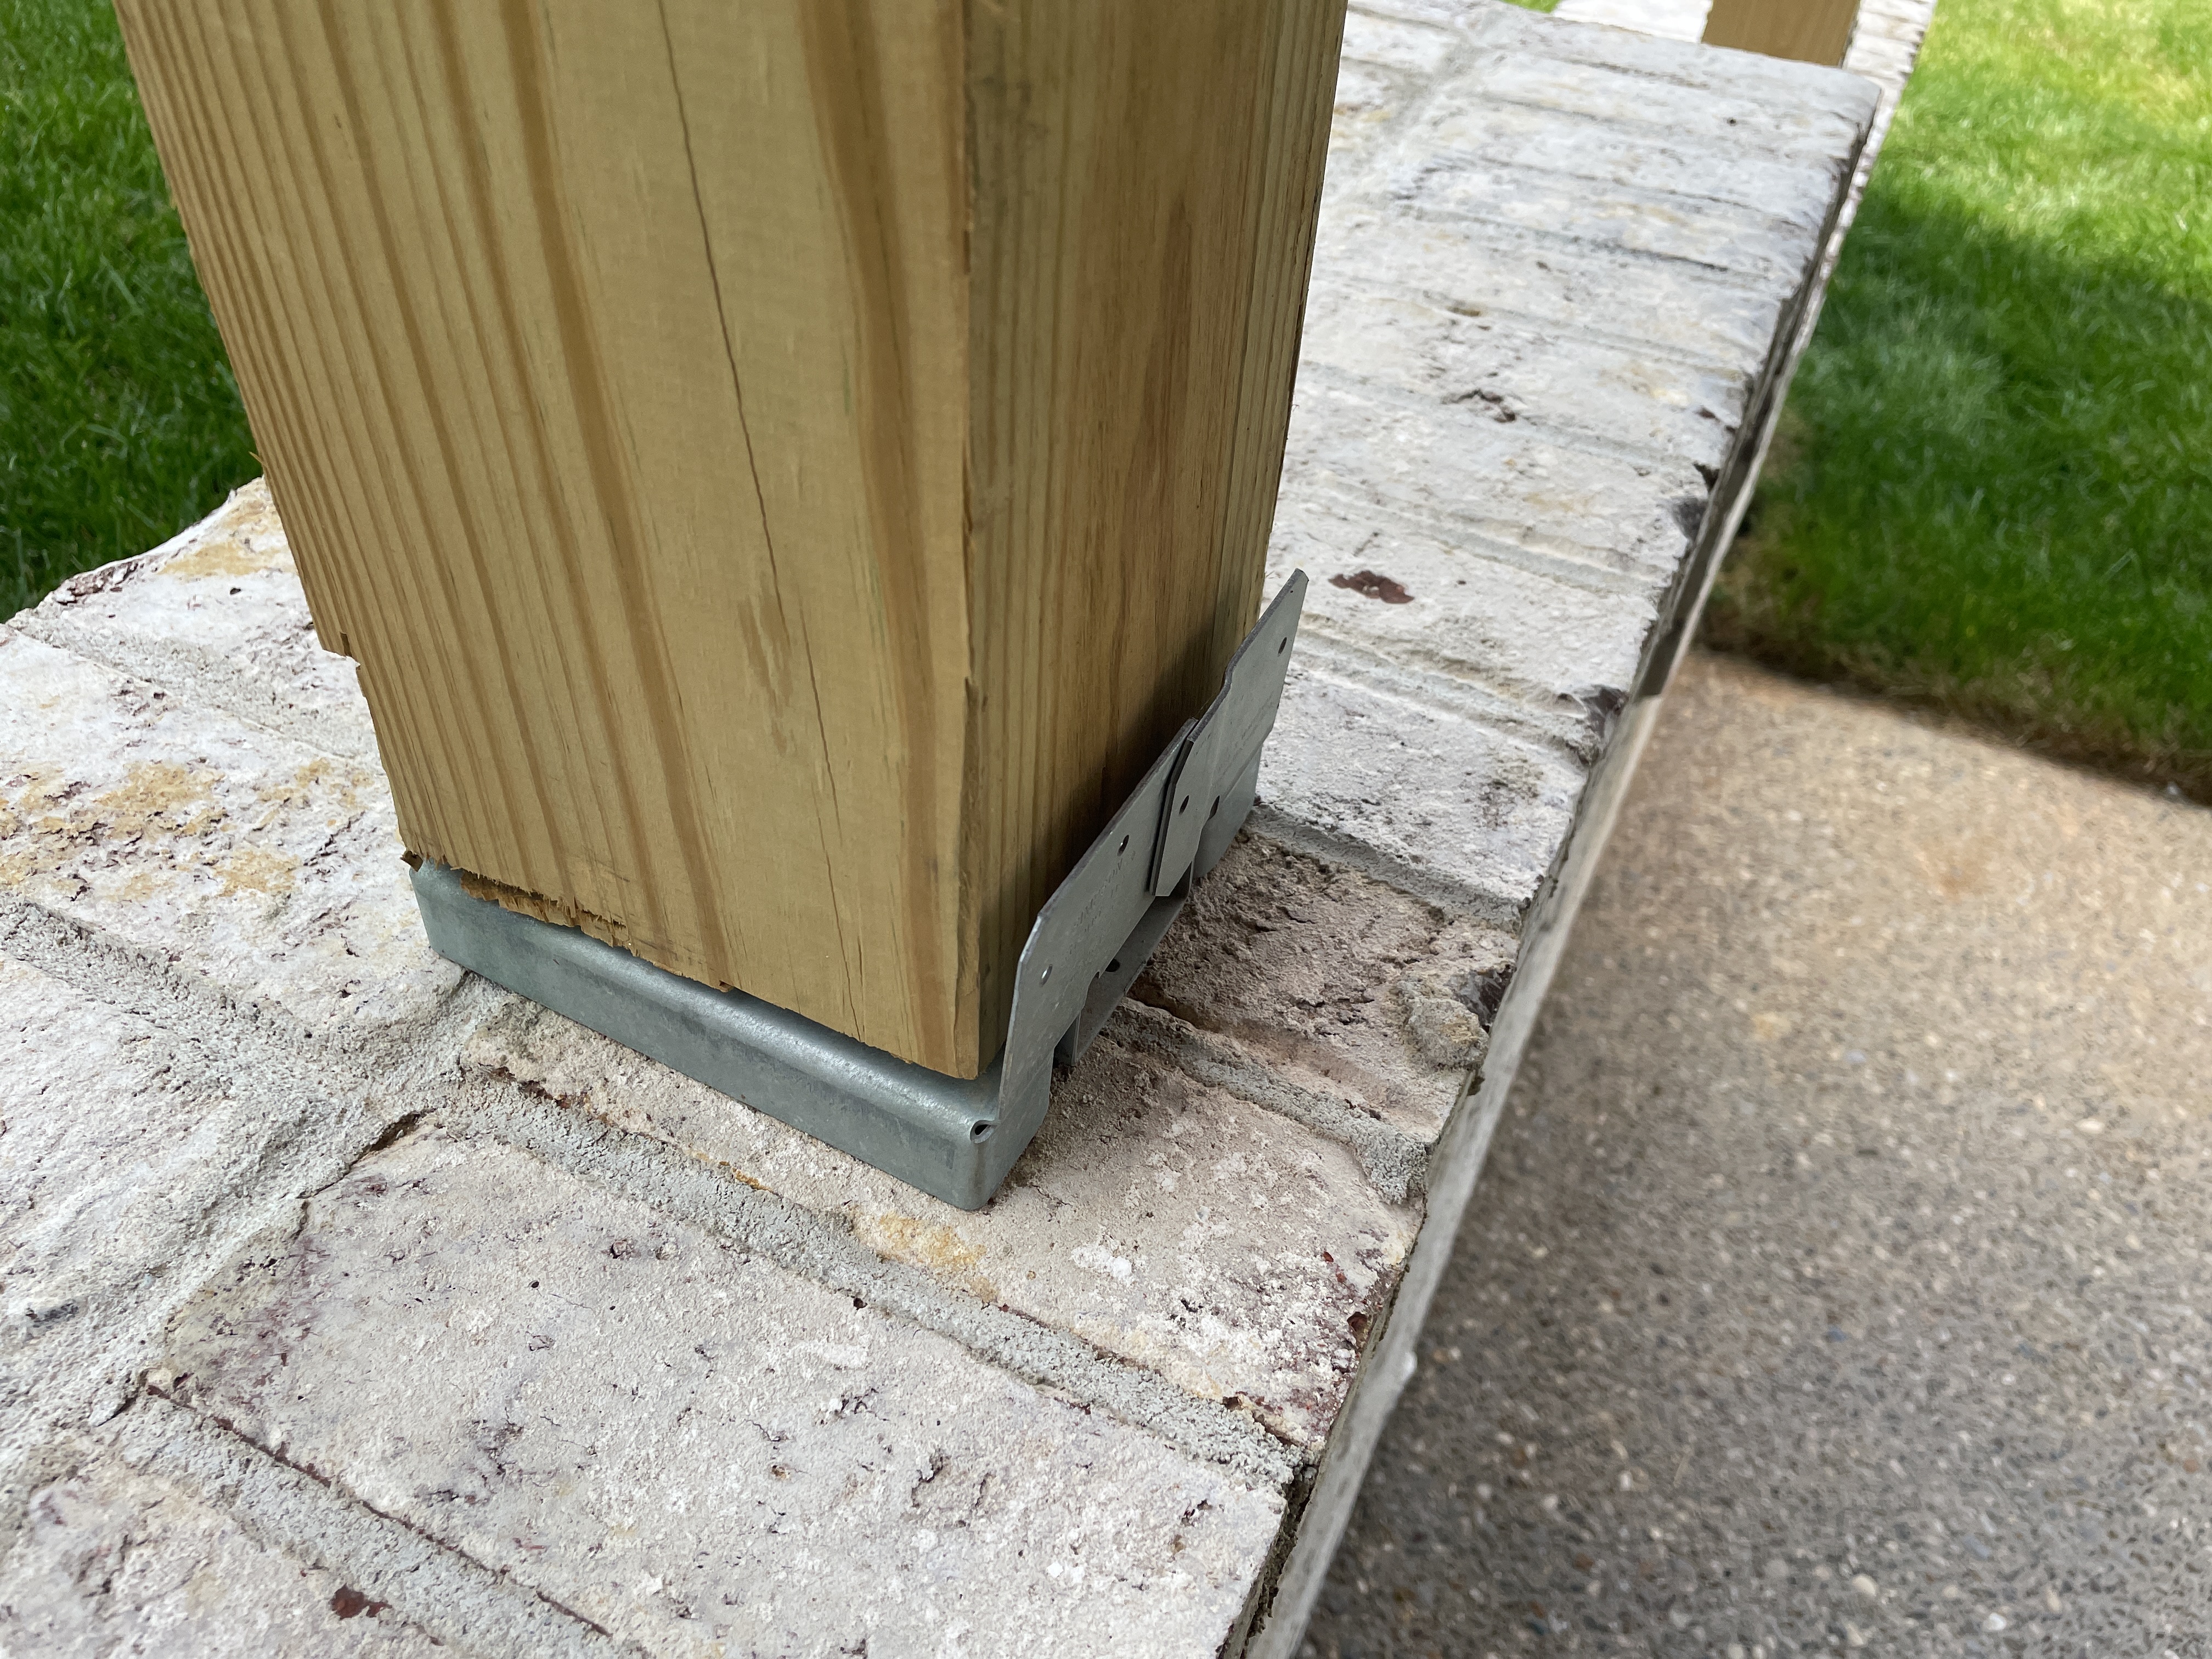
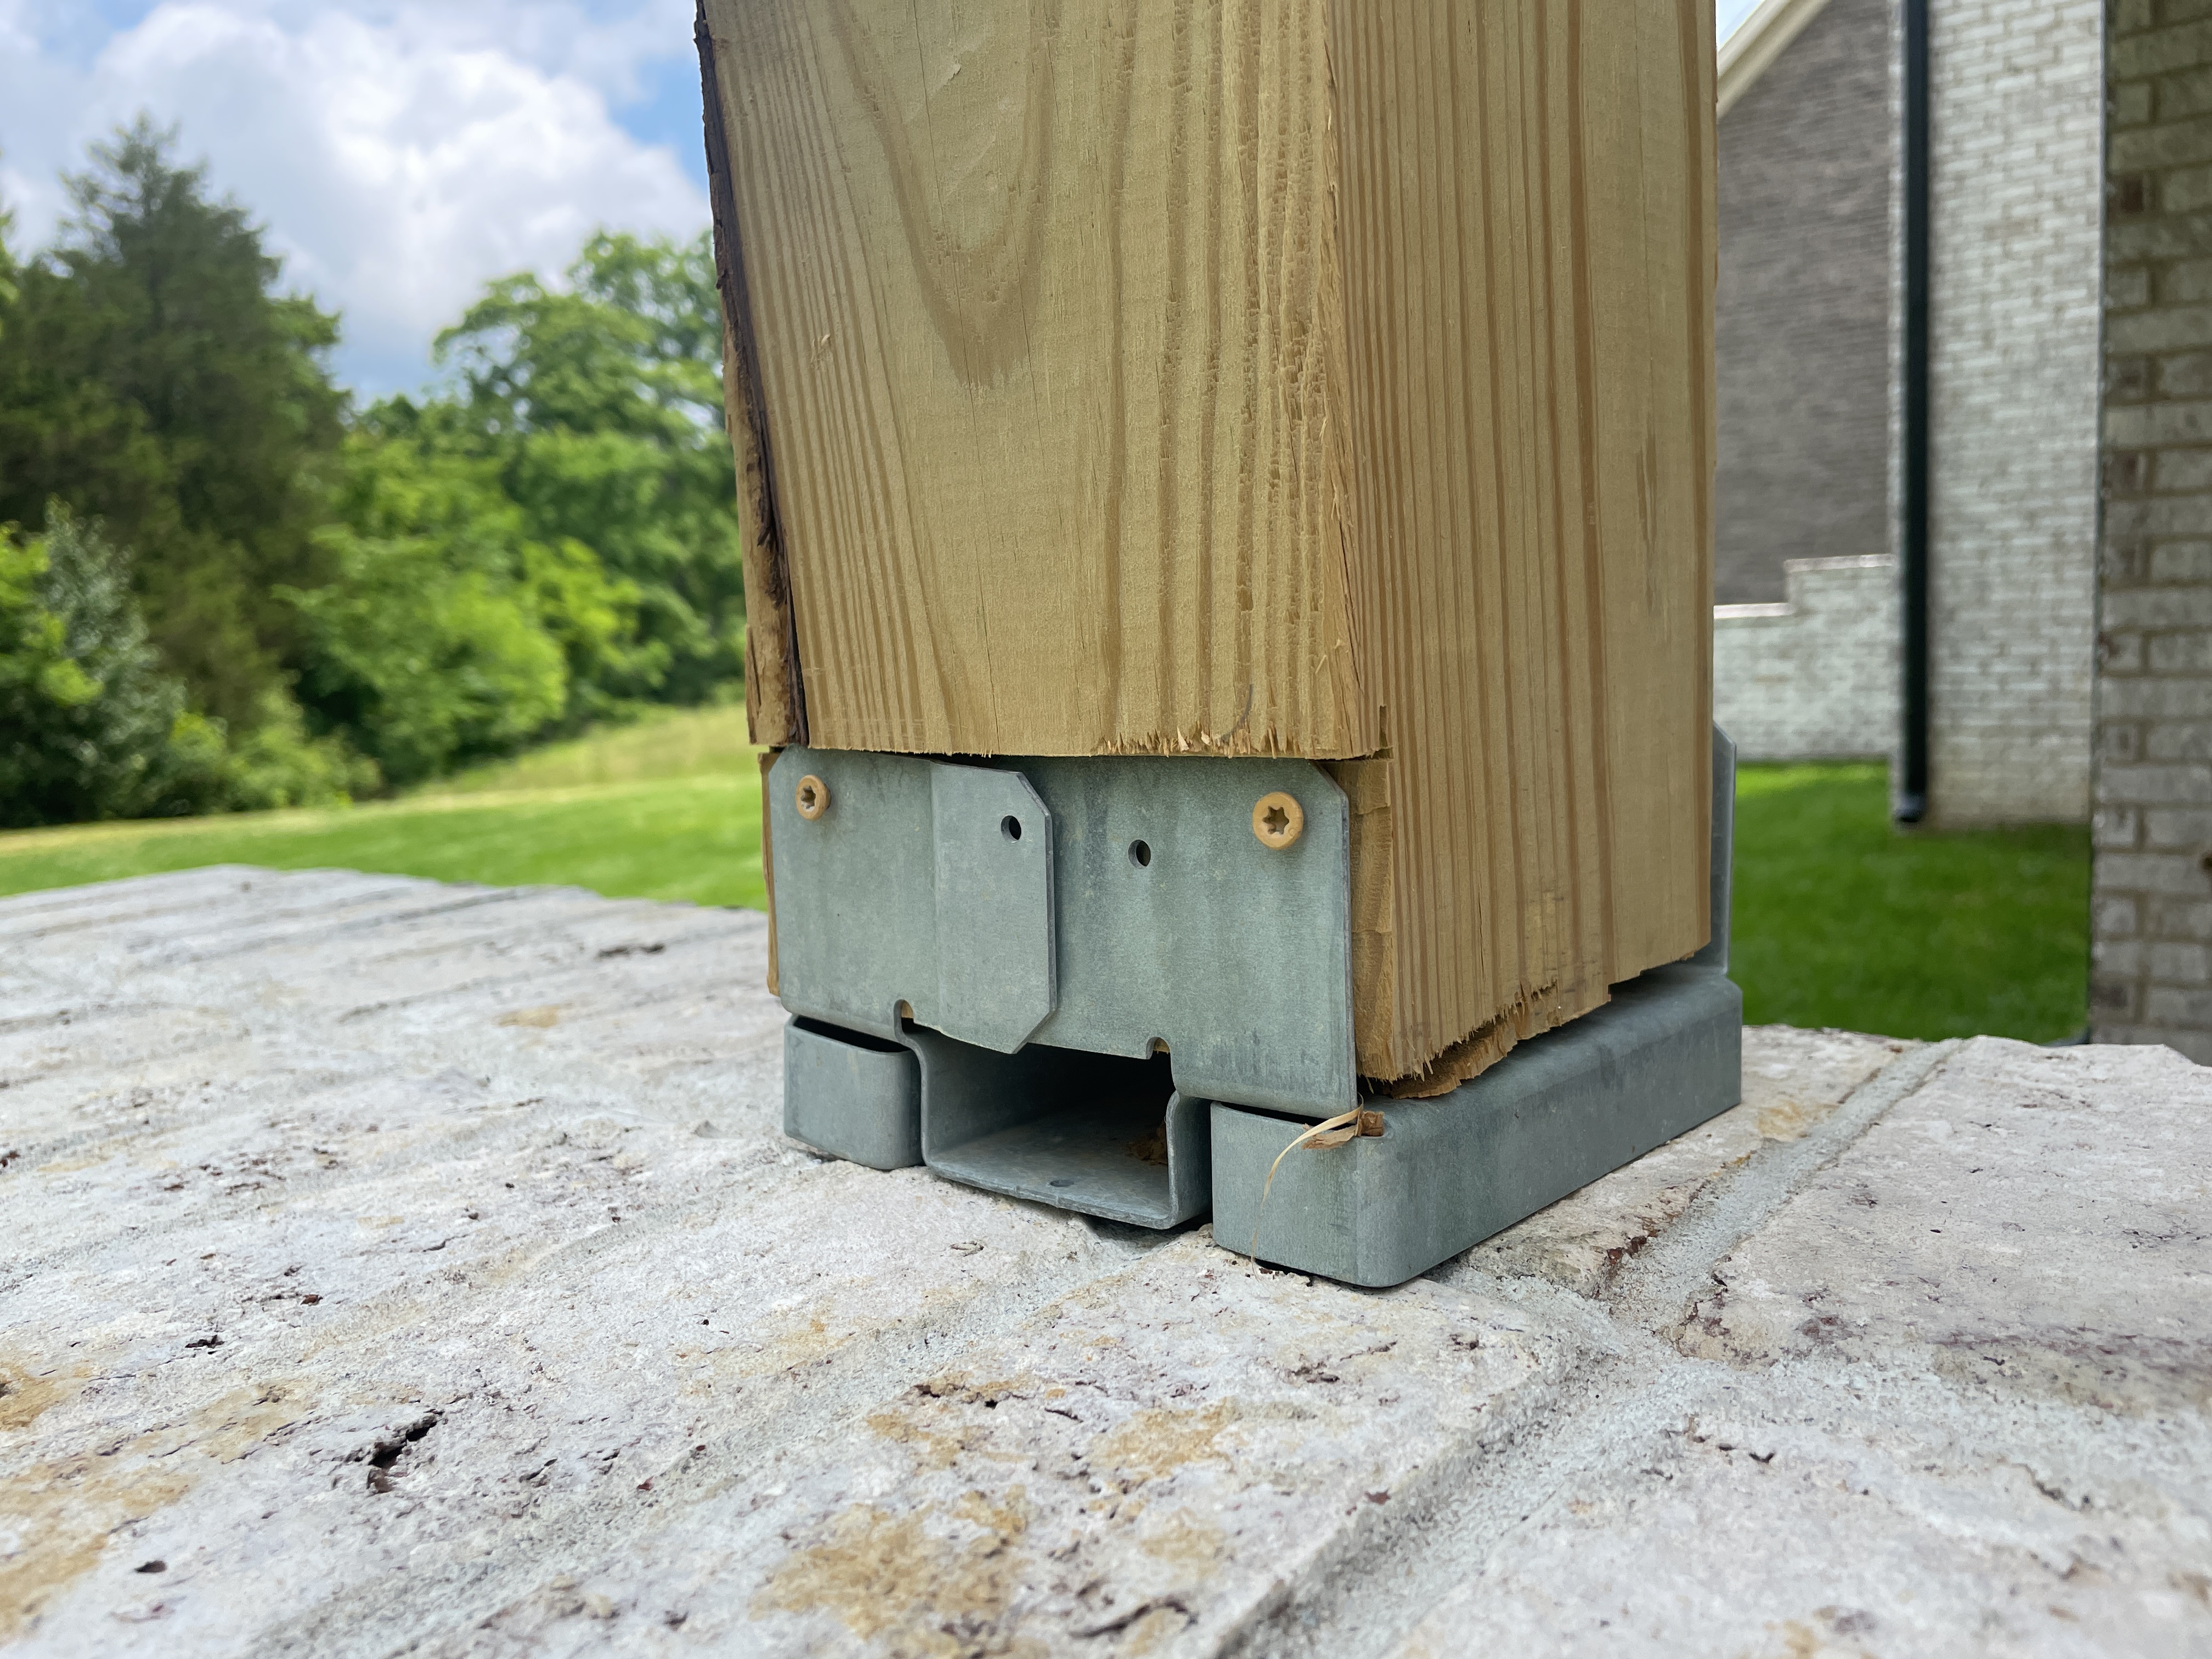
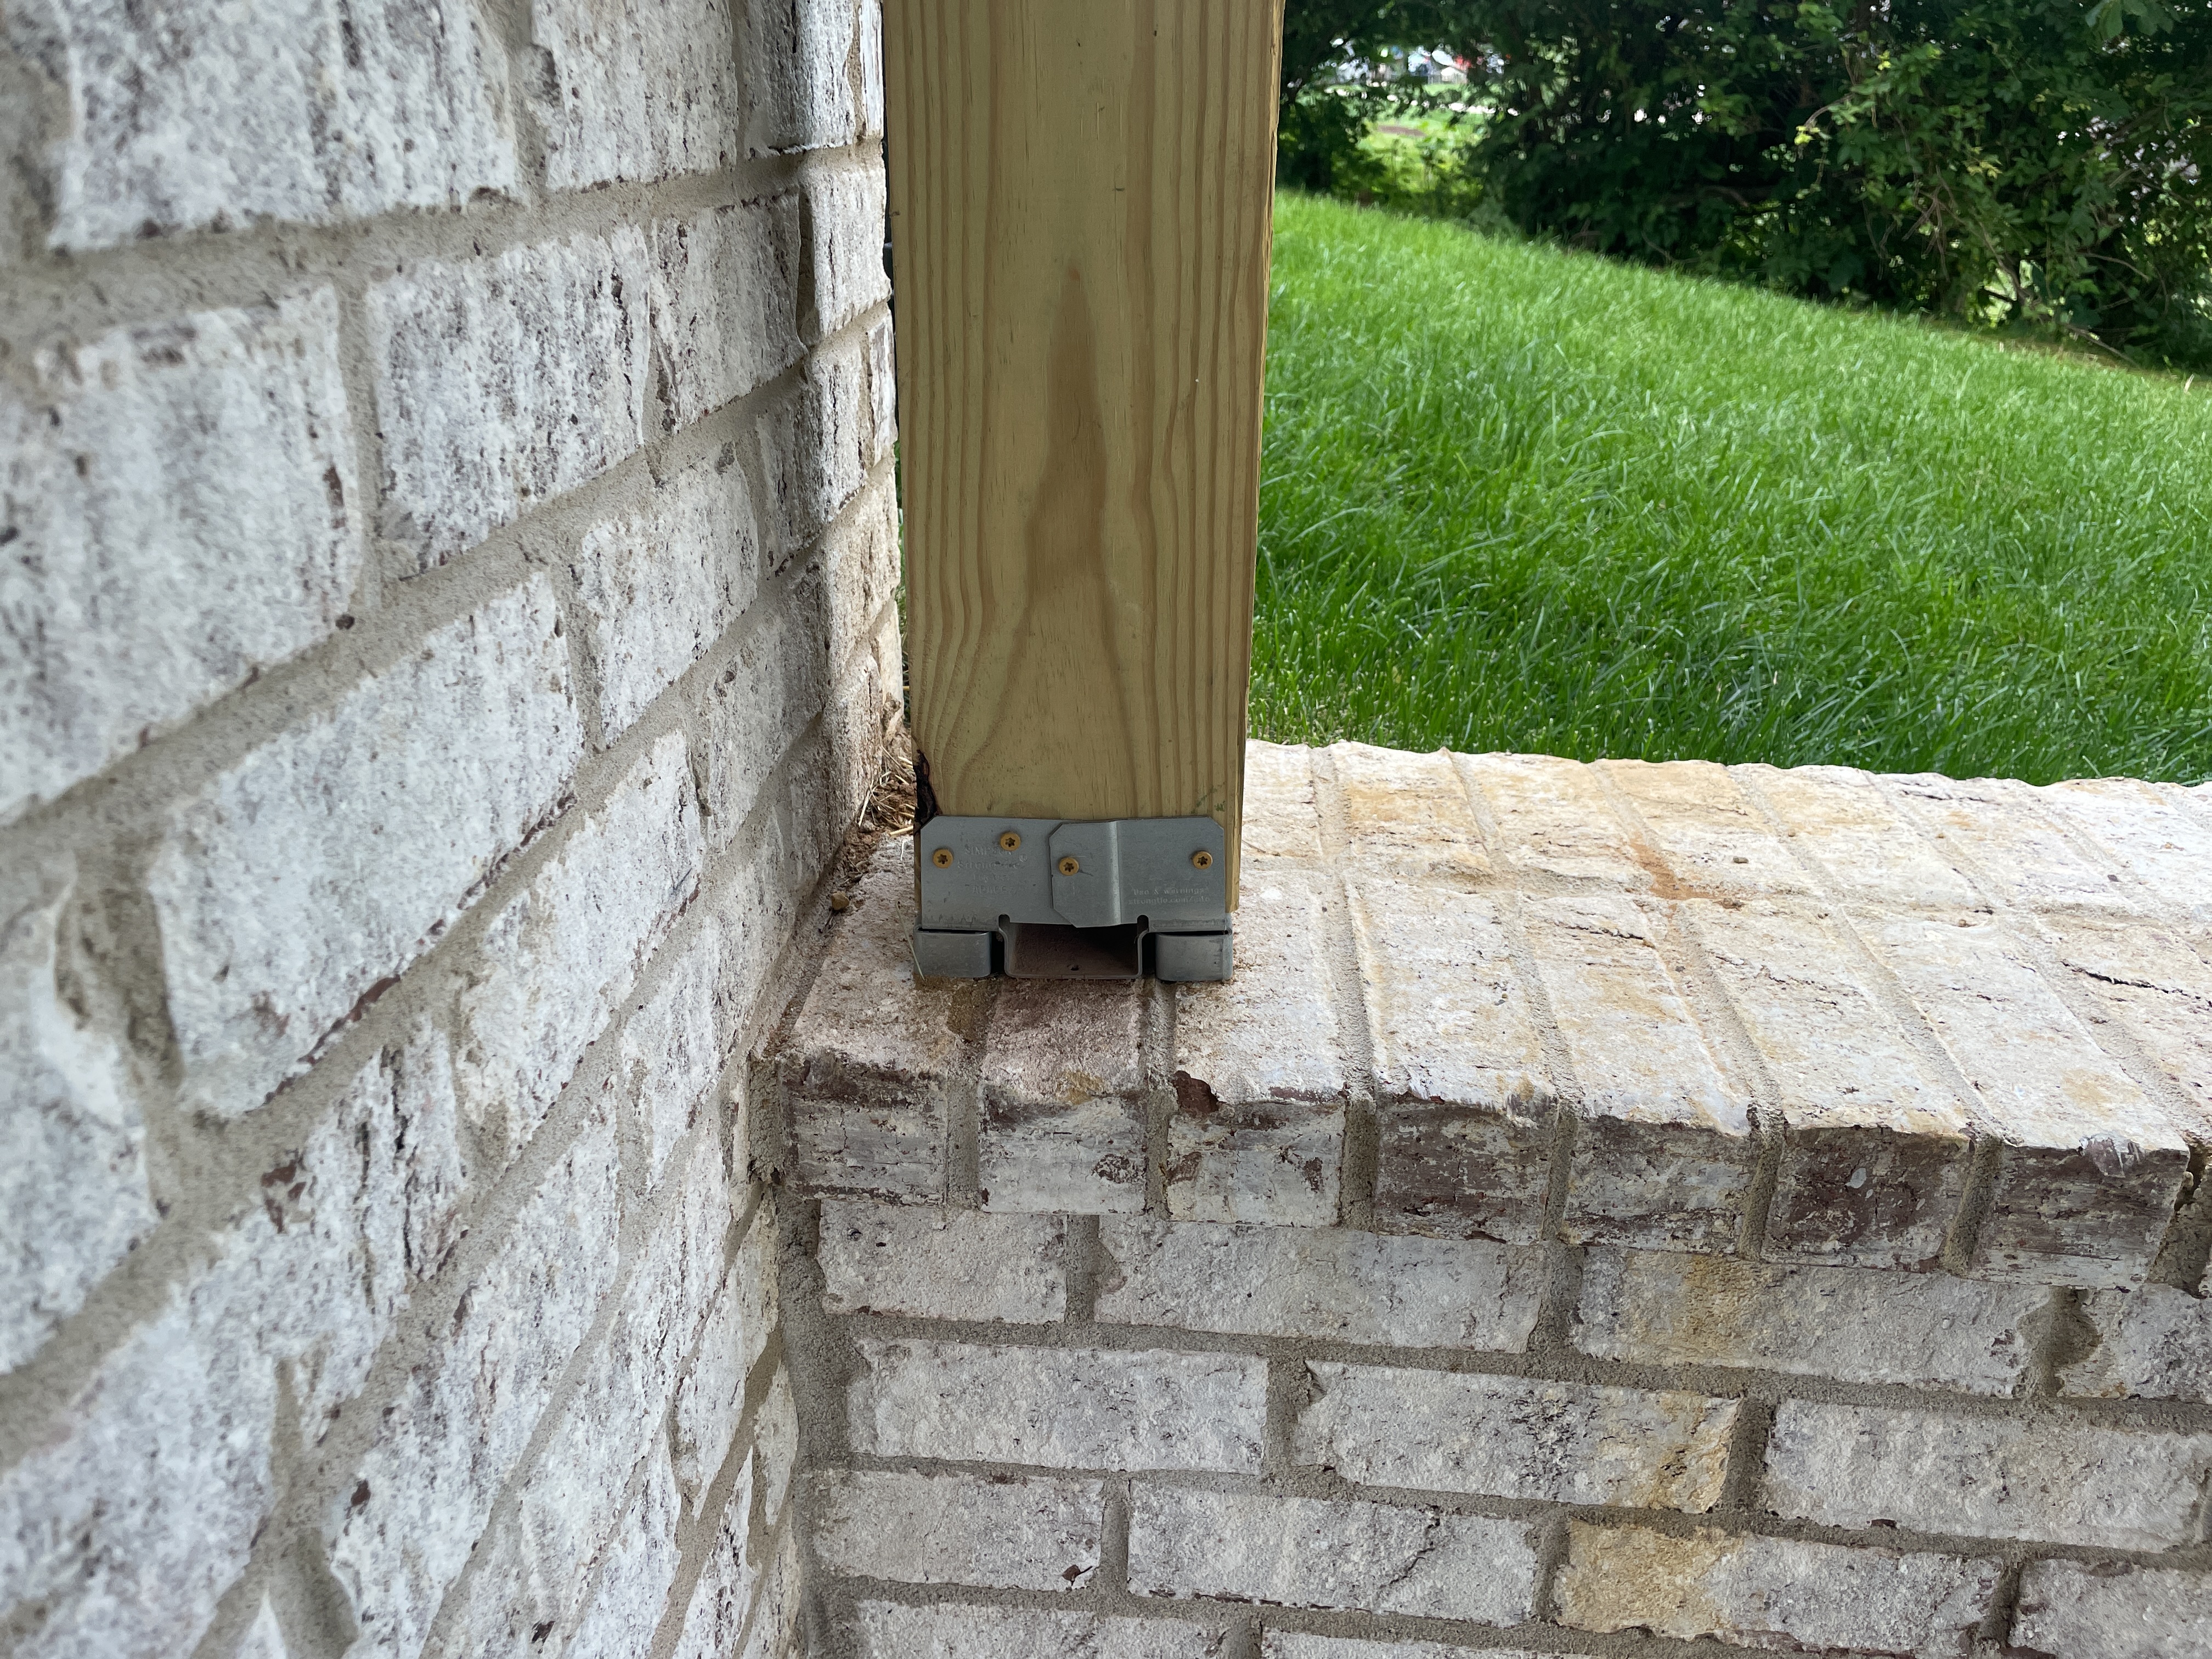
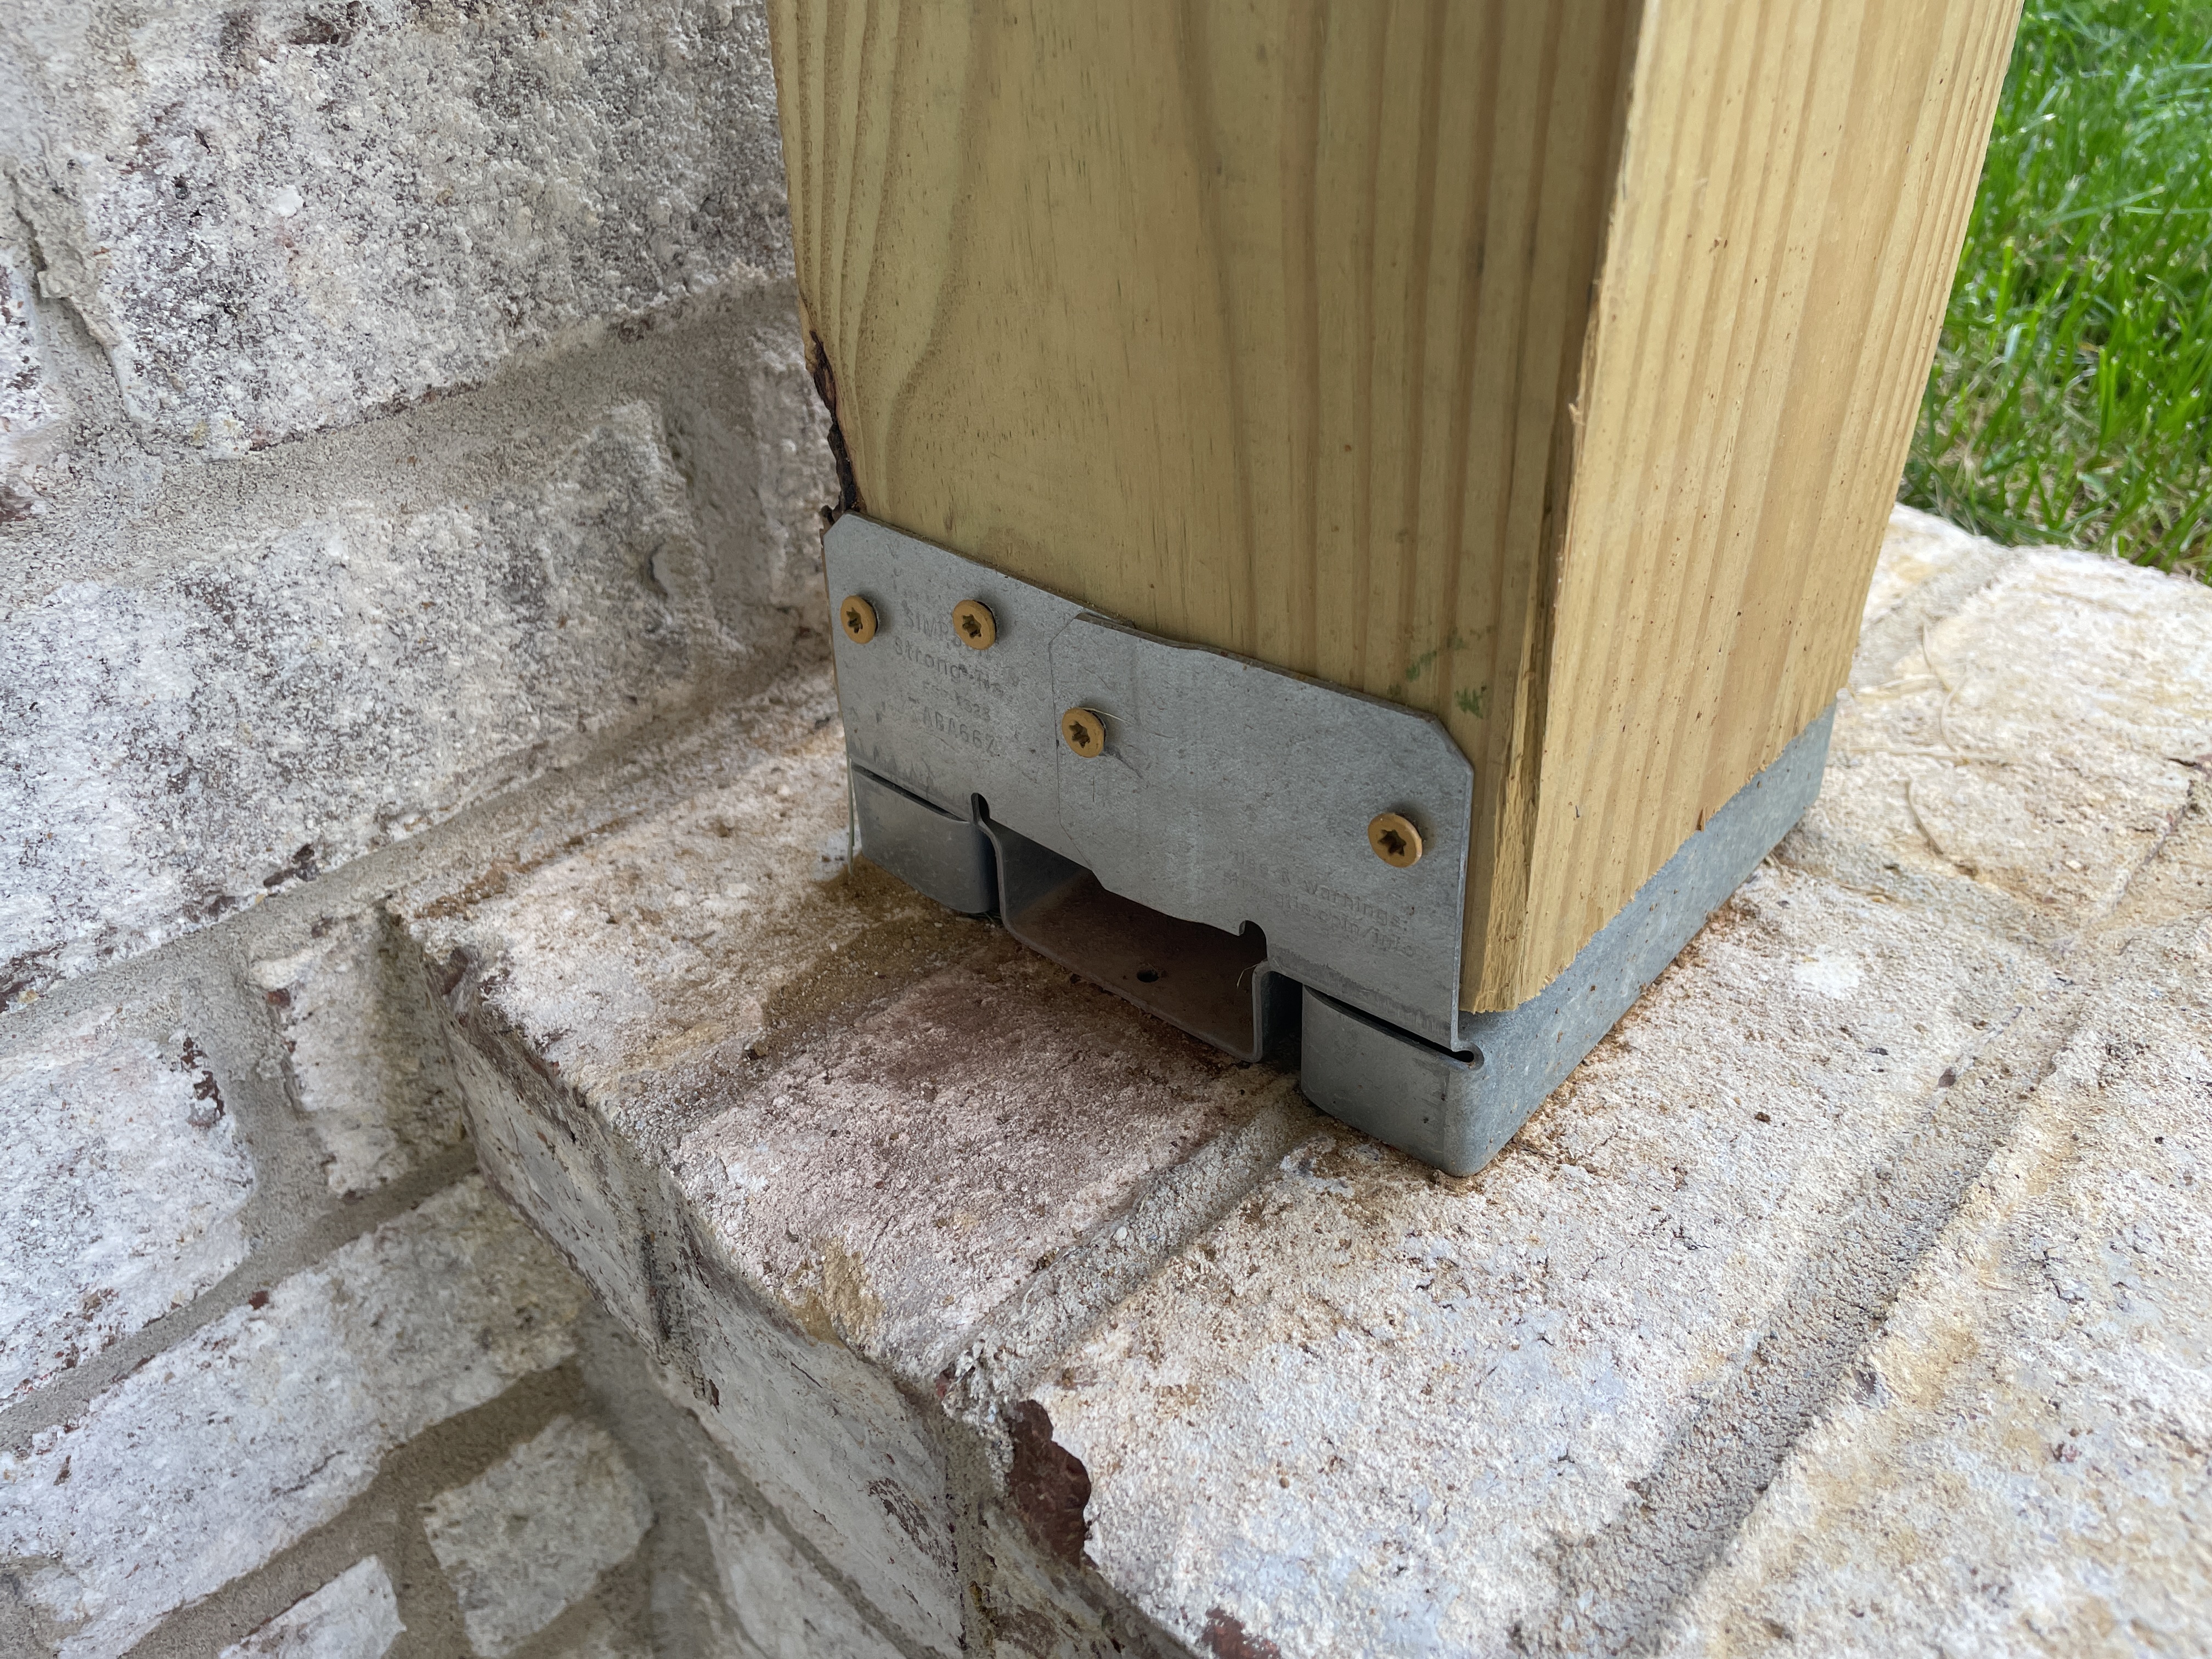
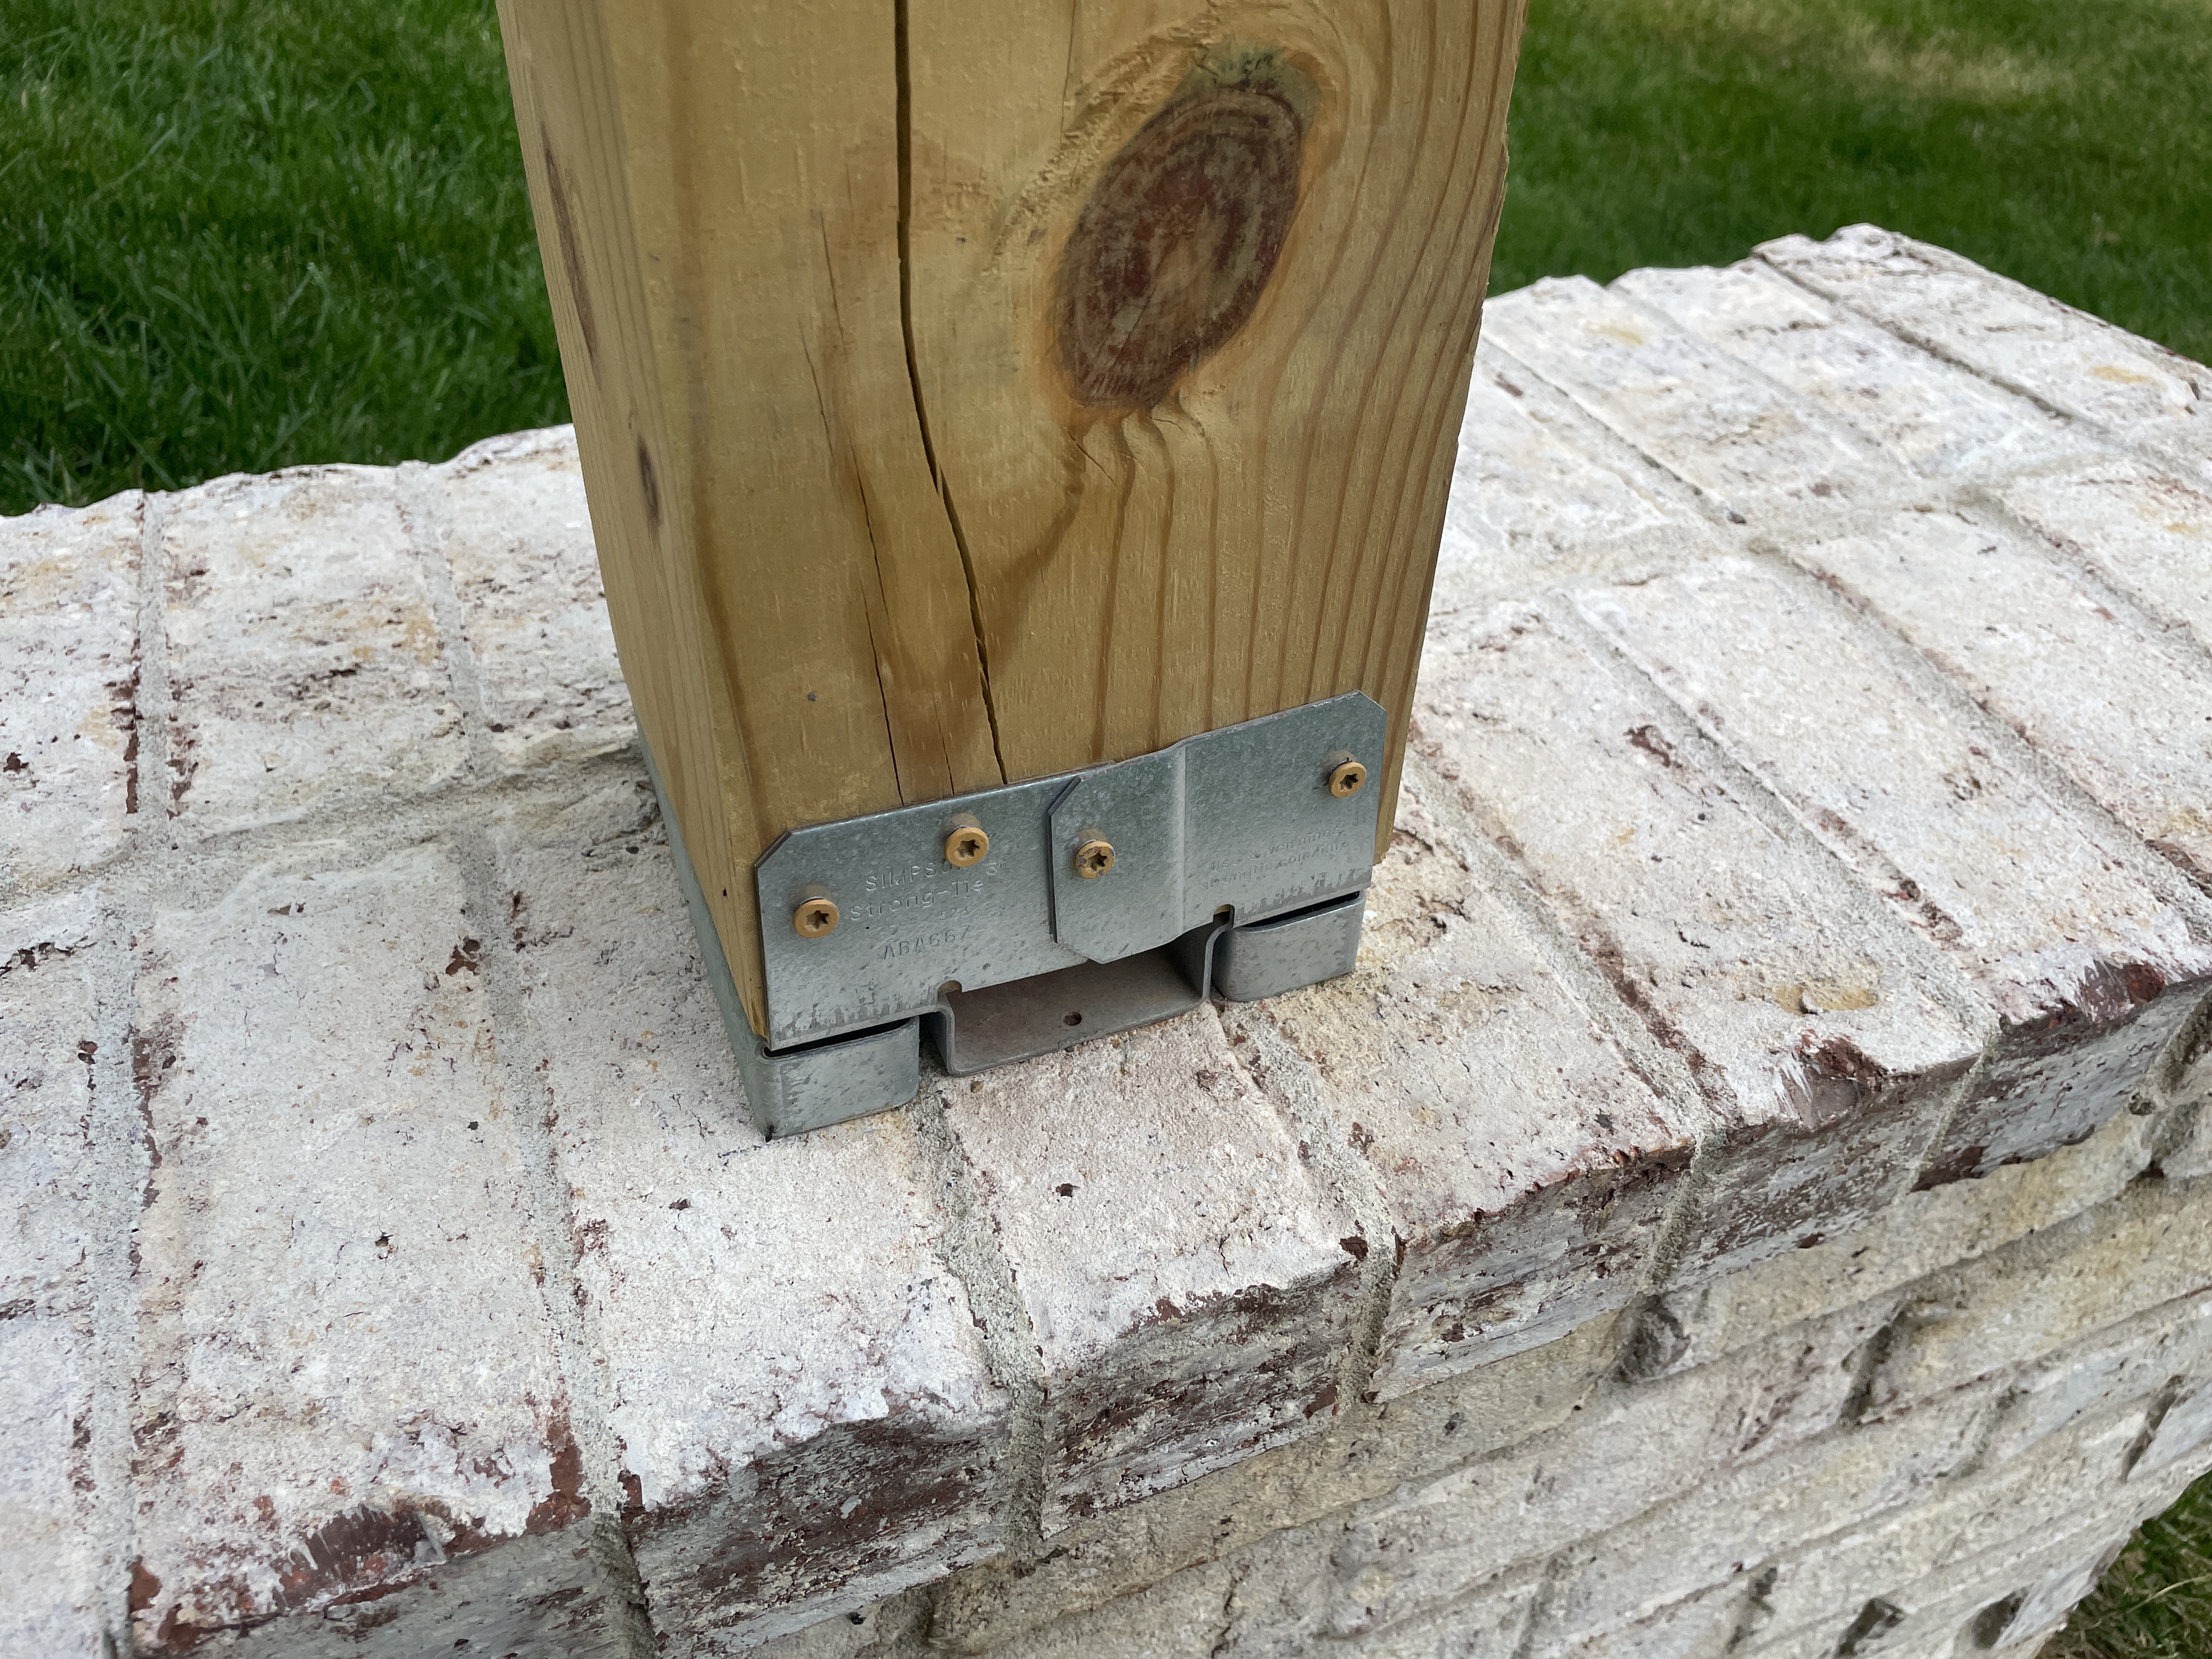
The brackets on the 6 x 6 posts for the deck are missing screws along the retaining wall. Have the proper hardware installed as needed.
Note: The screws that were installed look to be coated deck screws, which are not rated for structural brackets. Simpson Strong Ties have a listed set a fasteners that are approved for use with their products. Follow that guide and have these fasteners replaced as needed. Simpson Fastener Guide
 |  |
 |  |
 |  |
Part of the deck was built on top of the brick retaining wall. I have no way of knowing if the wall was was engineered/built to handle the weight of the deck/roof. Check with the builder to make sure this added structure was part of the design of the wall and that the proper footings and inspections were completed during construction.
.jpeg) |
⚡ Electric Service
Electric Service Equipment
Main Panel Amperage: 200 amps
Electric Service Amperage: 200 amps
Main Electric Panel Location: Basement
Panel Manufacturer: Square D
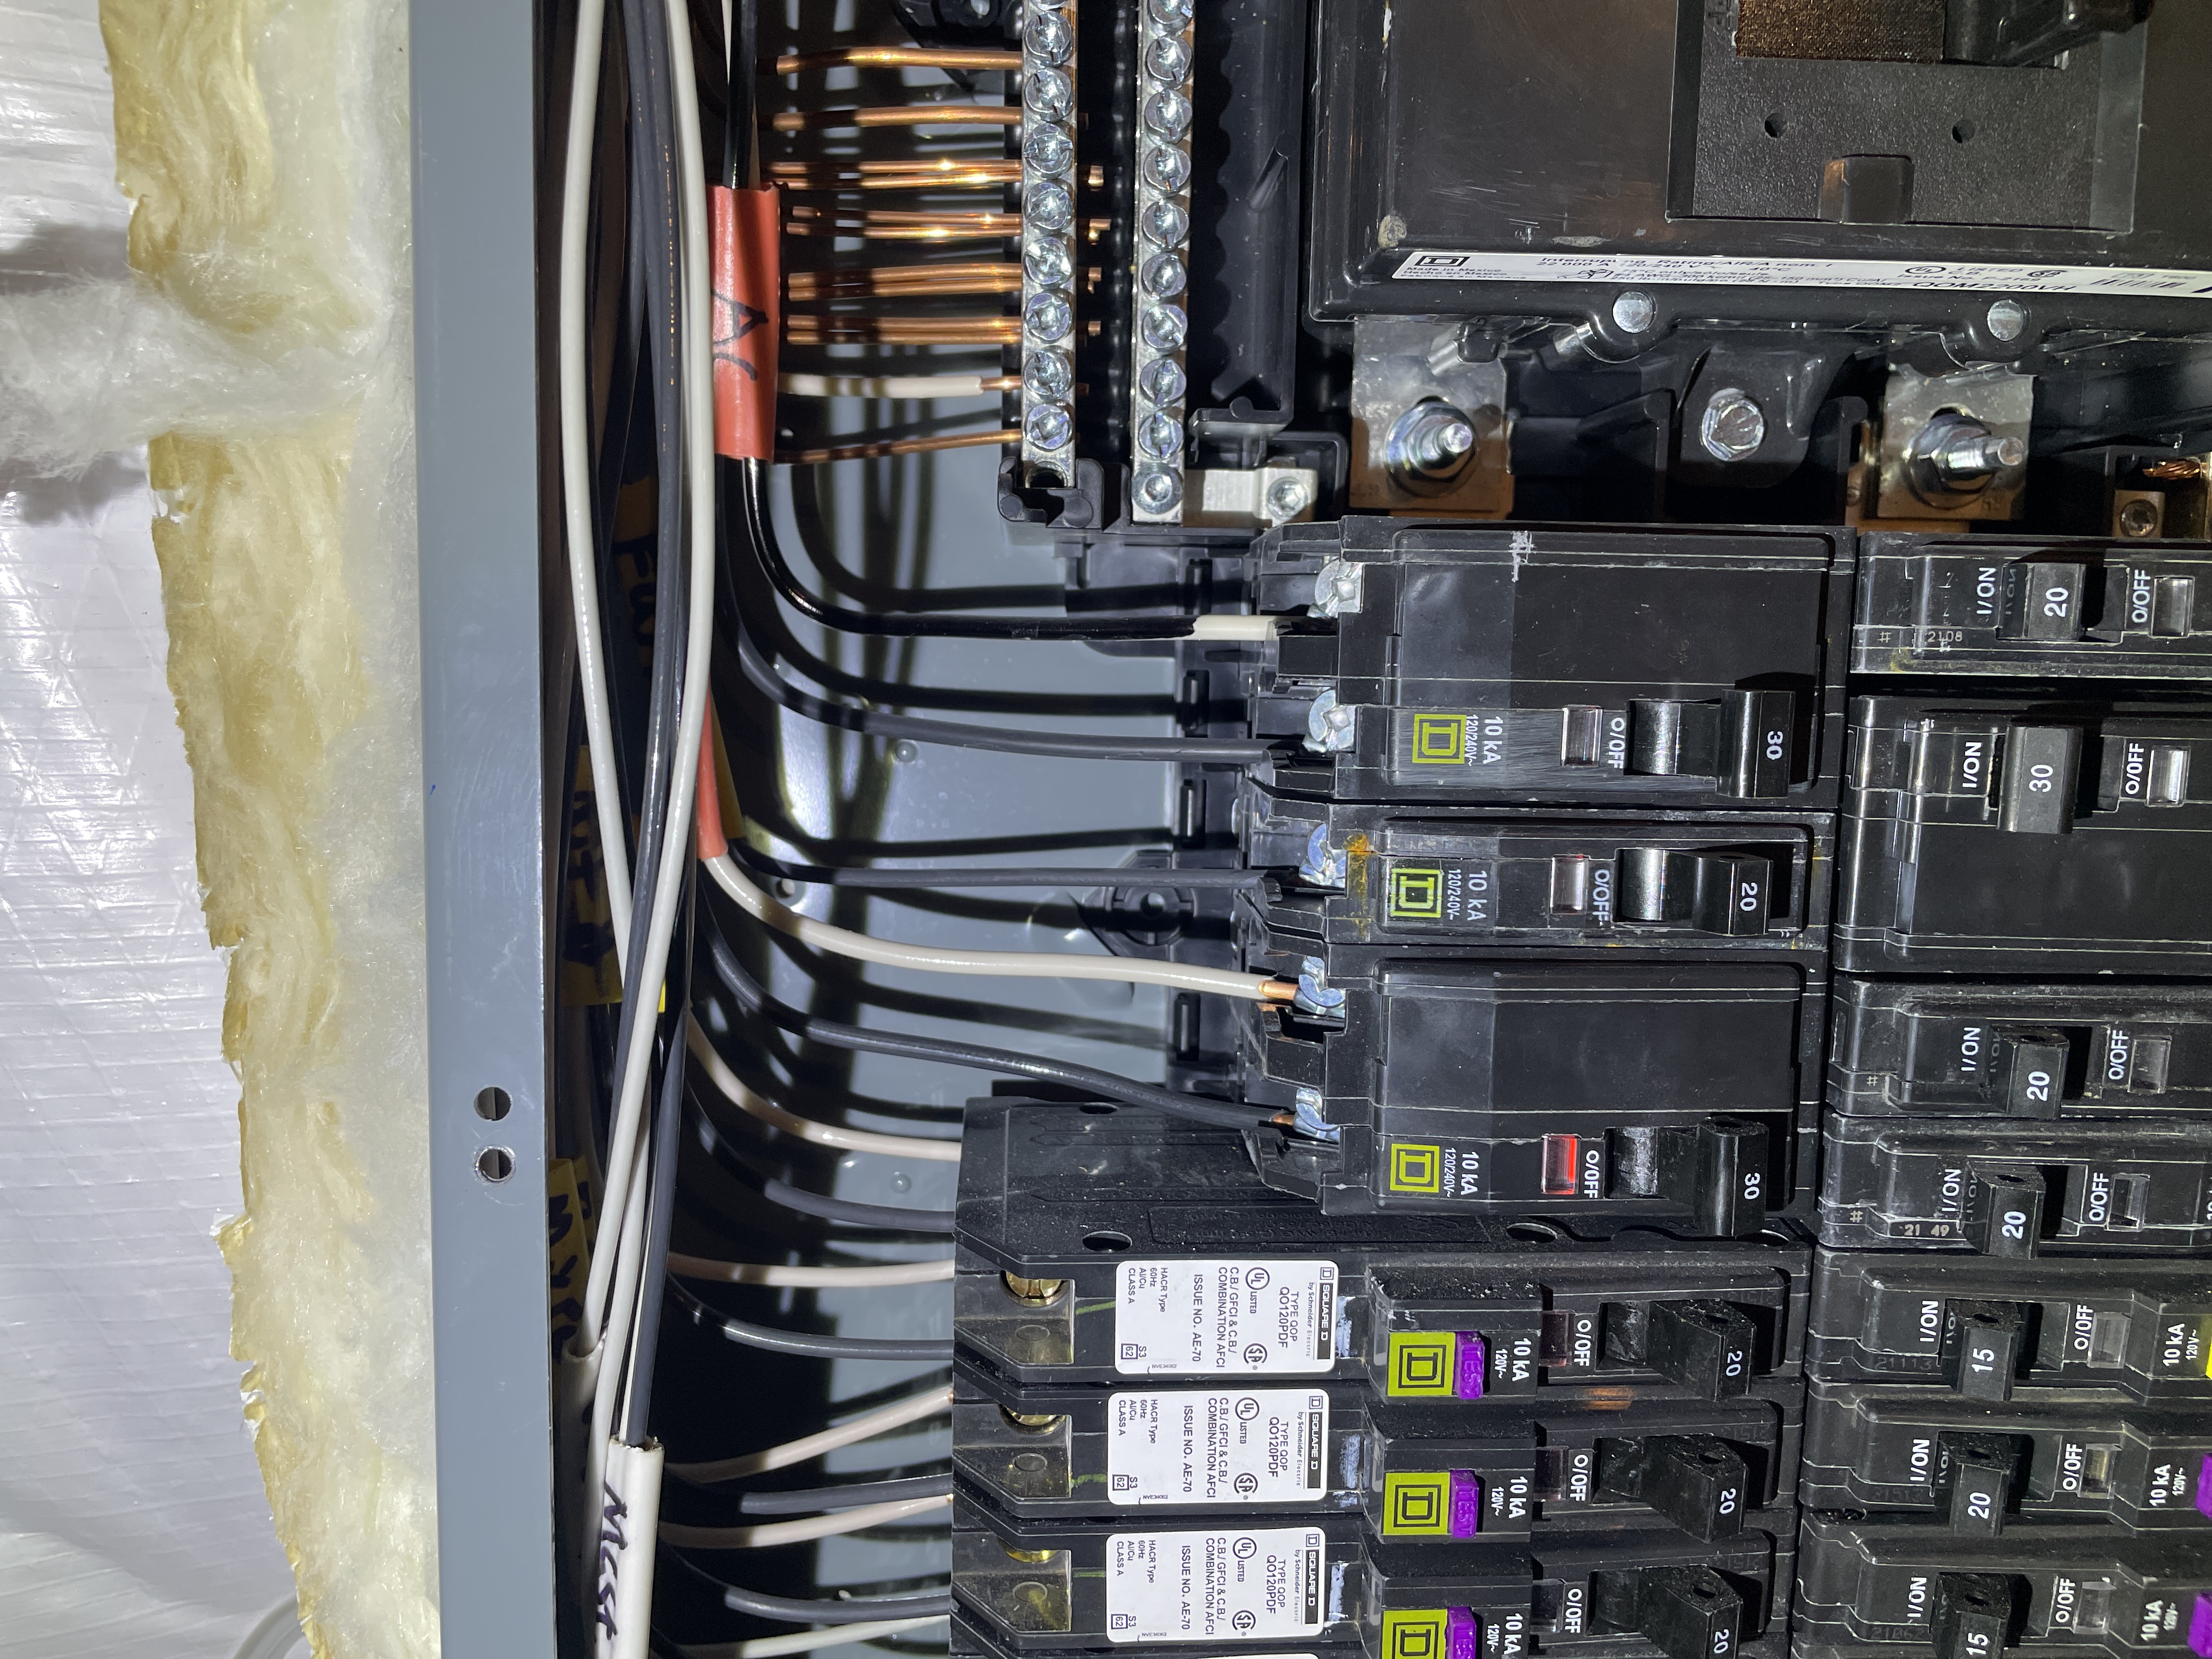
The white conductors inside the electric panel at the 240 volt circuit breakers were not correctly identified as 'hot' or 'ungrounded' conductors - these should be painted in black or red ink for correct identification and improved safety. Have an electrician evaluate the panel and correct the situation as needed.
 |
⚡ Electric Distribution and Finish Wiring
Receptacles and Fixtures
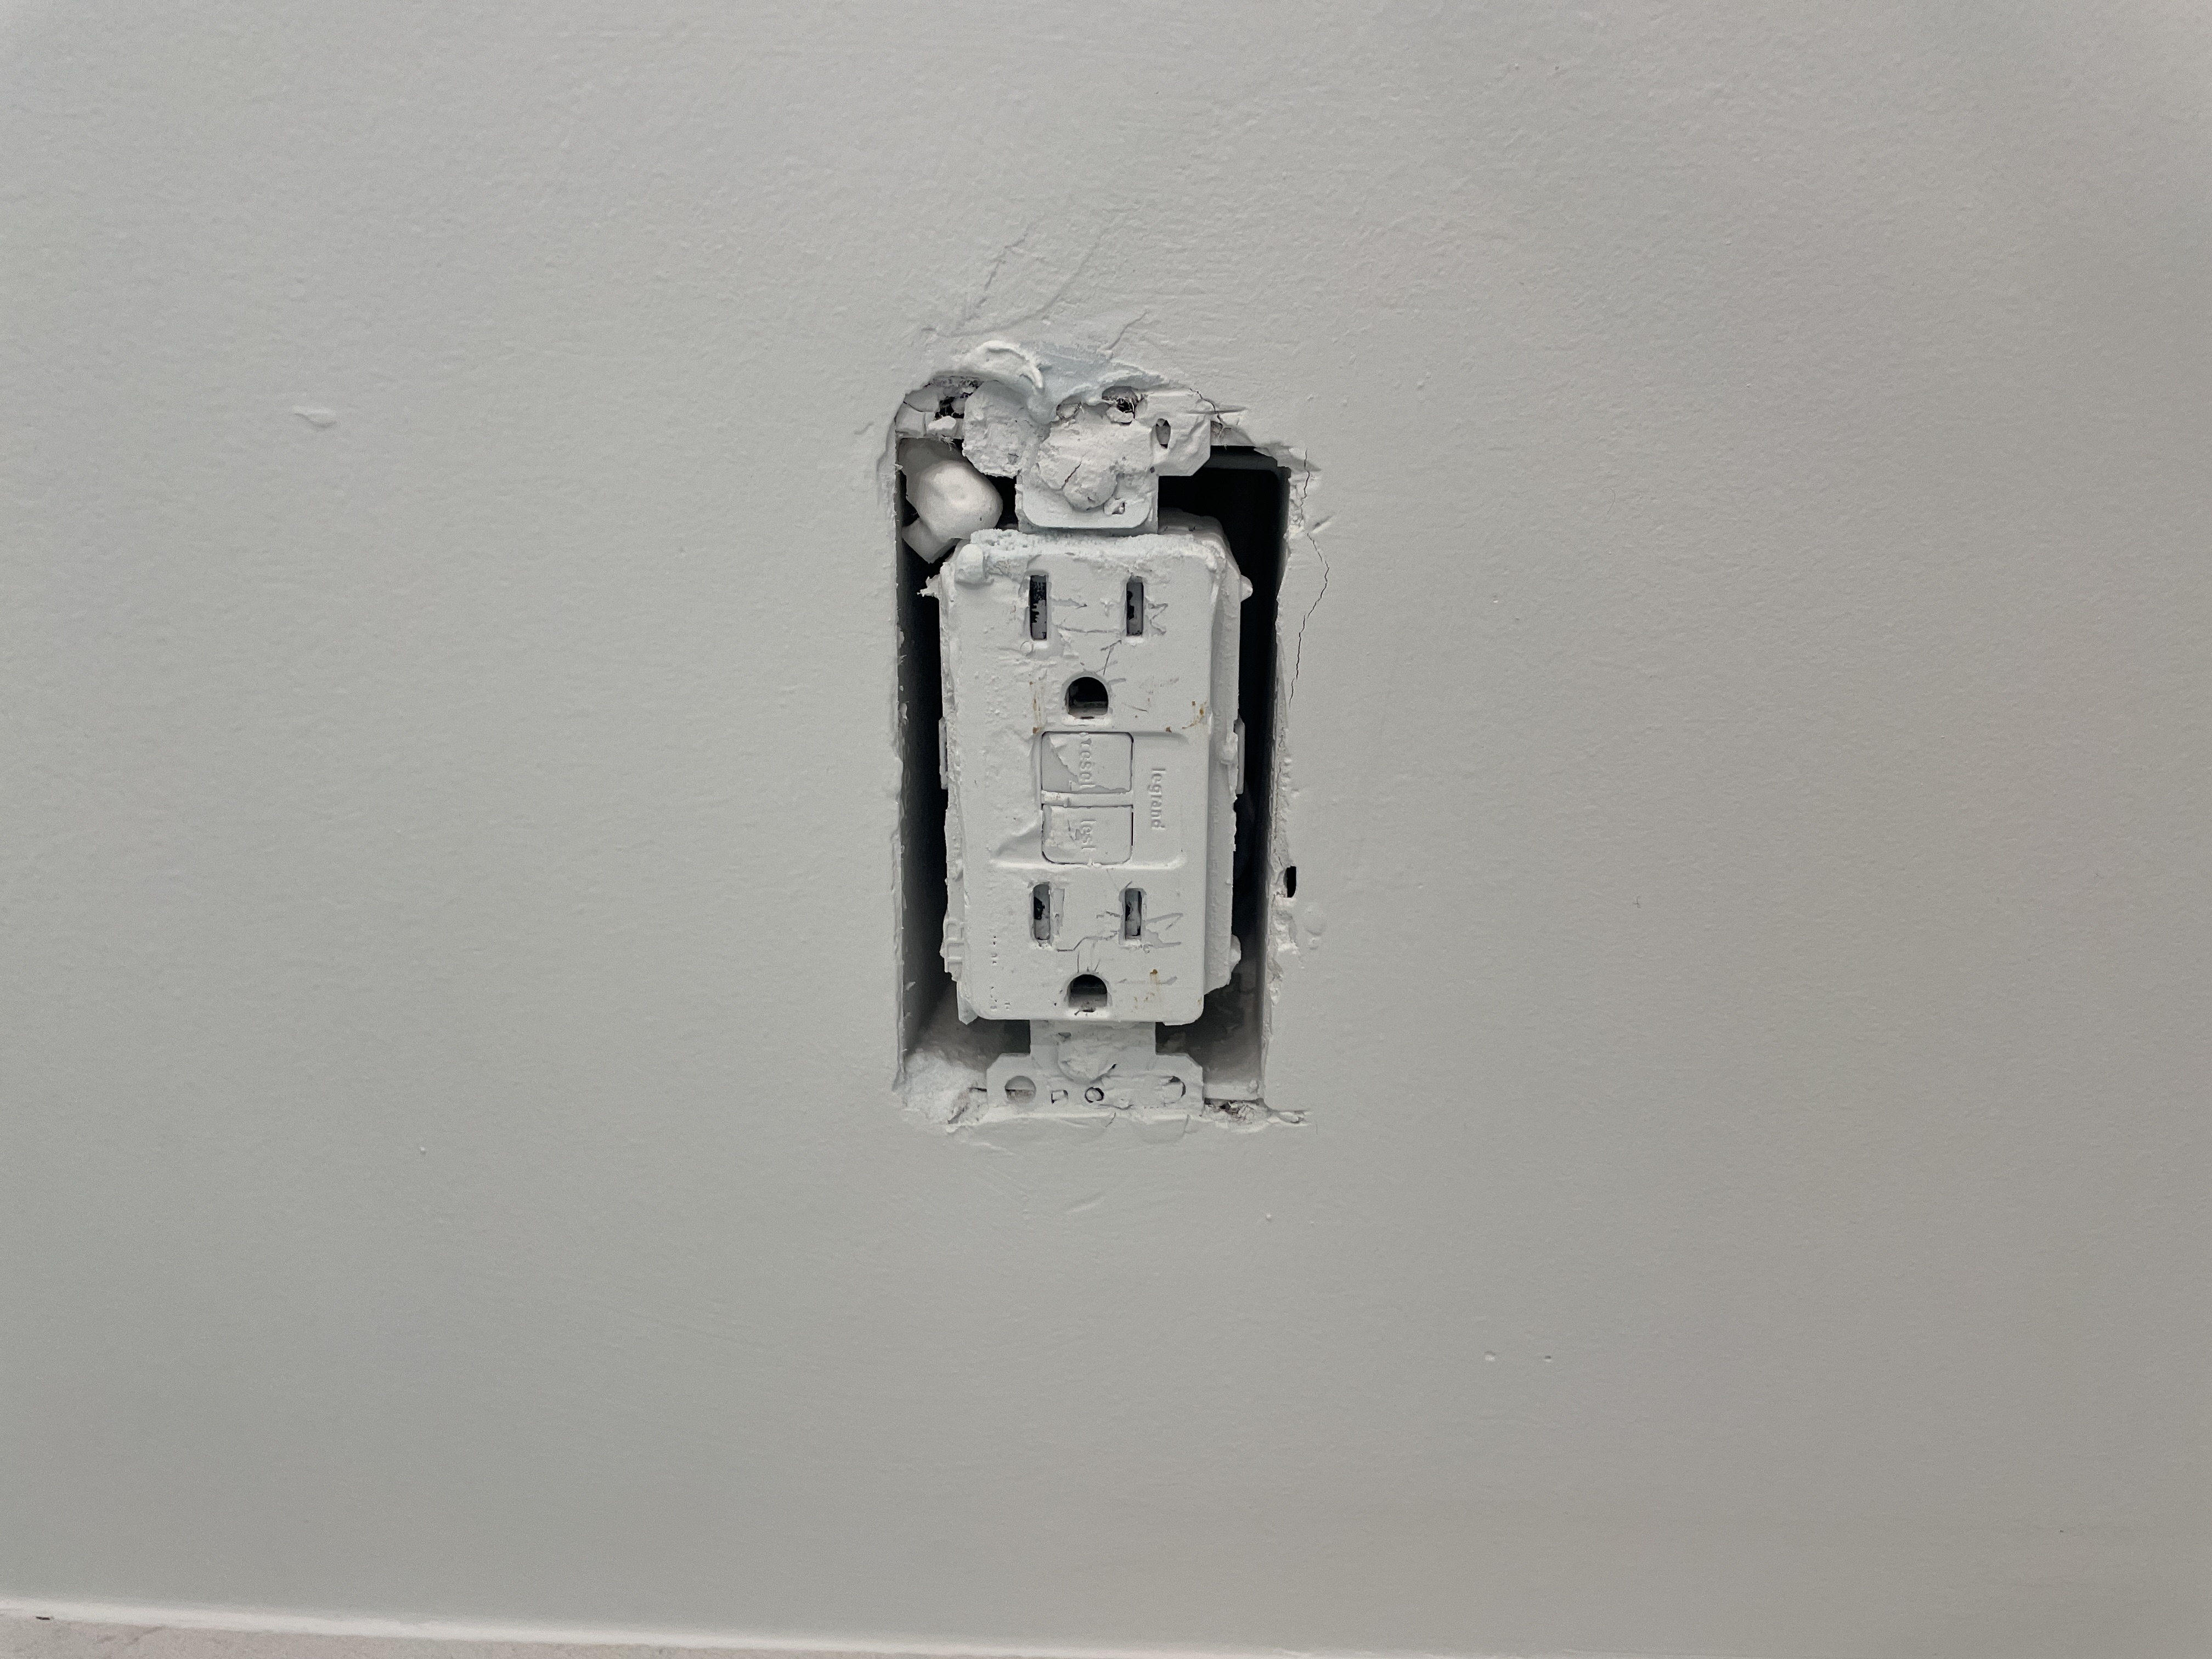
The GFCI in the guest bathroom has been painted over. Have the receptacle replaced.
 |
Smoke and Carbon Monoxide Alarm Systems
Smoke Detectors
Carbon Monoxide Detectors
In accordance with home inspection industry standards, I do not test smoke detectors as simply pressing the button doesn't give you any real data on how well the unit will work in a real fire. However, they are an important safety feature that must not be overlooked, and it is important to make sure that there are functional detectors installed at all required locations prior to occupying the premises. Unless the smoke detectors are newly installed I strongly encourage you to install new ones throughout the home when you move in. You can buy a 3-pack for around $30 on Amazon. Link to Smoke Detectors
Carbon monoxide (CO) is a colorless, odorless, and tasteless gas that is poisonous to humans. It is known as the “silent killer” because humans cannot tell when they are around it, but it can be very dangerous and deadly if the levels get high enough.
The carbon monoxide detector is a safety device that can alert homeowners of a CO leak and help them escape a potentially life-threatening situation, like carbon monoxide poisoning.
What does a carbon monoxide detector do?
Carbon monoxide alarms detect the poisonous gas and provide early warning. In the event of a carbon monoxide leak, it is critical that you get to fresh air as soon as possible. Every second counts, and a detector can provide you and your family the advanced warning necessary to escape your home during an emergency.
What are the main sources of carbon monoxide leaks?
Carbon monoxide can be produced by any fuel-burning device. Three main sources are your home’s furnace, dryer vent in a drying machine, and fireplace or chimney. It is important to have these sources regularly serviced and cleaned by a professional to help prevent a CO leak that could lead to carbon monoxide poisoning.
Because of the seriousness of carbon monoxide risk, I encourage you to replace or install new carbon monoxide detectors in the recommended areas.
You should not leave old or currently installed carbon monoxide detectors in place. Most manufacturers list their life expectancy at about five years, and it's simply not worth the risk of leaving an old or pre-existing carbon monoxide detector in place.
There are several different types of CO detectors available. Some are hardwired like this one: Hardwired CO Monitor and some plug into a receptacle for easy installation like this one; Wall Mount CO Monitor
You can also get some units that will alert you of carbon monoxide at a much lower level then some of the cheaper models. While these more sensitive units do cost more, they will alert you to a potential issue much sooner. Low Level CO Monitor.
🔥 Heating, Cooling, Fireplaces and Ventilation
Heating and Cooling General Information
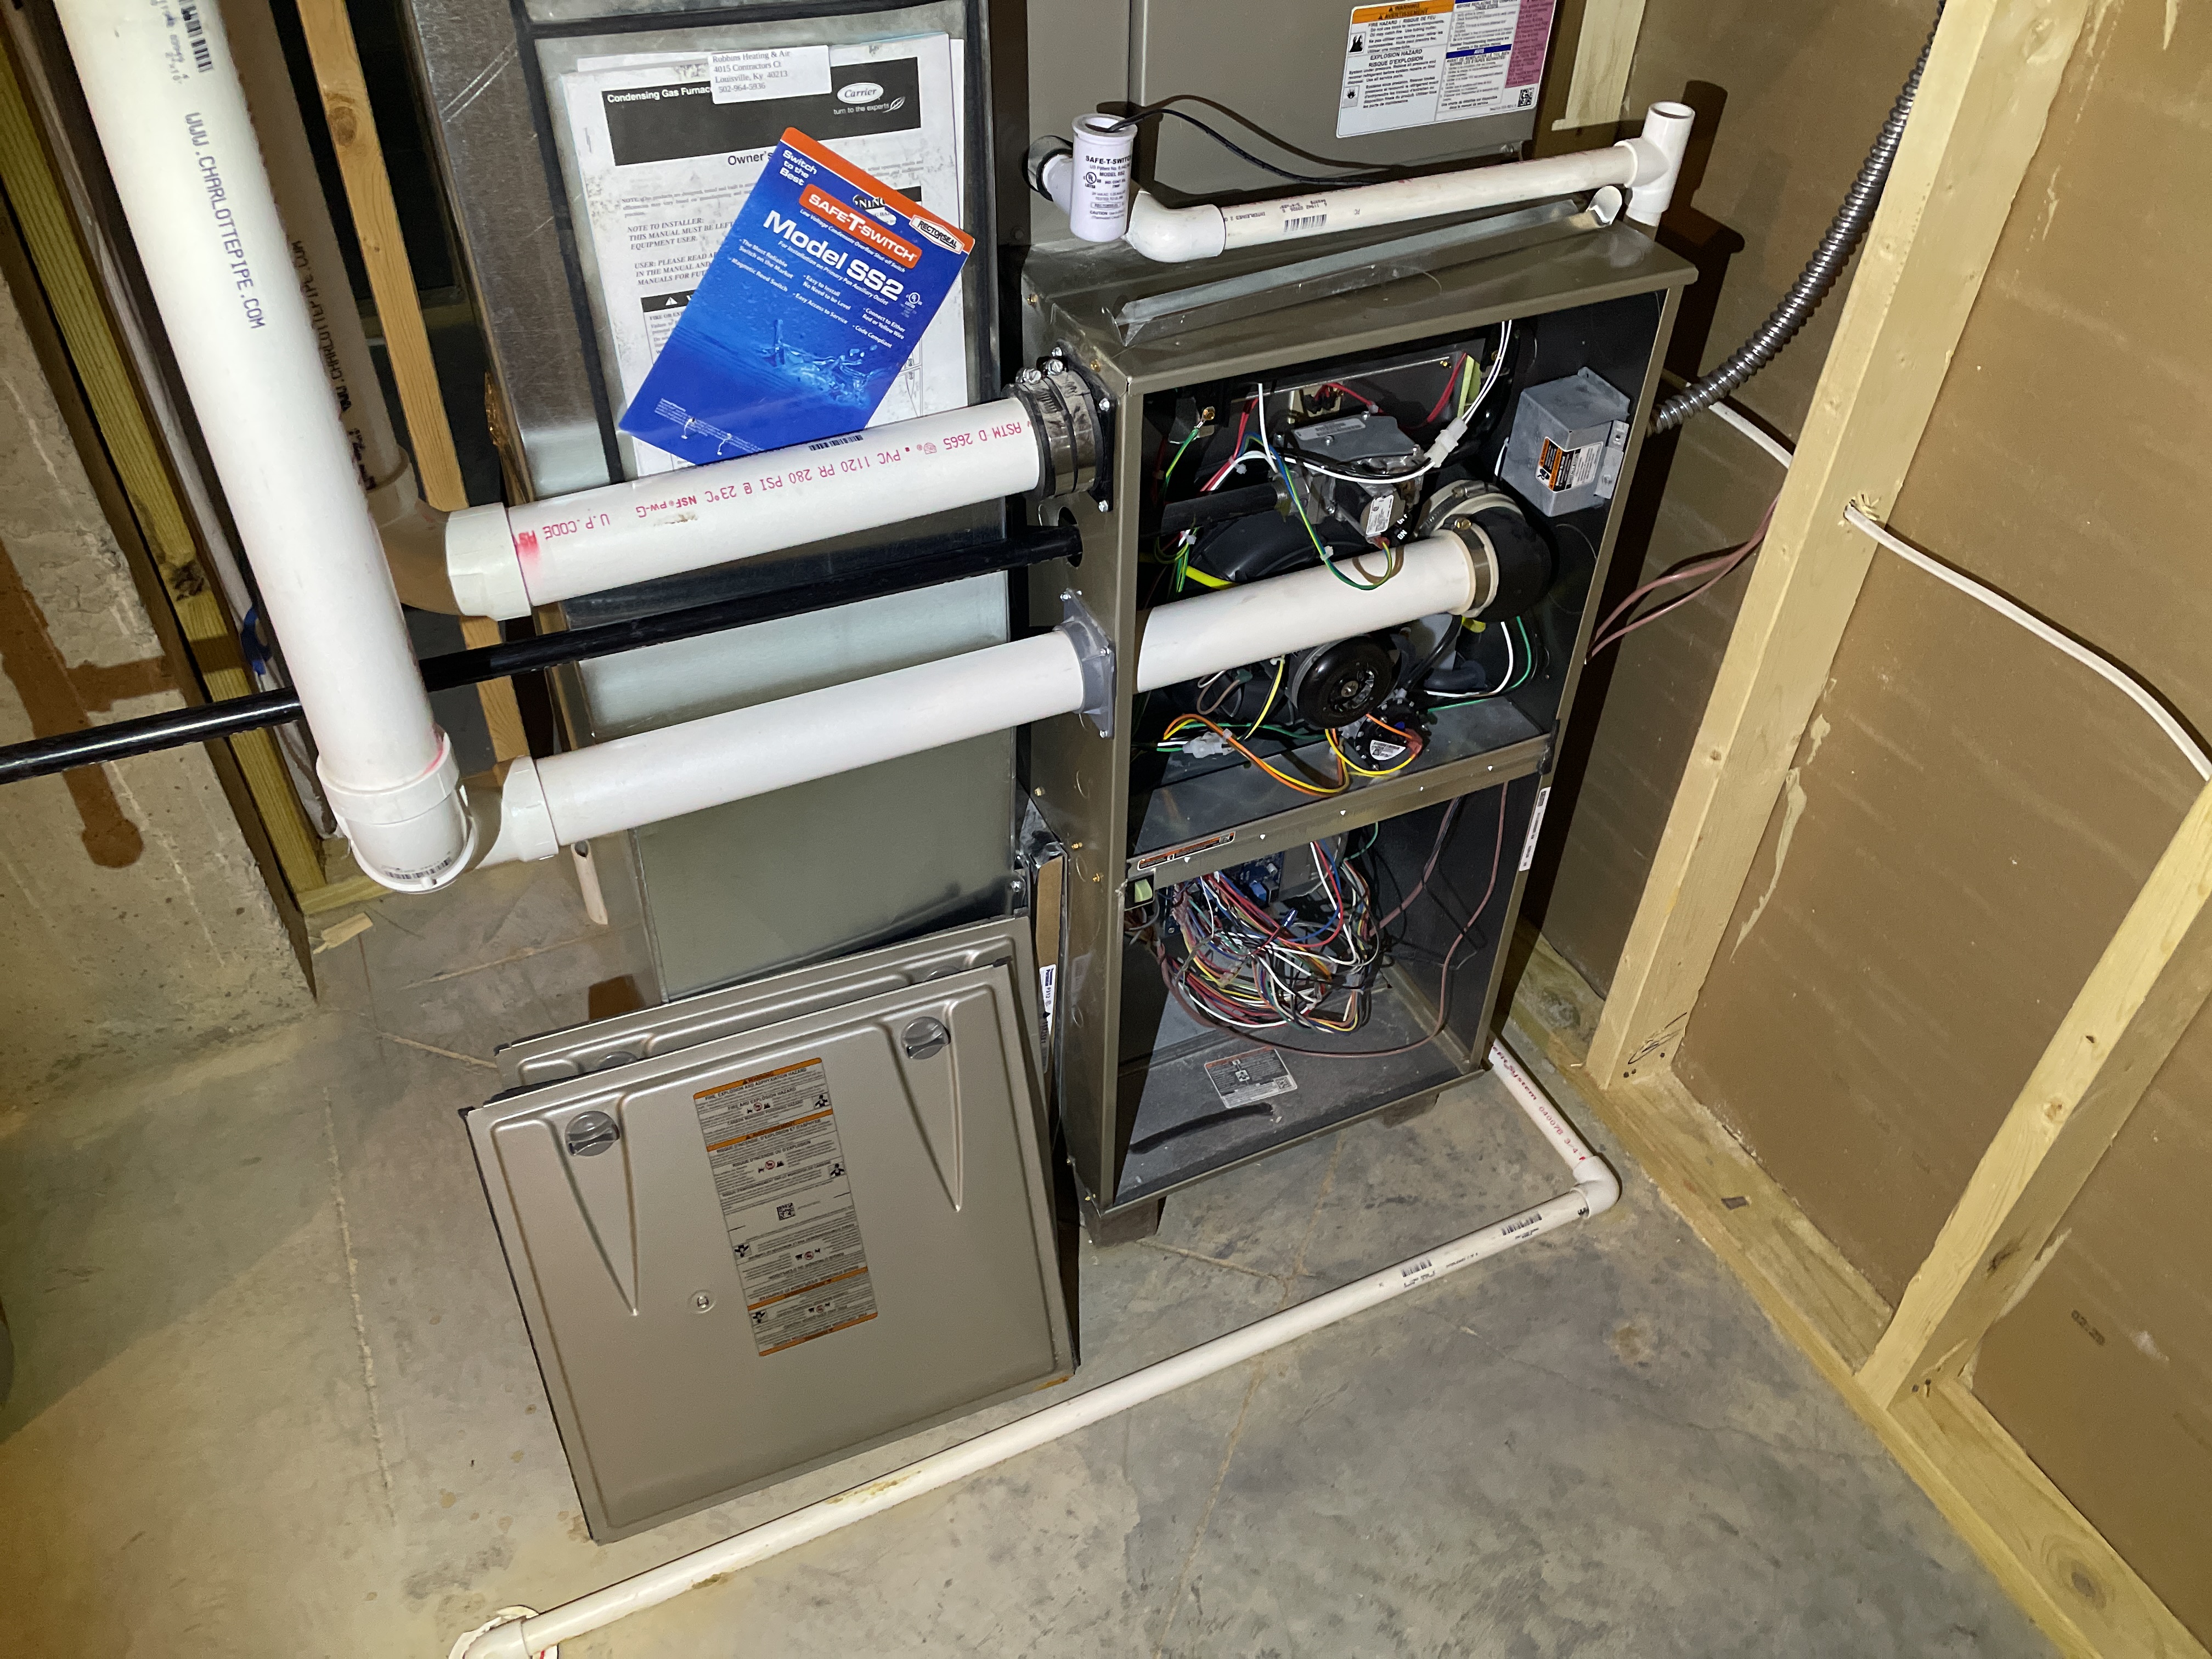
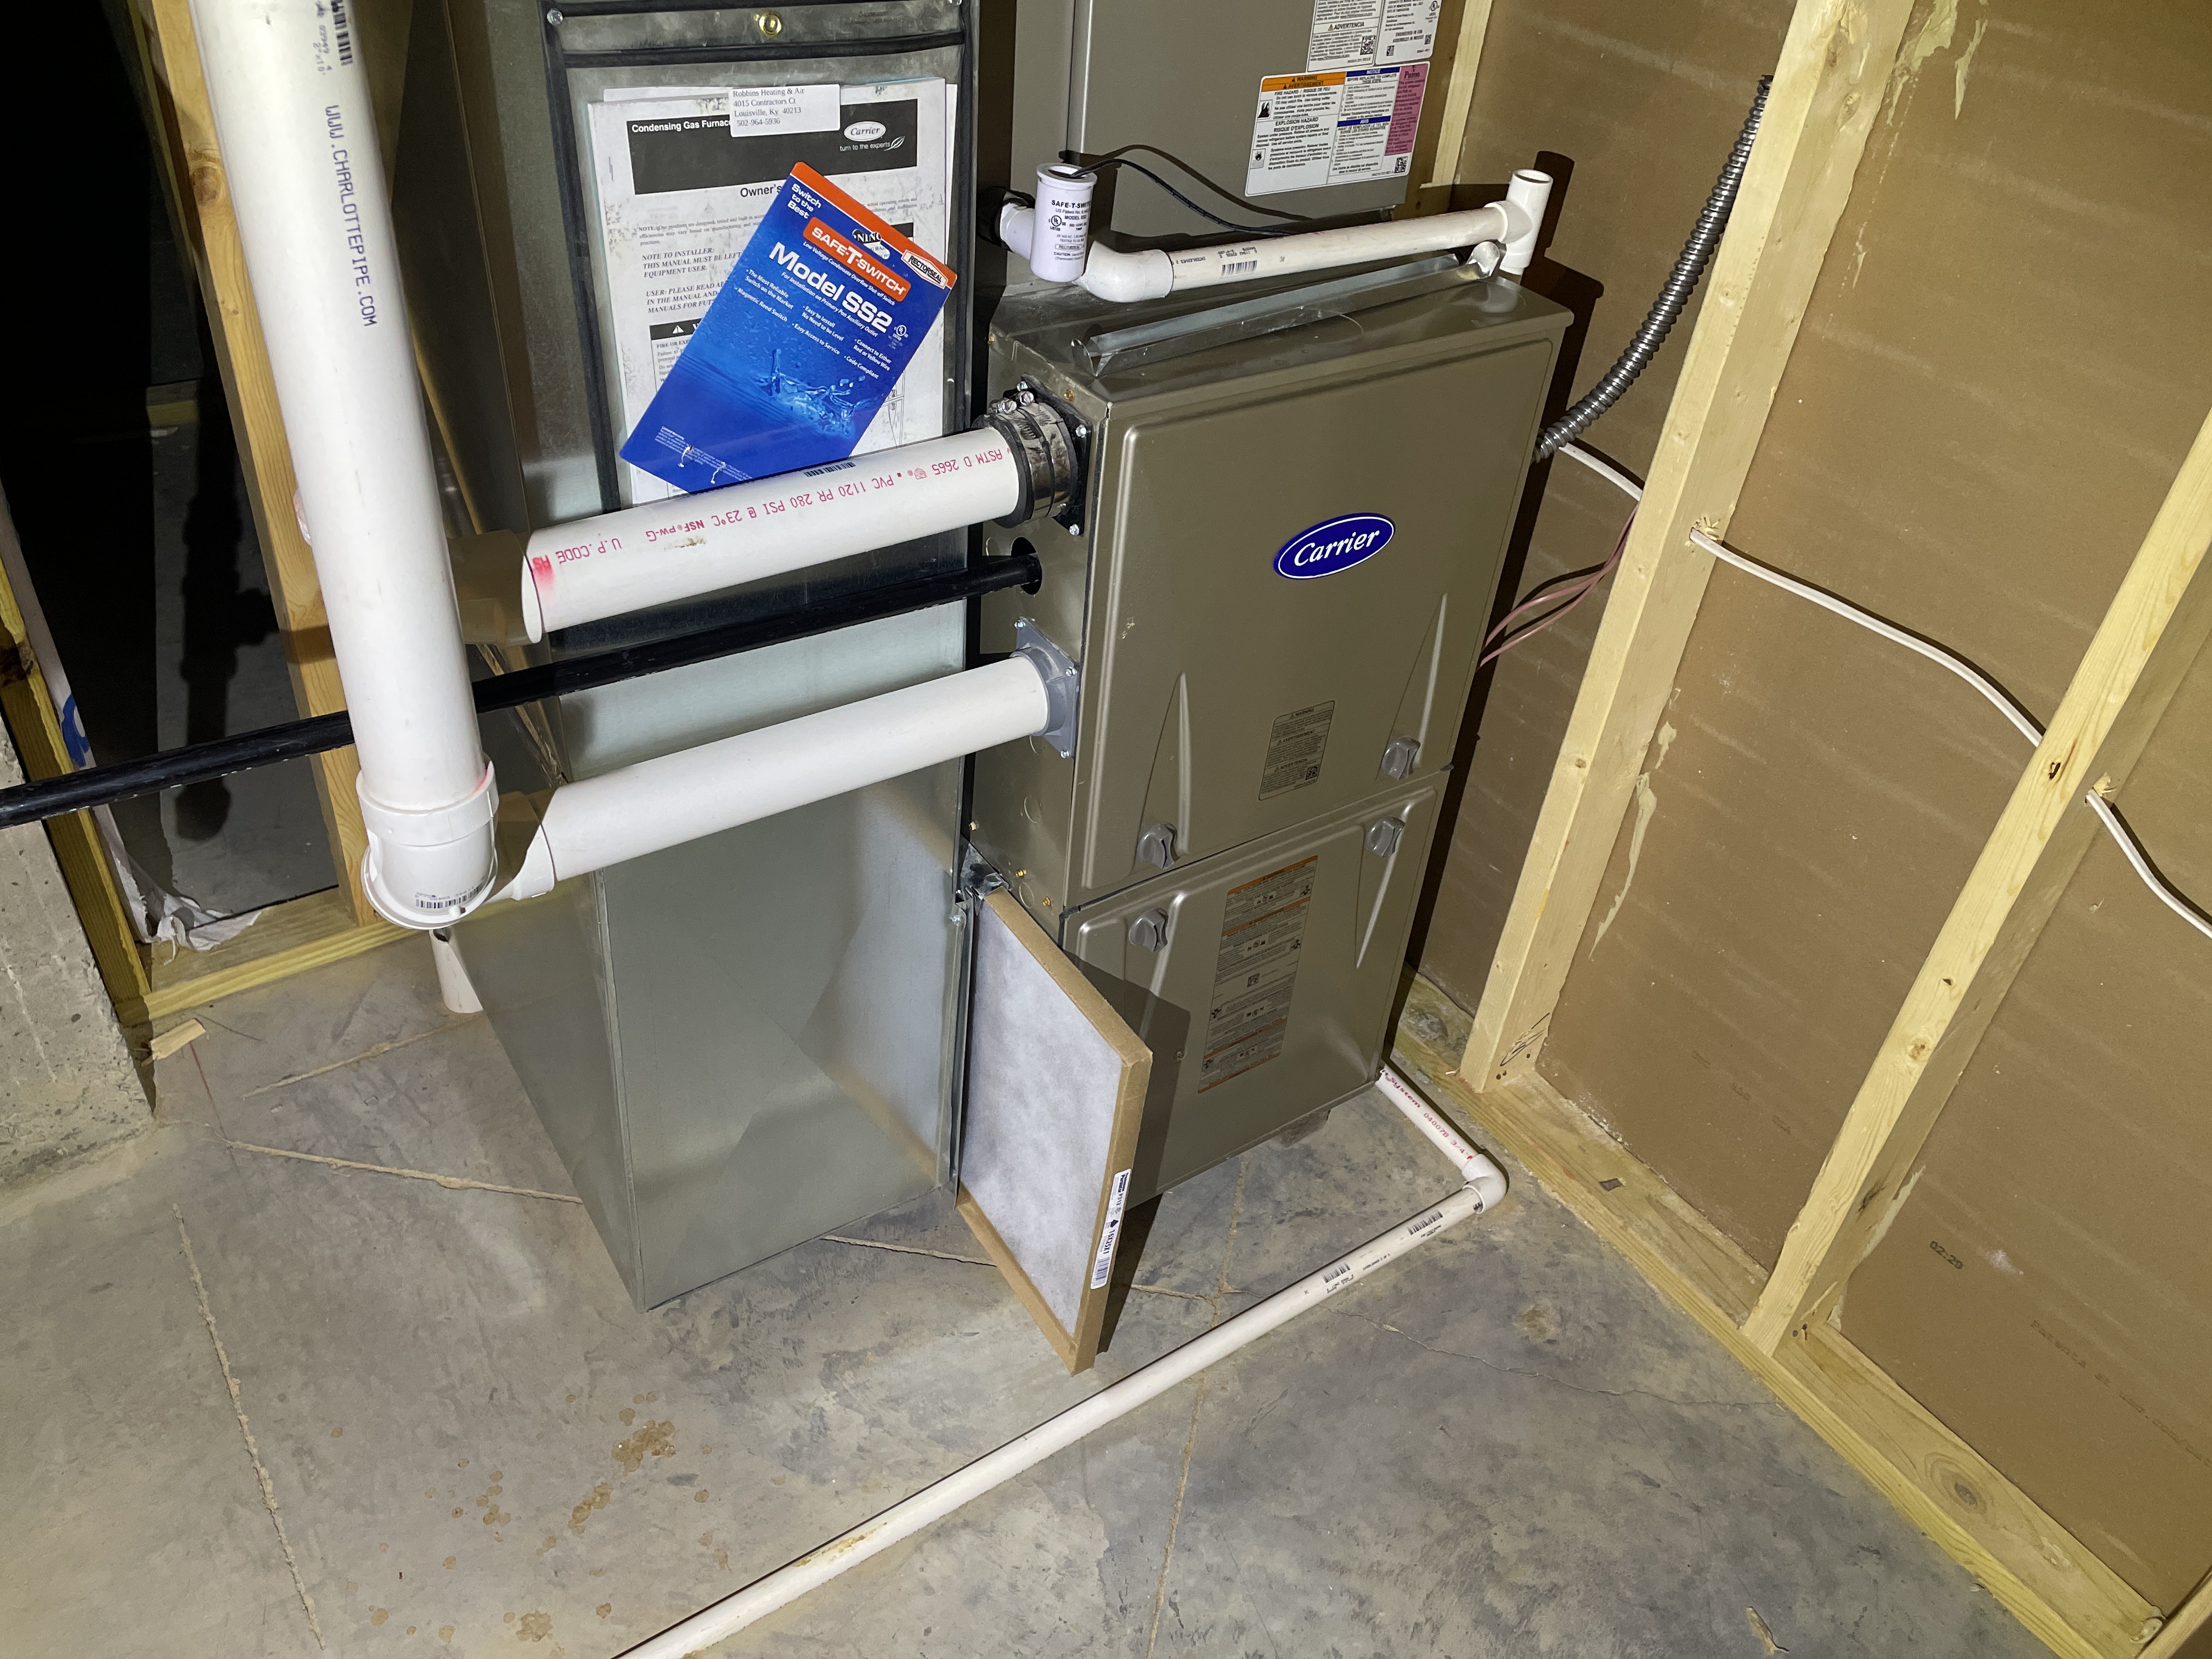
The inside of the HVAC system is dirty. More than likely the system was run without a filter during construction, and the cabinet and fan assembly is coated in dirt and dust. I can't see the inside evaporator coil, but more than likely it is coated as well. When the coil gets dirty and you turn on the air conditioning, the condensation inside the unit can cause the dirty to cake up and prevent proper airflow. You'll want to have the whole system cleaned, including the evaporator coil, to make sure things are working properly.
 |  |
 |
Air Filters
Understand that the primary function of the air filter is to protect the equipment--not your lungs. If a filter is too restrictive, the high static pressure may lead to a number of problems including burning out the fan motor or run capacitor, damage to the heat exchanger, poor efficiency, higher consumption of energy, etc.
The same can happen when you have no filter, an improperly sized/ fitting one, or one that is the correct size but is one in which the filter rack allows the filter to flop around, causing bypass of the filter media.
Aside from the adverse affects to a furnace, it will lead to clogging an attached evaporator coil, which inhibits airflow thus hindering performance. This often leads to overcharging and other silly attempts to "fix" the problem when the house doesn't cool or heat properly.
Keeping a clean, well fit filter is important to the health of your HVAC system. Your filter is located at the furnace. Be sure and change it every 30-60 days (or as needed).
 |
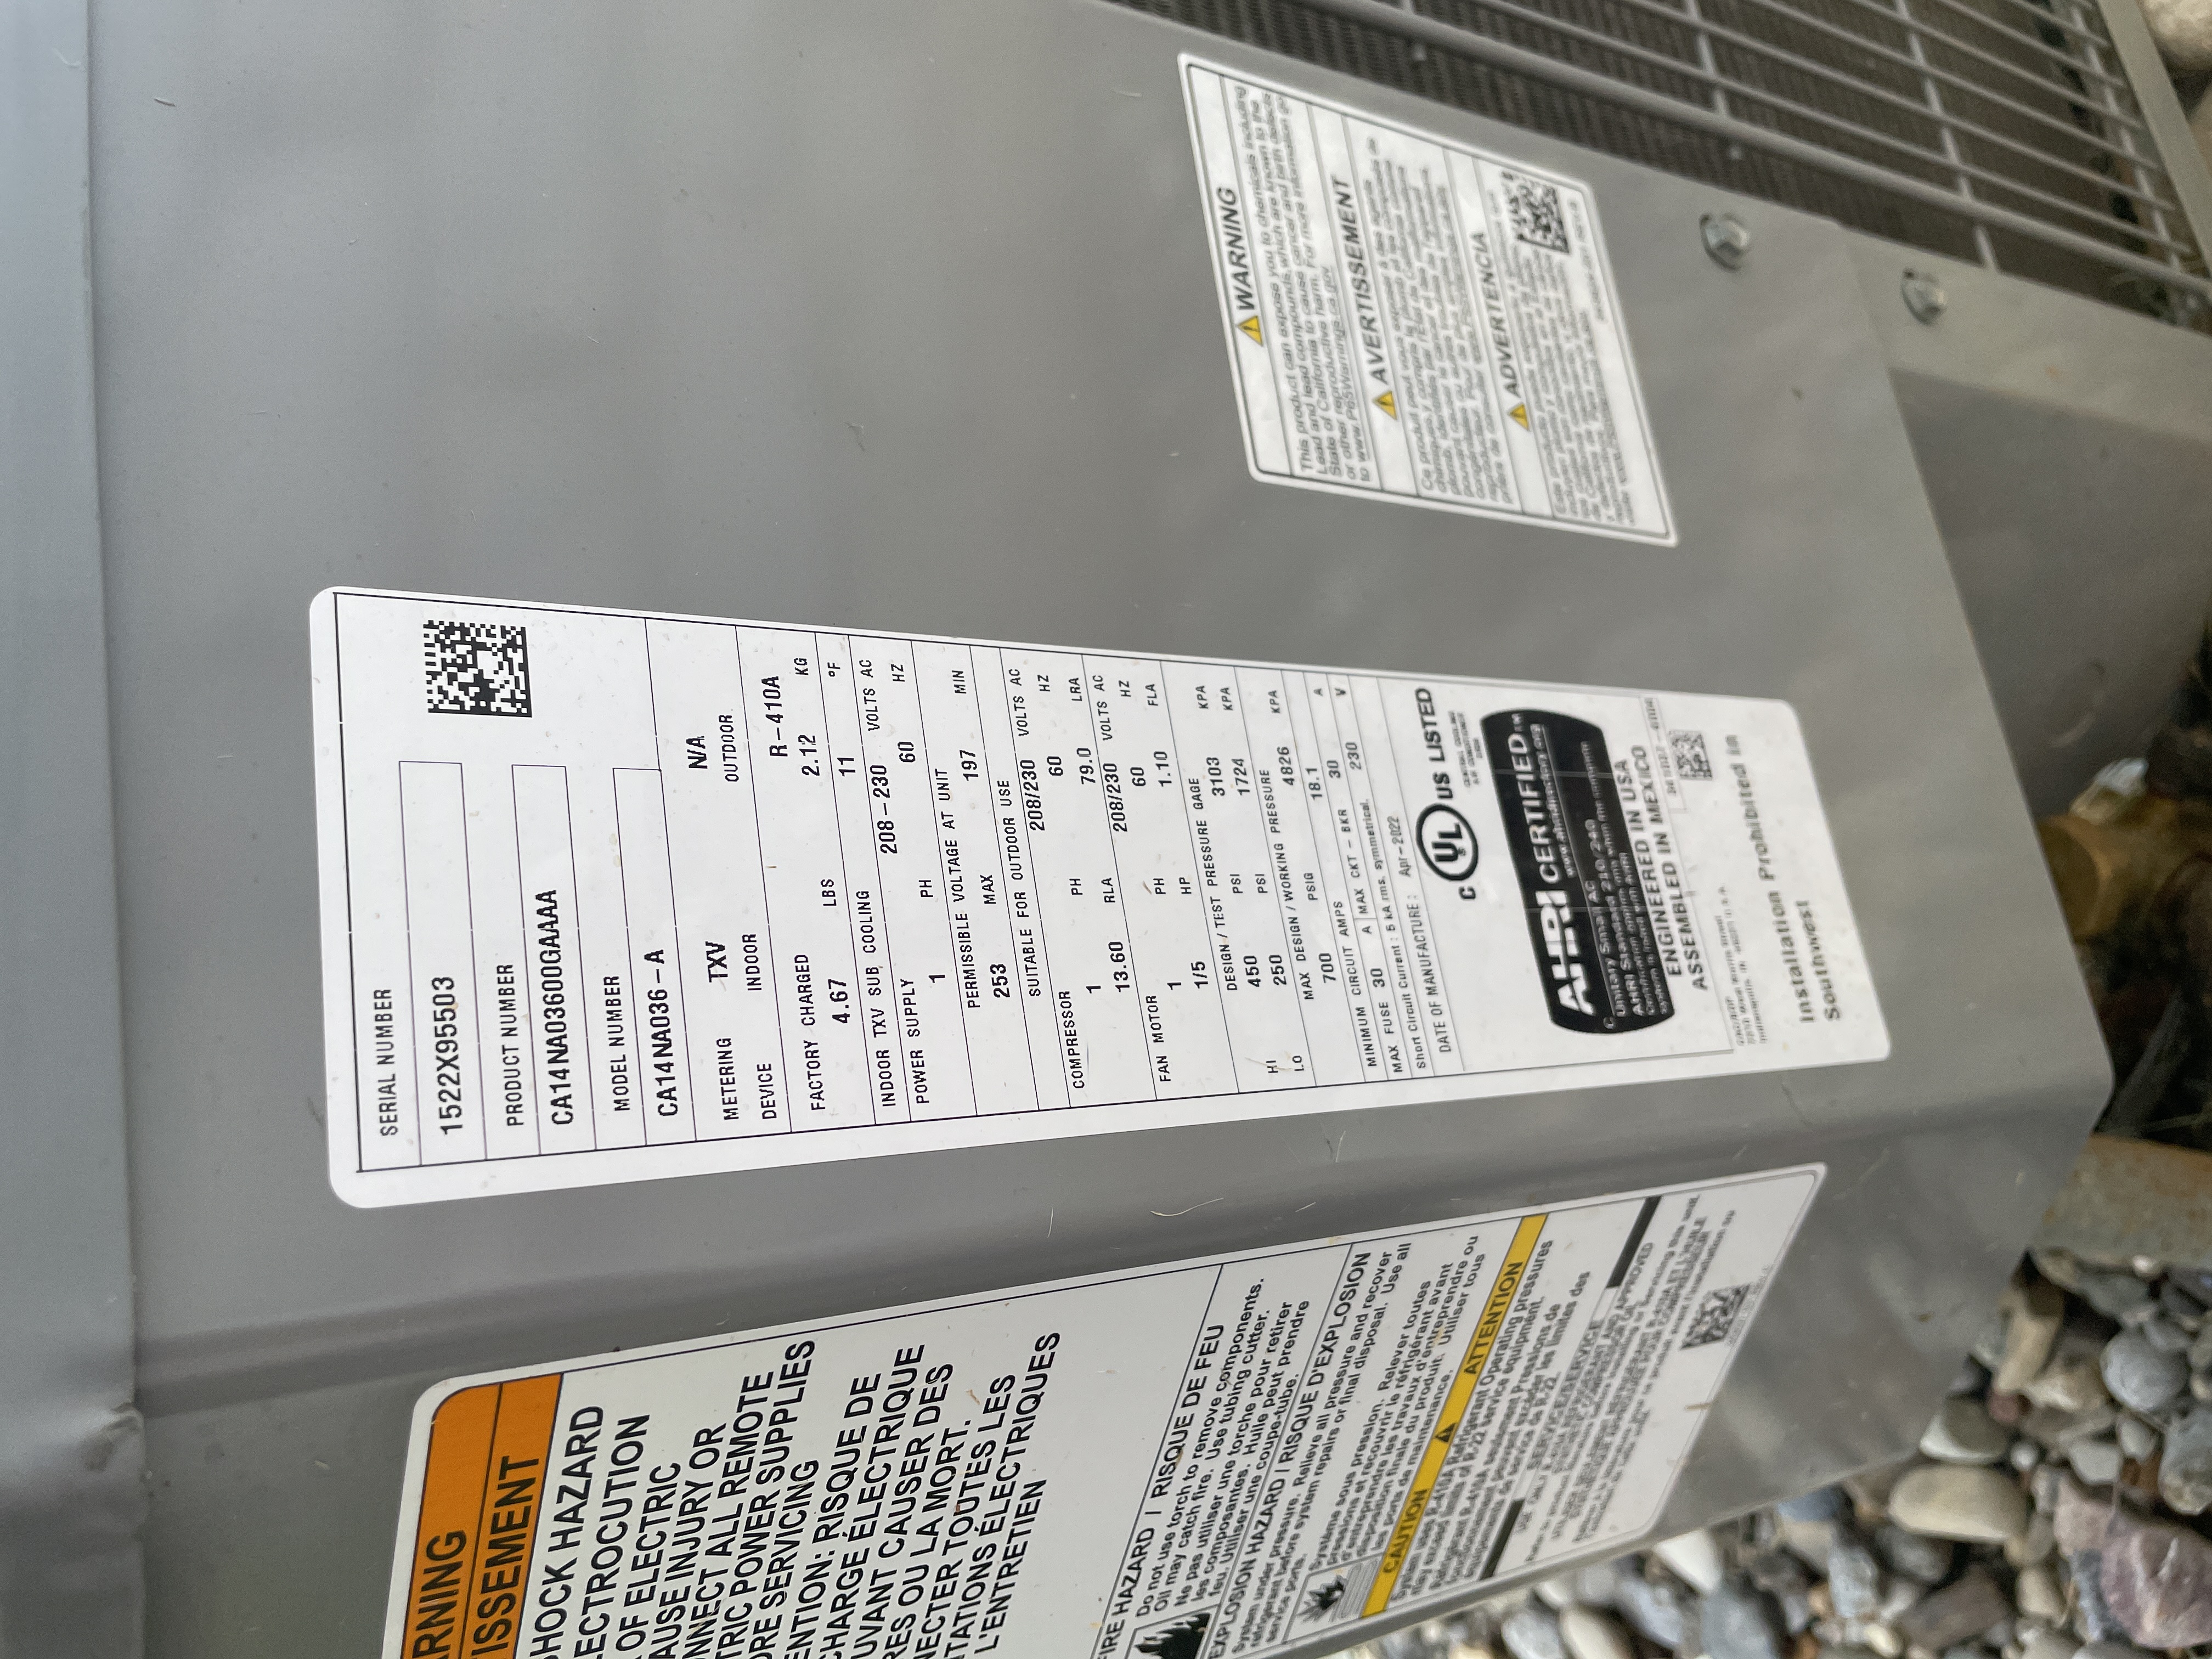
Cooling Systems and Heat Pumps
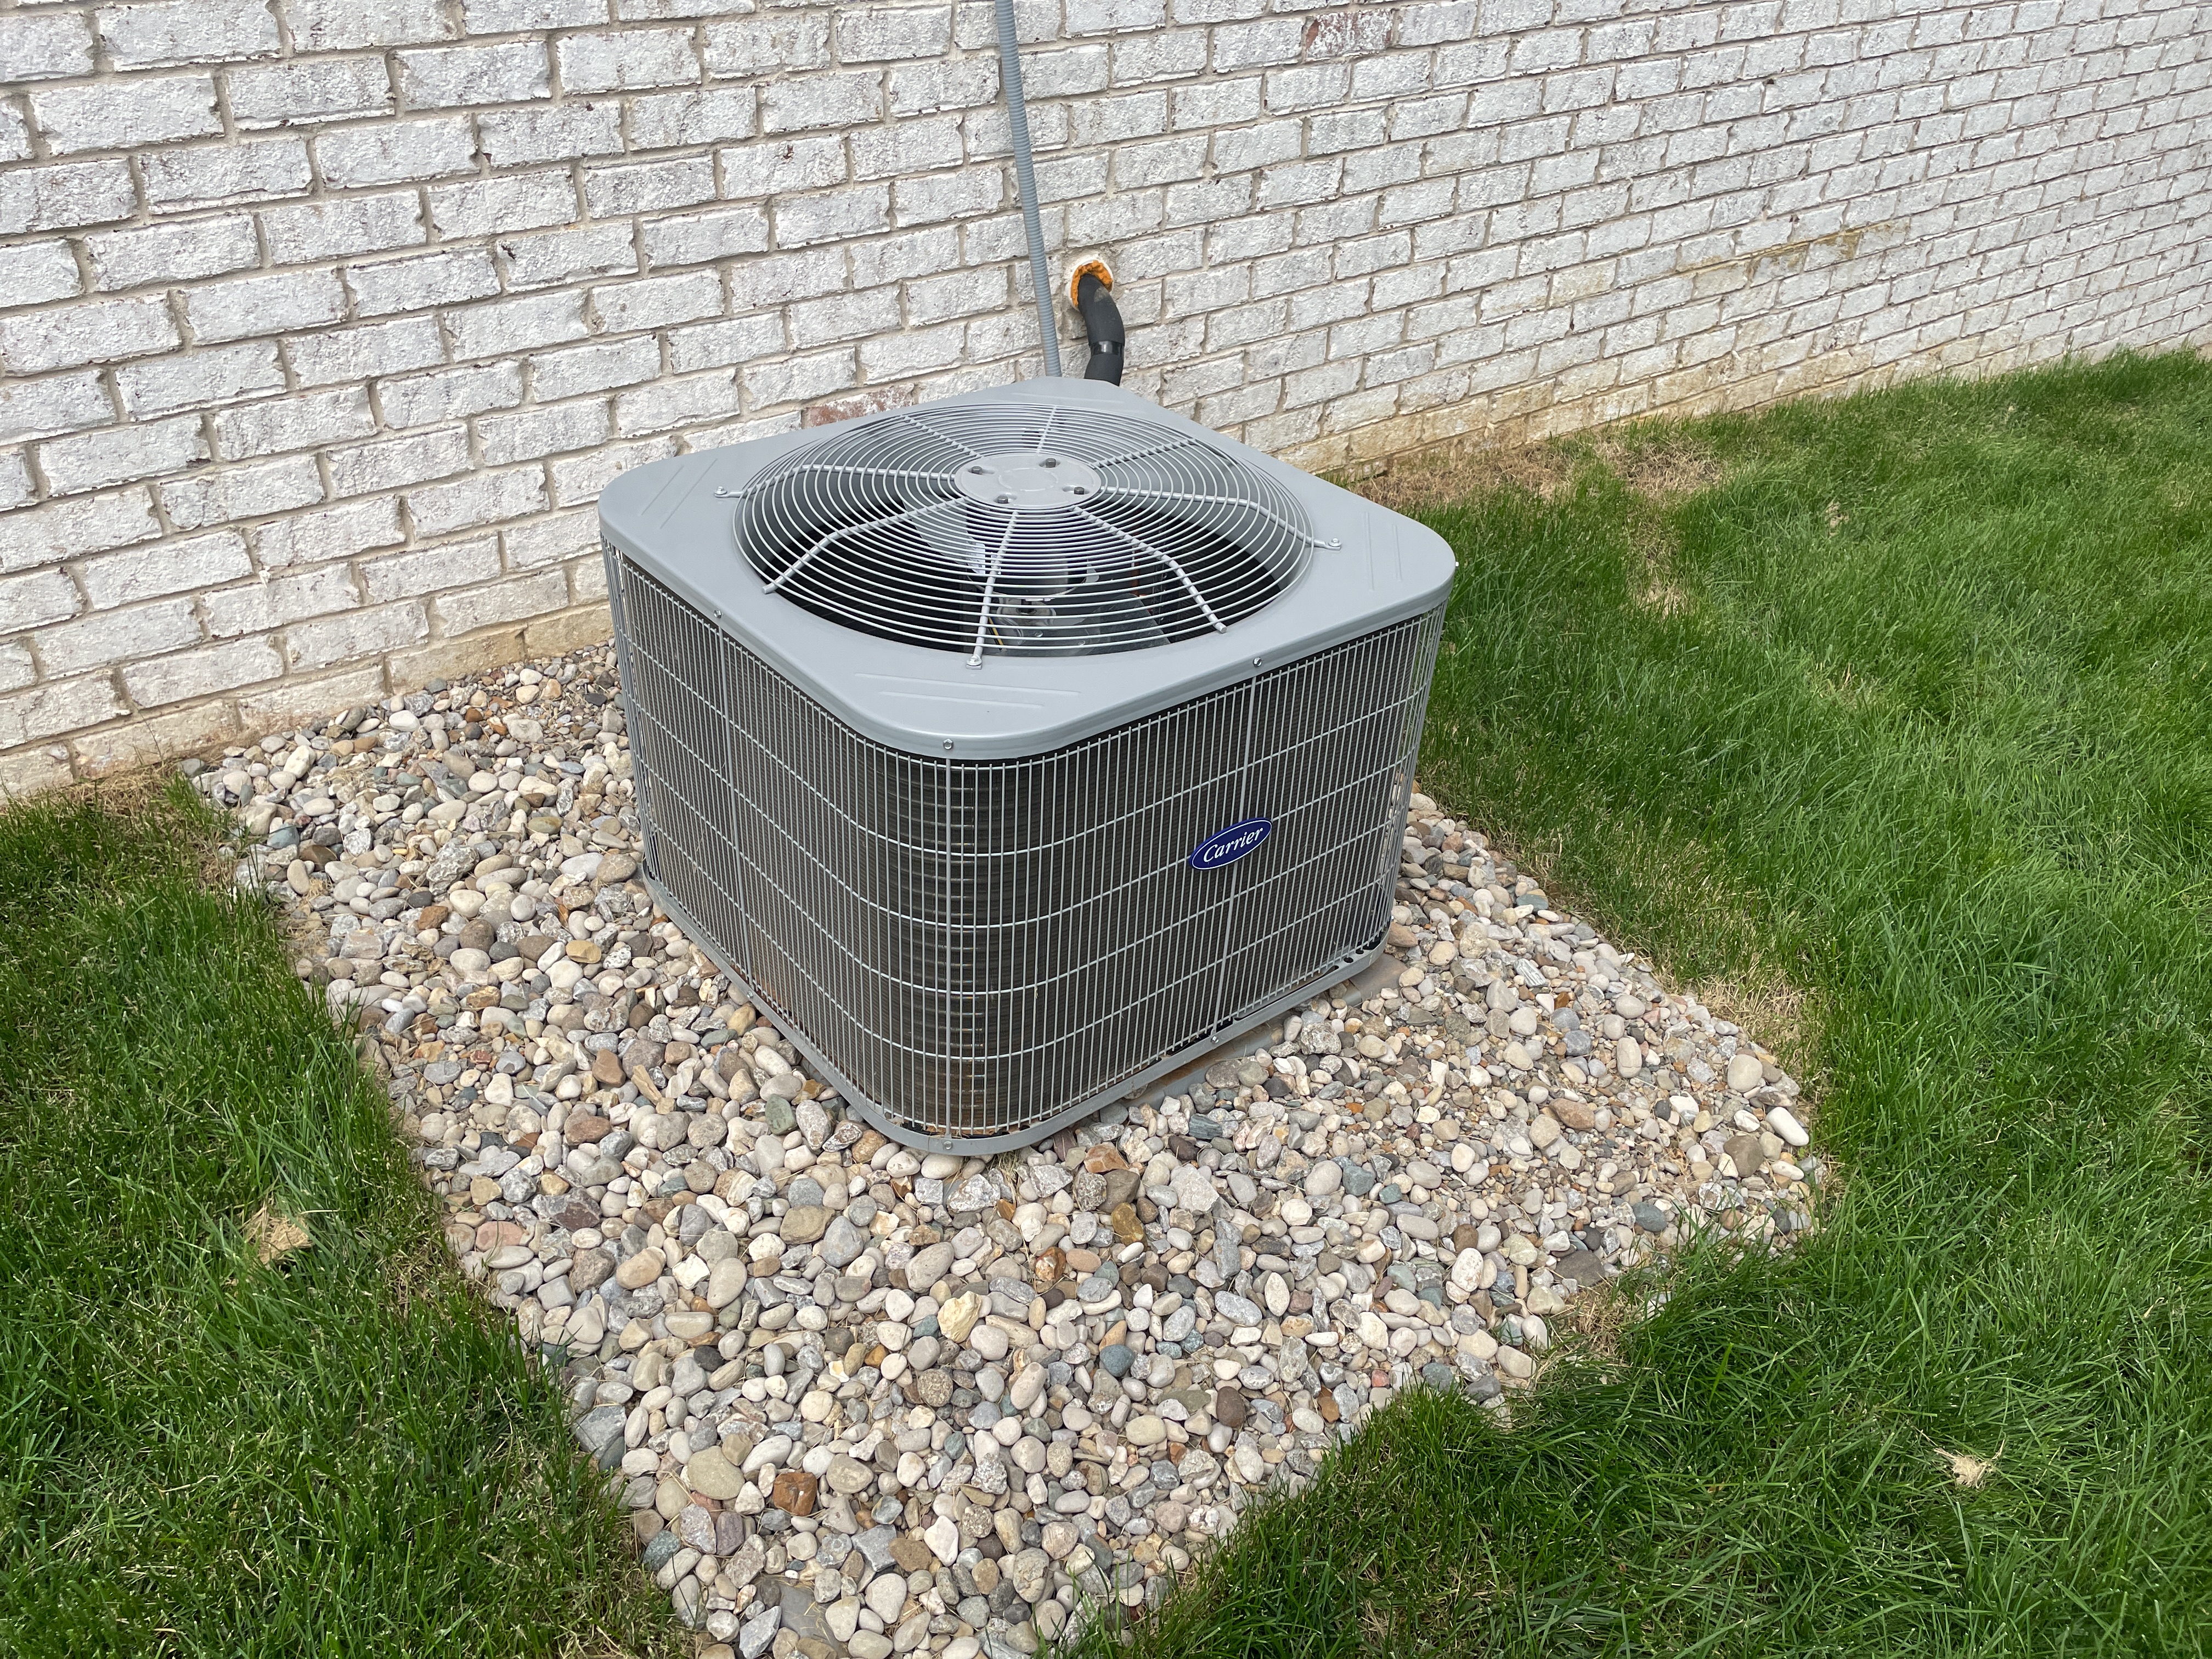
Data Plate: Shown here
The data plate for the outdoor condensing unit is here.
 |  |
System Type: Air Source
Heating and Cooling Distribution Systems
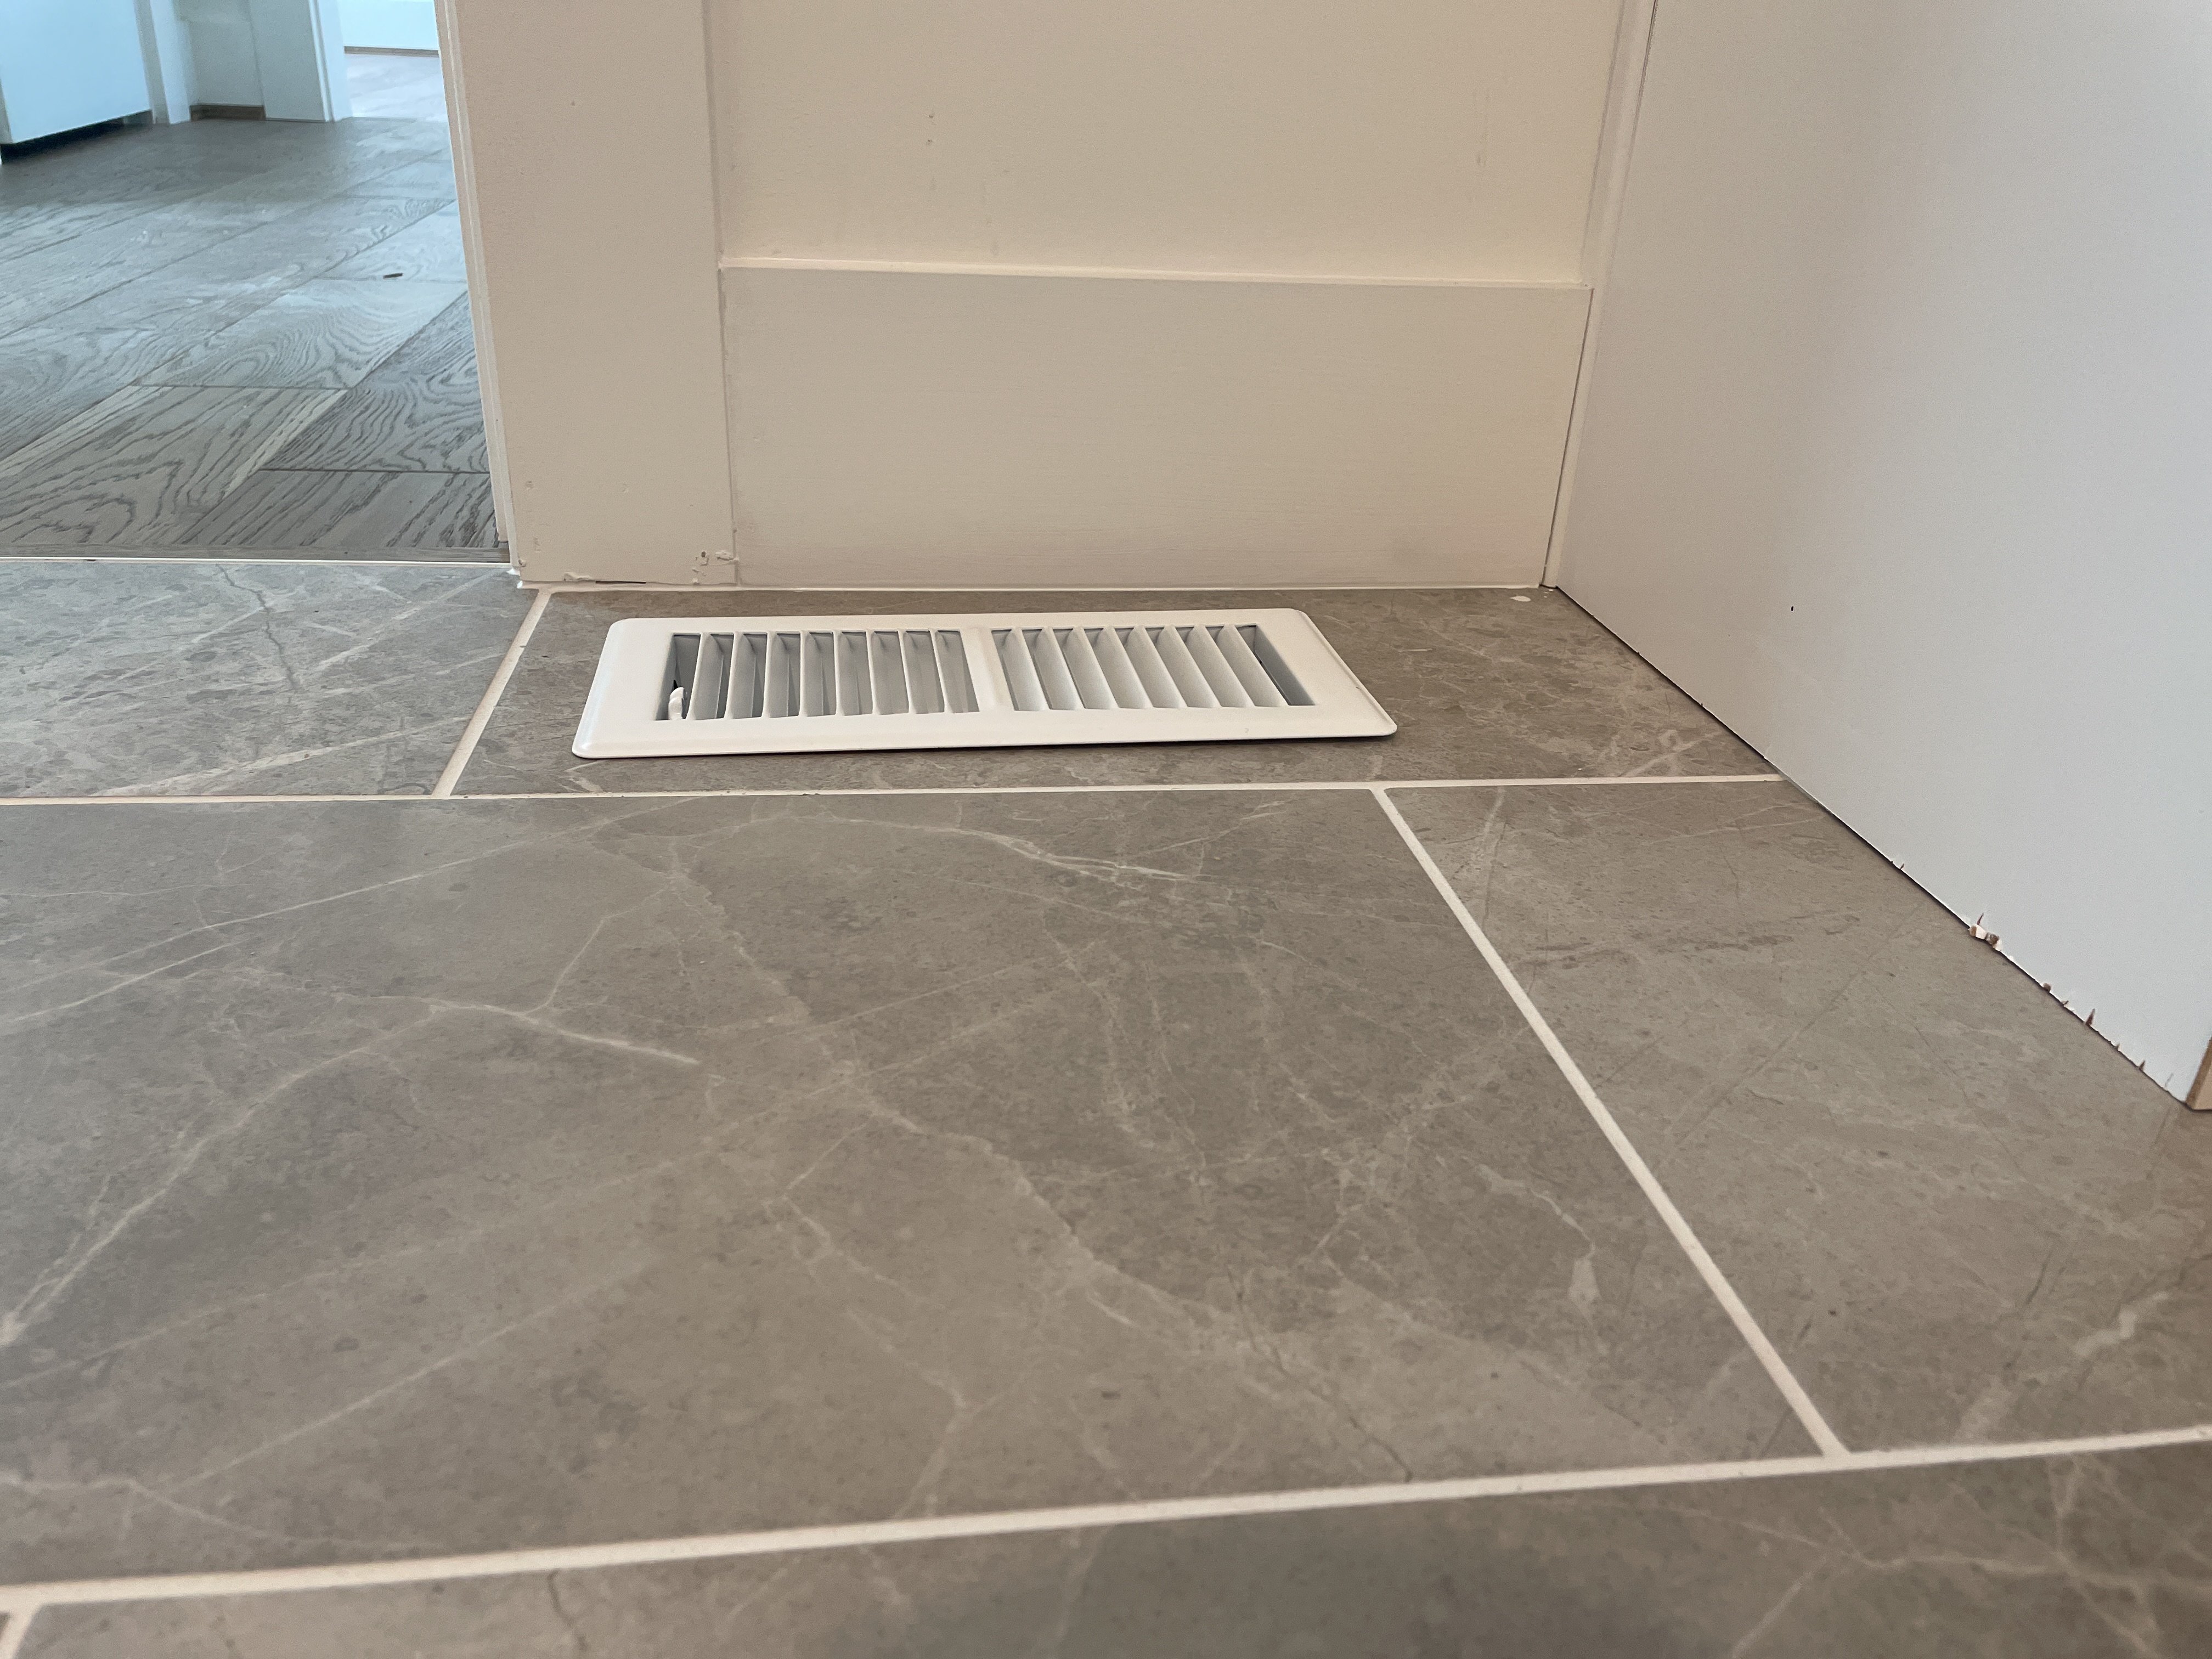
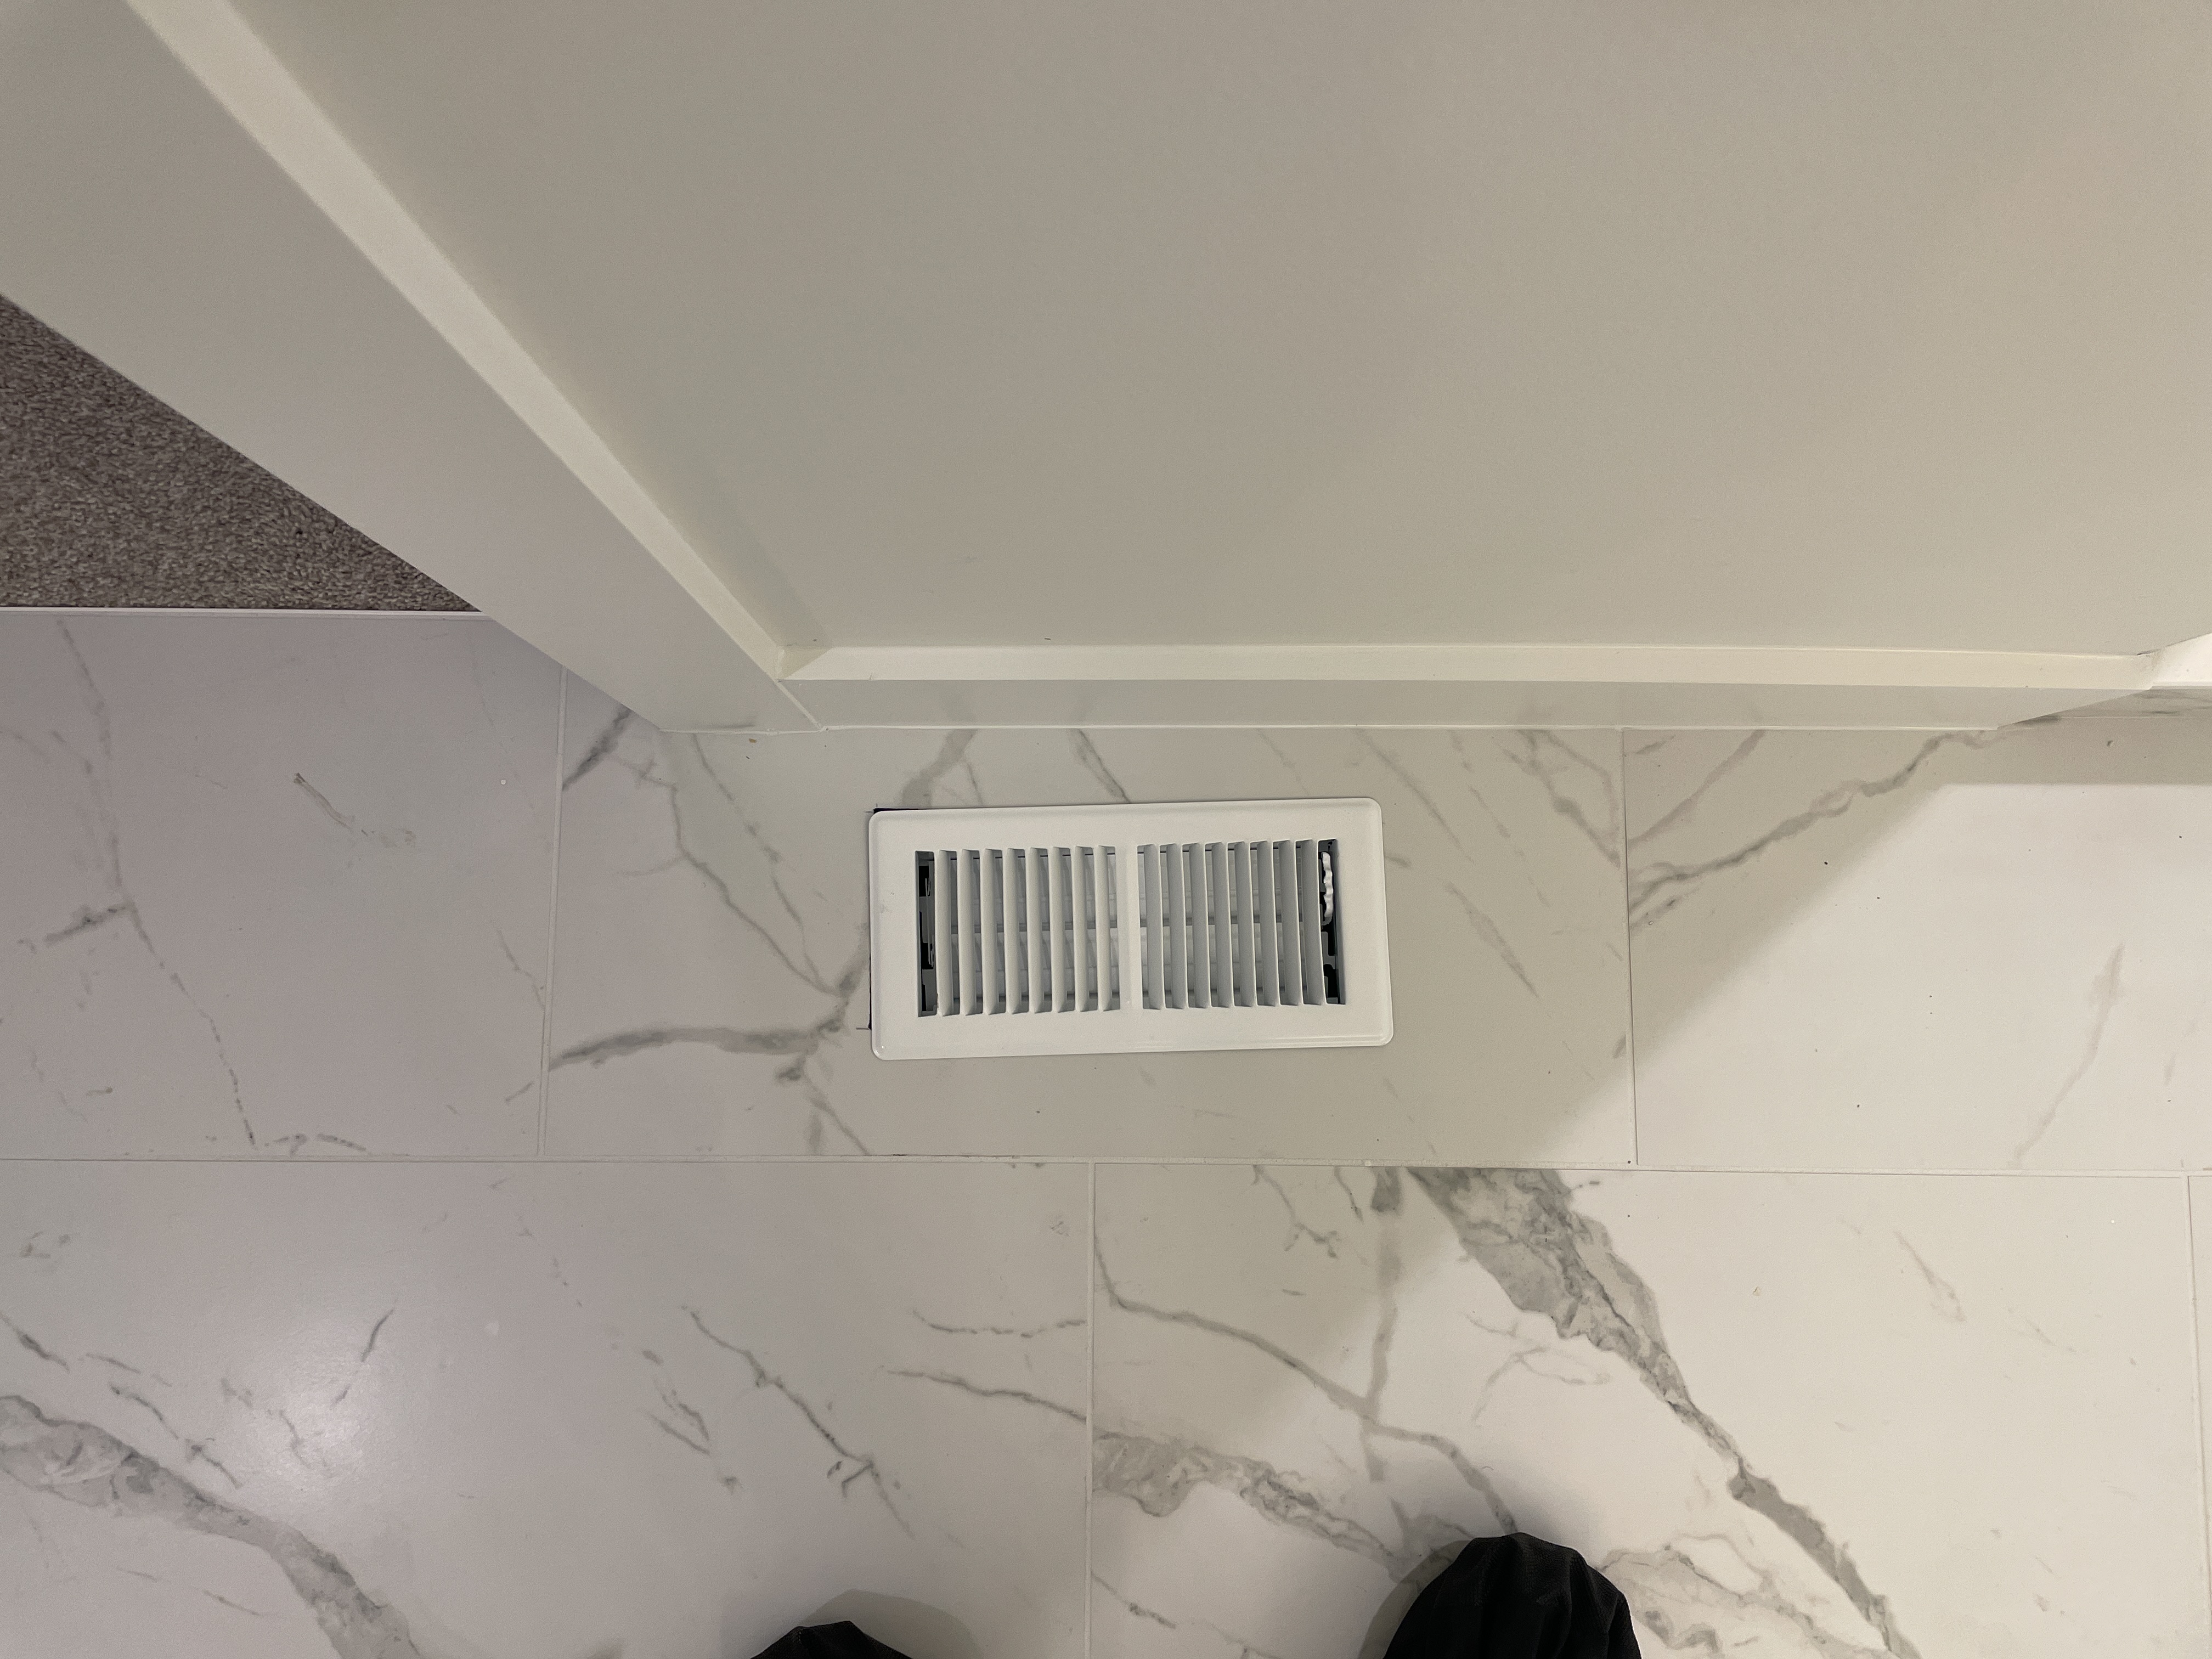
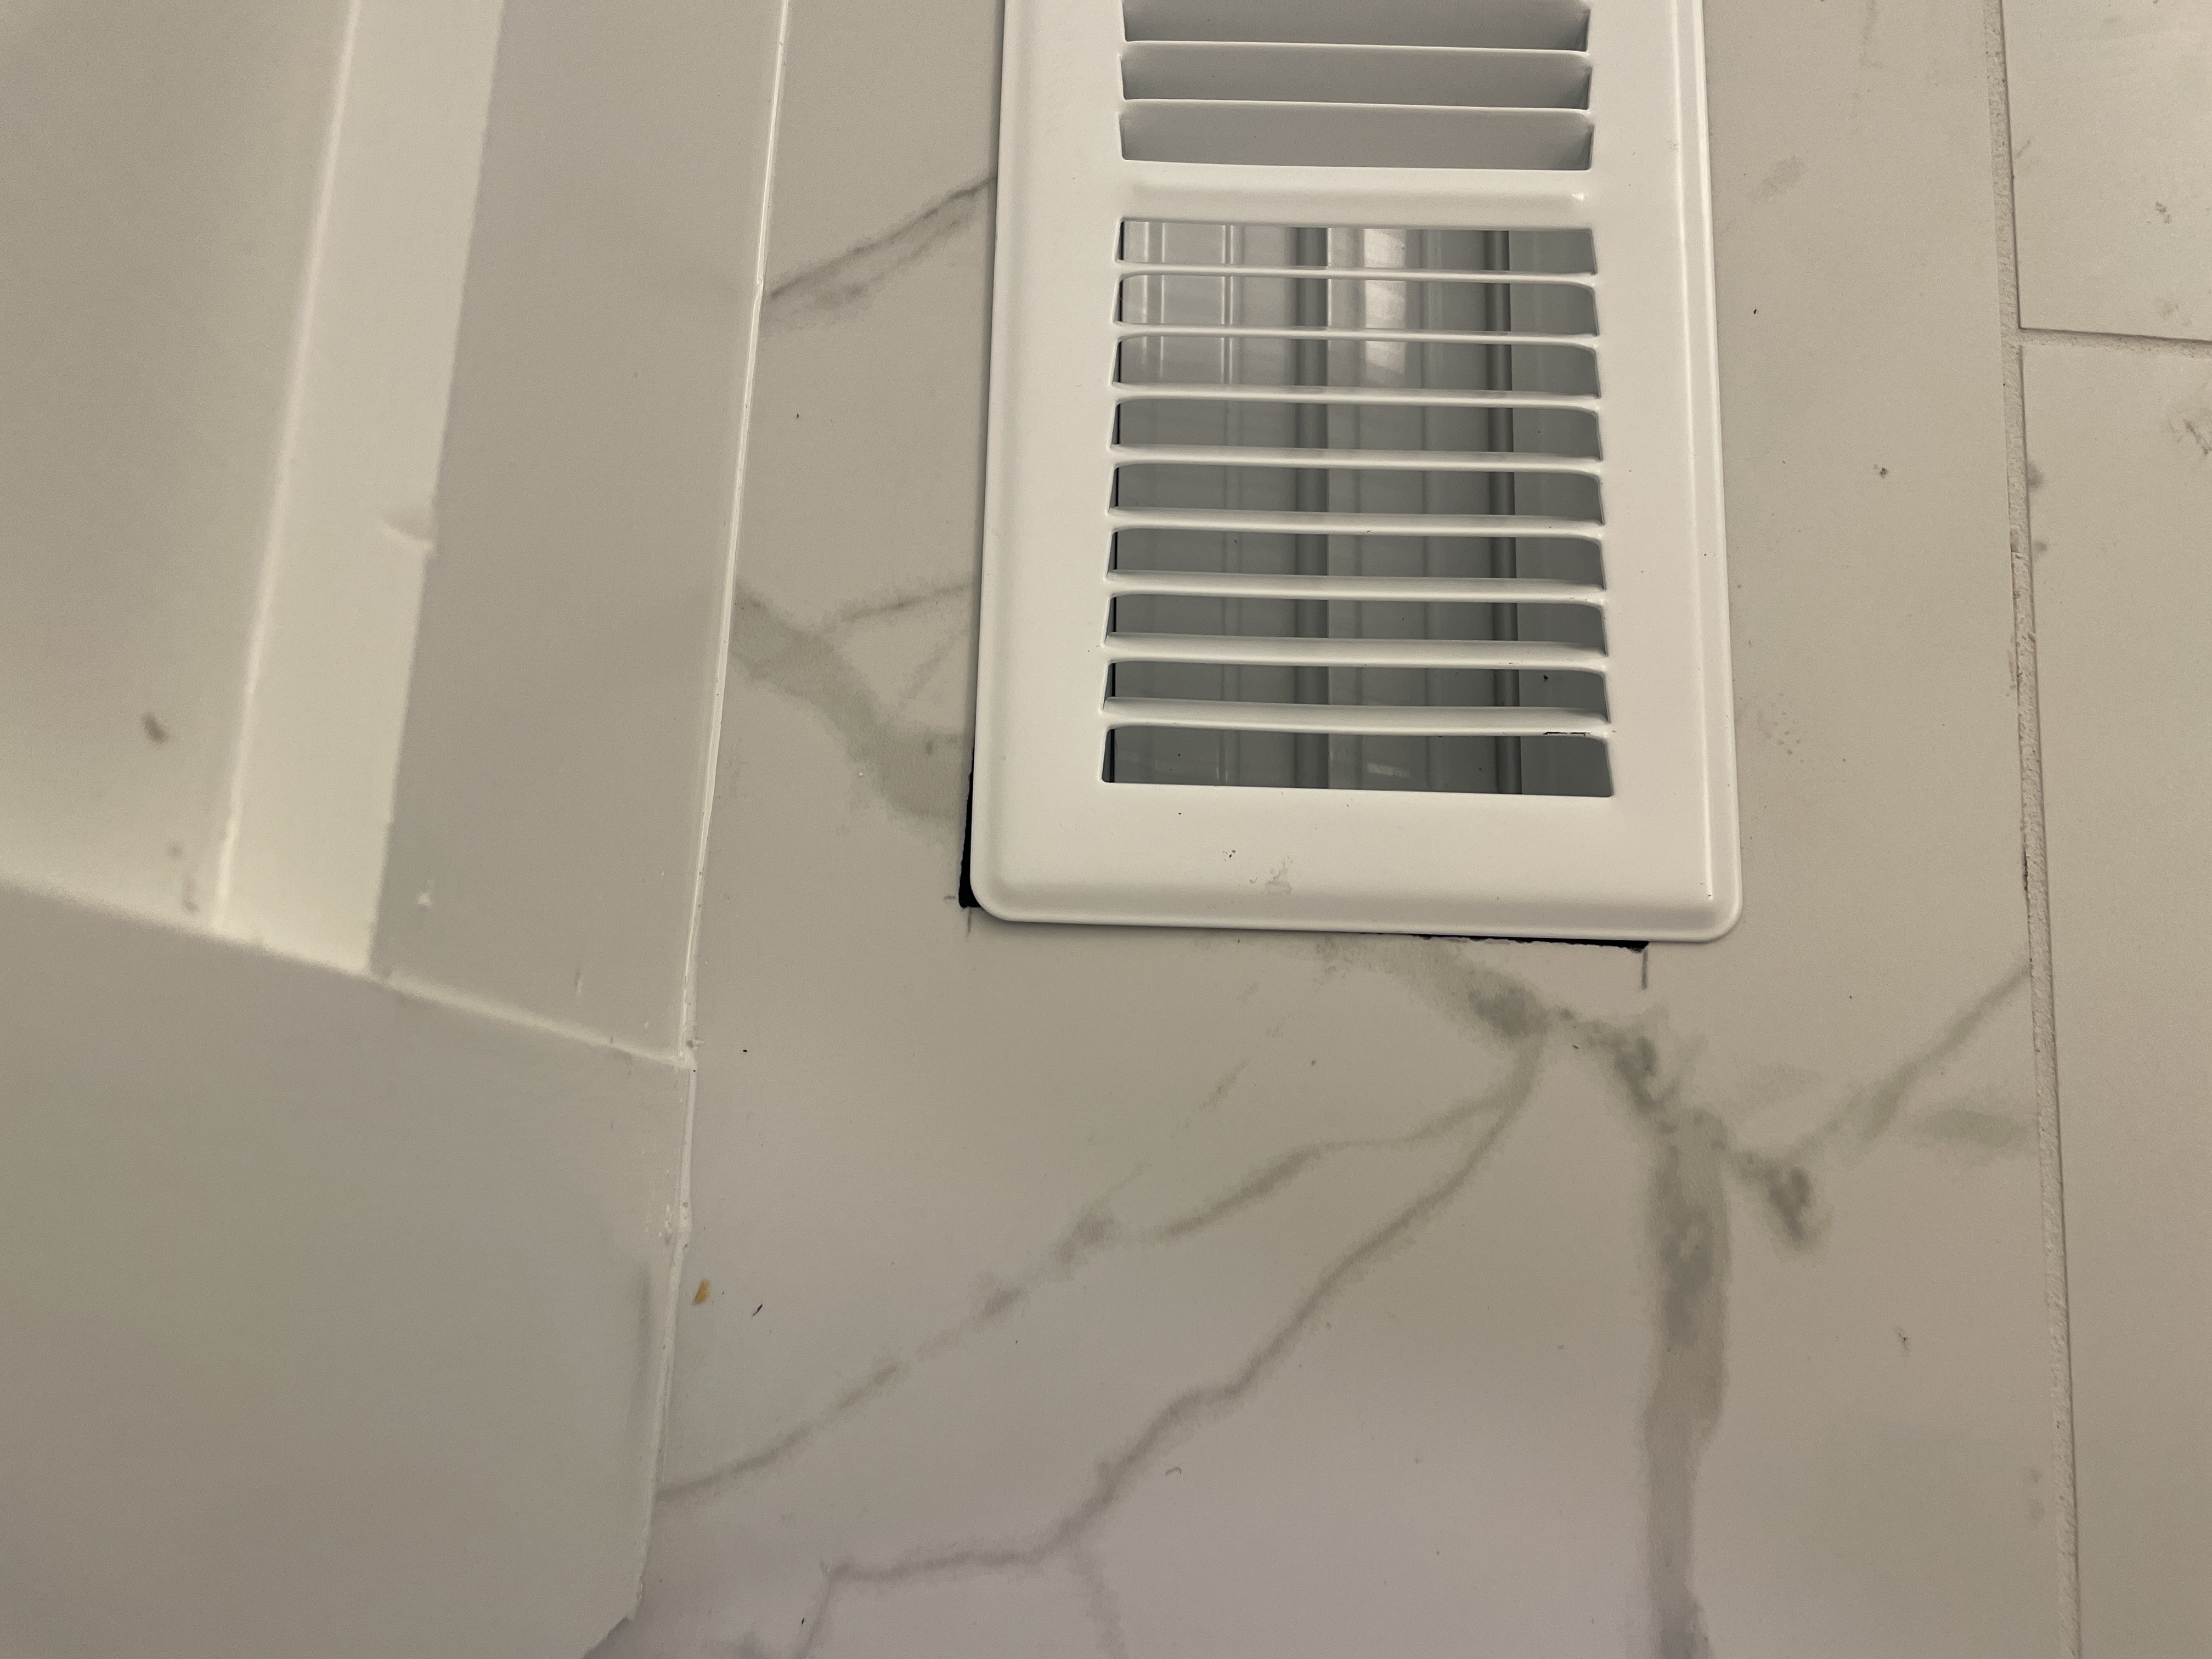
The supply registers in the guest bathroom and master bathroom are not sitting flush with the floor. This is usually due to the ductwork or tile not being opened wide enough for the metal grill to lay flat. Have the builder correct the installation as needed.
 |  |
 |
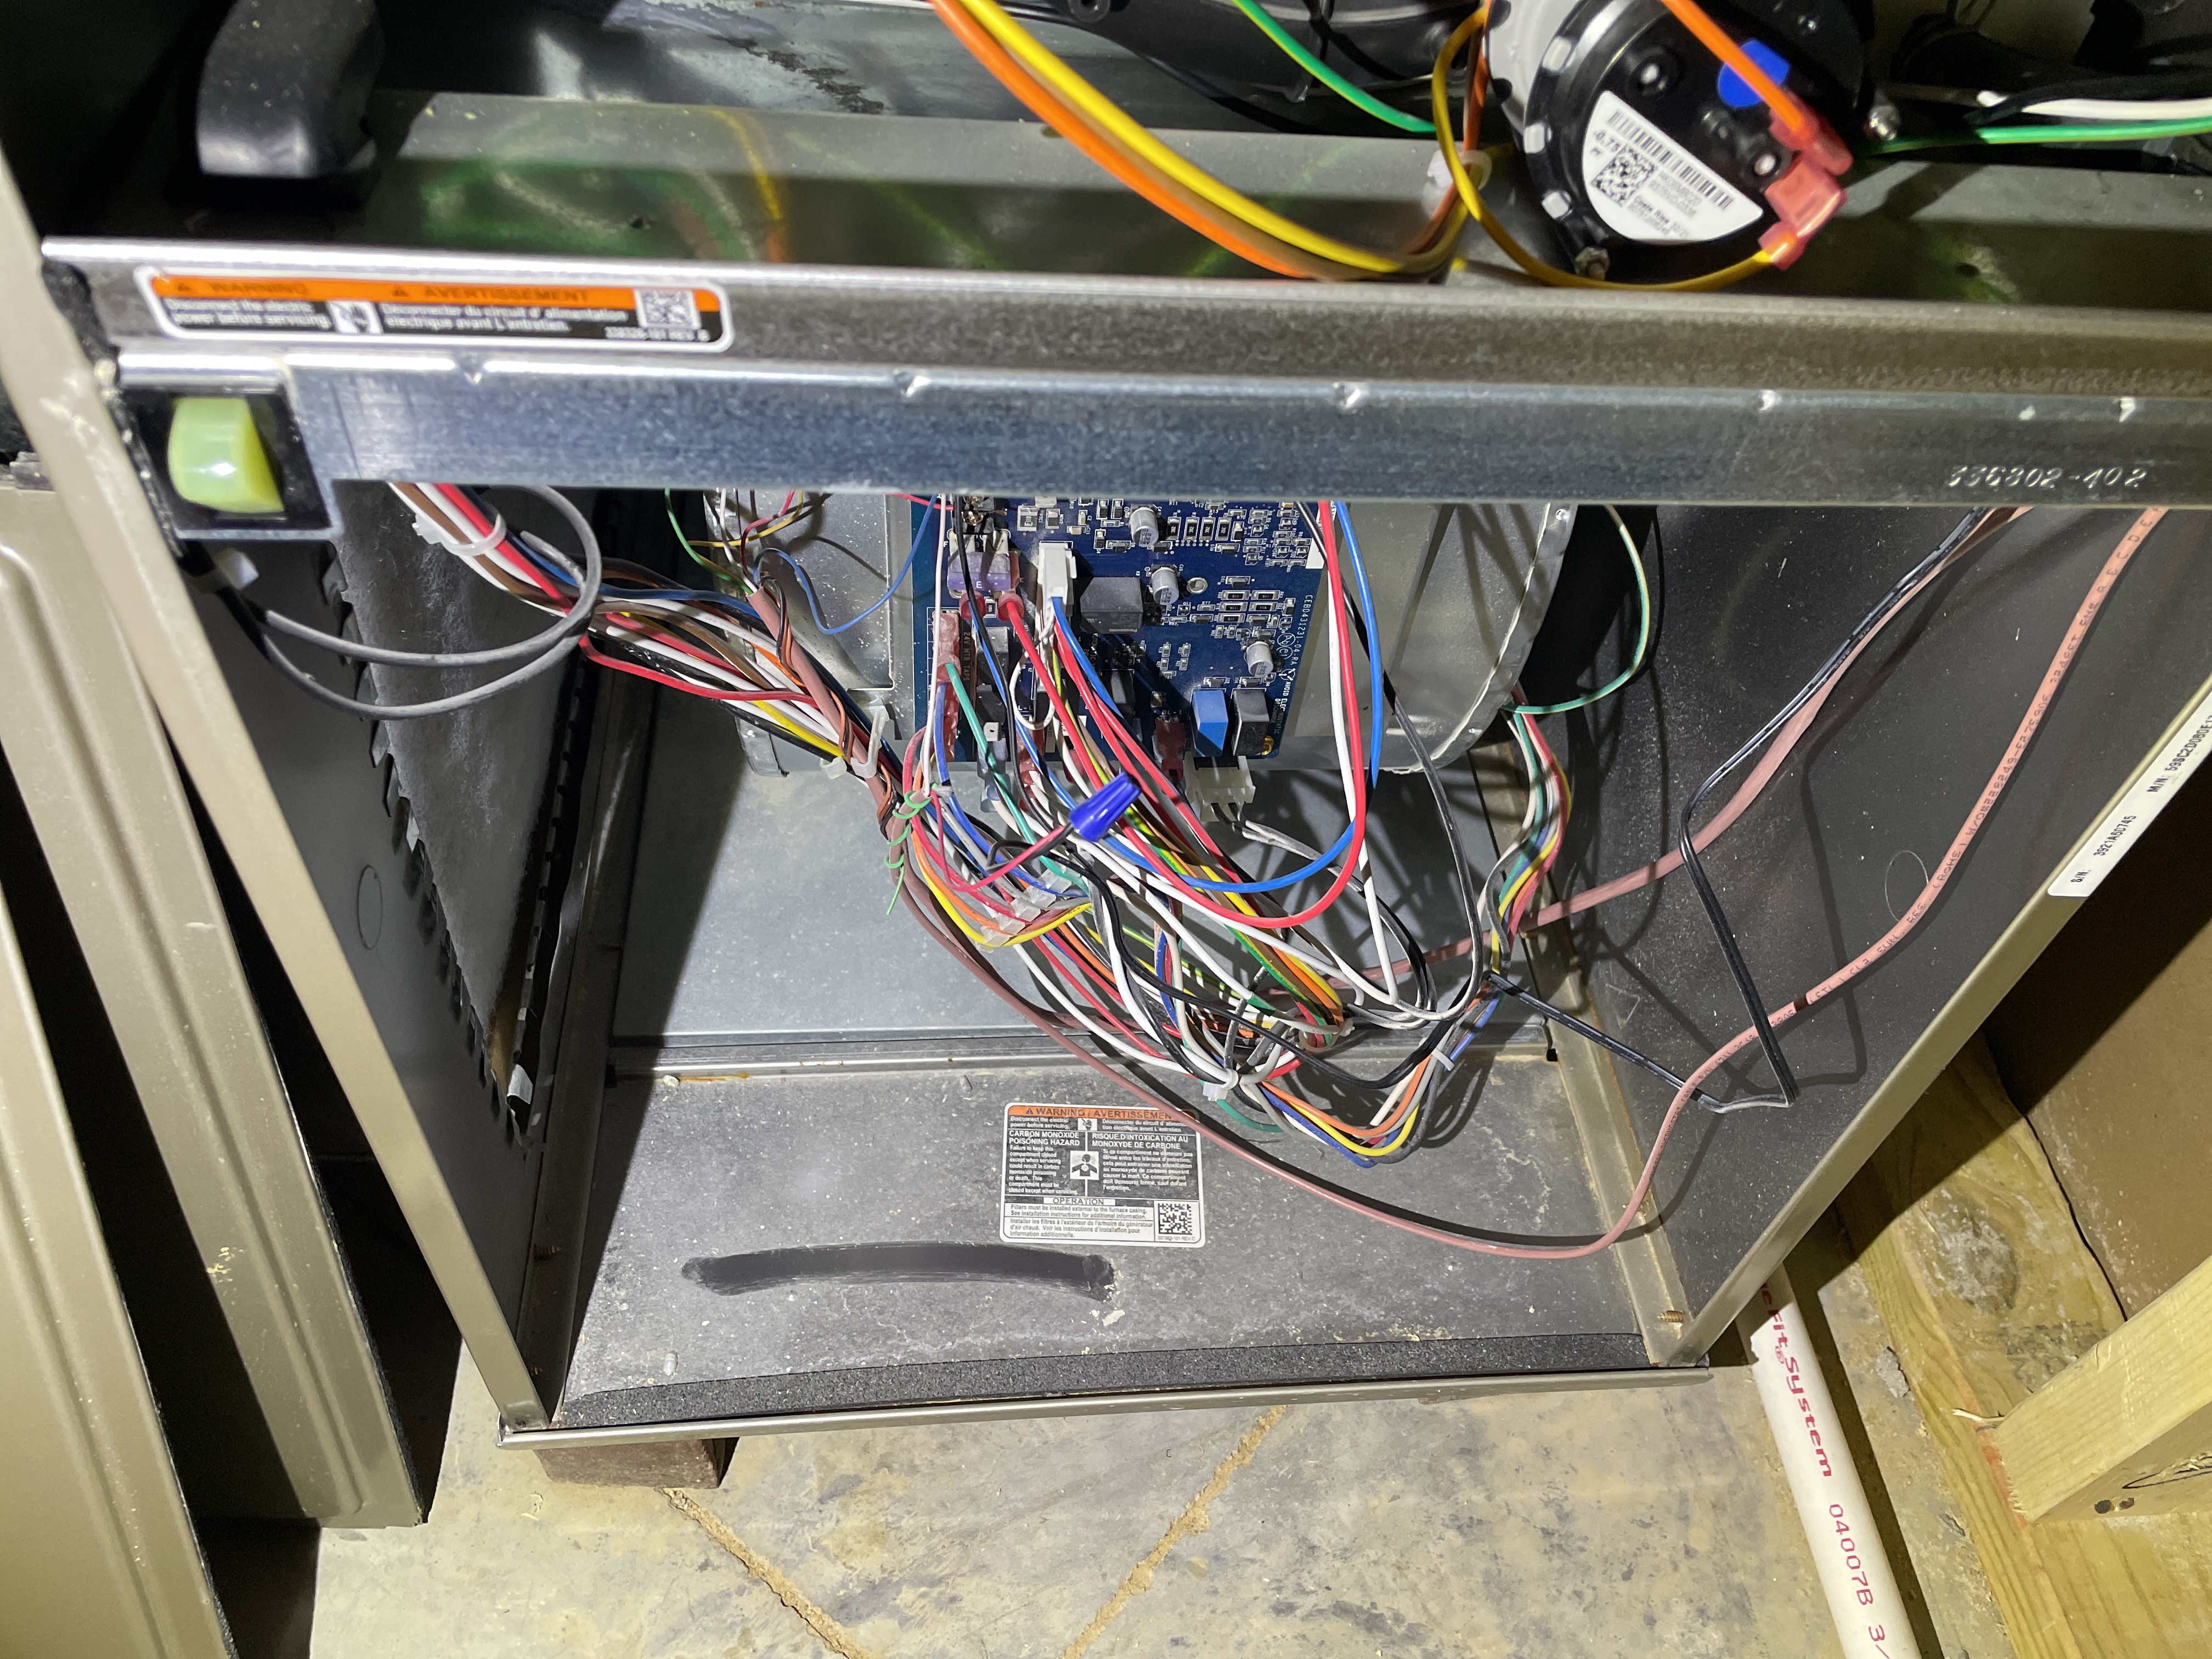
The return ductwork is not connected to the body of the furnace along the bottom edge. This large gap will allow air to be drawn in under the filter and not through the filter. This may explain why the furnace cabinet is so dirty. There is also a chance that the evaporator coil is dirty from the unfiltered air being drawn into the unit.
Have the ductwork repaired/sealed as needed so the return air will have to pass through the filter and not around it.
You will also want to have the system cleaned to eliminate the risk of a clogged evaporator.
 |
Gas Fireplaces
The fireplace did come on when tested. To light the unit simply flip the light switch to the right of the mantle.
🚿 Plumbing
Main Water Service Line
Main Water Shut-Off: Basement
The main water shut-off is located along the side wall of the basement.
Water Heater
Manufacturer: Bradford-White
System Type: Tank
Size: 50 gal
Energy Source: Electricity
💧 Additional Plumbing
Sump Pumps and Drains
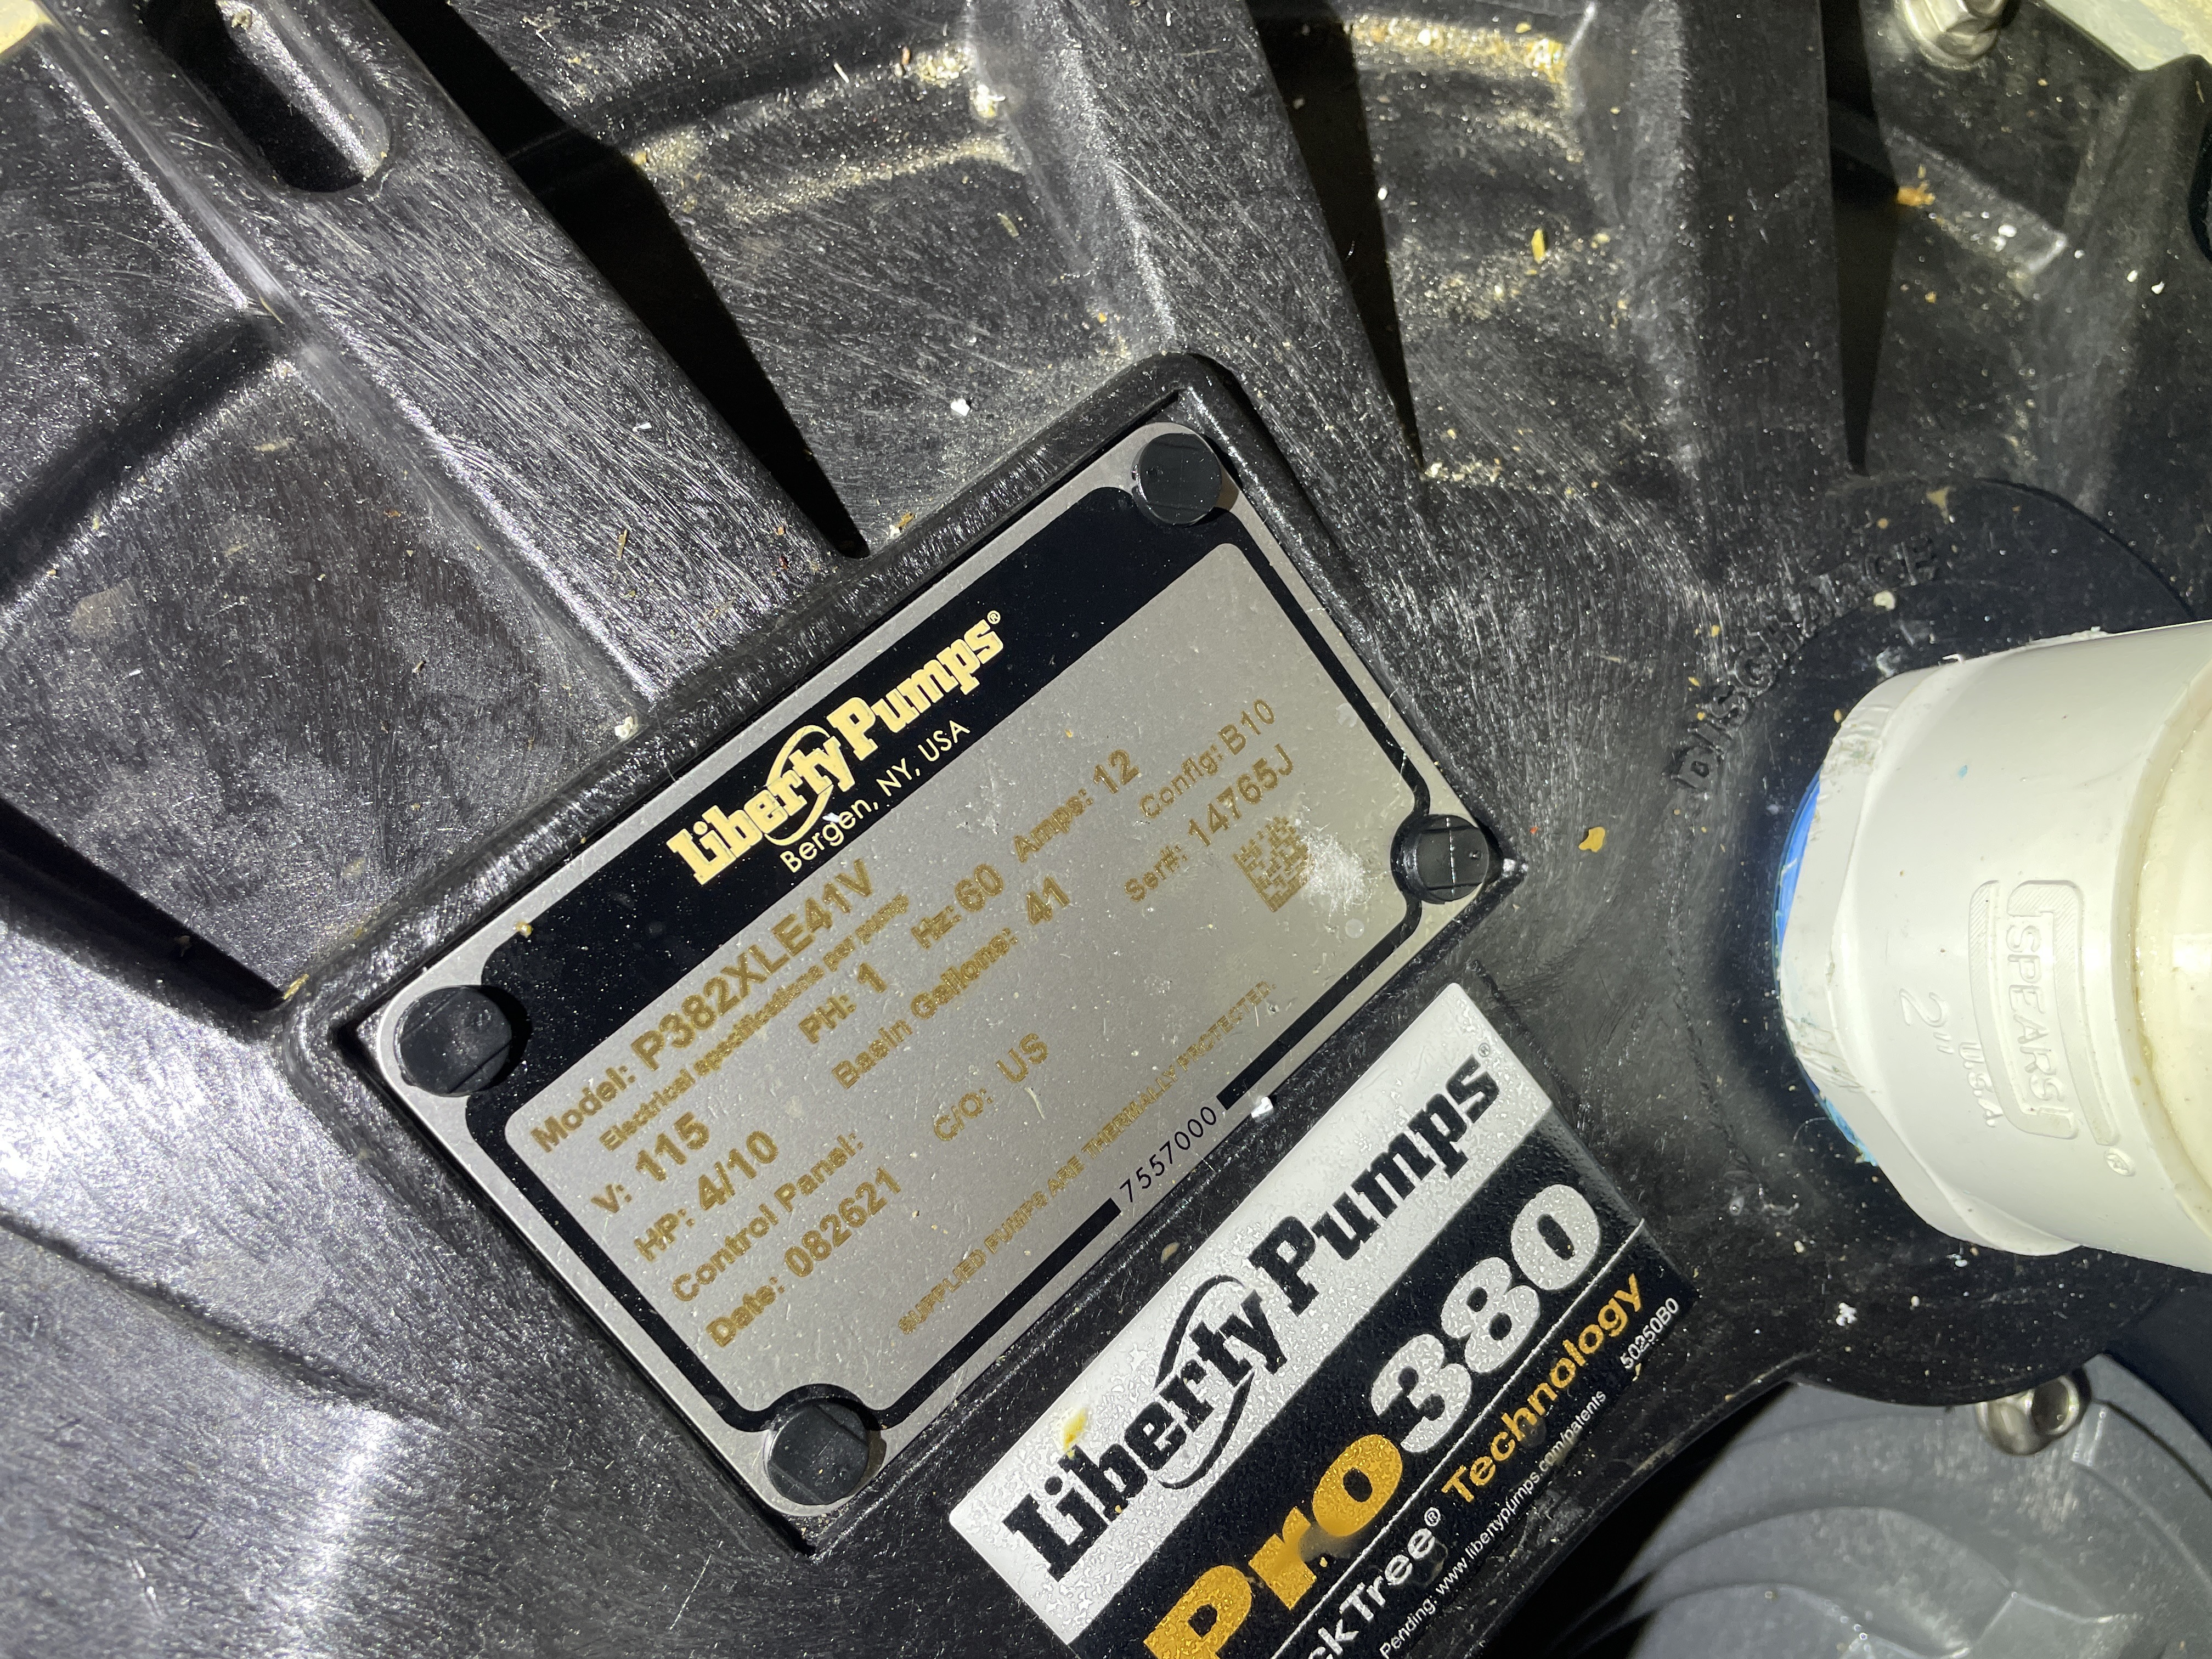
The discharge line for the sump pump is terminating at the foundation of the home. Have this extended away from the house as much as possible. Sump pumps that discharge near the foundation usually end up causing water intrusion in the basement as they recycle the same water over and over.
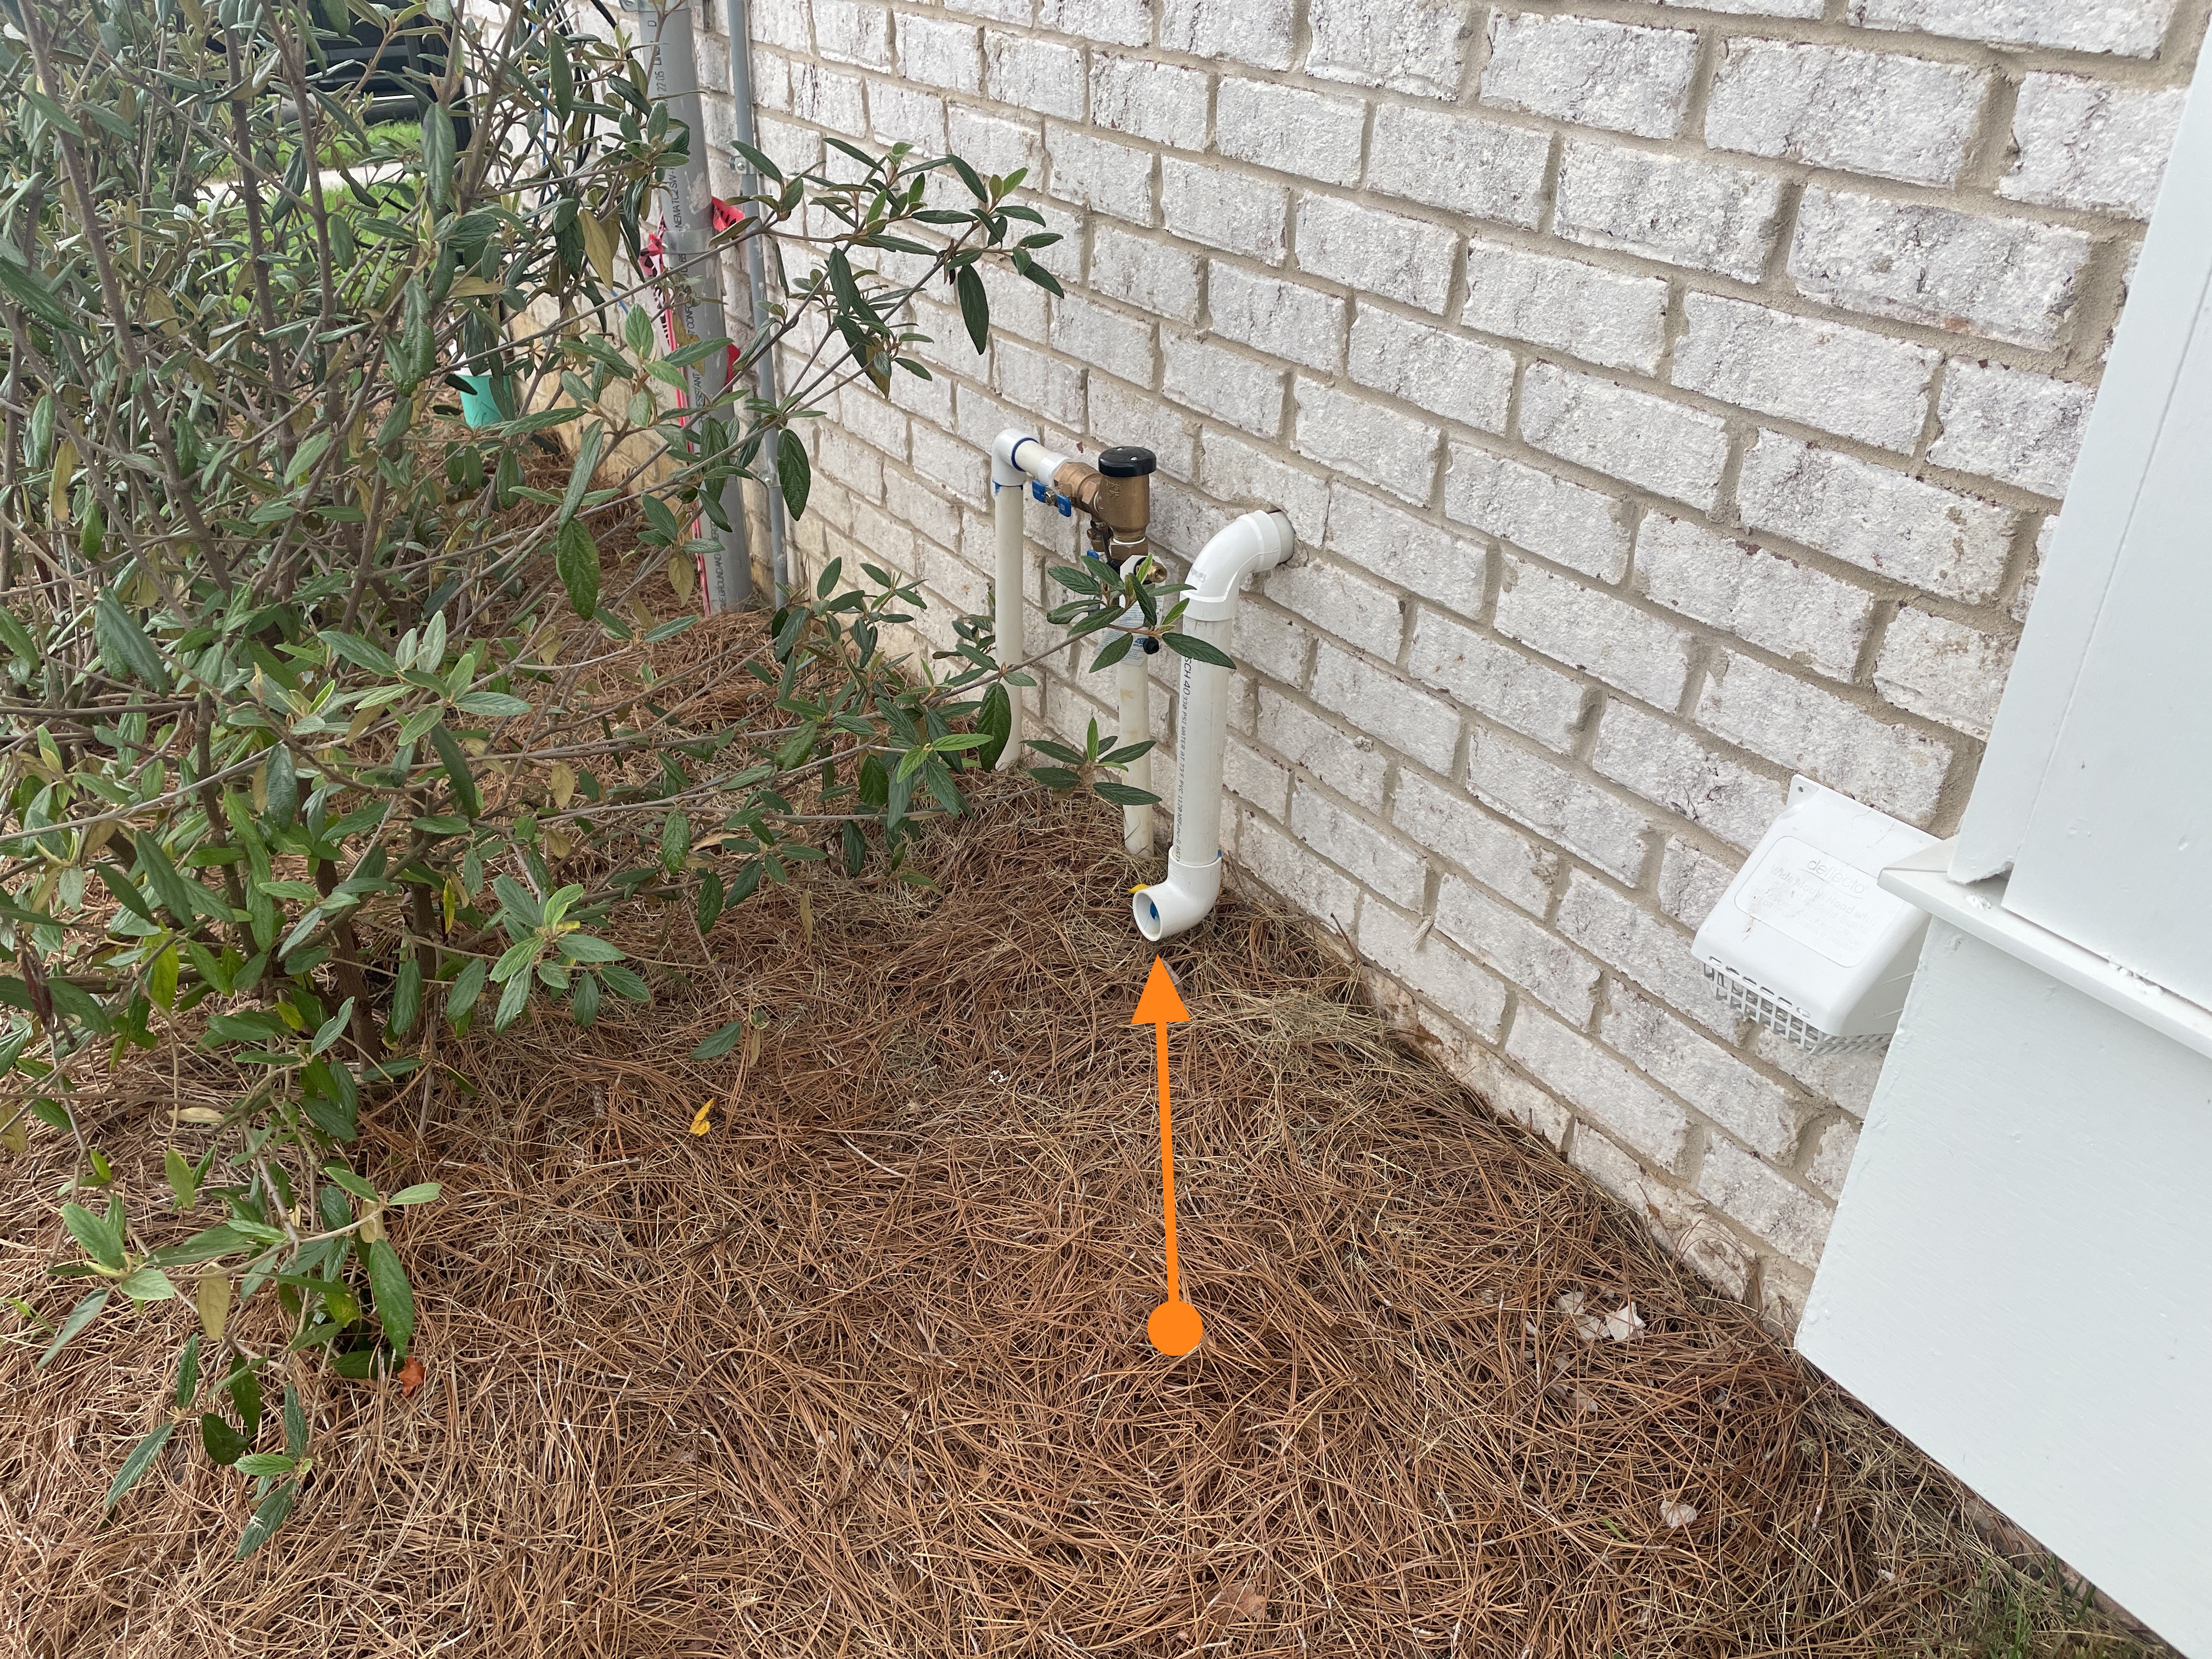 |
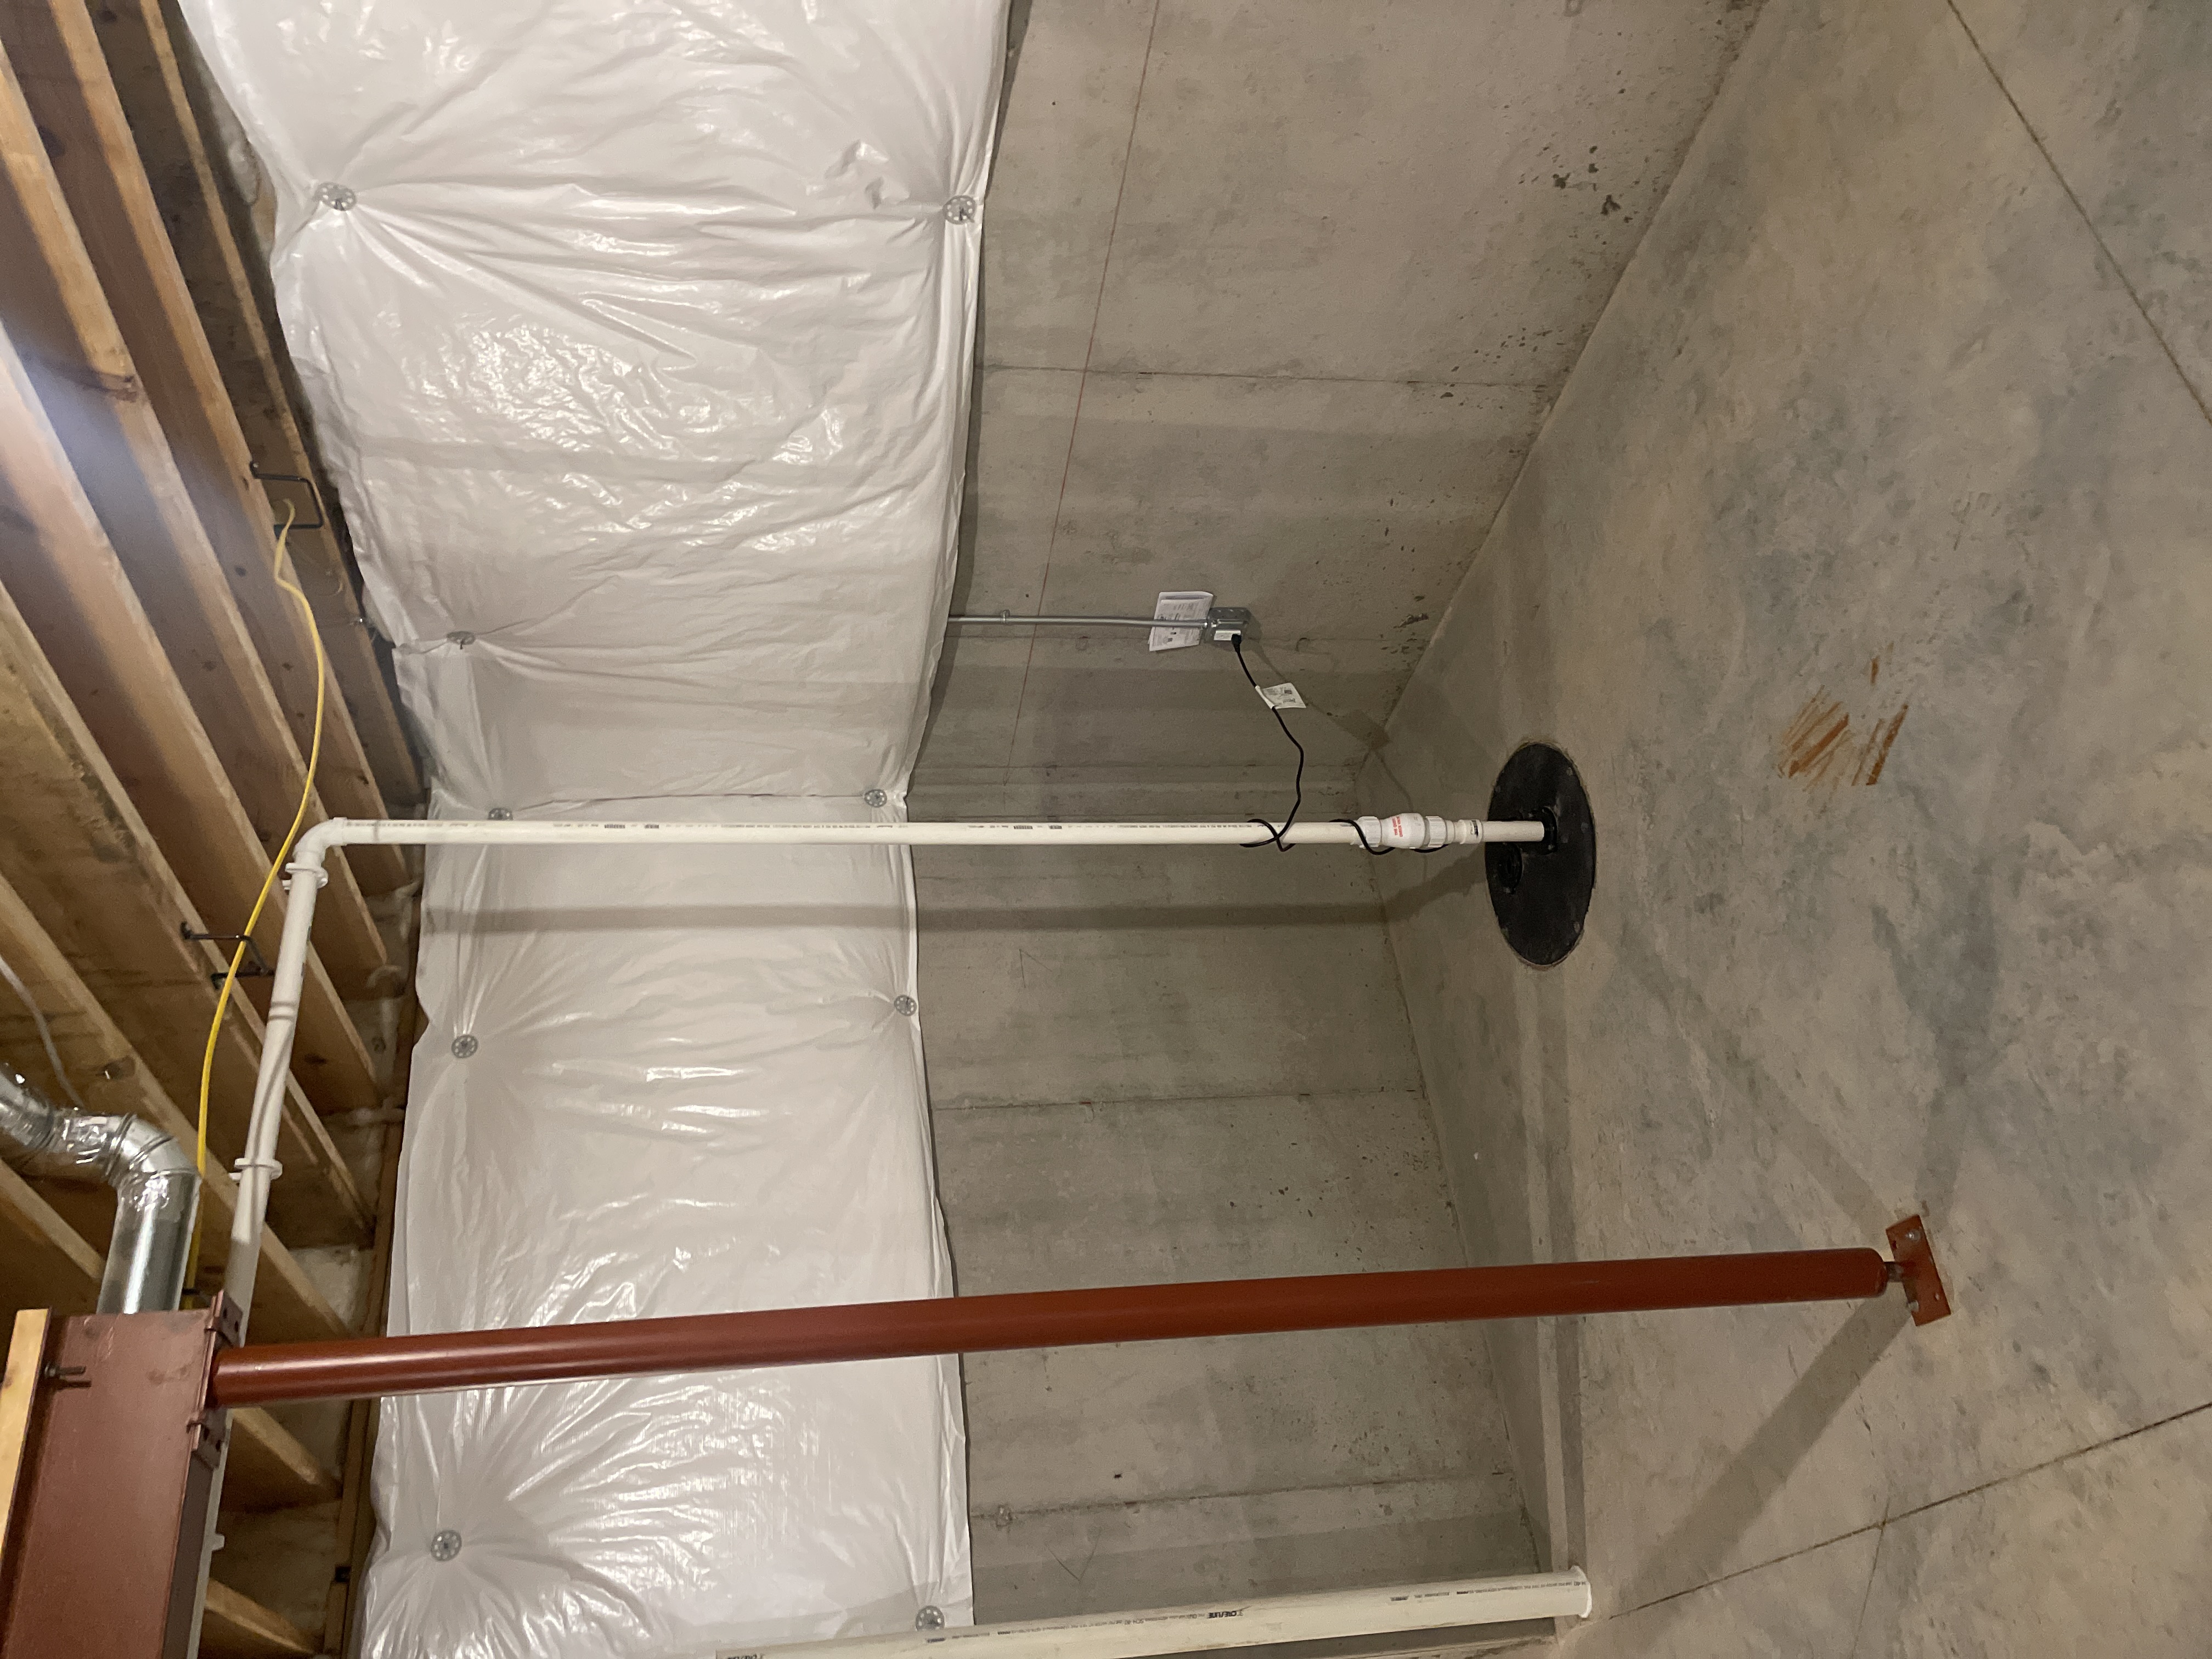
The sump pump did function when tested. This is something you will want to test once a month. If there is no water in the crock, you can pour a bucket of water in the hole to raise the water level. The pump is triggered by the float switch hanging off the side of it. To trigger the unit to come on simply lift the float vertically, or keep adding water to the pit until it turns on.
You'll want to also consider adding a water powered backup system. If the power were to ever go out, the back-up system will empty the basin, and may prevent your basement from flooding during hard rain. These can be found for here.
 |
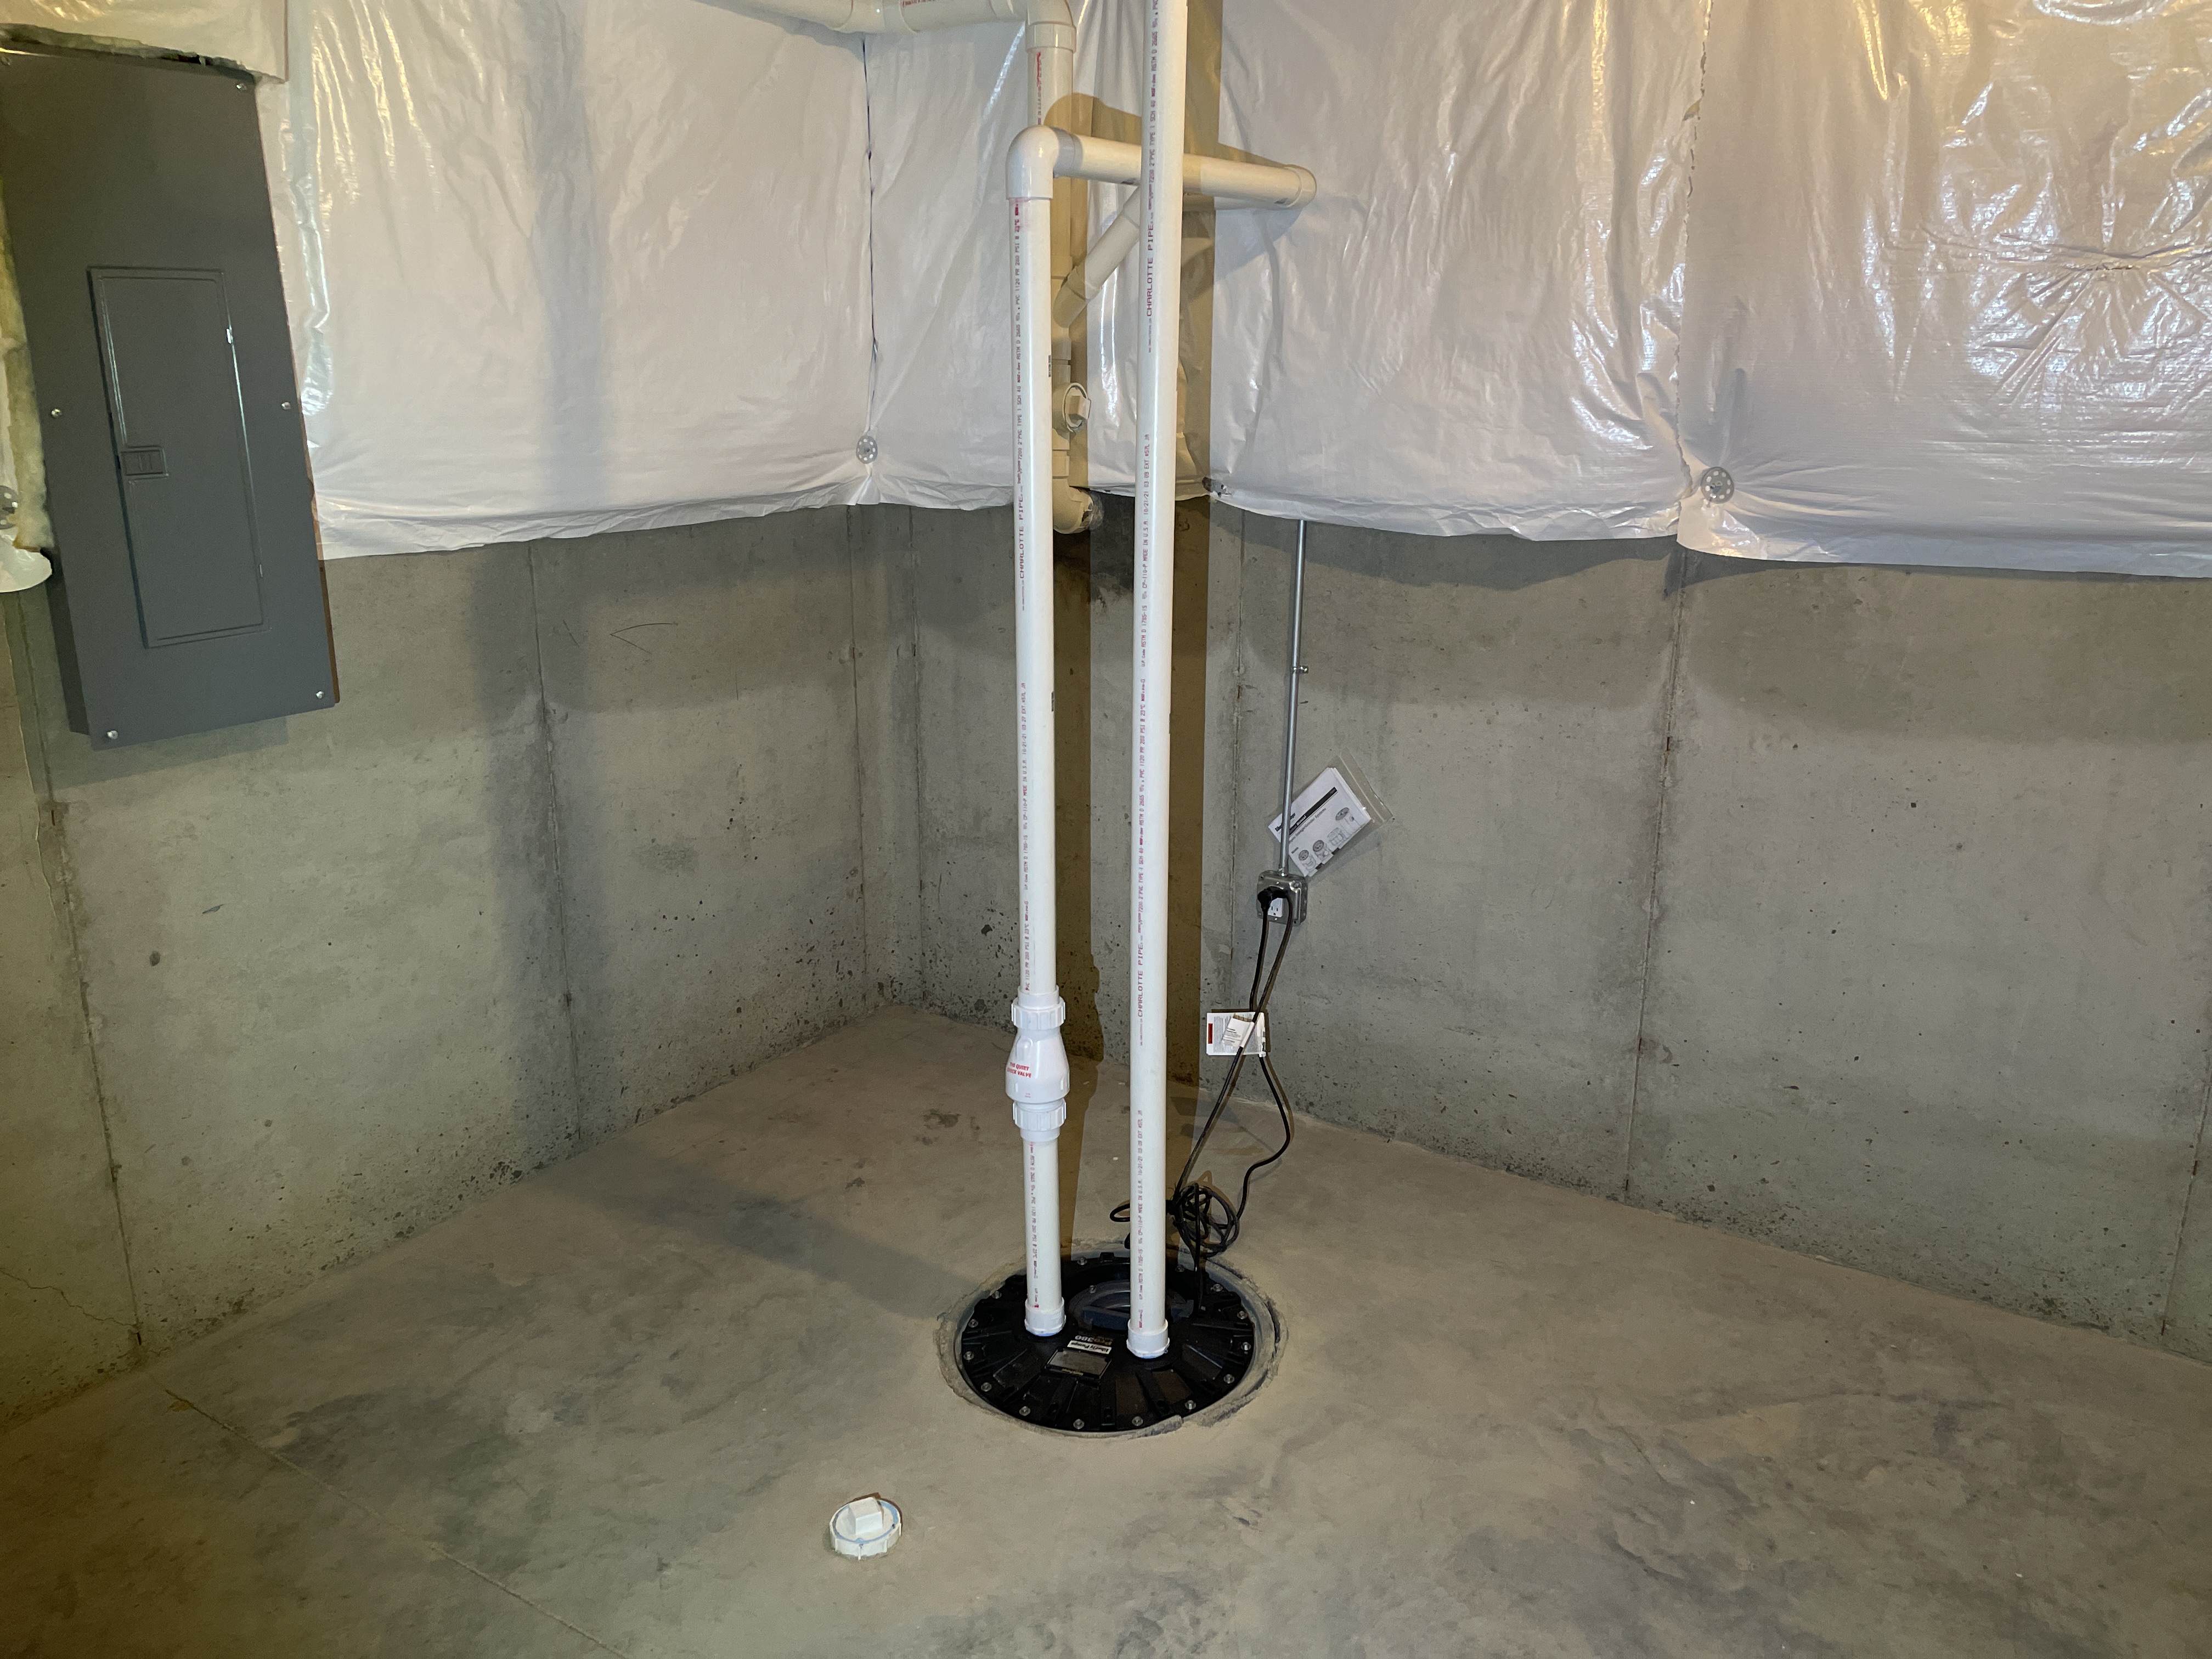
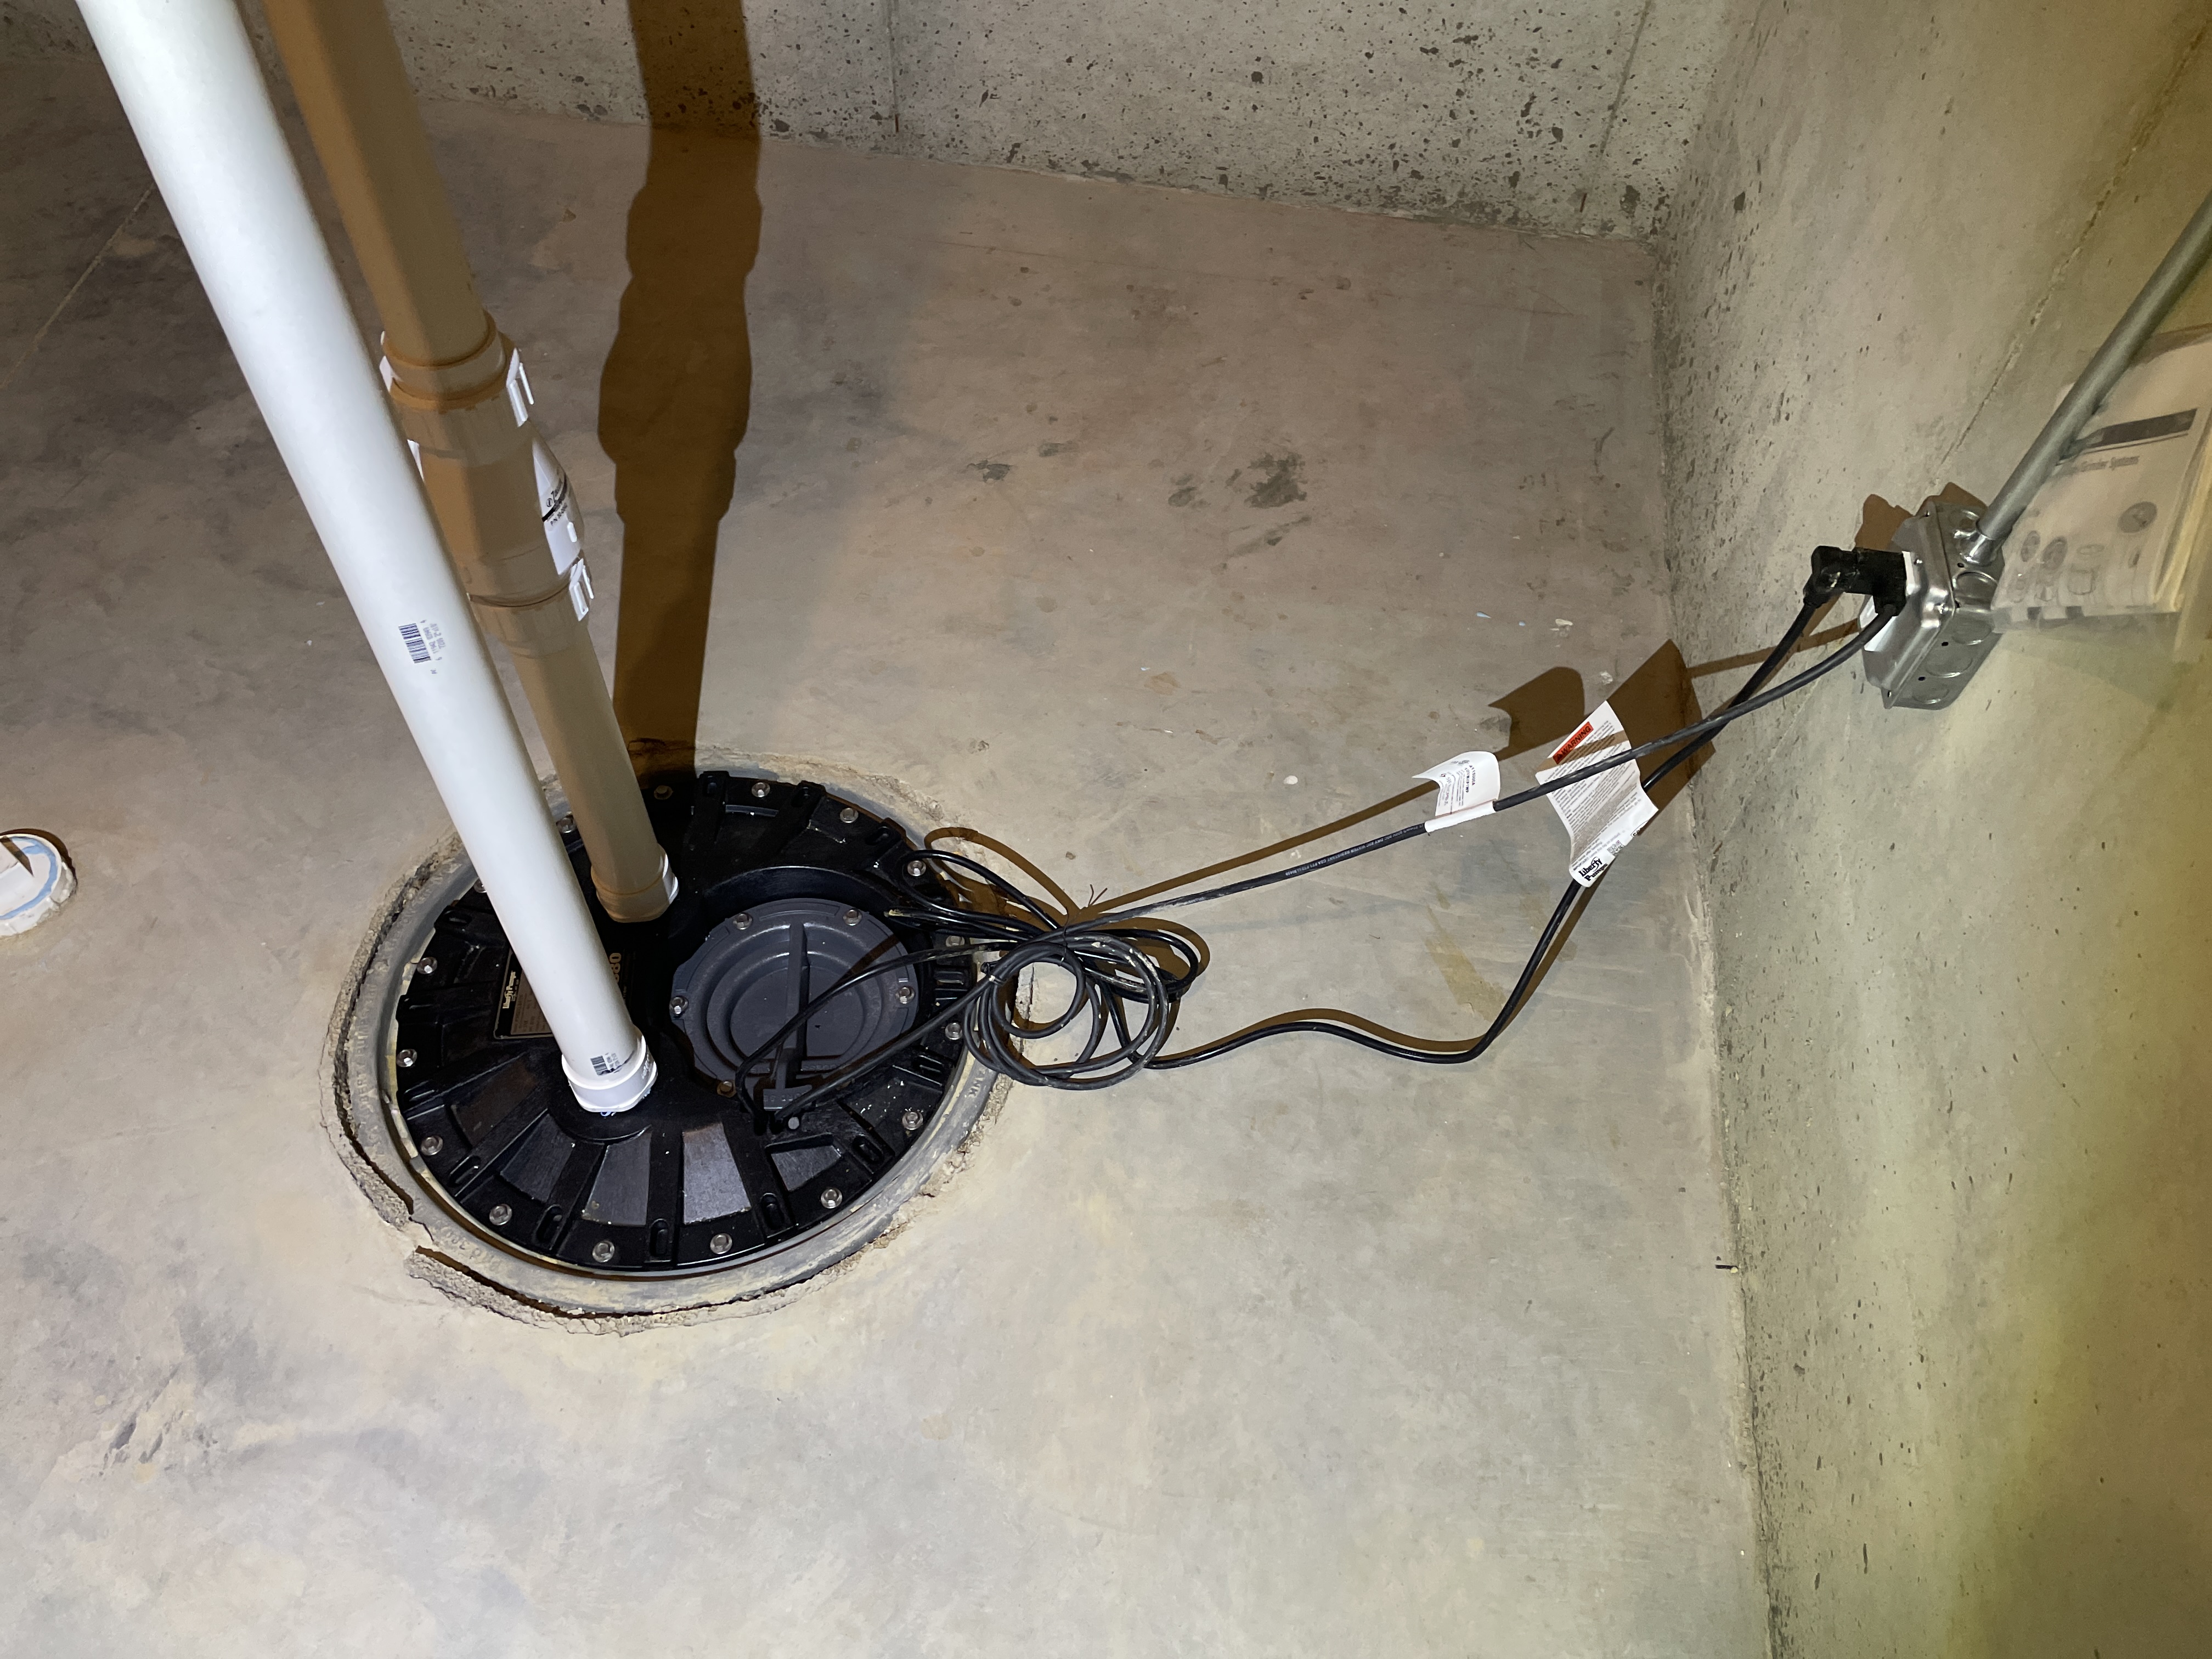
Sewage Ejector Pumps
The basement bathroom is draining into a sewage ejector pump kit. Think of it as a sump pump with a blender built on it.
The waste water for the bathroom downstairs drains into this basin. Once the water reaches a certain level, the pump will kick on, chop the contents into a slurry, and drain the basin.
It's a good idea to run a water through the sink every month to test the pump. If the pump is not working it can back up and cause a big mess.
 |  |
 |
🔑 Interior
Interior Doors
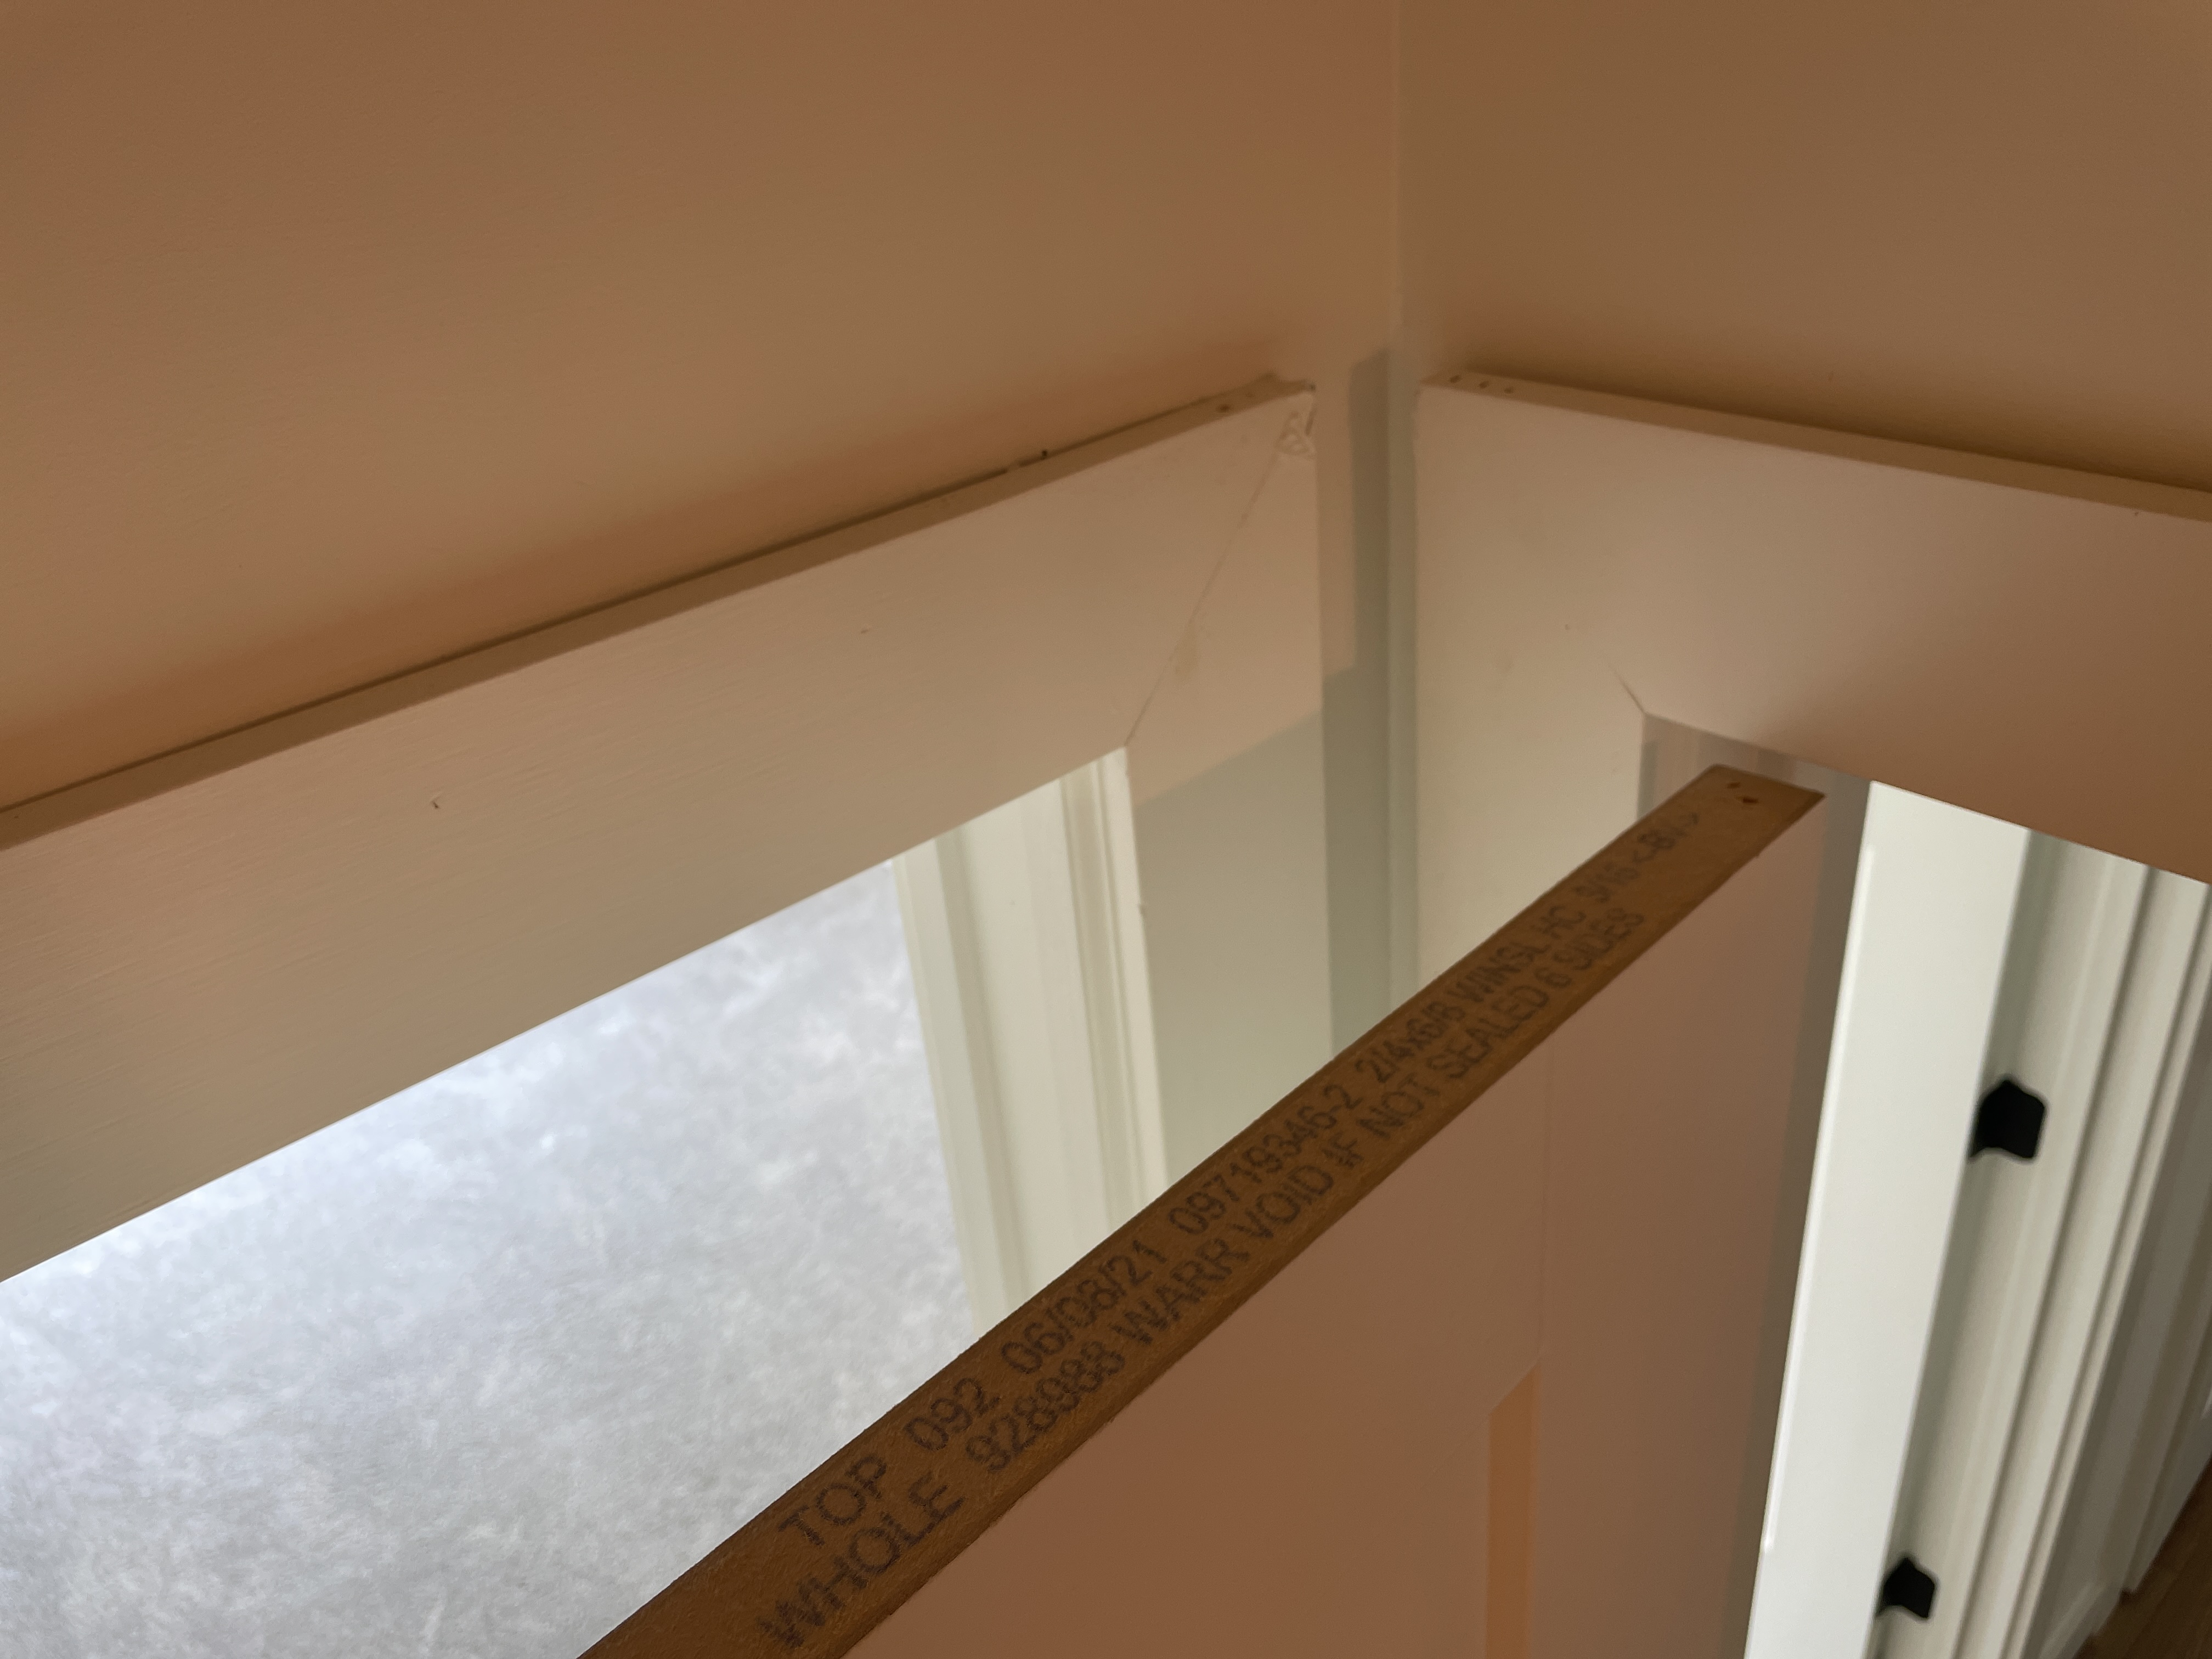
The interior doors were not painted along the top and bottom edge. It's printed on the doors that the "warranty is void if not sealed on all sides."
This is required to help moisture absorb evenly into the doors. If some edges are left raw, they will absorb more moisture than the adjacent painted areas which can cause the door to twist/warp out of place.
Have the builder paint the doors as the manufacturer requires so you don't develop issues in the future.
 |  |
Windows
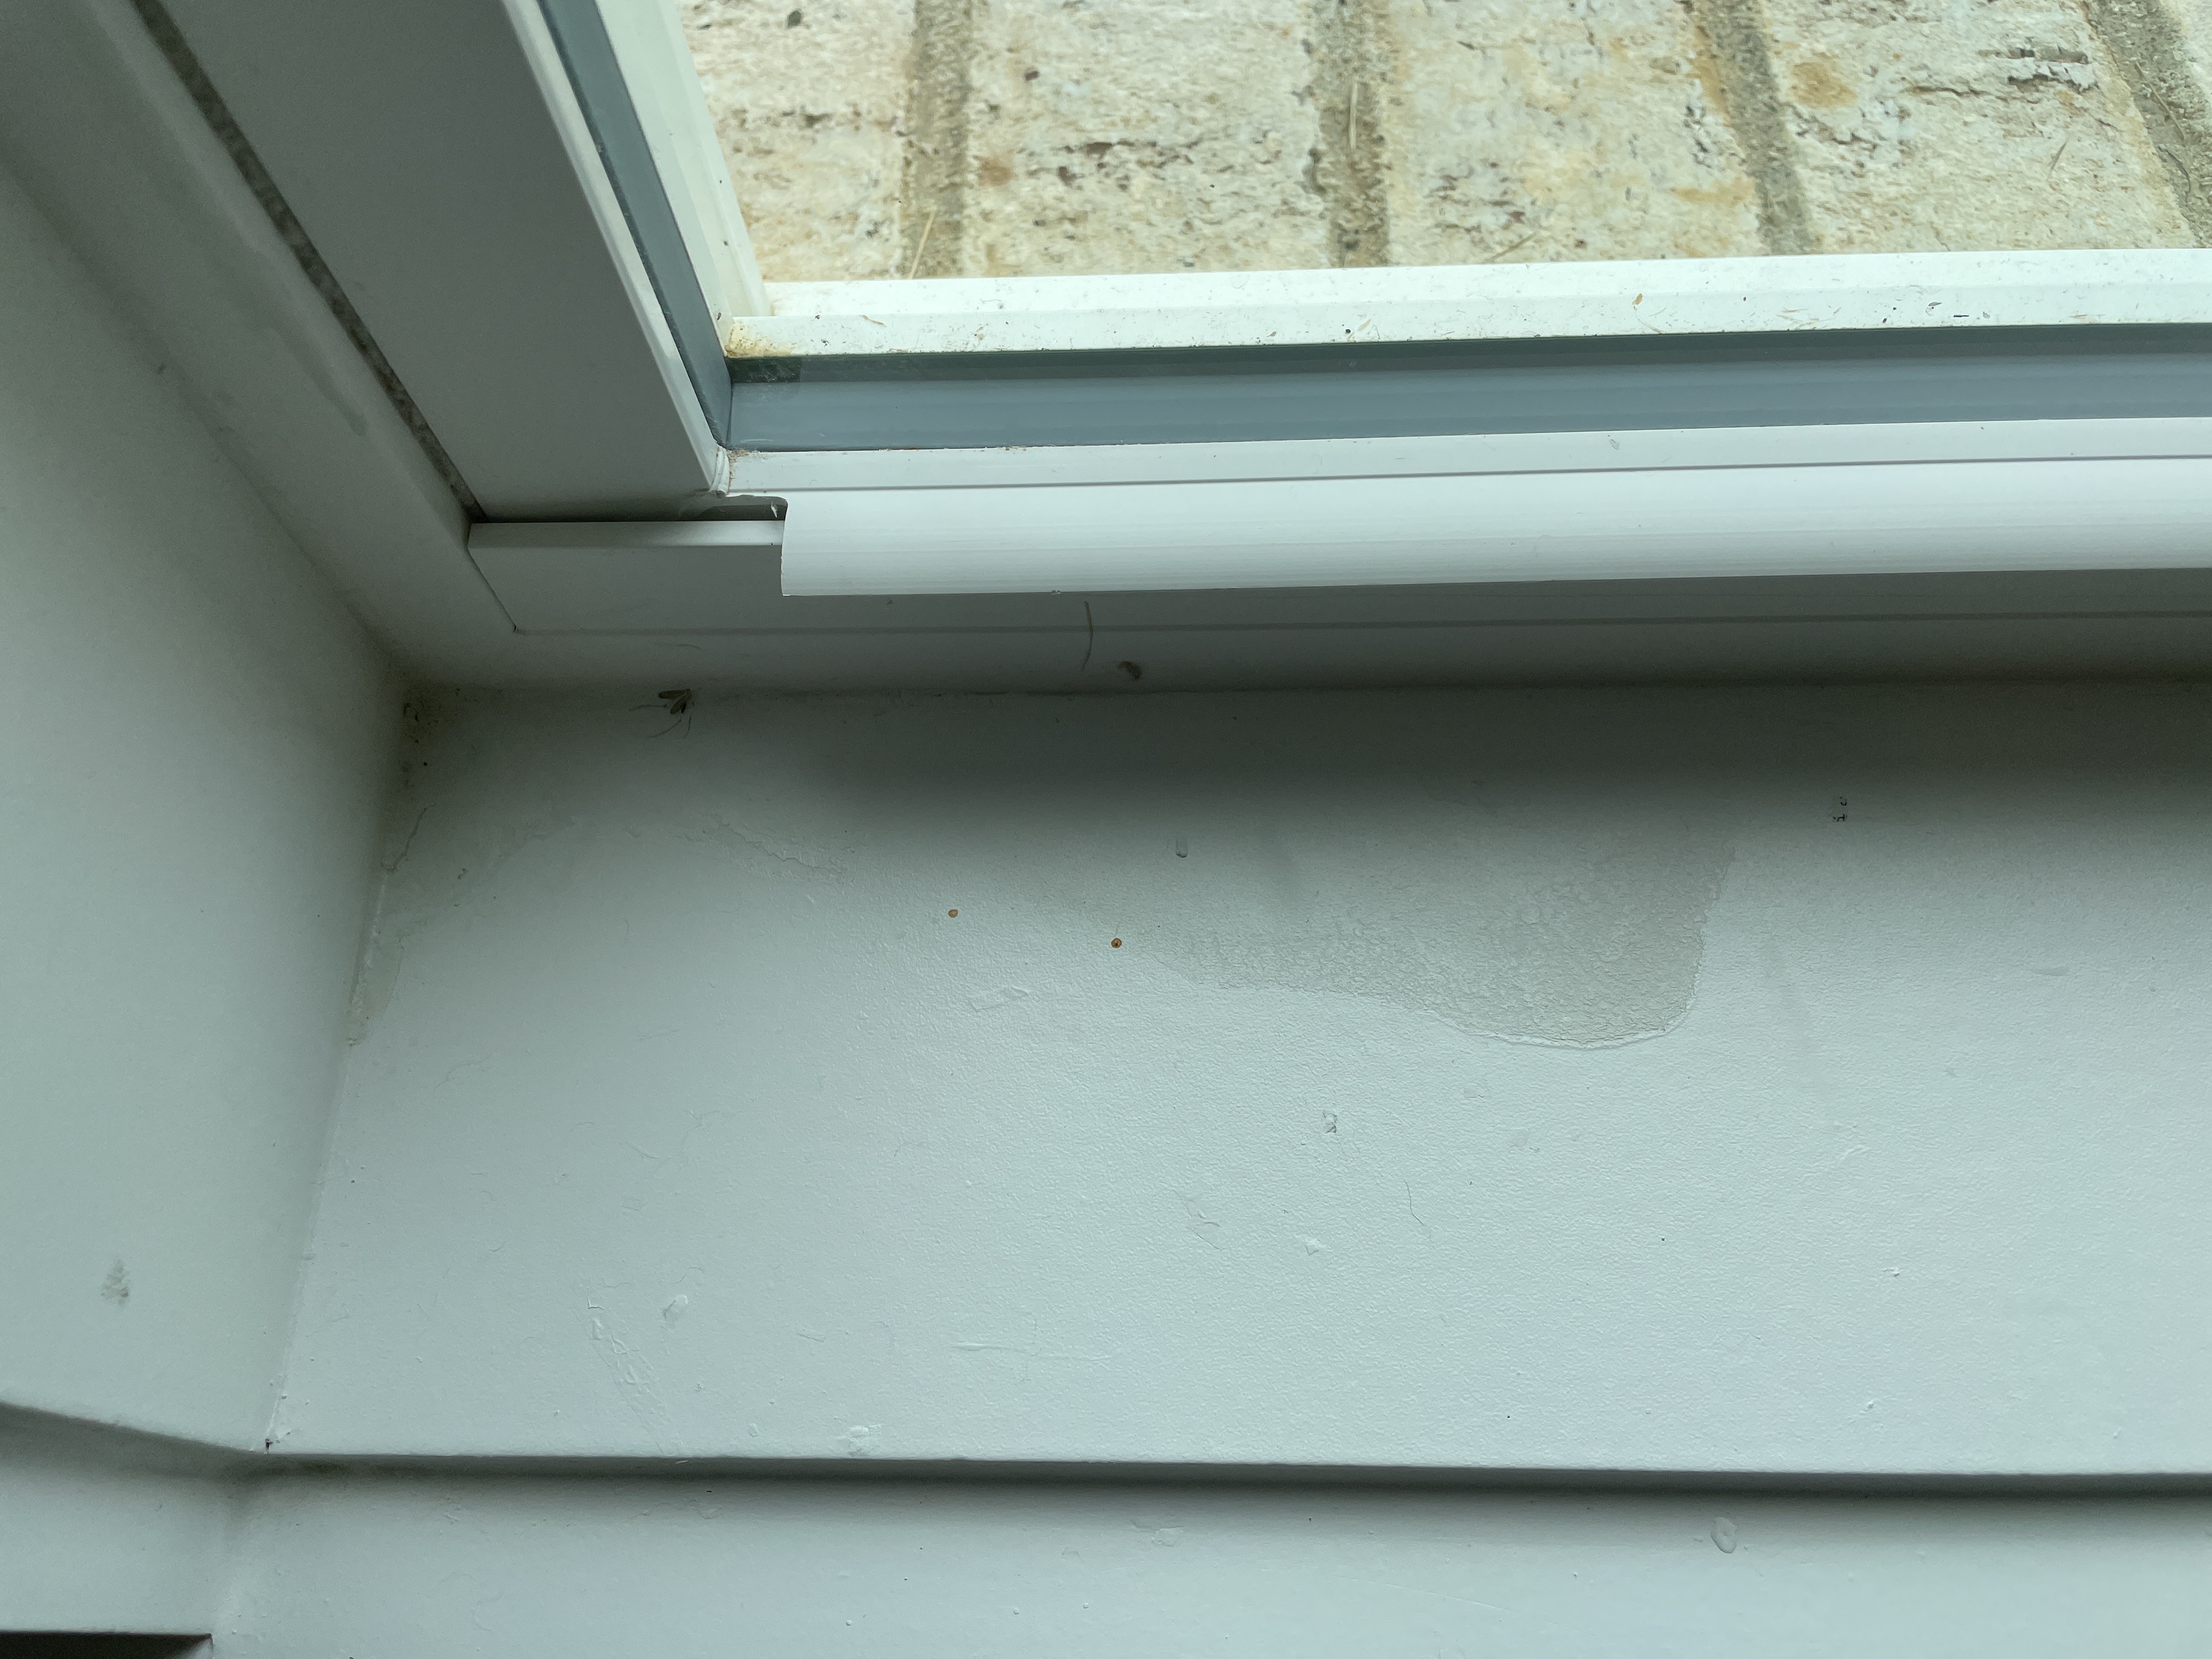
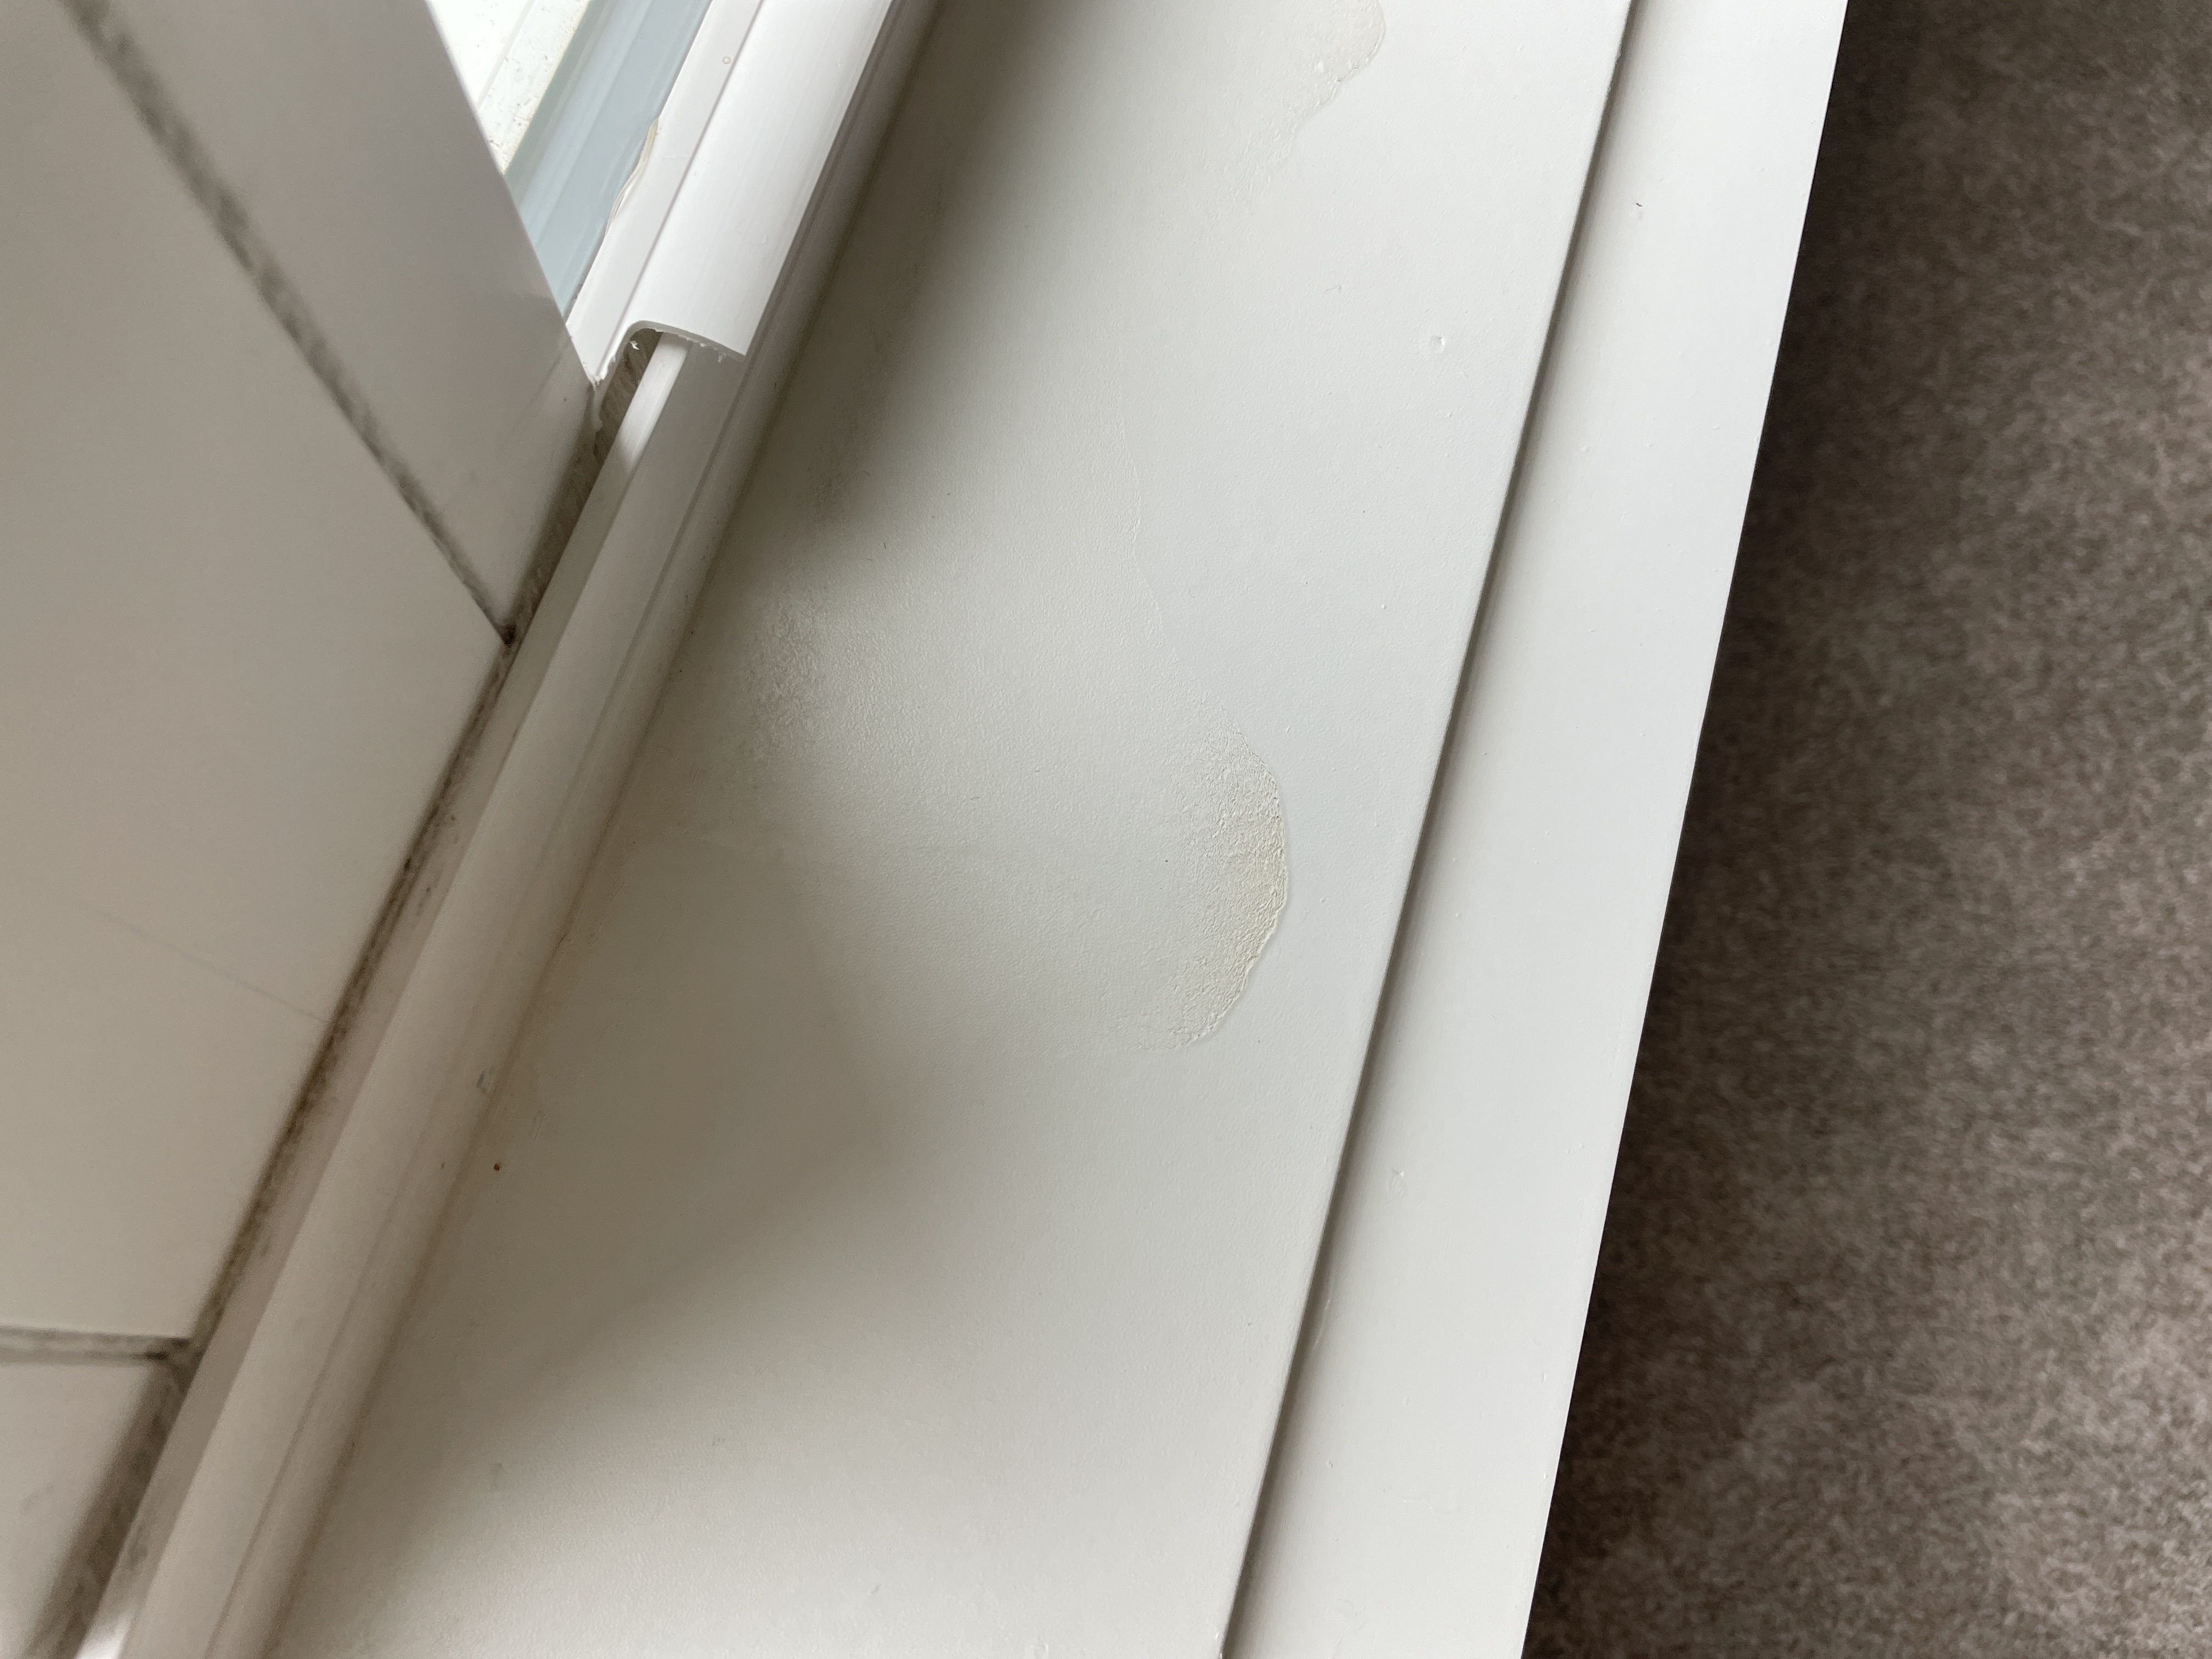
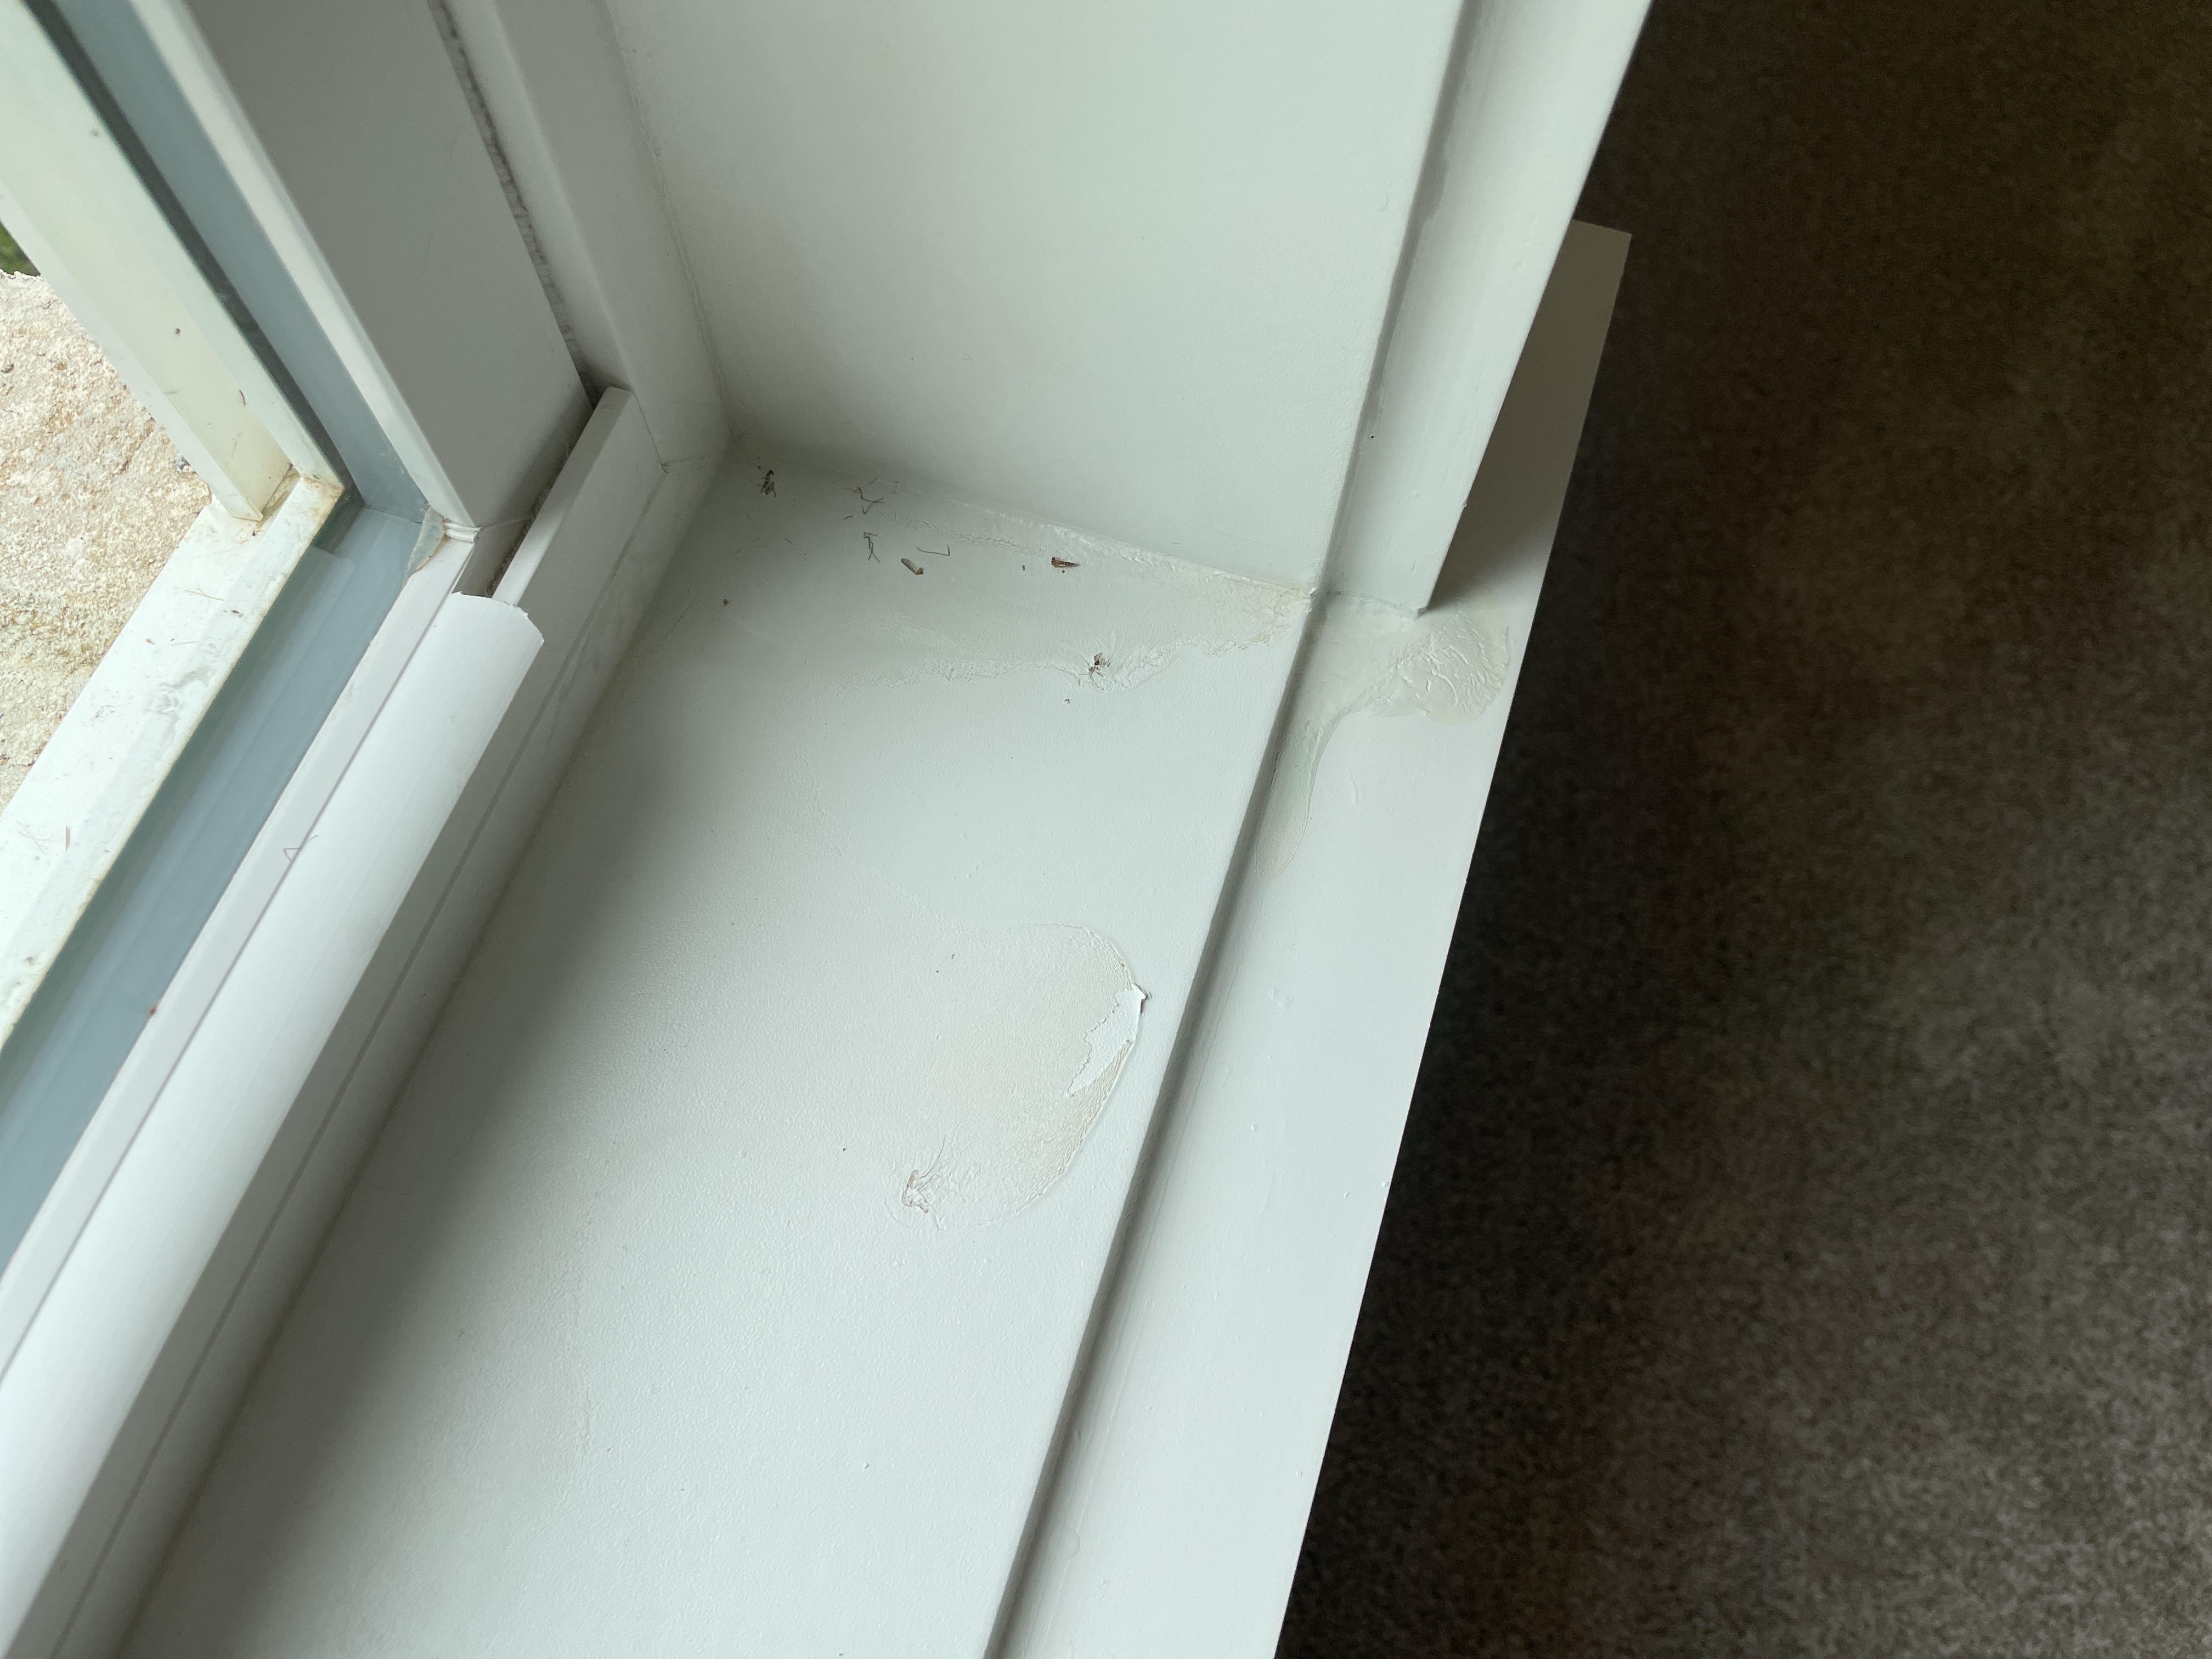
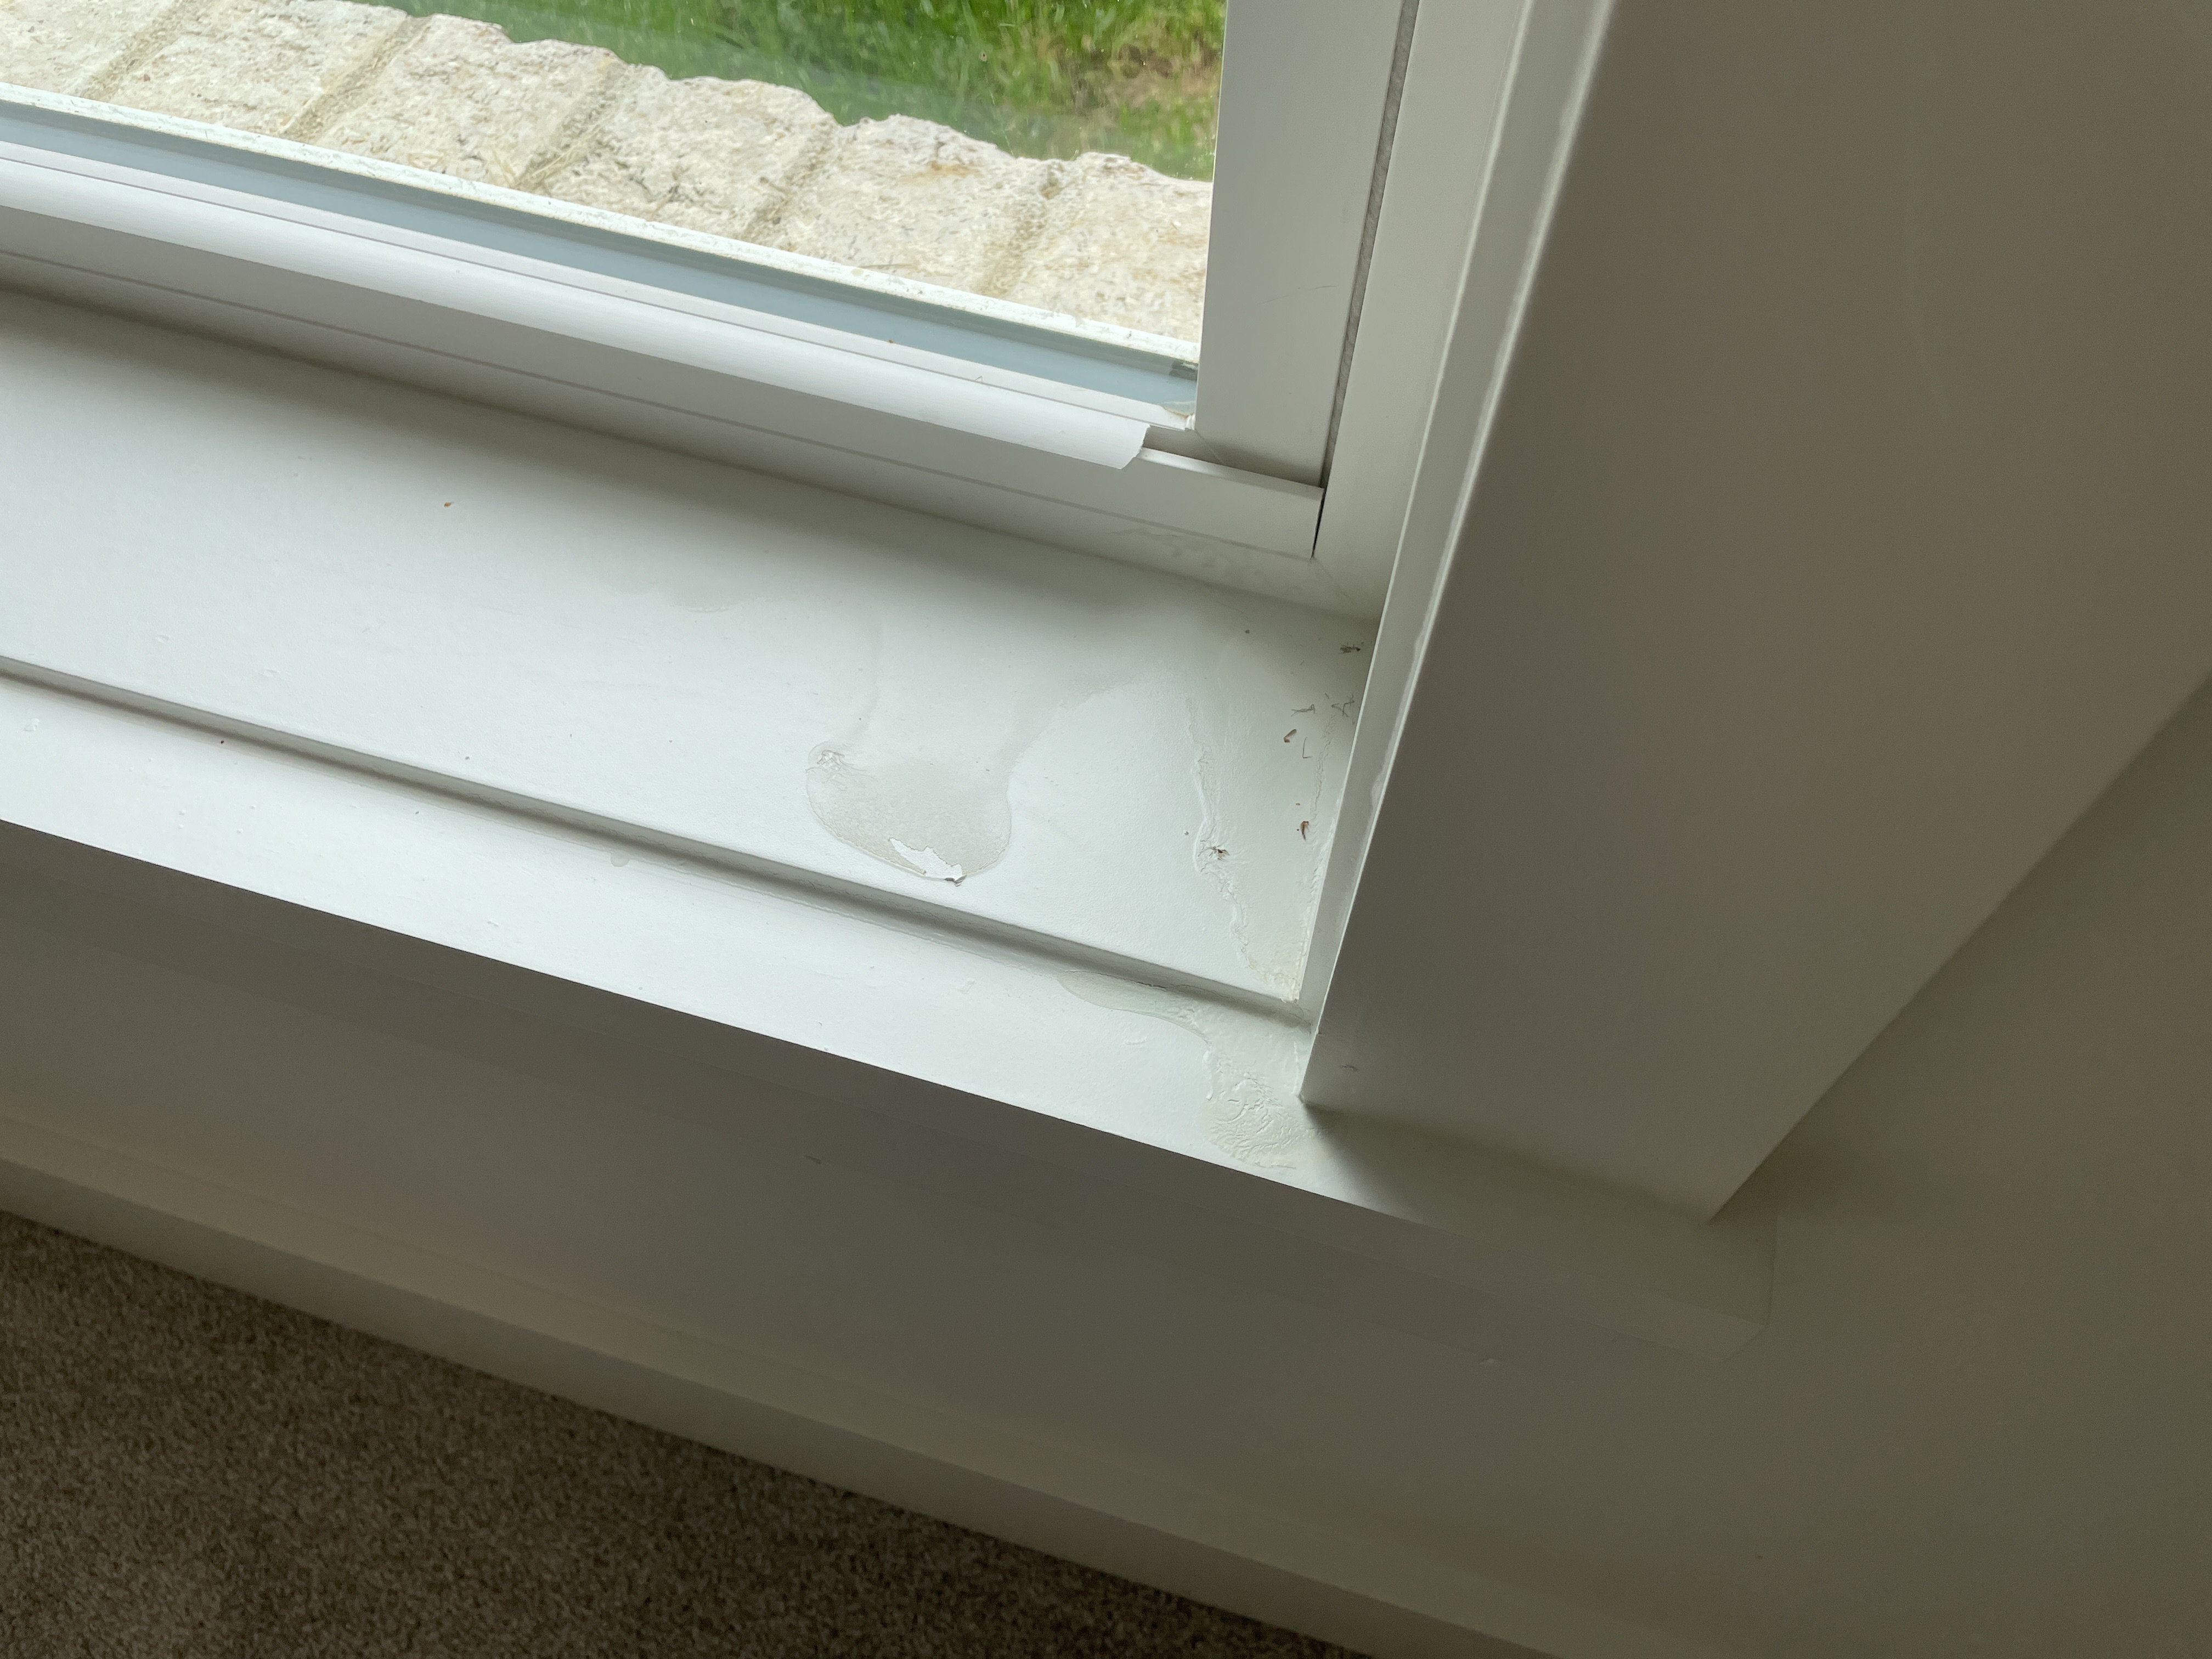
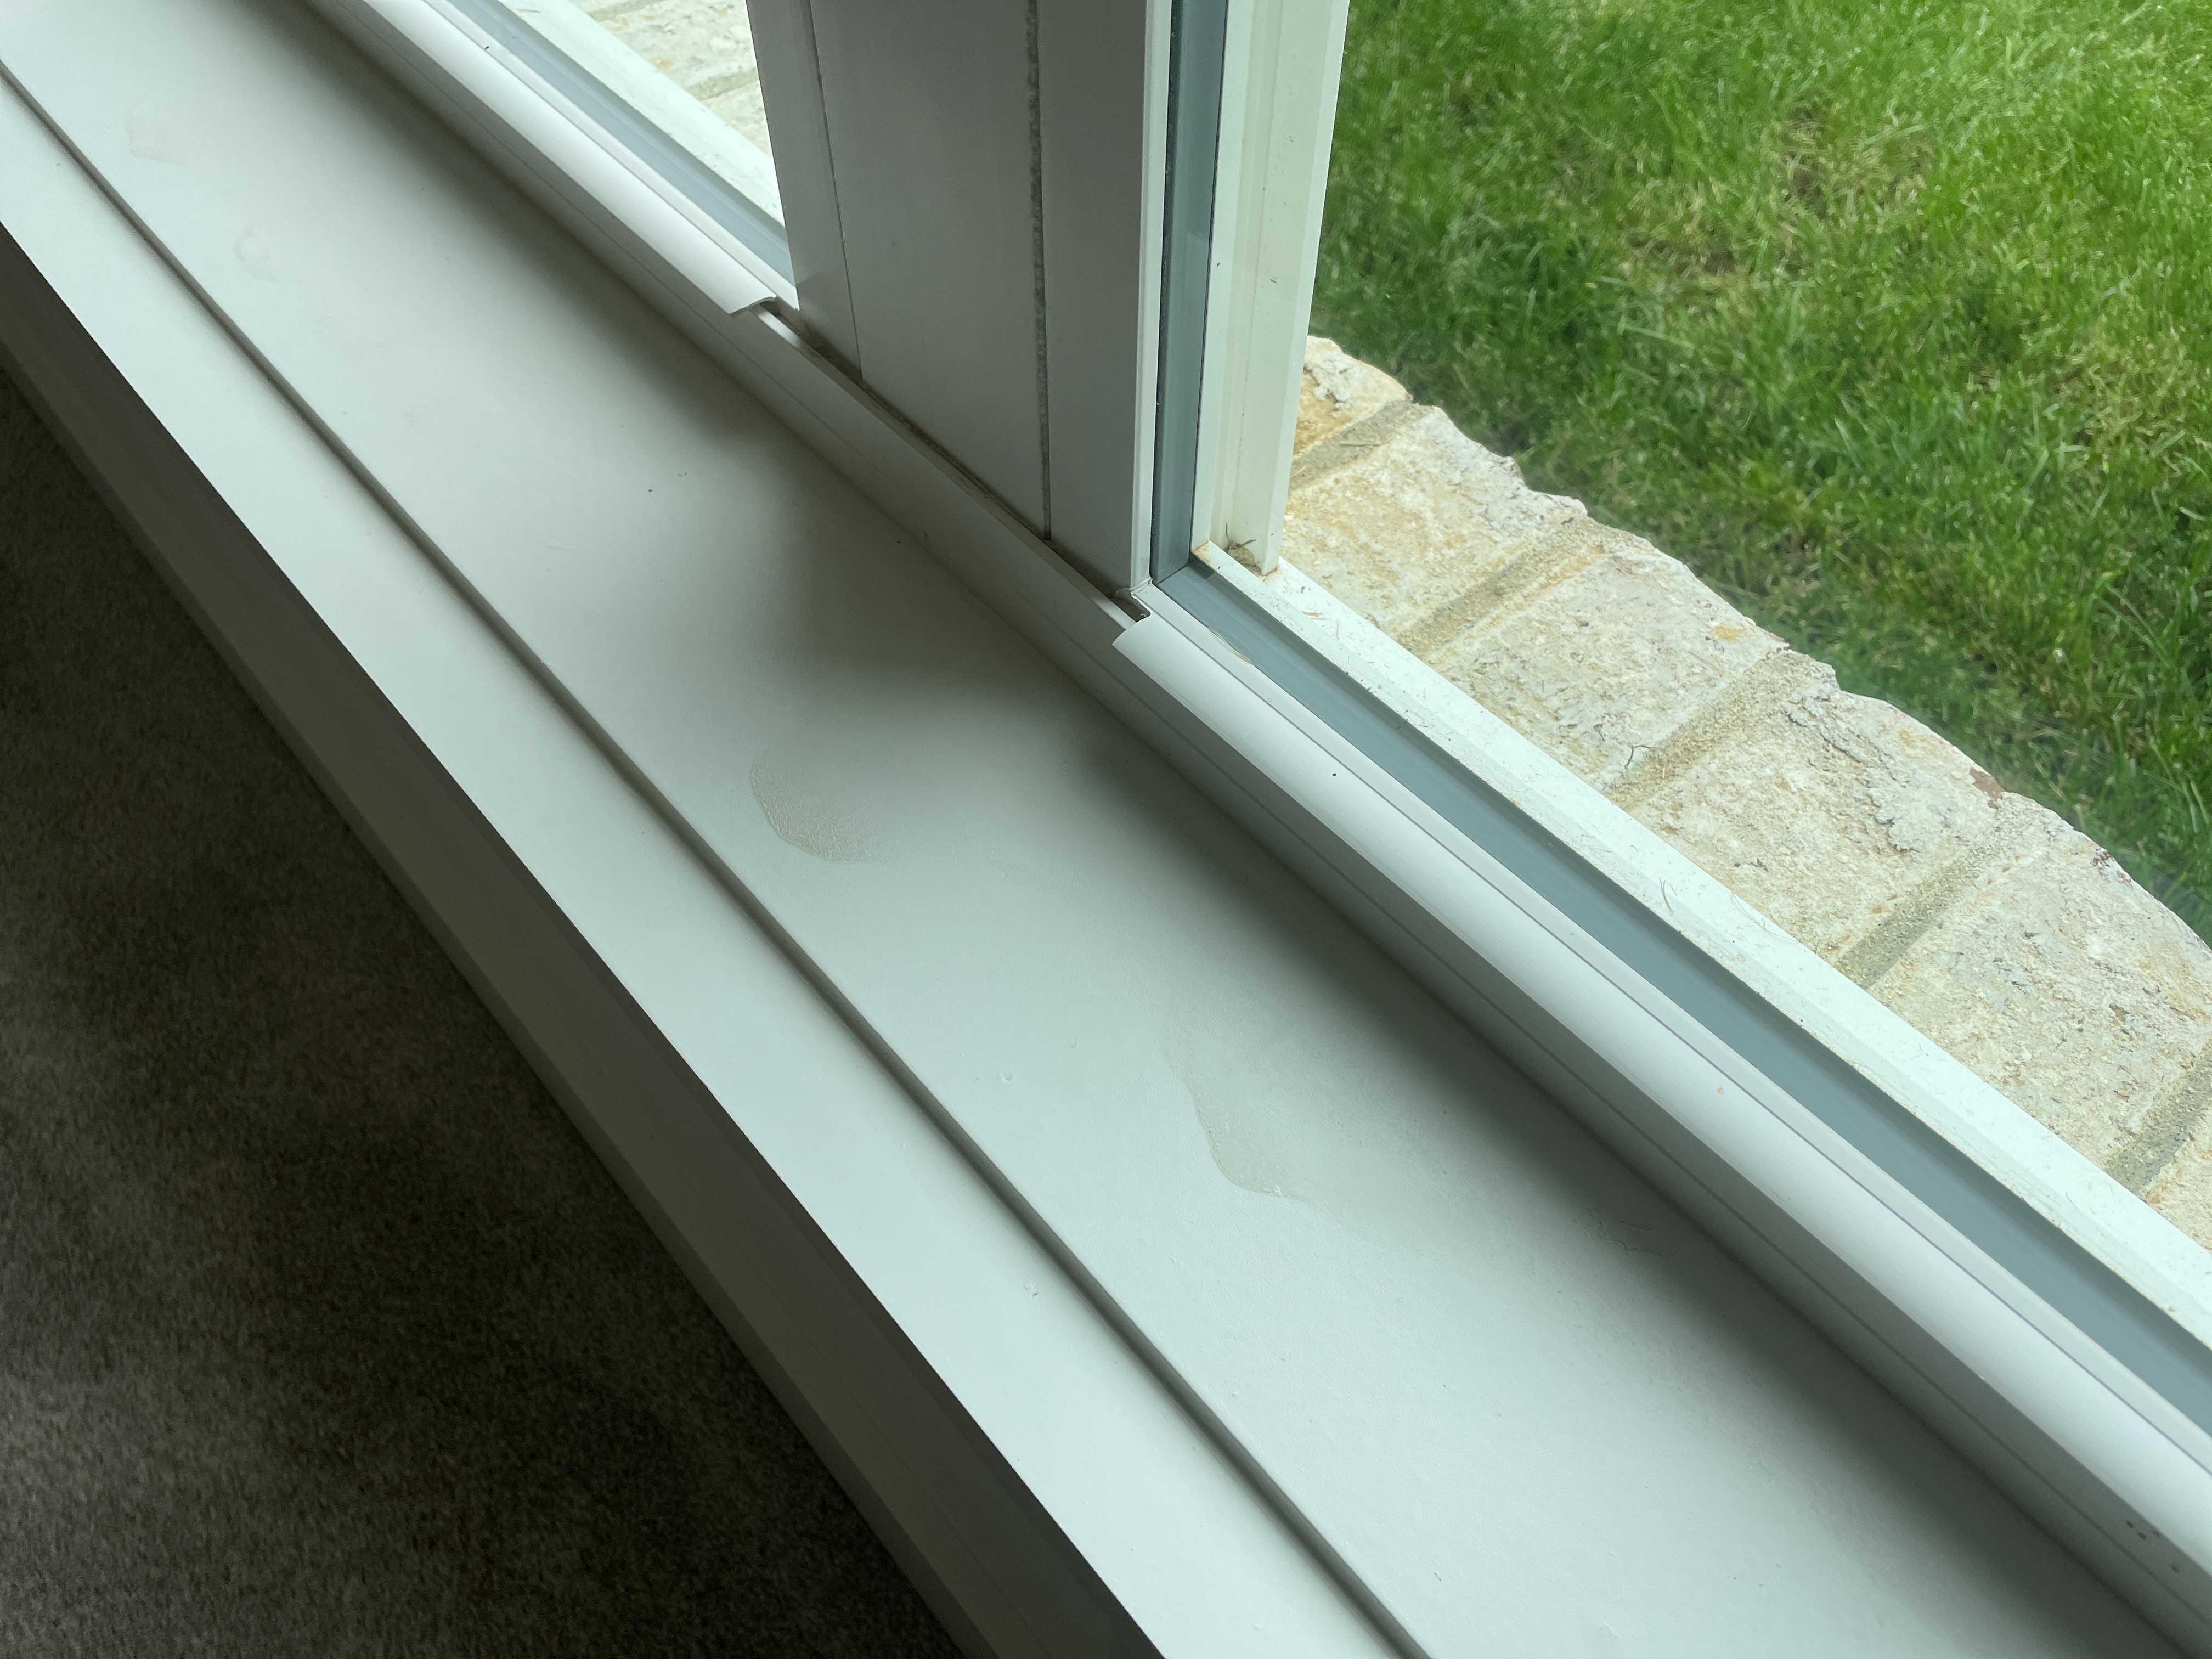
The interior trim of the basement windows (both sets of windows) looks to have puddles of paint across the entire opening. I do not know how this occurred. Have the builder address the situation as needed.
 |  |
 |  |
 |  |
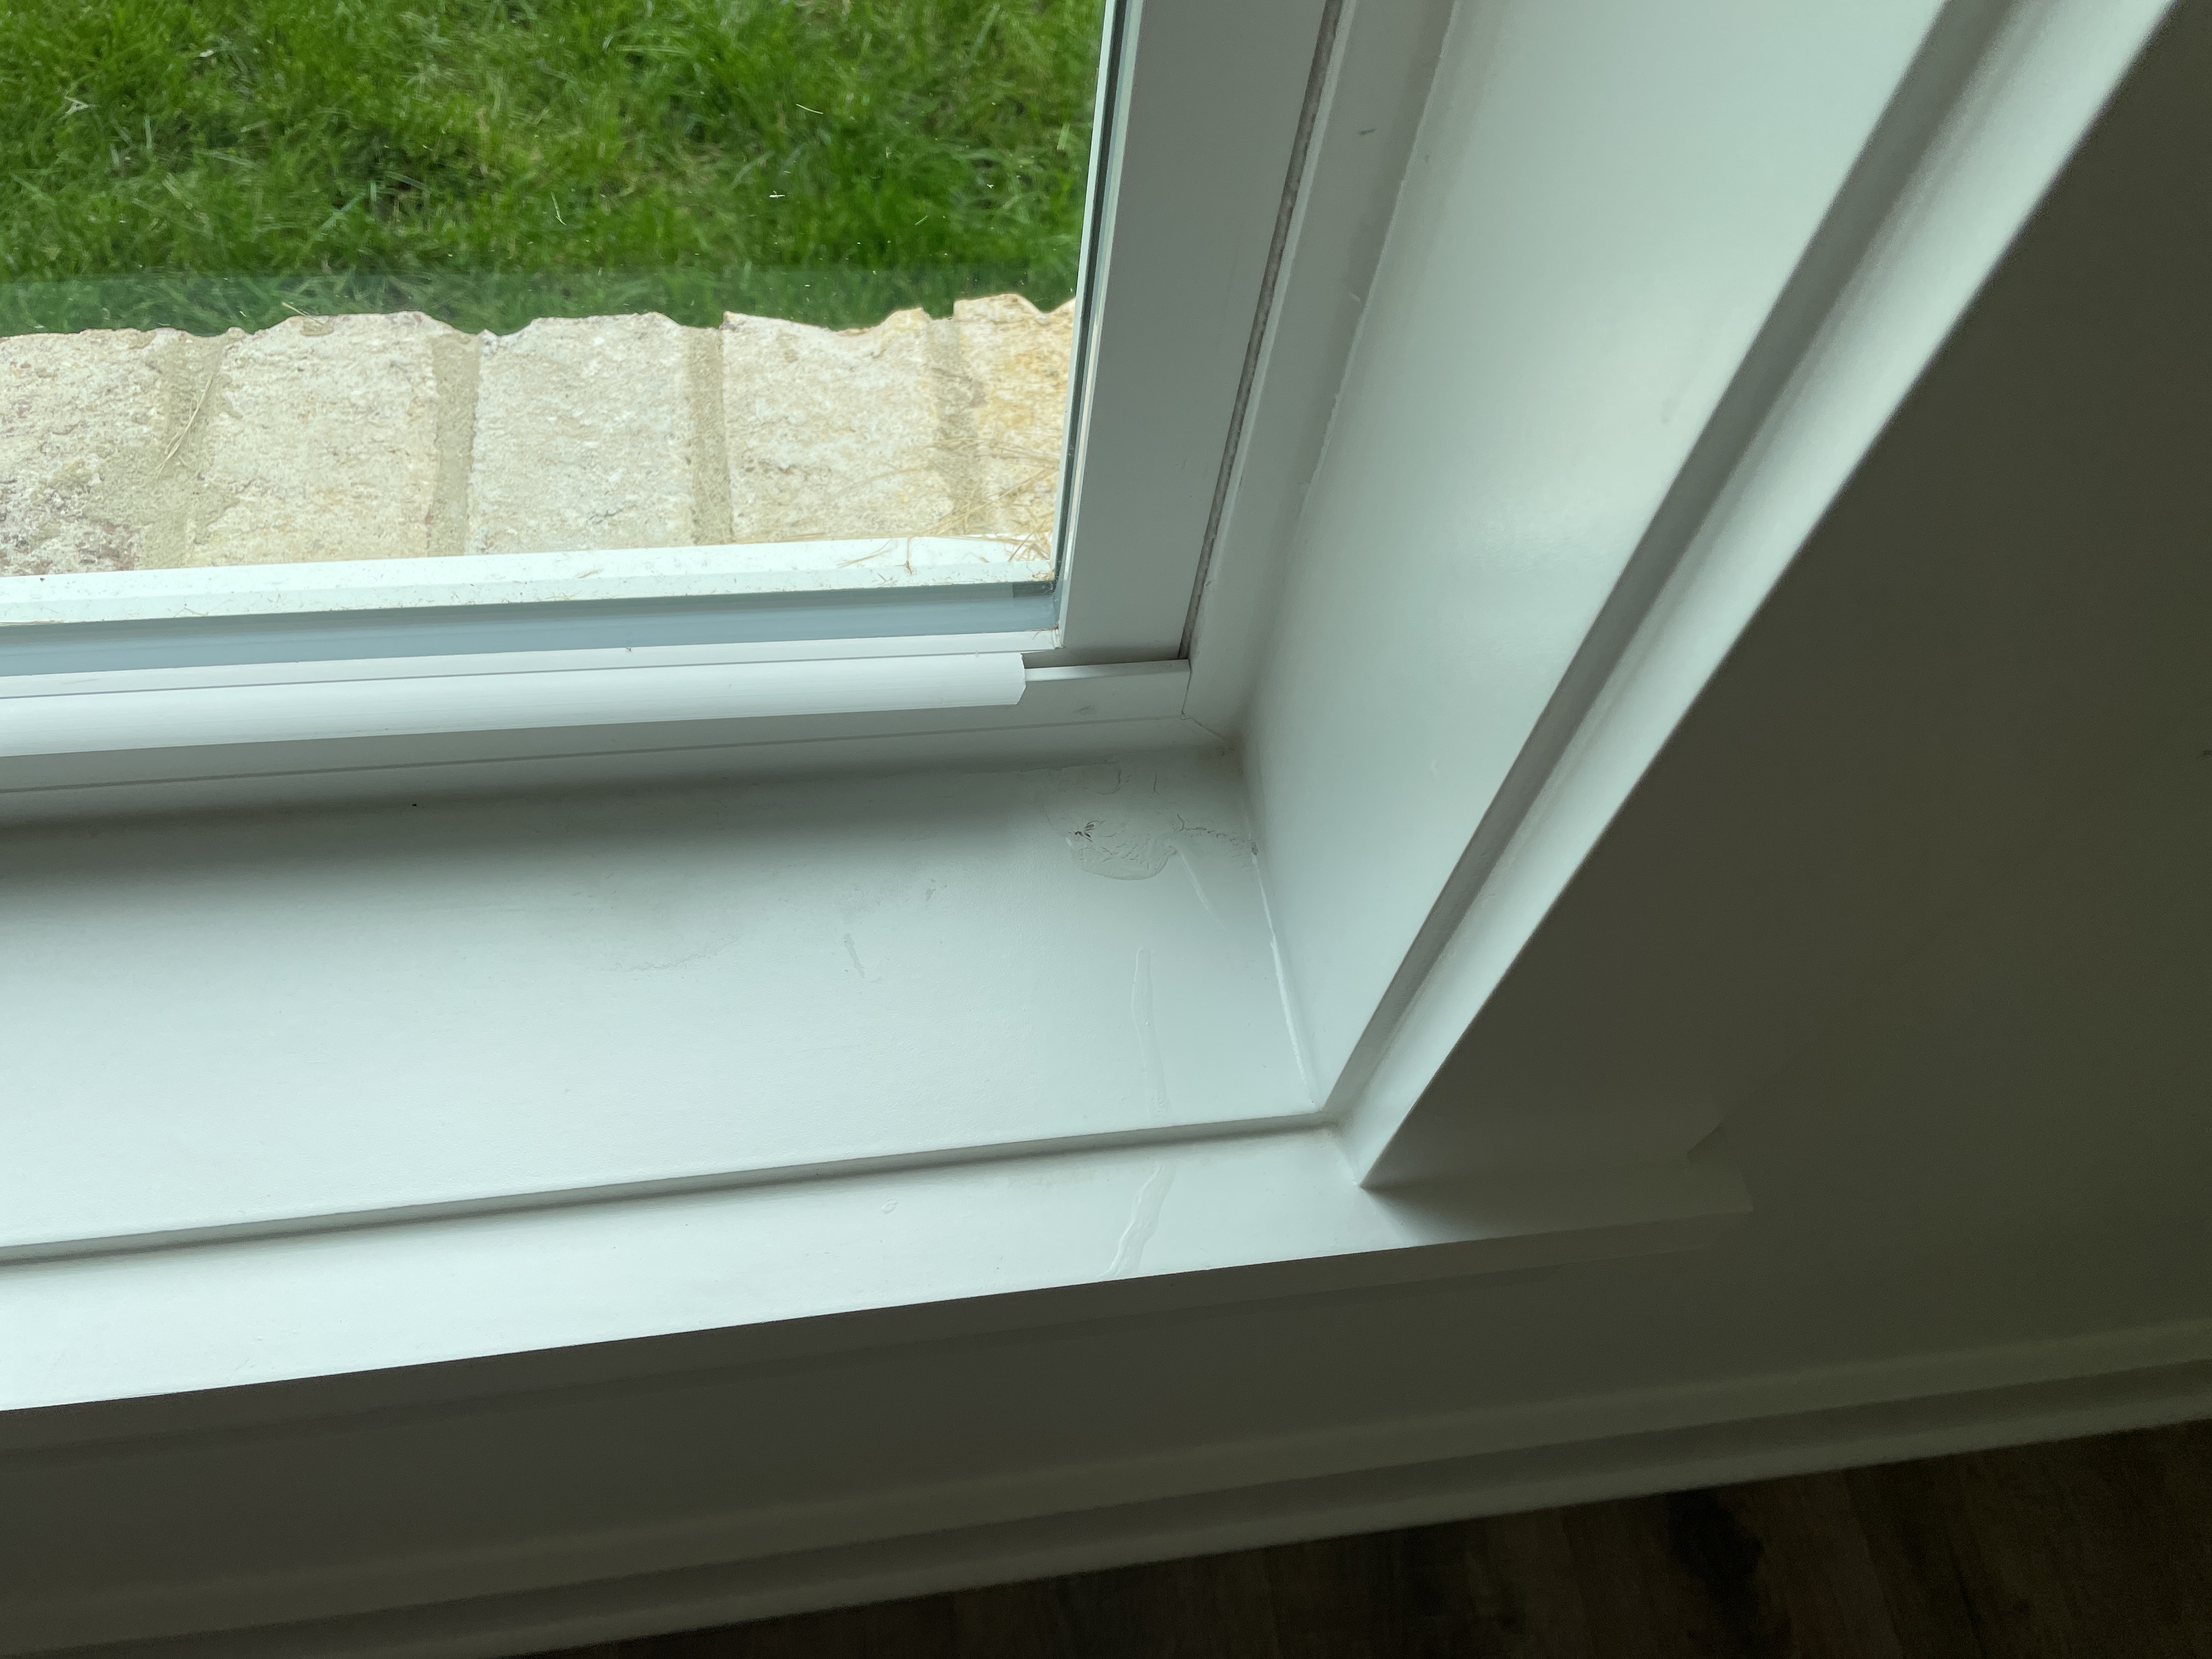 | 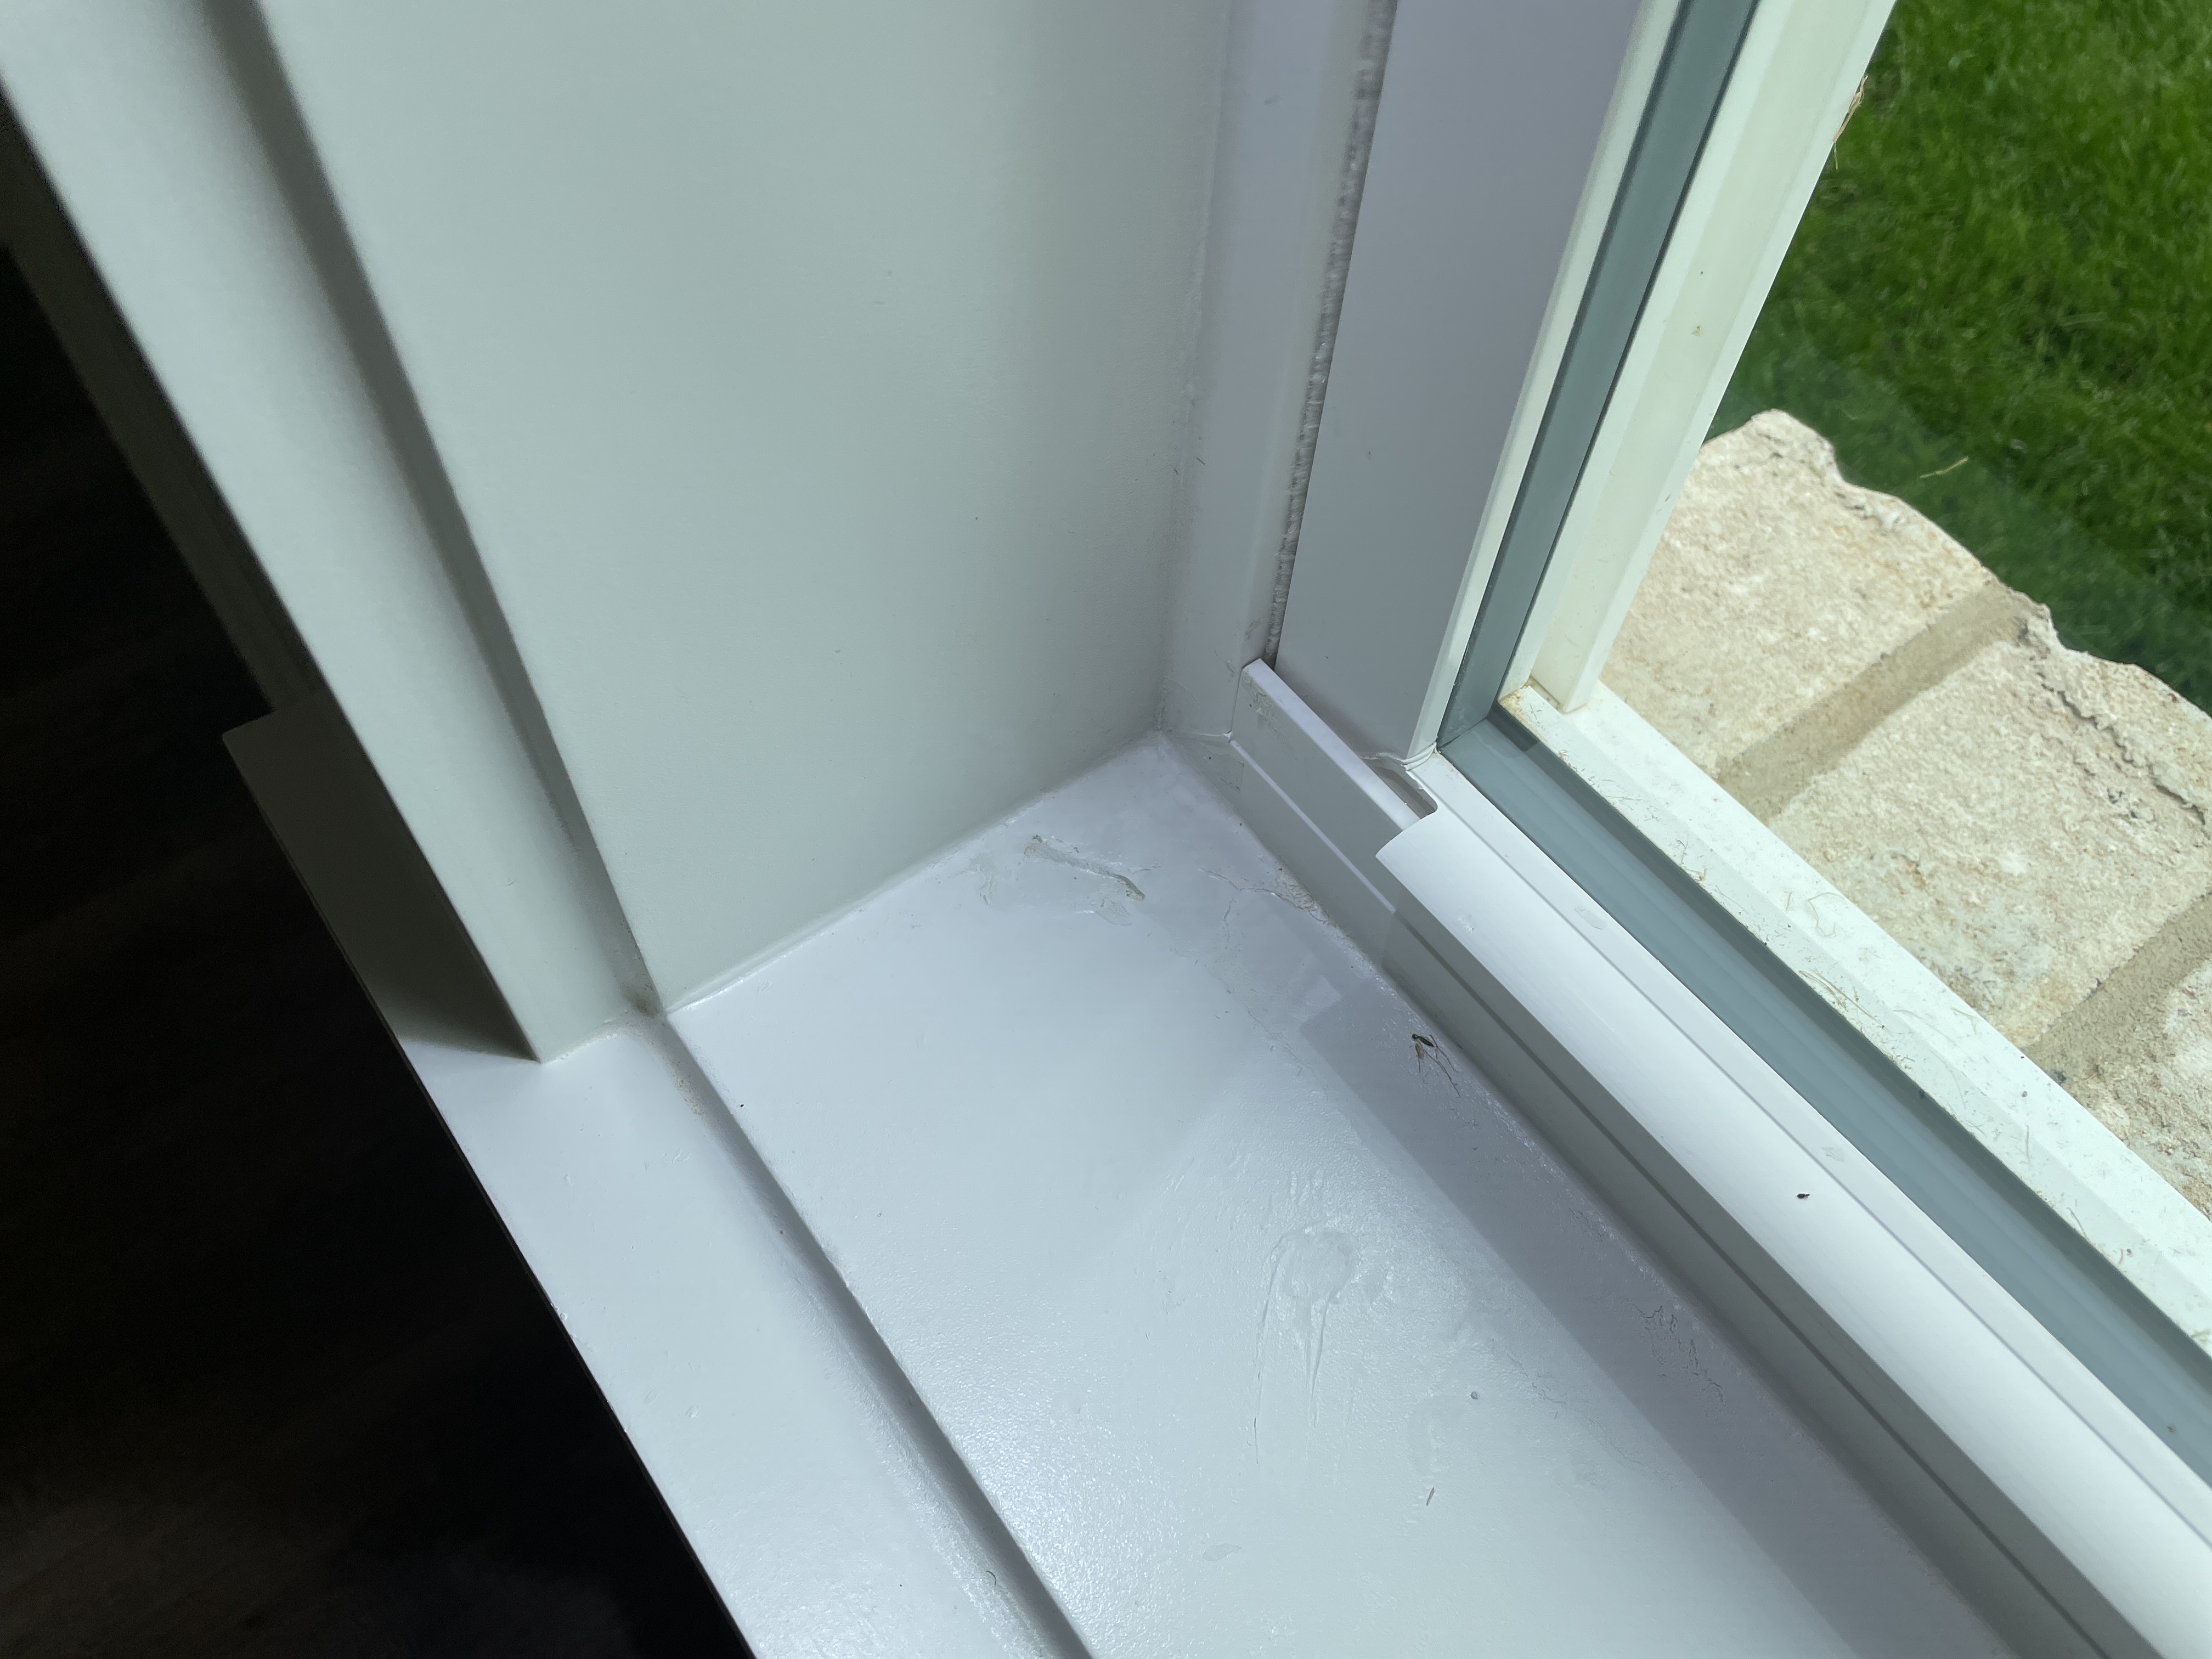 |
🔪 Kitchen
Sinks and Faucets
The kitchen sink faucet has been plumbed backward. When faucets are turned on by the lever, pulling them forward should turn on the cold water. This keeps kids from reaching up and turning on the hot (possibly getting burned). It's an easy fix by having the supply lines for the kitchen sink swapped with each other. That should make the cold water come on when you pull the handle forward.
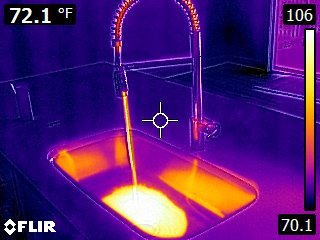 | 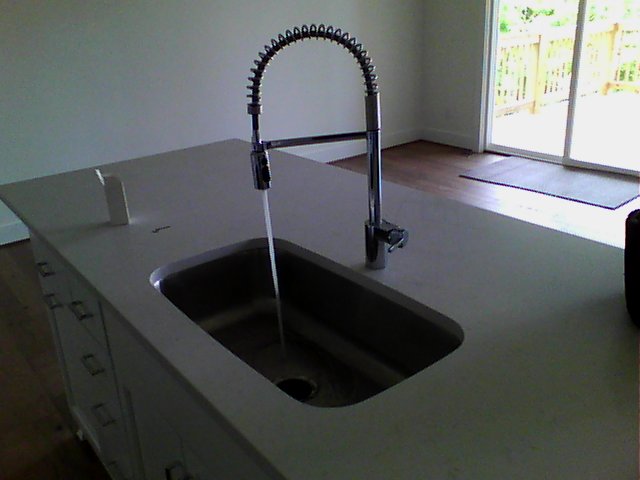 |
Dishwasher
The dishwasher was run through a basic wash cycle. Everything seemed to work as it should. This was a basic function test and not a test of every cycle.
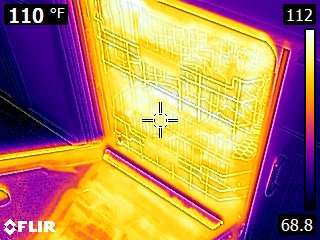 | 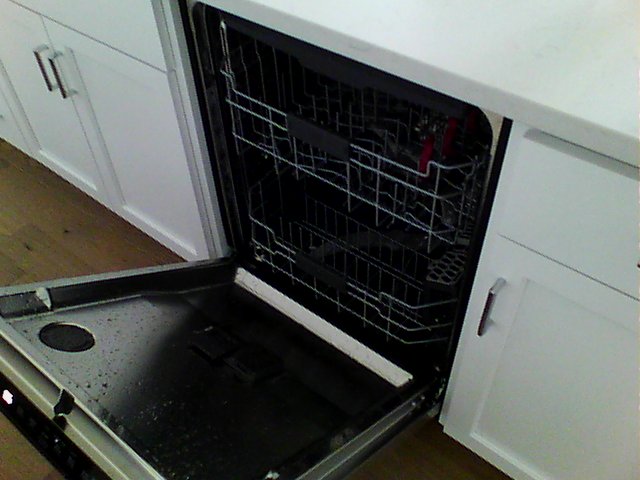 |
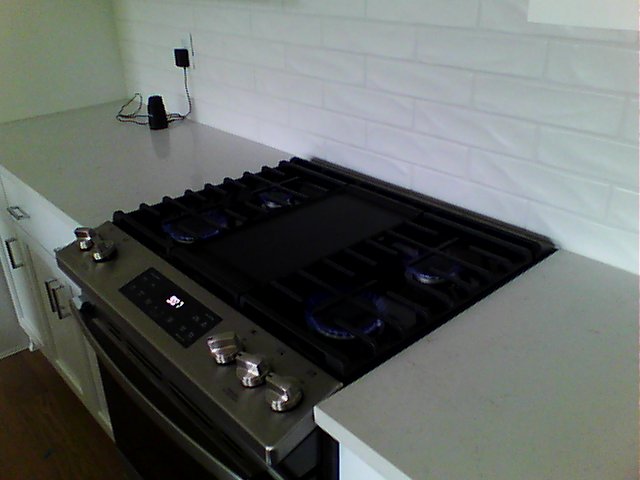
Ranges, Ovens and Cooktops
The range/oven was run through a basic function test. Everything seemed to work as it should. This was a basic function test and not a test of every cycle.
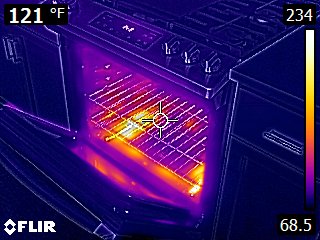 |  |
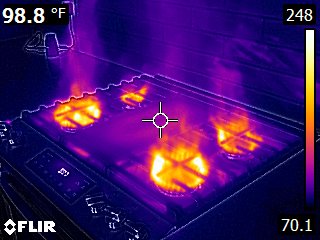 |  |
Refrigerators
Refrigerator: Not Installed
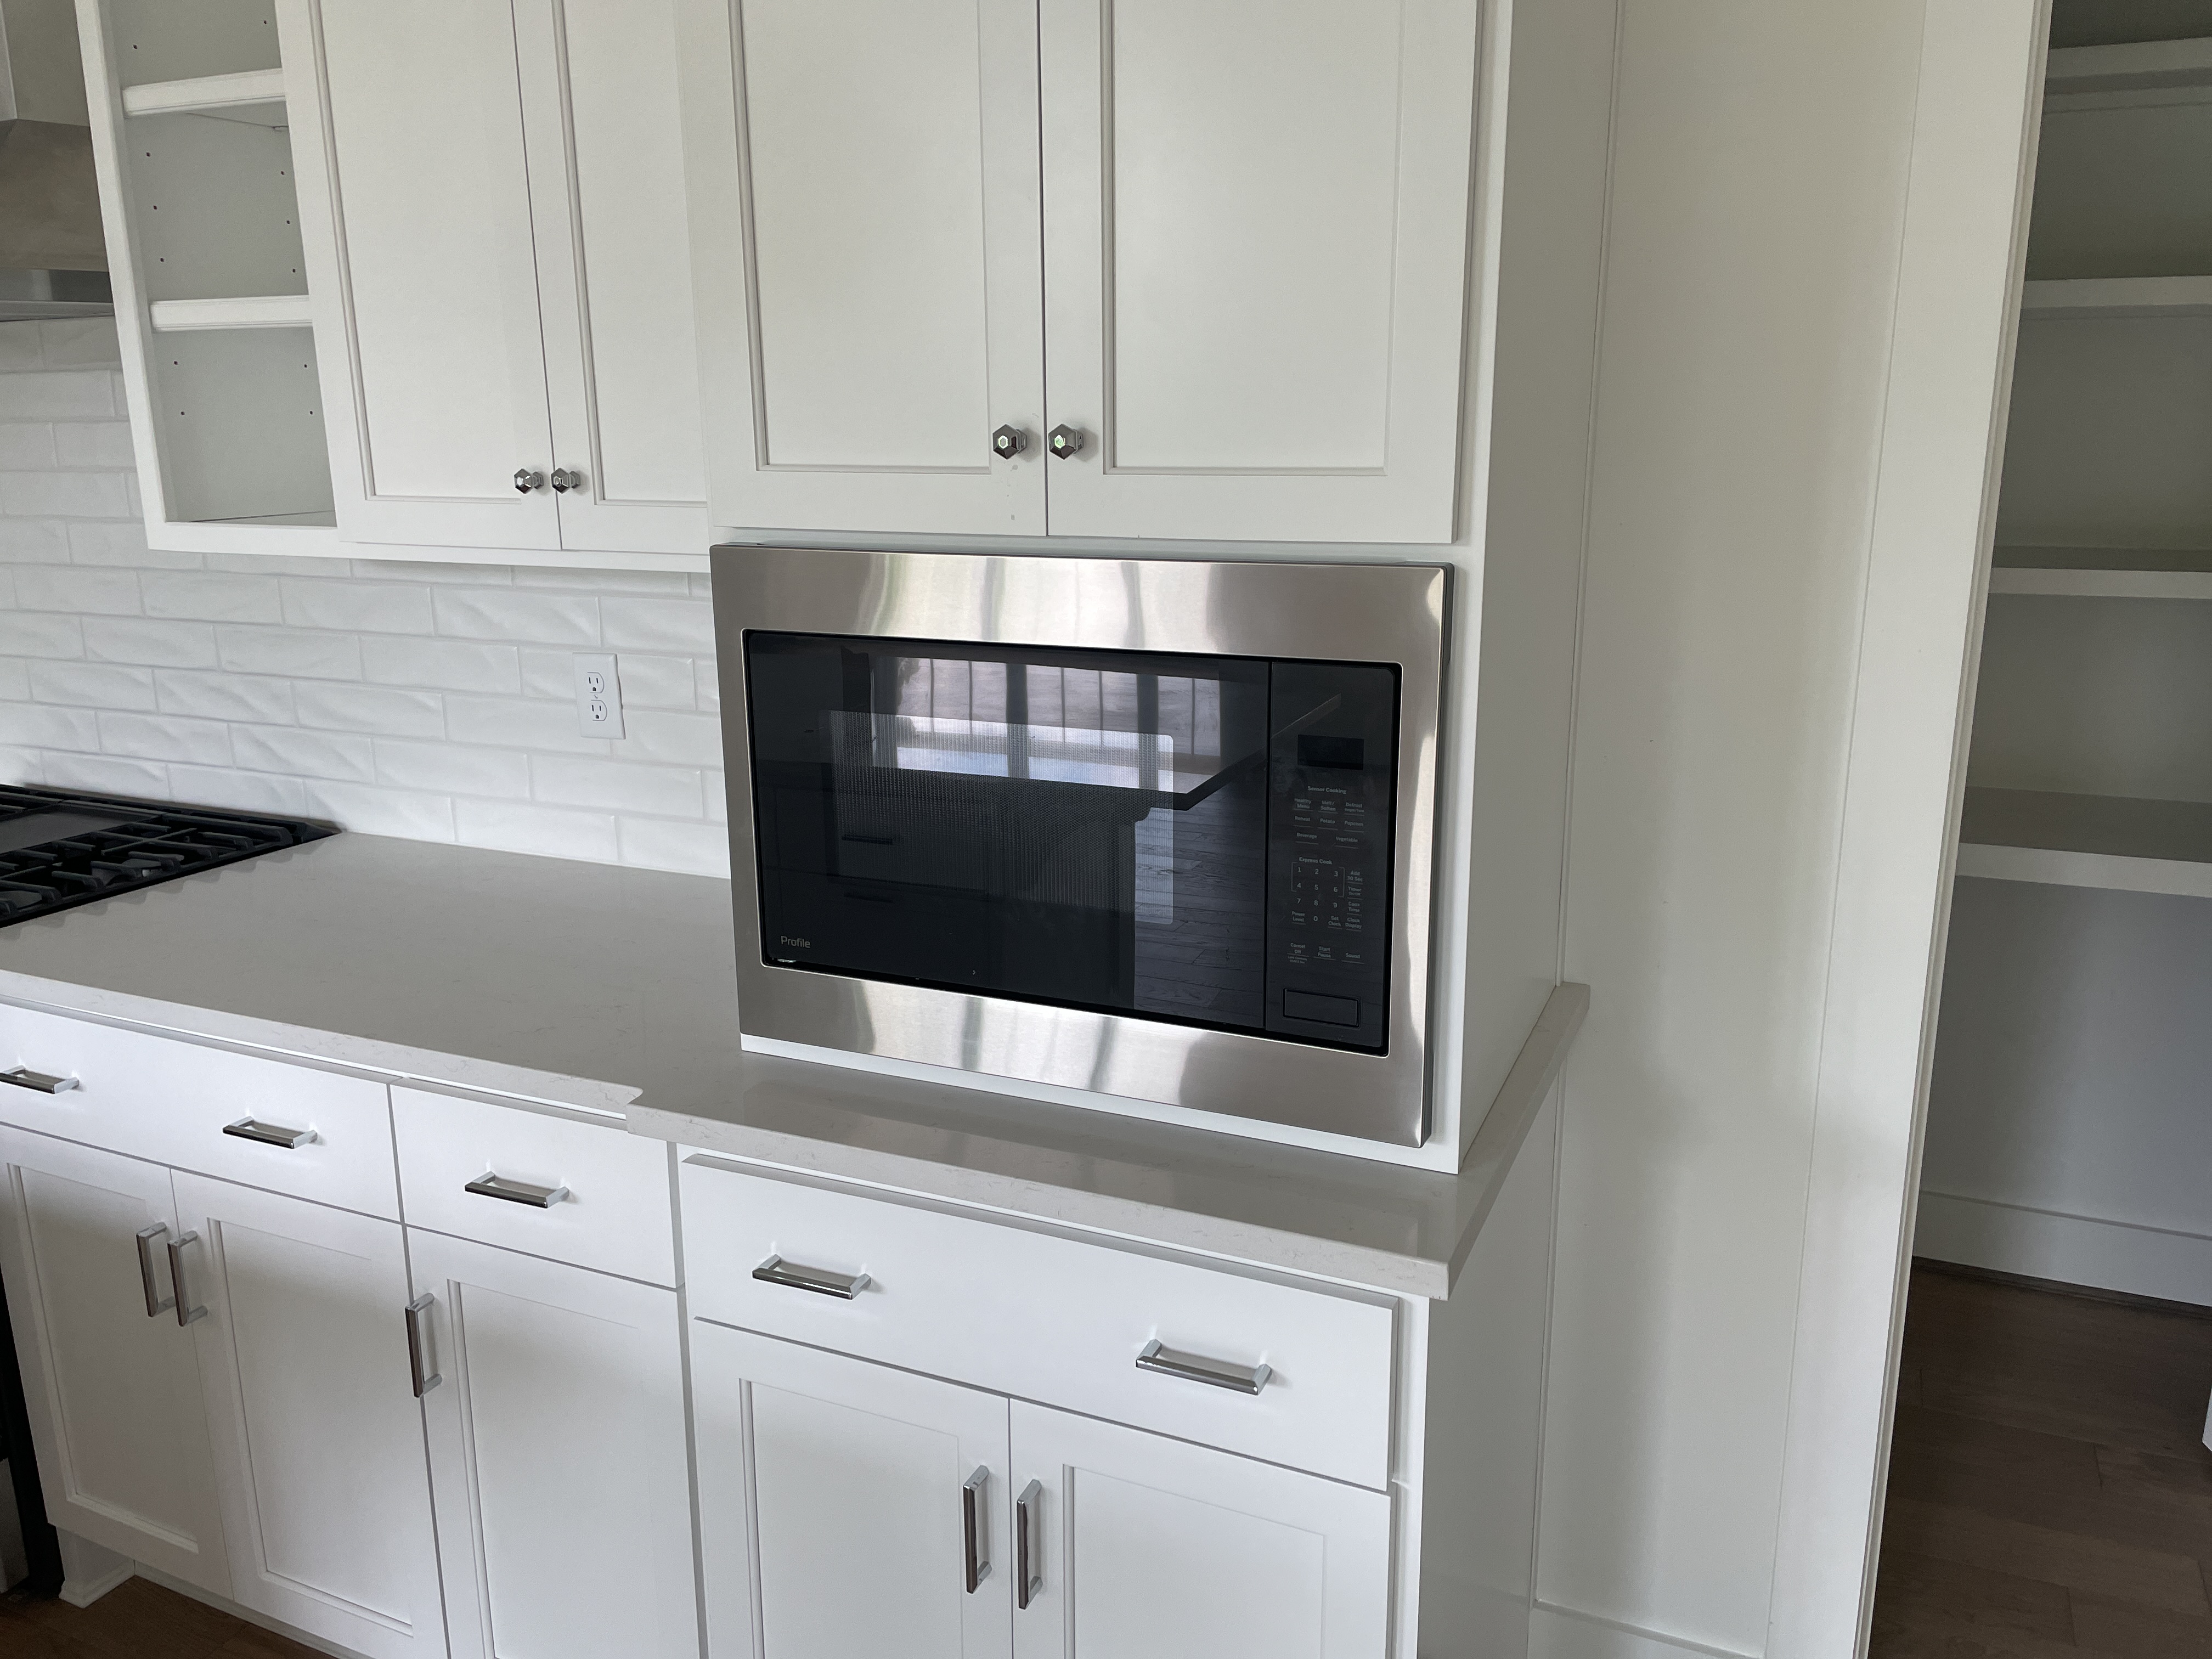
Built-In Microwave
There is a built-in microwave present but the unit does not have power. I was not able to test the microwave.
 |
🥼 Laundry Facilities
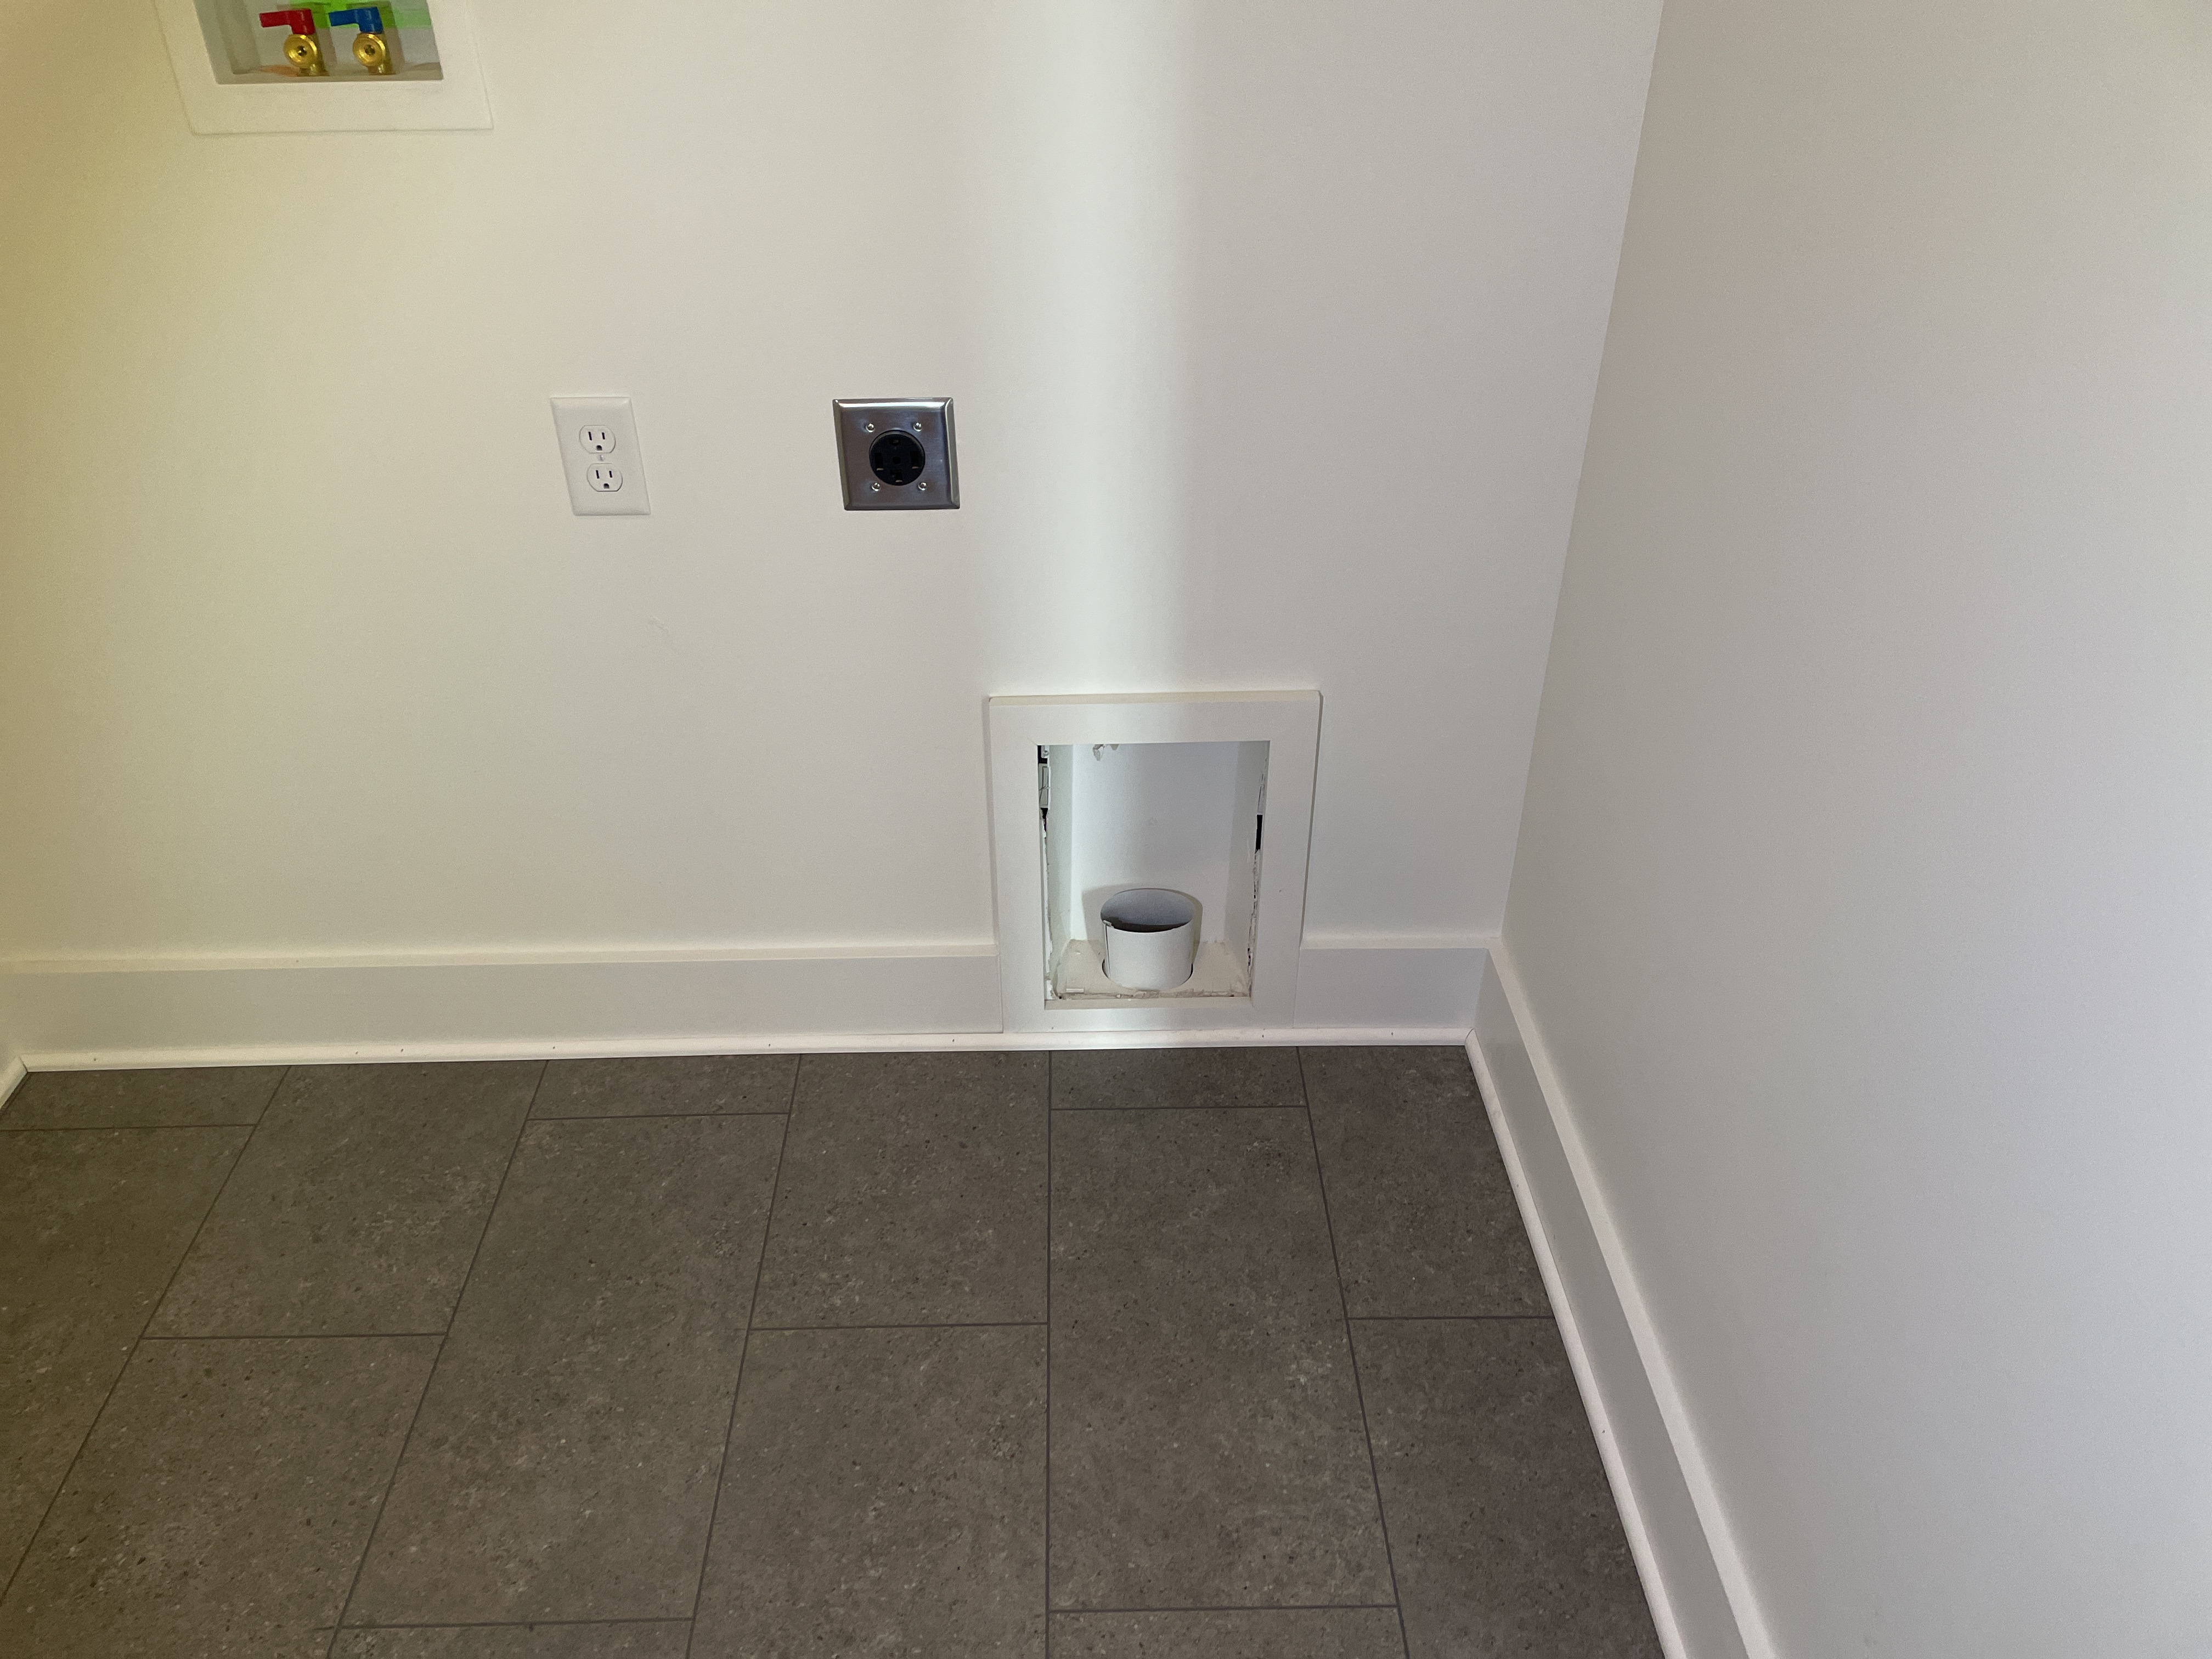
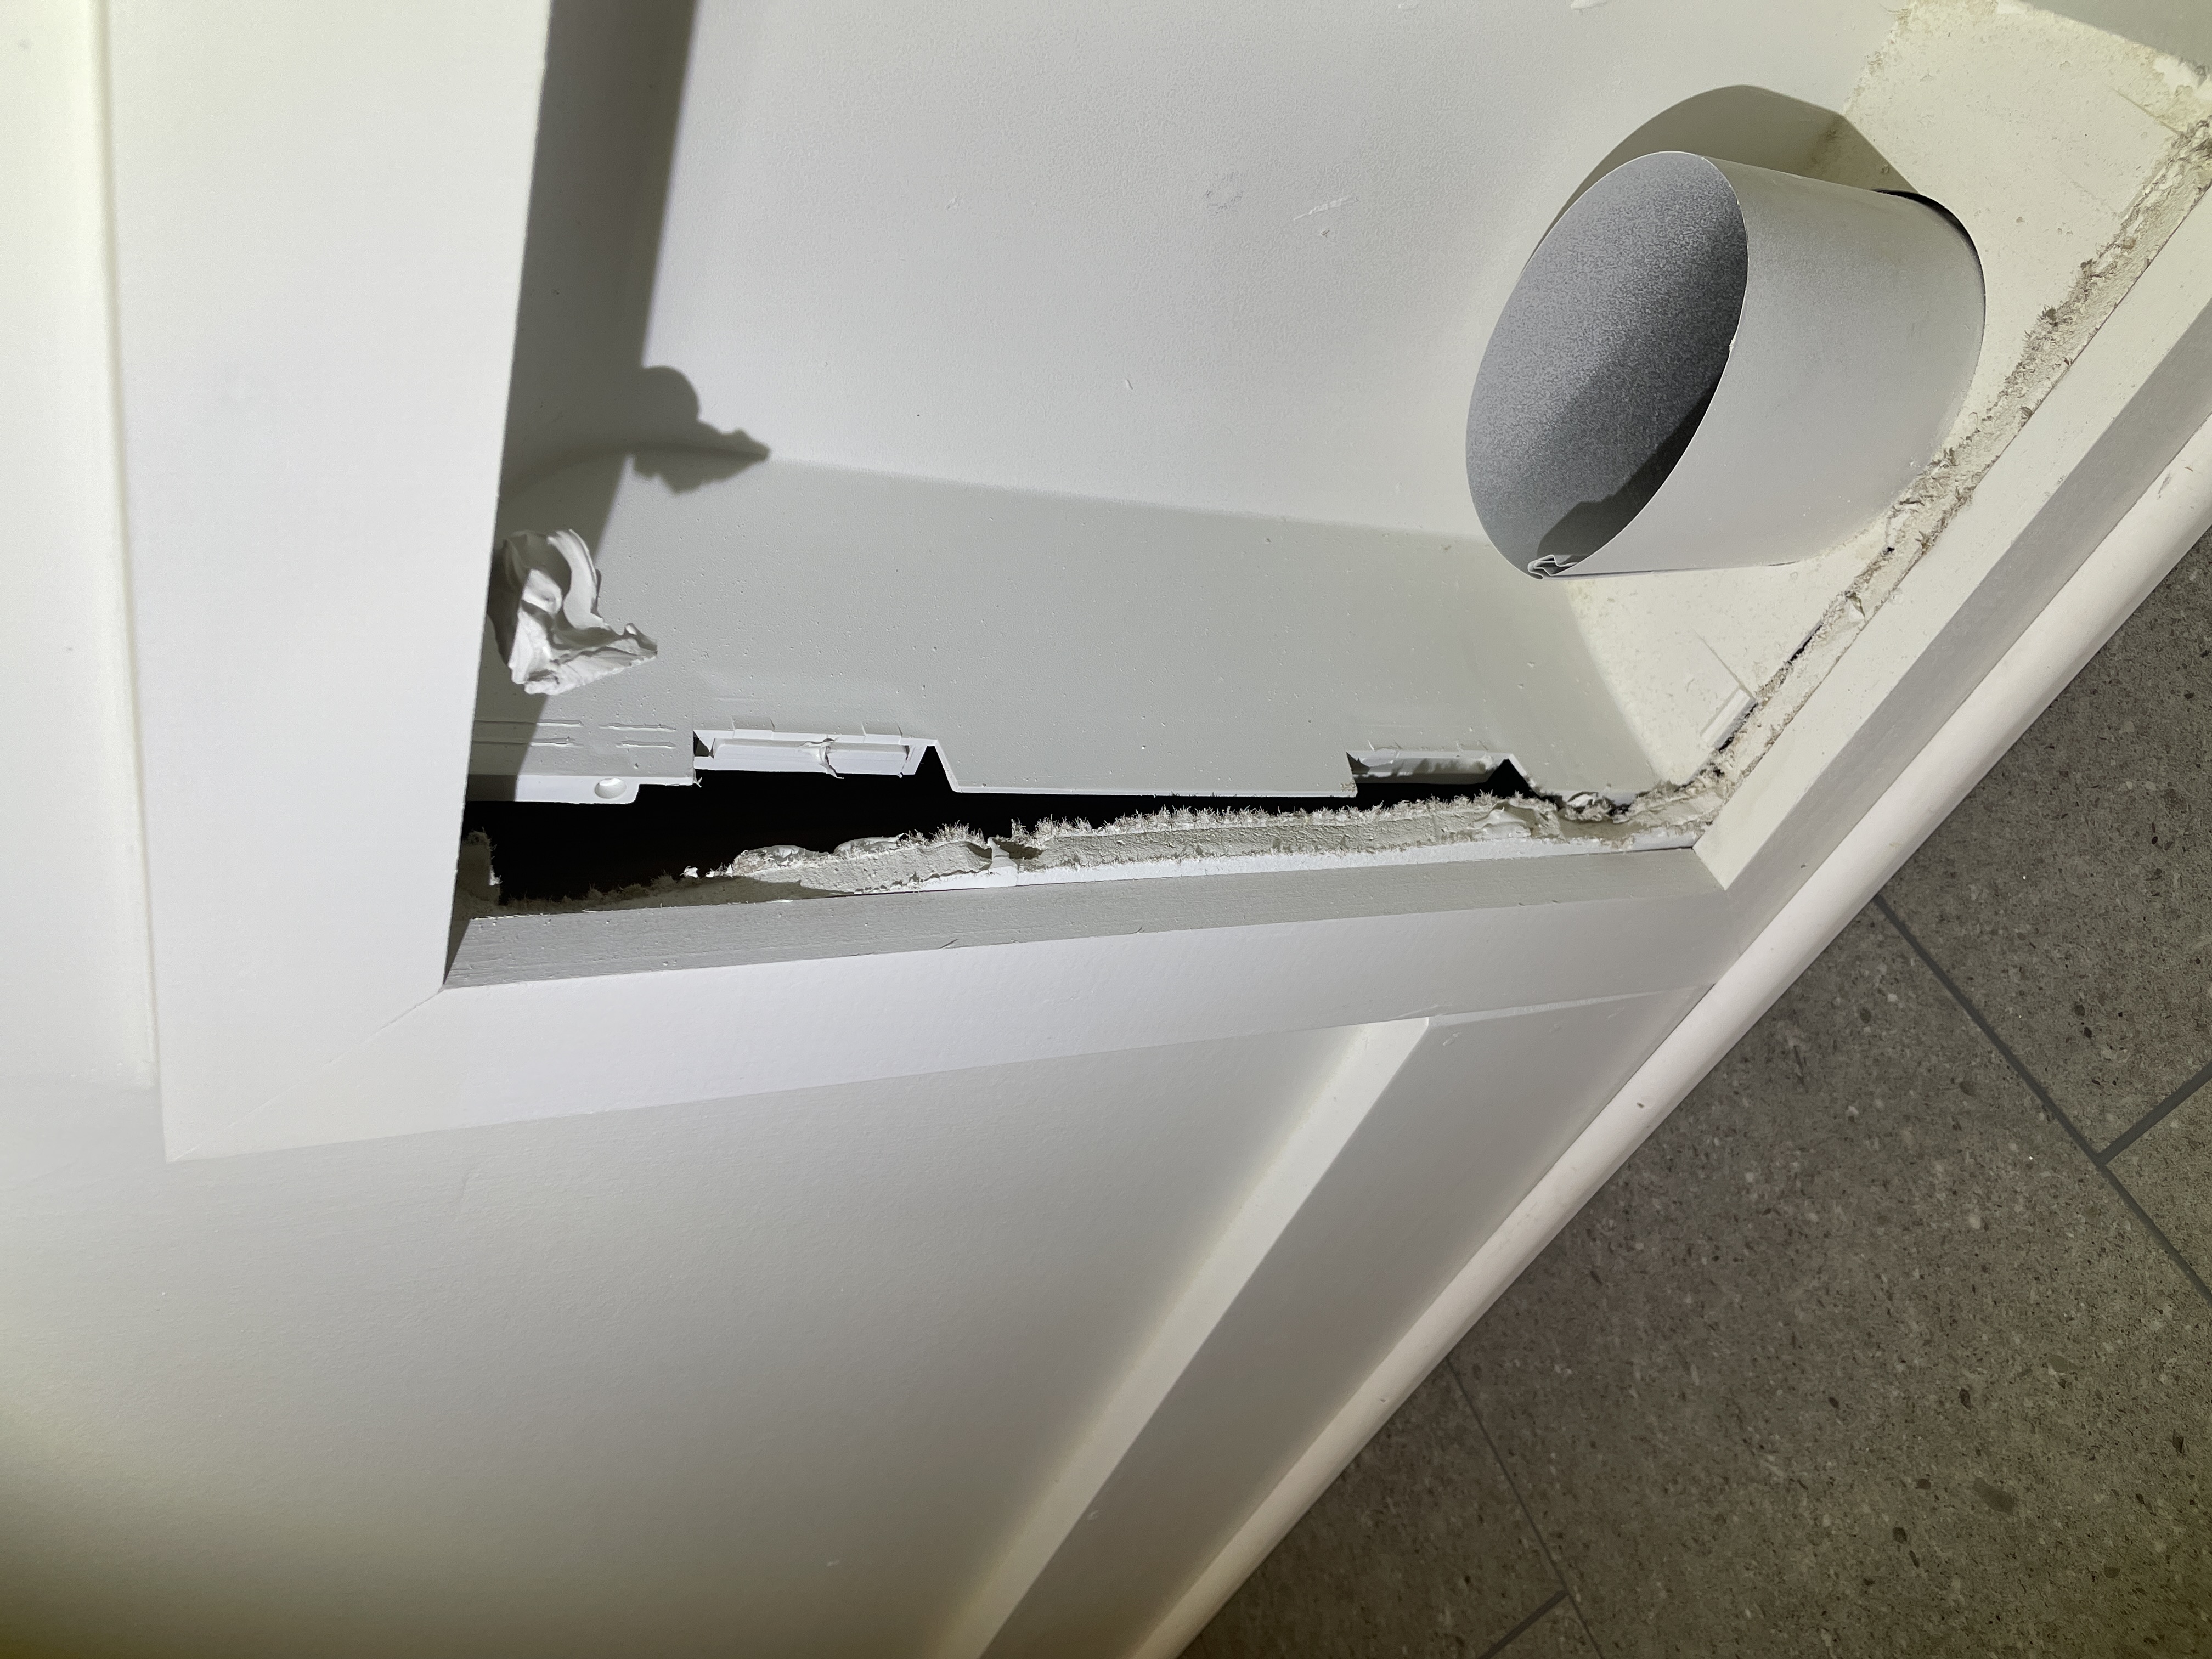
Dryer
The dryer vent box In the laundry room was poorly installed and flops inside the wall. Have the builder correct the enclosure installation as needed.
 |  |
 |
👨👦👦 Guest Bathroom
Toilet
The toilet in the basement bathroom is leaking around the bottom flange. I suspect this is a leaking wax ring. Have the builders plumber investigate and repair the situation as needed.
🗼 Attic
Attic Access
The attic access hatch cover is not air sealed and doesn't have any insulation on its backside. Areas like these can be a big ding to the efficiency of the home. You'll want to have the hatch sealed with weather stripping, and have ridged insulation placed on the back of the sheet goods that cover the hole. I've written a how-to guide on this subject that you can read here: http://abihomeservices.com/insulating-your-attic-access-hole/
 |  |
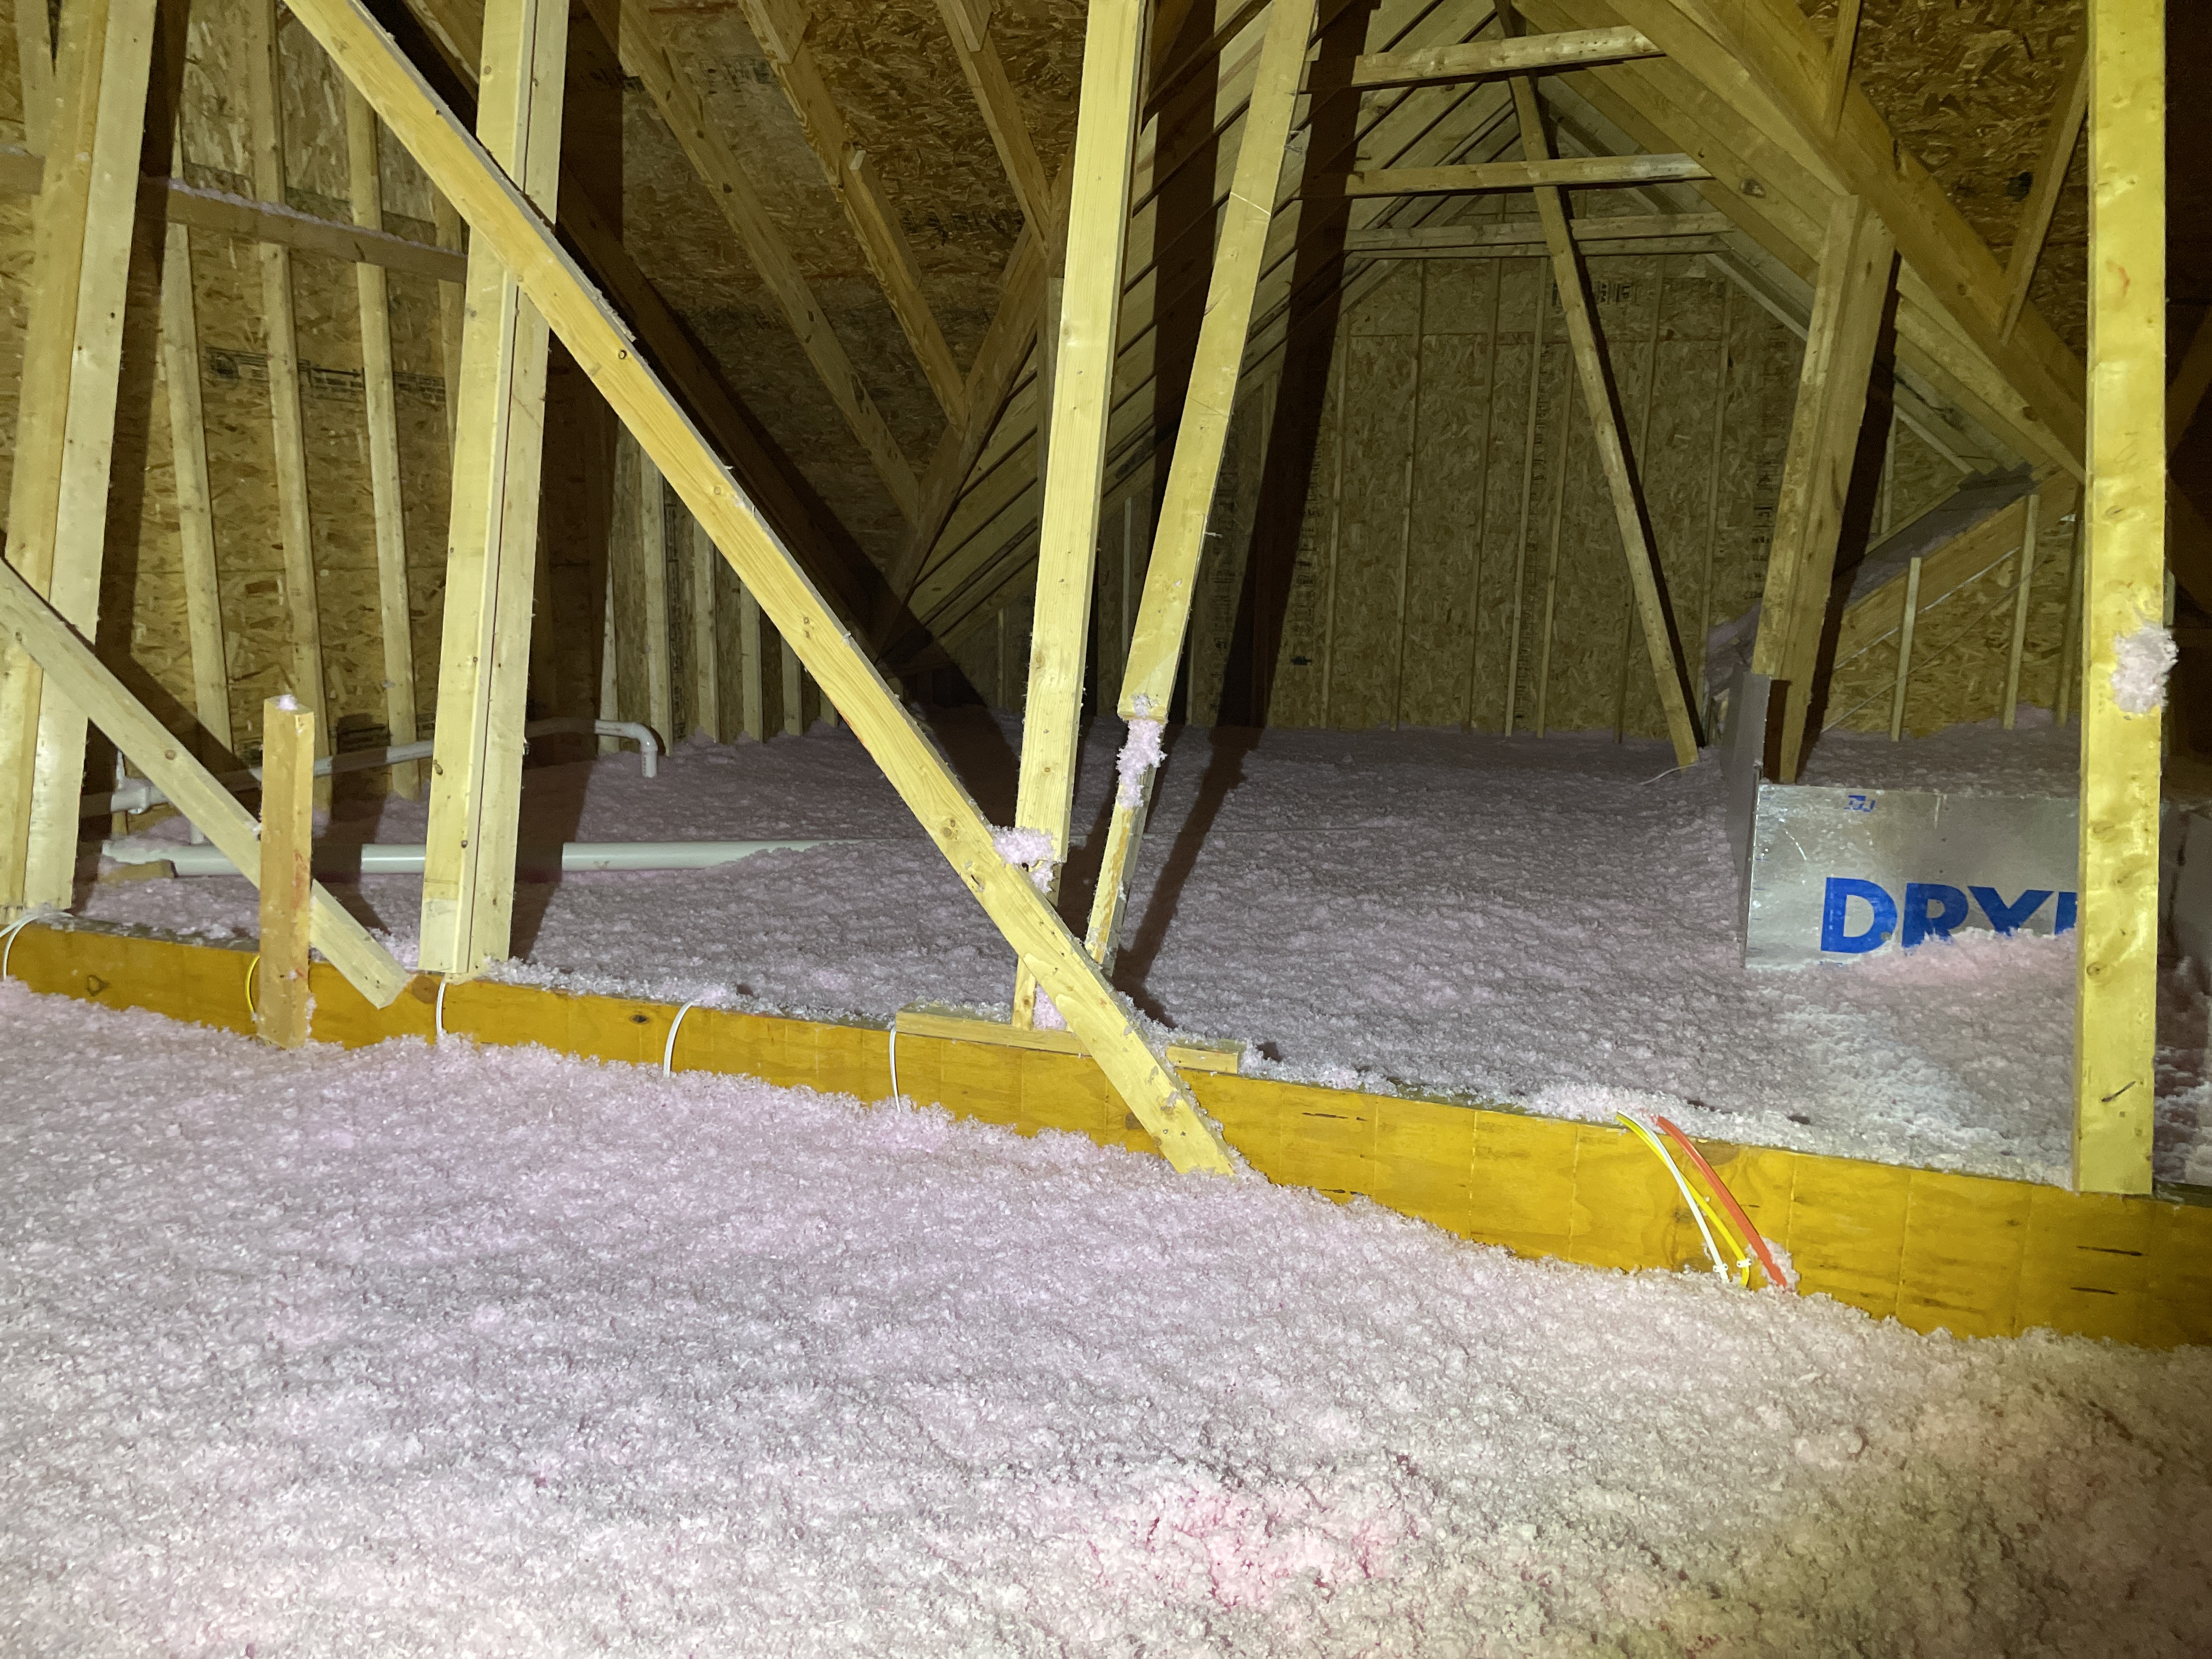
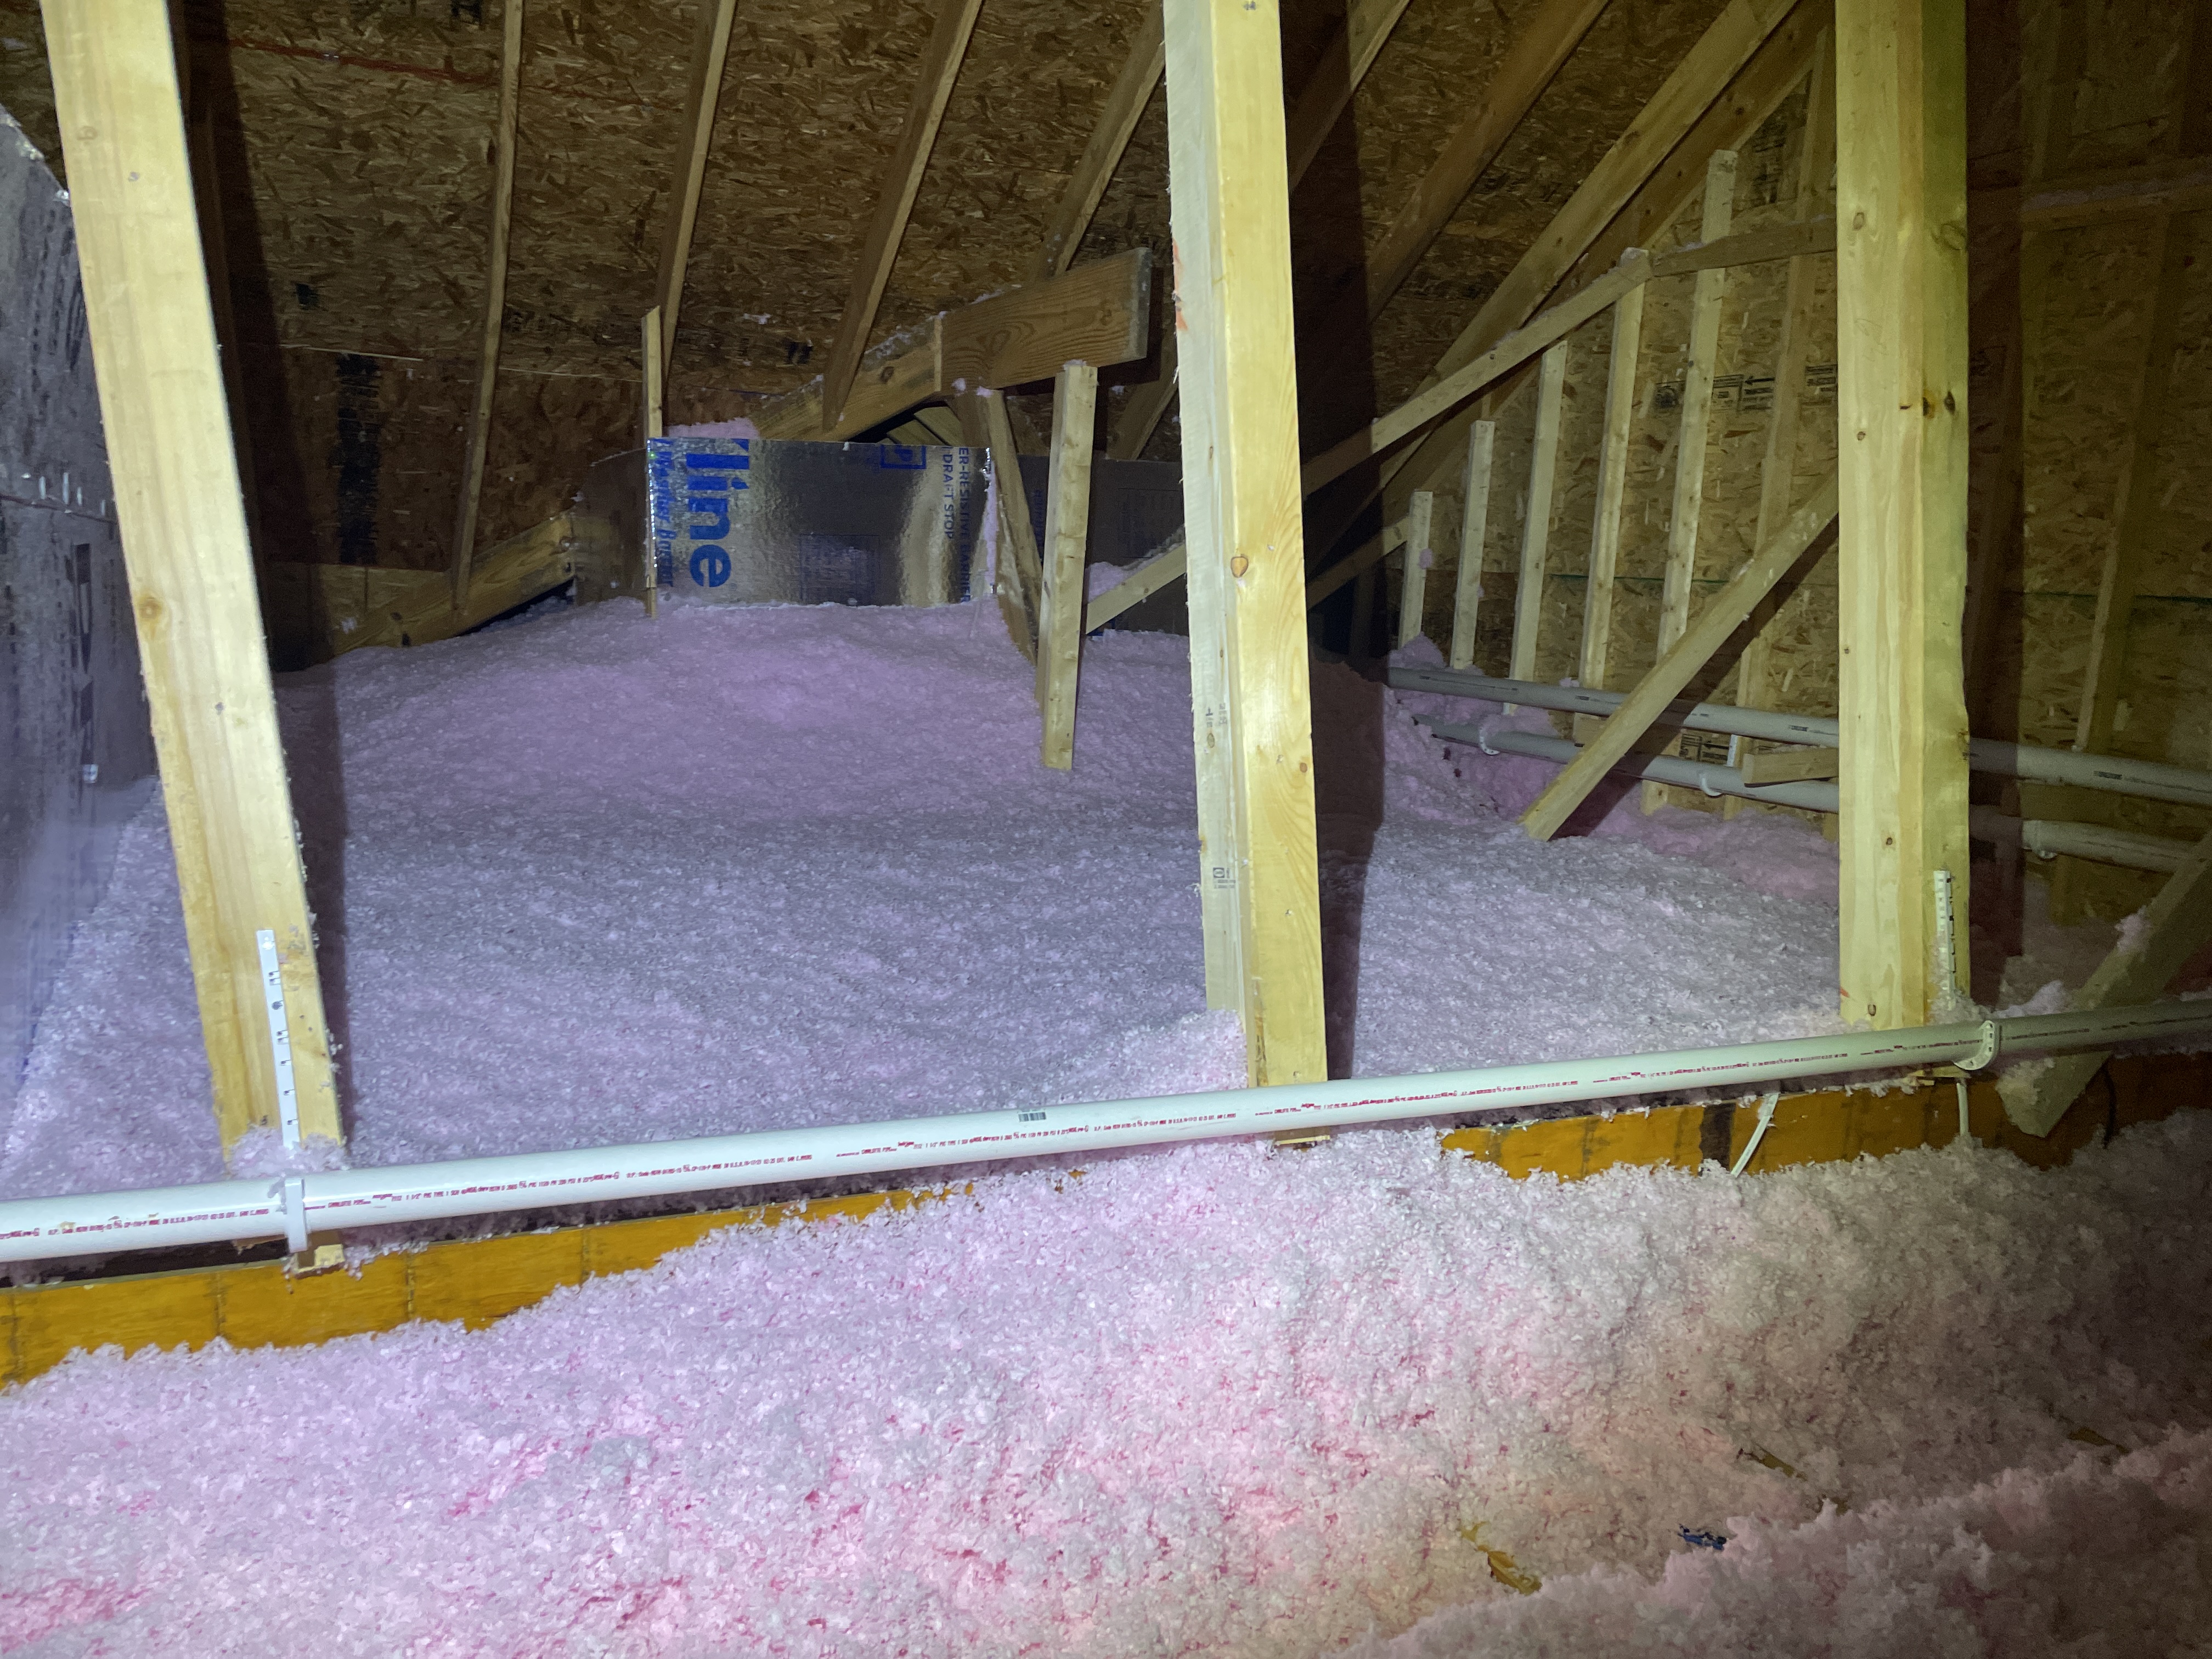
Attic Insulation
The tray ceiling in the master bedroom has a section that was not insulated. You can see the heat radiating through via thermal imaging along the back wall. You’ll want to have the builders correct this missing insulation as needed. Keep in mind that if the contractors have to wade through the deep blanket of insulation that is in place, that will also need to be repaired during the process.
 |  |
The attic has about 12" of blown-in insulation installed. This is great for energy efficiency, but does prevent me from crawling/wading through it to fully inspect the attic. I would have to move a pile of insulation out of the way every step and that would ruin your nice "blanket" of insulation. I was not able to see/inspect the attic framing or ceiling joists in the attic because of this.
 |  |
 |  |
 |
Receipt -- The Complete Inspection Report
123 Anywhere Drive Louisville, KY 40243
| Home Inspection | $550.00 |
| Radon Test | $150.00 |
| $700.00 | |
| PAID |