Jurie Fourie, License #NACHI14102004
The Scope and Purpose of this Home Inspection
Damp and Mould Inspection and Report
This Damp and Mould Inspection and Report aim to provide professional observations of components and defects as requested. The inspection and report may identify and suggest possible solutions for the maintenance of specific defects and components of the structure. The inspection is a limited visual inspection specific to the possible causes of damp and mould like substances in the house or building and may not include all the hidden or concealed causes. I try to inform you of what I observed during the inspection process. This is more difficult to convey in a report and one of the many reasons why I recommend attendance during the inspection.
A home inspection is not an insurance policy
This report does not substitute for or serve as a warranty or guarantee of any kind. Home warranties can be purchased separately from insurance firms that provide this service.
A home inspection is visual and not destructive
The descriptions and observations in this report are based on a visual inspection of the structure. I inspect the aspects of the structure that can be viewed without dismantling, damaging or disfiguring the structure and without moving furniture and interior furnishings. Areas that are concealed, hidden, inaccessible or unsafe to view are not covered in this inspection. Some systems cannot be tested during this inspection as testing risks damage to the building. For example, overflow drains on baths are generally not tested because if they were found to be leaking they could damage the finishes below. My procedures involve non-invasive investigation and non-destructive testing which limit the scope of the inspection.
This is not an inspection for NHBRC/Building Regulation/Municipal Compliance
Although this inspection report may refer to SANS (South African National Standards) and municipal by-laws, this report is not intended to be an NHBRC (National Home Builders Registration Council), NBR (National Building Regulation) or a local Municipal By-law Compliance inspection. Although some safety issues may be addressed in this report, this inspection is not a safety inspection and I am not required to identify all potential hazards.
My observations are based on my tertiary qualifications, InterNACHI's Continuing Education requirements, research and workplace experience
Construction techniques and standards vary. There are different ways to build a house or install a system in a house. The observations in this report are based on my tertiary qualifications, research and workplace experience. Other inspectors and contractors may have some differing opinions. You are welcome to seek opinions from other professionals.
The scope of this inspection
This inspection will include the following systems depending on the type of inspection required: exterior, roof, structure, drainage, foundation, interior, plumbing, cooling and heating. The evaluation will be based on limited observations that are primarily visual and non-invasive. This inspection and report are not intended to be technically exhaustive.
Your expectations
The overall goal of a home inspection is to help ensure your expectations are appropriate with the house you are renting, buying or own. To this end, I assist with the discovery by showing and documenting observations made during the home inspection. This should not be mistaken for a technically exhaustive inspection designed to uncover every defect in the building. Such inspections are available but they are generally cost-prohibitive to most home buyers and homeowners.
Your participation was requested
Your presence was requested during this inspection. A written report will not substitute for all the possible information that can be conveyed verbally by a shared visual observation of the conditions of the property.
How to Read This Report
Getting the Information to You
This report is designed to deliver important and technical information in a way that is easy to access and understand. This report may include a summary page. If you are in a hurry, you can take a quick look at my "Summary Page” and quickly get the critical information for important decision making. However, I strongly recommend that you take the time to read the full report, which includes digital photographs, captions, diagrams, descriptions, videos and hot links to additional information.
The best way to get the layers of information that are presented in this report is to read your report online, which will allow you to expand your knowledge about your house. You will notice some words or series of words highlighted in blue and underlined – clicking on these will provide you with a link to additional information.
This report can also be printed on paper or in a PDF document.
Chapters and Sections
This report is divided into chapters that parcel the home into logical inspection components. Each chapter is broken into sections that relate to a specific system or component of the home. You can navigate between chapters with the click of a button on the left side margin.
Most sections will contain some descriptive information done in black font. Observation narratives, done in coloured boxes, will be included if a system or component is found to be significantly deficient in some way or if I wish to provide helpful additional information about the system or the scope of my inspection. If a system or component of the home was deemed to be in satisfactory or serviceable condition, there may be no narrative observation comments in that section and it may simply say “tested,” or “inspected.”
Unless defective or maintenance items are specifically allocated to rooms or areas they should be regarded as generally defective items that can be found throughout the residence and/or property.
Photographs
Photographs take up a lot of space, therefore, the photographs about a particular defect do not necessarily include all the photographs or defects of the particular defect identified.
Note: For a better view of the photographs included in the report, click on the photographs to enlarge them.
Observation Labels
All narrative observations are coloured, numbered and labelled to help you find, refer to, and understand the severity of the observation. Observation colours and labels that may be used in this report are:
- No Visible Deficiency:A comment of the general condition of various aspects of the property noted during the inspection which did not appear to need attention.
- Note:Refers to aside information and /or any comments elaborating on descriptions of systems in the home or limitations to the home inspection.
- Microbial Activity:Visual evidence of microbial activity that would suggest the presence of mould, fungi or microbial activity, either past or present that require immediate attention to prevent additional damage or to eliminate health or safety hazards.
- Moisture Damage:Evidence of moisture damage which may have been caused by elevated moisture levels or water leakage requiring repair, maintenance or improvement at this time. General deficiencies include patching, painting, cleaning or items requiring replacement.
- Elevated Moisture:Tests done with a moisture meter indicating high moisture content. Elevated moisture conditions create a climate conducive to mould growth. This condition may have led to, or has the potential to lead to, moisture damage and mould growth
- Preventative Service Required:An improvement to an area, system, component or condition with the potential for mould growth that should be corrected.
- Water Leakage:Evidence of active water leakage or the presence of moisture observed, the source of which must be located and corrected or eliminated.
- High Humidity:Humidity or dampness (water vapour) in the air that can supply enough moisture for mould growth.
- Water Intrusion:Water intrusion from rising, falling or penetrating damp that can create a climate conducive to mold growth.
- Inspection Limitation:An observation, item or area that could not be inspected or which may require further investigation such as an area that could not be safely accessed, which was difficult to access or where access.was prohibited
Summary Page
The summary page is intended to provide you and interested other parties directly involved with this home a convenient and cursory preview of some of the conditions and components that I have identified within my report as needing further evaluation or service by an appropriately qualified specialist or that pose a potential health and safety risk. It is not intended to be comprehensive, and should not be used as a substitute for reading the entire home inspection report or be viewed as a tacit endorsement of the condition of components or features that do not appear in this summary report. The entire report must be read to get a complete understanding of this report as the Summary Page does not include photographs or photo captions.
Summary
No Visible Deficiencies
- G-4 Grounds:
The driveways on multiple locations around the building were mostly in a reasonable condition. Exceptions are specifically listed below.
- E-6 Exterior:
The exterior doors and frames were generally in a reasonable condition and working order.
- P-2 Plumbing:
The water pipes, where visible, were copper and flexible braided connectors and appeared to be in a reasonable condition.
- P-3 Plumbing:
Where visible, the drain and vent pipes inside the duct appeared to be functional at the time of the inspection. No leaks were observe.
Notes
- G2-2 General:
This building was occupied at the time of the inspection. Inspection of occupied buildings presents some challenges as goods, fittings, fixtures and furniture can obstruct visual inspection of and access to parts of the unit. I do my best during inspection to work around these to discover as much as possible about the building without moving or damaging goods, fittings, fixtures and furniture, however, the presence of these items may limit the inspection.
- IAQ1-2 Indoor Air Quality:
Please read through the Indoor Air Quality Questionnaire filled in by Ms Vermaak and Coetsee in the Invoice and Attachments at the bottom of the report below!
- G-3 Grounds:
A layer of plastic may have been placed under the paving to control a high water table. Plastic should not be used under paving as it creates instability and accumulates the rain or any water on top of the plastic. Placing plastic under paving may temporarily divert water away from the surface, but it won't address the underlying issue of high water tables. The plastic stops the water from draining through the paving and results in pooling of water on the plastic and joints of the paving. Plastic under paving can hinder natural drainage and exacerbates the problem of high water tables and water pooling on the paving. Proper drainage is important for managing water tables, and adding a barrier like plastic can trap water and prevent it from flowing naturally. Water will still accumulate underground, potentially causing structural and moisture problems and damaging the paving and structures over time. Solutions to high water tables include improving surface drainage, installing subsurface drainage systems and elevating structures.
- E-1 Exterior:
My inspection of the exterior included the visually accessible areas of windows, walls, doors and eaves. The exterior windows, walls and doors were inspected from the ground only and without the use of a ladder. My inspection was performed in accordance with the International Association of Certified Home Inspectors' Standards of Practice.
- SA-1 Service Areas:
My inspection of the interior of the house included the visually accessible areas of floors, walls and ceilings. The interior areas were inspected from floor level only and without the use of a ladder. No furniture, equipment, floor coverings, appliances or stored goods were moved during my inspection to prevent accidental damage. My inspection was performed in accordance with the International Association of Certified Home Inspectors' Standards of Practice.
- LA-3 Living Areas:
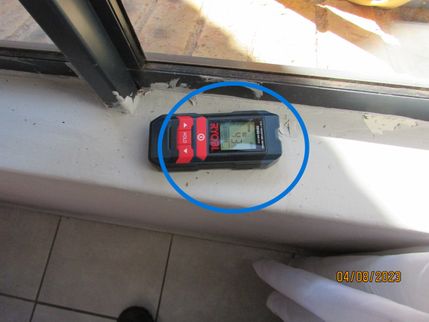
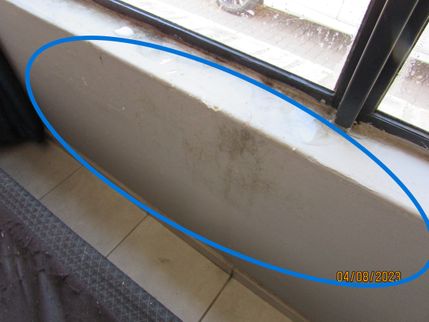
Most of the damp affected areas in the 1st bedroom (north facing) had been painted over and showed moisture readings similar to the "dry" walls.
- Moisture reading on the window sill.
- C-1 Conditions:
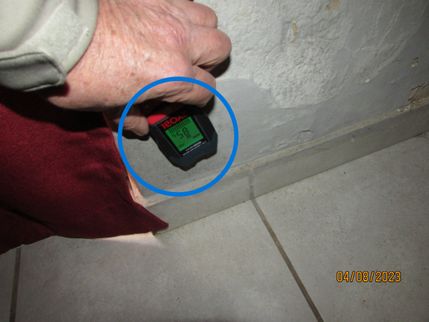
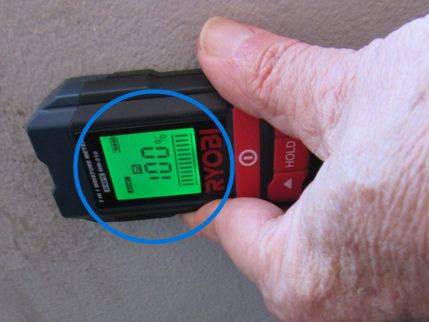
The moisture measurements on all the walls averaged at about 46% on the walls in the living areas excluding the damp or moisture damaged areas! Normal readings on the walls in living areas are usually around 35% in most houses and town houses! The measurements were therefore about 10% above the norm!
- M-1 Measurements:
At the time of my inspection, the exterior relative humidity (RH) was approximately 46%. The external temperature was approximately 18˚C. The average internal RH in the unit was approximately 48%. The temperature inside the unit was the same as the external temperature. No excessive humidity condition appears to exist in the unit at the time of the inspection. The unit might have been aired before the inspection. High RH may be created if the units windows are kept closed at night.
- IR-2 Inspector's Recommendation:
Please read through the Indoor Air Quality Questionnaire filled in by Ms Vermaak and Coetsee in the Invoice and Attachments section below!
Microbial Activities
- G-7 Grounds:
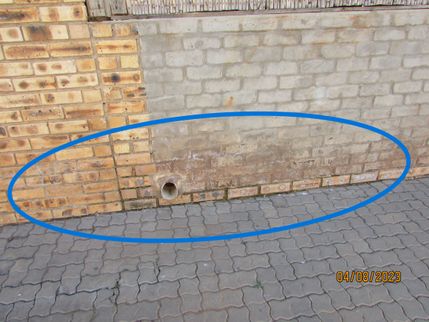
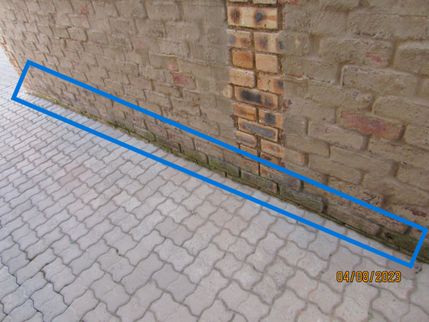
Moisture intrusion and efflorescence was observed on the wall coverings on the lower portions of the boundary wall. This common occurrence! Boundary walls and yard walls do not have a layer of DPC (damp proof course) built into the wall to prevent rising damp because this would make the wall unstable. The pooling of rain and stormwater should be avoided against the division walls. The gaps between the paving and the division walls should be sealed with mortar to prevent pooling against the walls.
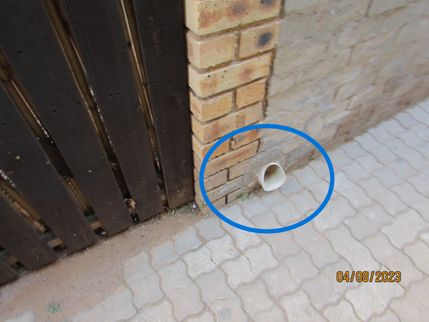
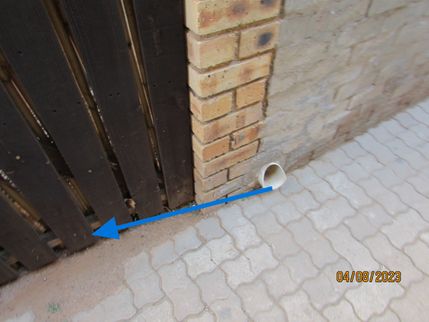
- This spout in the wall was too high and had allowed rain and stormwater pooling in the unit's garden on the other side of the wall. Note the efflorescence and mould on the wall!
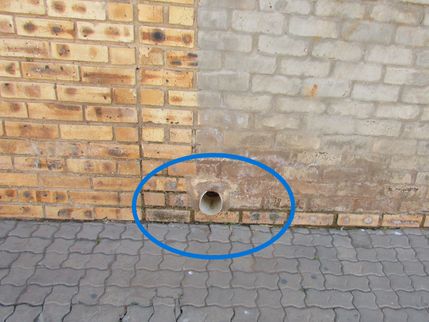
- This spout in the wall was too high and had allowed rain and stormwater pooling in the garden on the other side of the wall. Any stormwater discharged from this spout may flow under the gate into unit 92's garden!
- E-2 Exterior:
There was apparent visual evidence of microbial activity on the wall covering on all sides of the building that would suggest the presence of mould, fungi or microbial activity, either past or present. I recommend further evaluation and remediation by an appropriately qualified remediation contractor or industrial hygienist of the whole building.
- SA-3 Service Areas:
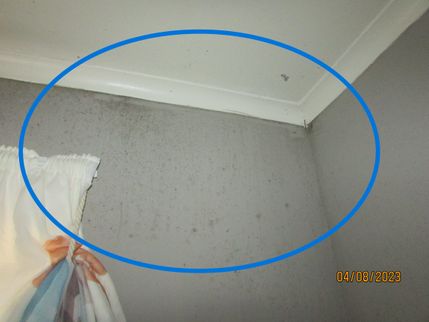
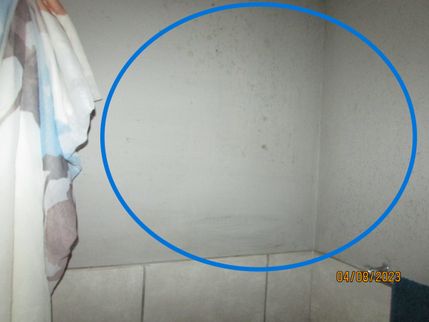
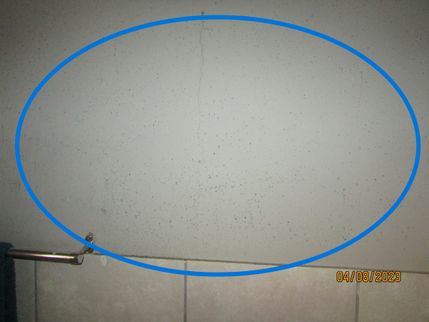
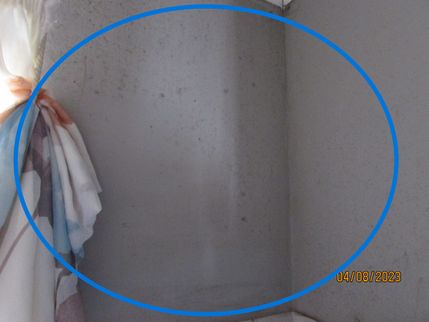
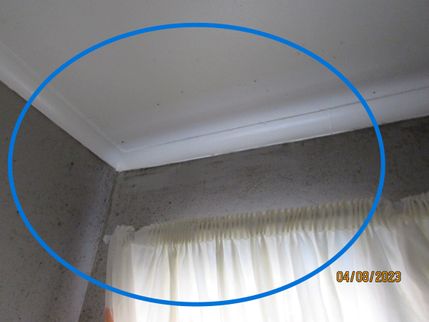
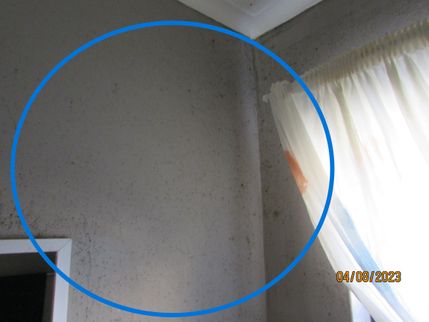
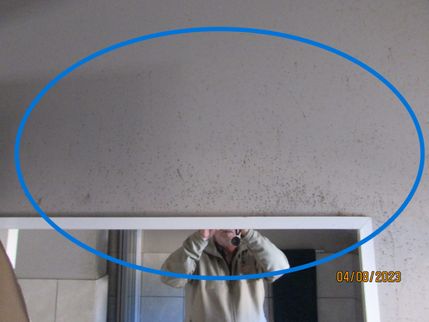
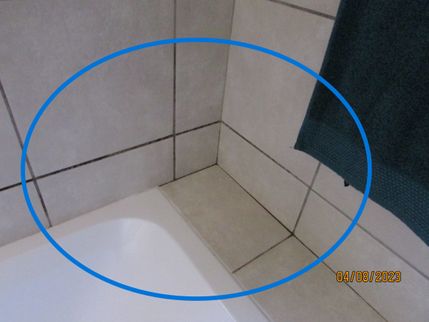
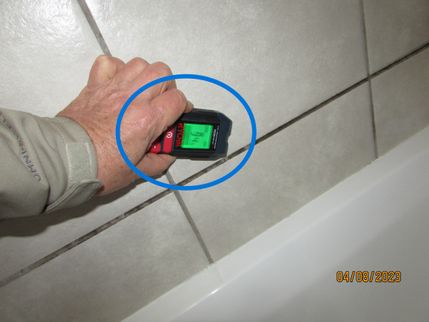
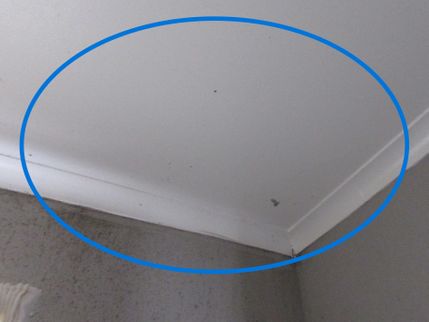
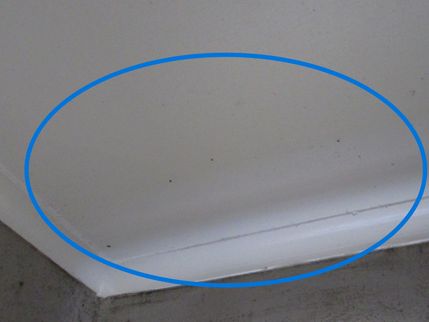
The walls and ceilings above the shower and bath had signs of mould infestation. The mould on the walls could be a result of condensation from bathing and showering, moisture intrusion through the duct walls, a result of falling and penetrating damp at the window or a combination of all three! The mould on the upper walls and ceiling appeared to be a result of condensation. As there were no mechanical exhaust provisions, it is important to open the bathroom window and door after taking hot or extended baths and showers, as this will help prevent the buildup of condensation and mould growth on the bathroom walls and ceilings. See Exterior: Exterior Walls and Window Exteriors and Sills
The mould should be removed with Mould Buster or watered down Jik as soon as possible. It may take awhile for the walls and ceiling to dry out before the mould is completely removed. If the mould continues to return and a musty smell is prevalent after an extended period, I recommend further evaluation by a mould remediation specialist to devise a plan to insure safe indoor air quality. The leaking in the duct and at the window should also be repaired as soon as possible!
Some examples are shown below:
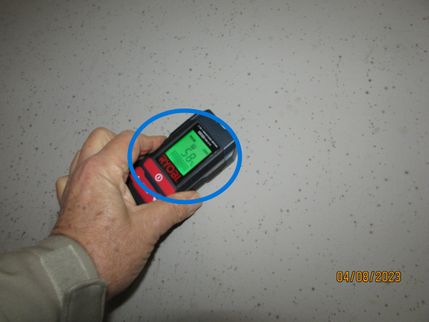
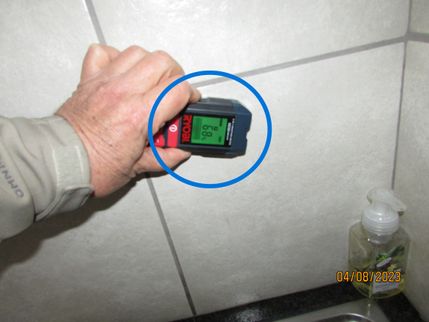
- The reading taken against the middle of bathroom wall was elevated but not all that high! A moisture reading in bathrooms are normally elevated!
- This very high reading below the window in the bathroom appeared to indicate moisture intrusion through the gaps in the window sill and frame.
- The reading against the shower wall was elevated but not more than would be expected.
- Mould between the tiles above the bath near the duct appeared to indicate moisture intrusion through the duct wall.
- This reading was taken lower down the window above the bath indication possible falling damp from the window sill.
- SA-7 Service Areas:
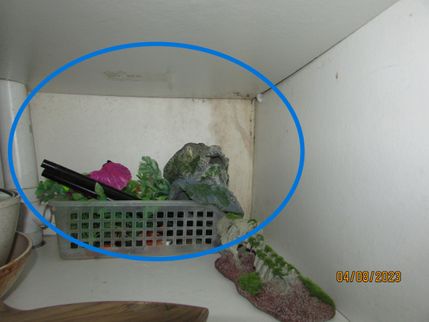
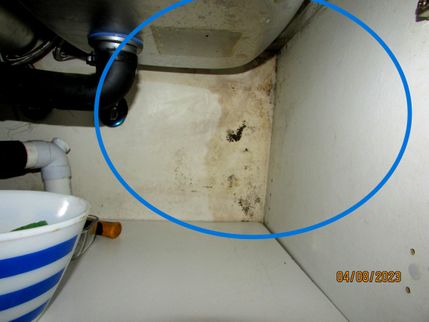
Mould like substances were noted on the back wall and side panel of the kitchen sink cupboard. Testing at the time of inspection indicated that the wall was wet. This was likely from plumbing leak or duct leak. I recommend an inspection and repair by a suitably qualified plumber. Please note that this condition risks hidden water damage! The wall can be repaired and painted once the source of the moisture is found and repaired. See Exterior: Exterior Walls
Moisture Damages
- G-5 Grounds:
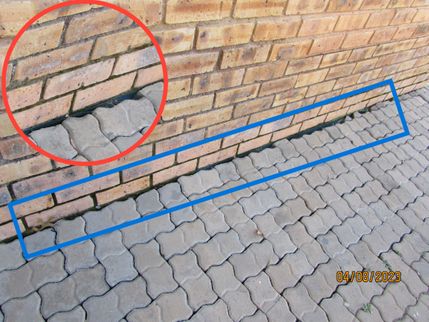
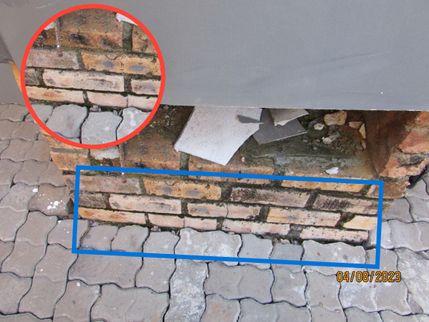
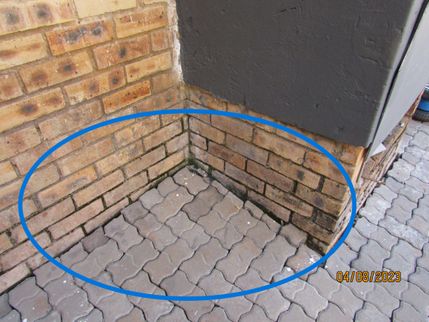
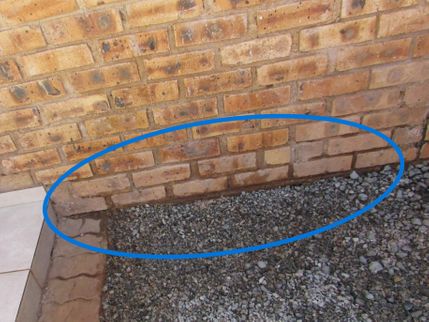
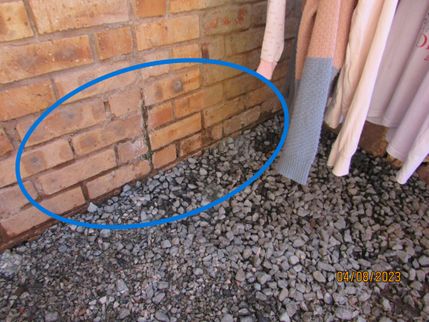
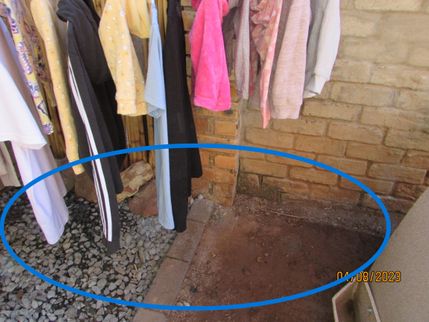
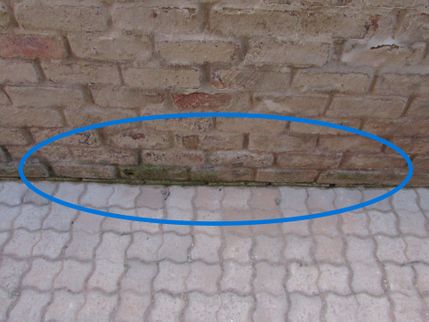
Water appeared to be pooling in areas where grouting was missing on the driveway at the south side the unit. These areas will require urgent attention. Filling up and grouting of the joints with a plaster/river sand and cement mixture is required against the walls and in the paving to prevent moisture from entering around the foundation and pooling in the cracks. Water pooling close to the unit appeared to have caused rising damp and moisture intrusion in the plinth and superstructure of the unit.
- The plastic layer can be seen folded up between the paving and the plinth. Note the gap and mould against the wall and lack of grouting between the pavers
- Note the open joints in the paving, against the wall where rainwater had pooled causing rising damp. Note the mould at the bottom of the plinth and above the DPC (floor level)!
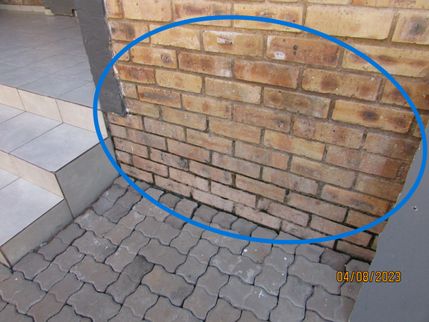
- Note the open joints between the pavers and the wall. The joints between pavers allowed water to pool against the wall of the plumbing duct causing rising damp. Note the black staining which is mould!
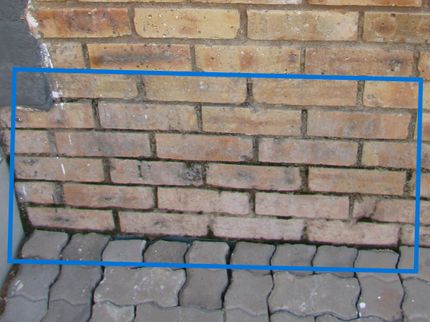
- This white stuff and staining on the plinth was a powder called efflorescence which remains behind on the surface when the moisture in the plinth evaporates! It is an indicator of excess moisture in the plinth.
- Moisture damage to the plasterwork that had been painted over. This is above the DPC (damp proof course) ie. above floor level!
- Gaps and holes where rainwater can go in in the paving close to the wall should be filled level with the paving. Note the rising damp and mould on the walls!
- E-5 Exterior:
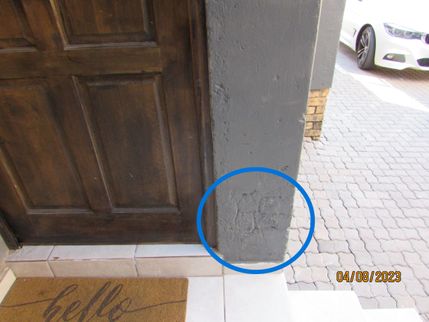
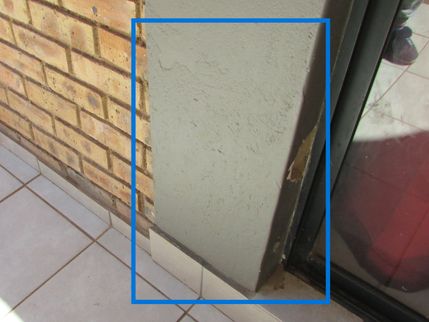
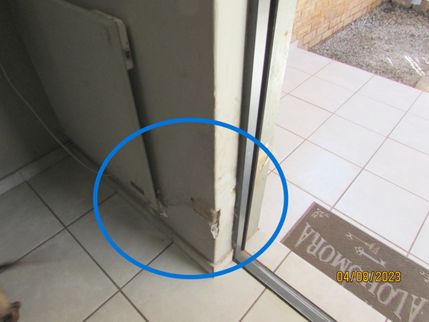
Evidence of moisture damage was observed at the wall covering at the north side of the building at the lounge. This condition appeared to have been caused by rising damp. Although there was no visible evidence of microbial activity in this area, moisture can allow mould growth, and the source of the moisture or leakage must be located and corrected or eliminated.
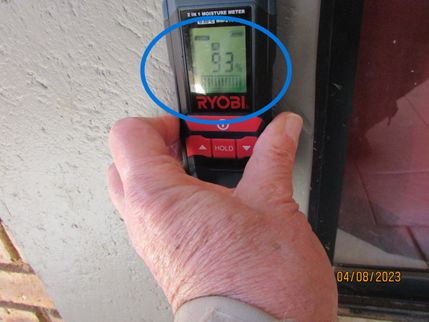
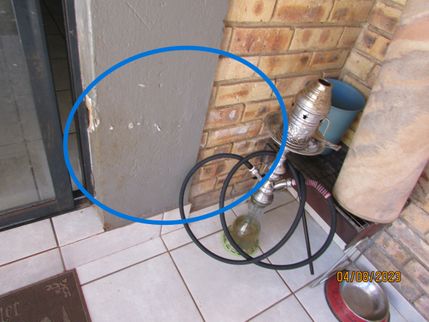
- Rising damp repairs against the sidewall of the lounge sliding door.
- A moisture reading that was very high in the door sidewall!
- Bubbling, flaking paintwork and efflorescence on the wall as a result of rising damp.
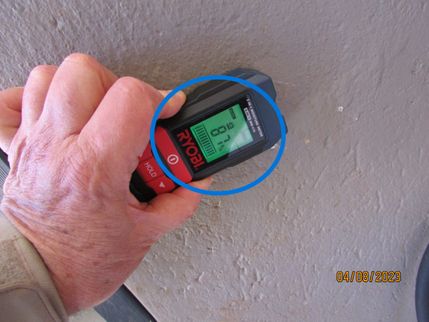
- A moisture reading taken on the wall indicated high moisture content.
- SA-6 Service Areas:
Evidence of moisture damage was observed on the wall at the south side of the kitchen. This condition appeared to have been caused by rising damp, falling damp and penetrating damp. There was visible evidence of microbial activity (mould) in this area. There also appeared to be condensation on the window and internal window sill. The source of the moisture or leakage must be located and corrected or eliminated. See Exterior: Exterior Walls and Window Exteriors and Sills
- Mould on the side of the kitchen window!
- A moisture reading taken on the wall indicated high moisture content.
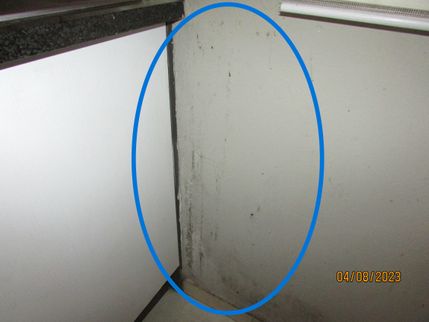
- Mould lower down at the kitchen sink unit.
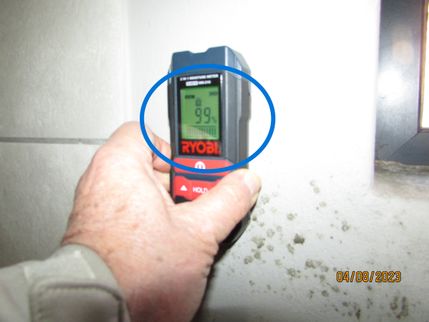
- An even higher moisture reading.
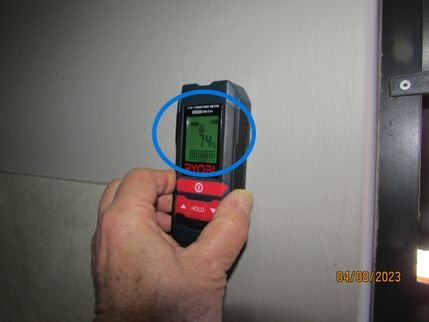
- A moisture reading above the kitchen sink on the wall between the kitchen and bathroom was much lower.
- Bubbling paintwork and damaged plasterwork and mould on the base of the wall.
- The wall was saturated with moisture.
- LA-2 Living Areas:
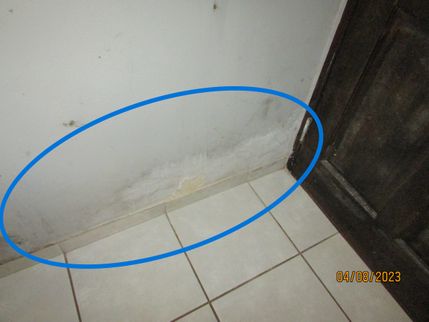
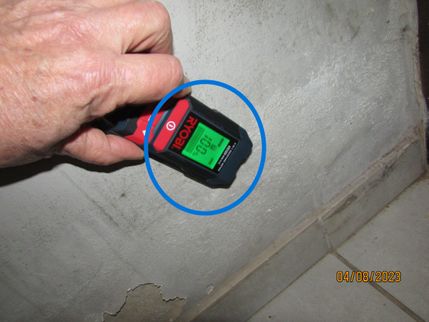
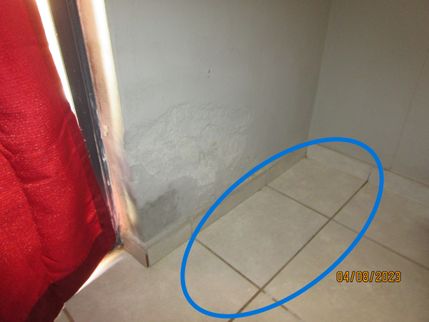
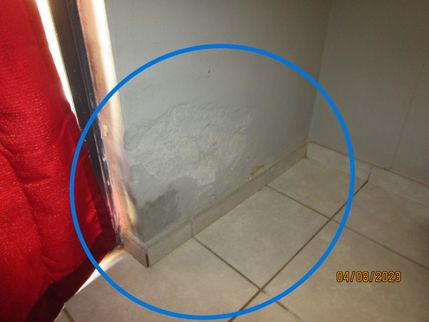
There was moisture damage and signs of bubbling paintwork, flaking paintwork and moisture damage on the lower portion of the walls internally in the lounge which appeared to be a result of rising damp. The walls on either side of the sliding door were protected by the covered patio. The rising damp may be a result of the lack of or damaged DPC in this area. There is also the possibility of the underfloor membrane being damaged in this area (if it was installed). I recommend an inspection and repair by a suitably qualified waterproofing contractor. The walls can be repaired and painted once the source of the moisture is found and repaired.
- A moisture reading taken on the wall indicated high moisture content.
- LA-4 Living Areas:
Evidence of moisture damage was observed on the wall at the south side of the 2nd bedroom. This condition appeared to have been caused by falling damp. There was visible evidence of microbial activity (mould) in this area. There also appeared to be condensation on the window and internal window sill. The source of the moisture or leakage must be located and corrected or eliminated. See Exterior: Exterior Walls and Window Exteriors and Sills
- Mould below the window in the 2nd bedroom.
- A moisture reading below the window. This reading was every high!
Elevated Moistures
- G-6 Grounds:
Downpipes should discharge to a concrete lined drainage channel which discharges at least 1.5 meters from the unit. The ground at the foundation should slope at least 75 mm in 1.5 metres, and past that, should drain freely away from the building. In this instance, the down pipe was discharging and the rainwater was pooling in the neighbour's yard against the division wall! the rainwater had penetrated through the division wall and pooled in the gavel area and caused rising damp against the neighbour's wall.
- SA-4 Service Areas:
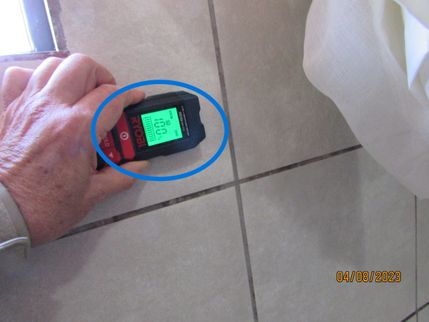
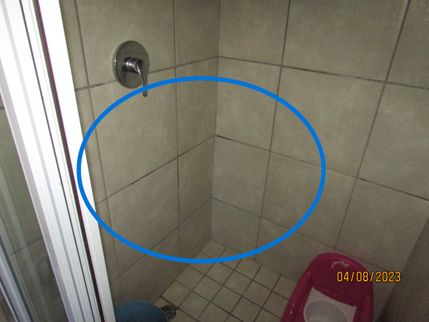
Elevated moisture levels are normal on the tile flooring in the bathroom. Elevated moisture do create conditions conducive to mould growth. Although there was no visible evidence of microbial activity in this area. As there were no mechanical exhaust provisions, it is important to open the bathroom window and door after taking hot or extended baths and showers to try and reduce the moisture in the floor.
- SA-5 Service Areas:
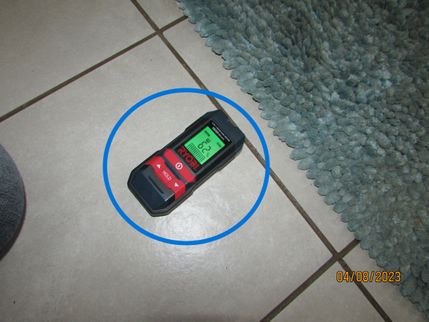
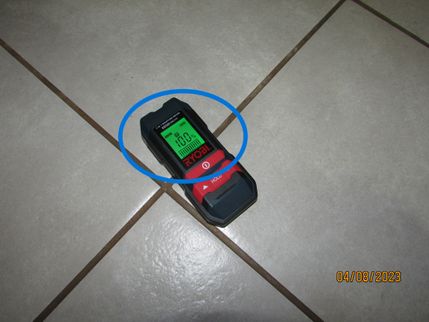
Elevated moisture levels were detected on the flooring in the kitchen near the entrance door. Elevated moisture conditions create a climate conducive to mould growth. This condition may have led to, or has the potential to lead to, moisture damage and mould growth. Although there was no visible evidence of microbial activity on the floor in this area, moisture can allow mould spores to grow and flourish, and the source of the moisture or leakage must be located and corrected or eliminated.
- LA-1 Living Areas:
The dark joints between the tiles indicated moisture intrusion. This can be the result of penetrating damp through the wall or rising damp through the floor or both. A suitably qualified waterproofing contractor should investigate and seal the wall and floor to prevent moisture intrusion.
- Dark tile joints indicate a damp floor.
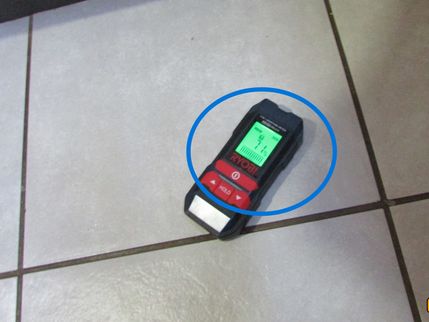
- A high reading on the tiles in the lounge.
Preventative Service Requireds
- G-1 Grounds:
The drainage holes through the division walls on the north side of the units were higher than the gardens causing the pooling of stormwater against the division walls and close to or against the units. The drainage holes should be lowered so that stormwater does not pool against the division walls.
- G-2 Grounds:
Downpipes were discharging adjacent to the building and into the gardens. This had allowed water to pool against the walls of the units during rainstorms. This had caused rising damp moisture problems and can also be responsible for the formation of mould.
- P-1 Plumbing:
No water pressure regulator was found! A water pressure regulator is required either on the main water supply to the unit or on the cold water line leading into the geysers. There may be one installed in one of the other plumbing ducts! Have a suitably qualified plumber investigate and install one if a regulator is not installed!
- P-4 Plumbing:
The discharge pipe for the temperature and pressure relief (TPR) valve could not be viewed and appeared not to be installed. Discharge pipes should always terminate near the ground or in a gulley to eliminate a scalding hazard and moisture intrusion condition. Ideally, the discharge terminates to an exterior or above a drain or gulley, though this is not always possible. Have this further evaluated and repaired by a licensed plumber.
Water Leakages
- E-3 Exterior:
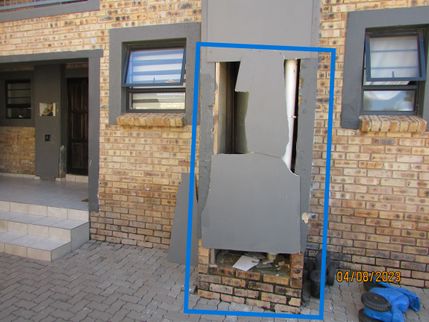
Evidence of active water leakage or the presence of moisture was observed on the wall covering at the inside and the outside of the duct at the bathroom and kitchen. Elevated moisture conditions create a climate conducive to mould growth. There was visible evidence of microbial activity in this area. The source of the moisture or leakage must be located and corrected or eliminated. I recommend further evaluation of this area by an appropriately qualified plumber for further remarks and recommendations.
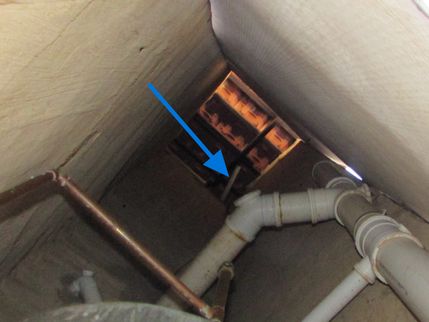
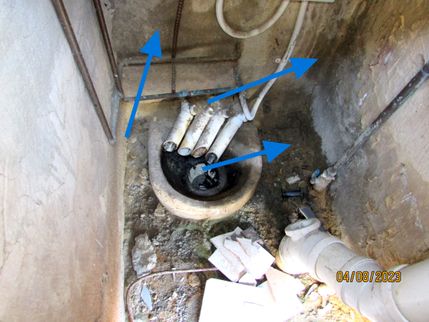
- The plumbing duct on the south side of the unit against the kitchen and bathroom.
- The drip tray PVC overflow line of the geyser serving the 1st floor unit should have been taken to the outside of the building and duct. This overflow line may be responsible for the damp walls on the side and below the geyser.
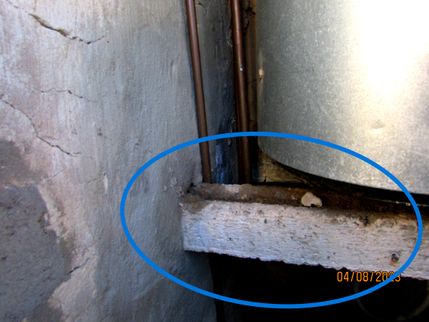
- Staining from water collecting on the lintel used as the geyser support!
- Water staining on the duct back wall against the bathroom and kitchen wall of the unit. Penetrating damp through the wall into the kitchen and bathroom may have occurred!
- Damp in the backwall of the duct at the geyser.
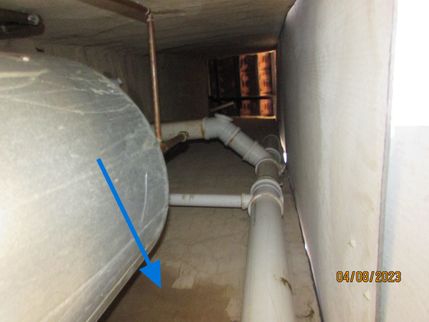
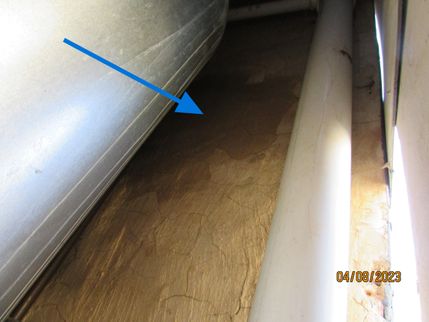
- Damp areas on the inside at the bottom of the plumbing duct. No drip pipe from the TPR valve could be observed leading into the gulley. The damp areas could be as a result of water discharge through the geyser's TPR valve. See Plumbing: Geyser
- SA-8 Service Areas:
Flaking paintwork, moisture damage and mould was noted on the sill in the kitchen's window indicating that the window was leaking or there was excessive condensation on the window draining down onto the window sill or both! There is always a chance of hidden moisture intrusion with this condition. Windows in the unit should be opened a crack as this will help prevent the buildup of condensation on the windows. Seal around the exterior of the frames at the sill, reveals and head of the windows with a suitable exterior silicone. See Exterior: Window Exteriors and Sills
- The water on the window sill appeared to be condensation on the window draining down on the window sill. Droplets were observed on the glass in the window.
- Note mould and water pooling on the window sill. This appeared to be from moisture condensing on the window and running down onto the window sill! Note the streaking on the window glass!
- LA-5 Living Areas:
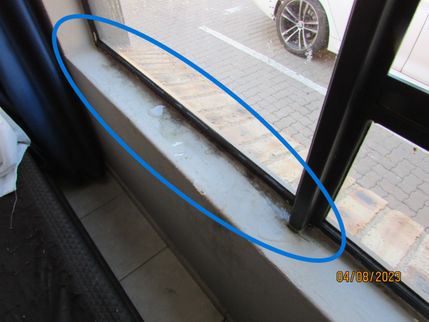
Flaking paintwork, moisture damage and mould was noted on the sill in the 2nd bedroom's window indicating that the window was leaking or there was excessive condensation on the window draining down onto the window sill or both! There is always a chance of hidden moisture intrusion with this condition. Windows in the unit should be opened a crack as this will help prevent the buildup of condensation on the windows. Seal around the exterior of the frames at the sill, reveals and head of the windows with a suitable exterior silicone. See Exterior: Window Exteriors and Sills
- This apparent leak at the window sill was probably as a result of condensation and not a window leak.
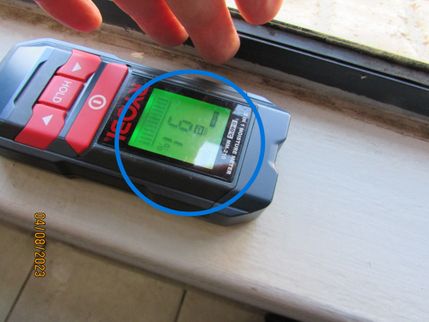
- A moisture reading on the window sill. This reading was very high!
High Humidities
- C-2 Conditions:
An excessive condensation condition appears to exist within the unit. This is the result of high humidity (excessive moisture in the air), high moisture content in the walls and lack of ventilation. The necessary steps need to be taken to determine and stop the source of the moisture so that the humidity can be lowered to an acceptable rate, thus eliminating the condensation that are allowing moulds to grow. Windows in bathrooms, kitchens and living areas should be opened during the day to allow through ventilation. Opening windows at night will be a risk as there were no burglar bars on the windows!
Water Intrusions
- E-4 Exterior:
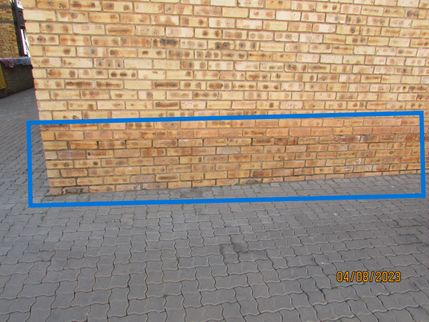
Evidence of active water intrusion and rising damp was observed at the south side of the bedroom. Water intrusion creates a climate conducive to mould growth. There was visible evidence of microbial activity in this area. Damp conditions appeared to have allowed mould spores to grow and flourish. The source and/or the location of the intrusion or leakage must be located and corrected or eliminated.
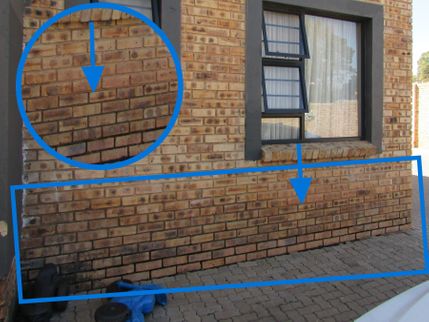
- Dark staining and efflorescence on the face brick plinth and superstructure indicating rising damp which extends above the DPC level.
- Dark staining and efflorescence on the face brick plinth and superstructure indicating rising damp. The arrows show the DPC level!
- E-7 Exterior:
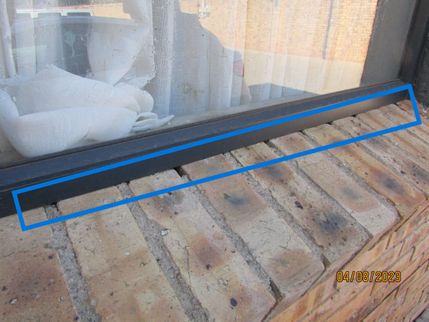
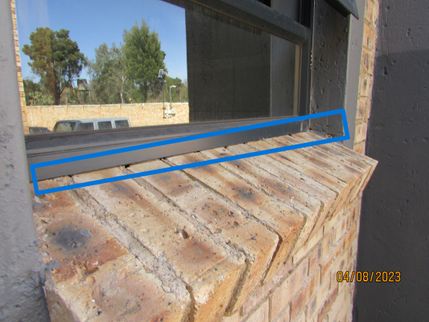
There were gaps on the window sills and the reveals (sides) of all the windows which were open to moisture intrusion and will require sealing. The window exteriors should have been sealed with silicon at the junction of all window frames and the plasterwork at the heads, reveals and sills. Gaps at the junction between the plasterwork and the window frames appeared to have allowed moisture intrusion into the window sill and wall structure.
Some examples are listed:
- Cracks and gaps at the sill and on the side of the window at the bathroom.
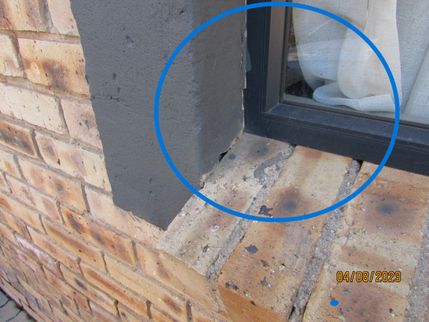
- This photograph is an example of poor workmanship and finishing! These gaps between the window sill and window frame should have been sealed!
- Sealing is required between the window frame and the window sill. Gaps should be properly sealed to prevent moisture intrusion from windblown rainwater!
Inspection Limitations
- SA-2 Service Areas:
A strong incense were being used inside the house and unit during my inspection. This takes away one of my senses I use during my inspection. These are often used to cover up pet, tobacco or musty odours.
Mould and Damp Report
Grounds
Gradients, Drainage and Elevations
Driveways, Walkways and Flatwork
Gardens, Trees and Vegetation
Boundary Walls, Yard Walls, Gates and Fences
General
Building Characteristics, Conditions and Limitations
Style of Home: Townhouse
Type of Building : Townhouse
Approximate Area (m²): 60
Approximate Year of Original Construction: 2019, 2018
Attending the Inspection: Tenants
Occupancy: Occupied
Animals Present: Dog present- no problem
Weather during the inspection: Clear, Mild
Approximate temperature during the inspection: Over 15 ˚C
Ground/Soil surface conditions: Damp
For the purposes of this report, the entrance to the unit is: South
A mould inspection simply confirms the presence of mould and generally defines the extent of the problem. The main purpose of a mould inspection is to identify the source or sources of the moisture that allows the mould to grow! The second most important purpose of the mould inspection is to recommend solutions to eradicate the sources of moisture! Mould testing, especially air testing, is often inaccurate. Air samples at best give a snapshot of the air in one location at one time. The samples do not represent the air conditions unless many air samples are taken over a long period of time. Air sampling typically overestimates or underestimates the number of mould spores in the air on average throughout the day. The World Health Organisation has set no guidelines for an acceptable amount of mould or mould spores in a house. WHO therefore agrees that mould testing is not always useful for this reason. Instead, they recommend hiring a professional inspector to look for the reasons that the mould is present. No recognised authoritative public agency recommends mould testing as a guide to the cleaning up of mould or the correction of the water problem.
This building was occupied at the time of the inspection. Inspection of occupied buildings presents some challenges as goods, fittings, fixtures and furniture can obstruct visual inspection of and access to parts of the unit. I do my best during inspection to work around these to discover as much as possible about the building without moving or damaging goods, fittings, fixtures and furniture, however, the presence of these items may limit the inspection.
Mould Information
Mould basics
In South Africa, as in any other country, mould refers to a type of fungus that thrives in damp and humid conditions. Mould growth can occur in various environments, including homes, buildings, and natural surroundings. Here are some basics about mould in South Africa:
- Common Types of Mould: South Africa experiences a variety of mould species, including Aspergillus, Penicillium, Cladosporium, and Stachybotrys chartarum (also known as black mold). These moulds can be found indoors and outdoors.
- Causes of Mould Growth: Mould typically develops in areas with excessive moisture and poor ventilation. Common causes of mould growth in South Africa include water leaks, condensation, flooding, high humidity levels, and inadequate ventilation.
- Health Risks: Mould and mould spores can have adverse health effects on individuals, particularly those who are sensitive or allergic to it. Exposure to mould spores may cause respiratory issues, allergic reactions, eye irritation, coughing, and skin problems. Individuals with asthma or compromised immune systems are more susceptible to mould-related health problems.
- Prevention: Mould spores are usually not a problem indoors, unless mould spores land on a wet or damp spot and begin growing. To prevent mould growth, it's important to control moisture levels in indoor environments. This can be achieved by fixing leaks promptly, improving ventilation, using dehumidifiers in humid areas, and ensuring adequate insulation. Regular cleaning and drying of affected areas also help in mould prevention.
- Remediation: If mould is already present, it's crucial to address the issue promptly. Professional mould remediation services may be necessary for extensive mould infestations. The affected areas should be thoroughly cleaned, and the source of moisture should be eliminated to prevent recurrence.
- Building Codes and Regulations: South Africa has building codes and regulations that address moisture control and ventilation in buildings. Compliance with these codes can help prevent mould growth and maintain healthy indoor environments.
- Insurance Coverage: In some cases, homeowner's insurance policies in South Africa may cover mould damage. However, coverage may vary, so it's important to review the policy terms and conditions or consult with the insurance provider.
It's worth noting that while these are general mould basics, specific circumstances and requirements may vary depending on the location, climate, and other factors within South Africa. If you have concerns about mould in a particular area or property, it's advisable to consult with local experts, such as mould certified home inspectors, remediation professionals or environmental health specialists, for accurate and tailored advice.
Respiratory symptoms of mould exposure include coughing, sneezing, runny nose, difficulty breathing, worsening of asthma symptoms in people with asthma or the development of asthma in people previously unaffected by the disease. Other diseases caused by toxic mould include respiratory tract infections such as bronchitis and chronic sinus infections. Infections in the lungs may also result from prolonged exposure to toxic mould. Other symptoms frequently caused by exposure to toxic mould include itchy and watery eyes, dizziness, fatigue, depression, difficulty concentrating and short-term memory problems.
Young children, elderly people and people with compromised immune systems, such as those with HIV or AIDS, are more susceptible to diseases caused by toxic mould, although anyone can develop symptoms after sufficient exposure. People that already suffer from respiratory problems, such as those with asthma, seasonal allergies, emphysema or chronic obstructive pulmonary disease are also particularly vulnerable.
Mould sickness and the health effects of mould are very dangerous. If you suspect you may have a mould problem, don’t delay in contacting a professional. Toxic mould can grow rapidly. Prompt action on your part can limit your symptoms and the amount of damage the mould does to the residence.
Symptoms that mould allergies cause include:
- Aching Joints
- Back Pain
- Chest Tightness
- Shoulder Pain
- Fatigue/Drowsiness
- Discoloured Skin
- Dry, Flaking Skin
- Dry Eyes
- Eye Irritation
- Dizziness
- A headache
- Nausea
- Noticeable Odours
- A Runny Nose
- Sinus Congestion
- Skin Irritation/Itching
- Sneezing
- A sore throat
- Stuffy/Stale Air
- Temperature Too Cold
- Temperature Too Hot
Services Offered
Damp and Mould Inspection Process
A damp and mould inspection follows this procedure:
- The client fills in an Indoor Air Quality Questionnaire.
- I take and record temperatures and relative humidity, both inside and outside the building.
- Together with the client I inspect the client's areas of concern.
- I further perform an inspection of the interior, examining interior surfaces for any evidence of mould or fungi, or odours associated with such conditions, as well as any visible water damage, moisture intrusion, or leakage.
- I then inspect the outside of the building for faulty grading and/or any conditions that could lead to moisture intrusion.
- Upon completion of my inspection, I prepared a report documenting any conditions that could adversely impact indoor air quality and/or promote mould growth. This includes such conditions as excessive humidity, poor ventilation, inadequate grading or drainage, and any recommendations for corrective measures or remediation.
Indoor Air Quality
Symptoms of toxic mould exposure
Respiratory symptoms of mould exposure include coughing, sneezing, runny nose, difficulty breathing, worsening of asthma symptoms in people with asthma or the development of asthma in people previously unaffected by the disease. Other diseases caused by toxic mould include respiratory tract infections such as bronchitis and chronic sinus infections. Infections in the lungs may also result from prolonged exposure to toxic mould. Other symptoms frequently caused by exposure to toxic mould include itchy and watery eyes, dizziness, fatigue, depression, difficulty concentrating and short-term memory problems.
Young children, elderly people and people with compromised immune systems, such as those with HIV or AIDS, are more susceptible to diseases caused by toxic mould, although anyone can develop symptoms after sufficient exposure. People that already suffer from respiratory problems, such as those with asthma, seasonal allergies, emphysema or chronic obstructive pulmonary disease are also particularly vulnerable.
Mould sickness and the health effects of mould are very dangerous. If you suspect you may have a mould problem, don’t delay in contacting a professional. Toxic mould can grow rapidly. Prompt action on your part can limit your symptoms and the amount of damage the mould does to the residence.
Symptoms that mould allergies cause include:
- Aching Joints
- Back Pain
- Chest Tightness
- Shoulder Pain
- Fatigue/Drowsiness
- Discoloured Skin
- Dry, Flaking Skin
- Dry Eyes
- Eye Irritation
- Dizziness
- A headache
- Nausea
- Noticeable Odours
- A Runny Nose
- Sinus Congestion
- Skin Irritation/Itching
- Sneezing
- A sore throat
- Stuffy/Stale Air
- Temperature Too Cold
- Temperature Too Hot
Occupant complaints and health status
Please read through the Indoor Air Quality Questionnaire filled in by Ms Vermaak and Coetsee in the Invoice and Attachments at the bottom of the report below!
Grounds
Gradients, Drainage and Elevations
The drainage holes through the division walls on the north side of the units were higher than the gardens causing the pooling of stormwater against the division walls and close to or against the units. The drainage holes should be lowered so that stormwater does not pool against the division walls.
Downpipes were discharging adjacent to the building and into the gardens. This had allowed water to pool against the walls of the units during rainstorms. This had caused rising damp moisture problems and can also be responsible for the formation of mould.
Driveways, Walkways and Flatwork
Driveways: Comment
A layer of plastic may have been placed under the paving to control a high water table. Plastic should not be used under paving as it creates instability and accumulates the rain or any water on top of the plastic. Placing plastic under paving may temporarily divert water away from the surface, but it won't address the underlying issue of high water tables. The plastic stops the water from draining through the paving and results in pooling of water on the plastic and joints of the paving. Plastic under paving can hinder natural drainage and exacerbates the problem of high water tables and water pooling on the paving. Proper drainage is important for managing water tables, and adding a barrier like plastic can trap water and prevent it from flowing naturally. Water will still accumulate underground, potentially causing structural and moisture problems and damaging the paving and structures over time. Solutions to high water tables include improving surface drainage, installing subsurface drainage systems and elevating structures.
The driveways on multiple locations around the building were mostly in a reasonable condition. Exceptions are specifically listed below.
Water appeared to be pooling in areas where grouting was missing on the driveway at the south side the unit. These areas will require urgent attention. Filling up and grouting of the joints with a plaster/river sand and cement mixture is required against the walls and in the paving to prevent moisture from entering around the foundation and pooling in the cracks. Water pooling close to the unit appeared to have caused rising damp and moisture intrusion in the plinth and superstructure of the unit.
- The plastic layer can be seen folded up between the paving and the plinth. Note the gap and mould against the wall and lack of grouting between the pavers
- Note the open joints in the paving, against the wall where rainwater had pooled causing rising damp. Note the mould at the bottom of the plinth and above the DPC (floor level)!
- Note the open joints between the pavers and the wall. The joints between pavers allowed water to pool against the wall of the plumbing duct causing rising damp. Note the black staining which is mould!
- This white stuff and staining on the plinth was a powder called efflorescence which remains behind on the surface when the moisture in the plinth evaporates! It is an indicator of excess moisture in the plinth.
- Moisture damage to the plasterwork that had been painted over. This is above the DPC (damp proof course) ie. above floor level!
- Gaps and holes where rainwater can go in in the paving close to the wall should be filled level with the paving. Note the rising damp and mould on the walls!
Gardens, Trees and Vegetation
Downpipes should discharge to a concrete lined drainage channel which discharges at least 1.5 meters from the unit. The ground at the foundation should slope at least 75 mm in 1.5 metres, and past that, should drain freely away from the building. In this instance, the down pipe was discharging and the rainwater was pooling in the neighbour's yard against the division wall! the rainwater had penetrated through the division wall and pooled in the gavel area and caused rising damp against the neighbour's wall.
Boundary Walls, Yard Walls, Gates and Fences
Moisture intrusion and efflorescence was observed on the wall coverings on the lower portions of the boundary wall. This common occurrence! Boundary walls and yard walls do not have a layer of DPC (damp proof course) built into the wall to prevent rising damp because this would make the wall unstable. The pooling of rain and stormwater should be avoided against the division walls. The gaps between the paving and the division walls should be sealed with mortar to prevent pooling against the walls.
- This spout in the wall was too high and had allowed rain and stormwater pooling in the unit's garden on the other side of the wall. Note the efflorescence and mould on the wall!
- This spout in the wall was too high and had allowed rain and stormwater pooling in the garden on the other side of the wall. Any stormwater discharged from this spout may flow under the gate into unit 92's garden!
Exterior
General
My inspection of the exterior included the visually accessible areas of windows, walls, doors and eaves. The exterior windows, walls and doors were inspected from the ground only and without the use of a ladder. My inspection was performed in accordance with the International Association of Certified Home Inspectors' Standards of Practice.
Exterior Walls
There was apparent visual evidence of microbial activity on the wall covering on all sides of the building that would suggest the presence of mould, fungi or microbial activity, either past or present. I recommend further evaluation and remediation by an appropriately qualified remediation contractor or industrial hygienist of the whole building.
Evidence of active water leakage or the presence of moisture was observed on the wall covering at the inside and the outside of the duct at the bathroom and kitchen. Elevated moisture conditions create a climate conducive to mould growth. There was visible evidence of microbial activity in this area. The source of the moisture or leakage must be located and corrected or eliminated. I recommend further evaluation of this area by an appropriately qualified plumber for further remarks and recommendations.
- The plumbing duct on the south side of the unit against the kitchen and bathroom.
- The drip tray PVC overflow line of the geyser serving the 1st floor unit should have been taken to the outside of the building and duct. This overflow line may be responsible for the damp walls on the side and below the geyser.
- Staining from water collecting on the lintel used as the geyser support!
- Water staining on the duct back wall against the bathroom and kitchen wall of the unit. Penetrating damp through the wall into the kitchen and bathroom may have occurred!
- Damp in the backwall of the duct at the geyser.
- Damp areas on the inside at the bottom of the plumbing duct. No drip pipe from the TPR valve could be observed leading into the gulley. The damp areas could be as a result of water discharge through the geyser's TPR valve. See Plumbing: Geyser
Evidence of active water intrusion and rising damp was observed at the south side of the bedroom. Water intrusion creates a climate conducive to mould growth. There was visible evidence of microbial activity in this area. Damp conditions appeared to have allowed mould spores to grow and flourish. The source and/or the location of the intrusion or leakage must be located and corrected or eliminated.
- Dark staining and efflorescence on the face brick plinth and superstructure indicating rising damp which extends above the DPC level.
- Dark staining and efflorescence on the face brick plinth and superstructure indicating rising damp. The arrows show the DPC level!
Evidence of moisture damage was observed at the wall covering at the north side of the building at the lounge. This condition appeared to have been caused by rising damp. Although there was no visible evidence of microbial activity in this area, moisture can allow mould growth, and the source of the moisture or leakage must be located and corrected or eliminated.
- Rising damp repairs against the sidewall of the lounge sliding door.
- A moisture reading that was very high in the door sidewall!
- Bubbling, flaking paintwork and efflorescence on the wall as a result of rising damp.
- A moisture reading taken on the wall indicated high moisture content.
Exterior Doors
The exterior doors and frames were generally in a reasonable condition and working order.
Window Exteriors and Sills
There were gaps on the window sills and the reveals (sides) of all the windows which were open to moisture intrusion and will require sealing. The window exteriors should have been sealed with silicon at the junction of all window frames and the plasterwork at the heads, reveals and sills. Gaps at the junction between the plasterwork and the window frames appeared to have allowed moisture intrusion into the window sill and wall structure.
Some examples are listed:
- Cracks and gaps at the sill and on the side of the window at the bathroom.
- This photograph is an example of poor workmanship and finishing! These gaps between the window sill and window frame should have been sealed!
- Sealing is required between the window frame and the window sill. Gaps should be properly sealed to prevent moisture intrusion from windblown rainwater!
Service Areas
General
My inspection of the interior of the house included the visually accessible areas of floors, walls and ceilings. The interior areas were inspected from floor level only and without the use of a ladder. No furniture, equipment, floor coverings, appliances or stored goods were moved during my inspection to prevent accidental damage. My inspection was performed in accordance with the International Association of Certified Home Inspectors' Standards of Practice.
Indoor Air Quality
A strong incense were being used inside the house and unit during my inspection. This takes away one of my senses I use during my inspection. These are often used to cover up pet, tobacco or musty odours.
Bathrooms
Wall and Ceiling Materials: Walls (Plaster and paint, Wall tiles), Ceilings (Plastered ceilings)
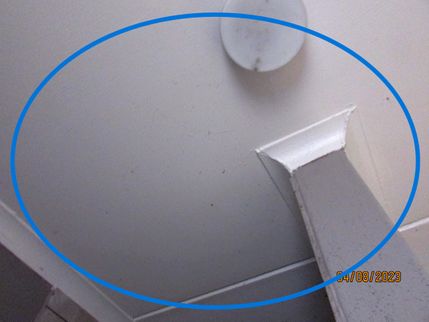
The walls and ceilings above the shower and bath had signs of mould infestation. The mould on the walls could be a result of condensation from bathing and showering, moisture intrusion through the duct walls, a result of falling and penetrating damp at the window or a combination of all three! The mould on the upper walls and ceiling appeared to be a result of condensation. As there were no mechanical exhaust provisions, it is important to open the bathroom window and door after taking hot or extended baths and showers, as this will help prevent the buildup of condensation and mould growth on the bathroom walls and ceilings. See Exterior: Exterior Walls and Window Exteriors and Sills
The mould should be removed with Mould Buster or watered down Jik as soon as possible. It may take awhile for the walls and ceiling to dry out before the mould is completely removed. If the mould continues to return and a musty smell is prevalent after an extended period, I recommend further evaluation by a mould remediation specialist to devise a plan to insure safe indoor air quality. The leaking in the duct and at the window should also be repaired as soon as possible!
Some examples are shown below:
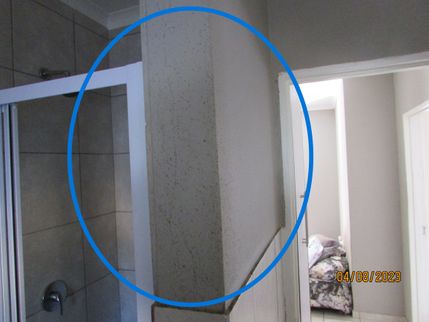
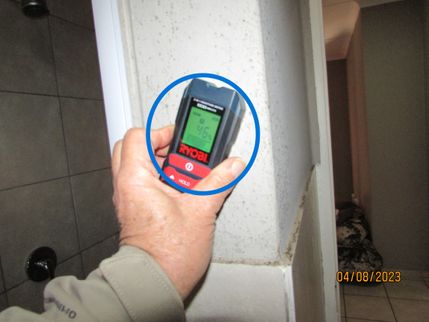
- The reading taken against the middle of bathroom wall was elevated but not all that high! A moisture reading in bathrooms are normally elevated!
- This very high reading below the window in the bathroom appeared to indicate moisture intrusion through the gaps in the window sill and frame.
- The reading against the shower wall was elevated but not more than would be expected.
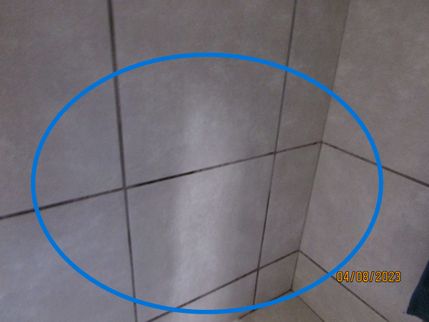
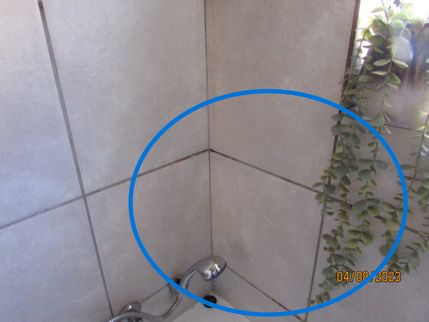
- Mould between the tiles above the bath near the duct appeared to indicate moisture intrusion through the duct wall.
- This reading was taken lower down the window above the bath indication possible falling damp from the window sill.
Bathroom Floors
Elevated moisture levels are normal on the tile flooring in the bathroom. Elevated moisture do create conditions conducive to mould growth. Although there was no visible evidence of microbial activity in this area. As there were no mechanical exhaust provisions, it is important to open the bathroom window and door after taking hot or extended baths and showers to try and reduce the moisture in the floor.
Kitchen
Wall and Ceiling Materials: Walls (Plaster and paint, Wall tiles), Ceilings (Plastered ceilings)
Kitchen Floors
Floor Materials: Ceramic tile
Floor Settlement: None noted
Elevated moisture levels were detected on the flooring in the kitchen near the entrance door. Elevated moisture conditions create a climate conducive to mould growth. This condition may have led to, or has the potential to lead to, moisture damage and mould growth. Although there was no visible evidence of microbial activity on the floor in this area, moisture can allow mould spores to grow and flourish, and the source of the moisture or leakage must be located and corrected or eliminated.
Kitchen Walls and Ceilings
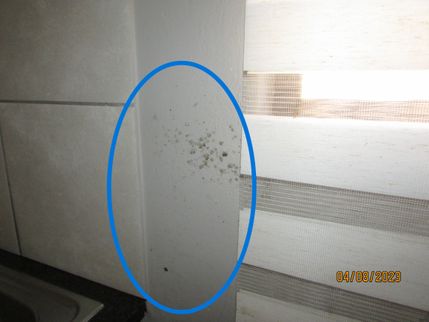
Evidence of moisture damage was observed on the wall at the south side of the kitchen. This condition appeared to have been caused by rising damp, falling damp and penetrating damp. There was visible evidence of microbial activity (mould) in this area. There also appeared to be condensation on the window and internal window sill. The source of the moisture or leakage must be located and corrected or eliminated. See Exterior: Exterior Walls and Window Exteriors and Sills
- Mould on the side of the kitchen window!
- A moisture reading taken on the wall indicated high moisture content.
- Mould lower down at the kitchen sink unit.
- An even higher moisture reading.
- A moisture reading above the kitchen sink on the wall between the kitchen and bathroom was much lower.
- Bubbling paintwork and damaged plasterwork and mould on the base of the wall.
- The wall was saturated with moisture.
Kitchen Cabinetry
Mould like substances were noted on the back wall and side panel of the kitchen sink cupboard. Testing at the time of inspection indicated that the wall was wet. This was likely from plumbing leak or duct leak. I recommend an inspection and repair by a suitably qualified plumber. Please note that this condition risks hidden water damage! The wall can be repaired and painted once the source of the moisture is found and repaired. See Exterior: Exterior Walls
Windows
Window Glazing: Single pane
Window Material: Aluminium
Window Styles: Awning
Internal Sills: Plastered and Painted
Flaking paintwork, moisture damage and mould was noted on the sill in the kitchen's window indicating that the window was leaking or there was excessive condensation on the window draining down onto the window sill or both! There is always a chance of hidden moisture intrusion with this condition. Windows in the unit should be opened a crack as this will help prevent the buildup of condensation on the windows. Seal around the exterior of the frames at the sill, reveals and head of the windows with a suitable exterior silicone. See Exterior: Window Exteriors and Sills
- The water on the window sill appeared to be condensation on the window draining down on the window sill. Droplets were observed on the glass in the window.
- Note mould and water pooling on the window sill. This appeared to be from moisture condensing on the window and running down onto the window sill! Note the streaking on the window glass!
Living Areas
Floors
Floor Materials: Tile
Floor Settlement: None noted
The dark joints between the tiles indicated moisture intrusion. This can be the result of penetrating damp through the wall or rising damp through the floor or both. A suitably qualified waterproofing contractor should investigate and seal the wall and floor to prevent moisture intrusion.
- Dark tile joints indicate a damp floor.
- A high reading on the tiles in the lounge.
Walls and Ceilings
There was moisture damage and signs of bubbling paintwork, flaking paintwork and moisture damage on the lower portion of the walls internally in the lounge which appeared to be a result of rising damp. The walls on either side of the sliding door were protected by the covered patio. The rising damp may be a result of the lack of or damaged DPC in this area. There is also the possibility of the underfloor membrane being damaged in this area (if it was installed). I recommend an inspection and repair by a suitably qualified waterproofing contractor. The walls can be repaired and painted once the source of the moisture is found and repaired.
- A moisture reading taken on the wall indicated high moisture content.
Most of the damp affected areas in the 1st bedroom (north facing) had been painted over and showed moisture readings similar to the "dry" walls.
- Moisture reading on the window sill.
Evidence of moisture damage was observed on the wall at the south side of the 2nd bedroom. This condition appeared to have been caused by falling damp. There was visible evidence of microbial activity (mould) in this area. There also appeared to be condensation on the window and internal window sill. The source of the moisture or leakage must be located and corrected or eliminated. See Exterior: Exterior Walls and Window Exteriors and Sills
- Mould below the window in the 2nd bedroom.
- A moisture reading below the window. This reading was every high!
Windows
Window Glazing: Single pane
Window Material: Aluminium
Window Styles: Awning
Internal Sill: Plastered and Painted
Flaking paintwork, moisture damage and mould was noted on the sill in the 2nd bedroom's window indicating that the window was leaking or there was excessive condensation on the window draining down onto the window sill or both! There is always a chance of hidden moisture intrusion with this condition. Windows in the unit should be opened a crack as this will help prevent the buildup of condensation on the windows. Seal around the exterior of the frames at the sill, reveals and head of the windows with a suitable exterior silicone. See Exterior: Window Exteriors and Sills
- This apparent leak at the window sill was probably as a result of condensation and not a window leak.
- A moisture reading on the window sill. This reading was very high!
Plumbing
Water Service Supply
Pipe Material: Unknown
Water Supply: Public water
Water Pressure Regulator: None noted
No water pressure regulator was found! A water pressure regulator is required either on the main water supply to the unit or on the cold water line leading into the geysers. There may be one installed in one of the other plumbing ducts! Have a suitably qualified plumber investigate and install one if a regulator is not installed!
Distribution Pipe
Supply Pipe Materials: Copper
The water pipes, where visible, were copper and flexible braided connectors and appeared to be in a reasonable condition.
Waste Pipe and Discharge
Discharge Type: Public sewer
Waste and Vent Pipe Materials: PVC
Where visible, the drain and vent pipes inside the duct appeared to be functional at the time of the inspection. No leaks were observe.
Water Heaters/Geysers
System Type: Vertical geyser mounted internally
Size: 150 litre
Energy Source: Electricity
Temperature Pressure Relief Value: Inadequate Discharge
The discharge pipe for the temperature and pressure relief (TPR) valve could not be viewed and appeared not to be installed. Discharge pipes should always terminate near the ground or in a gulley to eliminate a scalding hazard and moisture intrusion condition. Ideally, the discharge terminates to an exterior or above a drain or gulley, though this is not always possible. Have this further evaluated and repaired by a licensed plumber.
Conditions
Condensation and Humidity
The moisture measurements on all the walls averaged at about 46% on the walls in the living areas excluding the damp or moisture damaged areas! Normal readings on the walls in living areas are usually around 35% in most houses and town houses! The measurements were therefore about 10% above the norm!
An excessive condensation condition appears to exist within the unit. This is the result of high humidity (excessive moisture in the air), high moisture content in the walls and lack of ventilation. The necessary steps need to be taken to determine and stop the source of the moisture so that the humidity can be lowered to an acceptable rate, thus eliminating the condensation that are allowing moulds to grow. Windows in bathrooms, kitchens and living areas should be opened during the day to allow through ventilation. Opening windows at night will be a risk as there were no burglar bars on the windows!
Measurements
Measurements
At the time of my inspection, the exterior relative humidity (RH) was approximately 46%. The external temperature was approximately 18˚C. The average internal RH in the unit was approximately 48%. The temperature inside the unit was the same as the external temperature. No excessive humidity condition appears to exist in the unit at the time of the inspection. The unit might have been aired before the inspection. High RH may be created if the units windows are kept closed at night.
Inspector's Recommendation
Recommendation
I advise you to provide your medical practitioner or specialist with this report and obtain his or her opinion as far as your and your family's symptoms are concerned and my recommendation of the action you should take in cleaning up of the mould and moisture damage inside and outside the unit. In my opinion the building is in need of comprehensive renovation and maintenance. The repairs, maintenance and drying out of the unit may take some time. I would suggest that you hire a dehumidifier to dry out the inside of the unit or find alternative accommodation during this time because of the medical condition your family members are experiencing. Further exposure to the mould and damp will probably worsen the existing medical conditions you and your family members are experiencing.
Please read through the Indoor Air Quality Questionnaire filled in by Ms Vermaak and Coetsee in the Invoice and Attachments section below!
Invoice and Attachments
Attachments
Indoor Air Quality Questionnaire
.png)
.png)
.jpg)
