Jurie Fourie, License #NACHI14102004
The Scope and Purpose of this Home Inspection
Itemised Limited Inspection and Report
This Itemised Limited Inspection and Report aims to provide professional observations of components and defects as requested. The inspection and report may identify and suggest possible solutions for the maintenance of specific defects and components of the structure. The inspection is a limited visual inspection and may not include all the hidden or concealed causes of a defect or maintenance of a problem. I try to inform you what I see during the inspection process. This is more difficult to convey in a report and one of the many reasons why I recommend attendance during the inspection.
A home inspection is not an insurance policy
This report does not substitute for or serve as a warranty or guarantee of any kind. Home warranties can be purchased separately from insurance firms that provide this service.
A home inspection is visual and not destructive
The descriptions and observations in this report are based on a visual inspection of the structure. I inspect the aspects of the structure that can be viewed without dismantling, damaging or disfiguring the structure and without moving furniture and interior furnishings. Areas that are concealed, hidden, inaccessible or unsafe to view are not covered in this inspection. Some systems cannot be tested during this inspection as testing risks damage to the building. For example, overflow drains on baths are generally not tested because if they were found to be leaking they could damage the finishes below. My procedures involve non-invasive investigation and non-destructive testing which limit the scope of the inspection.
This is not an inspection for NHBRC/Building Regulation/Municipal Compliance
Although this inspection report may refer to SANS (South African National Standards) and municipal by-laws, this report is not intended to be an NHBRC (National Home Builders Registration Council), NBR (National Building Regulation) or a local Municipal By-law Compliance inspection. Although some safety issues may be addressed in this report, this inspection is not a safety inspection and I am not required to identify all potential hazards.
This is not an inspection for Mould or Wood Destroying Organisms
The Standards of Practice of the International Association of Certified Home Inspectors (InterNACHI) do not require me to determine the presence of mould, mildew or fungus! Nor do they require me to determine the presence of wood-destroying organisms (WDO) or pests. Observations of mould-like substances, WDO and pests may be included in this report as a courtesy. These observations are identified by WDO at the beginning of the narratives. However, this report is not a mould or WDO report. Mould and WDO inspections are separate inspections that are performed on request and quoted for and reported separately!
My observations are based on my tertiary qualifications, InterNACHI's Continuing Education requirements, research and workplace experience
Construction techniques and standards vary. There are different ways to build a house or install a system in a house. The observations in this report are based on my tertiary qualifications, research and workplace experience. Other inspectors and contractors may have some differing opinions. You are welcome to seek opinions from other professionals.
The scope of this inspection
This inspection will include the following systems depending on the type of inspection required: exterior, roof, structure, drainage, foundation, roof space, interior, plumbing, electrical and heating. The evaluation will be based on limited observations that are primarily visual and non-invasive. This inspection and report are not intended to be technically exhaustive.
Your expectations
The overall goal of a home inspection is to help ensure your expectations are appropriate with the house you have bought or own. To this end, I assist with the discovery by showing and documenting observations made during the home inspection. This should not be mistaken for a technically exhaustive inspection designed to uncover every defect with the building. Such inspections are available but they are generally cost-prohibitive to most home buyers and homeowners.
Your participation was requested
Your presence was requested during this inspection. A written report will not substitute for all the possible information that can be conveyed verbally by a shared visual observation of the conditions of the property.
How to Read This Report
Getting the Information to You
This report is designed to deliver important and technical information in a way that is easy to access and understand. I strongly recommend that you take the time to read the full report, which includes digital photographs, captions, diagrams, descriptions, videos and hot links to additional information.
The best way to get the layers of information that are presented in this report is to read your report online, which will allow you to expand your knowledge about your house. You will notice some words or series of words highlighted in blue and underlined – clicking on these will provide you with a link to additional information.
This report can also be printed on paper or in a PDF document.
Chapters and Sections
This report is divided into chapters that parcel the home into logical inspection components. Each chapter is broken into sections that relate to a specific system or component of the home. You can navigate between chapters with the click of a button on the left side margin.
Most sections will contain some descriptive information done in black font. Observation narratives, done in coloured boxes, will be included if a system or component is found to be significantly deficient in some way or if I wish to provide helpful additional information about the system or the scope of my inspection. If a system or component of the home was deemed to be in satisfactory or serviceable condition, there may be no narrative observation comments in that section and it may simply say “tested,” or “inspected.”
Unless defective or maintenance items are specifically allocated to rooms or areas they should be regarded as generally defective items that can be found throughout the residence and/or property.
Photographs
Photographs take up a lot of space, therefore, the photographs about a particular defect do not necessarily include all the photographs or defects of the particular defect identified.
Note: For a better view of the photographs included in the report, click on the photographs to enlarge them.
Observation Labels
All narrative observations are coloured, numbered and labelled to help you find, refer to, and understand the severity of the observation. Observation colours and labels that may be used in this report are:
- NOTE:Refers to aside information and /or any comments elaborating on descriptions of systems in the home or limitations to the home inspection.
- COMMENT:A comment of the general condition of various aspects of the property noted during the inspection.
- DEFICIENT:Repair and maintenance items noted during inspection. Please note that some repair items can be expensive to correct such as re-finishing hardwood floors, but are considered simply repair items due to their cosmetic nature.
- PREVENTATIVE:Any improvement to an area, system, component or condition that would help prevent a deficiency from occurring.
- EFFICIENTCY:Denotes observations that are needed to make the home more energy efficient as well as to bring the home up to modern insulation standards. This category typically includes windows and insulation. Other items, such as lighting and appliances, are not inspected for their energy status.
Summary Page
The summary page is intended to provide you and interested other parties directly involved with this home a convenient and cursory preview of some of the conditions and components that I have identified within my report as needing further evaluation or service by an appropriately qualified specialist or that pose a potential health and safety risk. It is not intended to be comprehensive, and should not be used as a substitute for reading the entire home inspection report or be viewed as a tacit endorsement of the condition of components or features that do not appear in this summary report. The entire report must be read to get a complete understanding of this report as the Summary Page does not include photographs or photo captions.
Summary
Deficients
- S-4 Structure:
The concrete of a portion of the underside of short spanning concrete beams were honeycombed (not properly compacted). If there is a substantial number of reinforcing bars in the bottom on the beam it is sometimes difficult to obtain the required consolidation of the concrete below the reinforcing. There was no loose material nor was any reinforcing steel exposed. The ends of the insitu concrete beams appeared to be resting on precast beams on either side. The honeycombing did not appear to be structurally significant. Once the underside of the slab is plastered the honeycombing will not be visible.
- S-6 Structure:
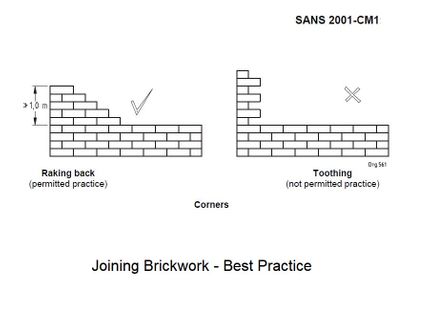
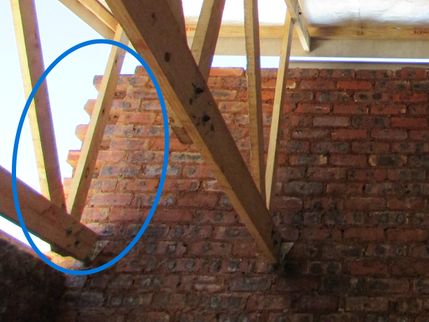
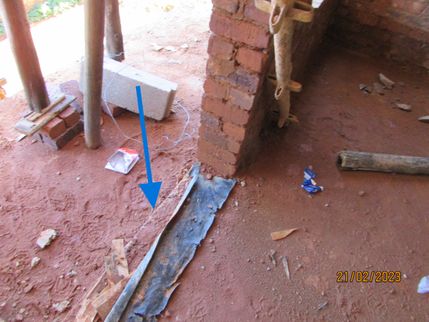
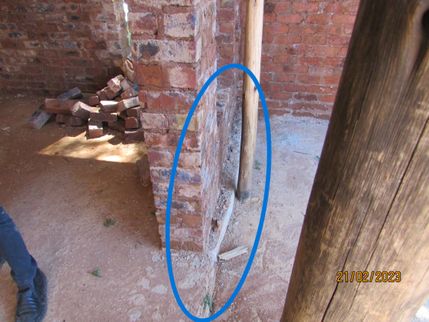
Toothing of brickwork is not permitted by the Building Regulations. Corners and intersecting walls should be raked back and not be raised above the general level of the remaining masonry work more than 1 metre at any one lift. In addition, the brickforce reinforcing required to be laid in every fourth course and every third course above window and door height and is supposed to overlap the intersecting brickforce by the width of the wall (see photo). This is to provide a full masonry bond. If walls can't be raked back on intersecting walls they should be tied to the masonry walls by means of galvanized hoop iron straps provide every 450 mm vertically. Intersecting walls and corners on the inspected structure were toothed which results in poor bonding of the brickwork at that point and can result in vertical cracks forming at the corners. The gaps in the intersecting walls should be cleaned out and a 1:4 moist (not runny) river sand mix should be forced into any openings that remain at the intersections. Furthermore, the brickforce had not been laid every 4th or 3rd course as required. Before the plastering begins, a metal lathe or fine chicken mesh should be nailed to the walls with concrete nails, both on the interior and exterior, in a V-shape a minimum of 150 mm on each side of the intersection to strengthen the intersections.
- S-8 Structure:
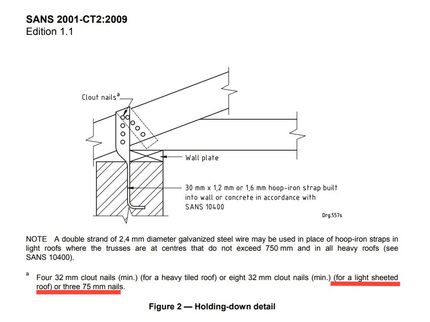
The roof structure was not adequately tied down onto the walls and wall plate to prevent wind from lifting the roof structure. SANS 10400 - Part L clear states states that, where any roof truss, rafter or beam is supported by any wall or column, provision shall be made to fix such truss, rafter or beam to such wall or column in a secure manner that will ensure that any actions to which the roof may normally be subjected will be transmitted to such wall or column. See attached diagram
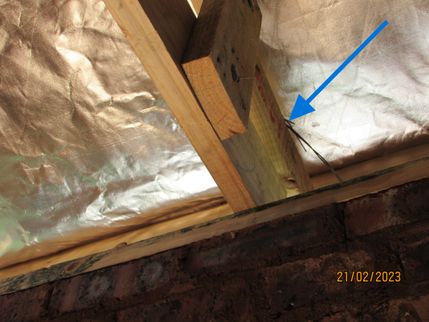
- The wire ties were fixed on top of the truss with a single nail only! The roof wire did not appear to be 2.4 mm wire either!
- The wire roof ties were not brought over the side of the trusses and fixed with nails on the side of the truss as required!
- R-2 Roof:
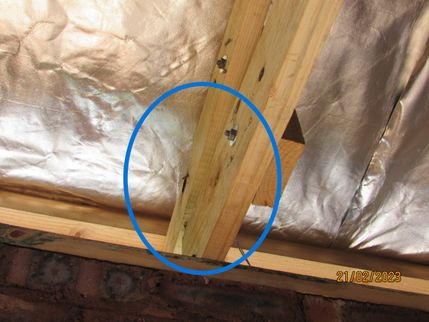
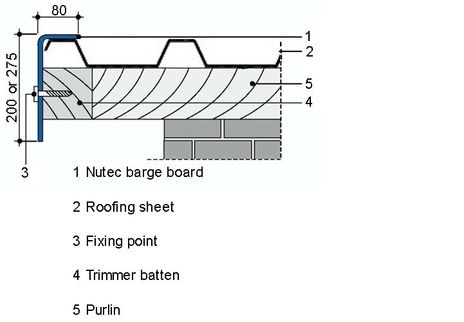
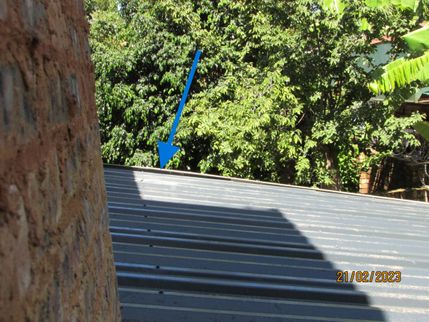
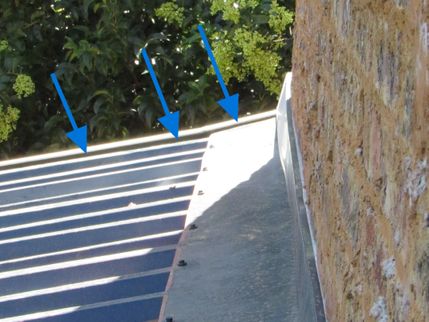
The barge boards were incorrectly installed and will allow wind-blown rainwater onto the timber roof structure that they are fixed to. The barge boards are not merely decorative and should be installed flat onto the roof sheeting to prevent the ingress of water and deterioration of the roof structure and walls under the last row of sheeting at the roof verge. Have a suitably qualified roofing contractor refit the barge boards and roof sheeting.
- Nutec barge board fitting detail on an IBR roof.
- Windblown rainwater will enter here and damage the roof structure.
- Windblown rainwater may enter here onto the roof structure. The bargeboard should be installed flat onto the roof sheeting and under the metal headwall flashing!
- R-3 Roof:
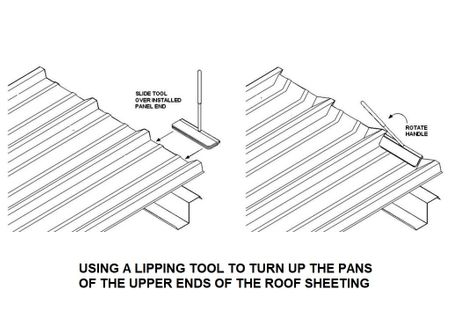
On all mono and double pitch metal roofs with a slope of less than 25° the pans (valleys) at the upper end of the roof sheeting should be turned up to stop wind driving water back over the top of the roof sheeting and onto the roof structure, walls and ceilings. This was not done! I recommend that you have this done. It will save expensive future maintenance and repairs.
- E-3 Exterior:
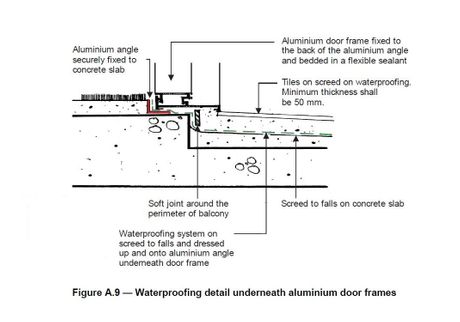
The stepdown at the balcony here was not inline with the superstructure brickwork and will need to be trimmed back to be below the level of the sloped screed and balcony waterproofing.
Preventatives
- E-1 Exterior:
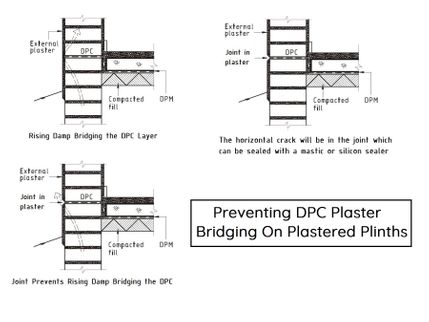
On buildings that have plastered and painted plinths, a plaster or mortar "bridge" may result in rising damp above the damp proof course level (DPC) if the plasterwork on the plinth is not properly separated from the plasterwork on the superstructure at floor level. The only way to separate the two is to form a deep joint horizontally through onto the brickwork and DPC at the DPC level to prevent rising damp bridging the DPC into the superstructure above. Consider having these joints installed to prevent rising damp into the structure above the floor levels to save on future expensive maintenance!
Diagrams explaining bridging are shown below:
- I-1 Interior:
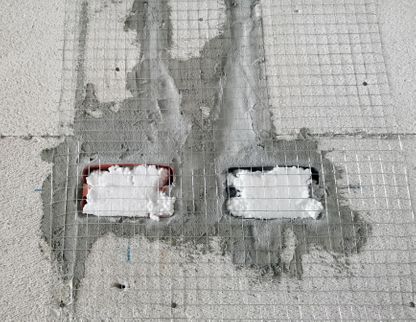
It is not a recommended or standard building practice to start the plastering activity until the structure has been completed. This includes the completion of the erection of roof trusses, beam filling and roof slabs. In addition, the first fix of the plumbing and electrical installation should also be completed before the any internal plastering commences. The preparation of all wall chases is required before the plastering starts. The preparation of wall chases is the fixing of lathing (expanded metal or wire mesh) over the 1st fix electrical and plumbing installation to ensure that there is no cracking along the lengths of the plumbing and electrical piping. This is especially important with hot water piping which expands with the use of hot water in the system. The best advise is not to start with any plasterwork until the all the preparation is completed.
Efficientcies
- R-5 Roof:
A reflective under roof membrane was installed under the roof sheeting. A reflective foil membrane performs as a radiant barrier, by reflecting a large amount of radiant heat striking the reflective surface from the exterior of the roof during summer. It is not very effective as insulation against the cold. The R-Value provided by the foil on a IBR roof with a gypsum ceiling without bulk insulation is between 0.7 and 1.6 depending on whether it is summer or winter. The foil on it's own does not provide sufficient insulation for adequate ceiling thermal insulation. To conform to modern standards, the minimum R-Value of roof assembly (ie. all components of the roof and ceiling) required in zone 2 is R-3.2 (Pretoria Area). For a IBR roof this equates to around 135 mm of a typical cellulose fibre insulation (Think Pink, Isotherm, Romatherm etc.). For energy saving and comfort I recommend that the ceilings be insulated to the latest requirements. Have an insulation contractor inspect the roof space and make further recommendations.
Itemised Limited Inspection Report
General Comments
Building Characteristics, Conditions and Limitations
Style of Home: Contemporary
Type of Building : Single Family (2-story)
Approximate Year of Original Construction: New Construction
Attending the Inspection: Owner and Inspector
Occupancy: Under construction
Weather during the inspection: Clear, Warm
Approximate temperature during the inspection: Over 25 ˚C
Ground/Soil surface conditions: Damp
For the purposes of this report, the entrance to the house is: East
As this is a new construction building, the approved building plans, occupation certificate and Electrical Certificate of Compliance (CoC) should be available. I recommend obtaining and keeping this information for your records and for future re-sale.
The Occupational Safety Act requires that all residential electrical installations must be installed and repaired under the control of a registered electrician. The act also requires that the property owner must be in possession of a Certificate of Compliance (CoC) at all times for any new installations and changes to the wiring of the building. An updated document is required every time a property is sold (transferred) and every time an electrical installation is altered. Make sure you have a copy!
Regulation 12 of the Electrical Machinery Regulations, 2011 imposes an obligation on the user of an electric fence system to have an electric fence system certificate of compliance. The requirement does not apply to a system in existence prior to 1 October 2012. However, as with an electrical compliance certificate, this certificate is required where an addition or alteration is effected to the system or where there is a change of ownership of the premises on which the system exists, if the change of ownership takes place after 1 October 2012. Please ensure that you have this certificate as you will be liable if an injury or death is caused as a result of a faulty installation.
Structure
Foundation
Foundation Description: Shallow foundations (Strip foundations)
The building's foundations appeared to be concrete strip foundation footings. Strip footings are a type of shallow foundation that is used to provide a continuous, level or stepped strip of firm concrete support for walls built centrally above them. Concrete strip footings can be reinforced or not depending on the soil founding conditions. The footing size or depth below the ground level could not be verified.
Floor, Wall and Roof Structure
Floor Structure: Ground Floor (Concrete/screed), 1st Floor (Composite slab)
Wall/Support Structure: Load-bearing (Masonry, 230 mm Brickwork), Non-load-bearing (Masonry, 110 mm Brickwork)
Roof and Ceiling Framing: Roof structure (Roof trusses/beams, Site made roof trusses)
The visible portions of the concrete ground floor structure of the house appeared to be in satisfactory condition at the time of the inspection.
The visible portions of the house's 1st-floor slab structure appeared to be in an acceptable condition at the time of the inspection except where addition issues or problems are specifically listed.
The concrete of a portion of the underside of short spanning concrete beams were honeycombed (not properly compacted). If there is a substantial number of reinforcing bars in the bottom on the beam it is sometimes difficult to obtain the required consolidation of the concrete below the reinforcing. There was no loose material nor was any reinforcing steel exposed. The ends of the insitu concrete beams appeared to be resting on precast beams on either side. The honeycombing did not appear to be structurally significant. Once the underside of the slab is plastered the honeycombing will not be visible.
The house's internal and external wall structure was generally in a satisfactory condition. Additional exceptions are specifically listed.
Toothing of brickwork is not permitted by the Building Regulations. Corners and intersecting walls should be raked back and not be raised above the general level of the remaining masonry work more than 1 metre at any one lift. In addition, the brickforce reinforcing required to be laid in every fourth course and every third course above window and door height and is supposed to overlap the intersecting brickforce by the width of the wall (see photo). This is to provide a full masonry bond. If walls can't be raked back on intersecting walls they should be tied to the masonry walls by means of galvanized hoop iron straps provide every 450 mm vertically. Intersecting walls and corners on the inspected structure were toothed which results in poor bonding of the brickwork at that point and can result in vertical cracks forming at the corners. The gaps in the intersecting walls should be cleaned out and a 1:4 moist (not runny) river sand mix should be forced into any openings that remain at the intersections. Furthermore, the brickforce had not been laid every 4th or 3rd course as required. Before the plastering begins, a metal lathe or fine chicken mesh should be nailed to the walls with concrete nails, both on the interior and exterior, in a V-shape a minimum of 150 mm on each side of the intersection to strengthen the intersections.
The visible portions of the house's roof structure appeared to be in satisfactory condition at the time of the inspection except where addition items or problems are specifically listed.
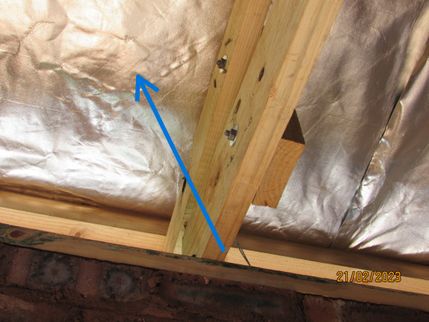
The roof structure was not adequately tied down onto the walls and wall plate to prevent wind from lifting the roof structure. SANS 10400 - Part L clear states states that, where any roof truss, rafter or beam is supported by any wall or column, provision shall be made to fix such truss, rafter or beam to such wall or column in a secure manner that will ensure that any actions to which the roof may normally be subjected will be transmitted to such wall or column. See attached diagram
- The wire ties were fixed on top of the truss with a single nail only! The roof wire did not appear to be 2.4 mm wire either!
- The wire roof ties were not brought over the side of the trusses and fixed with nails on the side of the truss as required!
Grounds
Gradients, Drainage and Elevations
Clearance to Landscaping: Standard
There was generally an adequate difference in elevation between the exterior ground level and the interior floors. Make sure that the ground level and paving level is more than 150 mm below the level of the DPC as required by the Building Regulations! Also ensure that the ground and paving slopes away from the building for a distance of at least 1.5 m to prevent any pooling of rain and stormwater close to the building.
Roof
Roofing and Flashings
Roof Covering Materials: Sheeted roofs (Metal with exposed fasteners)
The roof material on the house roof consisted of IBR profile sheeting which was fixed with pierced fixings. Pierced roof sheeting material can last between 40 to 70 years. However, much depend on the installation of the roofing. Items like roof screws, washers and rubber gaskets do not last as long! They typically last about 20 years, but roof sheet and screw movement can shorten this time! A pierced fixing roof system is installed by securing the sheets down by screwing through the metal. This method doesn’t allow the metal to expand and contract naturally causing the screws to enlarge the holes in the roof sheeting they are fixed through. In addition, heat and movement may cause the gaskets that come with the roof screws to deteriorate and fail. This leads to leaks and the need for regular maintenance.
Fascia boards, Barge boards and Verge Tiles
The barge boards were incorrectly installed and will allow wind-blown rainwater onto the timber roof structure that they are fixed to. The barge boards are not merely decorative and should be installed flat onto the roof sheeting to prevent the ingress of water and deterioration of the roof structure and walls under the last row of sheeting at the roof verge. Have a suitably qualified roofing contractor refit the barge boards and roof sheeting.
- Nutec barge board fitting detail on an IBR roof.
- Windblown rainwater will enter here and damage the roof structure.
- Windblown rainwater may enter here onto the roof structure. The bargeboard should be installed flat onto the roof sheeting and under the metal headwall flashing!
On all mono and double pitch metal roofs with a slope of less than 25° the pans (valleys) at the upper end of the roof sheeting should be turned up to stop wind driving water back over the top of the roof sheeting and onto the roof structure, walls and ceilings. This was not done! I recommend that you have this done. It will save expensive future maintenance and repairs.
Roof Drainage
Gutters and downpipes are not decorative installations. They are specifically installed on buildings to control rainwater discharging from the roof. Uncontrolled rainwater discharging onto the paving or ground can cause removal of the jointing material and erosion of the ground. Furthermore, the falling rainwater causes splashing up onto the lower portions of the house's walls. This splashing up against the walls causes staining and serious damage of plastered and painted finishes. Splashing up also causes rising damp and penetrating damp on plastered and painted walls. If you have not planned for it, serious consideration should be given to the installation of a complete roof drainage system to control and direct rainwater away from the house.
Insulation
A reflective under roof membrane was installed under the roof sheeting. A reflective foil membrane performs as a radiant barrier, by reflecting a large amount of radiant heat striking the reflective surface from the exterior of the roof during summer. It is not very effective as insulation against the cold. The R-Value provided by the foil on a IBR roof with a gypsum ceiling without bulk insulation is between 0.7 and 1.6 depending on whether it is summer or winter. The foil on it's own does not provide sufficient insulation for adequate ceiling thermal insulation. To conform to modern standards, the minimum R-Value of roof assembly (ie. all components of the roof and ceiling) required in zone 2 is R-3.2 (Pretoria Area). For a IBR roof this equates to around 135 mm of a typical cellulose fibre insulation (Think Pink, Isotherm, Romatherm etc.). For energy saving and comfort I recommend that the ceilings be insulated to the latest requirements. Have an insulation contractor inspect the roof space and make further recommendations.
Exterior
Exterior Walls
External Superstructure Finish: Plastered and Painted
On buildings that have plastered and painted plinths, a plaster or mortar "bridge" may result in rising damp above the damp proof course level (DPC) if the plasterwork on the plinth is not properly separated from the plasterwork on the superstructure at floor level. The only way to separate the two is to form a deep joint horizontally through onto the brickwork and DPC at the DPC level to prevent rising damp bridging the DPC into the superstructure above. Consider having these joints installed to prevent rising damp into the structure above the floor levels to save on future expensive maintenance!
Diagrams explaining bridging are shown below:
Decks, Patios, Balconies and Verandahs
Exterior Doors and Thresholds
The installation of aluminium doors and frames should be completed before the any internal or external plastering commences. This video from Swartland explains how it should be done!
Window Exteriors and Sills
The installation of aluminium windows and the building up of window sills should be completed before the any internal or external plastering commences This video from Swartland explains how it should be done!
Interior
Walls and Ceilings
It is not a recommended or standard building practice to start the plastering activity until the structure has been completed. This includes the completion of the erection of roof trusses, beam filling and roof slabs. In addition, the first fix of the plumbing and electrical installation should also be completed before the any internal plastering commences. The preparation of all wall chases is required before the plastering starts. The preparation of wall chases is the fixing of lathing (expanded metal or wire mesh) over the 1st fix electrical and plumbing installation to ensure that there is no cracking along the lengths of the plumbing and electrical piping. This is especially important with hot water piping which expands with the use of hot water in the system. The best advise is not to start with any plasterwork until the all the preparation is completed.
.png)
.png)
.jpg)
