The Scope and Purpose of a Home Inspection
Purchasing property involves risk
The purpose of a home inspection is to help reduce the risk associated with the purchase of a structure by providing professional observations about the overall condition of the structure. A home inspection is a limited visual inspection and it cannot eliminate all the risk. Some homes present more risks than others. I cannot control this, but I try to help inform you about what I don’t know during the inspection process. This is more difficult to convey in a report and one of many reasons why I recommend that you attend the inspection.
A home inspection is not an insurance policy
This report does not substitute for or serve as a warranty or guarantee of any kind. Home warranties can be purchased separately from insurance firms that provide this service.
A home inspection is visual and not destructive
The descriptions and observations in this report are based on a visual inspection of the structure. I inspect the aspects of the structure that can be viewed without dismantling, damaging or disfiguring the structure and without moving furniture and interior furnishings. Areas that are concealed, hidden or inaccessible to view are not covered by this inspection. Some systems cannot be tested during this inspection as testing risks damaging the building. For example, overflow drains on bathtubs are generally not tested because if they were found to be leaking they could damage the finishes below. My procedures involve non-invasive investigation and non-destructive testing which will limit the scope of the inspection.
This is not an inspection for NHBRC/Building Regulation compliance
Although this inspection report may refer to SANS (South African National Standards) and municipal by-laws, this report is not intended to be an NHBRC (National Home Builders Registration Council/National Building Regulation/local municipal by-law compliance inspection. Although some safety issues may be addressed in this report, this inspection is not a safety inspection and I am not required to identify all potential hazards.
During the construction, process structures are inspected for building regulation and bylaw compliance by NHBRC and municipal inspectors. They can view the construction process during the construction phase. The construction process is not viewable during inspections of finished homes. This limits the inspection. At some stage, all houses will fall out of building regulation and bylaw compliance after they are built, as these are continually updated. Updates are phased in by the NHBRC and municipalities in government-regulated timetables. There are generally no requirements to bring older homes into compliance unless substantial renovations and additions are being done.
For your information, the full Standards of Practice of the International Association of Certified Home Inspectors (“InterNACHI”) is available here.
My observations are based on my academic studies and workplace experience
Construction techniques and standards vary. There are different ways to build a house or install a system in a house. The observations in this report are based on my academic studies and workplace experience. Other inspectors and contractors may have some differing opinions. You are welcome to seek opinions from other professionals.
The scope of this inspection
This inspection will include the following systems depending on the type of inspection required: exterior, roof, structure, drainage, foundation, roof space, interior, plumbing, electrical and heating. The evaluation will be based on limited observations that are primarily visual and non-invasive. This inspection and report are not intended to be technically exhaustive.
Your expectations
The overall goal of a home inspection is to help ensure that your expectations are appropriate with the house you have bought or are proposing to buy. To this end, I assist with the discovery by showing and documenting observations during the home inspection. This should not be mistaken for a technically exhaustive inspection designed to uncover every defect with a building. Such inspections are available but they are generally cost-prohibitive to most homebuyers and homeowners.
Your participation was requested
Your presence was requested during this inspection. A written report will not substitute for all the possible information that can be conveyed verbally by a shared visual observation of the conditions of the property.
How to Read This Report
Getting the Information to You
This report is designed to deliver important and technical information in a way that is easy for anyone to access and understand. If you are in a hurry, you can take a quick look at our "Summary Page” and quickly get critical information for important decision making. However, we strongly recommend that you take the time to read the full Report, which includes digital photographs, captions, diagrams, descriptions, videos and hot links to additional information.
The best way to get the layers of information that are presented in this report is to read your report online, which will allow you to expand your learning about your house. You will notice some words or series of words highlighted in blue and underlined – clicking on these will provide you with a link to additional information.
This report can also be printed on paper or to a PDF document.
Chapters and Sections
This report is divided into chapters that parcel the home into logical inspection components. Each chapter is broken into sections that relate to a specific system or component of the home. You can navigate between chapters with the click of a button on the left side margin.
Most sections will contain some descriptive information done in black font. Observation narrative, done in colored boxes, will be included if a system or component is found to be significantly deficient in some way or if we wish to provide helpful additional information about the system or the scope of our inspection. If a system or component of the home was deemed to be in satisfactory or serviceable condition, there may be no narrative observation comments in that section and it may simply say “tested,” or “inspected.”
Observation Labels
All narrative observations are colored, numbered and labeled to help you find, refer to, and understand the severity of the observation. Observation colors and labels used in this report are:
- MAJOR CONCERN:Repair items that may cost significant money to correct now or in the near future, or items that require immediate attention to prevent additional damage or eliminate safety hazards.
- DEFICIENT:Repair and maintenance items noted during inspection. Please note that some repair items can be expensive to correct such as re-finishing hardwood floors, but are considered simply repair items due to their cosmetic nature.
- MAINTENANCE:A system or component requiring maintenance appears to be functioning as intended,but would benefit from minor repair, maintenance or improvement at this time. General deficiencies include patching, painting, cleaning, cleaning the gutters or changing the filters.
- PREVENTIVE:Any improvement to an area, system, component or condition that would help prevent a deficiency from occurring.
- MONITOR:An area, condition, system or component that is in need of monitoring appears to be functioning as intended and capable of safe usage in its present condition; however, your inspector's concern stated in the report should be monitored or further evaluated by an appropriate person.
- DEFERRED:Observation such as a buried oil tank that may require further investigation to determine the severity and / or urgency of repair.
- FUTURE PROJECT:A repair that may be deferred for some time but should be on the radar for repair or replacement in the near future.
- EFFICIENCY:Denotes observations that are needed to make the home more energy efficient as well as to bring the home up to modern insulation standards. This category typically includes windows and insulation. Other items, such as lighting and appliances, are not inspected for their energy status.
- COMMENT:Detailed description of various aspects of the property noted during the inspection
- NOTE:Refers to aside information and /or any comments elaborating on descriptions of systems in the home or limitations to the home inspection.
- DESCRIPTION:Detailed description of various aspects of the property noted during the inspection.
Summary Page
The Summary Page is designed as a bulleted overview of all the observations noted during inspection. This helpful overview is not a substitution for reading the entire inspection report. The entire report must be read to get a complete understanding of this inspection report as the Summary Page does not include photographs or photo captions.
Summary
MAJOR CONCERNS
- K-8 Kitchen:
The gas installation to the hob did not conform. A gas shut-off valve or isolator valve is required within easy reach of the hob should a fire break out at the hob. This shut off valve is normally installed in a cupboard next to the hob. No shut off valve was installed! I suggest that the installation be checked and repaired by an installer who is registered with the Liquefied Petroleum Gas Safety Association of Southern Africa (LPGAS).
- E-2 Electrical:
There were uncovered knockouts or openings in the cover of the main electrical panel that exposes those who have access to the panel to shock hazards. These openings will need to be covered with approved panel block out covers. This is a safety issue.
- E-5 Electrical:
There was an open electrical junction box in the roof space at the ceiling that should be provided with a blank cover so that any arcing or sparking would be contained within the box, and to help keep pests and moisture out. No bushes were fitted through which the wires should enter the box to protect the wiring against damage from sharp edges. The connection of the wiring in the box was suspect as well. I recommend the wiring system be properly checked in its entirety by a suitable registered and qualified electrician to ensure that the system is compliant.
DEFICIENCIES
- G-2 Grounds:
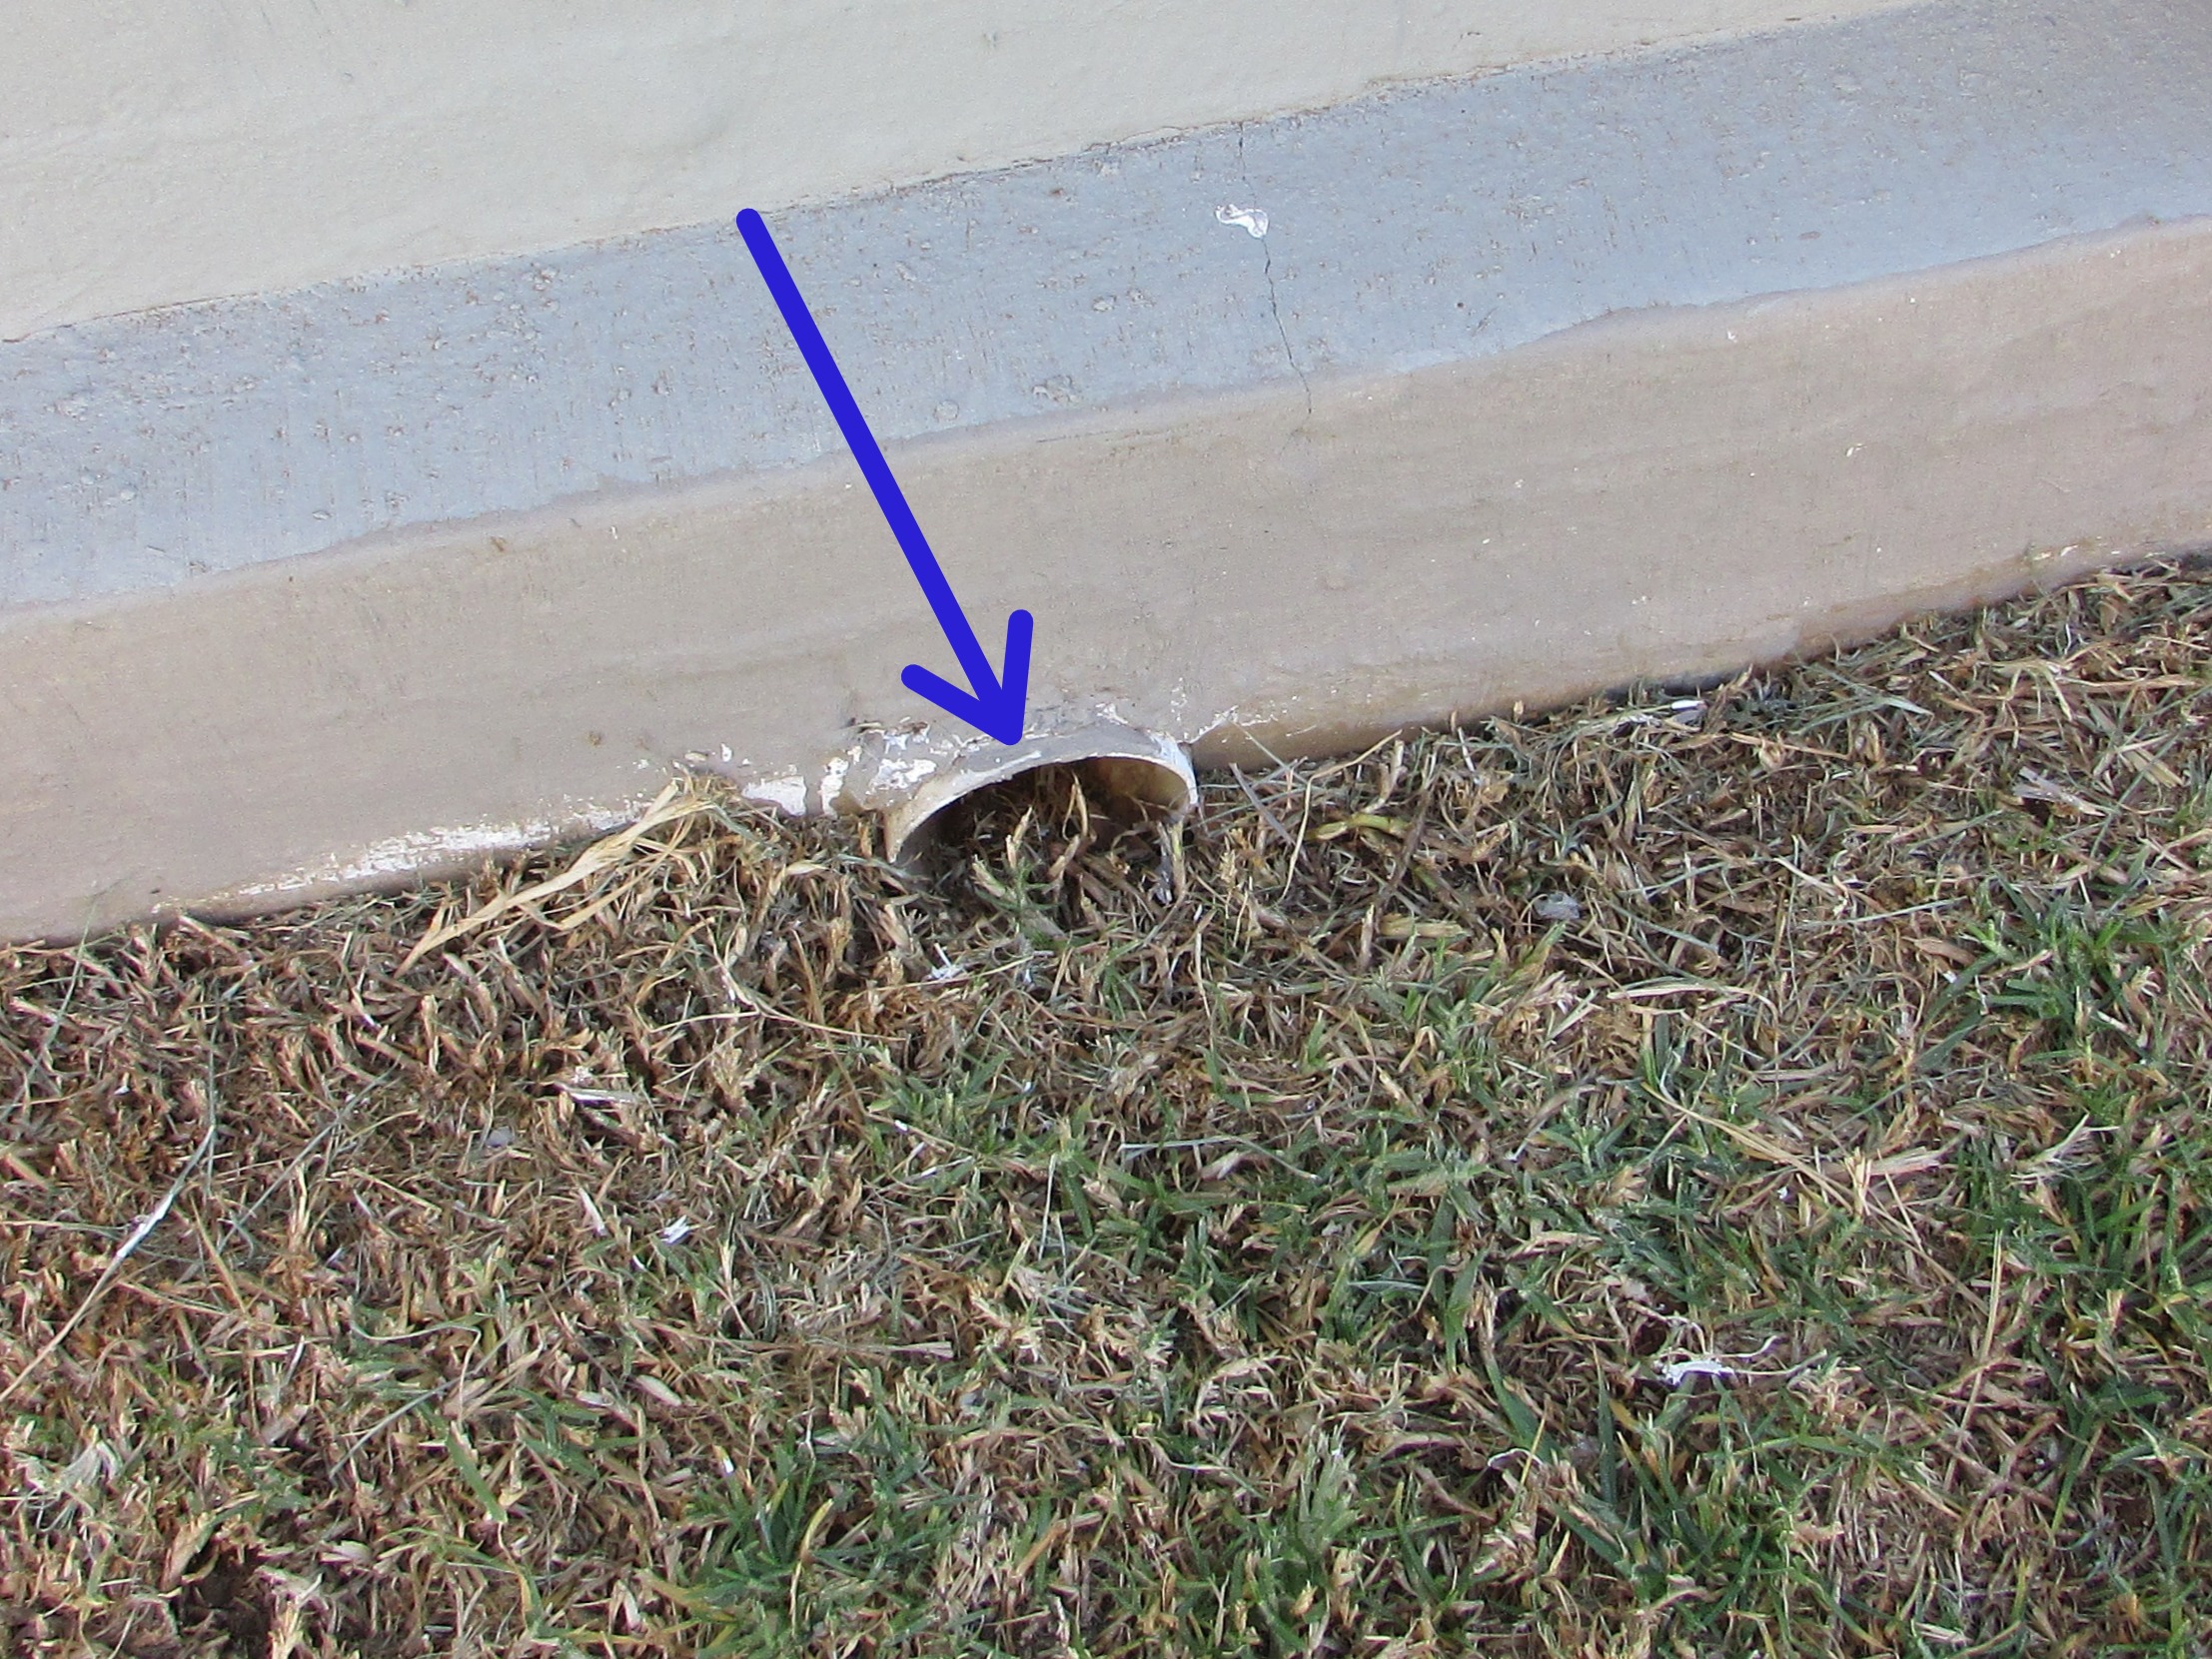
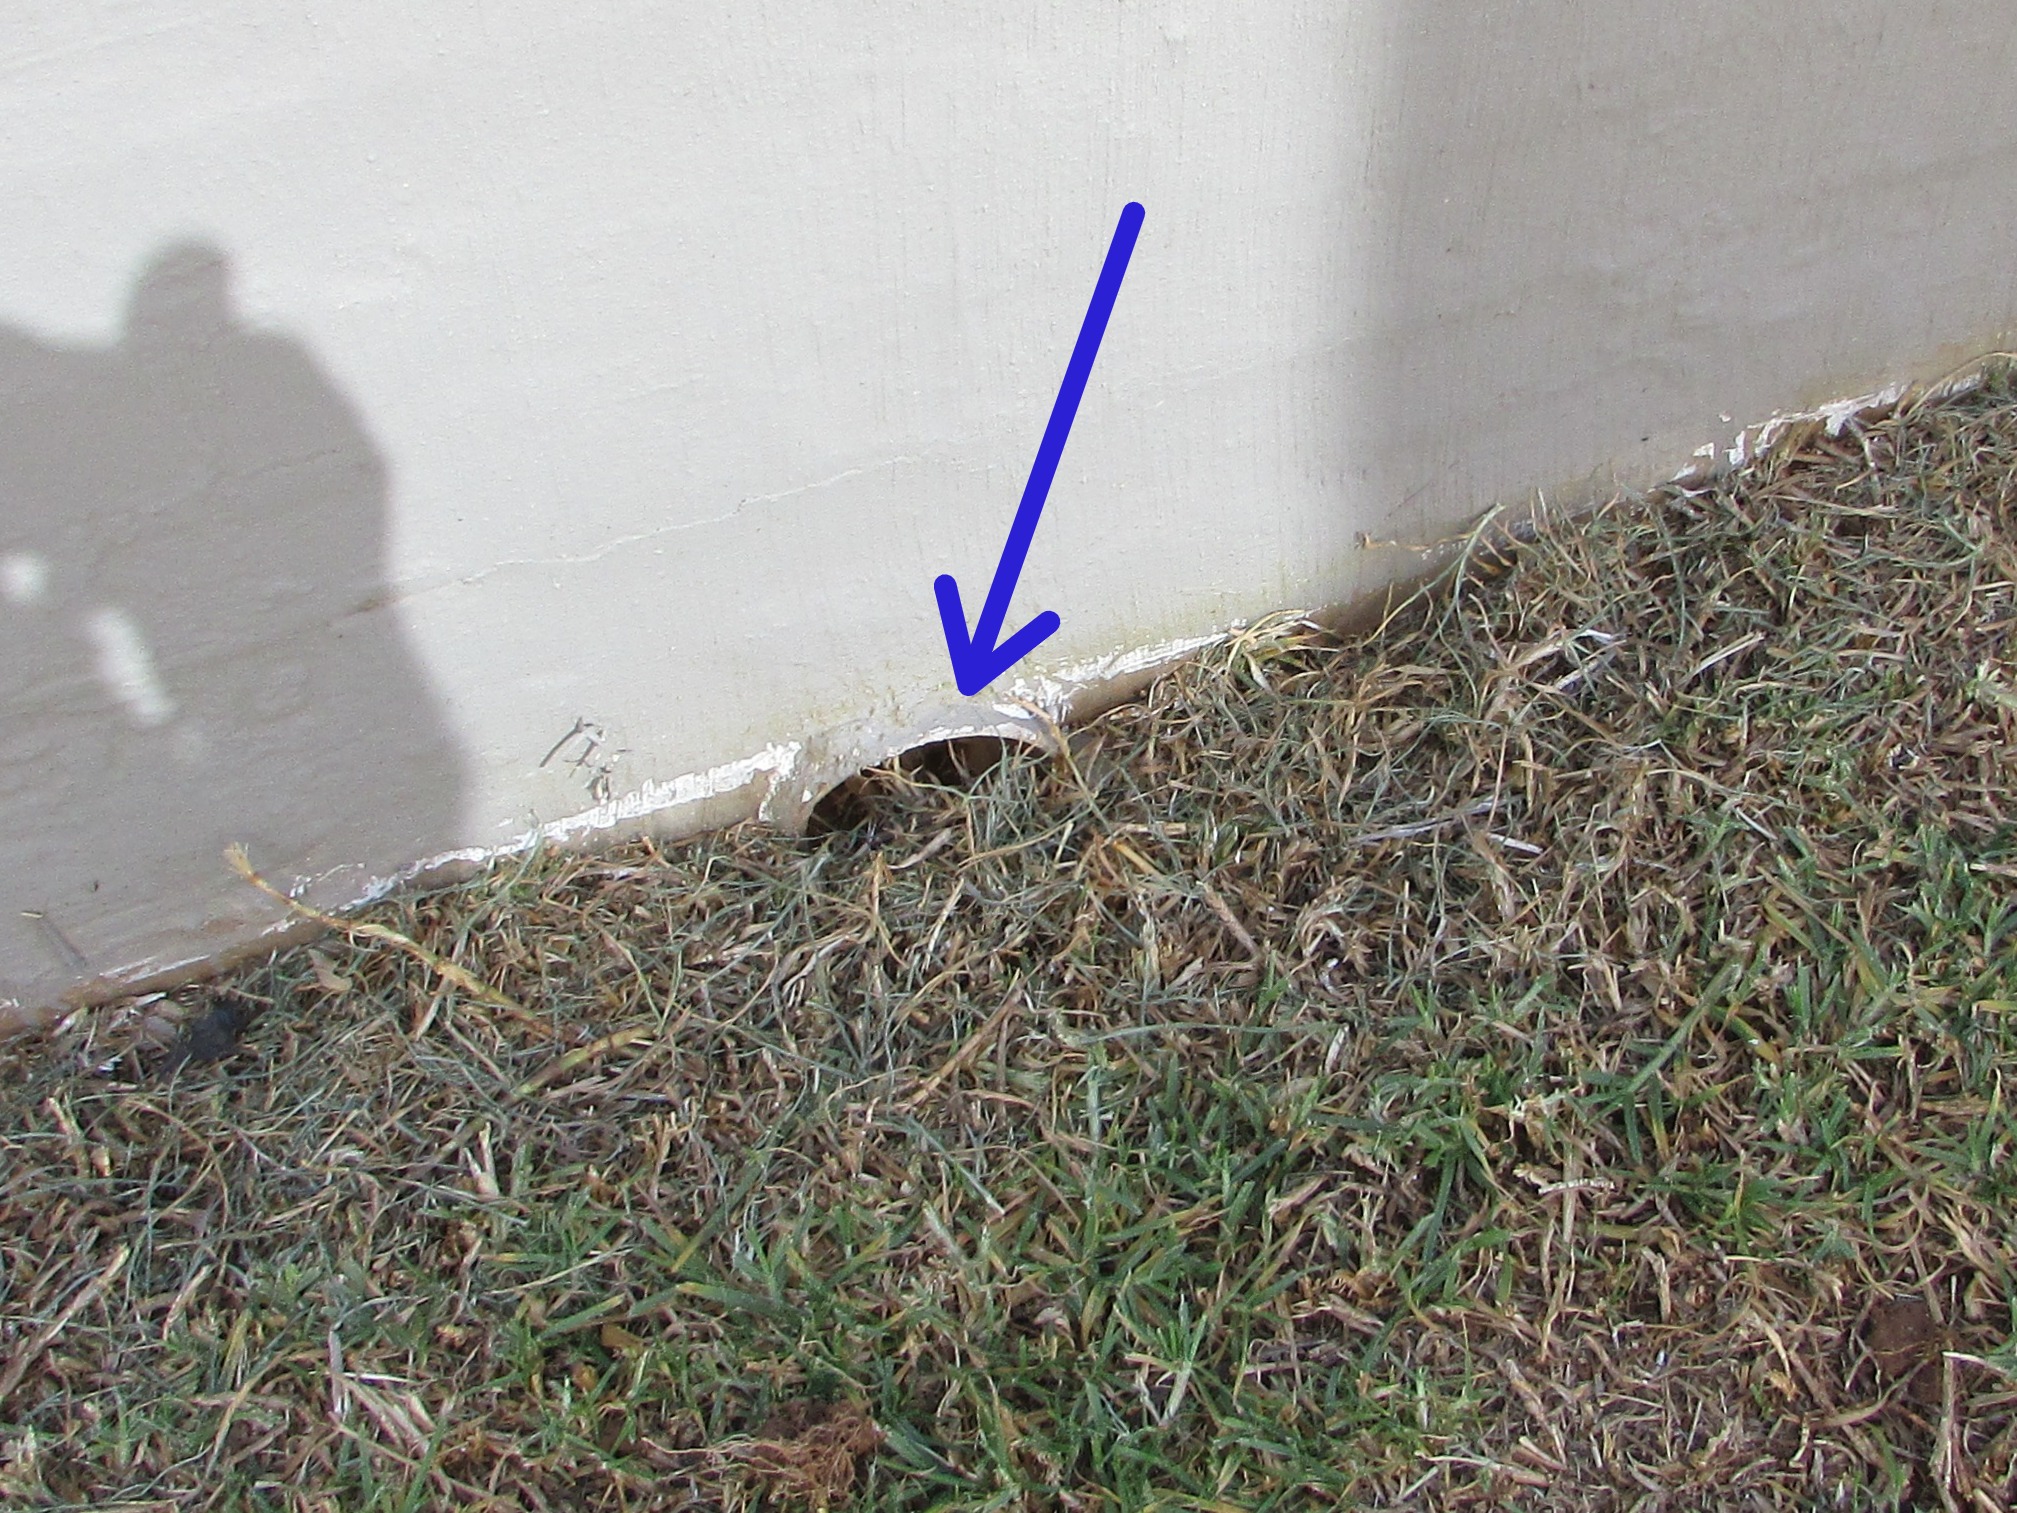
Most of the drainage holes through the boundary wall on the west side of the property were partially blocked by plant growth or soil. The drainage holes should be unblocked and exposed so that stormwater does not pond against the boundary wall.
- G-6 Grounds:
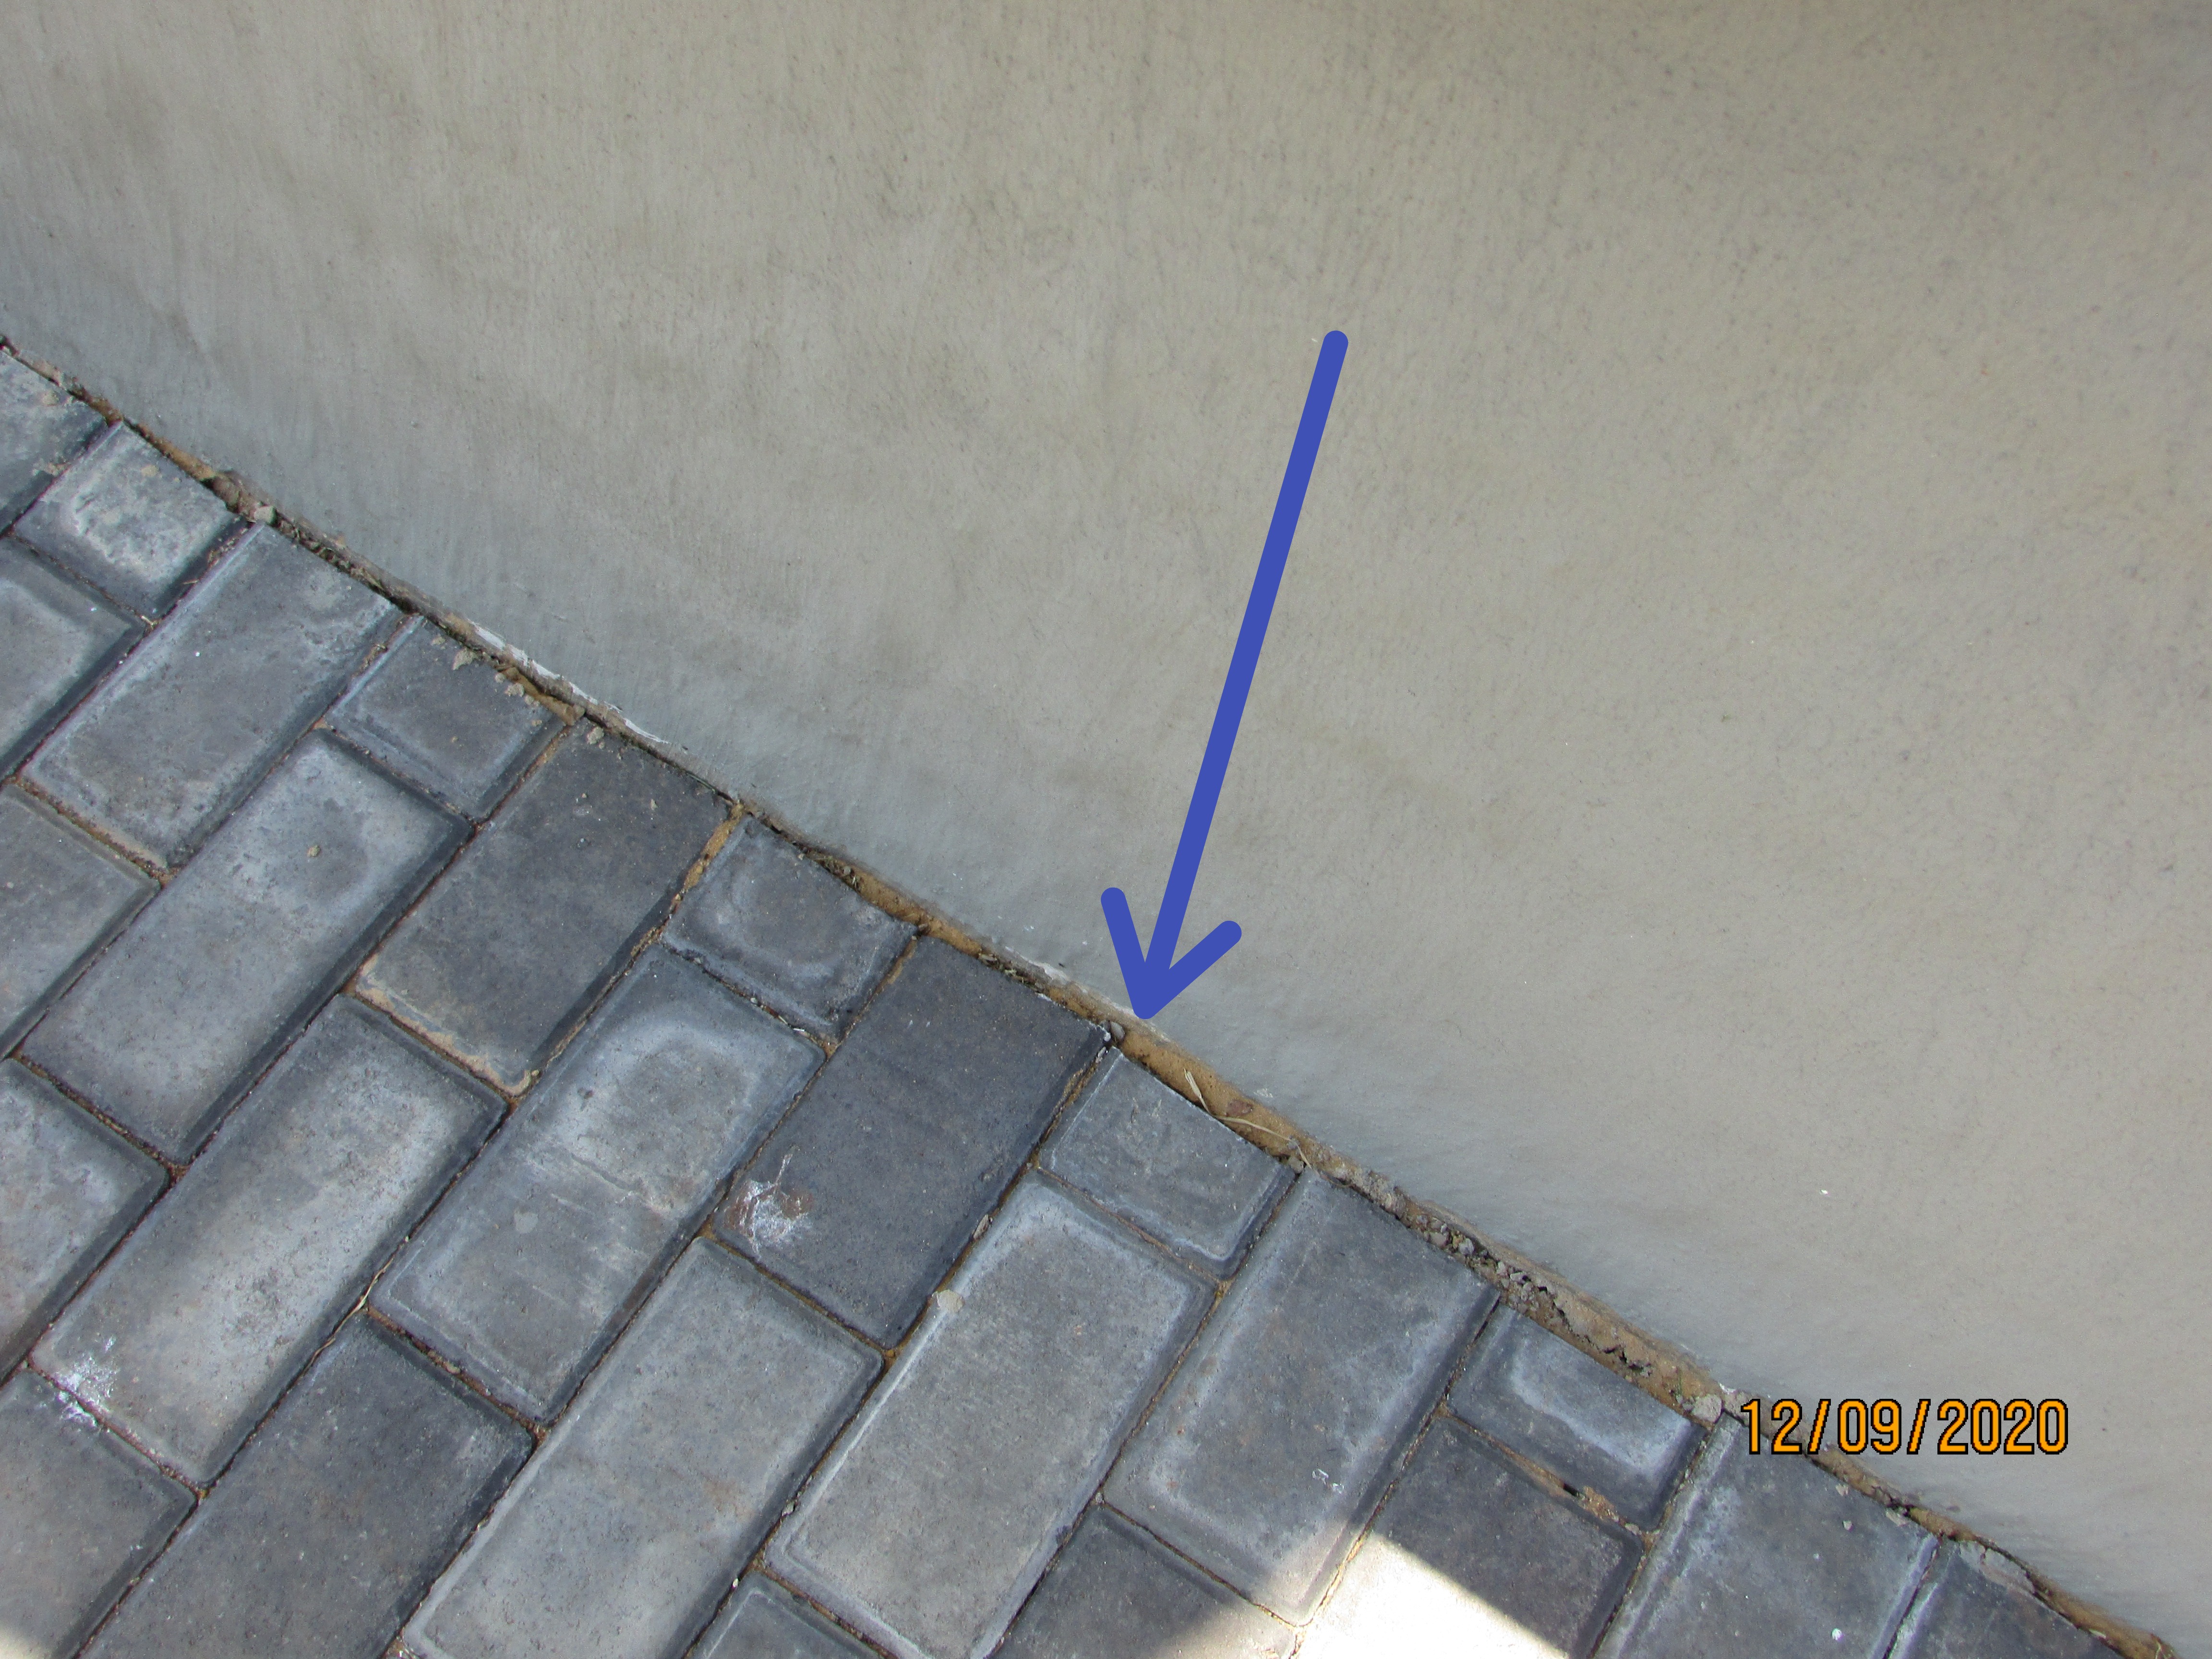
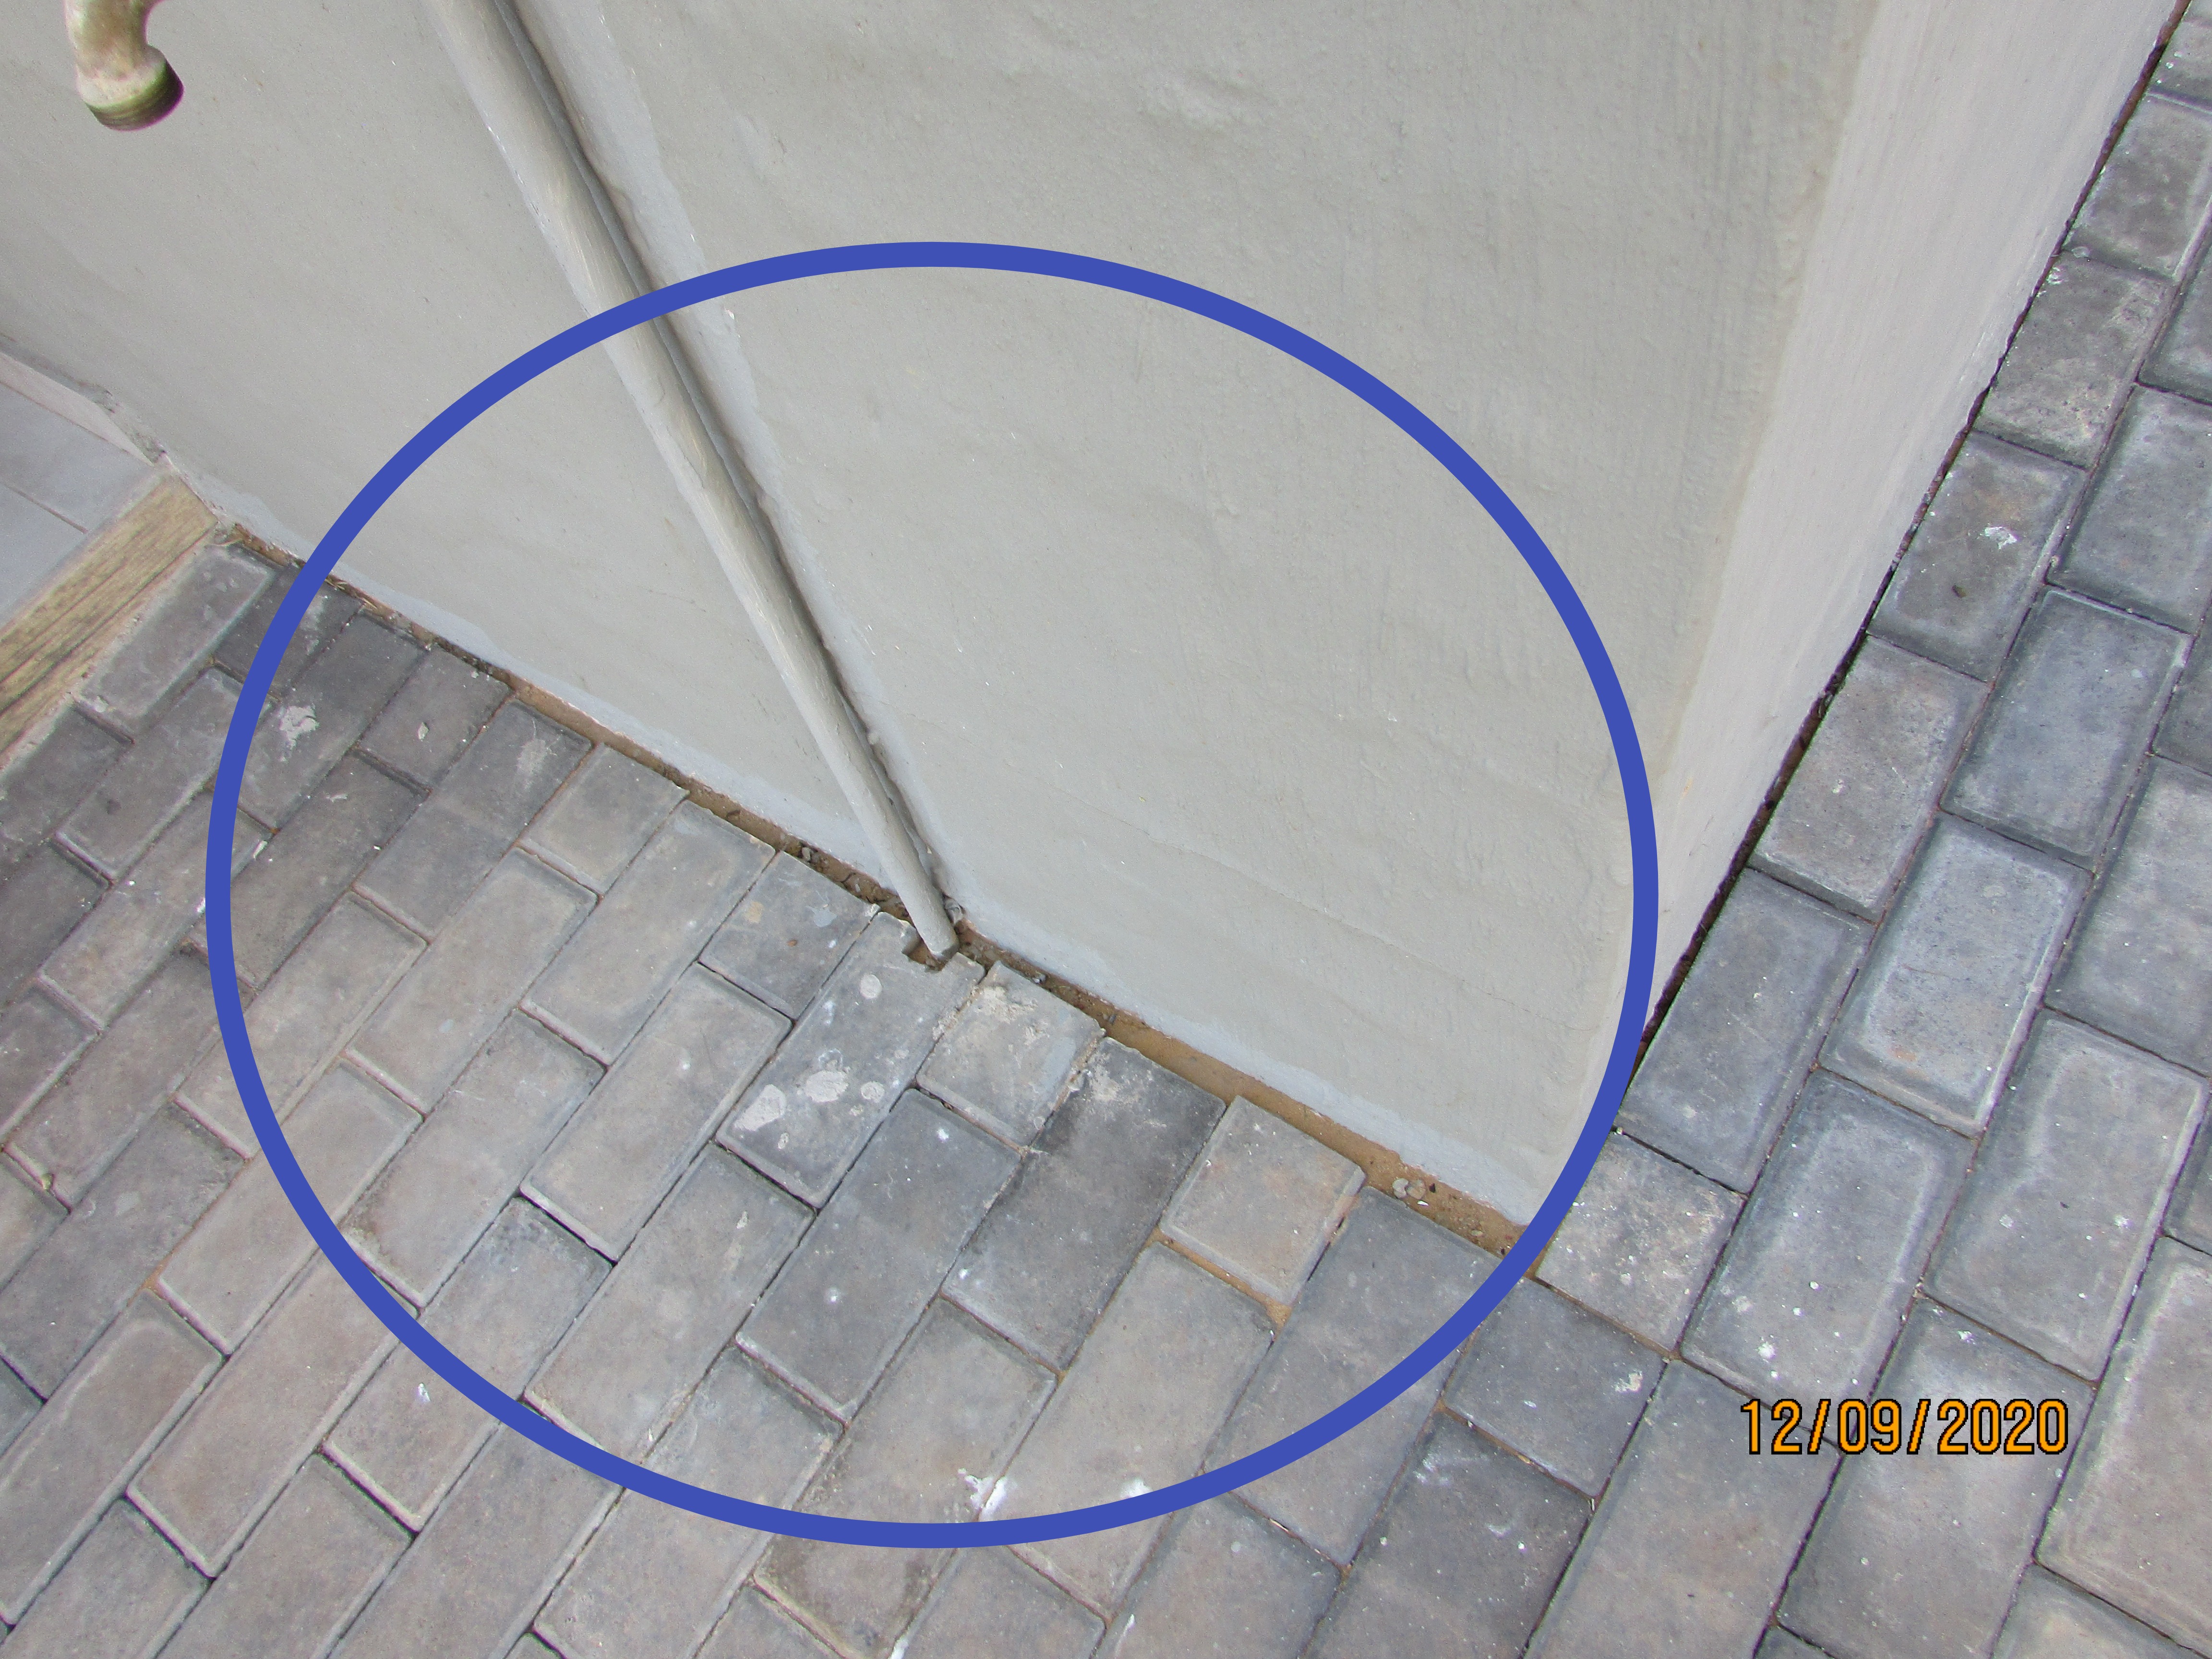
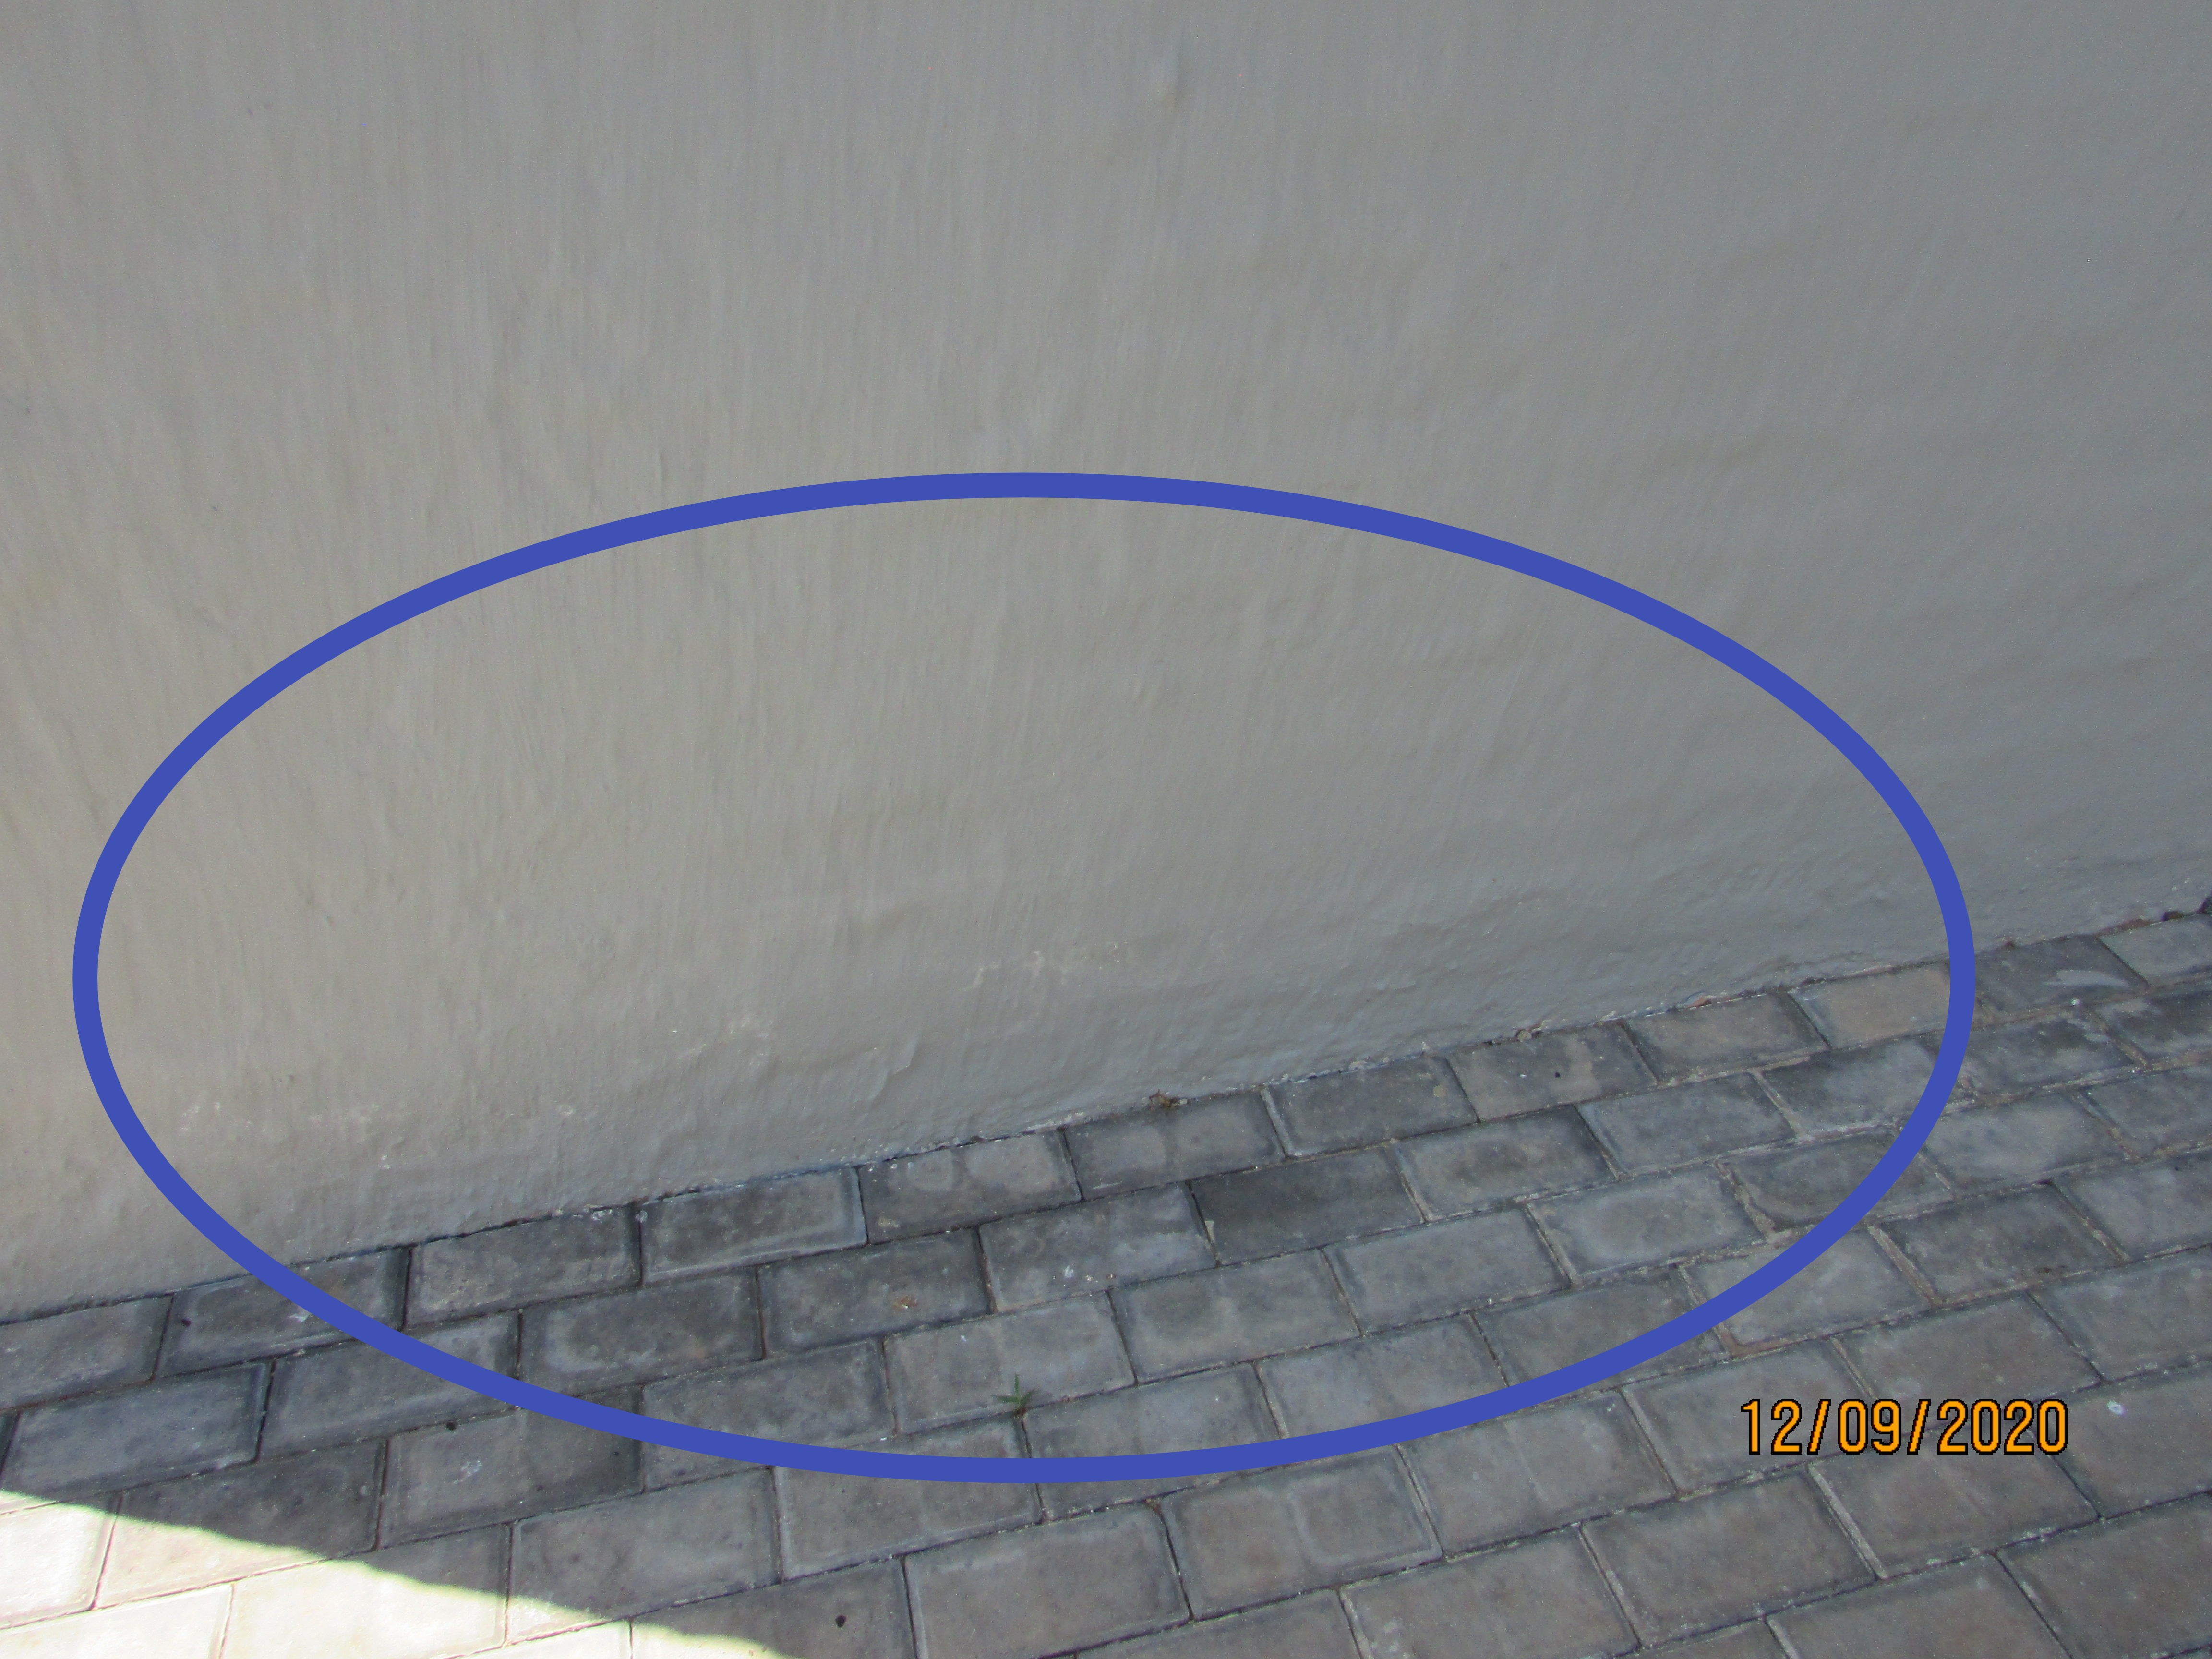
The lack of gutters and inadequate roof overhang had allowed rainwater falling off the roof to remove the paving joints in the paving and against the walls of the buildings. Cleaning out and grouting of the joints with plaster sand and cement mixture was required against the walls to prevent moisture from entering around the foundation and pooling in the cracks and resulting in rising damp.
- The joints will need to be cleaned out for a depth the same as the depth of the paving bricks before being grouted up with mortar.
- After the joints are cleaned out the mortar grout should be finished off at the same level as the paving.
- Here the soil between the wall and paving had been scoured away by the rainwater falling off the roof above allowing the rainwater to enter here. Care will have to be taken with the usage of the garden tap to prevent rising damp here!
- This moisture damage to the plaster work was caused by a combination of rain running down the face of the building and the pooling of rainwater in the gap between the paving and the wall. This was a start of a problem that will be widespread if the joint between the paving and house is not adequately sealed.
- R-2 Roof:
The sidewall flashings on the house were mostly installed with an acrylic membrane waterproofing system. There is an increasing trend in South Africa for builders and roofers to use “cheap and easy” acrylic membrane as a roofing flashing. This is seldom completely satisfactory as the end result is not as durable, or attractive, as professionally installed metal undertile flashing. The acrylic flashings should be monitored for deterioration (white spots) as it has a limited lifespan (±5 years depending on exposure to climatic conditions). I recommend that you have these flashing evaluated by an appropriately qualified roofing contractor for further remarks and recommendations.
- R-3 Roof:
There were several chipped tiles on the tiled roof that required replacement. The whole of the tiled roof should be checked. I recommend that the tiles are replaced by an appropriately qualified roof tiler.
- R-4 Roof:
There were cracks in the bedding mortar of the ridge tiles that may allow moisture intrusion into the ceiling space and on to the ceiling. Normally a layer of DPC (damp proof course) is laid below the ridge tiles to prevent moisture intrusion into the roof structure. However, as a preventative measure, I recommend that the ridge tile joints be repaired and sealed by an appropriately qualified roof tiler.
- R-5 Roof:
The roofing material on part of this building was a modified bitumen membrane. The waterproofing of the roof was incomplete. The brick parapet should be plastered and waterproofed. The manufacturers of the waterproofing membranes recommend that the membrane must be protected from direct sunlight conditions with an aluminium coating to improve and extend the performance and life expectancy of the membrane. I recommend additional inspection of the roof by a qualified waterproofing contractor. Implement repairs as recommended to insure reliable performance.
- The waterproofing membrane was not aluminium bitumen paint coated.
- The top and internal face of the brickwork here should be should be plastered and waterproofed.
- The waterproofing did not appear to be adequately sealed into the PVC drainpipe. The drain should have a grid installed at the inlet to the downpipe.
- R-8 Roof:
The flashing on this chimney was not done to any known or recognised standard. I recommend having metal head and side wall undertile flashing with counter flashings installed for this chimney to divert water around the chimney. The current waterproofed mortar installation is vulnerable to cracking and leaks where the roof drains toward the chimney.
- This was not an acceptable way to head flash a chimney! Note the pooling water of the flashing.
- This was not an acceptable way to sidewall or step flash a chimney!
- This patch over the tiles may have been installed where a leak or tile damage may have occurred. The tiles should rather be replaced!
- R-15 Roof:
Barge boards are not merely decorative and should be installed flat onto the roof tiles to prevent the ingress of wind blown rainwater and the deterioration of the roof timbers on the verge of the roof. Have the roof contractor check and correct the barge boards!
- R-10 Roof:
The two downpipes discharge here could cause splashing up against the walls and pooling on the paving. I suggest both be cut back and provide with 45° bend so that they can discharge freely away from the building. Patching around one downpipe was required to prevent moisture intrusion into the wall above the DPC.
- SB-4 Structure and Basement:
External crack repairs were noticeable on an exterior wall. Considering the size of the house, the structure has performed very well. None of the cracks appeared to be structurally significant at this stage. The cracks should be monitored for further movement. If they crack again and widen considerably, I would suggest you consult a structural engineer. In any event, cracks allow moisture intrusion into the structure and should always be sealed and repaired.
- SB-6 Structure and Basement:
It appeared that there were areas where concrete and clay bricks were built into the same wall. SANS 2001-CM1 specifically states that masonry units of dissimilar materials (calcium silicate, concrete and burnt clay) shall not be built into the same wall unless the different materials are separated by a horizontal damp proof course or a vertical control joint. Concrete and clay bricks should not be in contact with each other in the same wall. Concrete and calcium silicate bricks tend to contract while clay bricks tend to expand. Walls built with concrete bricks and clay bricks should be separated with control joint or movement joints. The clay and concrete bricks at window and door reveals and wall intersections should not be in contact with each other. The expansion and contraction between the different type of brick may cause stresses at the junction of the different bricks causing slight cracking which may appear at the corners of the windows, doors and connections of the face and concrete brick walls. In this case, because of the small areas of facebrick, most of the cracks that may occur should be cosmetic only and of no structural significance.
- This clay facebrick balcony wall and window feature wall appeared to be built into the plastered concrete brick wall.
- These header face bricks appeared to be built into the suspected internal concrete brick plastered wall.
- Here the facebrick header brick can be clearly be seen tying into the internal skin of the brick wall which was probably built with concrete bricks.
- SB-7 Structure and Basement:
Cracking at the level of the horizontal DPC (damp proof course) is a common problem with plastered superstructure walls where the foundation plinth is also plastered. It is a common and an incorrect practice to place the DPC onto the plinth brickwork without a mortar bedding. This forms an passage for moisture to penetrate the brickwork into the building. The DPC should extend over the full width of the wall including plaster thickness to prevent moisture from crossing past a mortar or plasterwork "bridge" at the face of the plasterwork. Patching and/or painting over the crack will not prevent the crack from reappearing. The only way to resolve the cracking is to form a joint horizontally through to the face of the brickwork at the DPC (damp proof course) level. The crack will then be in the deep joint and not readily visible. The cracking at the DPC level was not structurally significant but should be sealed to prevent moisture intrusion into the wall structure.
- SB-8 Structure and Basement:
Minor horizontal and vertical cracks on the interior walls of the main bedroom en-suite bathroom was most often caused by the slight movement or deflection of the suspended concrete slab. Cracking as a result of slab defection is normally part of the structure's settlement phase and usually does not usually continue after the settlement has taken place. The cracking appeared to be the result of the slight deflection. At most, an external flexible paintable filler can be applied to the cracks if necessary and the wall repainted. The cracks do not appear to be structurally significant.
- EG-2 Exterior/Garage:
Gaps and holes in the jointing in face brickwork can allow moisture intrusion into the structure. All gaps and holes should be filled and sealed with mortar and a jointing tool.
- Water intrusion into the structure will happen through these holes in the mortar joints every time it rains.
- These places must be sealed to prevent moisture intrusion into the walls.
- A typical area where moisture will enter in the joints and at the window frame.
- Holes in the brickwork joints at floor level. Note the damp brickwork and efflorescence on the bottom of the plinth. Water splashing up from the paving can be a problem here.
- Defective facebrick jointing at the front entrance door. This was just poor workmanship and should be repaired!
- EG-3 Exterior/Garage:
The tops of the face brick feature walls did not appear to be waterproofed. Plasterwork will crack at the junction of the horizontal surface and the vertical wall. They also crack along the the narrow width. Moisture intrusion had occurred into the wall structure. Note the white staining (efflorescence) on the brickwork and joints of the face brickwork. The top of the feature walls should be waterproofed on to the superstructure wall to prevent wind blown rainwater intrusion into the wall and into the house. Normally an acrylic waterproofing system is used for this. Larger areas should be should be waterproofed with a torch on membrane.
- Note the white powder called efflorescence in the joints which was deposited when the moisture in the wall evaporated.
- Note the white powder called efflorescence in the facebrick joints here under the roof verge on the gable wall which was deposited when the moisture in the wall evaporated.
- Efflorescence was a sign of moisture in the wall structure that had evaporated.
- This concrete roof over the main bedroom en-suite bathroom under the eaves where the rainwater will fall on the roof will need to be checked for a torch down membrane and fitted if not installed!
- The slightly sloped plaster band on top of the face brickwork here clearly illustrated the lack of waterproofing on top of the face brick feature wall.
- EG-4 Exterior/Garage:
There was what appeared to be rising damp in some areas on external face of the face brick and plastered and painted plinths of the house that will need to be monitored. This was evidenced by the staining, bubbling paintwork, and efflorescence on the lower portions of walls above the paving level.
- There appeared to be water pooling around the foot of the downpipe and rising damp in the wall. Note the lack of grouting material on the paving!
- Note the damp brickwork and efflorescence on the bottom of the plinth. Water splashing up from the paving can be a problem here.
- The dark area of facebrick was indicative of rising damp here. There was signs of efflorescence as well!
- EG-5 Exterior/Garage:
The dry stack feature wall on the entrance wall of the covered entrance finished against the brick plastered wall and column without any waterproofing between the dry stack feature and the plastered brick wall. Moisture control with exterior dry stack walls is very important. If the support wall has not been properly waterproofed, moisture intrusion into the yard wall and column can be expected. A solution for the moisture intrusion is difficult to suggest. Seal the top of dry stack stones with an acrylic waterproofing system and wait to see if it works. It it doesn't work,remove the stones, waterproof as required and have the dry stack feature rebuilt.
- Rainwater will be retained between the wall and dry stack feature.
- There was no sign of waterproofing between the dry stack feature and the undercoated plastered wall.
- The finish at the column was unacceptable! The dry stack stone should have been carried through to the face of the stone finish along the wall. Rainwater will enter here!
- The top of the dry stack feature and the wall will need to be waterproofed or sealed to prevent moisture intrusion between the dry stack feature and the brick wall.
- EG-6 Exterior/Garage:
There were different shades of paint patches on the walls in various places around the exterior of the house that were visually unacceptable. Where plaster and paint patching is required the wall should be painted from top to bottom and from corner to corner to ensure an even colour. The walls where the patches have occurred will need to be repainted.
- EG-7 Exterior/Garage:
A cover over plumbing duct inspection eye opening in the brick wall was missing and will need to be fitted and sealed.
- This inspection opening was missing a cover. Make sure it is properly sealed.
- The inspection covers on the plumbing ducts should be sealed with self adhesive sealing strip or silicon to prevent moisture intrusion into the structure.
- EG-8 Exterior/Garage:
The plastered portion of the 1st floor slab on the balconies and main bathroom en-suite had gaps where rainwater will enter causing rising damp in the wall above the slab and moisture intrusion the the floor internally. The holes and gaps should be sealed as a preventive measure.
- EG-13 Exterior/Garage:
All the door frames had gaps between the frames and walls that will need to be sealed to prevent moisture intrusion into the walls.
- EG-14 Exterior/Garage:
Generally, the door frames require cleaning and the removal of paint.
- EG-15 Exterior/Garage:
All the external windows of the house required sealing. There were cracks between the sills and frames, between the sills and the walls and between the frames and the walls. Wind blown rainwater had enter the cracks and had allowed moisture into the walls and internal window sills.
- The remains of the plastic protective cover should be removed and the gap between the frame and wall sealed with silicon. General cleaning of the brickwork was required.
- This gap will allow moisture into the brickwork at the frame.
- Cracks on sill and on the side of the window! Note the moisture damage at the internal sill and wall under Interior: Windows!
- Window sill on the stair landing window. Note the gaps between the window frame and sill. The window frame required cleaning!
- The edge of the stair landing window. Here rainwater will leak into the interior of the house.
- The sill here was not sloped to drain. Nor was the widow frame sealed. Best practices for all exterior sills are to slope to drain to shed water. Standing water on details like this can facilitate moisture intrusion.
- Here there was a crack in the window sill and a gap at the window trim. Both will need to be sealed.
- The remains of the plastic protective cover should be removed and the gap between the frame and wall sealed with silicon.
- Crack in the wall at the window sill which will allow moisture intrusion.
- EG-16 Exterior/Garage:
A cracked pane of glass was noted on the balcony in the 2nd bedroom (girl's room). This requires glazing replacement.
- EG-17 Exterior/Garage:
The windows frames had mortar and paint on the frames at the time of inspection. This is a general item applicable to all the windows. I recommend cleaning the windows frames before they are sealed.
- The window and the grouting at the sill and skirting needed to be repaired and cleaned up.
- Paint clean up required.
- Paint clean up required. Scratches on the window frame will need to be touched up!
- Window frame required cleaning! The plastic protective tape should be removed.
- Paint clean up required. The frame might have leaked here!
- The window and the grouting at the sill and skirting needed to be repaired and cleaned up.
- Paint clean up required here!
- The grouting at the sill and window needed to be repaired and cleaned up.
- EG-20 Exterior/Garage:
The balustrade posts required sealing on top of the parapet dwarf wall at bedroom 1 and 2 to prevent moisture intrusion into the wall and balcony slab.
- EG-22 Exterior/Garage:
The fixing method of the beam into the pergola columns was defective. Rainwater entering the pocket in the column cannot drain away. the beam should either be encased completely in the column and the column sealed on top to prevent moisture intrusion or the beam should be placed onto of the column where the rainwater can drain away. At the time of the inspection the end potion of the laminated beam in the pocket was not sealed to prevent moisture intrusion into the beam. Signs of de-lamination of the beam was noted. This could also mean that the beam was meant for internal use only! This problem should be rectified before the rain season.
- The pocket into which the beam sits will not allow rainwater to drain away. Note the efflorescence in the brickwork. The top of the bricks had cavities that were not sealed.
- The portion of the beams in the pockets were not treated with a sealer or wood preservative to protect them from the elements.
- The laminated beam appeared to be delaminating. Laminated beams for external use are manufactured with waterproof adhesive which will not de-laminate.
- EG-24 Exterior/Garage:
Rainwater was leaking past the doors into the garage. The threshold was not stepped down slightly or sloped sufficiently at the doors to prevent water from leaking under and at the sides of the door. An aluminium strip (±6 mm high) can be fixed and sealed to the floor behind the doors and along the edges up to the entrance walls to prevent water entering.
- EG-25 Exterior/Garage:
The garage door threshold was cracked at driveway paving. The damage and cracking will allow rainwater to enter at the crack and leak into the threshold and garage slab. Sealing of the crack of the threshold was required. The seals on the bottom of the garage doors appeared to be okay but no recess was formed between the threshold and the garage floor to prevent rainwater from penetrating the garage on the sides of the doors.
- EG-26 Exterior/Garage:
The start of typical cracks were noted in the concrete garage slab. No control joints were used in the concrete pour or screed here so the floor may crack further. No repair was needed at this time. This was a cosmetic defect.
- I-5 Interior:
It appeared that the grouting on the skirting tiling had been repaired at the skirtings after the skirting had been installed and painted. The grout buildup will need to be removed from the top of the skirtings and the skirtings touched up or repainted.
- I-6 Interior:
During the inspection I noted some areas of the interior paint job that require touch-up. This is normal in new construction. Paint touch-up is beyond the scope of this inspection but I recommend working with the builder once you have moved in when you will have the opportunity to make a snag list so that you can get the interior paint job tuned up to your satisfaction.
- Ceiling of the passage to the garage.
- Walls within the kitchen cupboards require another coat of paint.
- Paint and plasterwork around internal door frames should be redone. This was a poor finish! The best solution is to fit architraves to make the finish here acceptable.
- Corner at the ceiling in the ground floor bedroom needed attention.
- Paint touch required here in the main bathroom en-suite.
- Repair required on the ceiling here in the main bathroom en-suite.
- Bad paintwork on the shadow cornices. The was a general defect applicable to all the shadow cornices in the house. They should all be repaired!
- Touch up required on window sill in bedroom 1's en-suite bathroom.
- I-7 Interior:
Tiled floors are normally cleaned with a mop. The result of this is that water will seep in under the BIC's kick plates if they have not been sealed with a silicon sealer at the junction of the kick plate and tiled floor, resulting in moisture damage to the kick plates. The sealing of the kick plates had not been done and in time will result in a maintenance issue!
- I-12 Interior:
The doors and door frames at doors on the ground and 1st floor were generally rough to touch and require filling, sanding down and painting to obtain a satisfactory finish. The why that the doors were not built into the middle of the door left an unsatisfactory finis on the interior of the bedrooms.
- Here the weather stripping fitted to the internal door frame was badly executed and will need to be redone. Generally, the fitting on all the door frames was not good. Note the damage and crack on the top of the door jamb.
- Here is a badly fitted door hinge that should be filled on the frame, sanded down and painted. Note the poor grouting of the tile at the bottom of the door jamb!
- This is a top edge of a door. The edge was left very rough and a portion of the edge was missing at the top. Filling, sanding down and painting was required.
- The same door lower down! Note the rough edge!
- The door frame finish on the inside of the bedrooms and bathrooms was unacceptable! The door frames should be fitted with architraves! See detail A.
- Another badly fitted hinge! This was a general defect!
- Generally the door frames finish was sanded smooth and were rough to touch. Sanding down and painting was required.
- Touch up paint was required on the frames at the hinges.
- It appeared that the door frames may have been "glued" to the brickwork with an adhesive, polyurethane foam or a similar product. The frame may not have been fixed in the general accepted method. See detail B.
- I-13 Interior:
Some internal doors had a excessively large gaps at the bottom of the doors. If the gaps are unacceptable, they can be reduced by adding a strip to the bottom of the doors to reduce the gaps.
- I-15 Interior:
There were cracks in the plasterwork at and below an internal window sill of the staircase landing window. Typically, it appeared from the bubbling paintwork along the cracks internally was around the area of the the window sill as a result of moisture intrusion into the exterior walls at cracks on the window sills and cracks and gaps between the window frames and sills externally. All the cracks on the sills and junctions between all the sills and all the windows should be sealed with a suitable silicon and painted to prevent further intrusion into the structure.
- I-10 Interior:
End cap on the balustrading was missing on the 1st floor.
- GB-2 Guest Bathroom:
The plasterwork below the basin required repair and painting.
- GFEB-2 Ground Floor En-suite Bathroom:
The plasterwork below the basin required repair and painting.
- GFEB-7 Ground Floor En-suite Bathroom:
The shower drain was slow to drain and appeared to be obstructed. A plumber should further evaluate this drain line and repair for adequate drainage.
- MEB-1 Main En-suite Bathroom:
The wall behind the bathroom basin was not adequately sealed to the counter top or the wall and could allow water to get behind the counter top. Moisture damage may result in the cabinet below. Seal with silicon.
- MEB-3 Main En-suite Bathroom:
Cleaning off of grout was required under one side of the toilet tiling.
- B1EB-2 Bedroom 1 En-suite Bathroom:
The plasterwork below the basin required repair and painting.
- B1EB-3 Bedroom 1 En-suite Bathroom:
The cold and hot water supply side of the mixer on the basin had a weak supply. This may only be a blocked aerator sieve. The defect will need to be investigated and repaired.
- B1EB-5 Bedroom 1 En-suite Bathroom:
A grout repair was required under one side of the toilet tiling to prevent moisture intrusion should the toilet ever leak.
- B2EB-3 Bedroom 2 En-suite Bathroom:
The wall behind the bathroom basin was not adequately sealed to the counter top or the wall and could allow water to get behind the counter top. Moisture damage may result in the cabinet below. Seal with silicon.
- B2EB-5 Bedroom 2 En-suite Bathroom:
Cleaning off of grout was required under one side of the toilet tiling.
- E-8 Electrical:
The line and level of light switches and plug points was generally poor. Some switches and covers were loose and needed to be fitted properly. A general check and repair of the plugs points and light switches was required.
- Switch cover out of plumb.
- Switch cover require refitting.
- Plug point and cover was loose and out of level.
- level and lining up of covers poor!
- E-9 Electrical:
A loose ceiling light fixtures was noted in the 1st floor passage. Make sure these fixtures are well secured to prevent loose wires and physical damage. All the ceiling light fixtures in the hose required checking and correction by an appropriately qualified electrician.
- P-3 Plumbing:
A drip pipe was not fitted to the pressure regulator. The drip pipe should discharge directly into a gulley or waste pipe. Water from the regulator was dripping close to the walls of the residence. If the regulator is working properly a certain amount of water is discharged from the drip of the pressure regulator during the course of normal operation. This discharge should be directed away from the foundation of the house.
- P-4 Plumbing:
The supply pipes were not insulated in the roof space. If you have frost in the area and the winter temperatures gets to 3°C and below, be sure all supply lines in unheated spaces and areas have been adequately insulated to protect pipes from freezing conditions that could damage the pipes.
- None of the supply pipes were insulated in the unheated roof space. Check local conditions for minimum temperatures.
- The supply and return pipes to the solar water heater panel are normally insulated. These were not!
MAINTENANCE ITEMS
- SB-5 Structure and Basement:
Settlement usually occurs in new or relatively new buildings. Buildings are very heavy and cause the ground to compact, but this normally stops after a short while. Most buildings are constructed in a variety of materials, all of which need to settle down and have different shrinkage rates. It is not unusual for cracks to form in new houses. As long a water is kept away from the building no significant settlement or settlement cracking should take place.
- K-3 Kitchen:
A combination door on the wall unit against the kitchen wall required adjustment to close properly. Other doors on the same row cabinets where damaged.
Preventives
- G-8 Grounds:
The top of the plastered and painted yard and boundary walls were not waterproofed. Normally the tops of free standing walls should have a capping or be waterproofed with a waterproofing system to prevent moisture penetration into the walls. With plastered walls the plasterwork on top of the walls often cracks allowing the passage of water into the walls. The control joints in walls were not sealed with a mastic or silicon sealer to prevent moisture intrusion into the walls and moisture damage to the painted and plastered wall. Have the joints sealed as a preventative measure and the top of the walls waterproofed to prevent falling damp and any moisture damage to the walls. An acrylic waterproofing system is normally used.
- Typical unsealed control joint that has cracked at the joint which will allow moisture into the structure of the wall.
- This crack will allow falling damp to occur in the wall.
- The top of the wall was not waterproofed nor was the top joint of the expansion joint sealed.
- Typical unsealed top and side of a control joint that has cracked at the joint This joint will allow moisture into the structure of the wall.
- Some sort of membrane was placed horizontally. This may render the wall unstable. The wall should be monitored as this may become an unsafe condition.
- R-16 Roof:
Some barge boards required sealing with silicon or an acrylic waterproofing system where they butt against the walls to prevent moisture intrusion into the roof structure at the verge of the roof.
- I-8 Interior:
Sealing or grouting was required at the top of wall tiles in the showers. Steam condensing against the shower wall will allow moisture to enter at the top of the tiling and into the shower walls causing falling damp in the walls.
- K-4 Kitchen:
The joint between the counter top and tiled wall should be sealed with silicon to forestall possible moisture intrusion between the counter top and the wall.
- K-5 Kitchen:
Tiled floors are normally cleaned with a mop. The result of this is that water will seep in under the kick plates if the cabinets have not been sealed at the junction of the kick plates and side panels resulting in moisture damage and possible mould. The sealing on the kitchen kick plates had not been done!
- S-4 Scullery:
The joint between the counter top and tiled wall should be sealed with silicon to forestall possible moisture intrusion between the counter top and the wall.
- S-5 Scullery:
Tiled floors are normally cleaned with a mop. The result of this is that water will seep in under the kick plates if the cabinets have not been sealed at the junction of the kick plates and side panels resulting in moisture damage and possible mould. The sealing on the kitchen kick plates had not been done!
- GFEB-5 Ground Floor En-suite Bathroom:
The mixer valve covers will need to be sealed at covers and tiles or sealed at the supply behind the covers to help prevent moisture intrusion behind the covers and into the walls.
- MEB-5 Main En-suite Bathroom:
The bath mixer valve covers will need to be sealed at covers and tiles or sealed at the supply behind the covers to help prevent moisture intrusion behind the covers and into the walls.
- MEB-7 Main En-suite Bathroom:
The shower mixer valve cover will need to be sealed at cover and tiles or sealed at the supply behind the covers to help prevent moisture intrusion behind the covers and into the walls.
- B1EB-8 Bedroom 1 En-suite Bathroom:
The shower mixer valve cover will need to be sealed at cover and tiles or sealed at the supply behind the cover to help prevent moisture intrusion behind the cover and into the wall.
- B2EB-8 Bedroom 2 En-suite Bathroom:
The bath mixer and bath wand valve cover will need to be sealed at cover and tiles or sealed at the supply behind the covers to help prevent moisture intrusion behind the covers and into the walls.
- P-20 Plumbing:
A hose tap required drainage away from the structure. Normally hose bib taps are installed above gulleys or at a position on the stand away from the structure so that moisture intrusion into the structure and foundation is avoided.
Monitors
- P-7 Plumbing:
I could not access the sewer and the venting system components serving the 1st floor plumbing fixtures which were located in enclosed ducts and therefore these could not be evaluated. No venting was visible above the roof line so it is possible that the vent pipes terminate in the roof space or the ducts. The vents should have been provided with an air admittance valves. If you have sewer smells in your bathrooms and bedrooms you should have a plumber check the venting.
DEFERRED ITEMS
- R-6 Roof:
No liner was noted in the braai flue. A flue liner is recommended the the manufacturer to provide a smooth surface for better draw and protect the brickwork against heat corrosion. Contact a qualified installer or the manufacturer to further evaluate the system.
- R-7 Roof:
The top cover over the chimney appeared to have been built with concrete lintels with opening on the side to allow the chimney to draw. These openings may allow wind blown rainwater to enter the chimney. The heat from the chimney while the braai is being used may cause cracking between the lintels and leaks. No cowl was installed on the top of the chimney as recommended by the manufacturer. A rotating cowl is necessary to prevent down drafts on windy days and to prevent rain from entering the chimney. Manufacturers advise that the necessary precautions should be taken to protect the braai against rust by regularly checking the installation and repainting areas where necessary. Contact a qualified installer or the manufacturer to further evaluate the system.
- EG-11 Exterior/Garage:
The sliding doors in the lounge were locked. and were not tested.
- EG-18 Exterior/Garage:
I could not ascertain if the waterproofing of the balcony floors under the tiling had been done. Because the balconies are exposed to the elements, the balcony floors should be waterproofed and the waterproofing should also have been taken onto the side of the perimeter walls. If the balcony floors were waterproofed, the waterproofing would have been taken into the opening of the concealed downpipes. However, I could not check this because of the drain cover had been sealed onto the top of the drain. Have the developer supply a 5 year guarantee for the waterproofing under the tiling of the balconies. See attached waterproofing details from Building Regulation SANS 10400-L 201.
- EG-23 Exterior/Garage:
The automatic opener for the automatic garage door was unplugged. It is not clear why this was unplugged. I do not operate systems that are unplugged as it could be unsafe or damage the door. I recommend having the door checked once the door opener motor is enegised.
- K-6 Kitchen:
The gas hob in the kitchen was not tested. The gas supply was not connected. The hob should be for safe operation once the gas is connected.
- K-7 Kitchen:
The electric oven was not tested. The original packaging was still in the oven. The oven should be tested for safe operation once the packaging is removed.
- B2EB-7 Bedroom 2 En-suite Bathroom:
A the time of the inspection the shower wand and pipe were detached from the water supply and could not be tested.
- E-4 Electrical:
The wiring in the roof spaces was mostly covered with insulation. Only parts of the wiring could be observed.
- FSD-1 Fuel Storage and Distribution:
The gas bottle storage at the exterior on the east side of house appeared to conform to the required standards. The installation should have been fitted by an installer who is registered with the Liquefied Petroleum Gas Safety Association of Southern Africa (LPGAS) and a Gas Certificate of Conformance should be provided to you by the developer.
FUTURE PROJECTS
- R-9 Roof:
Gutters and downpipes had not been provided at the eaves of the tile roofs on the house and garage. Uncontrolled stormwater discharging onto the ground and paving had caused splashing up onto the walls below the roofs. Rainwater splashing up against the walls will cause serious damage to painted and plastered finishes and allow moisture intrusion into the structure of the house and garage. Serious consideration should be given to the installation of a complete system for roof drainage to control and direct rainwater away from the house and garage.
- No gutters and downpipes were installed.
- Note the damp marks on the plastered and painted wall from rainwater splashing up because of the lack of gutters and downpipes.
- Note the damp marks on the face brick wall from rainwater splashing up because of the lack of gutters and downpipes.
- P-15 Plumbing:
The geyser may not be adequately to supply hot water to a 4 bedroom house with 4 en-suite bathrooms, a kitchen and a scullery. The standard geyser for this sized house is 200 litres. A 150 litre geyser will often suffice but is at greater risk of inadequacy. This home had a 150 litre geyser. Another geyser may need to be fitted at a later stage.
Efficiencies
- R-13 Roof:
All of the house's ceiling was insulated with 100 mm insulation. According to SANS 10400-XA more insulation should be added for more for improved energy efficiency. The building regulations require that all new roofs, erected since 11th November 2011, have to conform to the minimum R-Value of roof assembly (ie. all components of the roof and ceiling). The R-Value required in zone 2 is R-3.2 (Pretoria Area). For a roof this equates to around 135 to 150 mm of a typical cellulose fibre insulation (Think Pink, Isotherm, Romatherm etc.) depending on whether it is a tiled or sheeted roof. You would probably require a 135 mm Isotherm (R-value = 3.14). For energy saving and comfort I recommend that the ceilings be insulated to the latest requirements. Have an insulation contractor inspect the roof space and make further recommendations.
- P-18 Plumbing:
The geyser was not wrapped with an insulative blanket as recommended by Eskom to conserve energy.
COMMENTS
- G-1 Grounds:
In general, the surface drainage provided around the buildings appeared to be satisfactory except where addition items are specifically listed.
- G-3 Grounds:
There was generally an adequate difference in elevation between the exterior ground and paving level and the interior floors.
- G-4 Grounds:
The concrete paver driveway leading up to the house and garage was functional.
- G-5 Grounds:
The walkways at various location around the house were mostly functional. Exceptions are specifically listed below.
- G-7 Grounds:
The plastering and paintwork on the boundary and yard walls were generally in a fair condition. Addition items are specifically listed.
- G-9 Grounds:
The stairs leading up to the ground floor of the lounge of the house were functional.
- R-1 Roof:
Roof flashings are used to keep a roofing system water proof where the roofing material starts, stops, changes direction or is penetrated. During inspection, I look for standard flashing techniques that could be considered normal or standard in South Africa. Damaged, incomplete or non-standard flashings can be a sign of a less reliable roofing system and may require repair. Any non-standard flashings noted during inspection will be reported on below if found.
- R-12 Roof:
The concrete tile roof appeared to be in a satisfactory condition.
- R-14 Roof:
The ventilation within the roof space appeared to be adequate.
- SB-1 Structure and Basement:
The structure appeared to consist of a concrete strip foundation which is either reinforced or not depending on the soil founding conditions, with plinth walls built up to the surface bed (concrete floor slab), levelled, backfilled and compacted. The footing size or depth below the ground level could not verified.
- SB-2 Structure and Basement:
The visible portions of the ground floor and 1st floor concrete structure appeared to be in satisfactory condition at the time of the inspection.
- SB-3 Structure and Basement:
The external structure of the house was generally in a satisfactory condition. Additional exceptions are specifically listed.
- EG-1 Exterior/Garage:
The facebrick and plastered and painted wall finish of the residence was generally in a satisfactory condition. Additional exceptions are specifically listed.
- EG-9 Exterior/Garage:
The eaves and gables on the house were in satisfactory condition.
- EG-10 Exterior/Garage:
The tested exterior aluminium doors of the house were functional at the time of the inspection.
- EG-12 Exterior/Garage:
The sliding door in the main bedroom was functional at the time of the inspection.
- EG-19 Exterior/Garage:
The brick and stainless steel balustrades on both balconies were functional. Exceptions and addition items are specifically listed.
- EG-21 Exterior/Garage:
The floor tiling on the 1st floor balconies were in a reasonable condition except where addition items or problems are specifically listed.
- EG-27 Exterior/Garage:
The walls and ceiling of the garage were in a satisfactory condition.
- I-1 Interior:
Where visible, the tile flooring in the house appeared to be functional.
- I-2 Interior:
The interior wall finishes observed in the house were generally functional at the time of the inspection.
- I-3 Interior:
The interior ceiling finishes observed in the house were generally functional at the time of the inspection.
- I-4 Interior:
All BIC exteriors and interiors in the bedrooms and passage were functional.
- I-11 Interior:
The interior doors and frames in the house were functional except where addition items are specifically listed.
- I-14 Interior:
All tested windows were found to be functional at the time of the inspection.
- I-9 Interior:
The stairs and landing leading up to the 1st floor of the house were functional.
- K-1 Kitchen:
The vegetable bowl, mixer and drain point appeared to be functional. The sink was filled and allowed to drain. No leaking was noticeable at the time of the inspection.
- K-2 Kitchen:
The kitchen cabinets were in a good condition. Additional items are specifically listed.
- K-9 Kitchen:
The kitchen was generally in a good condition with a few minor defects.
- S-1 Scullery:
The sink, mixer and drain point appeared to be functional. The sink was filled and allowed to drain. No leaking was noticeable at the time of the inspection.
- S-2 Scullery:
The scullery cabinets were in a good condition.
- S-3 Scullery:
The counter tops in the scullery were in a good condition. Addition items are specifically listed..
- S-6 Scullery:
The scullery was generally in a good condition with a few minor defects. The house was newly built.
- GB-1 Guest Bathroom:
The basin, mixer tap and drain points were functional. The basin was filled and allowed to drain. No leaks were observed.
- GB-3 Guest Bathroom:
The toilet was functional and responded properly when flushed. No leaks were observed st the time of the inspection.
- GB-4 Guest Bathroom:
The bathroom was in a good condition.
- GFEB-1 Ground Floor En-suite Bathroom:
The basin, mixer tap and drain points were functional. The basin was filled and allowed to drain. No leaks were observed.
- GFEB-3 Ground Floor En-suite Bathroom:
The toilet was functional and responded properly when flushed. No leaks were observed.
- GFEB-4 Ground Floor En-suite Bathroom:
The shower mixer tap, shower heads appeared functional. The shower was allowed to run and allowed to drain. No leaking was noticeable at the time of the inspection.
- GFEB-6 Ground Floor En-suite Bathroom:
The shower surround appeared to be watertight and no leaking was observed at the time of the inspection.
- GFEB-9 Ground Floor En-suite Bathroom:
The bathroom was in a good condition with some minor defects that will require attention.
- MEB-2 Main En-suite Bathroom:
The toilet was functional and responded properly when flushed. No leaks were observed.
- MEB-4 Main En-suite Bathroom:
The bath, mixer taps, shower wand and pop-up drain plug and drain were functional. The bath was filled and allowed to drain. No leaking was noticeable at the time of the inspection.
- MEB-6 Main En-suite Bathroom:
The shower mixer tap, shower heads and drain appeared functional. The shower was allowed to run and allowed to drain. No leaking was noticeable at the time of the inspection.
- MEB-9 Main En-suite Bathroom:
The bathroom was in a good condition with some minor defects that will require attention.
- B1EB-1 Bedroom 1 En-suite Bathroom:
The basin, taps and drain points were functional. The basin was filled and allowed to drain. No leaks were observed.
- B1EB-4 Bedroom 1 En-suite Bathroom:
The toilet was functional and responded properly when flushed. No leaks were observed.
- B1EB-6 Bedroom 1 En-suite Bathroom:
The shower mixer tap, shower heads and drain appeared functional. The shower was allowed to run and allowed to drain. No leaking was noticeable at the time of the inspection.
- B1EB-7 Bedroom 1 En-suite Bathroom:
The shower surround appeared to be watertight and no leaking was observed at the time of the inspection.
- B1EB-10 Bedroom 1 En-suite Bathroom:
The bathroom was in a good condition with some minor defects that will require attention.
- B2EB-1 Bedroom 2 En-suite Bathroom:
The basin, mixer tap and drain points were functional. The basin was filled and allowed to drain. No leaks were observed.
- B2EB-2 Bedroom 2 En-suite Bathroom:
The basin shelves and counter was in a good except where addition items or problems are specifically listed.
- B2EB-4 Bedroom 2 En-suite Bathroom:
The toilet was functional and responded properly when flushed. No leaks were observed.
- B2EB-6 Bedroom 2 En-suite Bathroom:
The bath, mixer tap and pop-up drain plug and drain were functional. The bath was filled and allowed to drain. No leaking was noticeable at the time of the inspection.
- B2EB-10 Bedroom 2 En-suite Bathroom:
The bathroom was in a good condition with some minor defects that will require attention.
- E-3 Electrical:
The exterior and interior covers of the main panel were functional.
- E-6 Electrical:
All tested interior and exterior light fixtures and switches of the residence were functional except where additional items are reported.
- E-7 Electrical:
An earth leakage circuit breaker (ELCB) socket tester was used to test plug points. All tested plug points were functional as far as the earthing, swapped phases and neutrals were concerned.
- P-2 Plumbing:
This house had a pressure reducing valve to control high water pressure where the water supply enters the building.
- P-6 Plumbing:
Where visible the drain and vent pipes outside the house appeared to be functional at the time of the inspection.
- P-8 Plumbing:
The temperature and pressure relief valve is arguably one of the most important safety devices in the house. Should the thermostats fail inside the geyser, this allows excess pressure to "blow off," which will prevent catastrophic build up of temperature and pressure which can make geysers explosive.
- P-9 Plumbing:
The TPR valve ( temperature and pressure release valve) at the geyser could not be viewed but a copper discharge pipe could be observed leading to the outside of the building. A discharge pipe could be viewed under the eaves of the house as required, projecting out from the wall. This means that the TPR valve and drain pipe were probably installed as required. The next time you have a plumber around for another job just have him check the TPR valve installation.
- P-10 Plumbing:
The geyser was equipped with a geyser tray that includes a PVC overflow line routed to an approved discharge location as needed to help prevent water damage from a leak.
- P-11 Plumbing:
The vent pipes and vacuum breakers on the geyser were installed to the correct standard. The vent pipes and vacuum breakers on the incoming and discharge sides were visible at the time of the inspection.
- P-12 Plumbing:
A drain valve was installed on the geyser. No leakage was noted.
- P-13 Plumbing:
The hot water supply system included solar water heating equipment, which appeared to be functional.
- P-14 Plumbing:
The water line connectors at the geyser appeared functional. A shut-off valve on the cold water line was installed before the geyser with easy access. This valve which is required by law and is needed as an emergency shut-off.
- P-16 Plumbing:
A geyser isolator could be observed within 1 m from the geyser as required for safety by the Building Regulations.
- P-17 Plumbing:
The electrical connection to the geyser appeared to be satisfactory.
- P-19 Plumbing:
The hose tap above the gulley at the scullery was functional.
- HCFV-1 Heating, Cooling, Fireplaces and Ventilation:
The factory built wood or charcoal burning braai unit had no visible defects. It was a new installation.
Notes
- GC-1 General Comments:
Unless defective items are specifically allocated to rooms or areas they should be regarded as generally defective items that can be found throughout the residence and/or property. In addition, photographs take up a lot of space, therefore, the photographs pertaining to a particular defect do not necessarily include all the photographs or defects of the particular defect identified.
- GC-2 General Comments:
The Occupational Safety Act (85) of 1993 (updated in 2008) requires that all house electrical installations must be installed and repaired under the control of a registered electrician. The act also requires that the property owner must be in possession of a Certificate of Compliance (CoC) at all times for any new installations and changes to wiring of the building. An update document is required every time a property is sold (transferred) and every time an electrical installation is altered. Make sure you get a copy!
- GC-3 General Comments:
An electrical inspection during a home inspection is limited to the list below. Only licensed electricians are permitted to open electrical distribution boards. The visible portion of the distribution board is checked for compliance. Only visible and accessible plug points are checked. Those plug points that are concealed or inaccessible due to stored items, furniture, etc. are not tested or inspected. No Electrical Certificate of Compliance (CoC) is issued for the installation. Only licensed electricians can issue a CoC.
The following is inspected and reported on:
- Loose, exposed or dangerous wiring.
- Dangerous, broken or illegal electrical distribution boards.
- Dangerous and illegal hot water geyser and stove connections and earthing.
- Illegal live points in too close proximity to water in the bathrooms or kitchens.
- Missing, damaged or broken plug sockets and earthing, neutral and live wire faults on plug circuits.
- Missing cover plates on junction boxes, light switches and electrical plug points.
- Missing, incomplete or broken light fittings and switches.
- Space heating and cooling fixtures.
- Electric fences (visual inspection only).
- Automated gate and garage door motors.
- Swimming pool and spa sub DB boards.
- Built in electrical appliances such as extractors, stoves, ovens and stove hobs.
- GC-4 General Comments:
A Gas Certificate of Conformity must be obtained for each gas installation, modification or alteration. This very important especially if there is a fire or explosion as your insurance may not pay out if these certificates are not available.
- GC-5 General Comments:
It is always wise to get plans from the developer and to do a visual due diligence to ensure that the approved plans correspond with the “as built” structures on the property. By law, property owners in South Africa have to ensure that all the buildings on their properties are on the plan and that the plans have been approved by the relevant local authorities and comply with Building Regulations. It is important to have the approved plans for the property and any extensions and renovations. Final approval of the building(s) is in the form of an Occupation Certificate which is issued by the building control element of the municipality to certify that the construction or extensions and renovations have been executed in accordance with the approved drawings. The Building Regulations apply to all buildings within the borders of South Africa.
- GC-6 General Comments:
Your developer, according to law, must be registered with the National Home Builders Registration Council (NHBRC) to build your home. Your new home must also be registered with the NHBRC. Ask your developer for a copy of the registration certificate. The NHBRC Warranty Fund was established to cover consumers against major and defined structural defects for a period of up to five years. Enrolling new homes with the NHBRC is not only a statutory requirement but also affords consumers protection against contractors who deliver substandard design, workmanship and poor quality materials.
As a housing consumer you have the right to:
• Within 90 days of taking occupation instruct the developer to contract to rectify, at his own expense, any deficiency related to workmanship and materials.
• Within 12 months, instruct the developer to repair roof leaks attributable to workmanship, design or materials.
• Within 5 years, instruct the developer to rectify major structural defects identified in the home which have been caused by non-compliance to technical building standards.
In the event that a developer is unable or unwilling to rectify reported defects, the NHBRC can rectify the defects, following the completion by you, the consumer, of a complaint and conciliation process. - GC-7 General Comments:
Any waterproofing system that was installed on the house which forms part of the roof over the building must be done by a “competent person” who must install the waterproofing according to the manufacturer’s instructions. The Building Regulations (SANS 10400-L) states that for roofs and balconies to be up to standard, they must remain watertight for at least five years without the need for any form of maintenance other than the normal cleaning of downpipes, gutters and so on. It is also important that the person who did the installation was satisfied that the materials used were appropriate for the particular application, and should therefore have taken into account the degree of exposure the waterproofing system will be subjected to, how much protection the waterproofing material will afford and how it affects the building because of where it is located. Make sure that the developer provides you with a certificate of guarantee for material and workmanship for at least 5 years from date of occupation or installation if installed after occupation.
- GC-8 General Comments:
In new buildings where appliances are provided by the developer they are normally guaranteed by the manufacture or supplier for a minimum of a year. Ask your builder/developer for a copy of the guarantee and invoice.
These may include the following:
- Geysers, solar assisted geyser and heat pumps.
- Stove, hobs and ovens.
- Automatic garage doors.
- Air conditioners.
- Any other appliances such as dishwashers, washing machines and clothes dryers etc.
- R-11 Roof:
There was a trapdoor opening in the ceiling in bedroom 1's bathroom en-suite that was entered in order to evaluate the roof space areas and components. I inspected the roof space as best as I possibly could from all accessible vantage points at the trapdoor. However, I do not try to enter a roof area that is less than 900 mm high, or where passage is restricted by framing, distribution ducting, etc., nor will I attempt to access any areas where suitable crawl boards are not installed. I do not enter a trap door that is smaller than the standard 600 mm x 600 mm size.
- GFEB-8 Ground Floor En-suite Bathroom:
Bathroom ventilation is important to prevent mould from forming. Moisture and condensation collects on the ceilings and walls from the lack of sufficient ventilation in bathrooms, creating an ideal situation for the formation of mould. I suggest that the door and windows be left open to provide through ventilation to disperse the steam and condensation resulting from showering.
- MEB-8 Main En-suite Bathroom:
Bathroom ventilation is important to prevent mould from forming. Moisture and condensation collects on the ceilings and walls from the lack of sufficient ventilation in bathrooms, creating an ideal situation for the formation of mould. I suggest that the door and windows be left open to provide through ventilation to disperse the steam and condensation resulting after showering and bathing.
- B1EB-9 Bedroom 1 En-suite Bathroom:
Bathroom ventilation is important to prevent mould from forming. Moisture and condensation collects on the ceilings and walls from the lack of sufficient ventilation in bathrooms, creating an ideal situation for the formation of mould. I suggest that the door and windows be left open to provide through ventilation to disperse the steam and condensation resulting after showering.
- B2EB-9 Bedroom 2 En-suite Bathroom:
Bathroom ventilation is important to prevent mould from forming. Moisture and condensation collects on the ceilings and walls from the lack of sufficient ventilation in bathrooms, creating an ideal situation for the formation of mould. I suggest that the door and windows be left open to provide through ventilation to disperse the steam and condensation resulting after showering.
- E-1 Electrical:
The main electricity disconnect circuit breaker is located on the distribution board.
- E-10 Electrical:
The earth leakage circuit breaker at the main panel responded to its test button. An earth leakage circuit breaker (ELCB) socket tester was used to trip the earth leakage circuit breaker. The breaker tripped at 30 mA as required.
- P-1 Plumbing:
This shows the location of the main water shutoff located on the east side of the house.
- P-5 Plumbing:
I test the drain, waste and vent (DWV) system by running water through every fixture drain and watching for blockages or slow drains. Fixture blockages become quickly evident and can usually be cured by clearing out the traps. However, if the main drain line is blocked or damaged, there is a very strong chance that it will not become apparent during the course of my inspection, and for this reason I strongly recommend that you have it checked by an appropriately qualified plumber to determine its present condition.
General Comments
Building Characteristics, Conditions and Limitations
Unless defective items are specifically allocated to rooms or areas they should be regarded as generally defective items that can be found throughout the residence and/or property. In addition, photographs take up a lot of space, therefore, the photographs pertaining to a particular defect do not necessarily include all the photographs or defects of the particular defect identified.
The Occupational Safety Act (85) of 1993 (updated in 2008) requires that all house electrical installations must be installed and repaired under the control of a registered electrician. The act also requires that the property owner must be in possession of a Certificate of Compliance (CoC) at all times for any new installations and changes to wiring of the building. An update document is required every time a property is sold (transferred) and every time an electrical installation is altered. Make sure you get a copy!
An electrical inspection during a home inspection is limited to the list below. Only licensed electricians are permitted to open electrical distribution boards. The visible portion of the distribution board is checked for compliance. Only visible and accessible plug points are checked. Those plug points that are concealed or inaccessible due to stored items, furniture, etc. are not tested or inspected. No Electrical Certificate of Compliance (CoC) is issued for the installation. Only licensed electricians can issue a CoC.
The following is inspected and reported on:
- Loose, exposed or dangerous wiring.
- Dangerous, broken or illegal electrical distribution boards.
- Dangerous and illegal hot water geyser and stove connections and earthing.
- Illegal live points in too close proximity to water in the bathrooms or kitchens.
- Missing, damaged or broken plug sockets and earthing, neutral and live wire faults on plug circuits.
- Missing cover plates on junction boxes, light switches and electrical plug points.
- Missing, incomplete or broken light fittings and switches.
- Space heating and cooling fixtures.
- Electric fences (visual inspection only).
- Automated gate and garage door motors.
- Swimming pool and spa sub DB boards.
- Built in electrical appliances such as extractors, stoves, ovens and stove hobs.
A Gas Certificate of Conformity must be obtained for each gas installation, modification or alteration. This very important especially if there is a fire or explosion as your insurance may not pay out if these certificates are not available.
It is always wise to get plans from the developer and to do a visual due diligence to ensure that the approved plans correspond with the “as built” structures on the property. By law, property owners in South Africa have to ensure that all the buildings on their properties are on the plan and that the plans have been approved by the relevant local authorities and comply with Building Regulations. It is important to have the approved plans for the property and any extensions and renovations. Final approval of the building(s) is in the form of an Occupation Certificate which is issued by the building control element of the municipality to certify that the construction or extensions and renovations have been executed in accordance with the approved drawings. The Building Regulations apply to all buildings within the borders of South Africa.
Your developer, according to law, must be registered with the National Home Builders Registration Council (NHBRC) to build your home. Your new home must also be registered with the NHBRC. Ask your developer for a copy of the registration certificate. The NHBRC Warranty Fund was established to cover consumers against major and defined structural defects for a period of up to five years. Enrolling new homes with the NHBRC is not only a statutory requirement but also affords consumers protection against contractors who deliver substandard design, workmanship and poor quality materials.
As a housing consumer you have the right to:
• Within 90 days of taking occupation instruct the developer to contract to rectify, at his own expense, any deficiency related to workmanship and materials.
• Within 12 months, instruct the developer to repair roof leaks attributable to workmanship, design or materials.
• Within 5 years, instruct the developer to rectify major structural defects identified in the home which have been caused by non-compliance to technical building standards.
In the event that a developer is unable or unwilling to rectify reported defects, the NHBRC can rectify the defects, following the completion by you, the consumer, of a complaint and conciliation process.
Any waterproofing system that was installed on the house which forms part of the roof over the building must be done by a “competent person” who must install the waterproofing according to the manufacturer’s instructions. The Building Regulations (SANS 10400-L) states that for roofs and balconies to be up to standard, they must remain watertight for at least five years without the need for any form of maintenance other than the normal cleaning of downpipes, gutters and so on. It is also important that the person who did the installation was satisfied that the materials used were appropriate for the particular application, and should therefore have taken into account the degree of exposure the waterproofing system will be subjected to, how much protection the waterproofing material will afford and how it affects the building because of where it is located. Make sure that the developer provides you with a certificate of guarantee for material and workmanship for at least 5 years from date of occupation or installation if installed after occupation.
In new buildings where appliances are provided by the developer they are normally guaranteed by the manufacture or supplier for a minimum of a year. Ask your builder/developer for a copy of the guarantee and invoice.
These may include the following:
- Geysers, solar assisted geyser and heat pumps.
- Stove, hobs and ovens.
- Automatic garage doors.
- Air conditioners.
- Any other appliances such as dishwashers, washing machines and clothes dryers etc.
Grounds
Gradients, Drainage and Elevations
Clearance to Landscaping: Standard
Downpipe Discharge: Above grade
Drainage Spouts Discharge: Onto paving
Site Description: Moderate slope
In general, the surface drainage provided around the buildings appeared to be satisfactory except where addition items are specifically listed.
Most of the drainage holes through the boundary wall on the west side of the property were partially blocked by plant growth or soil. The drainage holes should be unblocked and exposed so that stormwater does not pond against the boundary wall.
 |  |
 |  |
There was generally an adequate difference in elevation between the exterior ground and paving level and the interior floors.
Driveways, Walkways and Flatwork
Driveway: Pavers
Walkways: Pavers
Patios: Tile
The concrete paver driveway leading up to the house and garage was functional.
The walkways at various location around the house were mostly functional. Exceptions are specifically listed below.
The lack of gutters and inadequate roof overhang had allowed rainwater falling off the roof to remove the paving joints in the paving and against the walls of the buildings. Cleaning out and grouting of the joints with plaster sand and cement mixture was required against the walls to prevent moisture from entering around the foundation and pooling in the cracks and resulting in rising damp.
- The joints will need to be cleaned out for a depth the same as the depth of the paving bricks before being grouted up with mortar.
- After the joints are cleaned out the mortar grout should be finished off at the same level as the paving.
- Here the soil between the wall and paving had been scoured away by the rainwater falling off the roof above allowing the rainwater to enter here. Care will have to be taken with the usage of the garden tap to prevent rising damp here!
- This moisture damage to the plaster work was caused by a combination of rain running down the face of the building and the pooling of rainwater in the gap between the paving and the wall. This was a start of a problem that will be widespread if the joint between the paving and house is not adequately sealed.

Boundary Walls, Yard Walls and Fences
Boundary Walls/Fencing: Present (Plastered and painted)
Yard/Courtyard Walls: Present (Plastered and painted, Dry stack stone cladding)
The plastering and paintwork on the boundary and yard walls were generally in a fair condition. Addition items are specifically listed.
The top of the plastered and painted yard and boundary walls were not waterproofed. Normally the tops of free standing walls should have a capping or be waterproofed with a waterproofing system to prevent moisture penetration into the walls. With plastered walls the plasterwork on top of the walls often cracks allowing the passage of water into the walls. The control joints in walls were not sealed with a mastic or silicon sealer to prevent moisture intrusion into the walls and moisture damage to the painted and plastered wall. Have the joints sealed as a preventative measure and the top of the walls waterproofed to prevent falling damp and any moisture damage to the walls. An acrylic waterproofing system is normally used.
- Typical unsealed control joint that has cracked at the joint which will allow moisture into the structure of the wall.
- This crack will allow falling damp to occur in the wall.
- The top of the wall was not waterproofed nor was the top joint of the expansion joint sealed.
- Typical unsealed top and side of a control joint that has cracked at the joint This joint will allow moisture into the structure of the wall.
- Some sort of membrane was placed horizontally. This may render the wall unstable. The wall should be monitored as this may become an unsafe condition.
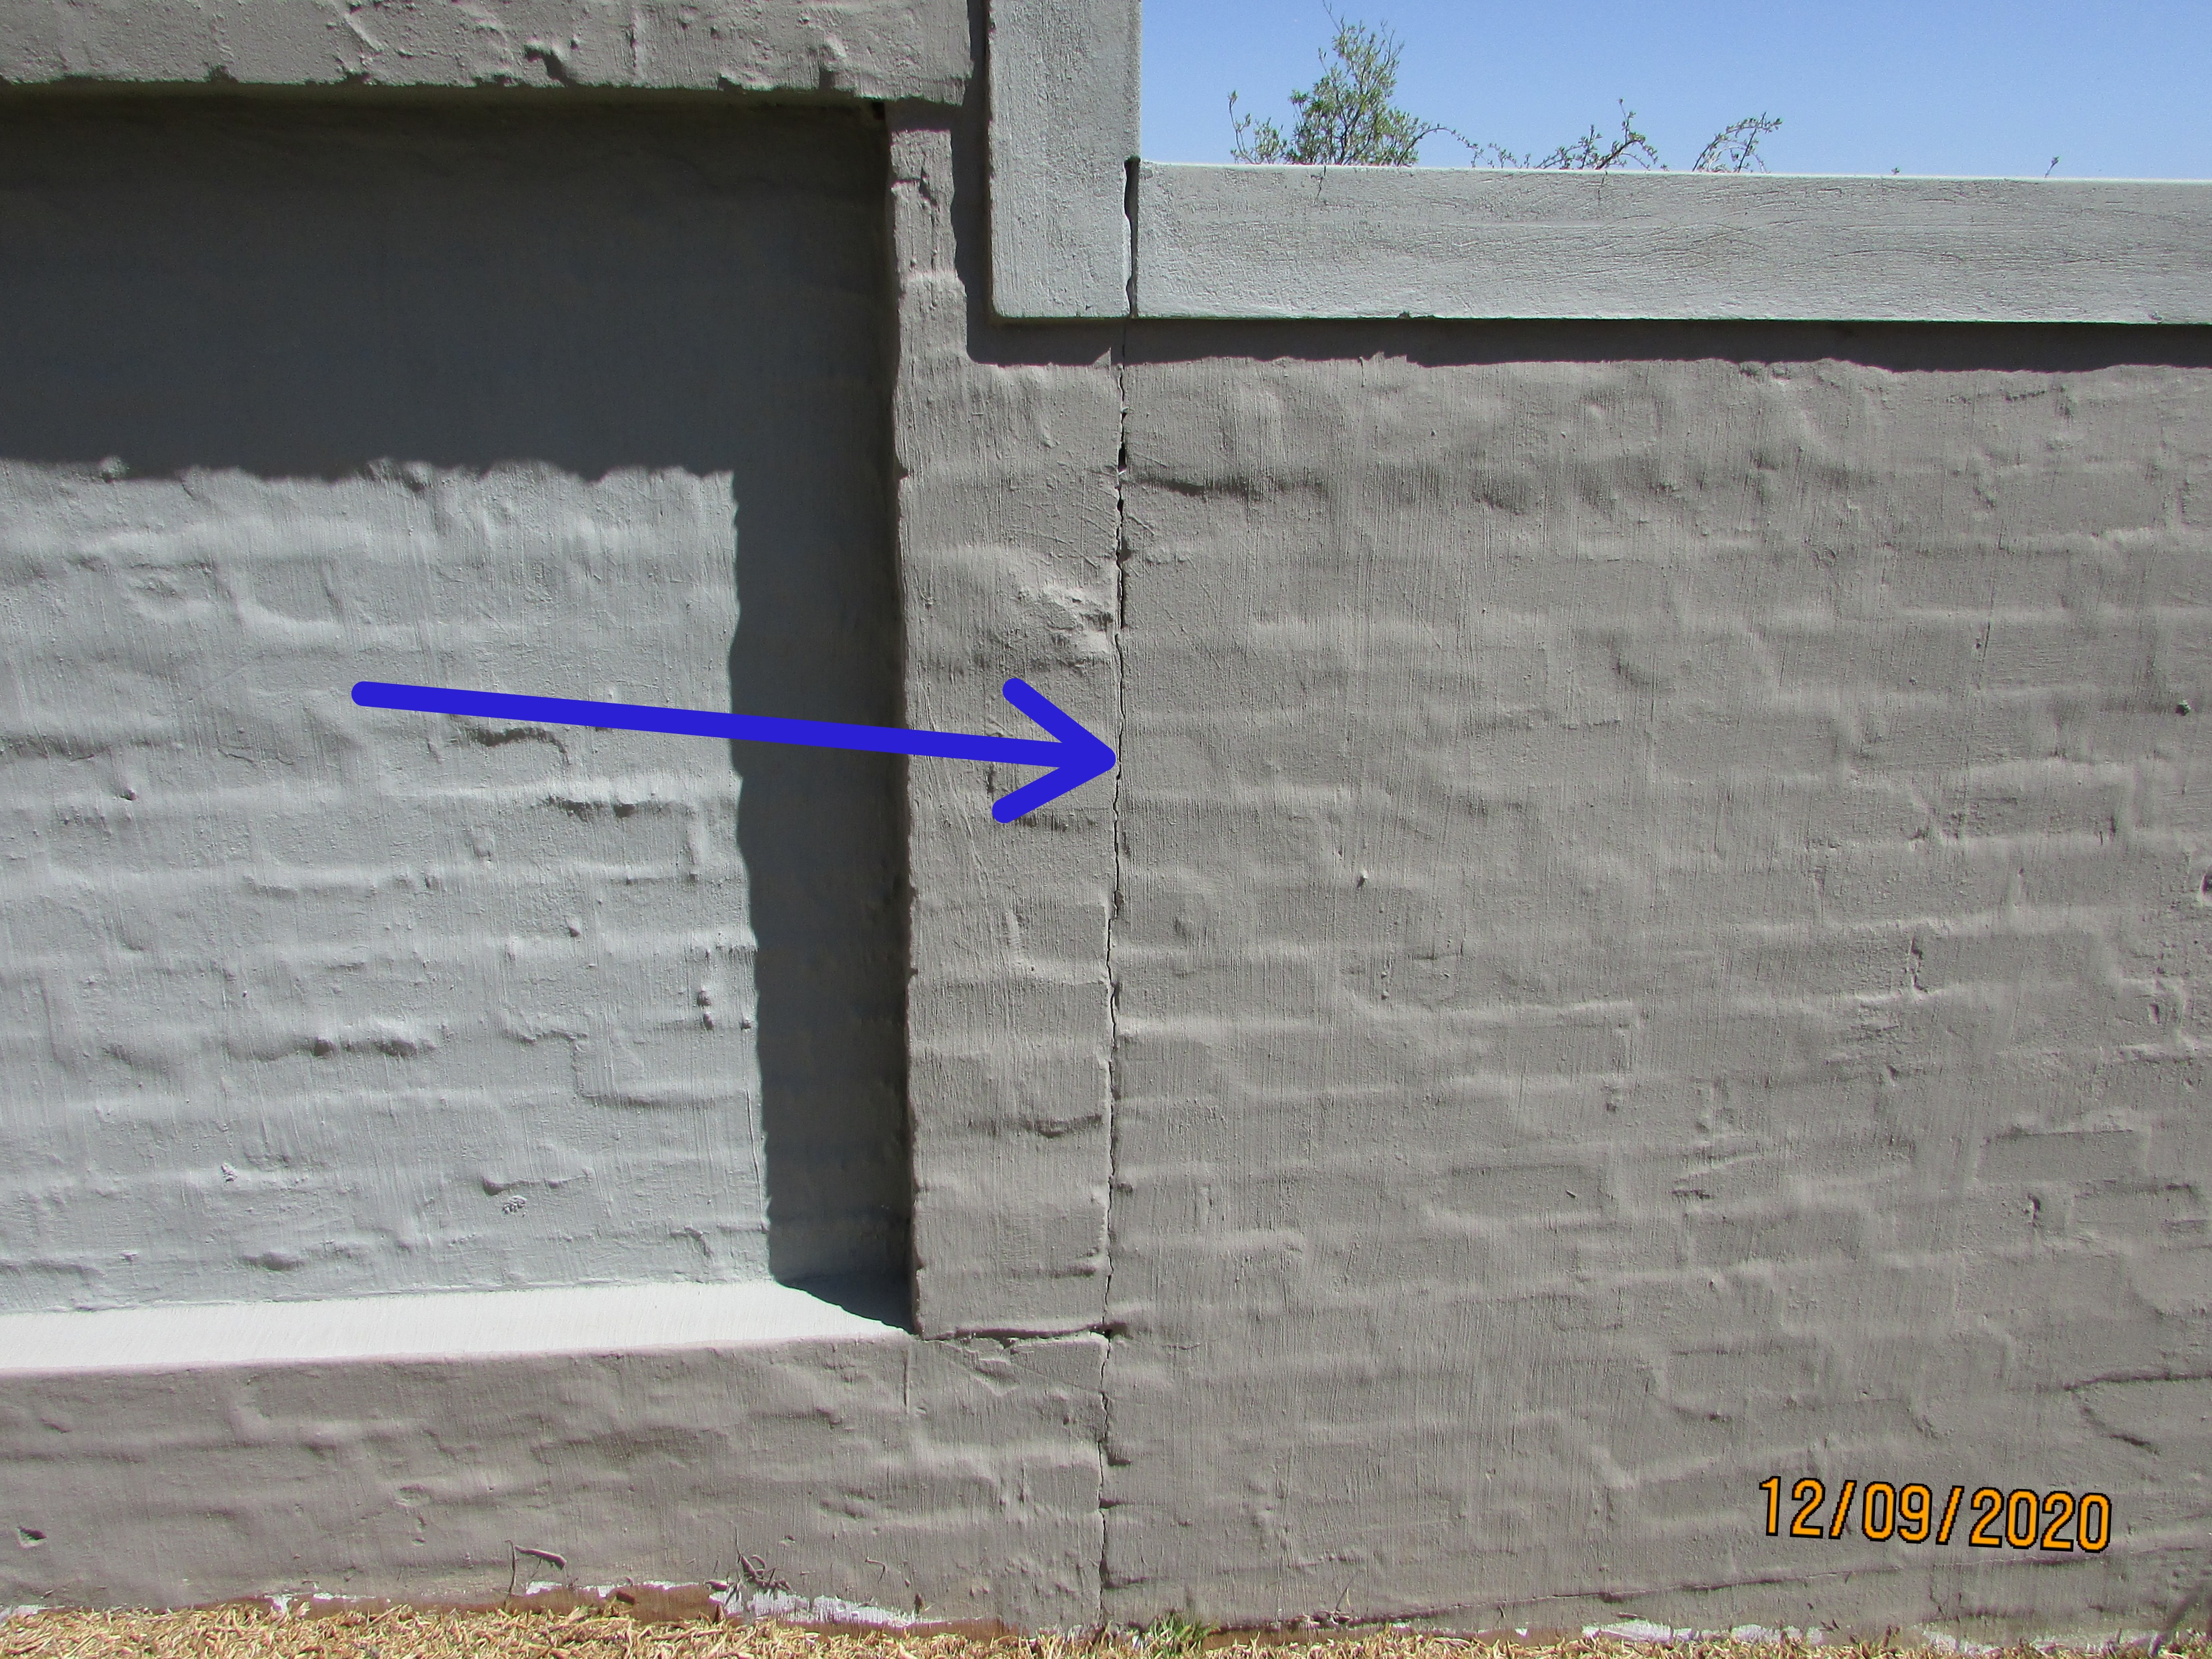

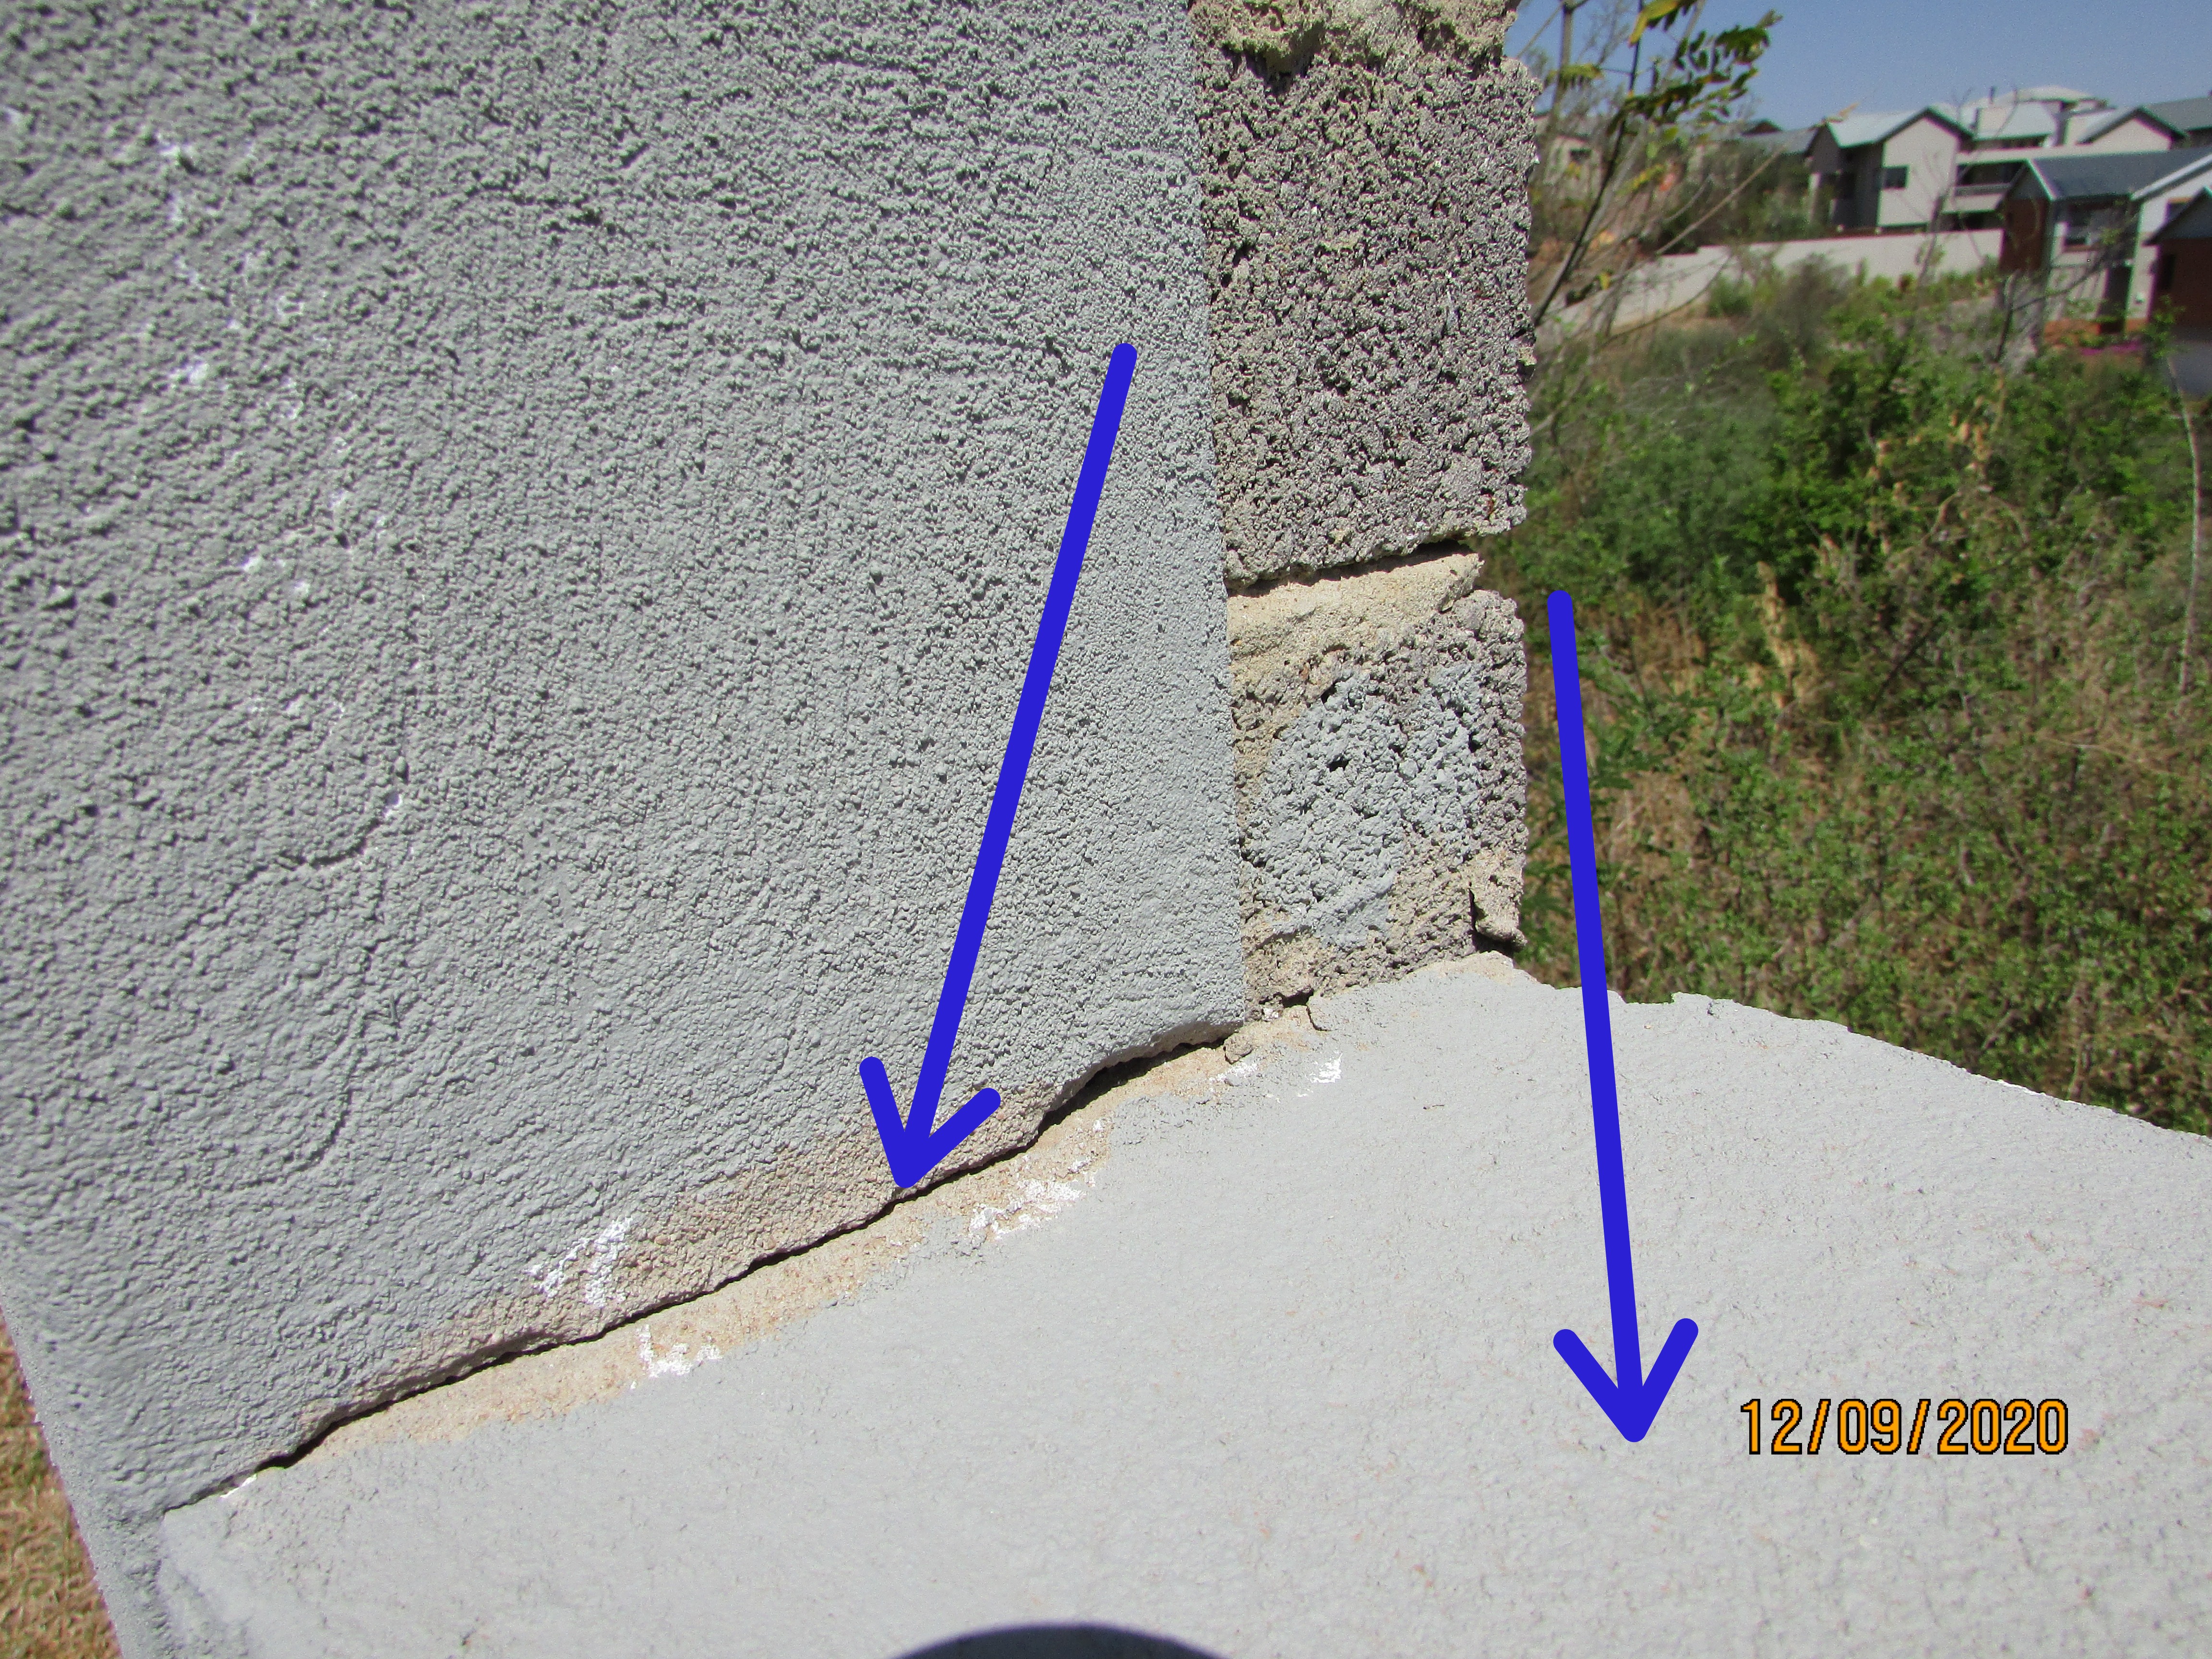
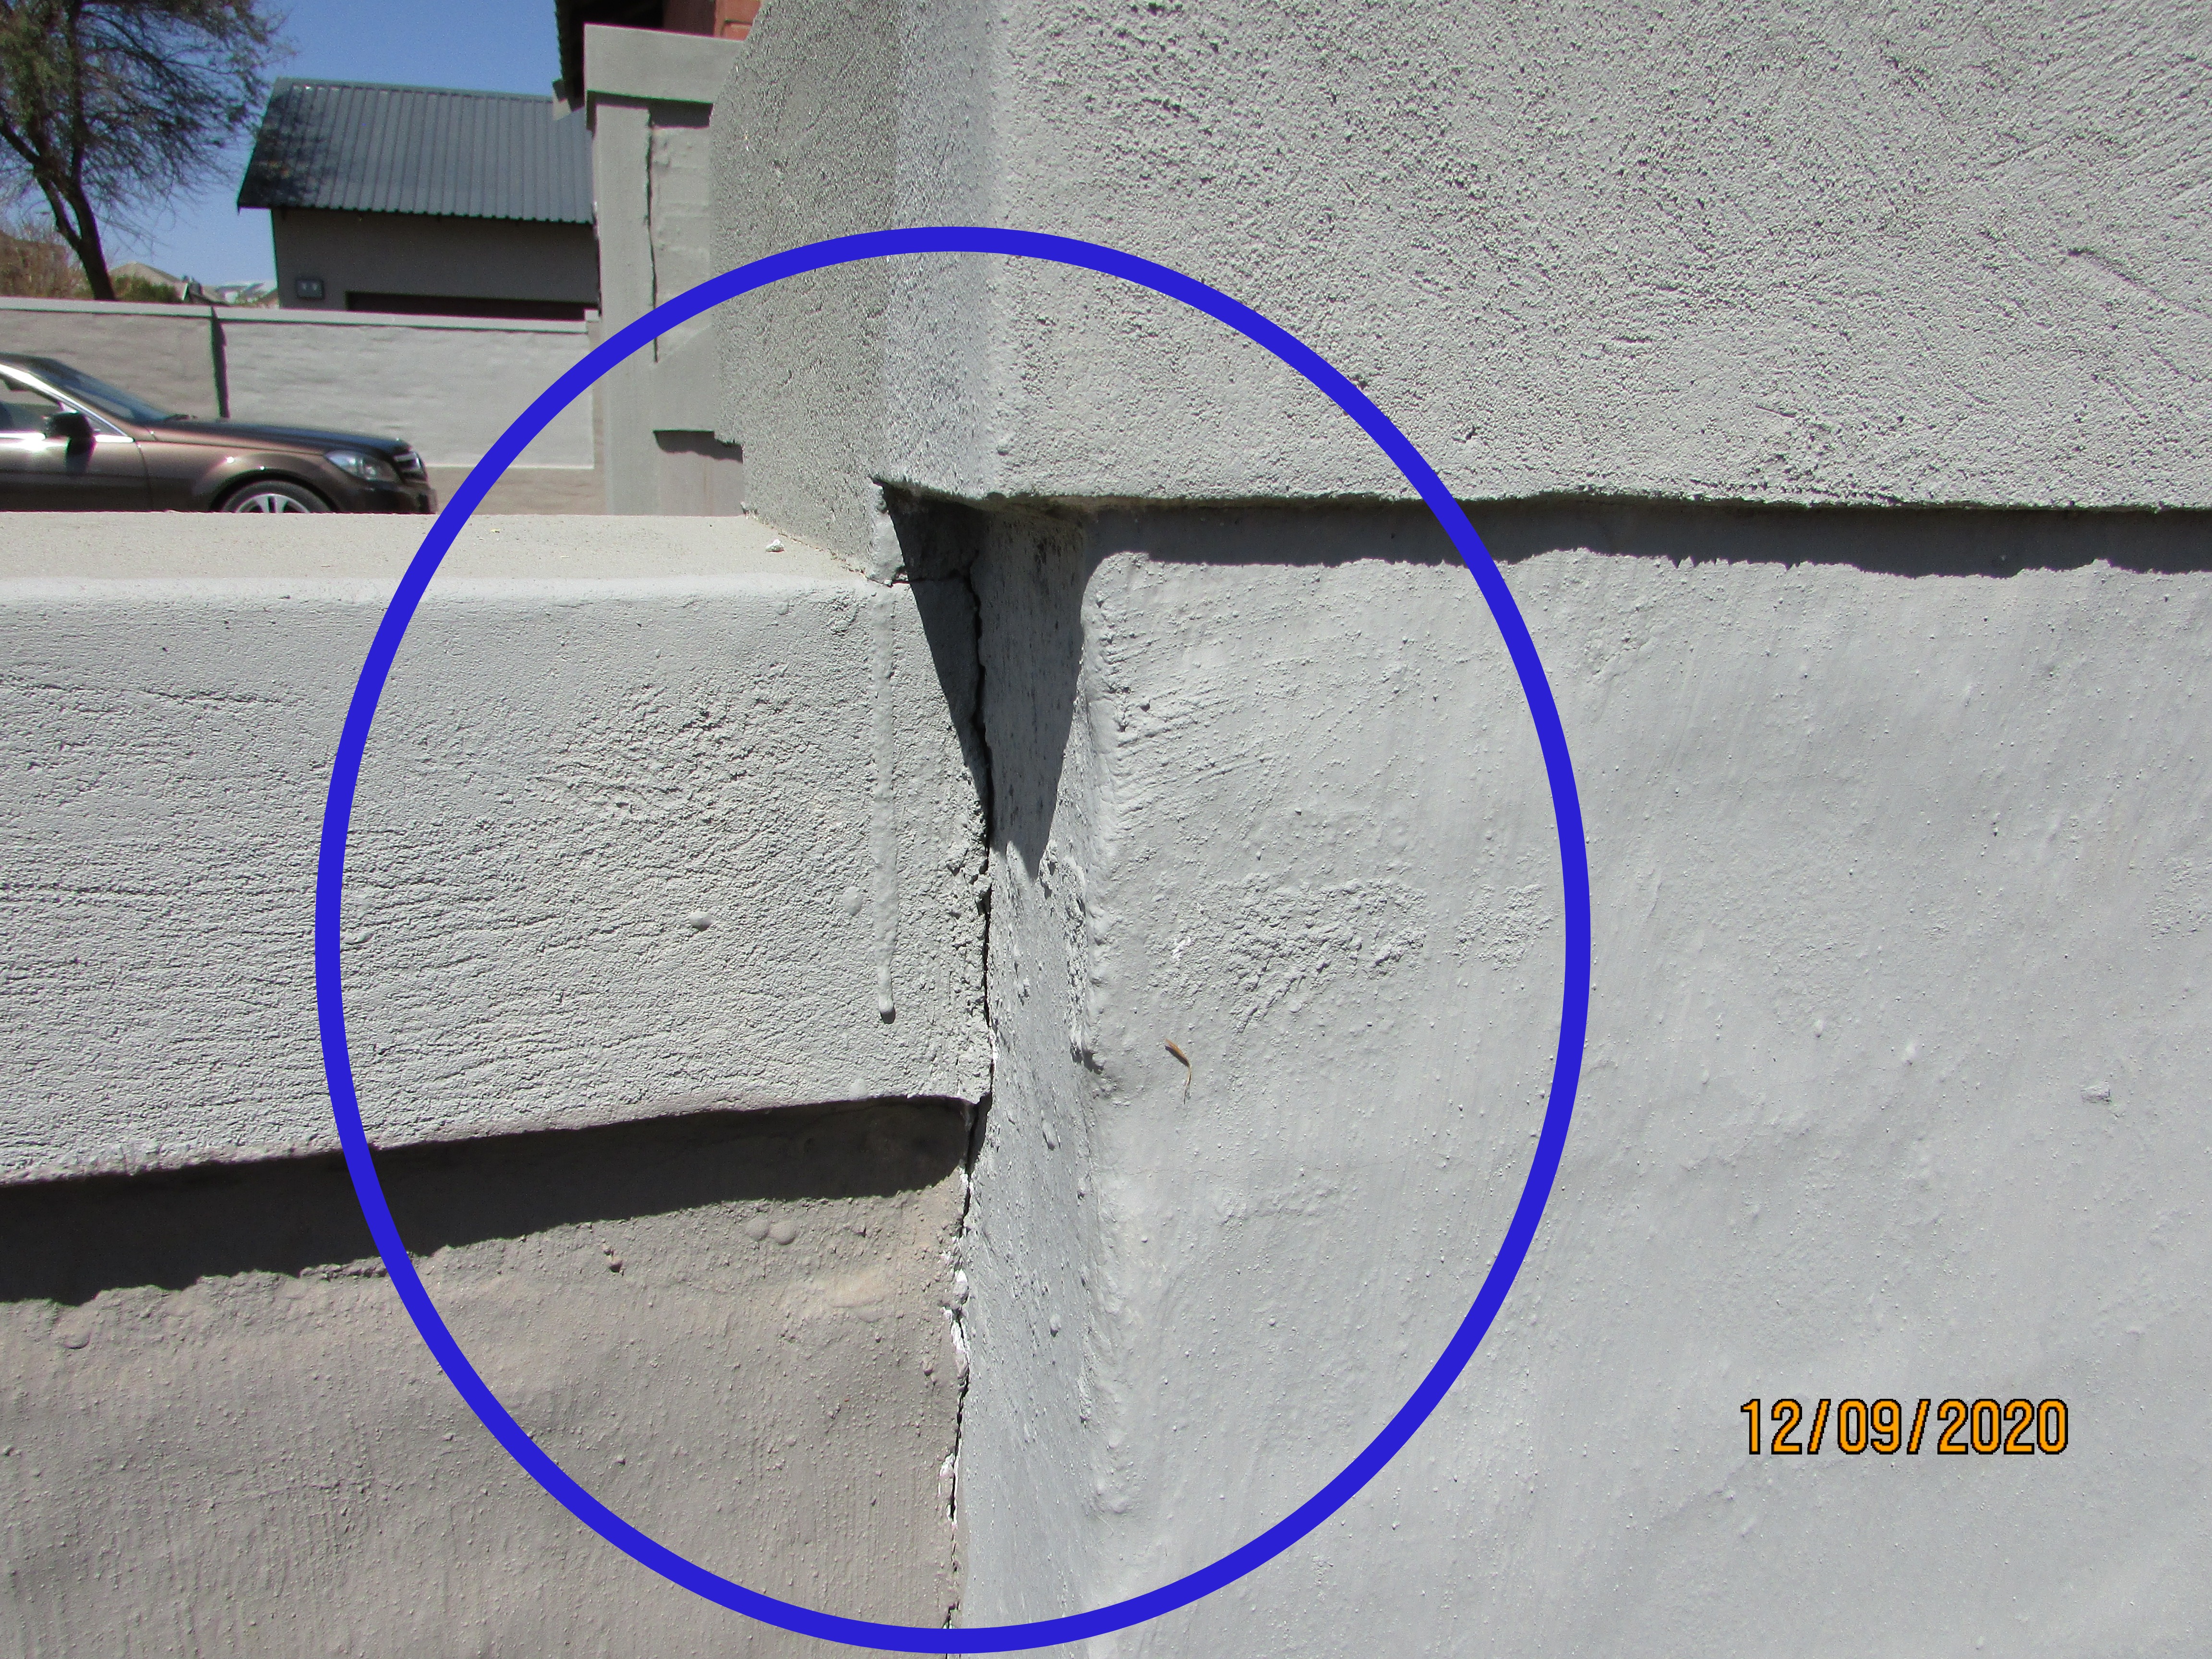
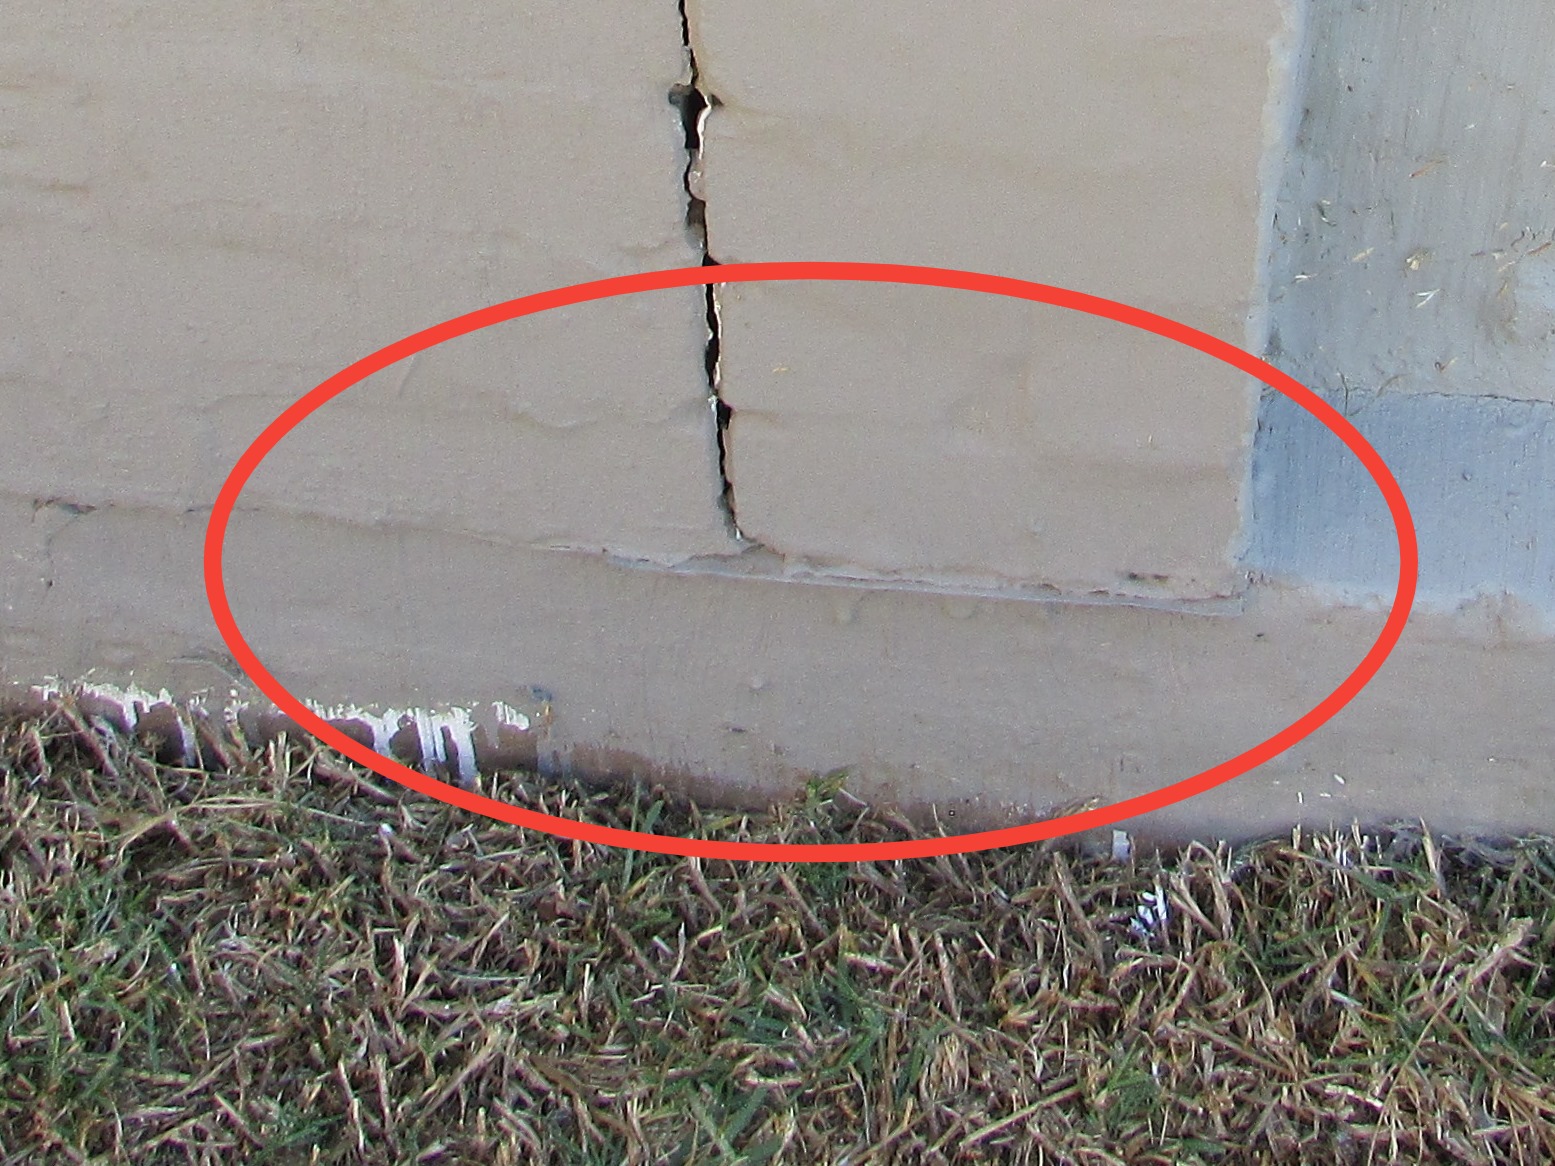
Exterior Stairs
The stairs leading up to the ground floor of the lounge of the house were functional.
Roof
Roofing
Method of Roof Inspection: Viewed from the ground and 1st floor
Roof Style: Gable, Waterproofed concrete roof slab
Flashings: Present and Visually Standard
Roof Covering Materials: Torch-down, Clay/concrete tiles
Approximate Age of Roof Covering: New
Roof Underlay: No
Roof flashings are used to keep a roofing system water proof where the roofing material starts, stops, changes direction or is penetrated. During inspection, I look for standard flashing techniques that could be considered normal or standard in South Africa. Damaged, incomplete or non-standard flashings can be a sign of a less reliable roofing system and may require repair. Any non-standard flashings noted during inspection will be reported on below if found.
The sidewall flashings on the house were mostly installed with an acrylic membrane waterproofing system. There is an increasing trend in South Africa for builders and roofers to use “cheap and easy” acrylic membrane as a roofing flashing. This is seldom completely satisfactory as the end result is not as durable, or attractive, as professionally installed metal undertile flashing. The acrylic flashings should be monitored for deterioration (white spots) as it has a limited lifespan (±5 years depending on exposure to climatic conditions). I recommend that you have these flashing evaluated by an appropriately qualified roofing contractor for further remarks and recommendations.
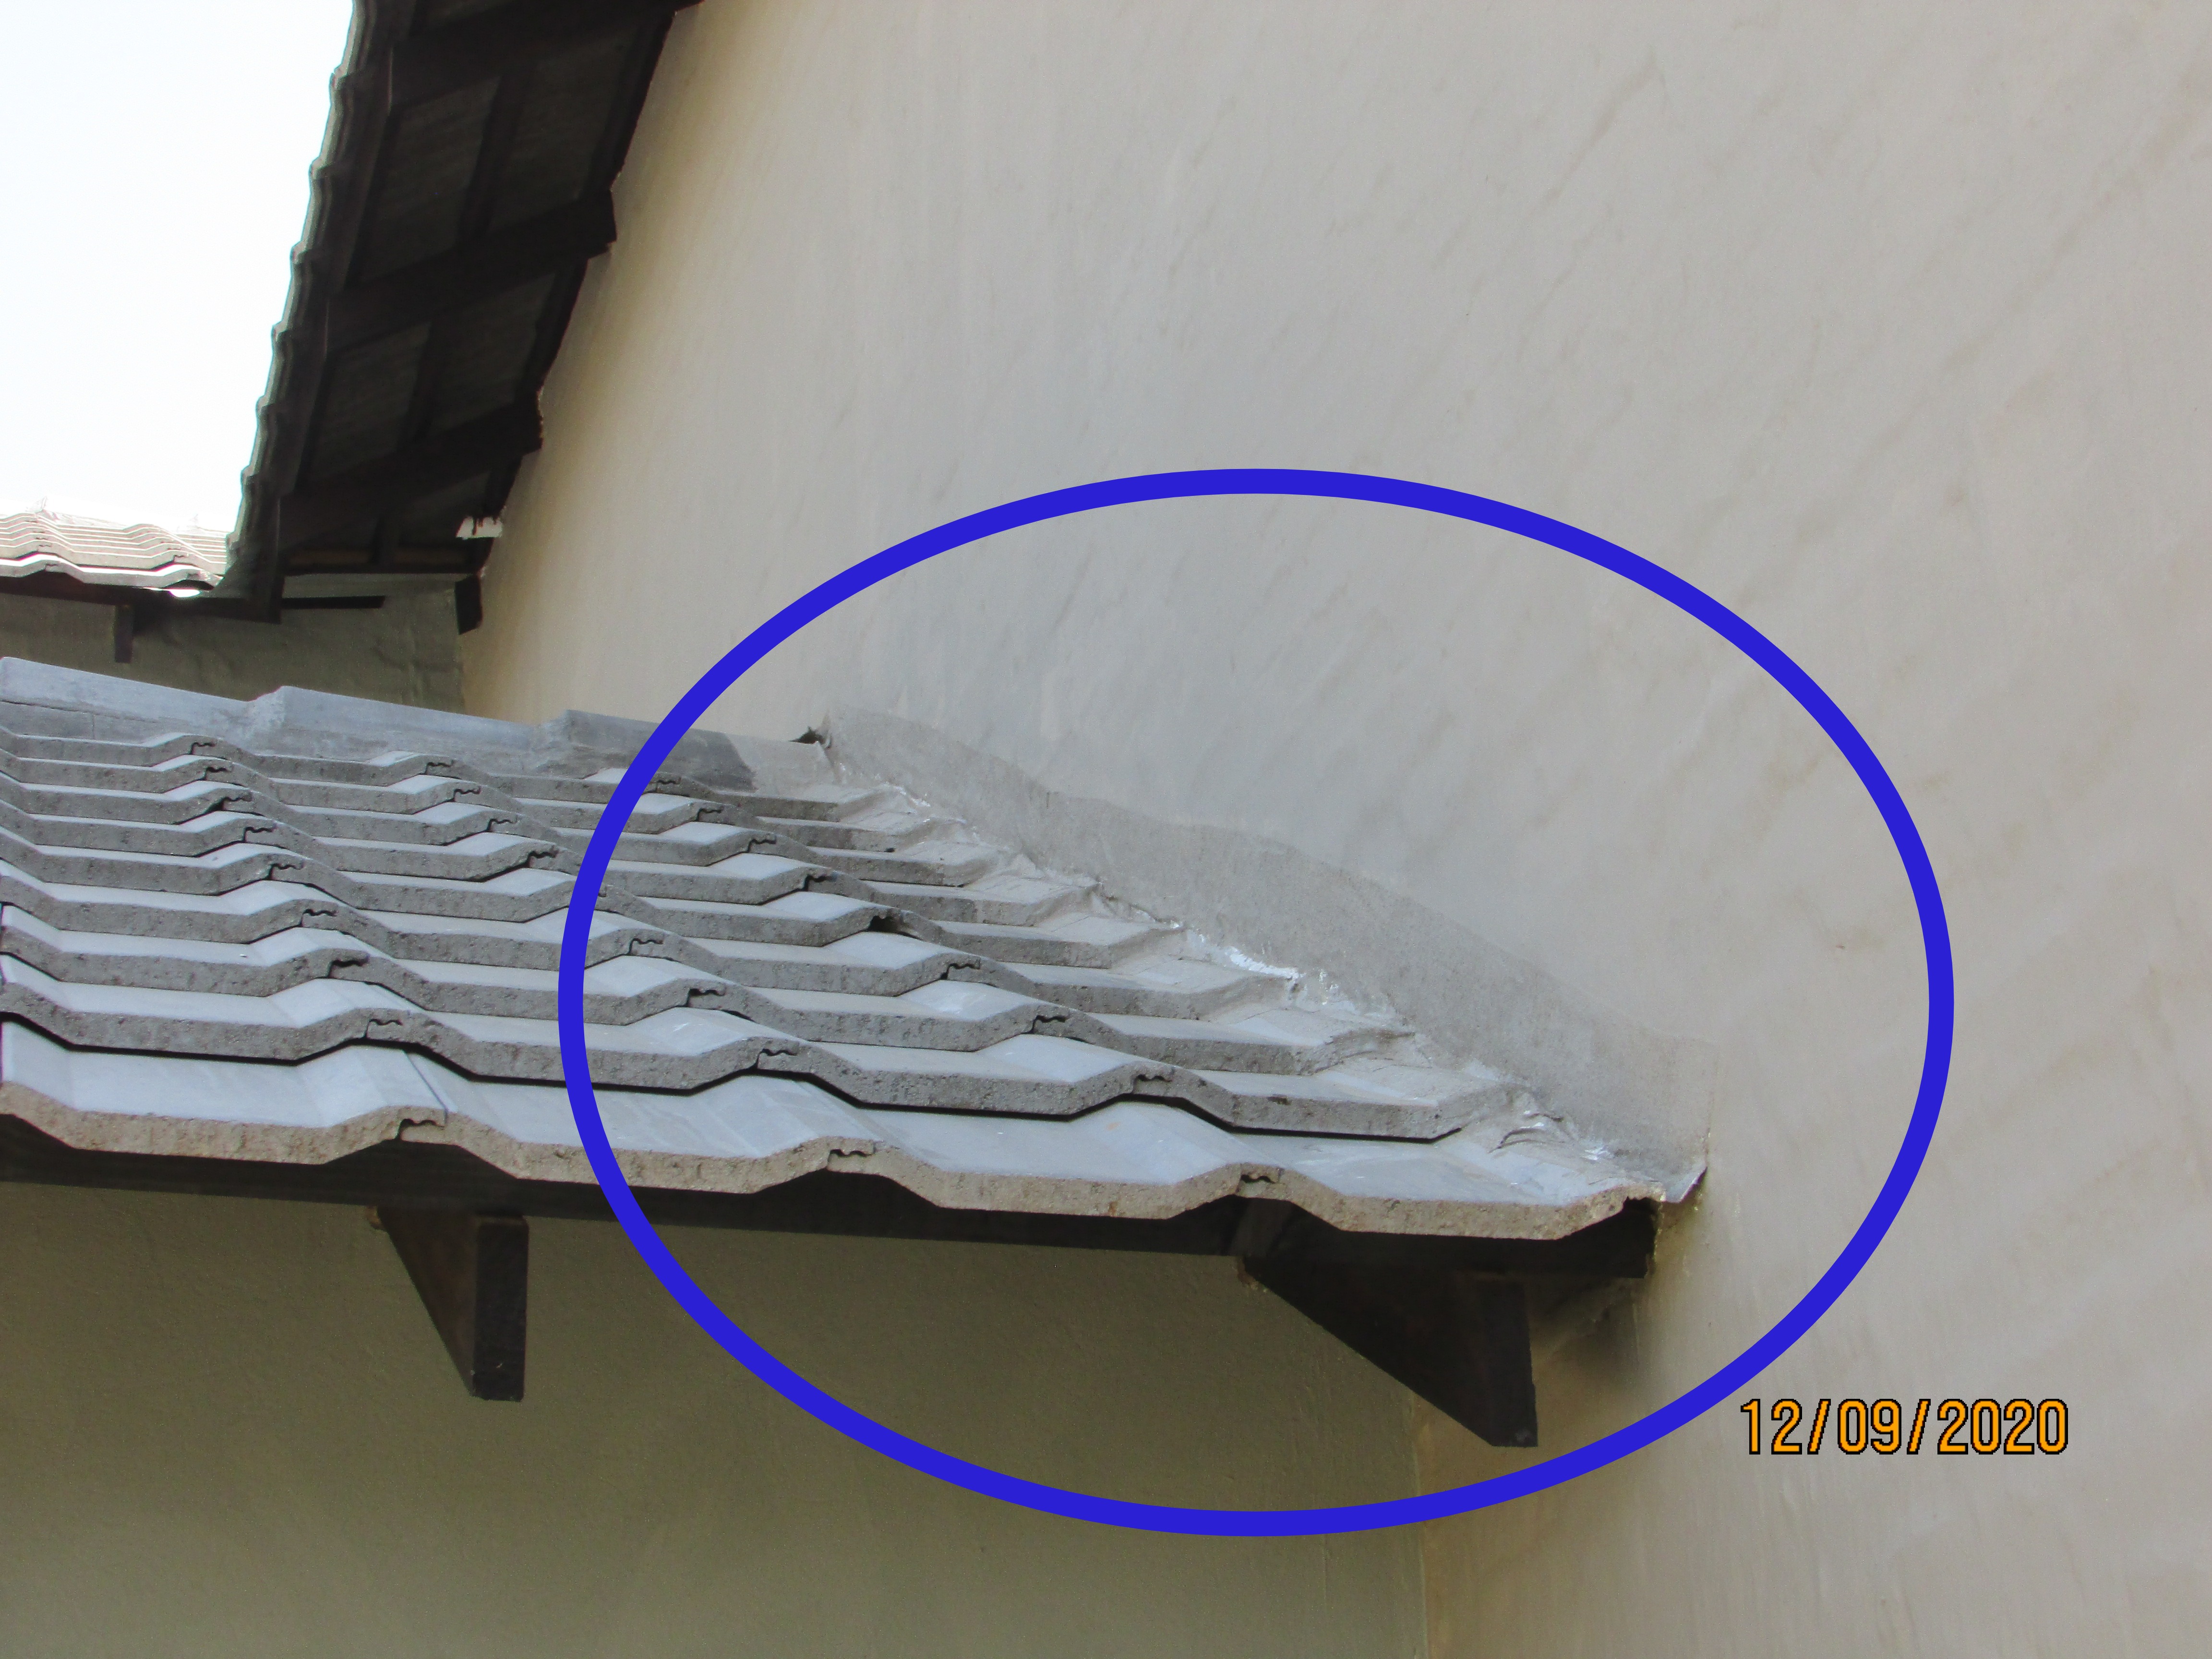
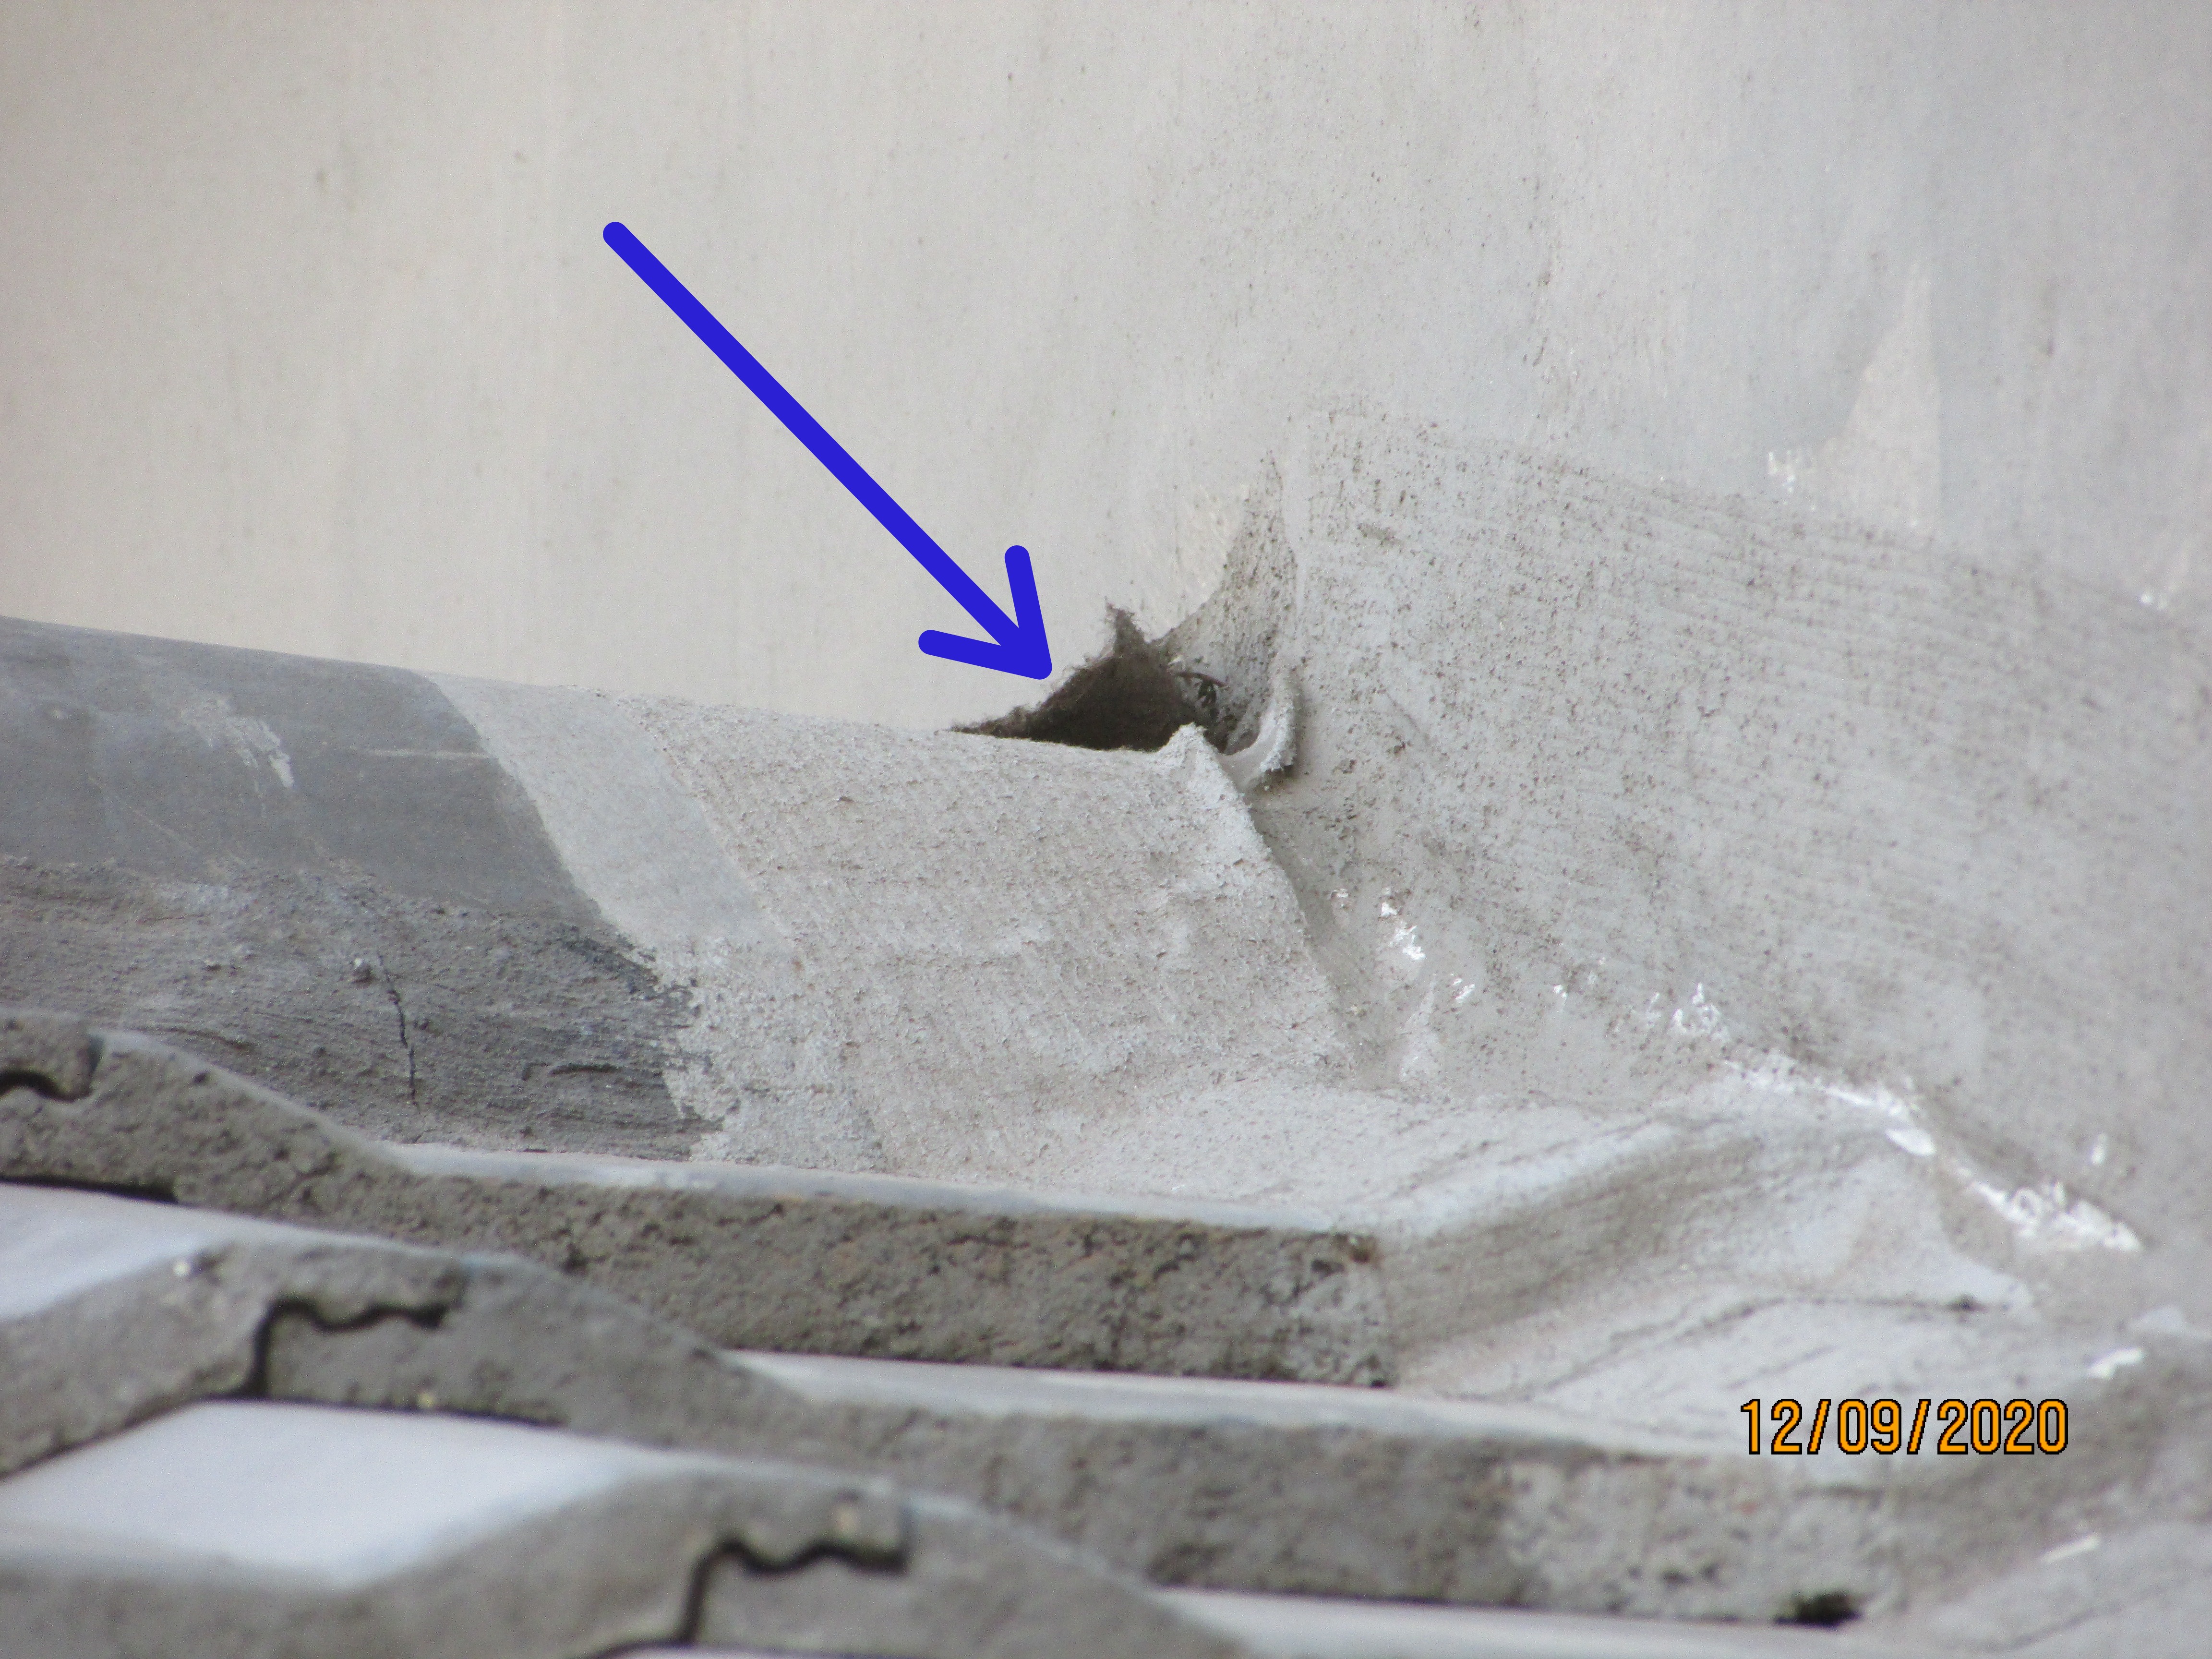
There were several chipped tiles on the tiled roof that required replacement. The whole of the tiled roof should be checked. I recommend that the tiles are replaced by an appropriately qualified roof tiler.
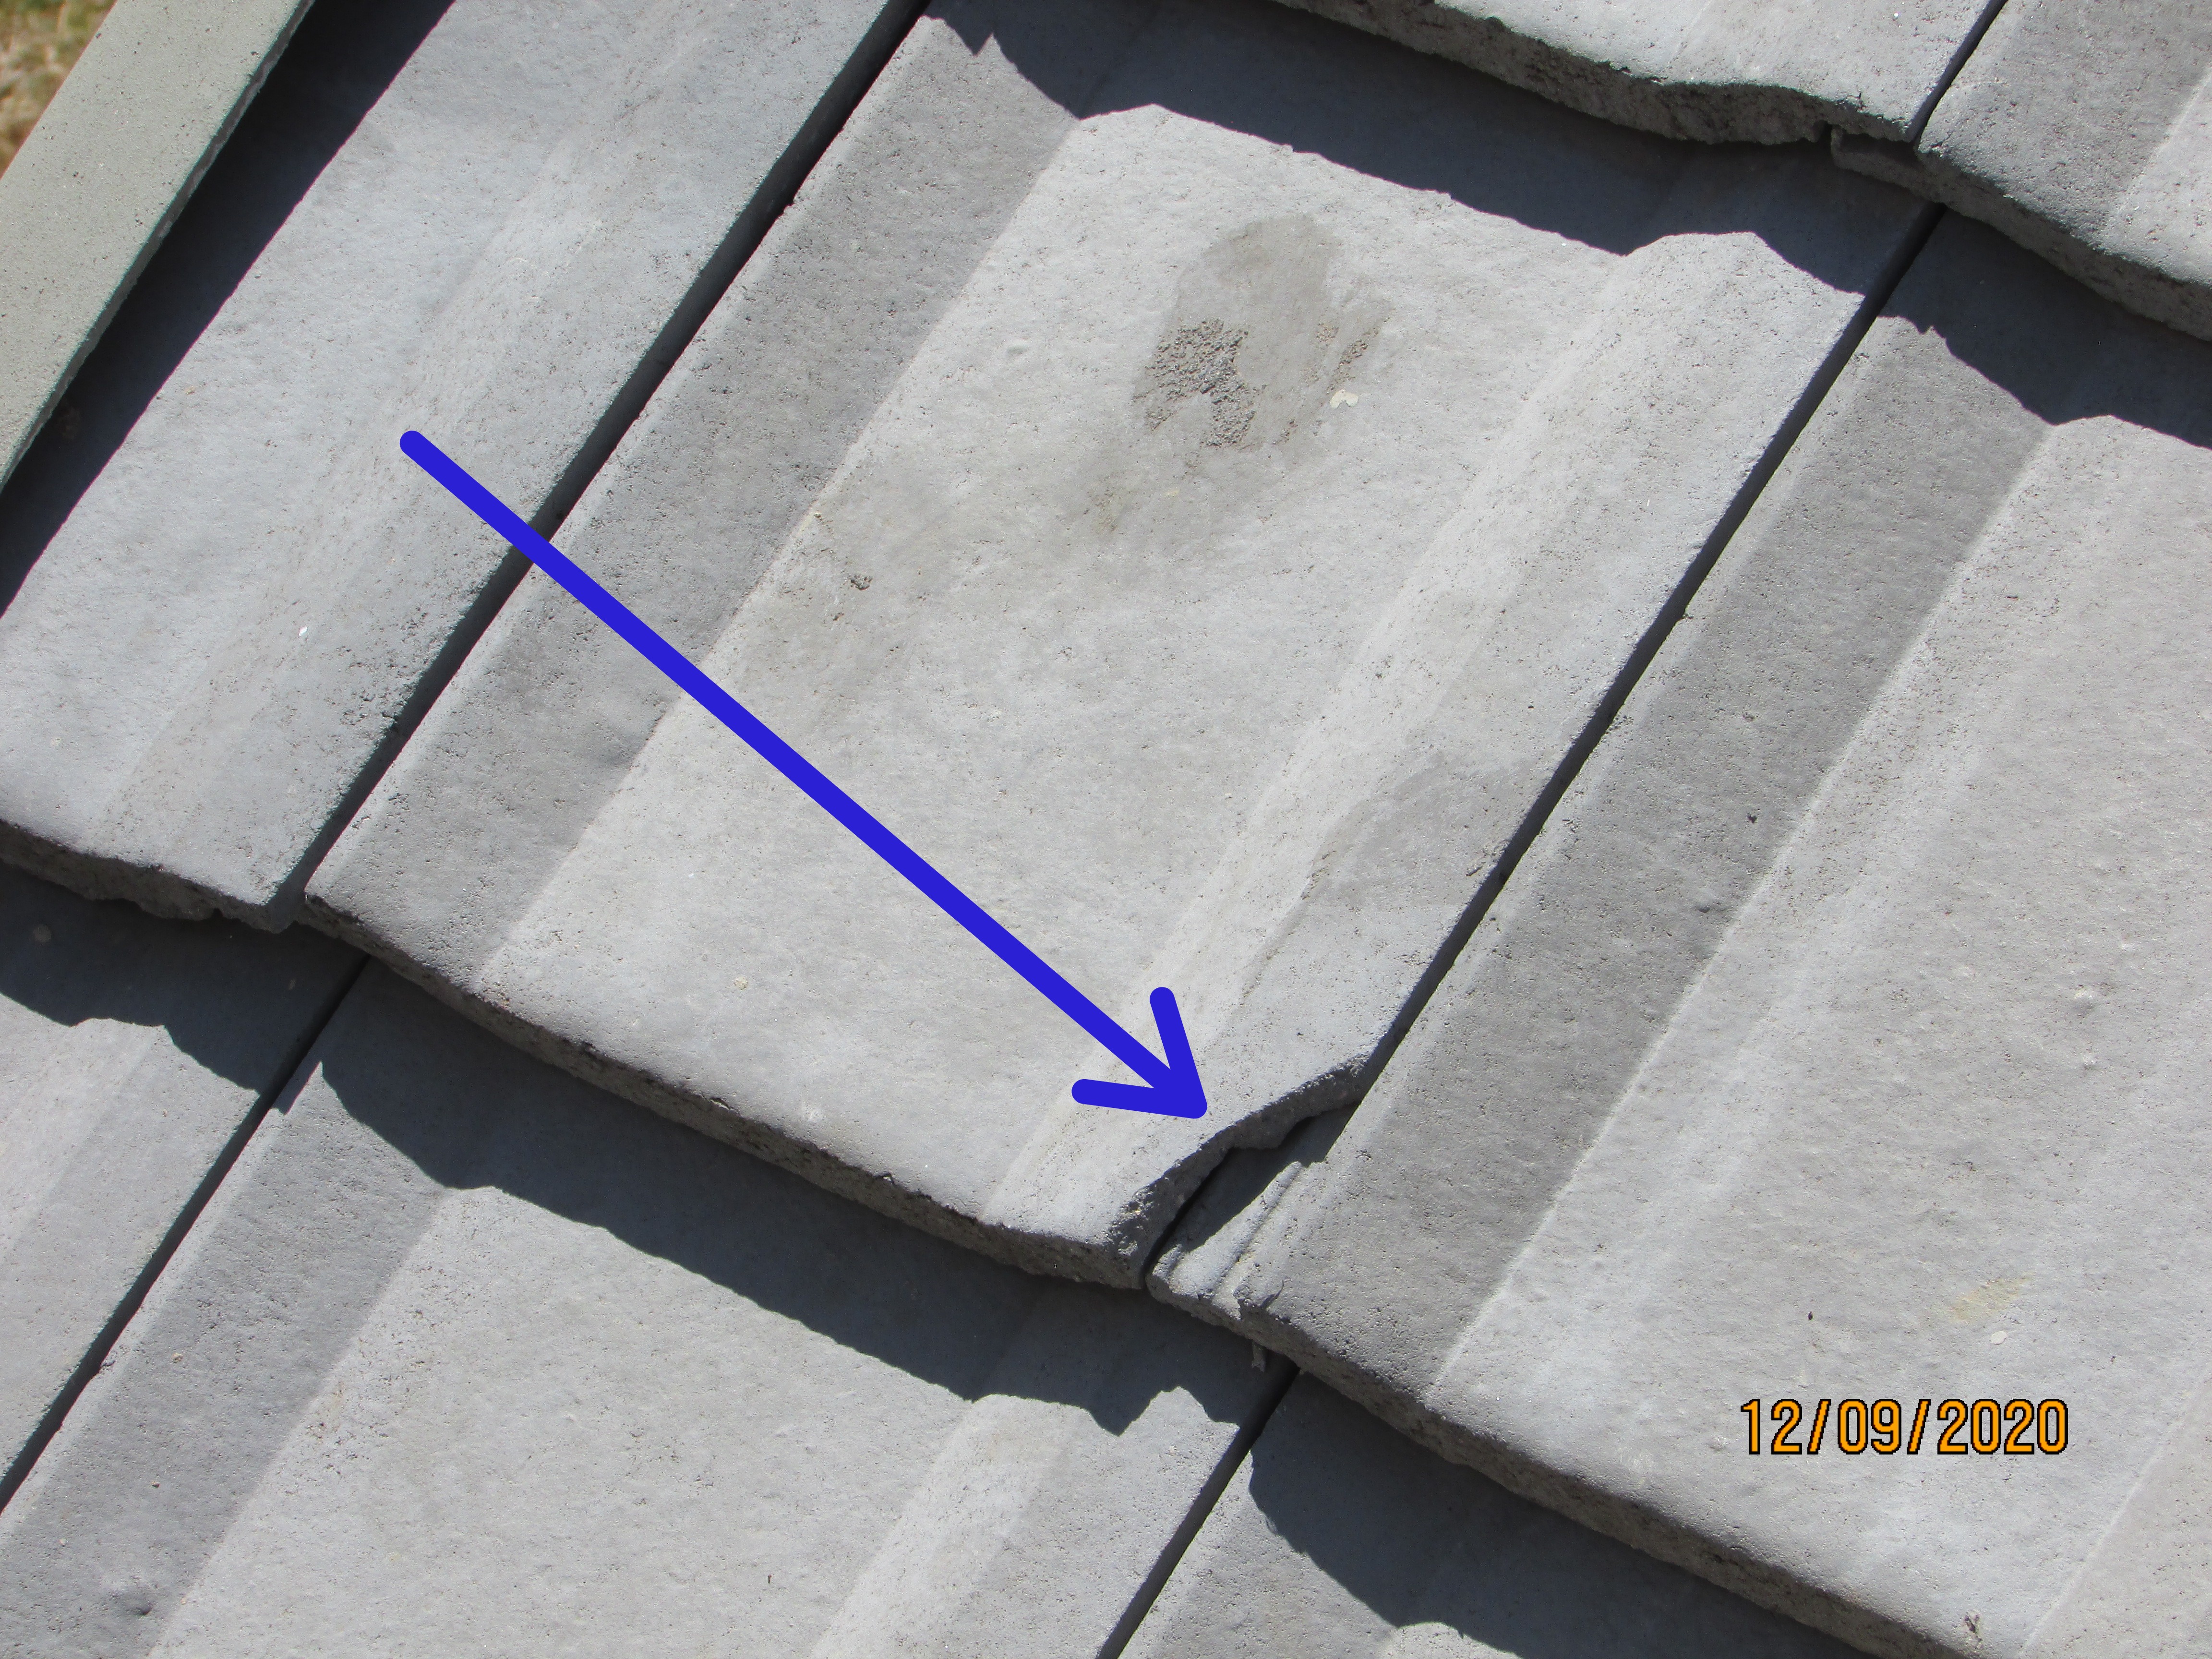 | 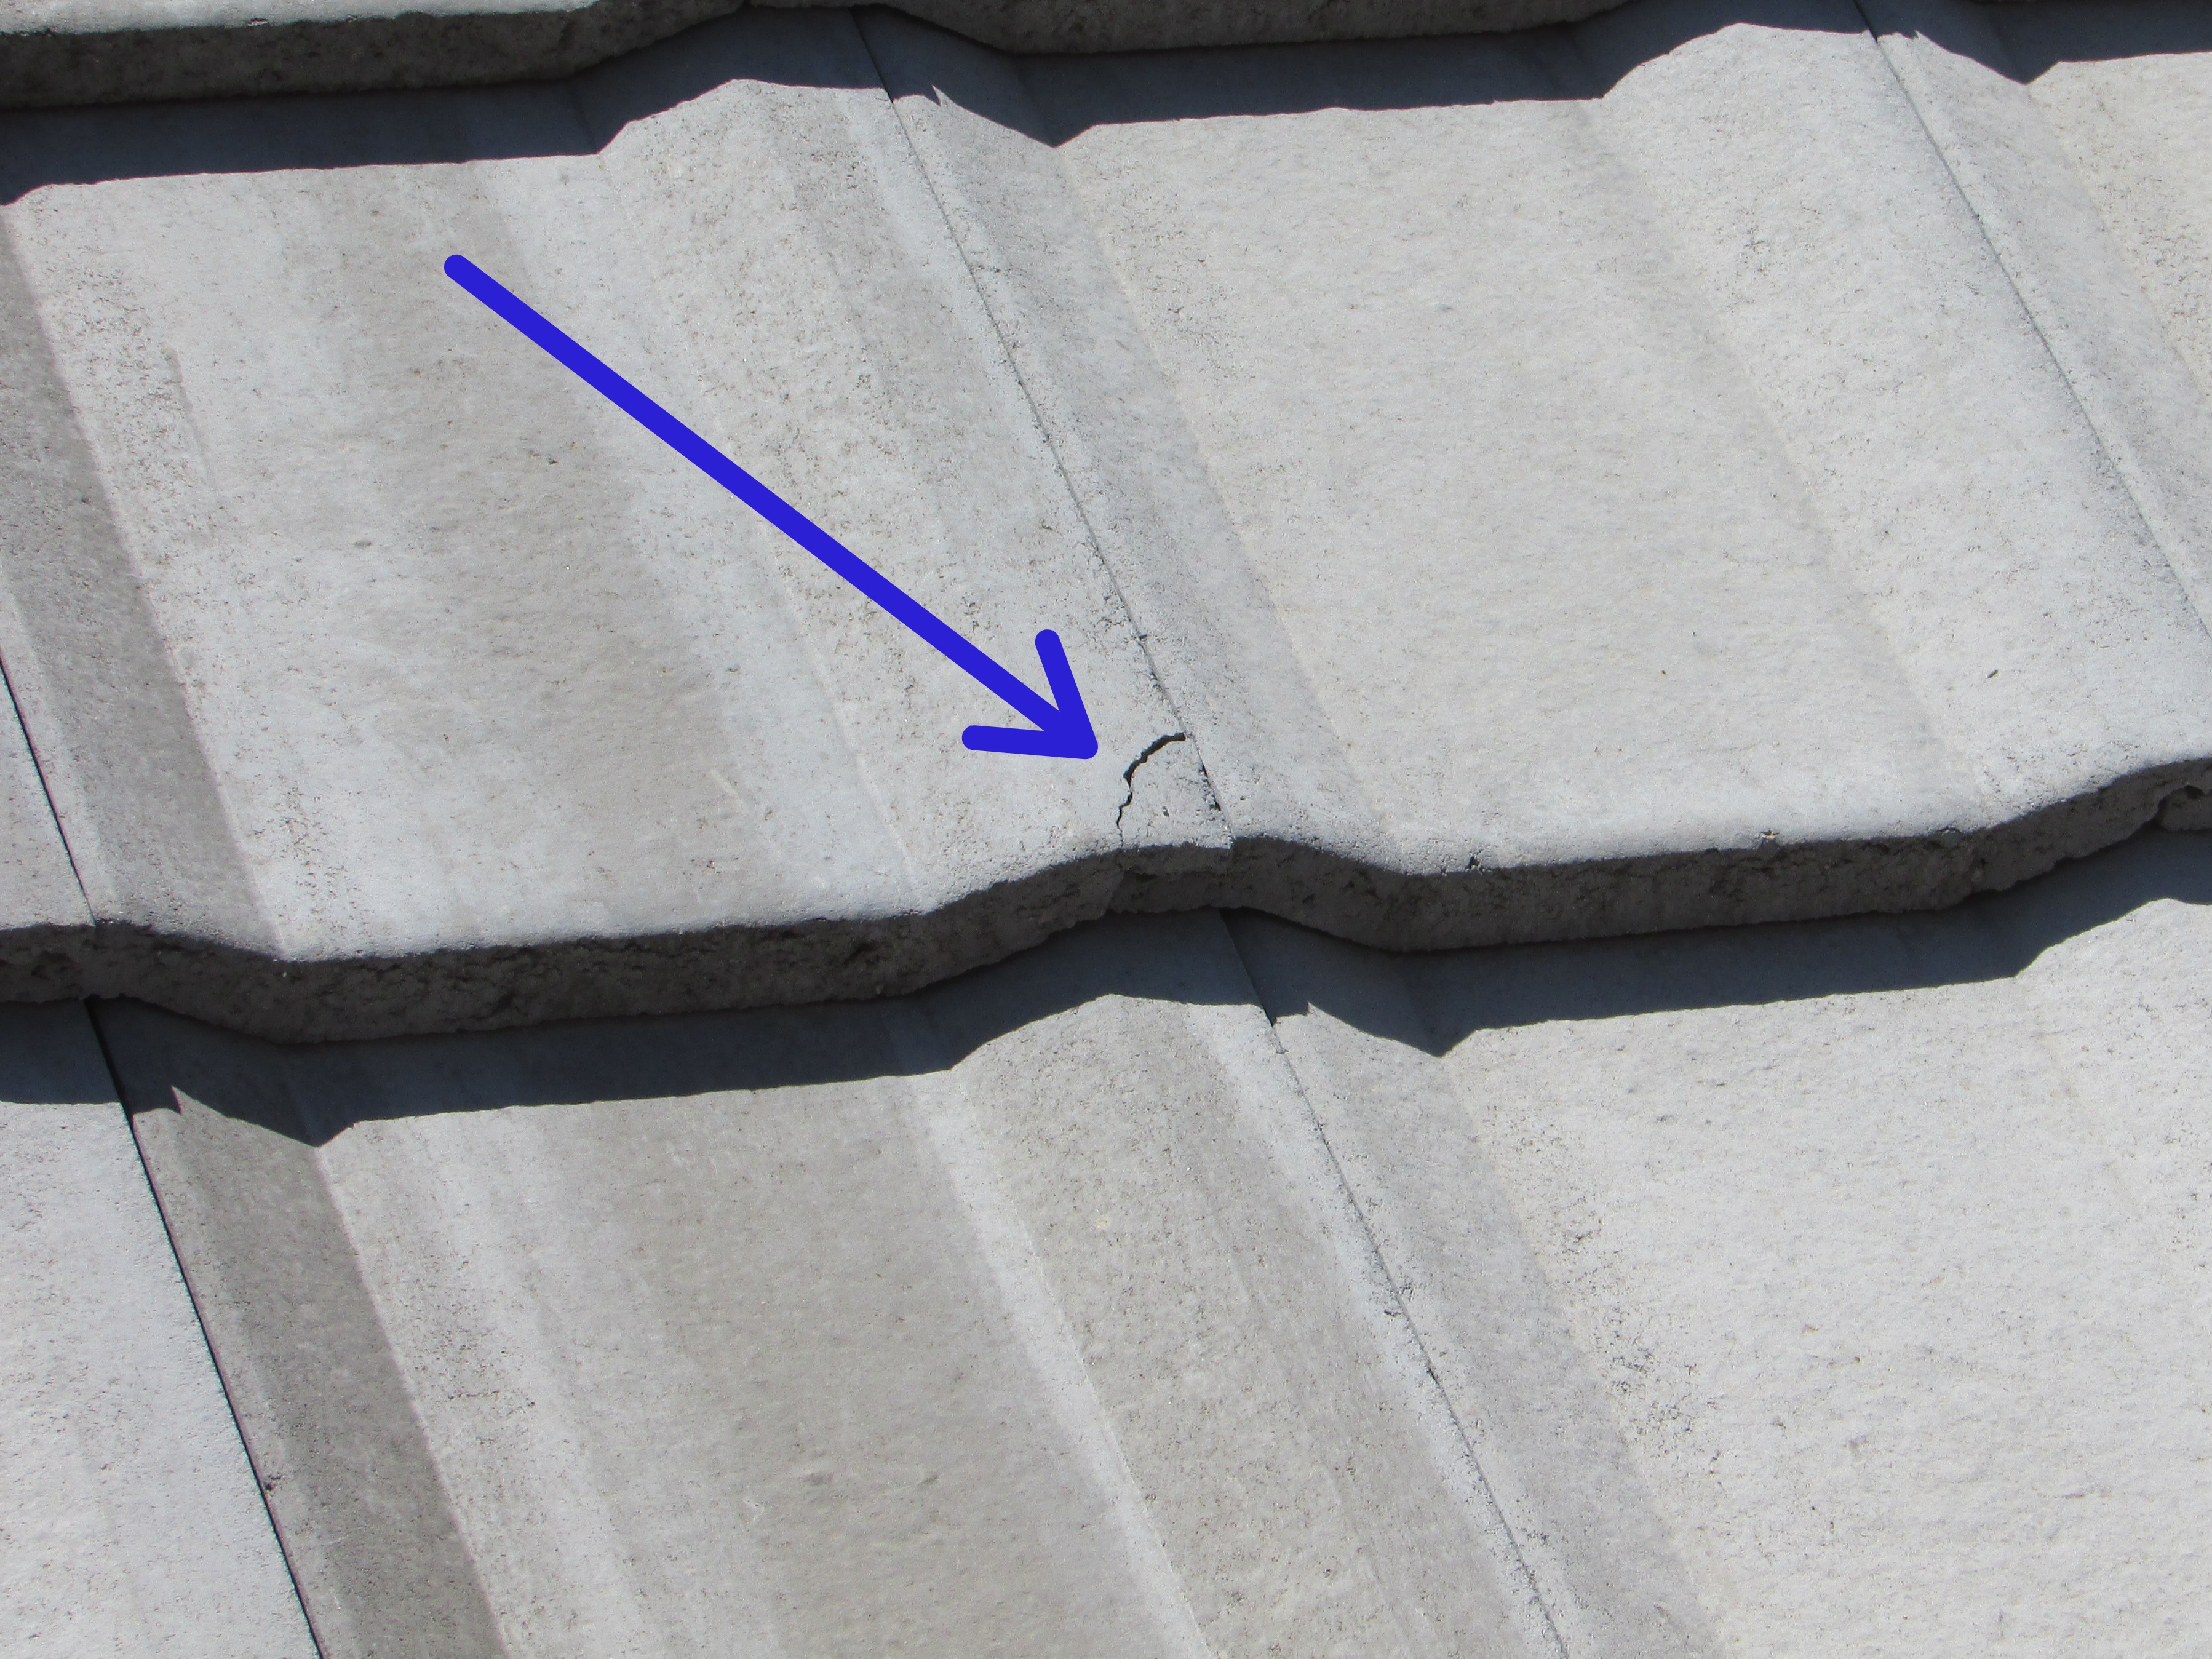 |
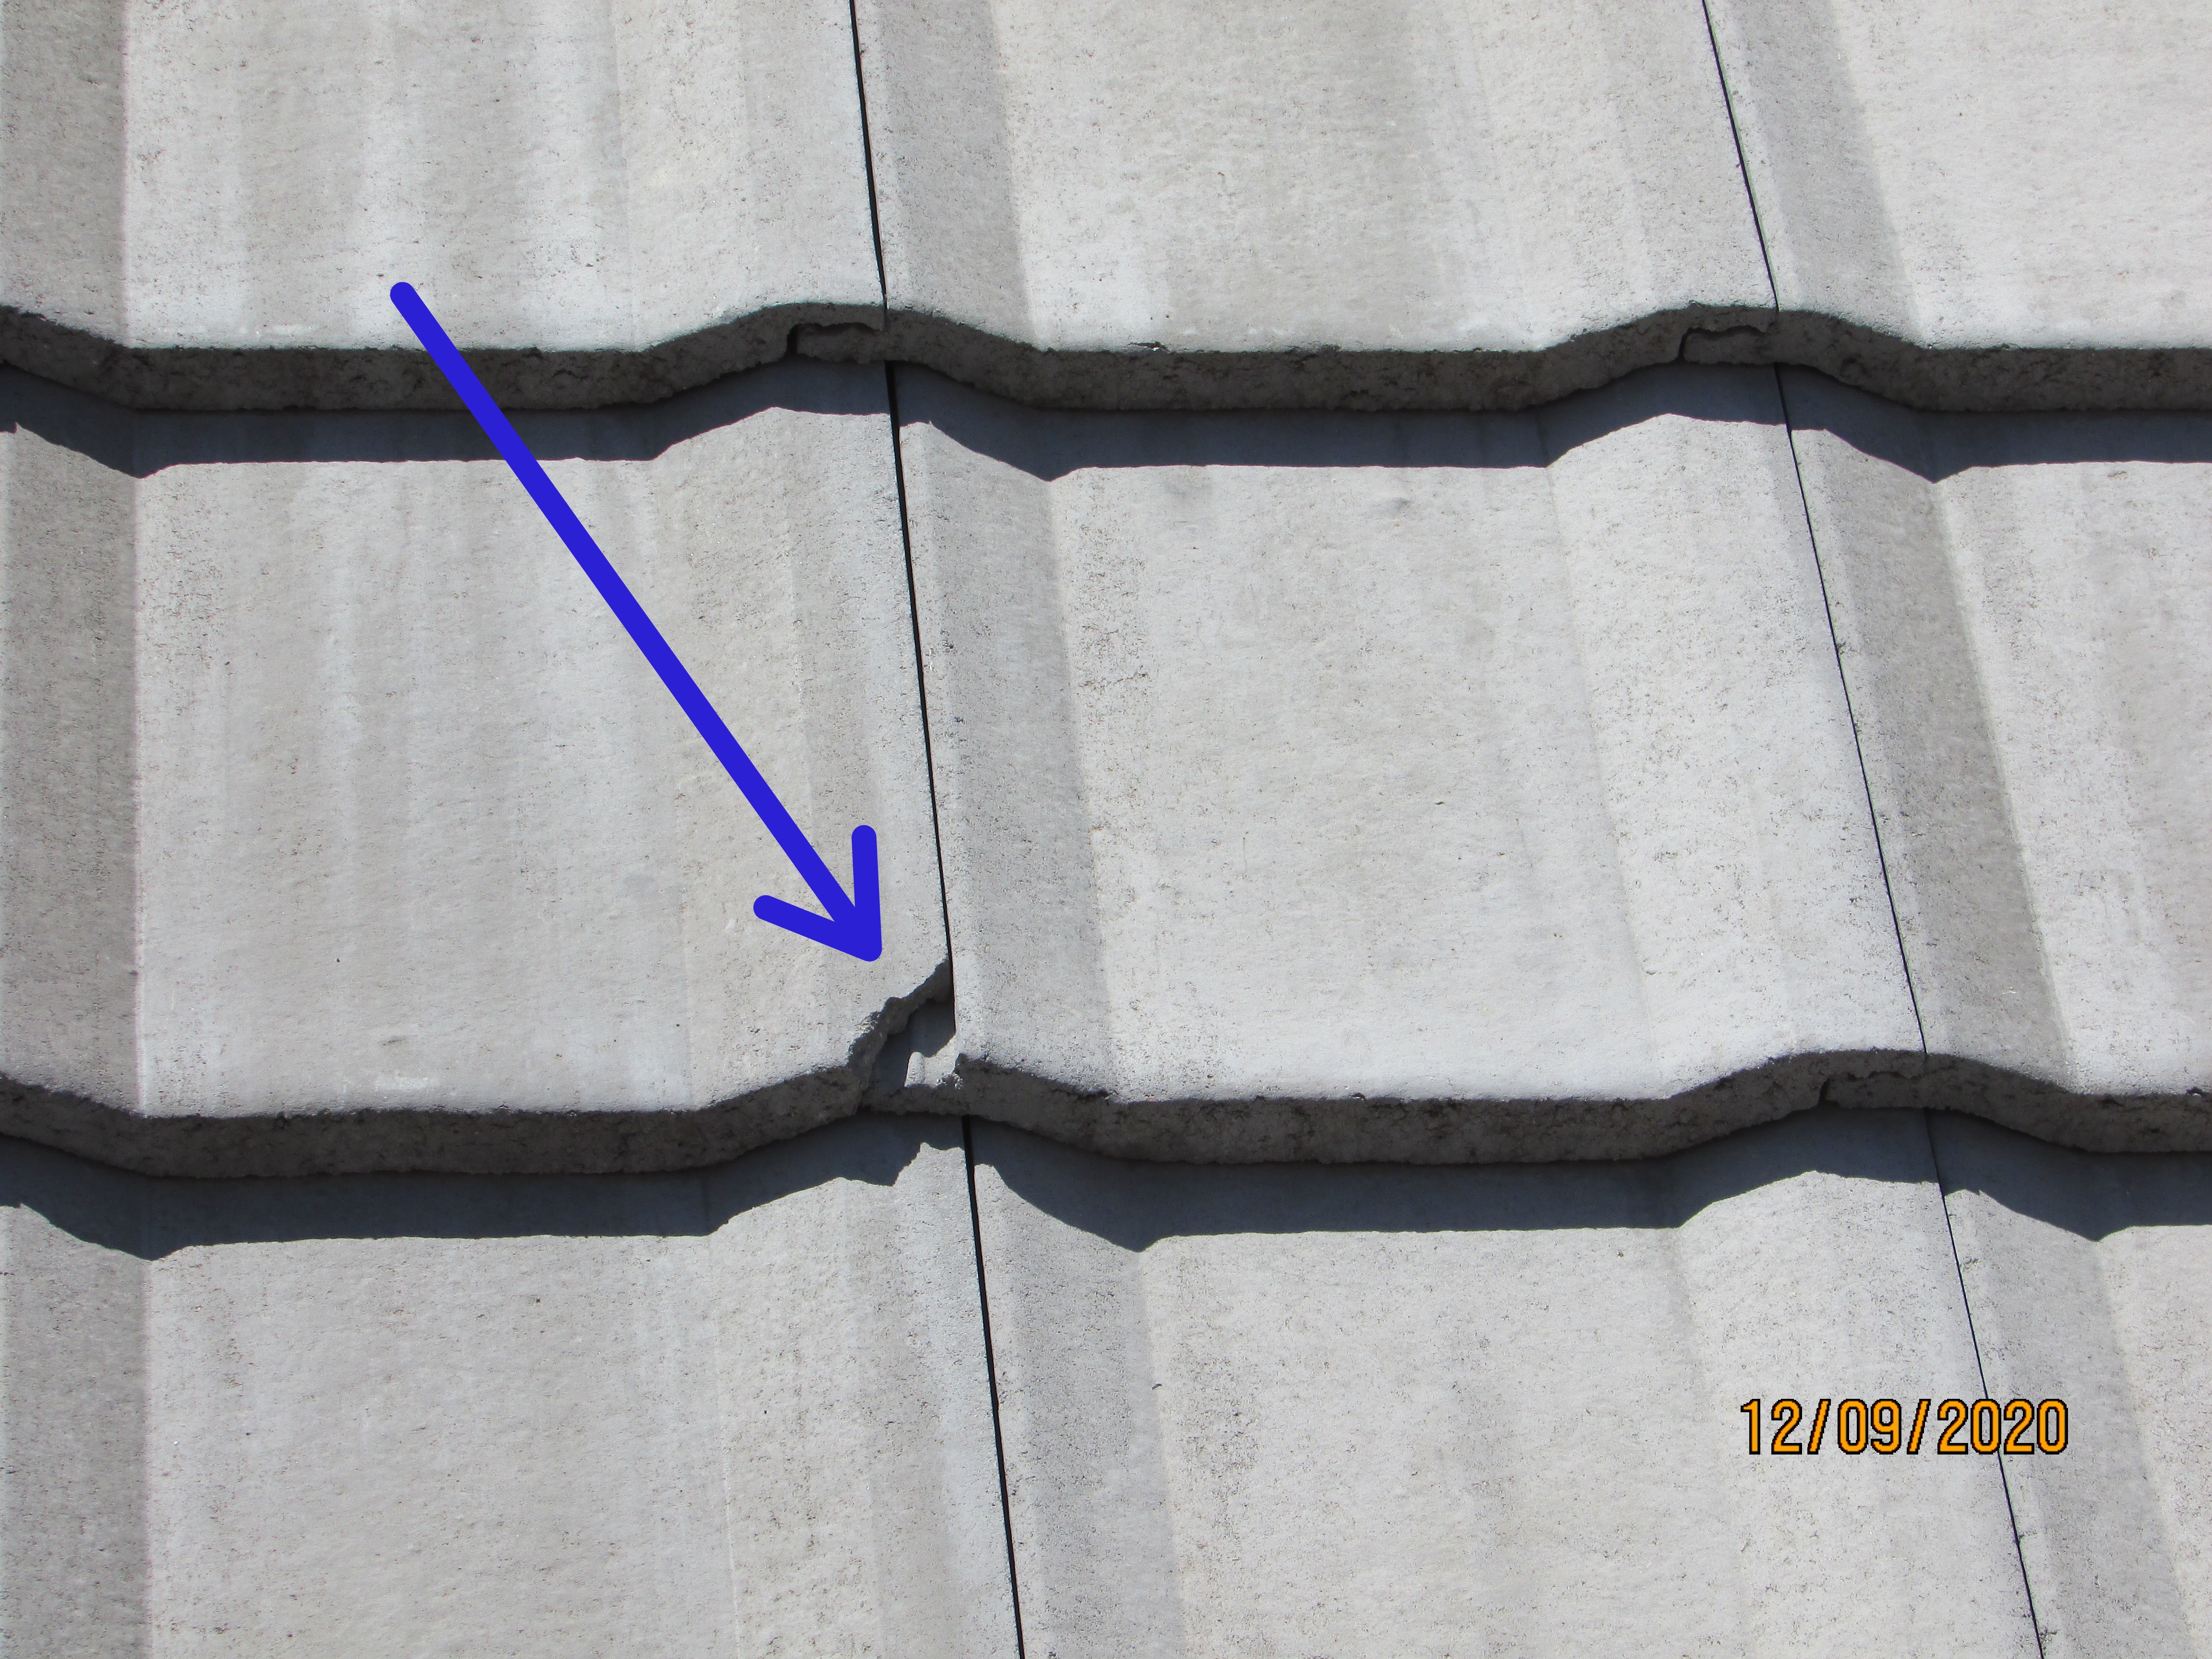 |  |
There were cracks in the bedding mortar of the ridge tiles that may allow moisture intrusion into the ceiling space and on to the ceiling. Normally a layer of DPC (damp proof course) is laid below the ridge tiles to prevent moisture intrusion into the roof structure. However, as a preventative measure, I recommend that the ridge tile joints be repaired and sealed by an appropriately qualified roof tiler.
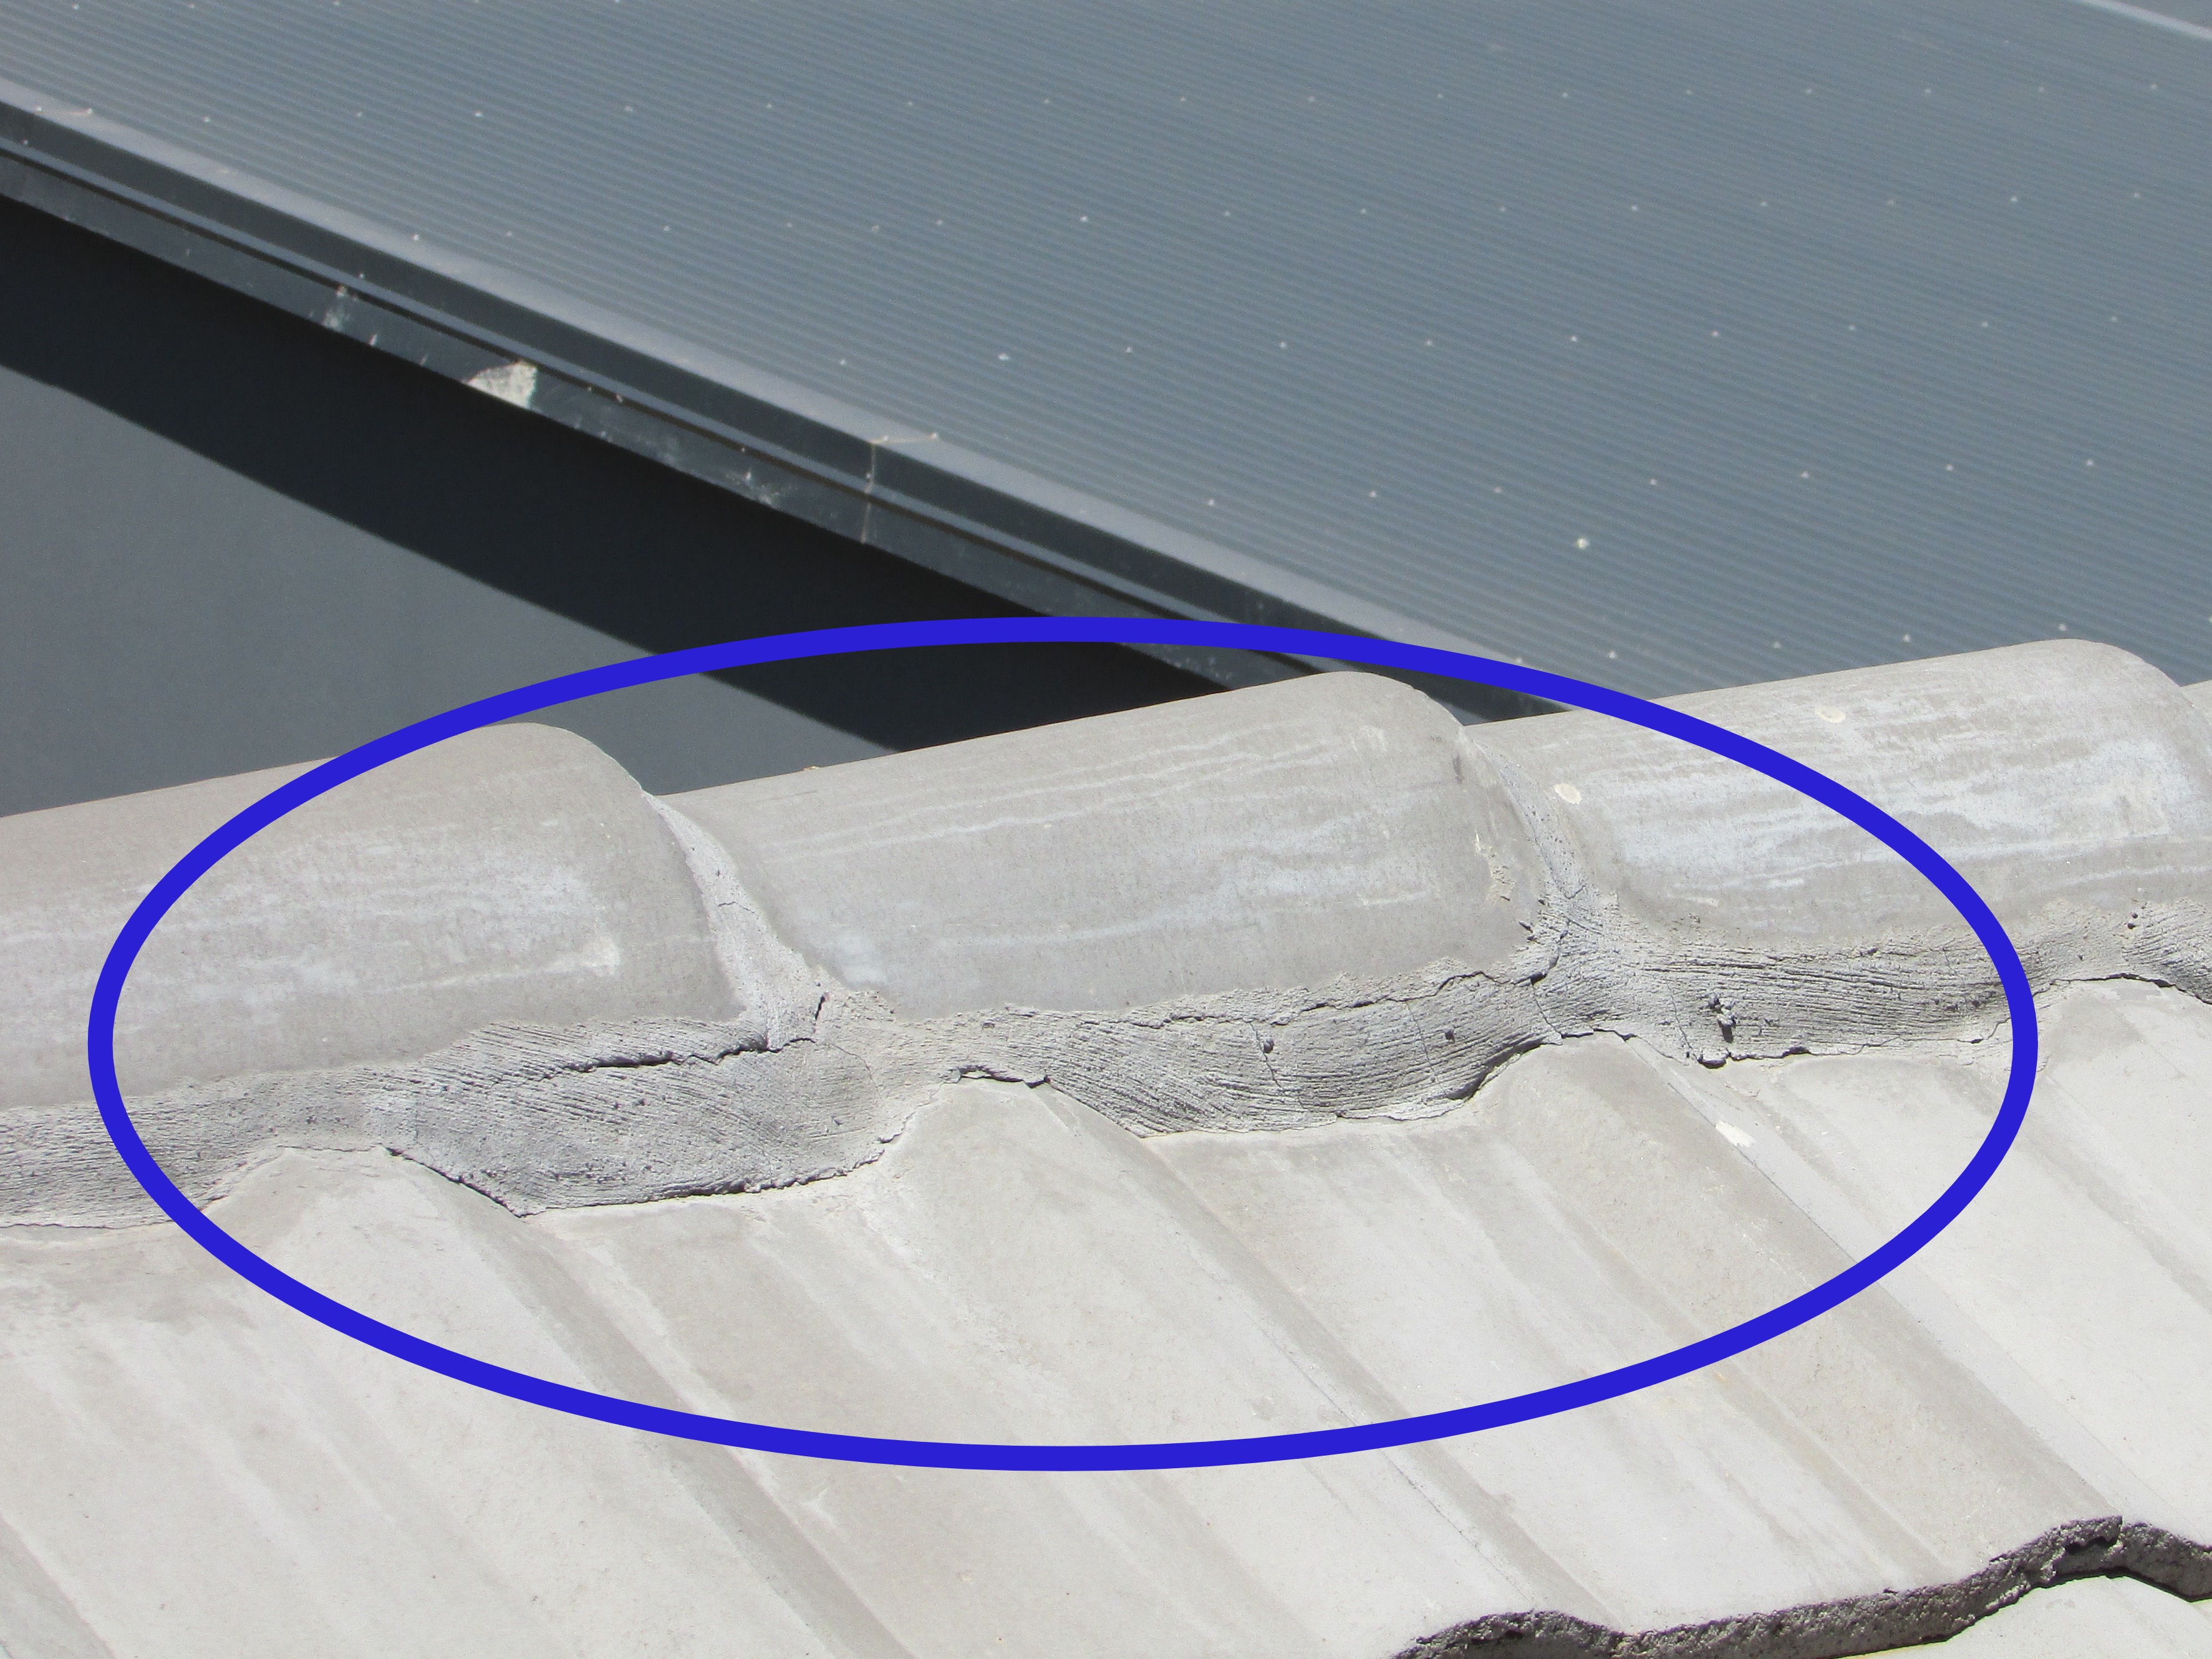 | 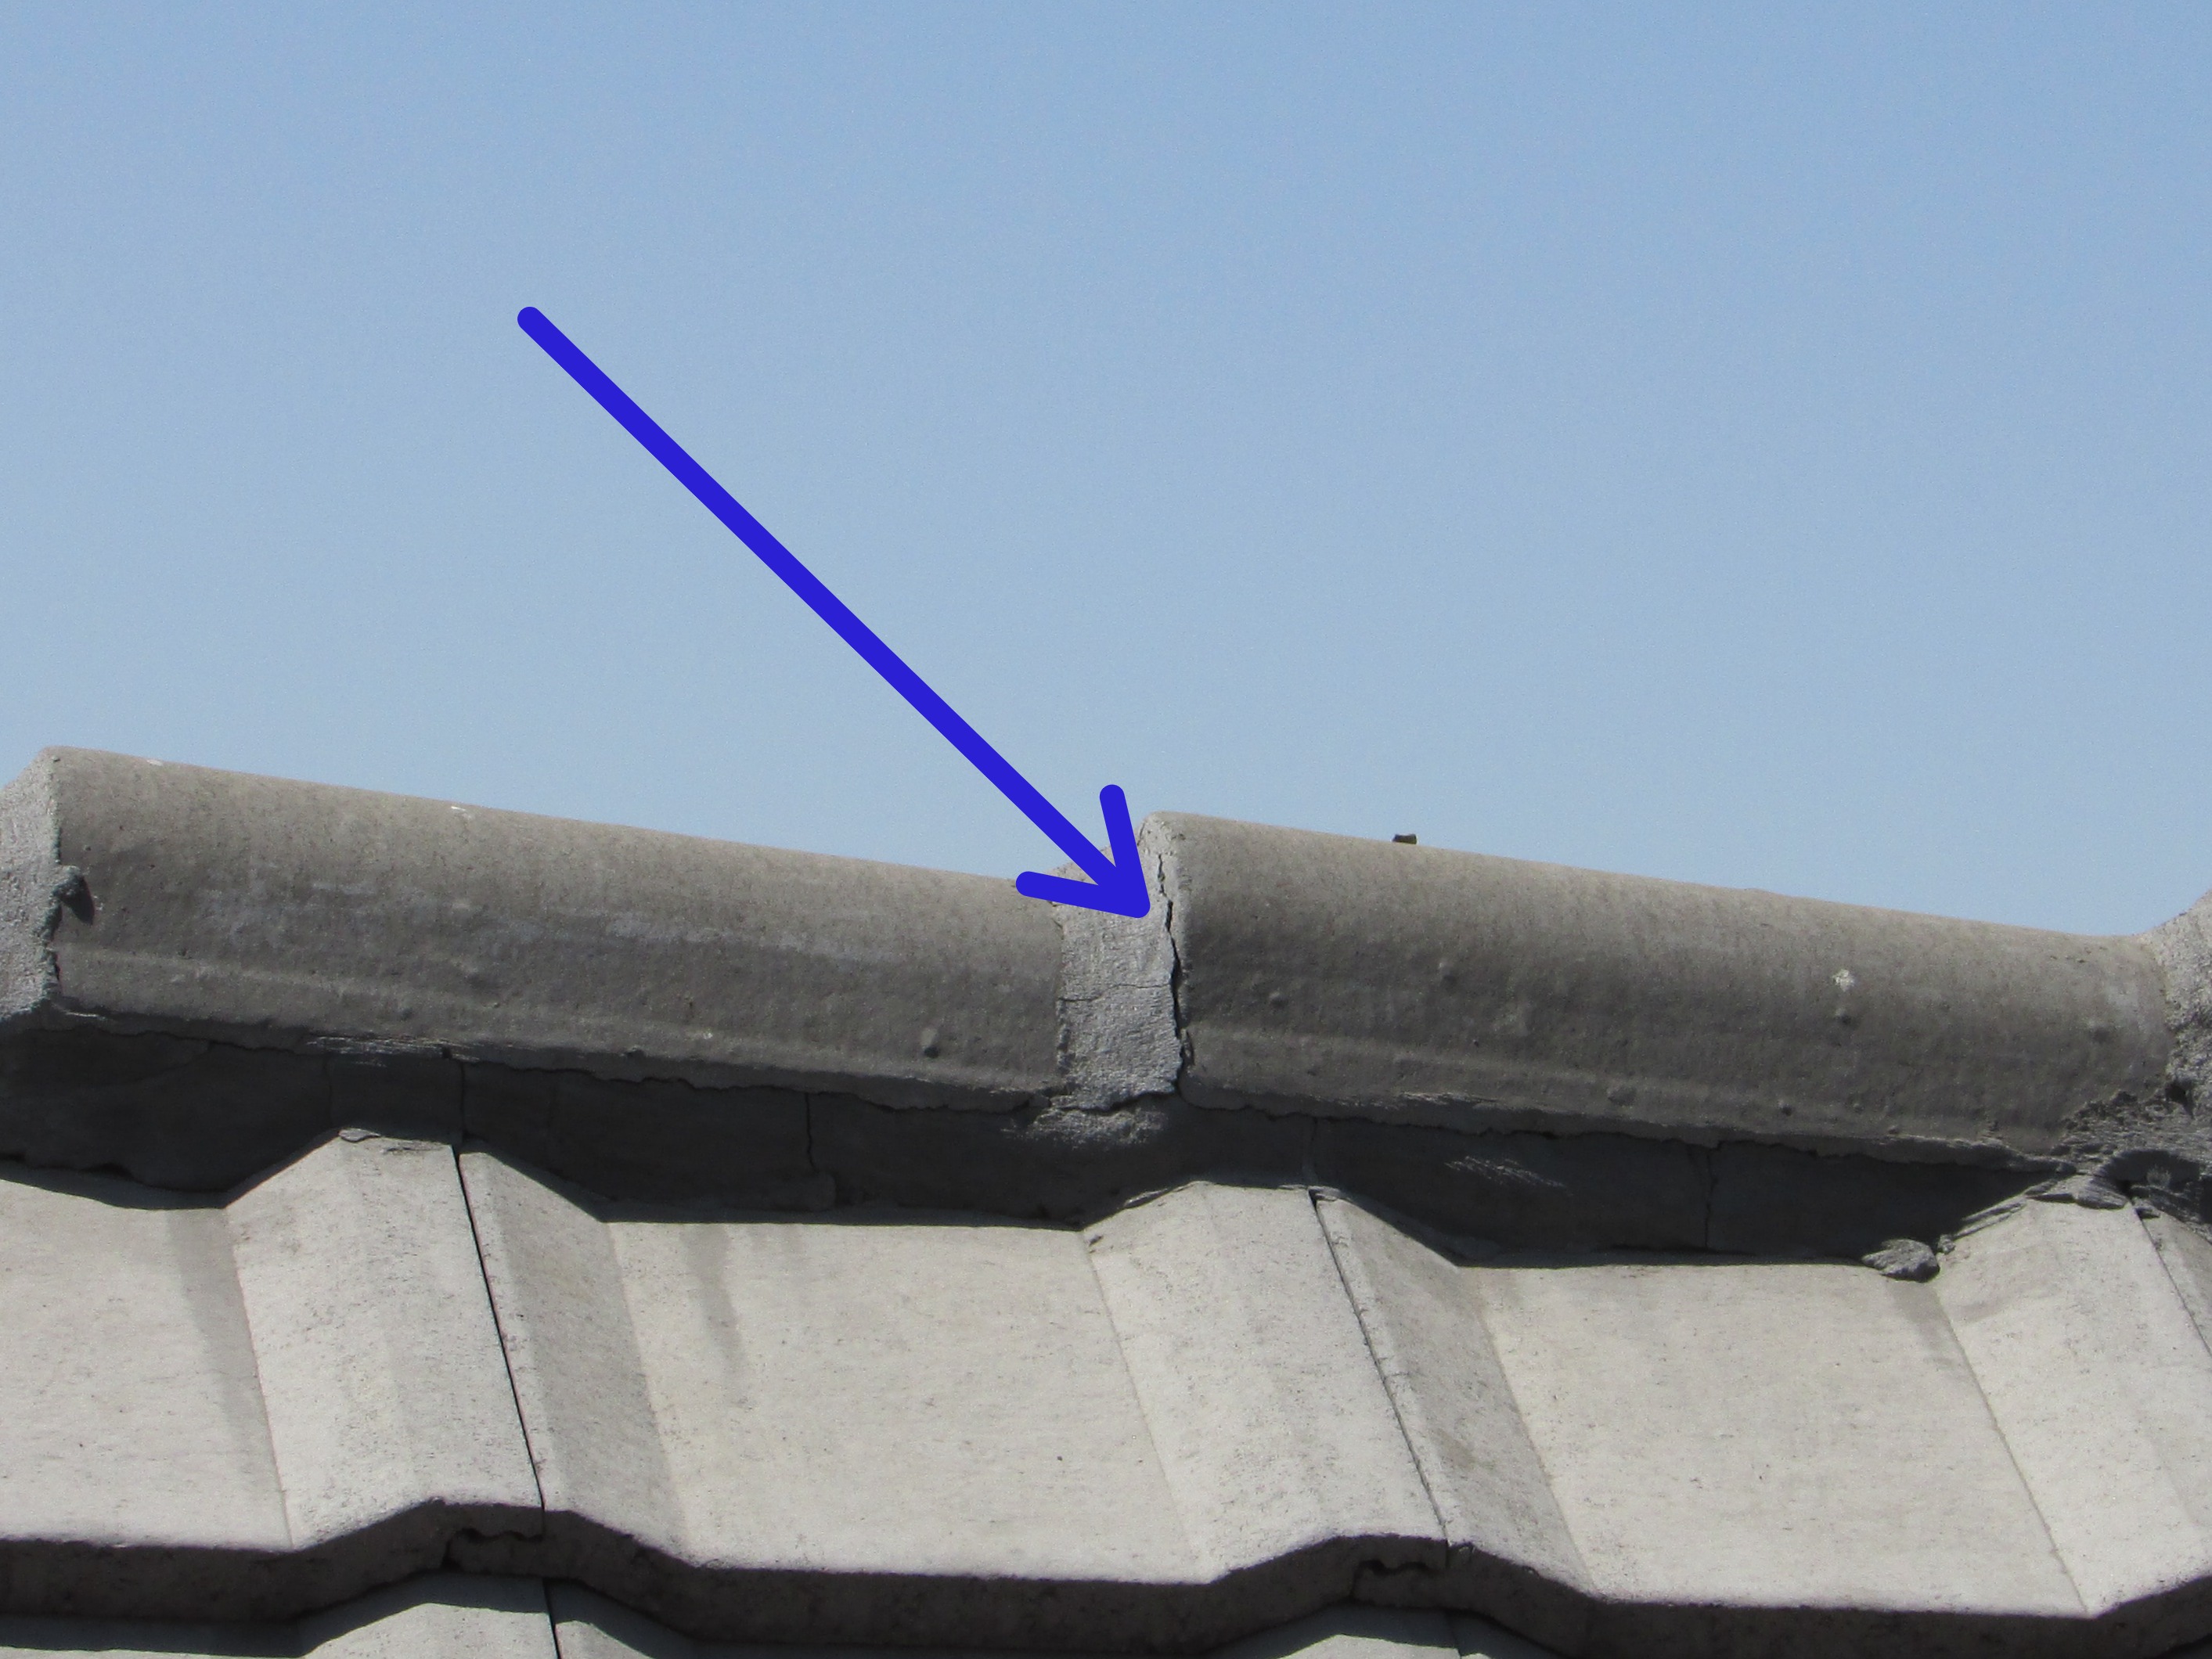 |
The roofing material on part of this building was a modified bitumen membrane. The waterproofing of the roof was incomplete. The brick parapet should be plastered and waterproofed. The manufacturers of the waterproofing membranes recommend that the membrane must be protected from direct sunlight conditions with an aluminium coating to improve and extend the performance and life expectancy of the membrane. I recommend additional inspection of the roof by a qualified waterproofing contractor. Implement repairs as recommended to insure reliable performance.
- The waterproofing membrane was not aluminium bitumen paint coated.
- The top and internal face of the brickwork here should be should be plastered and waterproofed.
- The waterproofing did not appear to be adequately sealed into the PVC drainpipe. The drain should have a grid installed at the inlet to the downpipe.
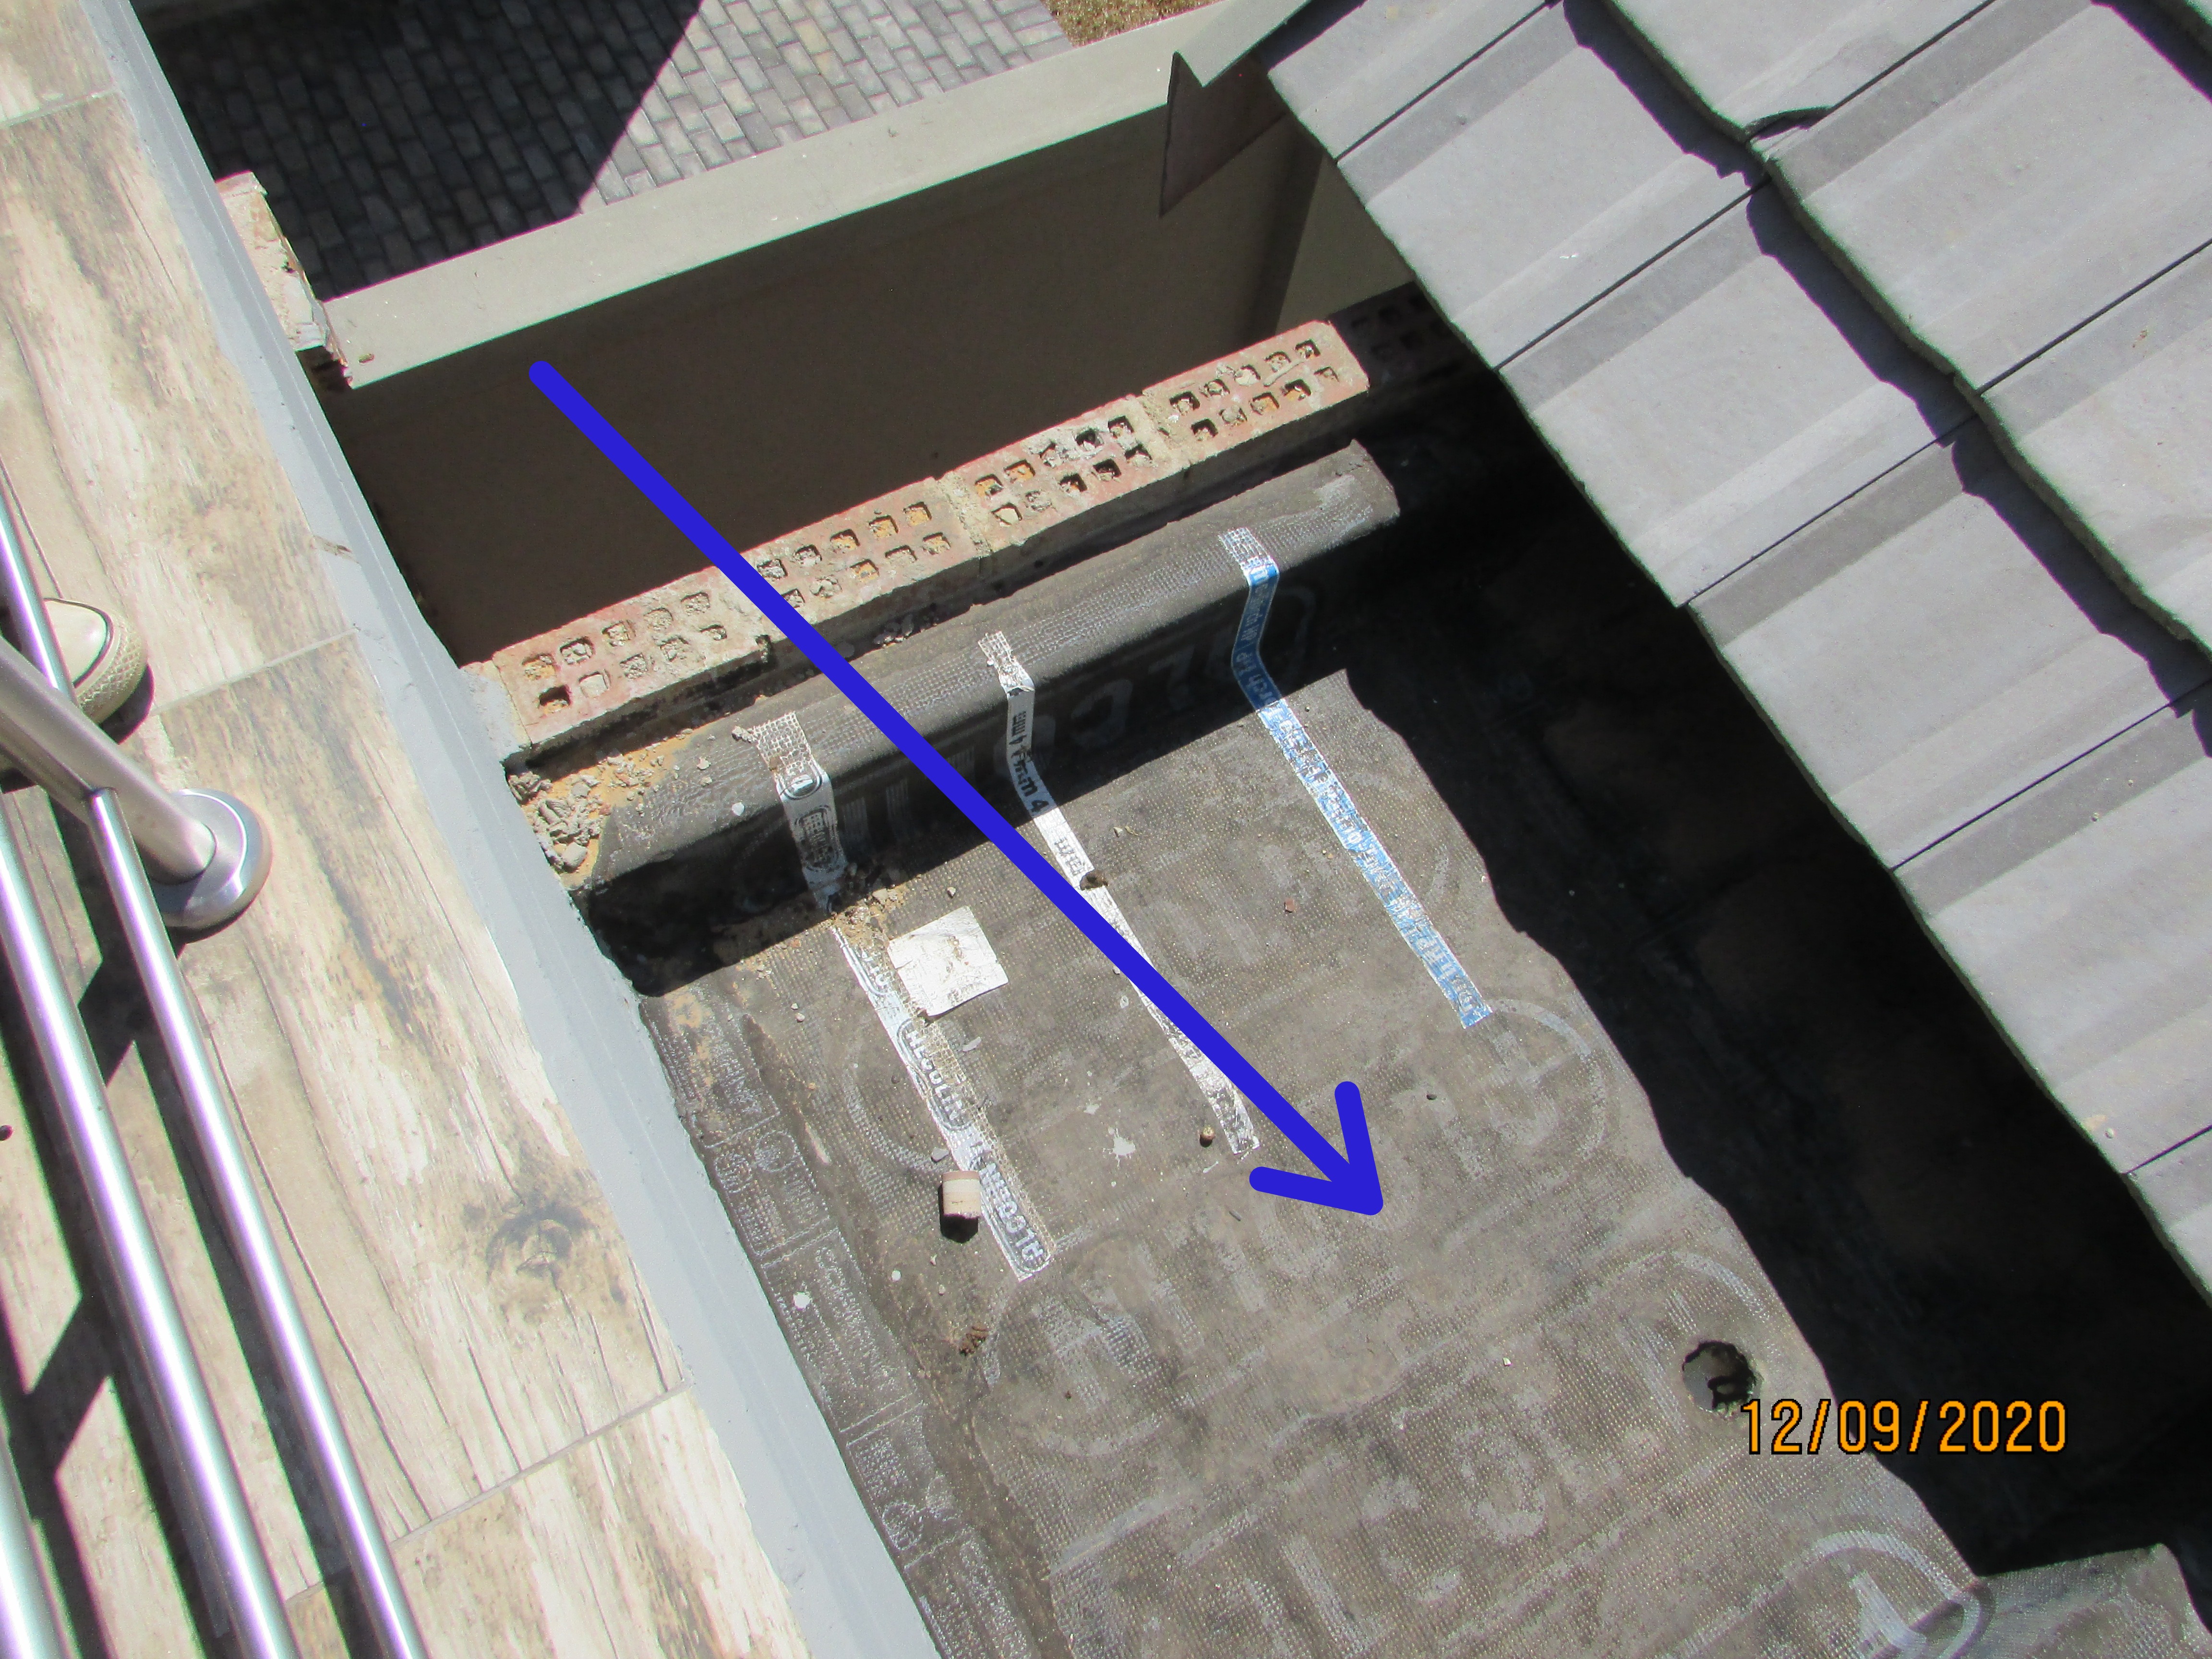
.JPG)
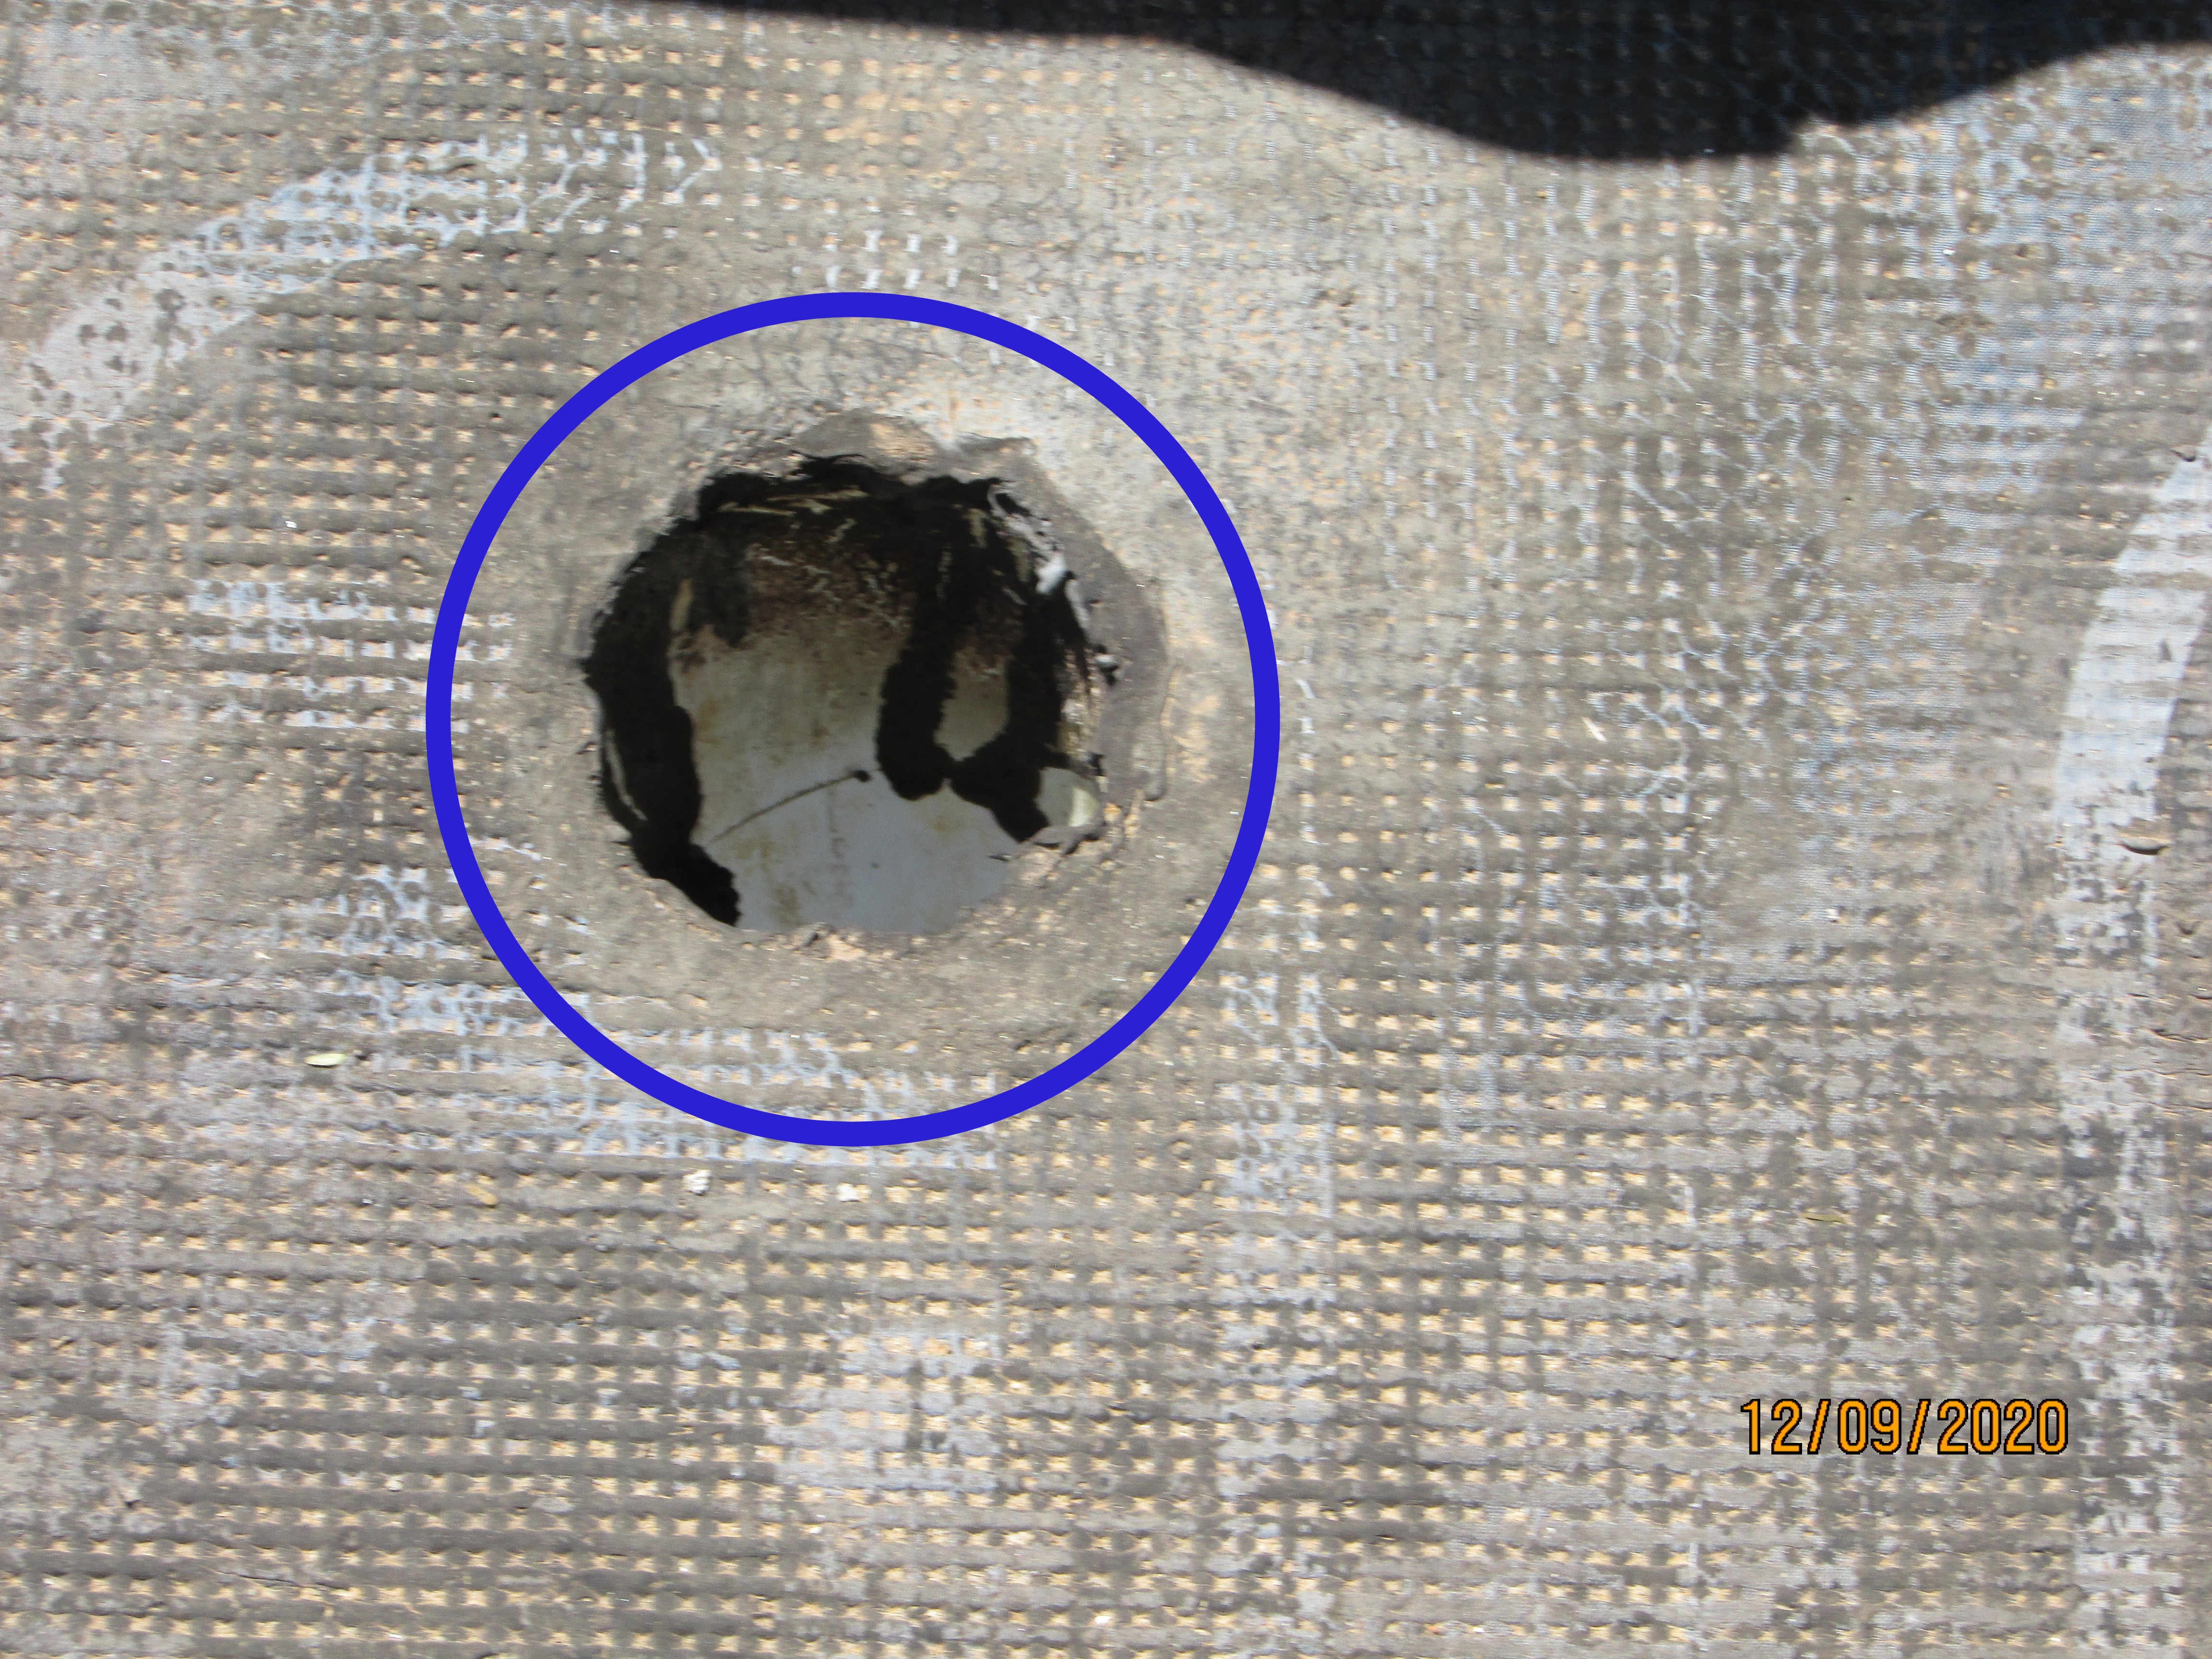
Chimneys
Present
Chimney Material: Masonry
Chimney Flue Liners: None noted
No liner was noted in the braai flue. A flue liner is recommended the the manufacturer to provide a smooth surface for better draw and protect the brickwork against heat corrosion. Contact a qualified installer or the manufacturer to further evaluate the system.
 |
The top cover over the chimney appeared to have been built with concrete lintels with opening on the side to allow the chimney to draw. These openings may allow wind blown rainwater to enter the chimney. The heat from the chimney while the braai is being used may cause cracking between the lintels and leaks. No cowl was installed on the top of the chimney as recommended by the manufacturer. A rotating cowl is necessary to prevent down drafts on windy days and to prevent rain from entering the chimney. Manufacturers advise that the necessary precautions should be taken to protect the braai against rust by regularly checking the installation and repainting areas where necessary. Contact a qualified installer or the manufacturer to further evaluate the system.
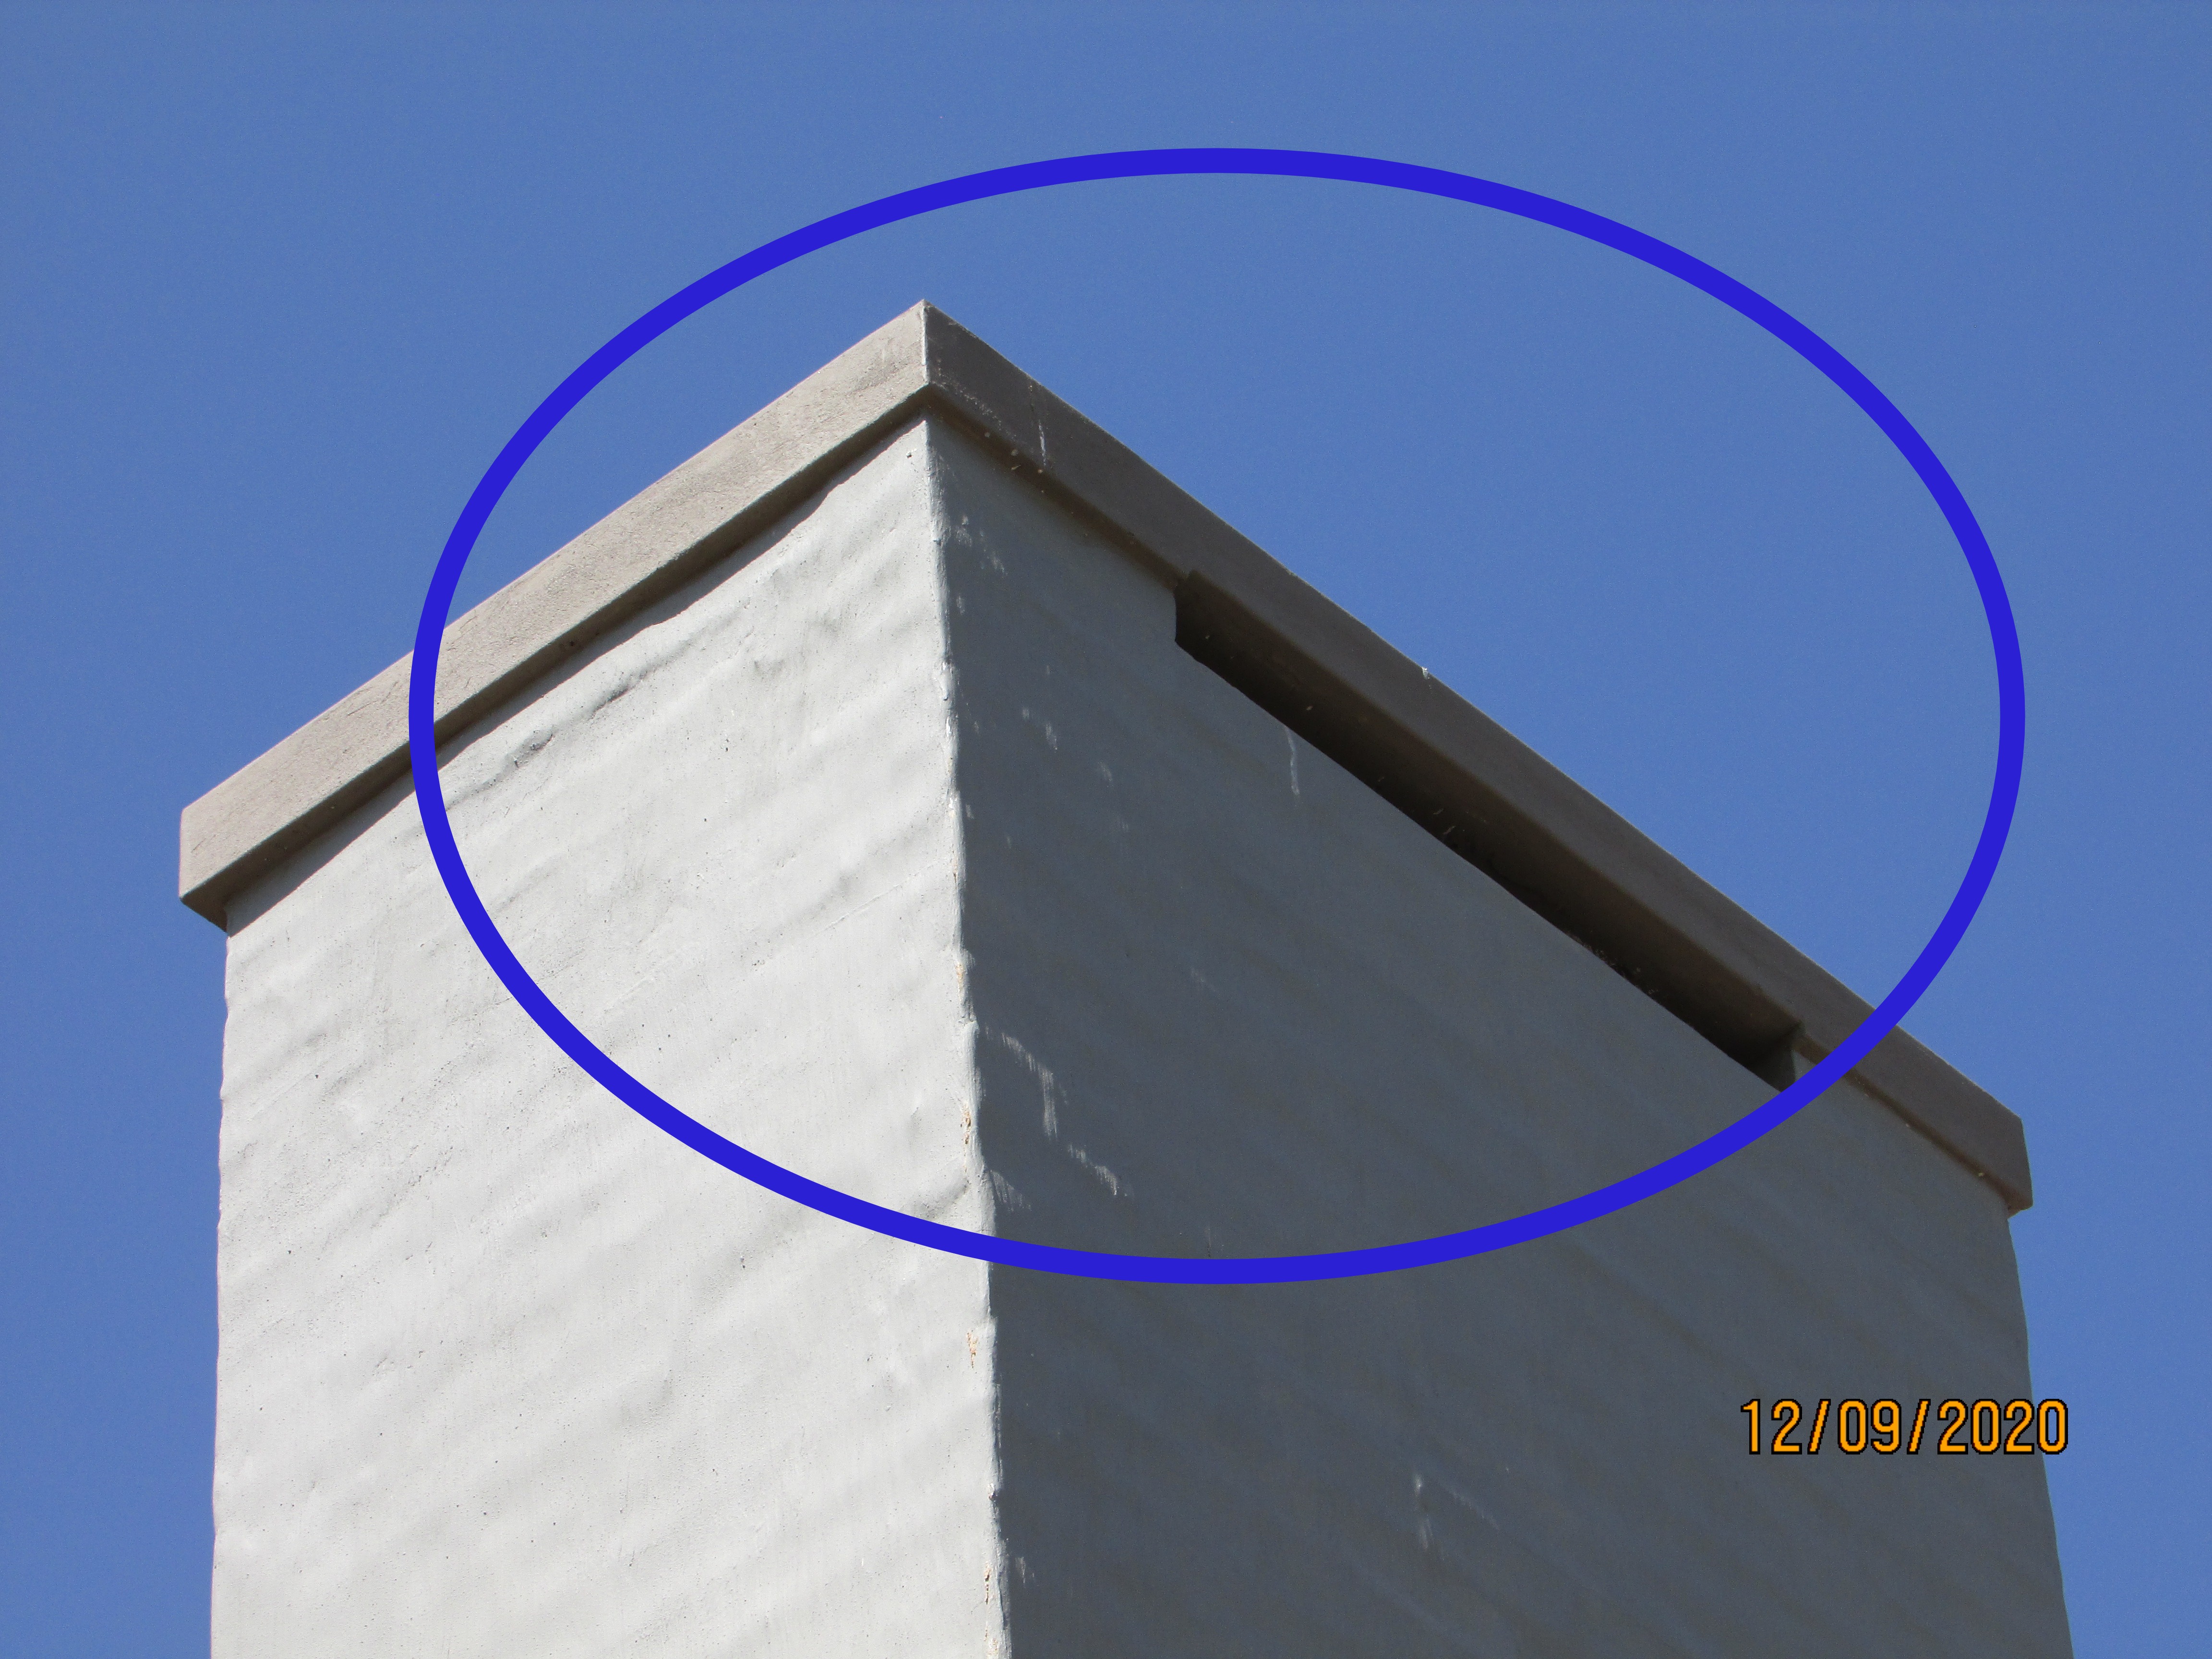 |
The flashing on this chimney was not done to any known or recognised standard. I recommend having metal head and side wall undertile flashing with counter flashings installed for this chimney to divert water around the chimney. The current waterproofed mortar installation is vulnerable to cracking and leaks where the roof drains toward the chimney.
- This was not an acceptable way to head flash a chimney! Note the pooling water of the flashing.
- This was not an acceptable way to sidewall or step flash a chimney!
- This patch over the tiles may have been installed where a leak or tile damage may have occurred. The tiles should rather be replaced!
.JPG)
.JPG)

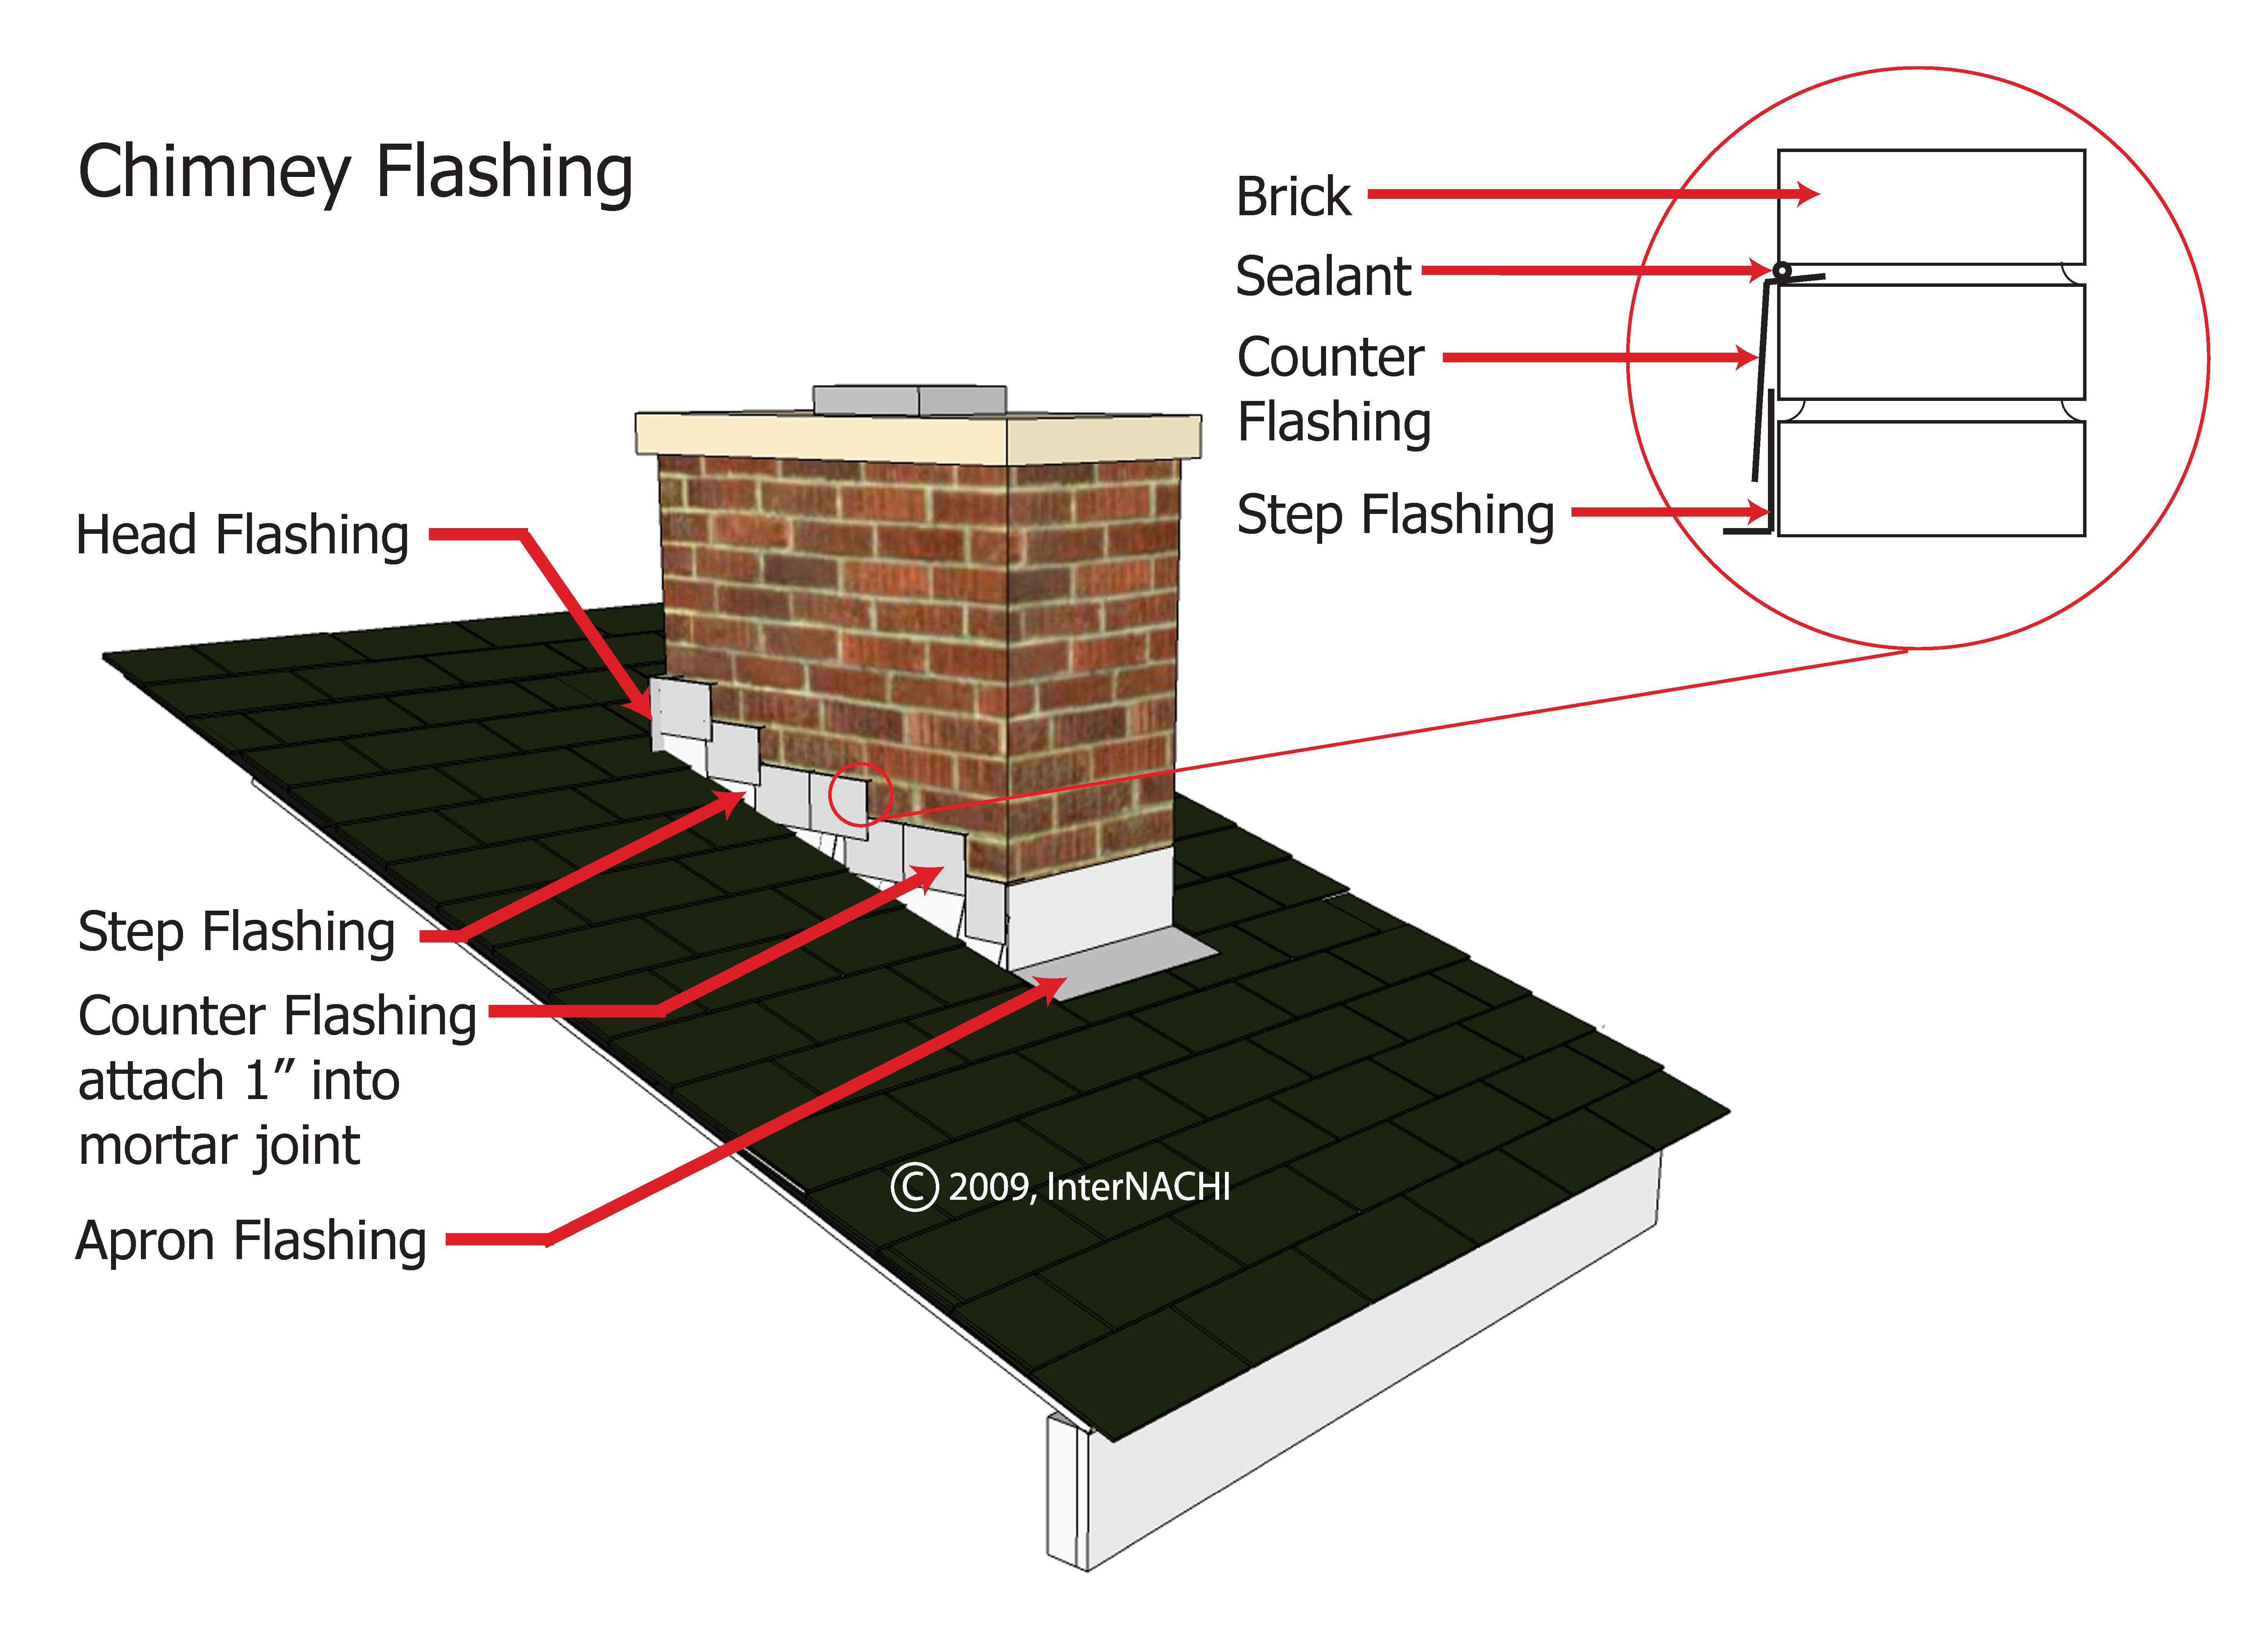 | 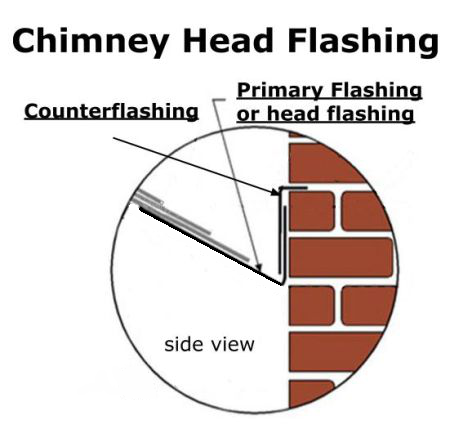 |
Fascia and Barge Boards
Fascia Boards: None
Barge Boards: Asbestos/Fibre Board
Barge boards are not merely decorative and should be installed flat onto the roof tiles to prevent the ingress of wind blown rainwater and the deterioration of the roof timbers on the verge of the roof. Have the roof contractor check and correct the barge boards!
 | 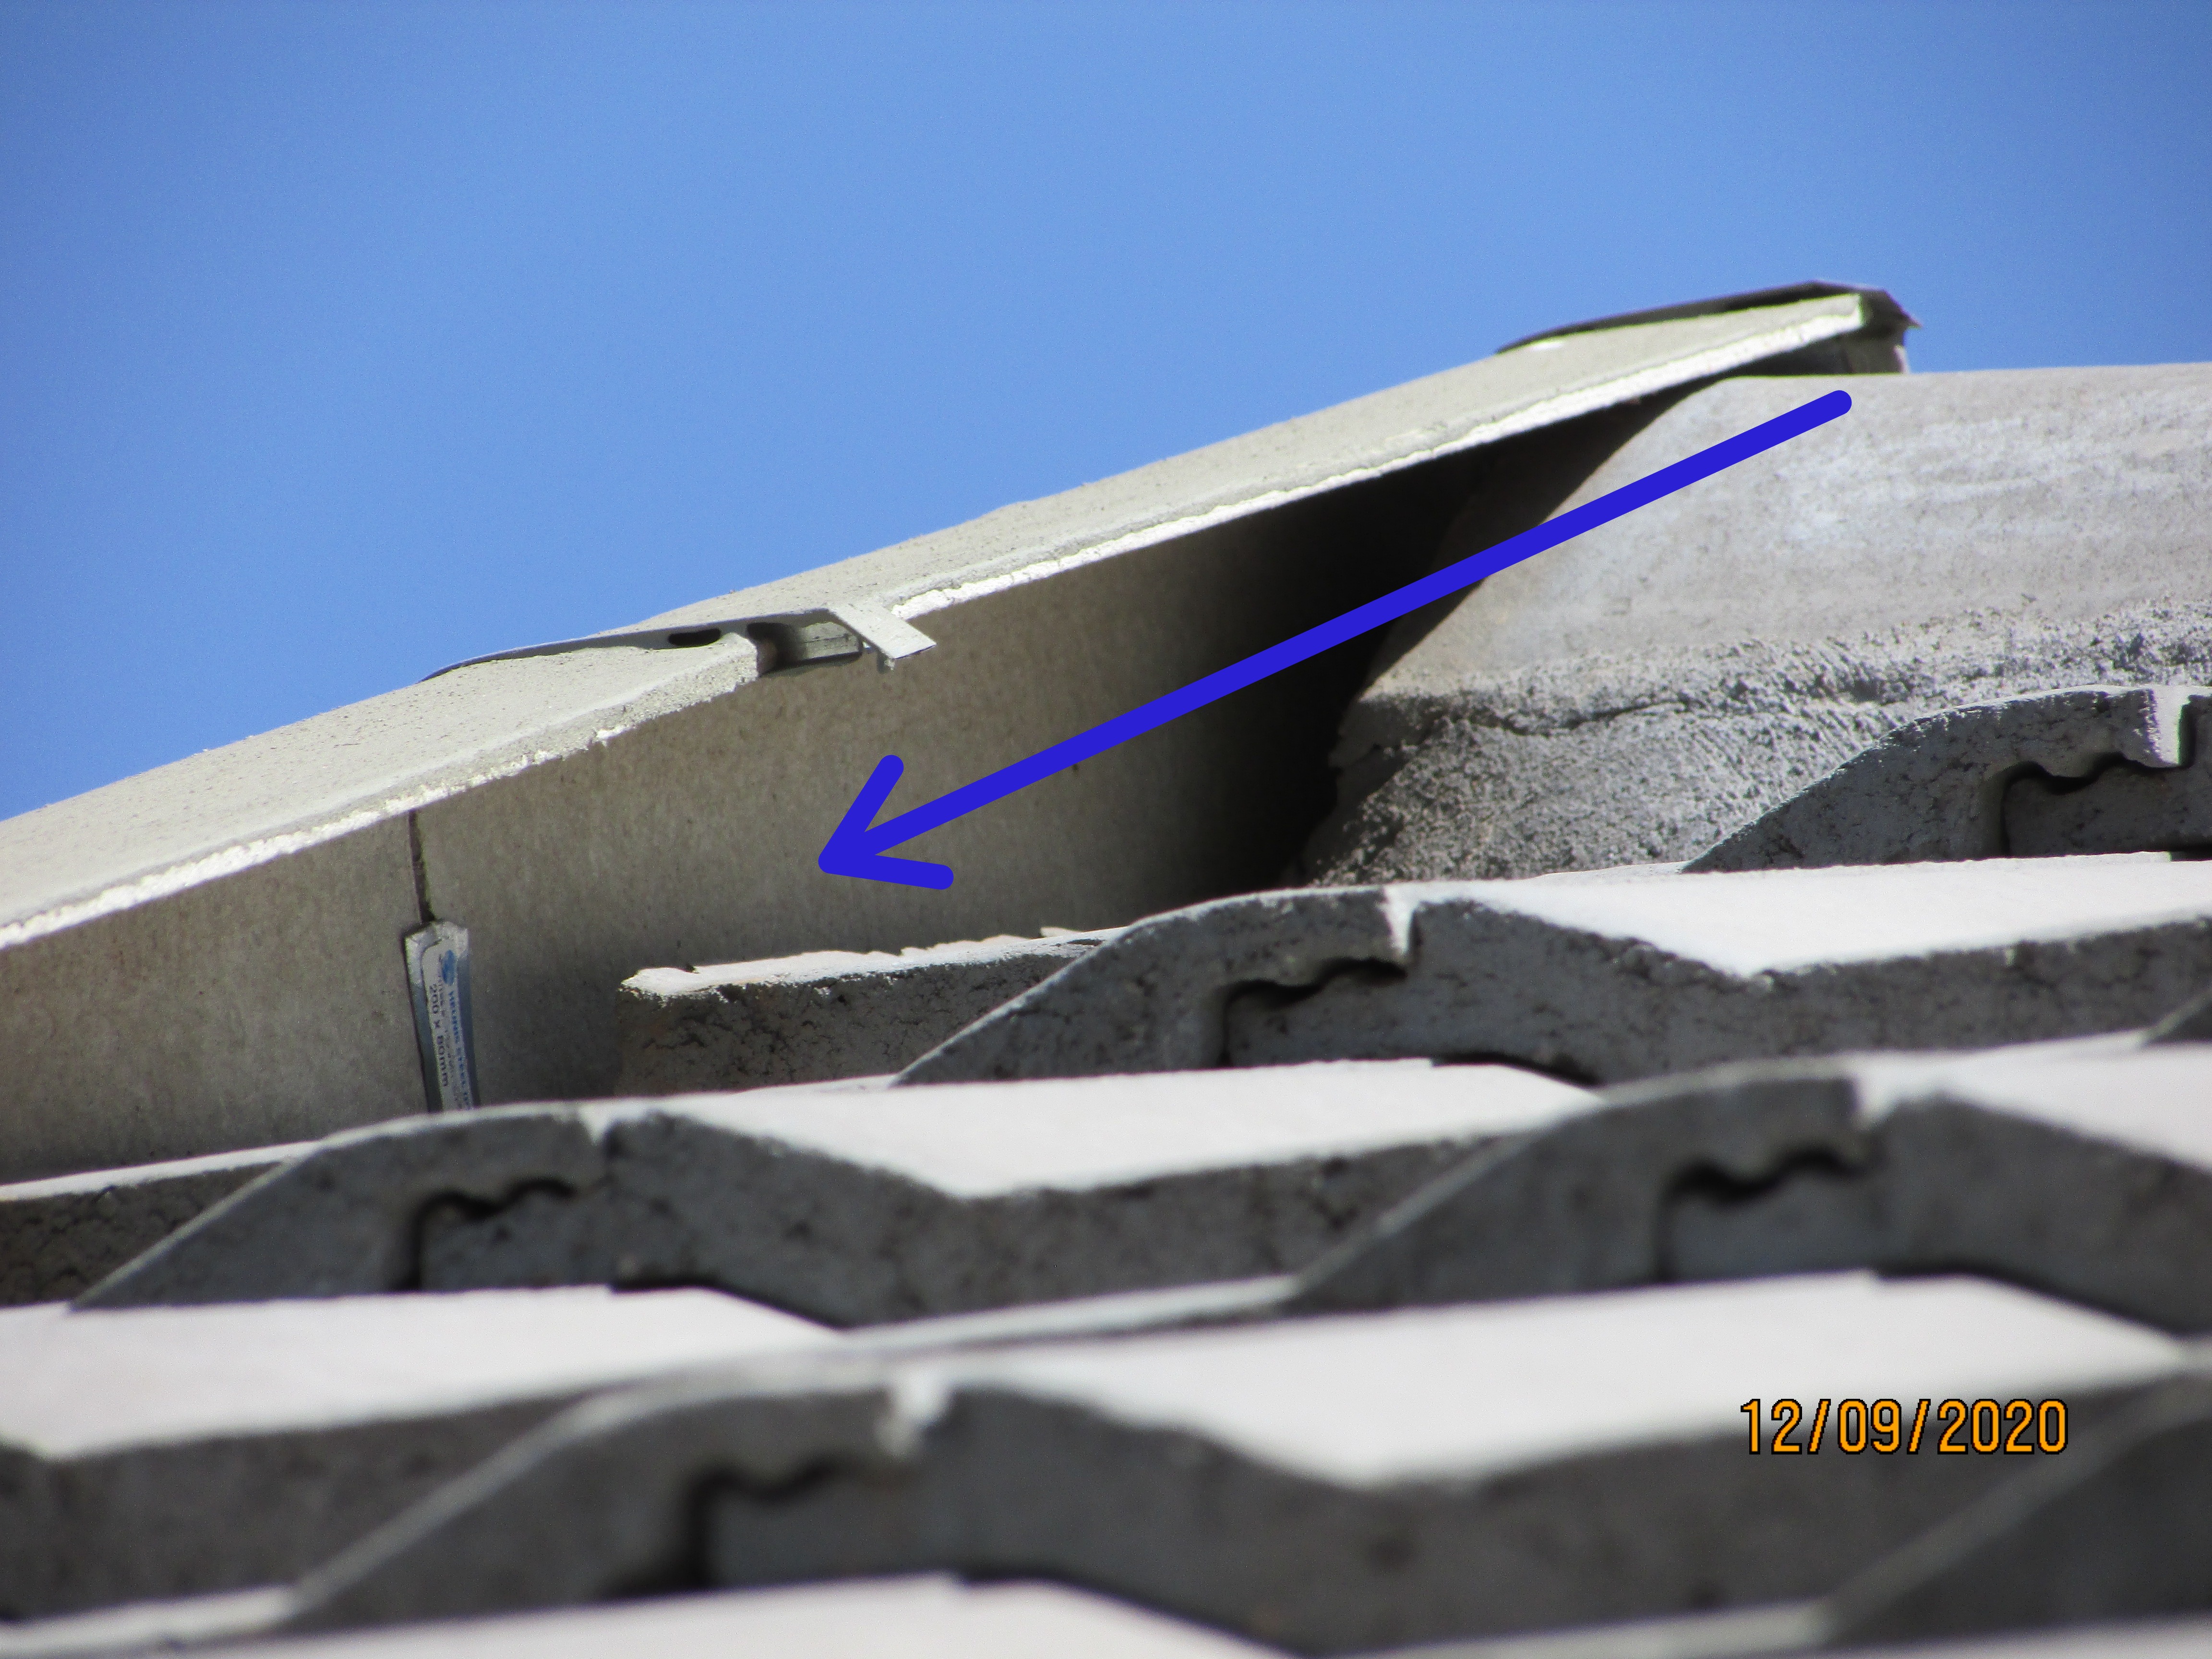 |
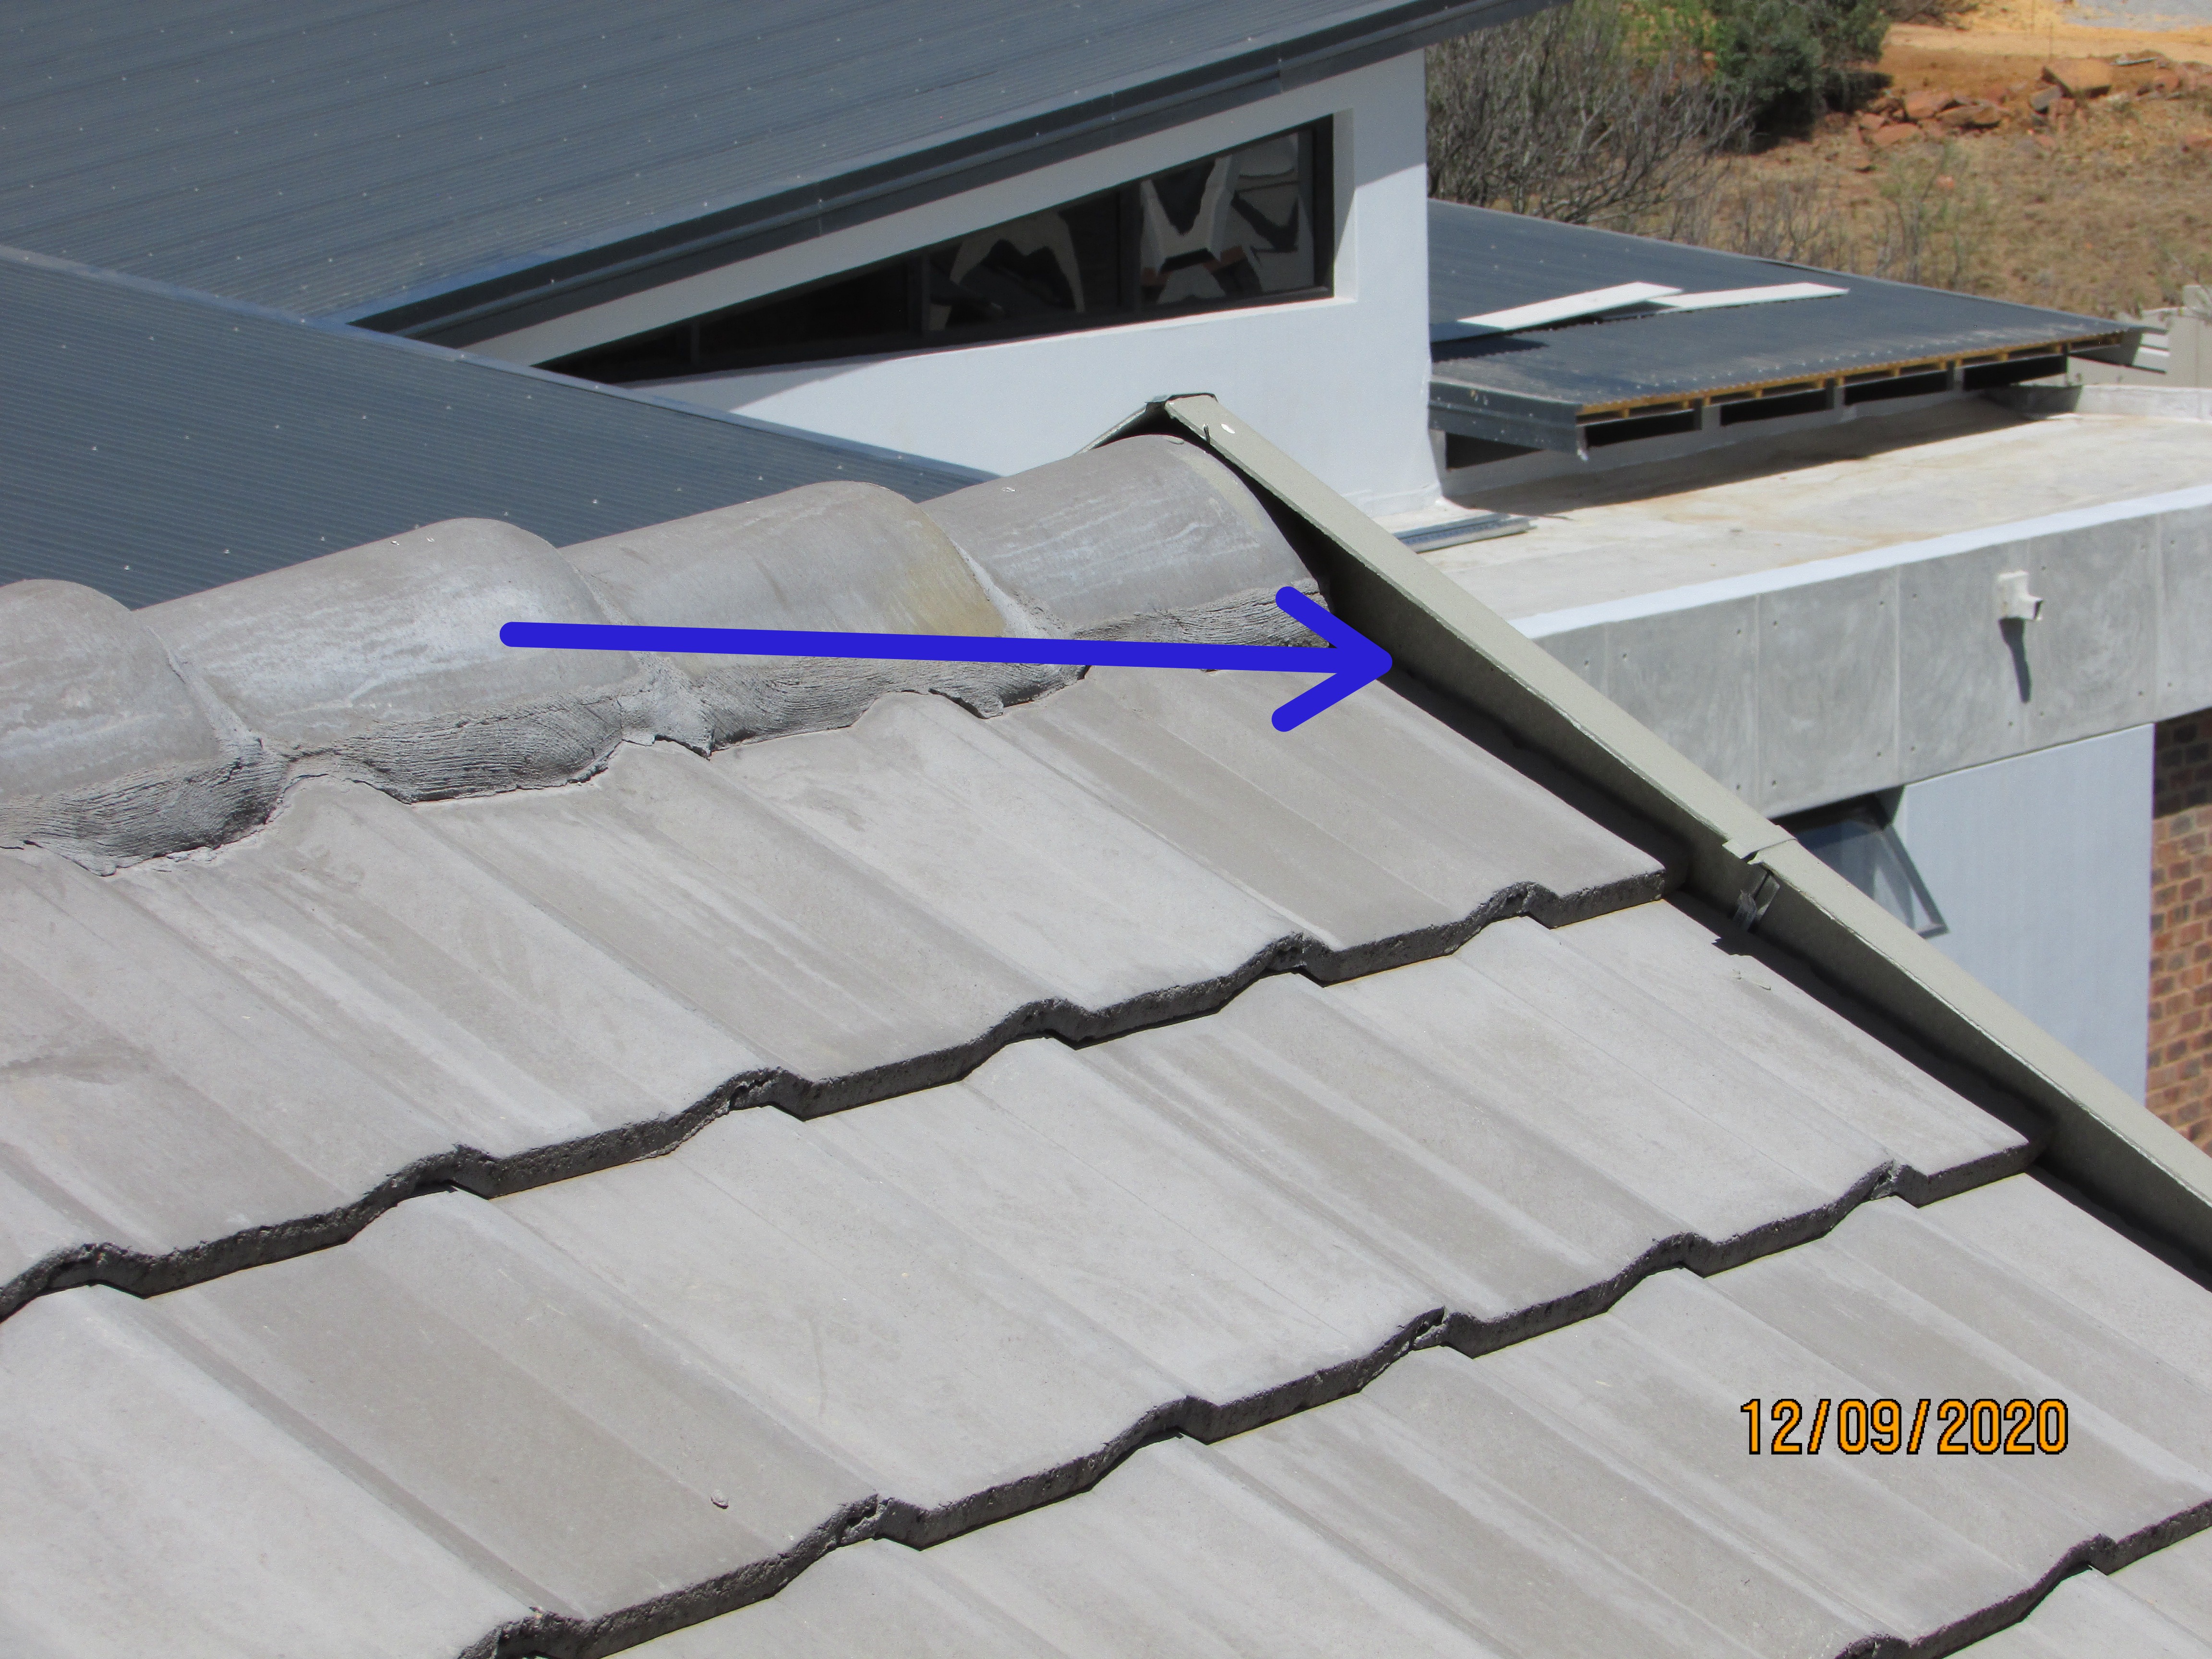 |
Some barge boards required sealing with silicon or an acrylic waterproofing system where they butt against the walls to prevent moisture intrusion into the roof structure at the verge of the roof.
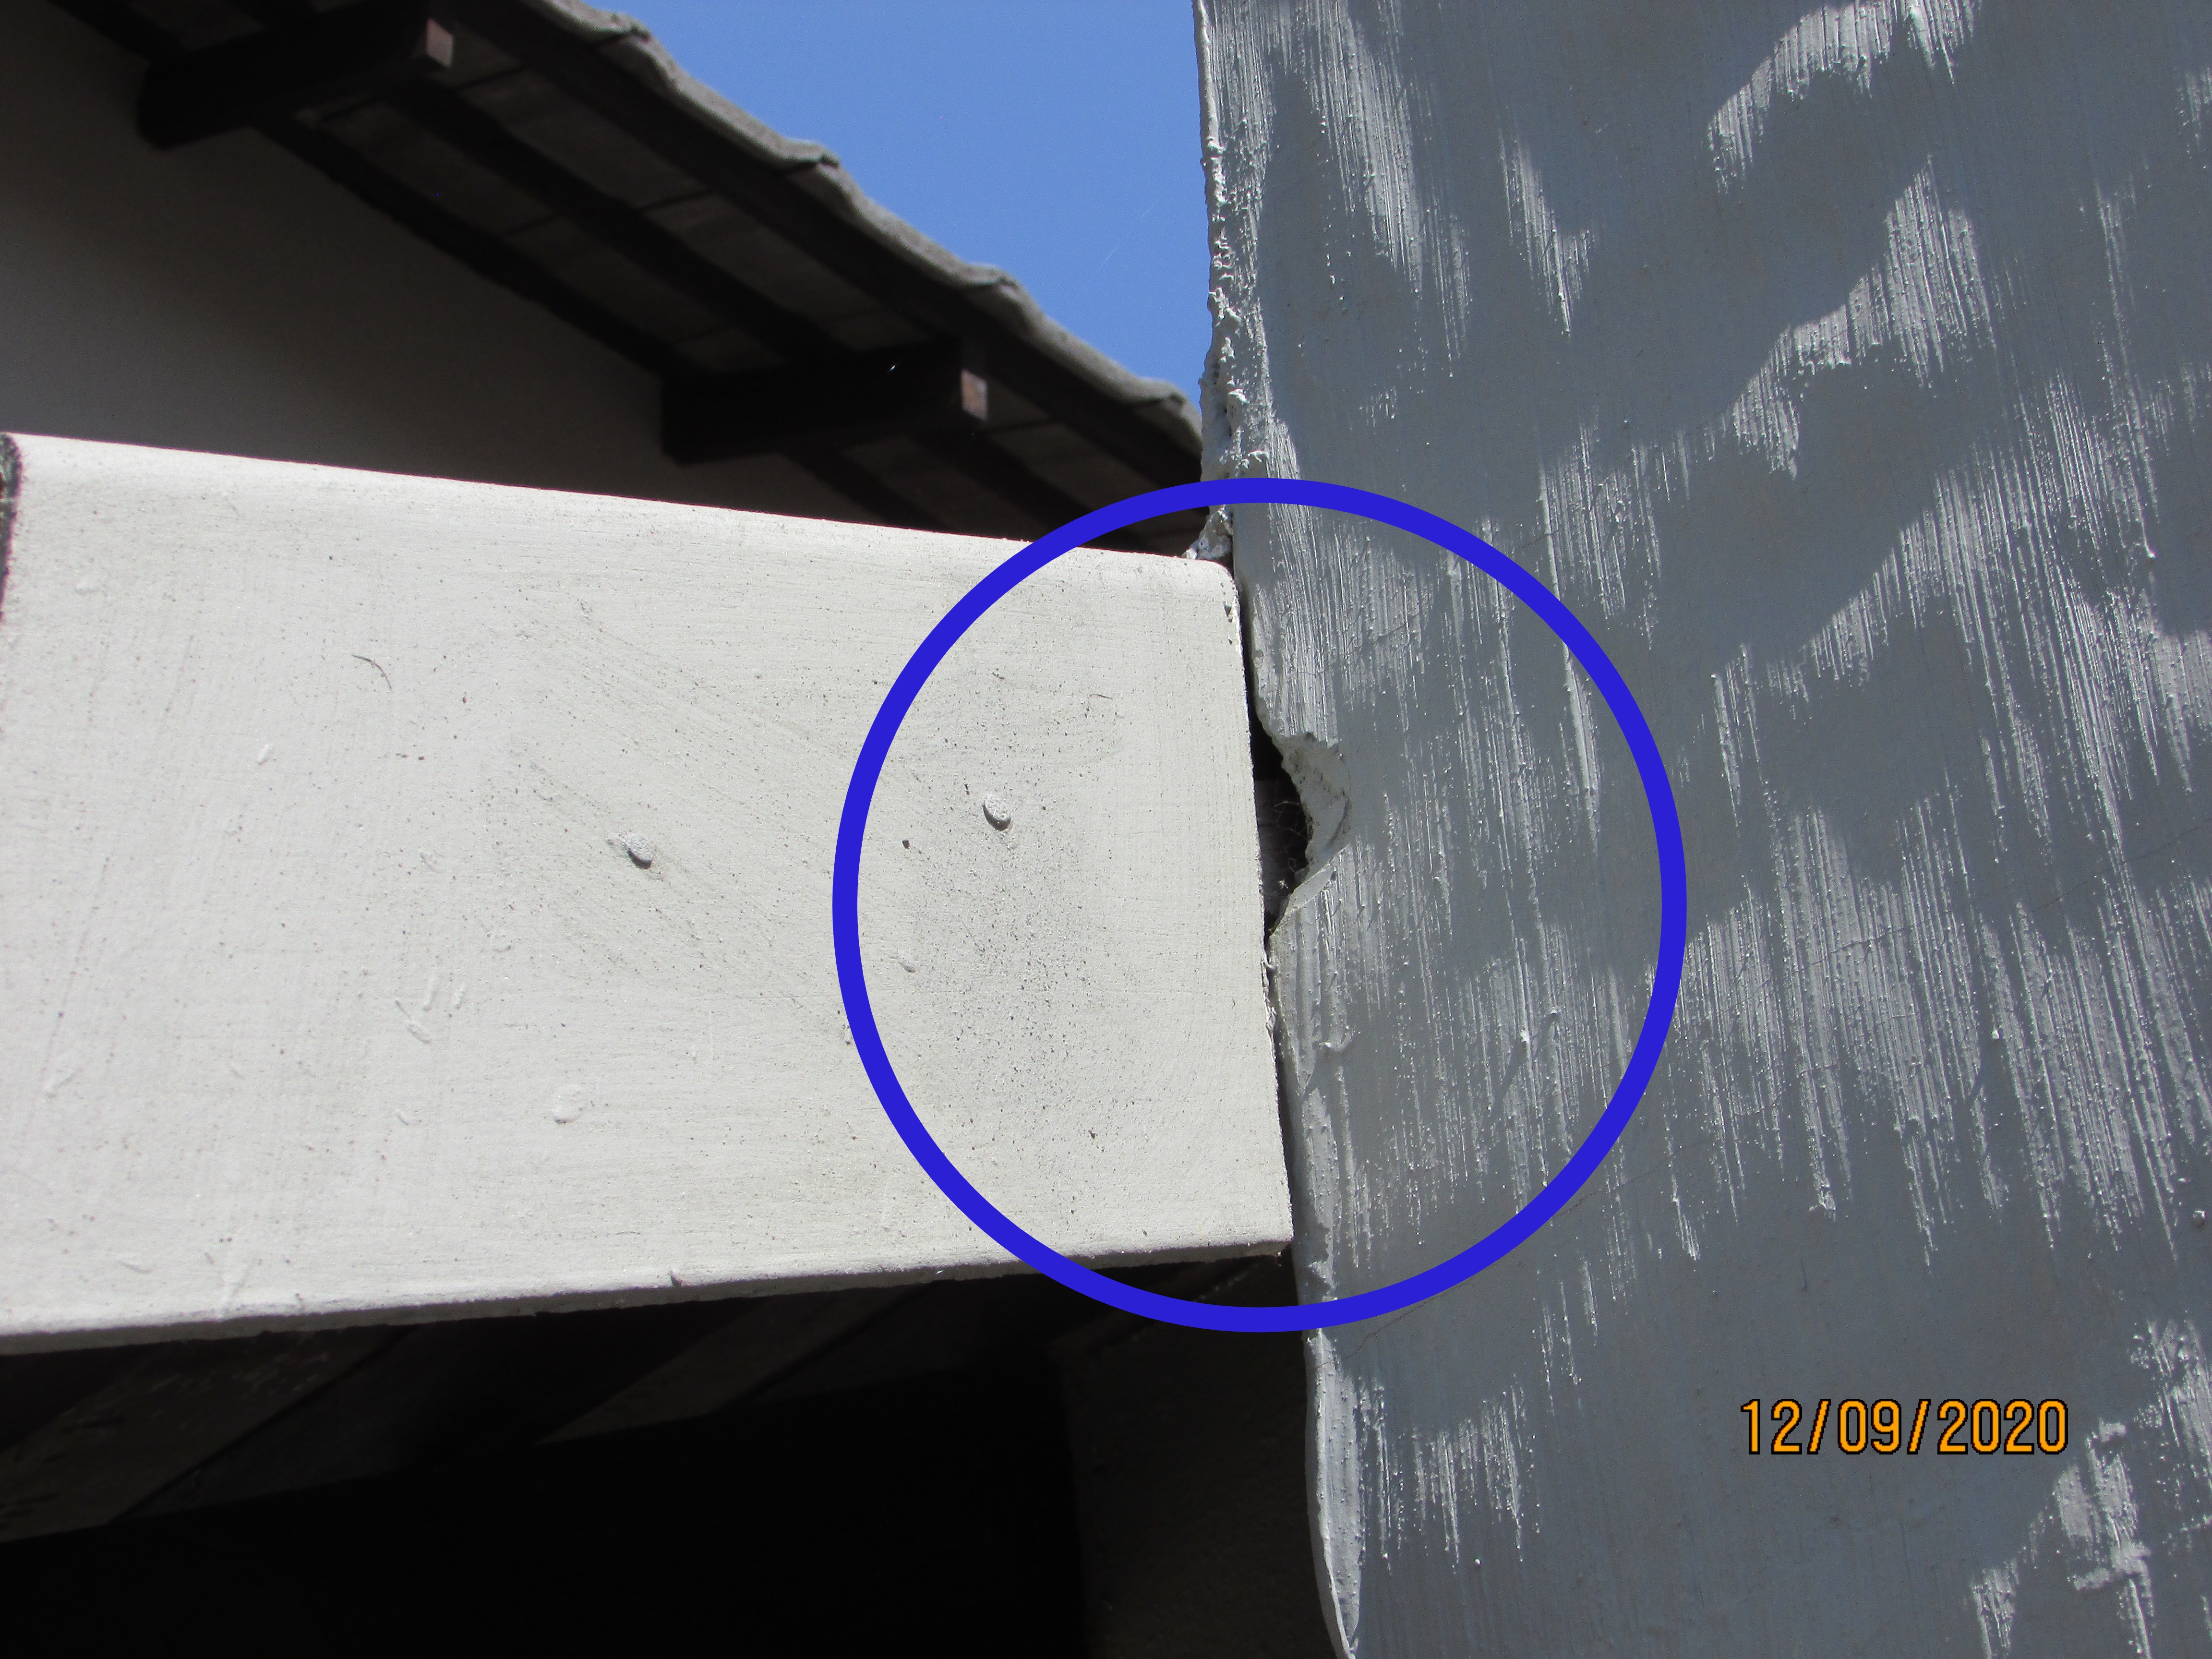 | 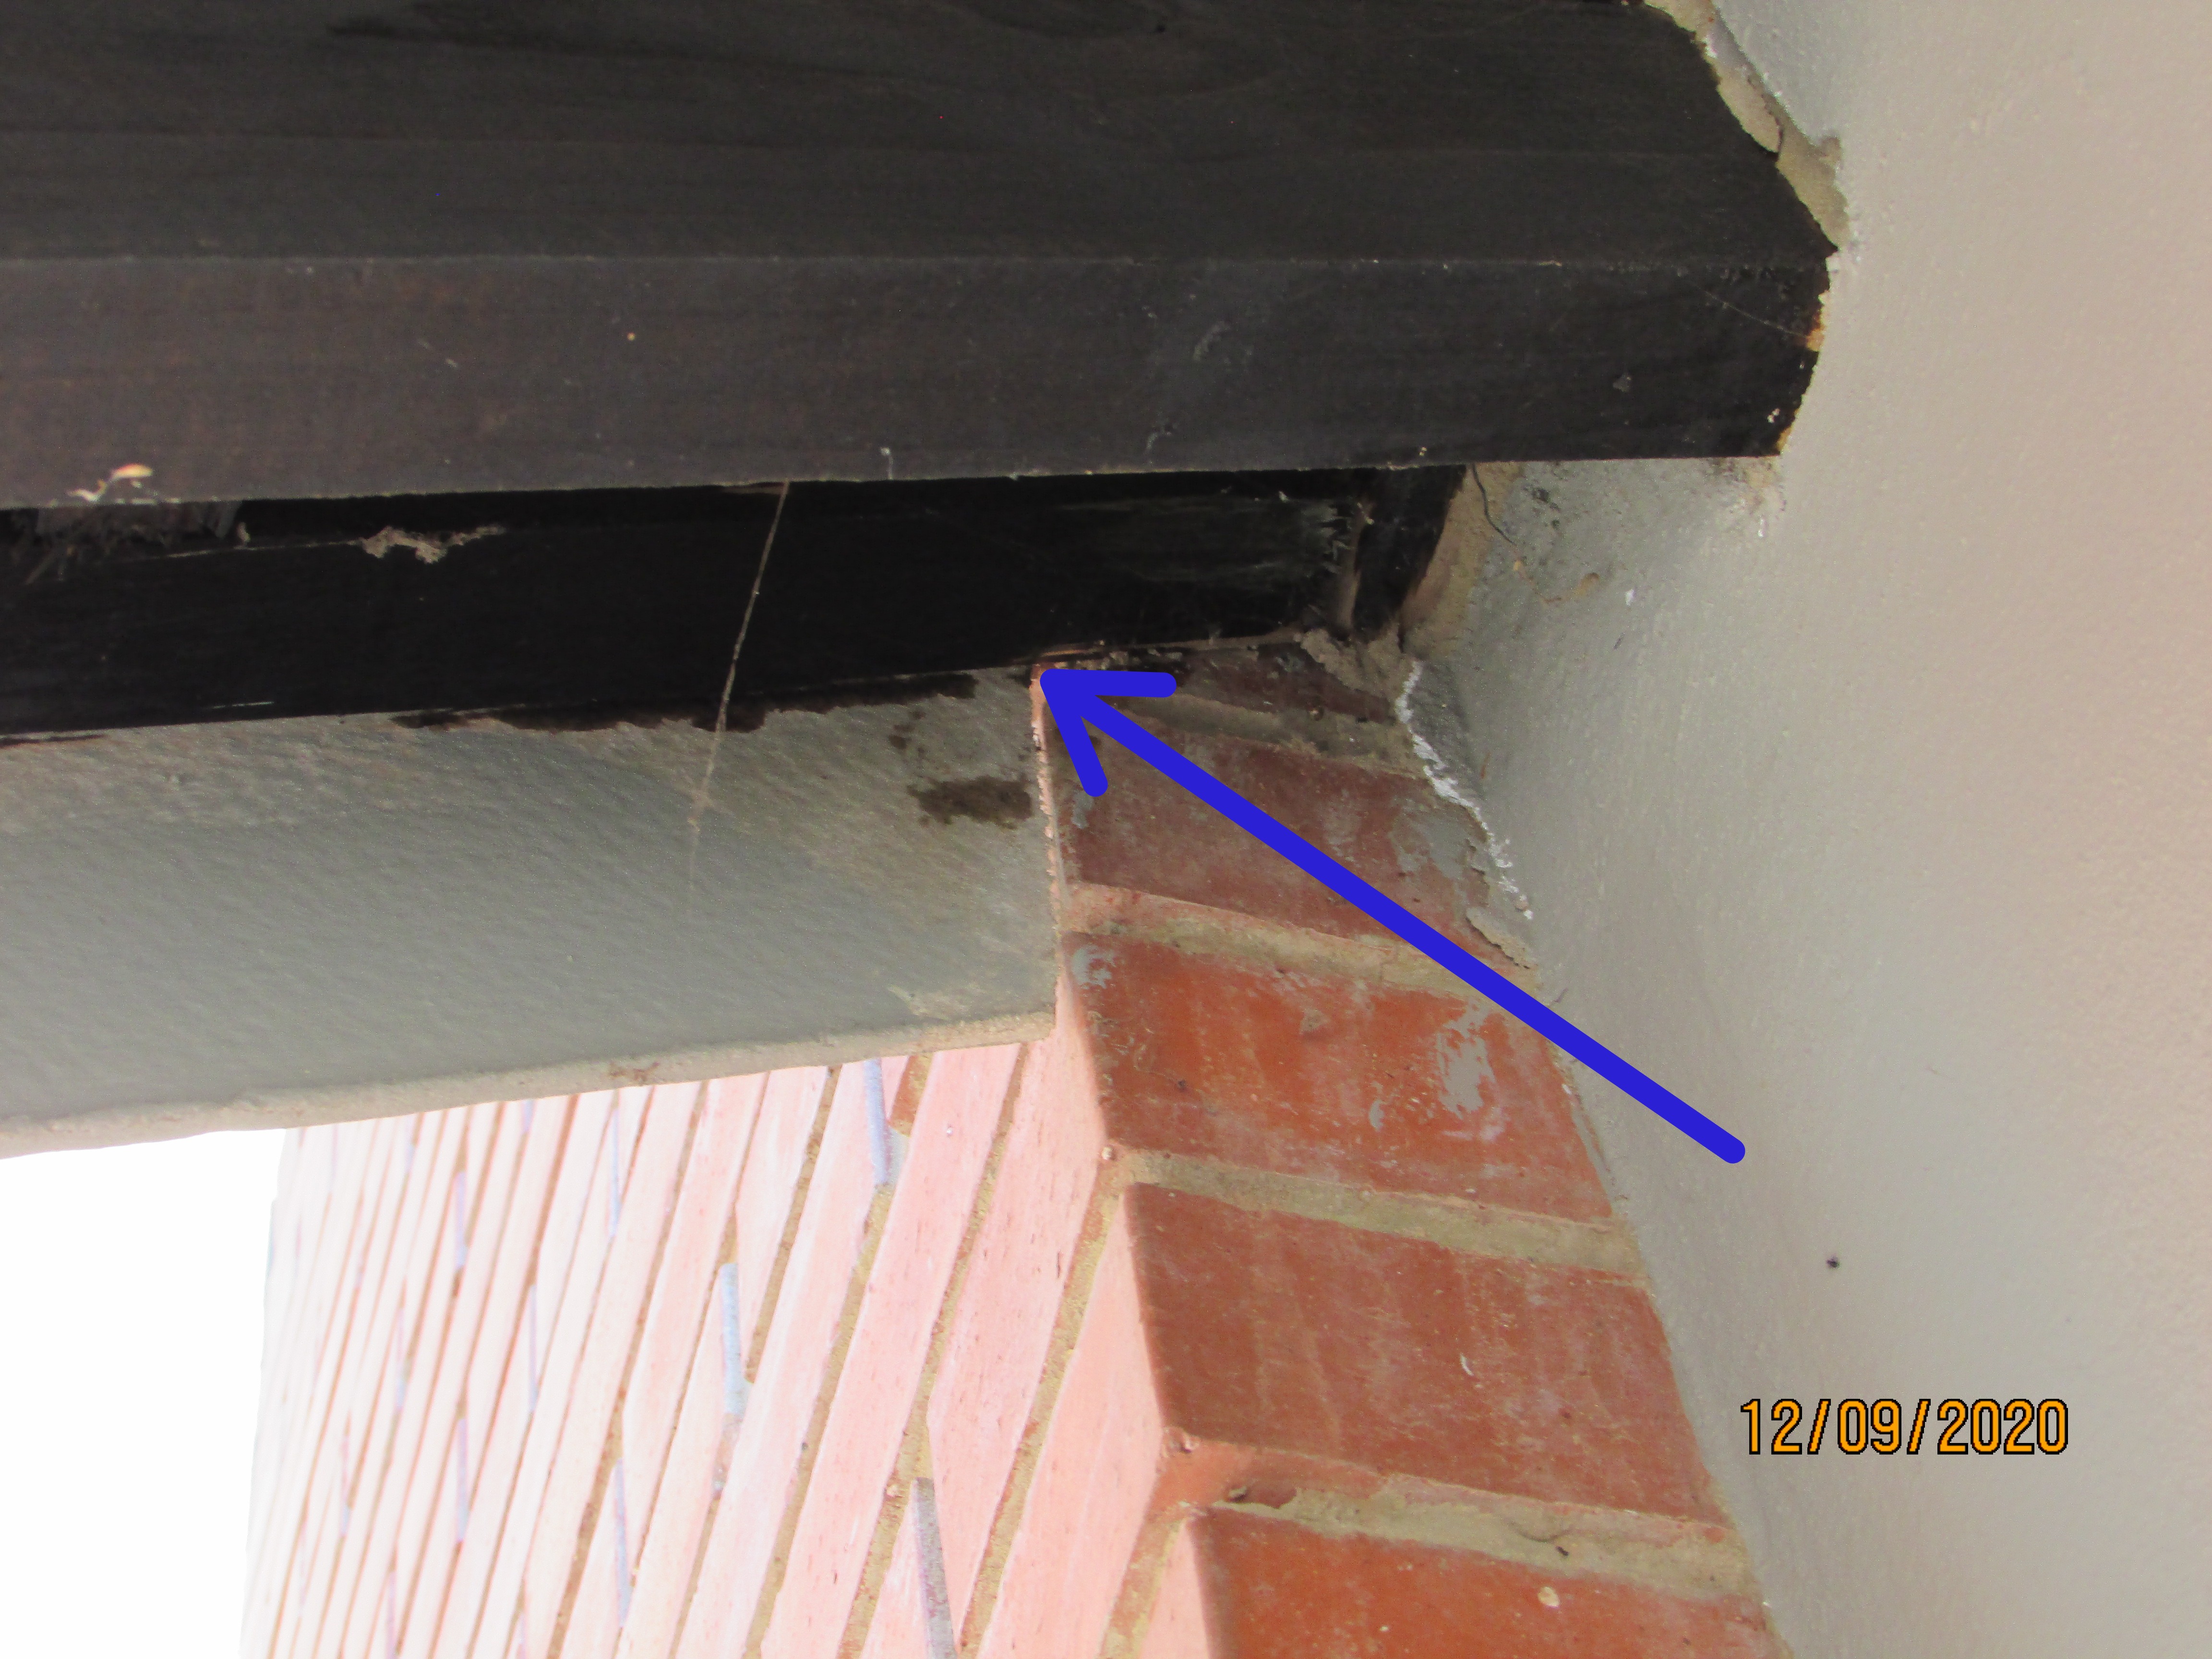 |
Roof Drainage
Gutter and Downpipe Materials: None, Internal scupper drains
Gutters and downpipes had not been provided at the eaves of the tile roofs on the house and garage. Uncontrolled stormwater discharging onto the ground and paving had caused splashing up onto the walls below the roofs. Rainwater splashing up against the walls will cause serious damage to painted and plastered finishes and allow moisture intrusion into the structure of the house and garage. Serious consideration should be given to the installation of a complete system for roof drainage to control and direct rainwater away from the house and garage.
- No gutters and downpipes were installed.
- Note the damp marks on the plastered and painted wall from rainwater splashing up because of the lack of gutters and downpipes.
- Note the damp marks on the face brick wall from rainwater splashing up because of the lack of gutters and downpipes.

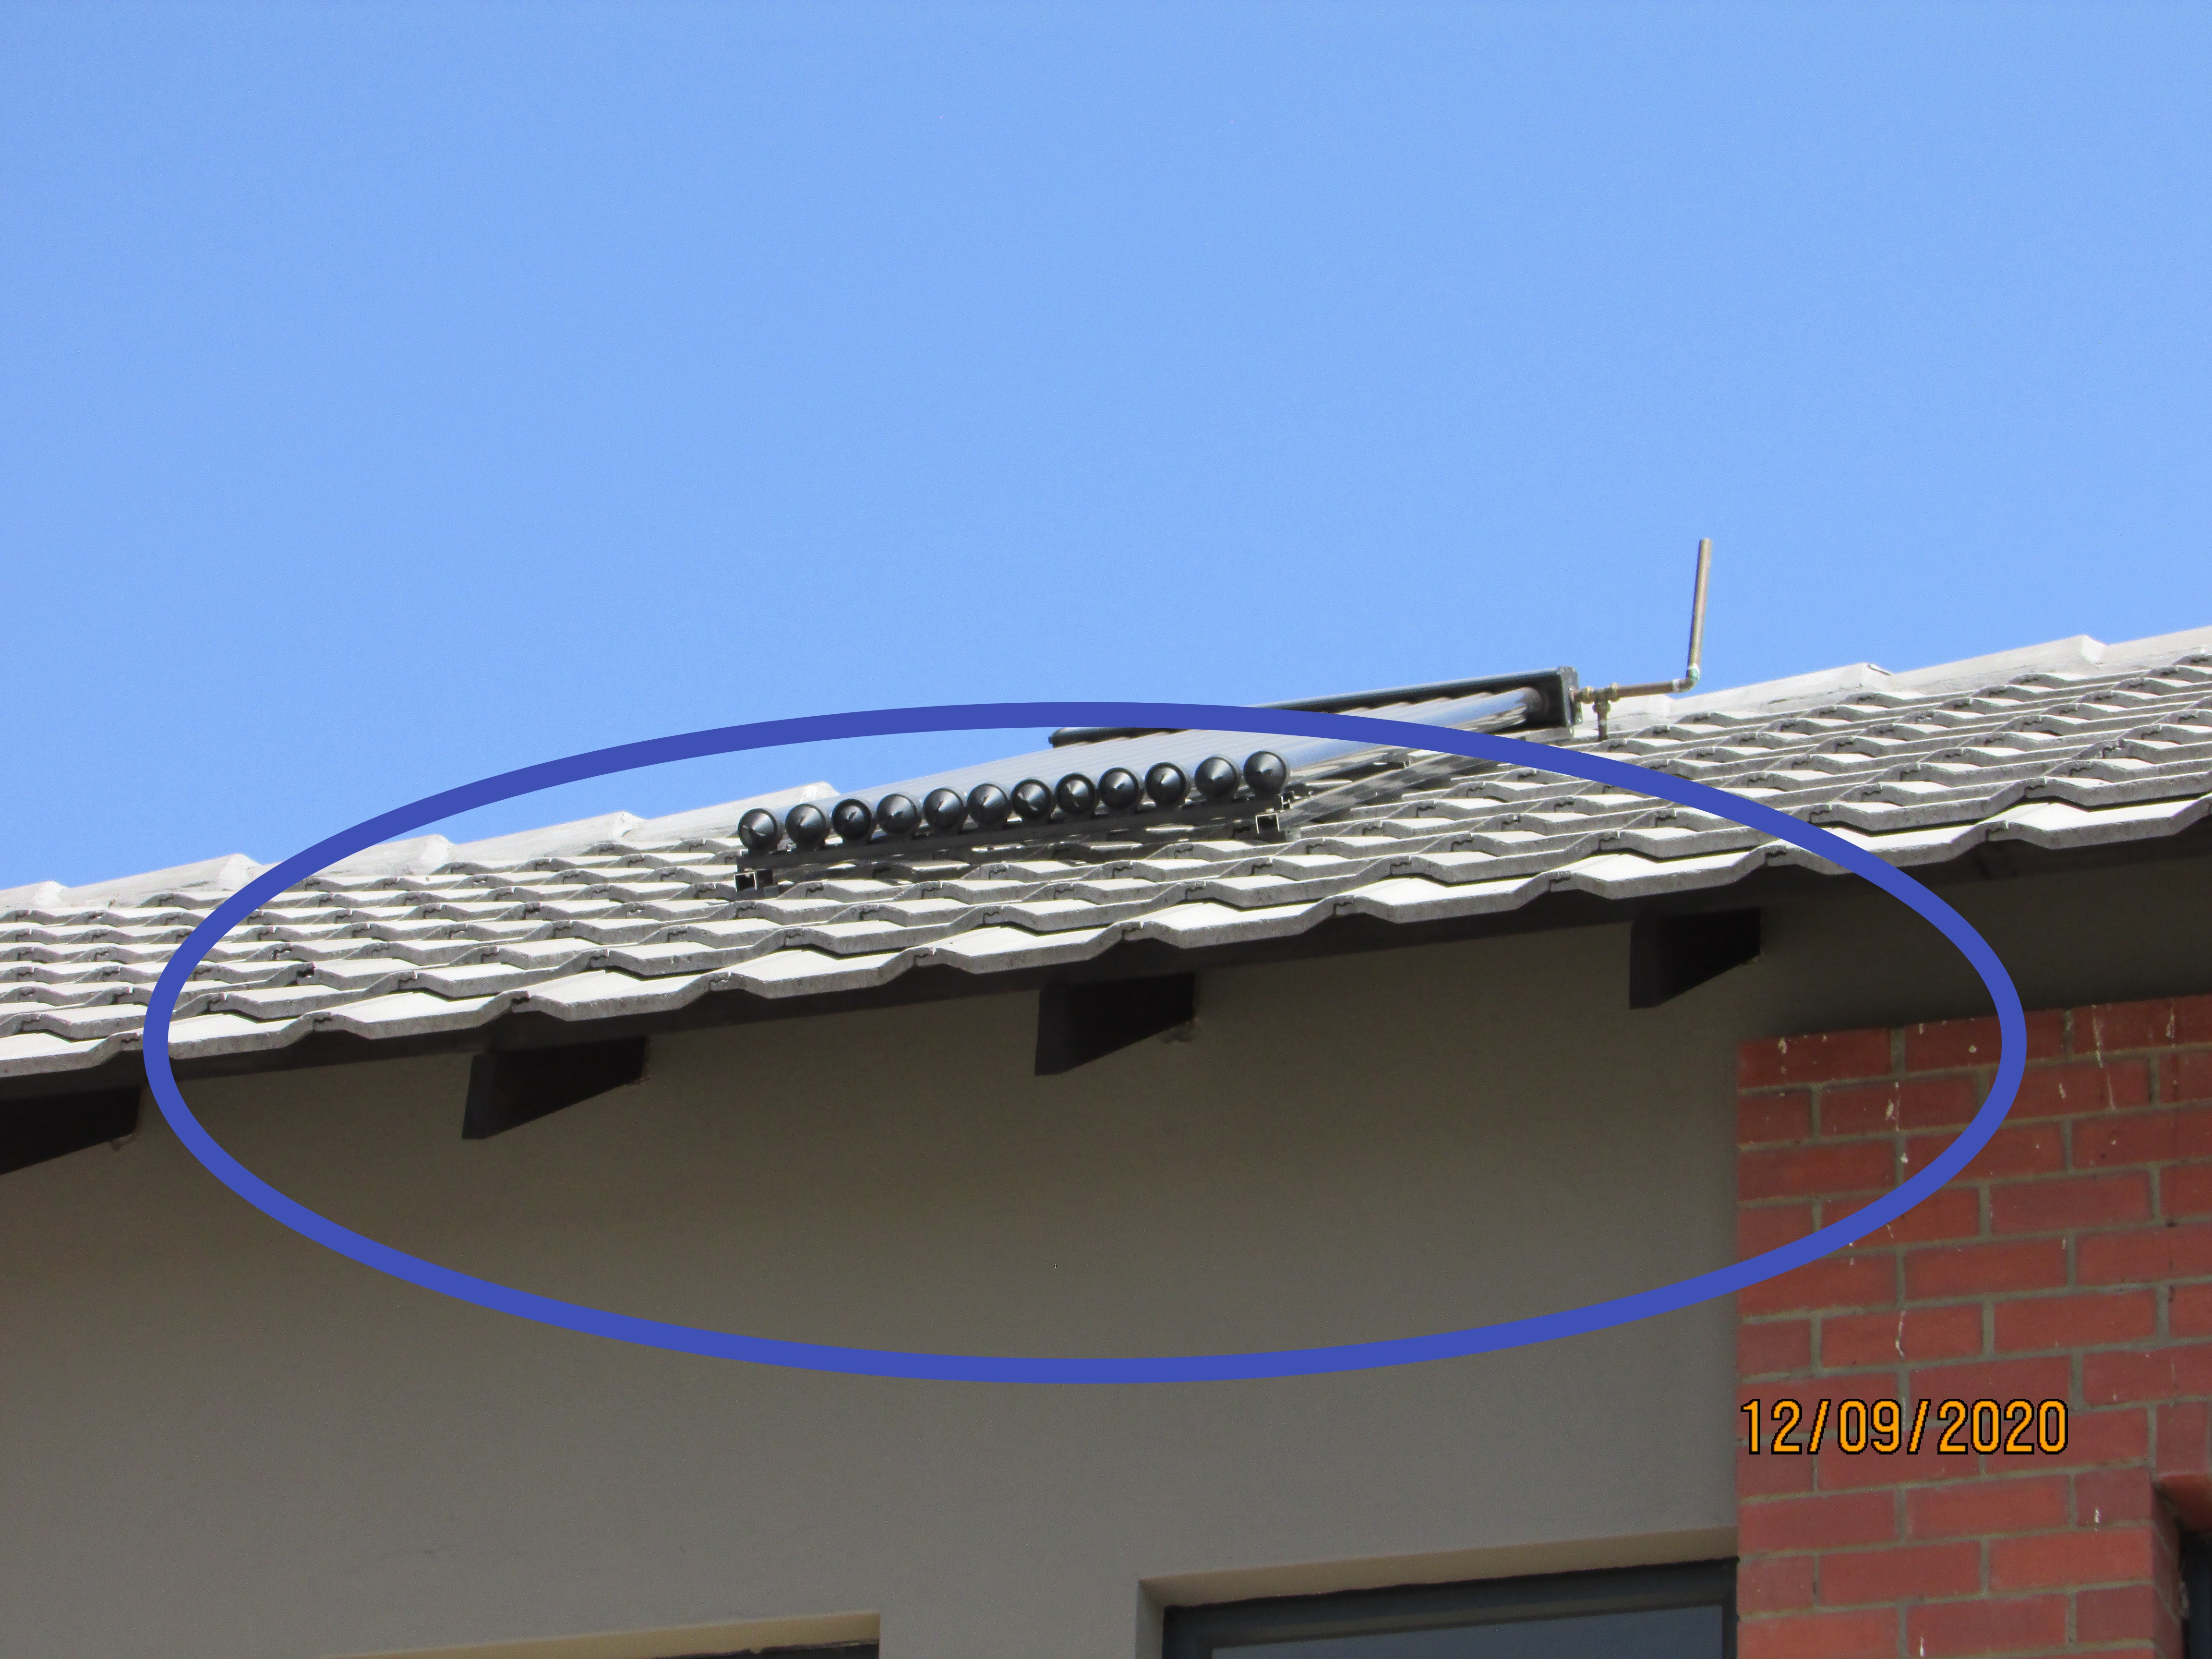
.JPG)
.JPG)
The two downpipes discharge here could cause splashing up against the walls and pooling on the paving. I suggest both be cut back and provide with 45° bend so that they can discharge freely away from the building. Patching around one downpipe was required to prevent moisture intrusion into the wall above the DPC.
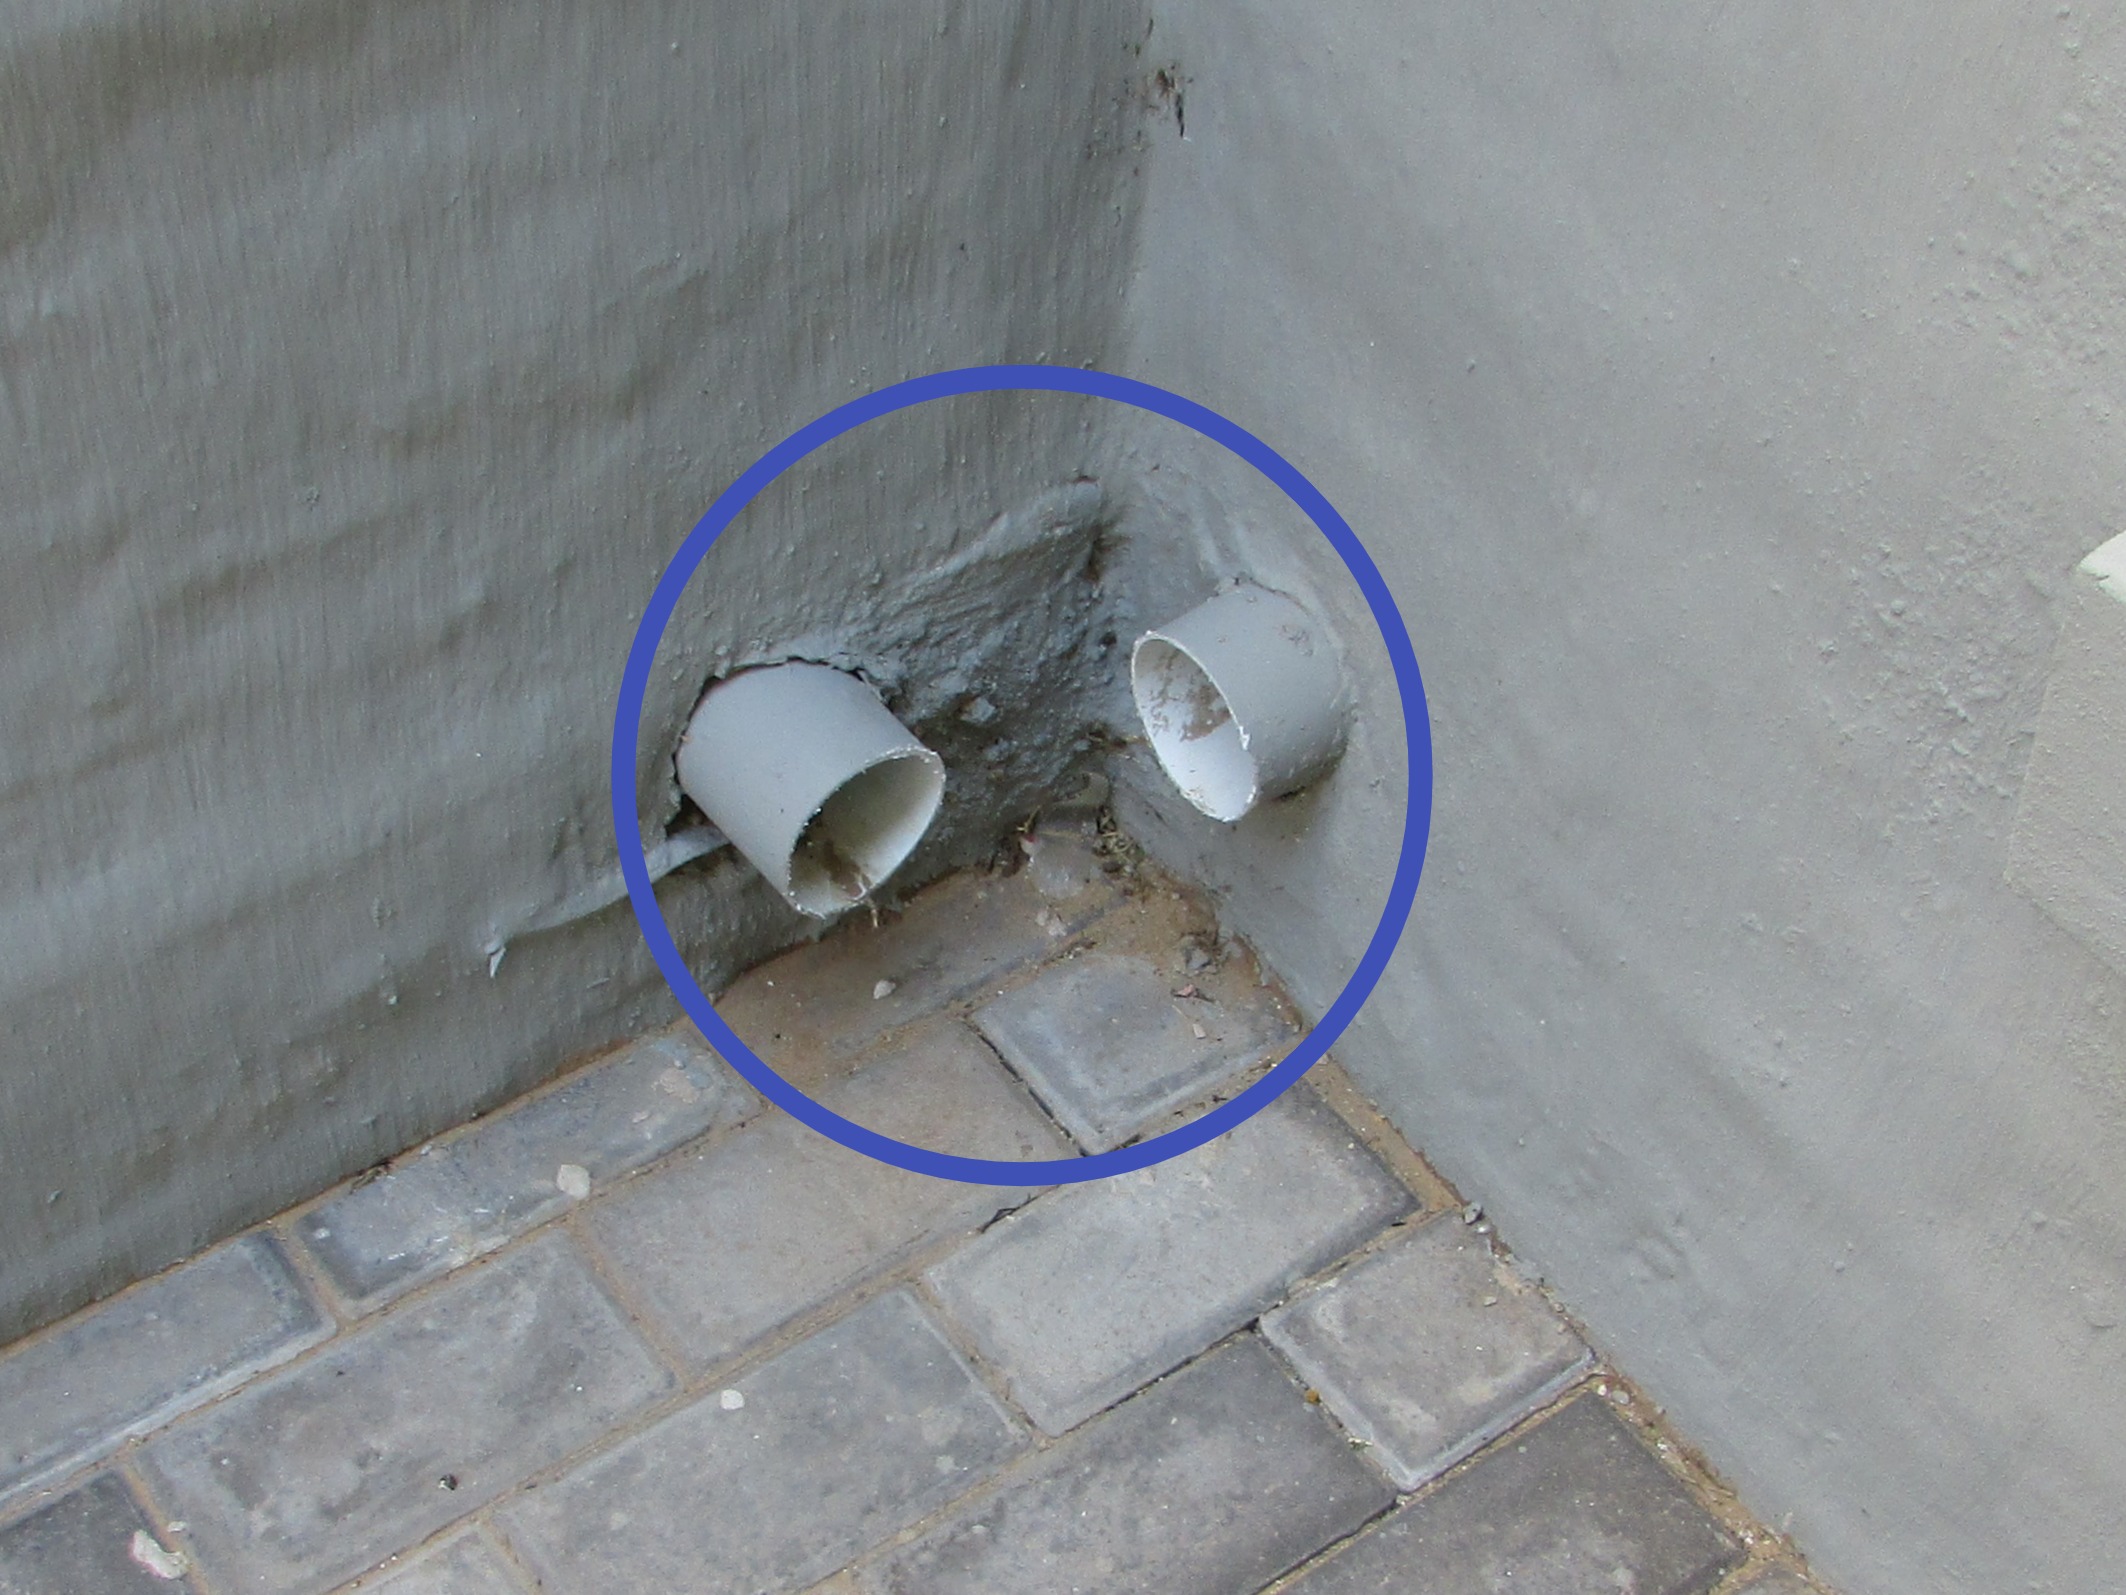 | 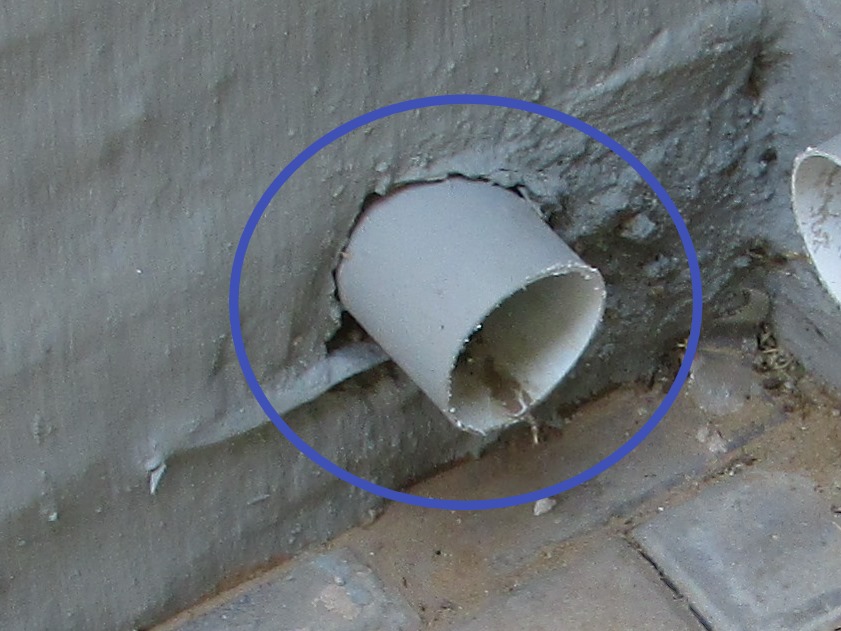 |
Roof Space Access
Access: Ceiling trapdoor
There was a trapdoor opening in the ceiling in bedroom 1's bathroom en-suite that was entered in order to evaluate the roof space areas and components. I inspected the roof space as best as I possibly could from all accessible vantage points at the trapdoor. However, I do not try to enter a roof area that is less than 900 mm high, or where passage is restricted by framing, distribution ducting, etc., nor will I attempt to access any areas where suitable crawl boards are not installed. I do not enter a trap door that is smaller than the standard 600 mm x 600 mm size.
Roof Space Interior
Rafters and Roof Trusses: Factory manufactured roof trusses
Under Roof Membrane: None
The concrete tile roof appeared to be in a satisfactory condition.
Insulation
Insulation Type: Polyester fibre insulation
All of the house's ceiling was insulated with 100 mm insulation. According to SANS 10400-XA more insulation should be added for more for improved energy efficiency. The building regulations require that all new roofs, erected since 11th November 2011, have to conform to the minimum R-Value of roof assembly (ie. all components of the roof and ceiling). The R-Value required in zone 2 is R-3.2 (Pretoria Area). For a roof this equates to around 135 to 150 mm of a typical cellulose fibre insulation (Think Pink, Isotherm, Romatherm etc.) depending on whether it is a tiled or sheeted roof. You would probably require a 135 mm Isotherm (R-value = 3.14). For energy saving and comfort I recommend that the ceilings be insulated to the latest requirements. Have an insulation contractor inspect the roof space and make further recommendations.
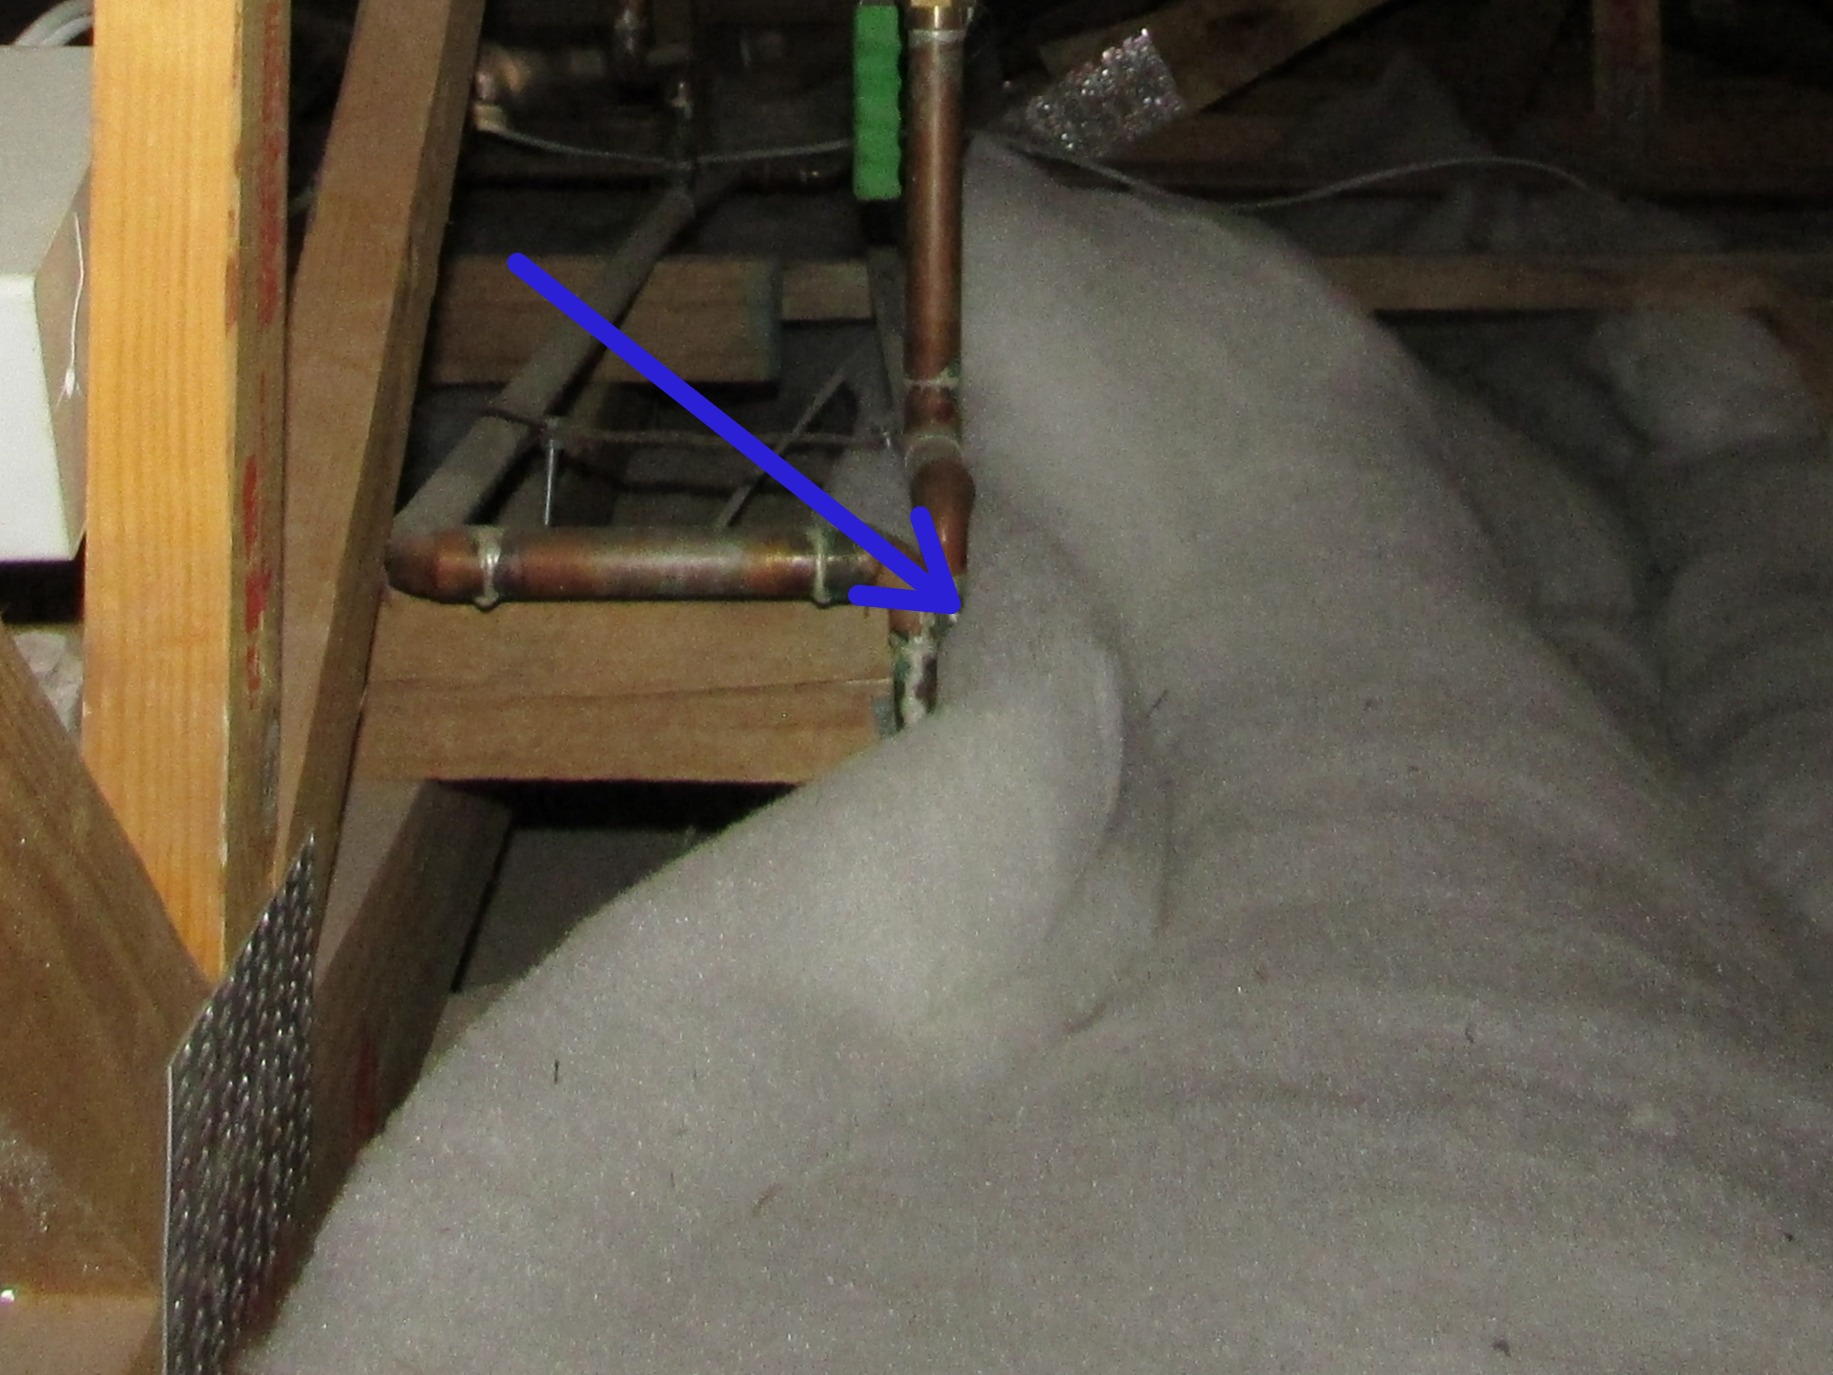 |
Ventilation
Roof Space Ventilation Method: Venting between tiles
The ventilation within the roof space appeared to be adequate.
Structure and Basement
Foundation
Foundation: Not visible
Building Configuration: Brick plinth and concrete slab cast on earth filling
Foundation Description: Strip foundation or reinforced strip foundation
The structure appeared to consist of a concrete strip foundation which is either reinforced or not depending on the soil founding conditions, with plinth walls built up to the surface bed (concrete floor slab), levelled, backfilled and compacted. The footing size or depth below the ground level could not verified.
Floor, Wall and Roof Structure
Wall Structure: Masonry
Floor Structure: Ground floor concrete slab cast on compacted fill, 1st Floor suspended reinforced concrete or composite floor slab (block and beam)
Roof and Ceiling Framing: Factory manufactured roof trusses, Concrete roof slab
The visible portions of the ground floor and 1st floor concrete structure appeared to be in satisfactory condition at the time of the inspection.
The external structure of the house was generally in a satisfactory condition. Additional exceptions are specifically listed.
External crack repairs were noticeable on an exterior wall. Considering the size of the house, the structure has performed very well. None of the cracks appeared to be structurally significant at this stage. The cracks should be monitored for further movement. If they crack again and widen considerably, I would suggest you consult a structural engineer. In any event, cracks allow moisture intrusion into the structure and should always be sealed and repaired.
 | 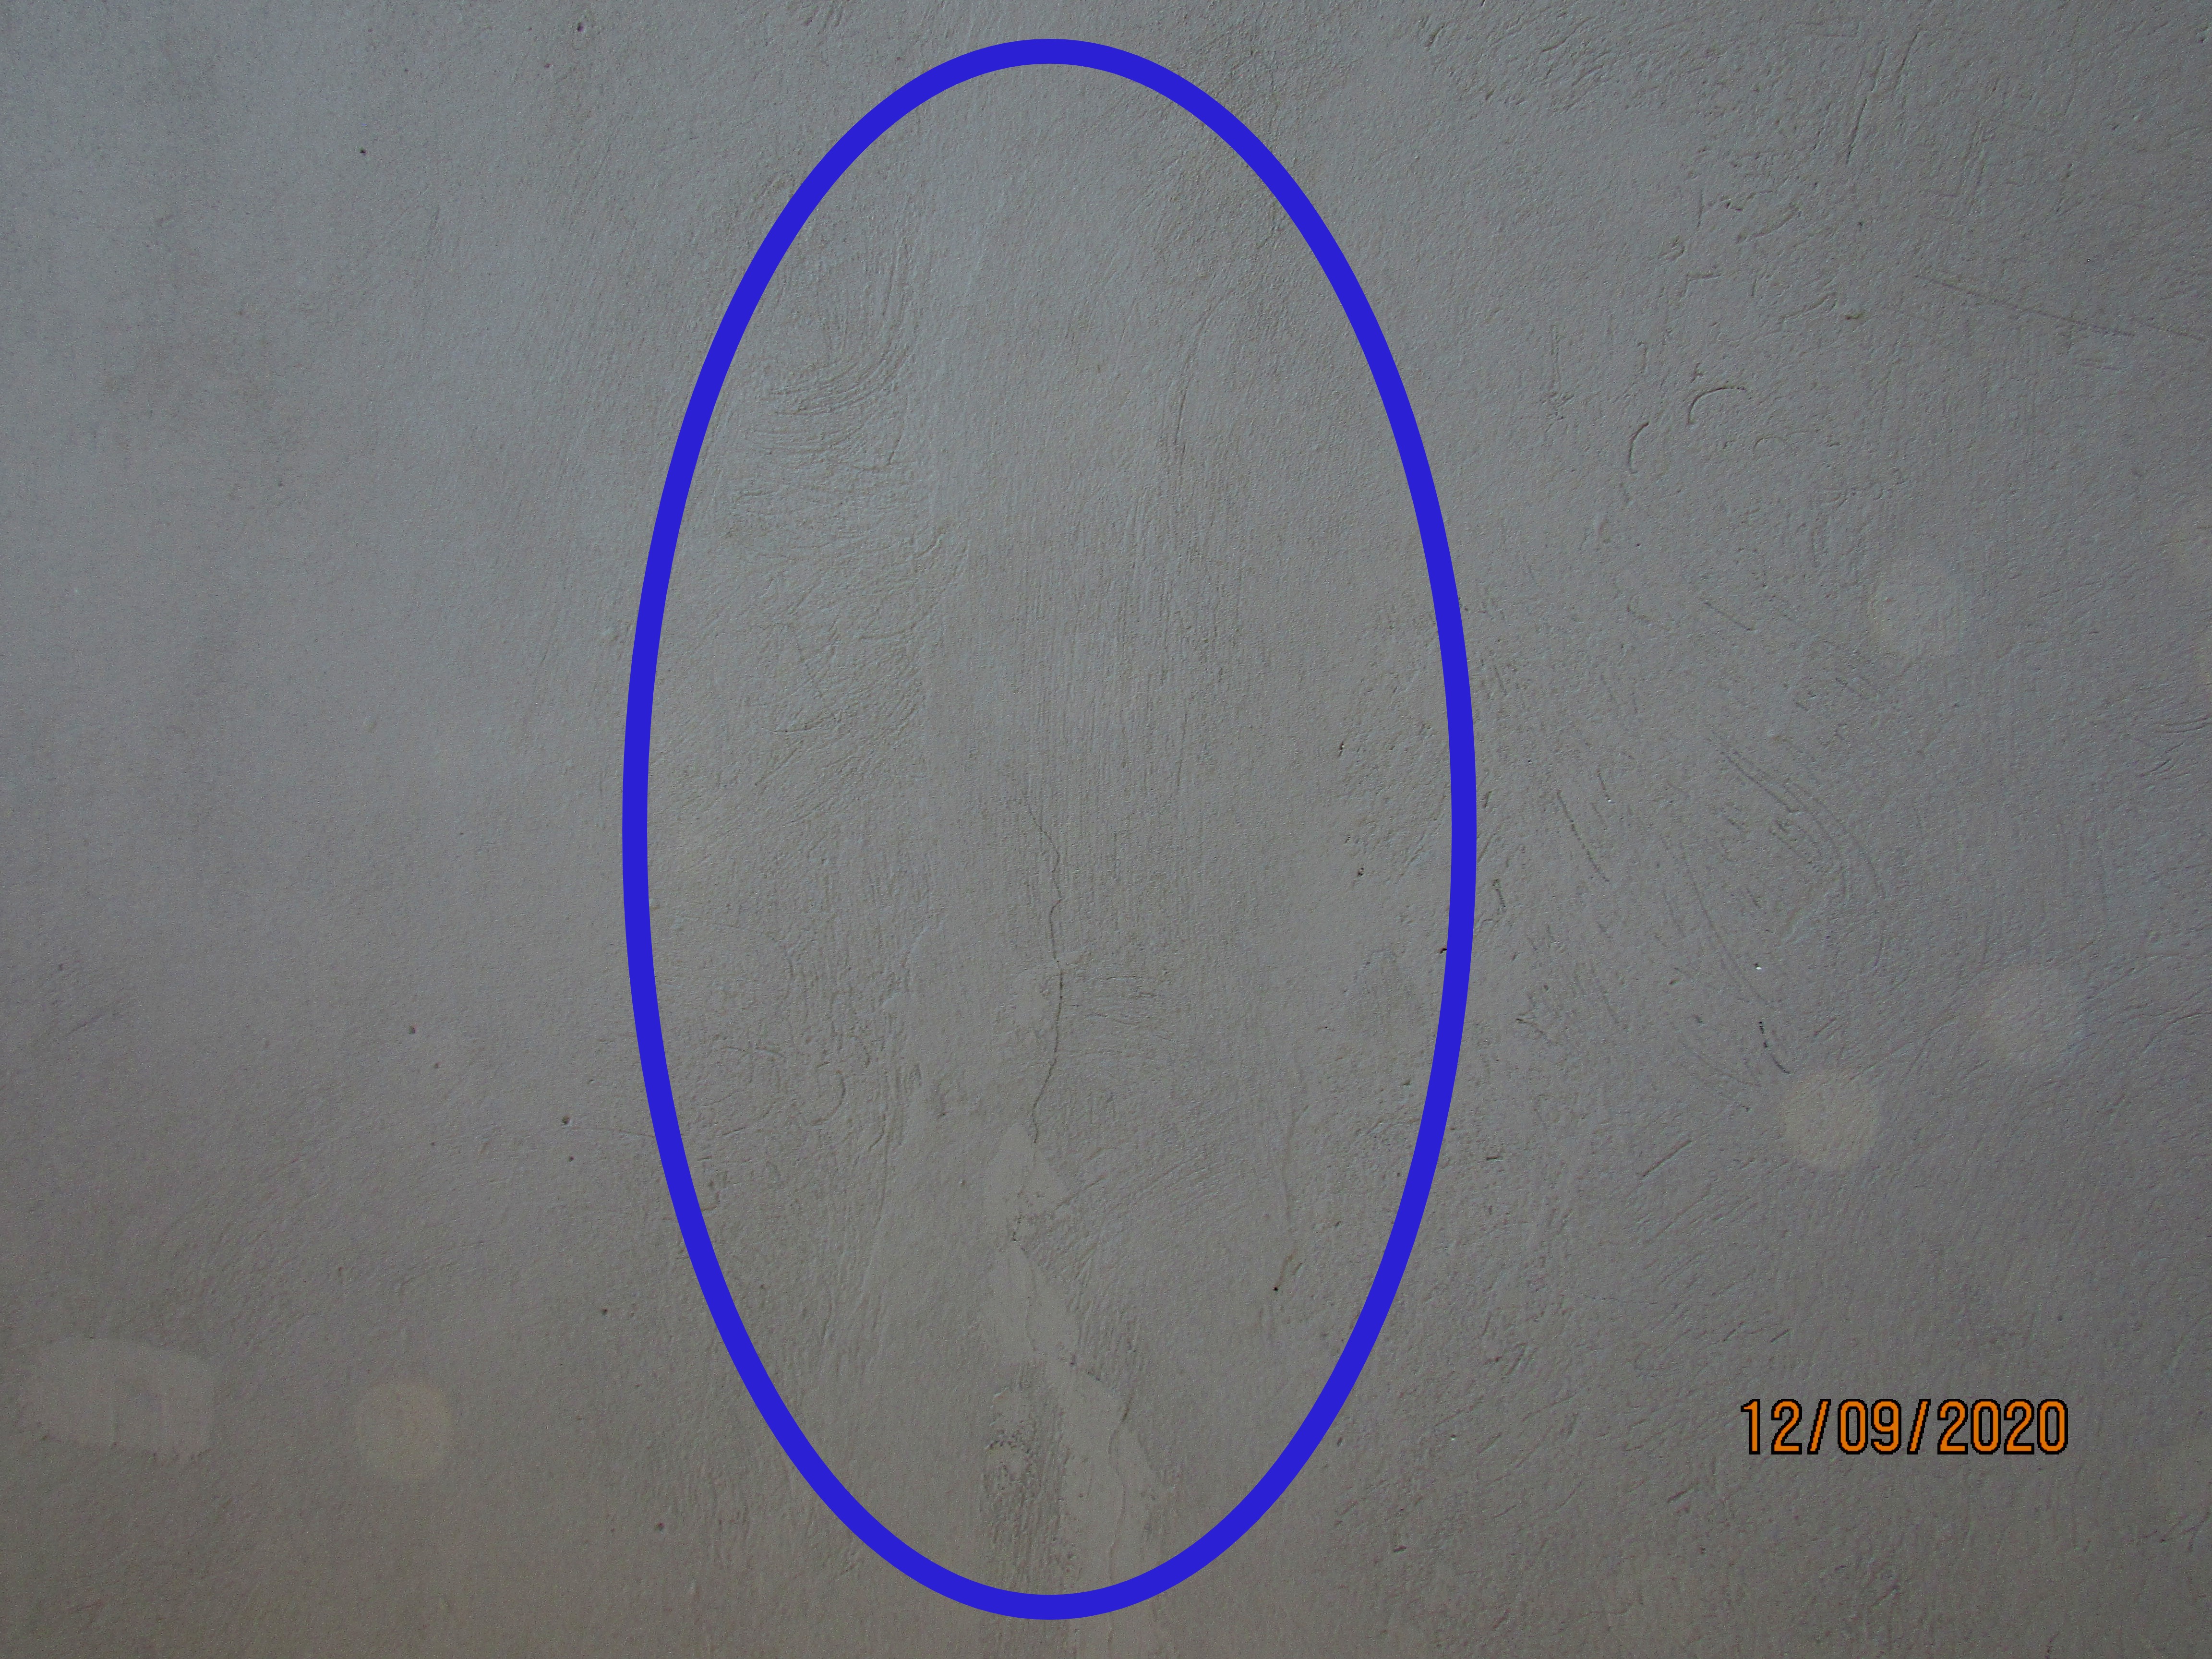 |
Settlement usually occurs in new or relatively new buildings. Buildings are very heavy and cause the ground to compact, but this normally stops after a short while. Most buildings are constructed in a variety of materials, all of which need to settle down and have different shrinkage rates. It is not unusual for cracks to form in new houses. As long a water is kept away from the building no significant settlement or settlement cracking should take place.
.JPG) |
It appeared that there were areas where concrete and clay bricks were built into the same wall. SANS 2001-CM1 specifically states that masonry units of dissimilar materials (calcium silicate, concrete and burnt clay) shall not be built into the same wall unless the different materials are separated by a horizontal damp proof course or a vertical control joint. Concrete and clay bricks should not be in contact with each other in the same wall. Concrete and calcium silicate bricks tend to contract while clay bricks tend to expand. Walls built with concrete bricks and clay bricks should be separated with control joint or movement joints. The clay and concrete bricks at window and door reveals and wall intersections should not be in contact with each other. The expansion and contraction between the different type of brick may cause stresses at the junction of the different bricks causing slight cracking which may appear at the corners of the windows, doors and connections of the face and concrete brick walls. In this case, because of the small areas of facebrick, most of the cracks that may occur should be cosmetic only and of no structural significance.
- This clay facebrick balcony wall and window feature wall appeared to be built into the plastered concrete brick wall.
- These header face bricks appeared to be built into the suspected internal concrete brick plastered wall.
- Here the facebrick header brick can be clearly be seen tying into the internal skin of the brick wall which was probably built with concrete bricks.
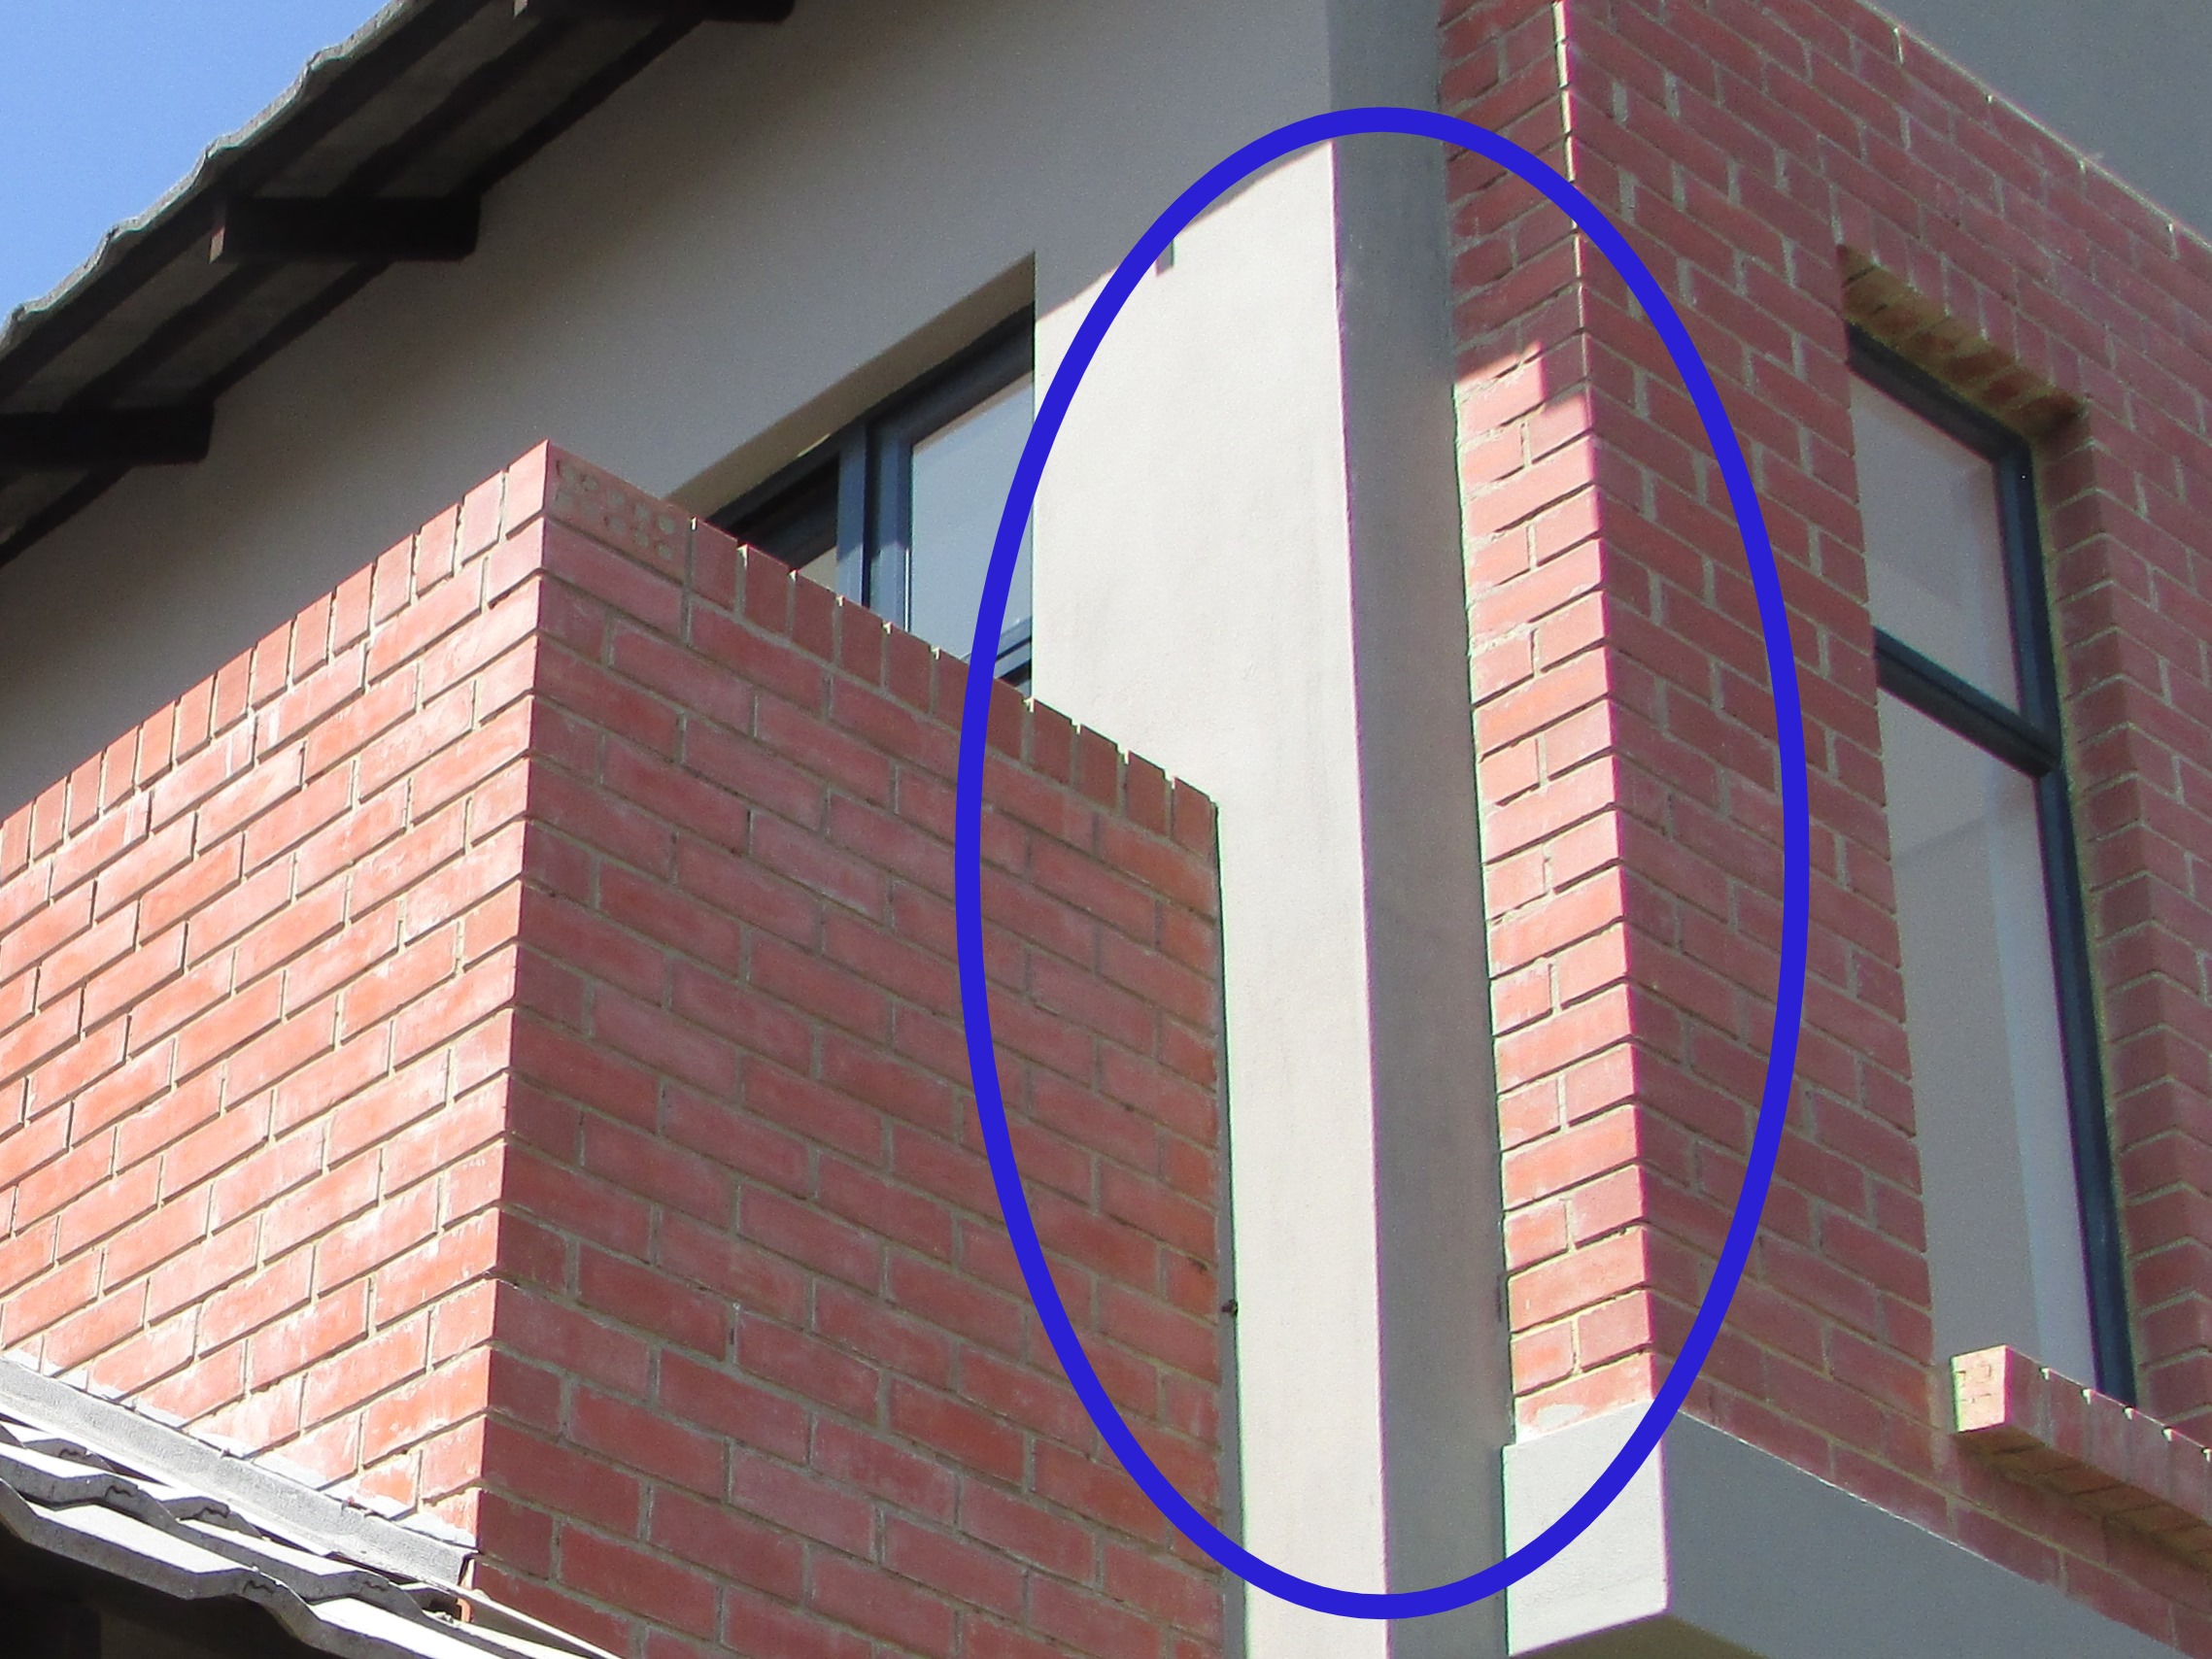
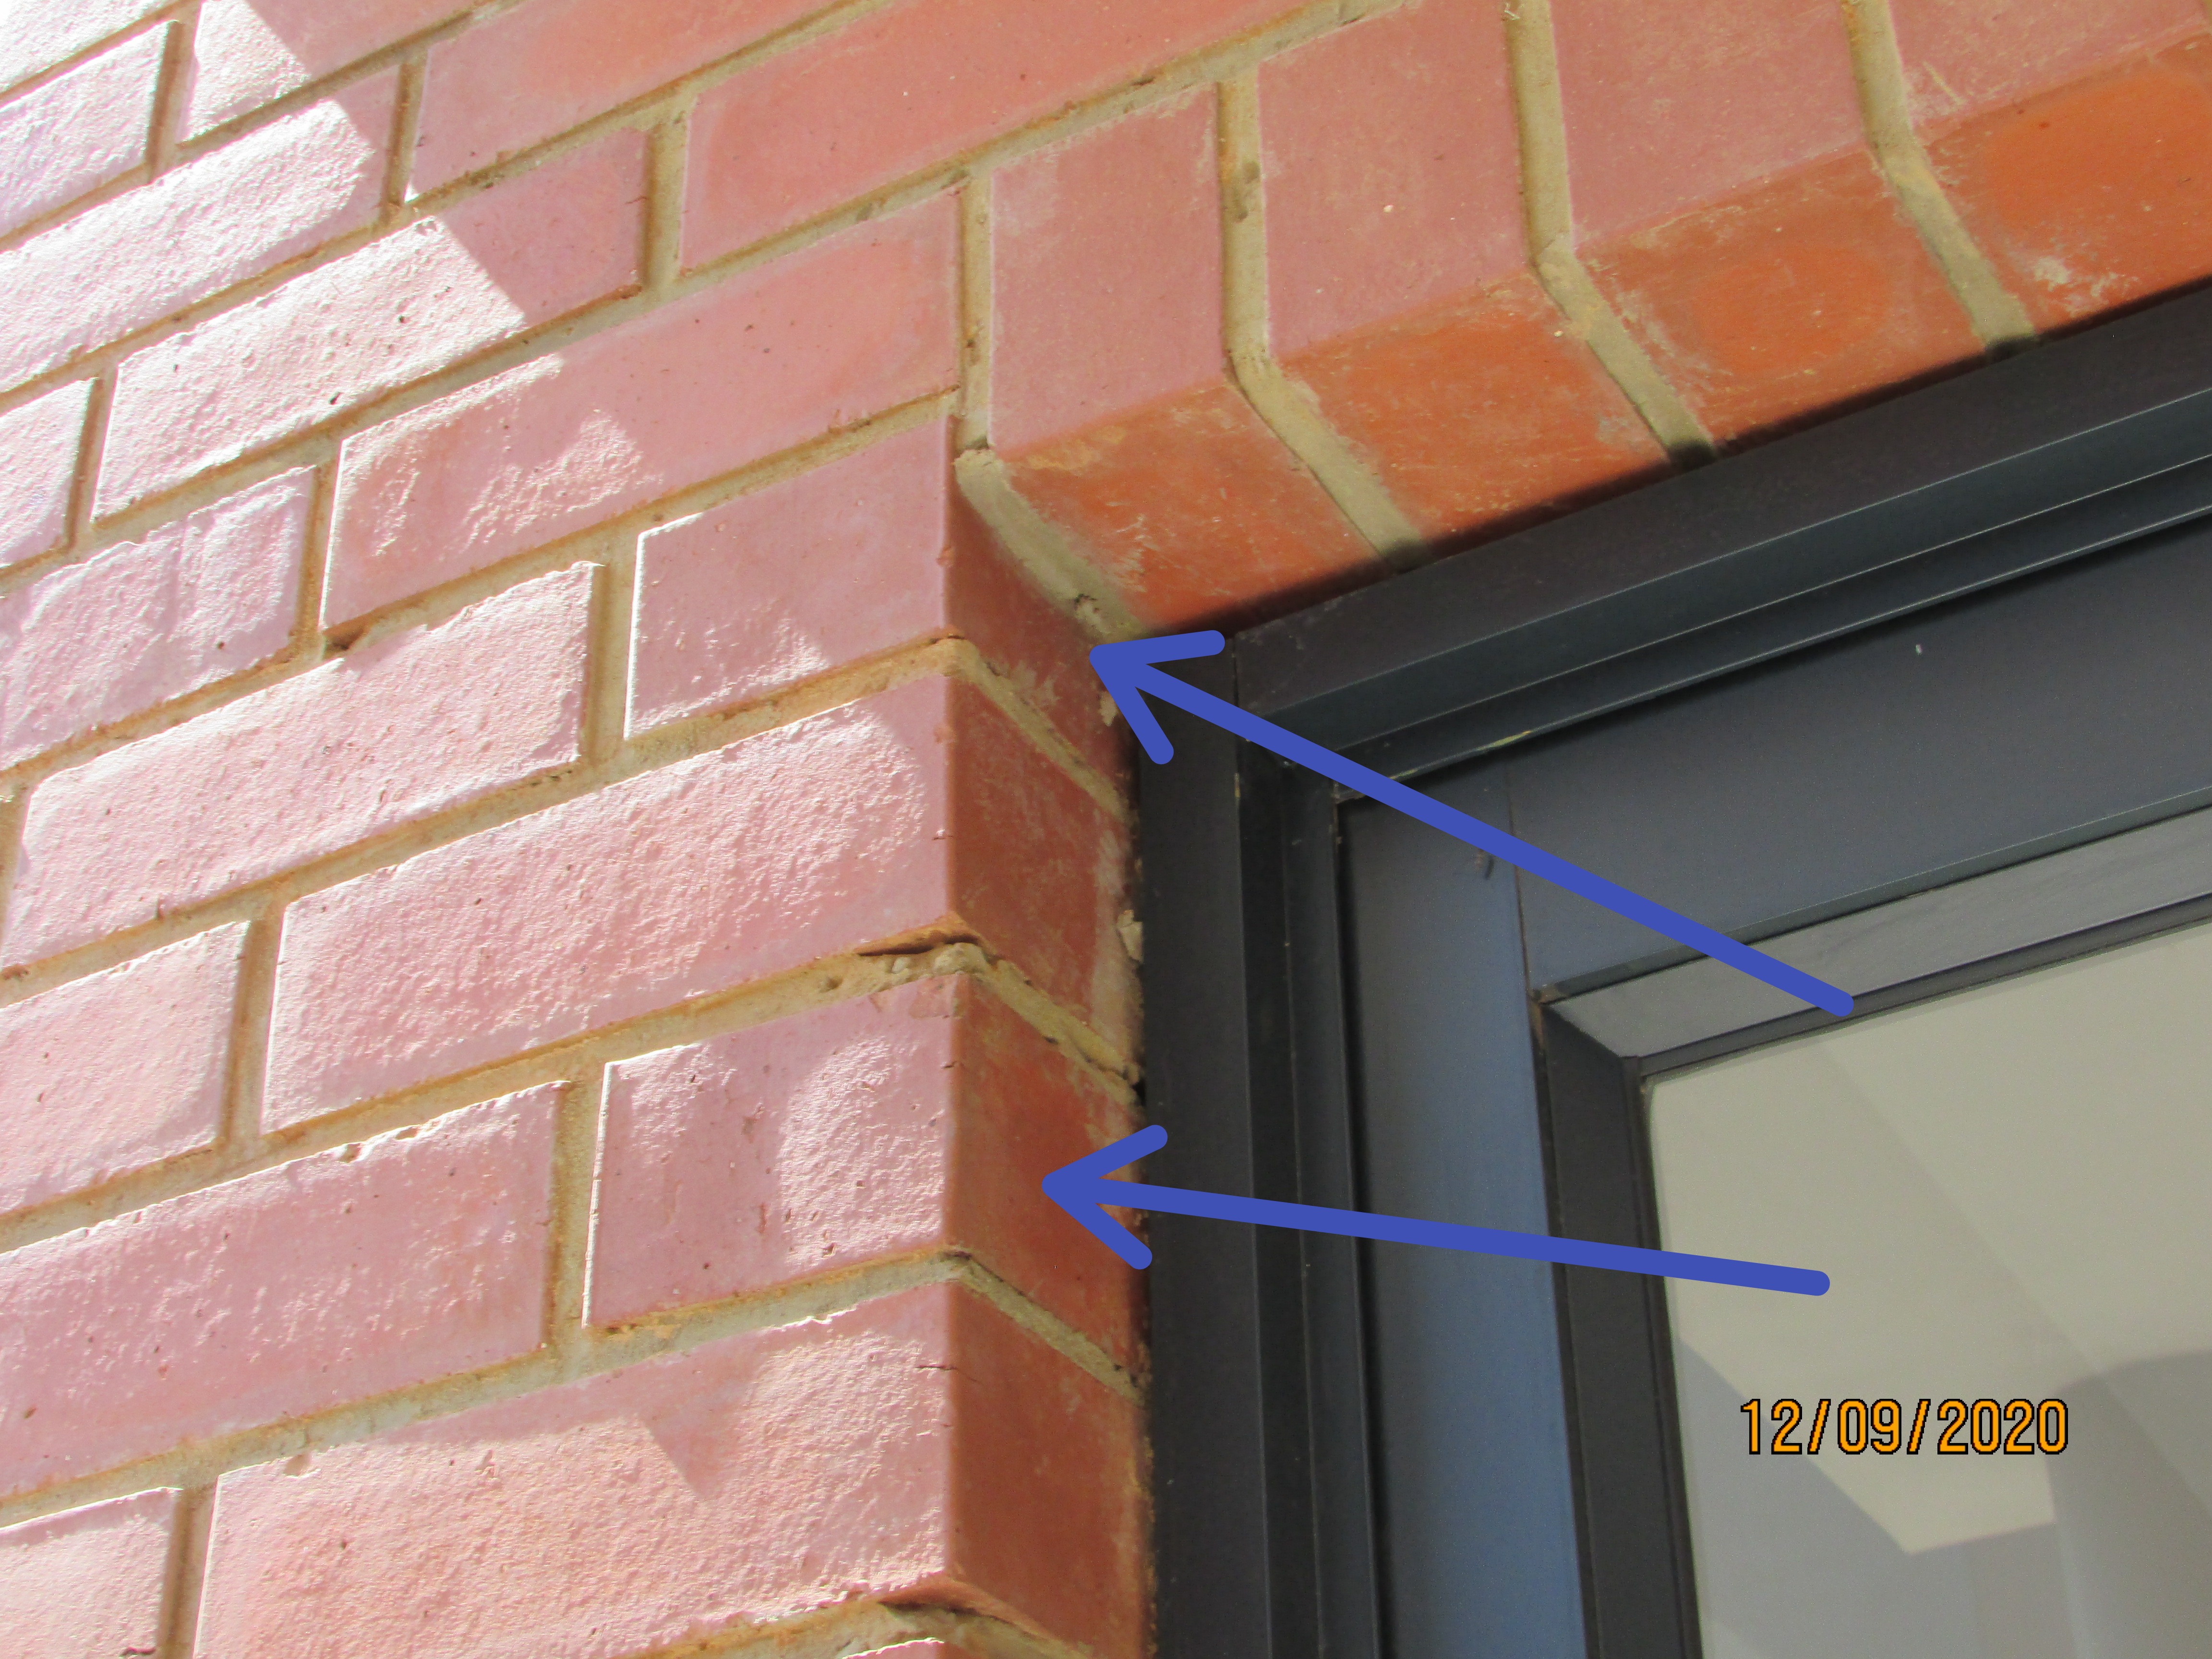
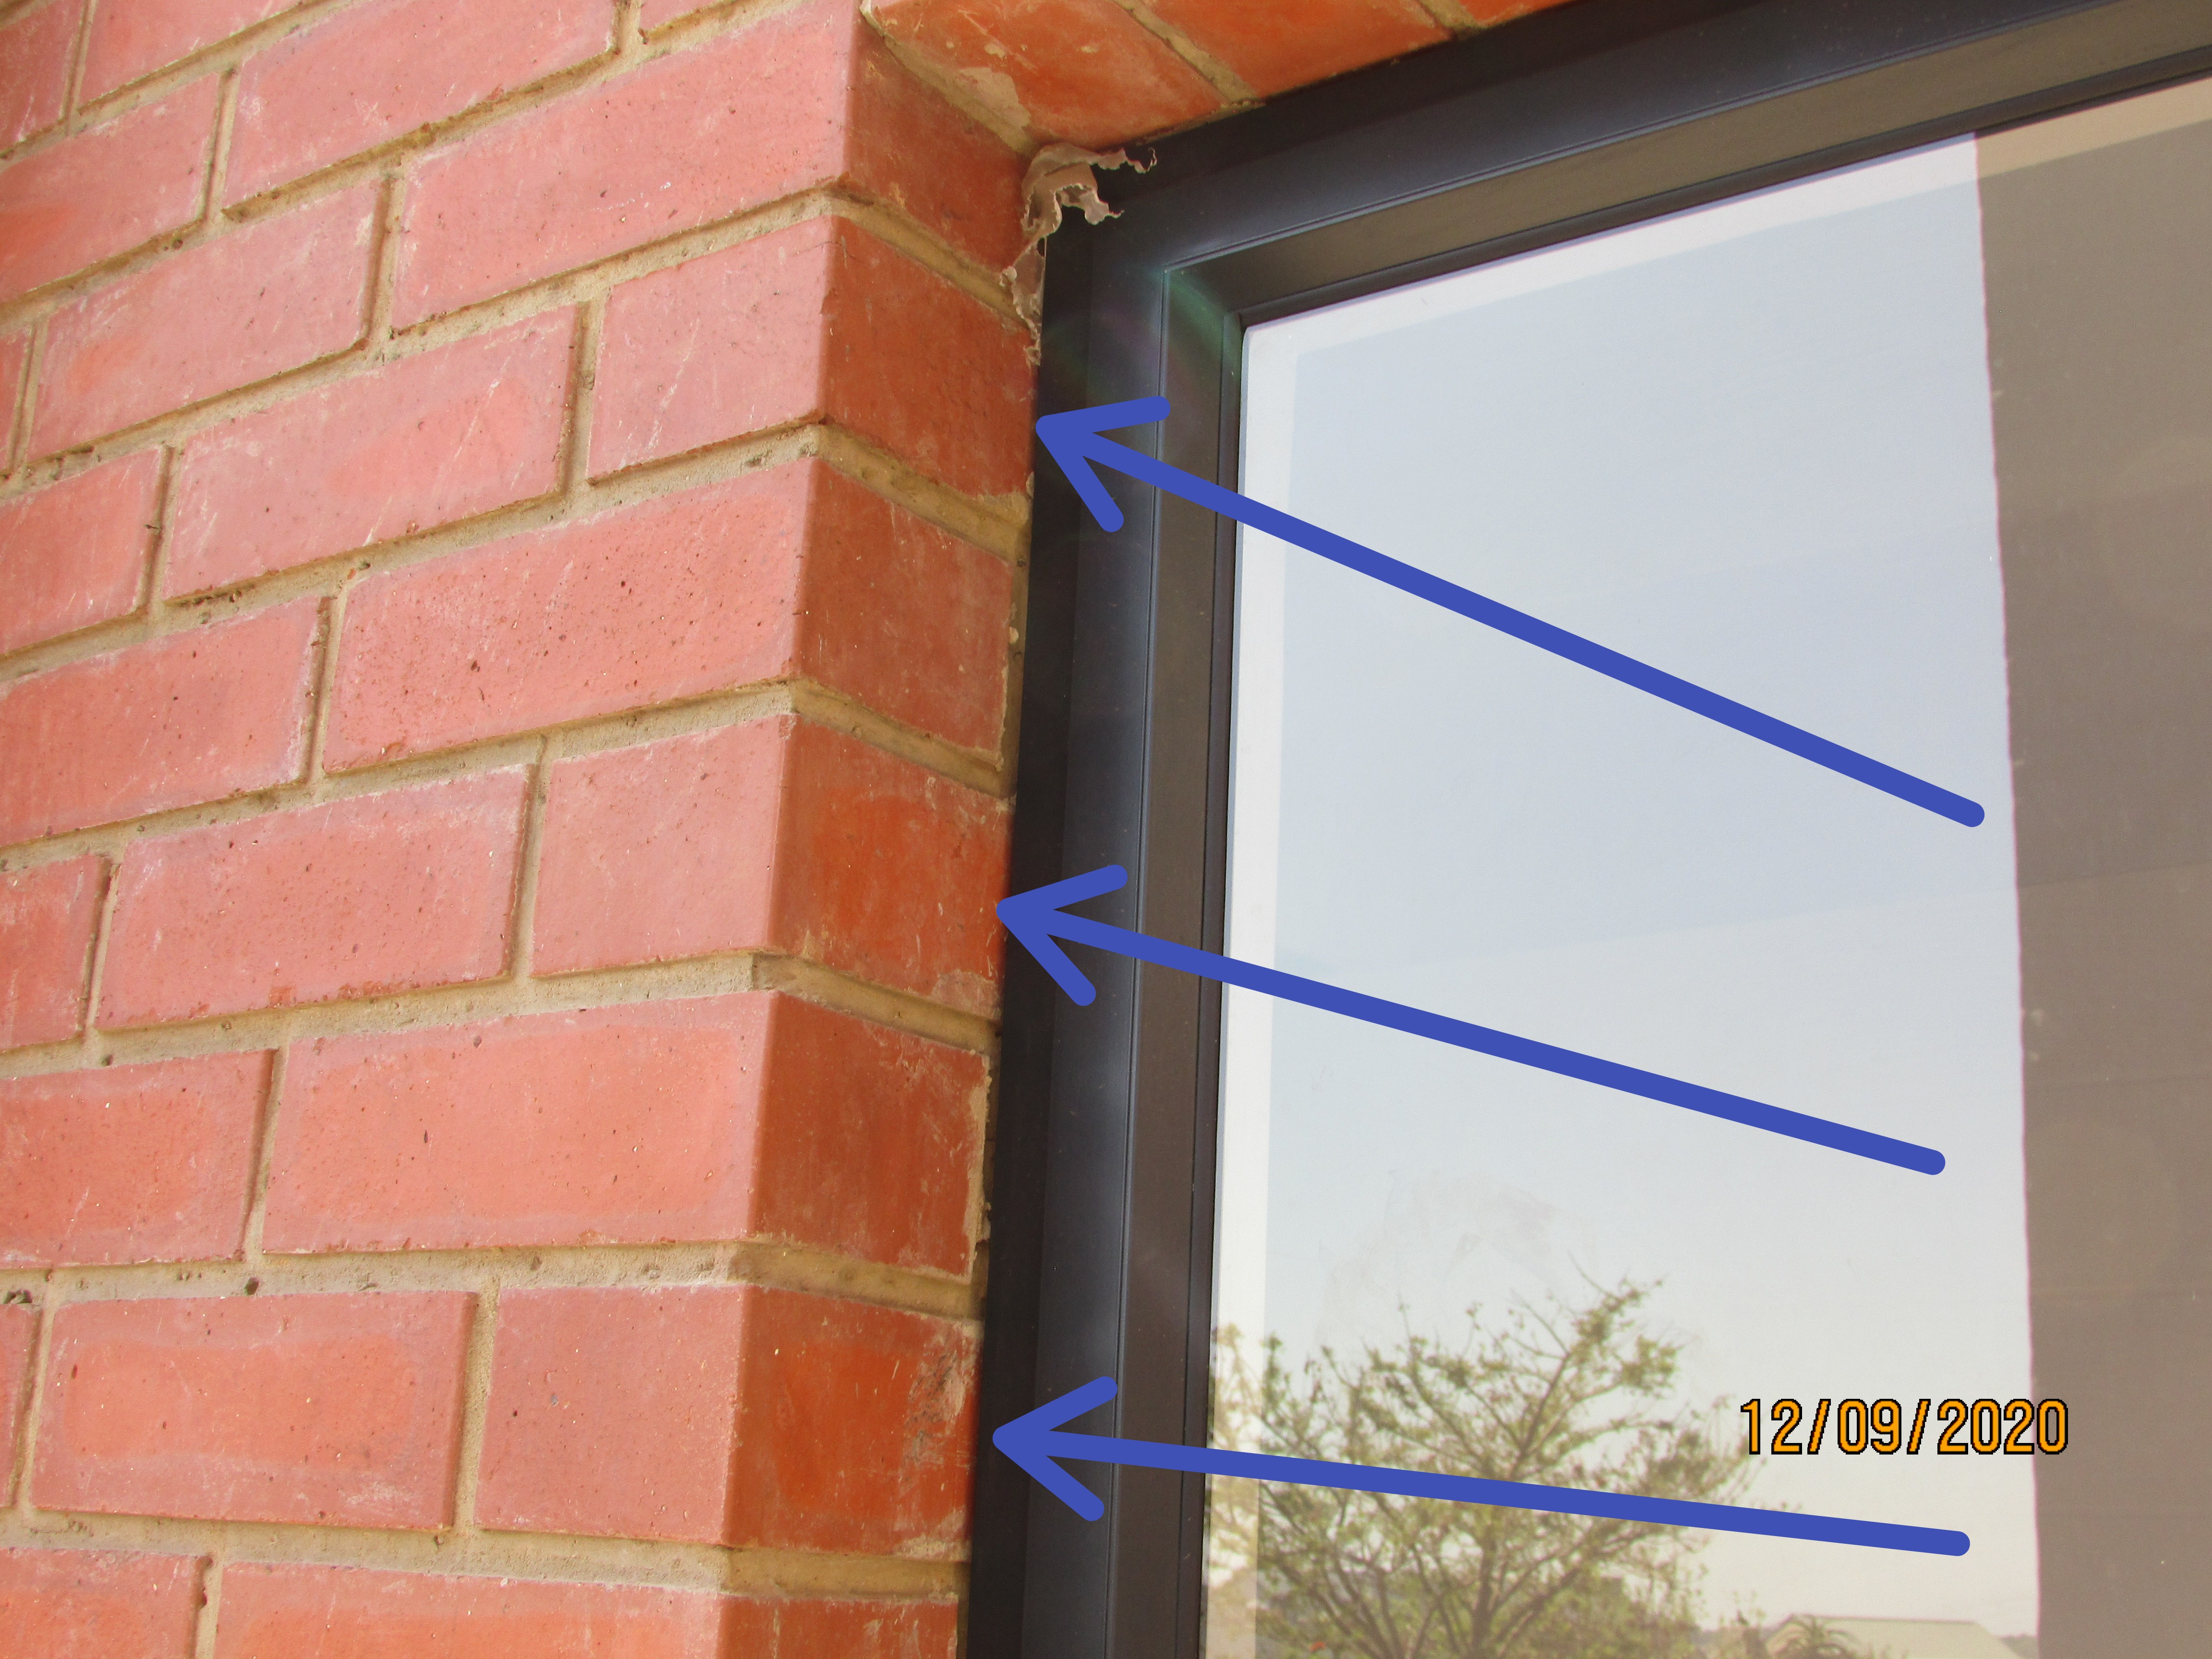
Cracking at the level of the horizontal DPC (damp proof course) is a common problem with plastered superstructure walls where the foundation plinth is also plastered. It is a common and an incorrect practice to place the DPC onto the plinth brickwork without a mortar bedding. This forms an passage for moisture to penetrate the brickwork into the building. The DPC should extend over the full width of the wall including plaster thickness to prevent moisture from crossing past a mortar or plasterwork "bridge" at the face of the plasterwork. Patching and/or painting over the crack will not prevent the crack from reappearing. The only way to resolve the cracking is to form a joint horizontally through to the face of the brickwork at the DPC (damp proof course) level. The crack will then be in the deep joint and not readily visible. The cracking at the DPC level was not structurally significant but should be sealed to prevent moisture intrusion into the wall structure.
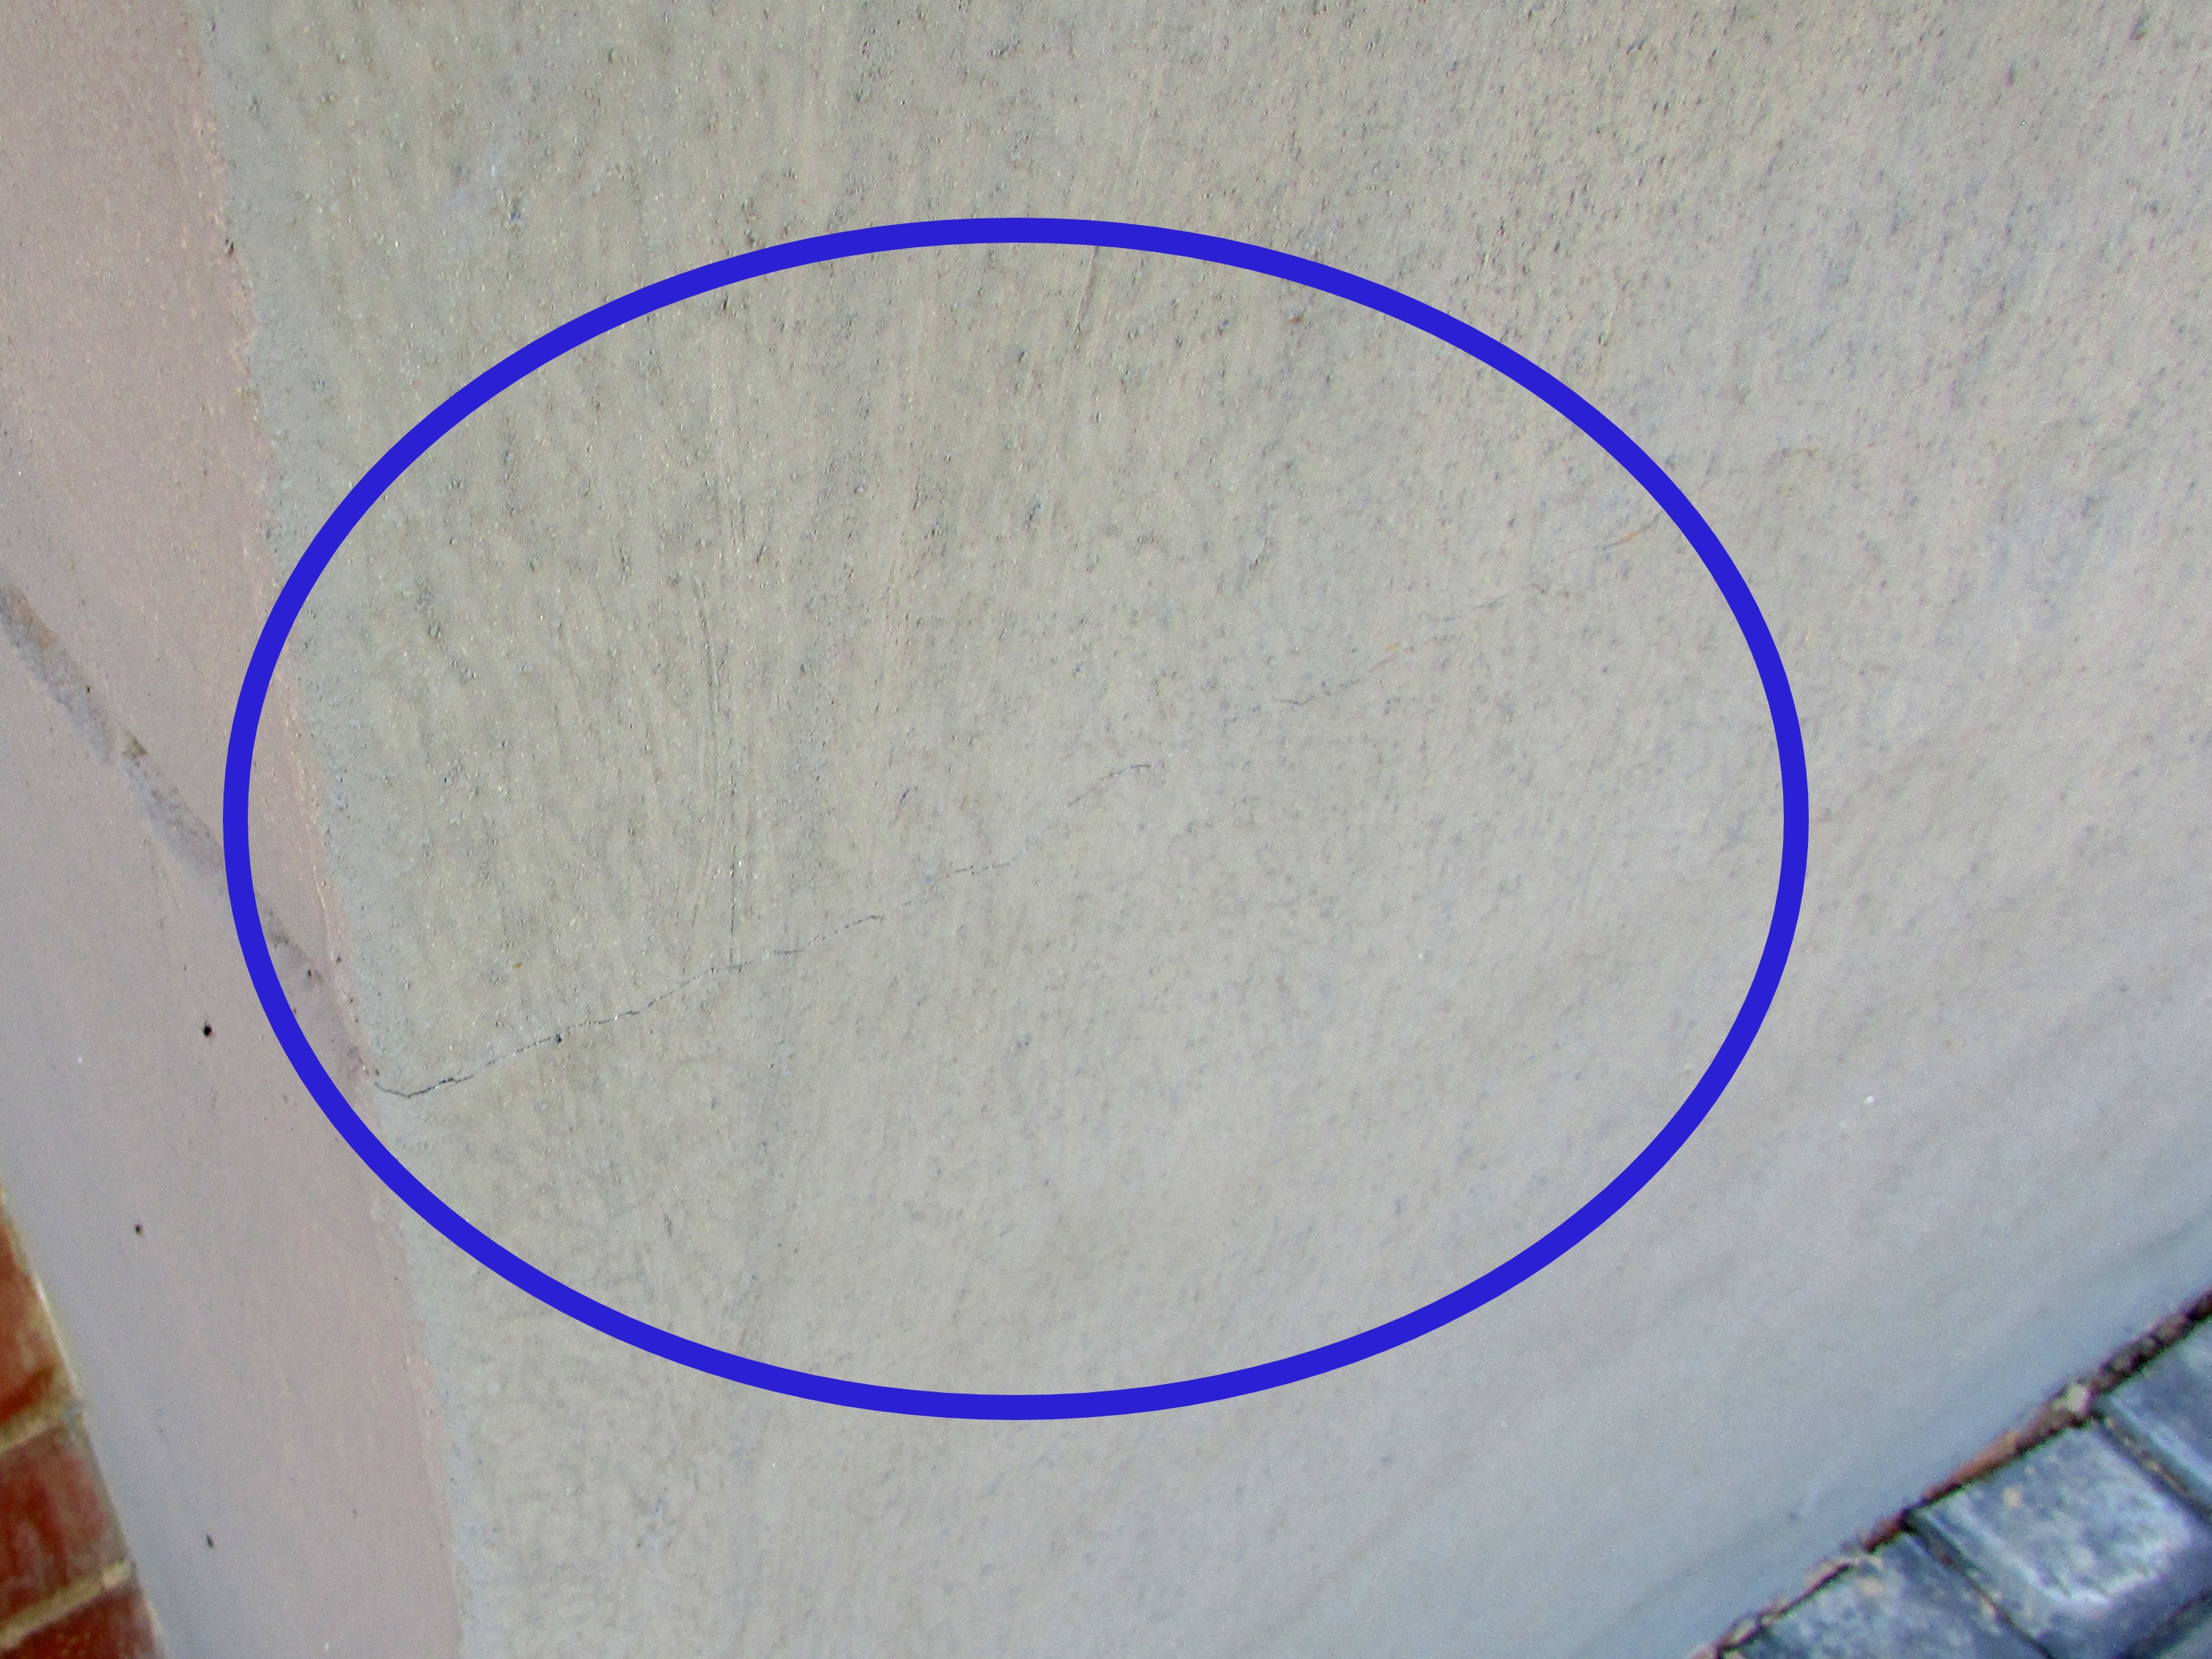 |
Minor horizontal and vertical cracks on the interior walls of the main bedroom en-suite bathroom was most often caused by the slight movement or deflection of the suspended concrete slab. Cracking as a result of slab defection is normally part of the structure's settlement phase and usually does not usually continue after the settlement has taken place. The cracking appeared to be the result of the slight deflection. At most, an external flexible paintable filler can be applied to the cracks if necessary and the wall repainted. The cracks do not appear to be structurally significant.
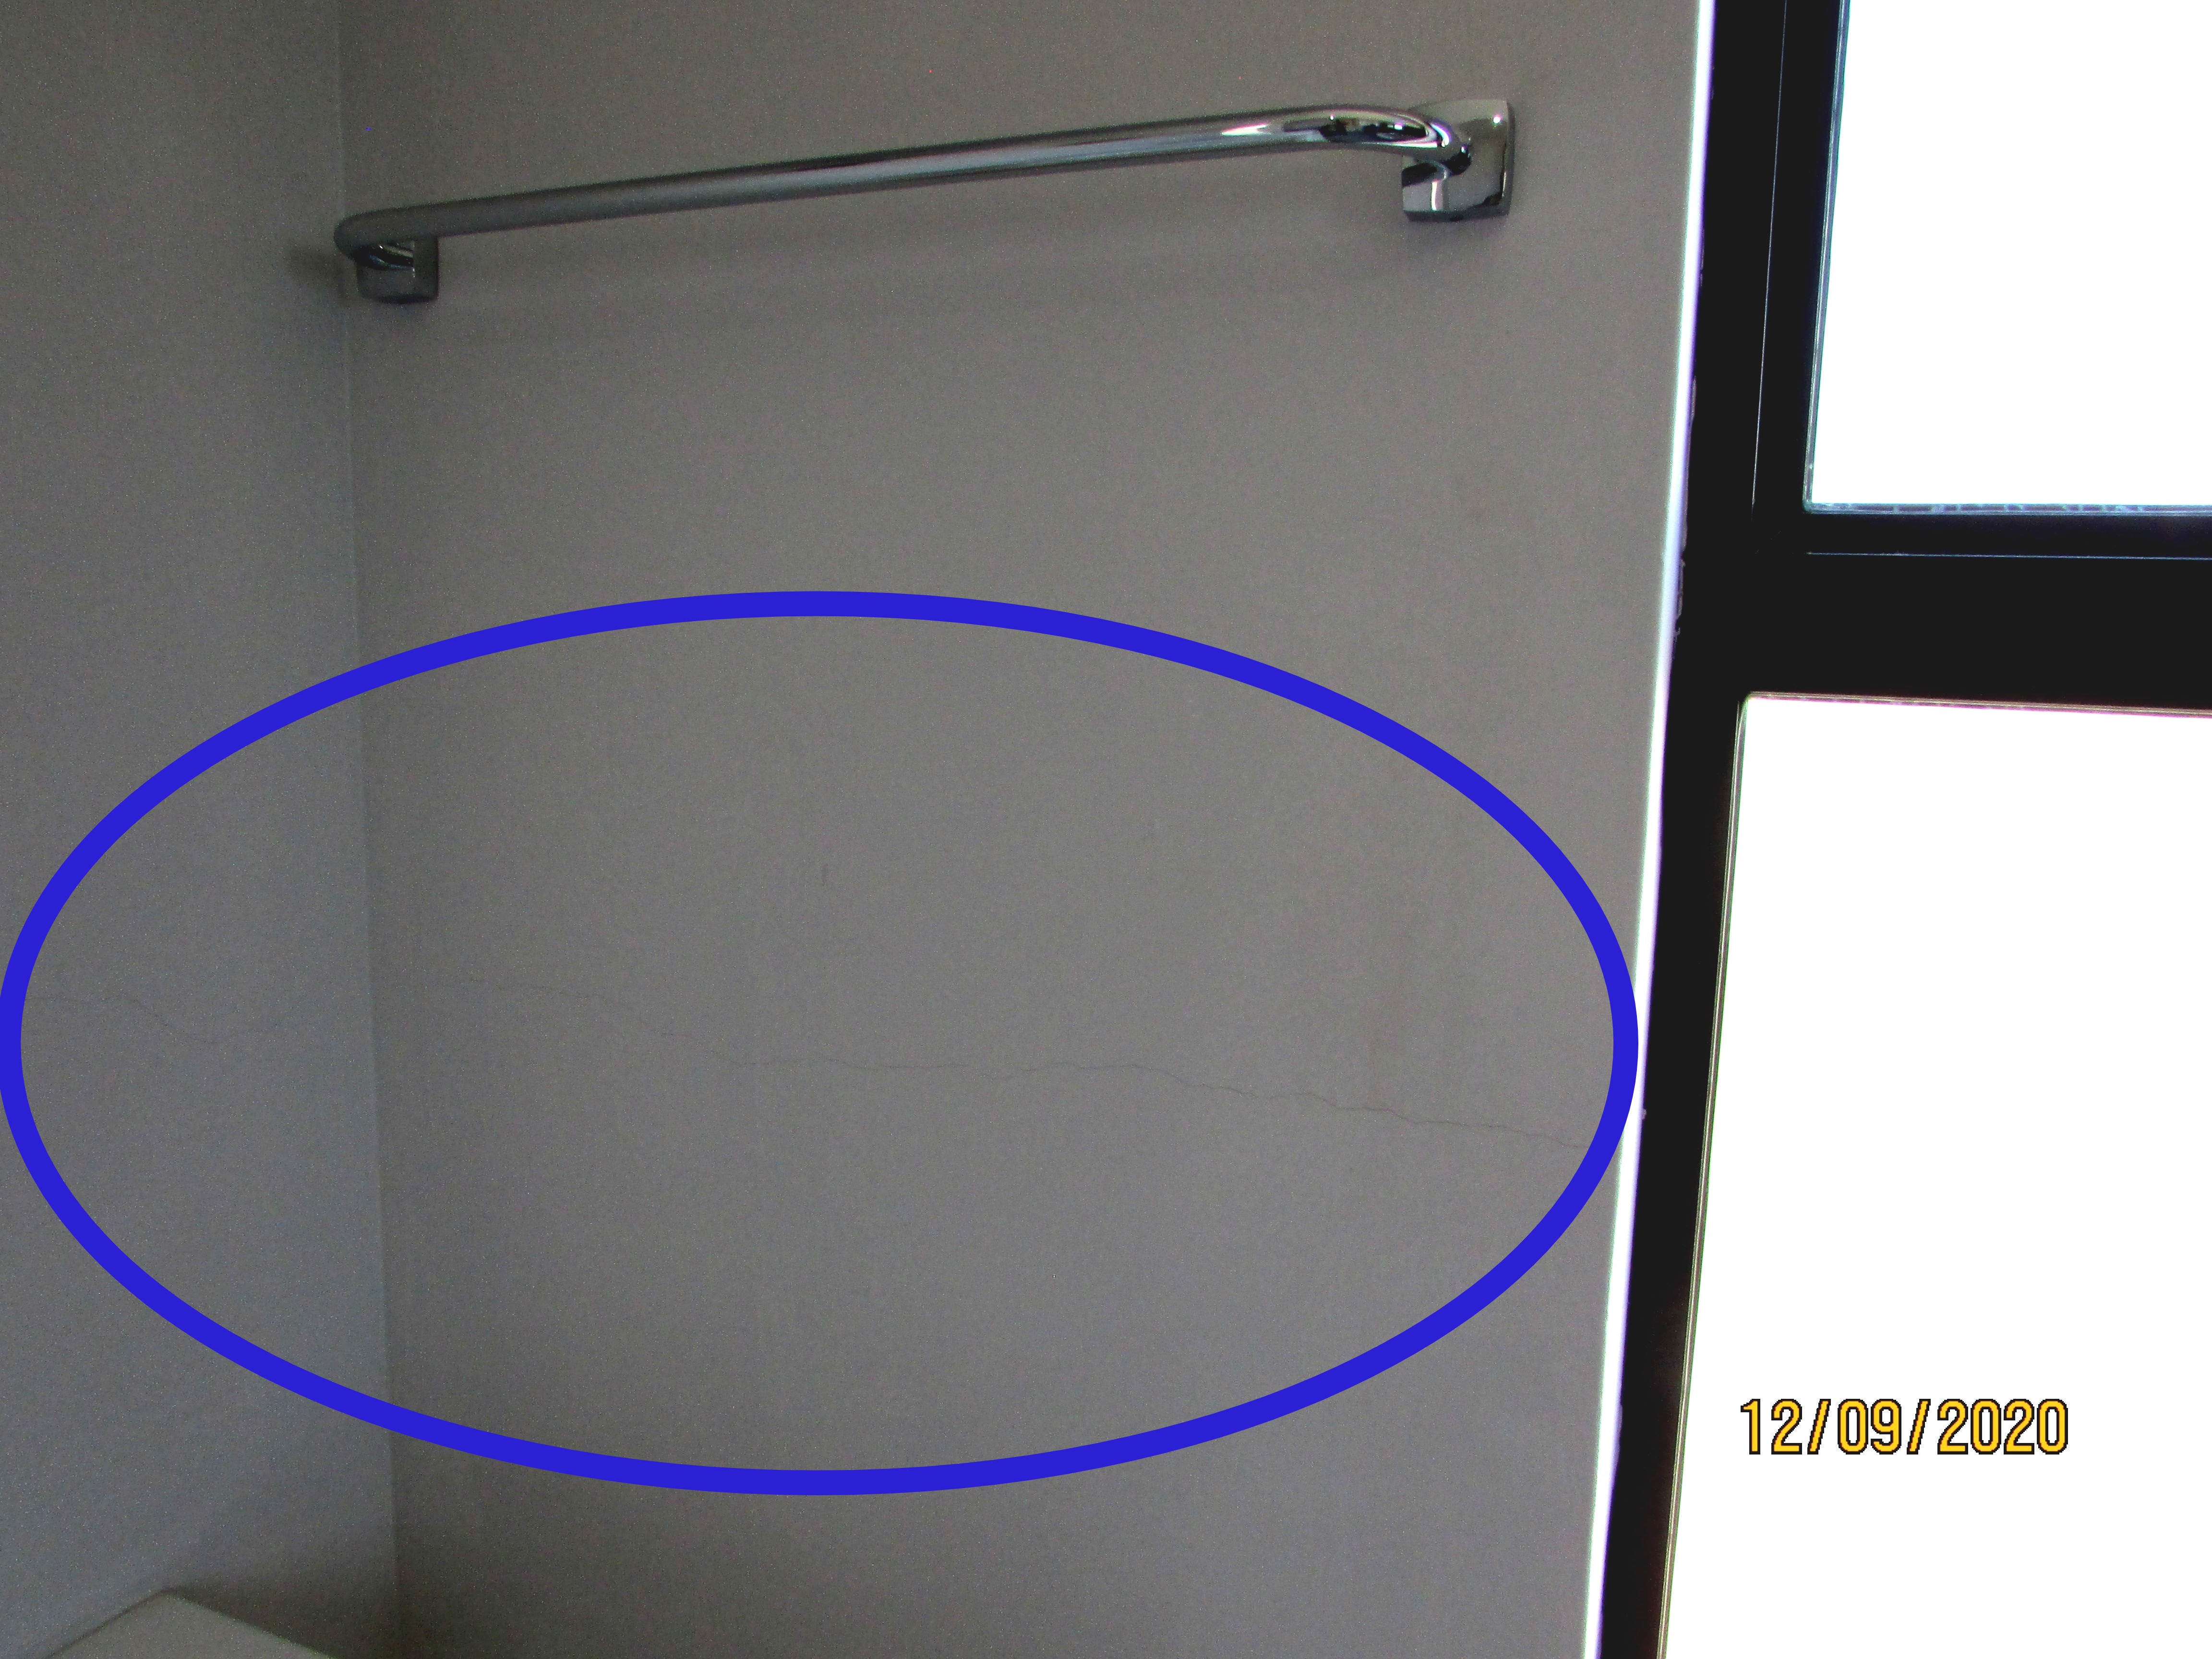 |
Exterior/Garage
External Walls
Exterior Plinth Finish: Plaster and paint
External Superstructure Finish: Plastered and Painted, Fair faced (face, semi-face or clinker brick)
The facebrick and plastered and painted wall finish of the residence was generally in a satisfactory condition. Additional exceptions are specifically listed.
Gaps and holes in the jointing in face brickwork can allow moisture intrusion into the structure. All gaps and holes should be filled and sealed with mortar and a jointing tool.
- Water intrusion into the structure will happen through these holes in the mortar joints every time it rains.
- These places must be sealed to prevent moisture intrusion into the walls.
- A typical area where moisture will enter in the joints and at the window frame.
- Holes in the brickwork joints at floor level. Note the damp brickwork and efflorescence on the bottom of the plinth. Water splashing up from the paving can be a problem here.
- Defective facebrick jointing at the front entrance door. This was just poor workmanship and should be repaired!
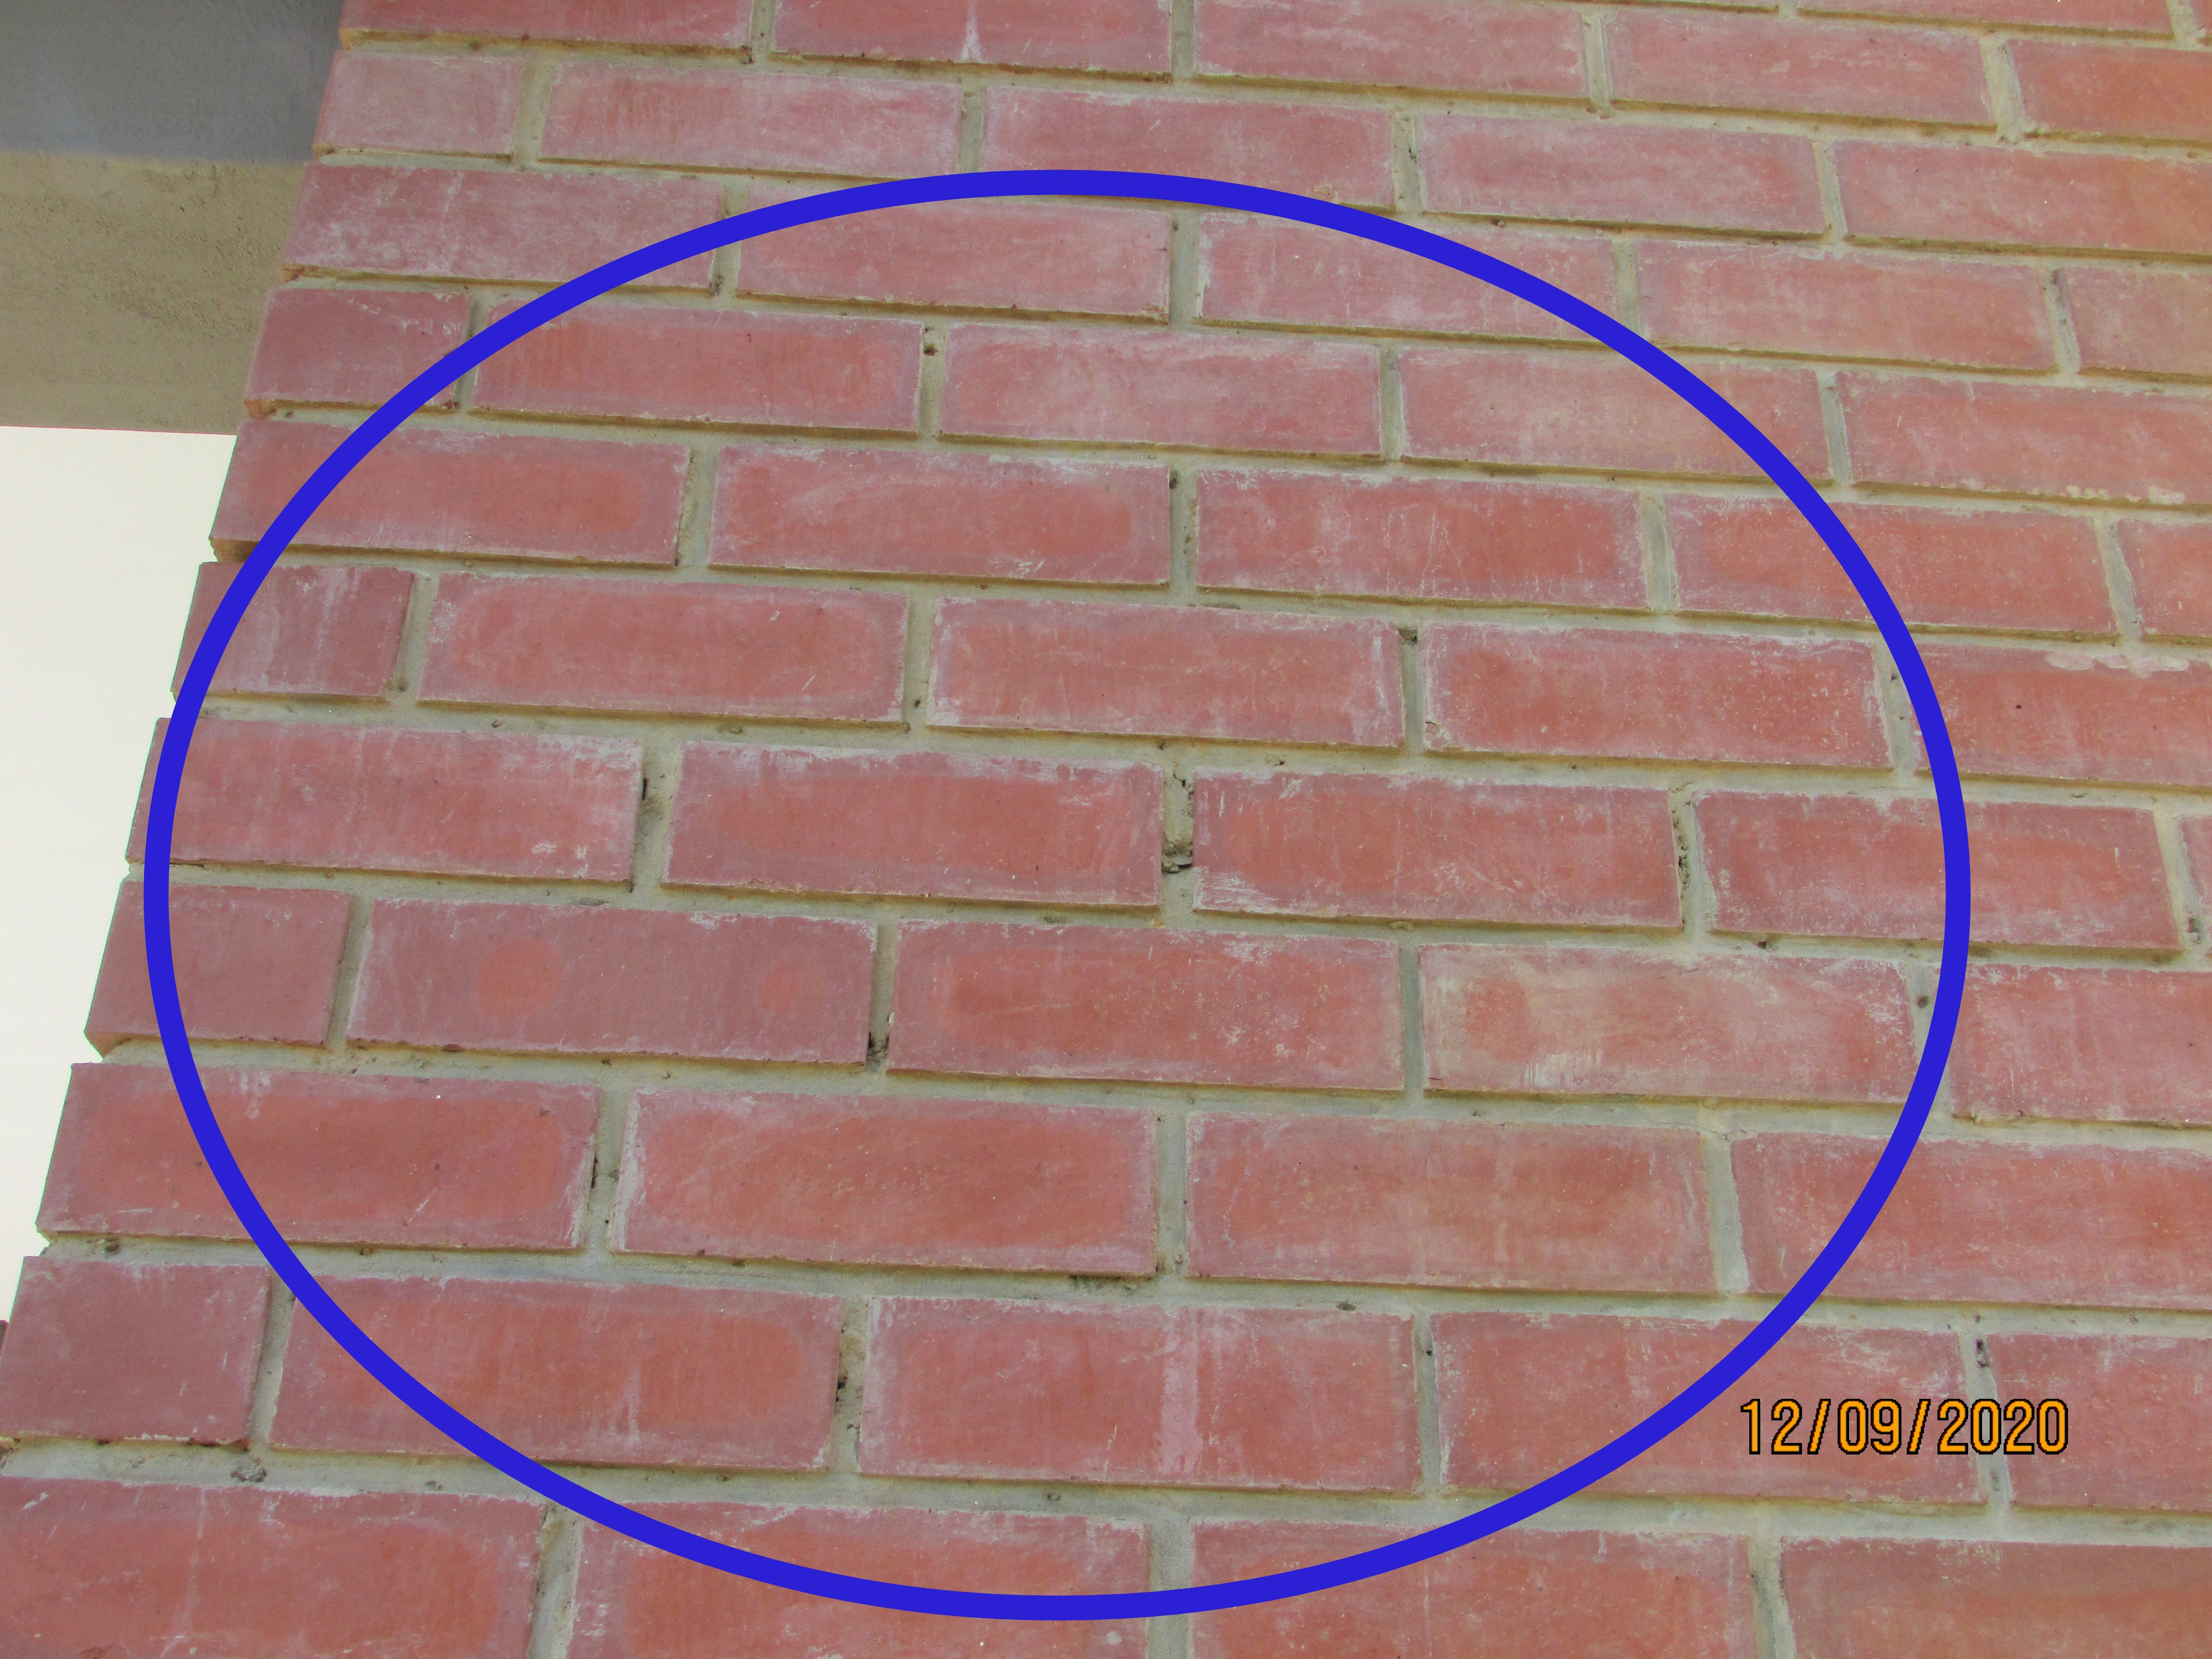
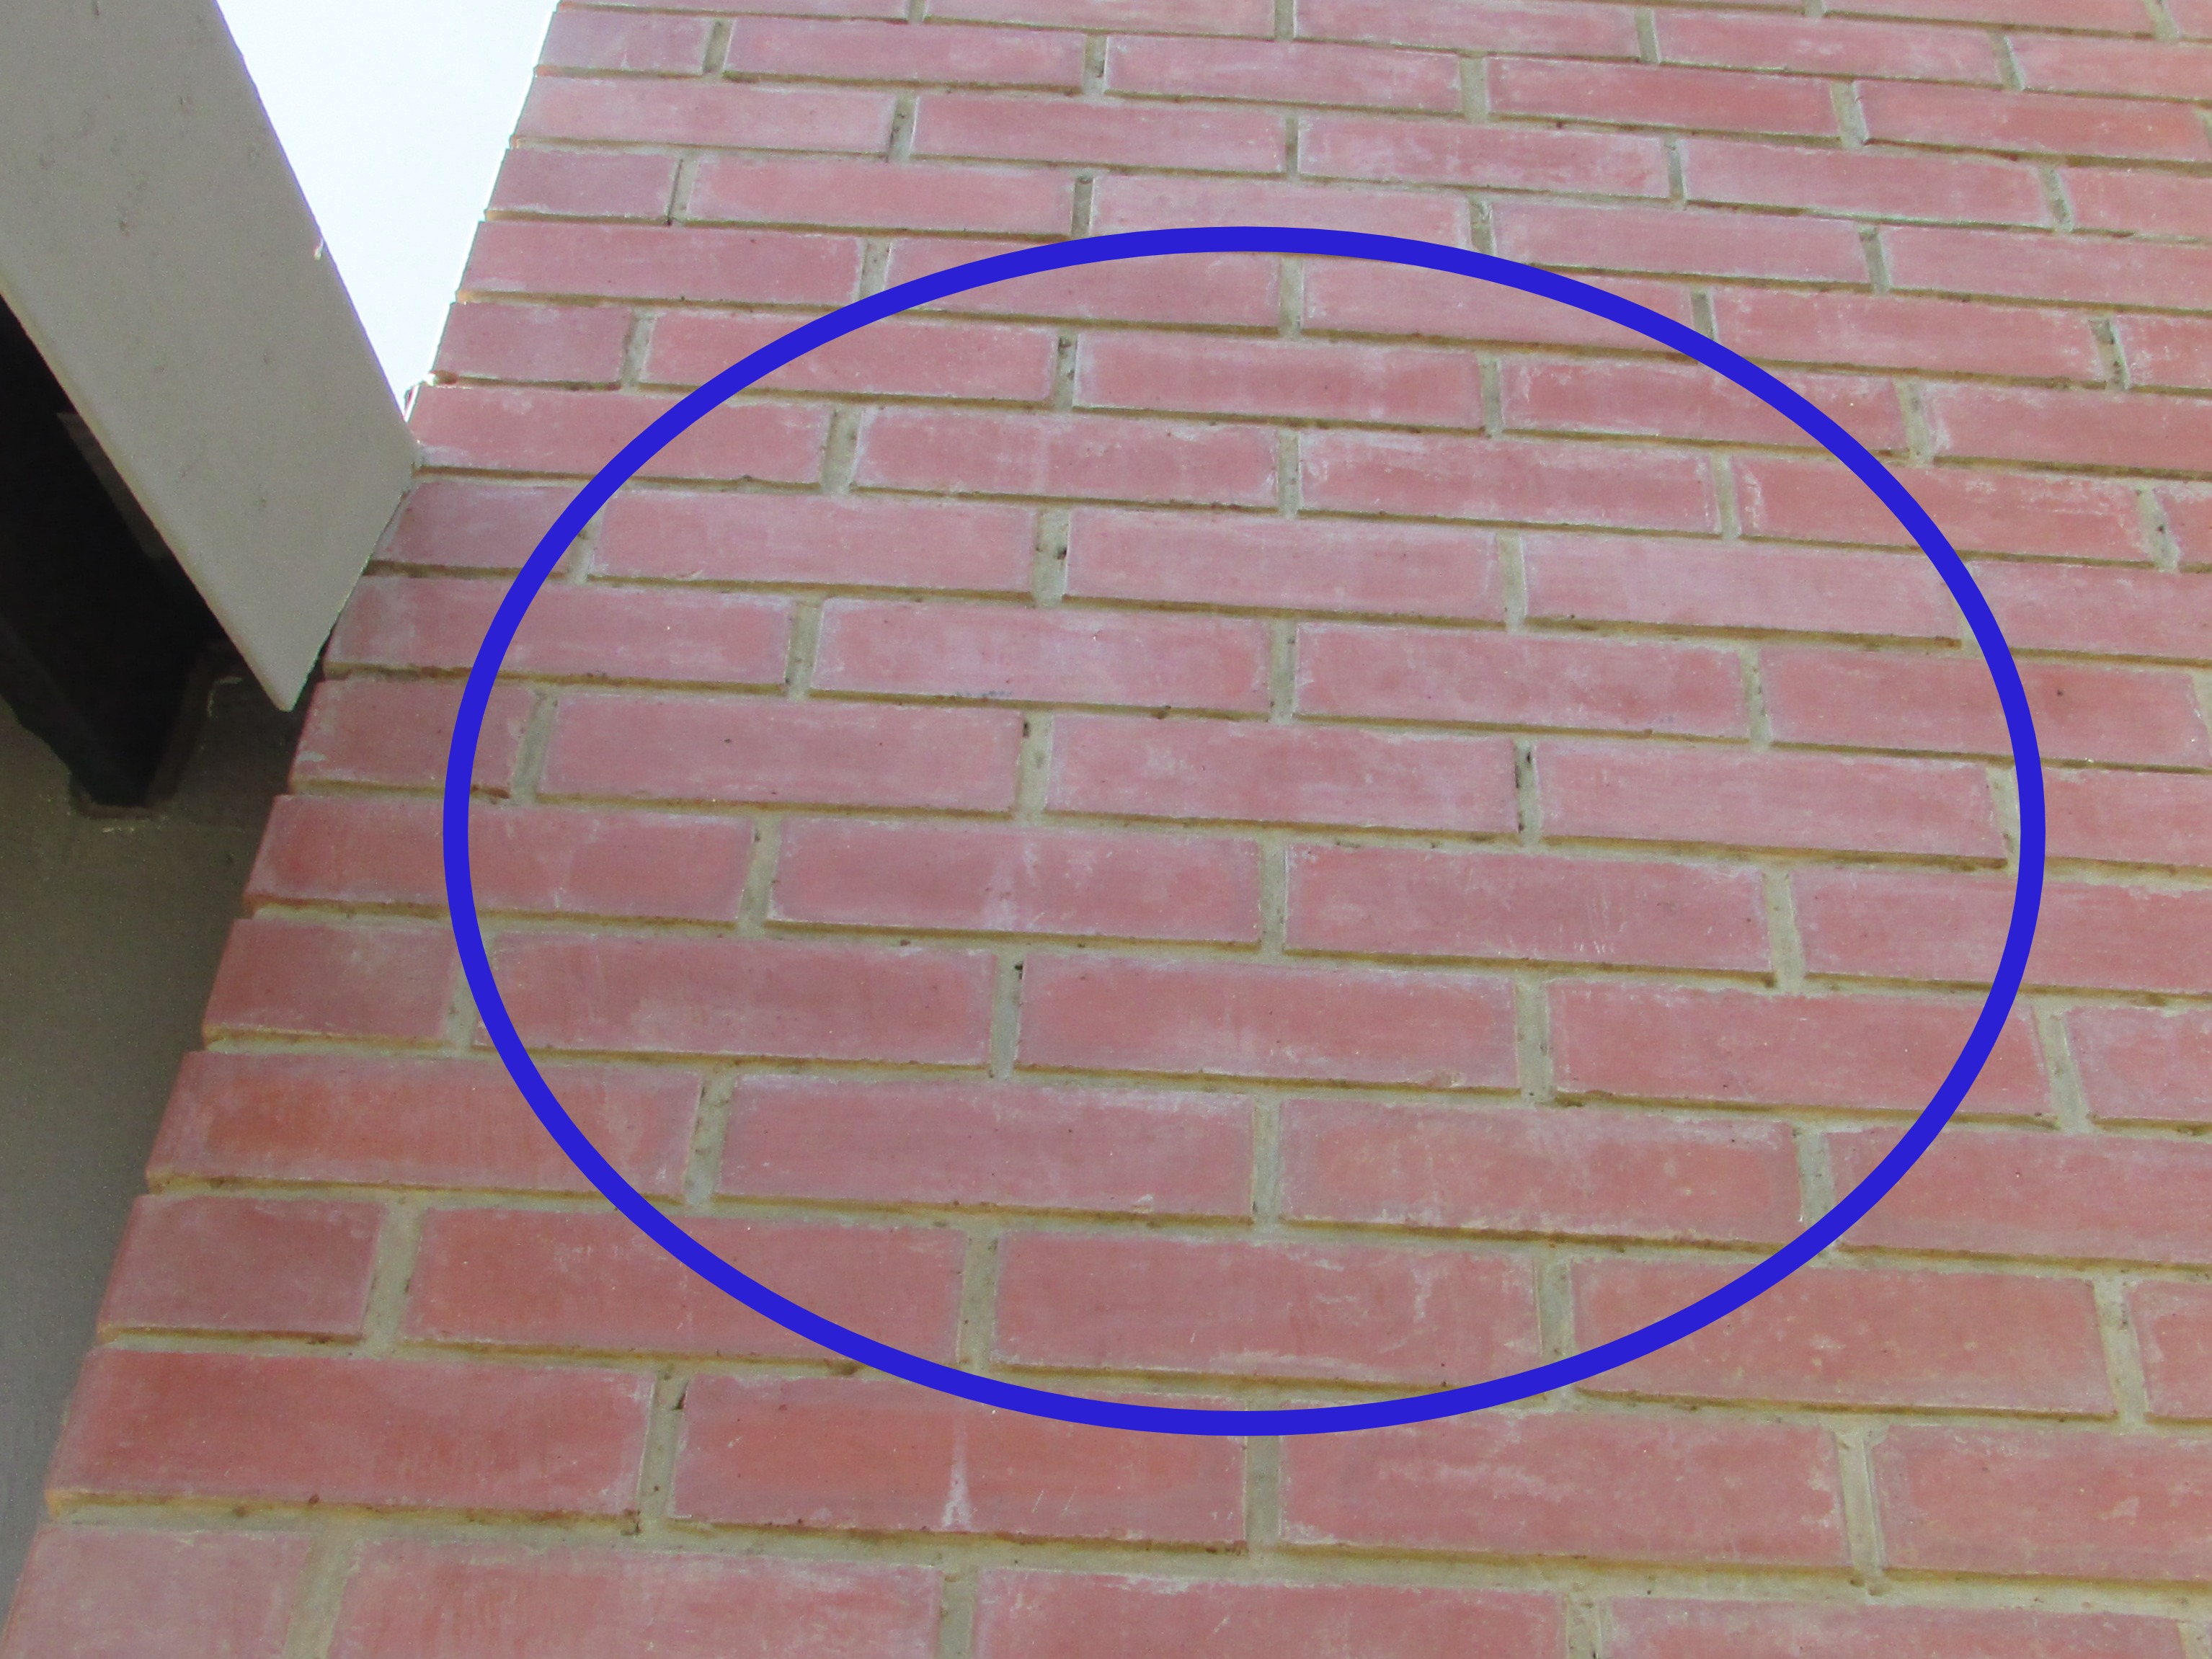
.JPG)
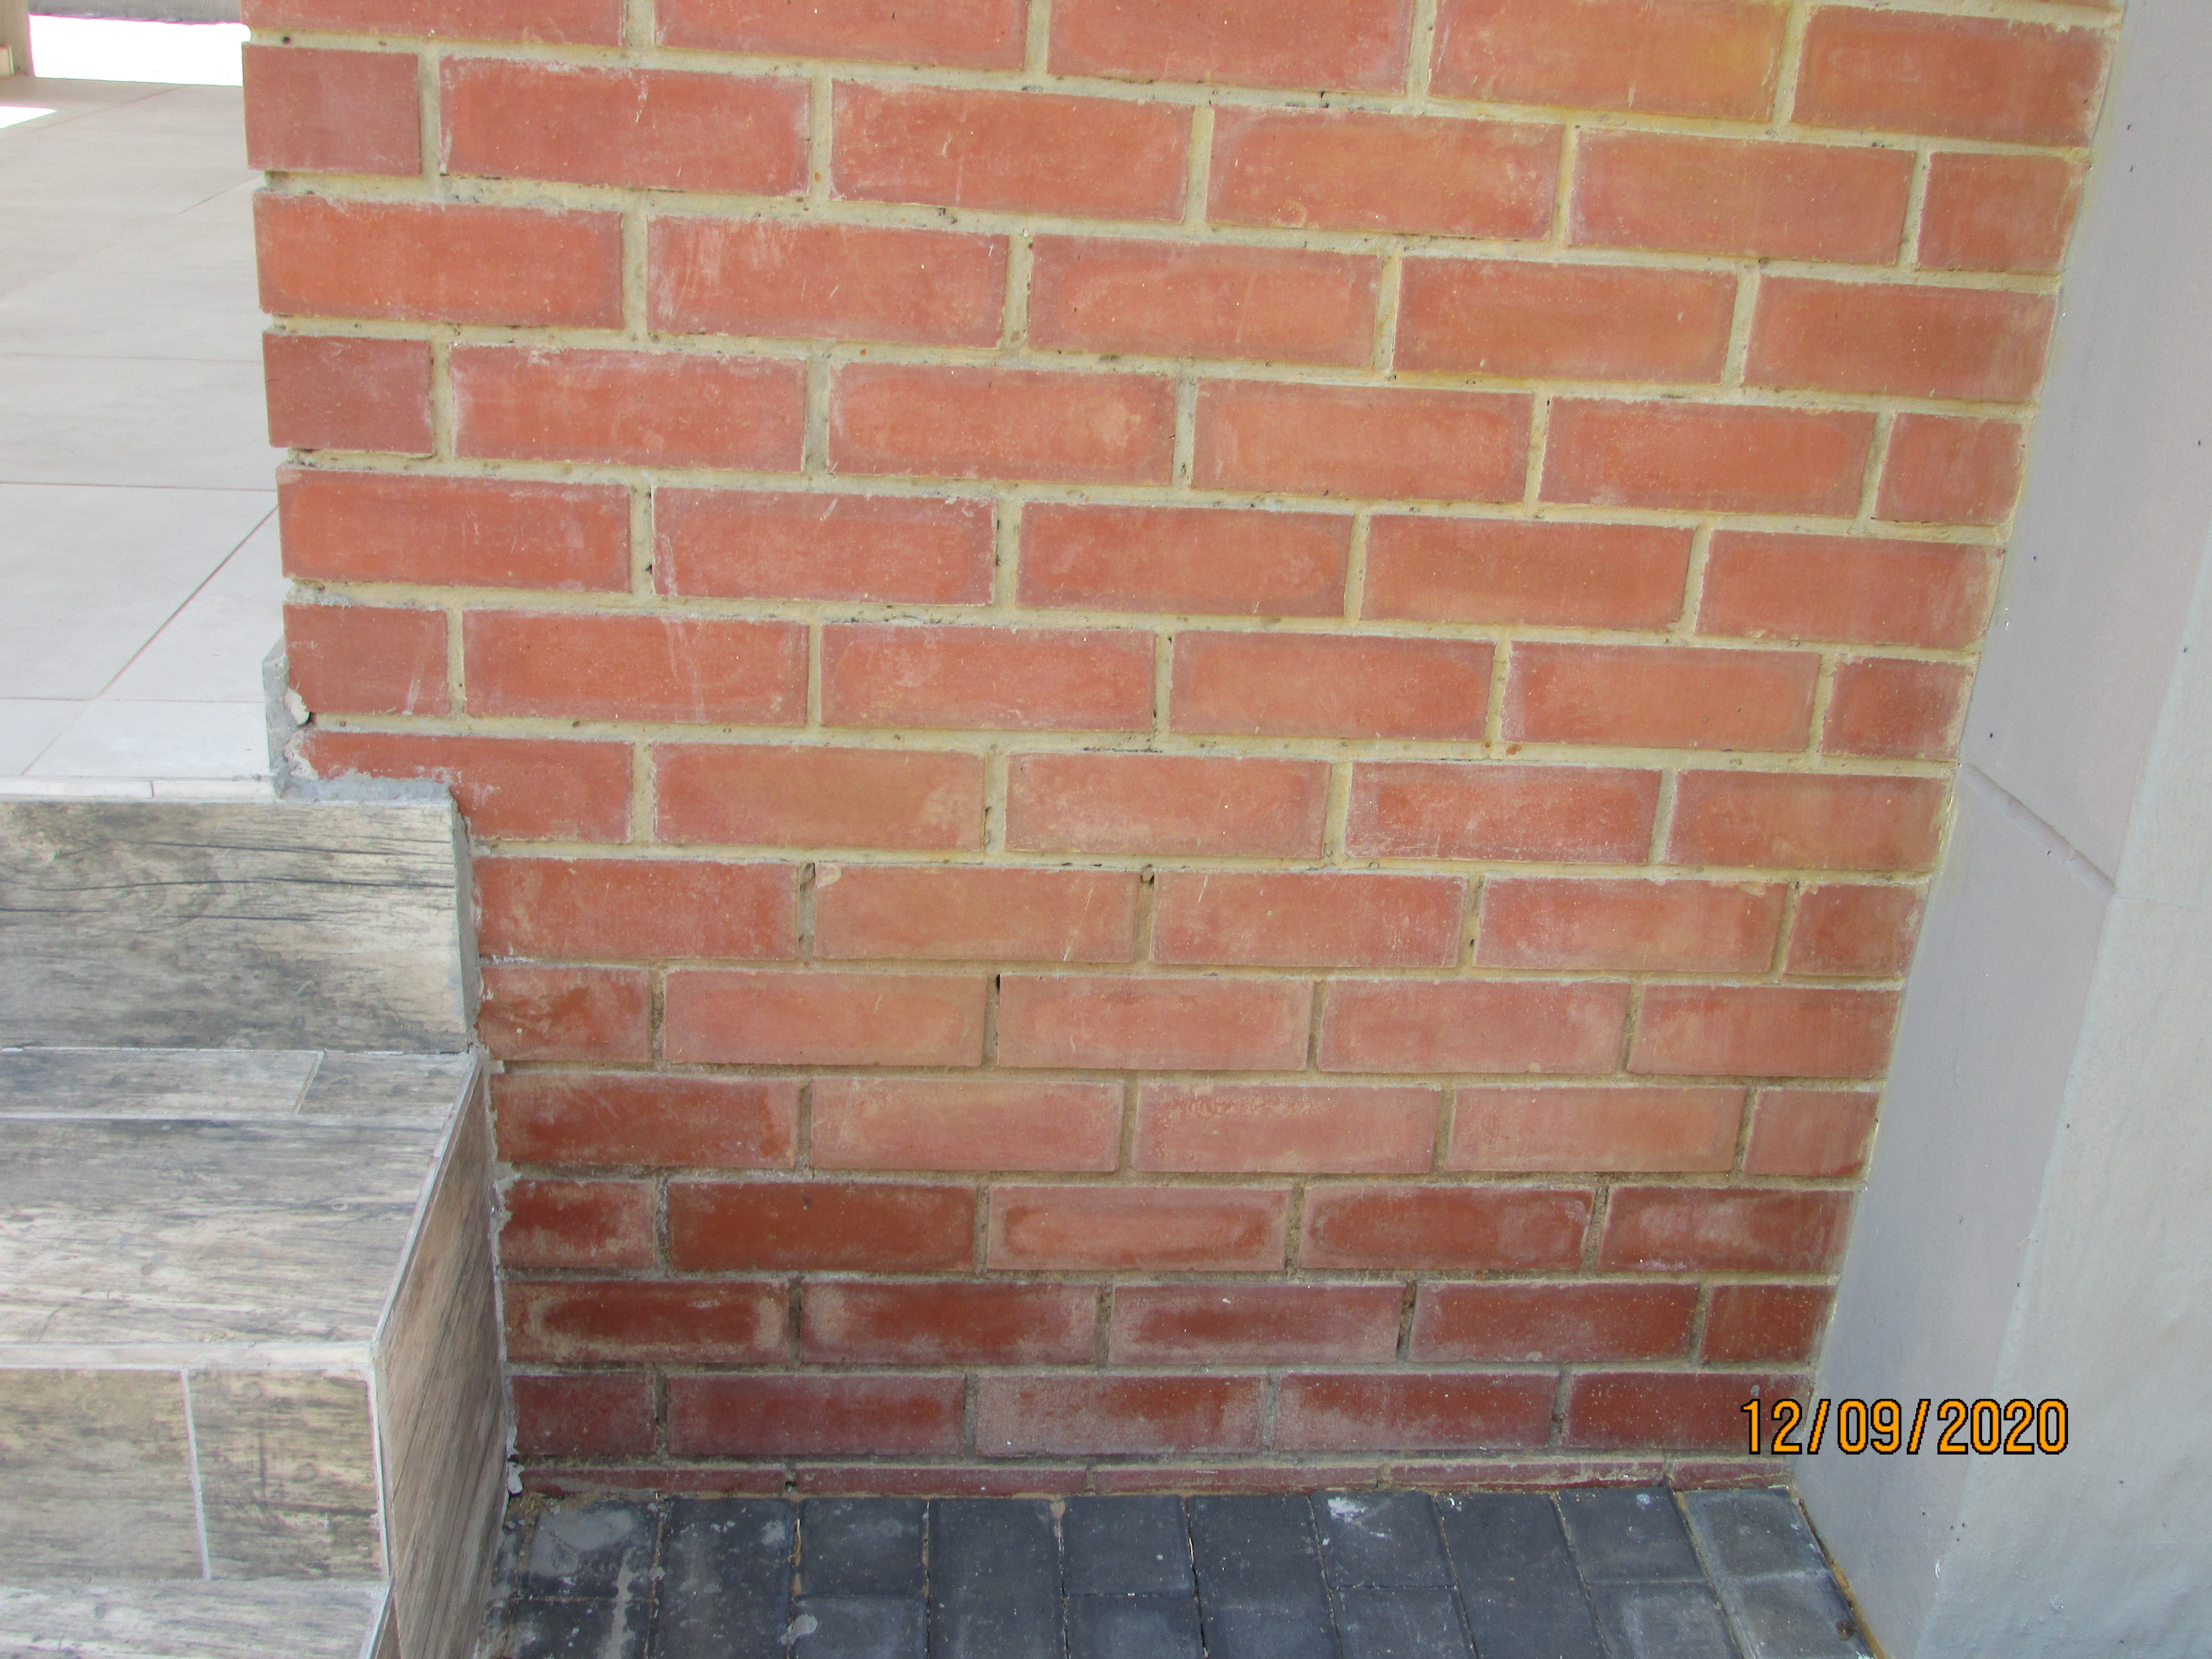
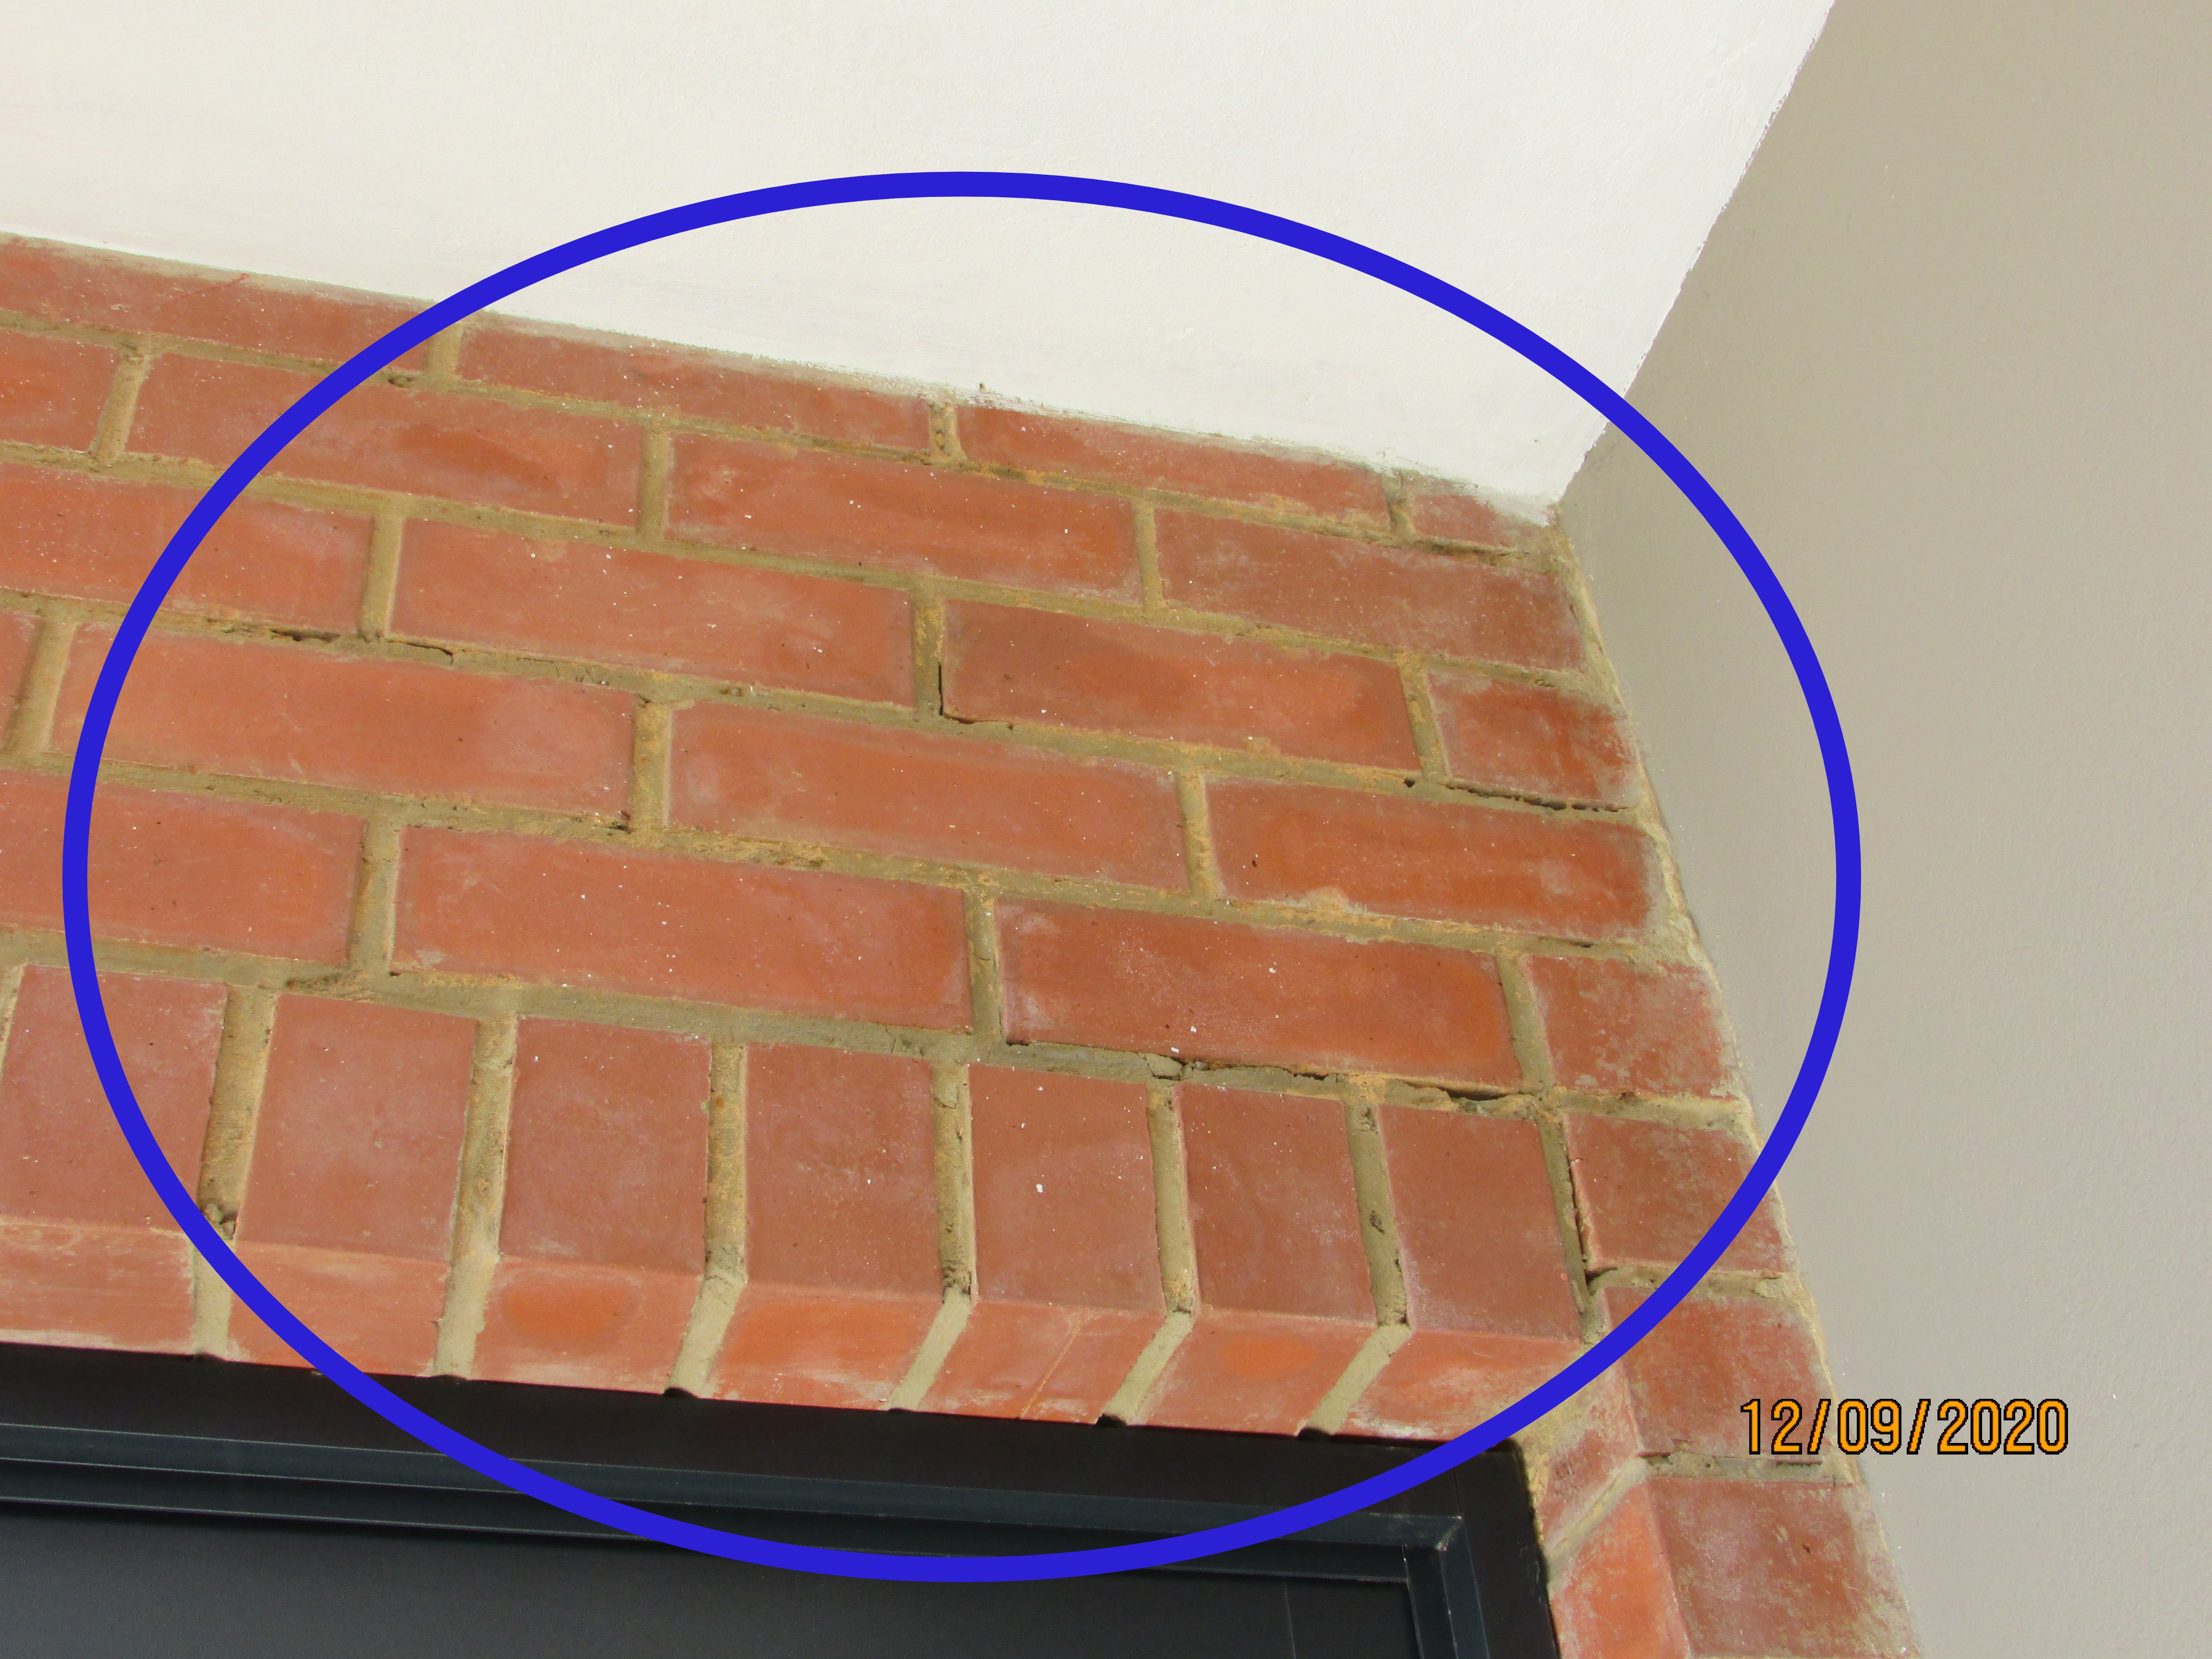
The tops of the face brick feature walls did not appear to be waterproofed. Plasterwork will crack at the junction of the horizontal surface and the vertical wall. They also crack along the the narrow width. Moisture intrusion had occurred into the wall structure. Note the white staining (efflorescence) on the brickwork and joints of the face brickwork. The top of the feature walls should be waterproofed on to the superstructure wall to prevent wind blown rainwater intrusion into the wall and into the house. Normally an acrylic waterproofing system is used for this. Larger areas should be should be waterproofed with a torch on membrane.
- Note the white powder called efflorescence in the joints which was deposited when the moisture in the wall evaporated.
- Note the white powder called efflorescence in the facebrick joints here under the roof verge on the gable wall which was deposited when the moisture in the wall evaporated.
- Efflorescence was a sign of moisture in the wall structure that had evaporated.
- This concrete roof over the main bedroom en-suite bathroom under the eaves where the rainwater will fall on the roof will need to be checked for a torch down membrane and fitted if not installed!
- The slightly sloped plaster band on top of the face brickwork here clearly illustrated the lack of waterproofing on top of the face brick feature wall.
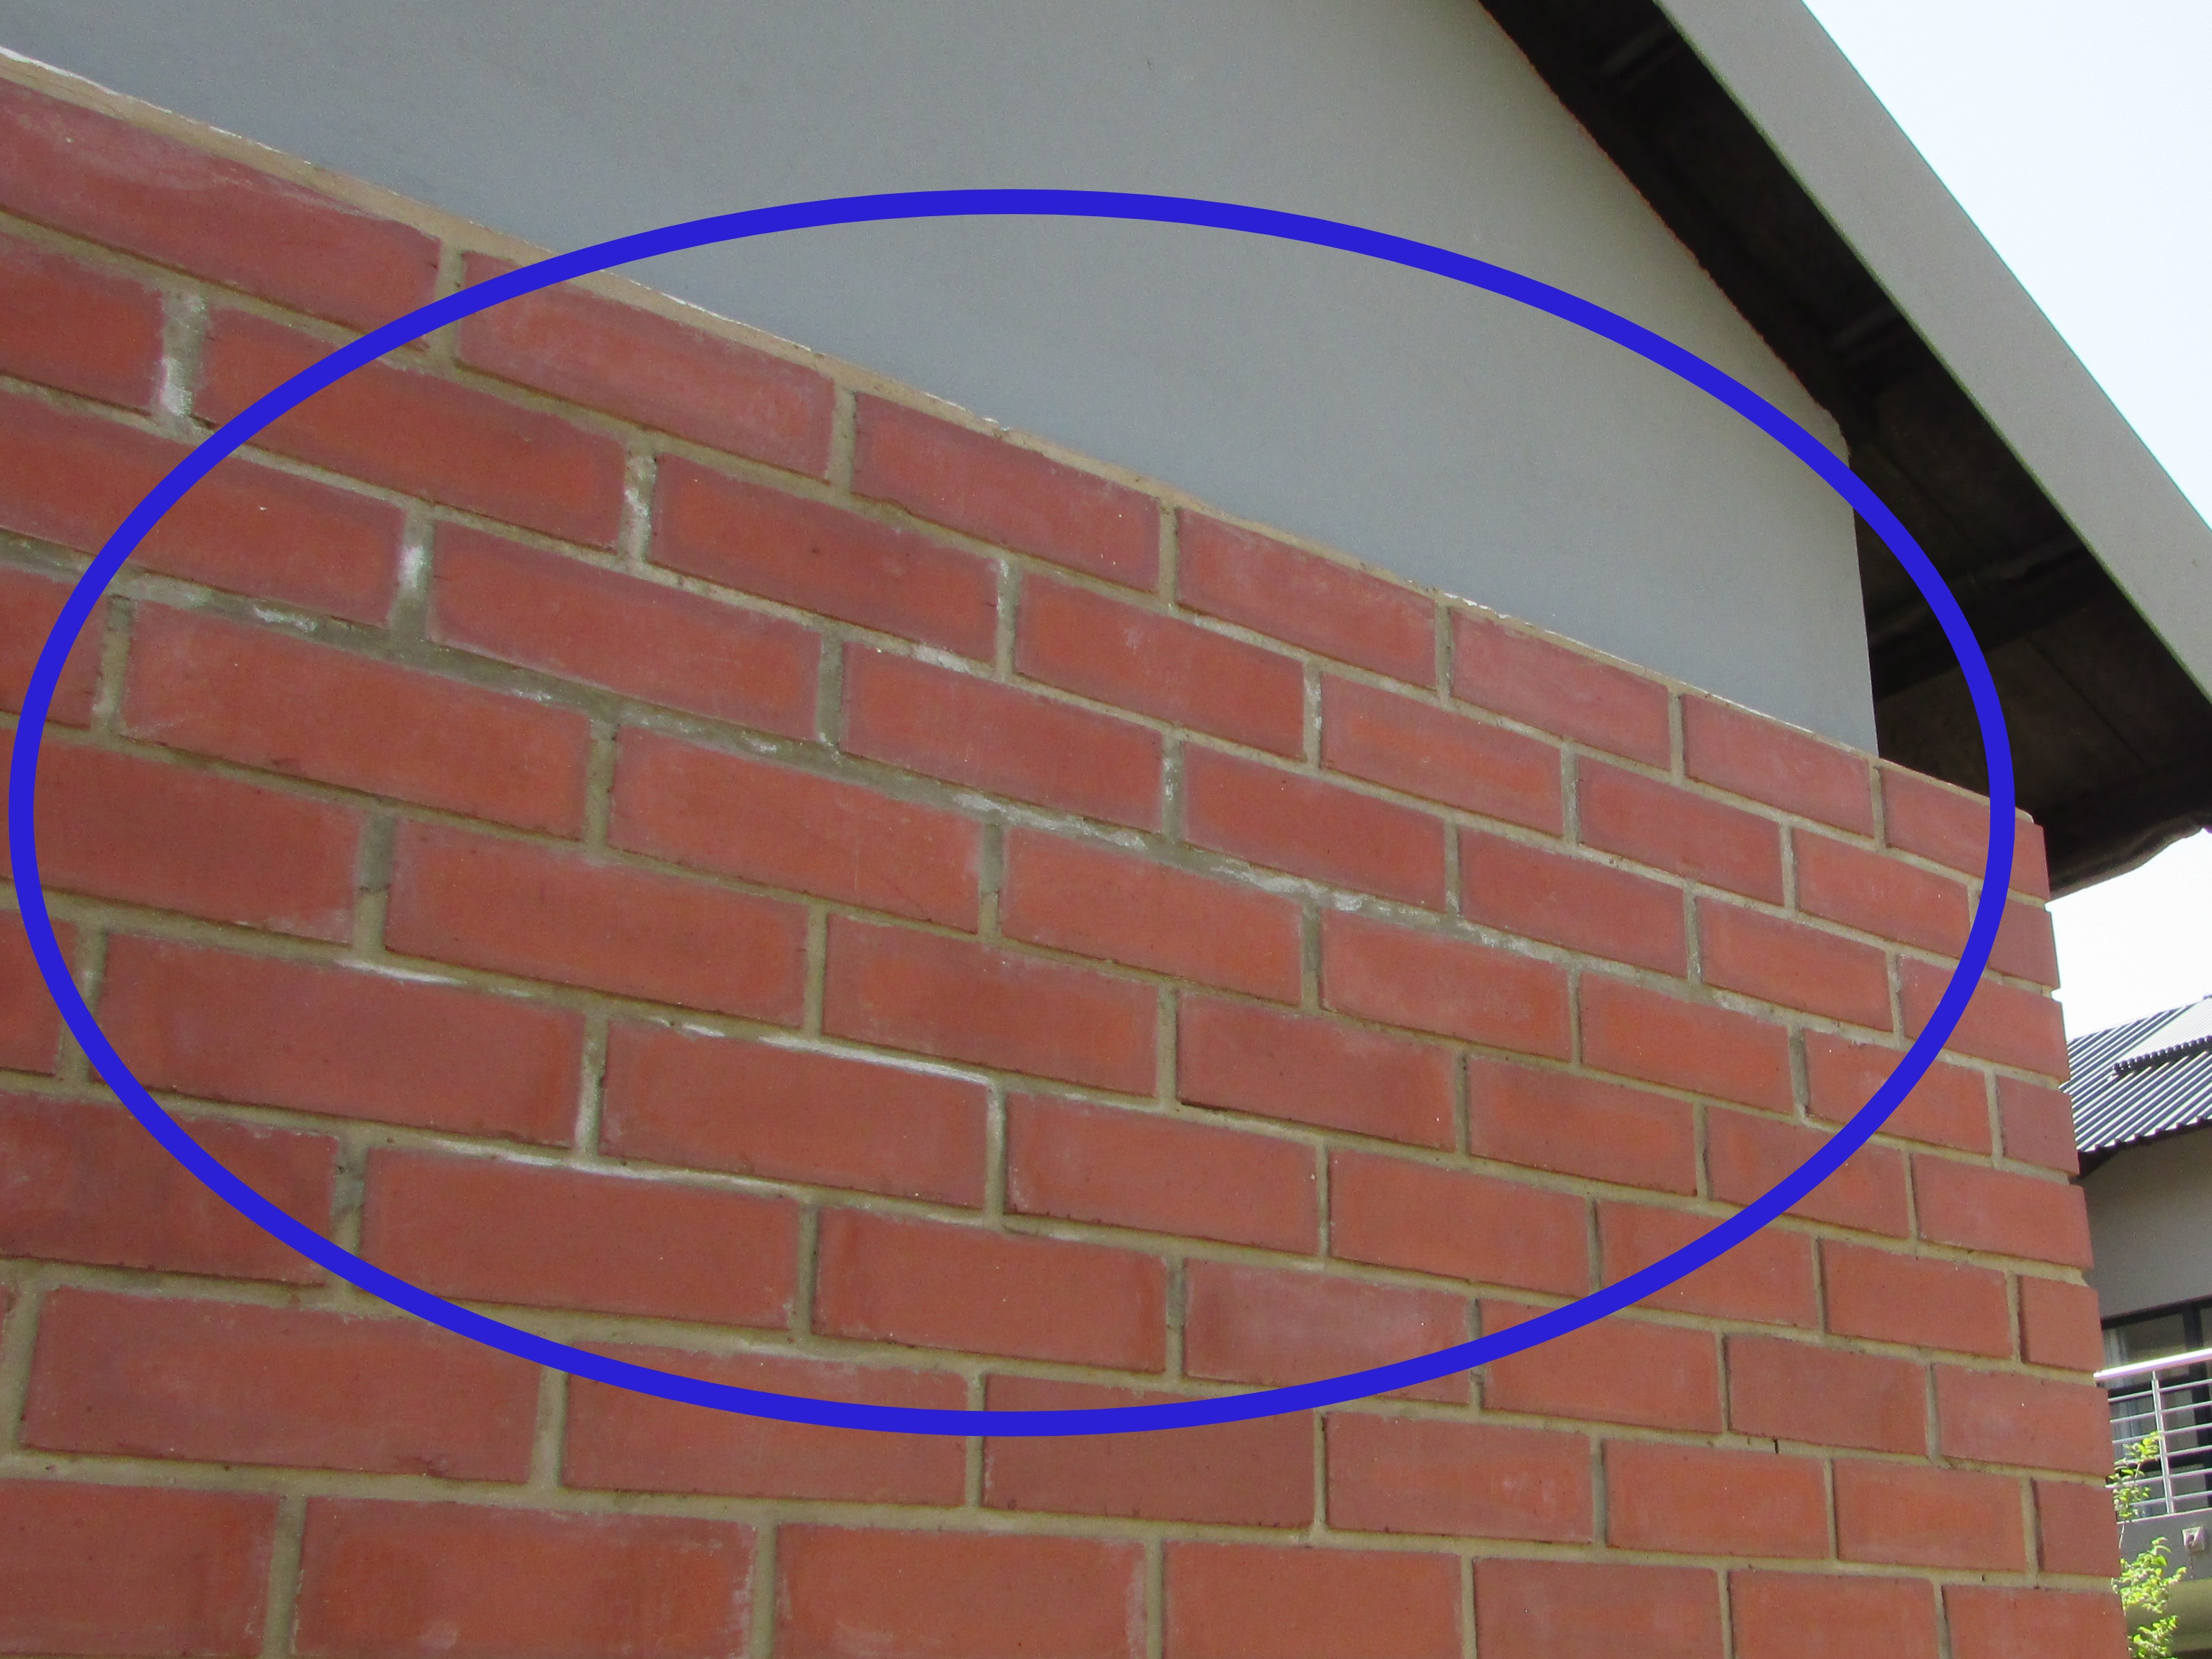
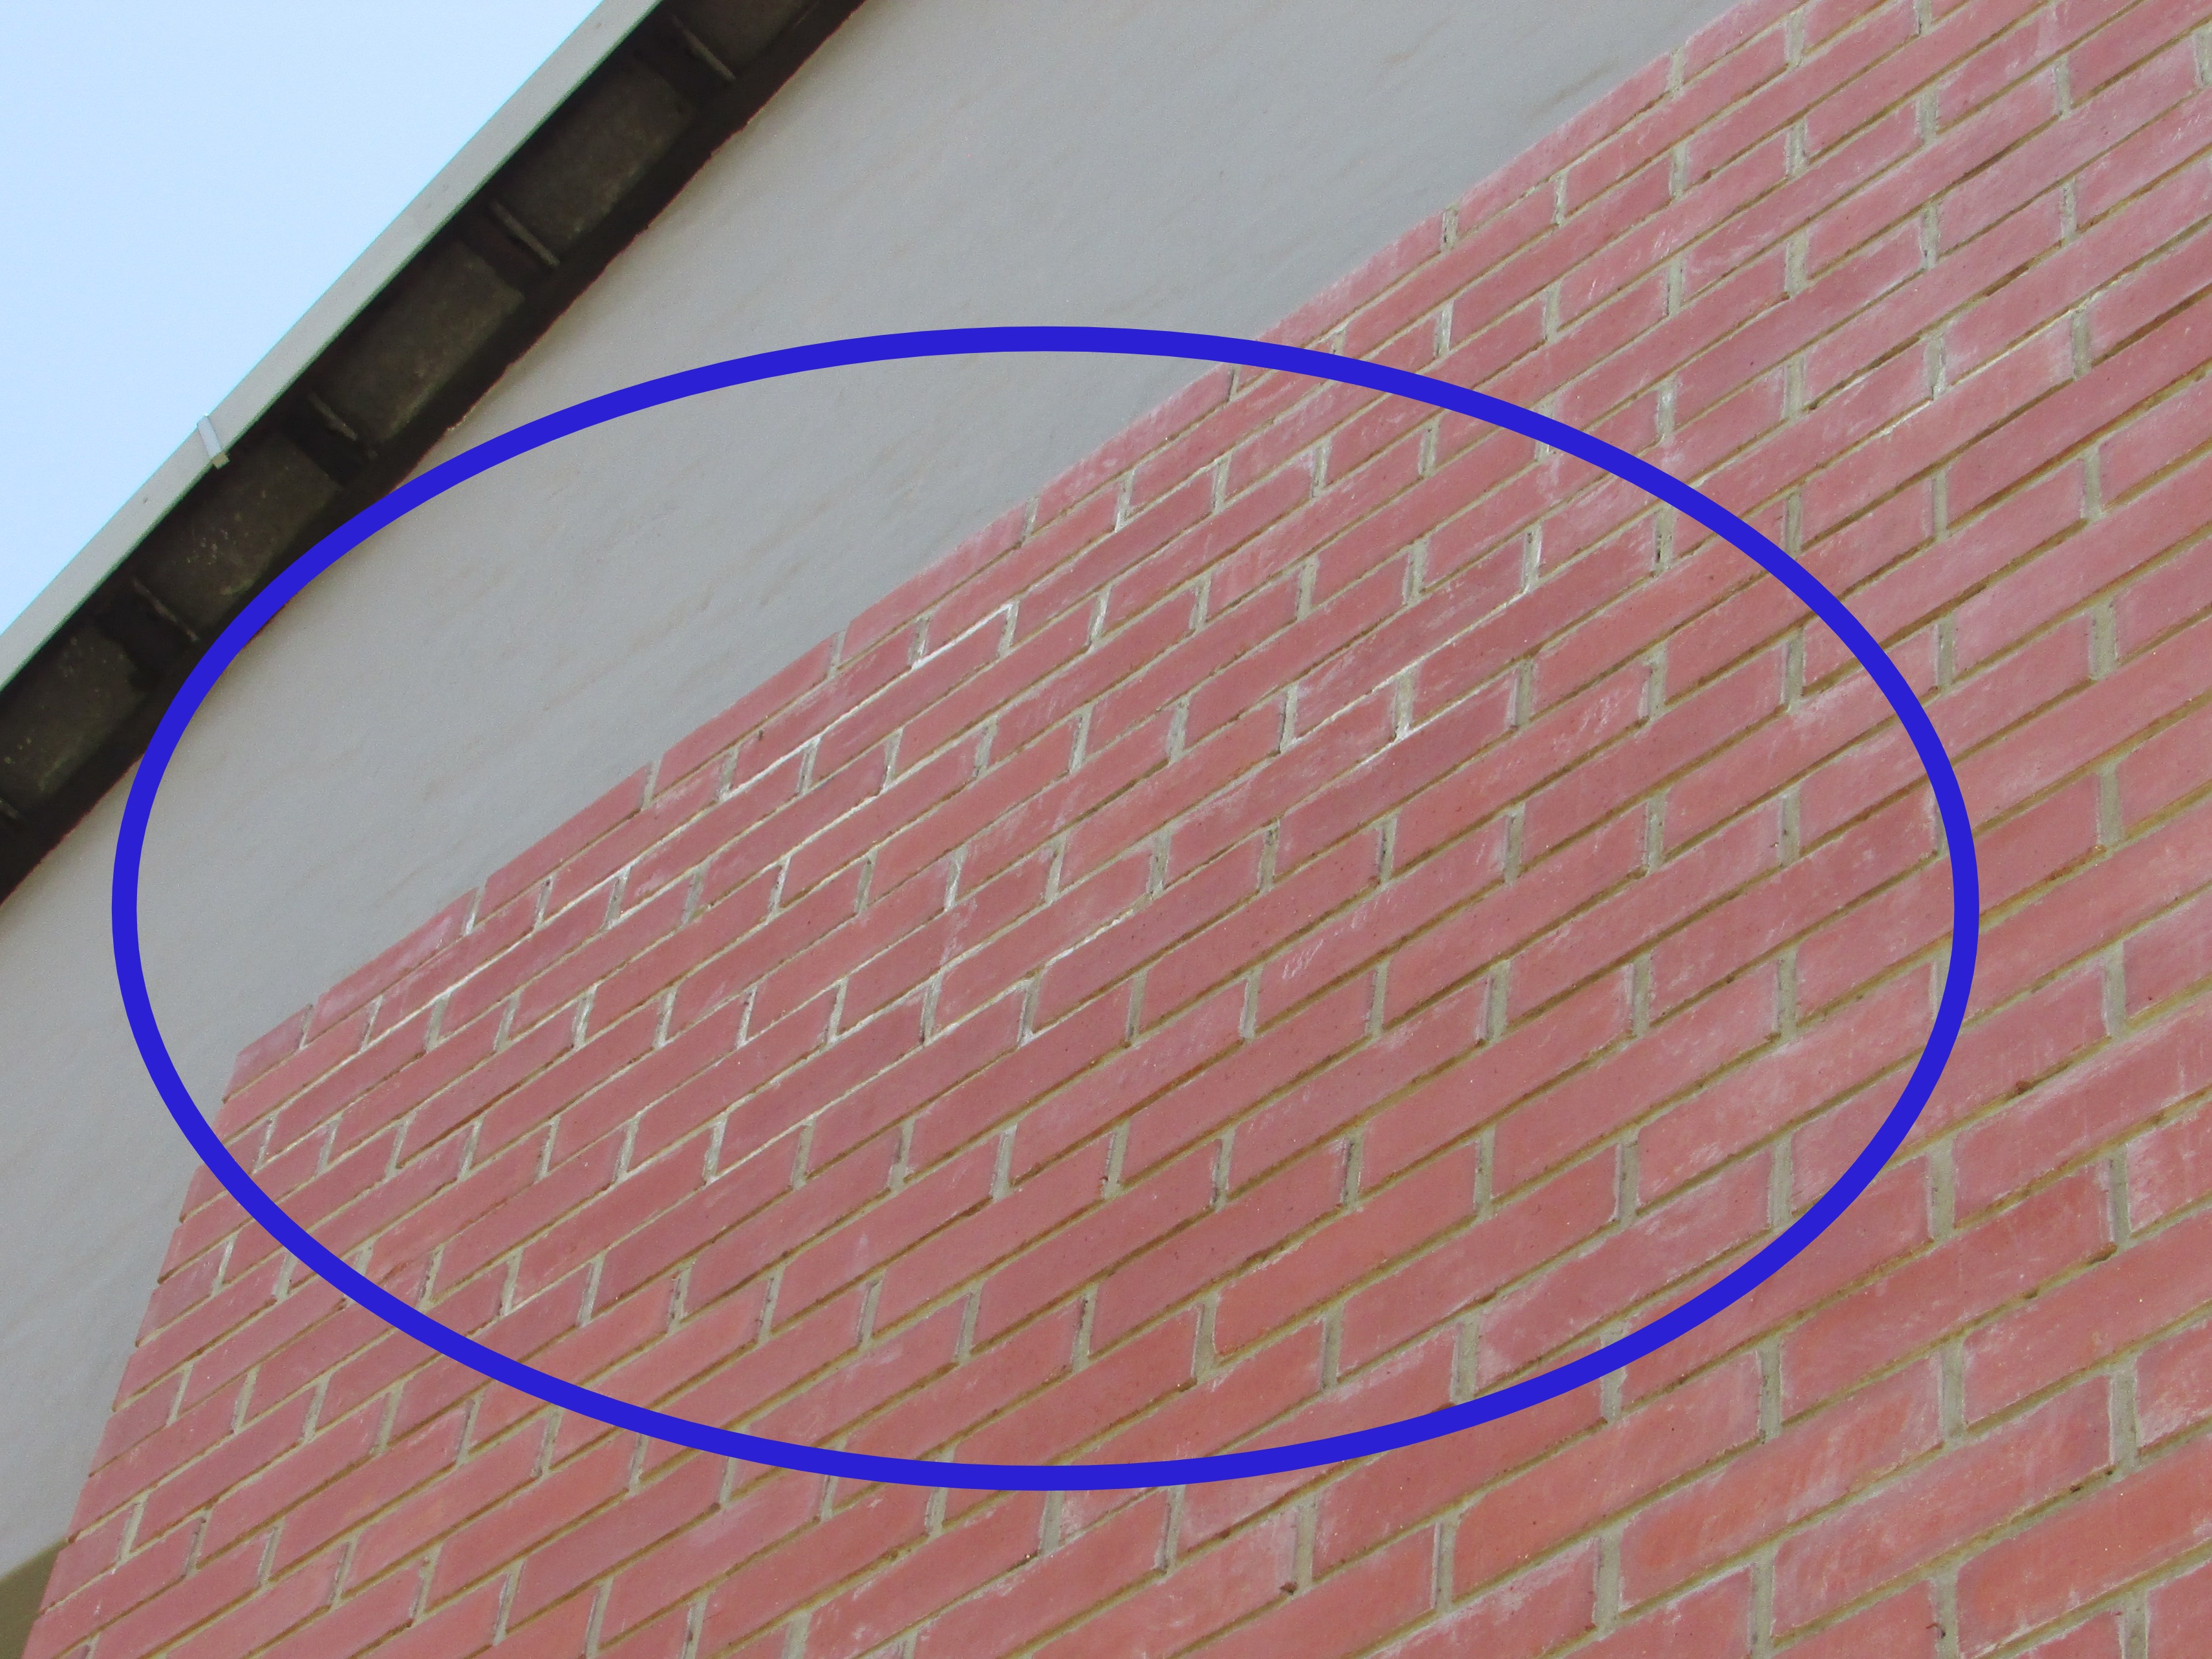
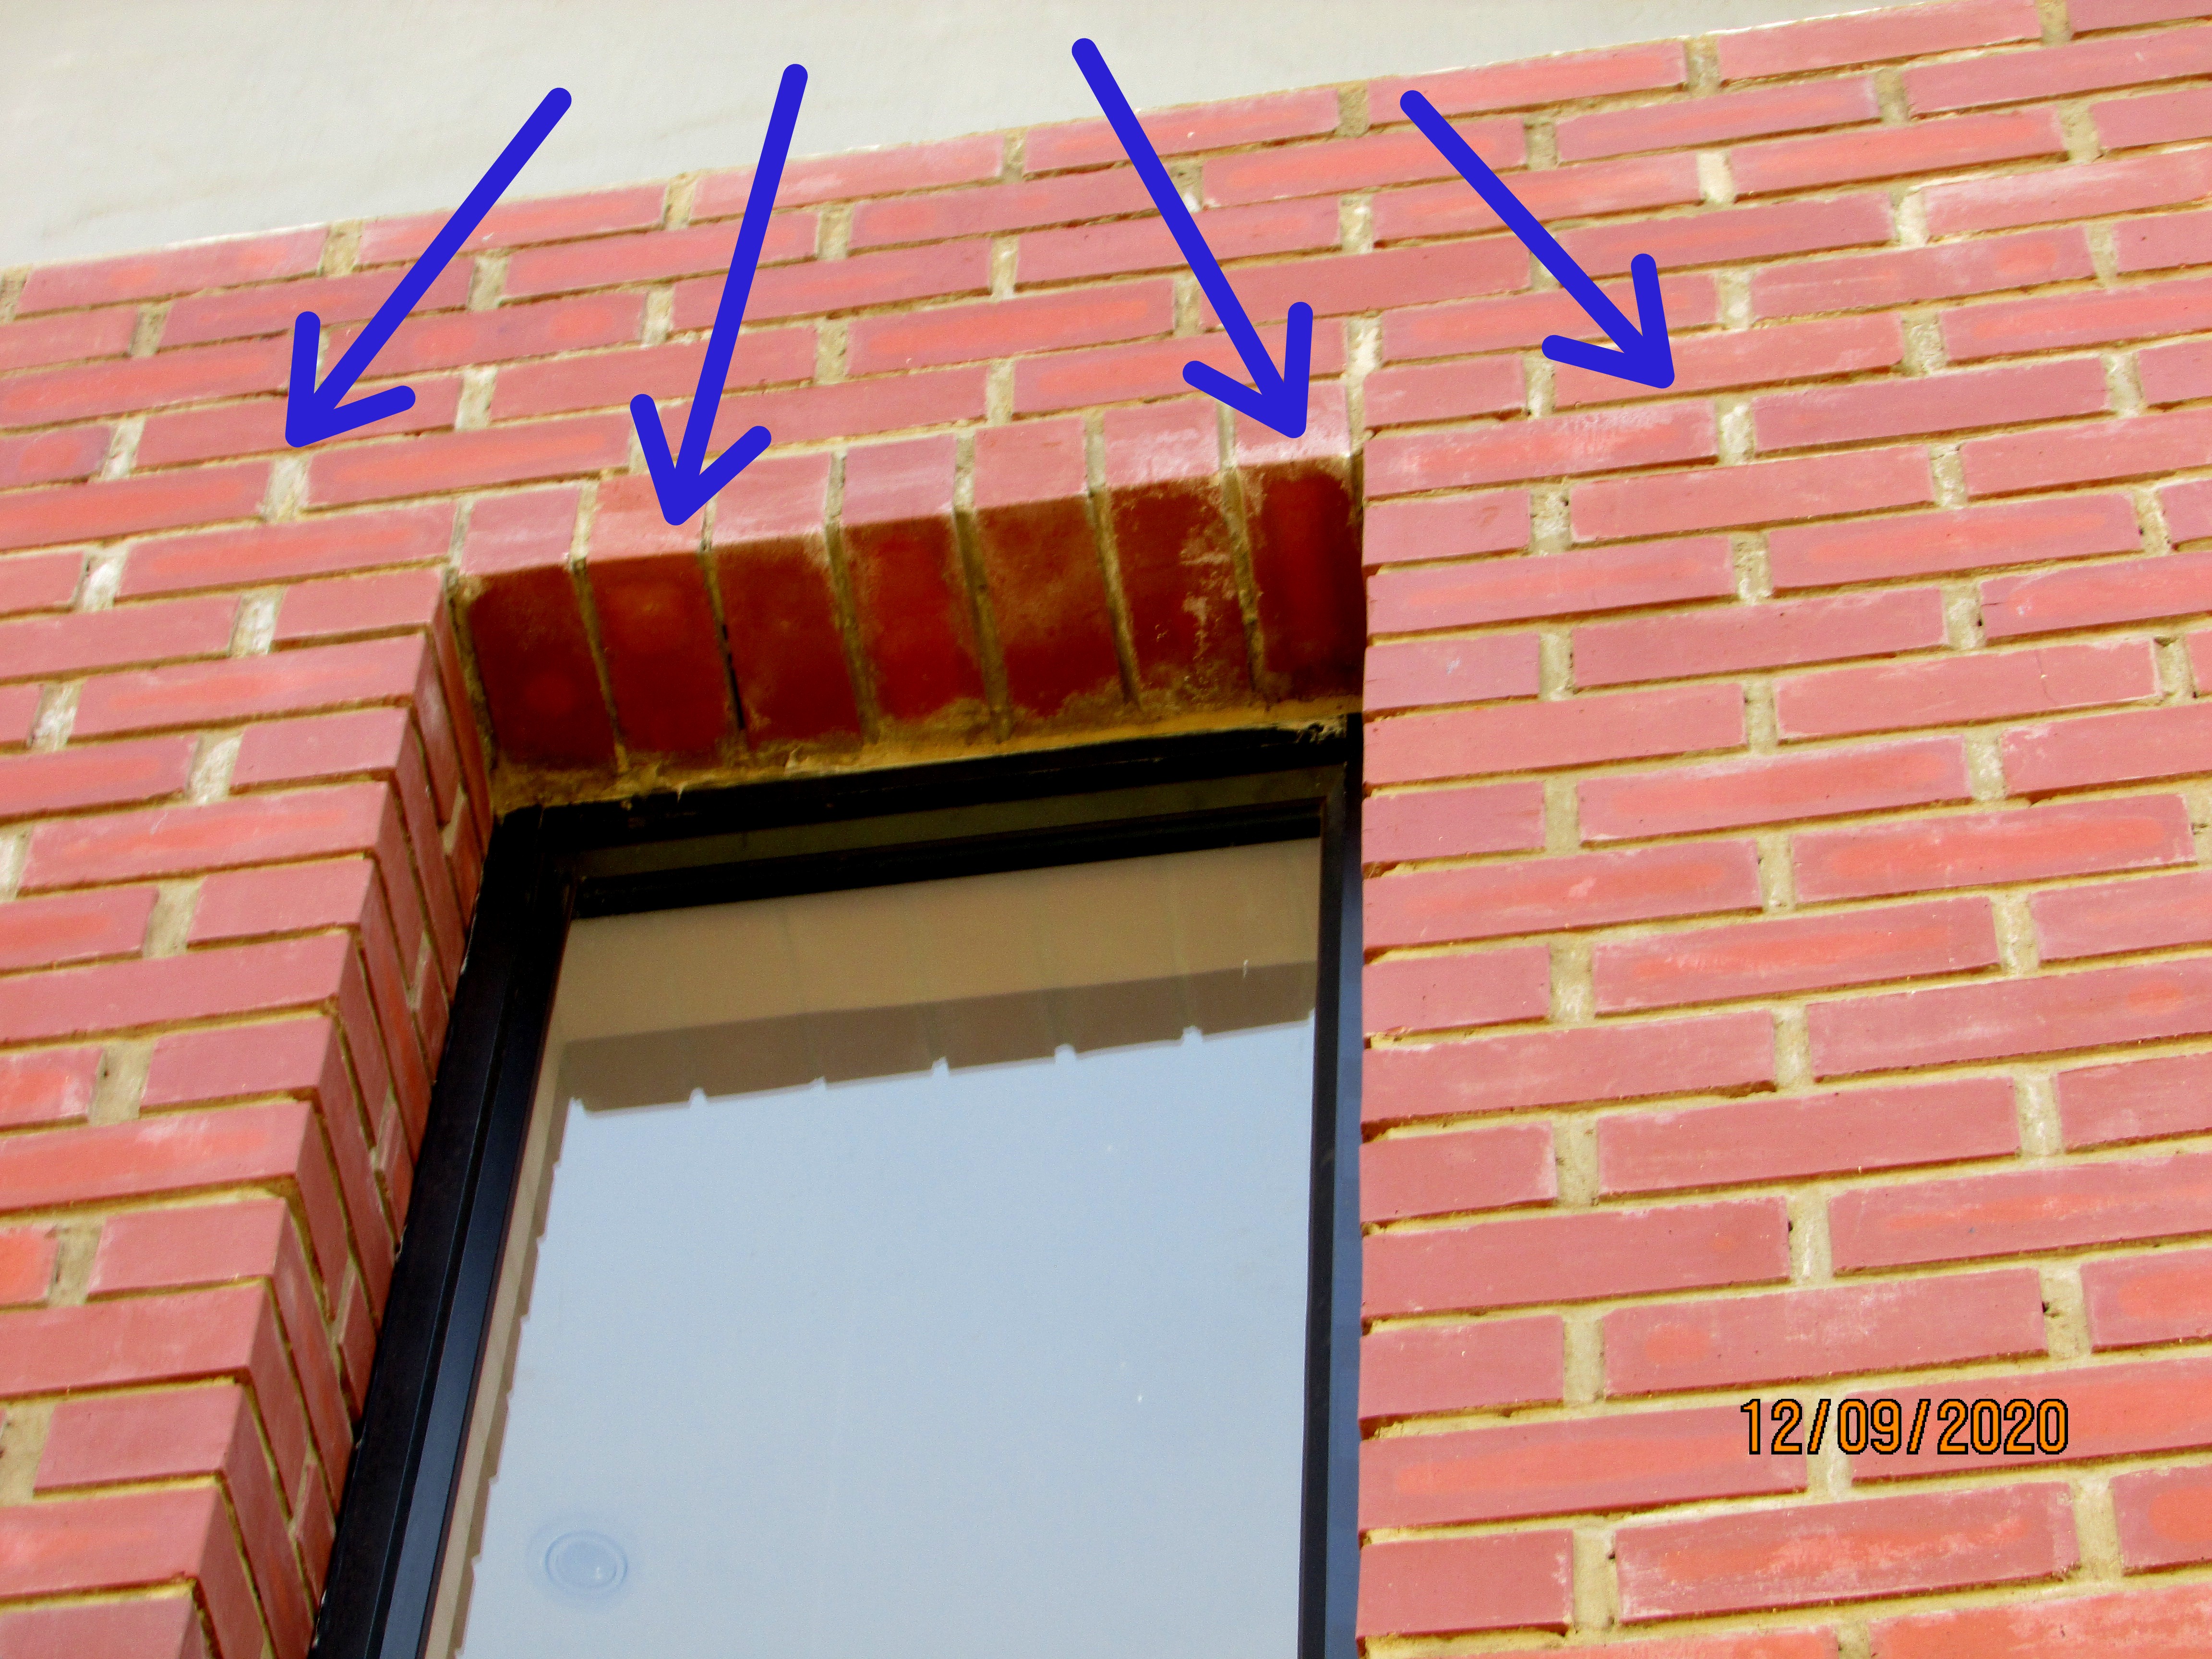
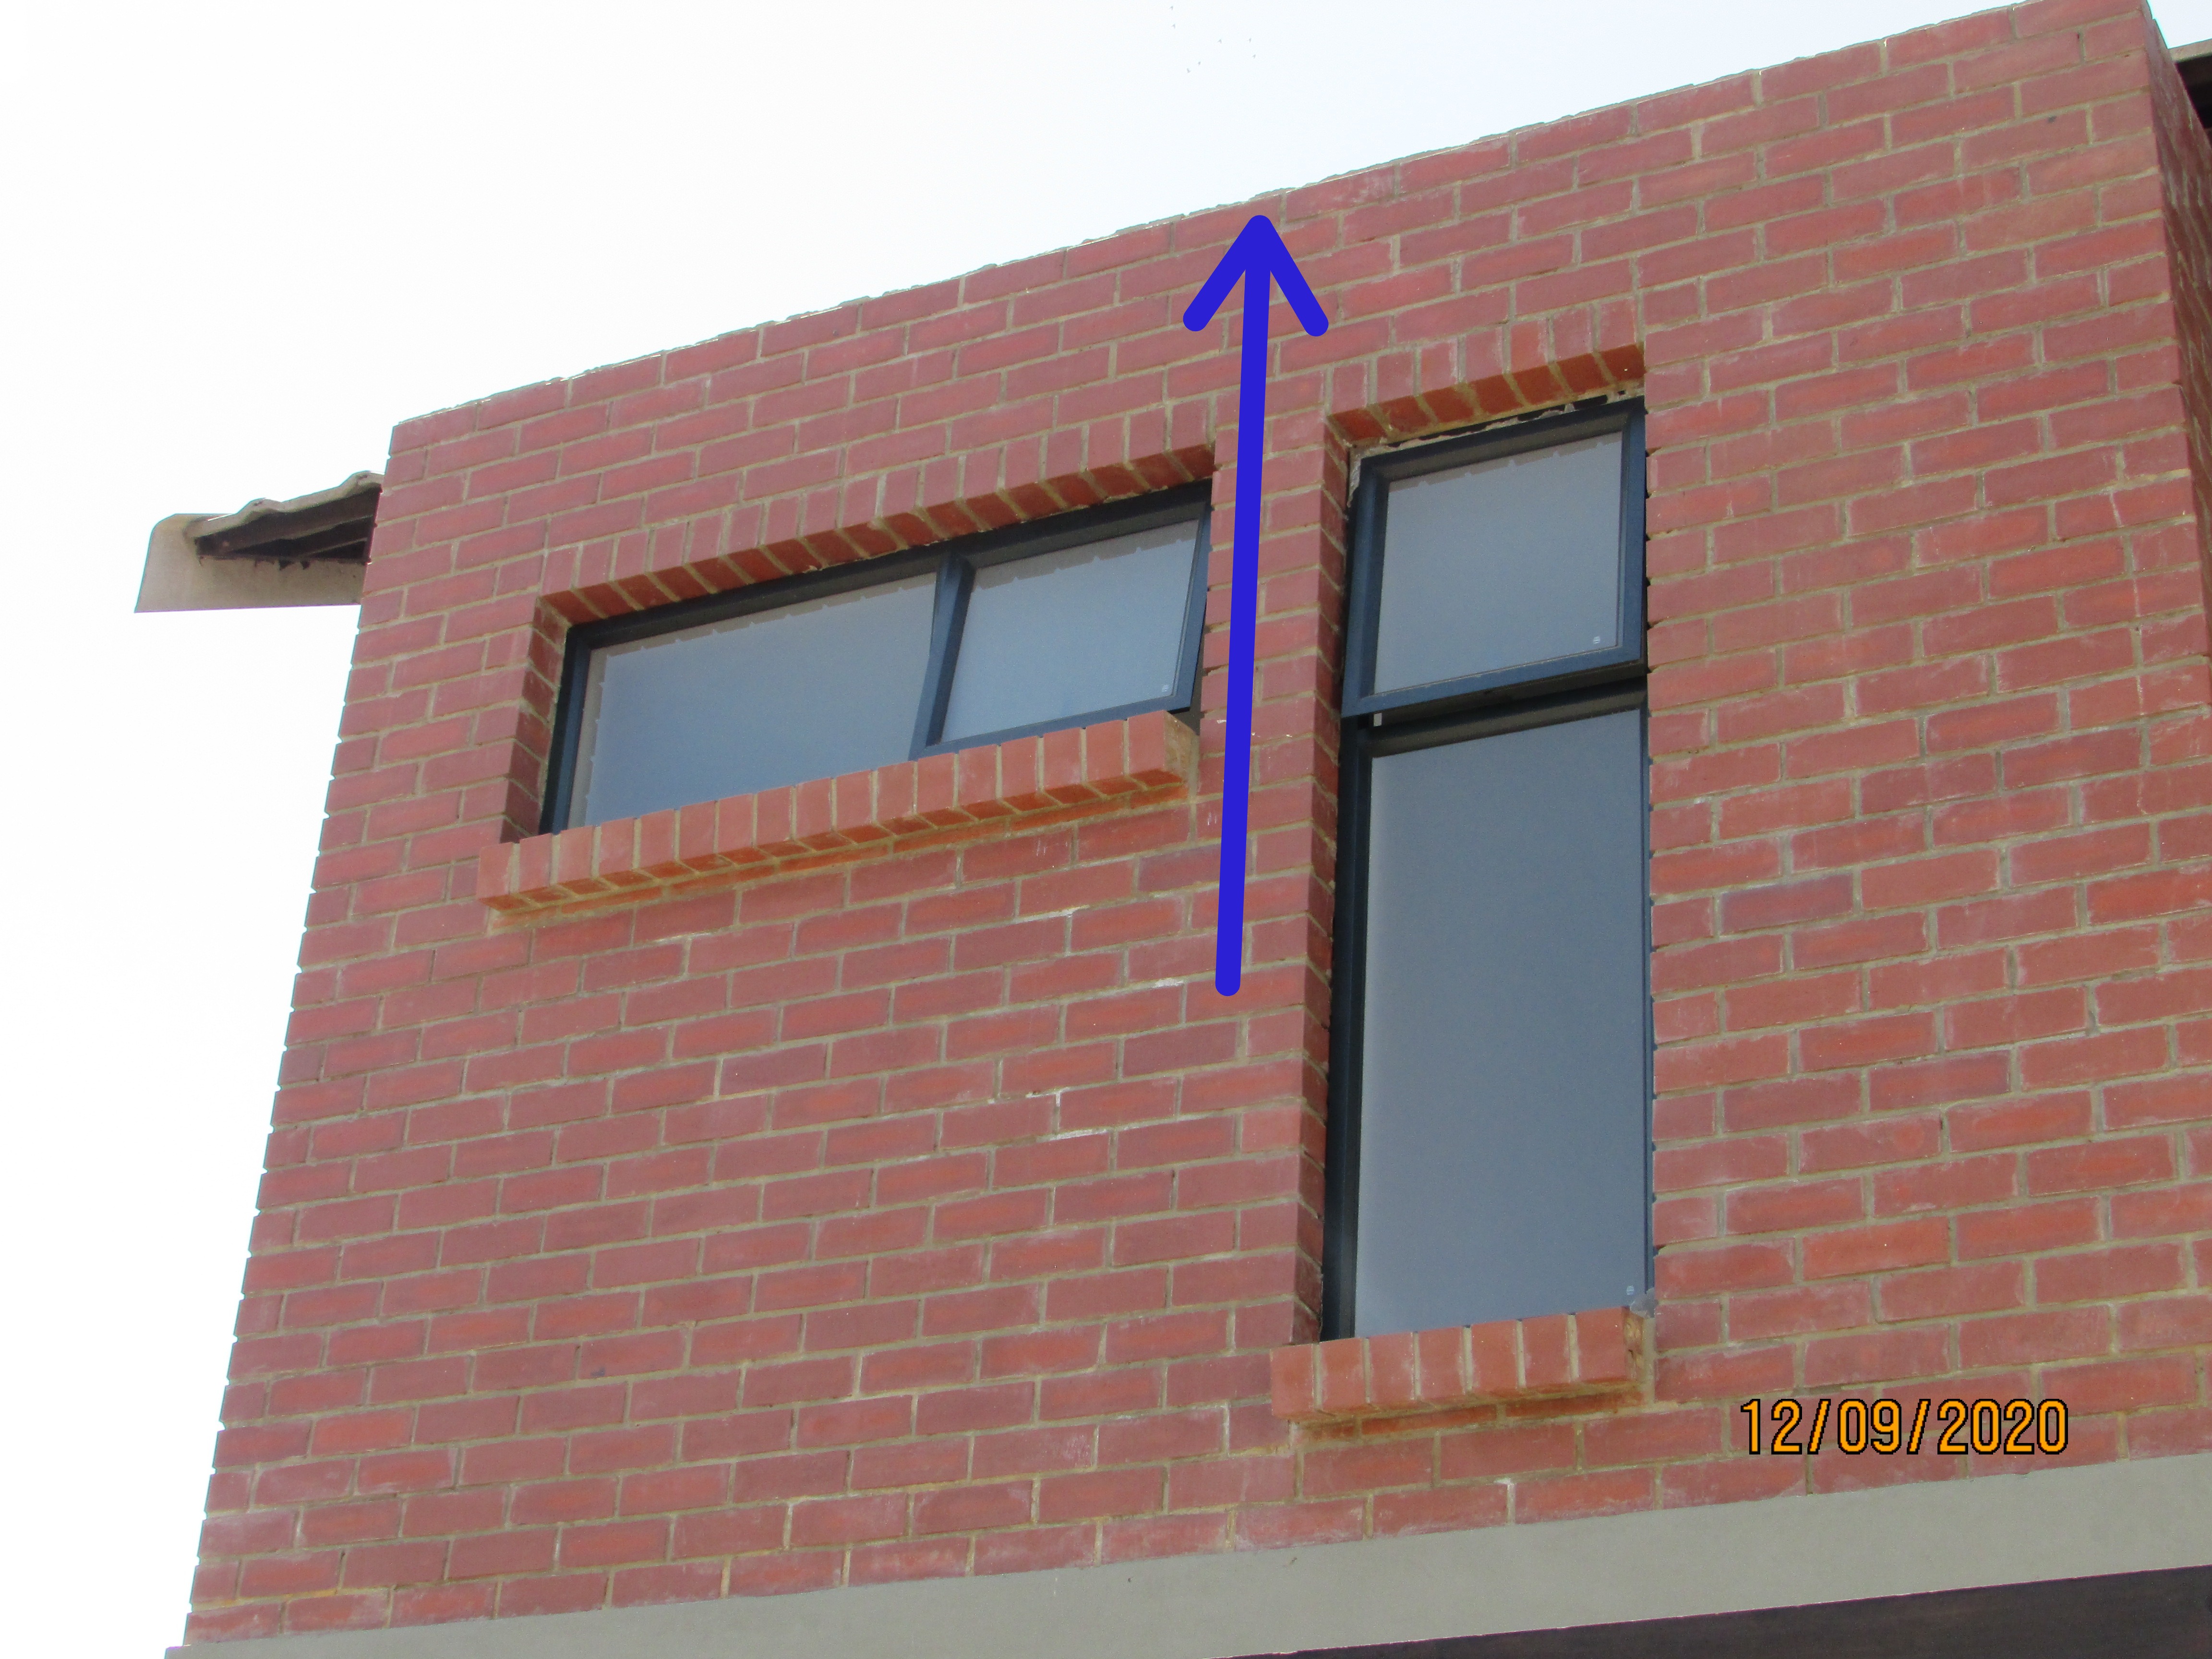
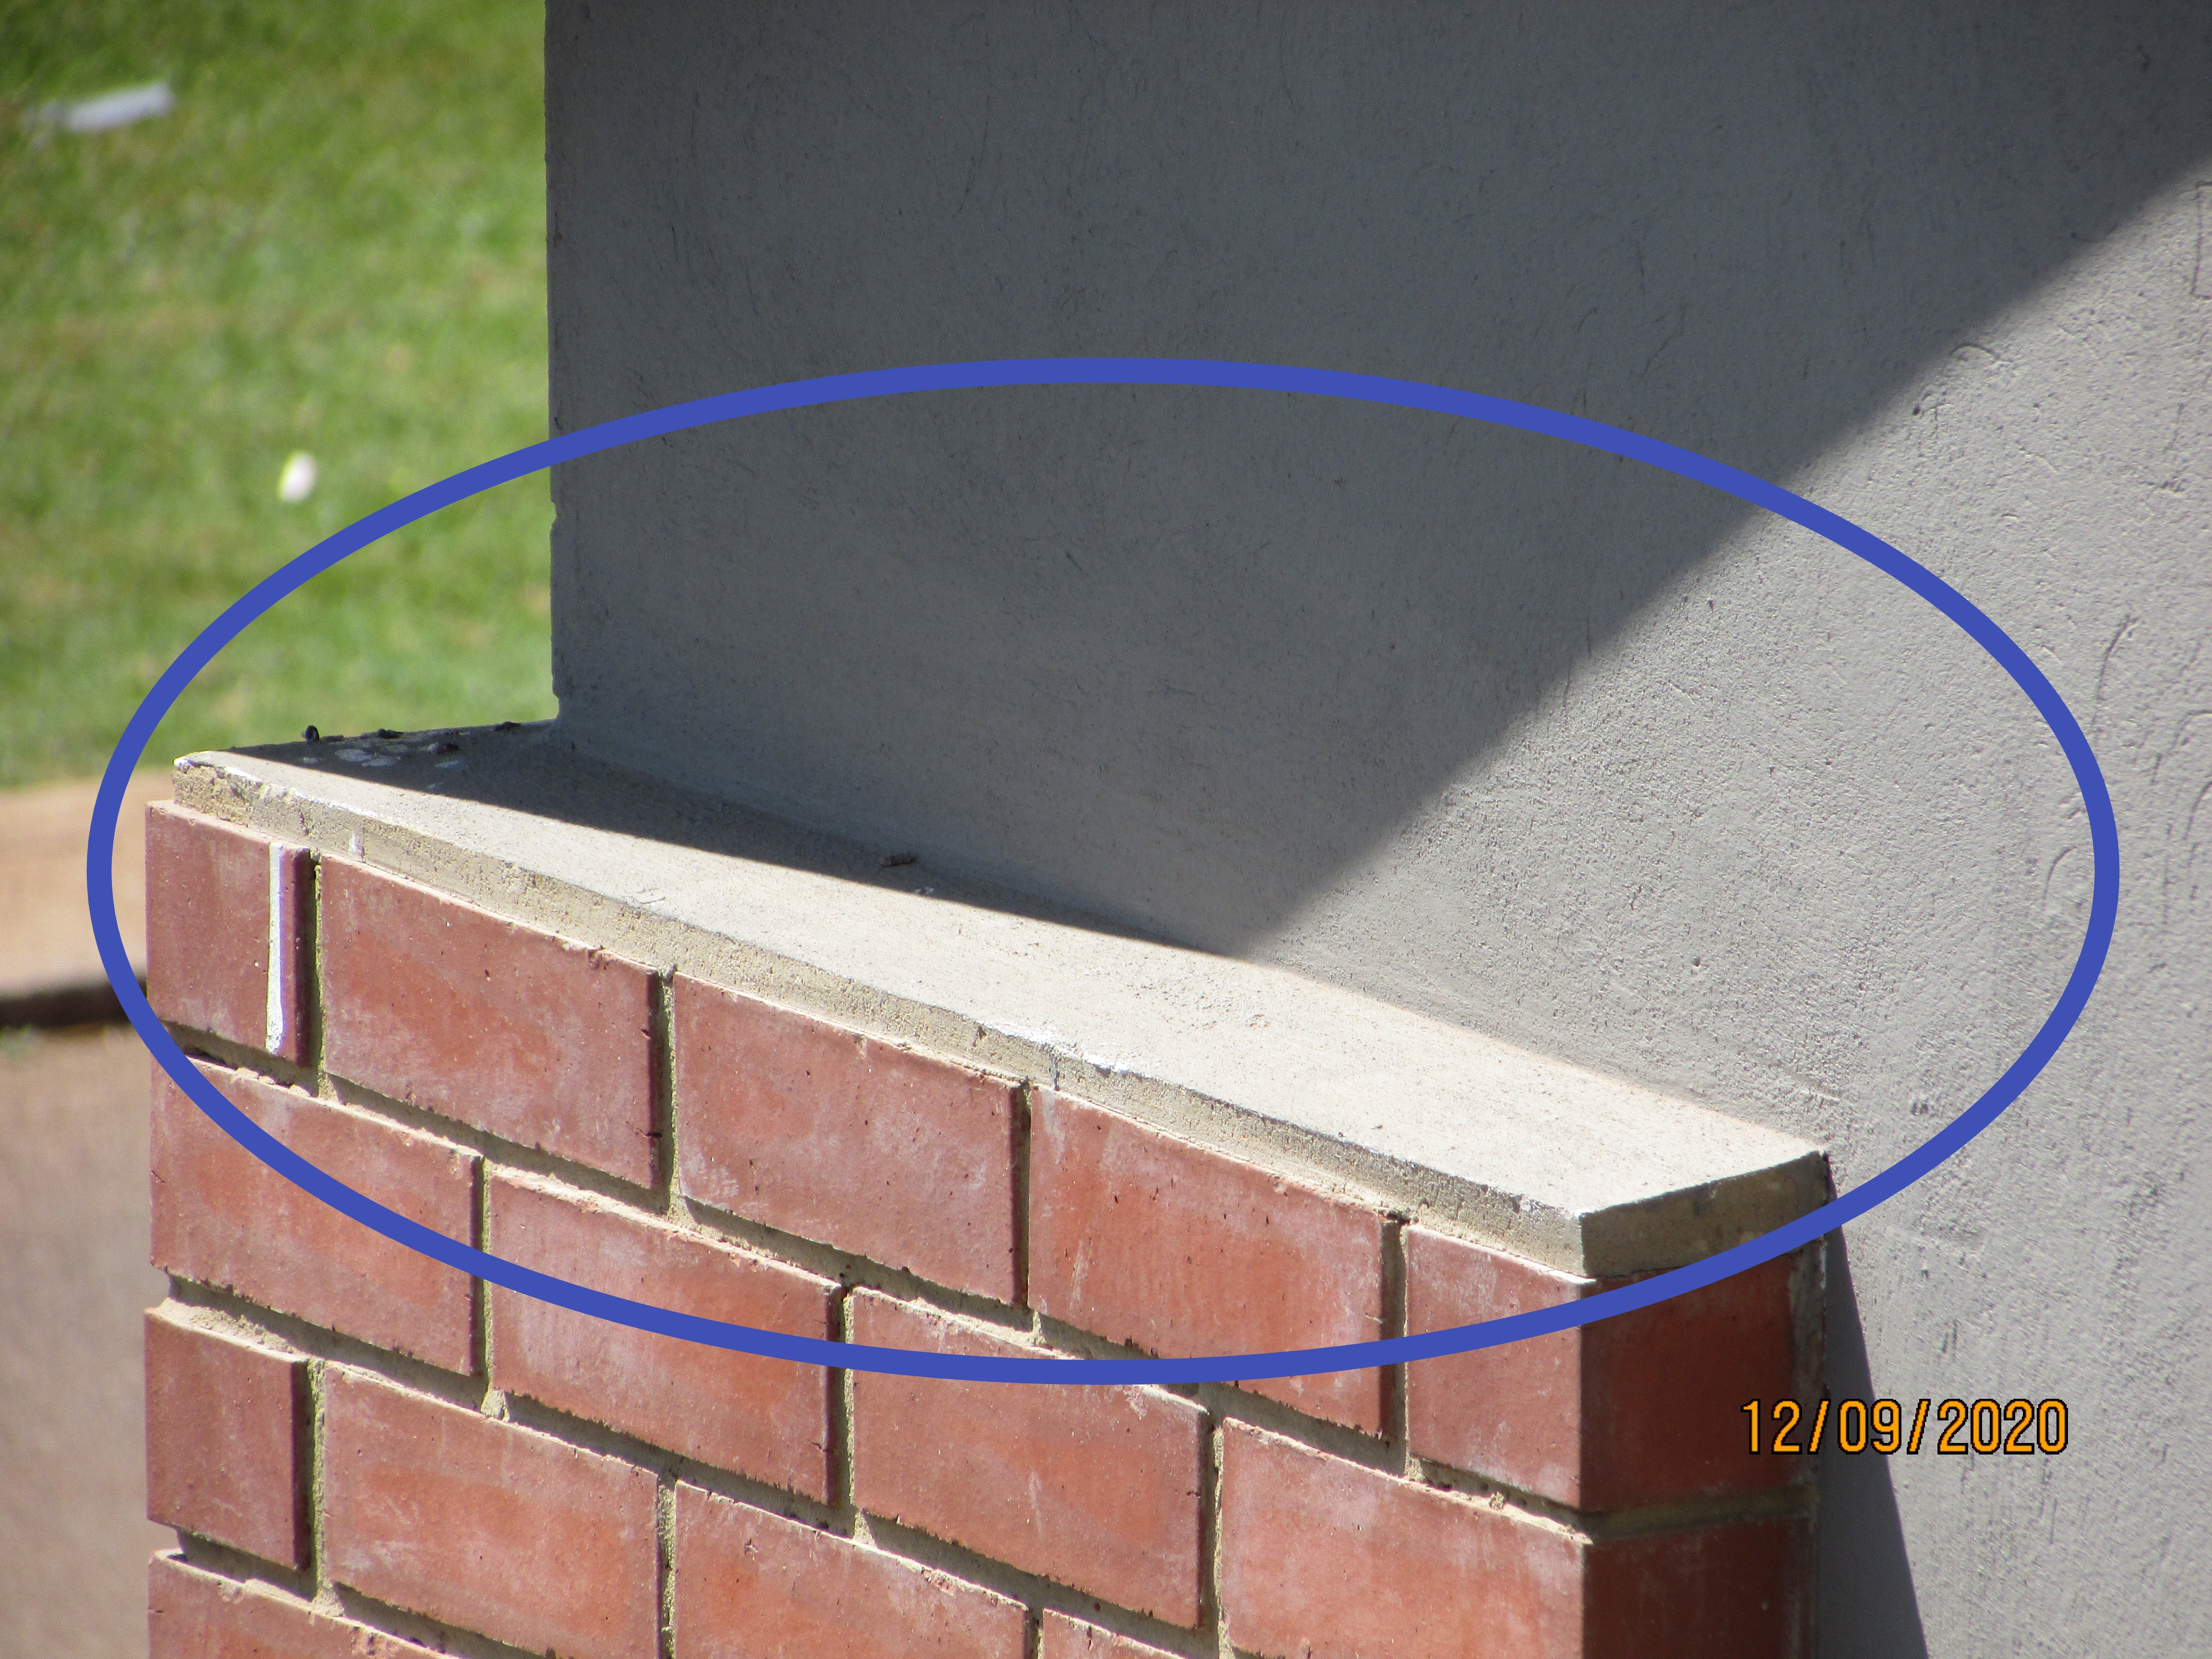
There was what appeared to be rising damp in some areas on external face of the face brick and plastered and painted plinths of the house that will need to be monitored. This was evidenced by the staining, bubbling paintwork, and efflorescence on the lower portions of walls above the paving level.
- There appeared to be water pooling around the foot of the downpipe and rising damp in the wall. Note the lack of grouting material on the paving!
- Note the damp brickwork and efflorescence on the bottom of the plinth. Water splashing up from the paving can be a problem here.
- The dark area of facebrick was indicative of rising damp here. There was signs of efflorescence as well!
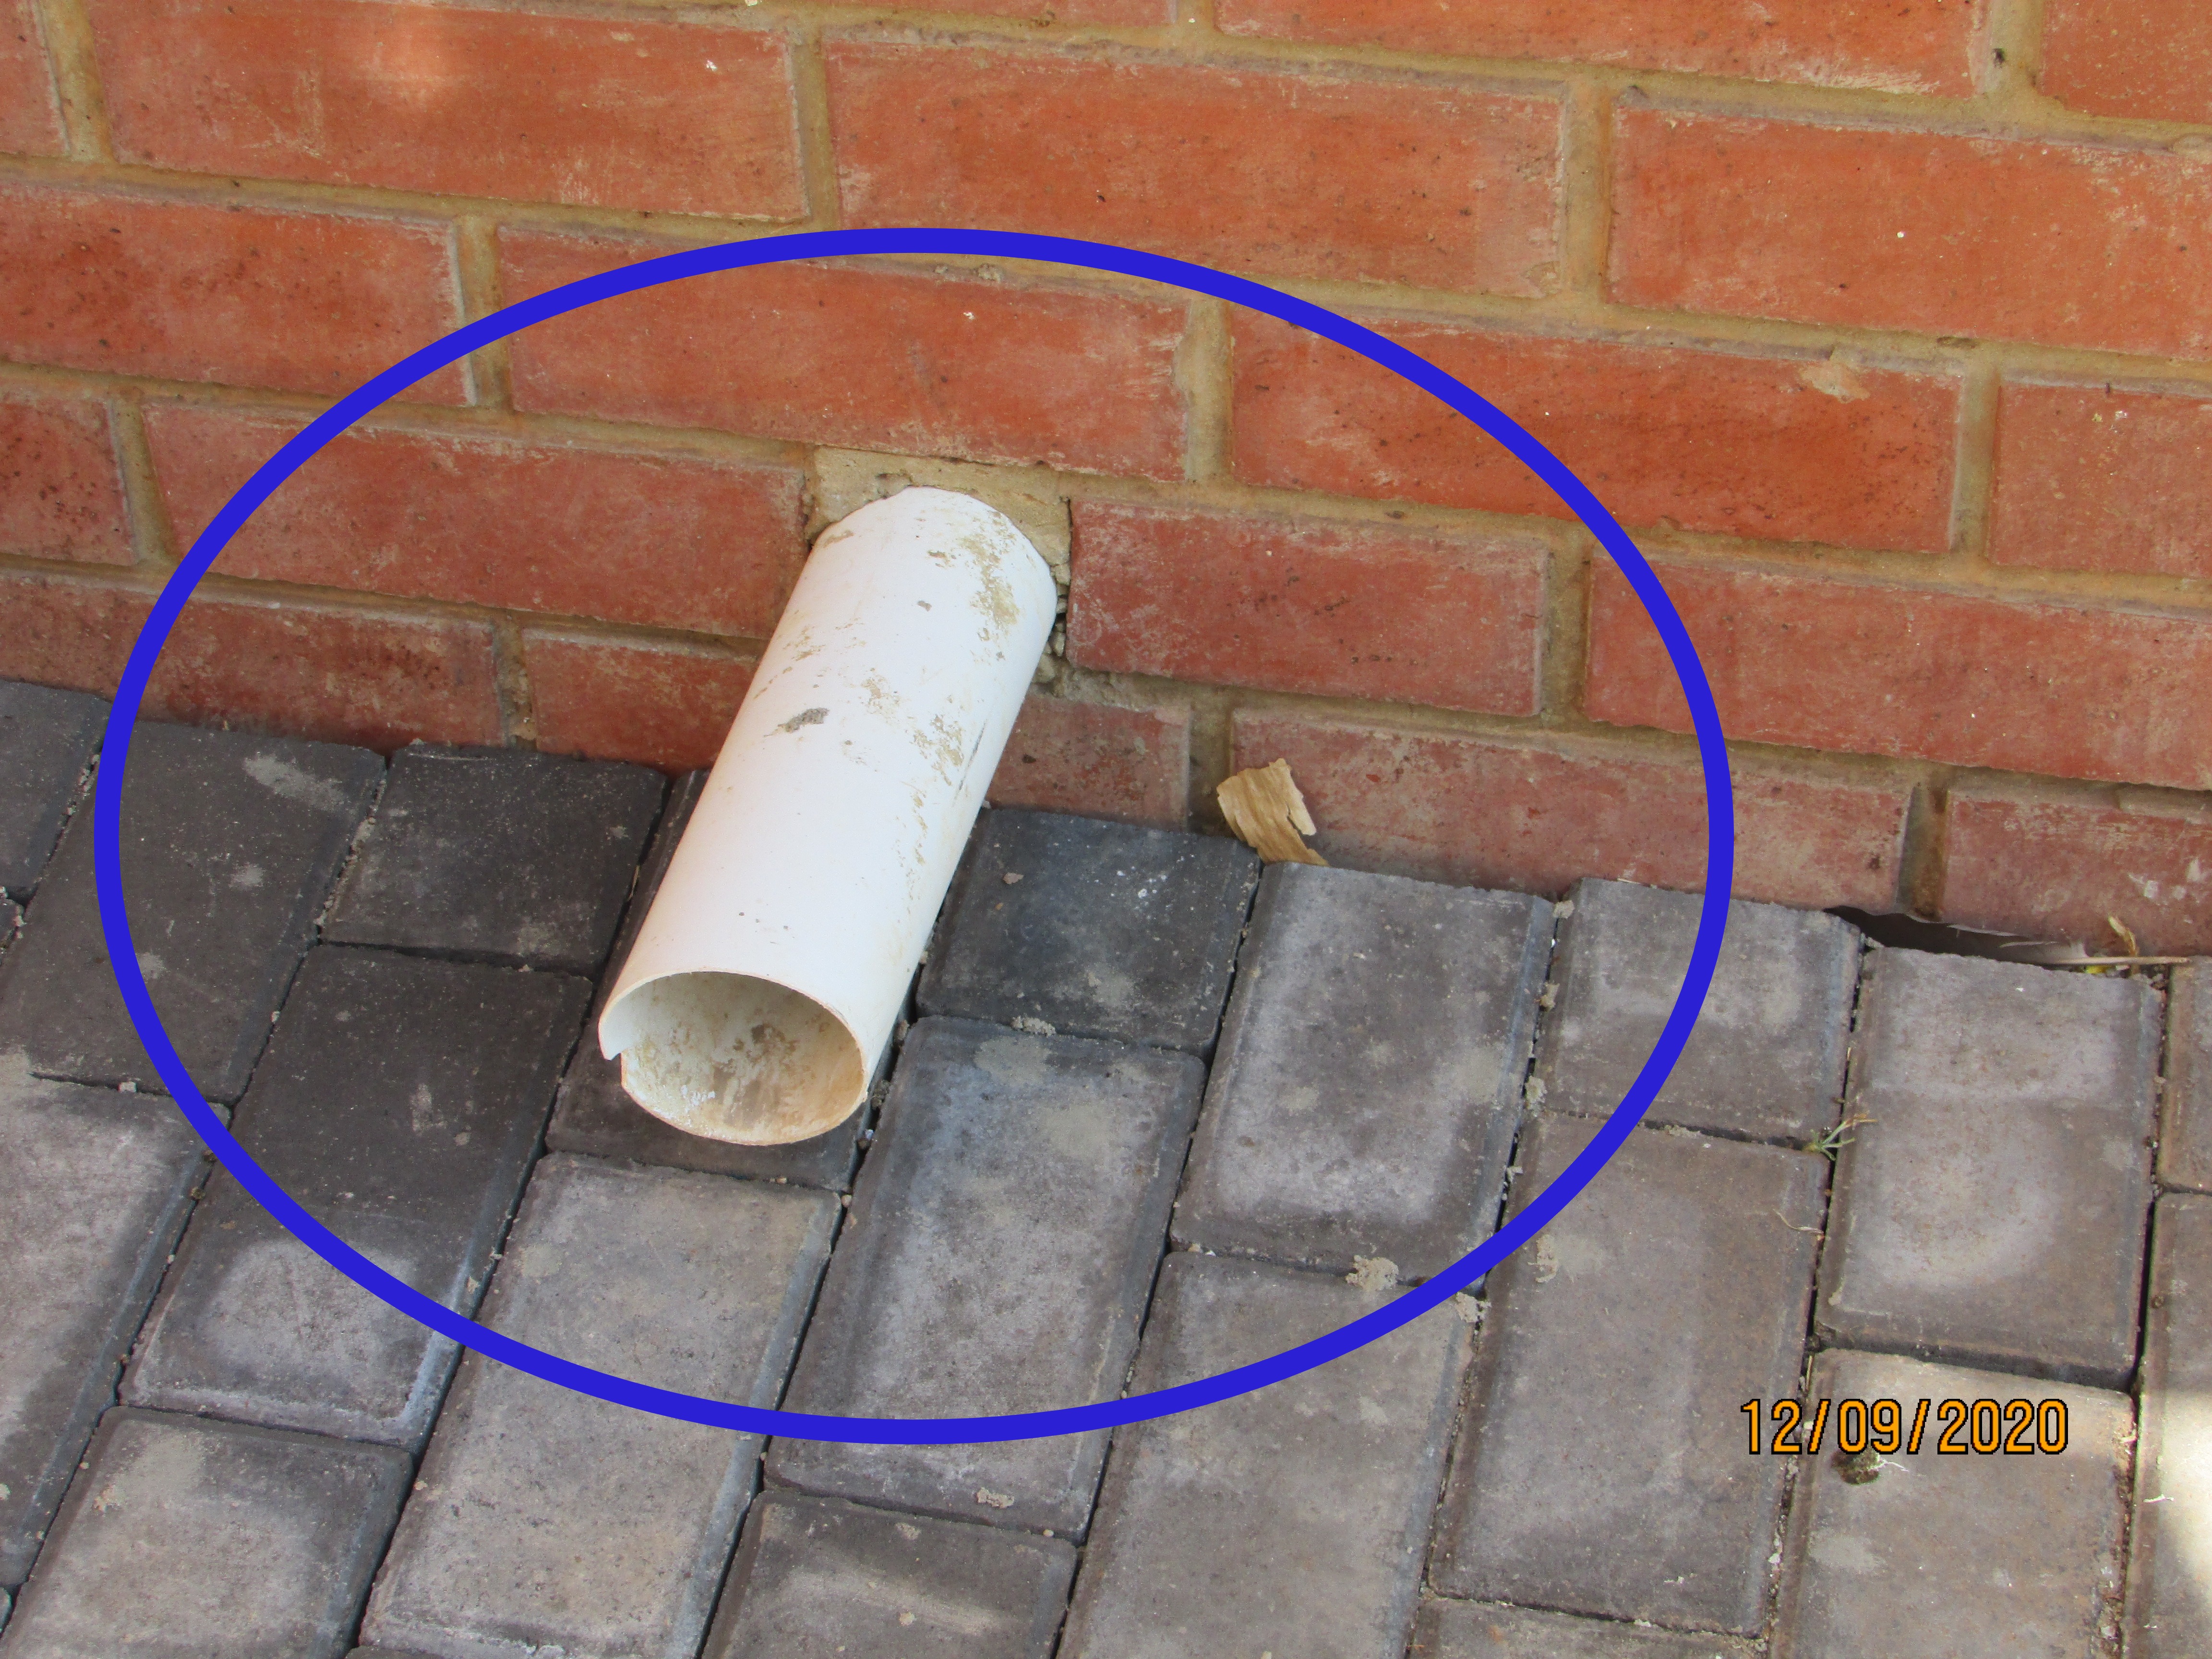
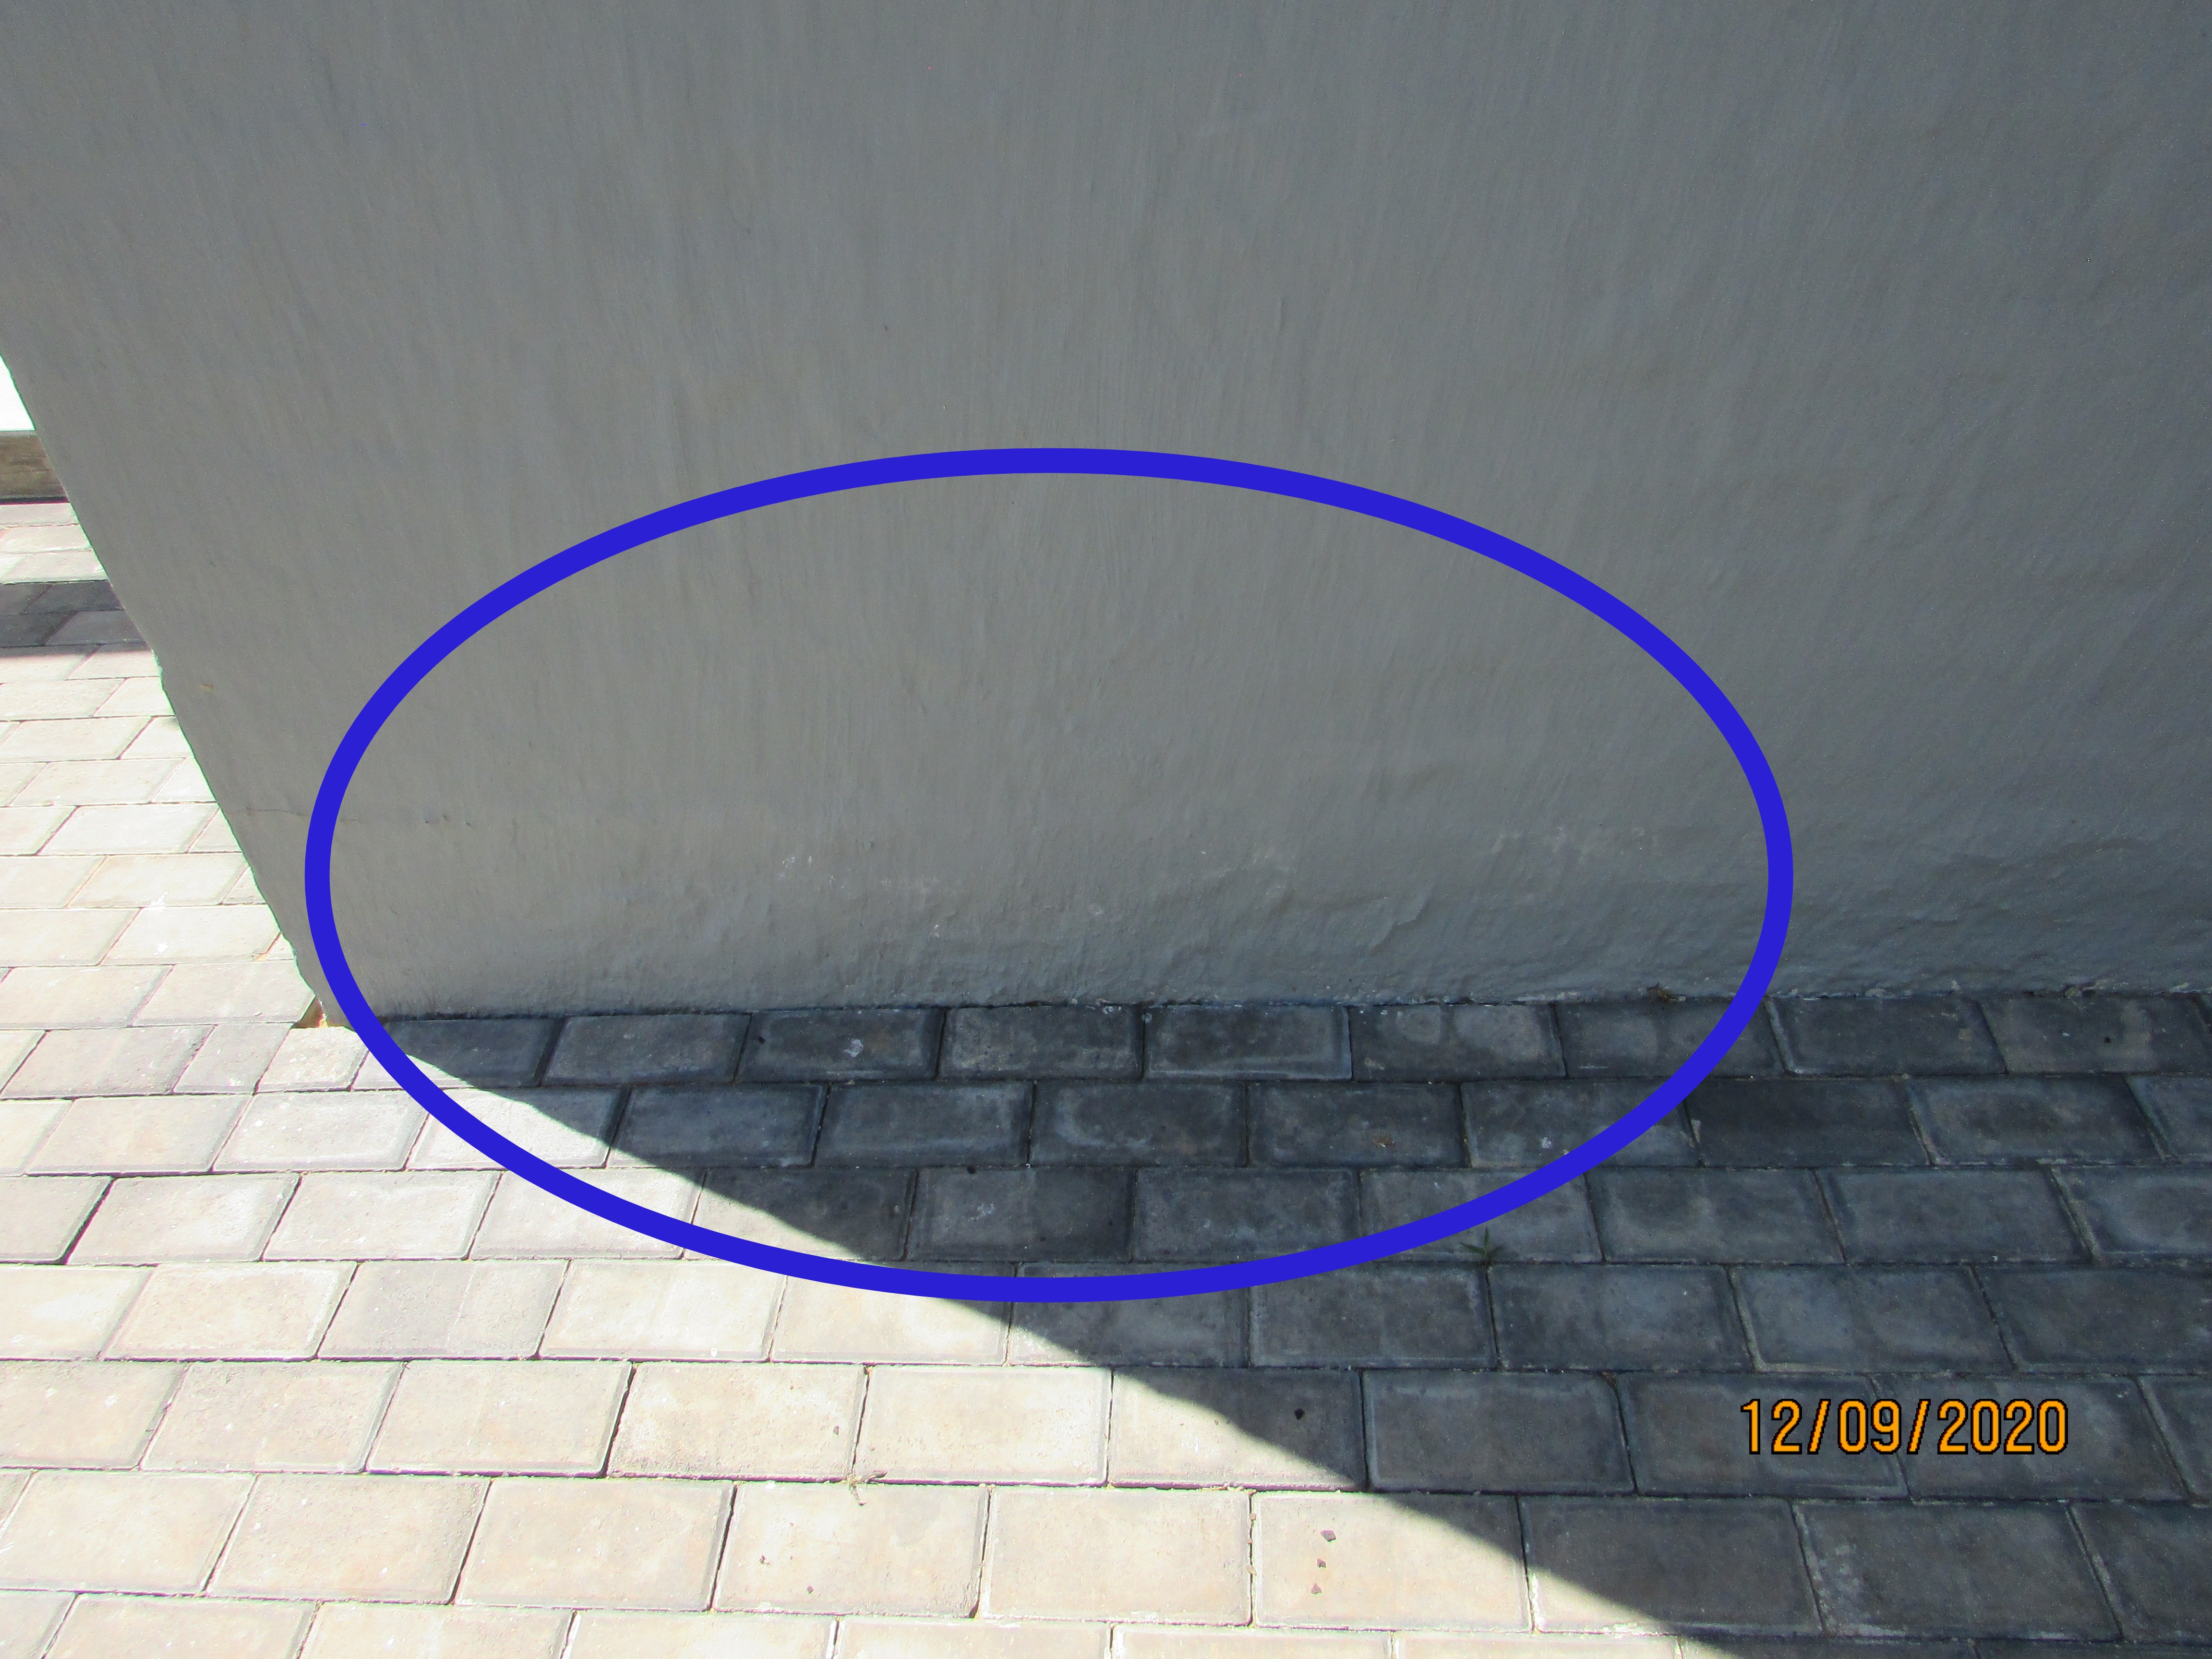
.JPG)
The dry stack feature wall on the entrance wall of the covered entrance finished against the brick plastered wall and column without any waterproofing between the dry stack feature and the plastered brick wall. Moisture control with exterior dry stack walls is very important. If the support wall has not been properly waterproofed, moisture intrusion into the yard wall and column can be expected. A solution for the moisture intrusion is difficult to suggest. Seal the top of dry stack stones with an acrylic waterproofing system and wait to see if it works. It it doesn't work,remove the stones, waterproof as required and have the dry stack feature rebuilt.
- Rainwater will be retained between the wall and dry stack feature.
- There was no sign of waterproofing between the dry stack feature and the undercoated plastered wall.
- The finish at the column was unacceptable! The dry stack stone should have been carried through to the face of the stone finish along the wall. Rainwater will enter here!
- The top of the dry stack feature and the wall will need to be waterproofed or sealed to prevent moisture intrusion between the dry stack feature and the brick wall.

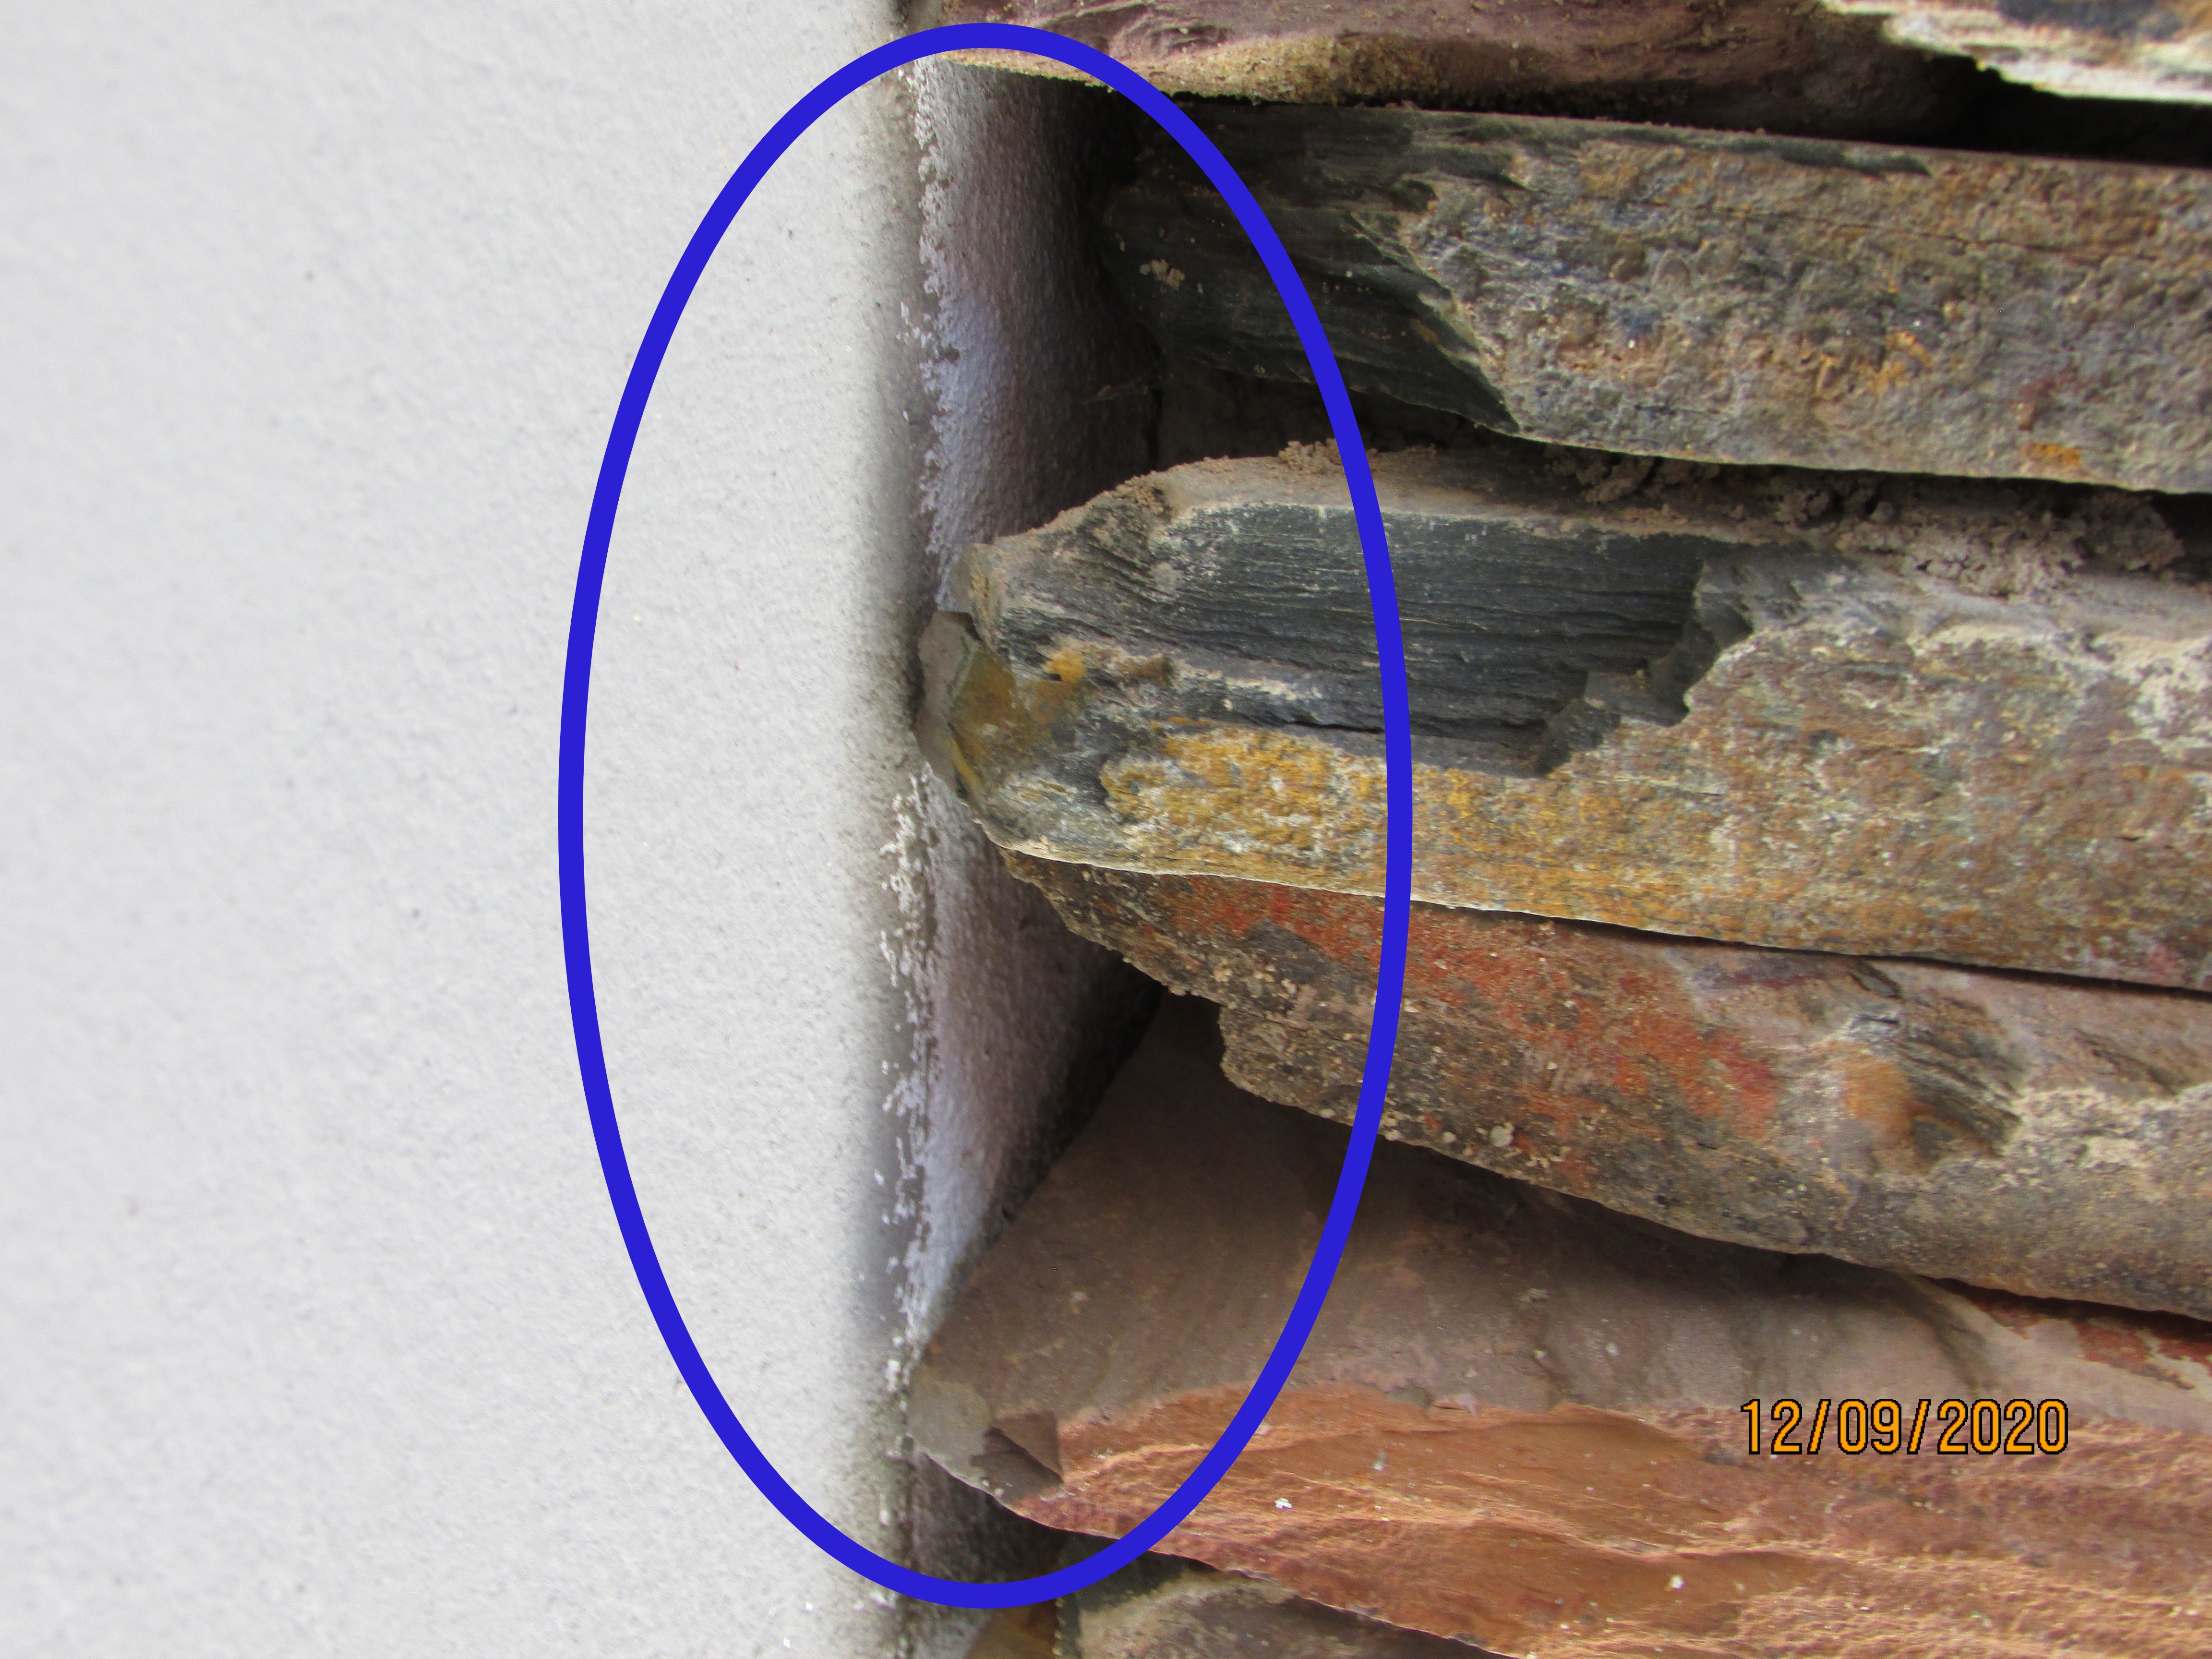
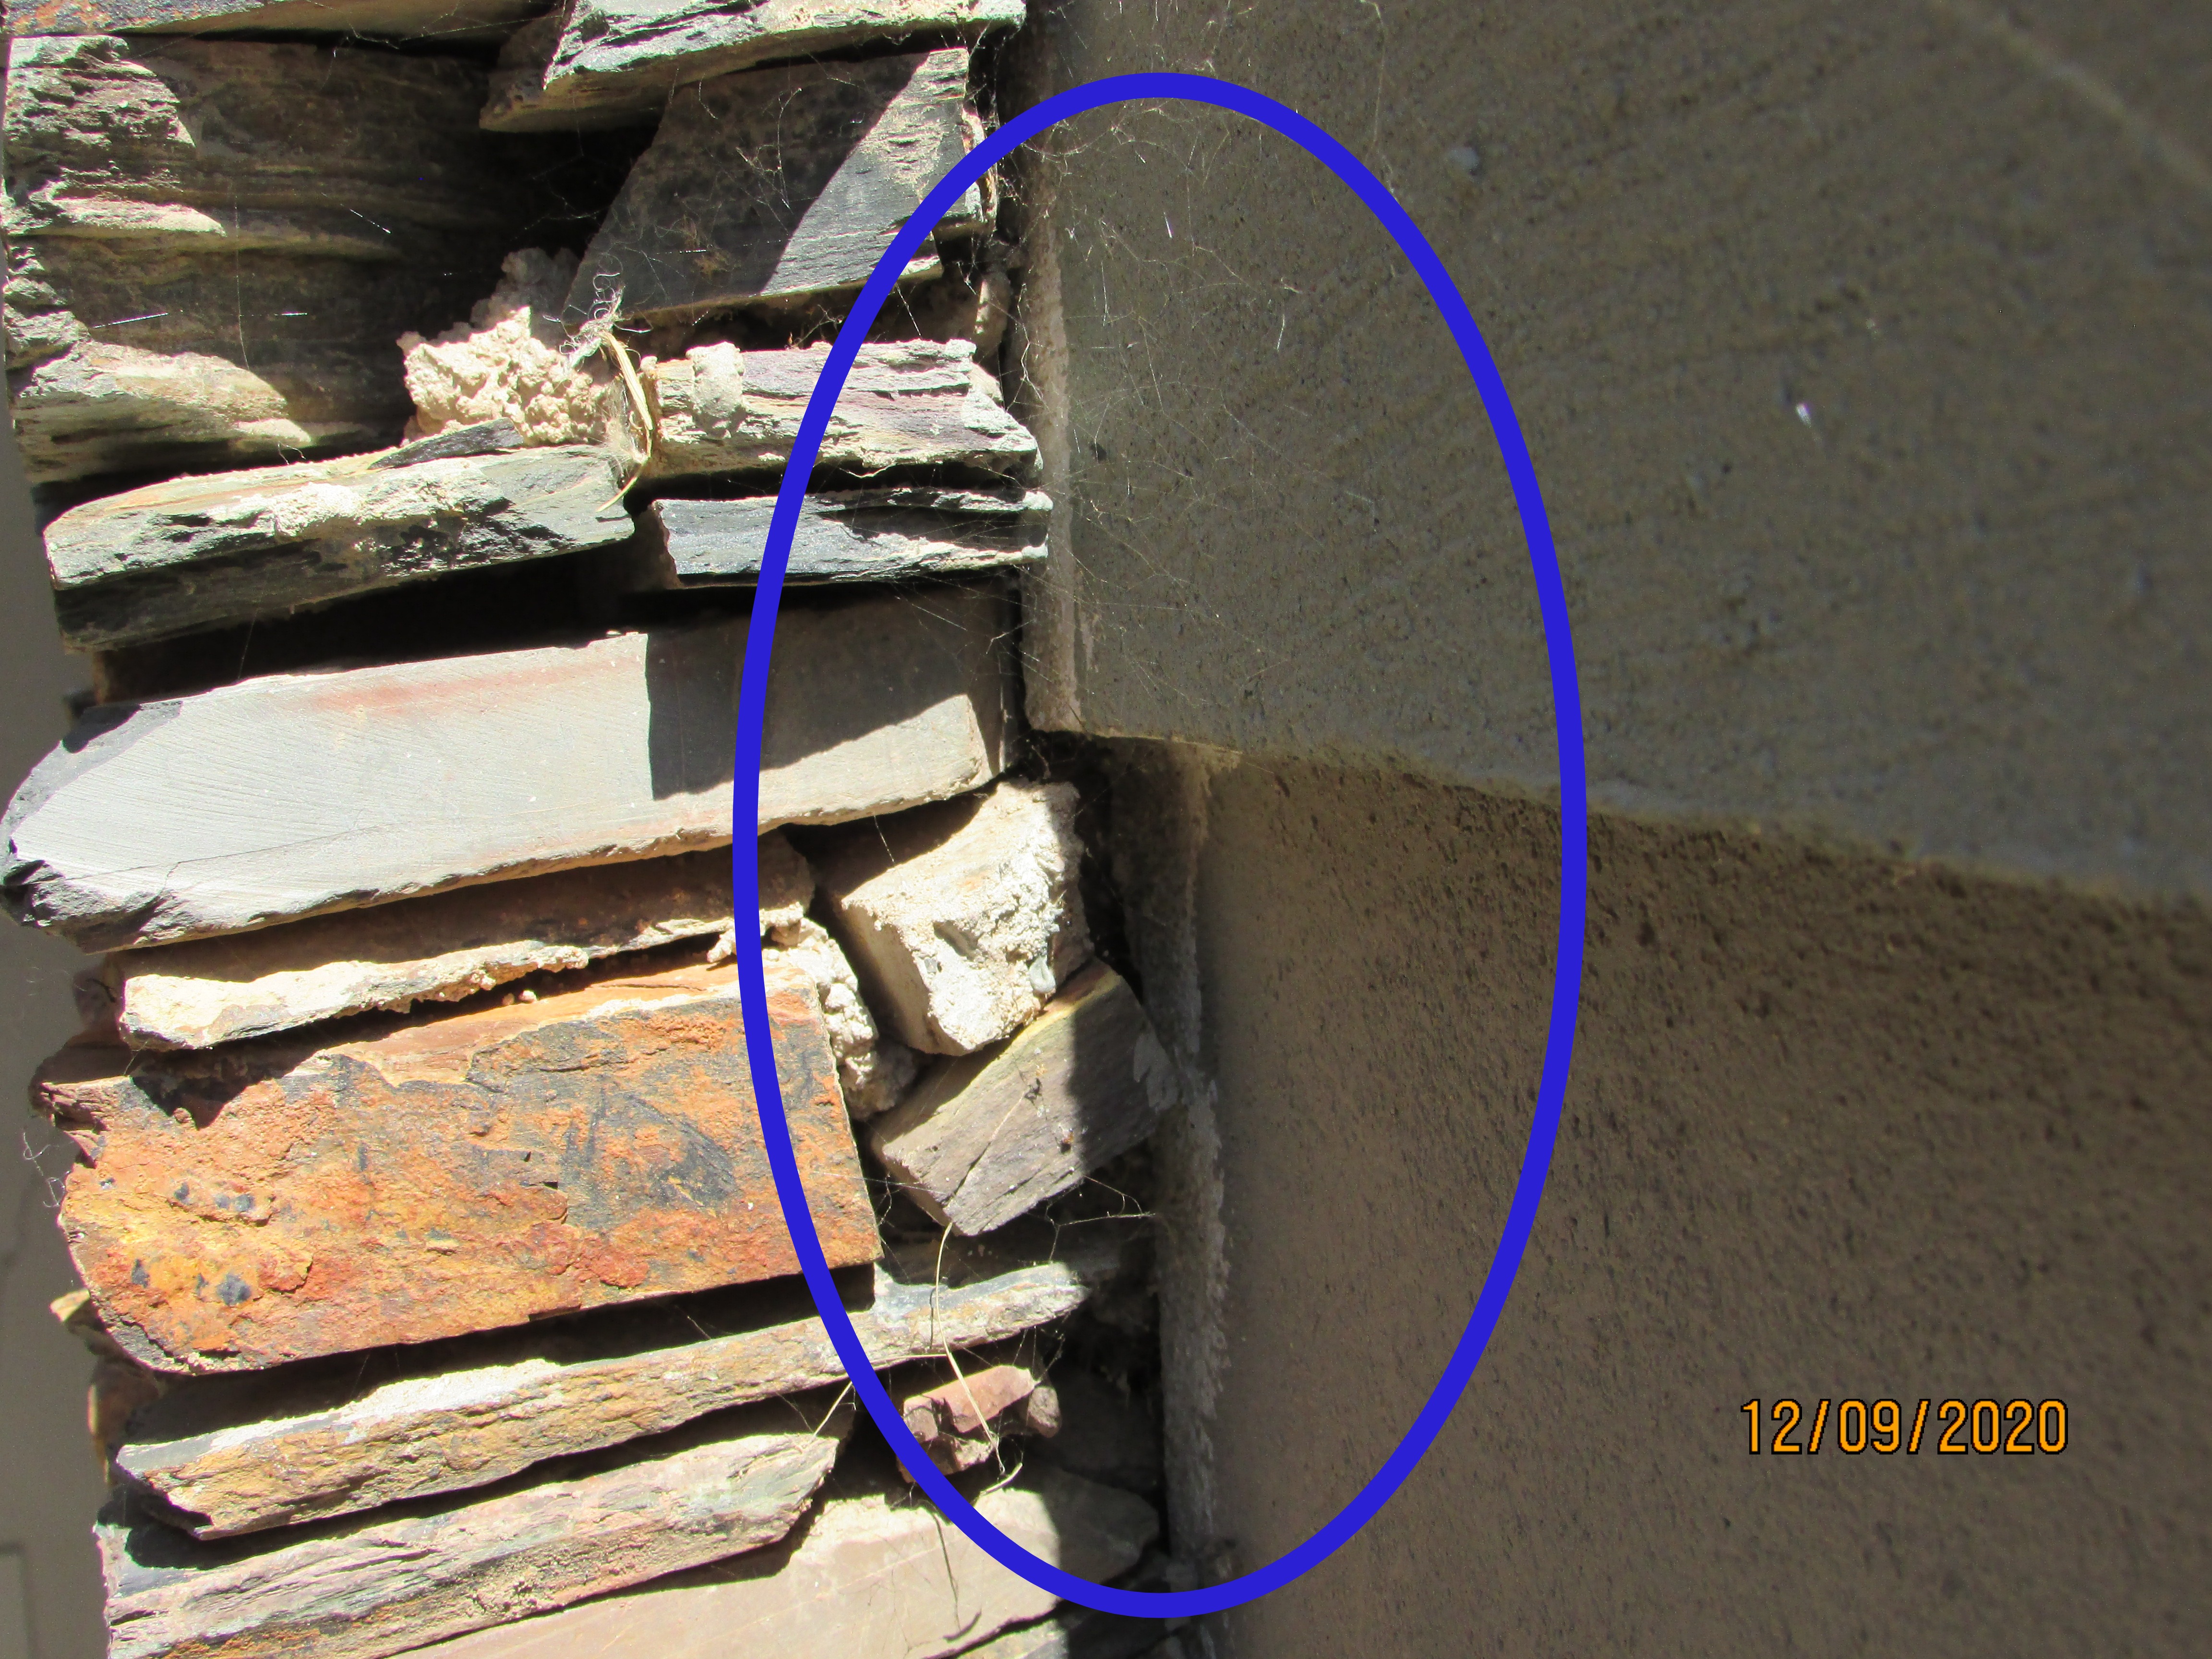
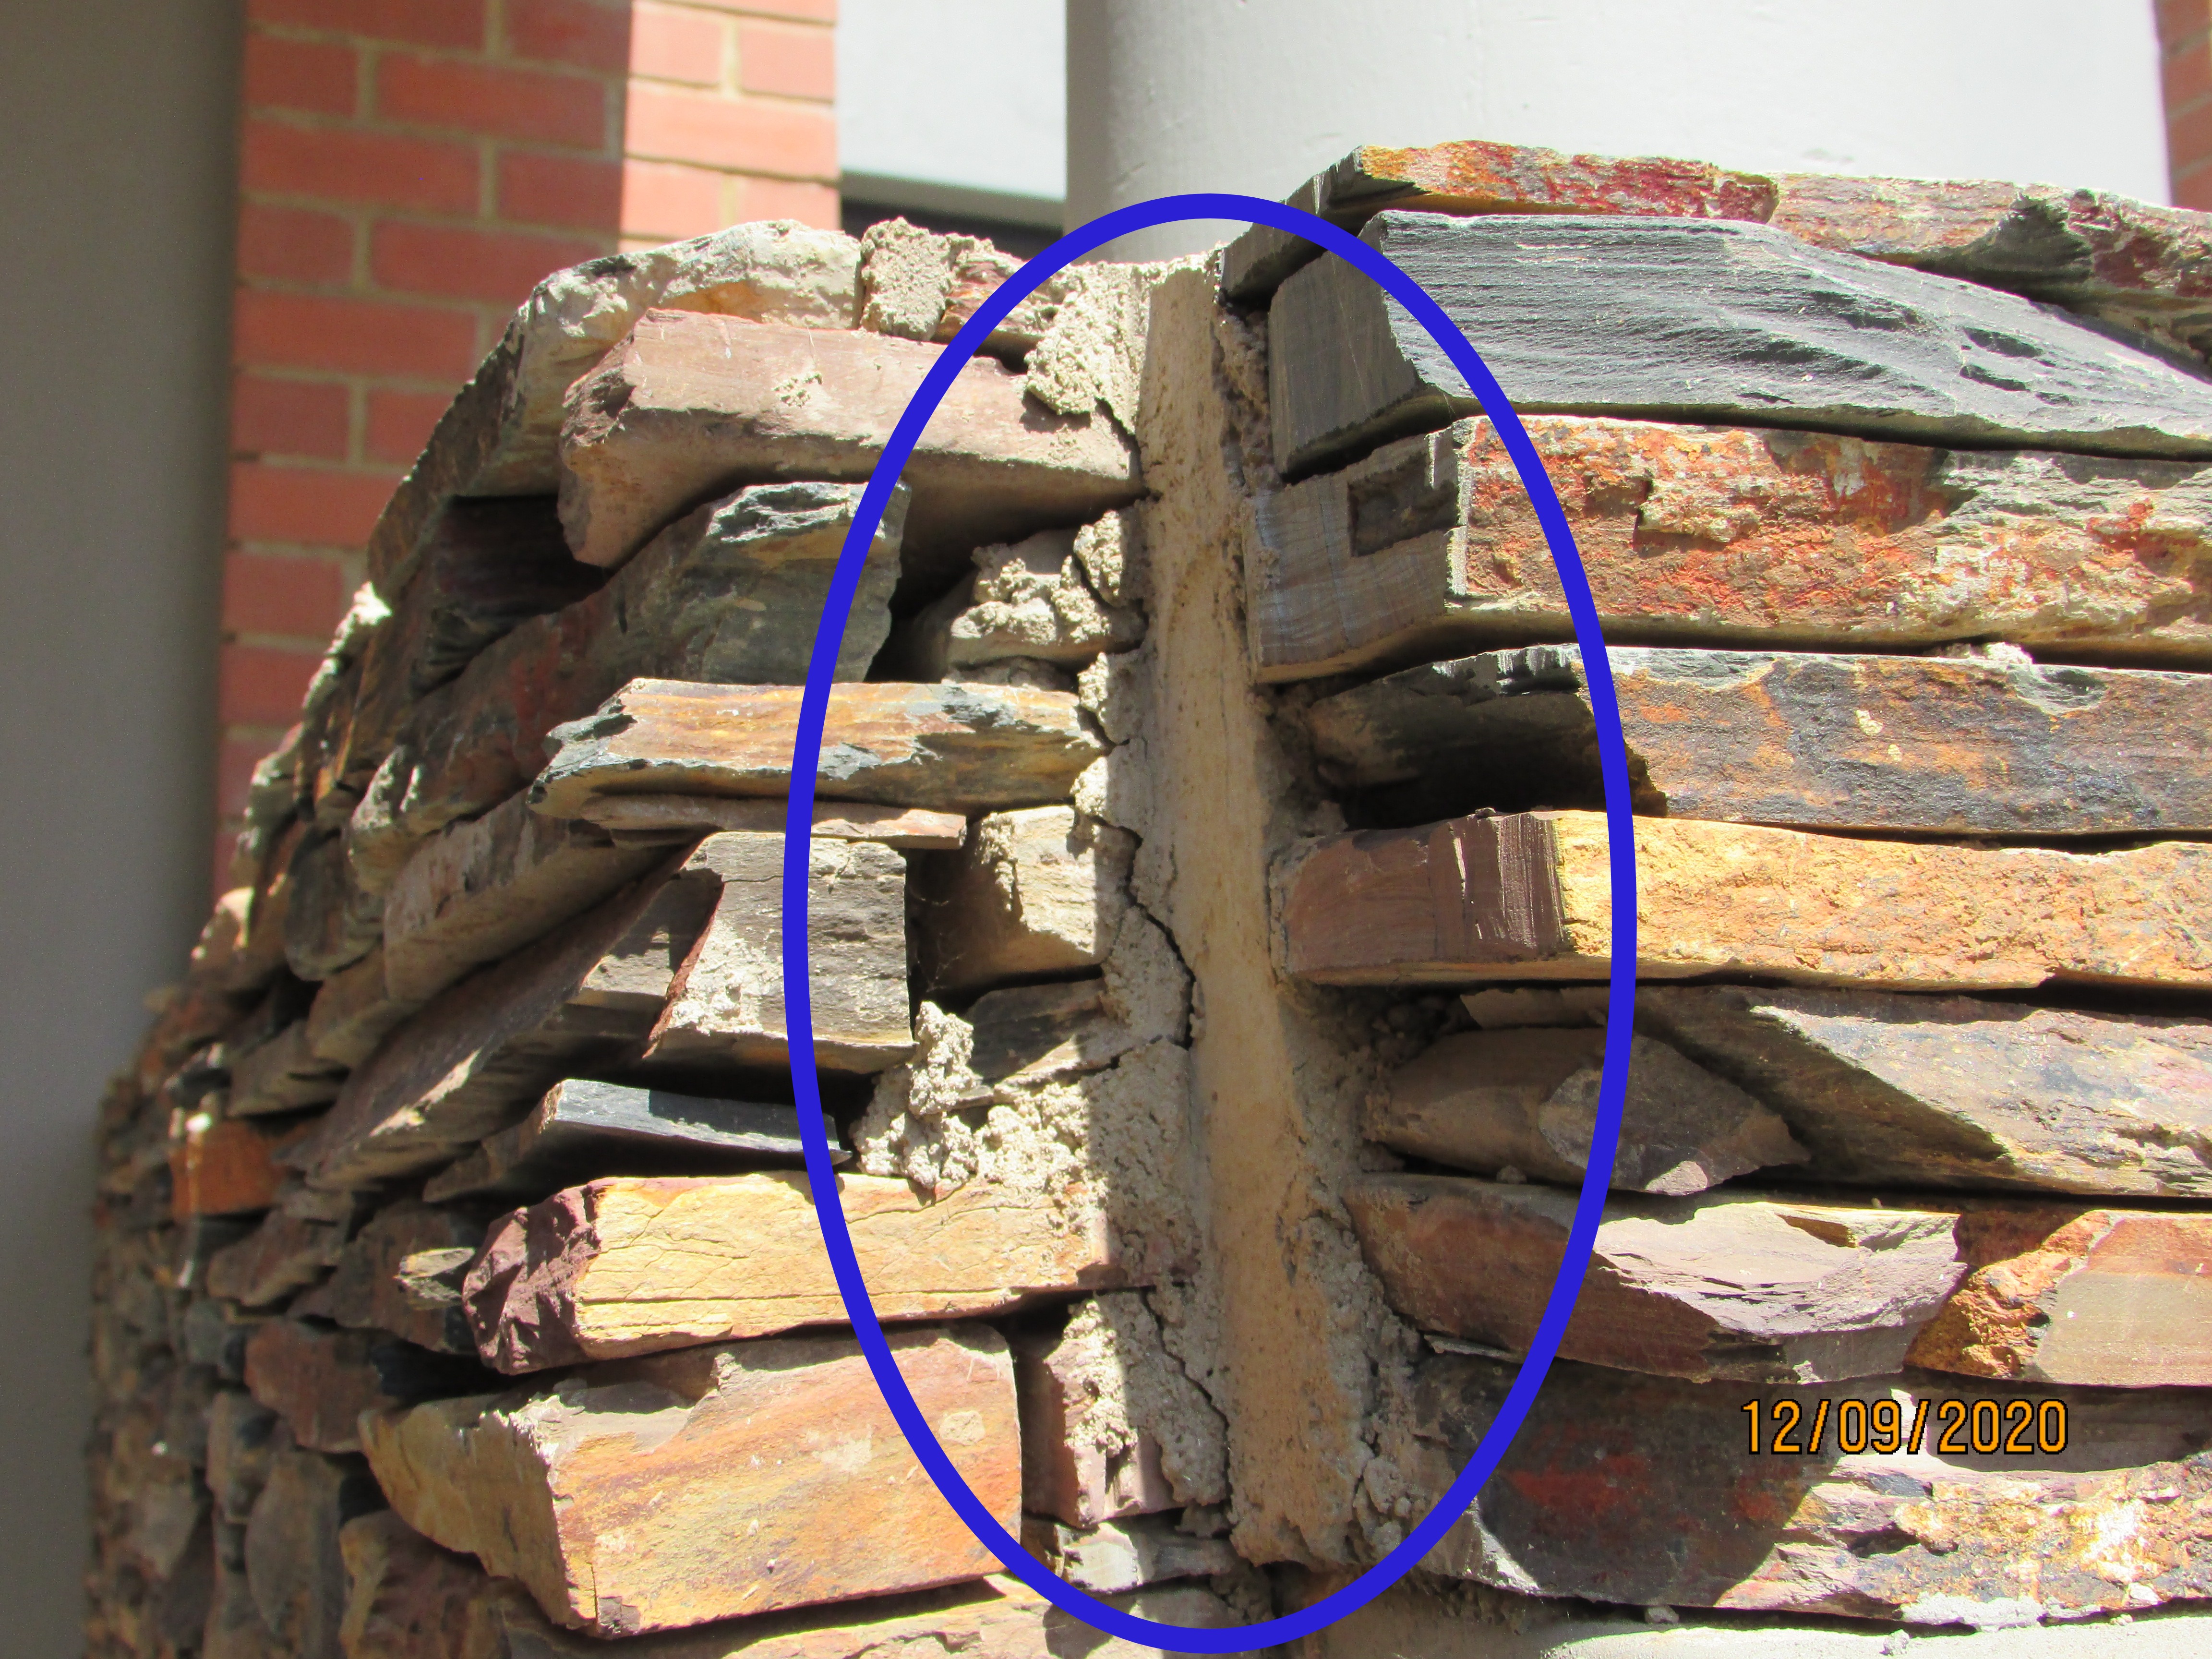
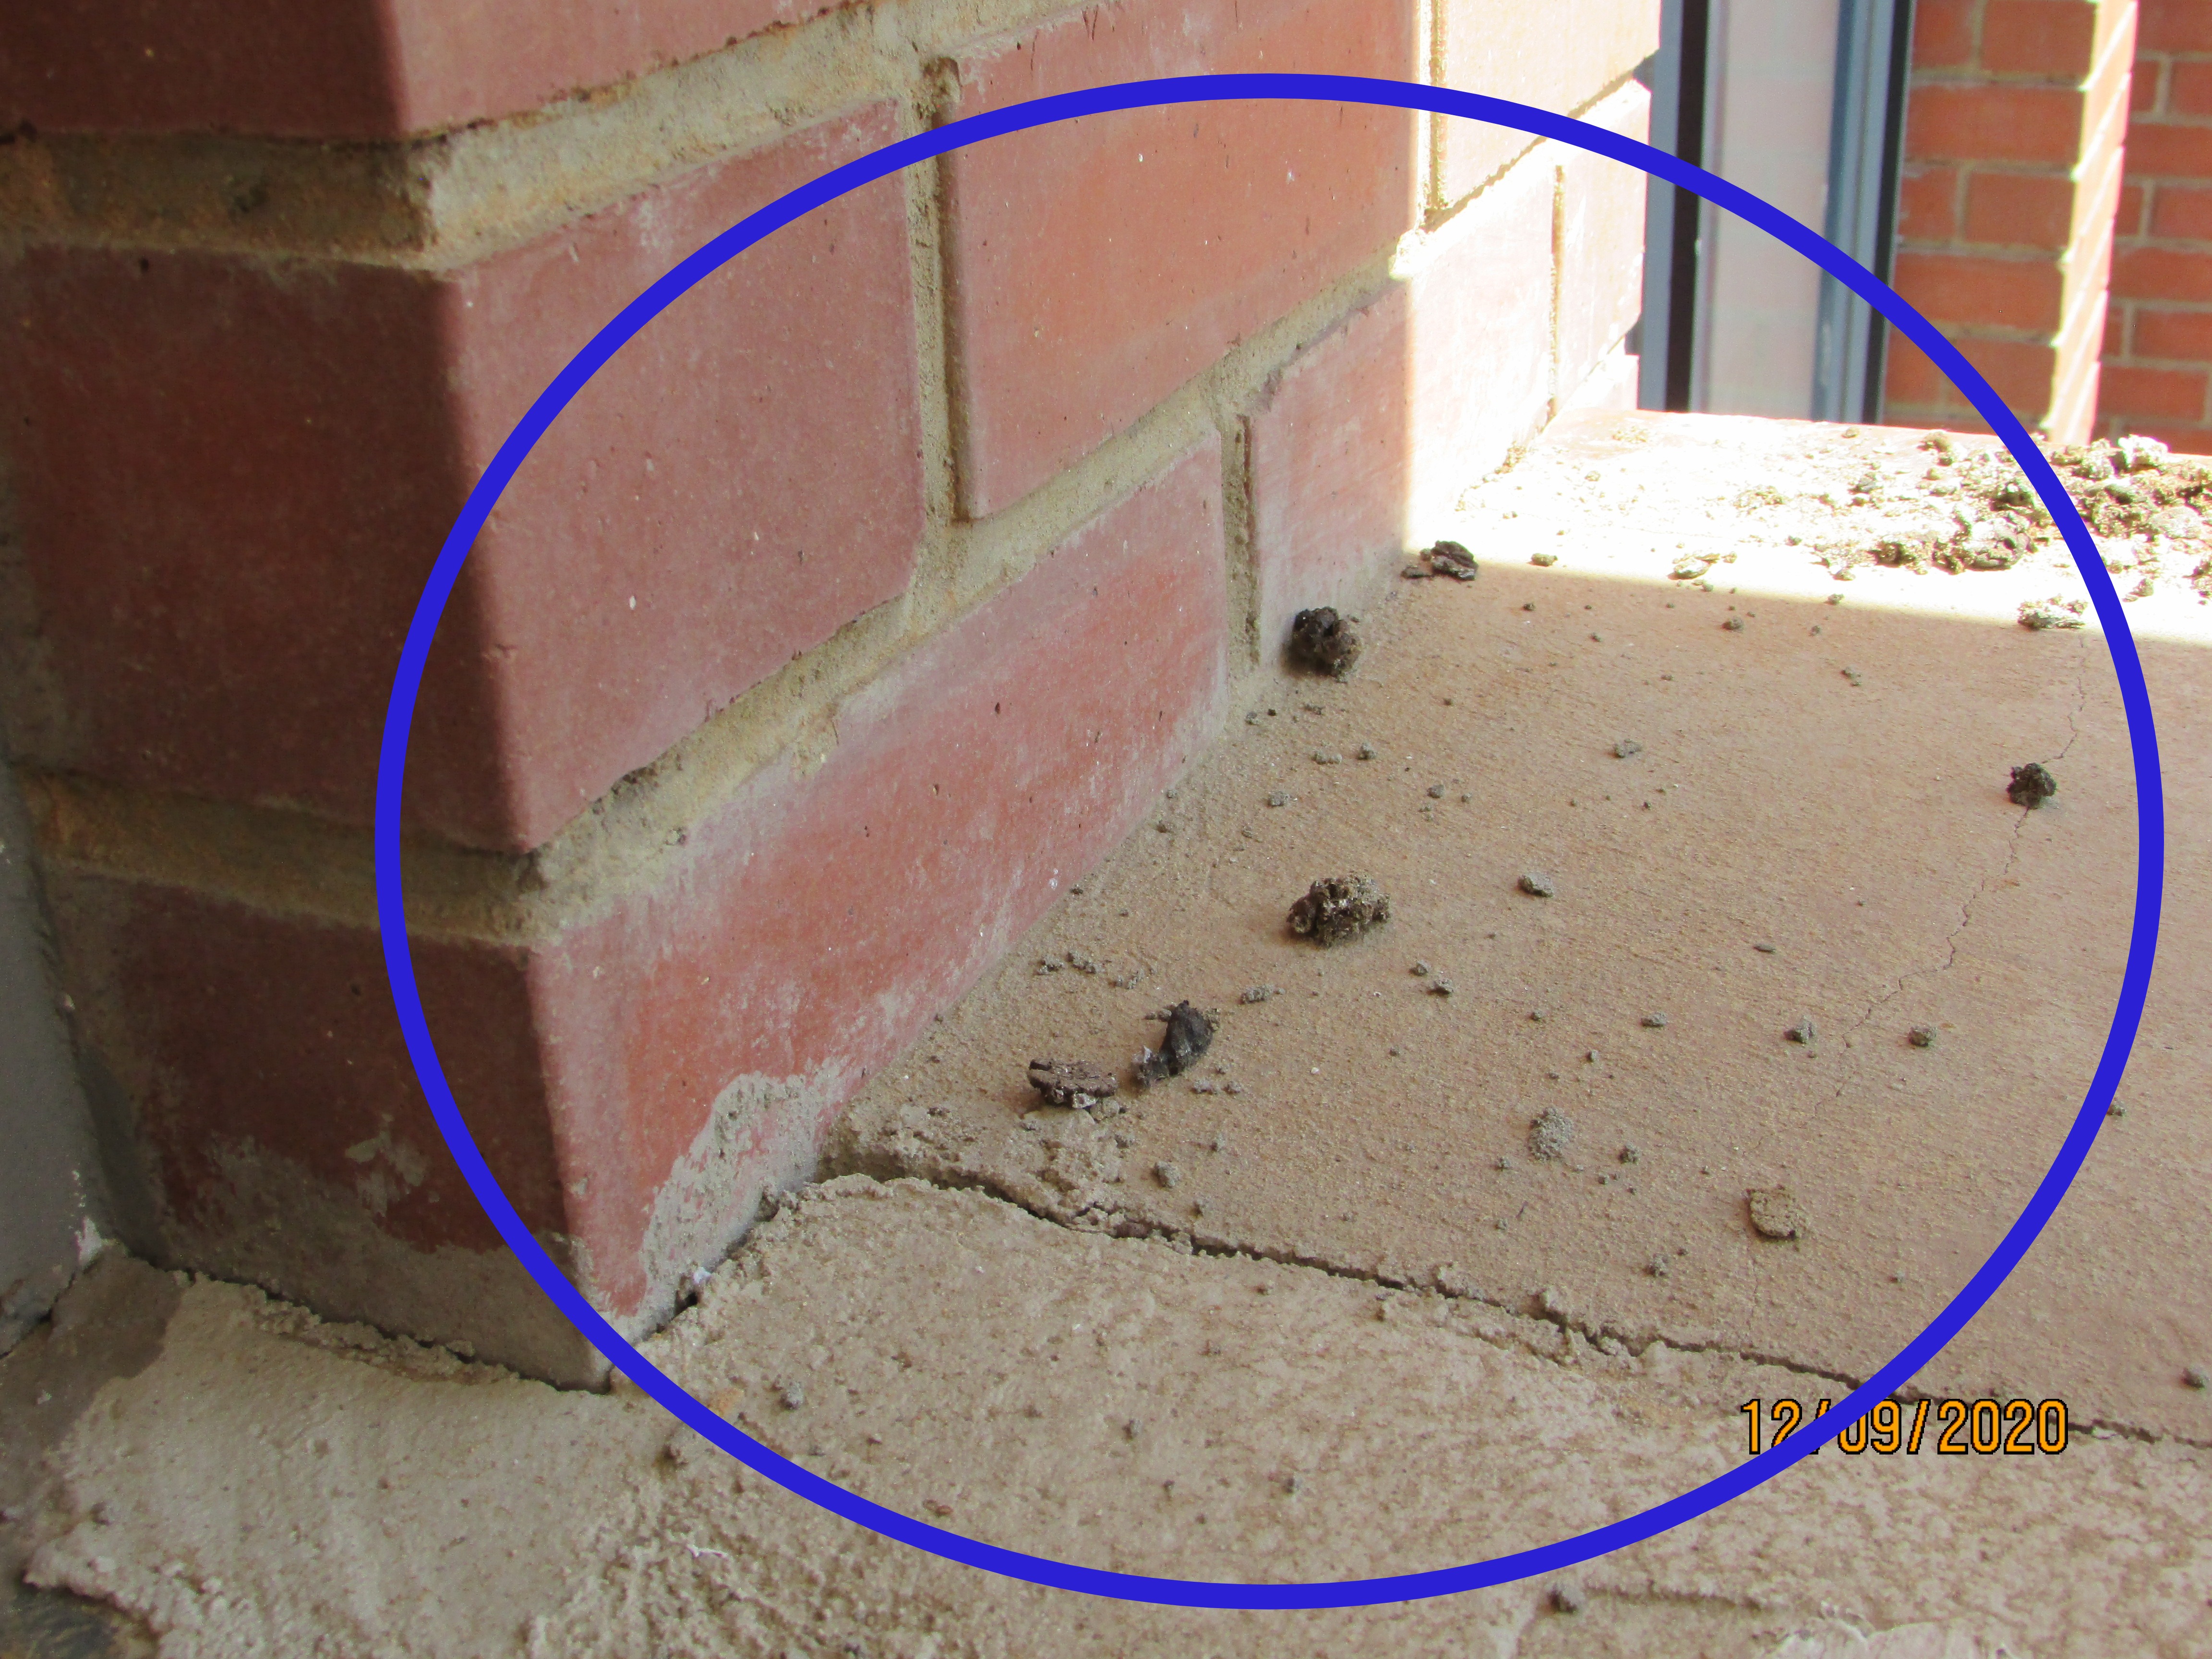
There were different shades of paint patches on the walls in various places around the exterior of the house that were visually unacceptable. Where plaster and paint patching is required the wall should be painted from top to bottom and from corner to corner to ensure an even colour. The walls where the patches have occurred will need to be repainted.
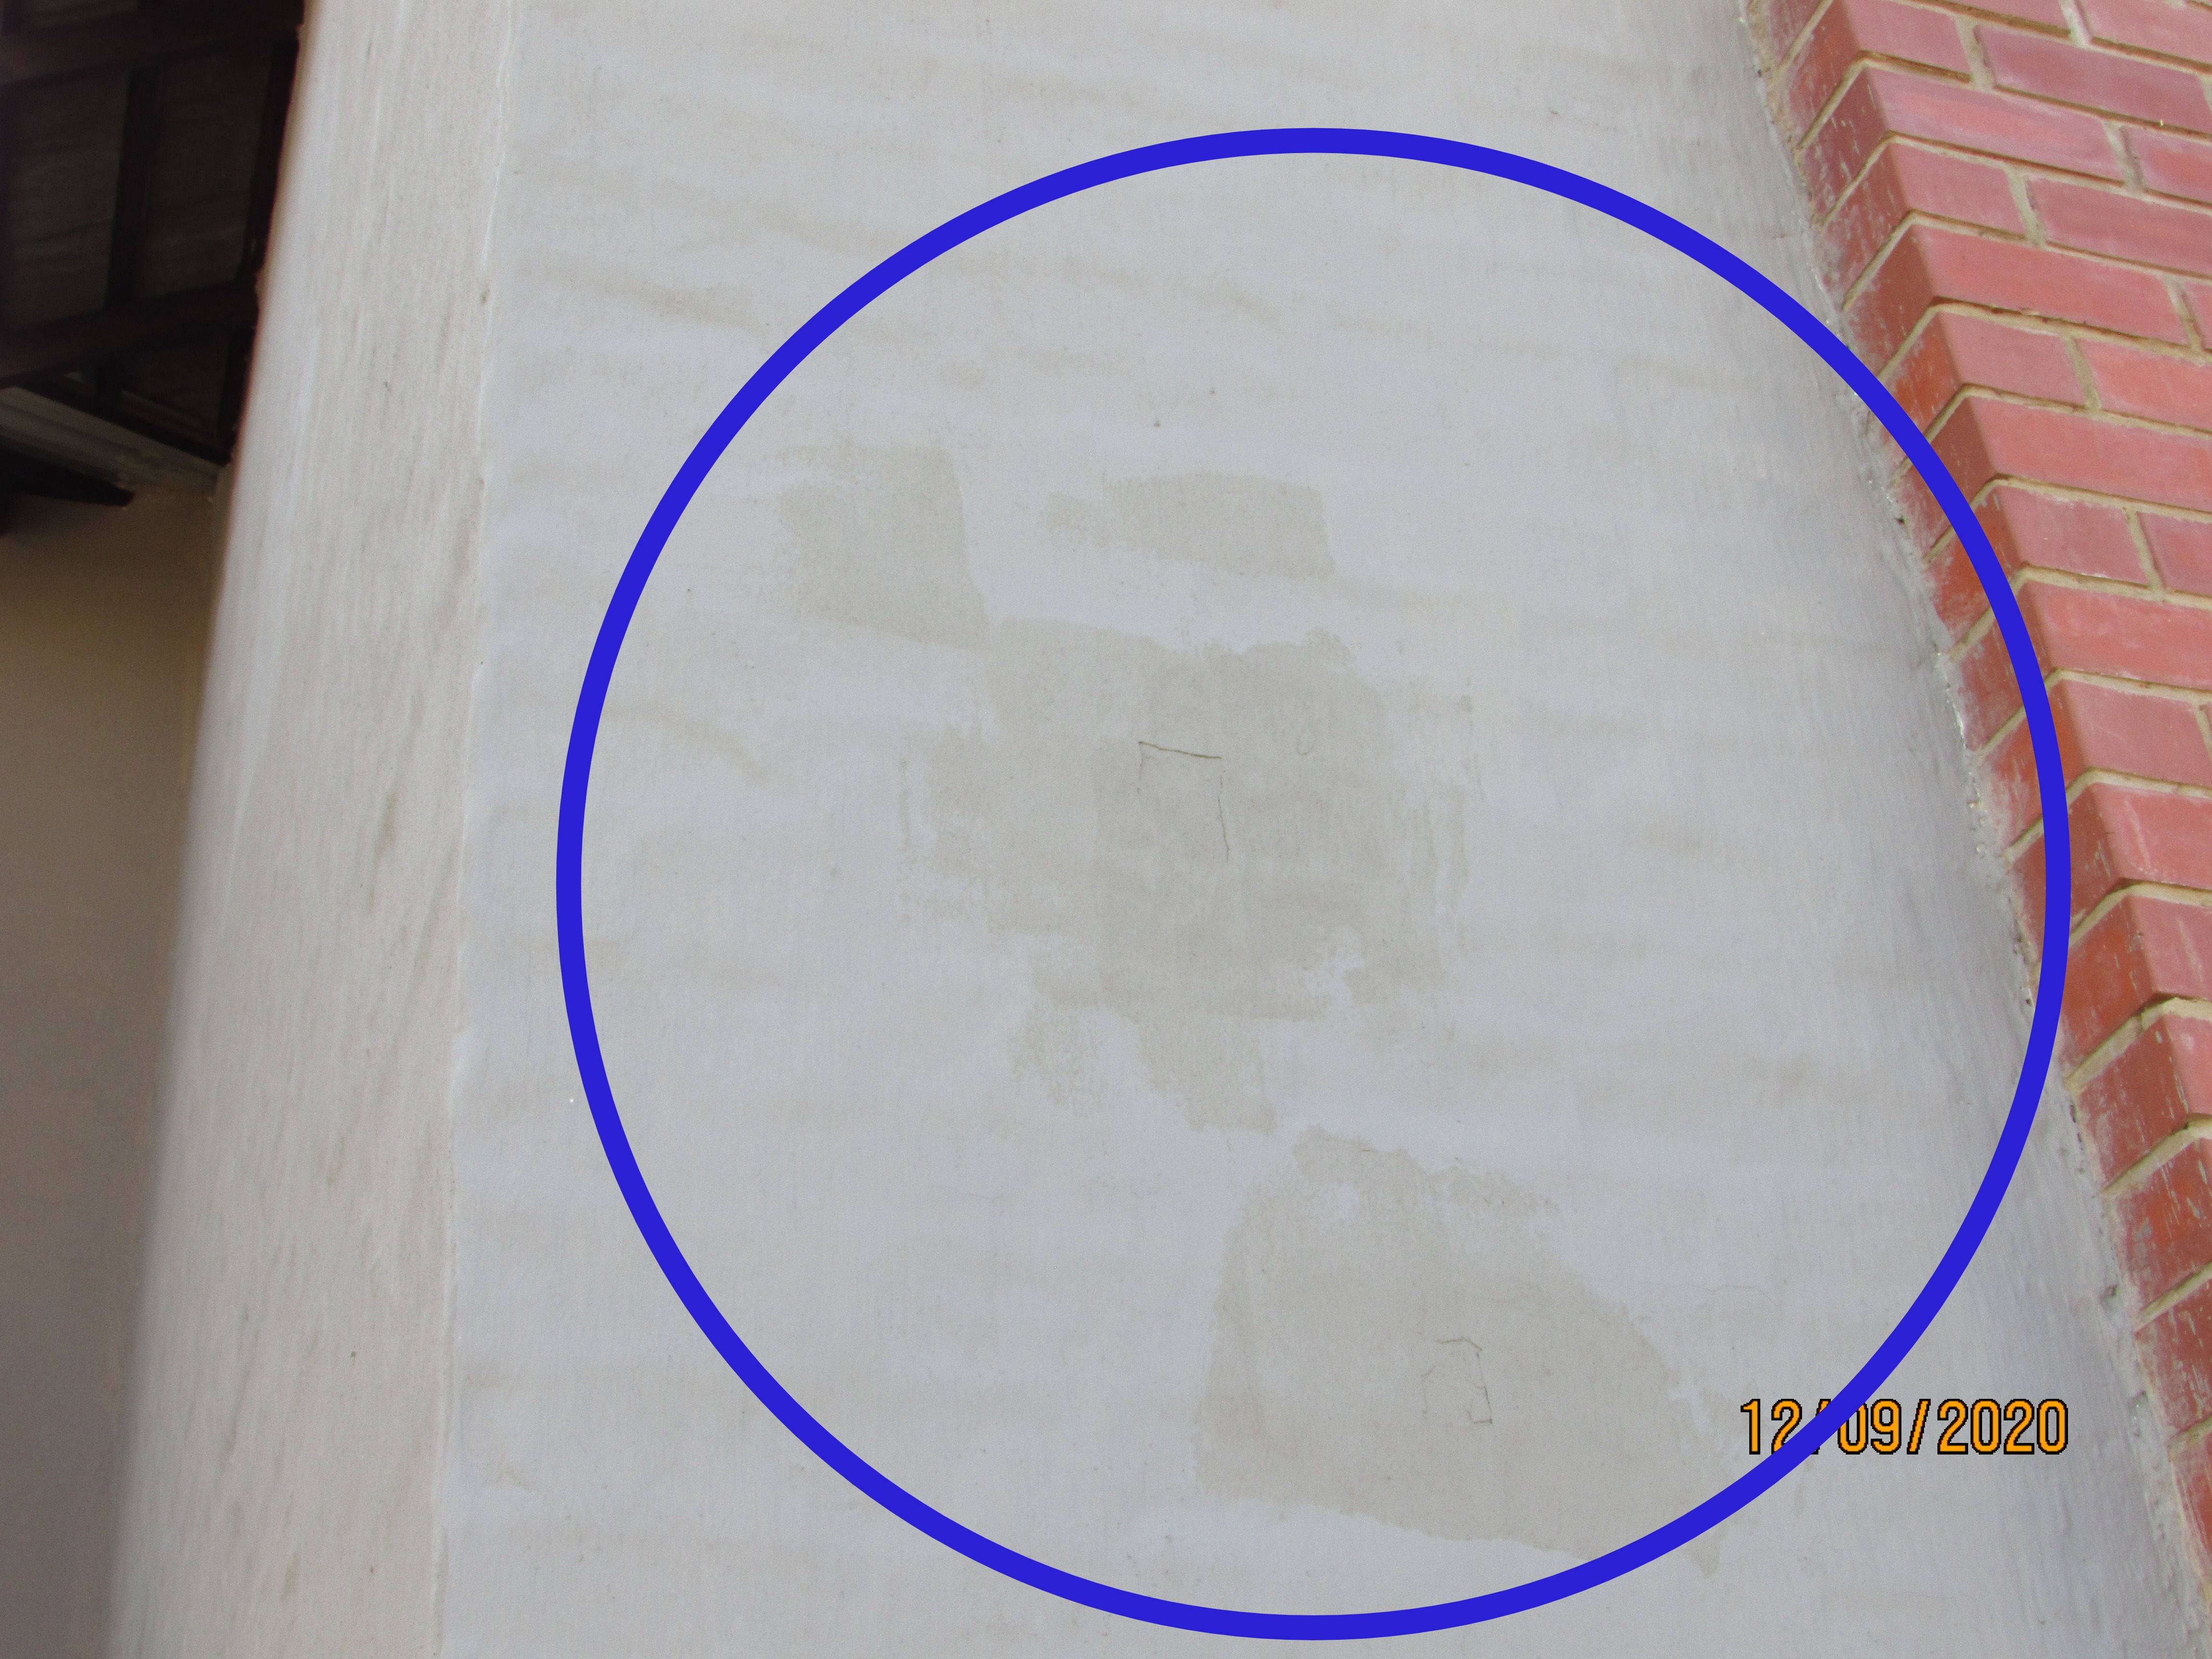 | 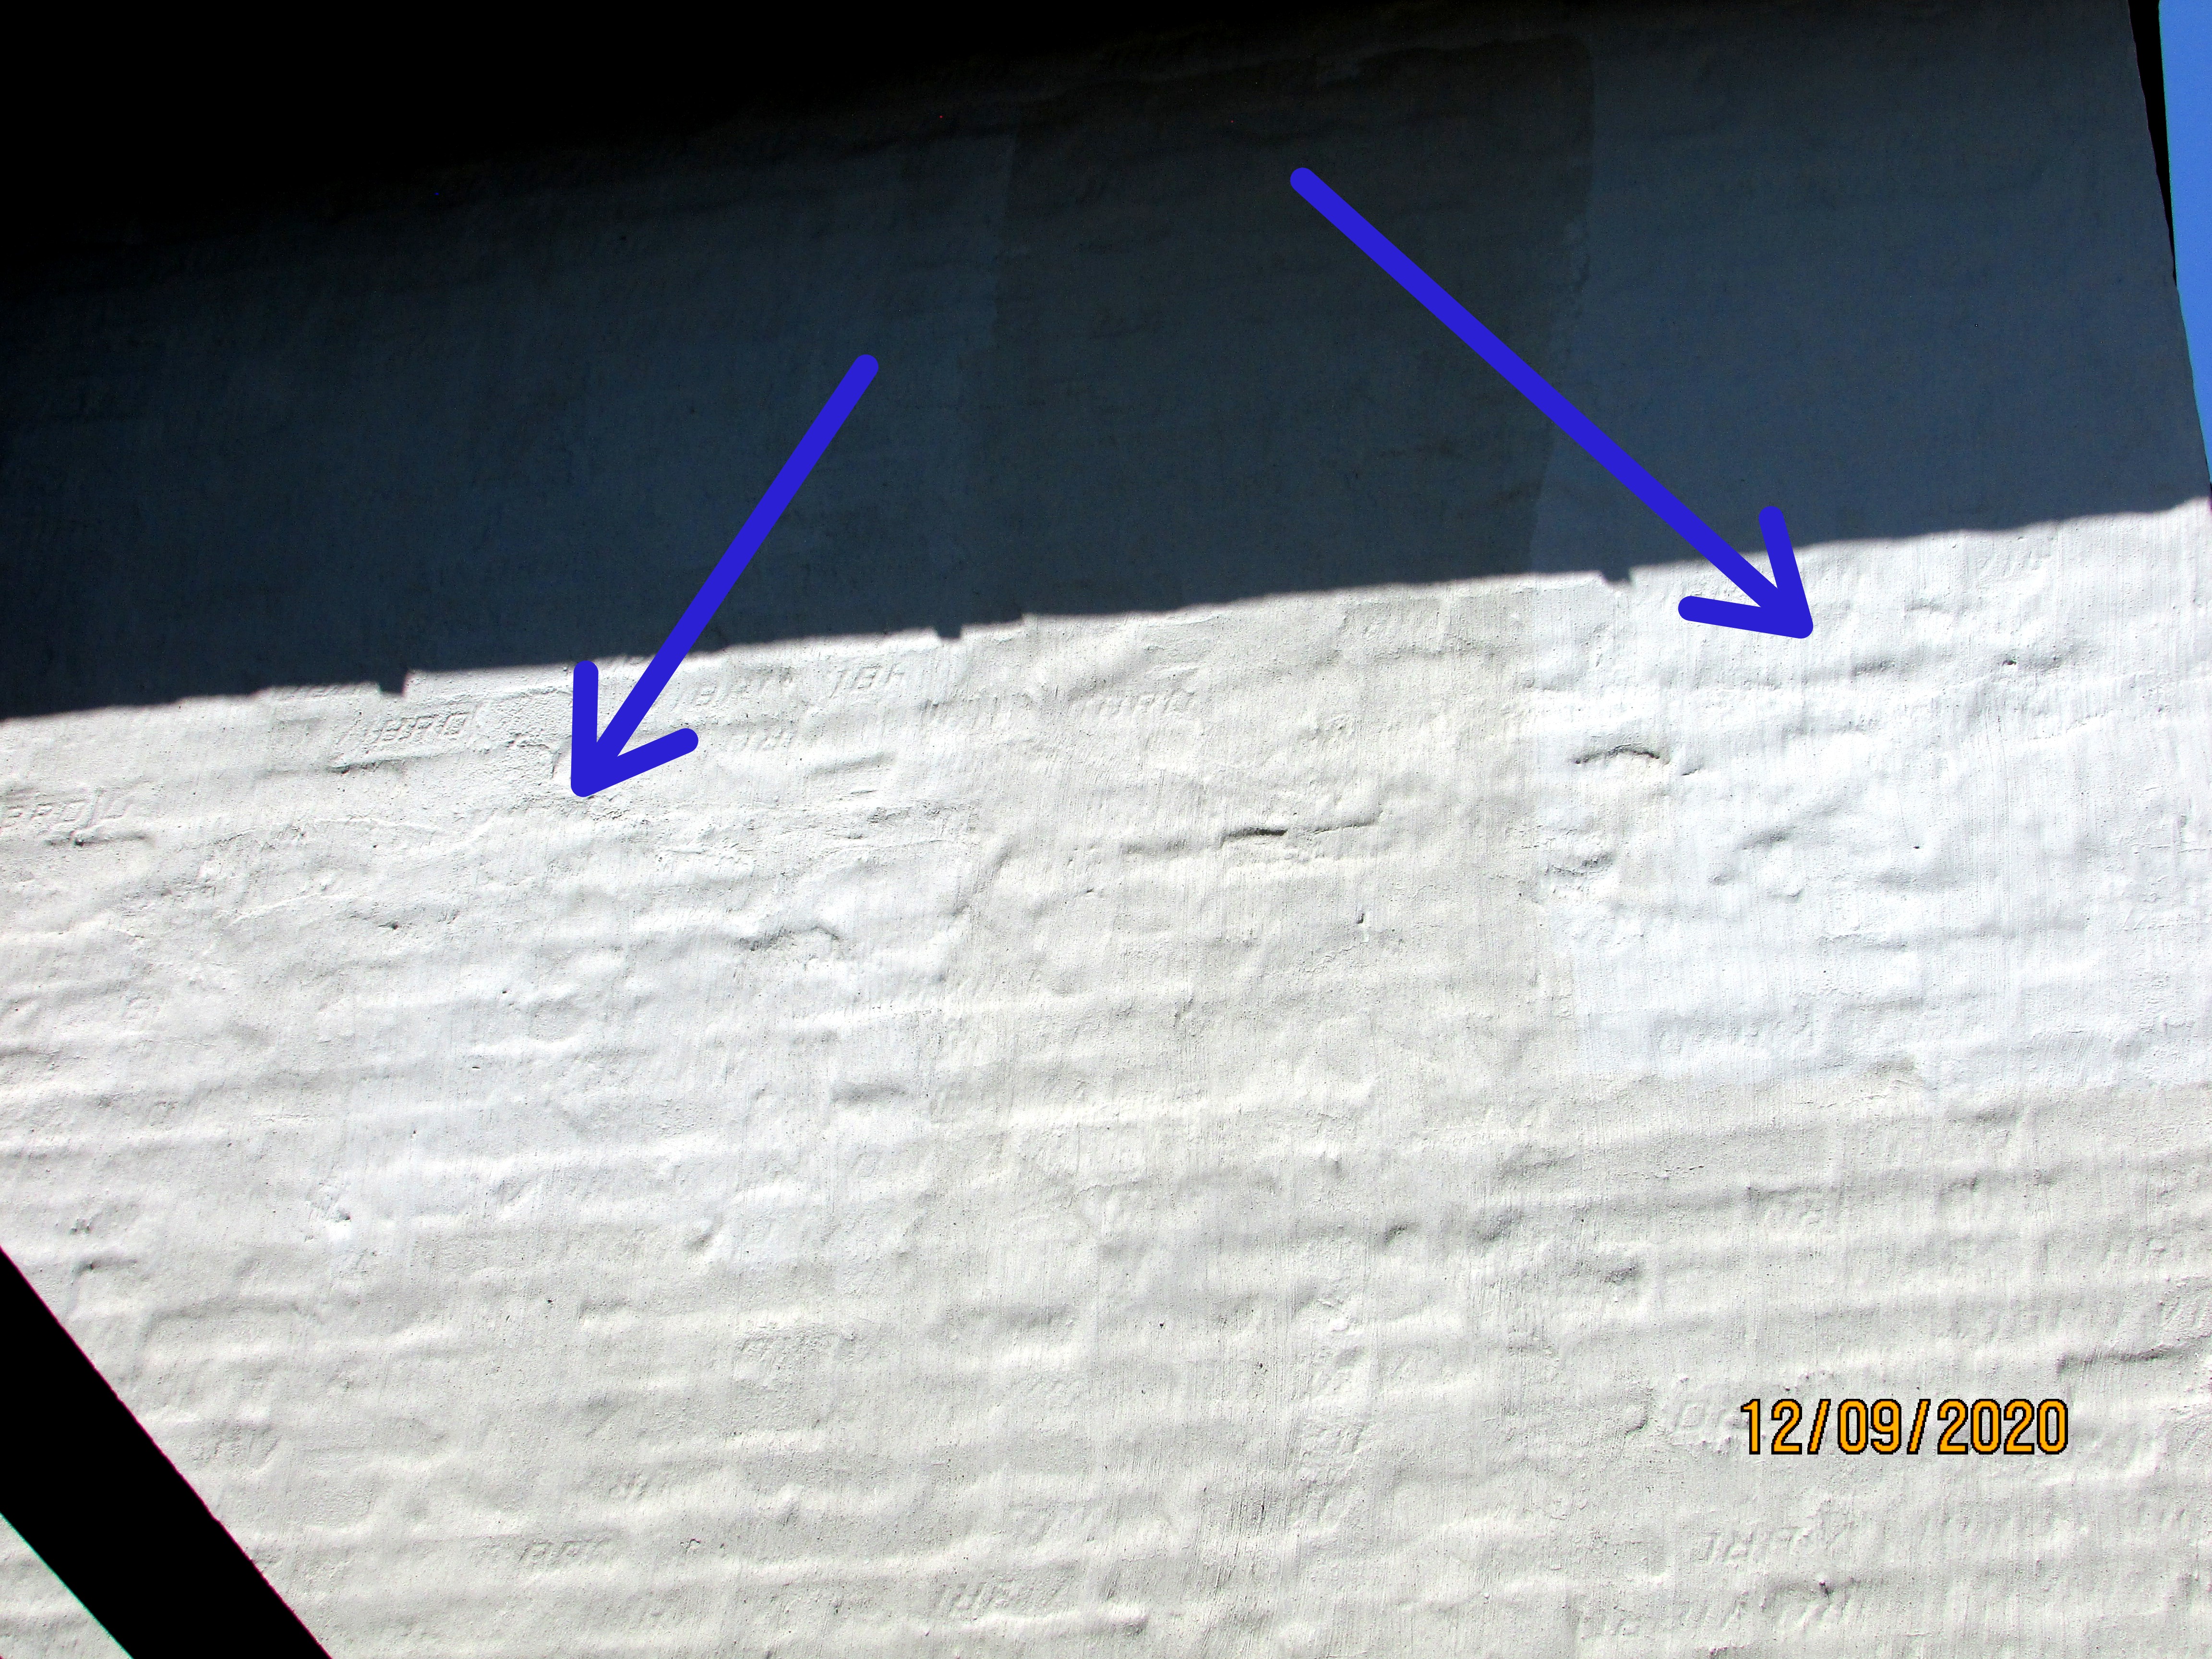 |
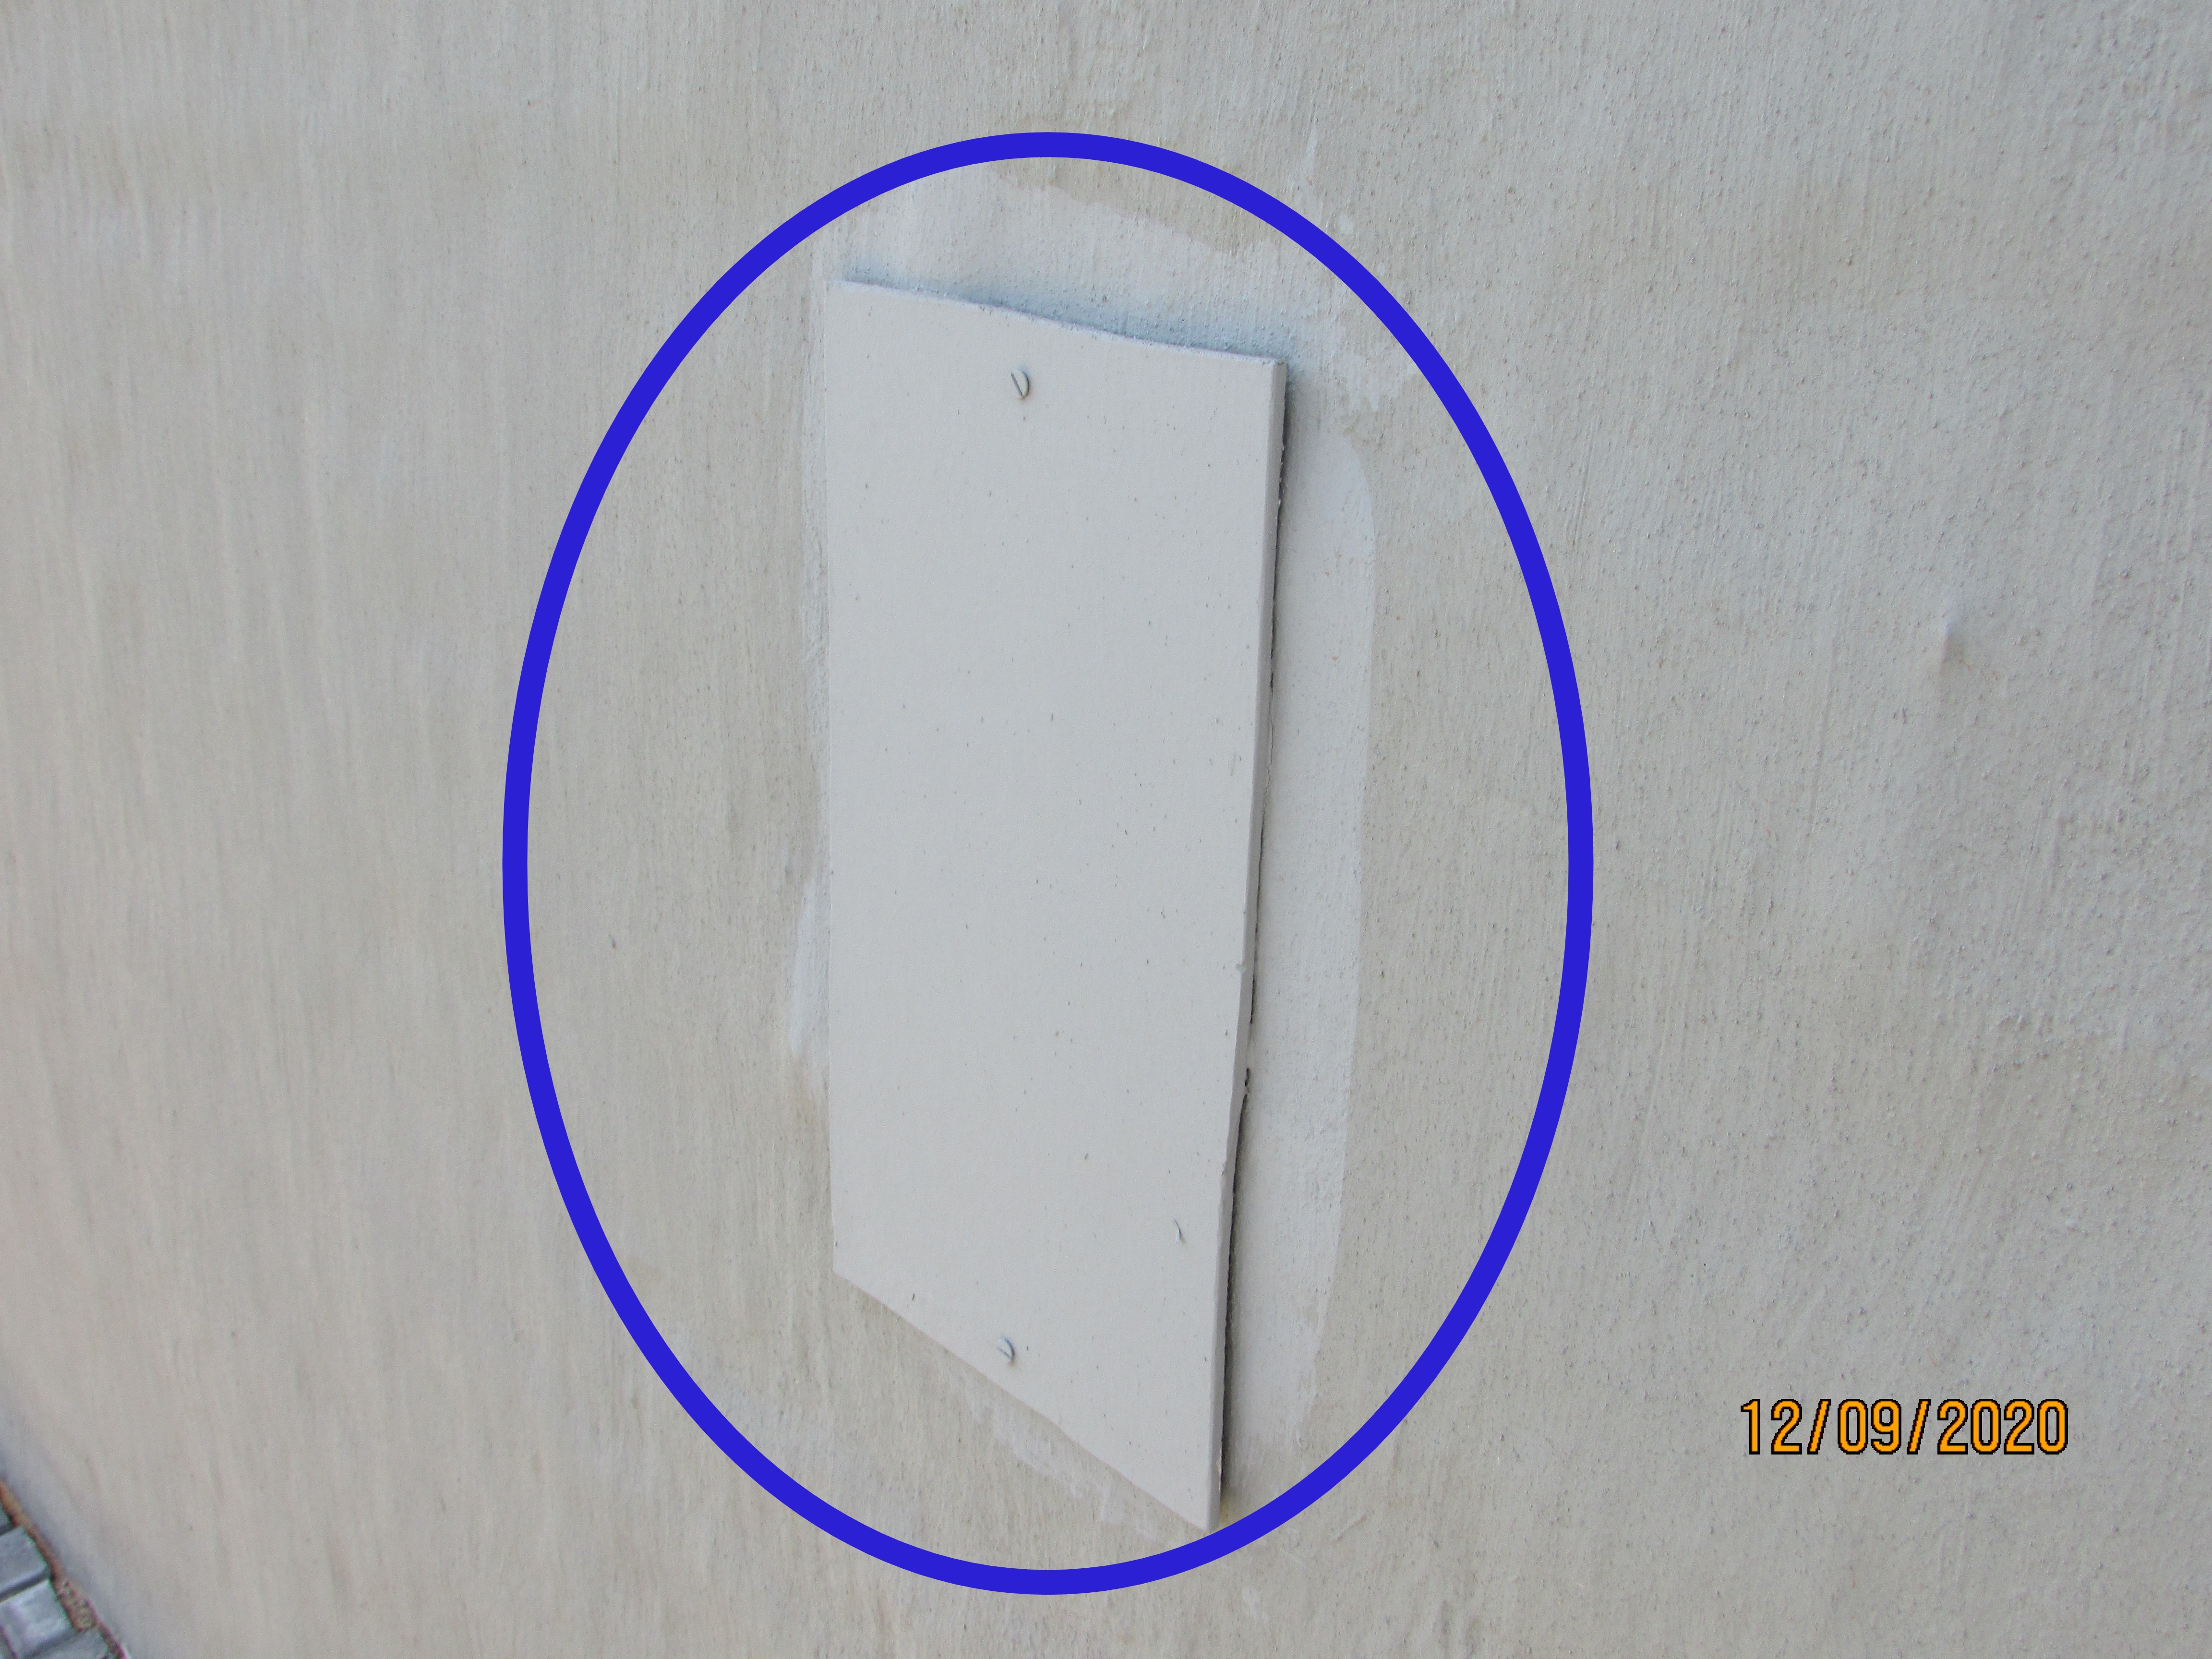 |
A cover over plumbing duct inspection eye opening in the brick wall was missing and will need to be fitted and sealed.
- This inspection opening was missing a cover. Make sure it is properly sealed.
- The inspection covers on the plumbing ducts should be sealed with self adhesive sealing strip or silicon to prevent moisture intrusion into the structure.
.JPG)
.JPG)
The plastered portion of the 1st floor slab on the balconies and main bathroom en-suite had gaps where rainwater will enter causing rising damp in the wall above the slab and moisture intrusion the the floor internally. The holes and gaps should be sealed as a preventive measure.
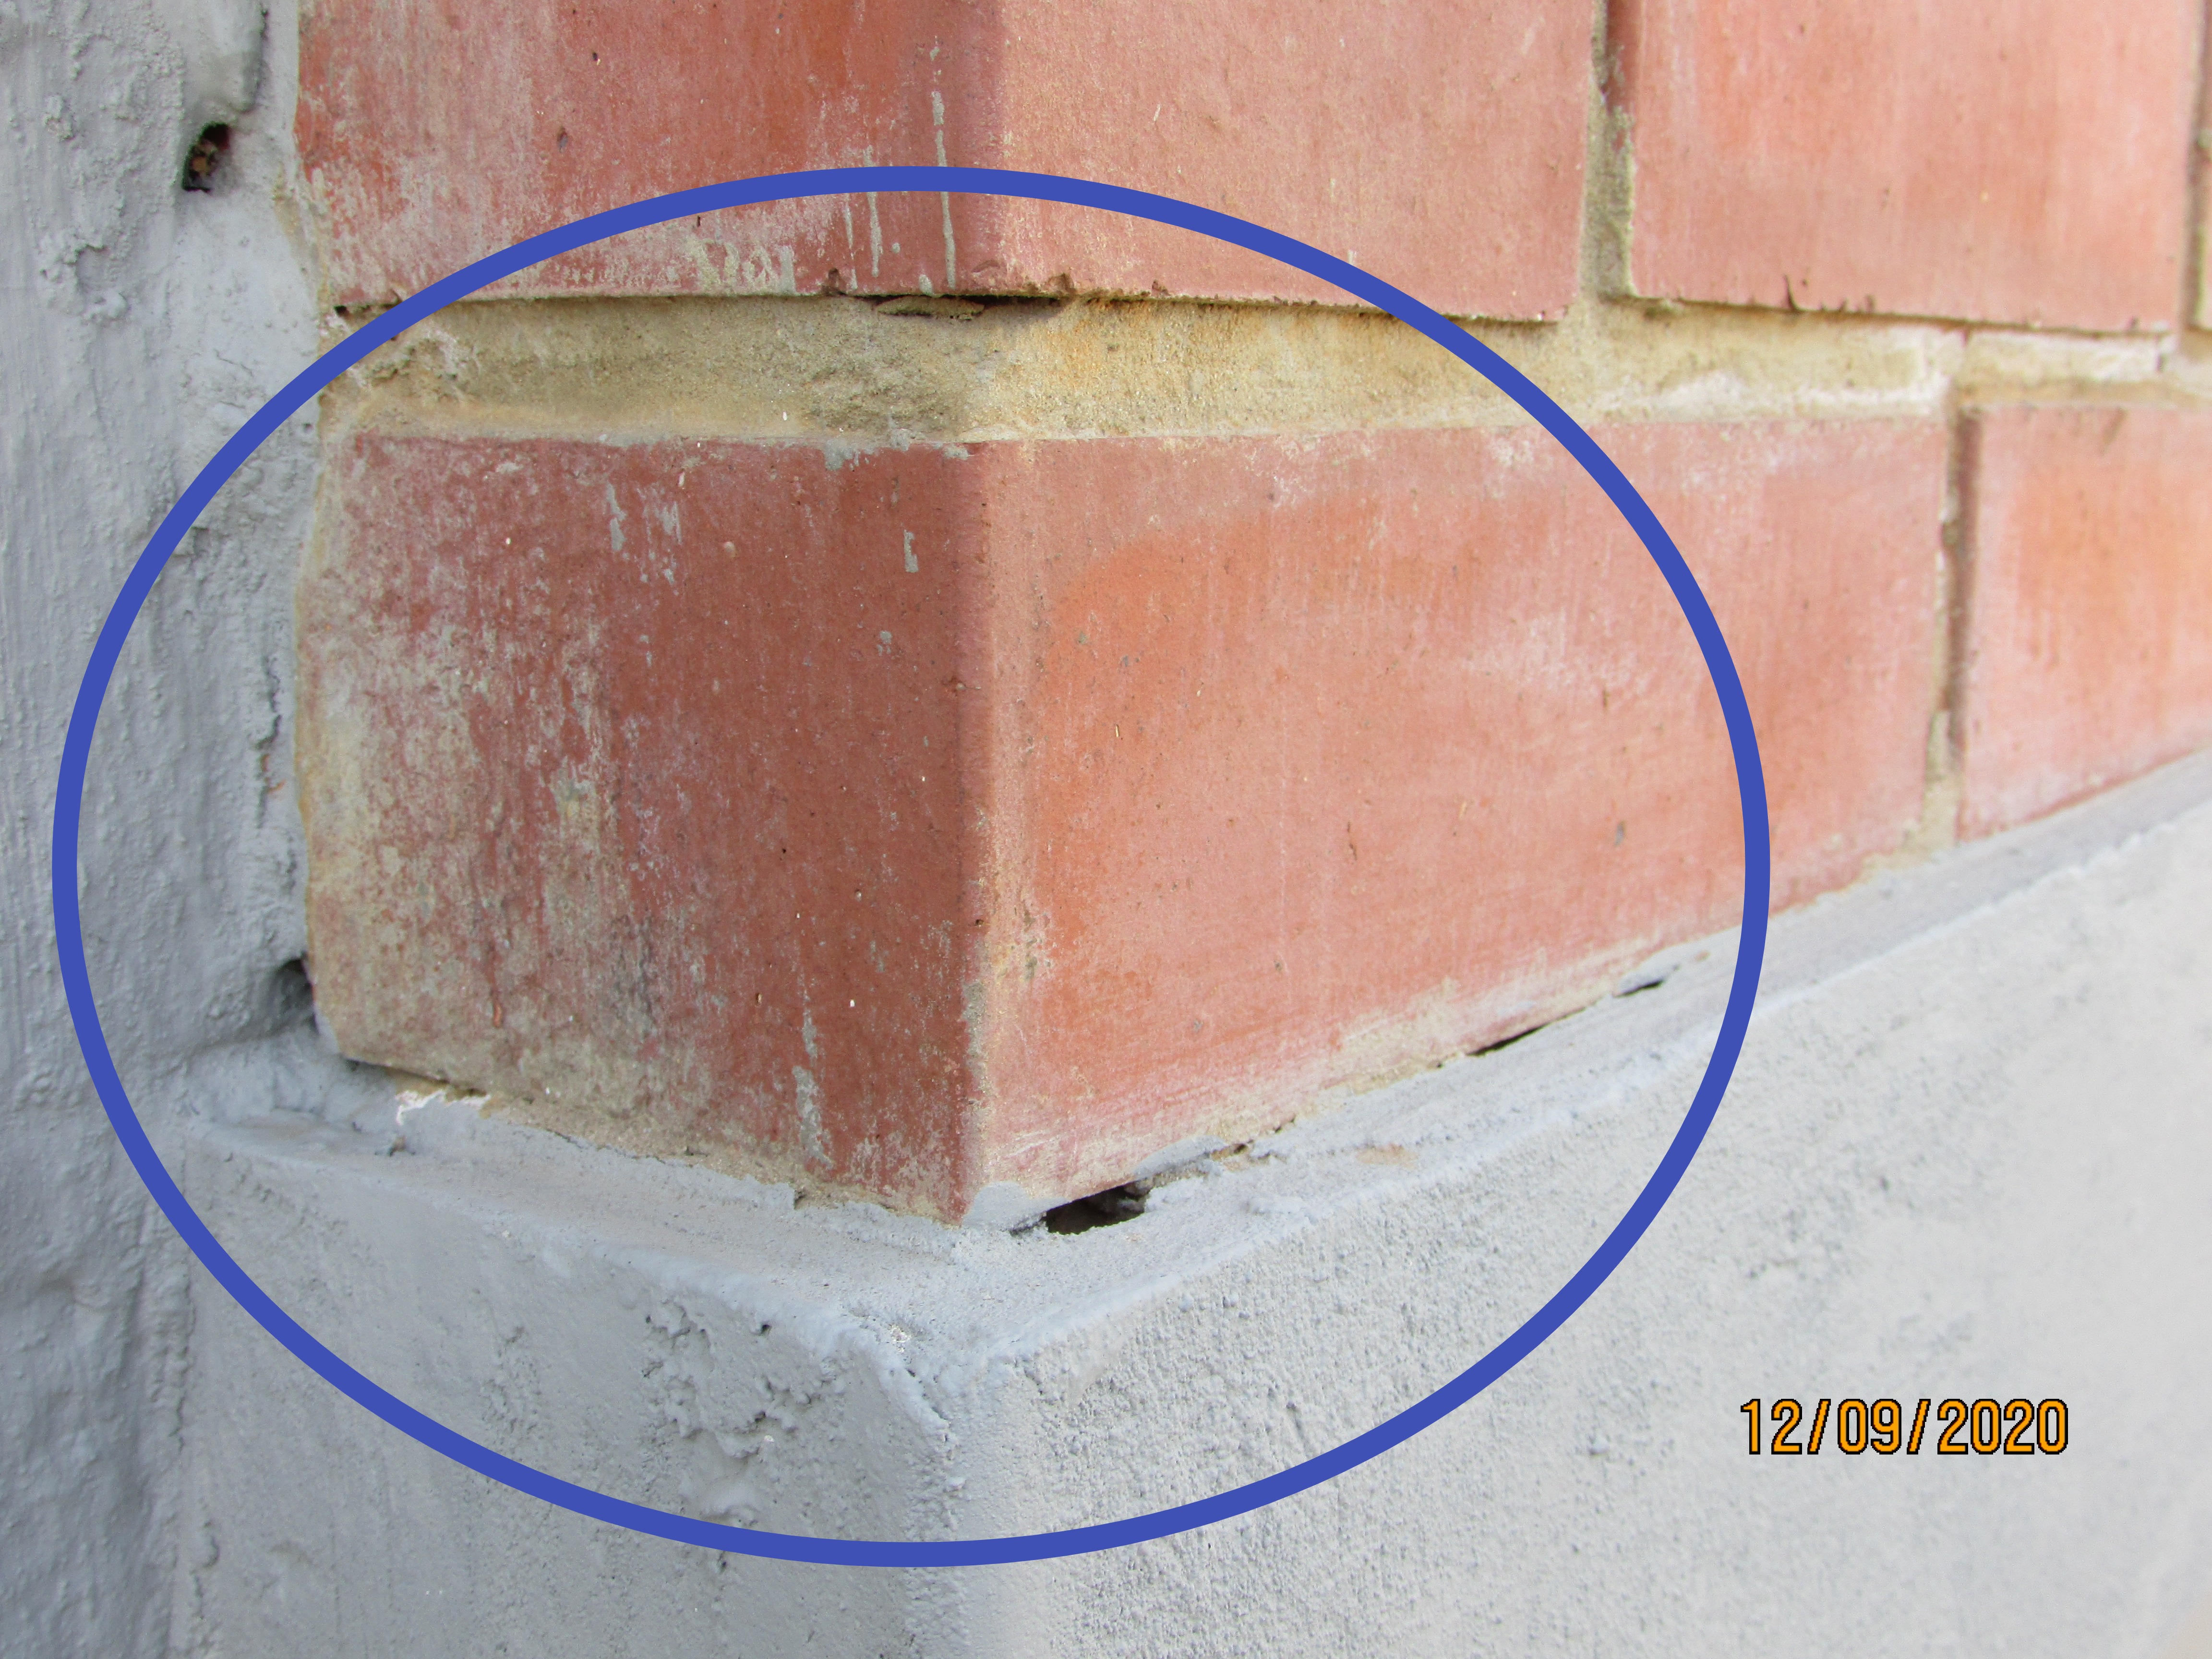 | 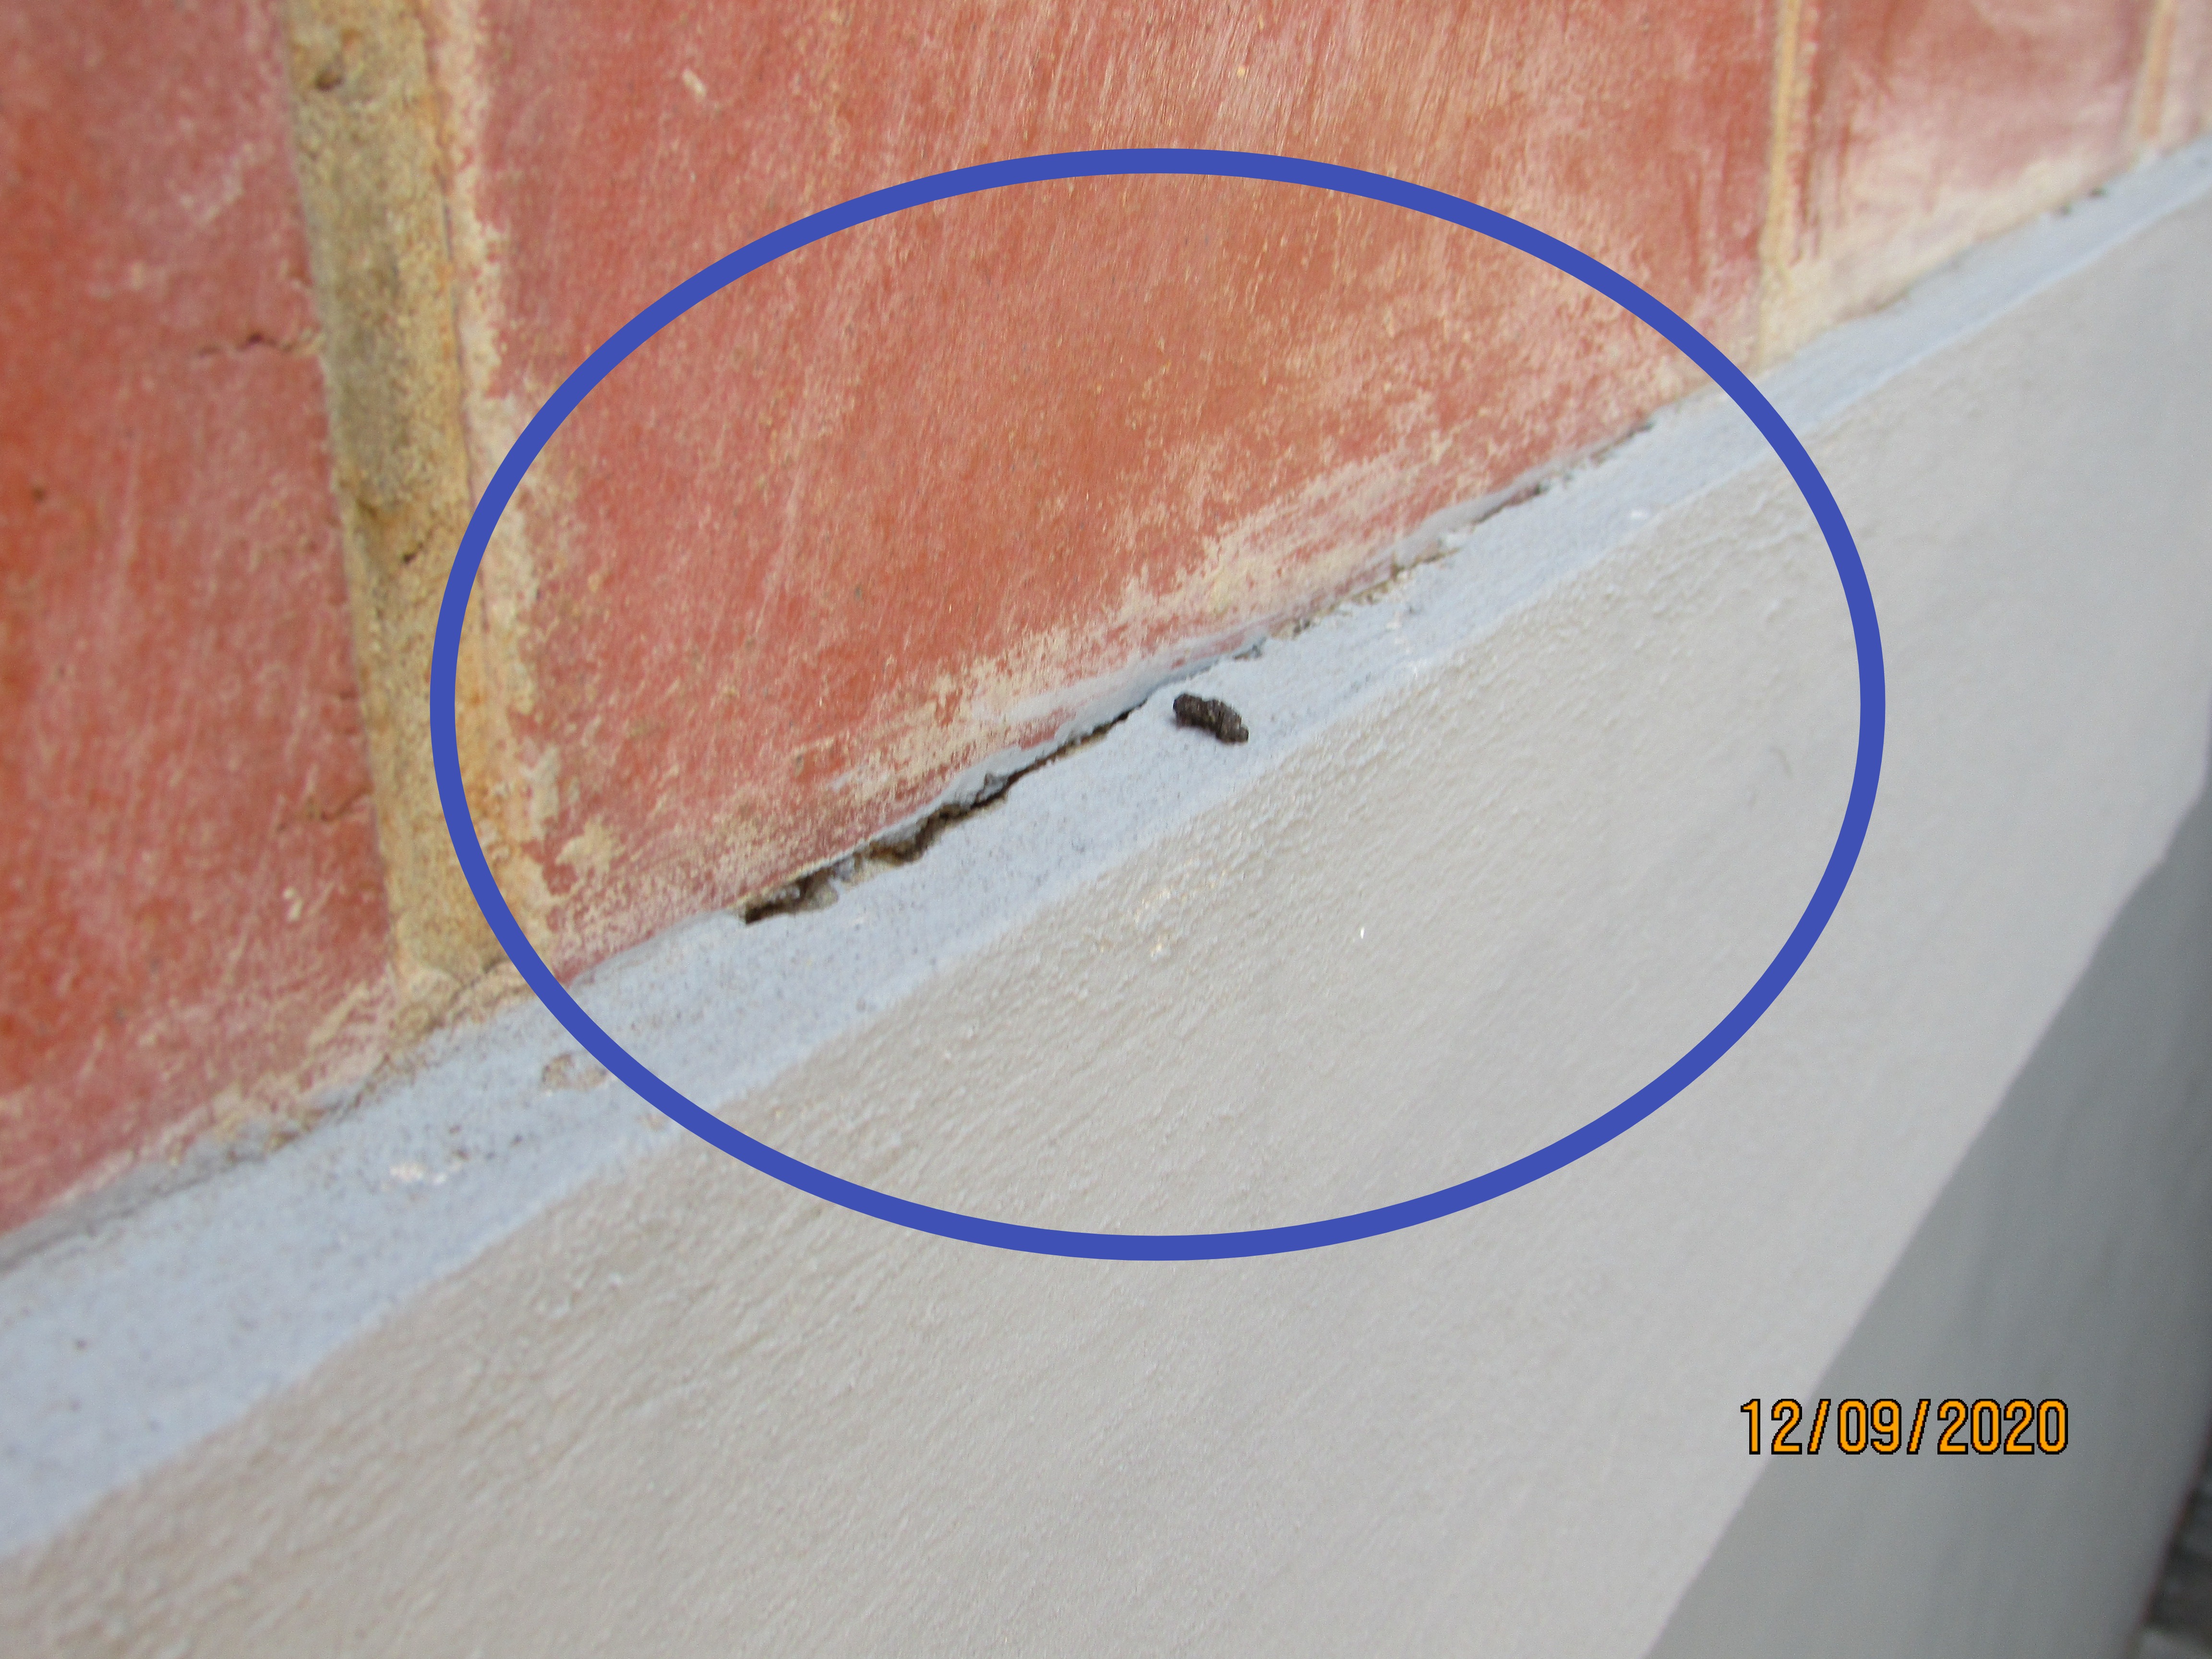 |
Eaves and Verges
Eaves Finish: Open rafters
Verge Finish: Open rafters
The eaves and gables on the house were in satisfactory condition.
Doors Exteriors
Door Types: Aluminium folding/sliding doors, Aluminium french doors, Aluminium glazed doors
The tested exterior aluminium doors of the house were functional at the time of the inspection.
The sliding doors in the lounge were locked. and were not tested.
The sliding door in the main bedroom was functional at the time of the inspection.
All the door frames had gaps between the frames and walls that will need to be sealed to prevent moisture intrusion into the walls.
.JPG) | 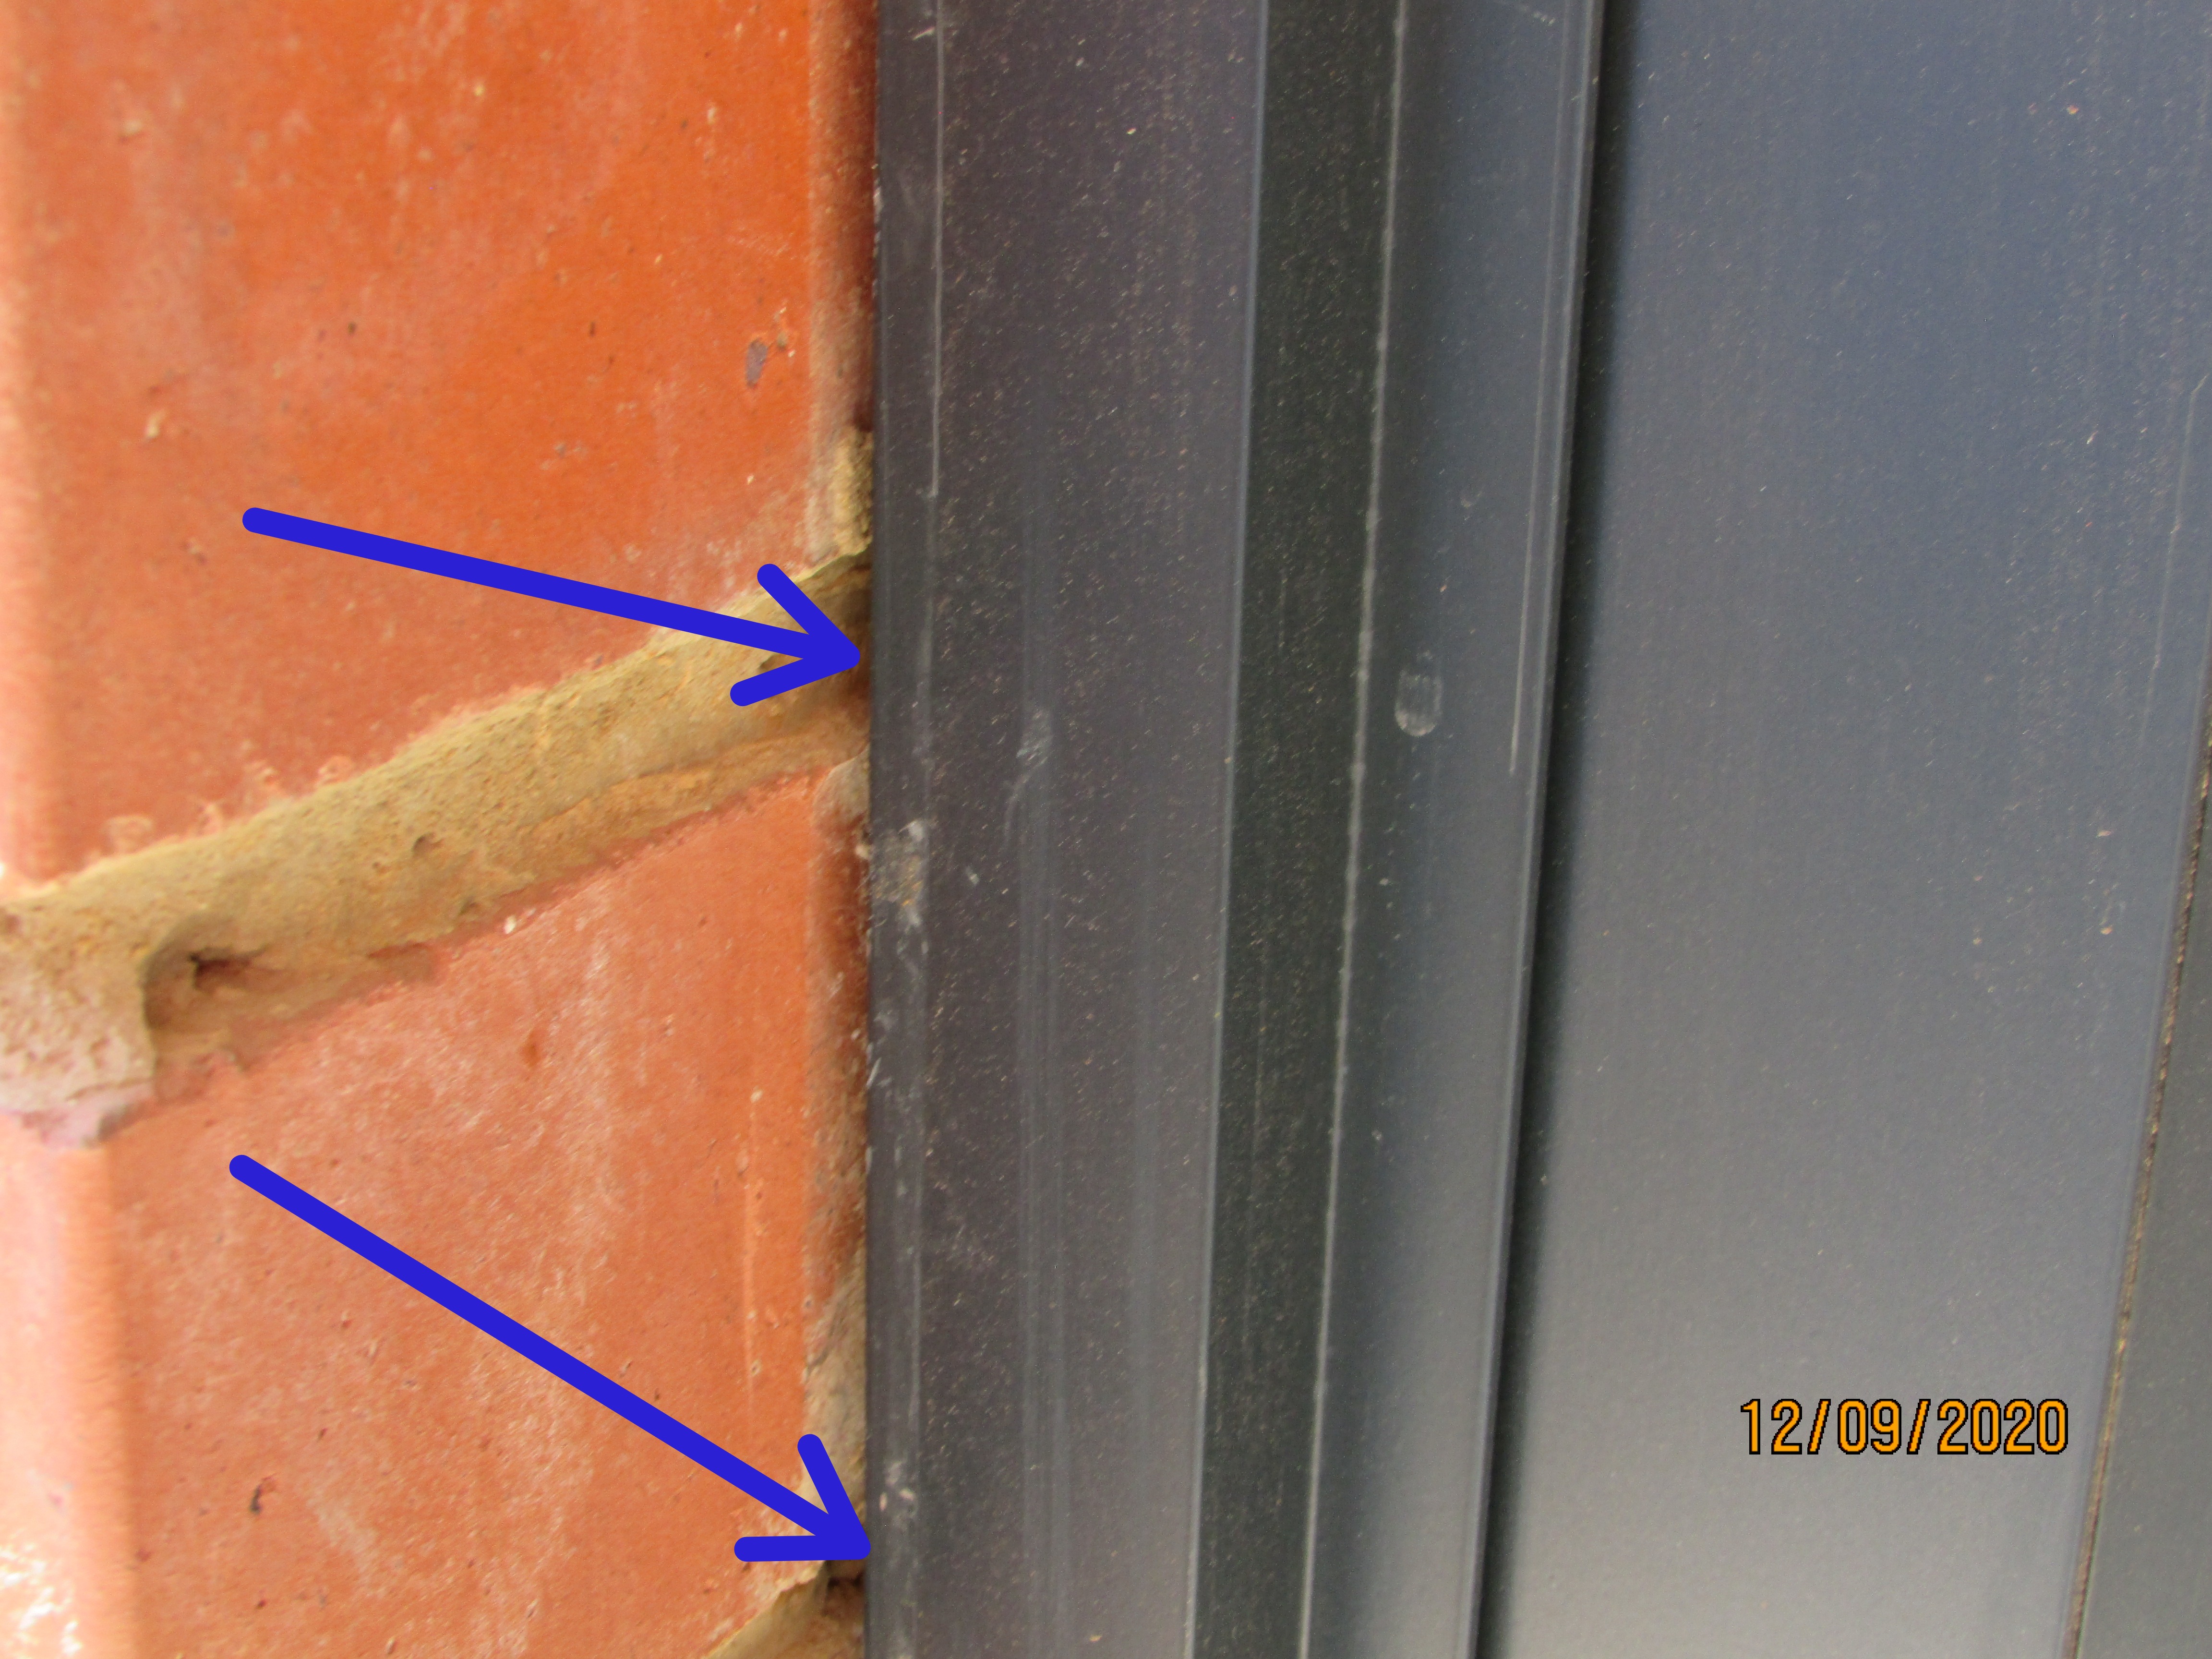 |
Generally, the door frames require cleaning and the removal of paint.
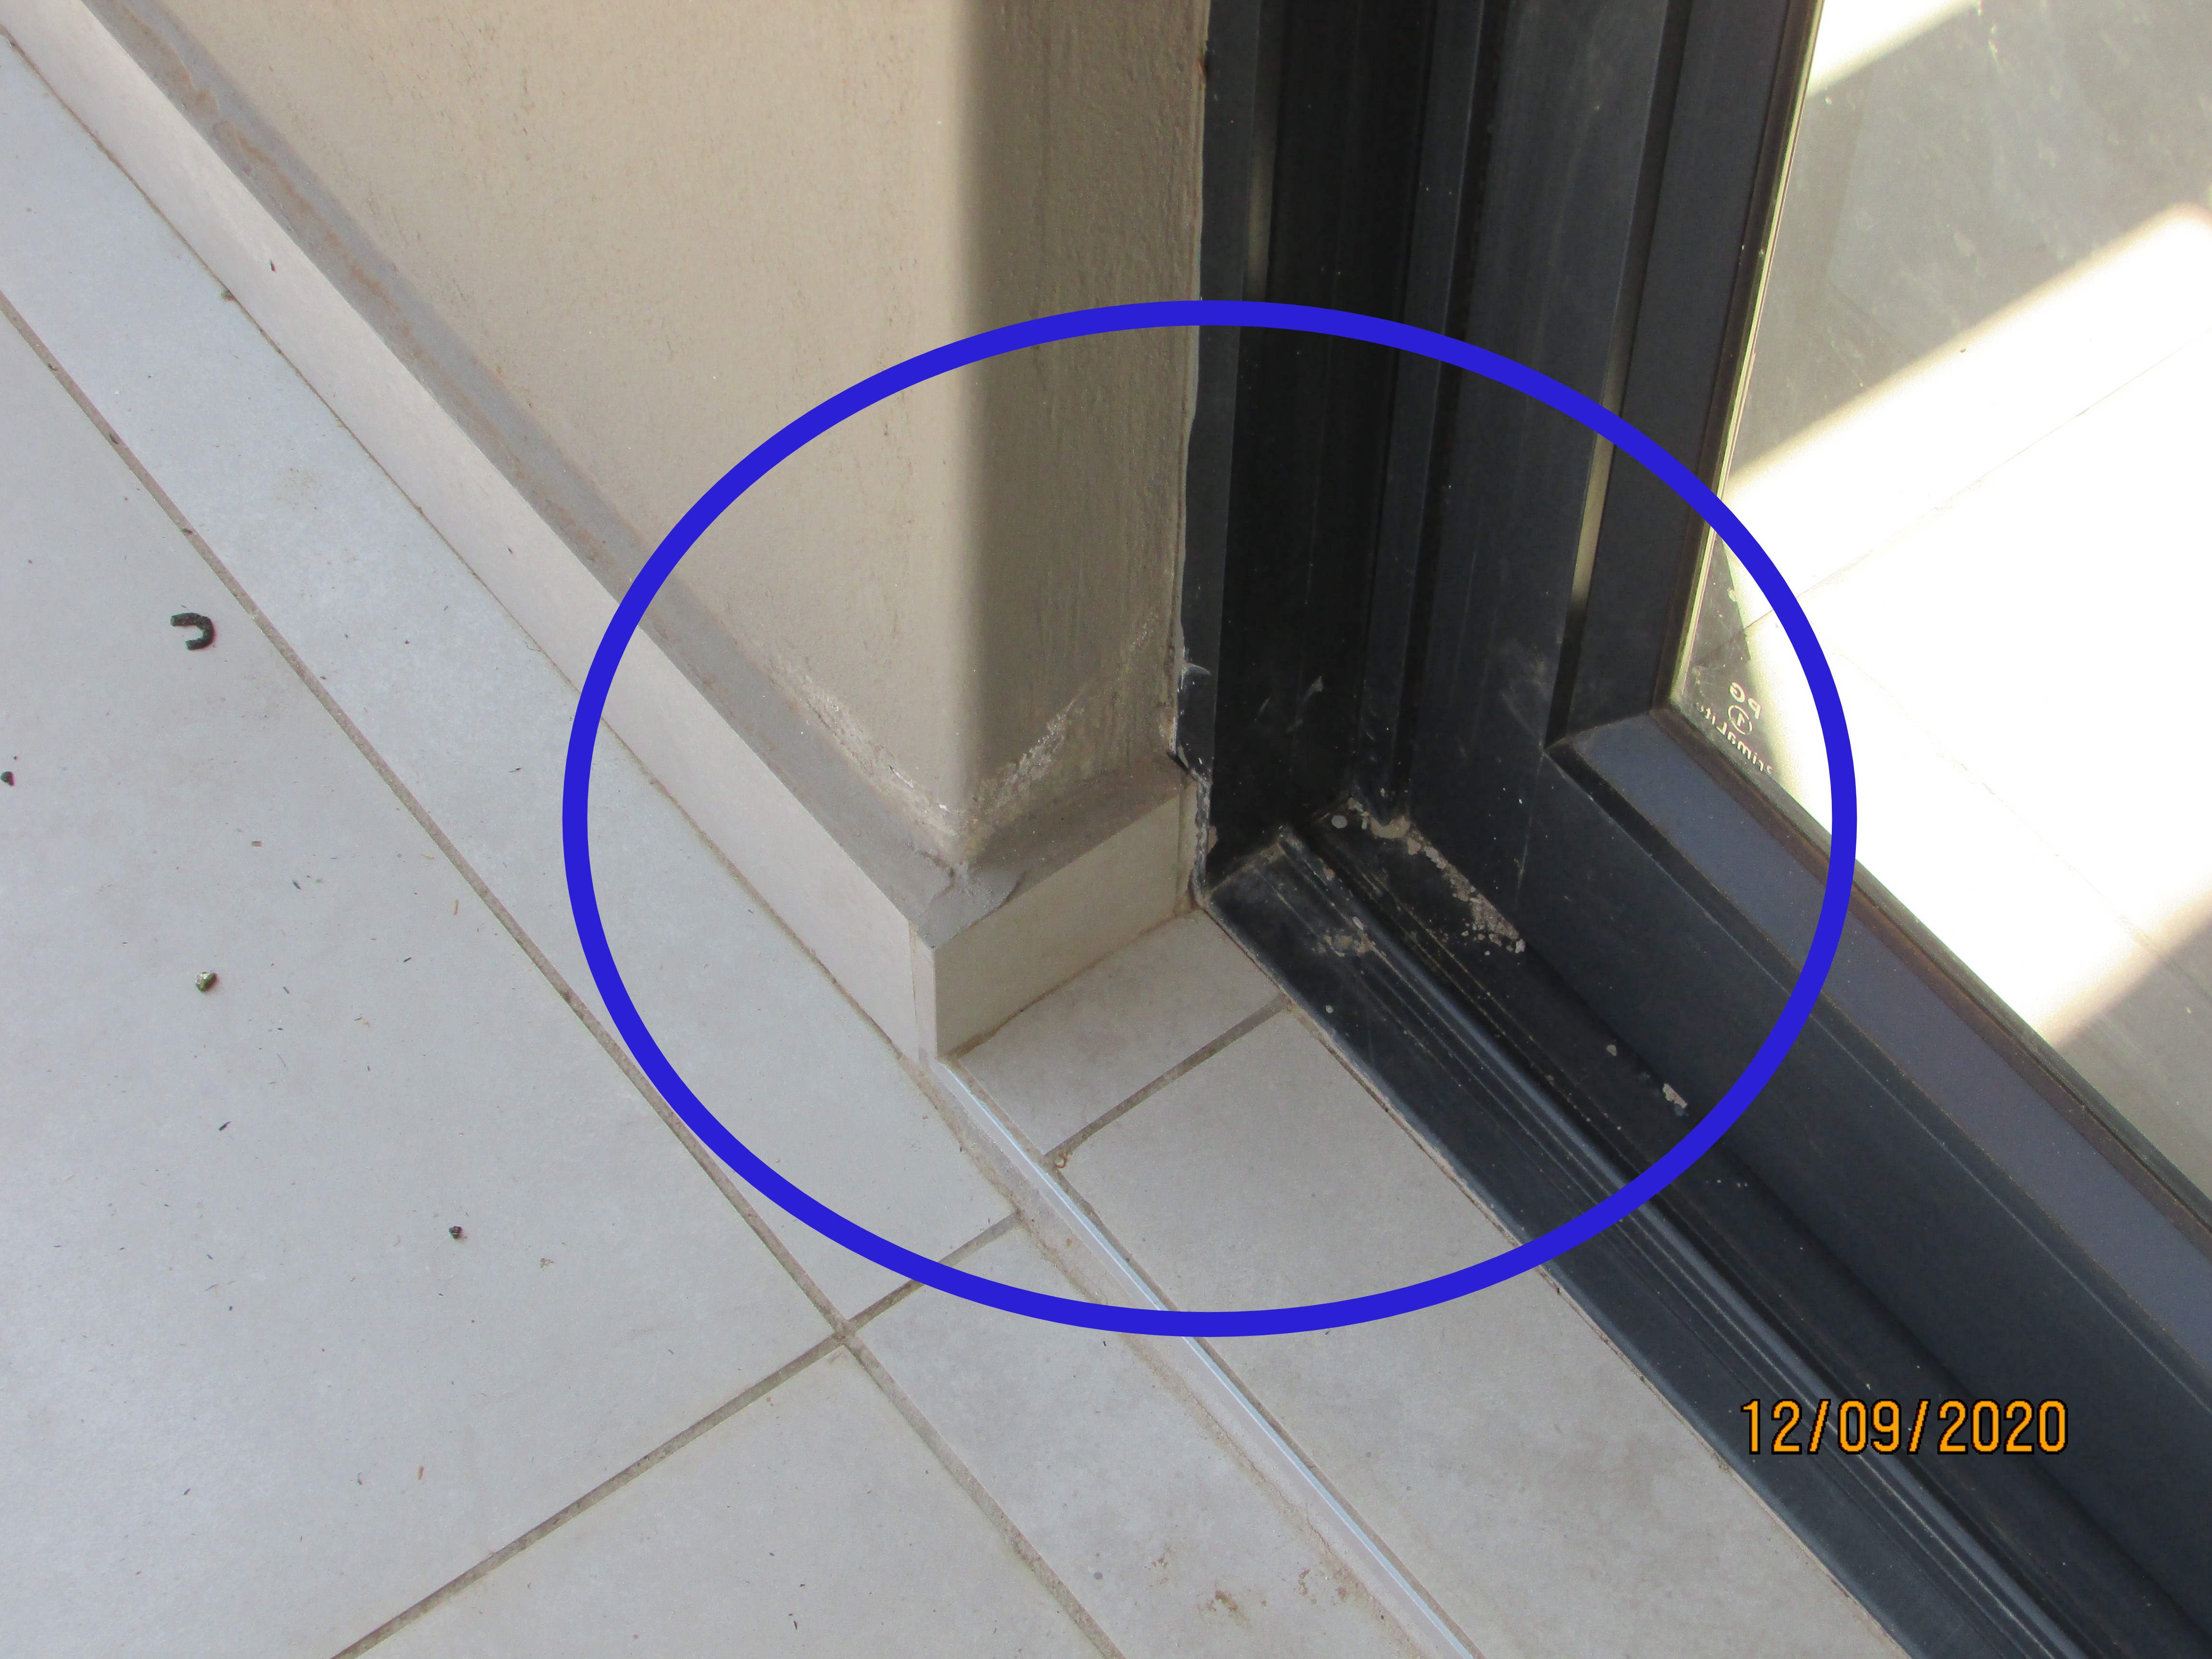 | 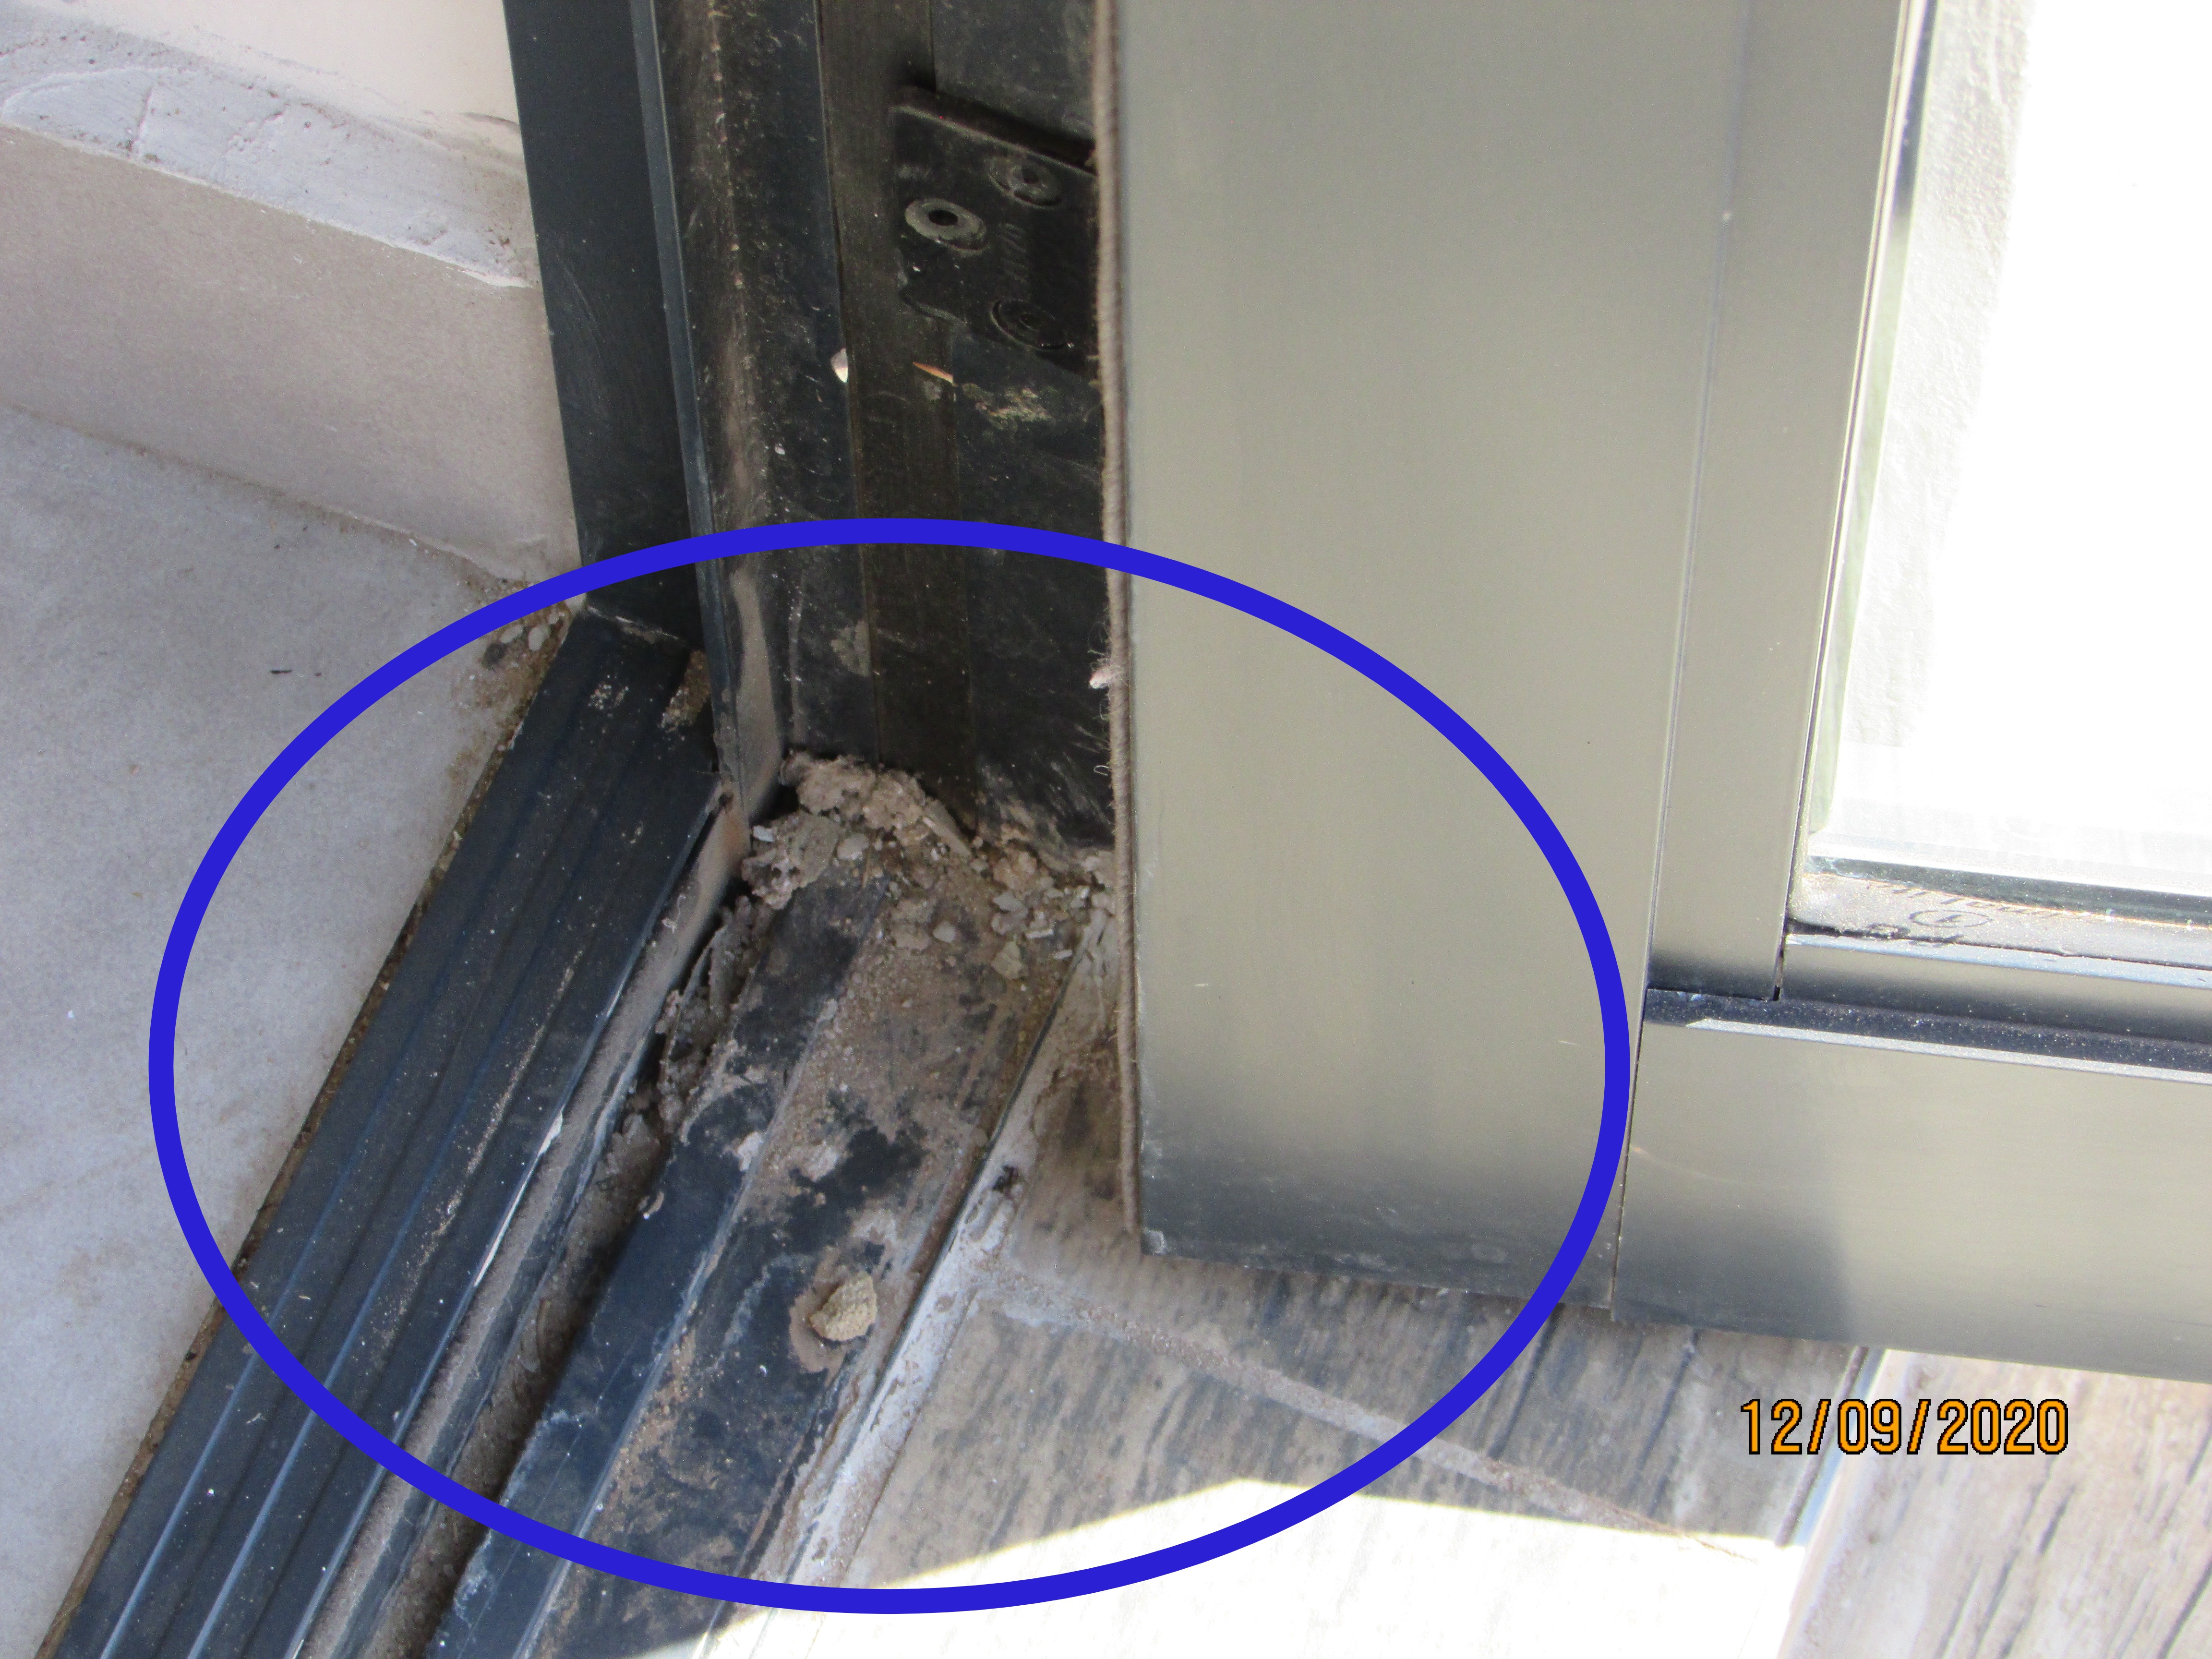 |
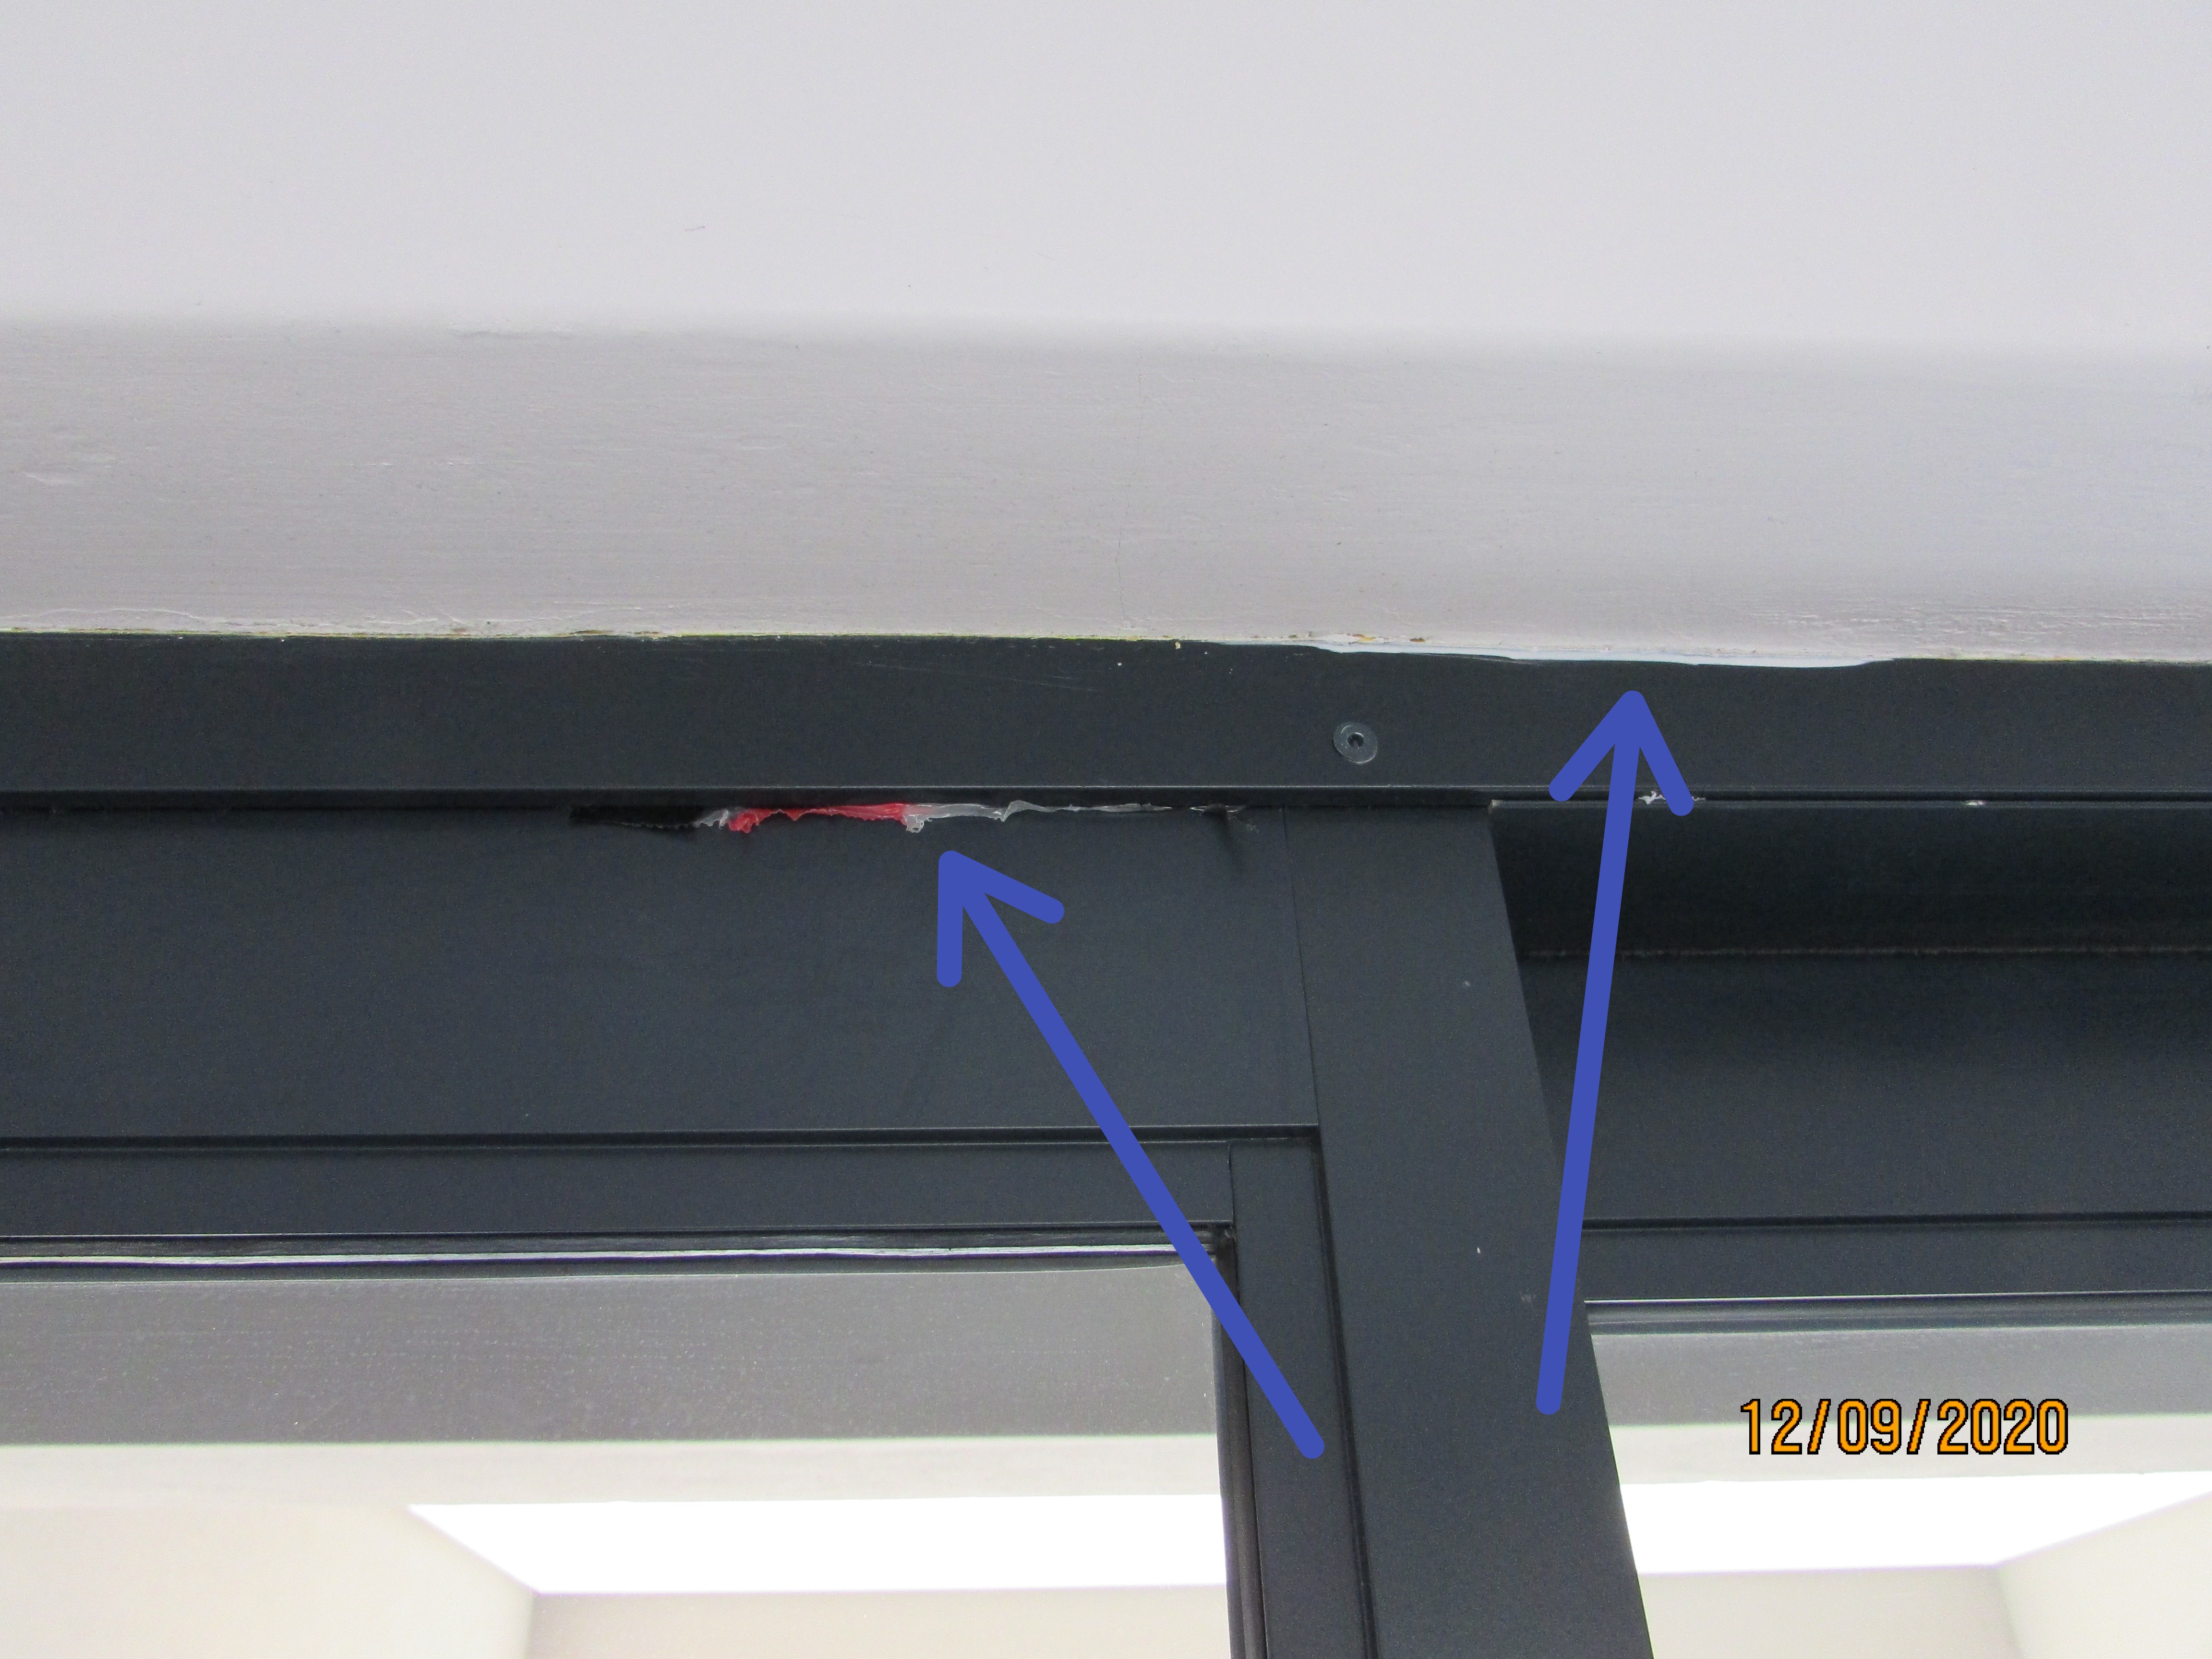 |
Window Exteriors
Window Material: Aluminium
All the external windows of the house required sealing. There were cracks between the sills and frames, between the sills and the walls and between the frames and the walls. Wind blown rainwater had enter the cracks and had allowed moisture into the walls and internal window sills.
- The remains of the plastic protective cover should be removed and the gap between the frame and wall sealed with silicon. General cleaning of the brickwork was required.
- This gap will allow moisture into the brickwork at the frame.
- Cracks on sill and on the side of the window! Note the moisture damage at the internal sill and wall under Interior: Windows!
- Window sill on the stair landing window. Note the gaps between the window frame and sill. The window frame required cleaning!
- The edge of the stair landing window. Here rainwater will leak into the interior of the house.
- The sill here was not sloped to drain. Nor was the widow frame sealed. Best practices for all exterior sills are to slope to drain to shed water. Standing water on details like this can facilitate moisture intrusion.
- Here there was a crack in the window sill and a gap at the window trim. Both will need to be sealed.
- The remains of the plastic protective cover should be removed and the gap between the frame and wall sealed with silicon.
- Crack in the wall at the window sill which will allow moisture intrusion.
.JPG)

.JPG)
.JPG)
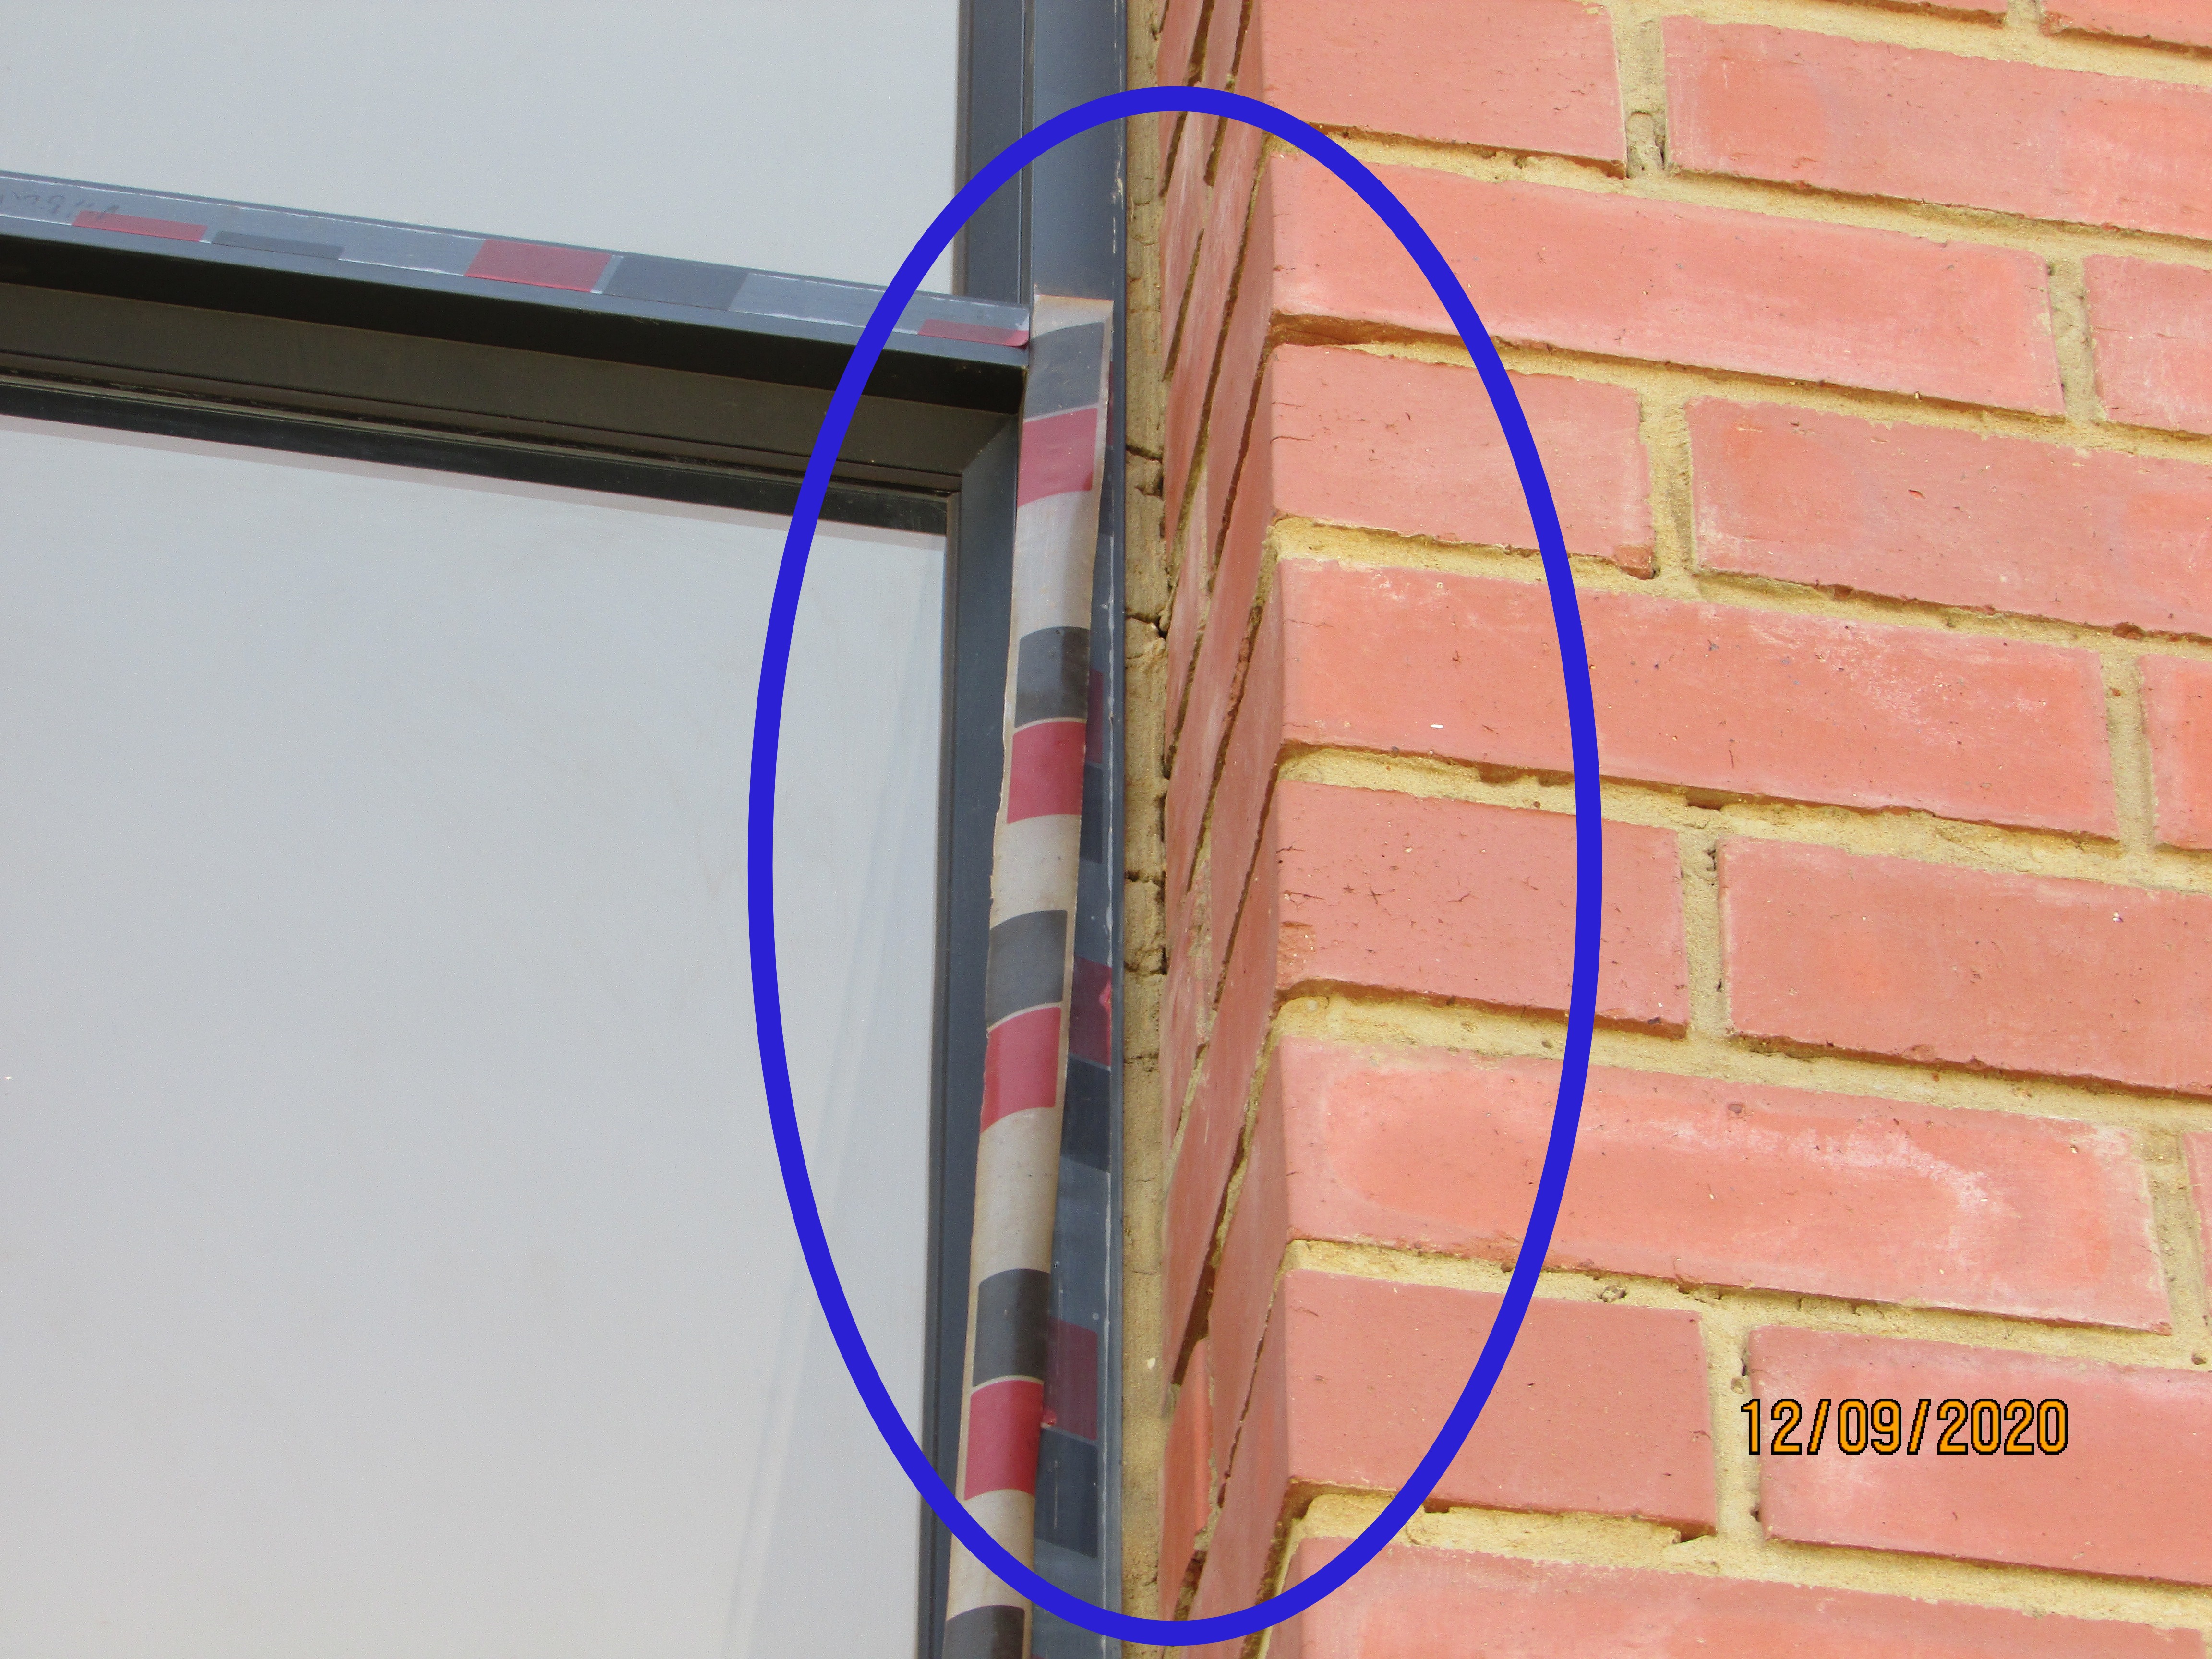
.JPG)
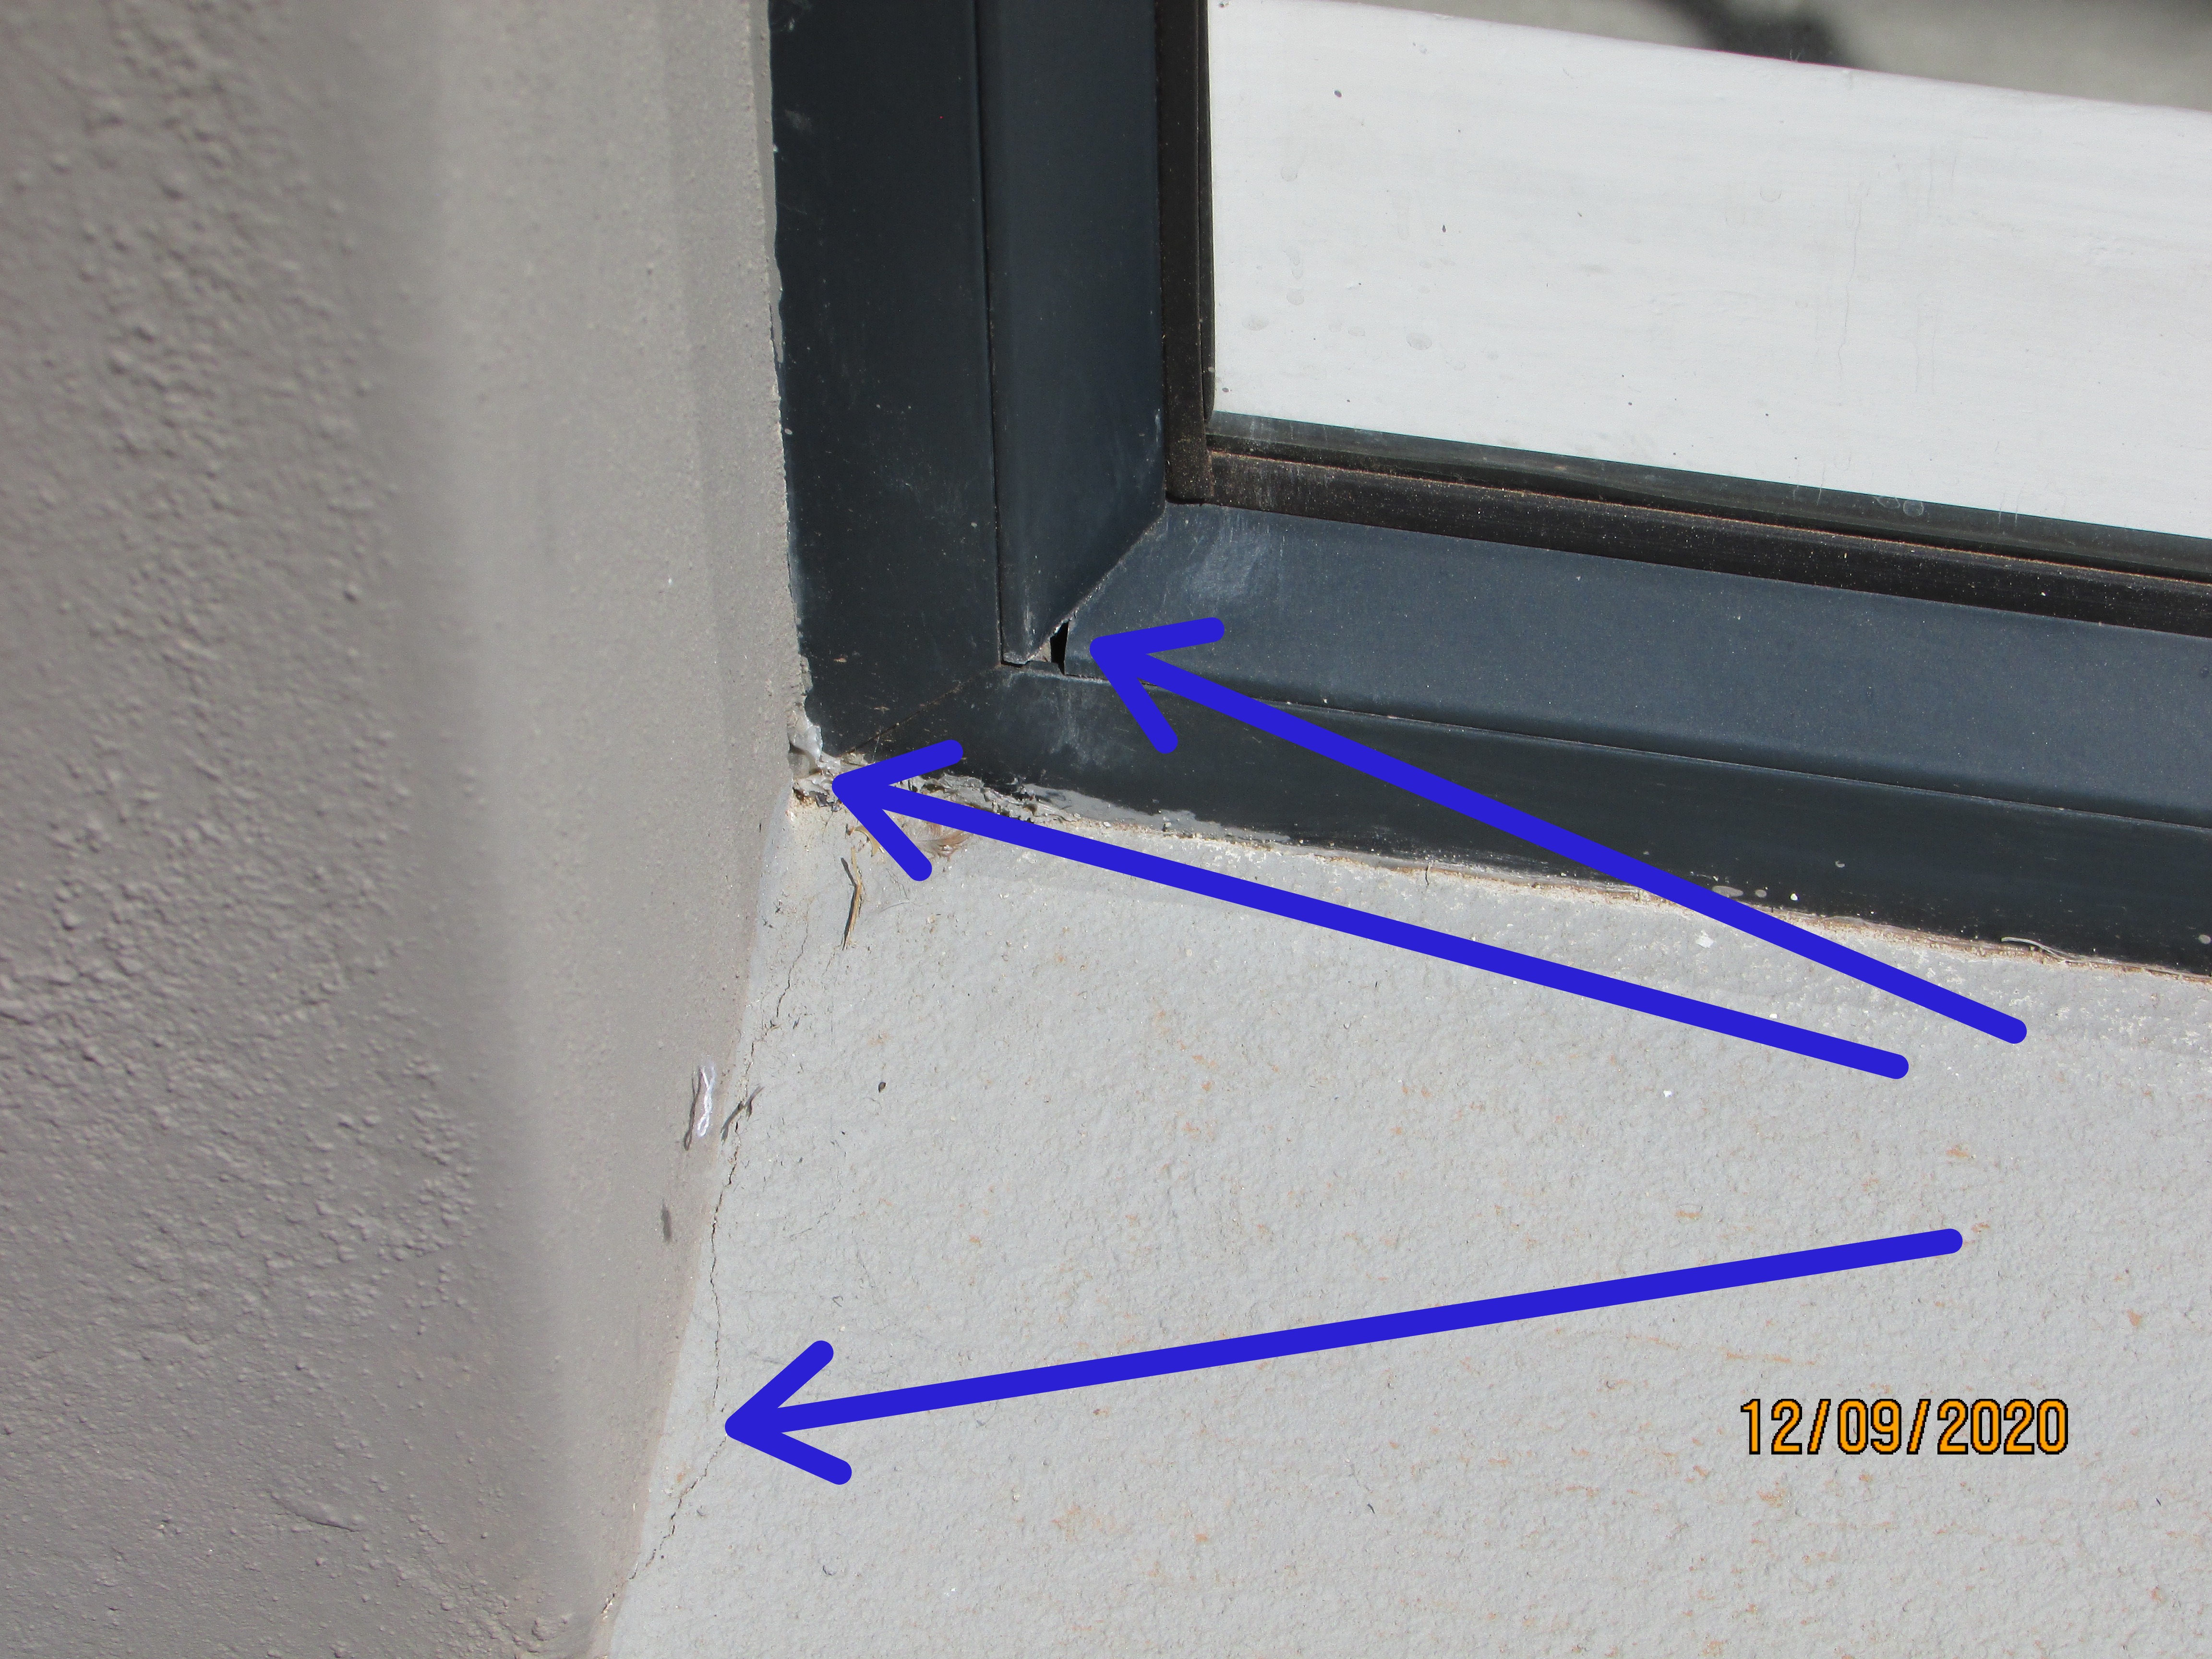
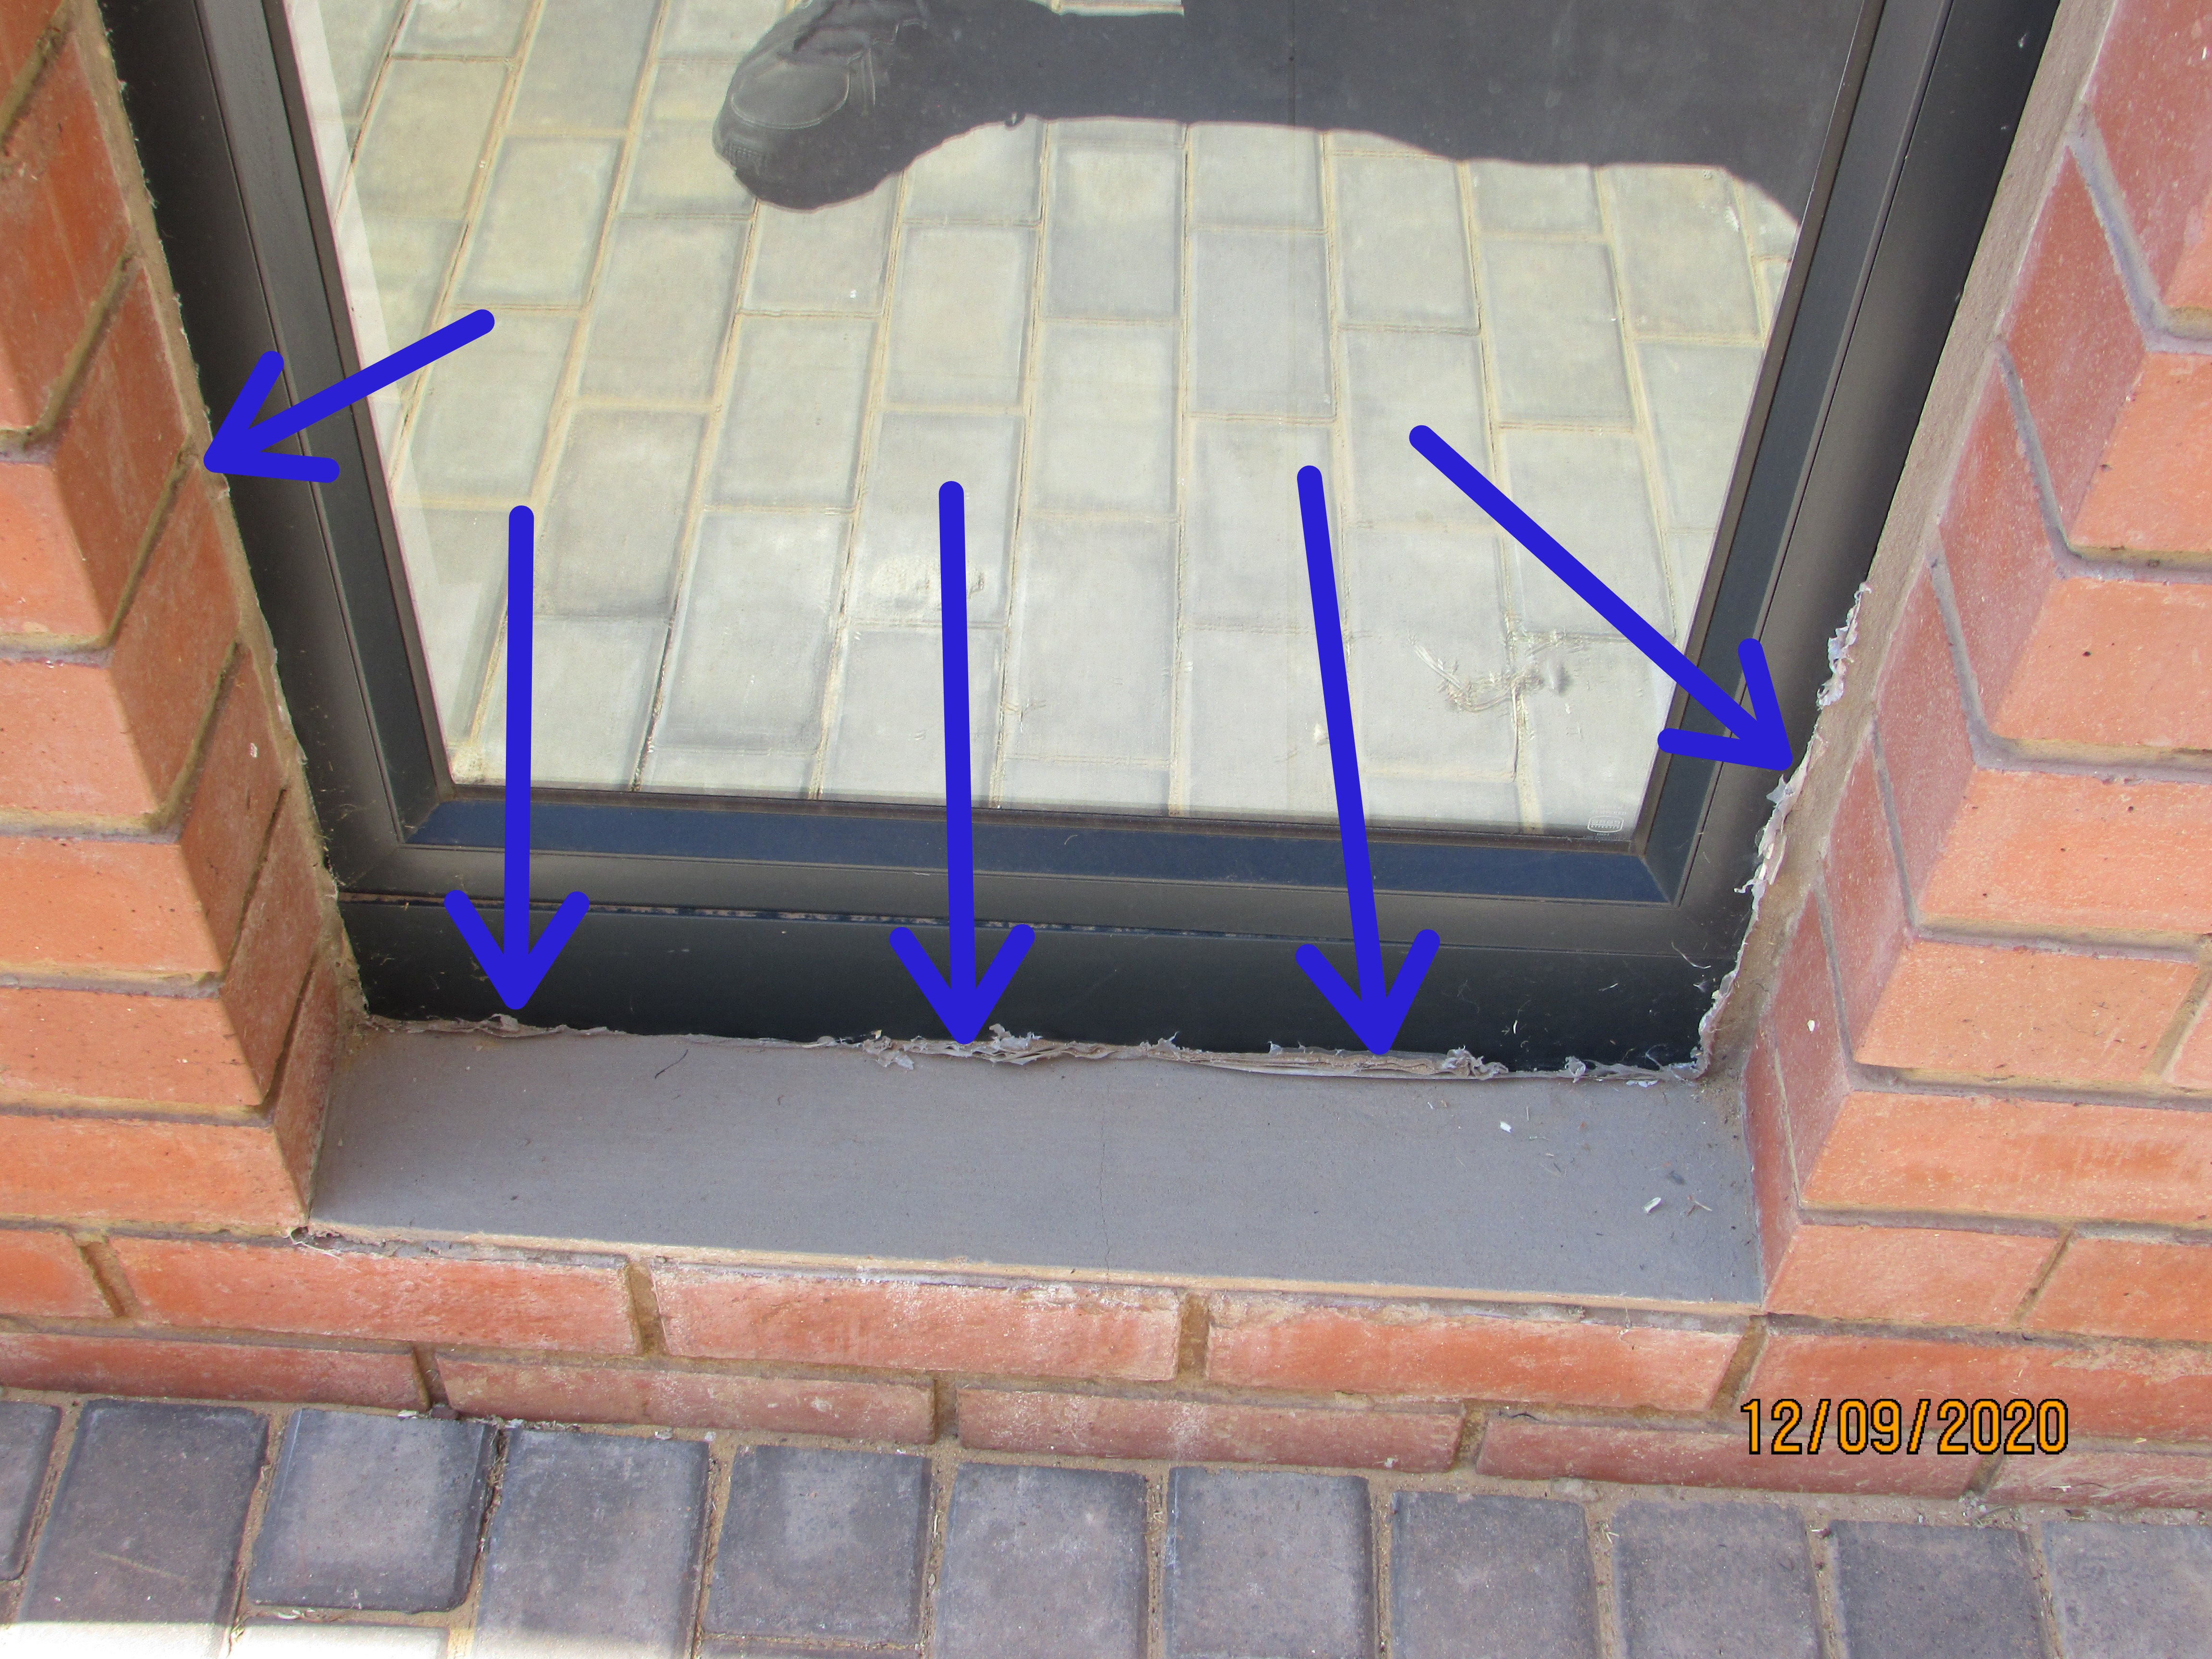
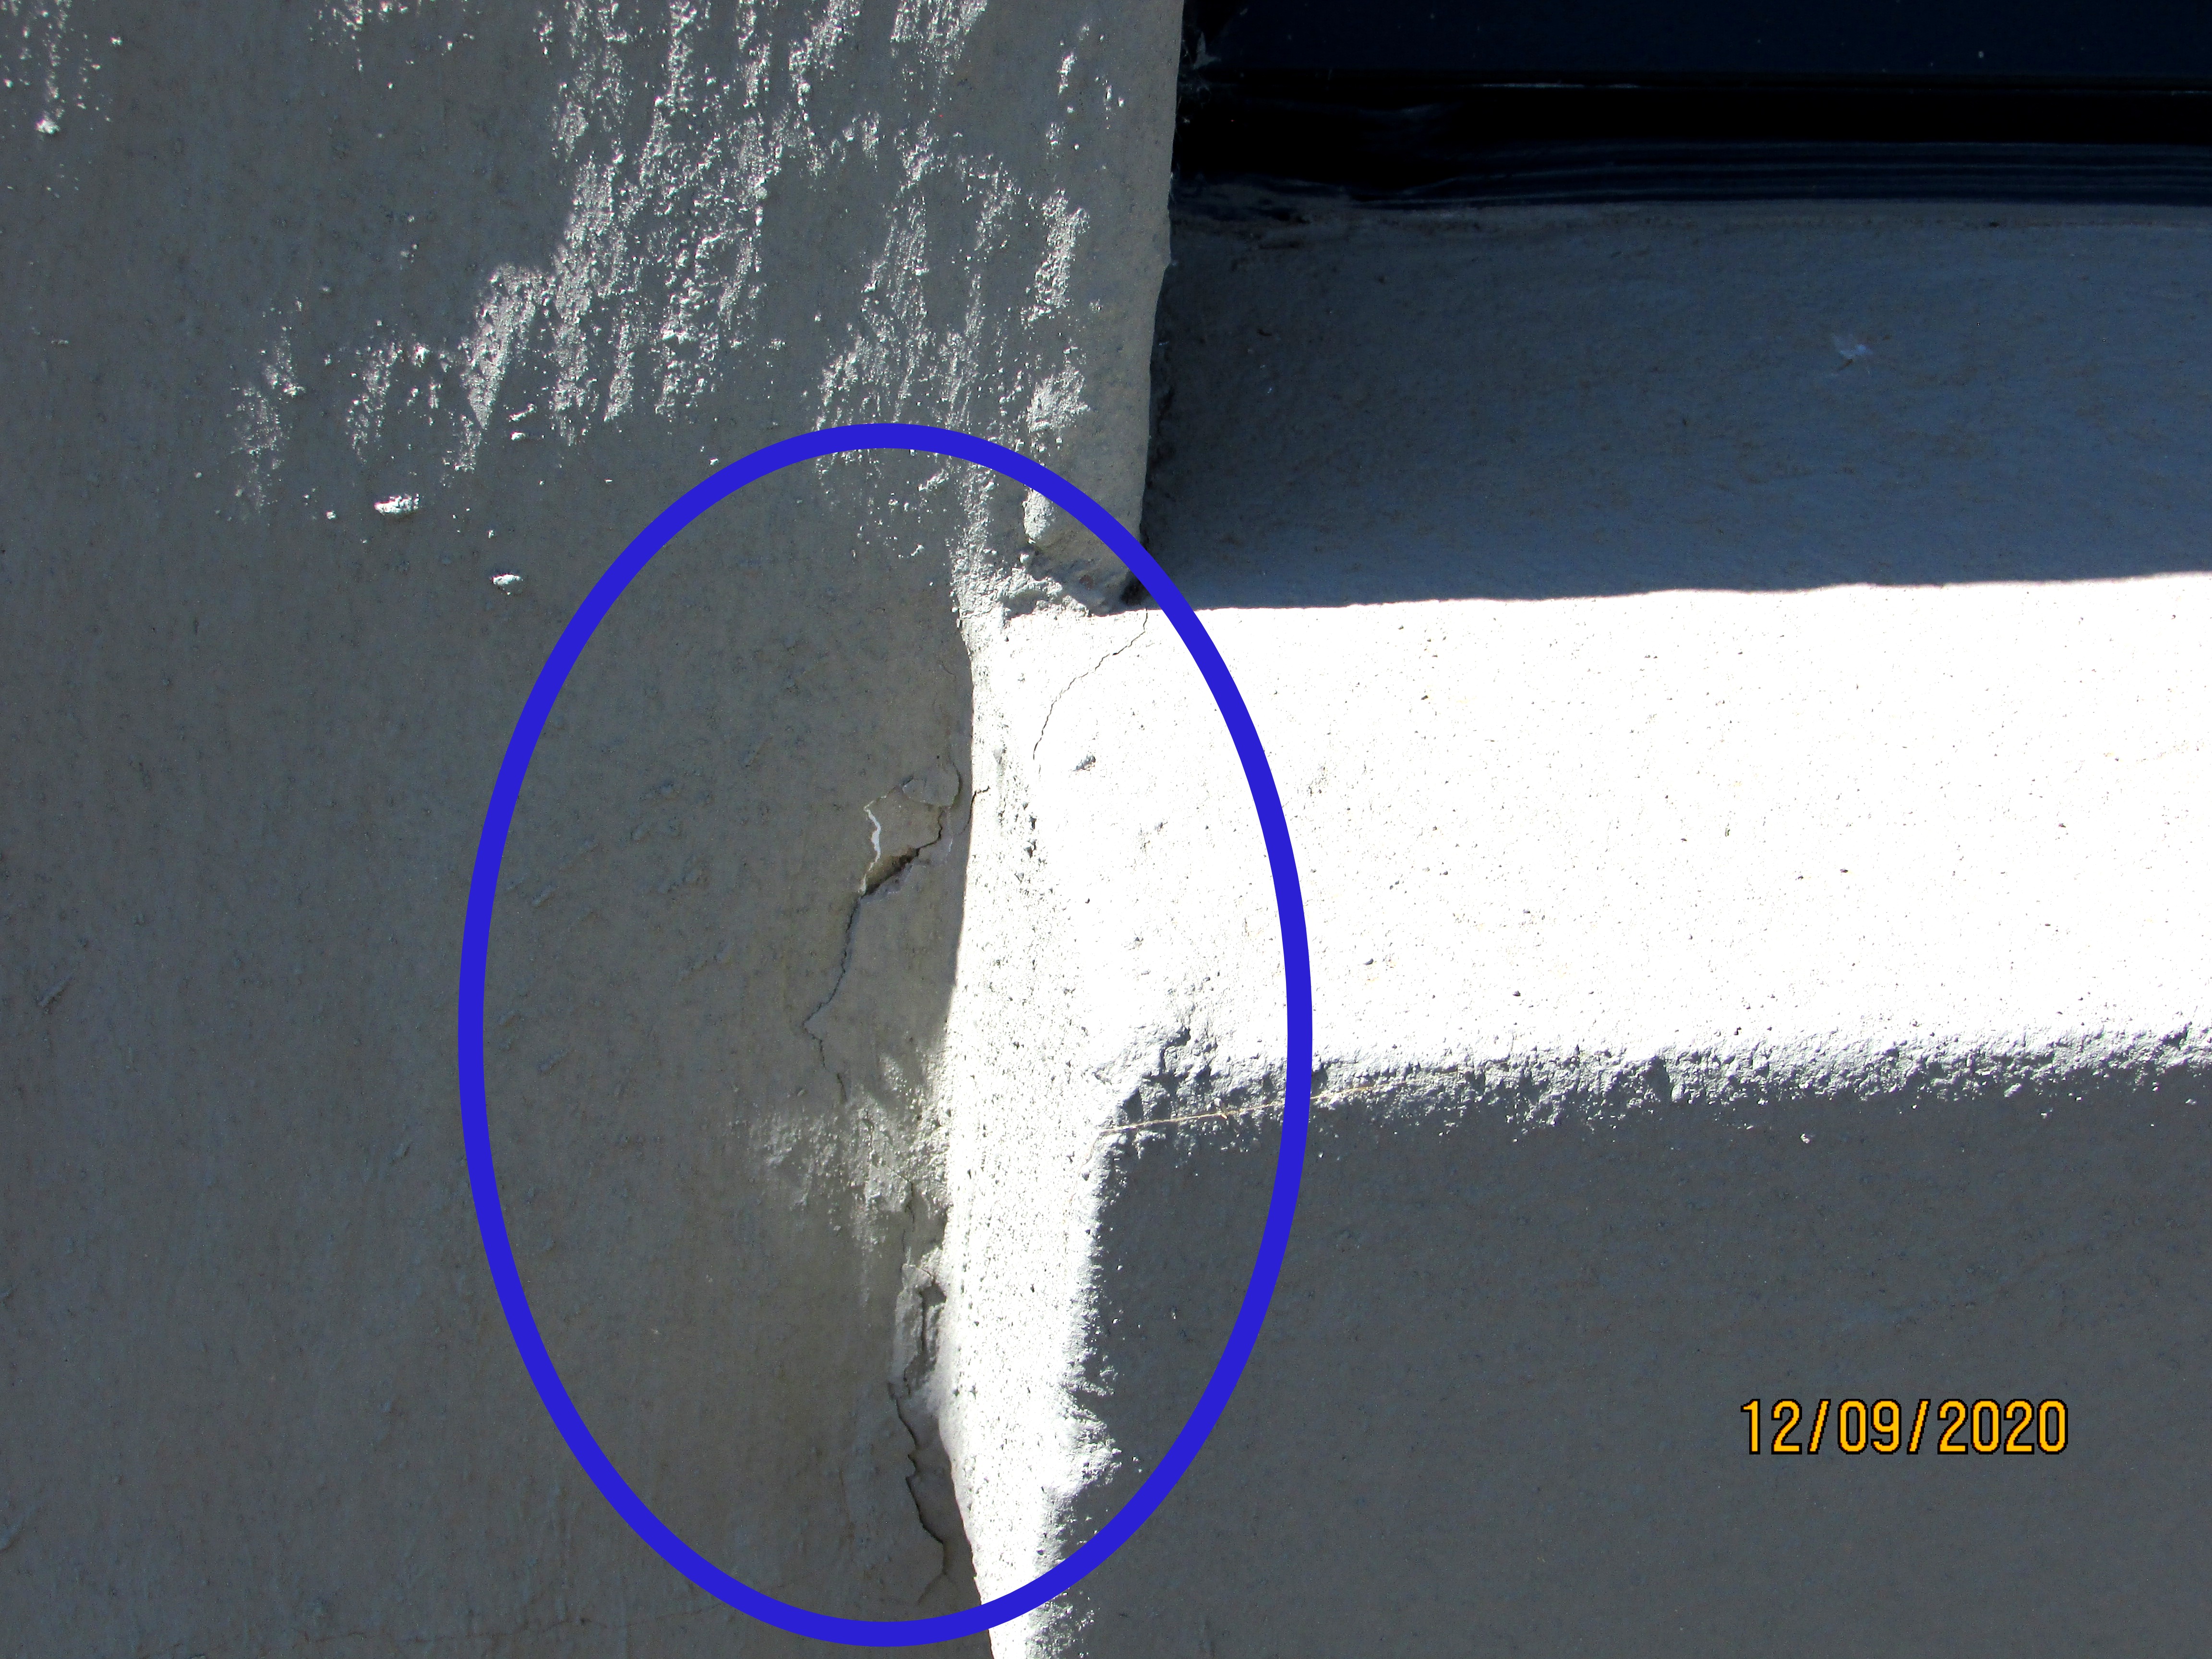
A cracked pane of glass was noted on the balcony in the 2nd bedroom (girl's room). This requires glazing replacement.
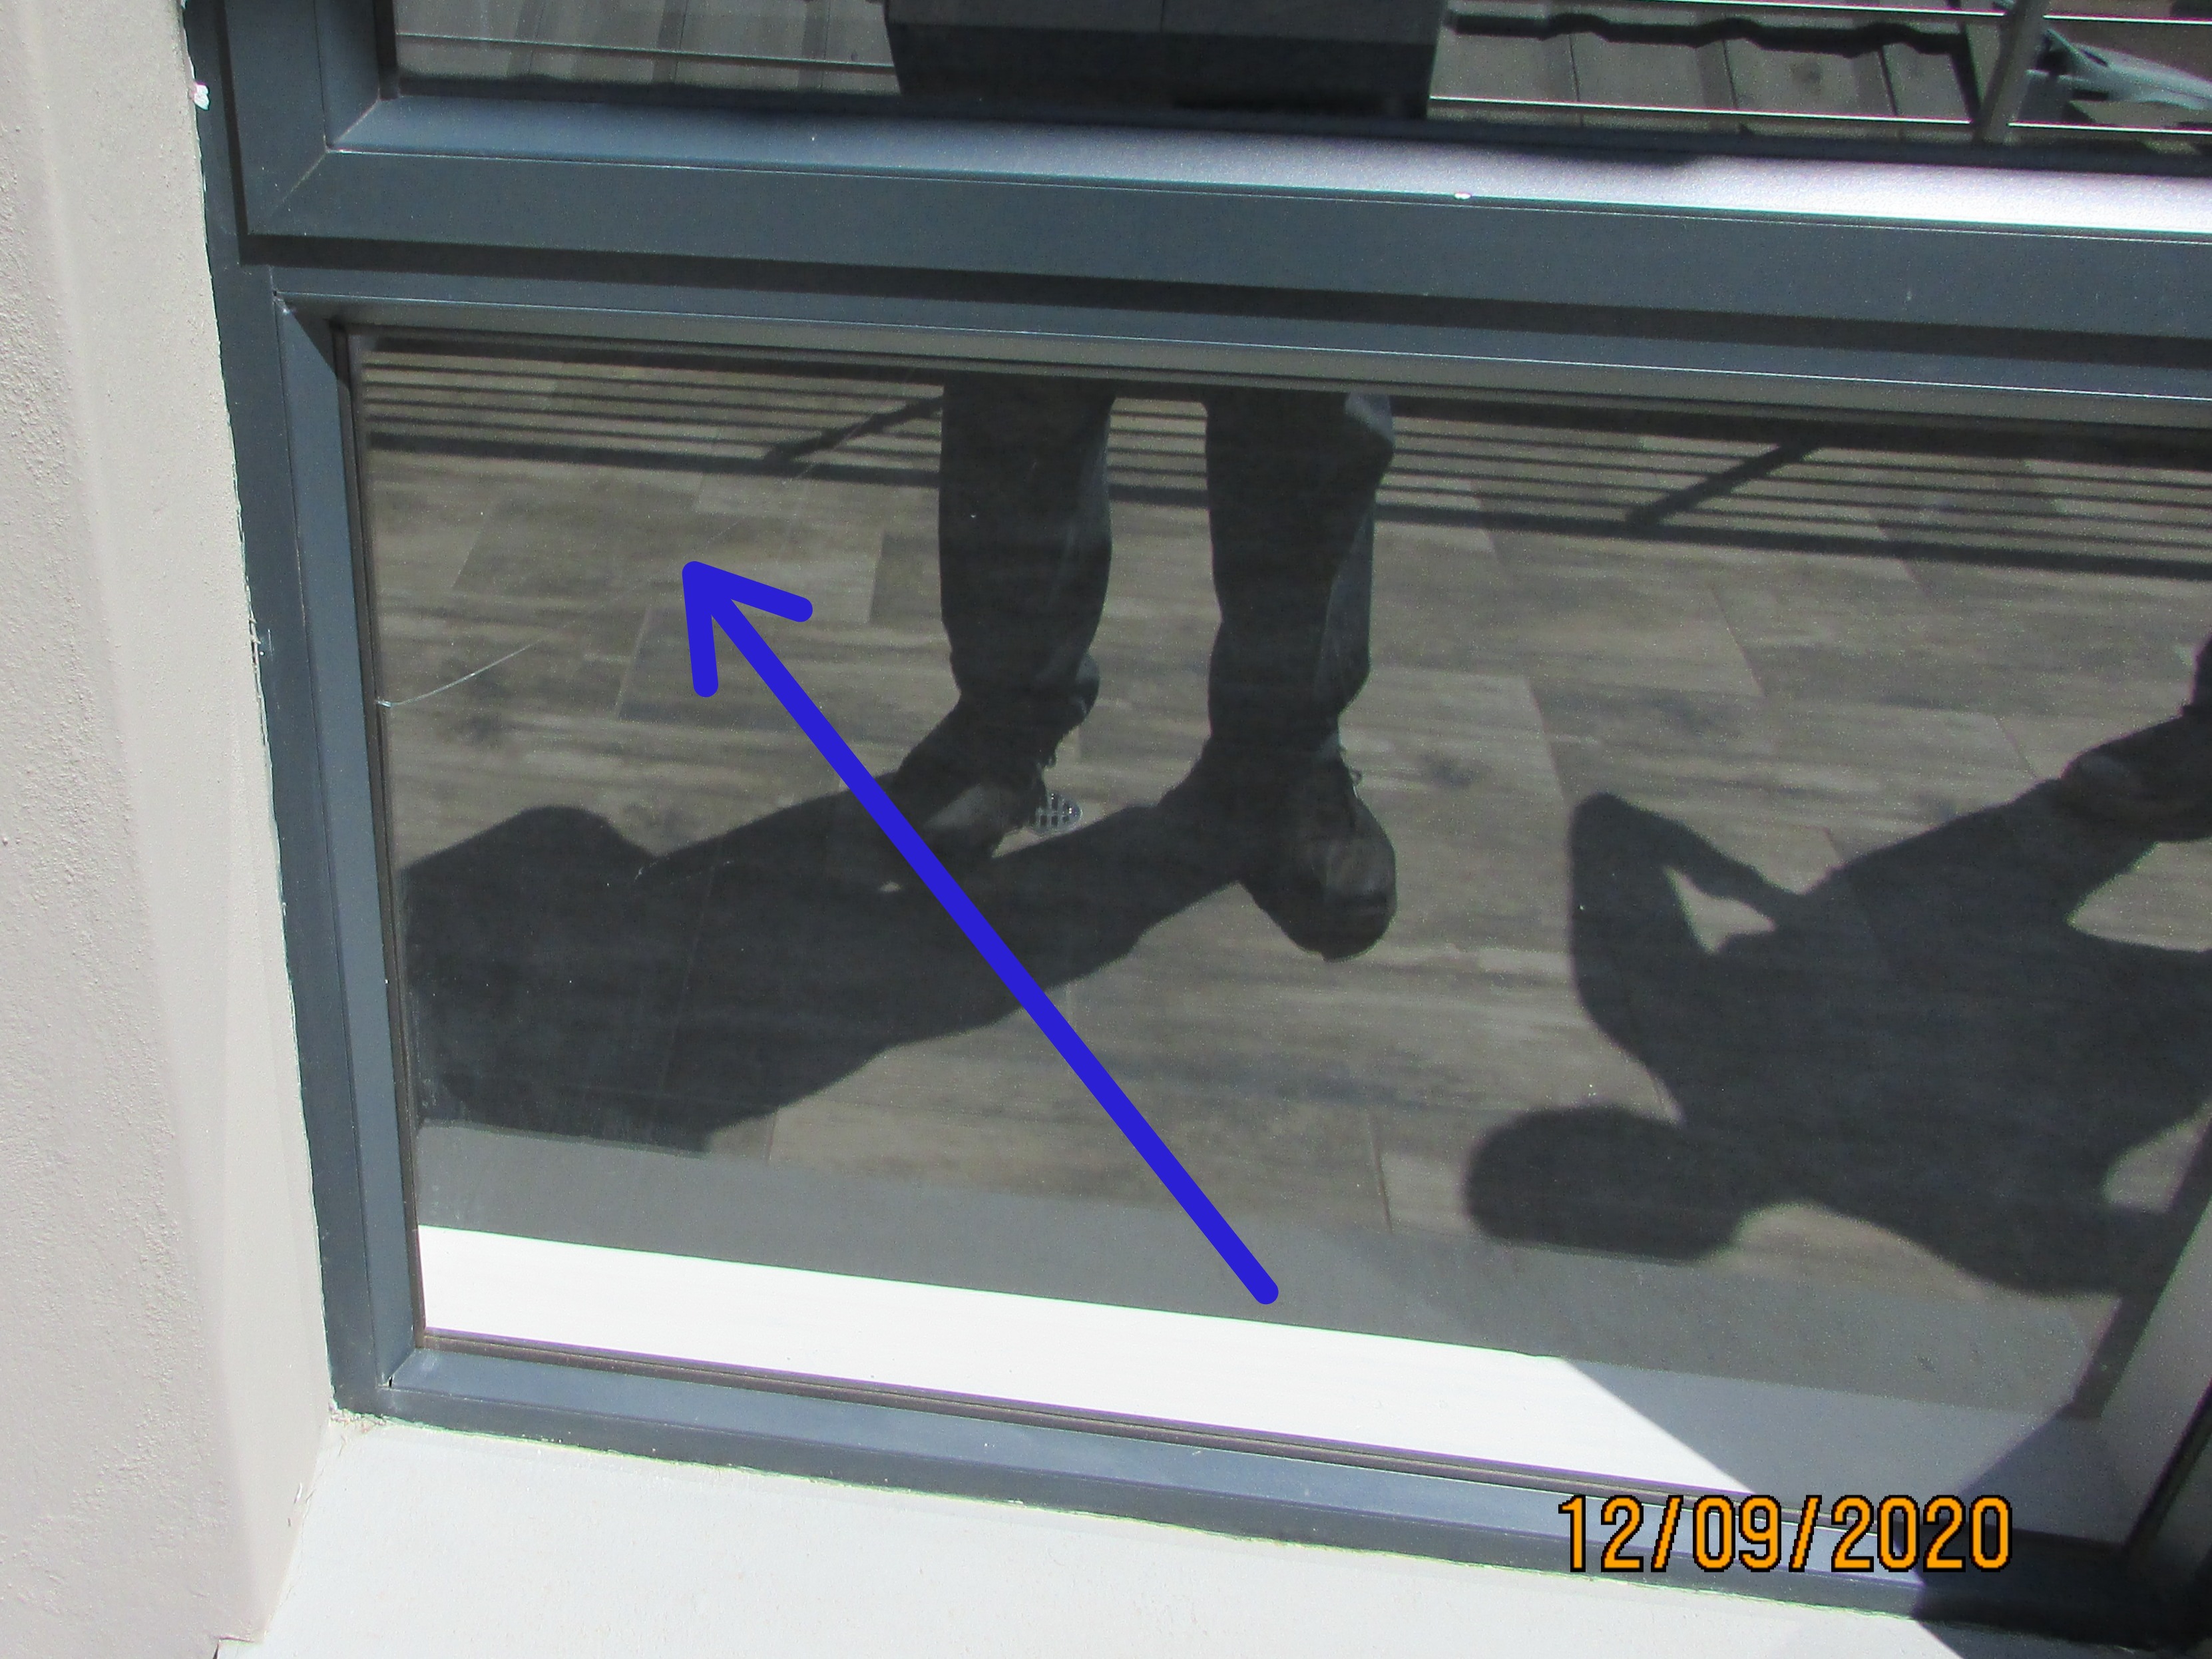 |
The windows frames had mortar and paint on the frames at the time of inspection. This is a general item applicable to all the windows. I recommend cleaning the windows frames before they are sealed.
- The window and the grouting at the sill and skirting needed to be repaired and cleaned up.
- Paint clean up required.
- Paint clean up required. Scratches on the window frame will need to be touched up!
- Window frame required cleaning! The plastic protective tape should be removed.
- Paint clean up required. The frame might have leaked here!
- The window and the grouting at the sill and skirting needed to be repaired and cleaned up.
- Paint clean up required here!
- The grouting at the sill and window needed to be repaired and cleaned up.
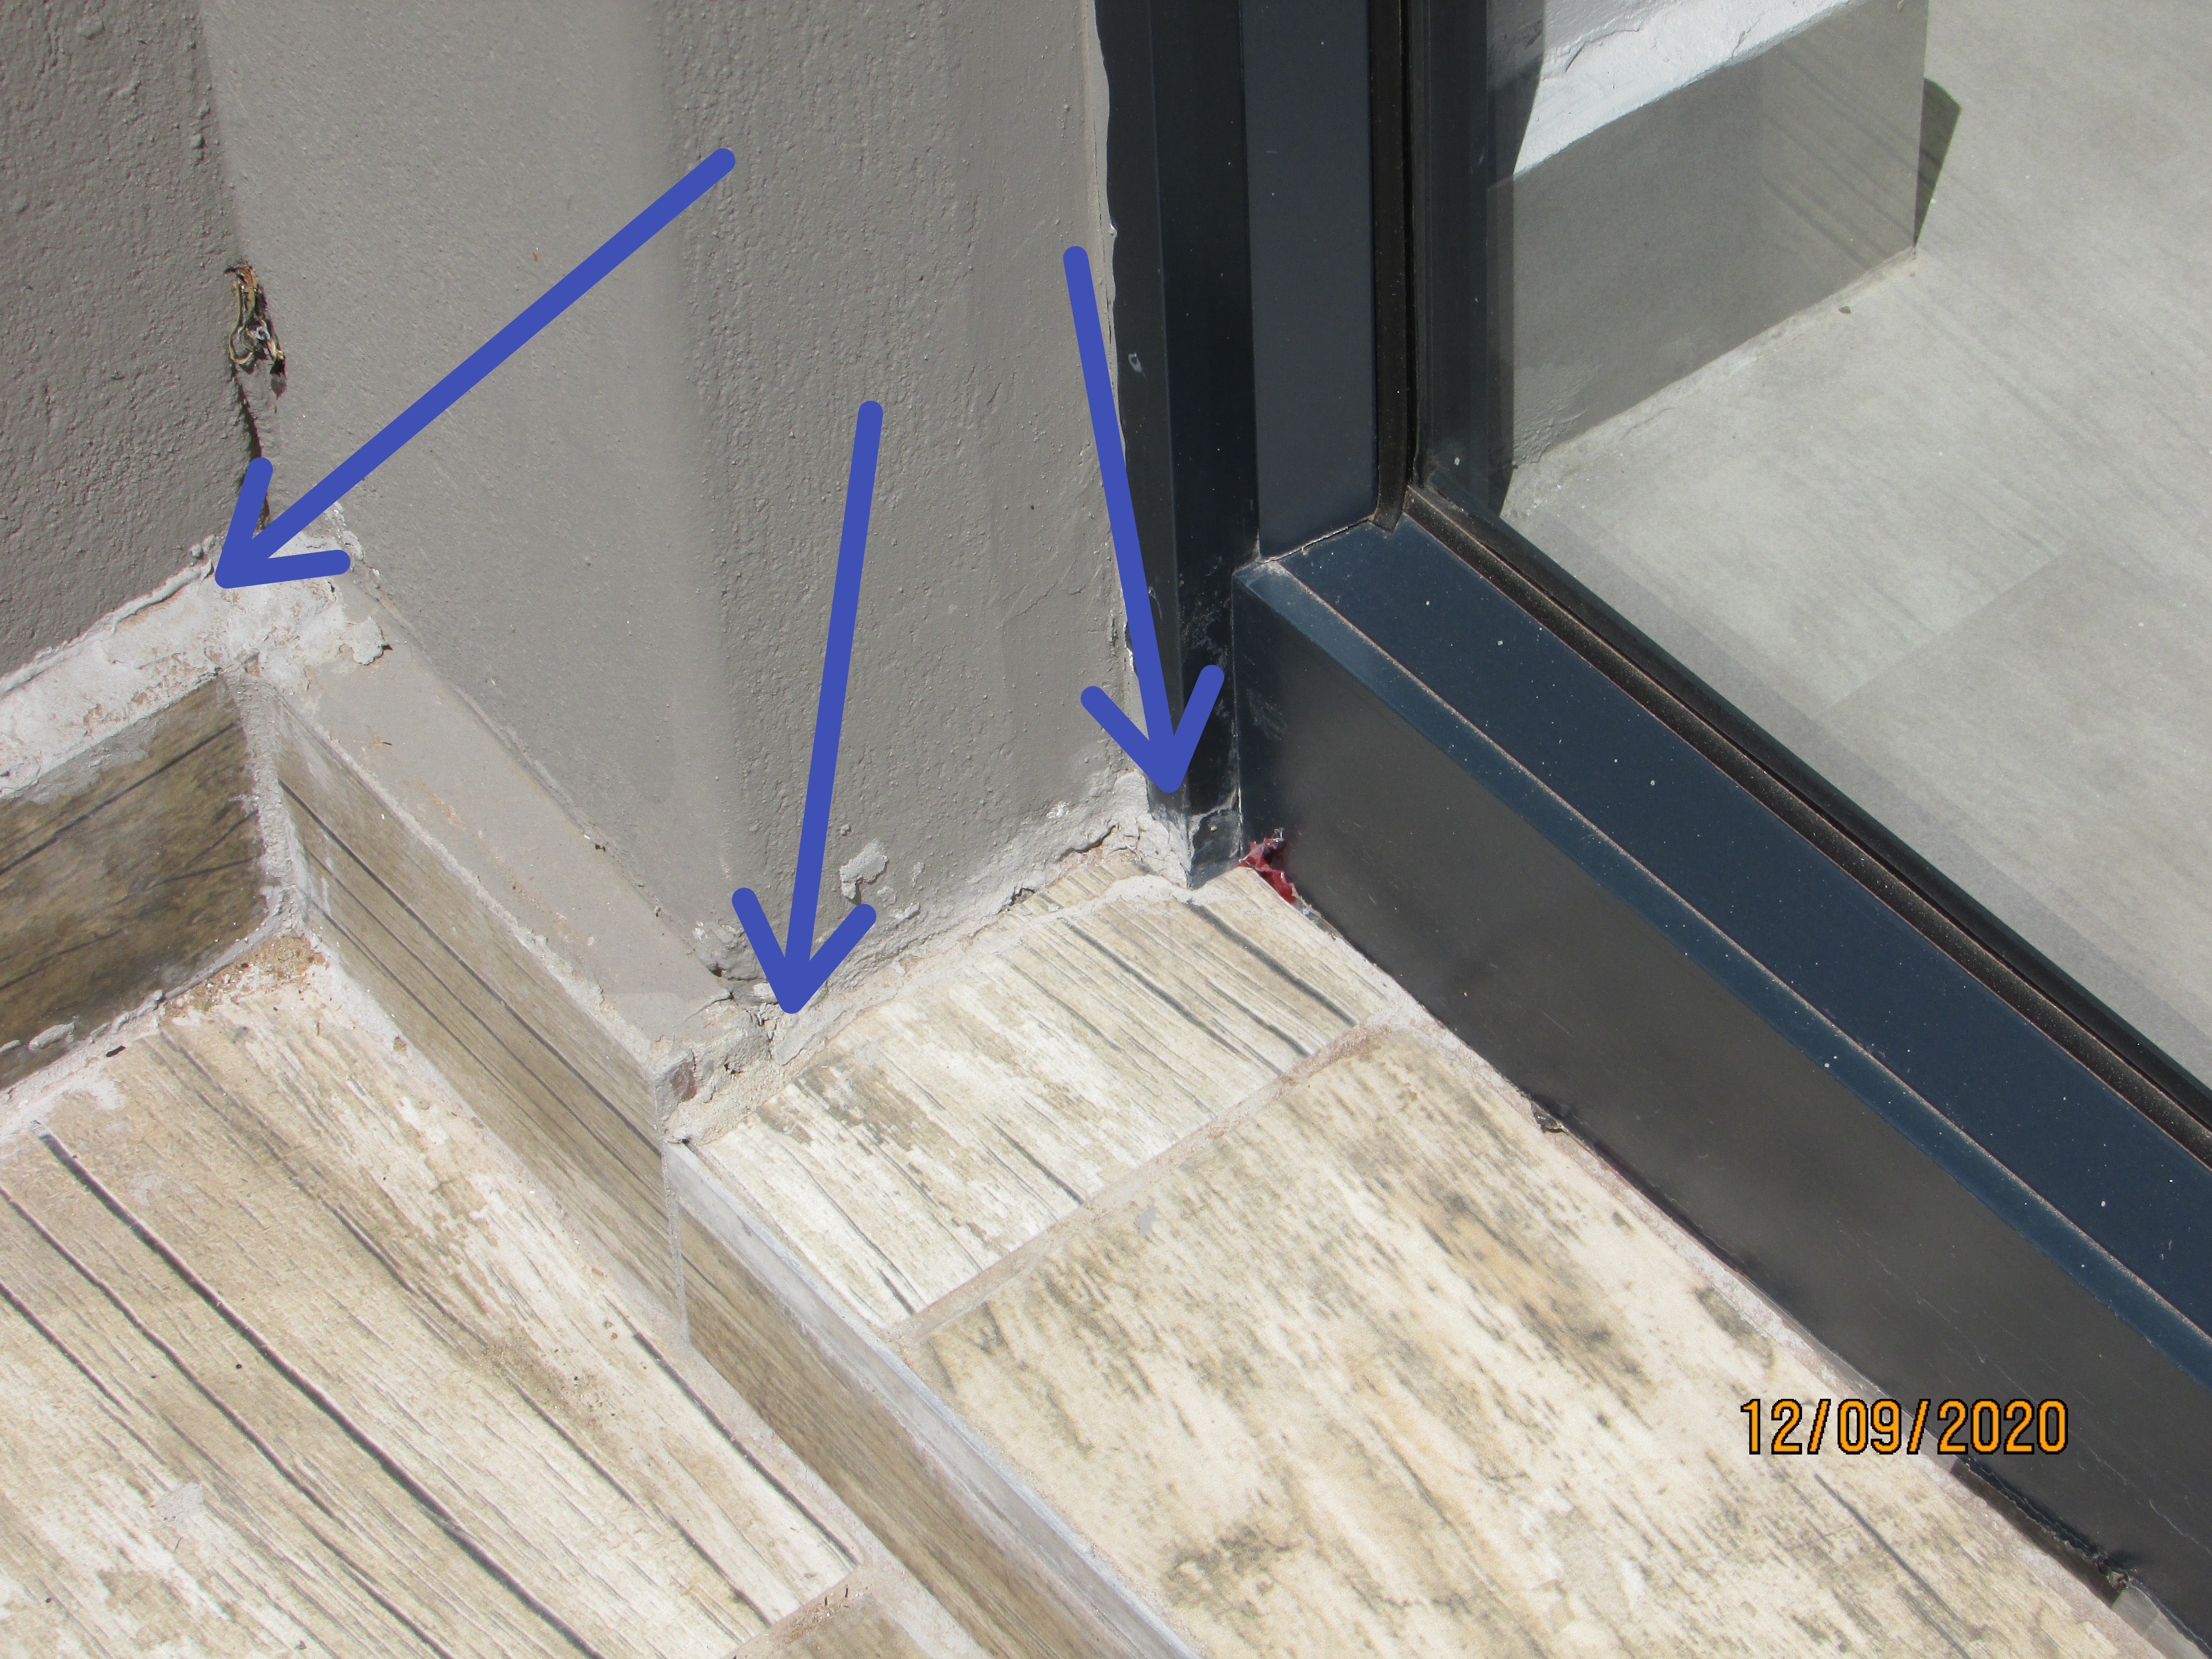
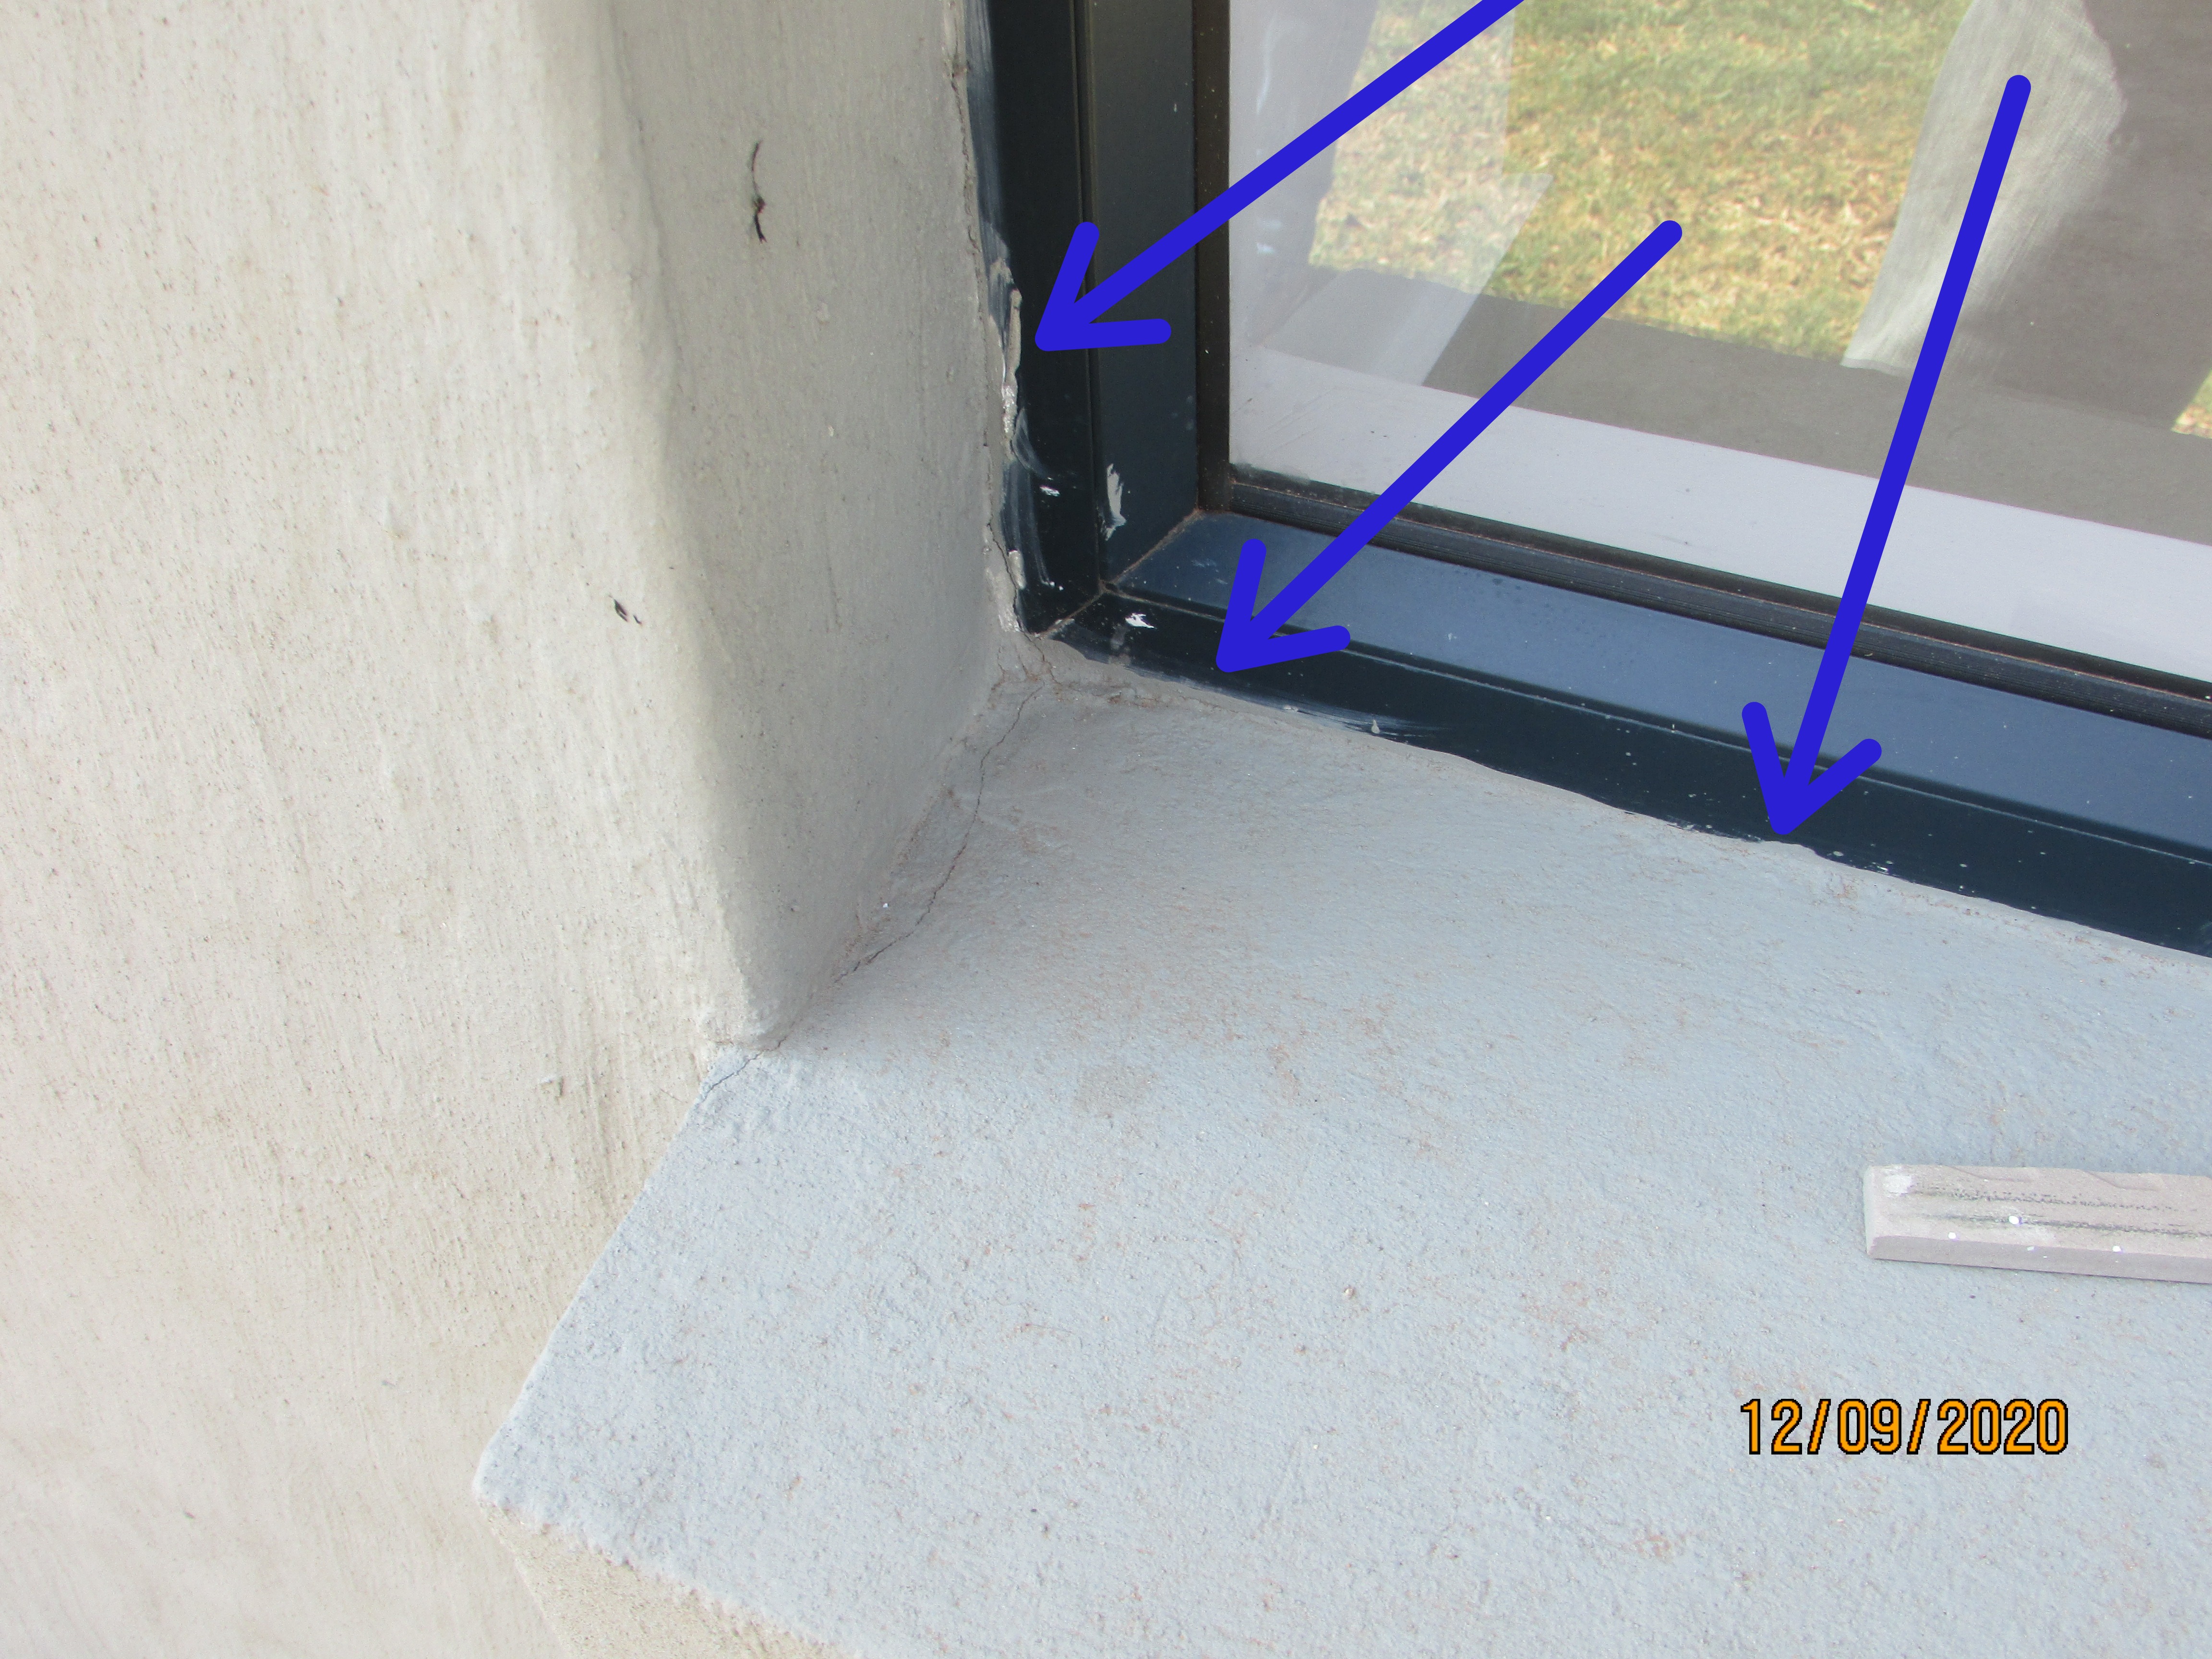

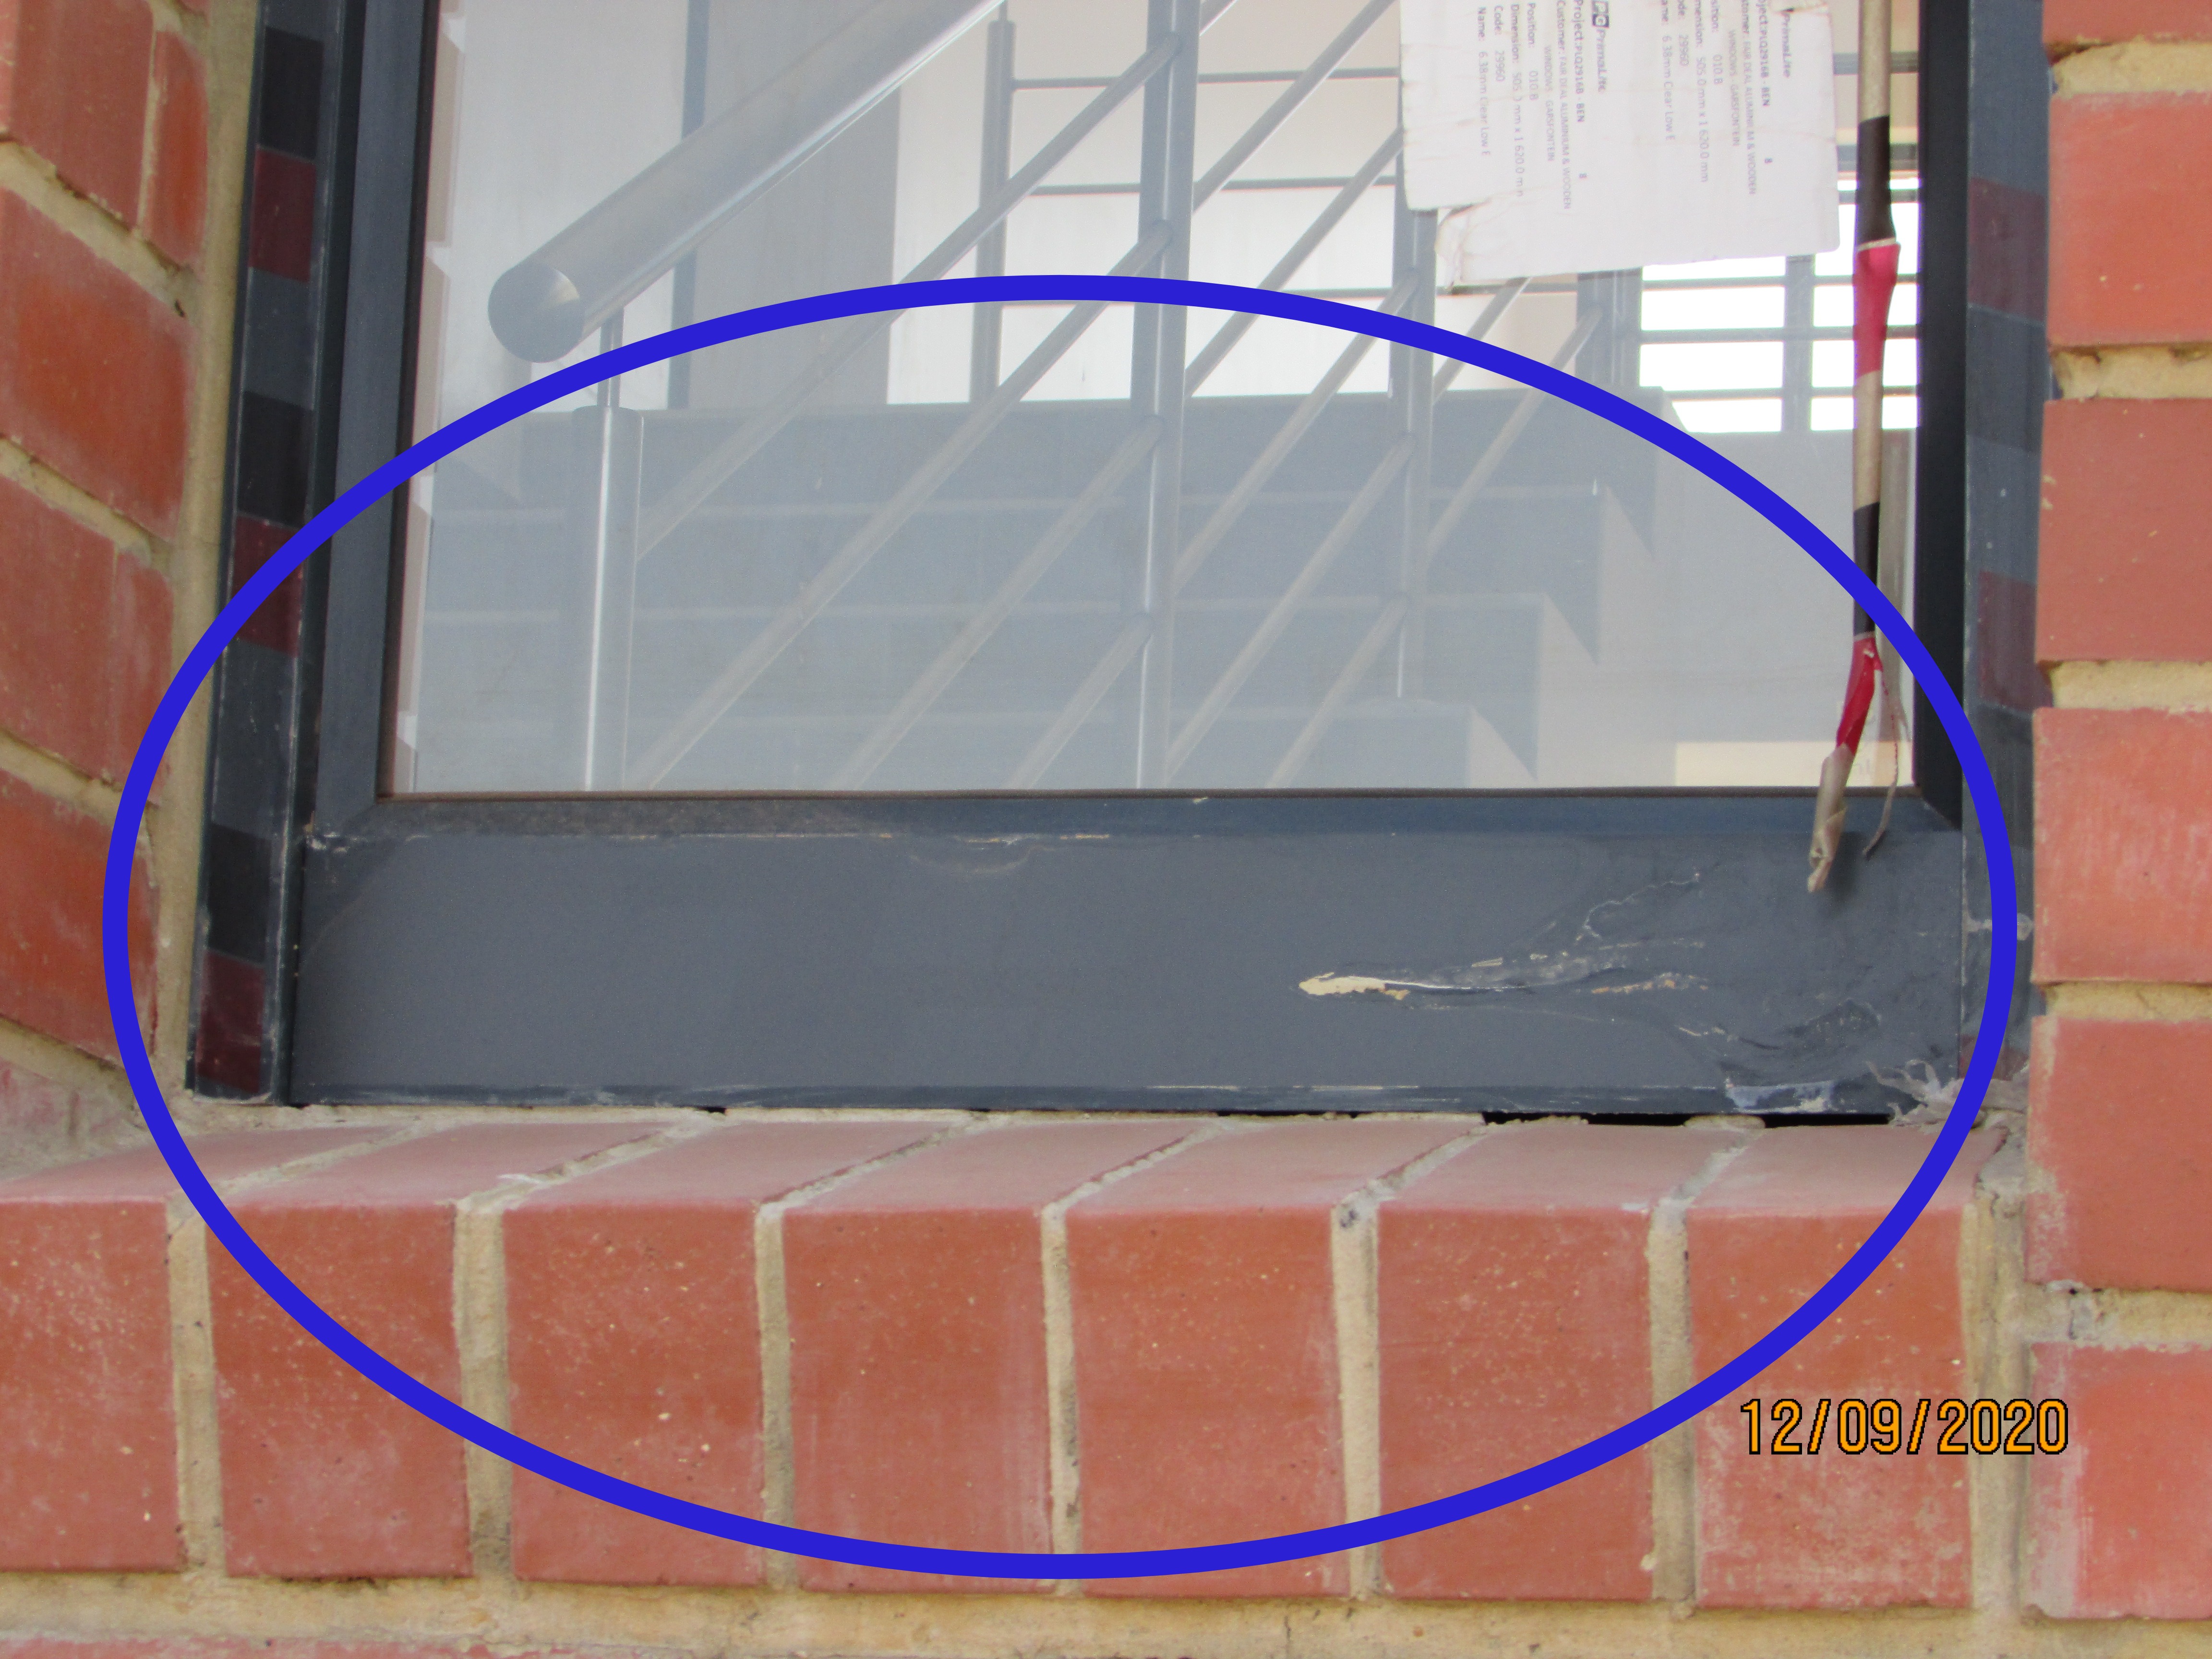
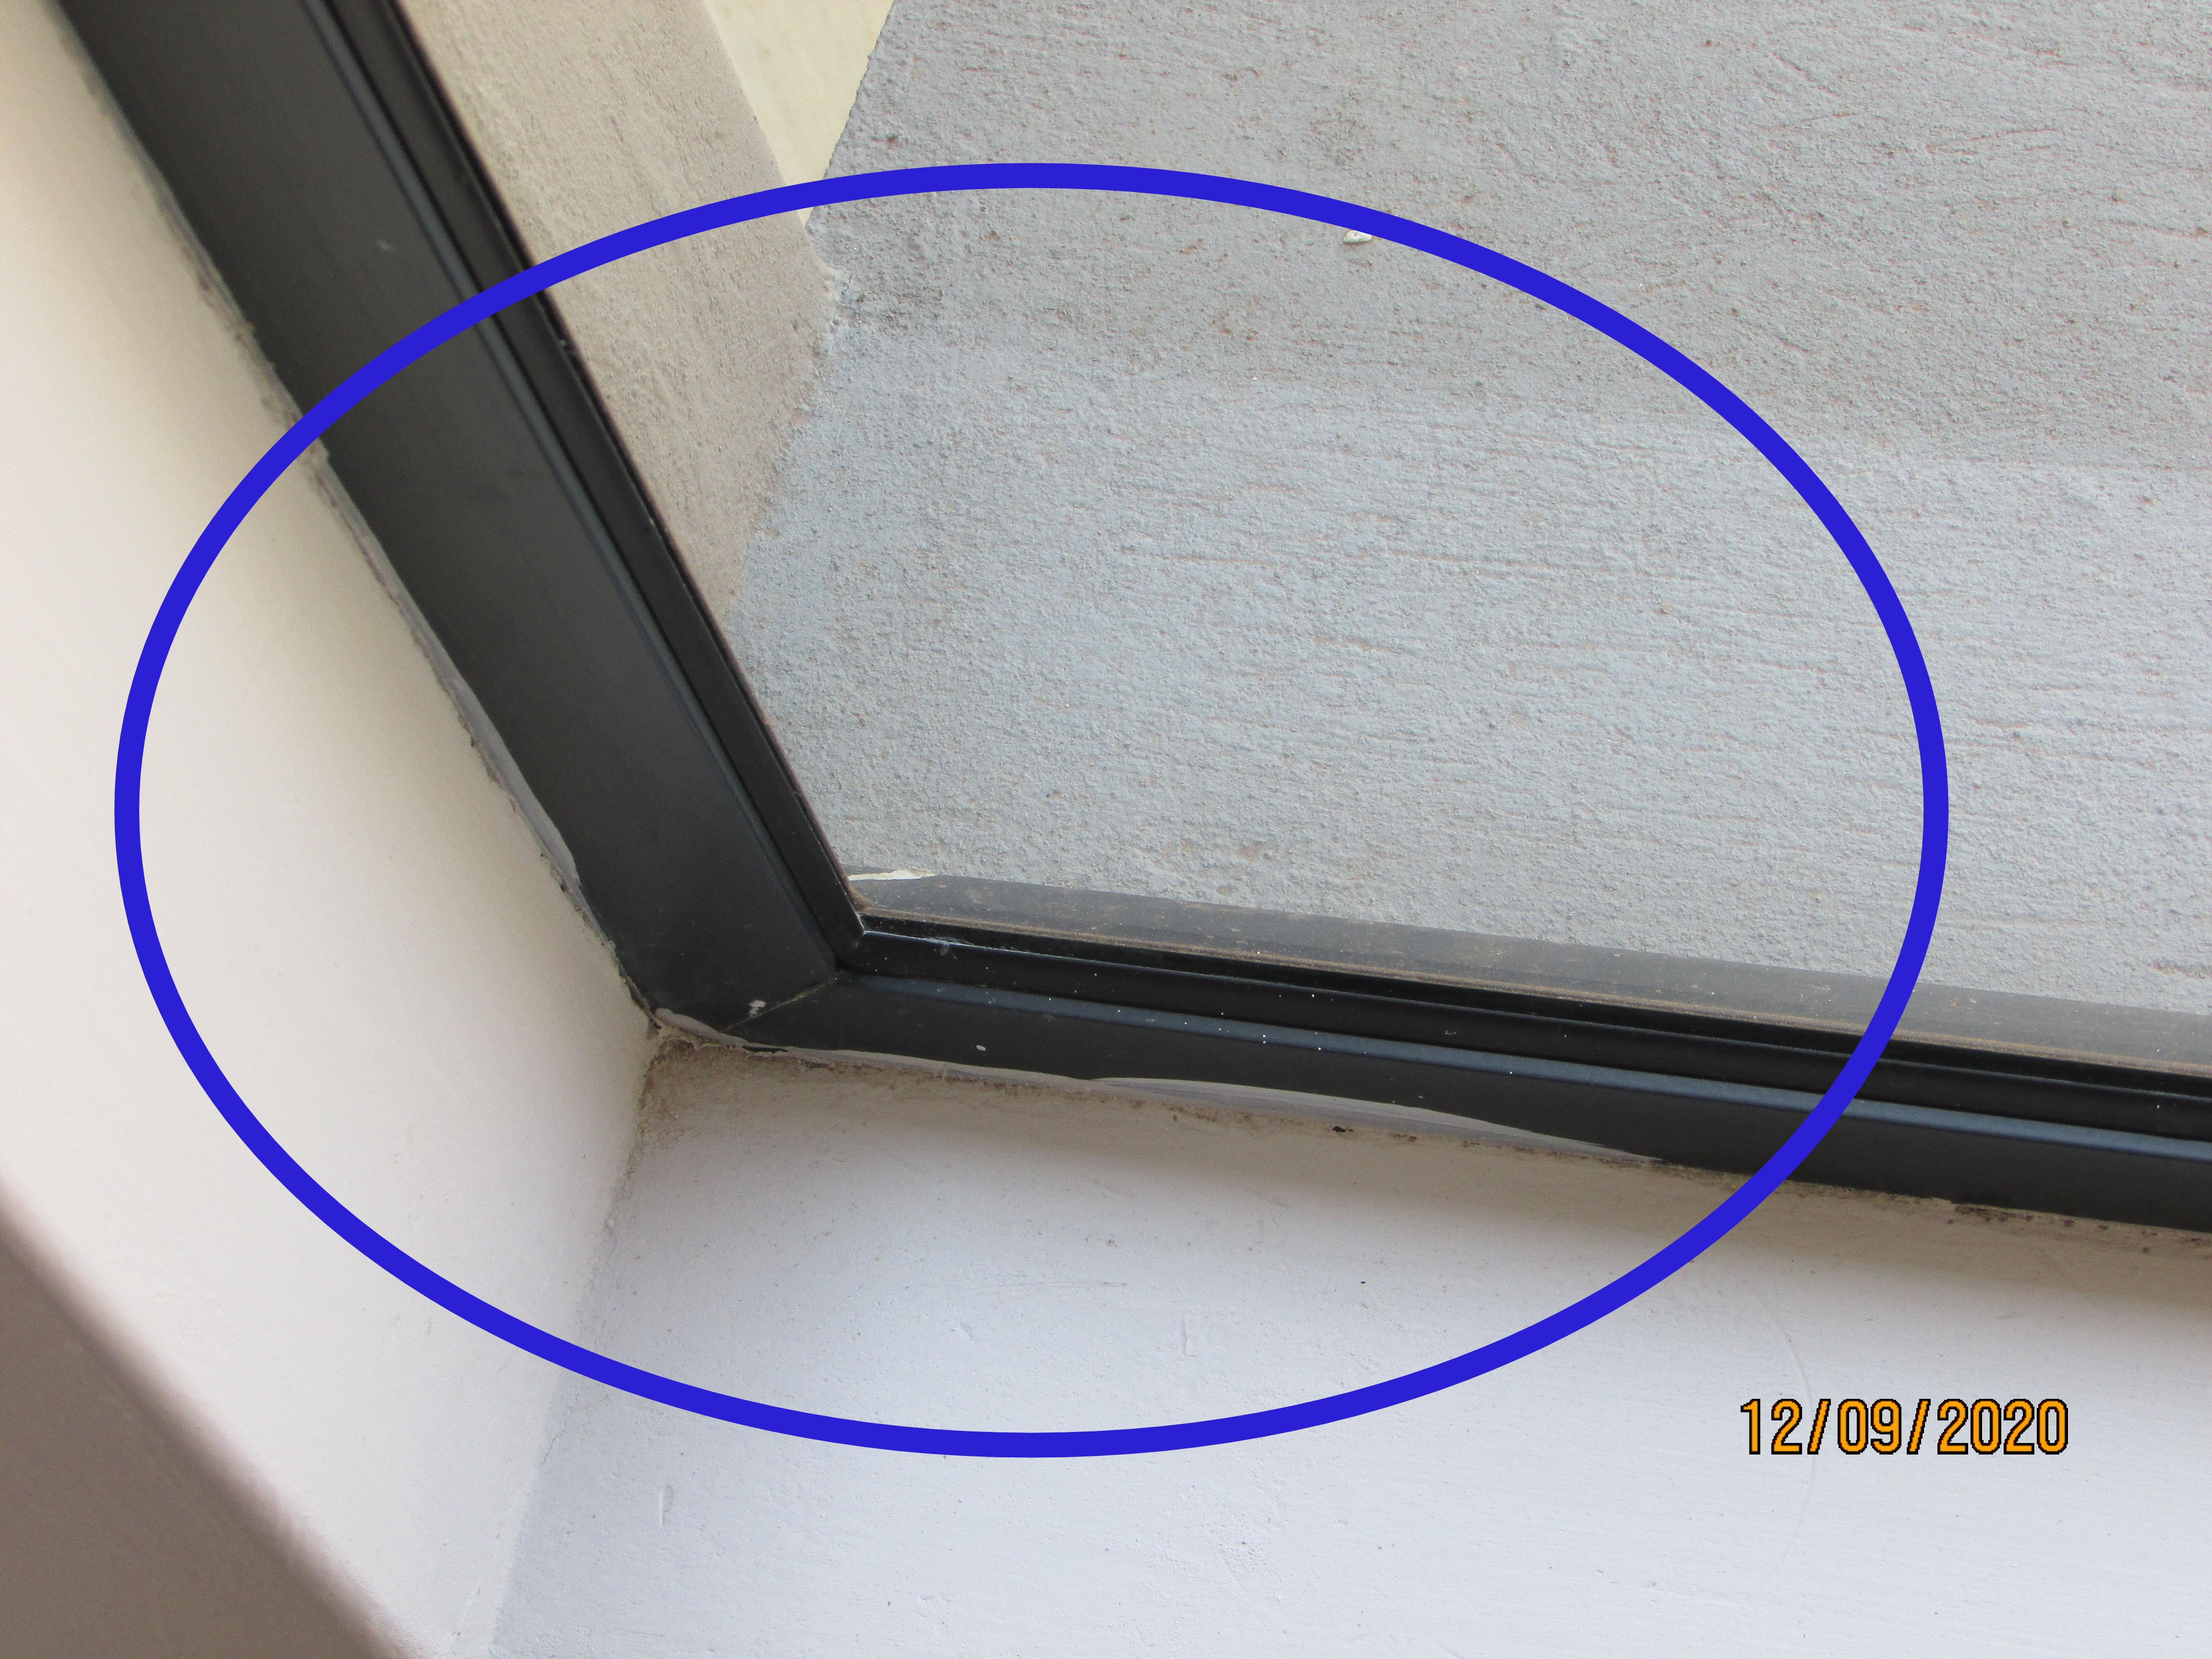
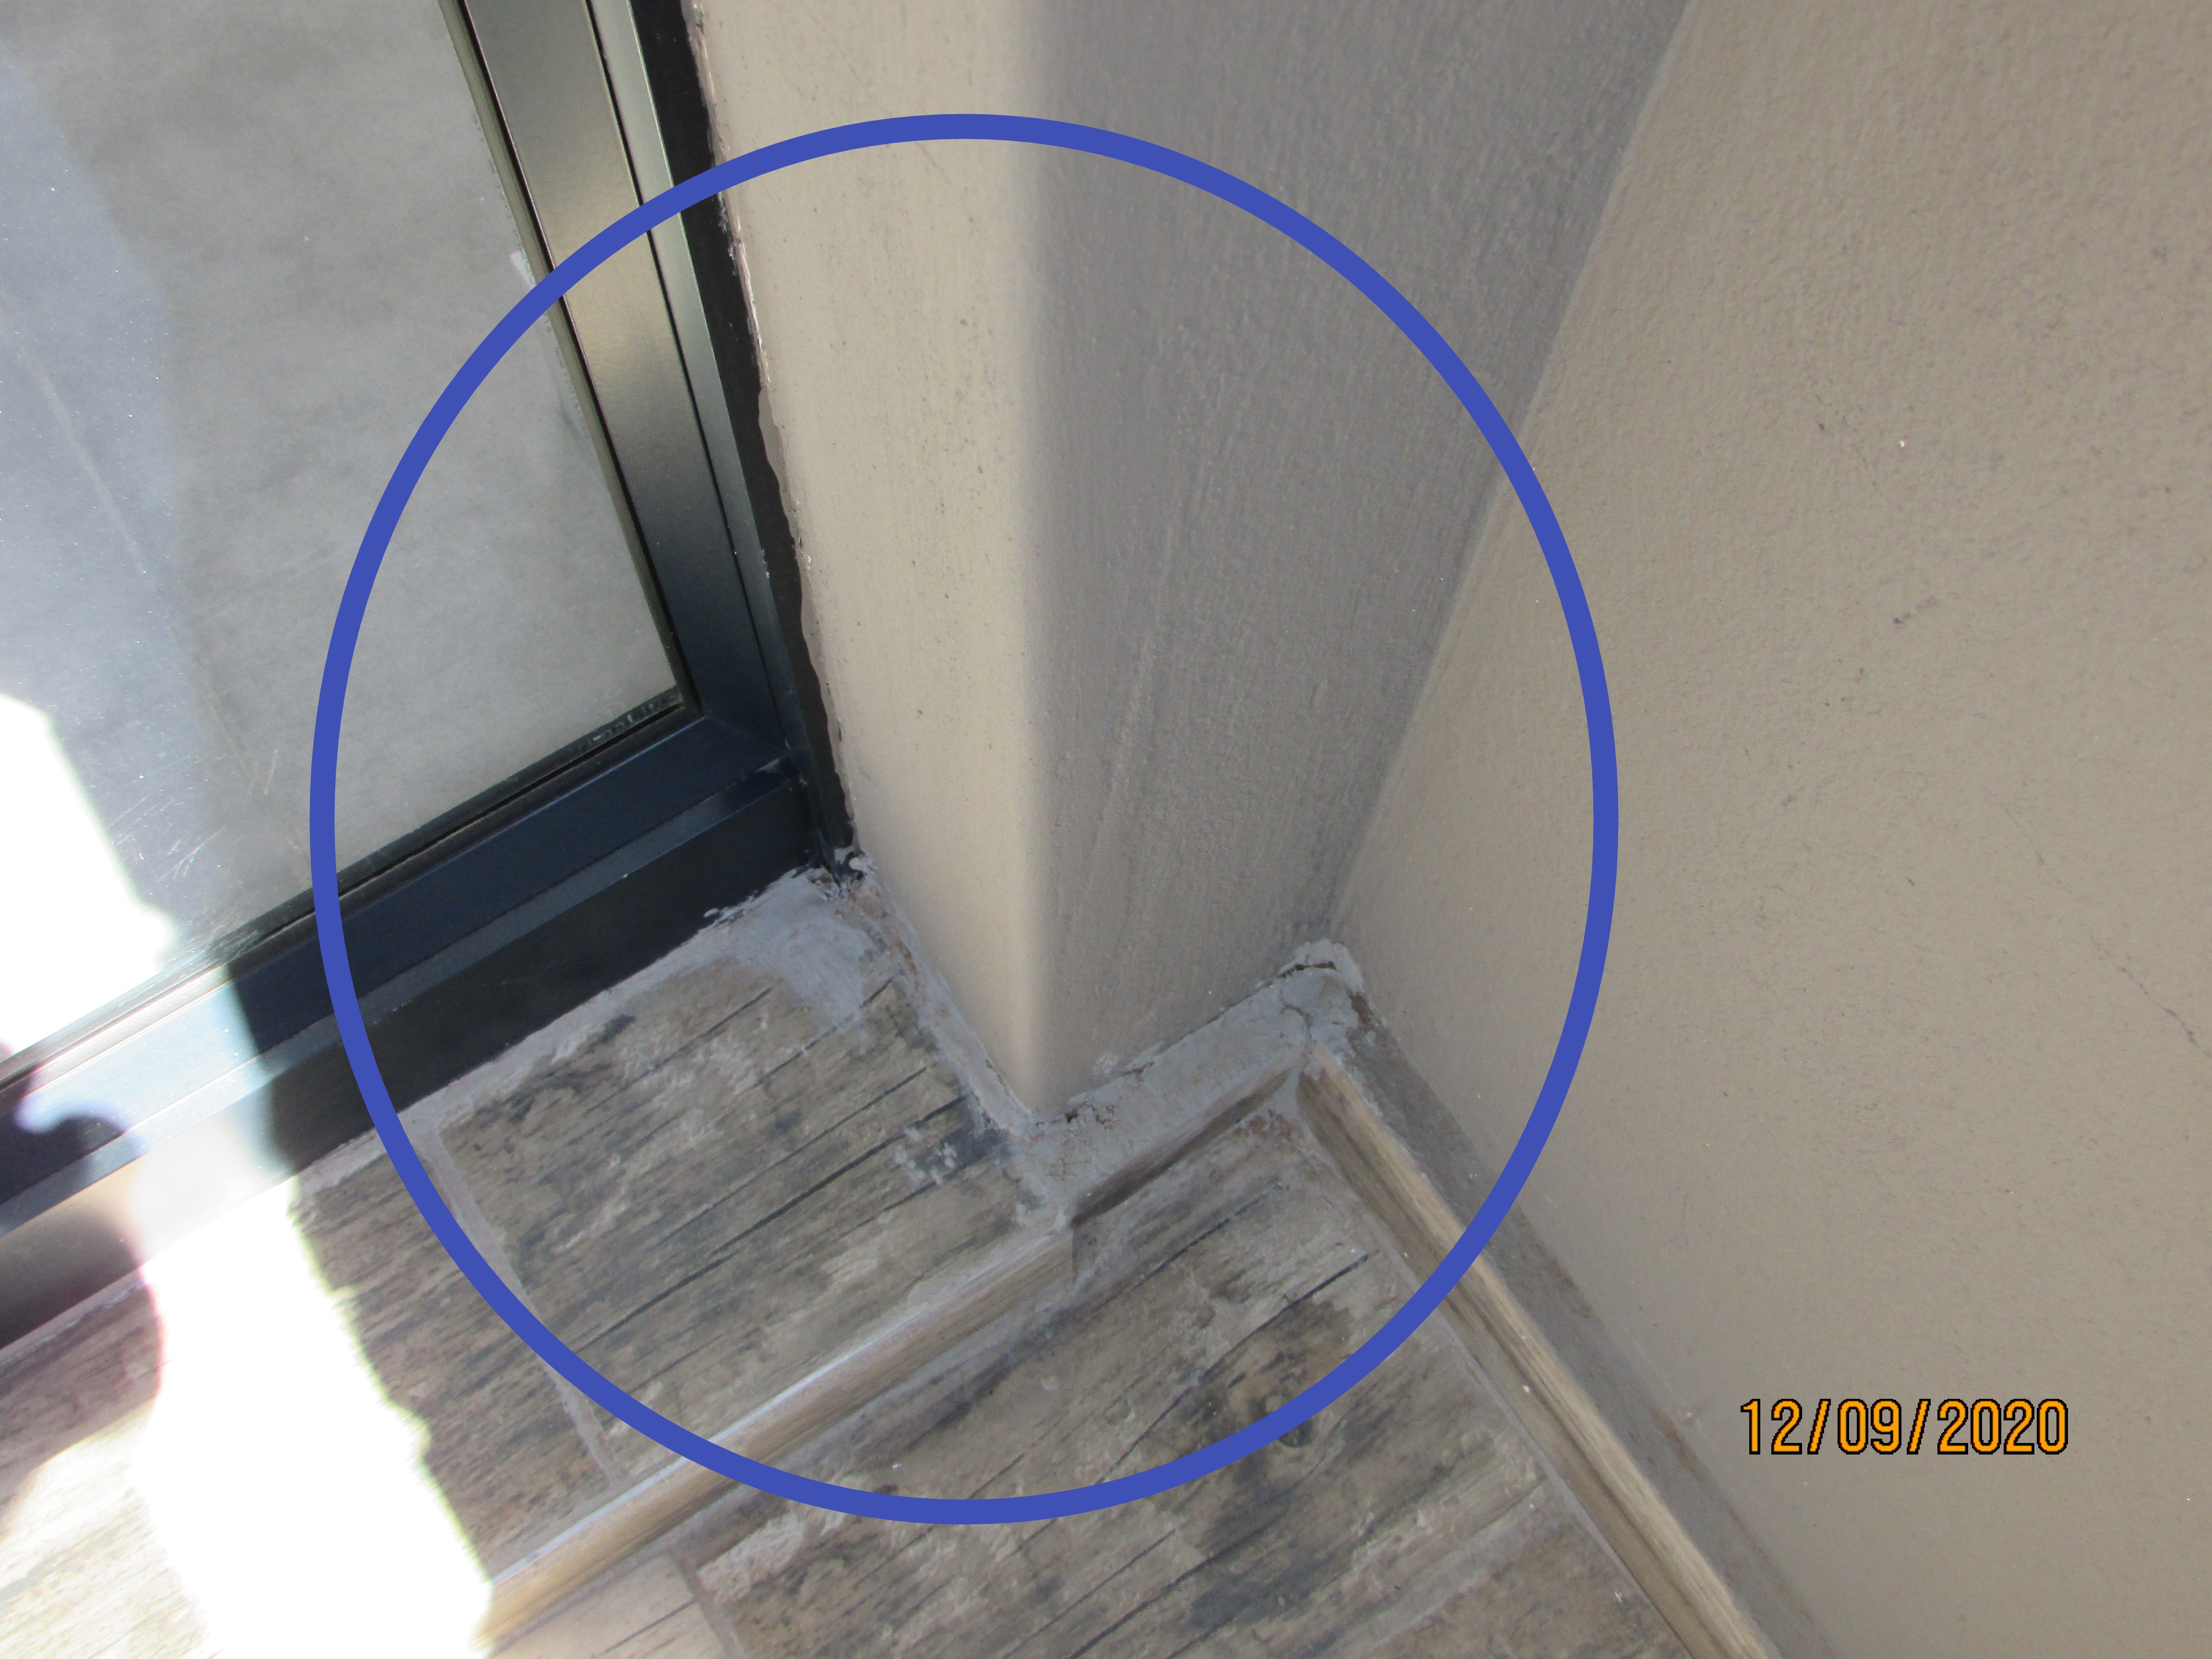
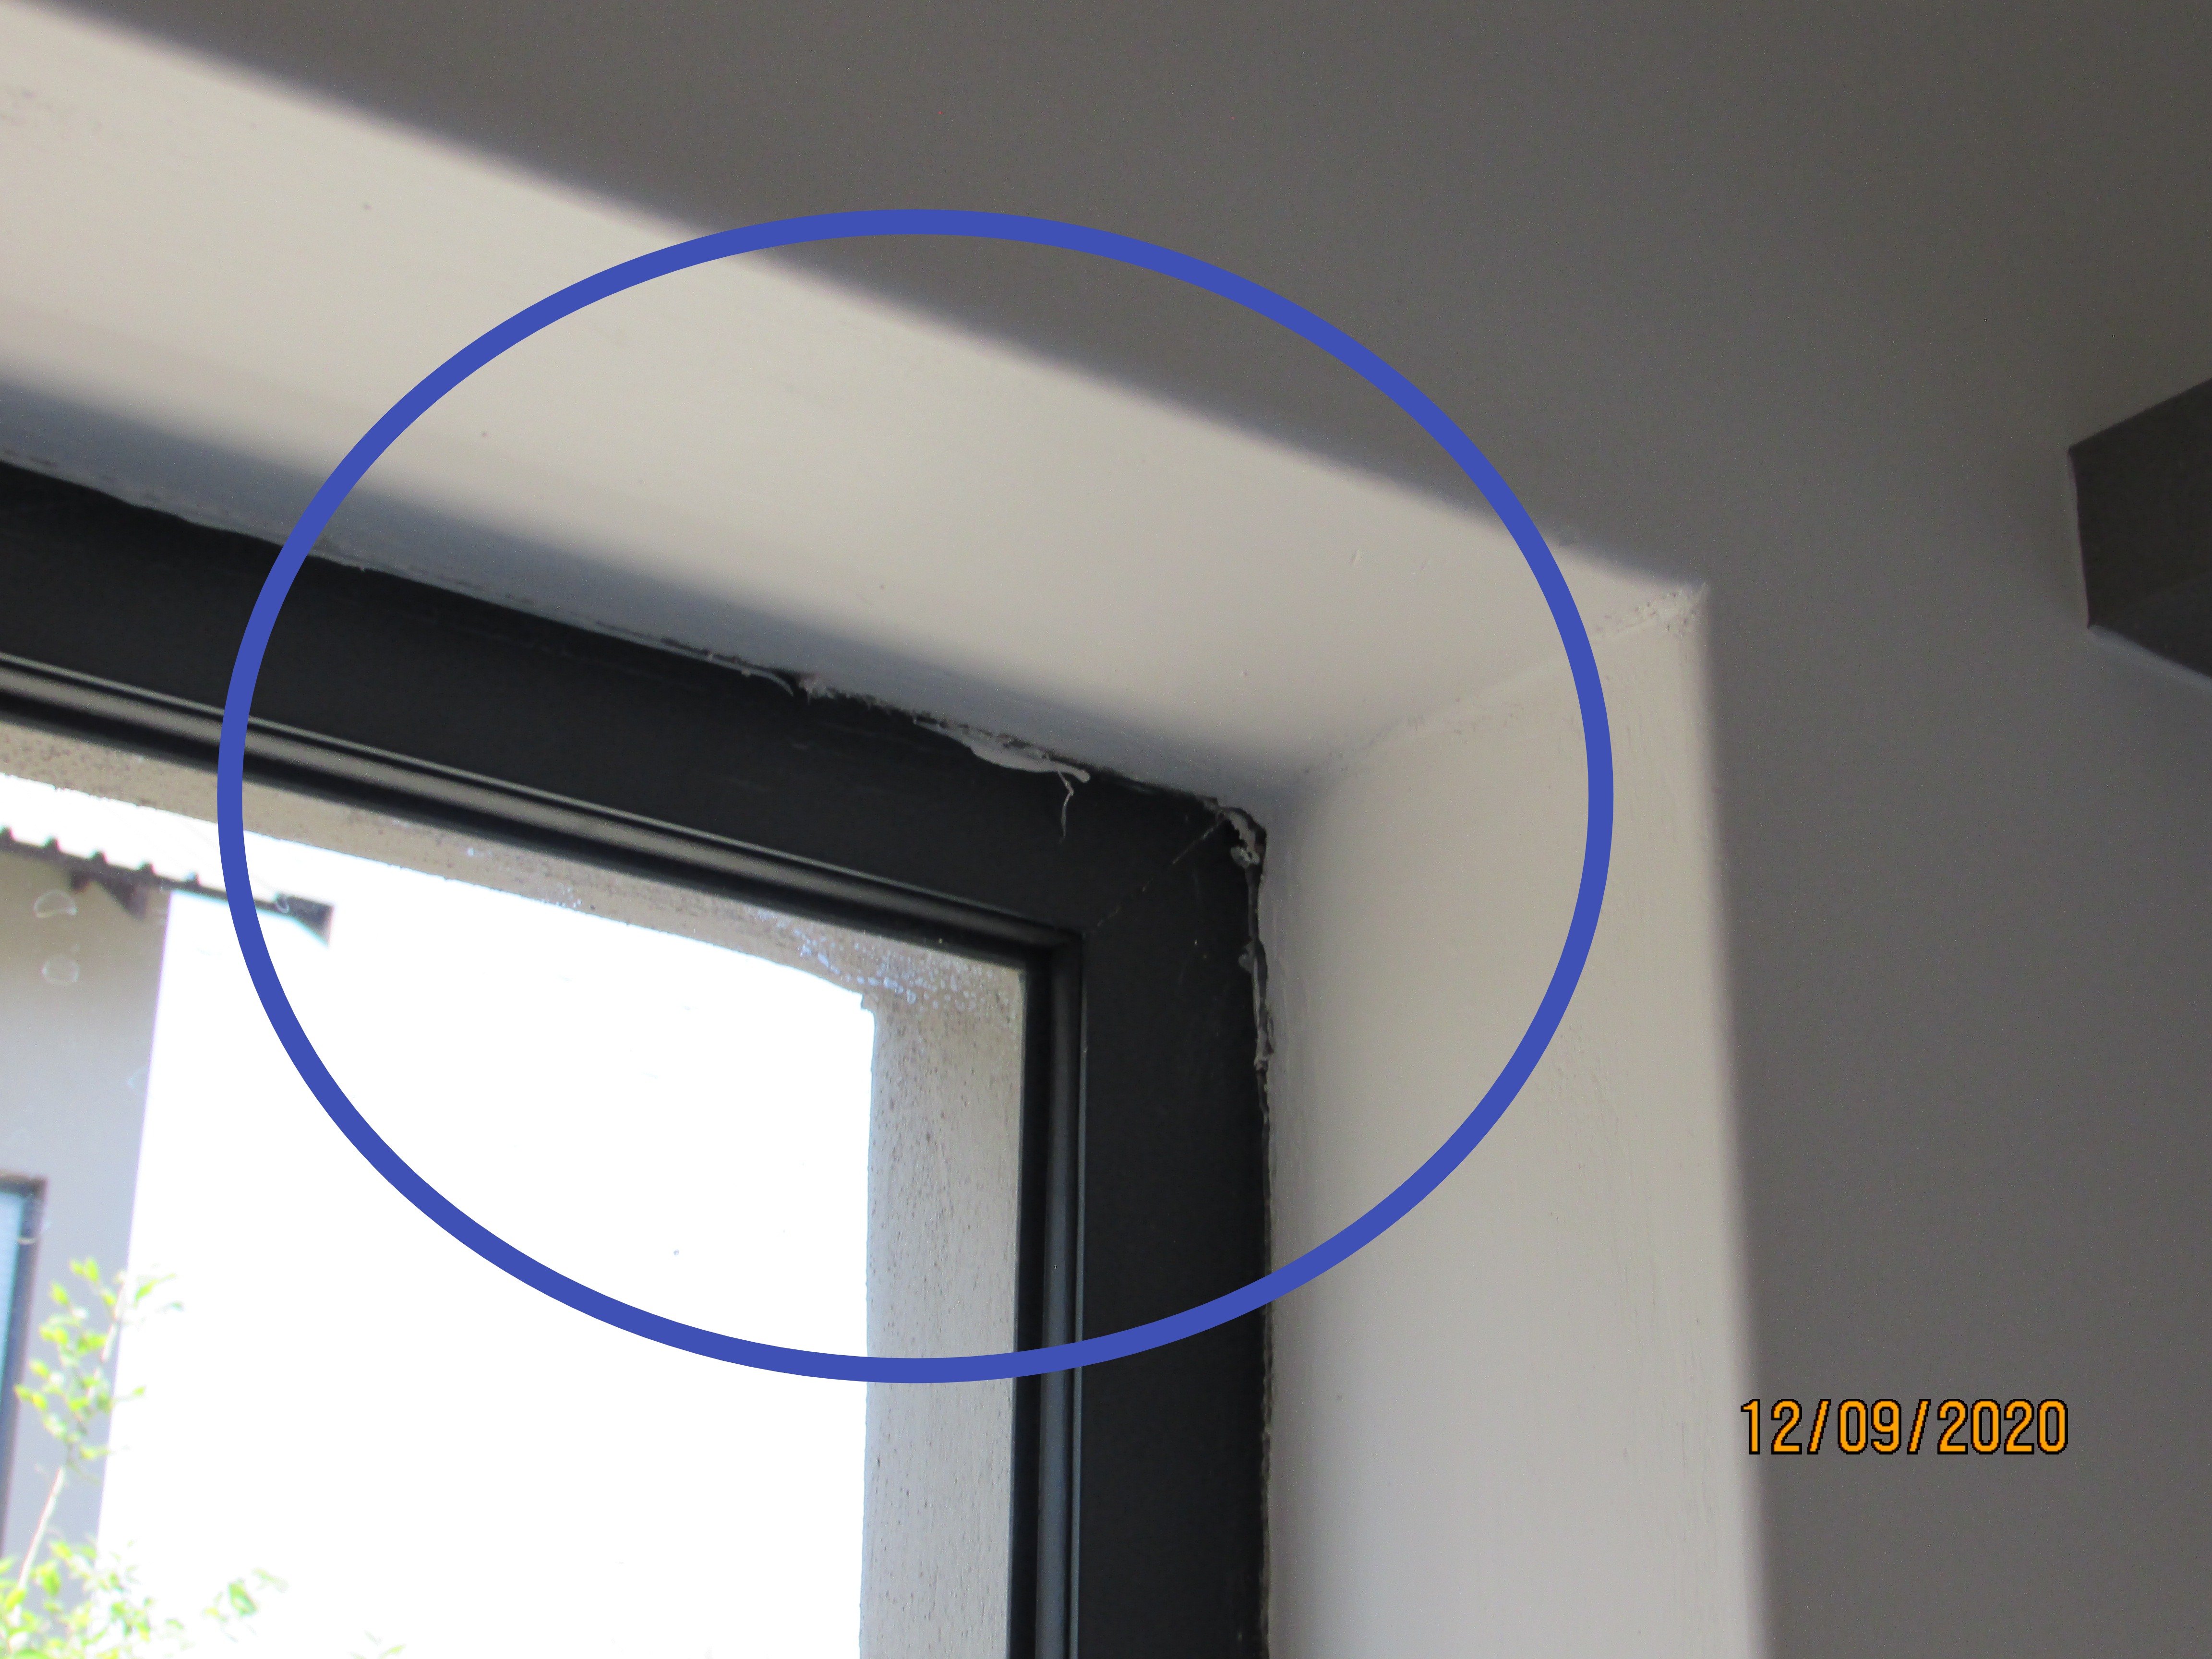
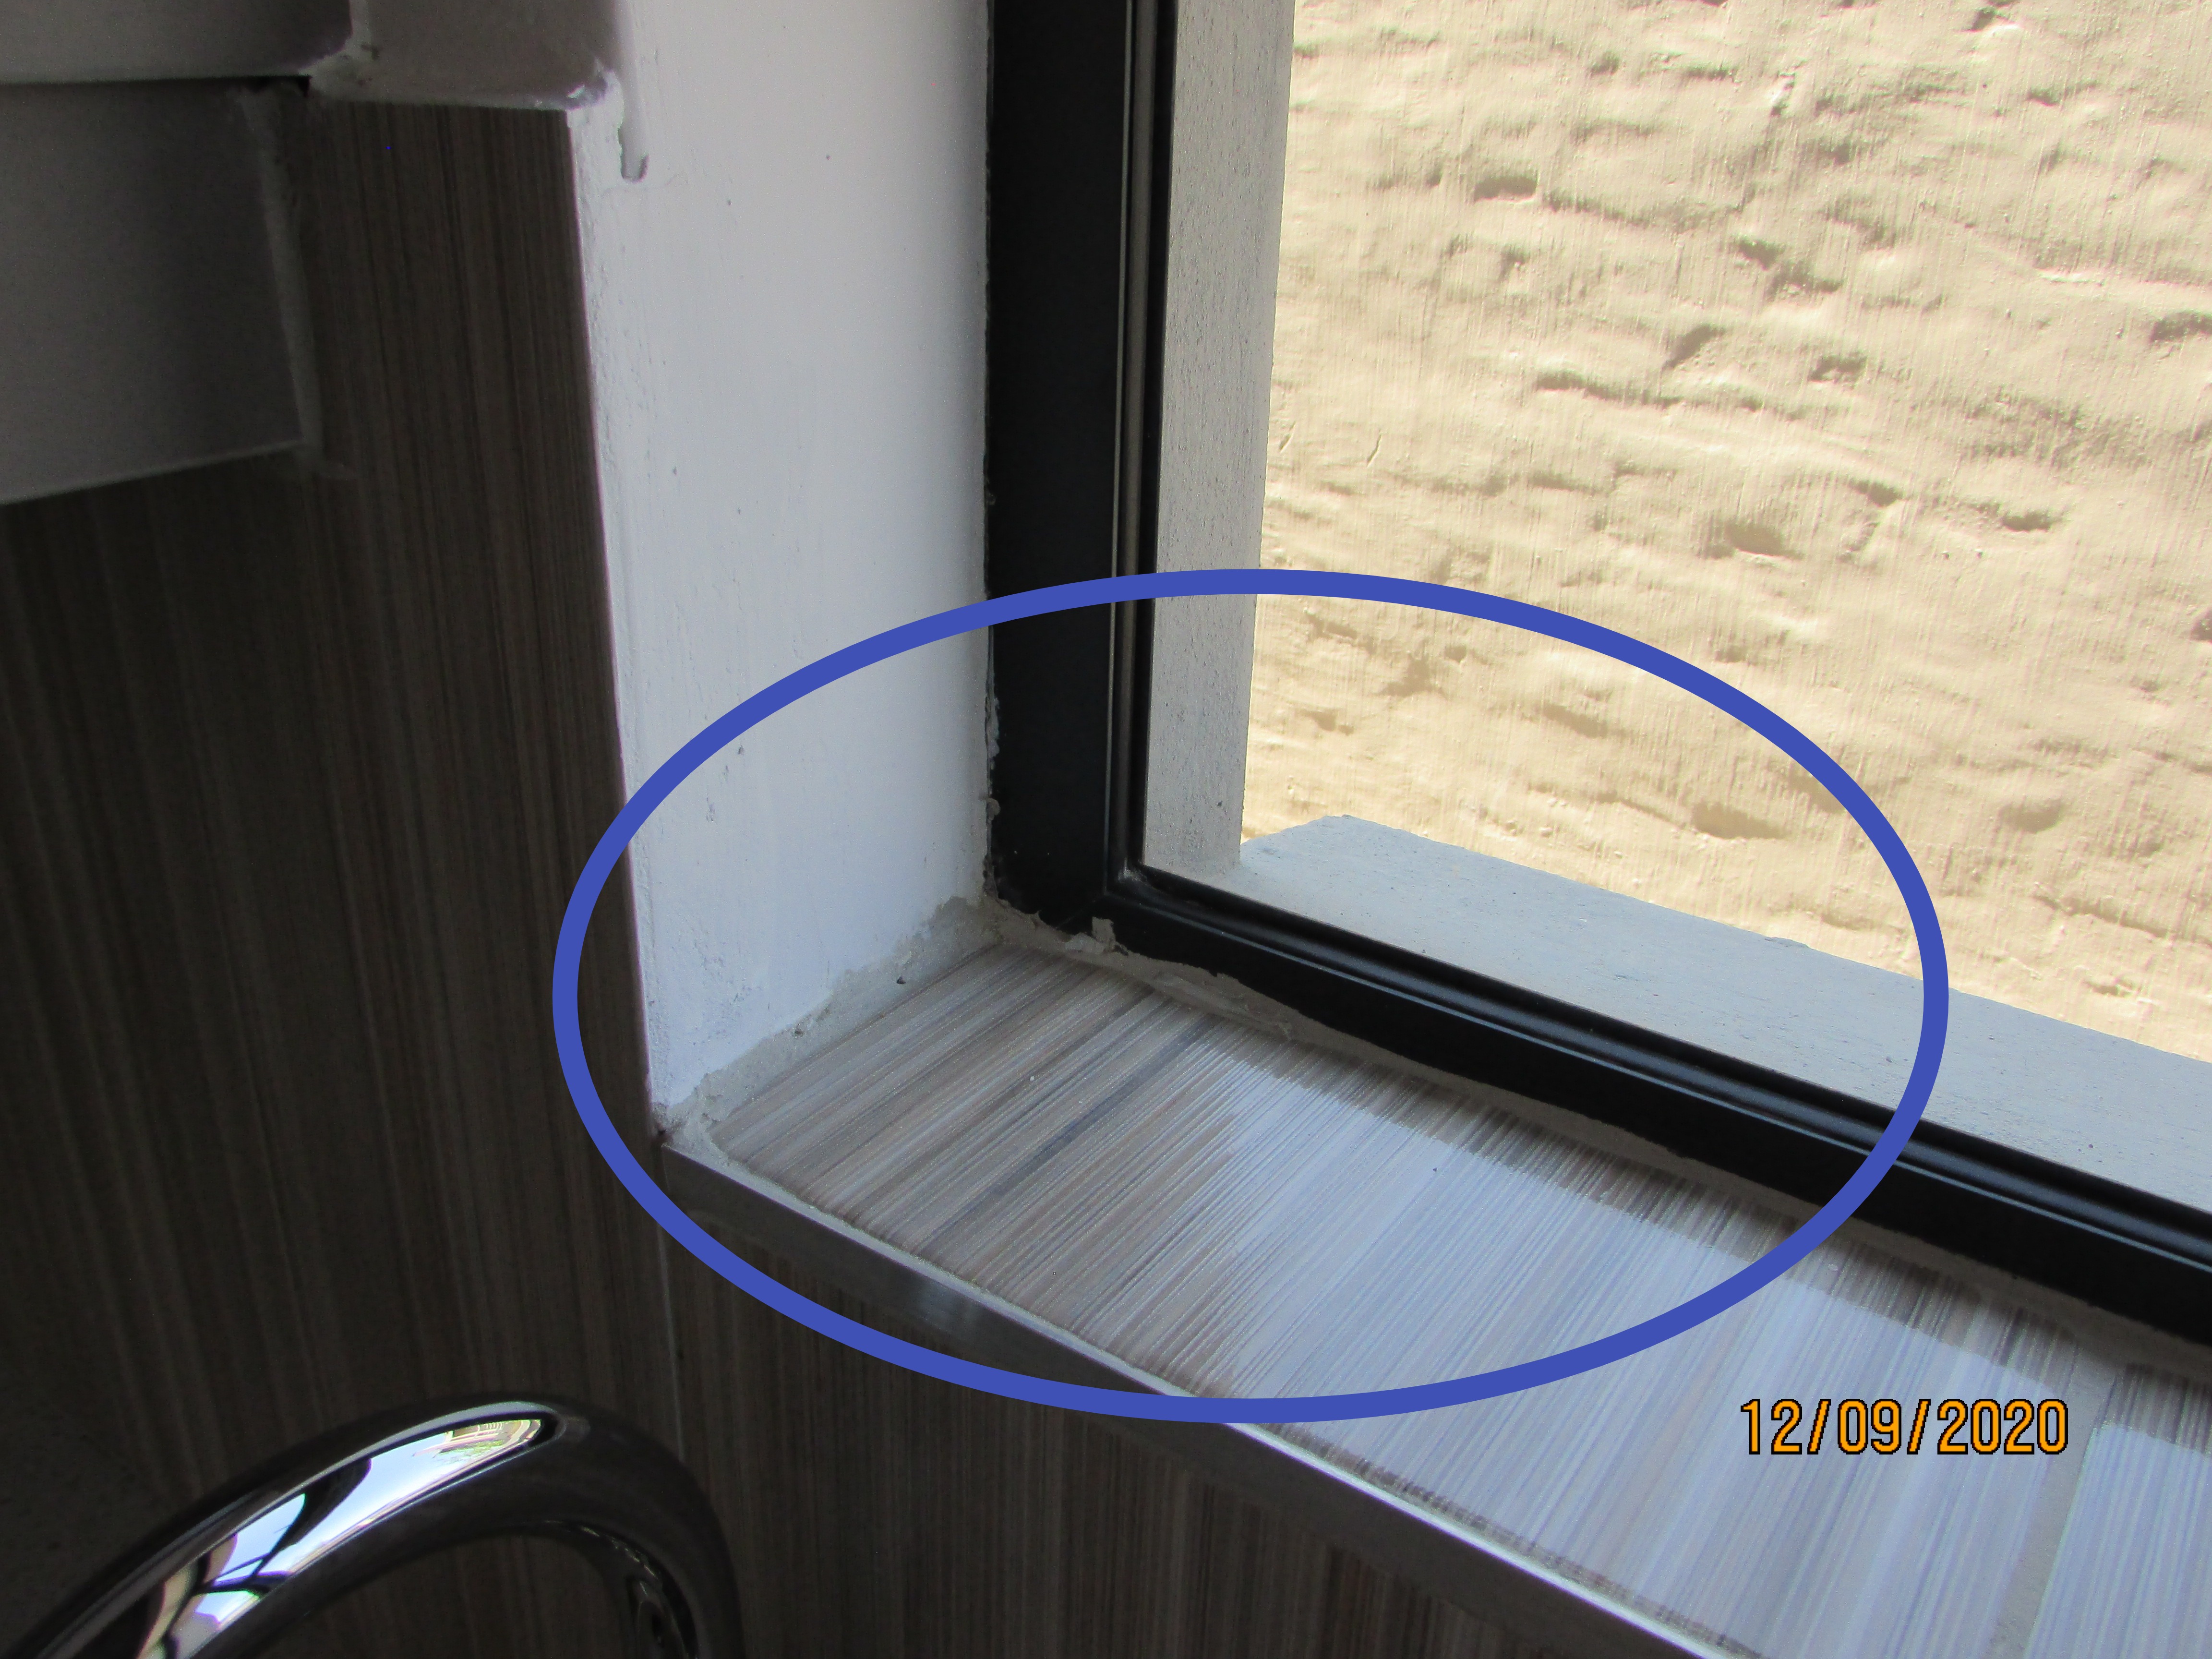
Decks, Patios, Balconies and Verandahs
Verandahs/Patios: Ground floor covered patios
Balconies: 1st floor balconies
Balustrade/Handrails: Balcony (masonry, metal)
Decking/Floor Material: Tiles
I could not ascertain if the waterproofing of the balcony floors under the tiling had been done. Because the balconies are exposed to the elements, the balcony floors should be waterproofed and the waterproofing should also have been taken onto the side of the perimeter walls. If the balcony floors were waterproofed, the waterproofing would have been taken into the opening of the concealed downpipes. However, I could not check this because of the drain cover had been sealed onto the top of the drain. Have the developer supply a 5 year guarantee for the waterproofing under the tiling of the balconies. See attached waterproofing details from Building Regulation SANS 10400-L 201.
.jpg) | 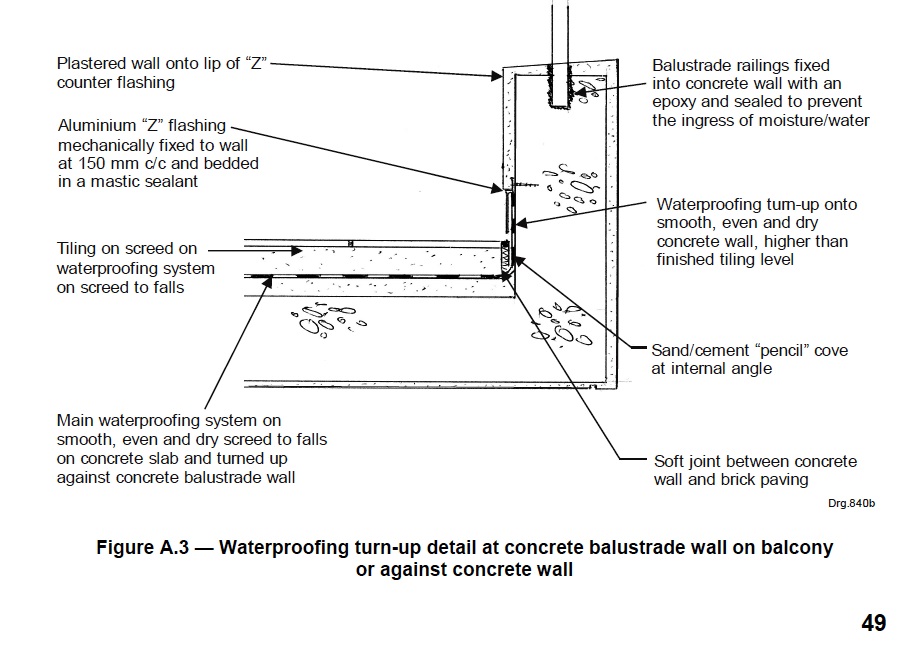 |
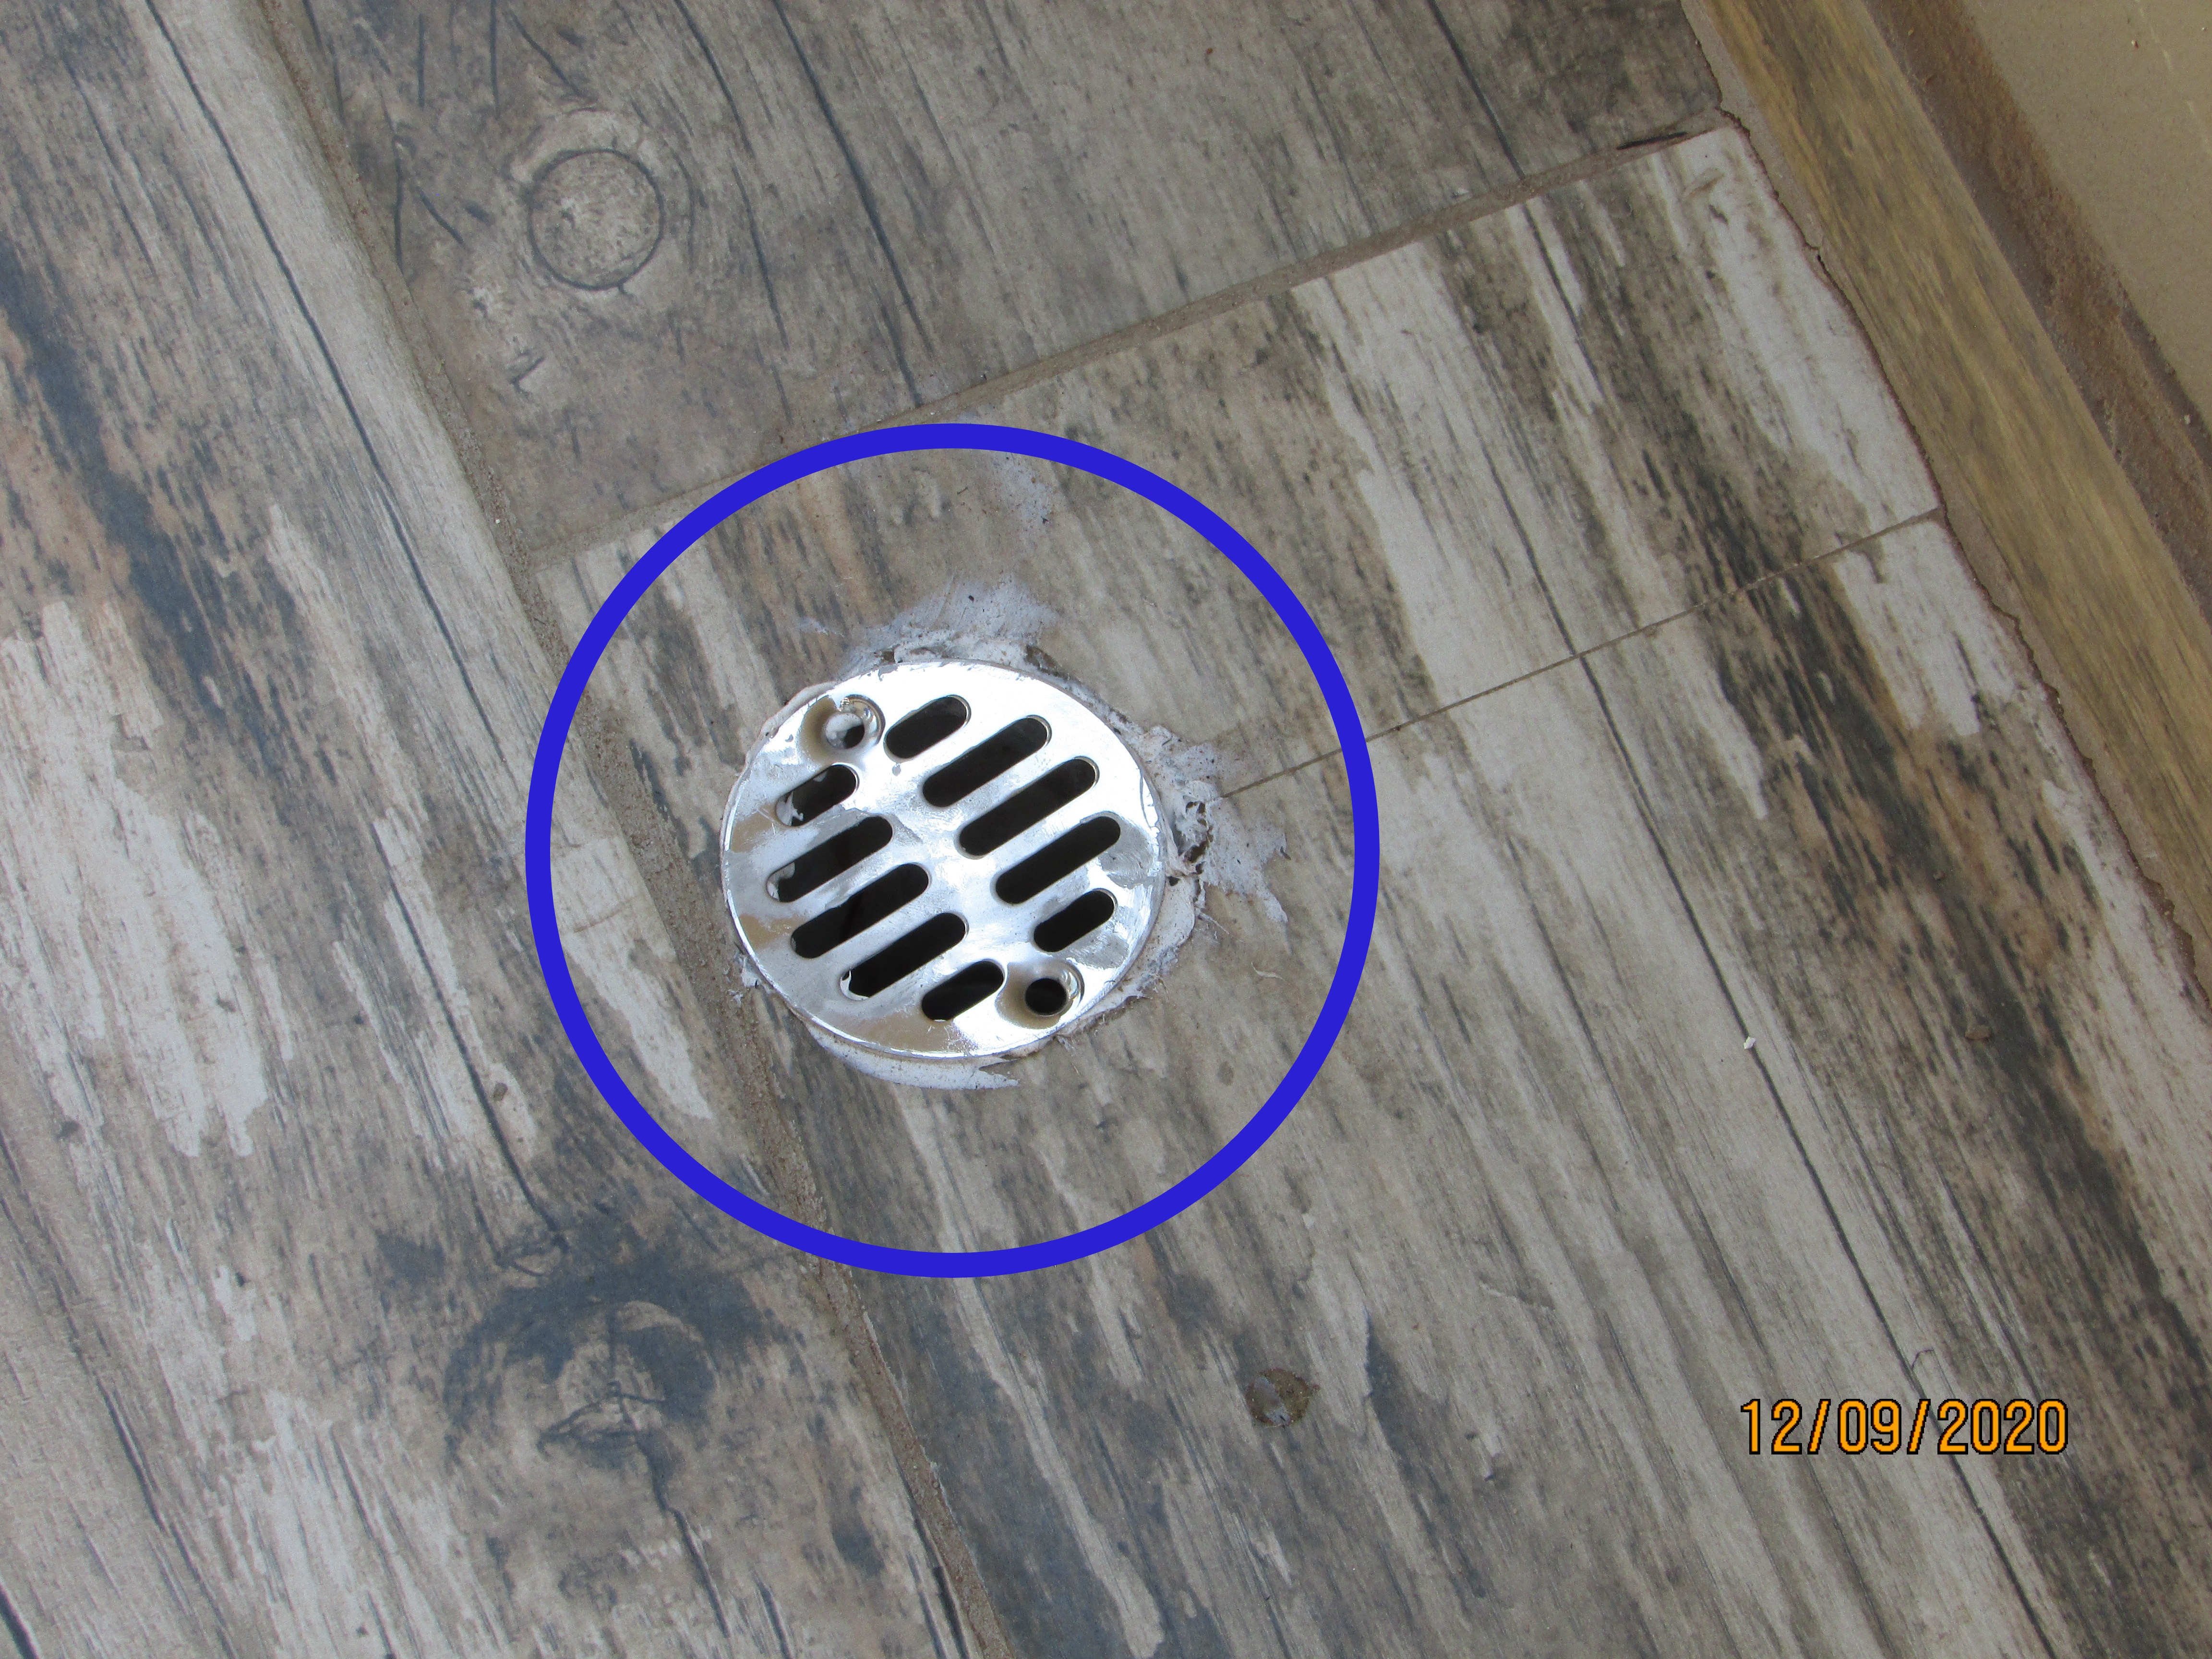 |
The brick and stainless steel balustrades on both balconies were functional. Exceptions and addition items are specifically listed.
The balustrade posts required sealing on top of the parapet dwarf wall at bedroom 1 and 2 to prevent moisture intrusion into the wall and balcony slab.
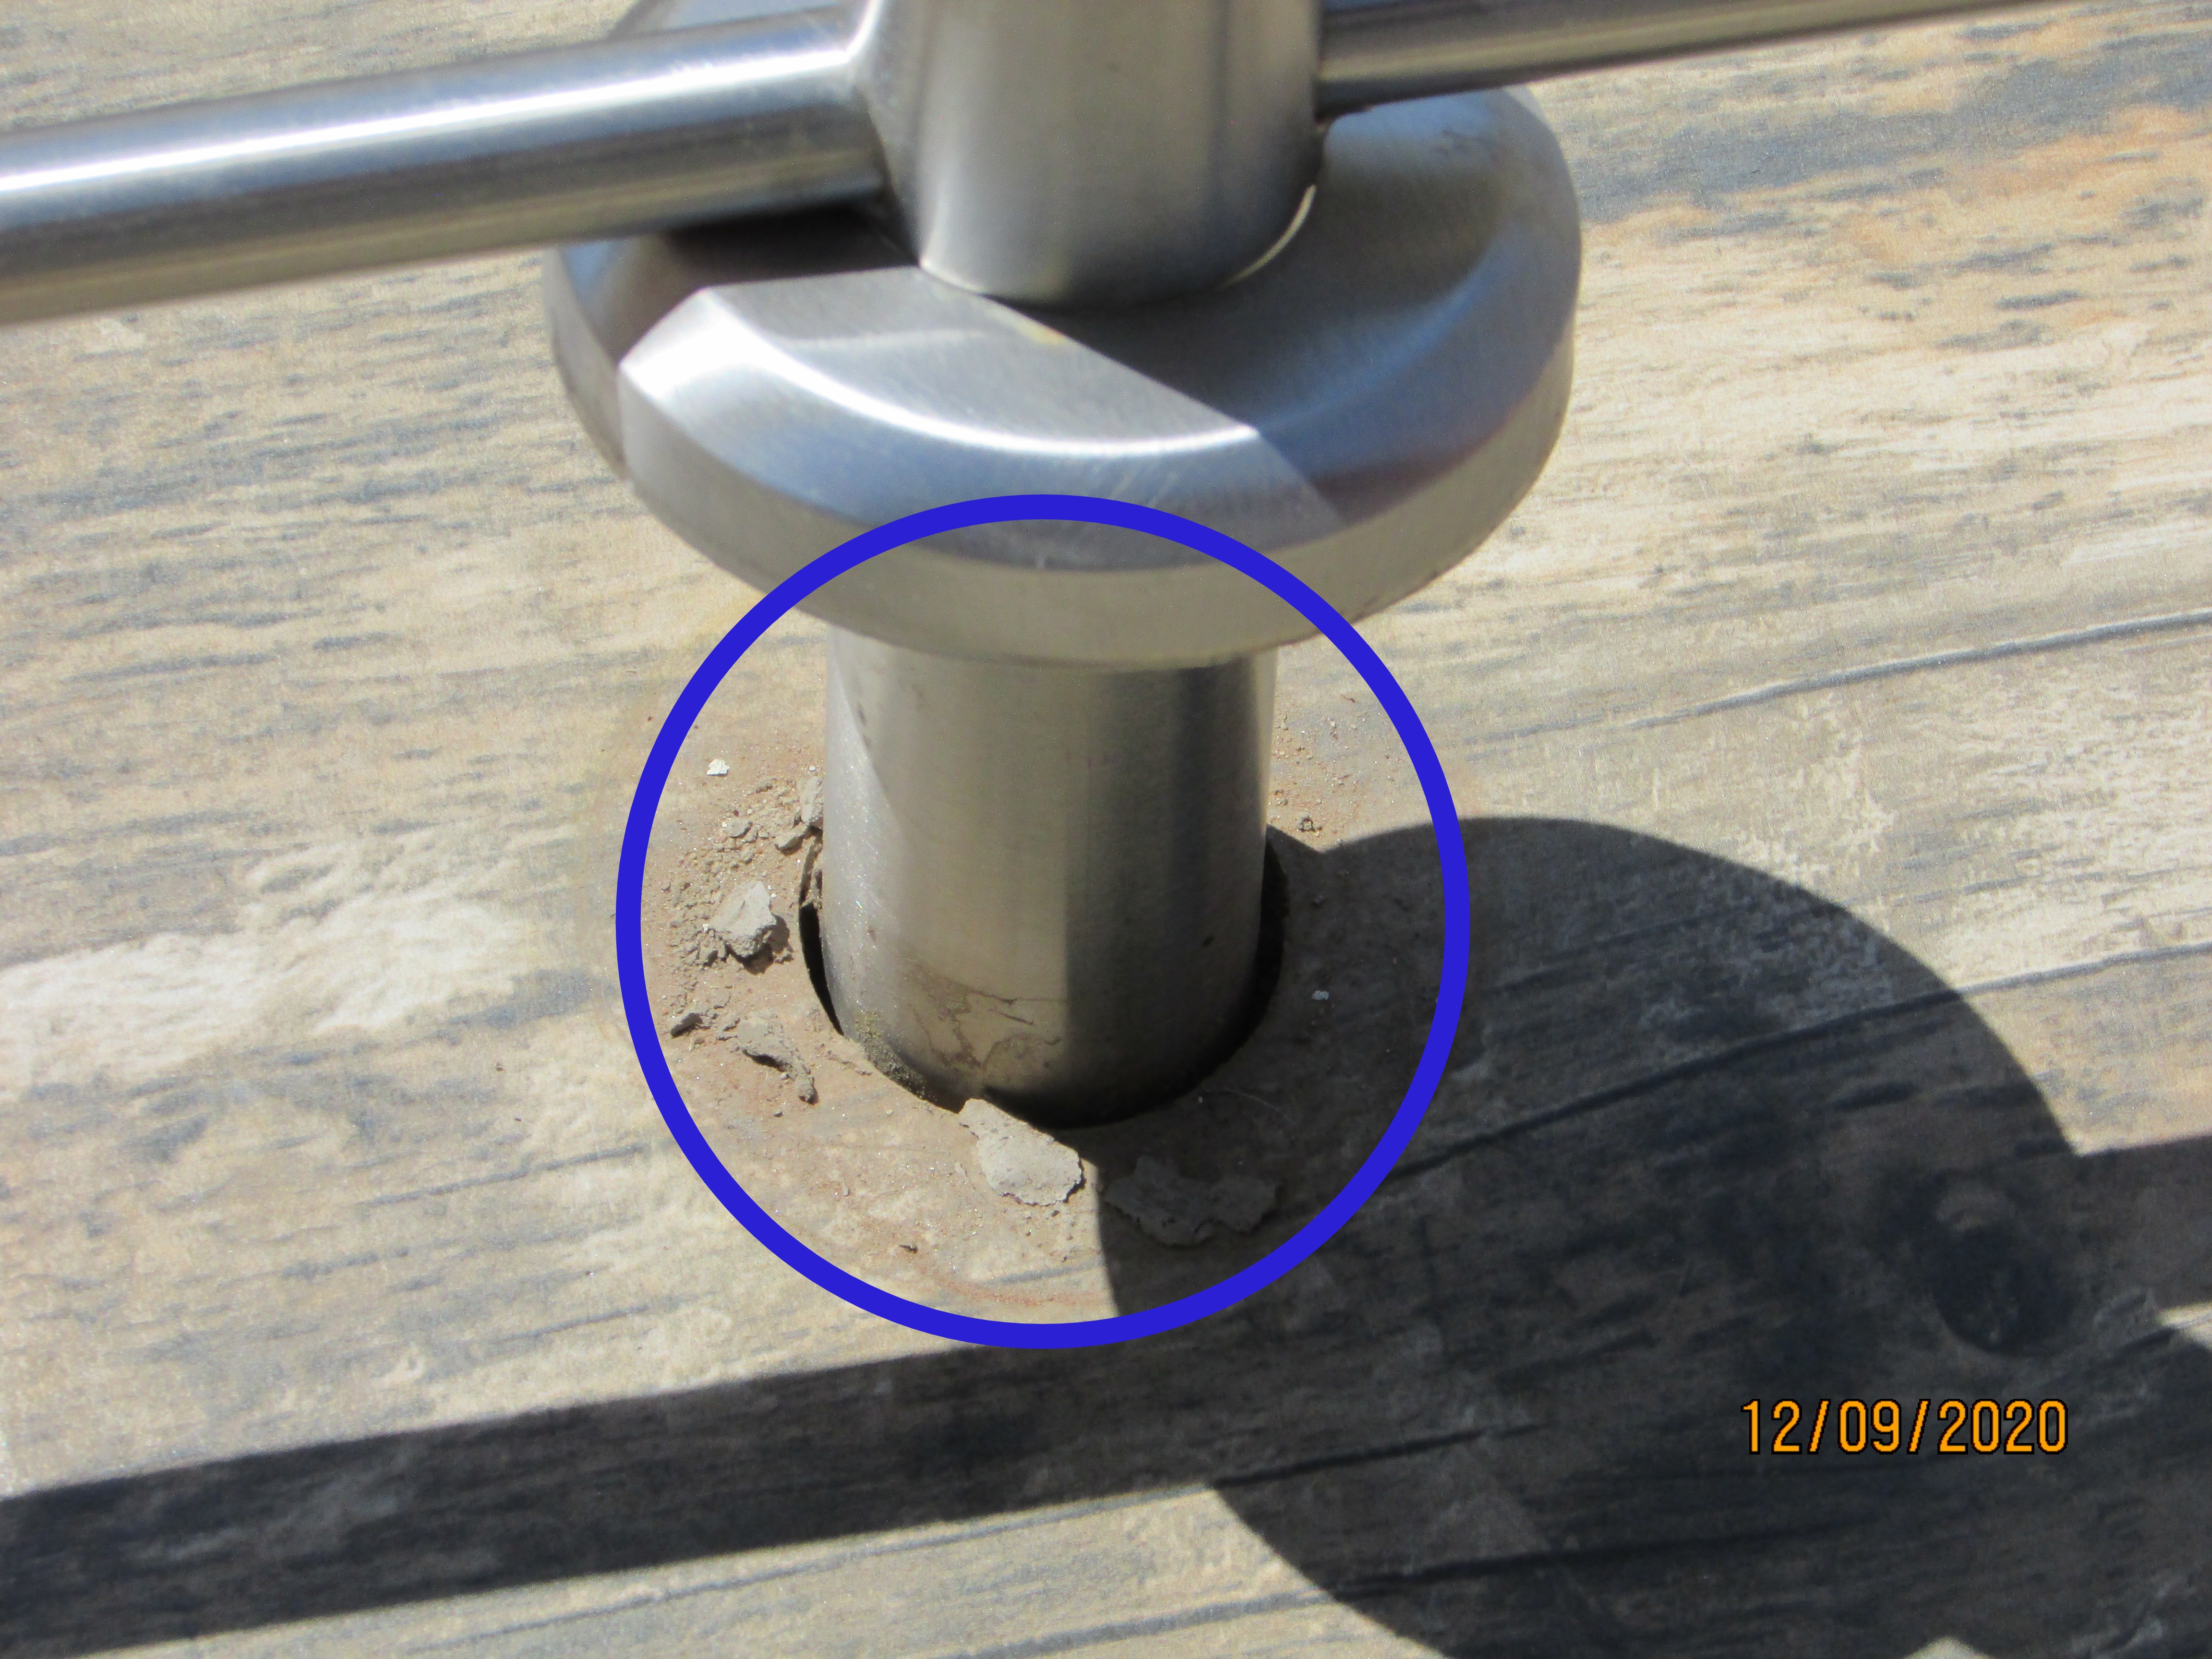 |
The floor tiling on the 1st floor balconies were in a reasonable condition except where addition items or problems are specifically listed.
The fixing method of the beam into the pergola columns was defective. Rainwater entering the pocket in the column cannot drain away. the beam should either be encased completely in the column and the column sealed on top to prevent moisture intrusion or the beam should be placed onto of the column where the rainwater can drain away. At the time of the inspection the end potion of the laminated beam in the pocket was not sealed to prevent moisture intrusion into the beam. Signs of de-lamination of the beam was noted. This could also mean that the beam was meant for internal use only! This problem should be rectified before the rain season.
- The pocket into which the beam sits will not allow rainwater to drain away. Note the efflorescence in the brickwork. The top of the bricks had cavities that were not sealed.
- The portion of the beams in the pockets were not treated with a sealer or wood preservative to protect them from the elements.
- The laminated beam appeared to be delaminating. Laminated beams for external use are manufactured with waterproof adhesive which will not de-laminate.
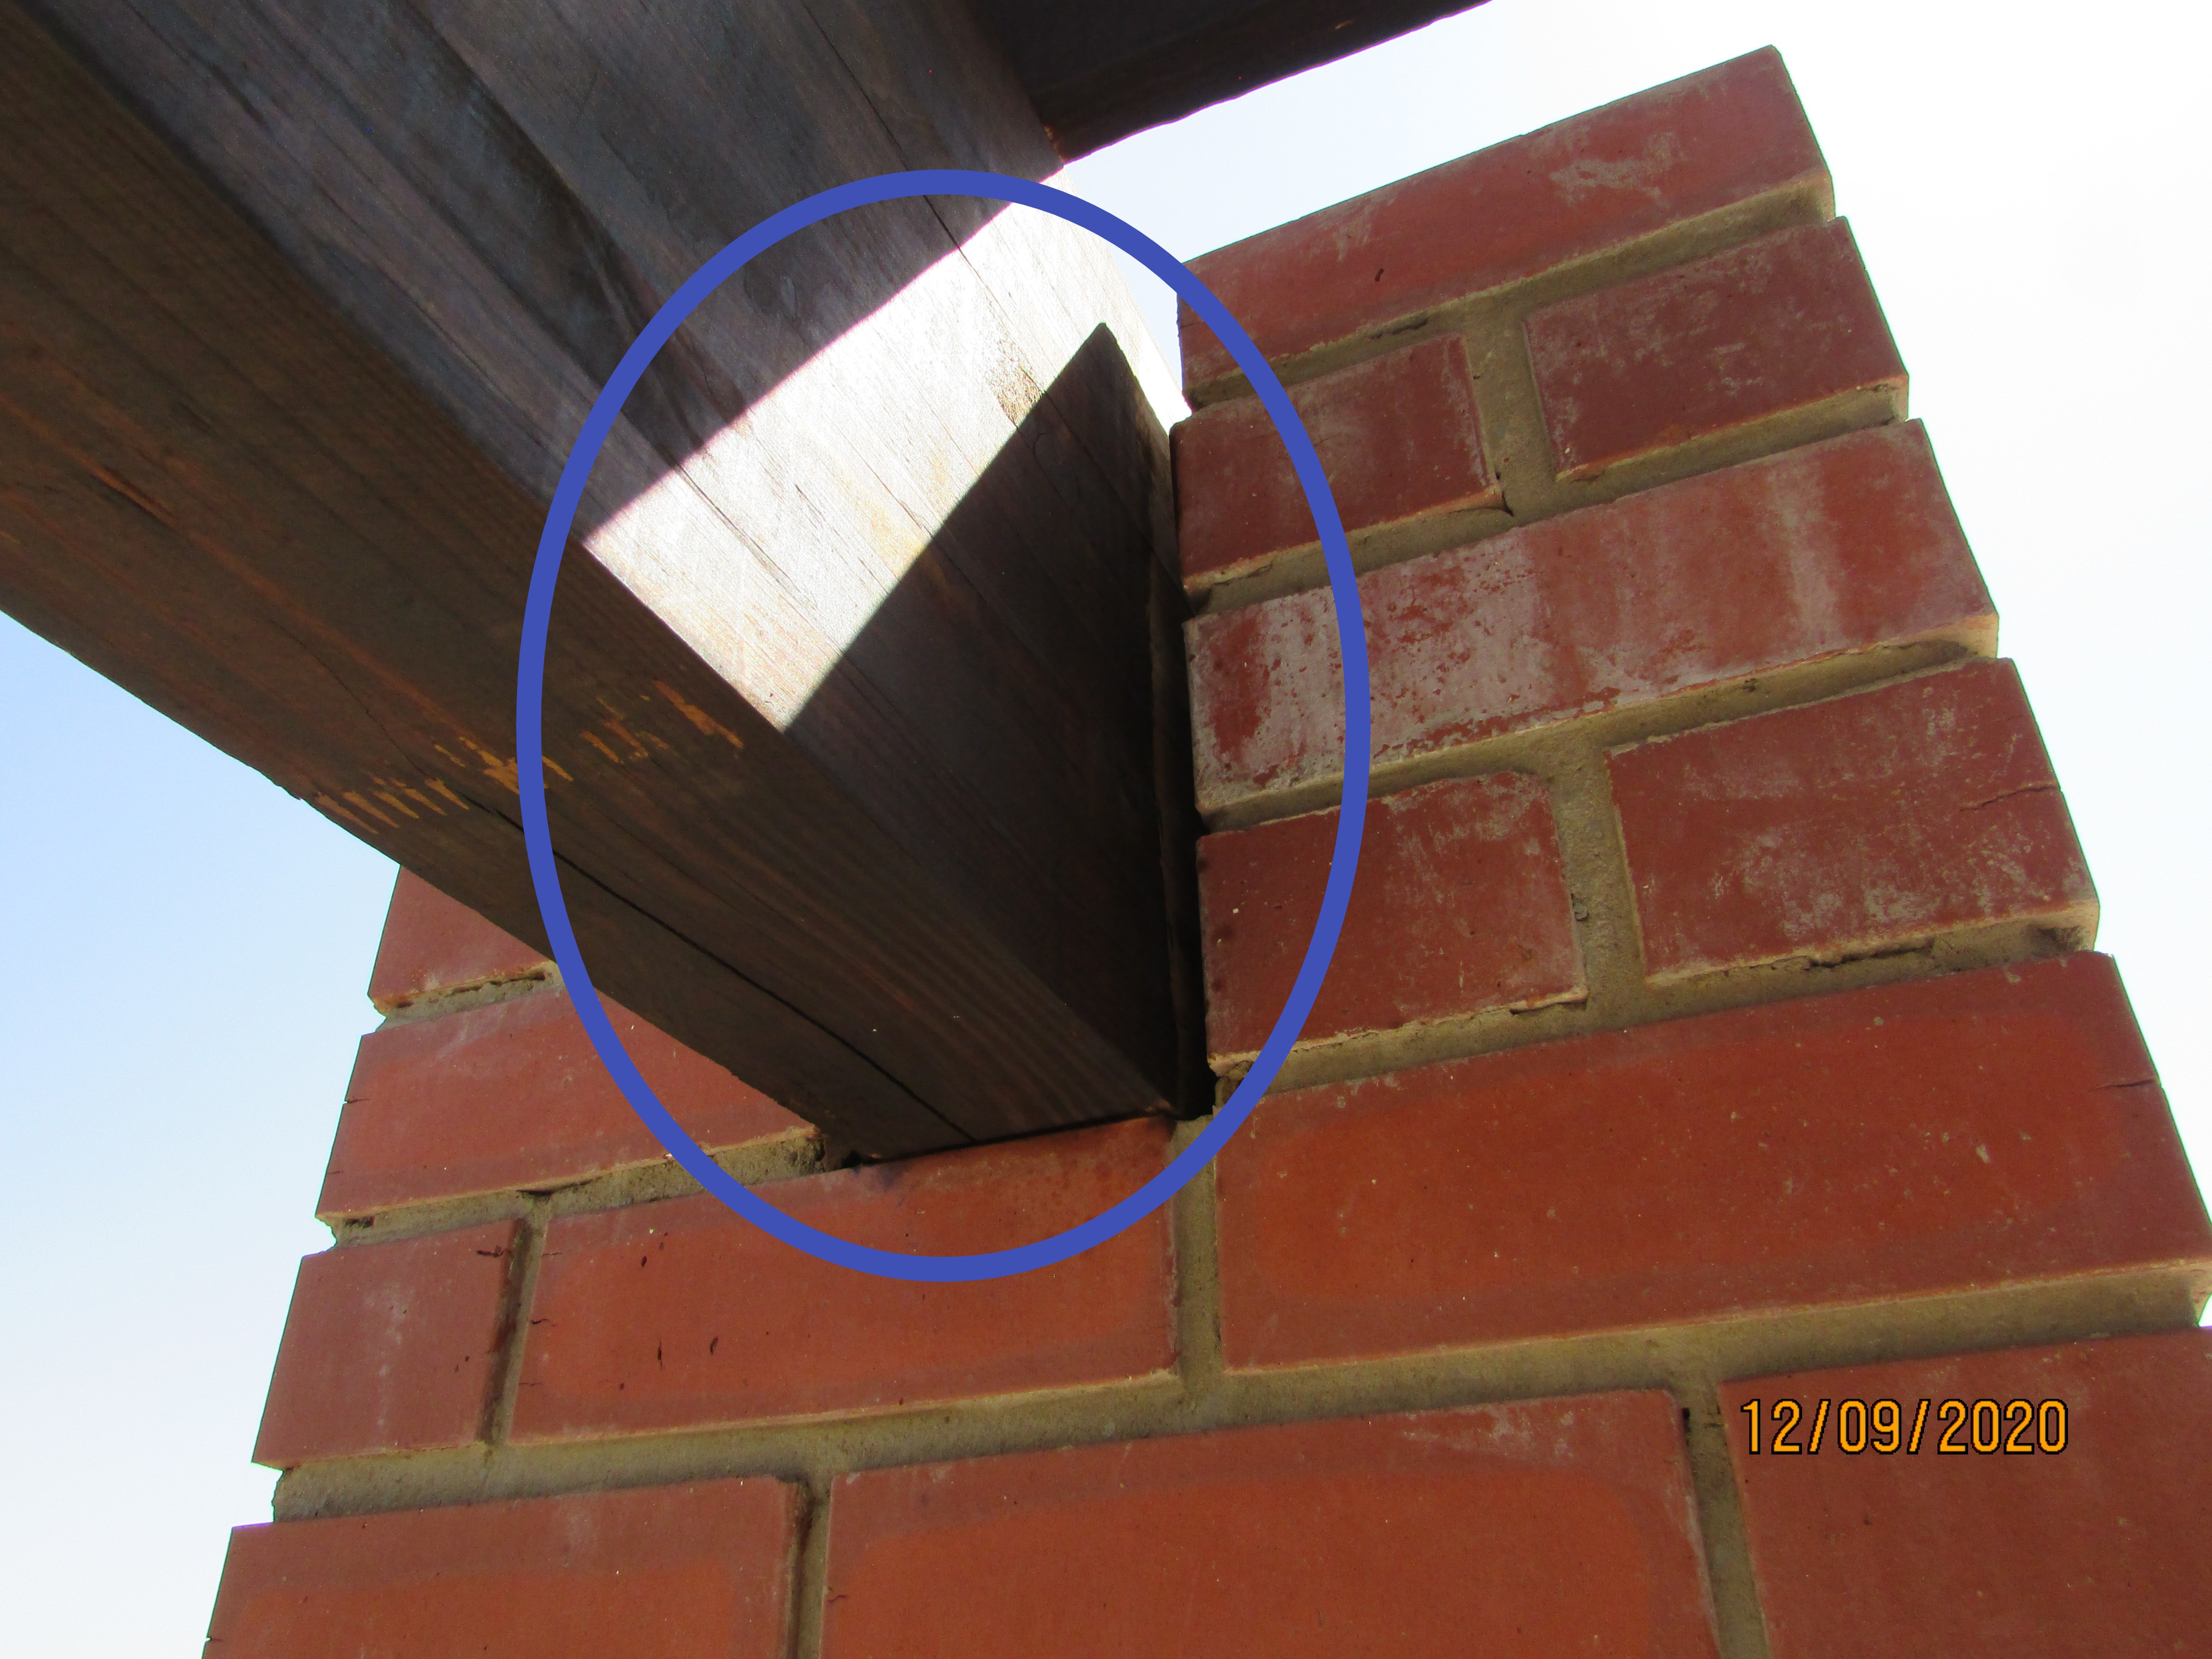
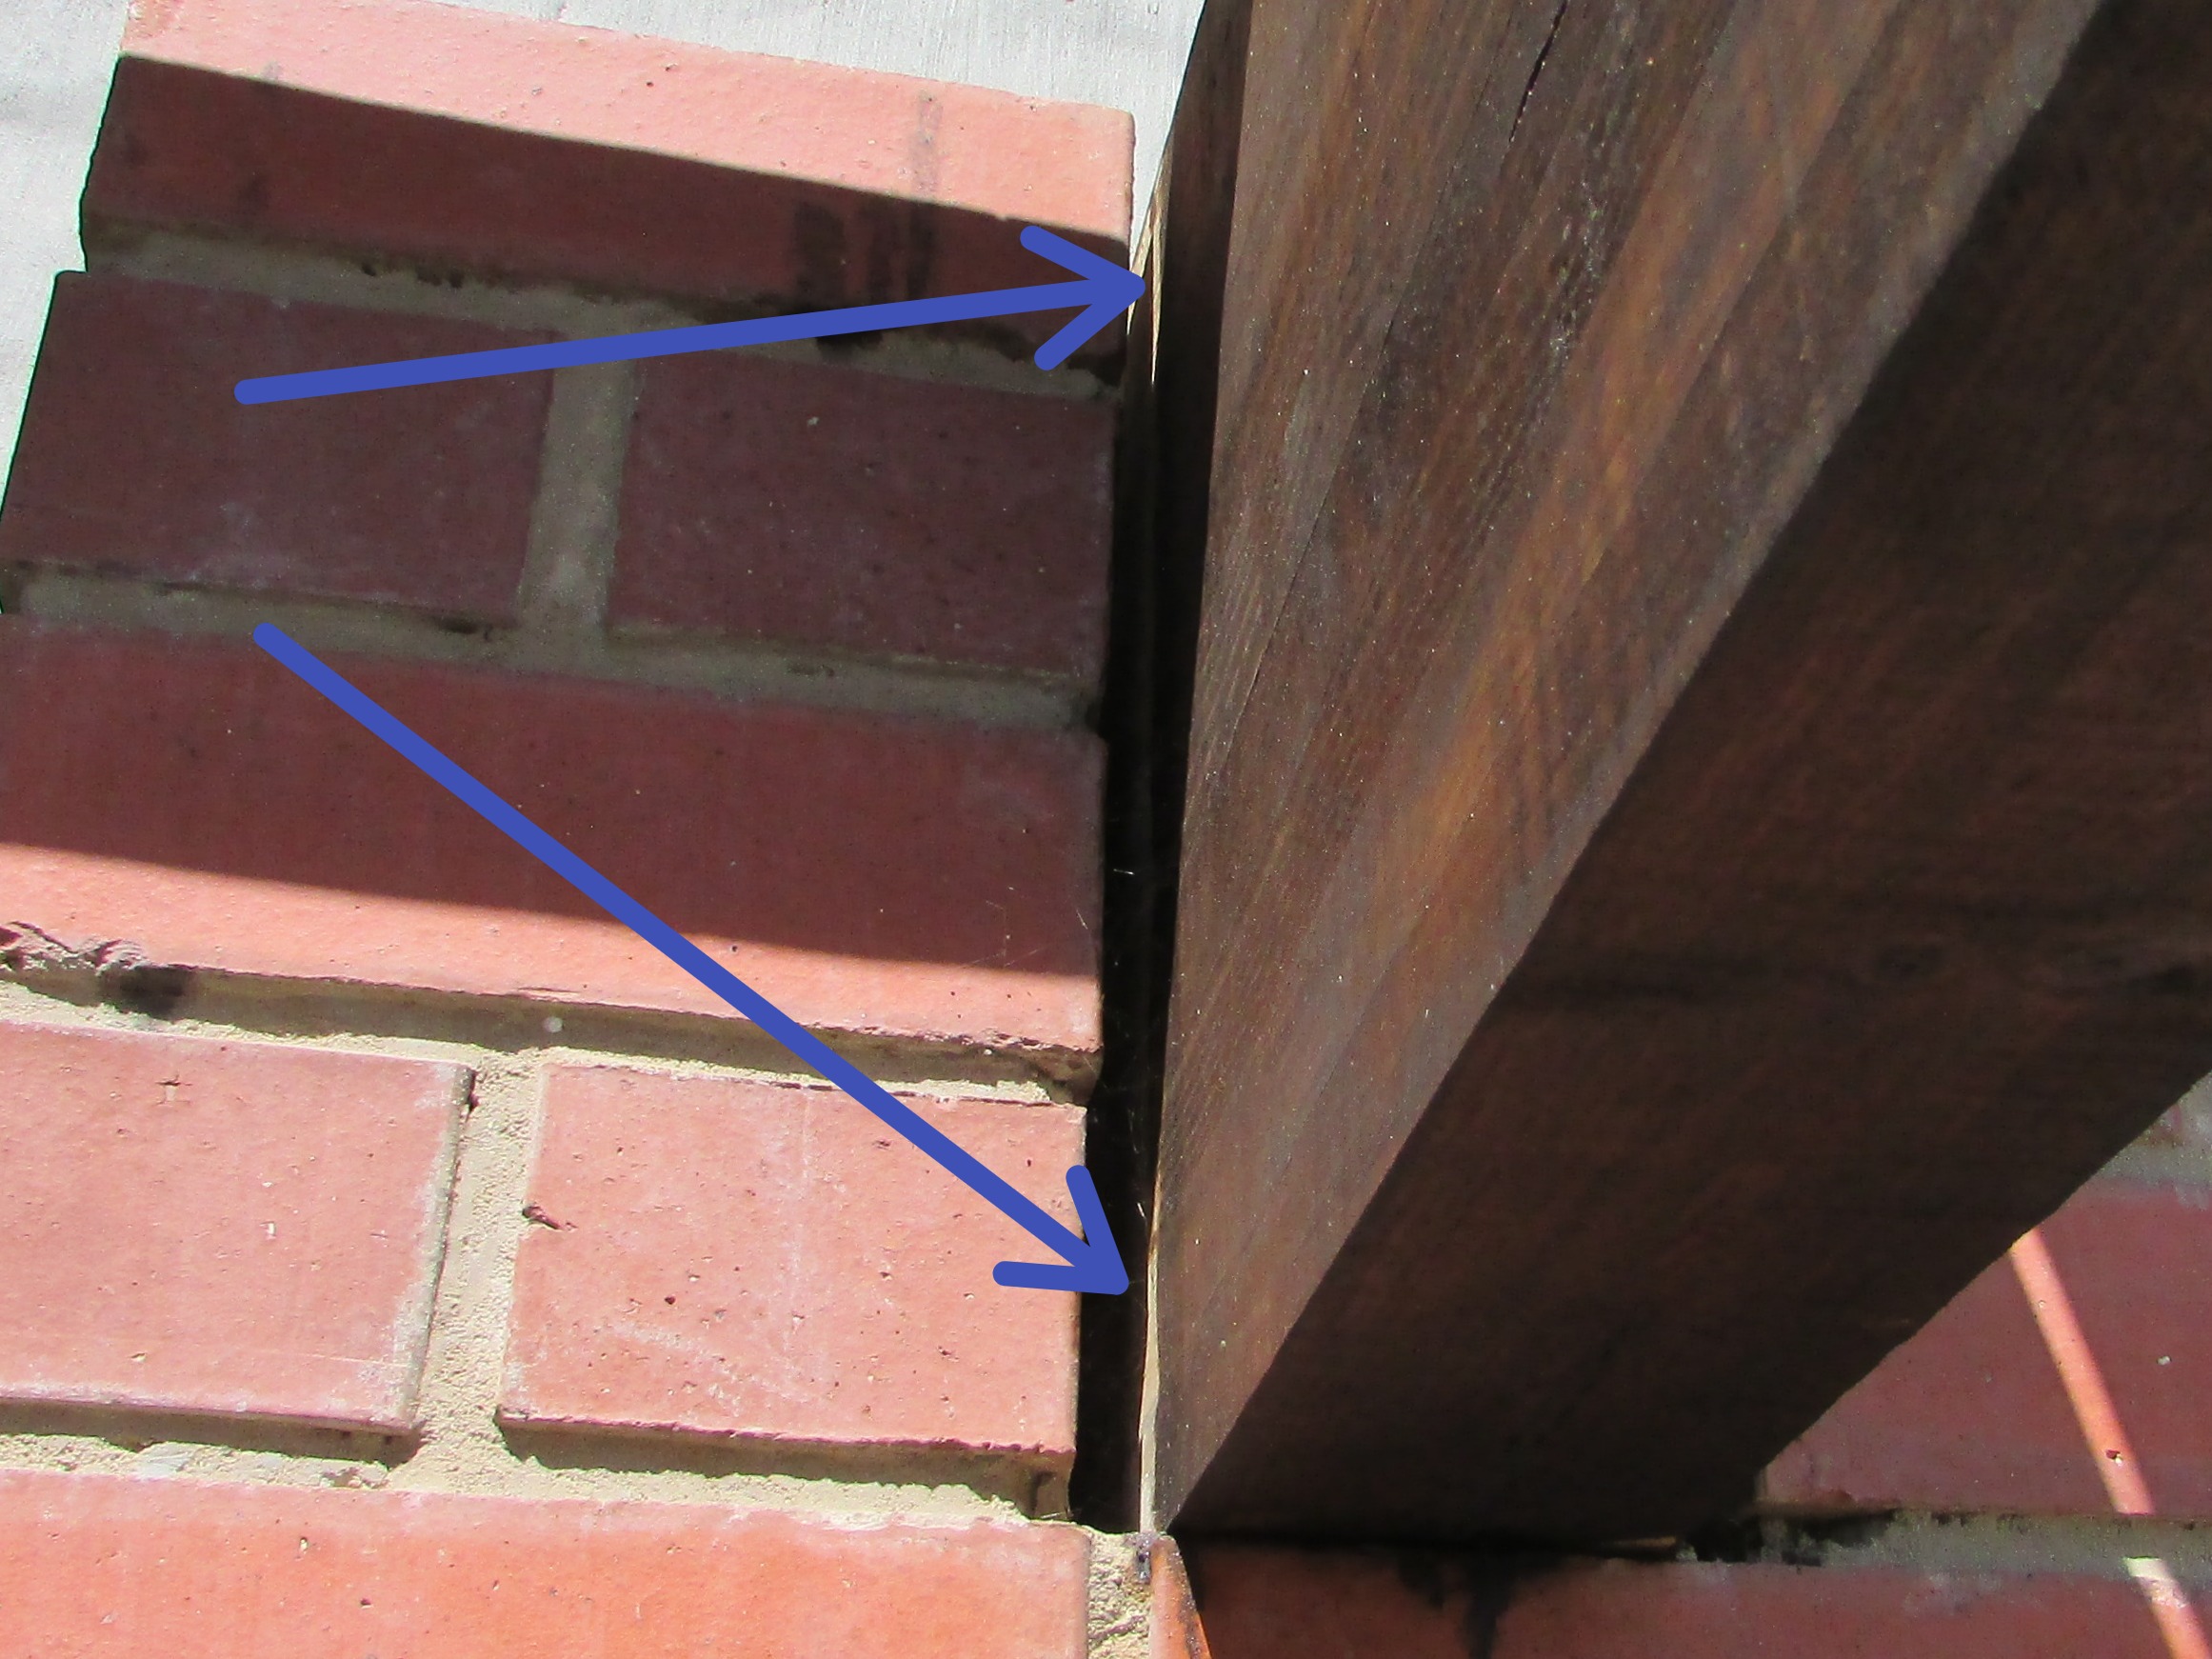
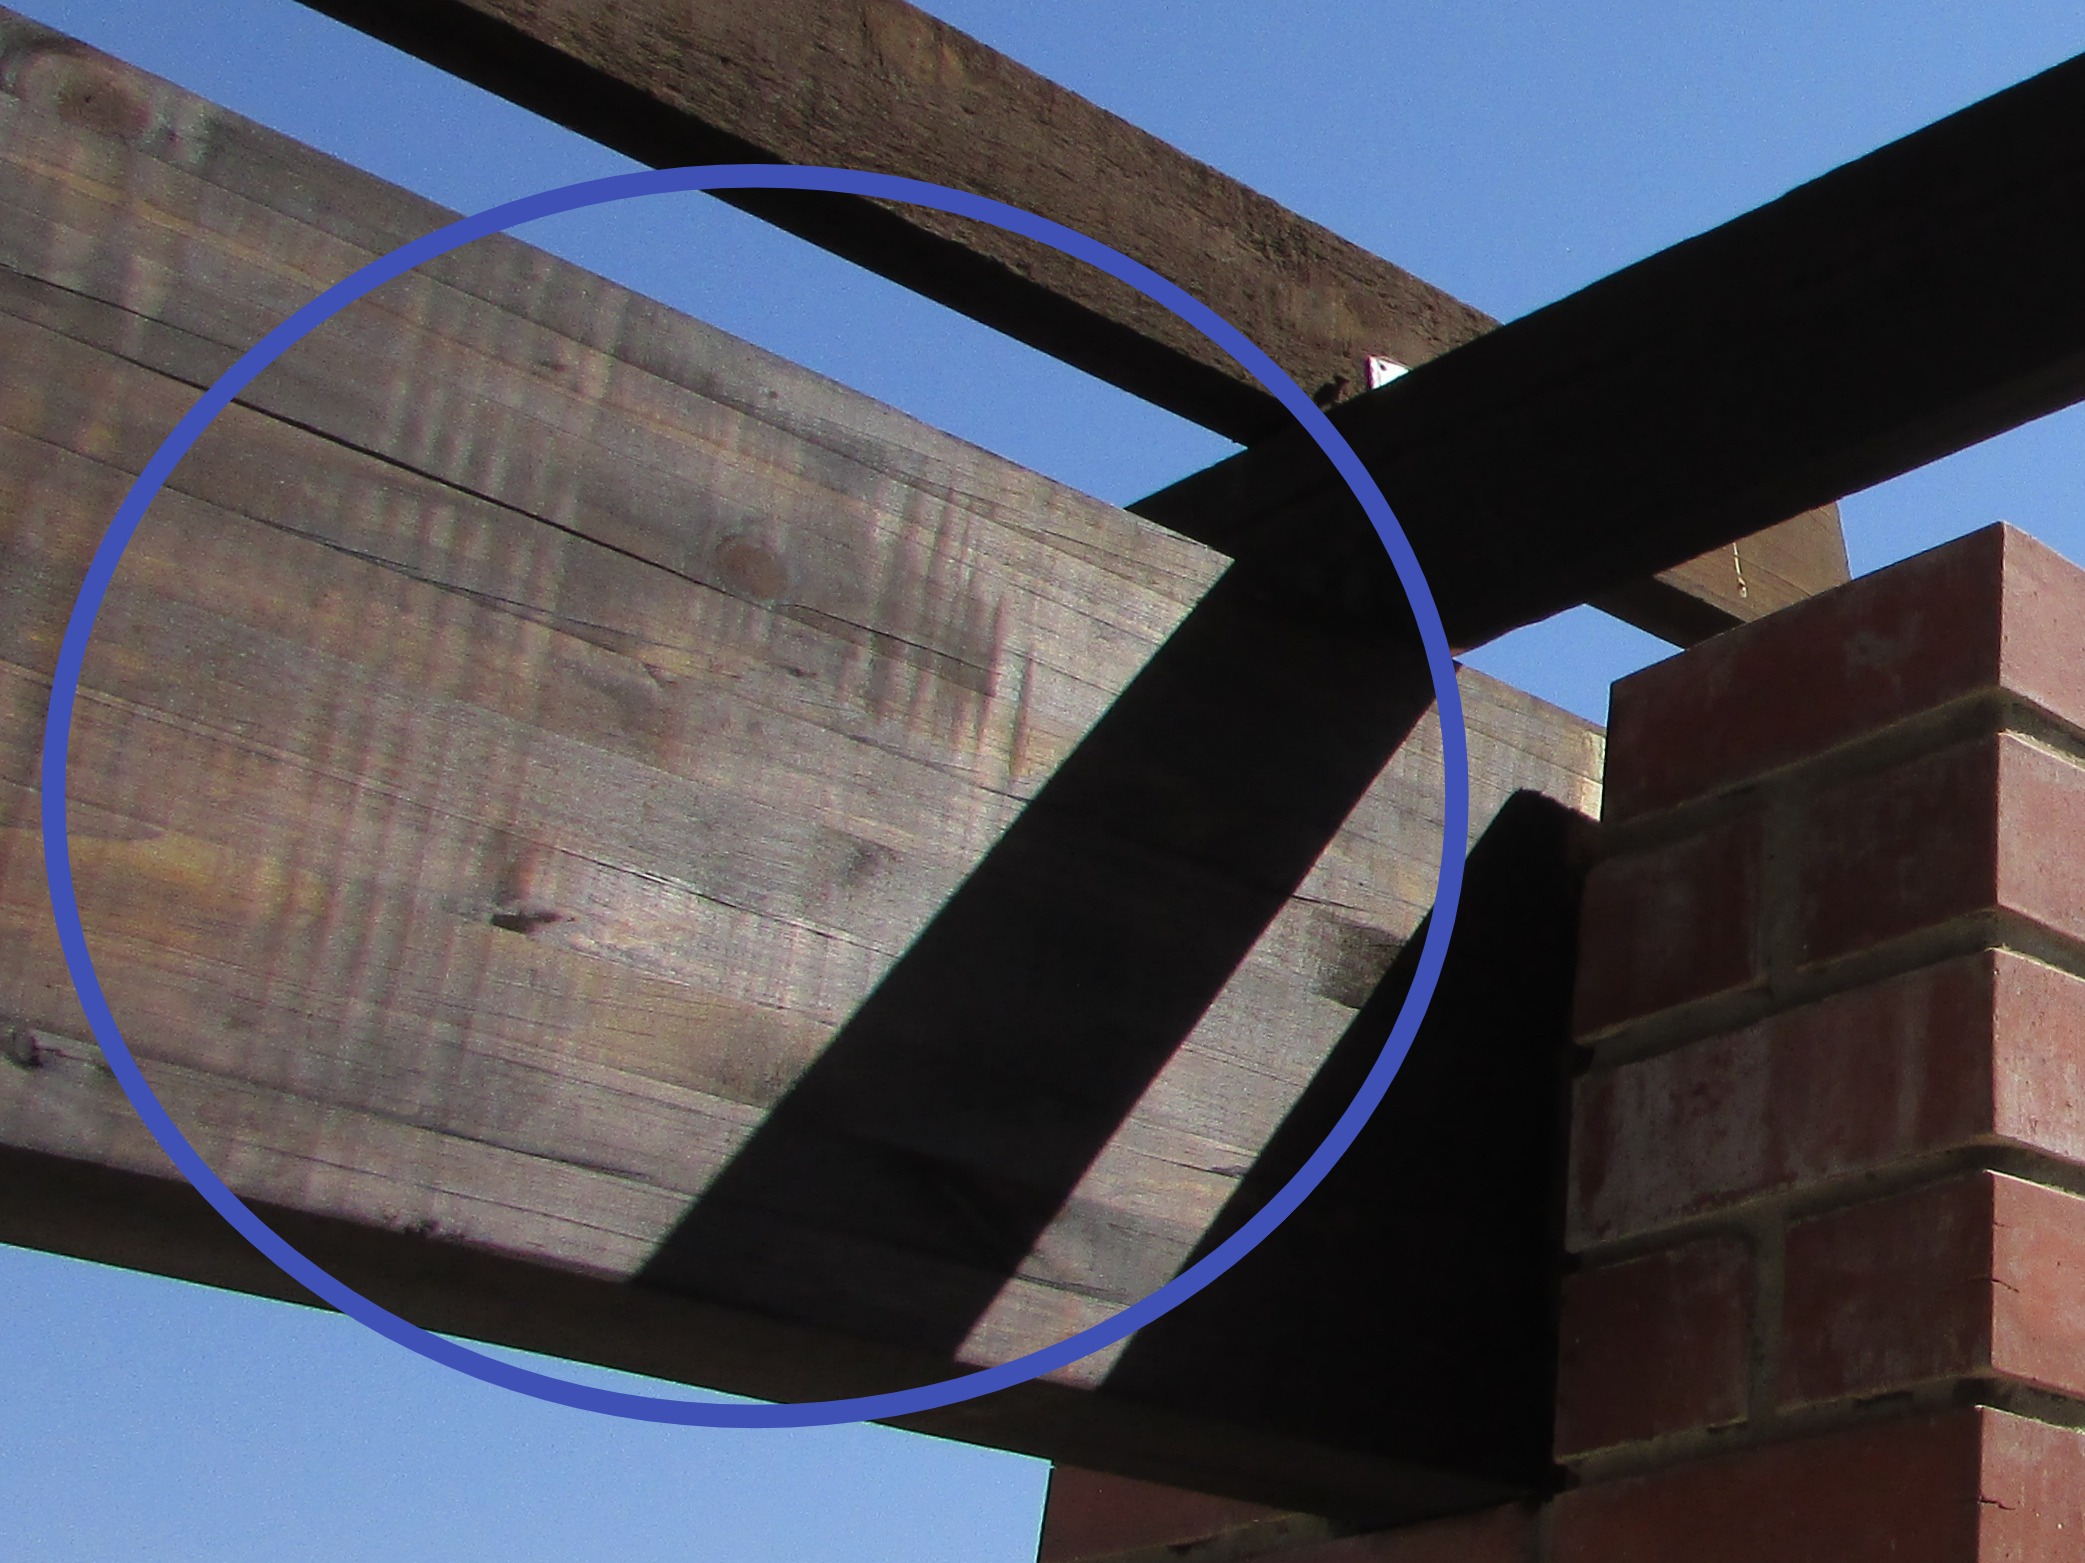
Garage
Garage: Attached
Automatic Garage Opener: Present, Not Tested - Unplugged
Garage Door Type: Metal, Sectional roll-up
Garage Slab: Screed
The automatic opener for the automatic garage door was unplugged. It is not clear why this was unplugged. I do not operate systems that are unplugged as it could be unsafe or damage the door. I recommend having the door checked once the door opener motor is enegised.
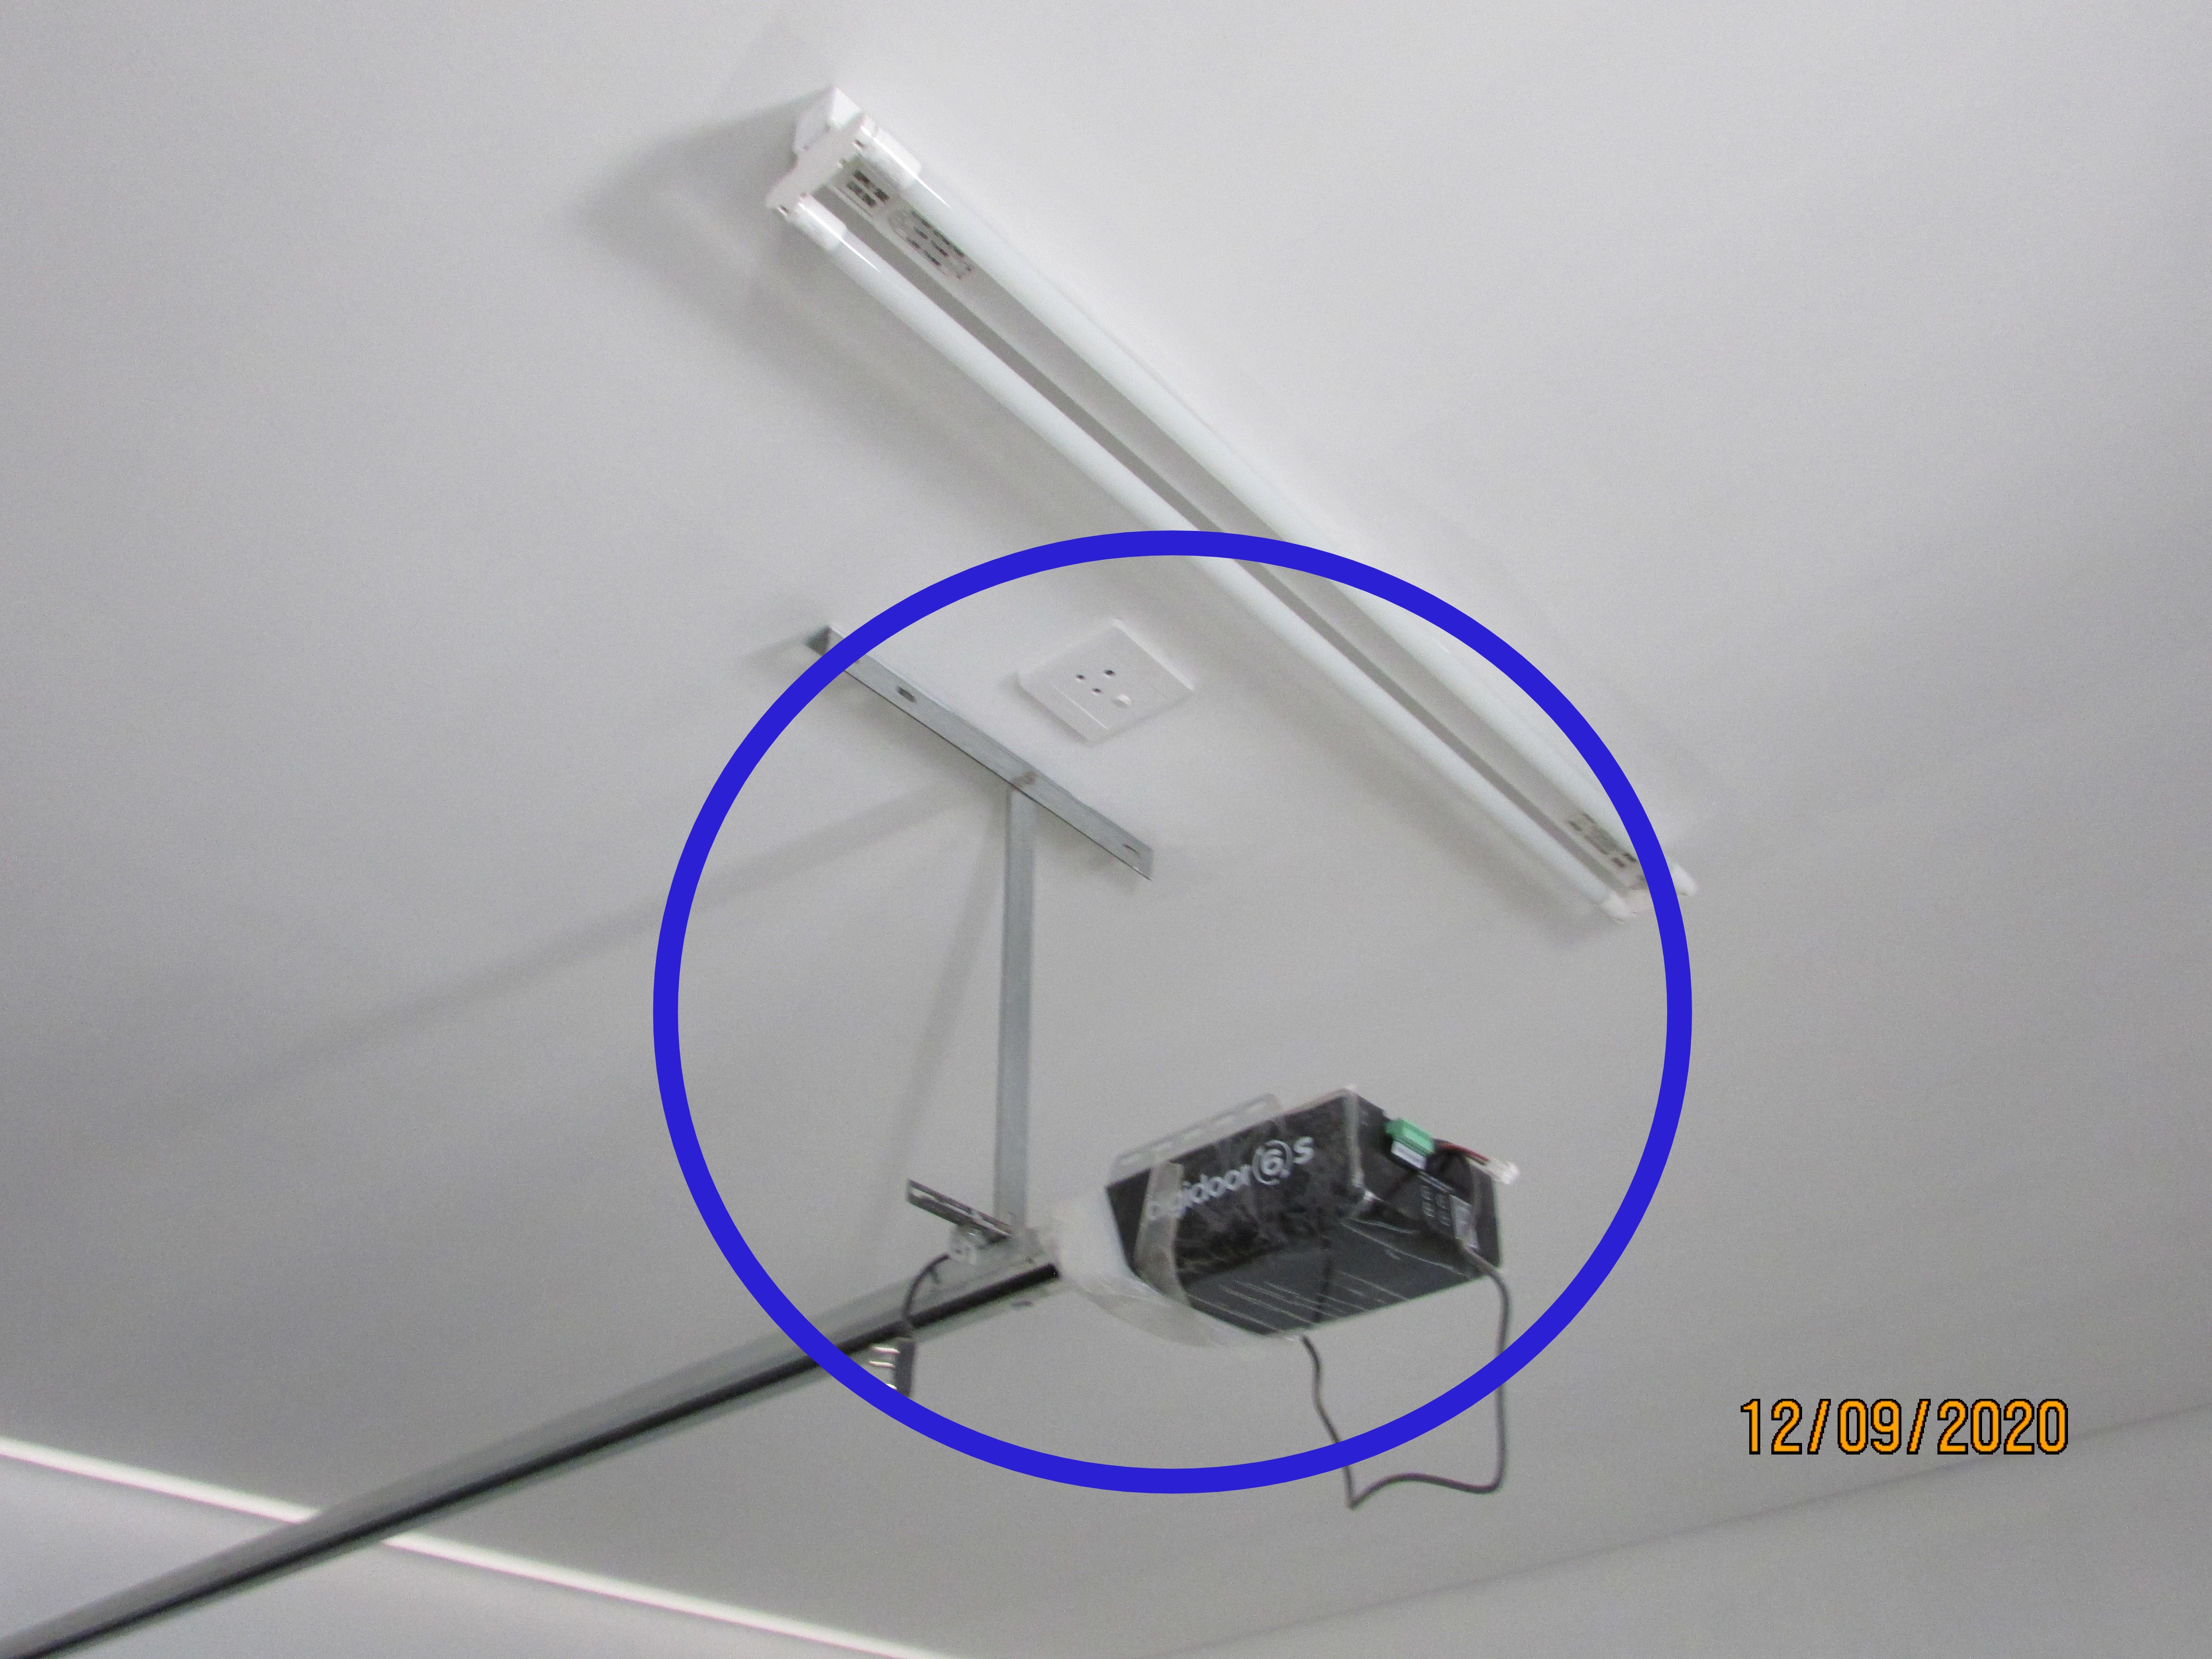 |
Rainwater was leaking past the doors into the garage. The threshold was not stepped down slightly or sloped sufficiently at the doors to prevent water from leaking under and at the sides of the door. An aluminium strip (±6 mm high) can be fixed and sealed to the floor behind the doors and along the edges up to the entrance walls to prevent water entering.
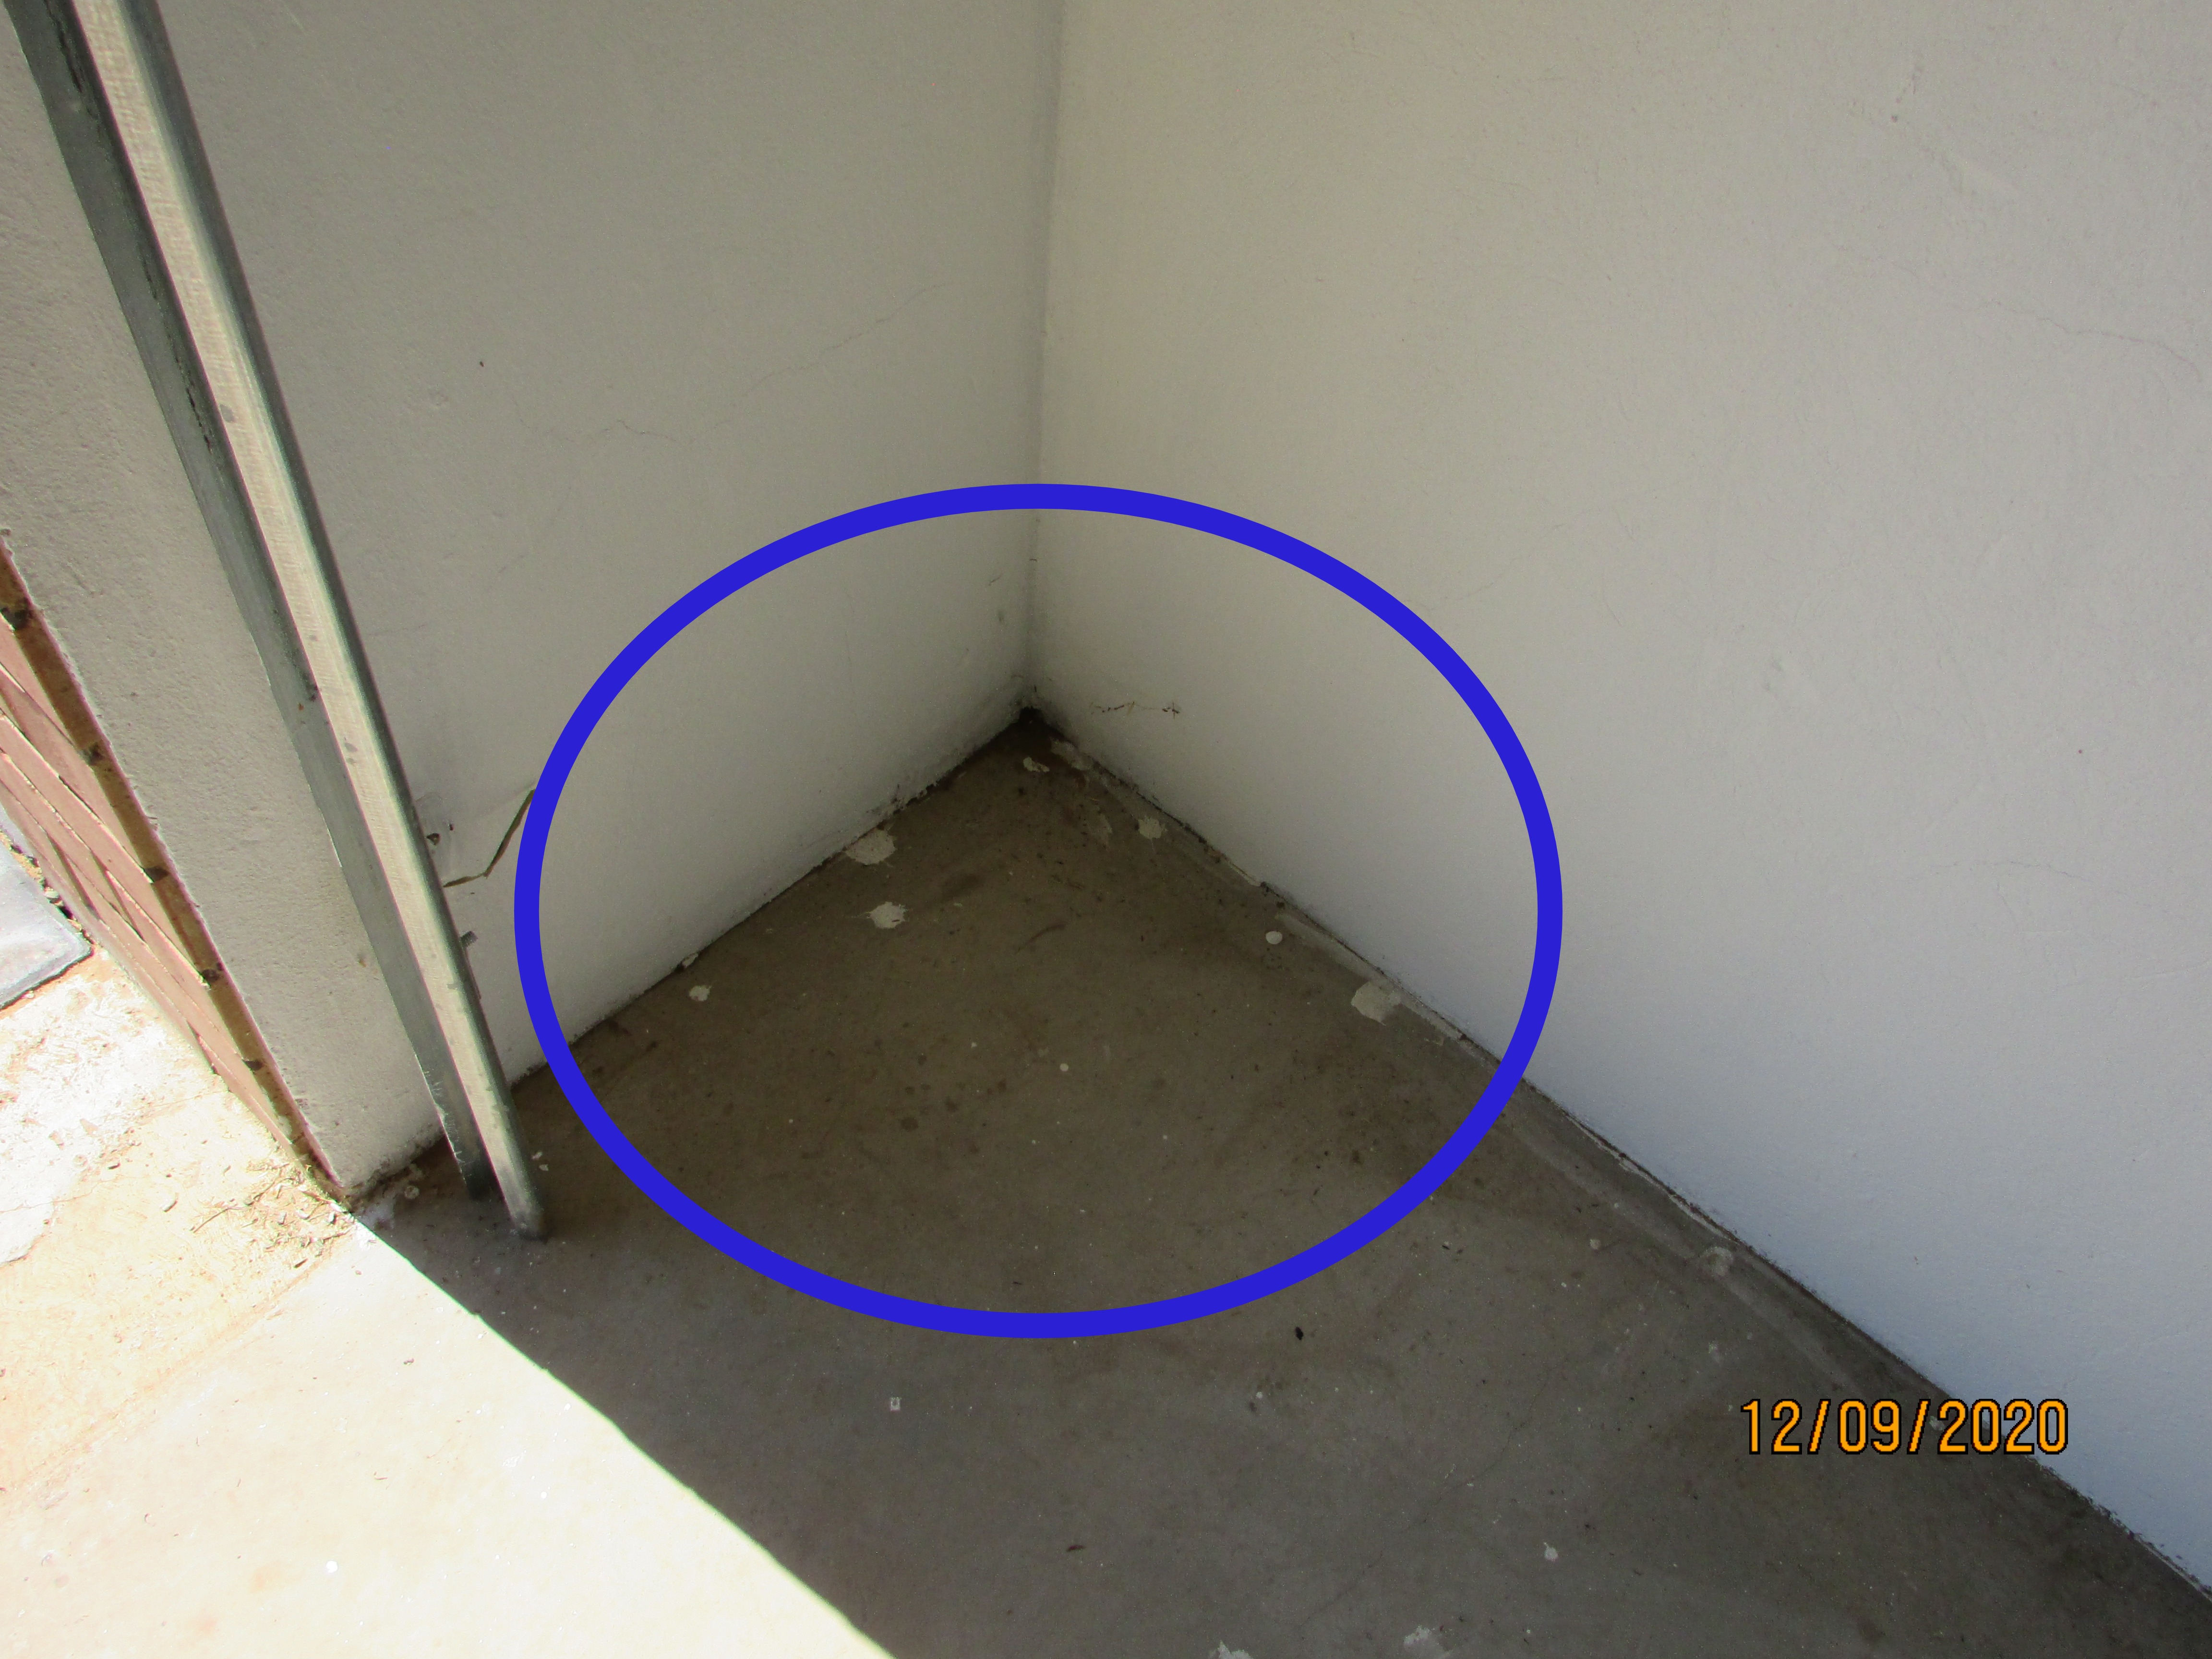
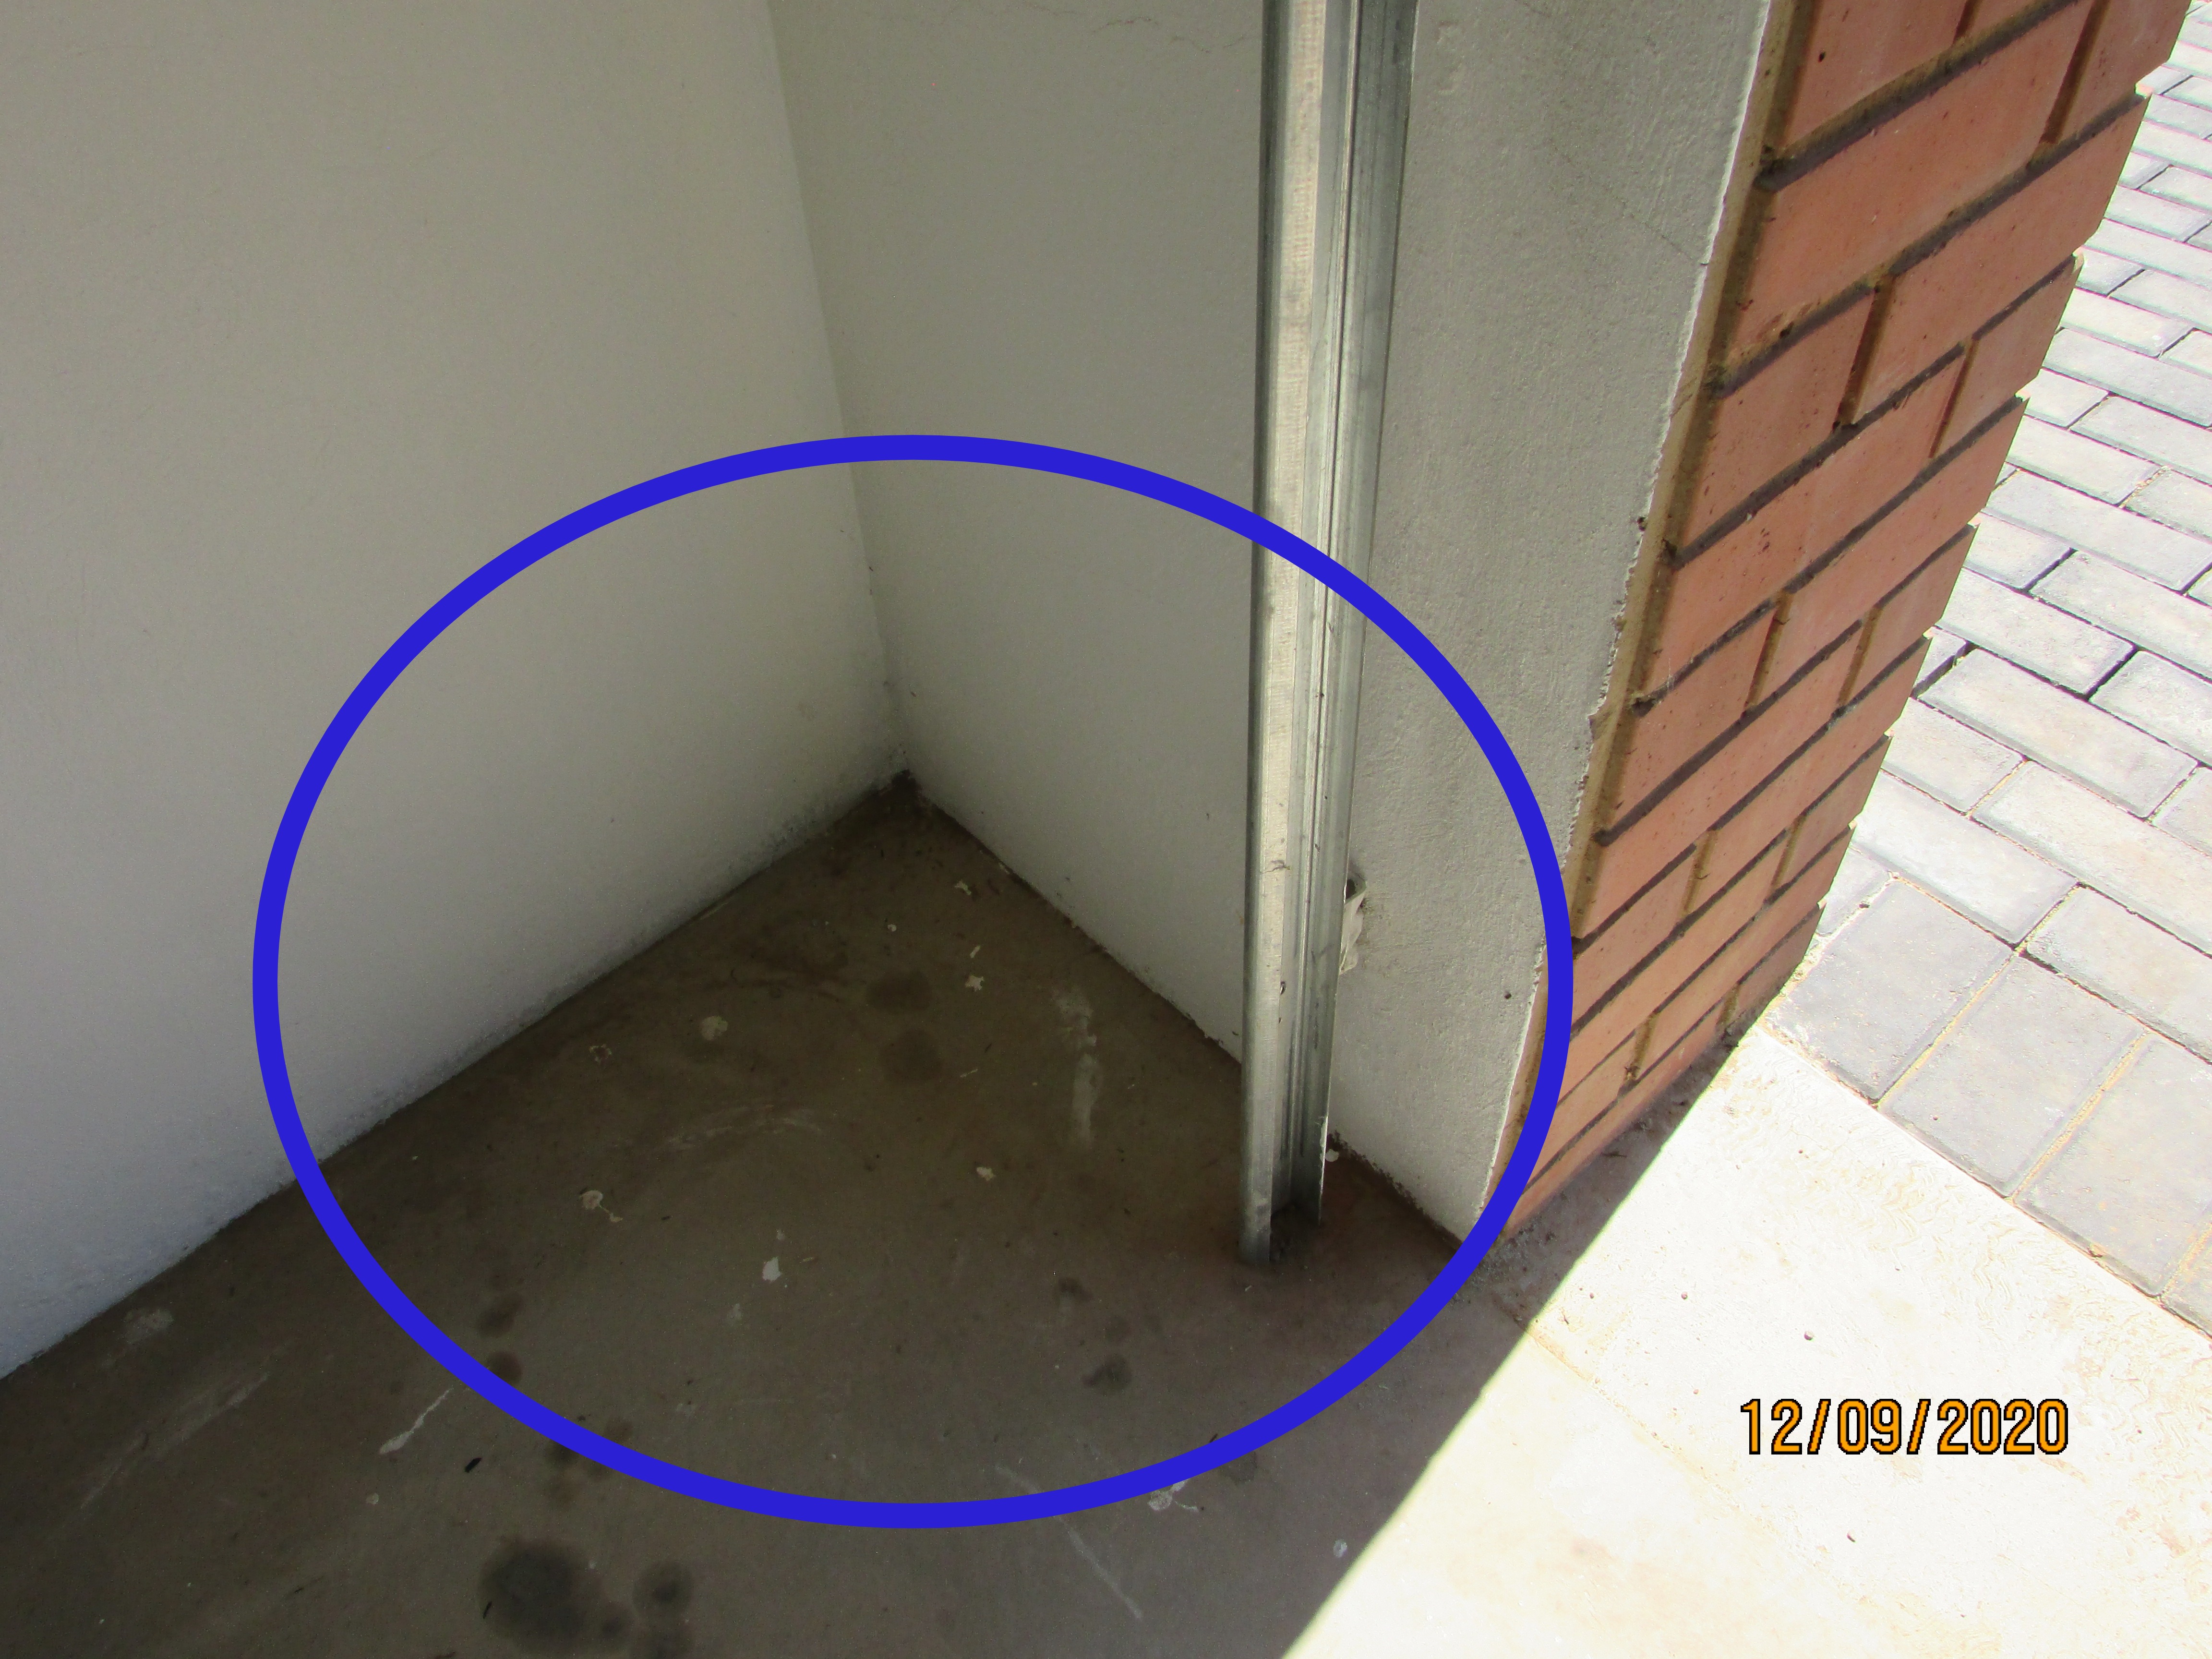
The garage door threshold was cracked at driveway paving. The damage and cracking will allow rainwater to enter at the crack and leak into the threshold and garage slab. Sealing of the crack of the threshold was required. The seals on the bottom of the garage doors appeared to be okay but no recess was formed between the threshold and the garage floor to prevent rainwater from penetrating the garage on the sides of the doors.
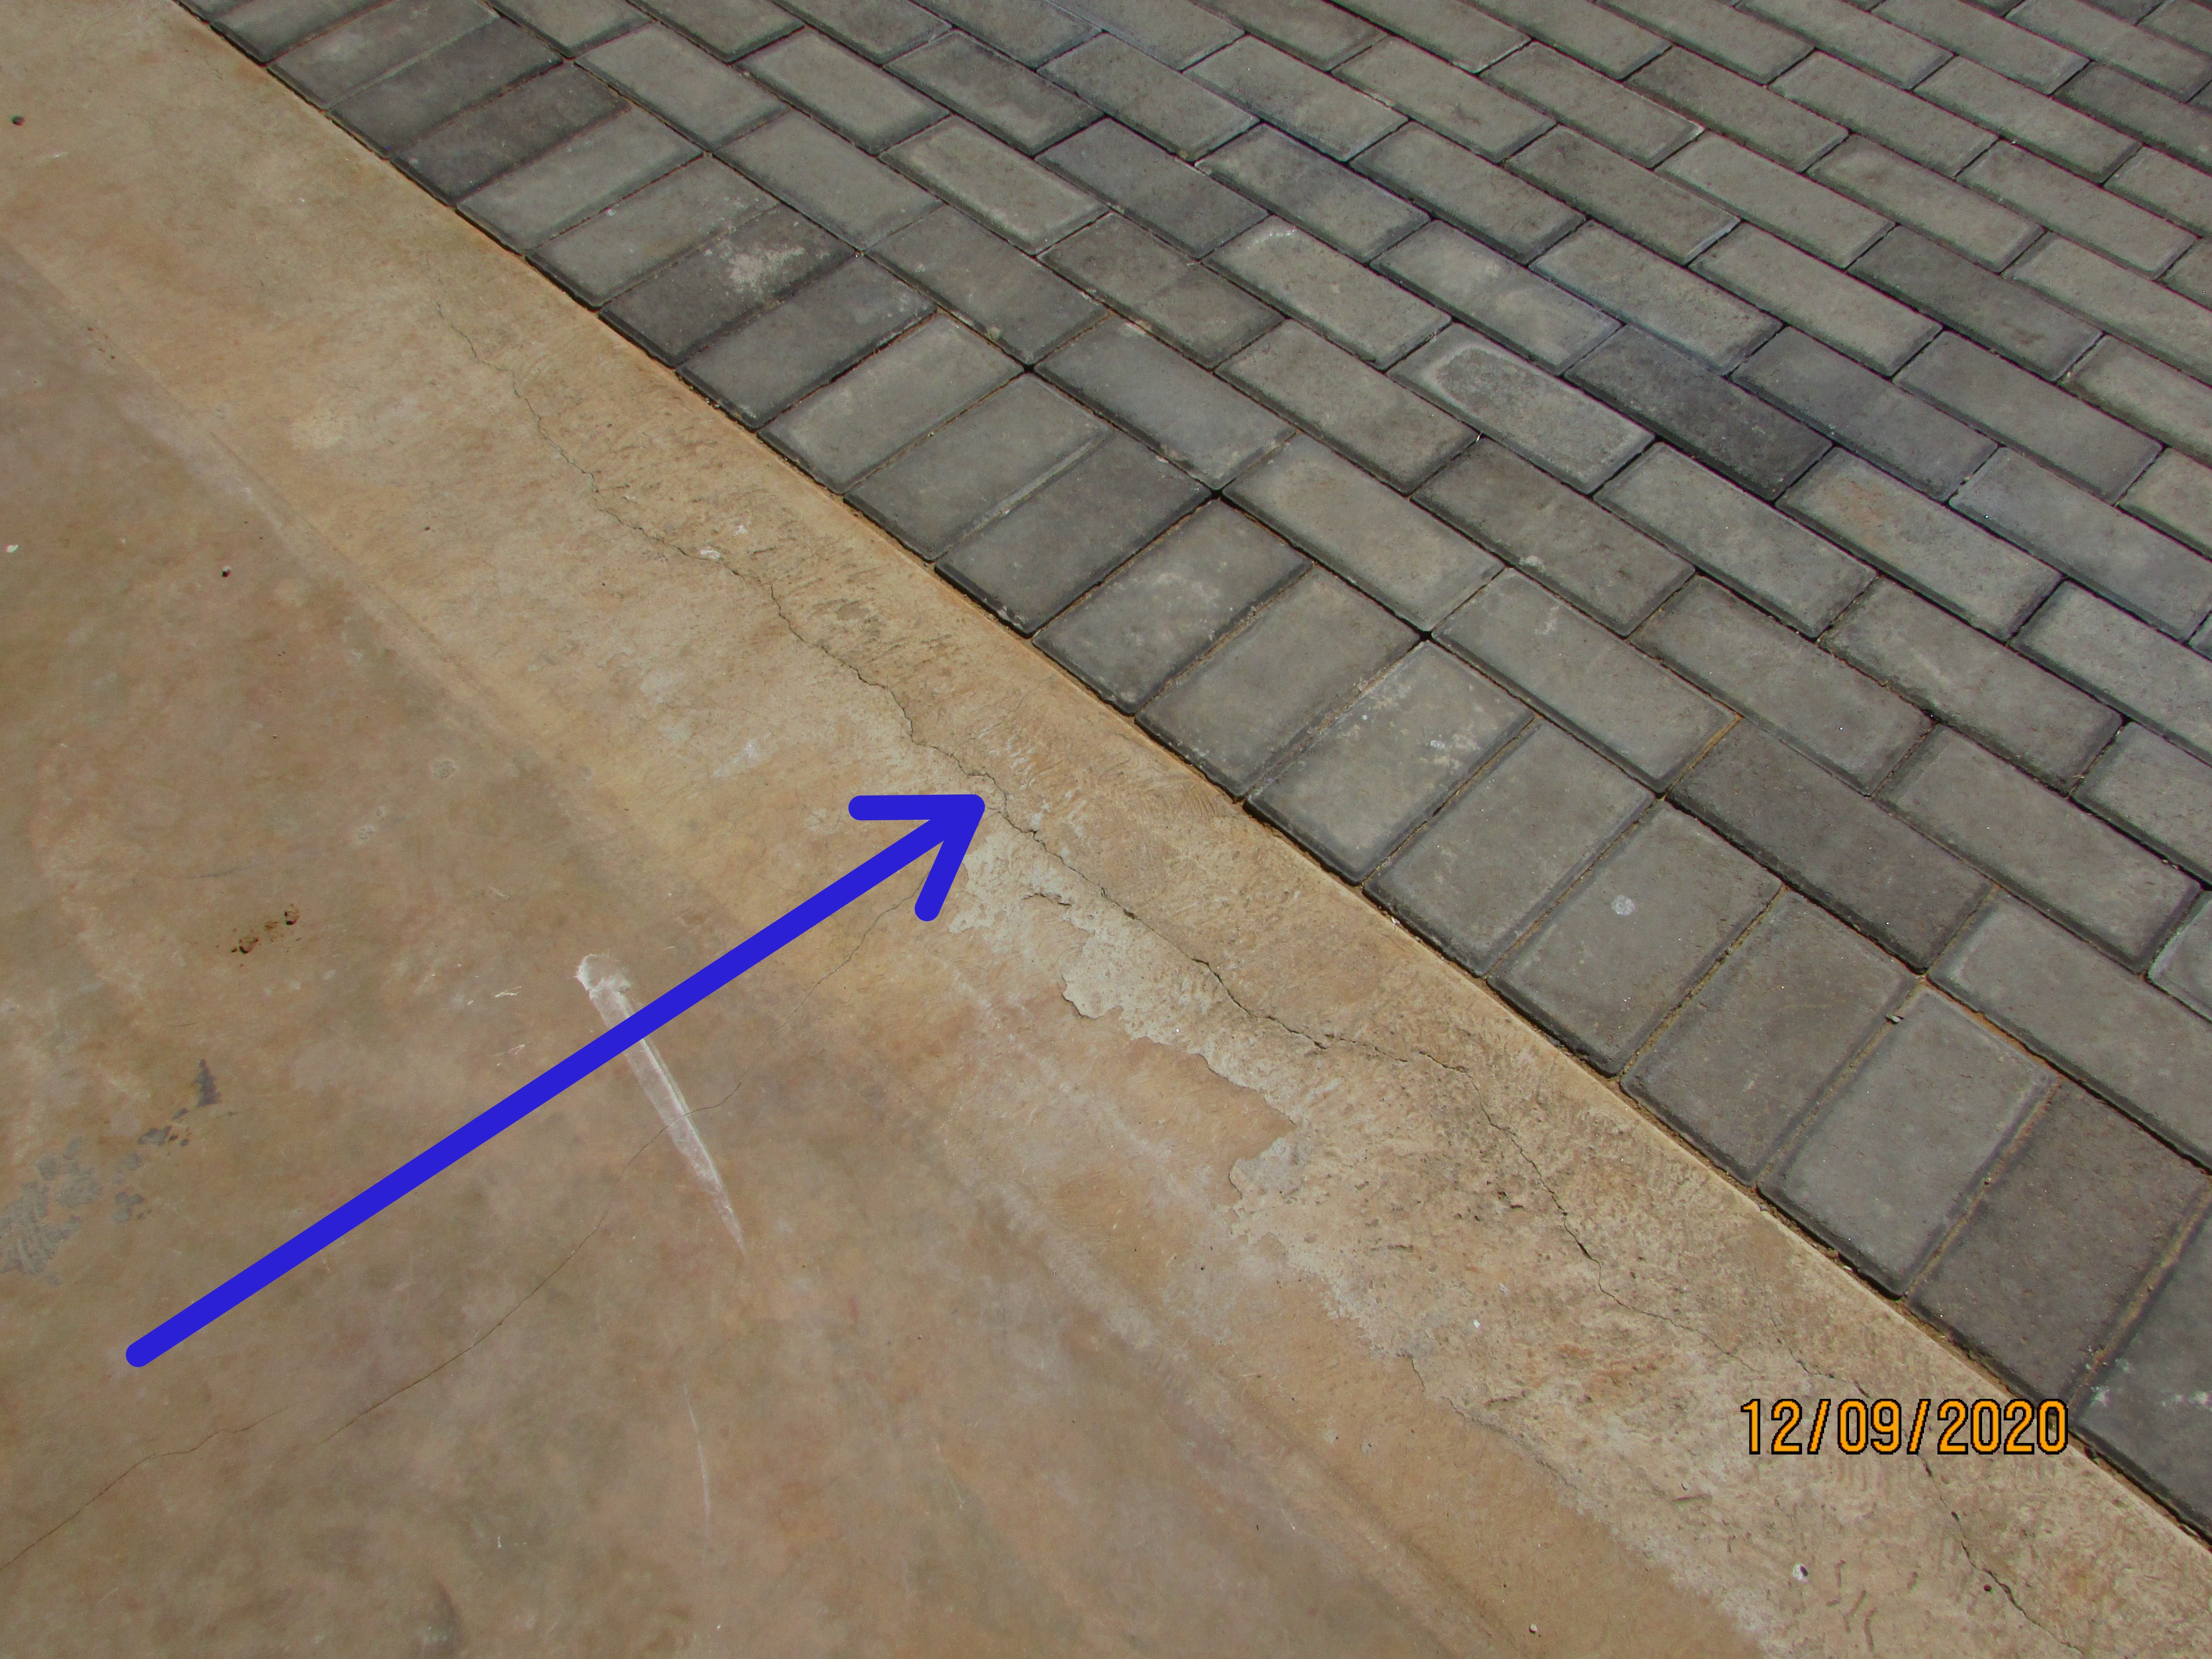 | 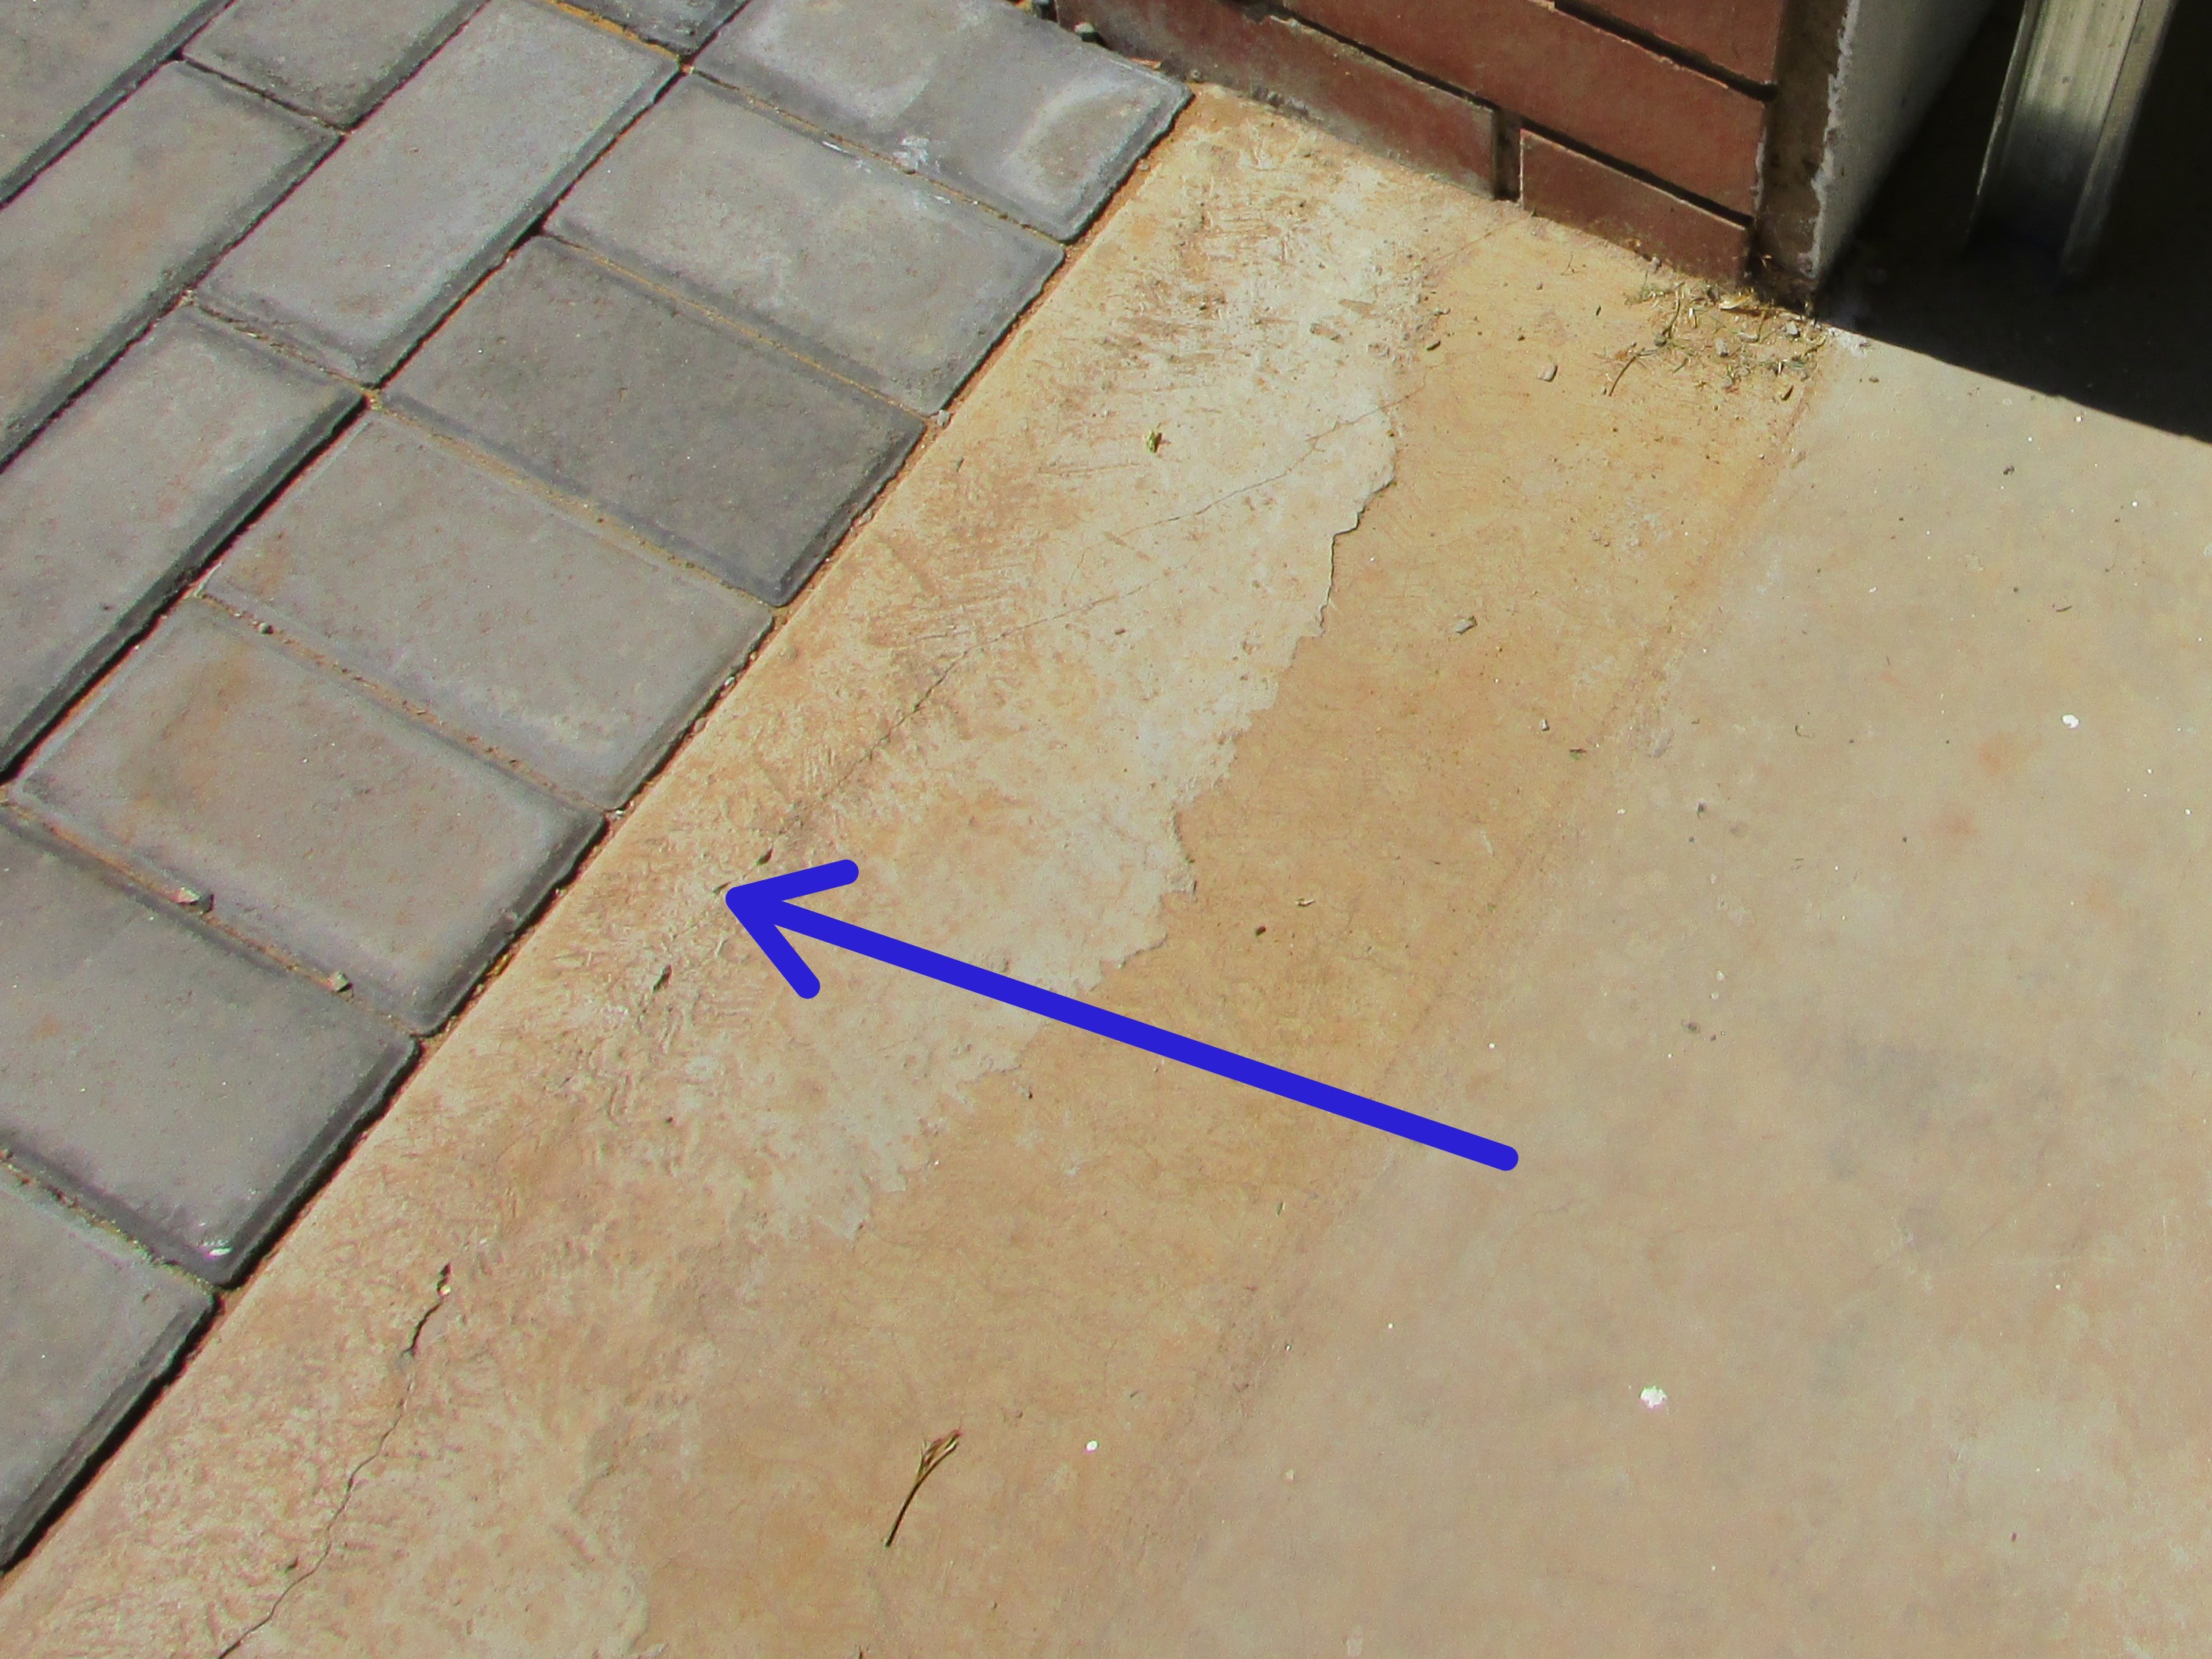 |
The start of typical cracks were noted in the concrete garage slab. No control joints were used in the concrete pour or screed here so the floor may crack further. No repair was needed at this time. This was a cosmetic defect.
.JPG) |
The walls and ceiling of the garage were in a satisfactory condition.
Interior
Floors and Floor Materials
Floor Materials: Tile
Floor Settlement: None noted
Where visible, the tile flooring in the house appeared to be functional.
Walls, Ceilings, Skirtings and BICs
Wall and Ceiling Materials: Drywall
The interior wall finishes observed in the house were generally functional at the time of the inspection.
The interior ceiling finishes observed in the house were generally functional at the time of the inspection.
All BIC exteriors and interiors in the bedrooms and passage were functional.
It appeared that the grouting on the skirting tiling had been repaired at the skirtings after the skirting had been installed and painted. The grout buildup will need to be removed from the top of the skirtings and the skirtings touched up or repainted.
.JPG) | .JPG) |
 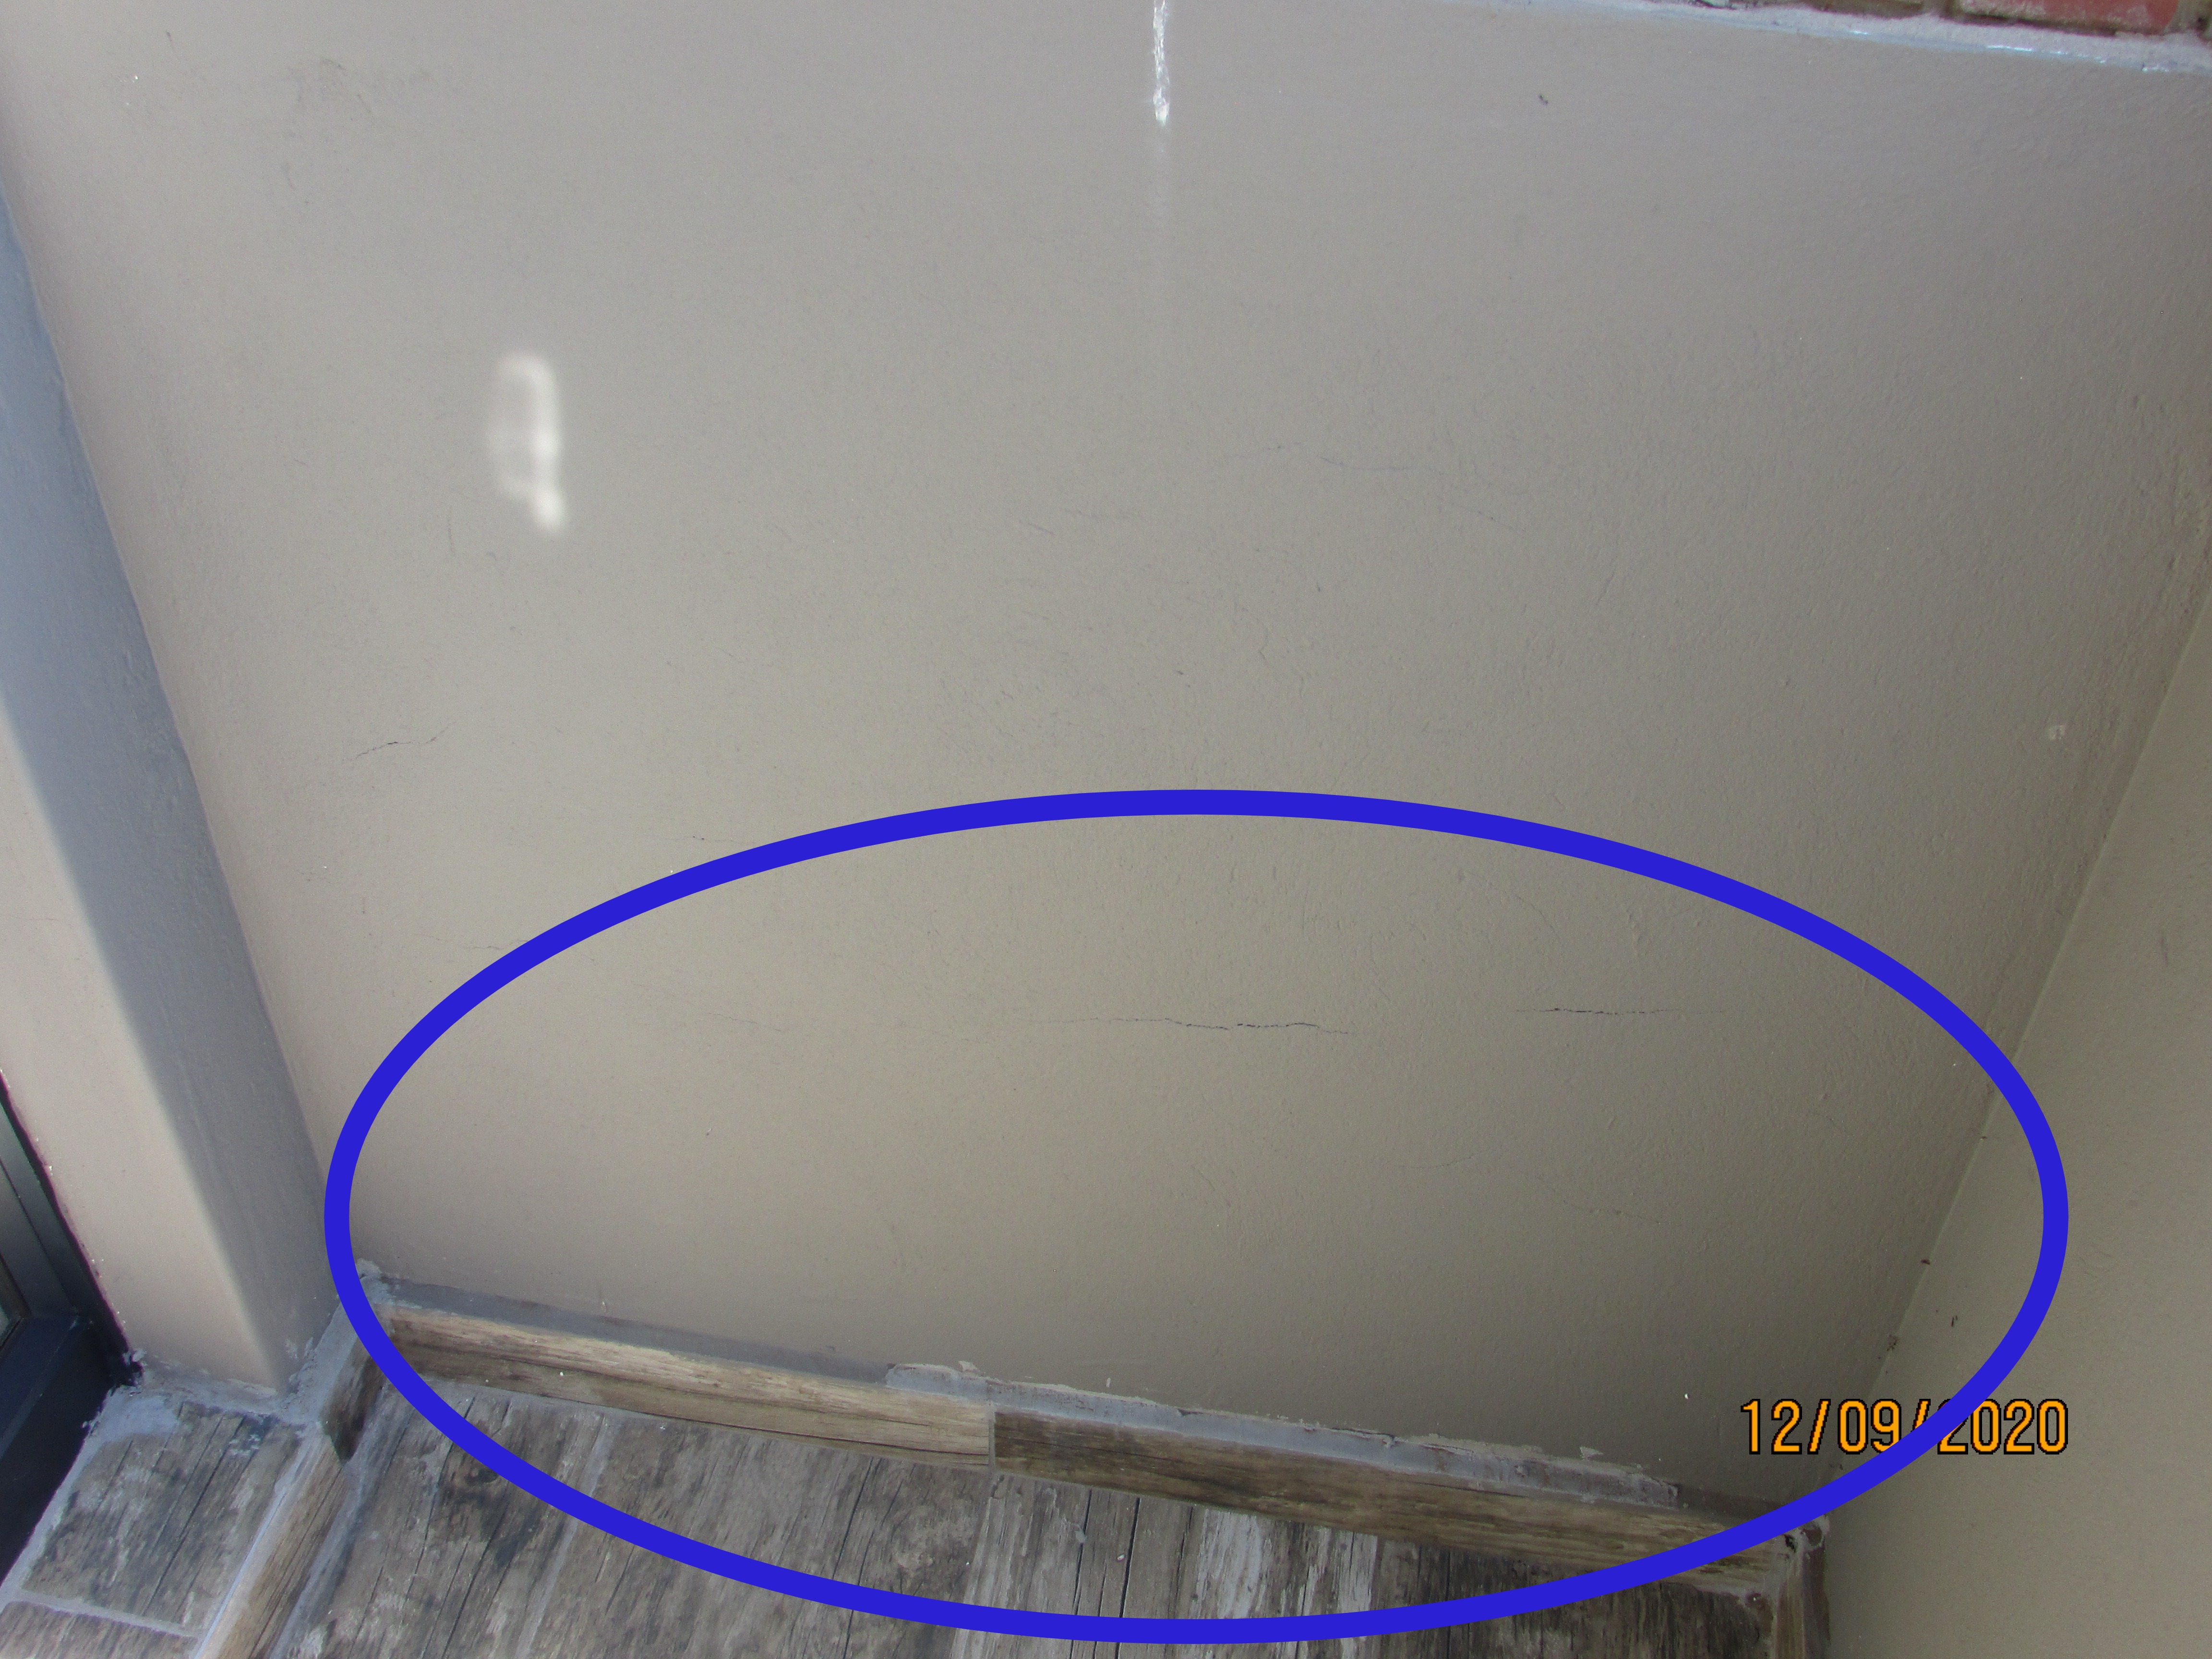 |
.JPG) | 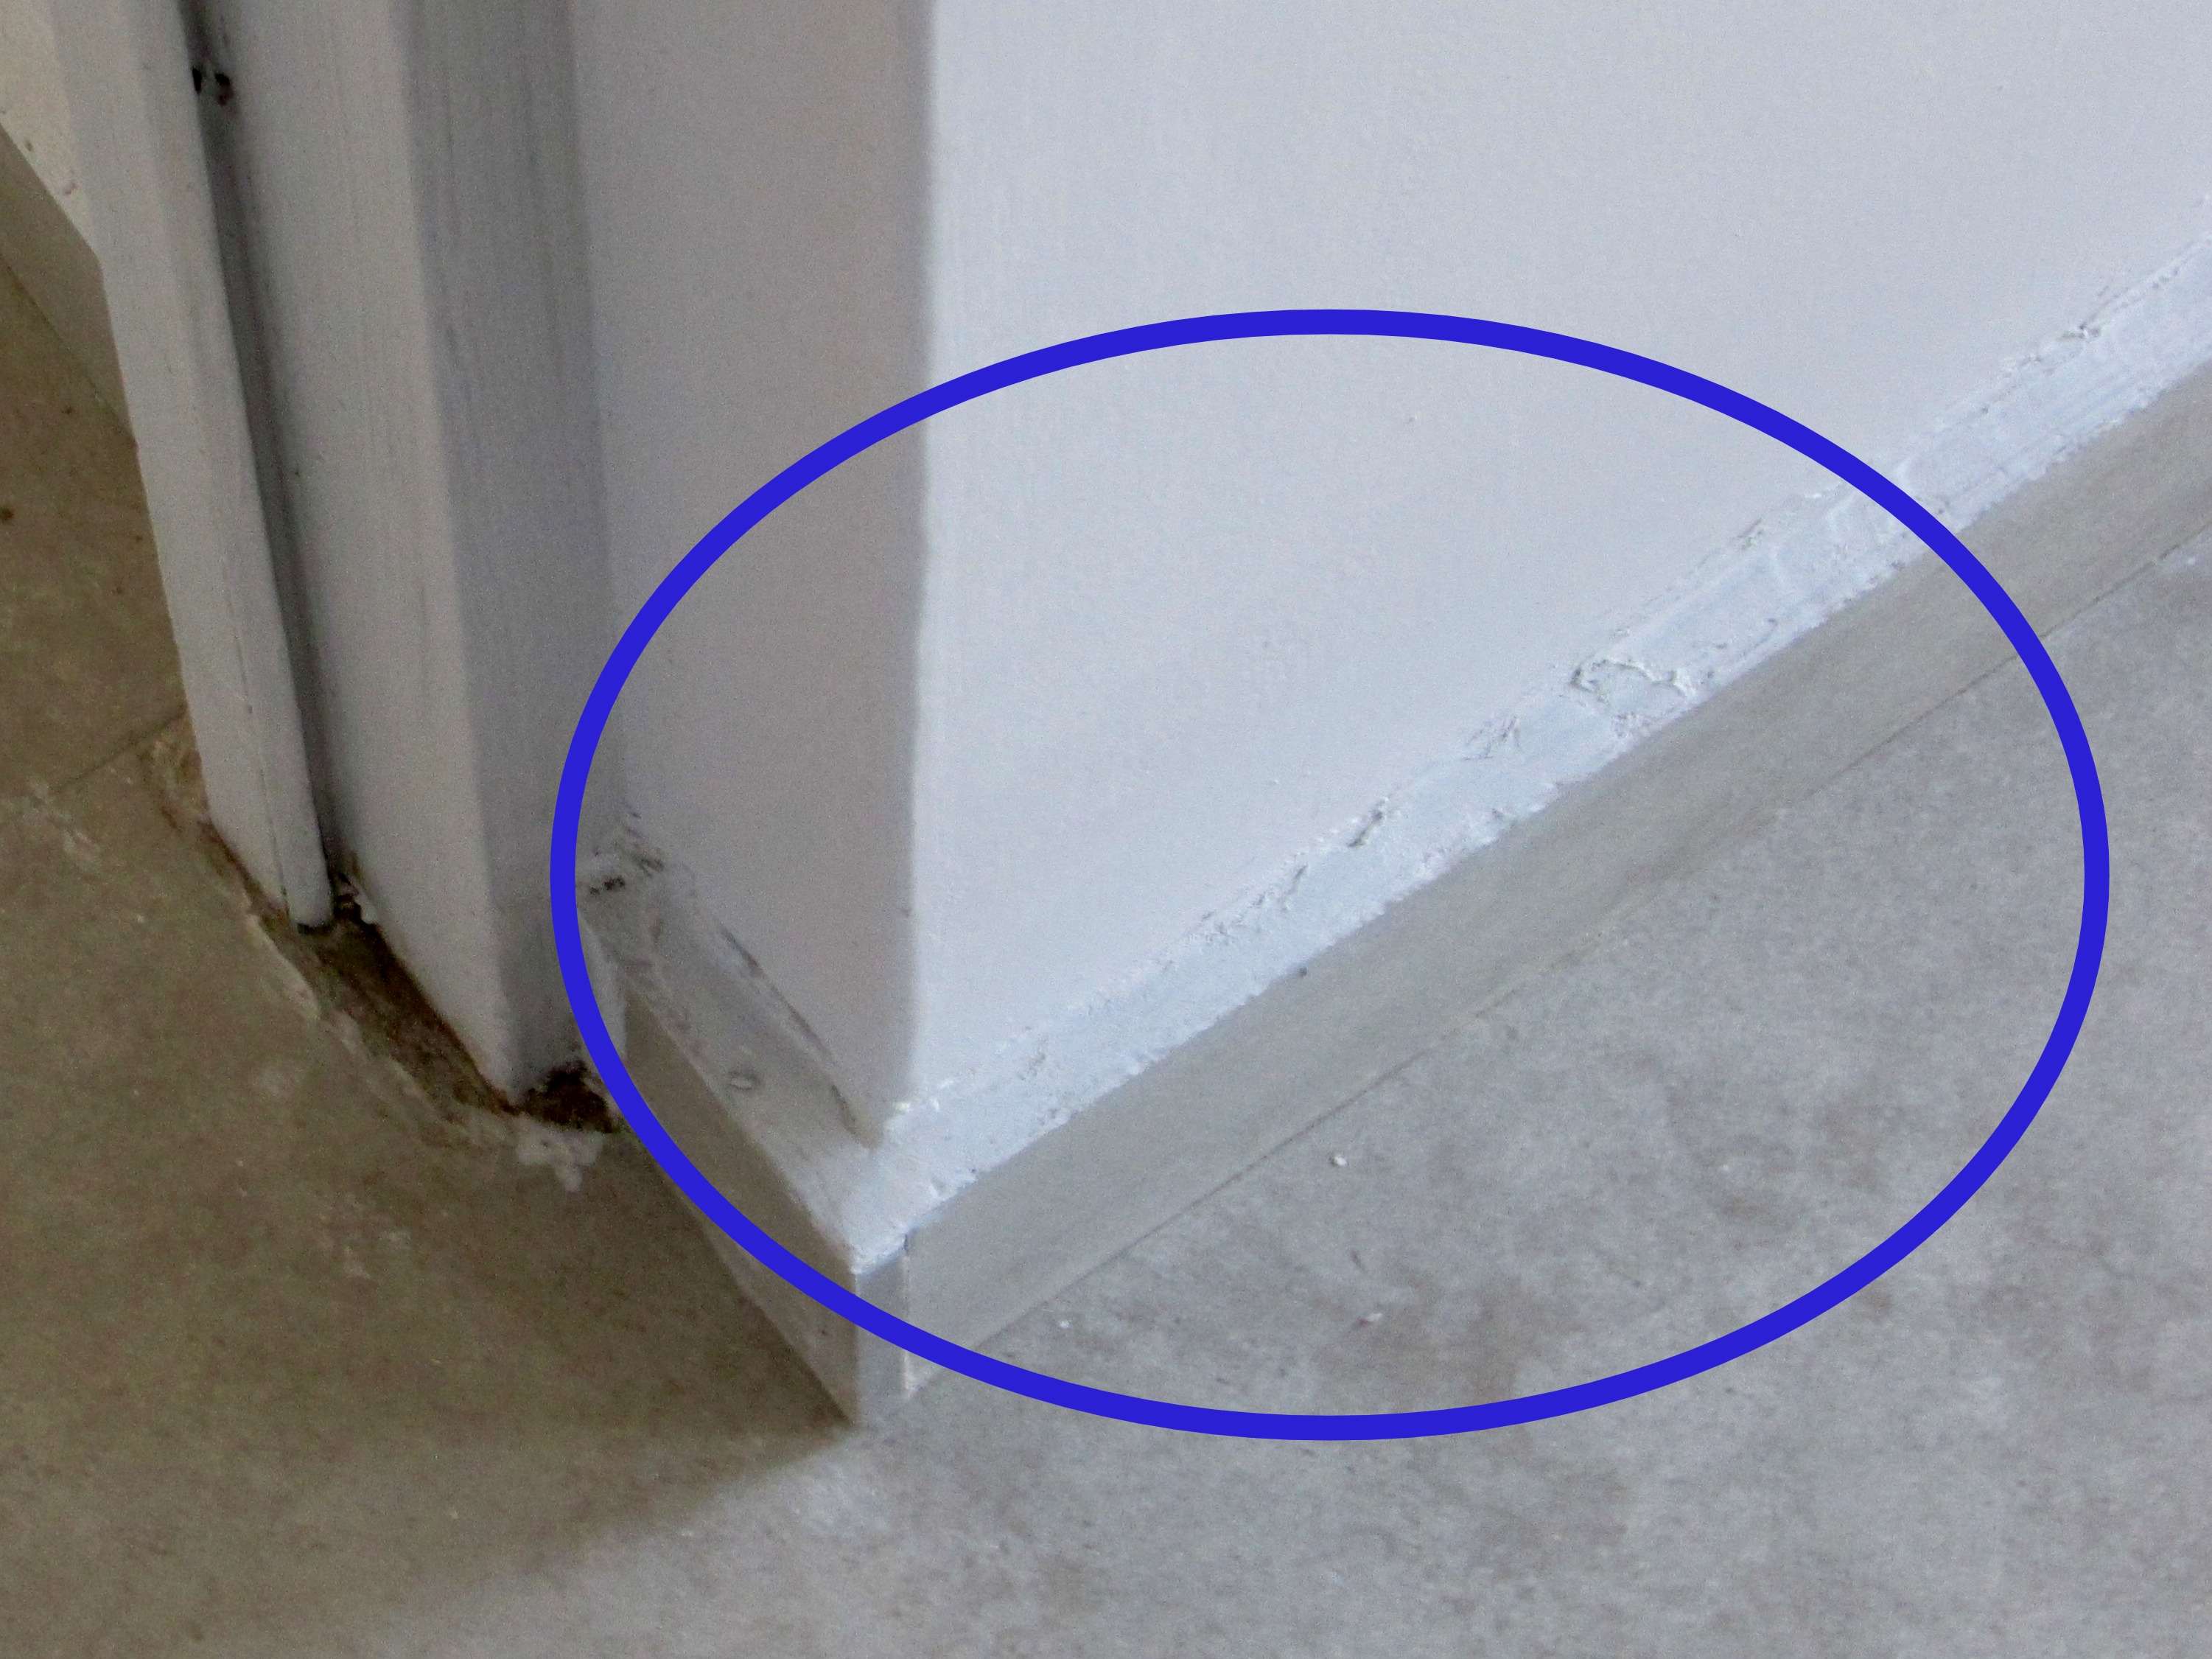 |
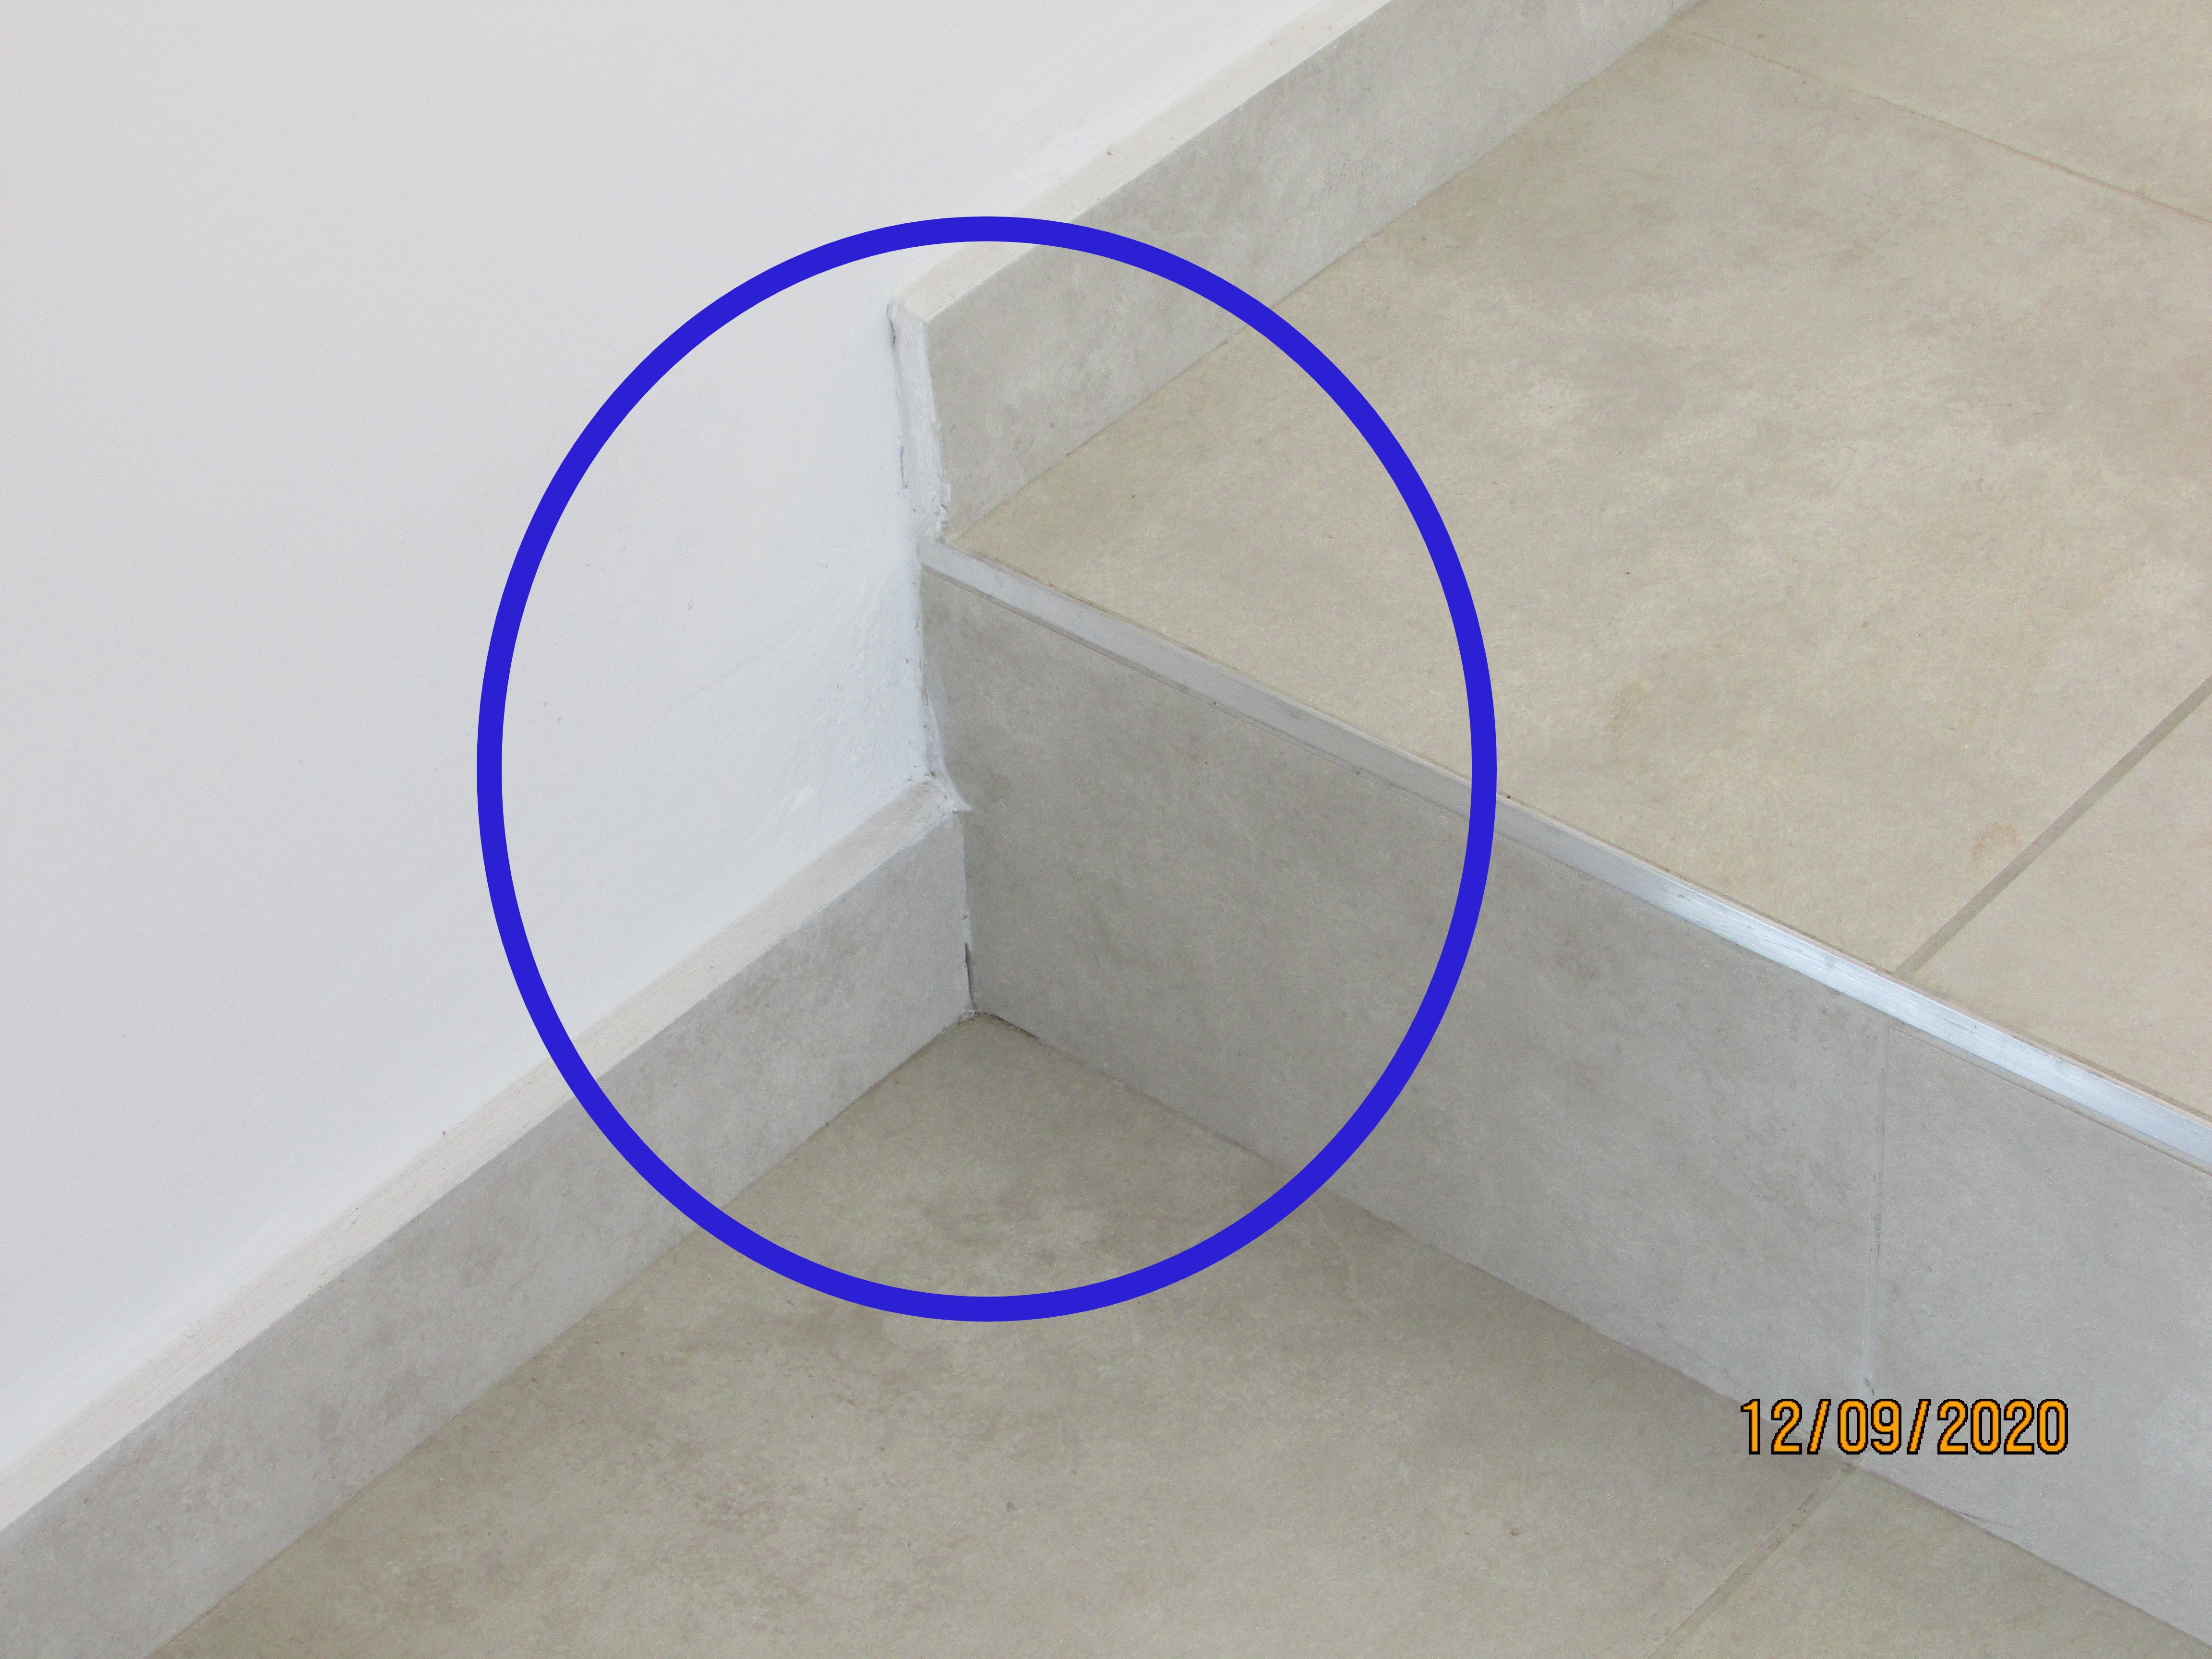 |
During the inspection I noted some areas of the interior paint job that require touch-up. This is normal in new construction. Paint touch-up is beyond the scope of this inspection but I recommend working with the builder once you have moved in when you will have the opportunity to make a snag list so that you can get the interior paint job tuned up to your satisfaction.
- Ceiling of the passage to the garage.
- Walls within the kitchen cupboards require another coat of paint.
- Paint and plasterwork around internal door frames should be redone. This was a poor finish! The best solution is to fit architraves to make the finish here acceptable.
- Corner at the ceiling in the ground floor bedroom needed attention.
- Paint touch required here in the main bathroom en-suite.
- Repair required on the ceiling here in the main bathroom en-suite.
- Bad paintwork on the shadow cornices. The was a general defect applicable to all the shadow cornices in the house. They should all be repaired!
- Touch up required on window sill in bedroom 1's en-suite bathroom.
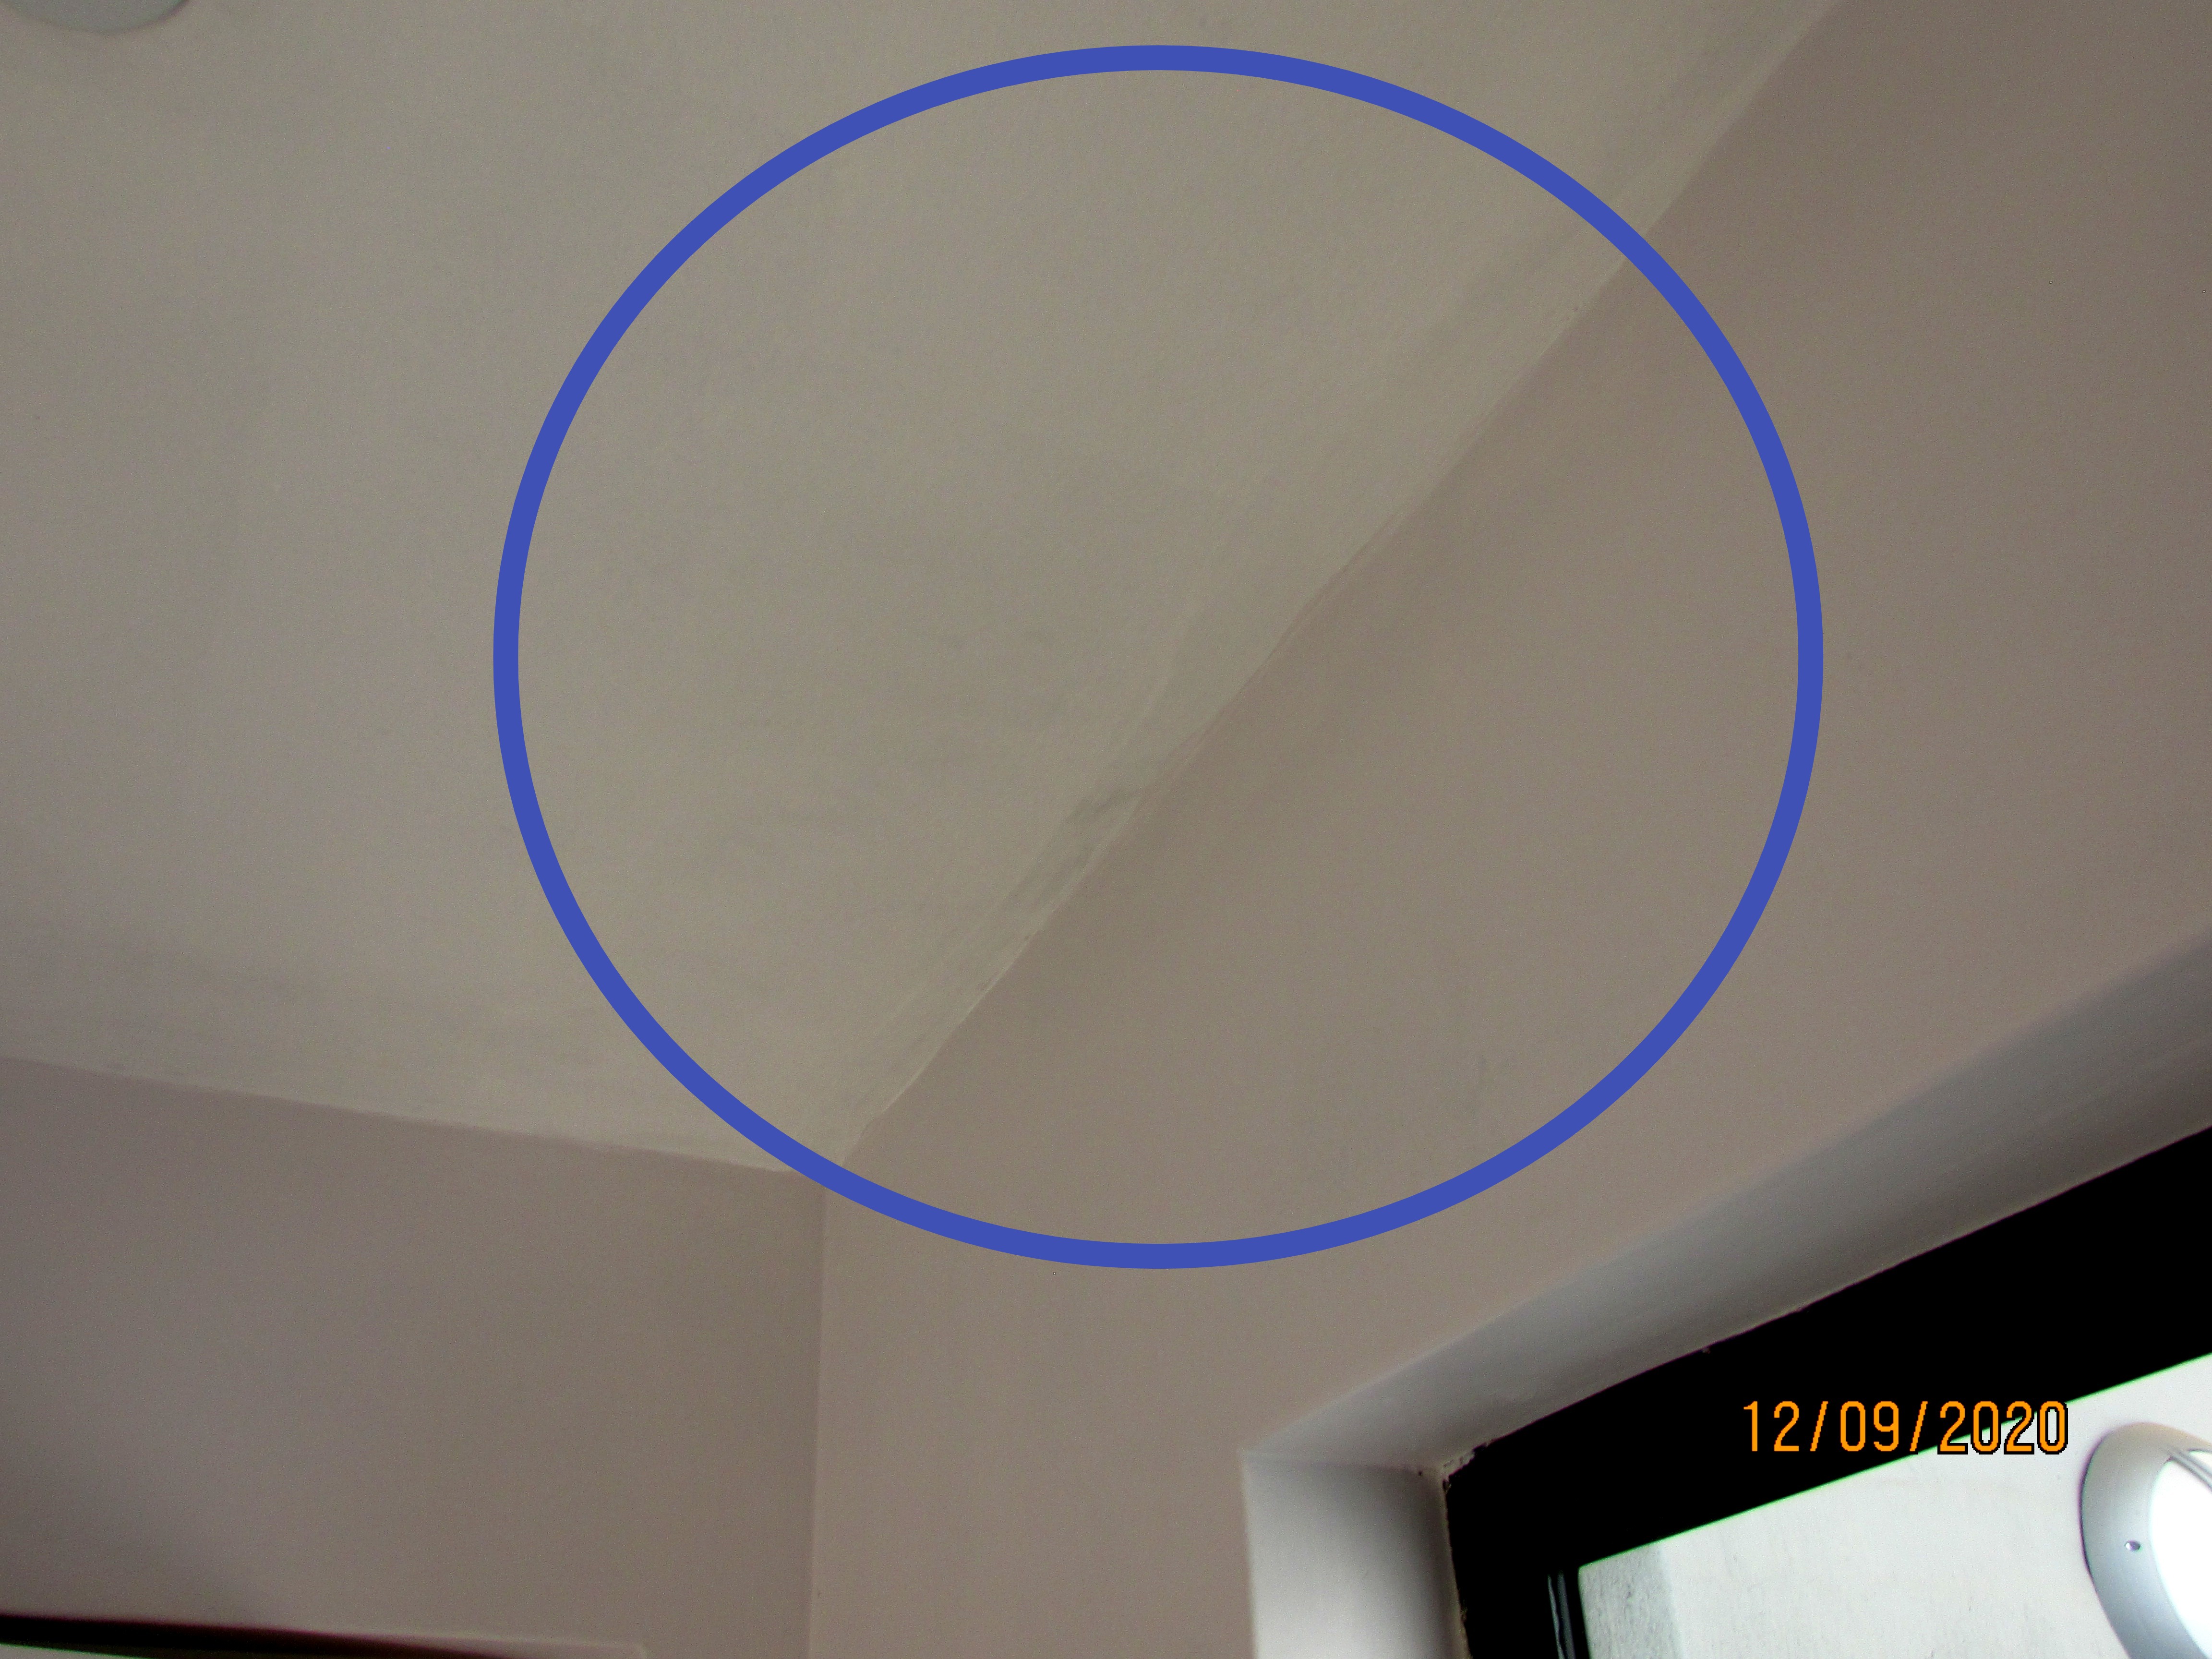
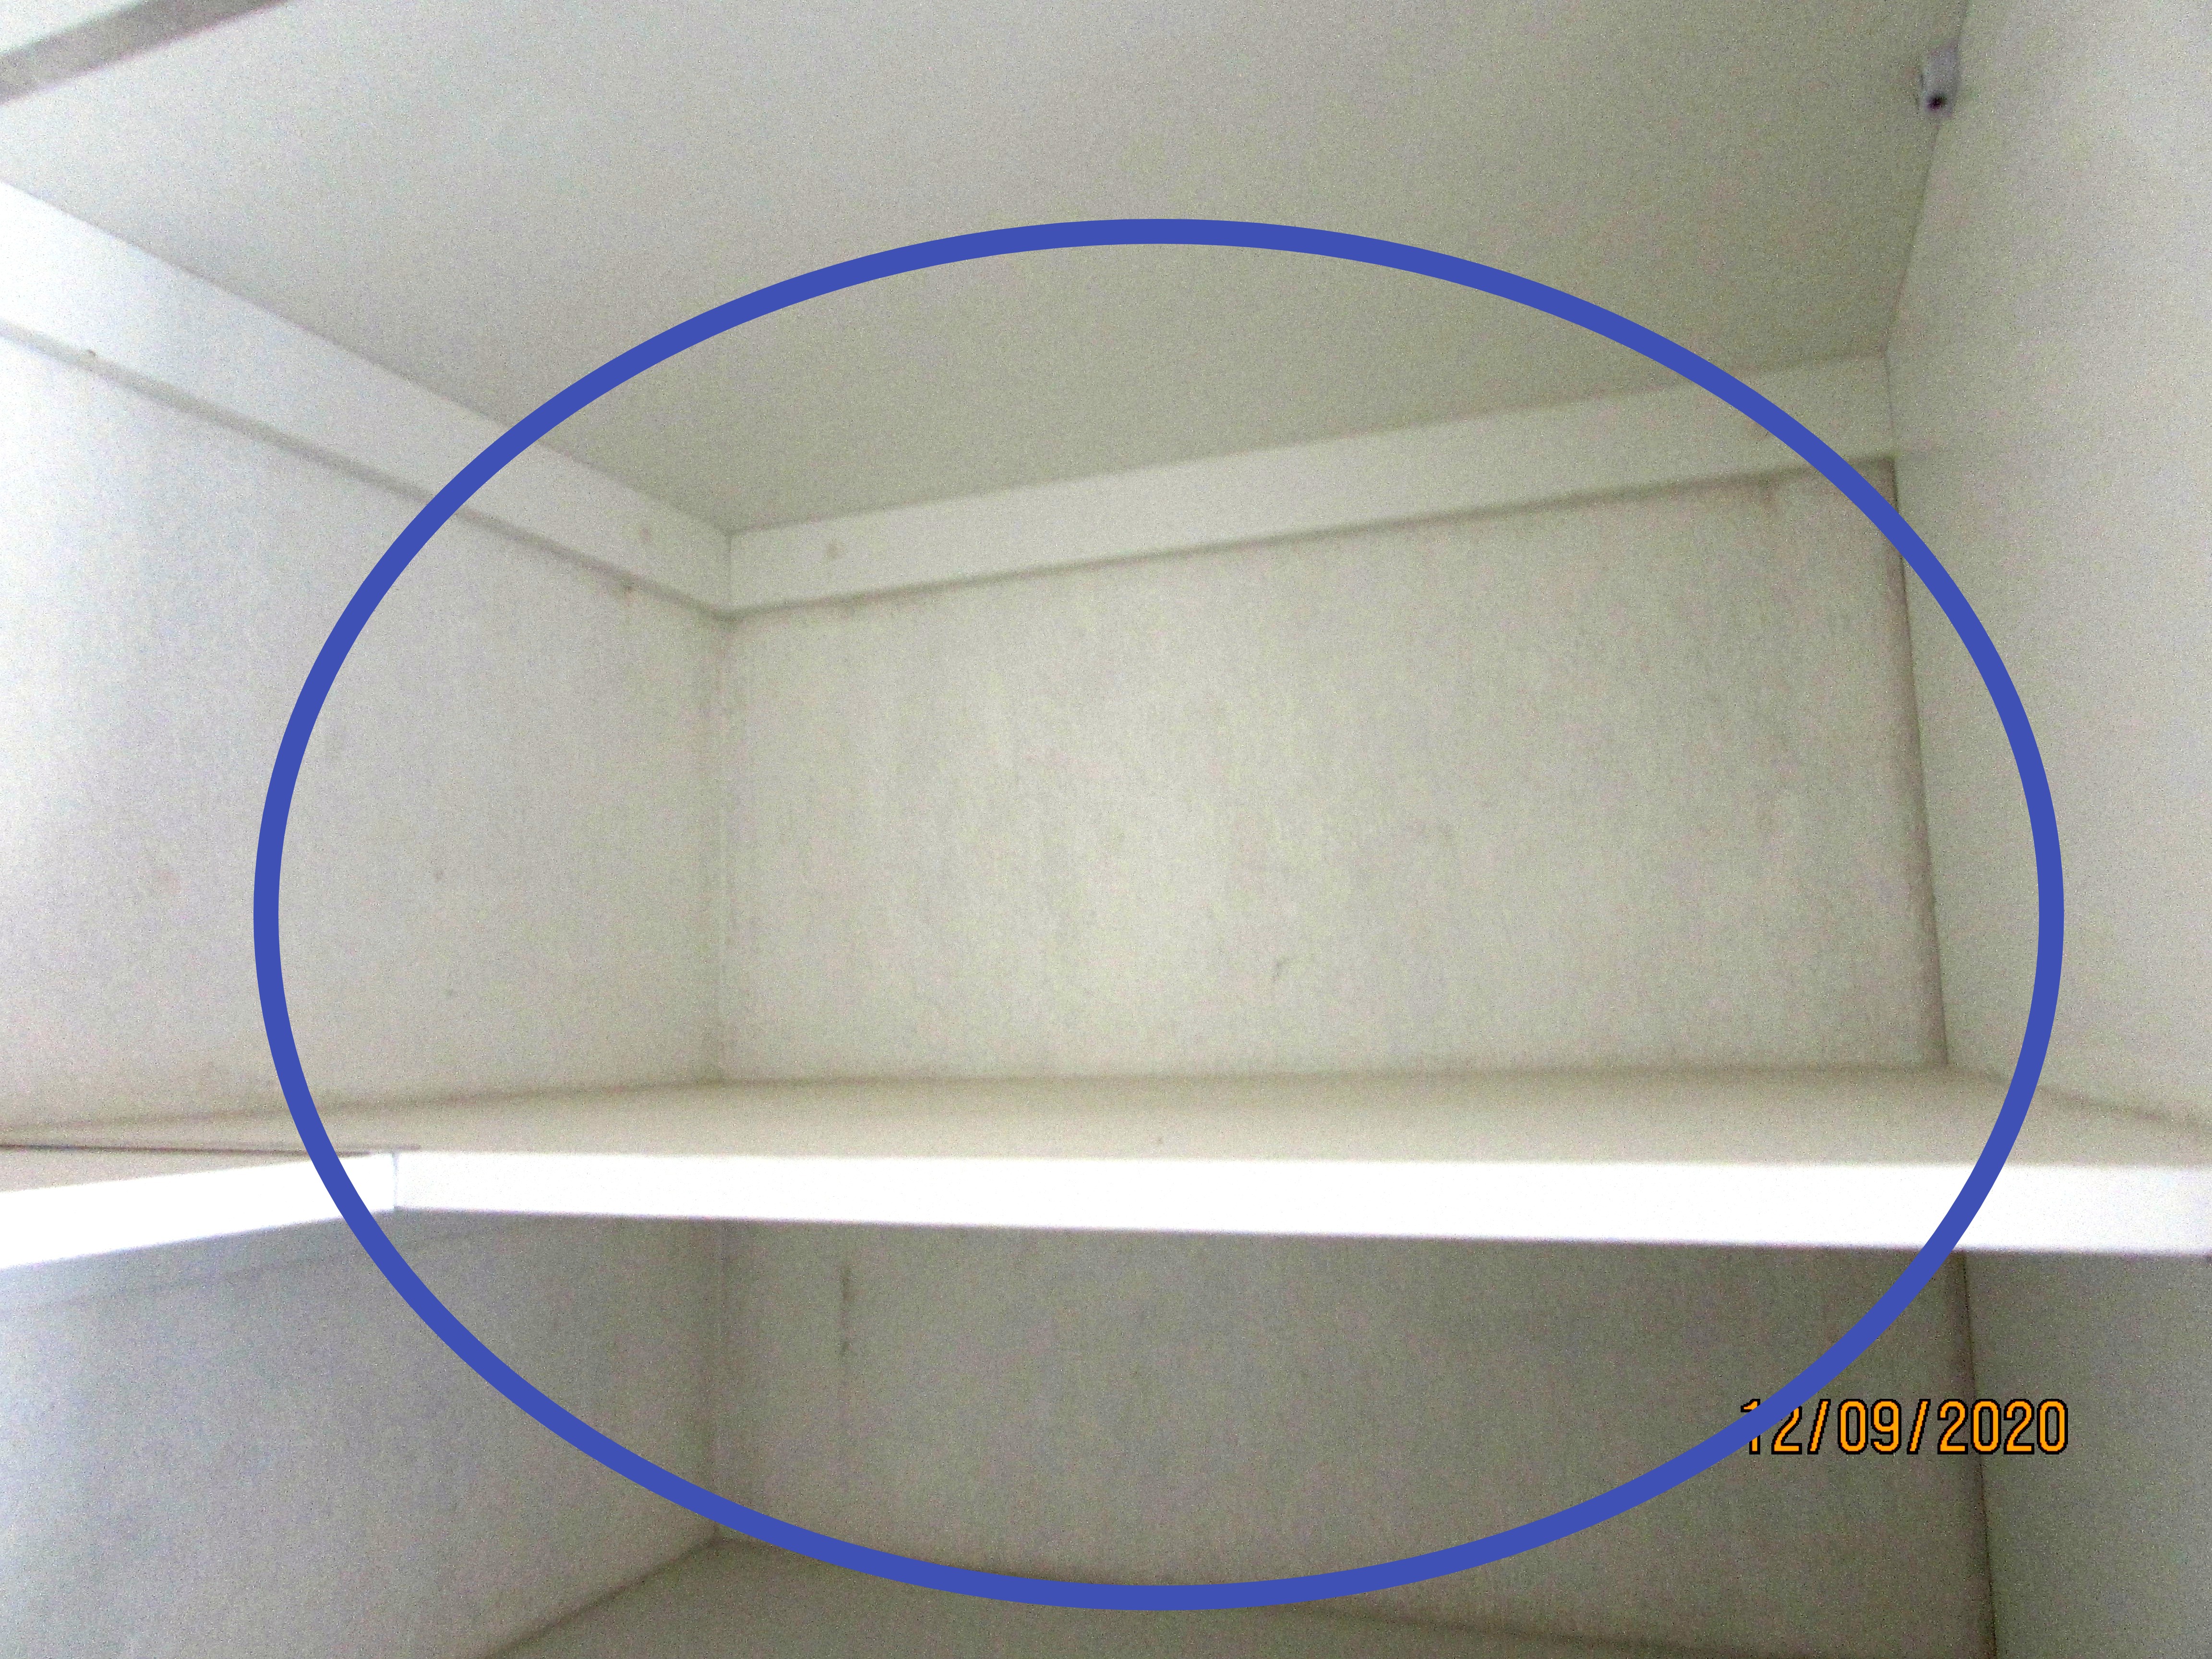
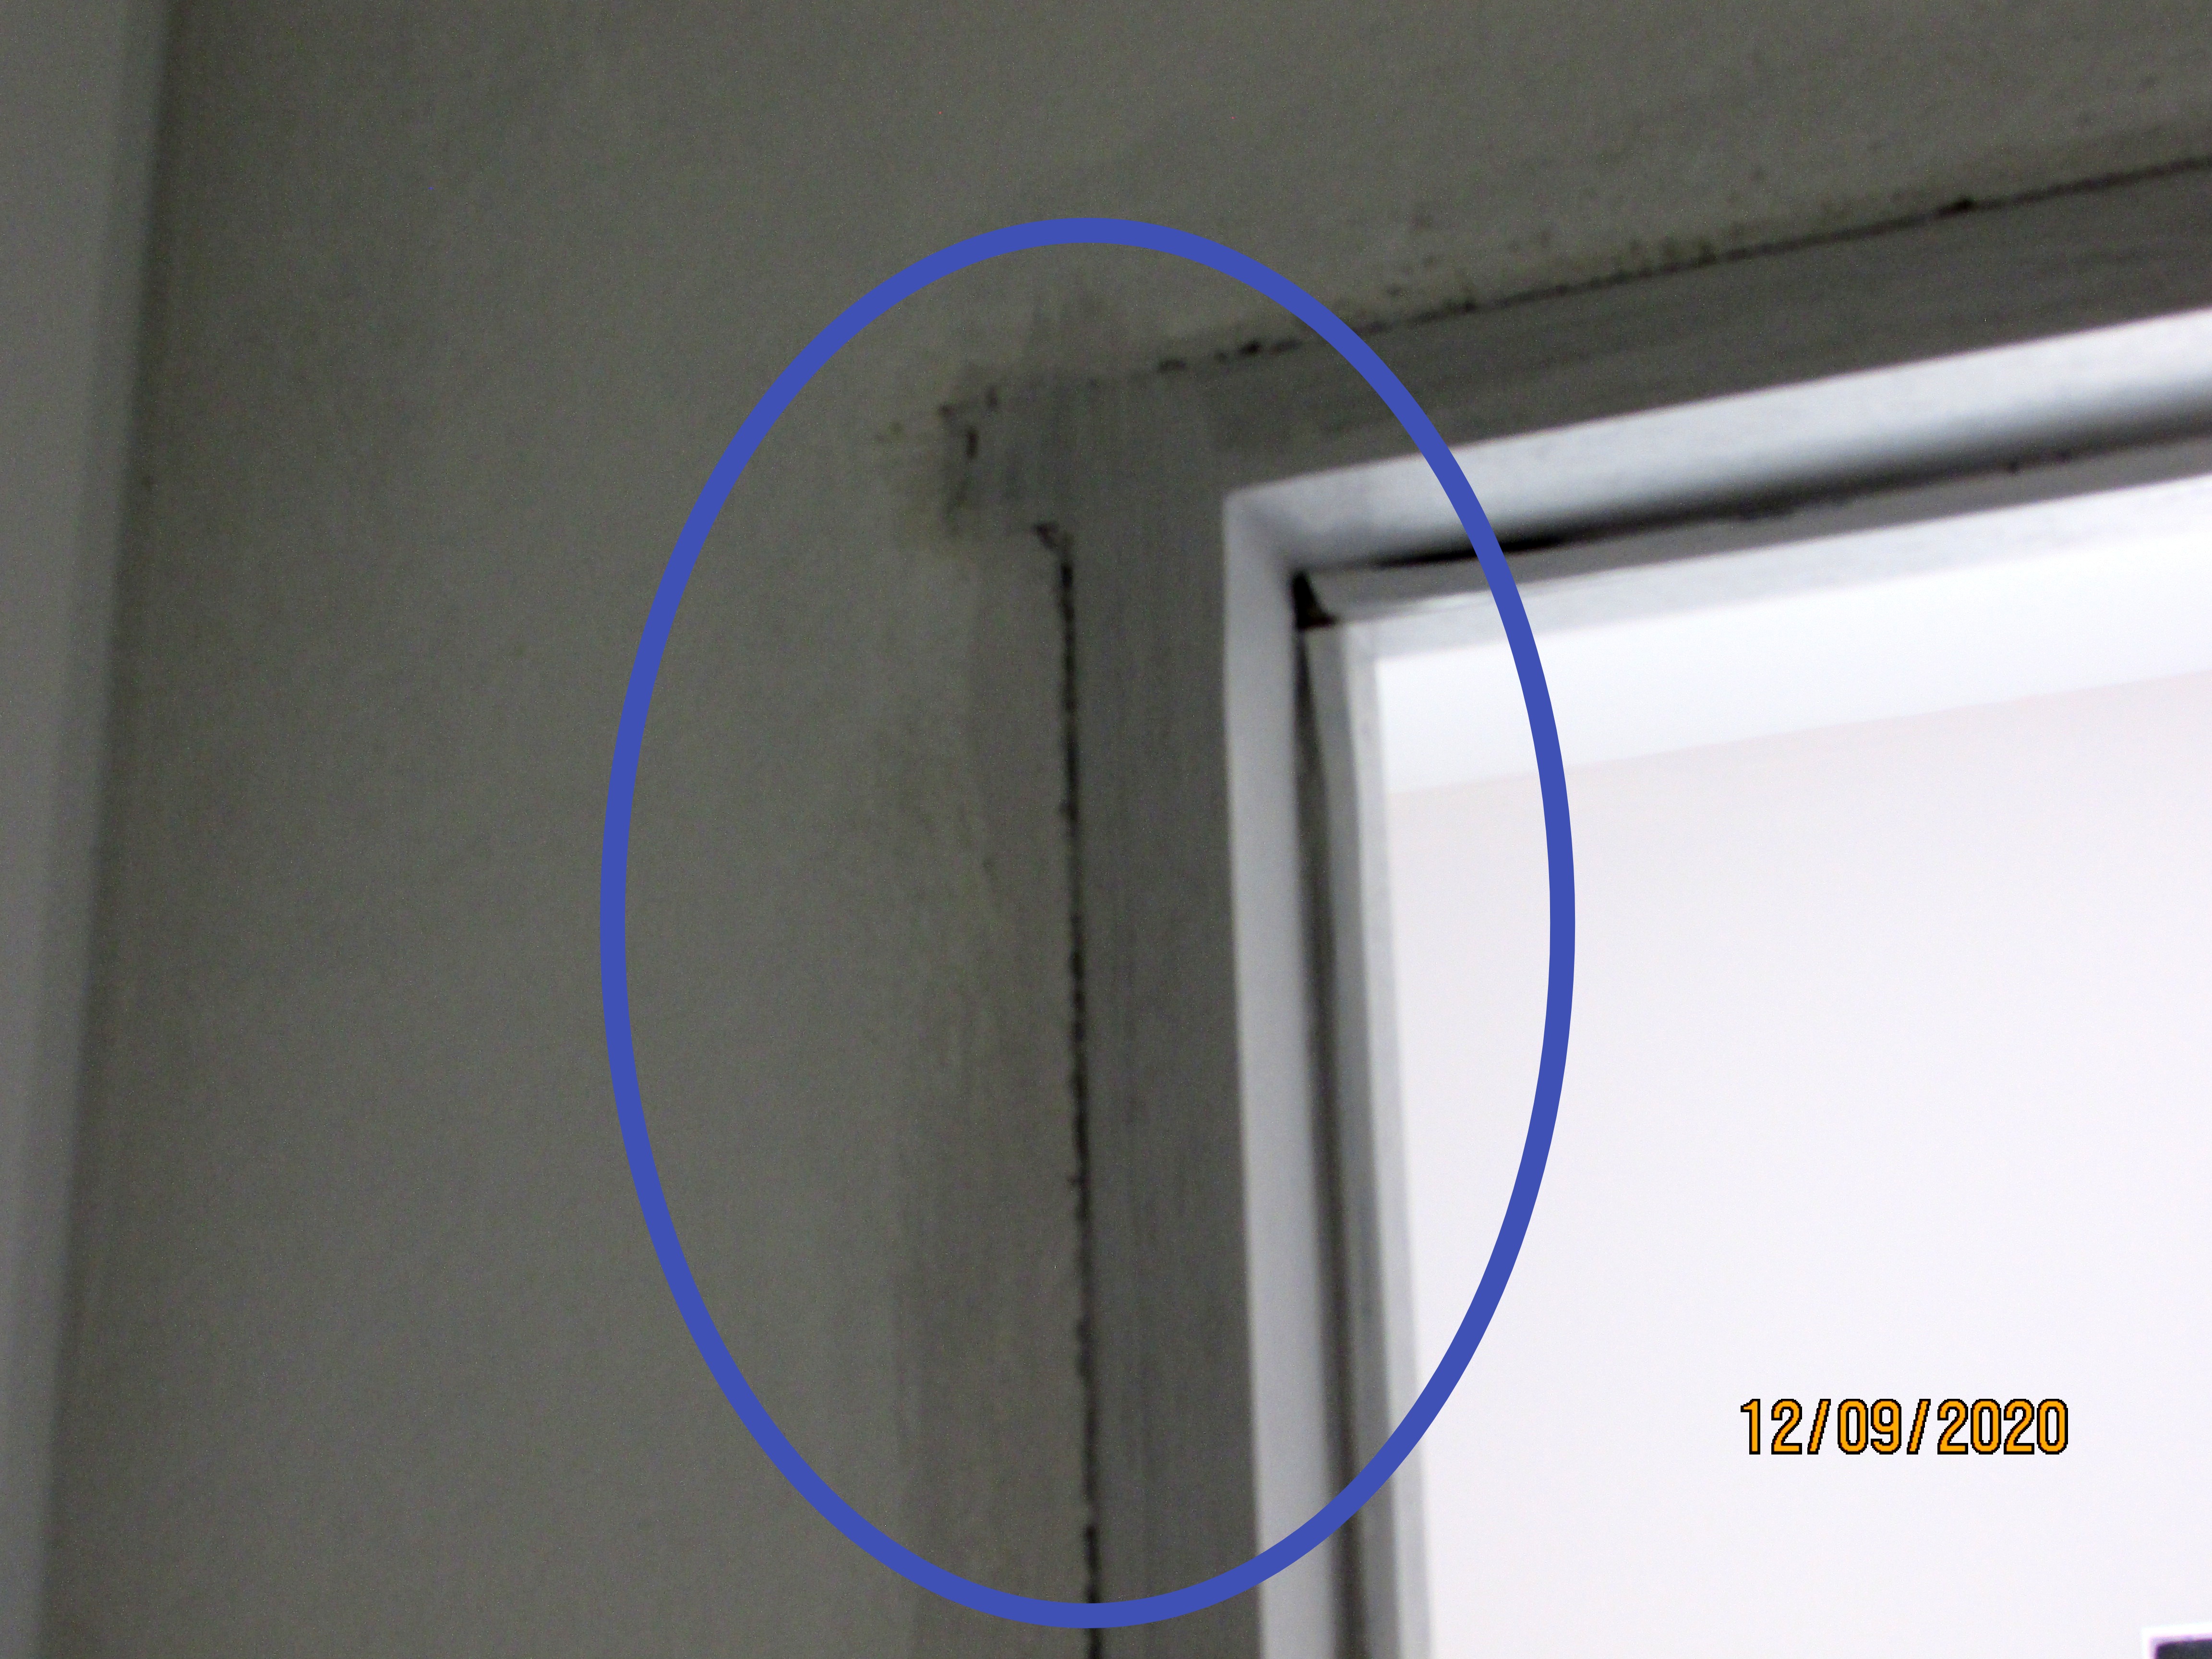
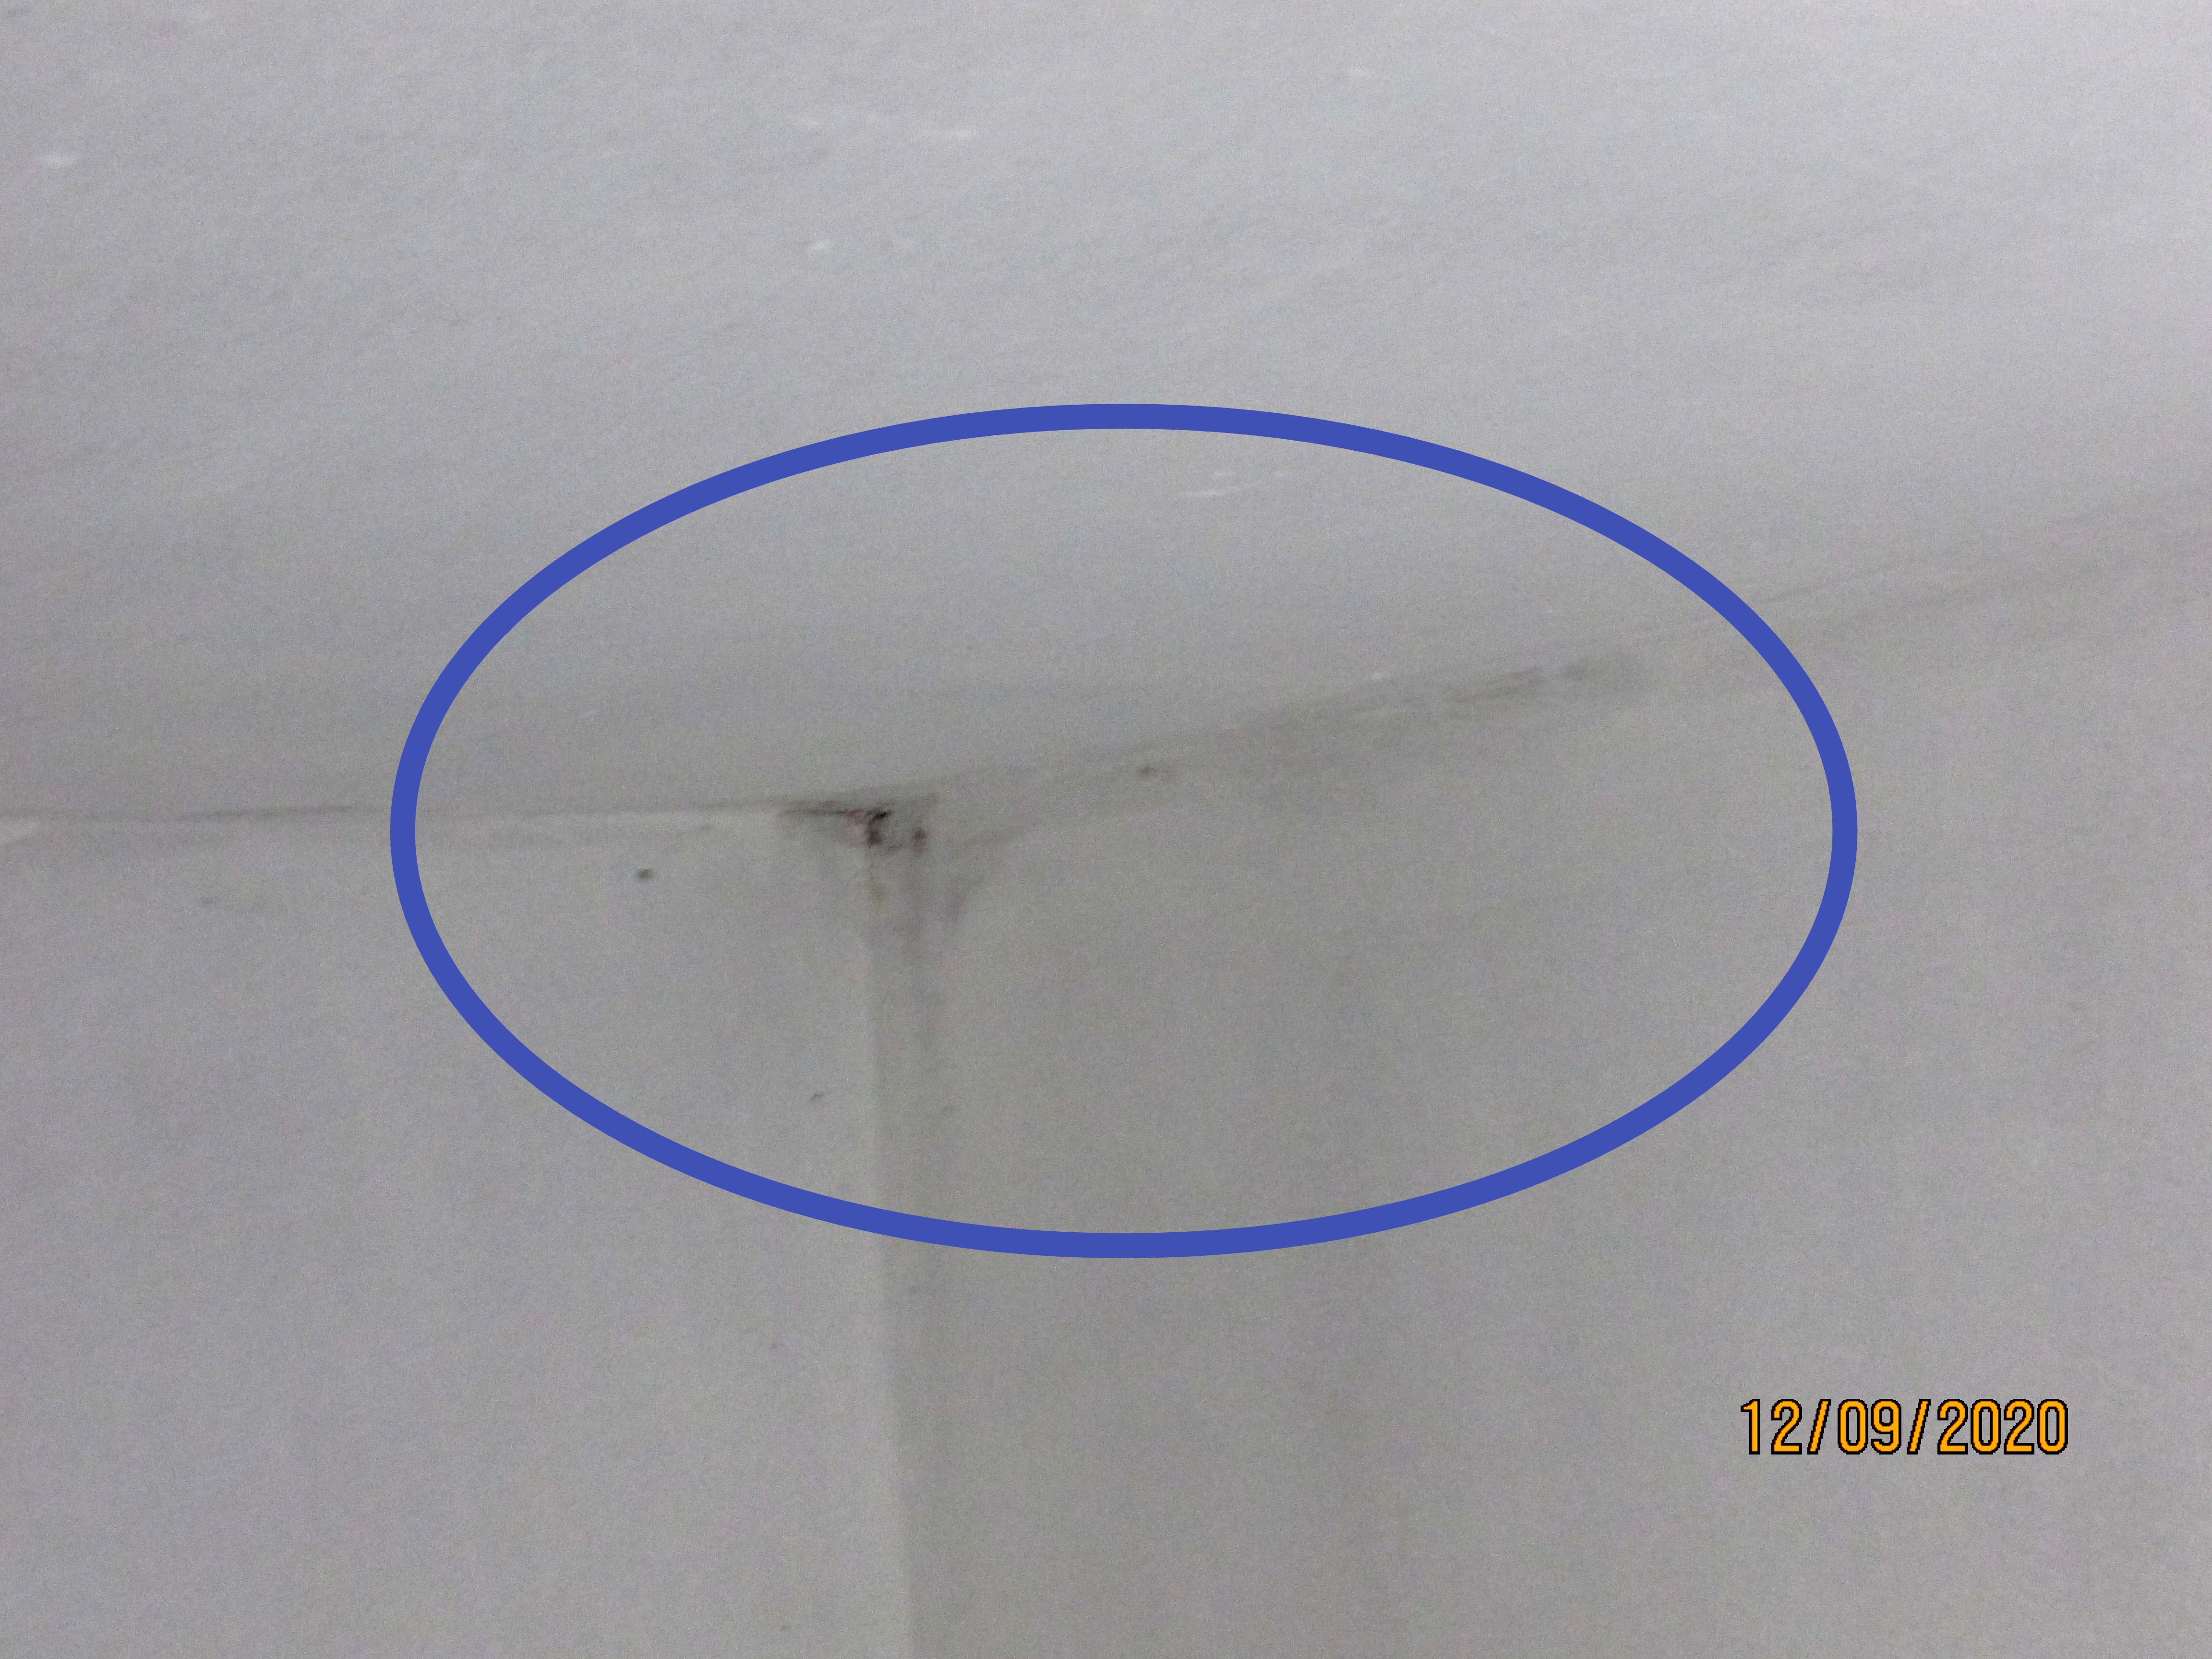
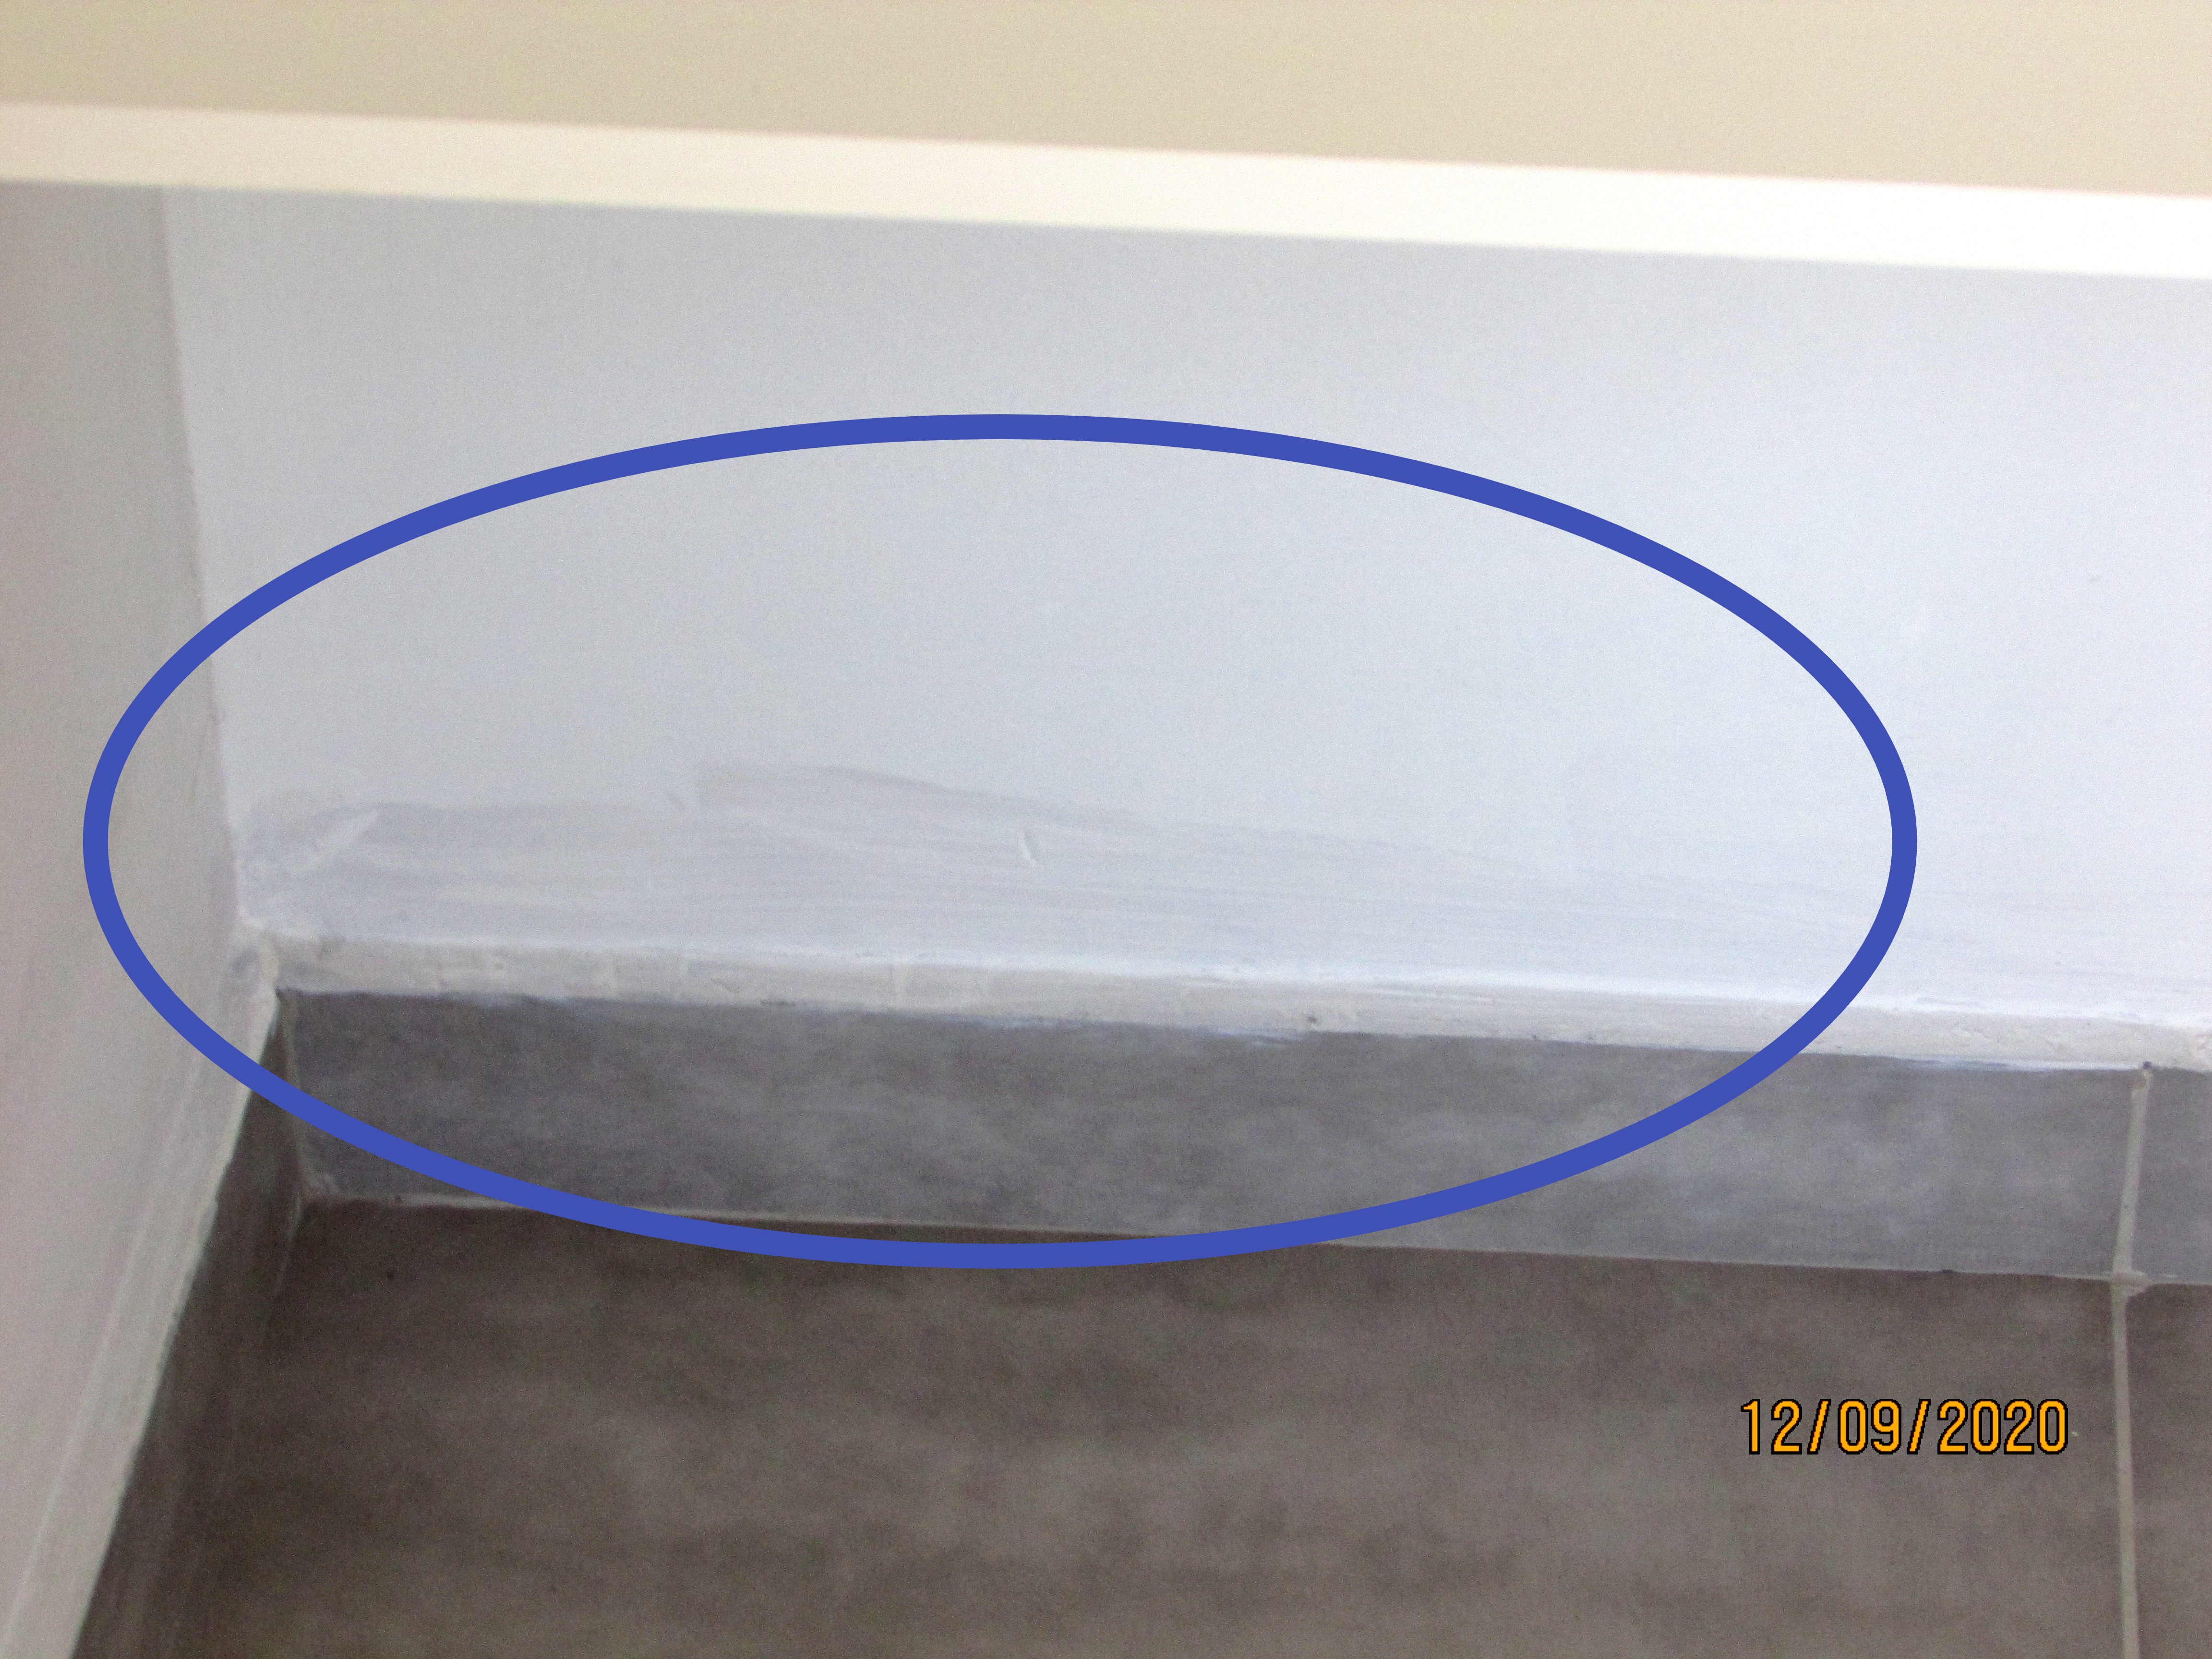
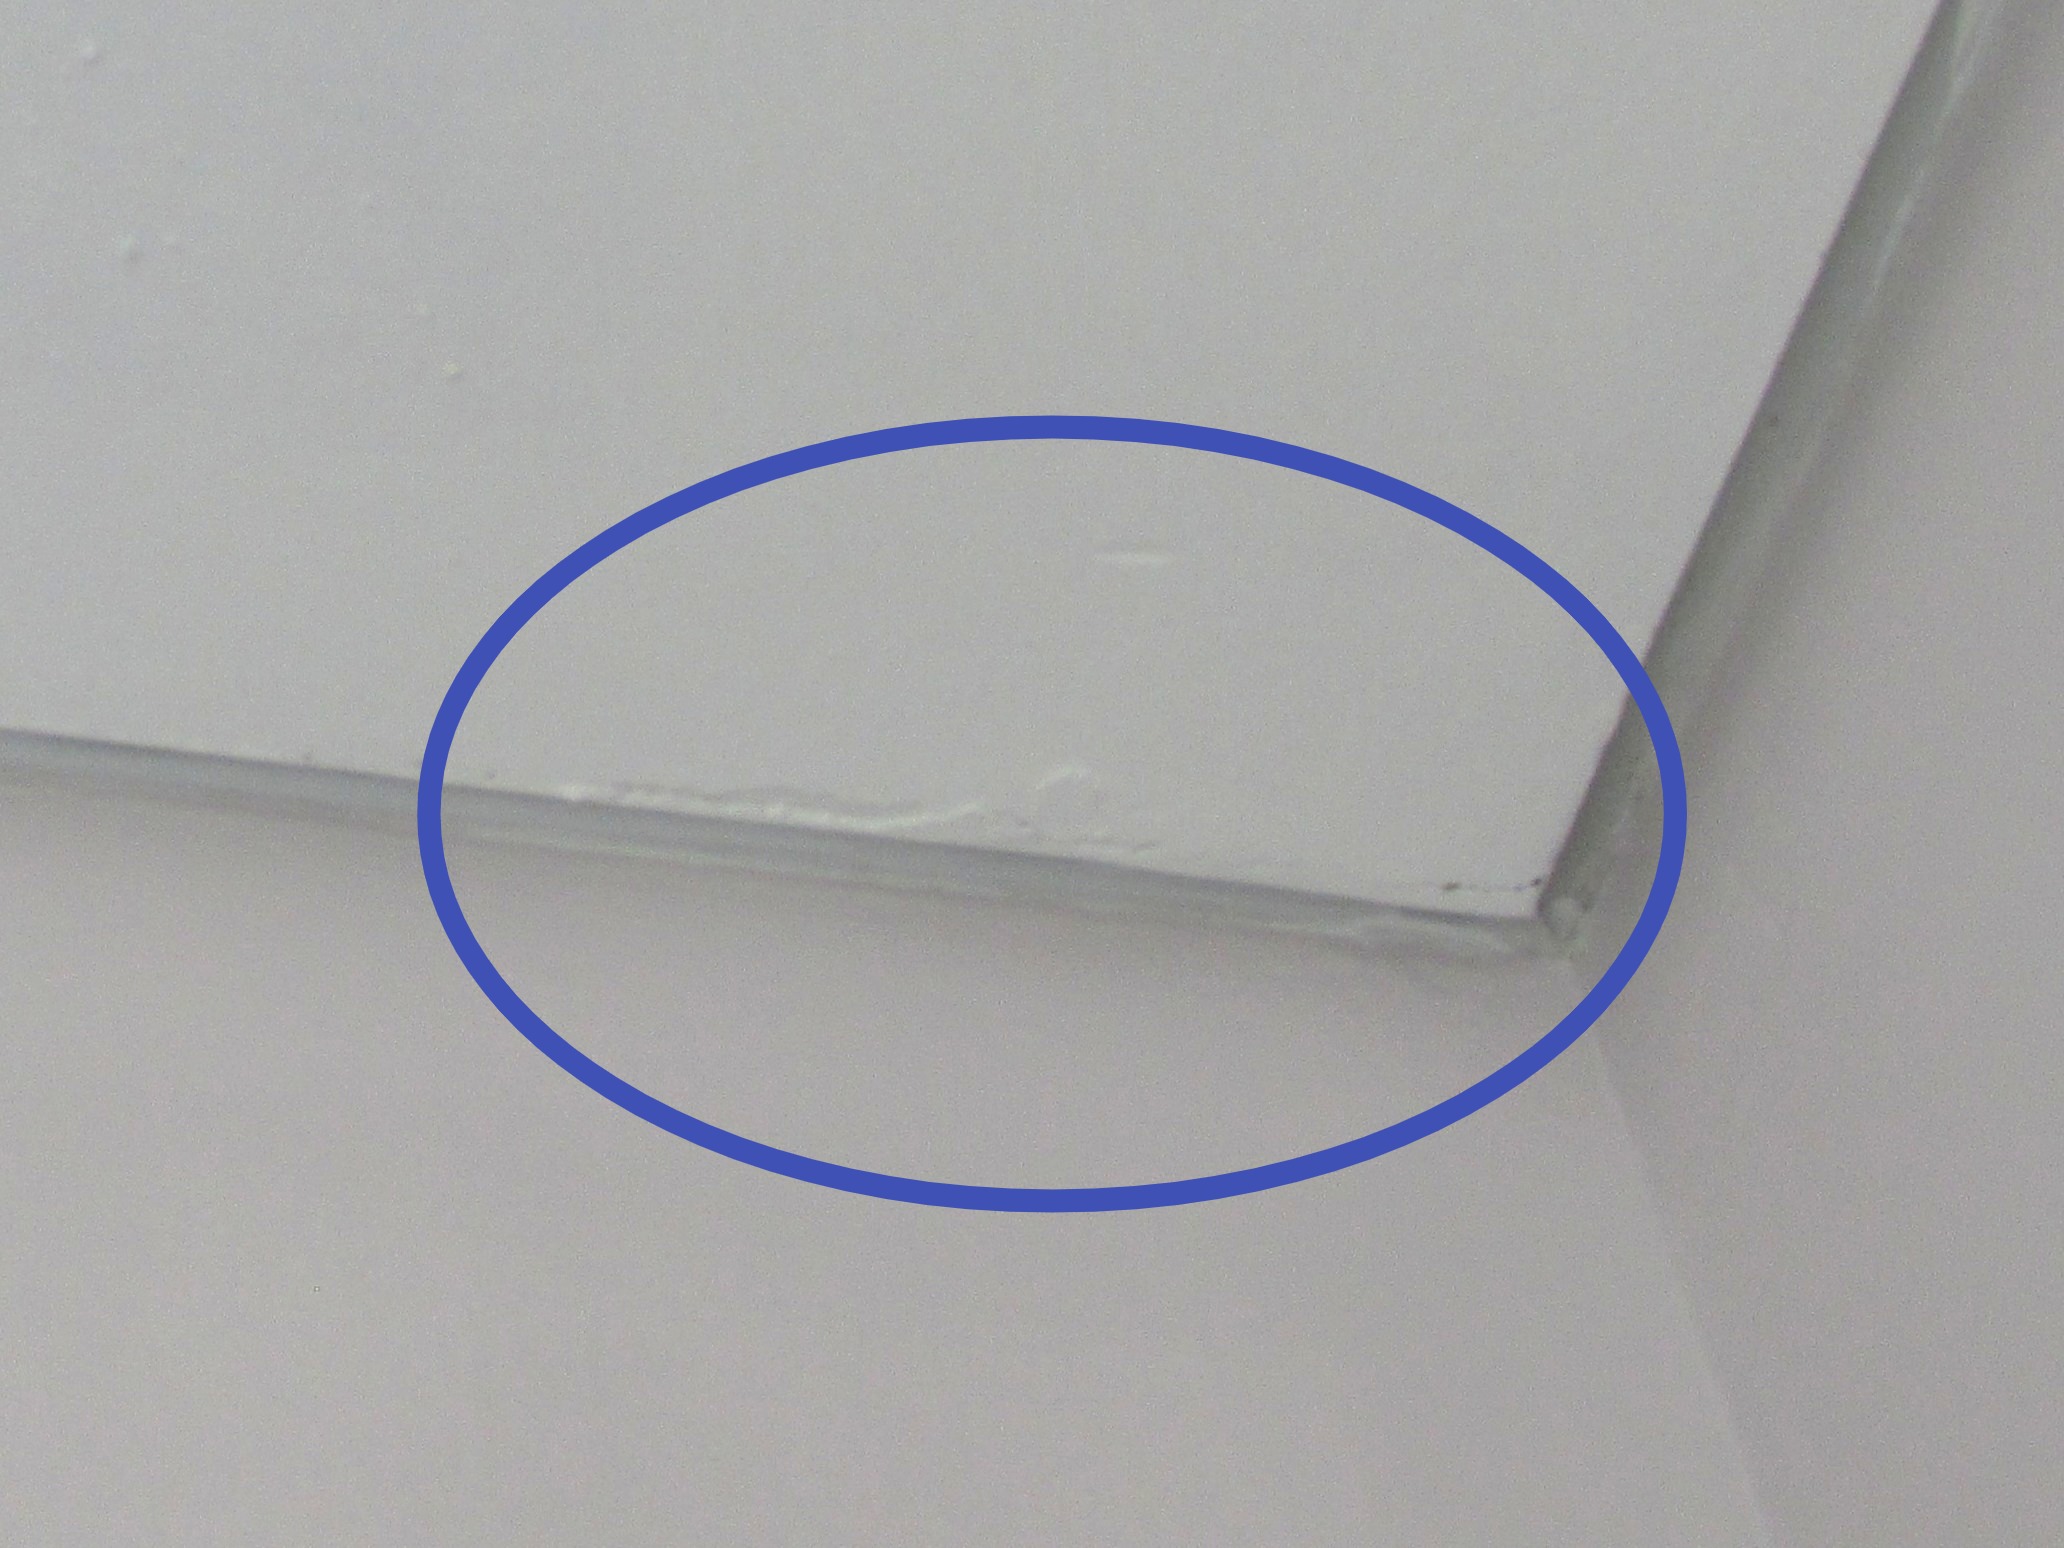
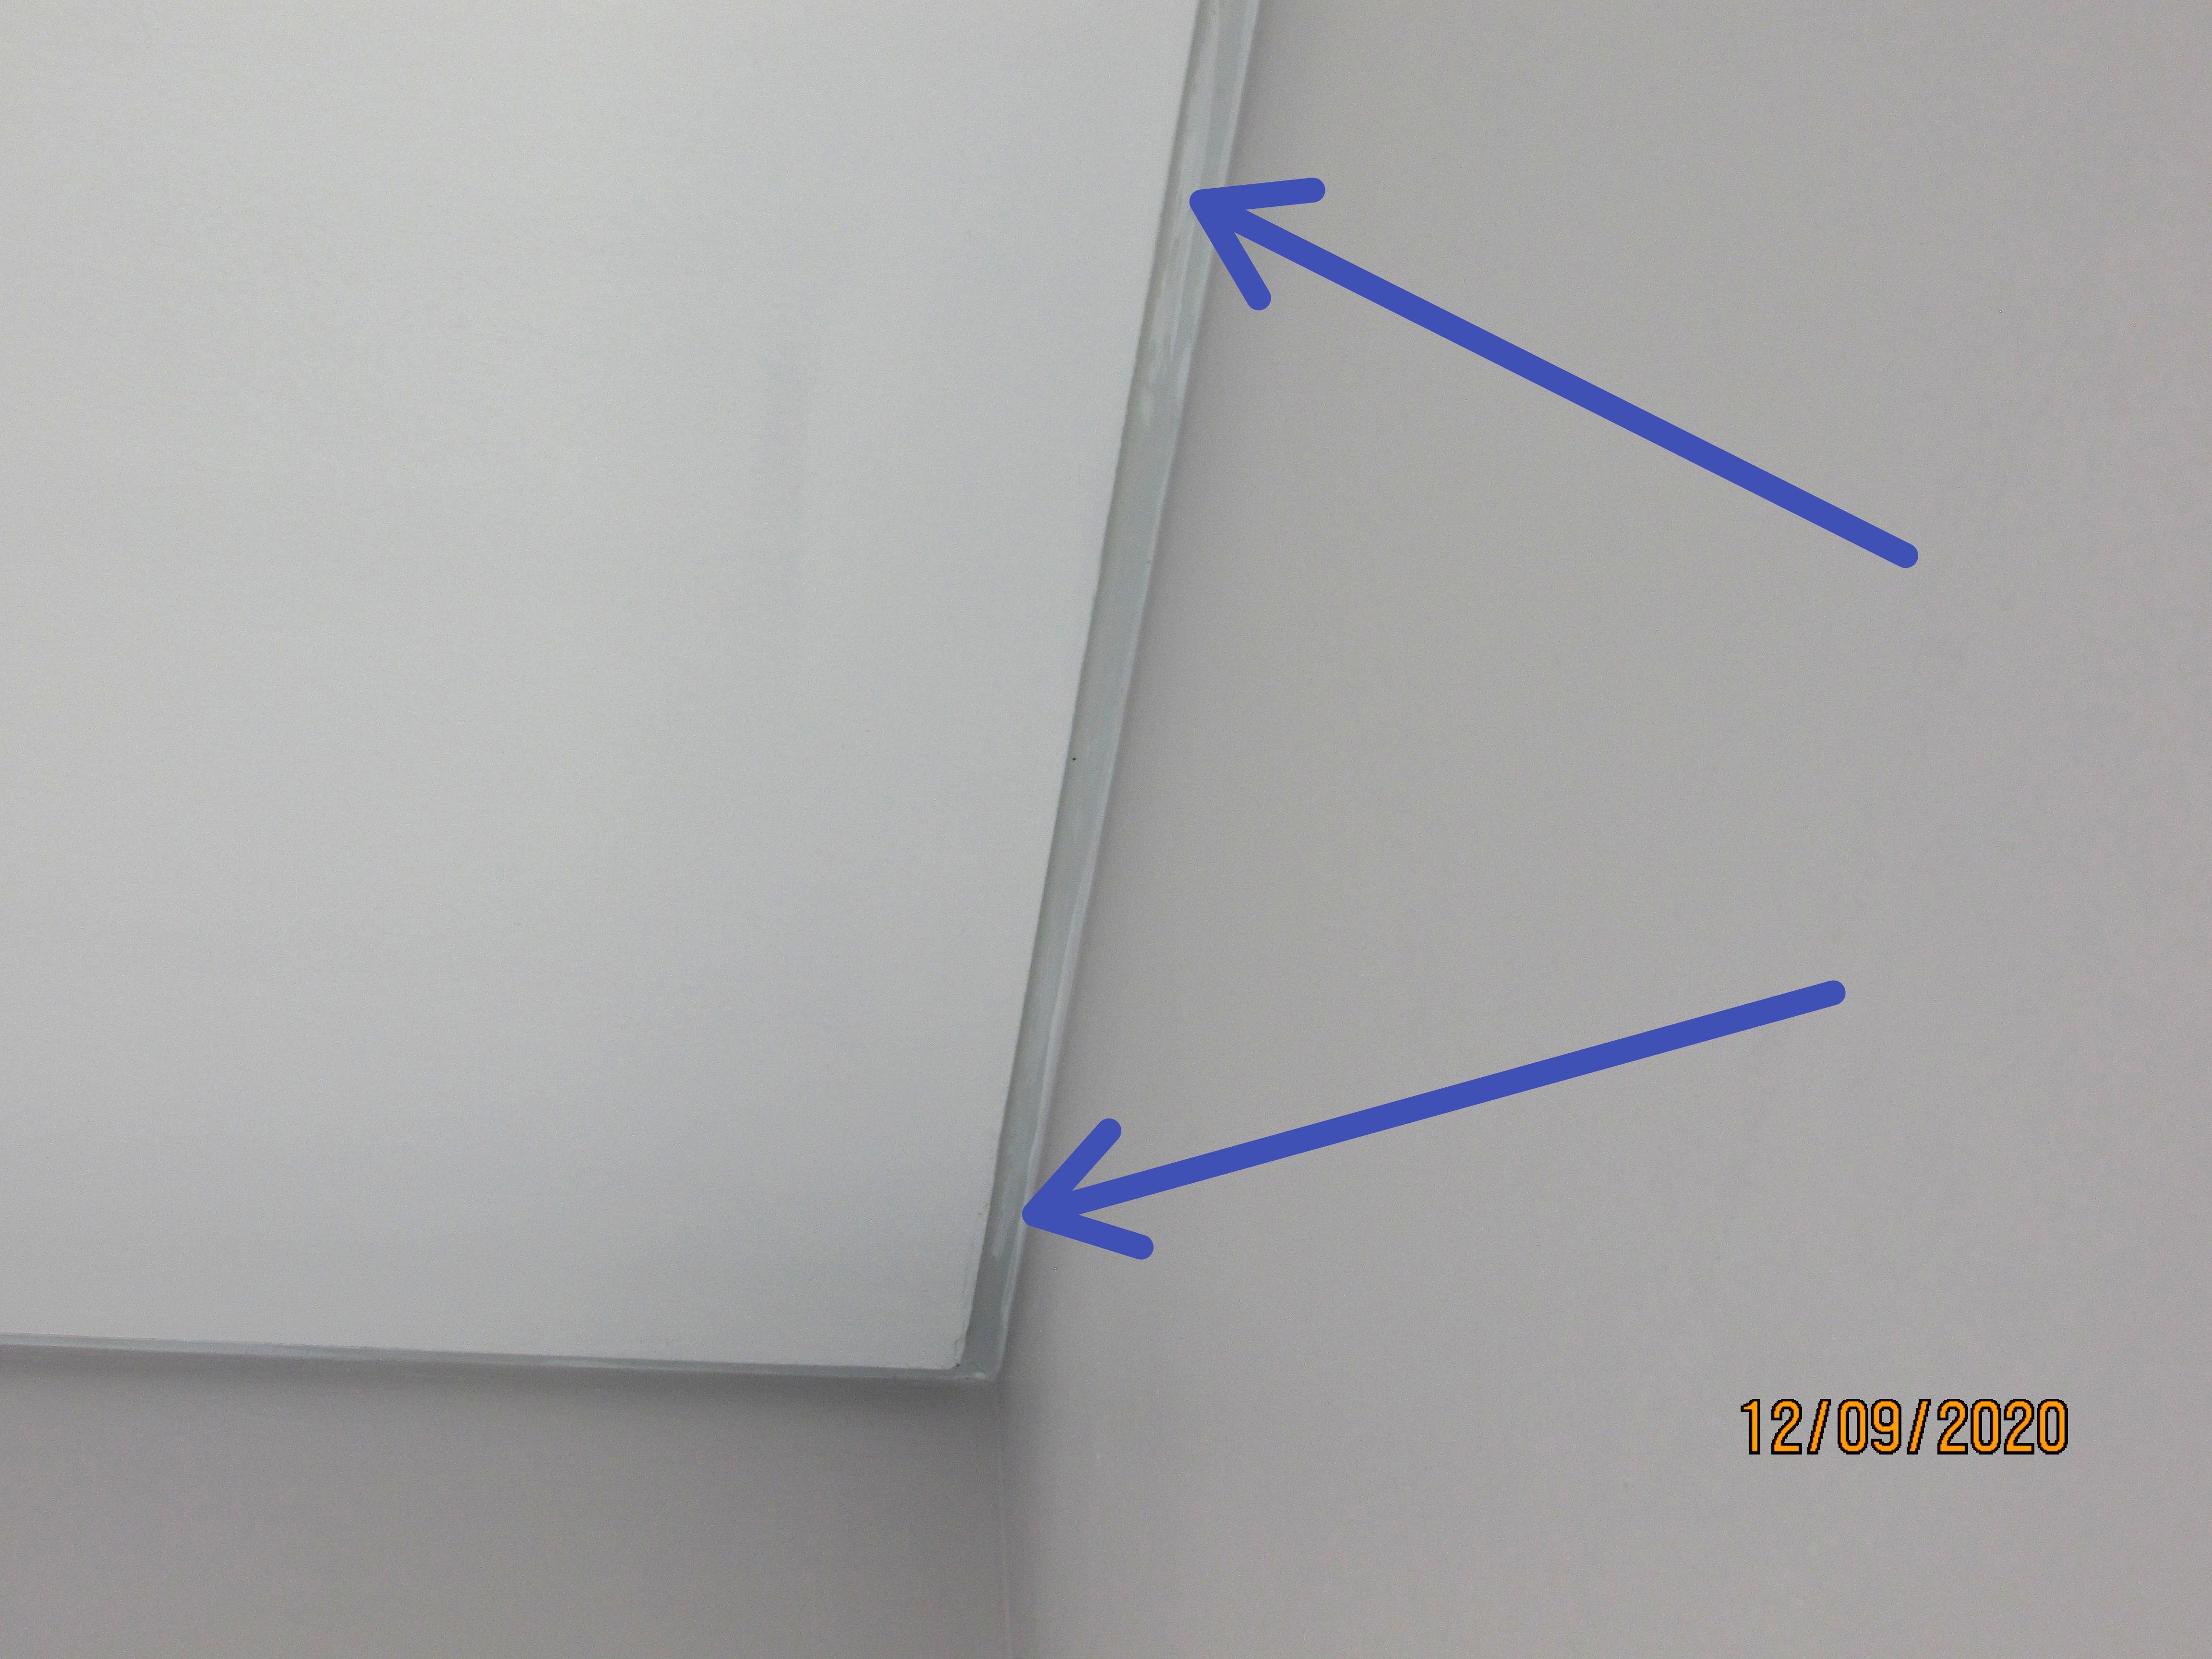
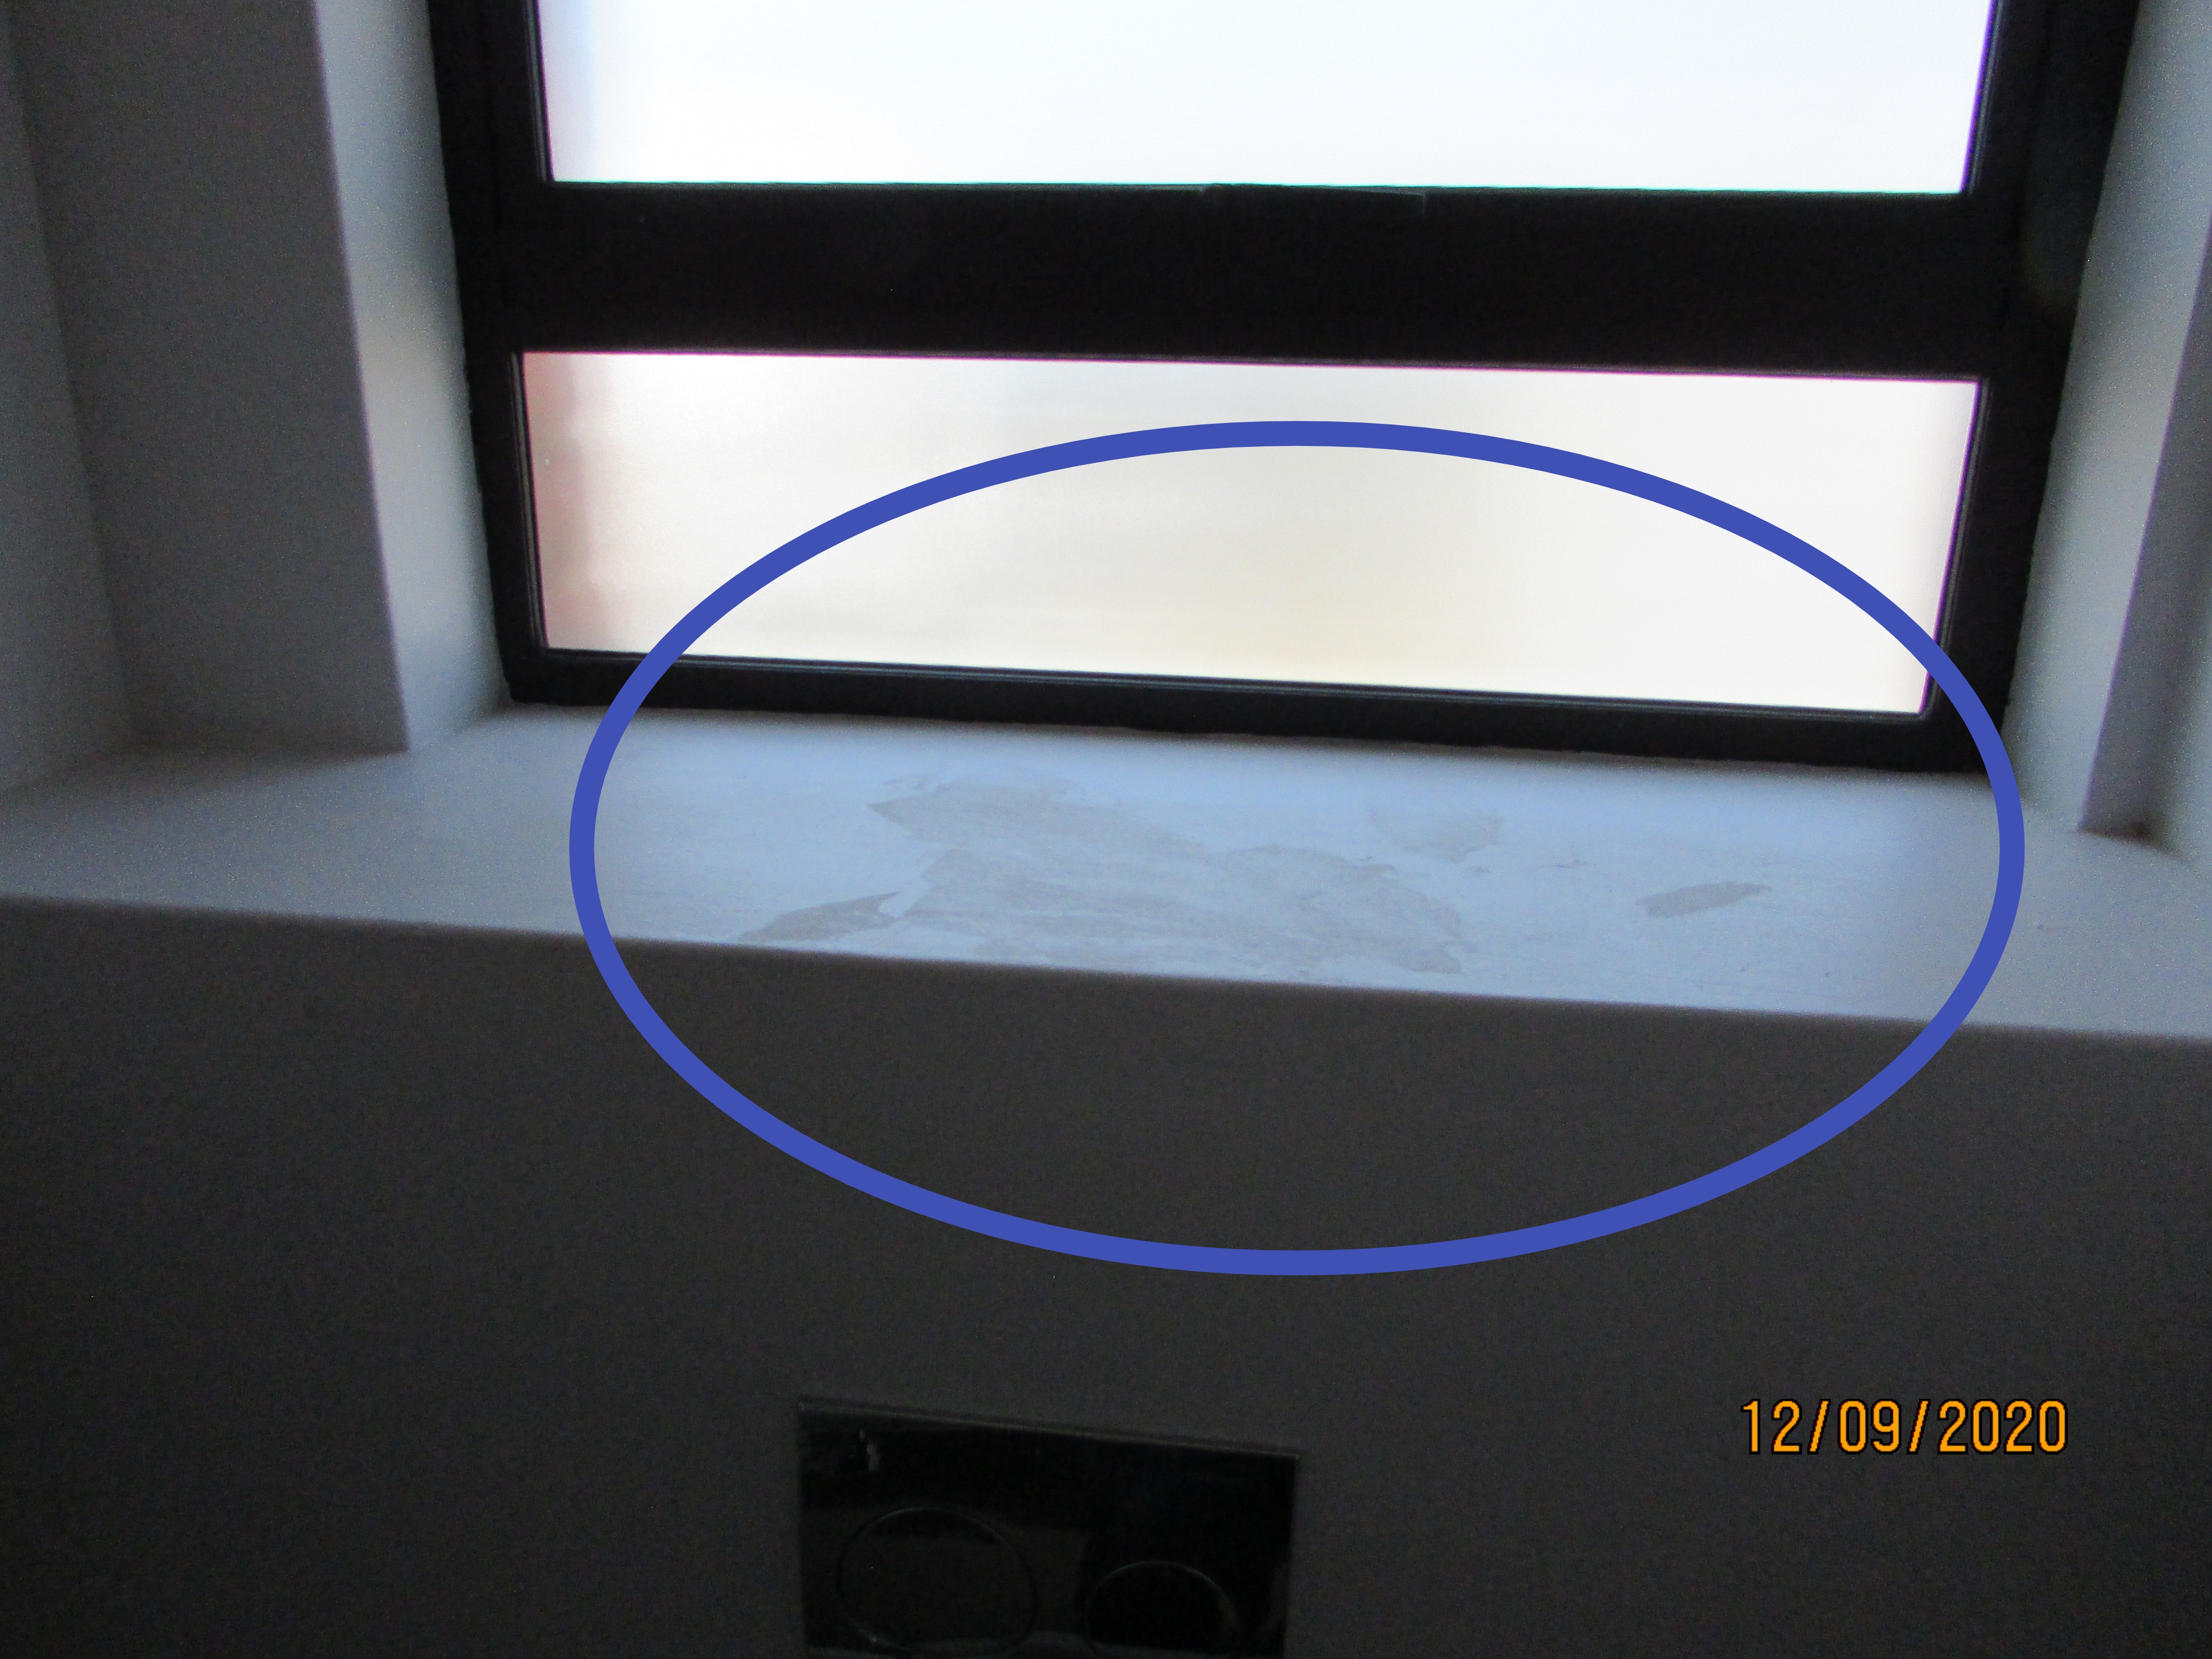
Tiled floors are normally cleaned with a mop. The result of this is that water will seep in under the BIC's kick plates if they have not been sealed with a silicon sealer at the junction of the kick plate and tiled floor, resulting in moisture damage to the kick plates. The sealing of the kick plates had not been done and in time will result in a maintenance issue!
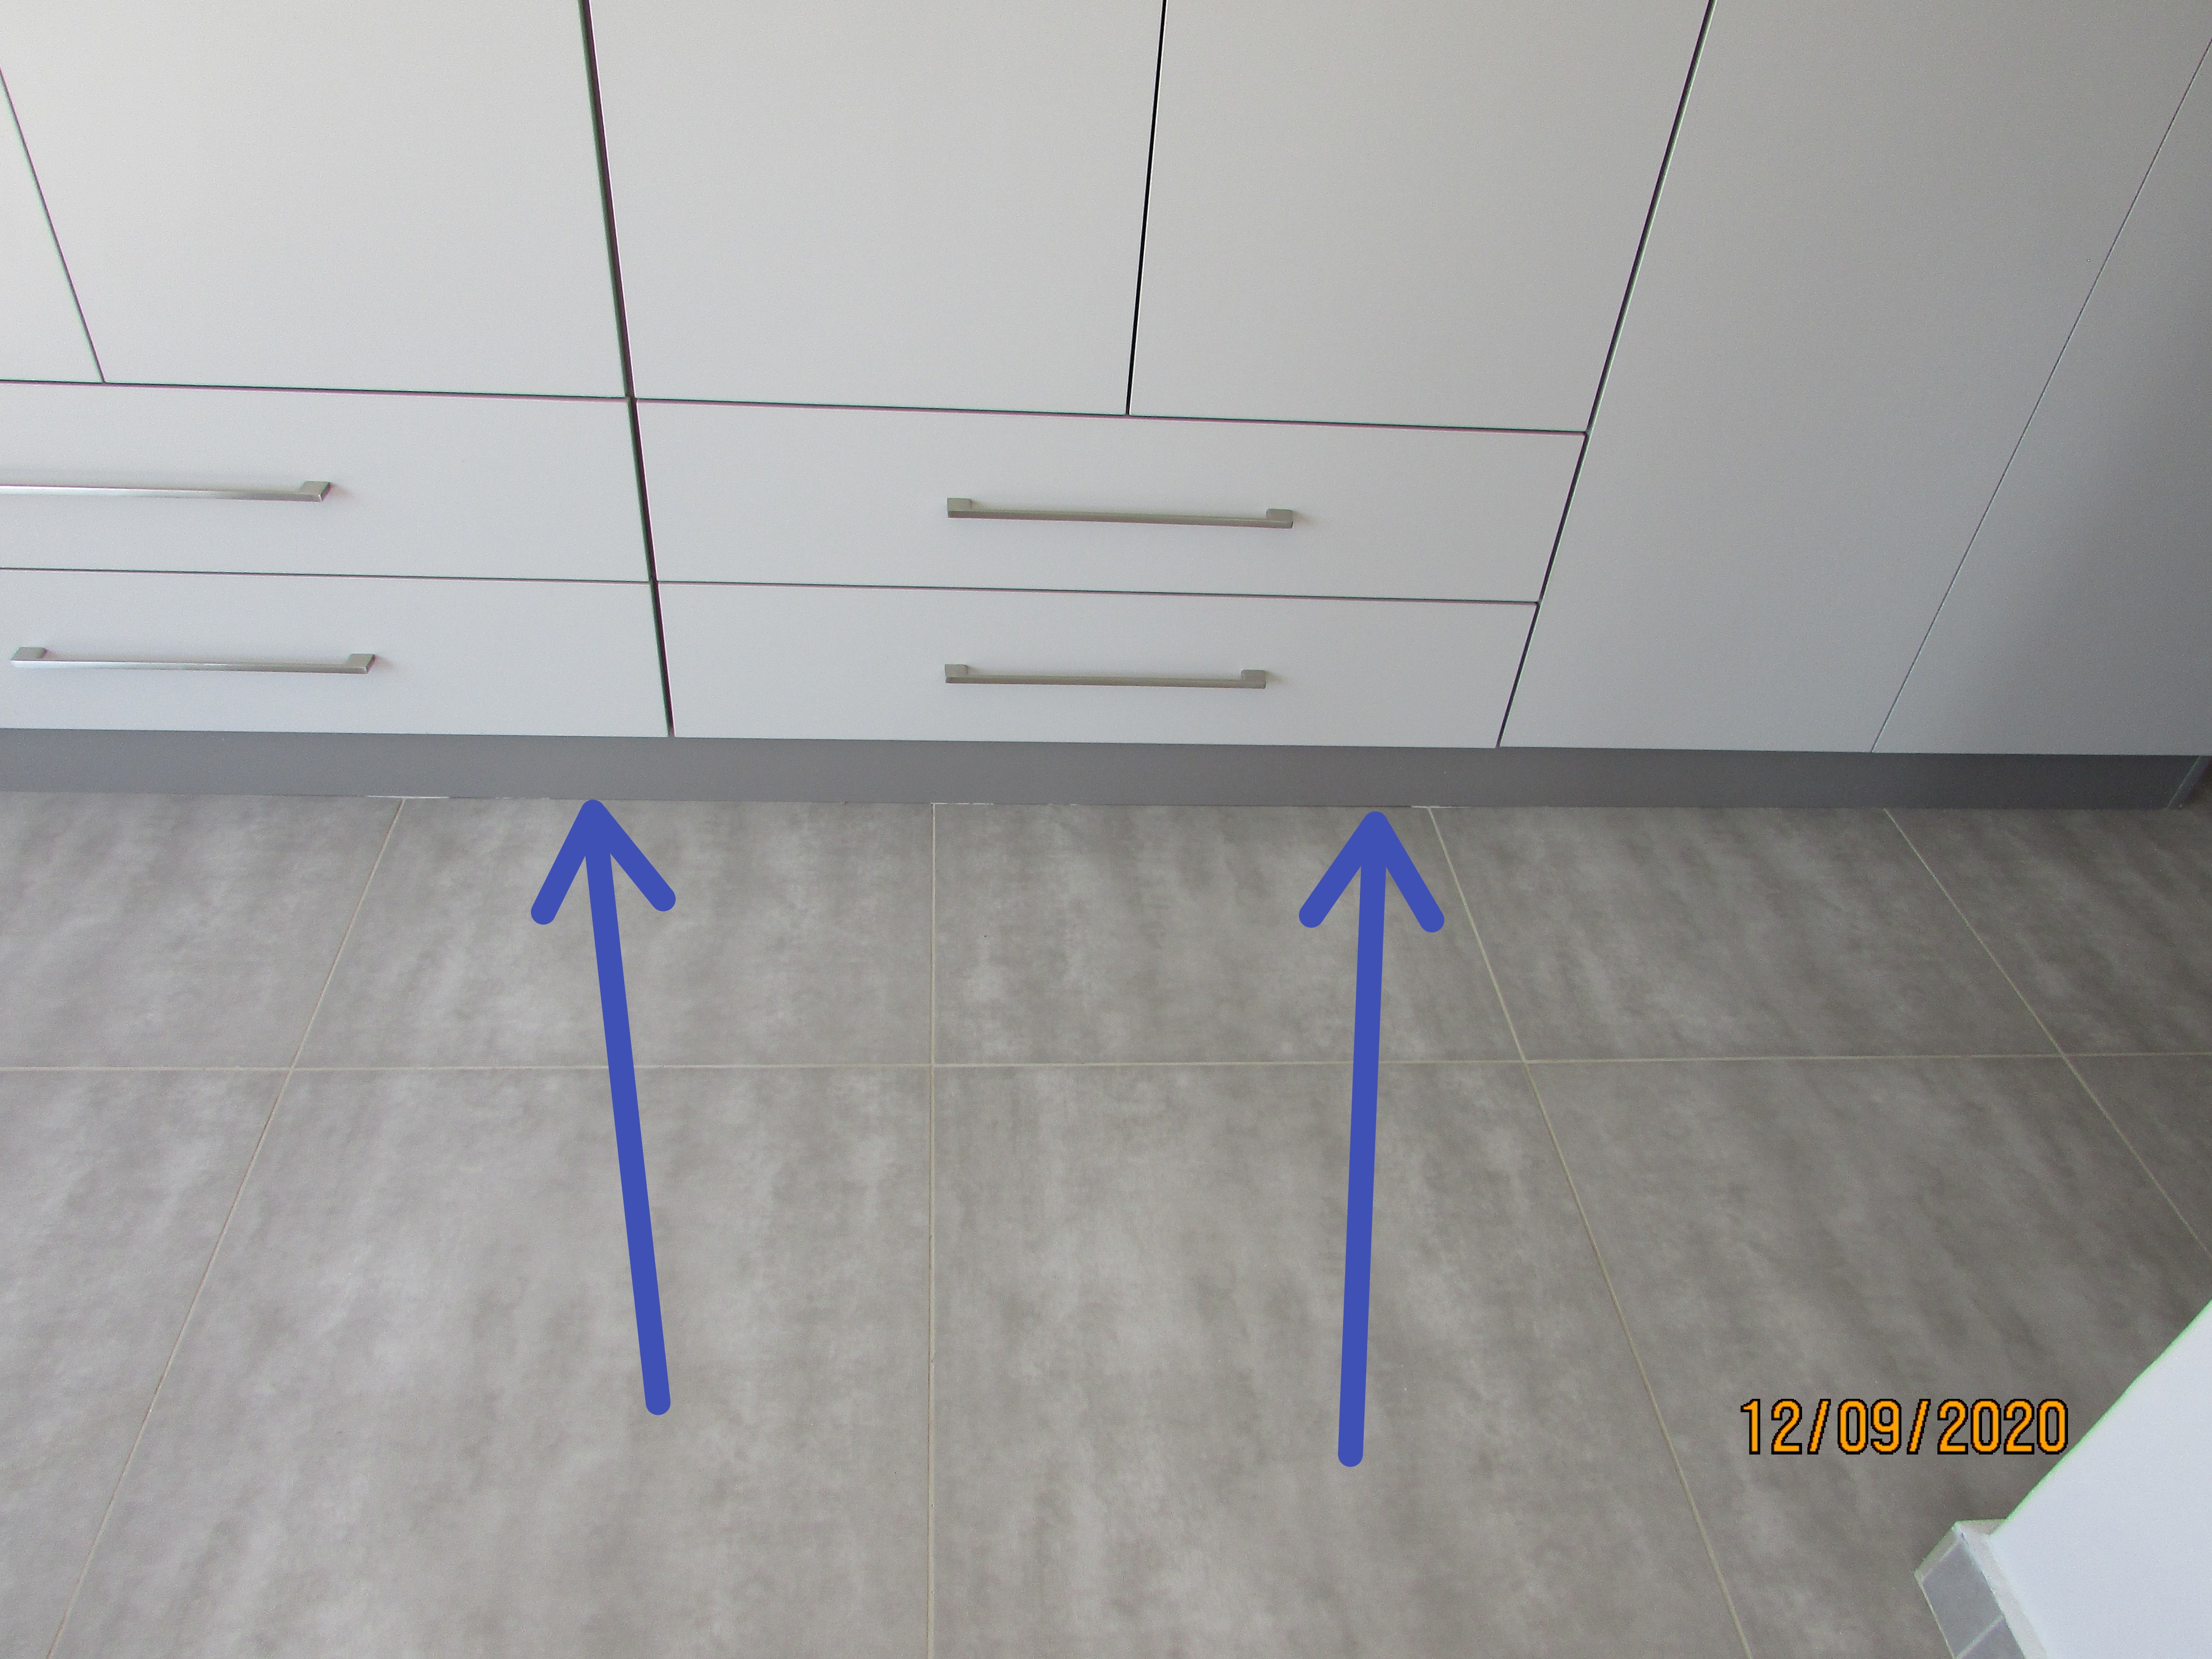 | 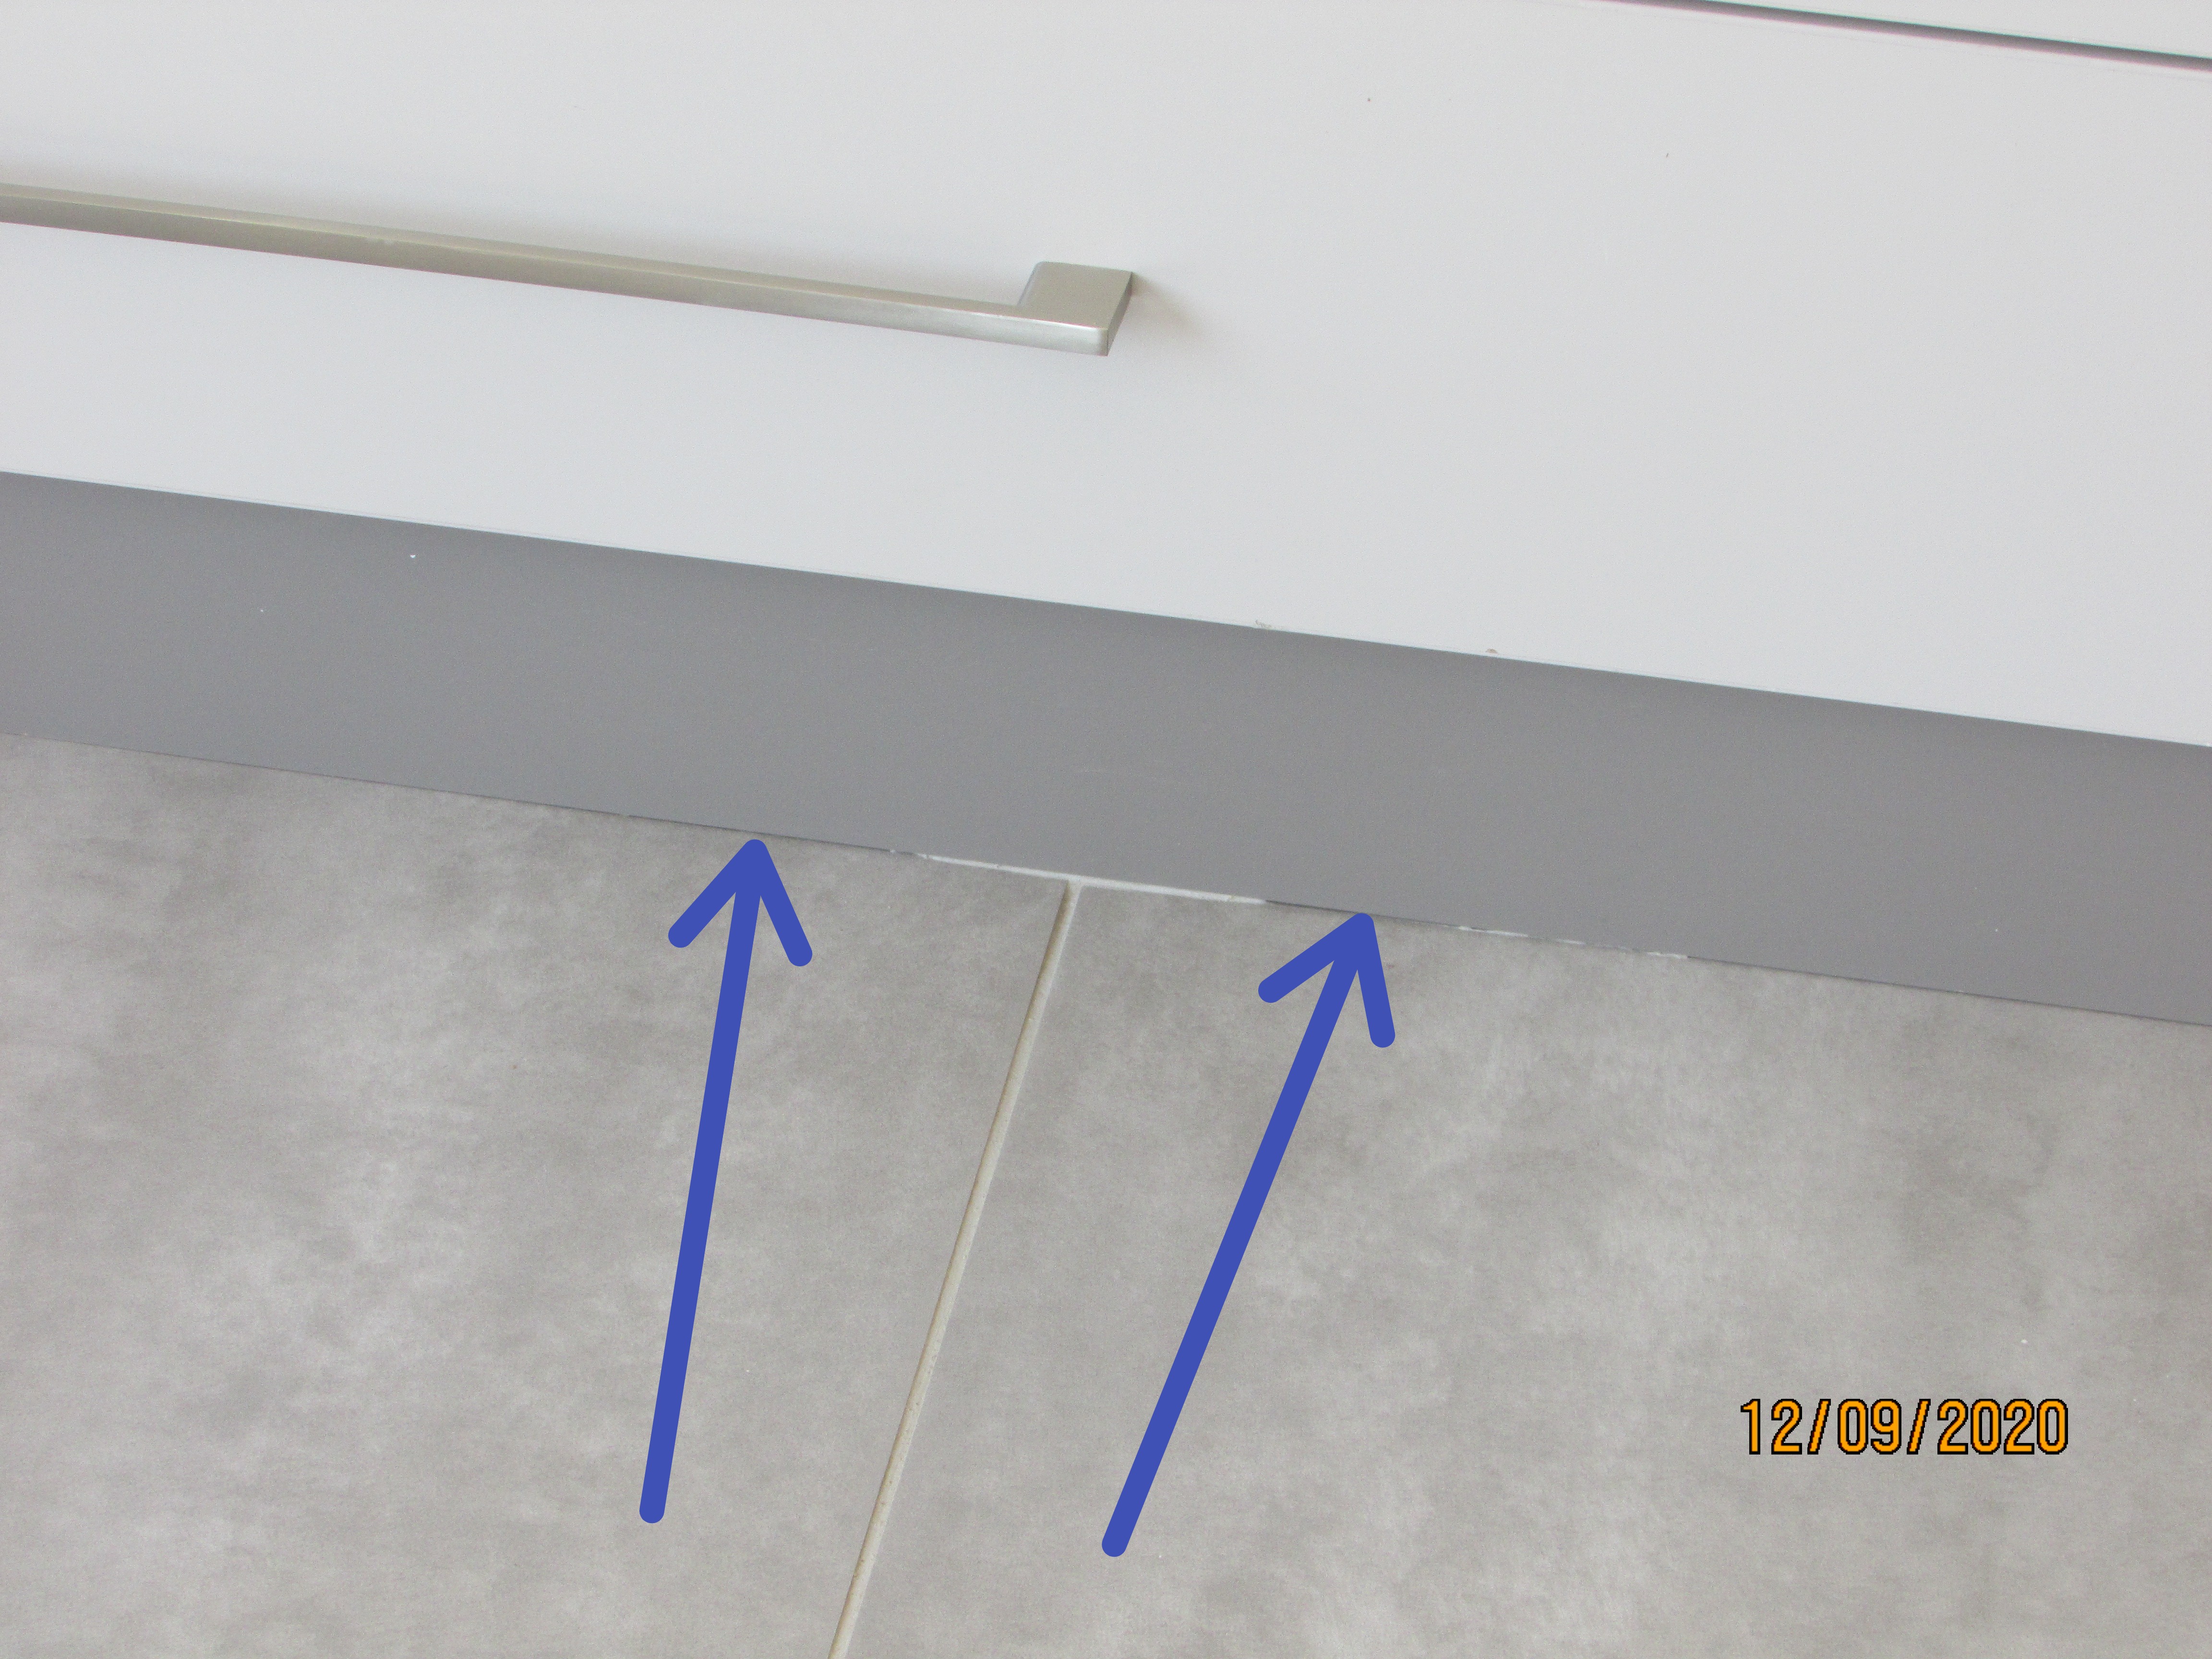 |
Sealing or grouting was required at the top of wall tiles in the showers. Steam condensing against the shower wall will allow moisture to enter at the top of the tiling and into the shower walls causing falling damp in the walls.
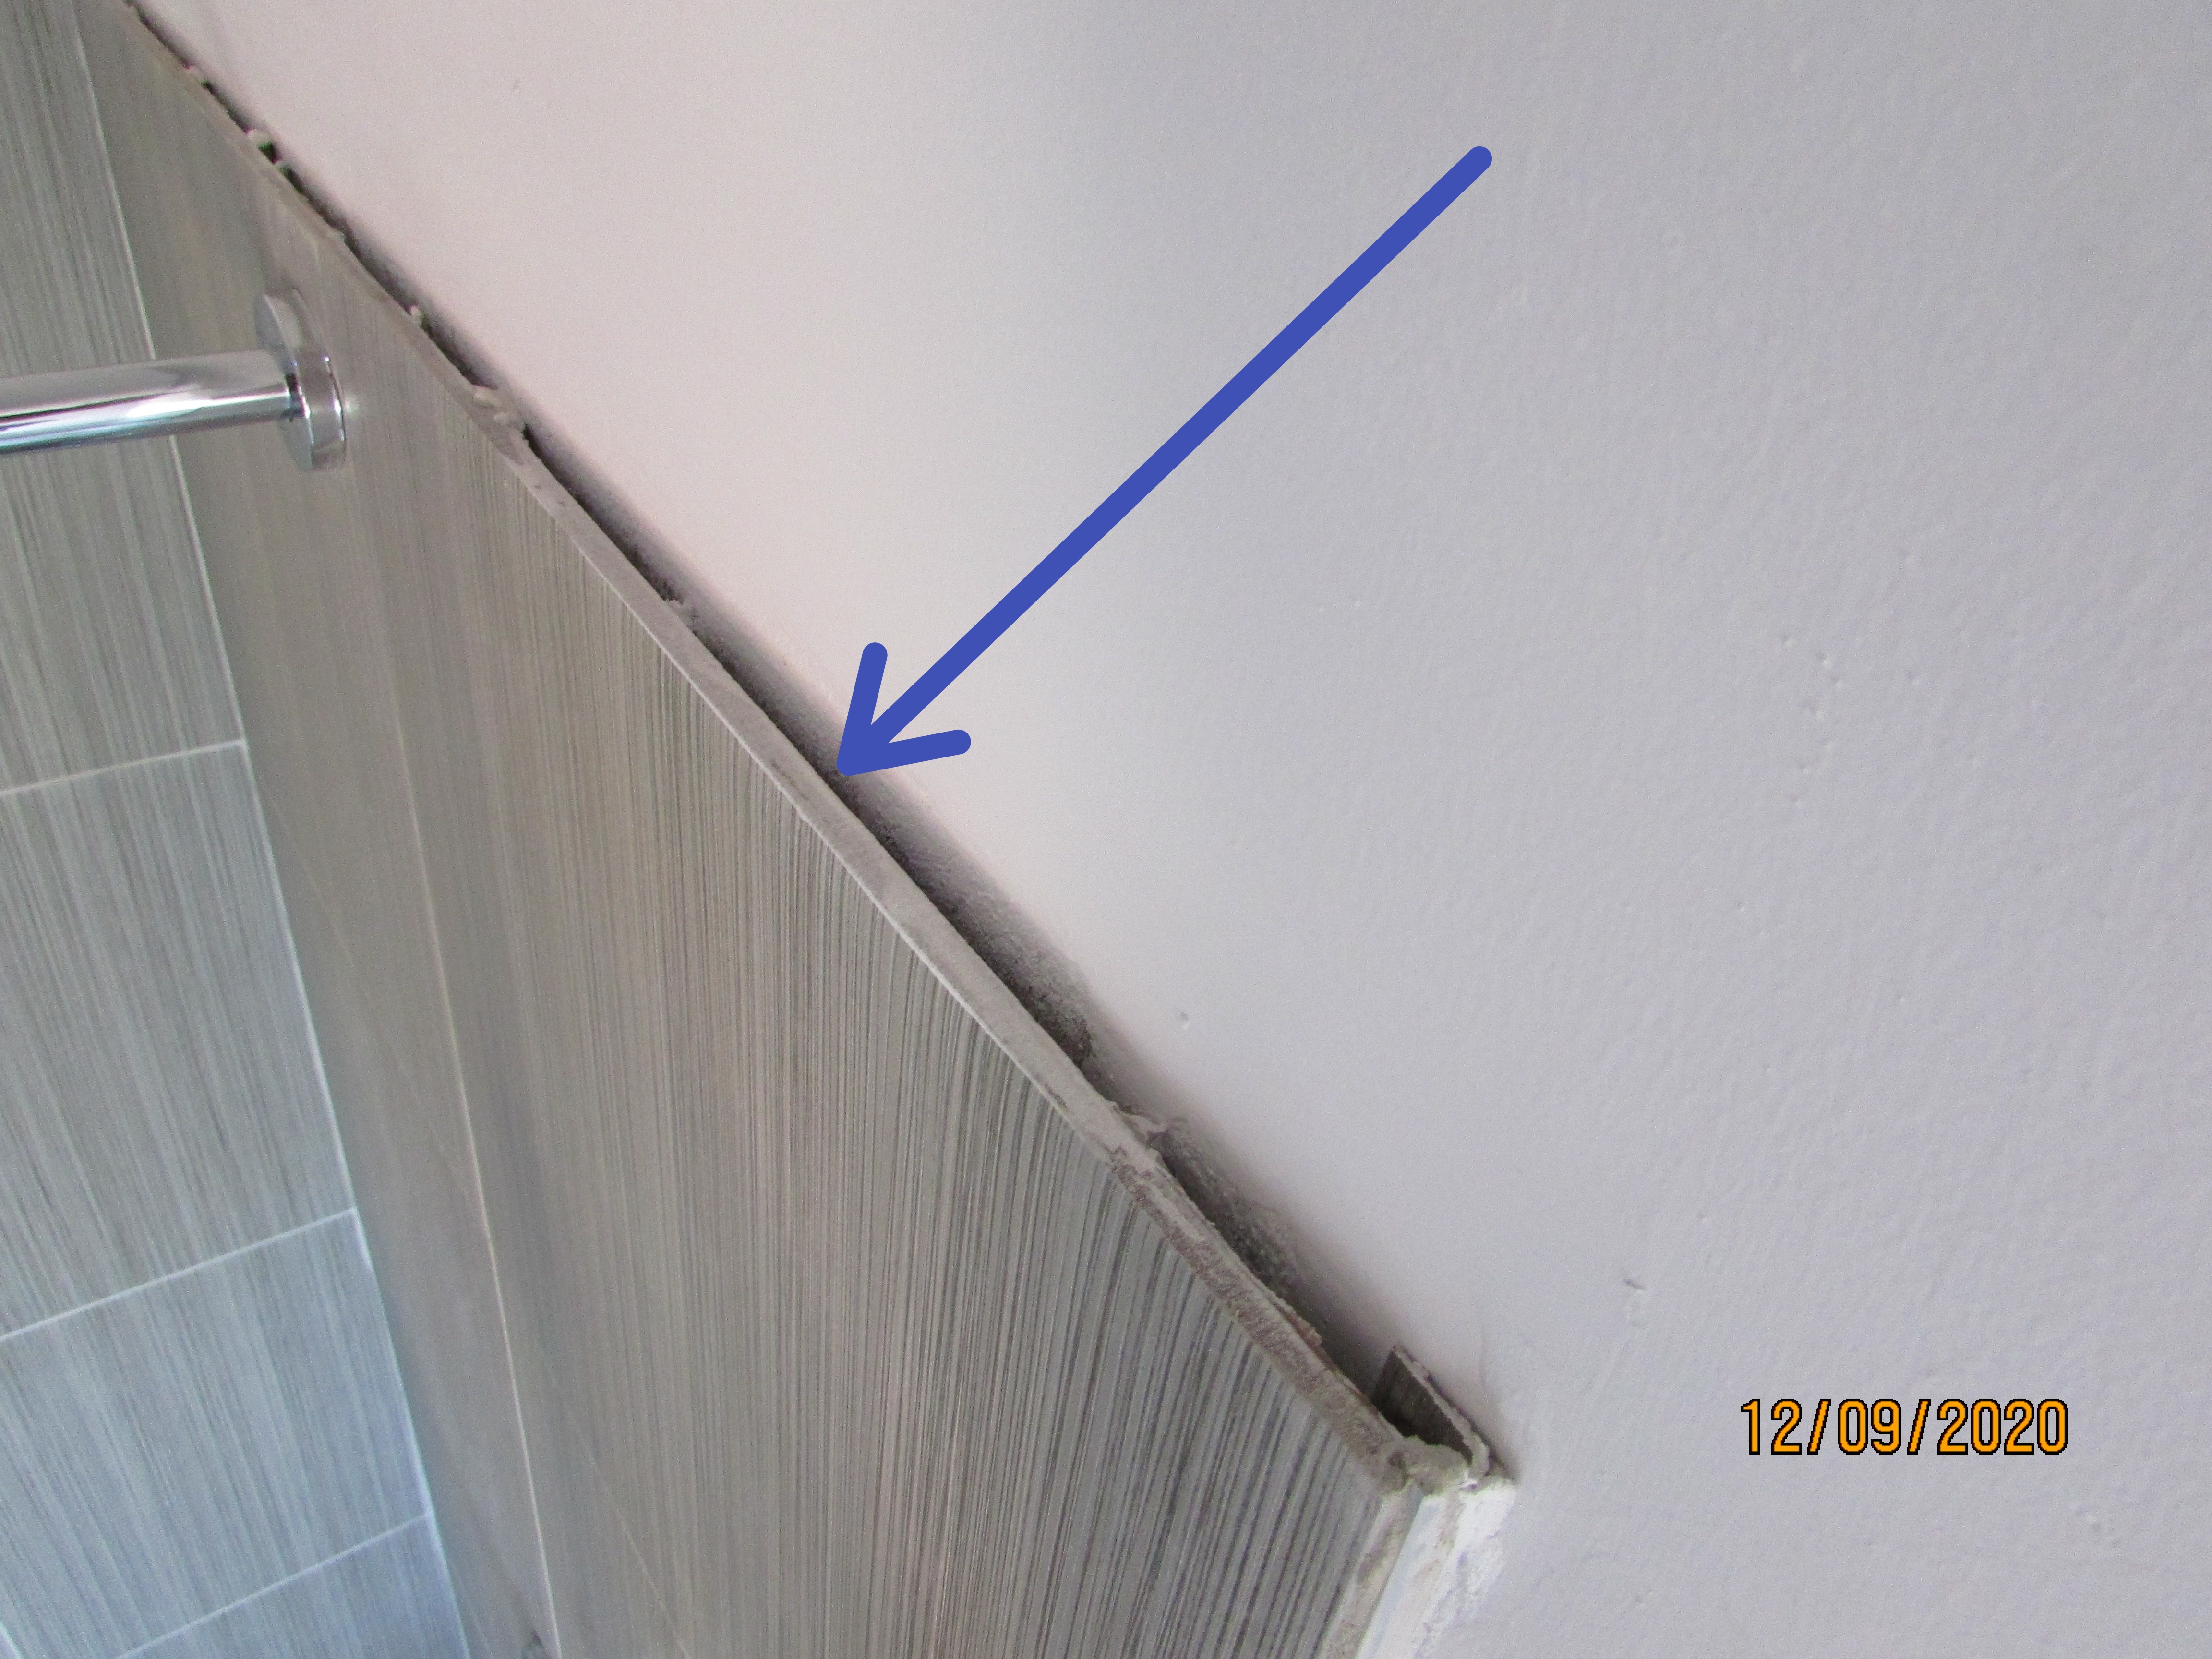 |
Interior Doors and Frames
Door Type: Panel doors
The interior doors and frames in the house were functional except where addition items are specifically listed.
The doors and door frames at doors on the ground and 1st floor were generally rough to touch and require filling, sanding down and painting to obtain a satisfactory finish. The why that the doors were not built into the middle of the door left an unsatisfactory finis on the interior of the bedrooms.
- Here the weather stripping fitted to the internal door frame was badly executed and will need to be redone. Generally, the fitting on all the door frames was not good. Note the damage and crack on the top of the door jamb.
- Here is a badly fitted door hinge that should be filled on the frame, sanded down and painted. Note the poor grouting of the tile at the bottom of the door jamb!
- This is a top edge of a door. The edge was left very rough and a portion of the edge was missing at the top. Filling, sanding down and painting was required.
- The same door lower down! Note the rough edge!
- The door frame finish on the inside of the bedrooms and bathrooms was unacceptable! The door frames should be fitted with architraves! See detail A.
- Another badly fitted hinge! This was a general defect!
- Generally the door frames finish was sanded smooth and were rough to touch. Sanding down and painting was required.
- Touch up paint was required on the frames at the hinges.
- It appeared that the door frames may have been "glued" to the brickwork with an adhesive, polyurethane foam or a similar product. The frame may not have been fixed in the general accepted method. See detail B.
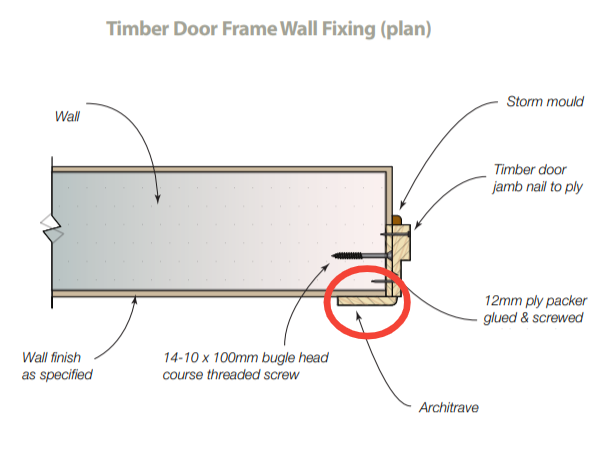
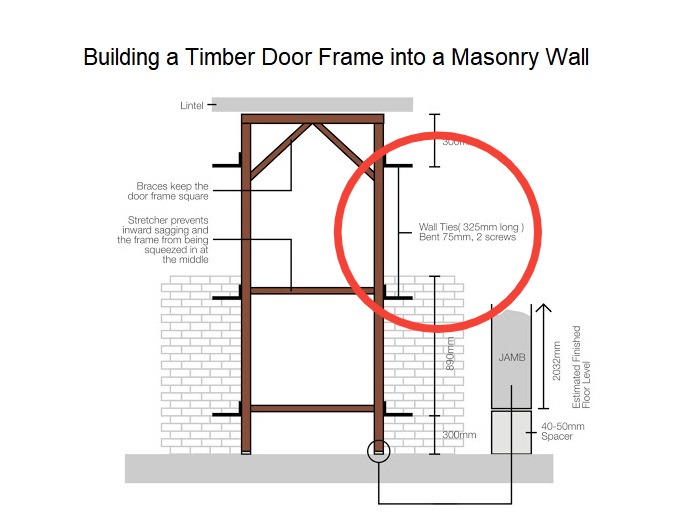
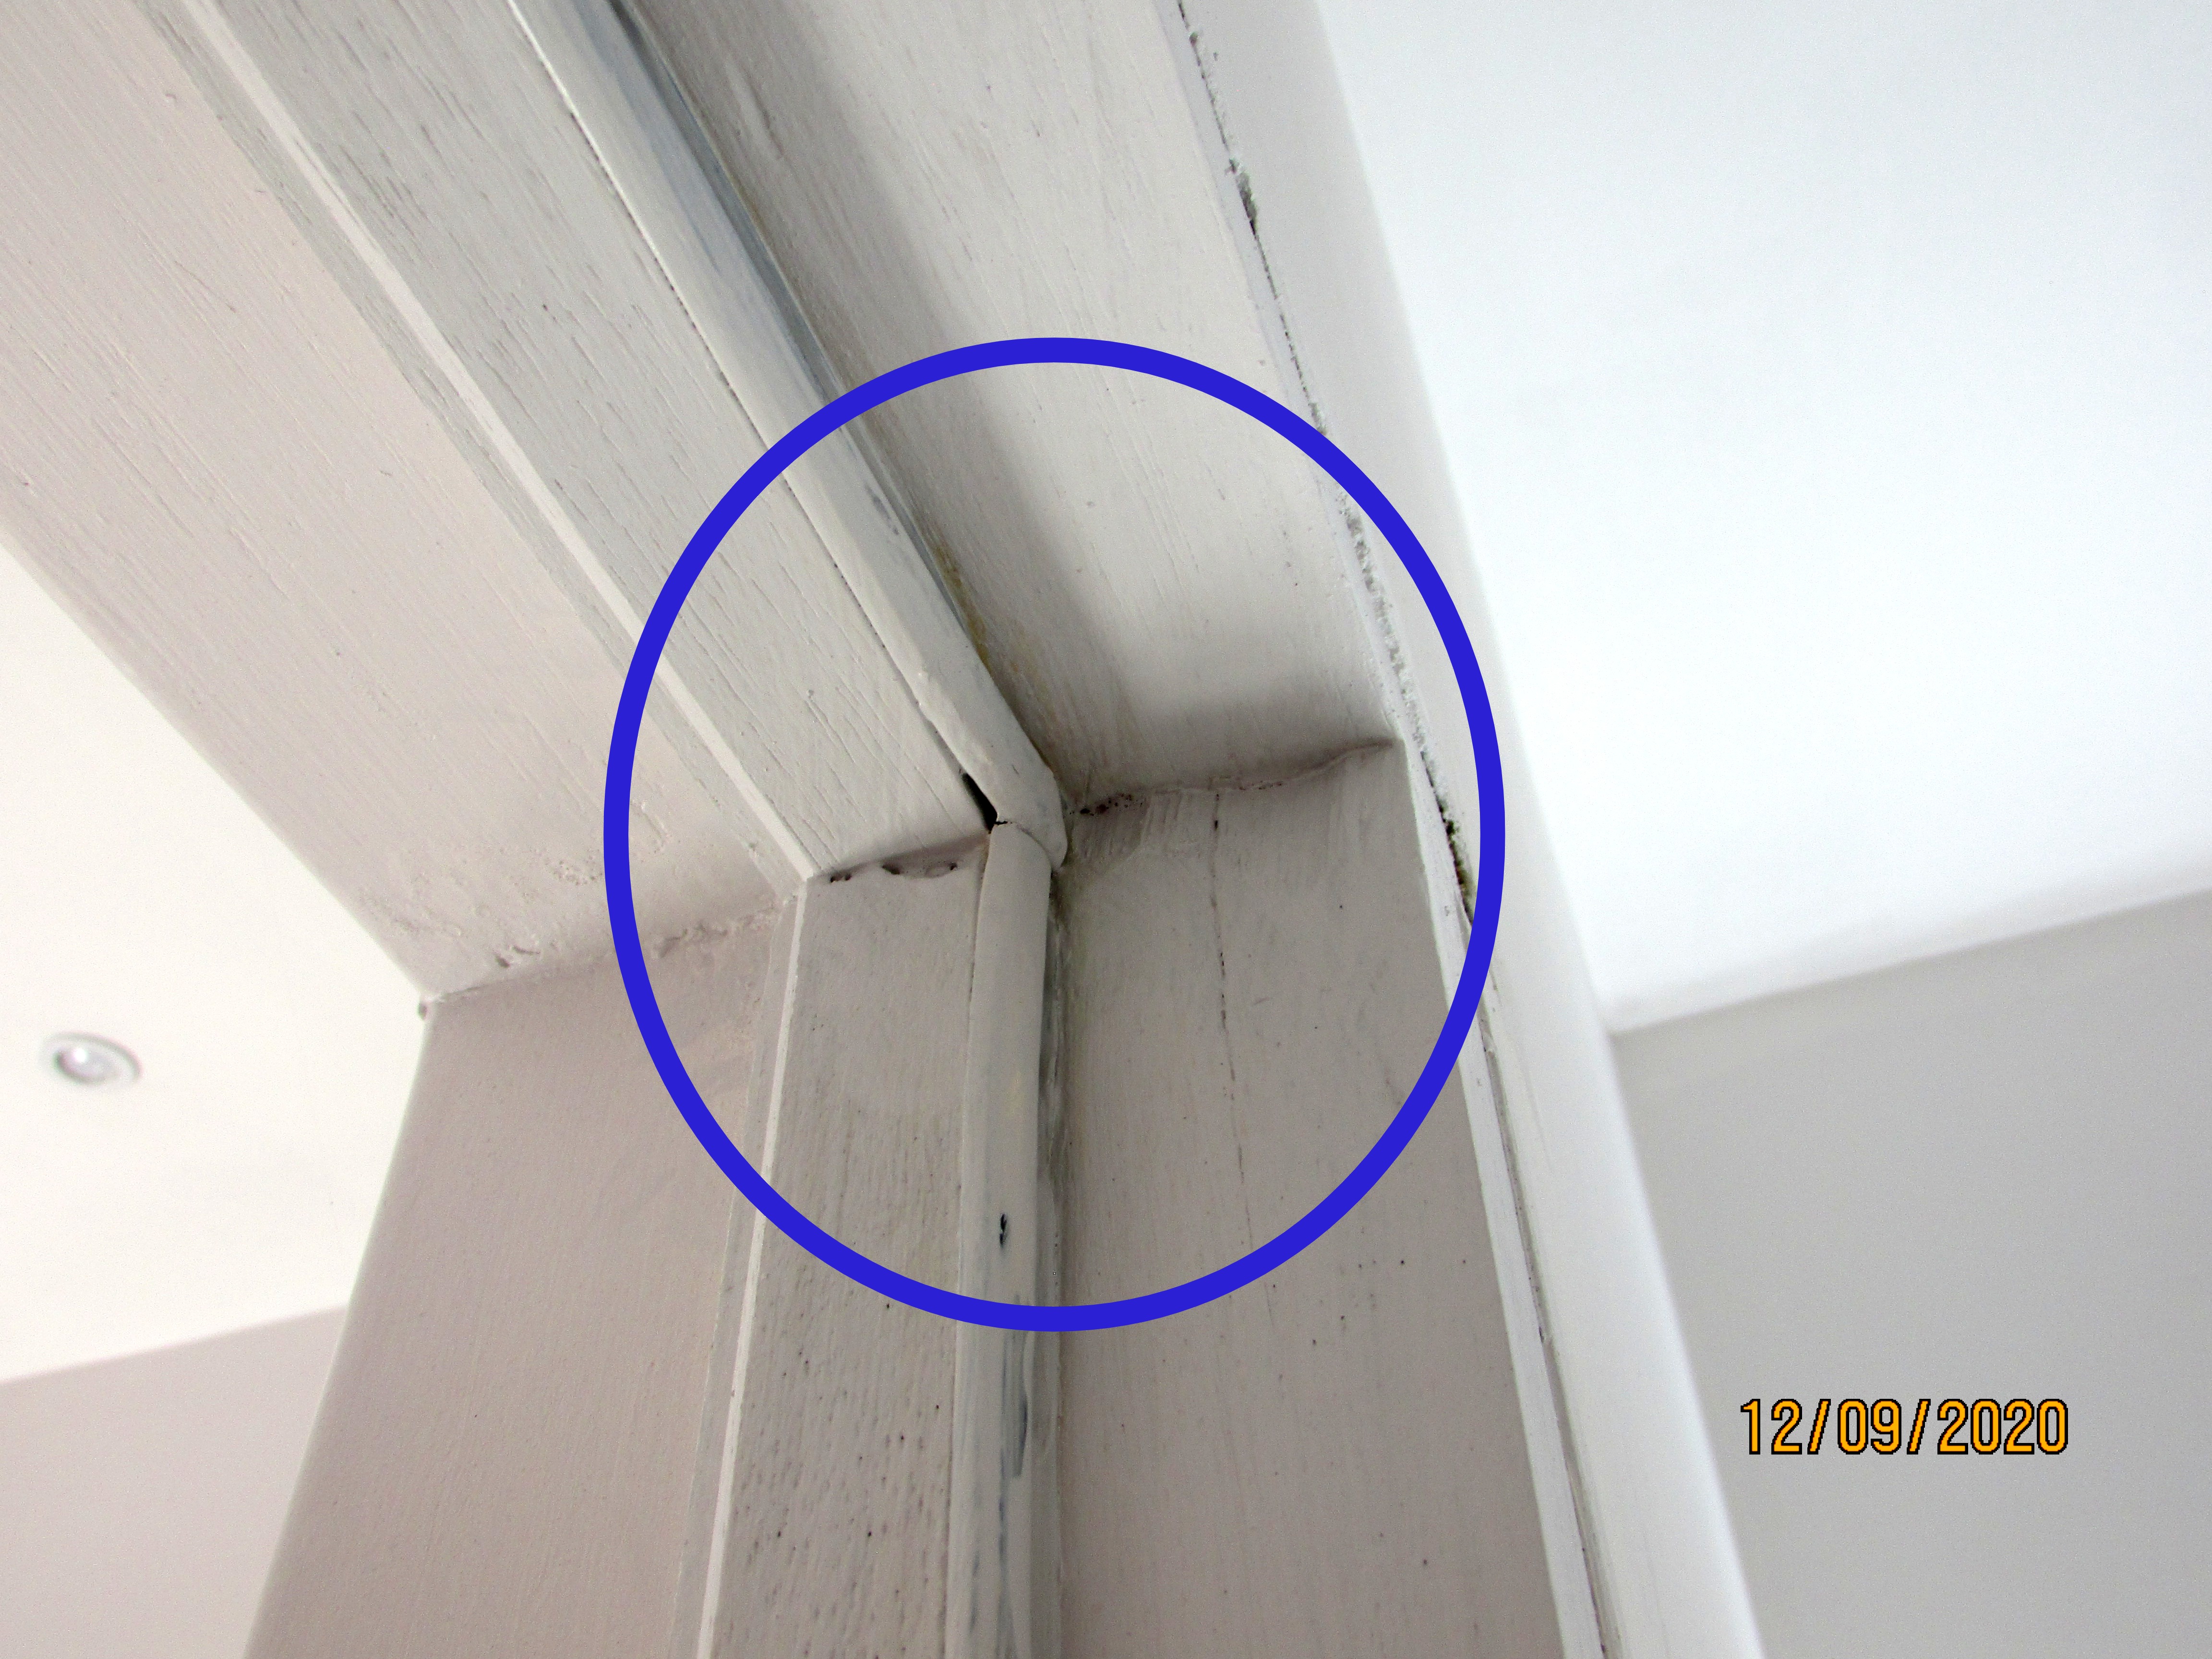
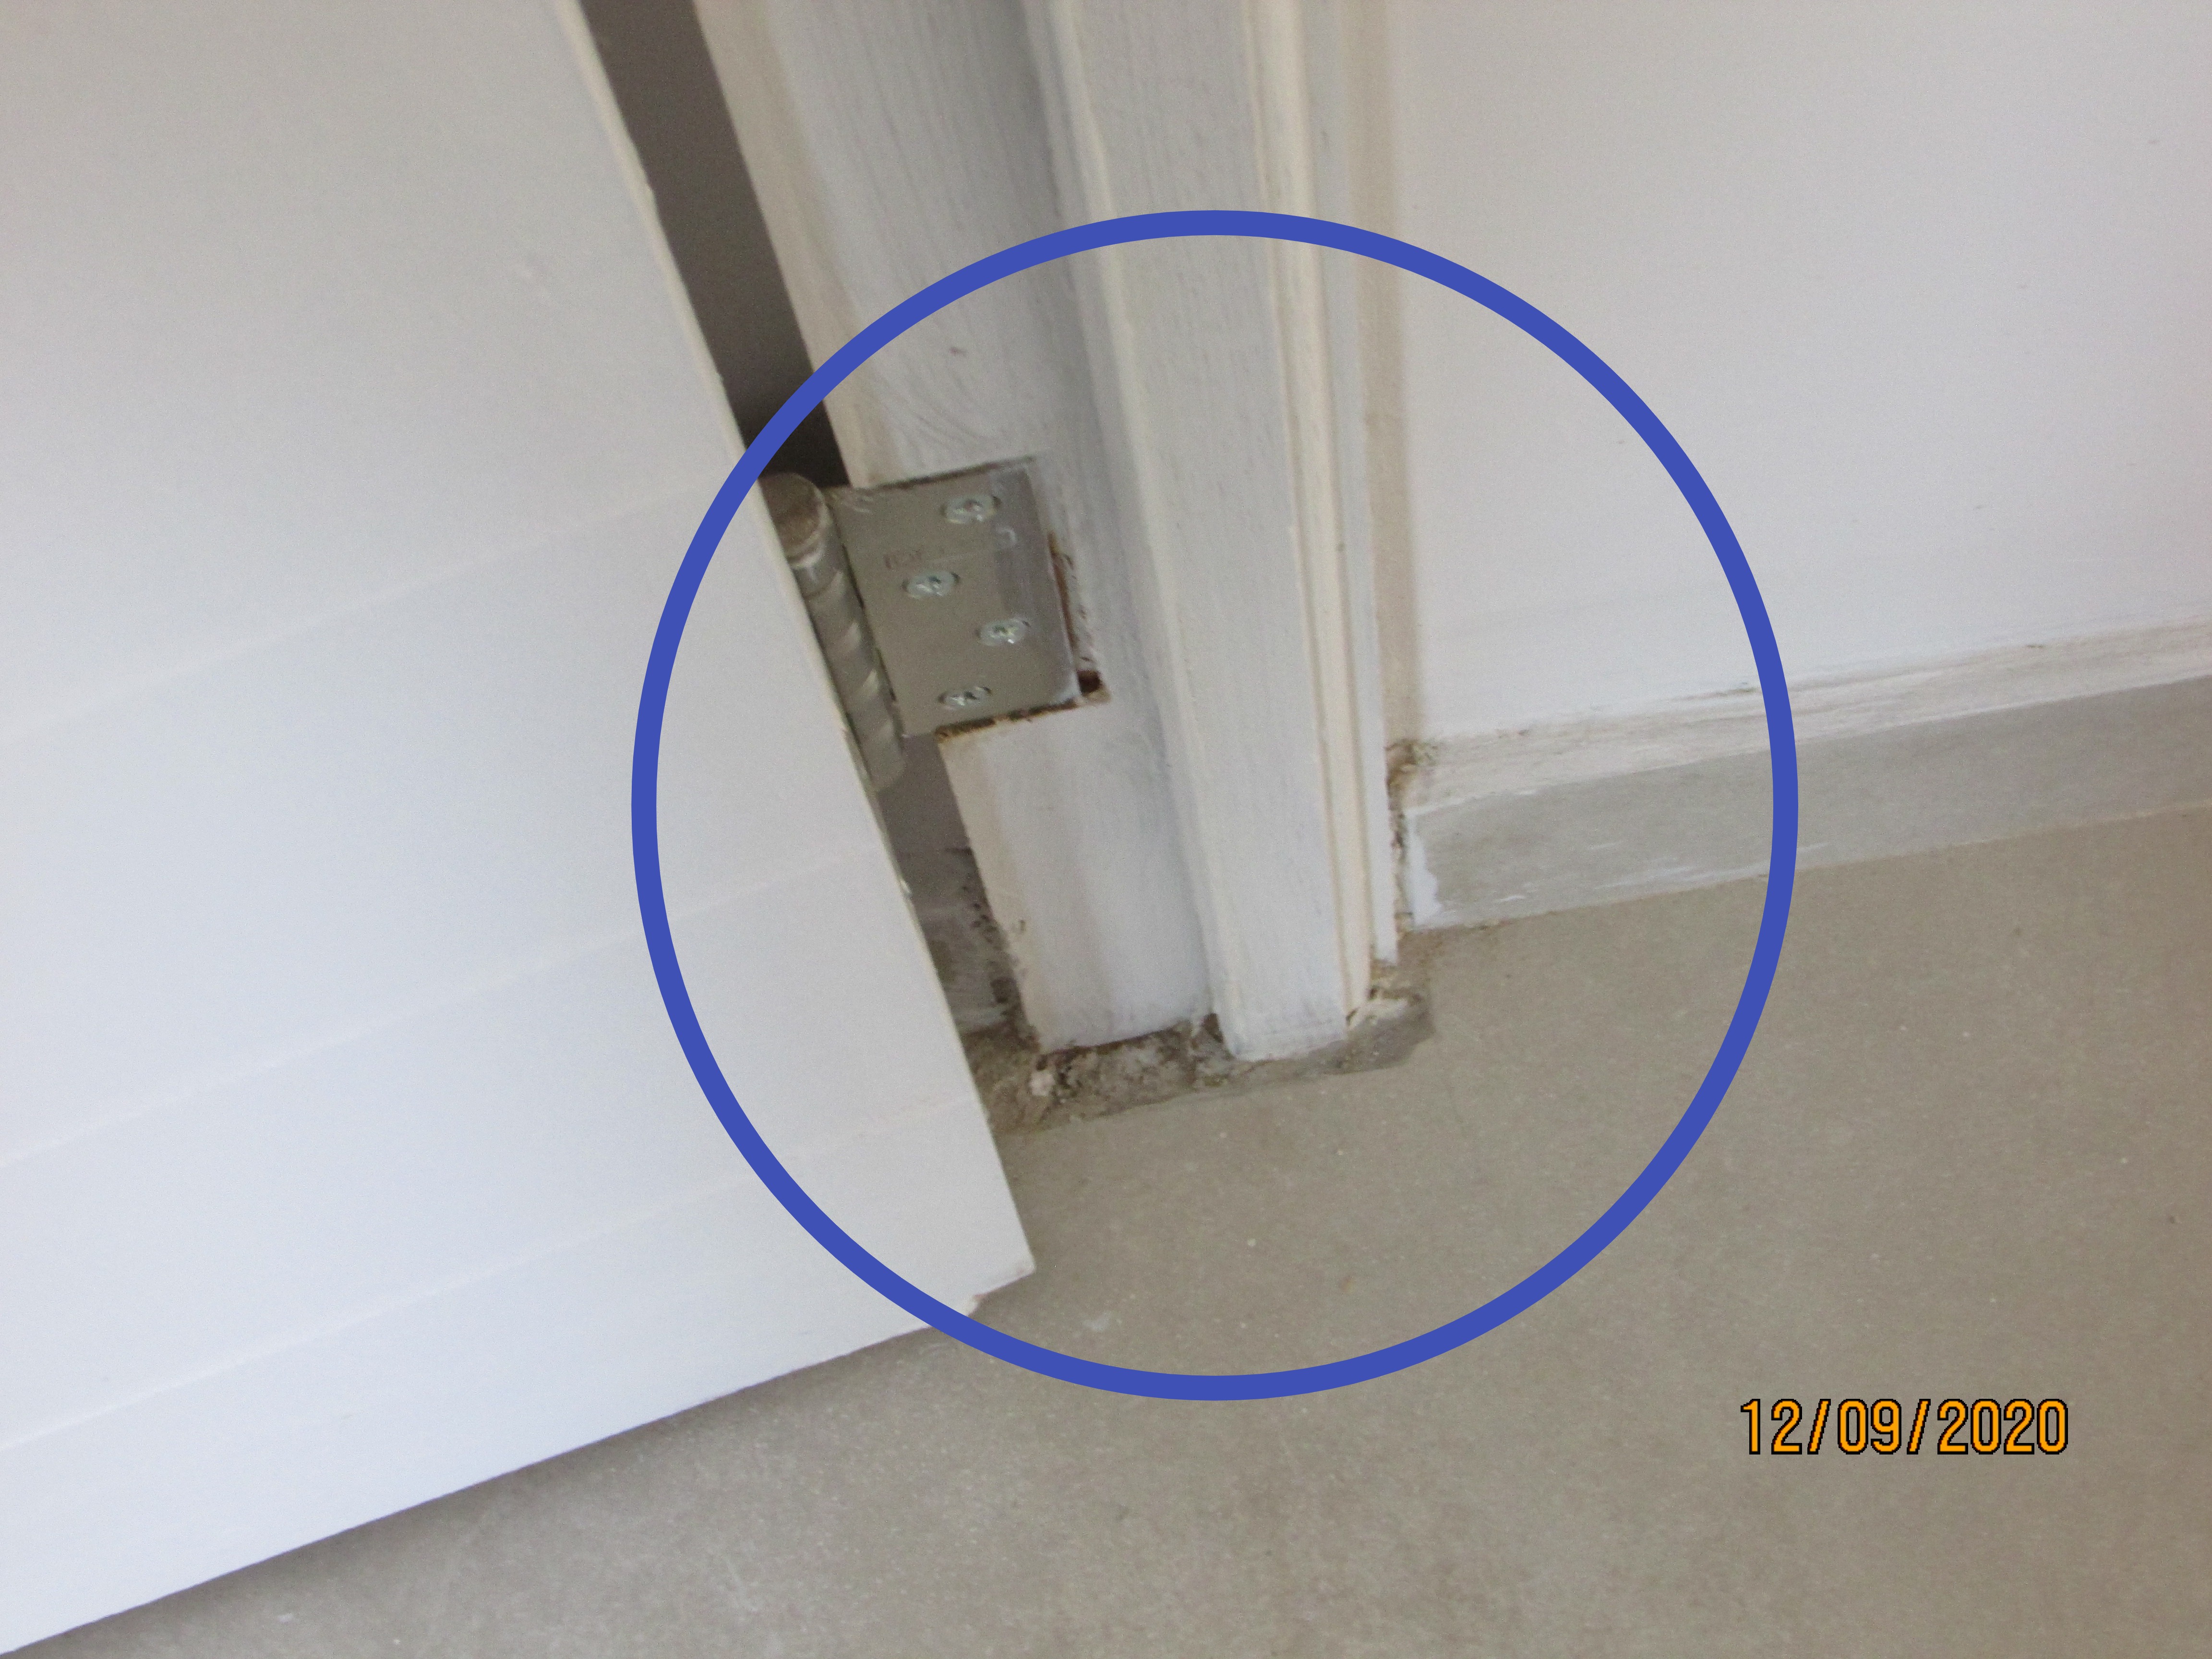
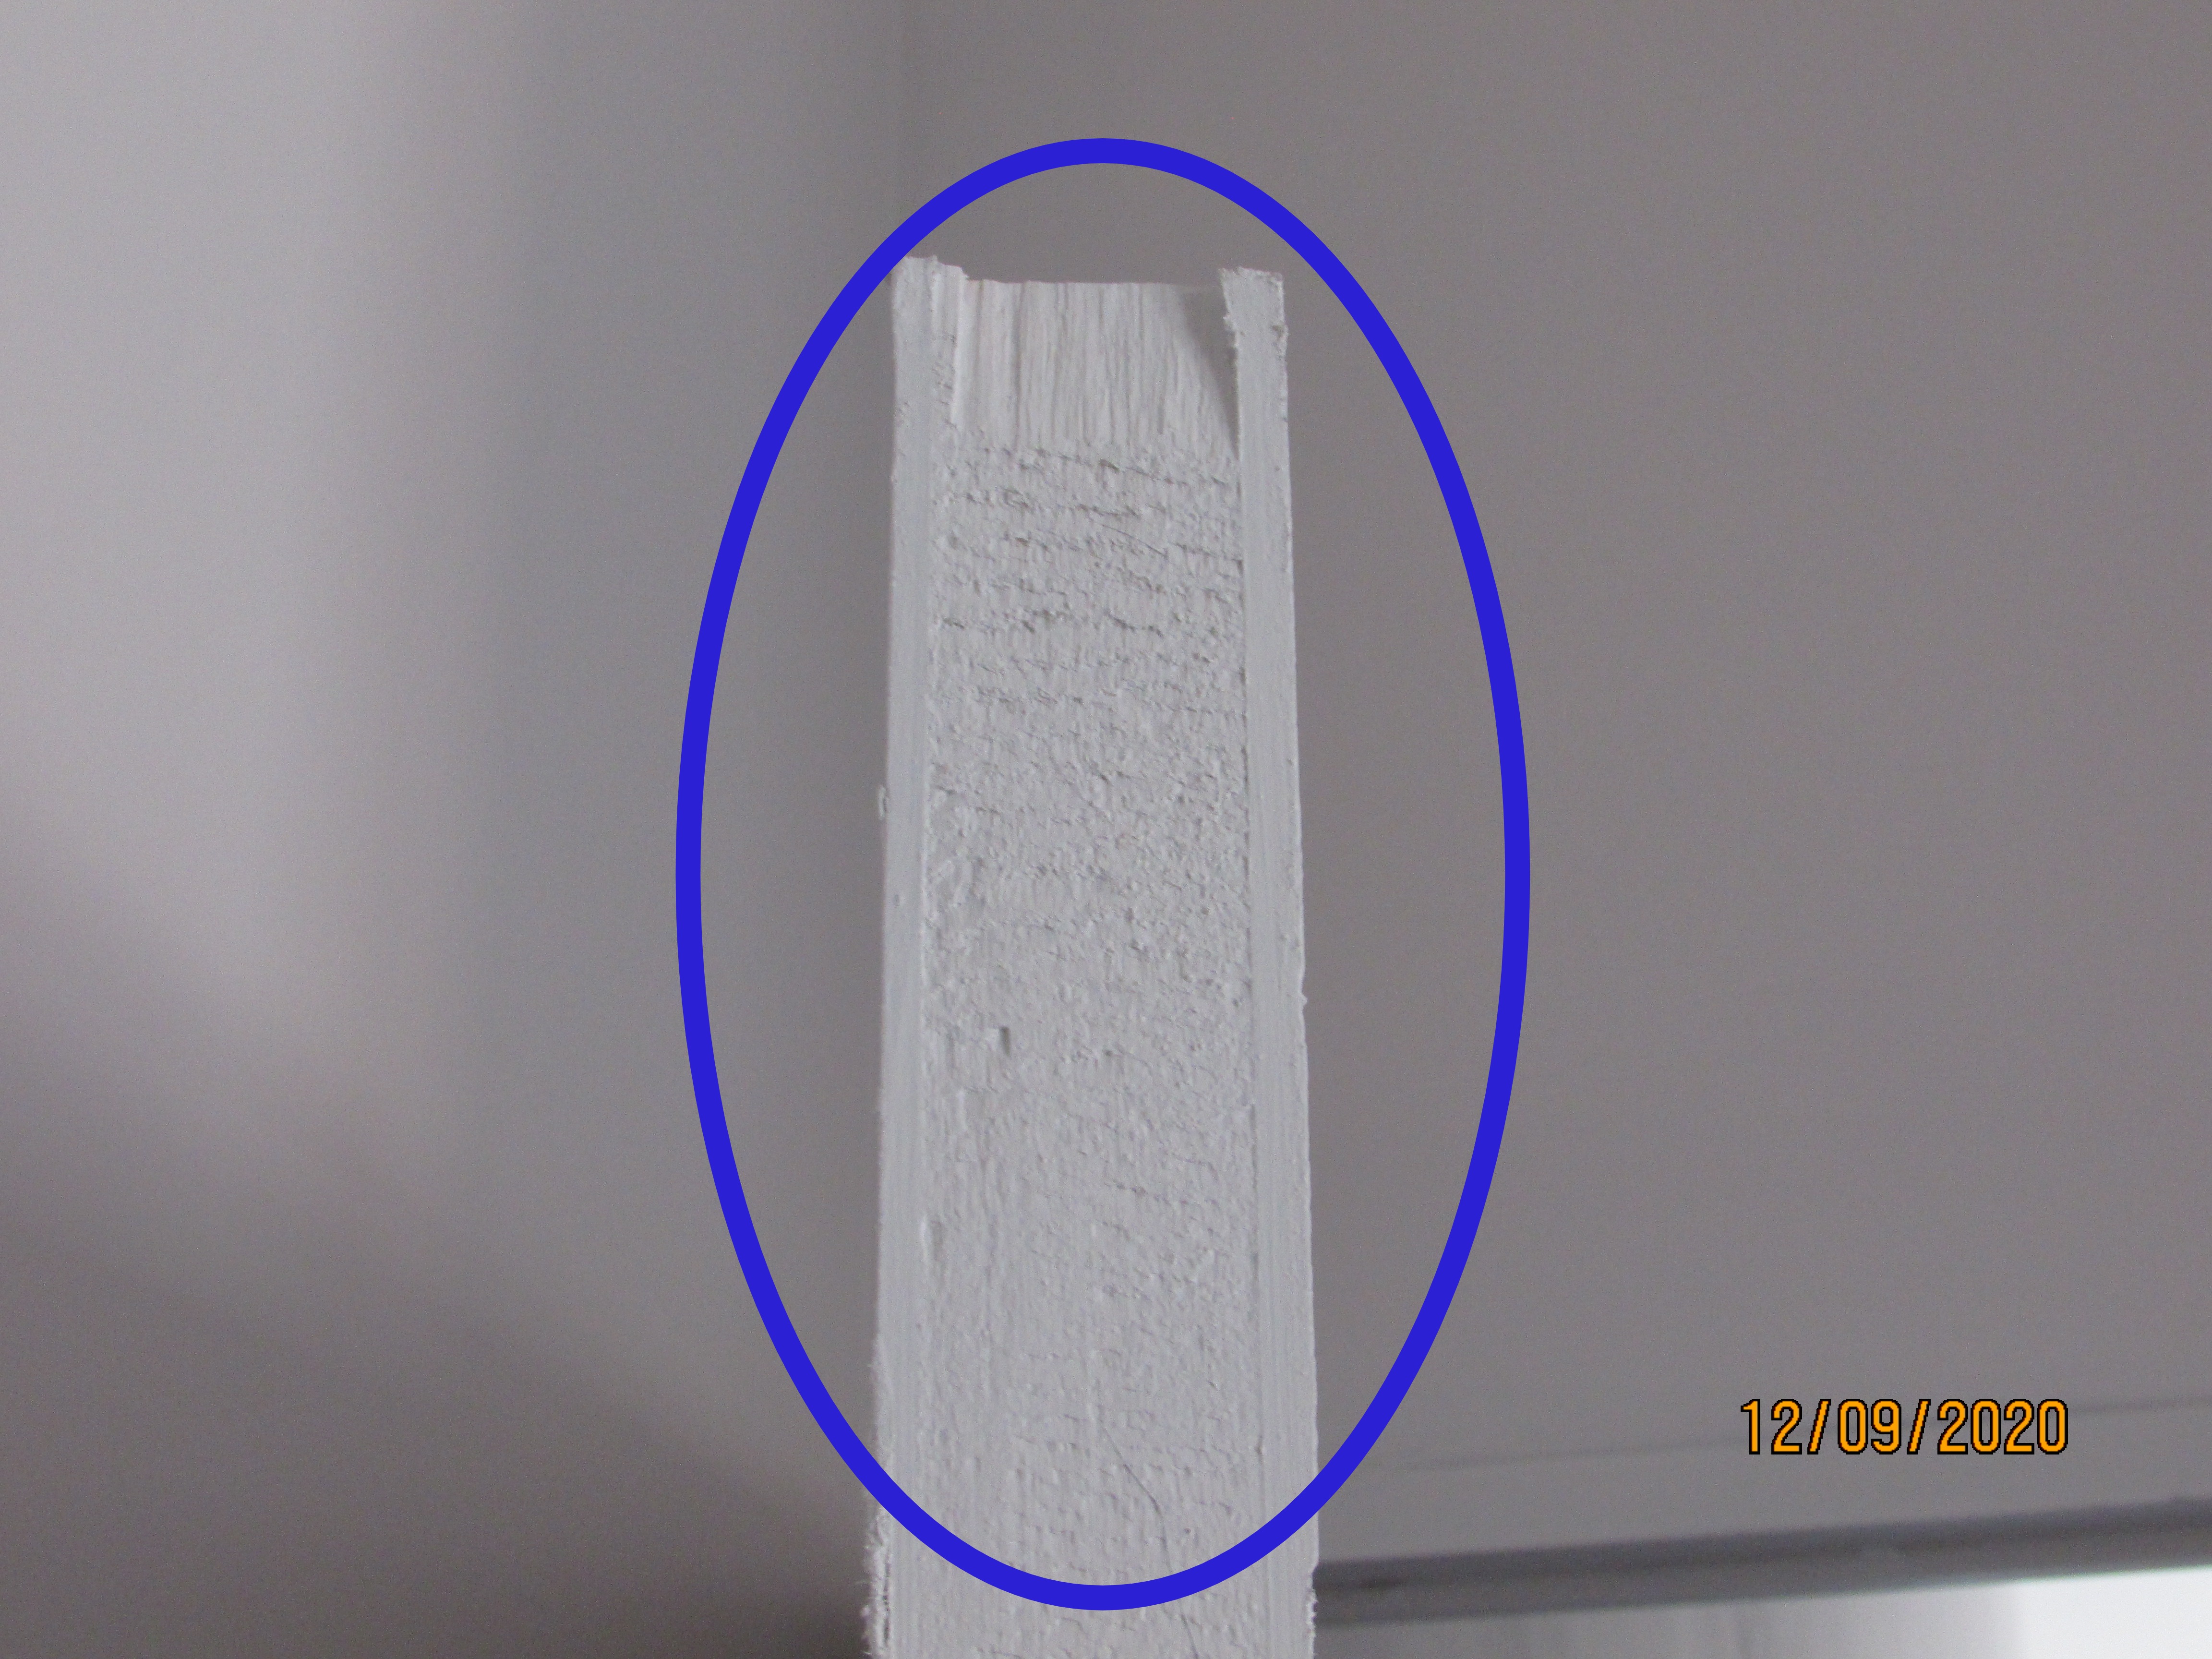
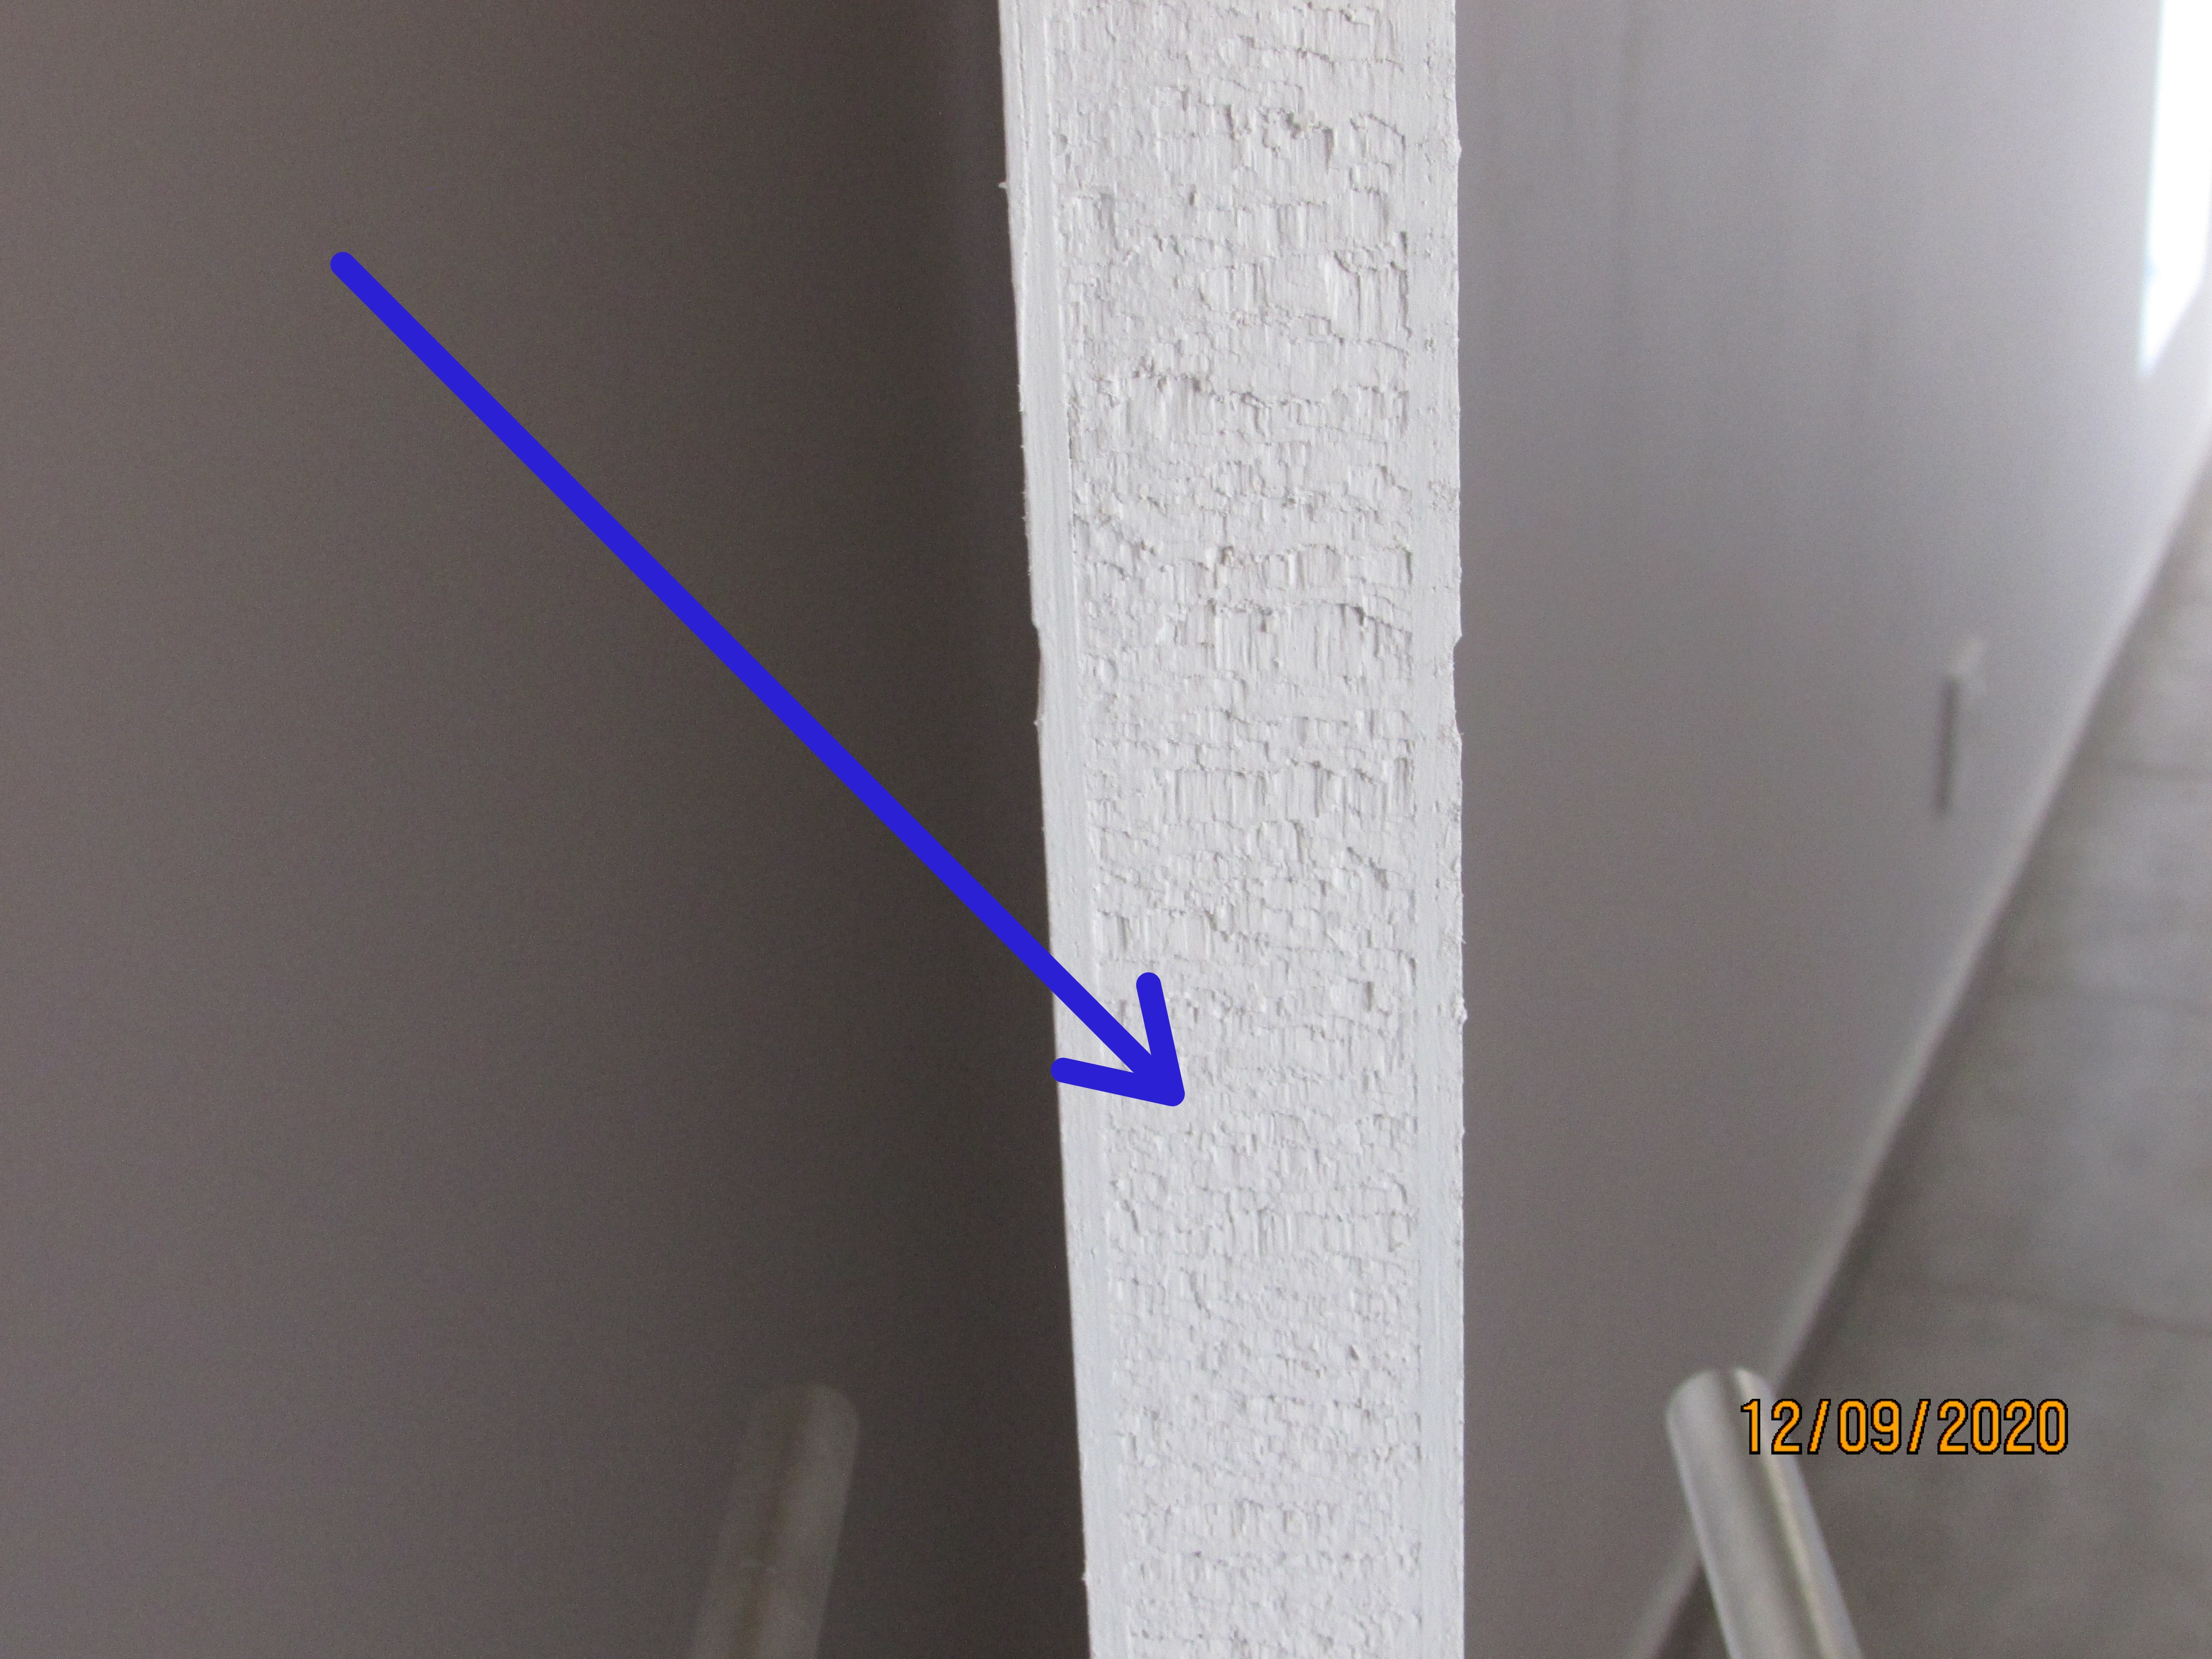
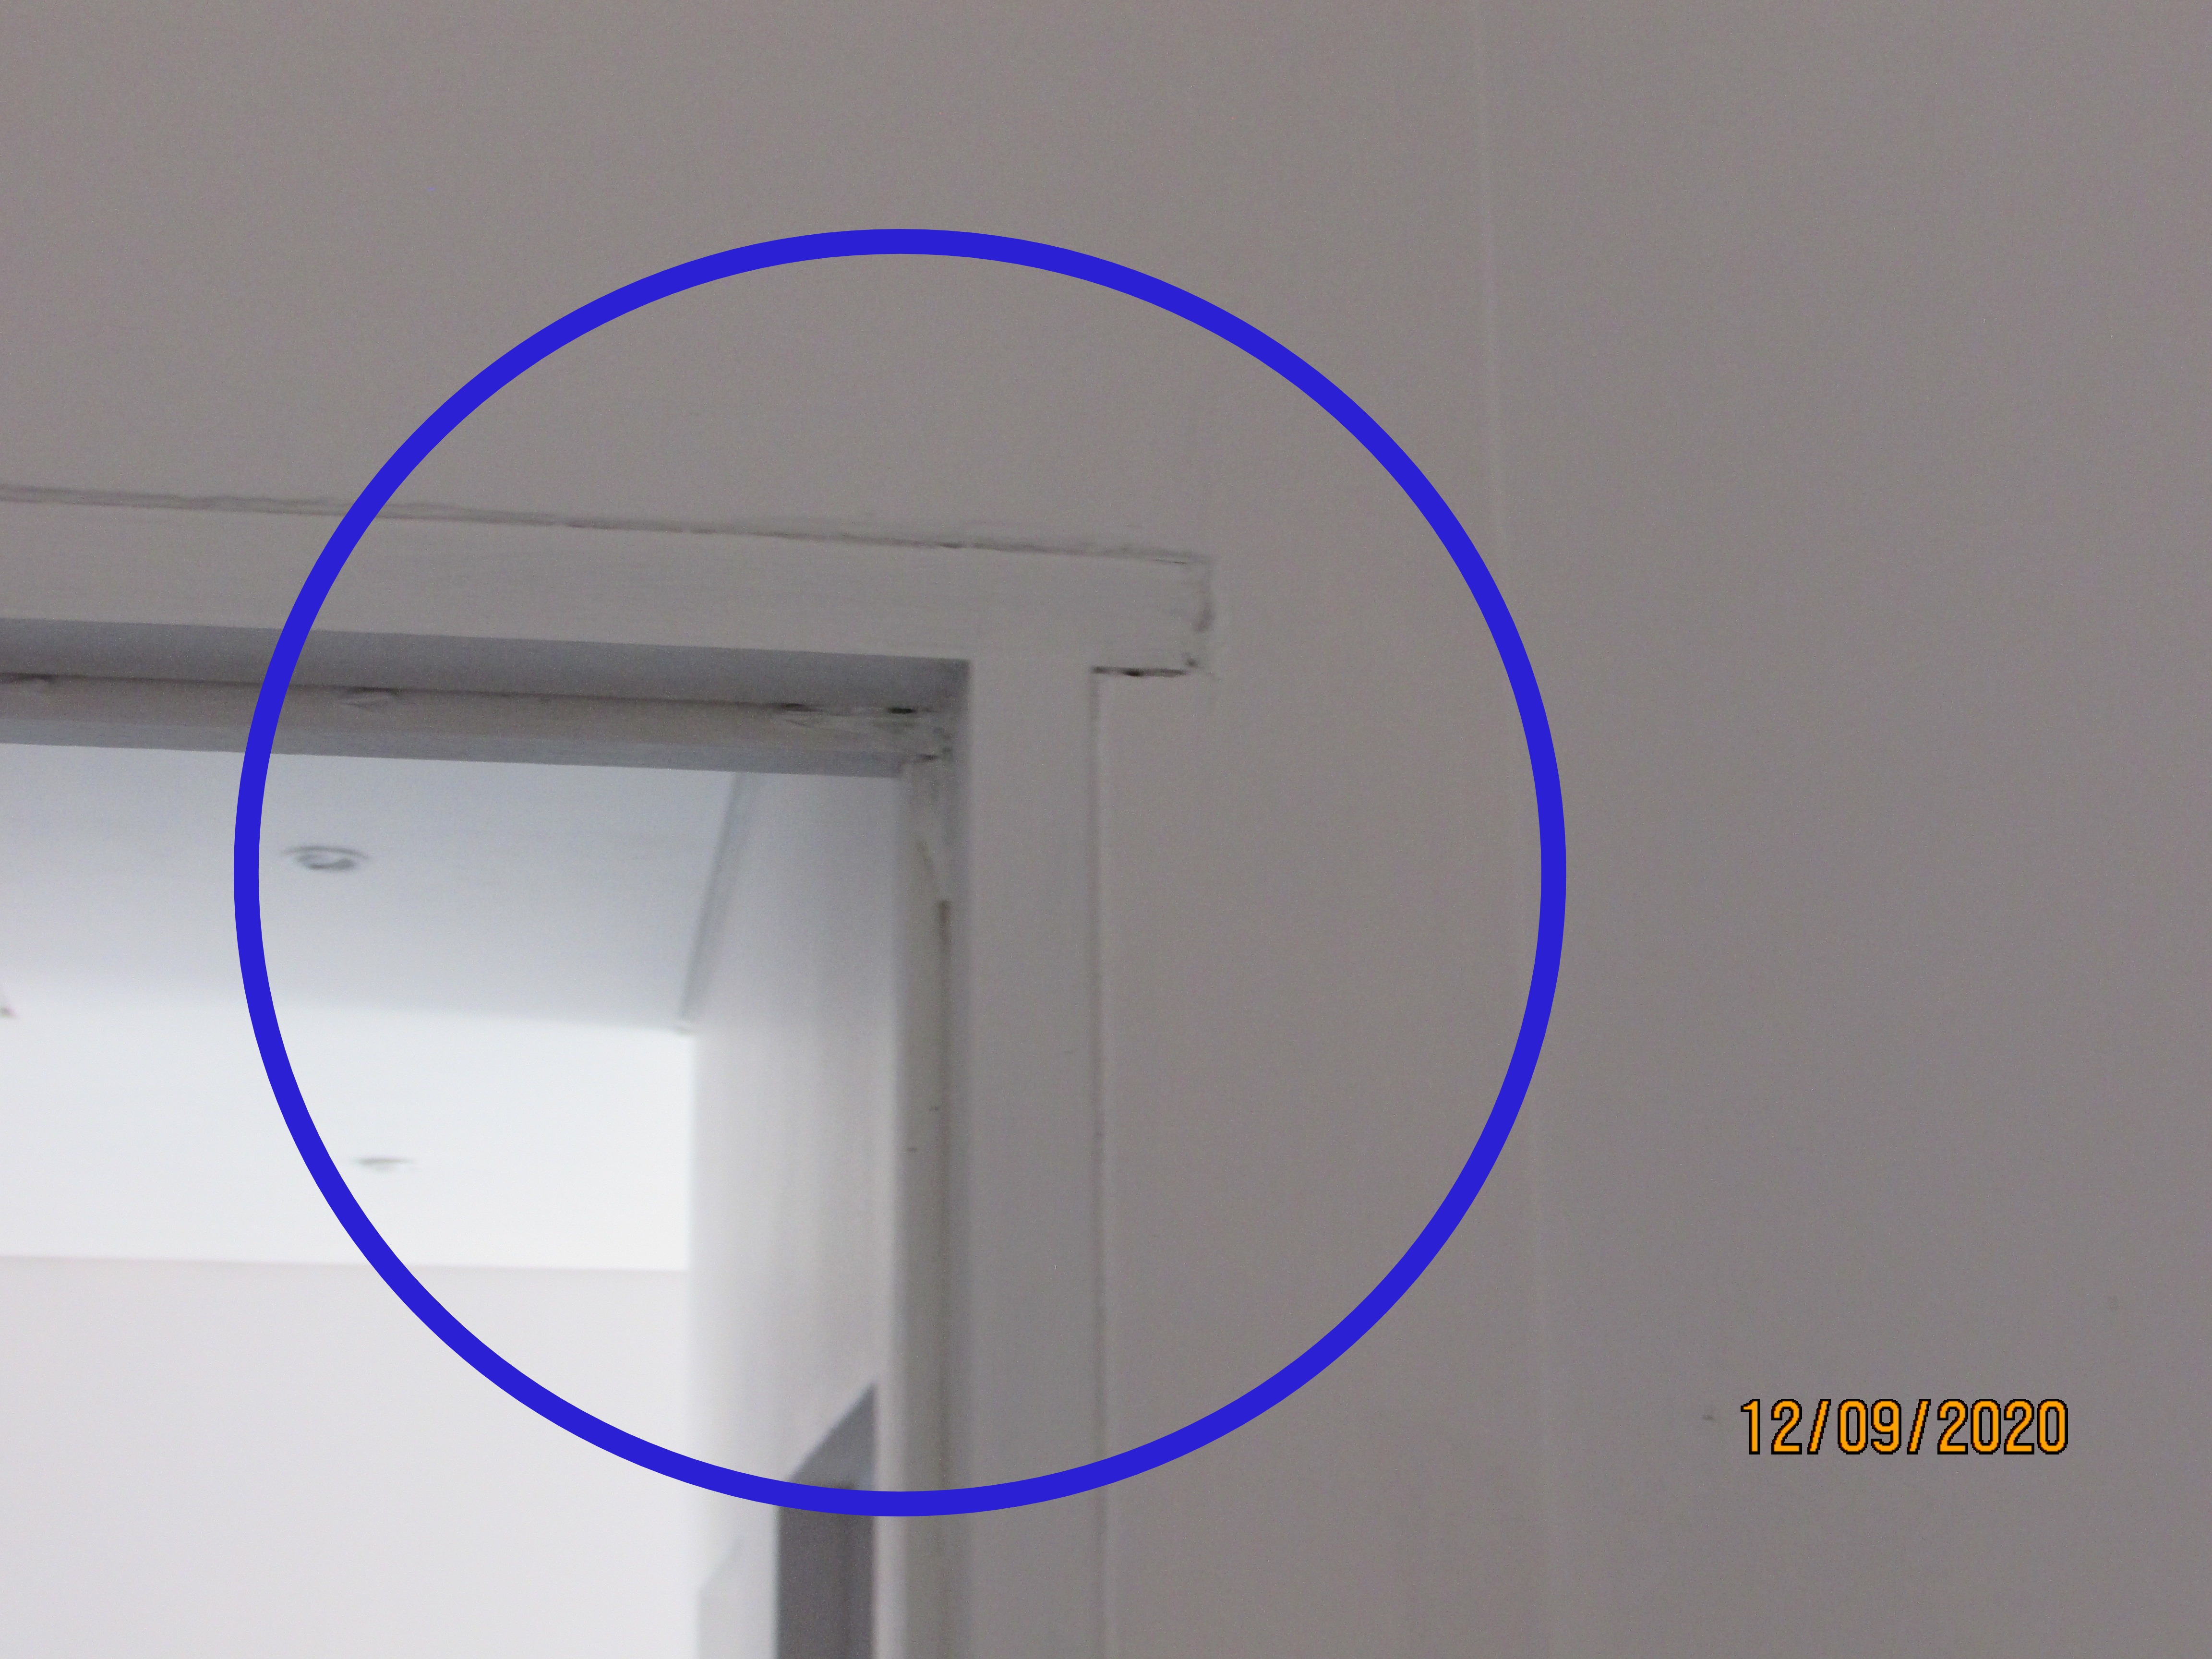
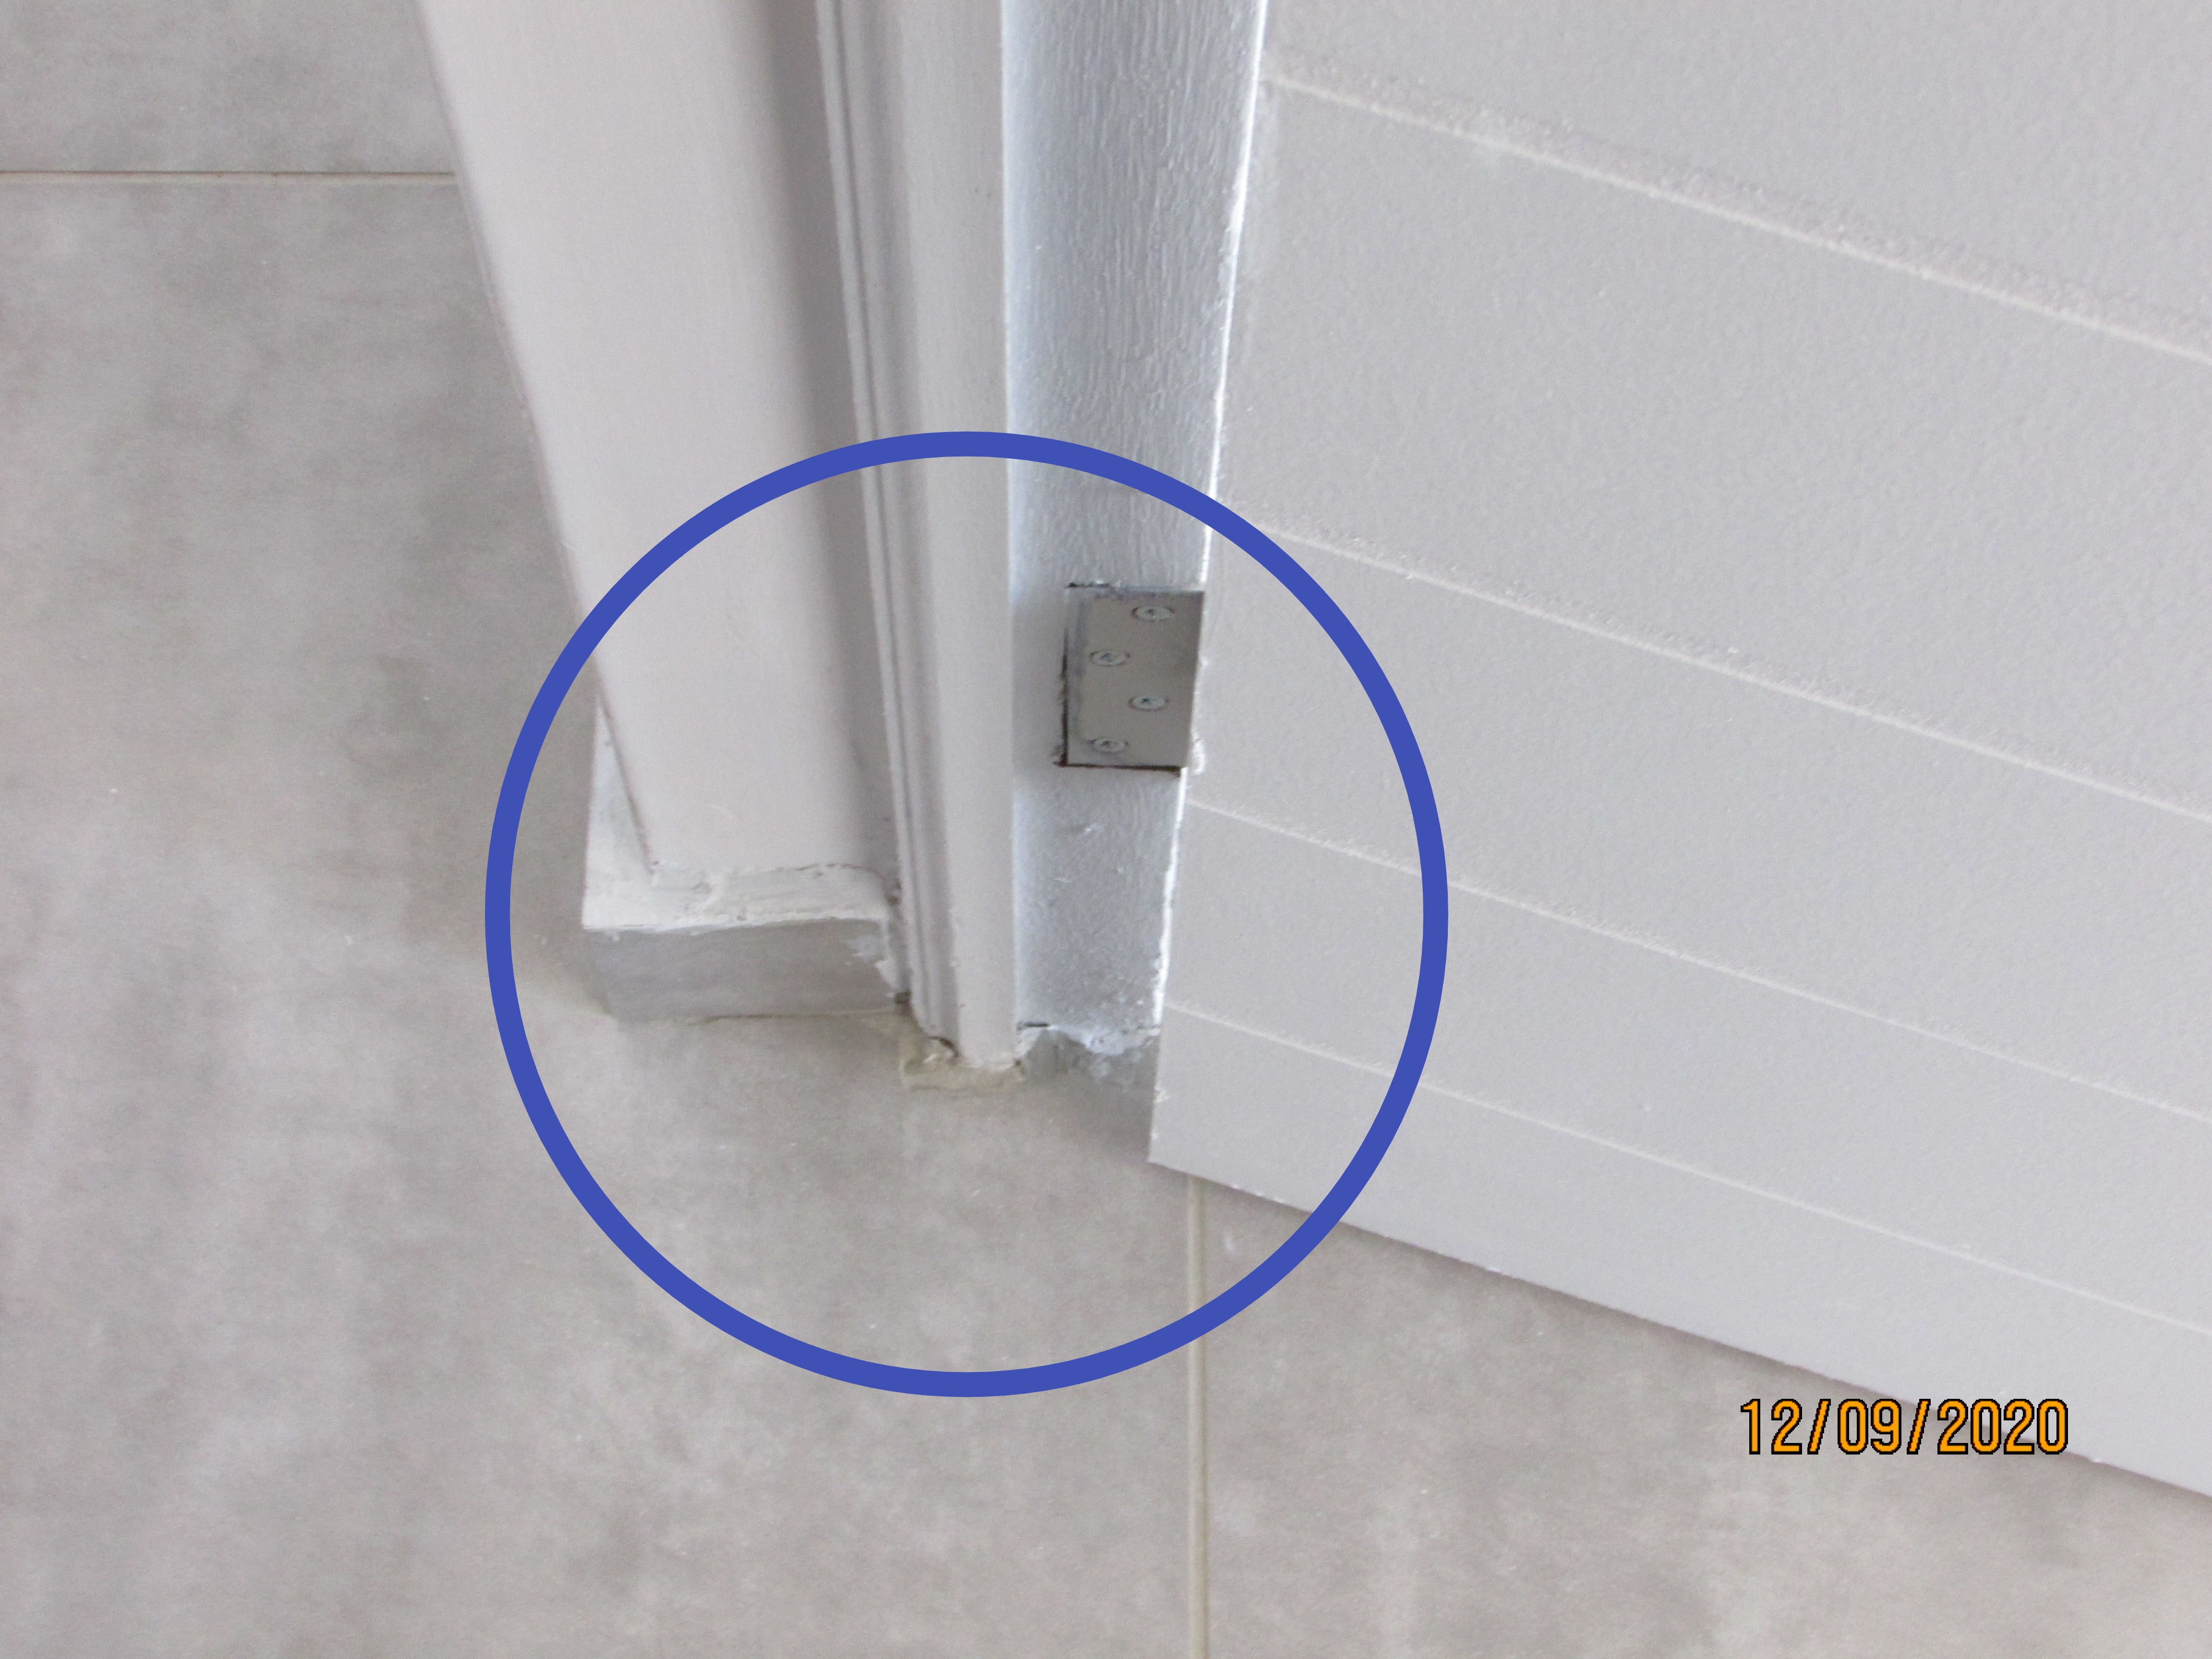
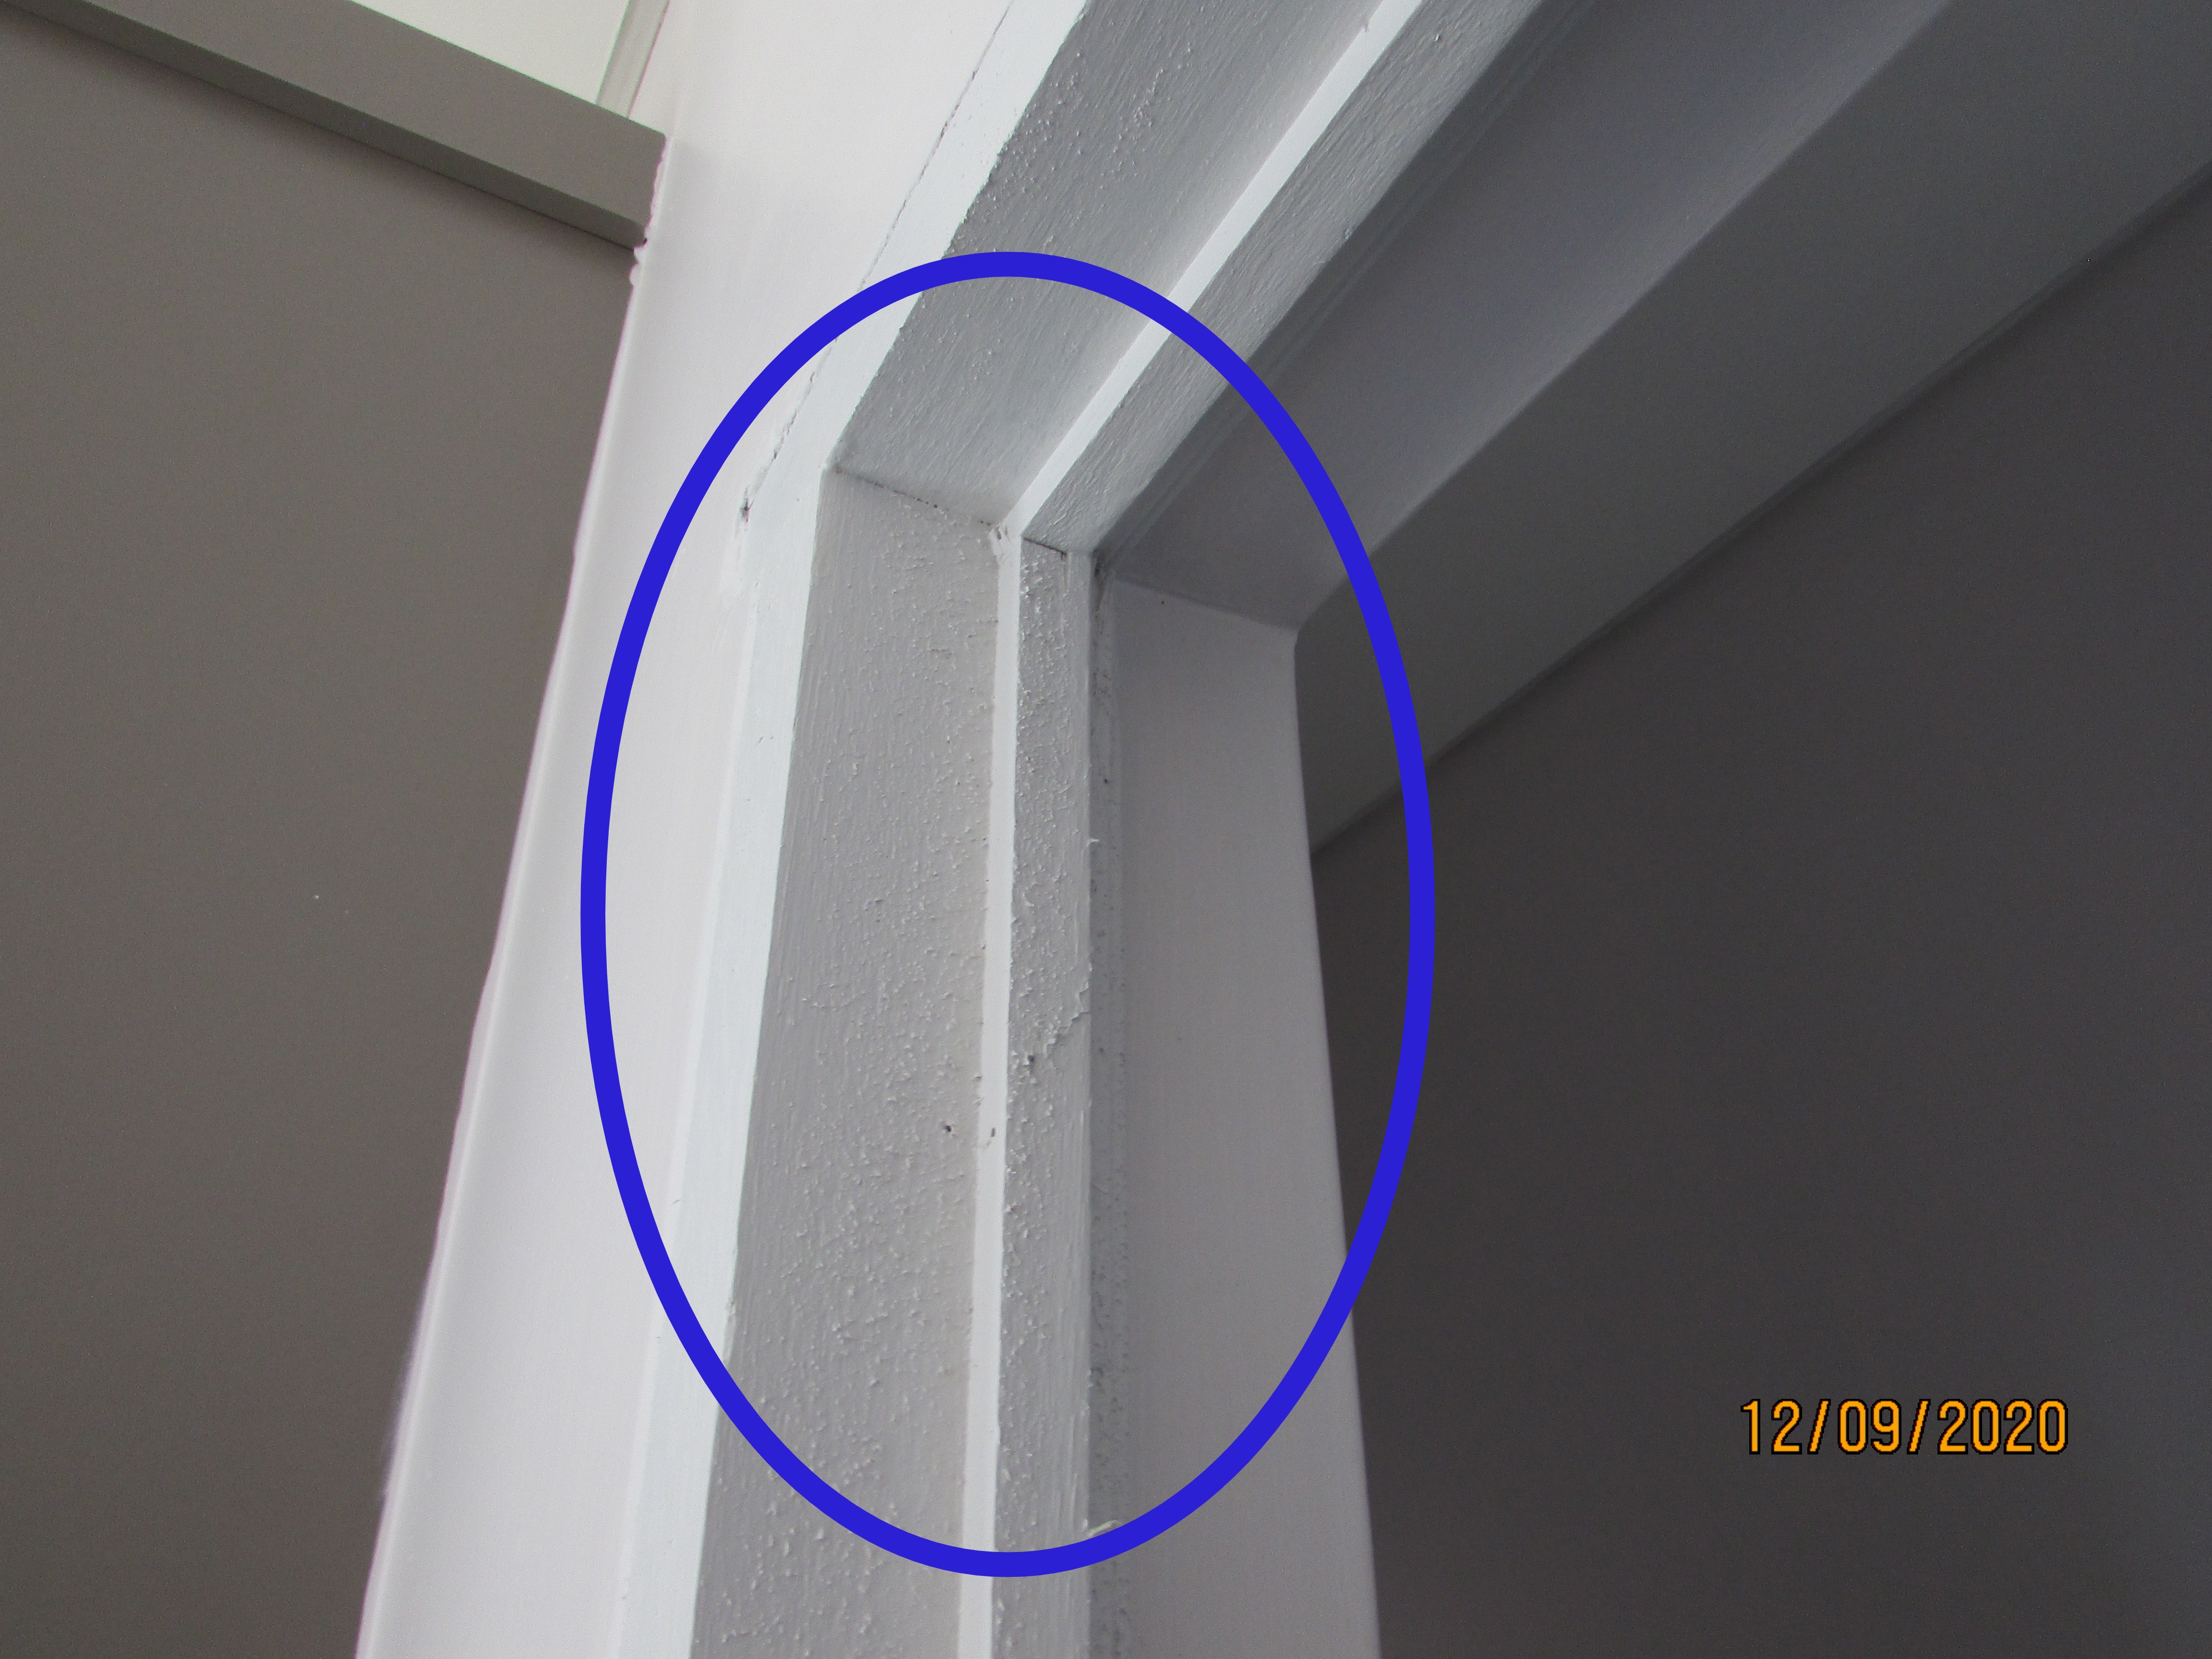
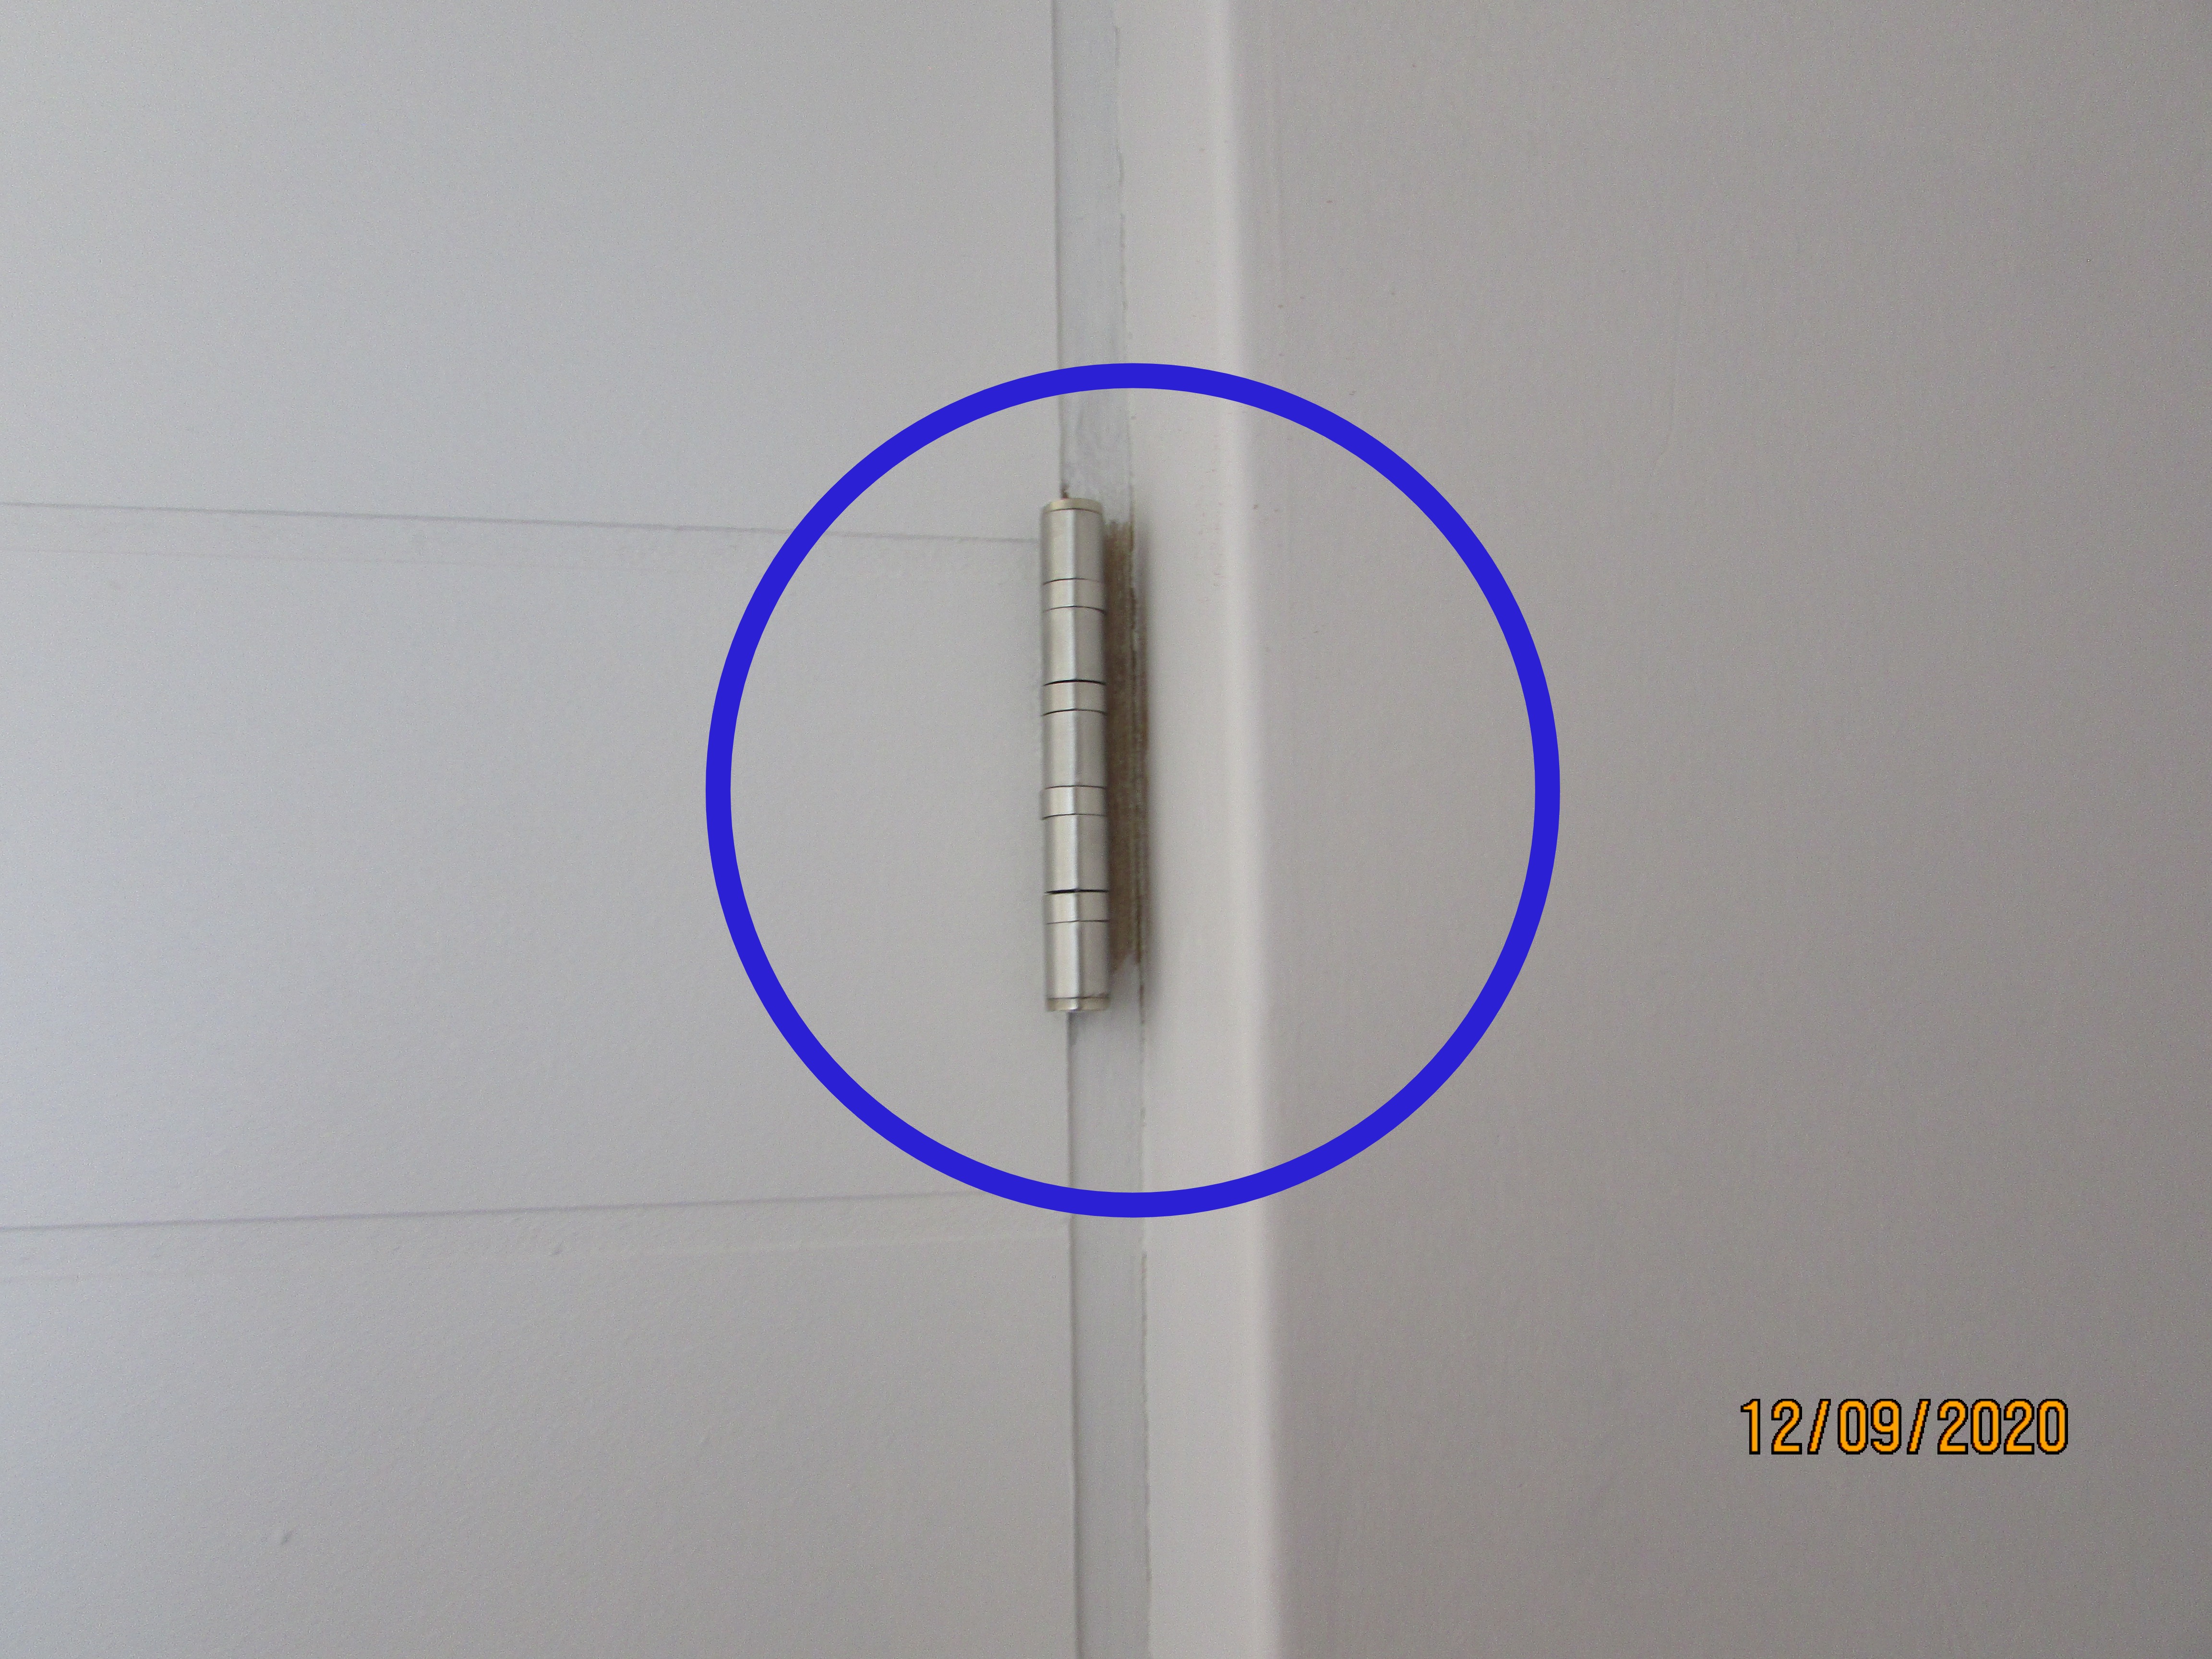
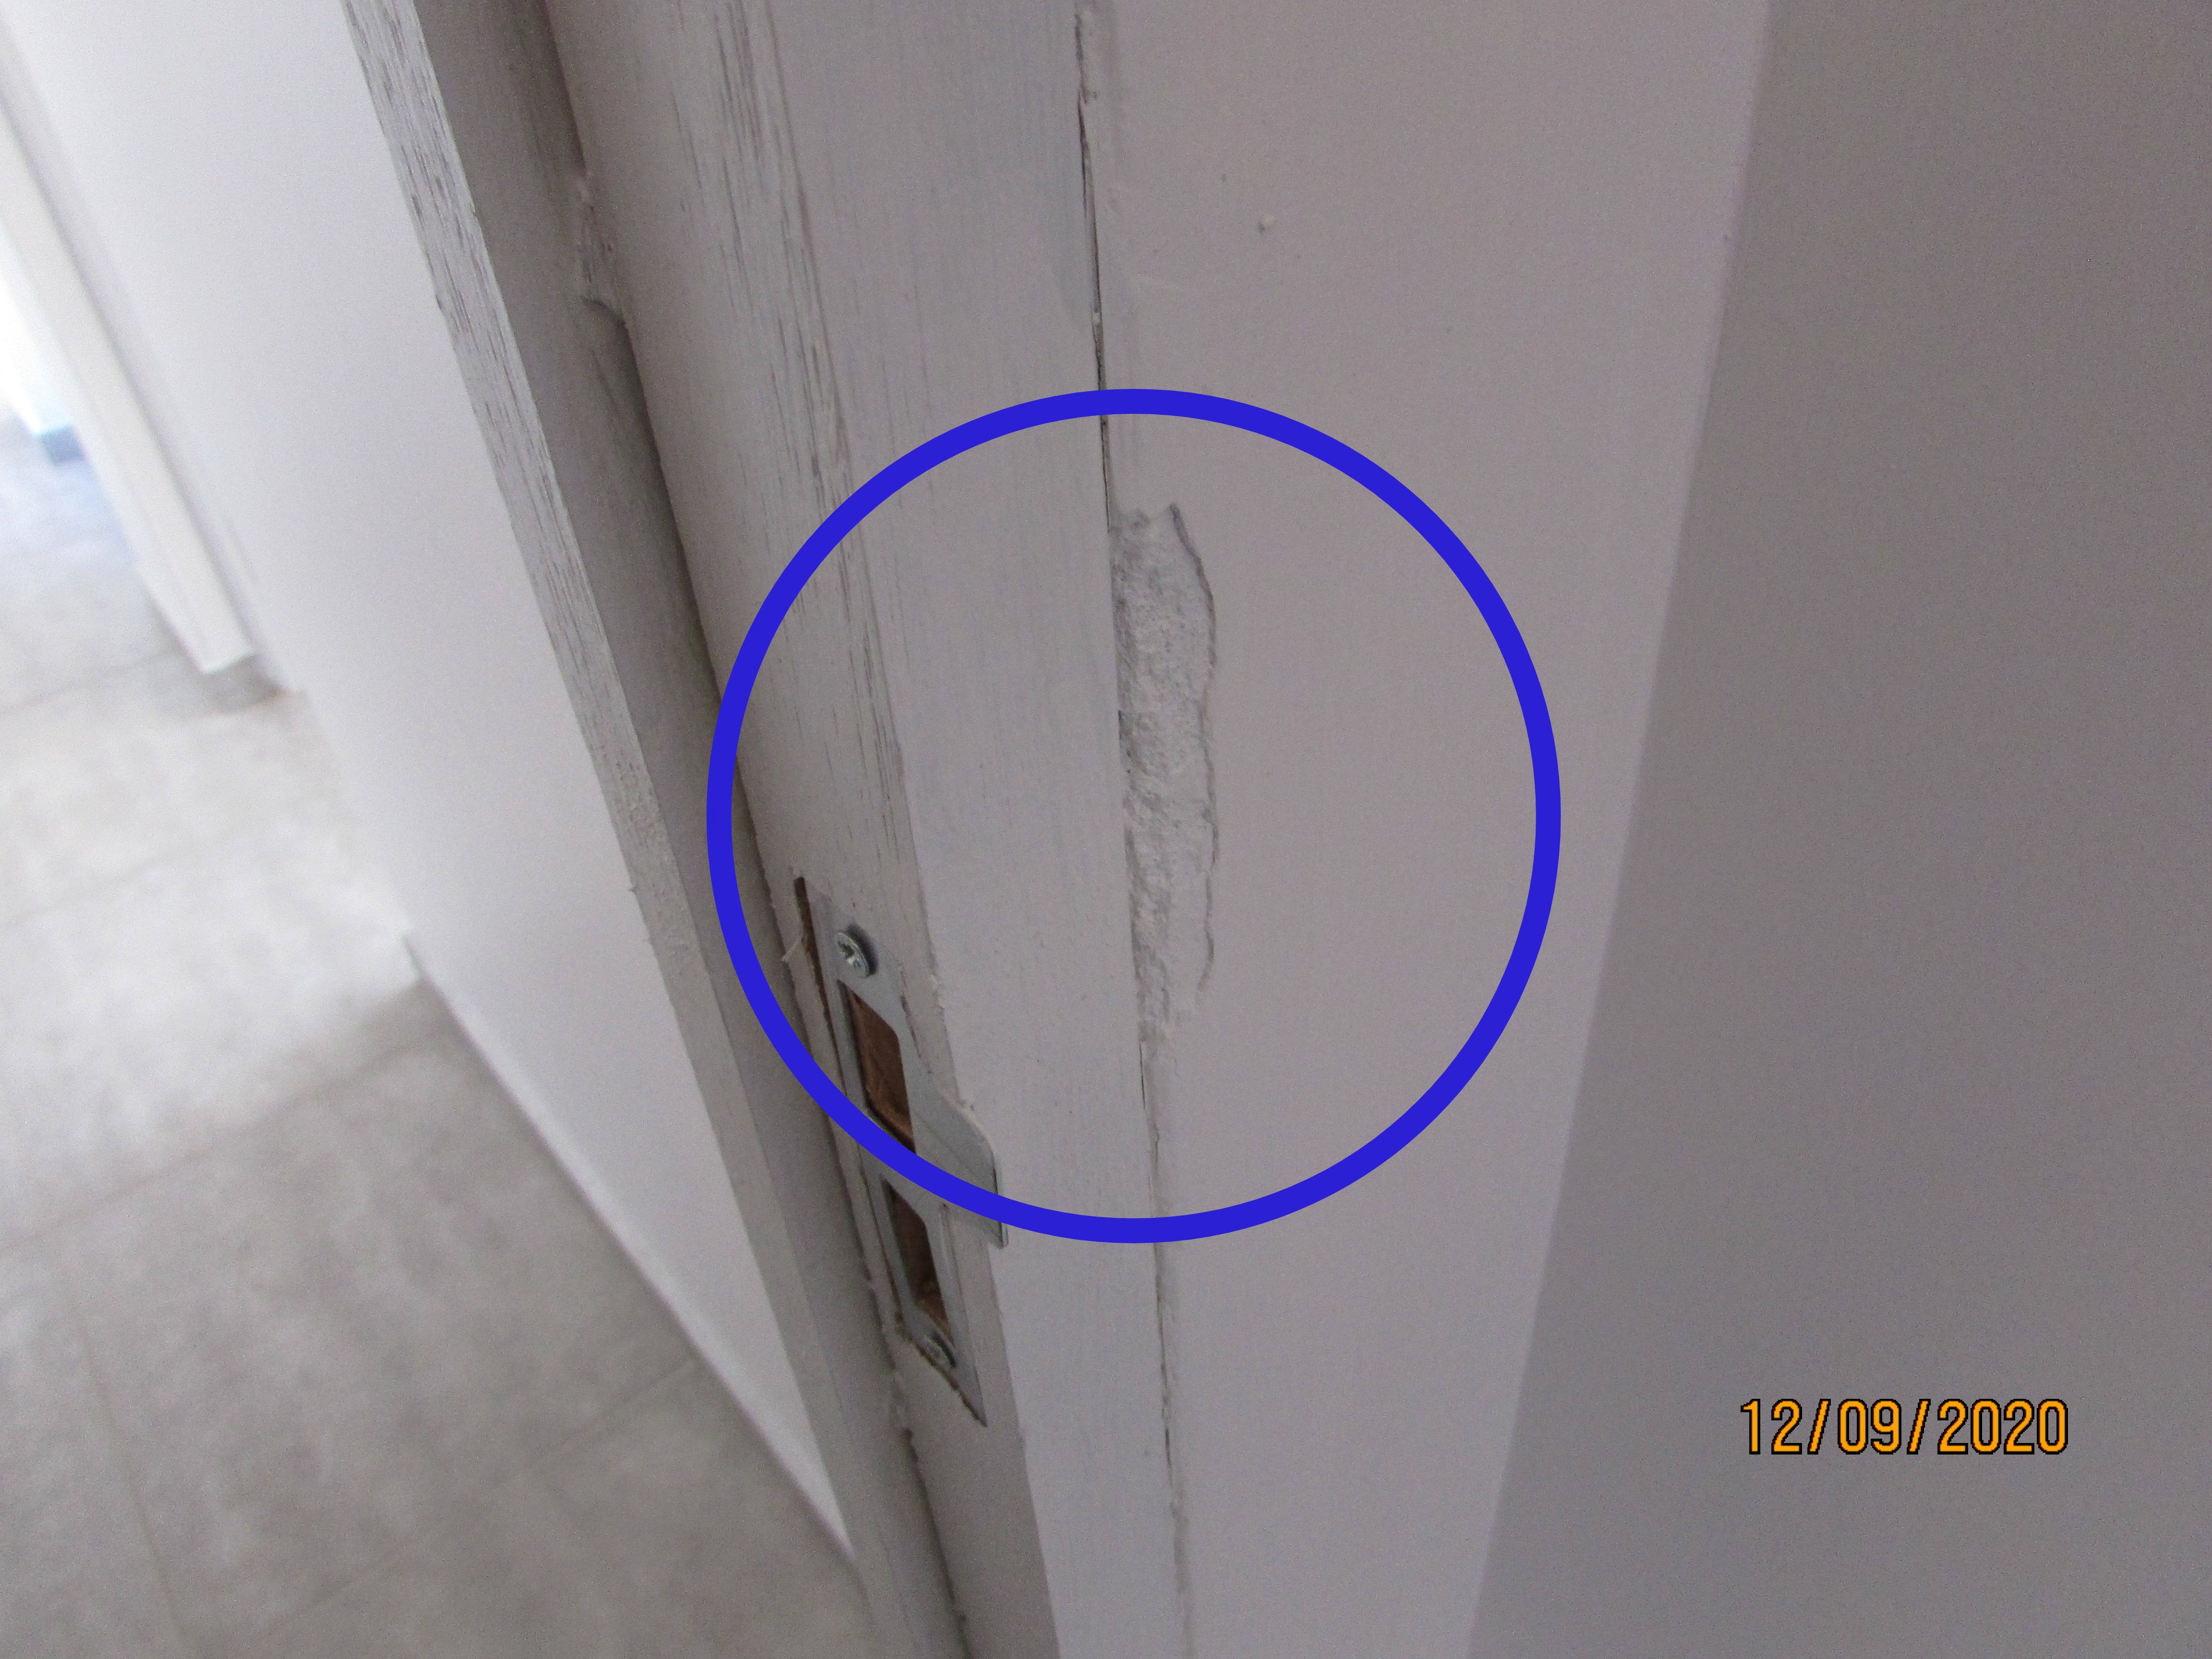
Some internal doors had a excessively large gaps at the bottom of the doors. If the gaps are unacceptable, they can be reduced by adding a strip to the bottom of the doors to reduce the gaps.
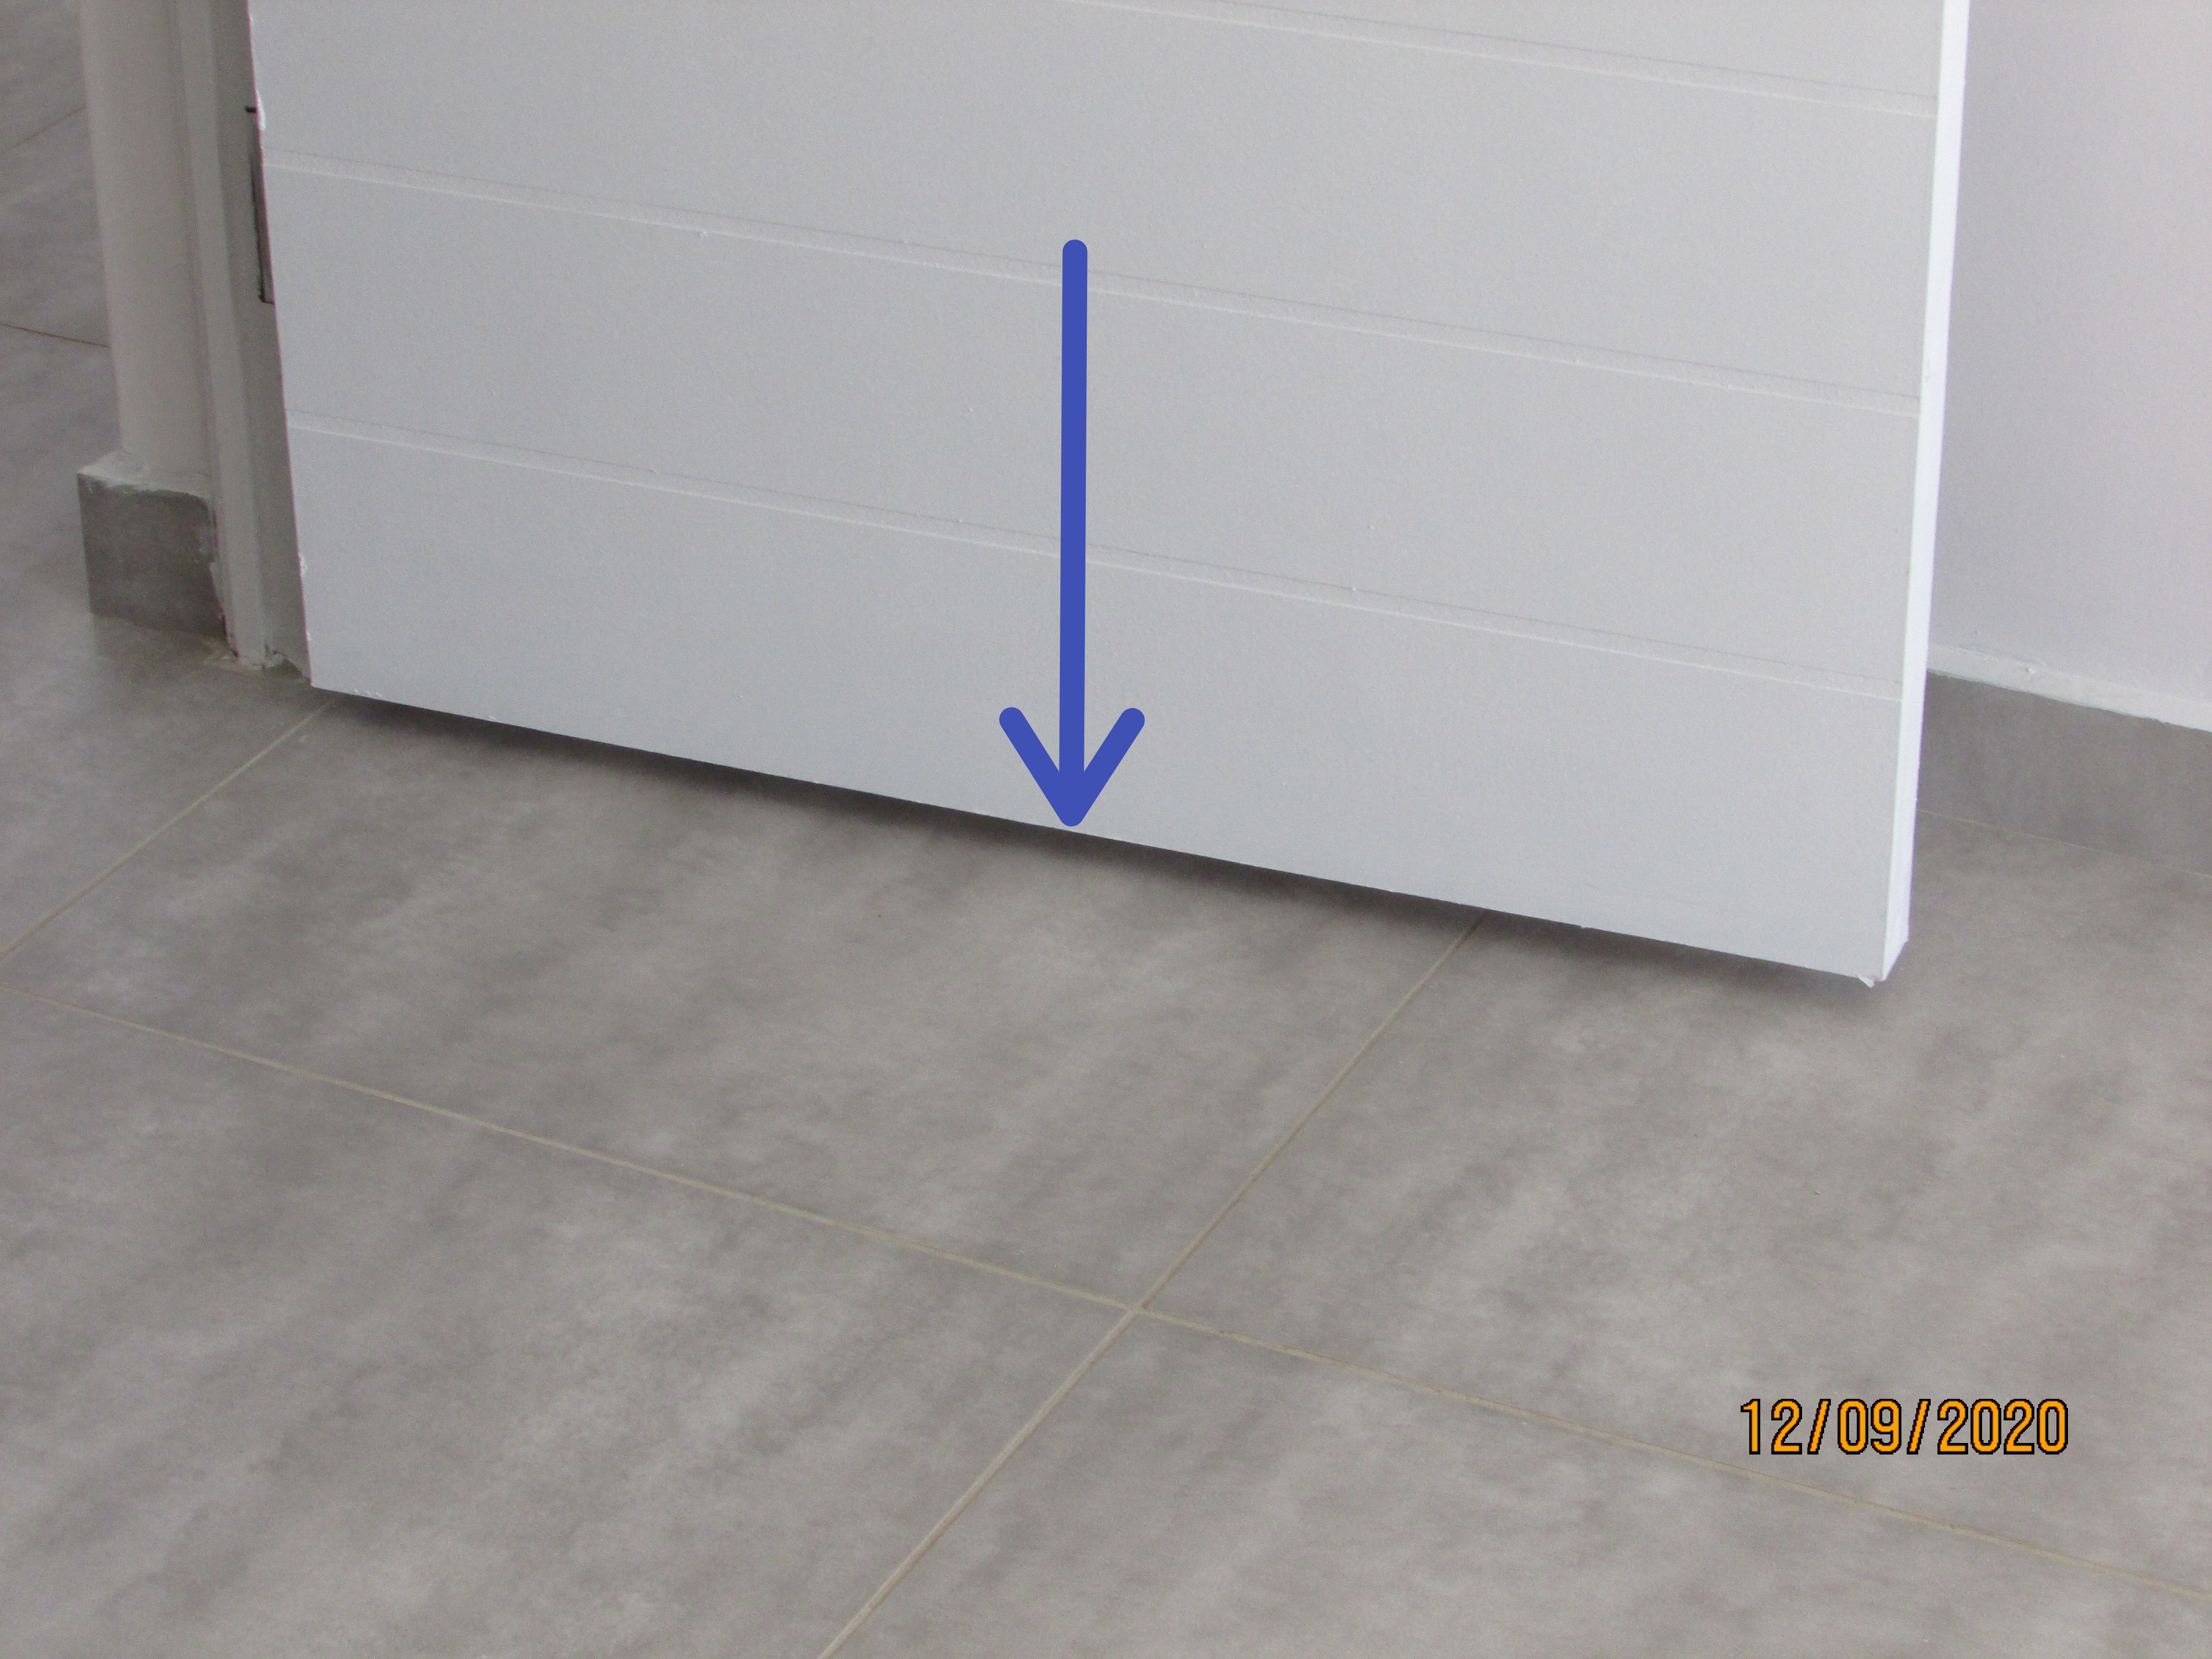 | 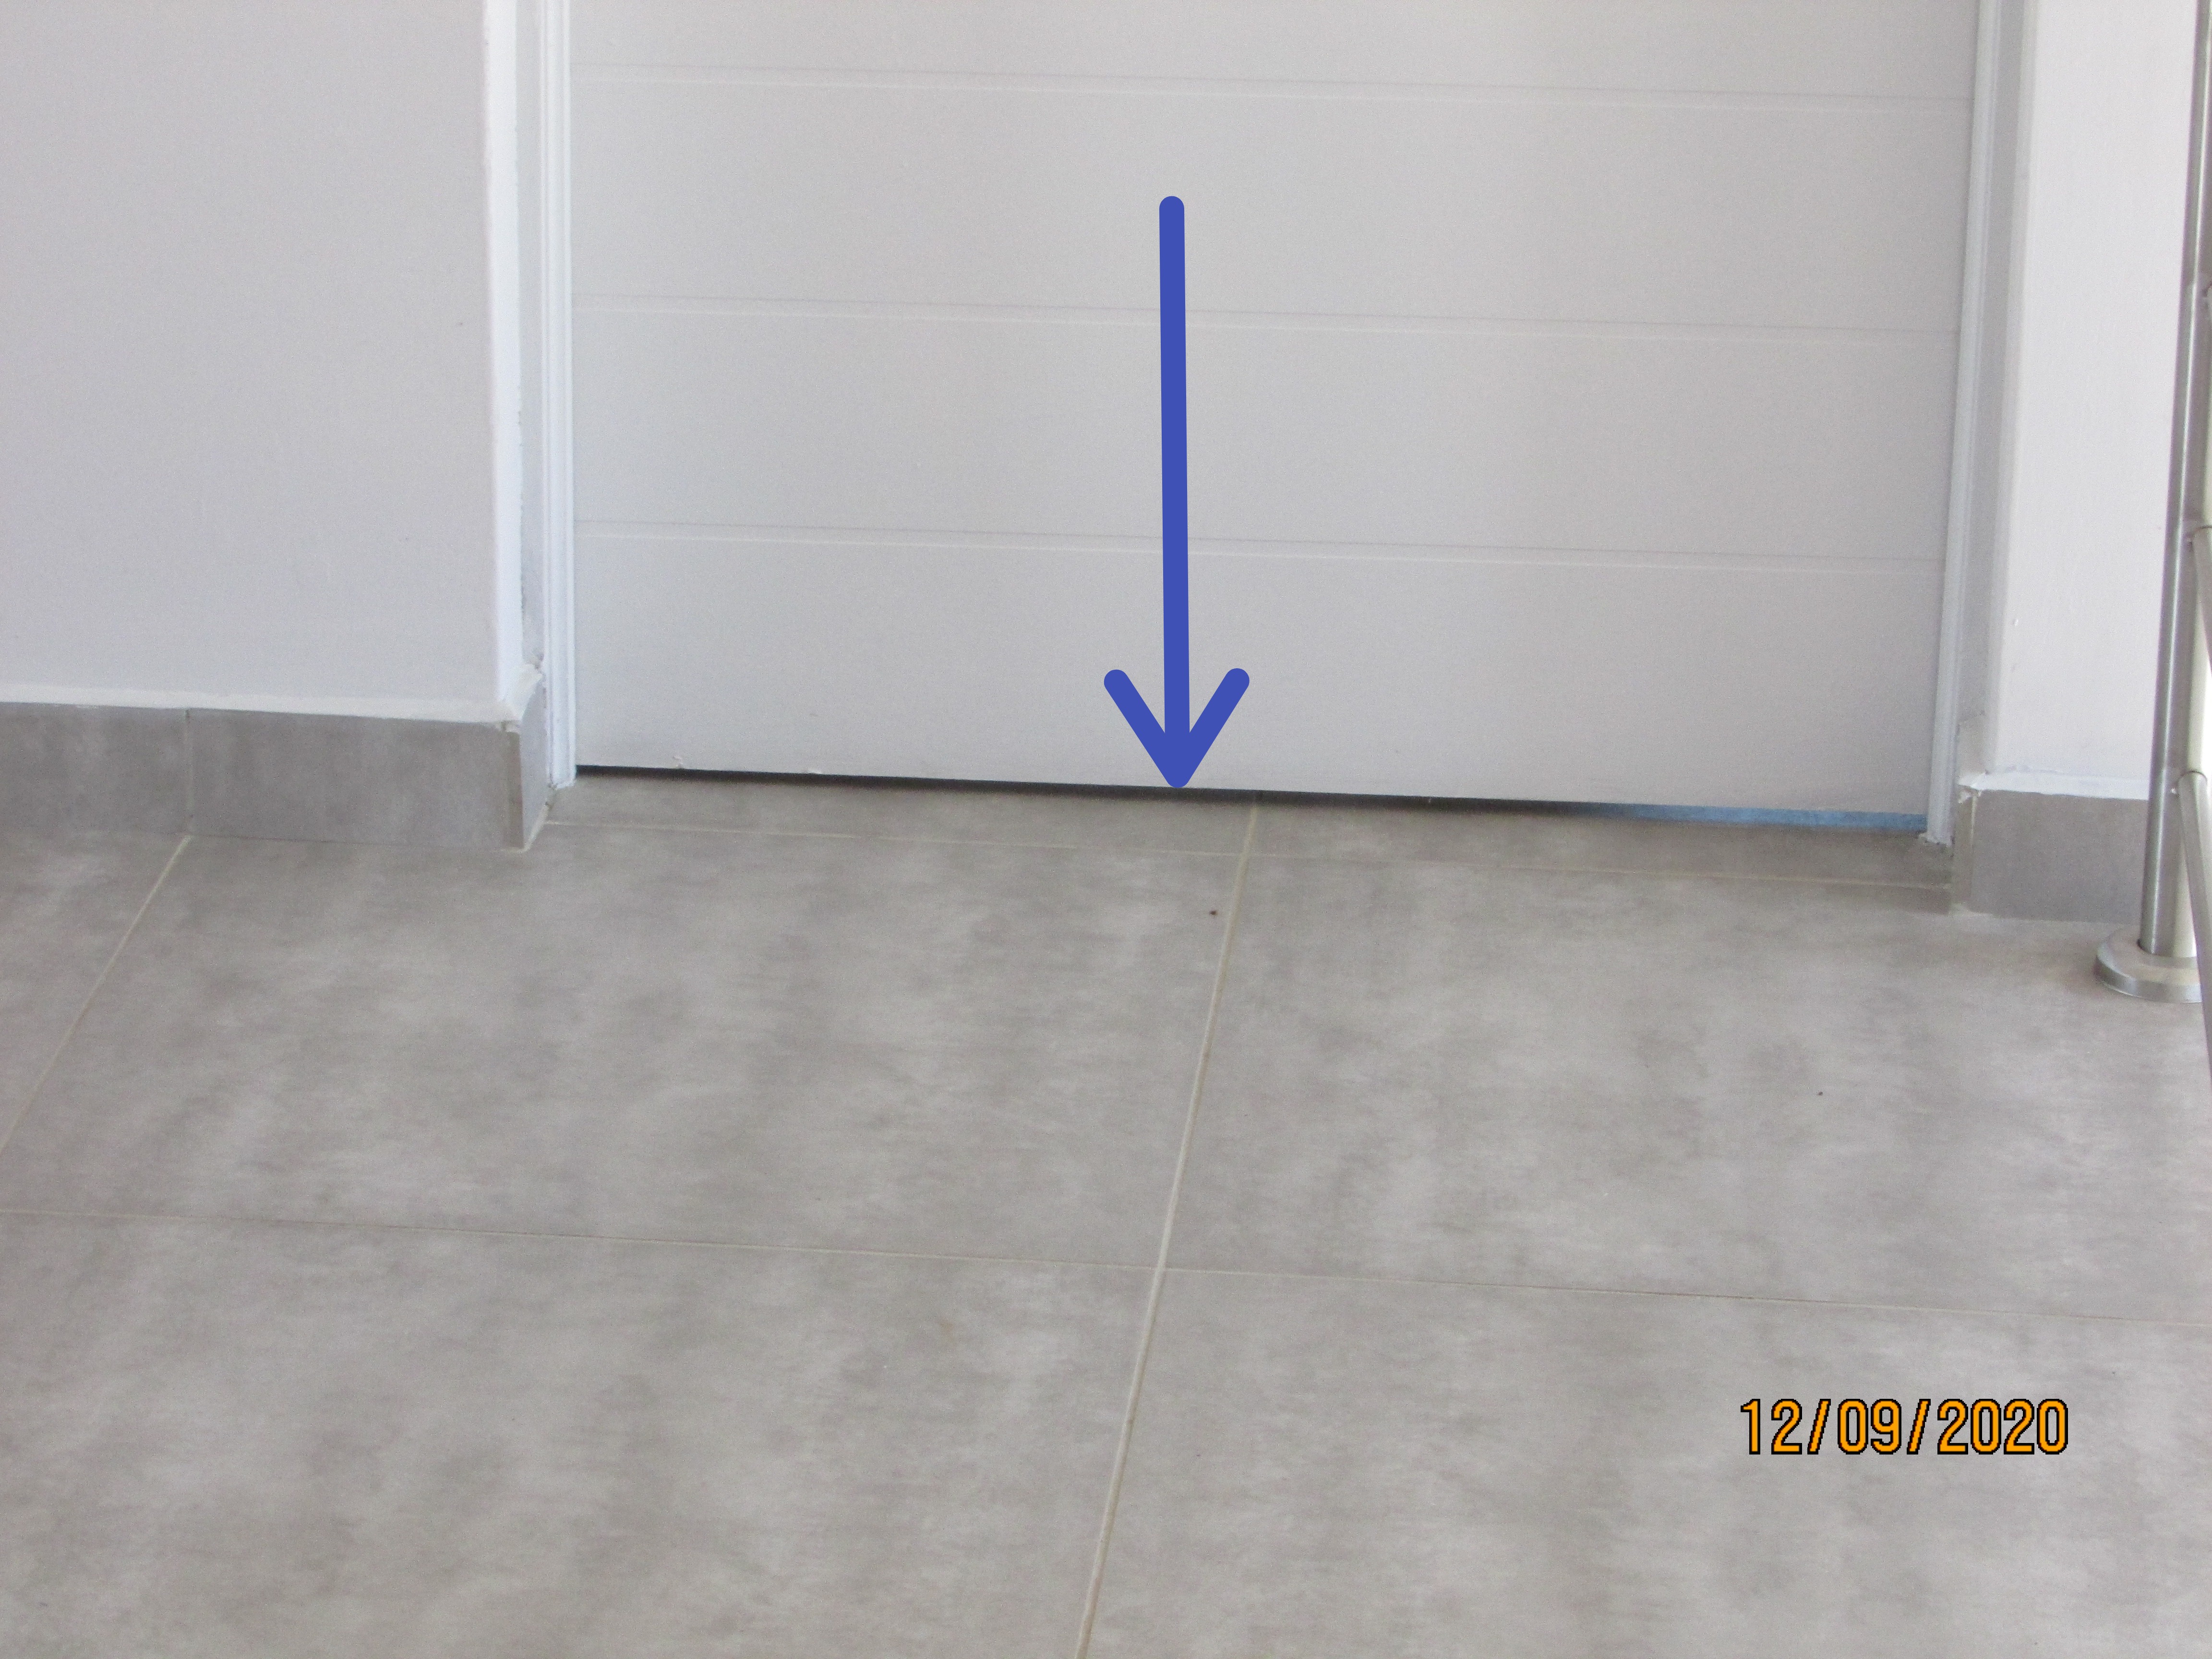 |
Windows
Window Glazing: Single pane
Interior Window Frame: Metal
Window Styles: Awning
All tested windows were found to be functional at the time of the inspection.
There were cracks in the plasterwork at and below an internal window sill of the staircase landing window. Typically, it appeared from the bubbling paintwork along the cracks internally was around the area of the the window sill as a result of moisture intrusion into the exterior walls at cracks on the window sills and cracks and gaps between the window frames and sills externally. All the cracks on the sills and junctions between all the sills and all the windows should be sealed with a suitable silicon and painted to prevent further intrusion into the structure.
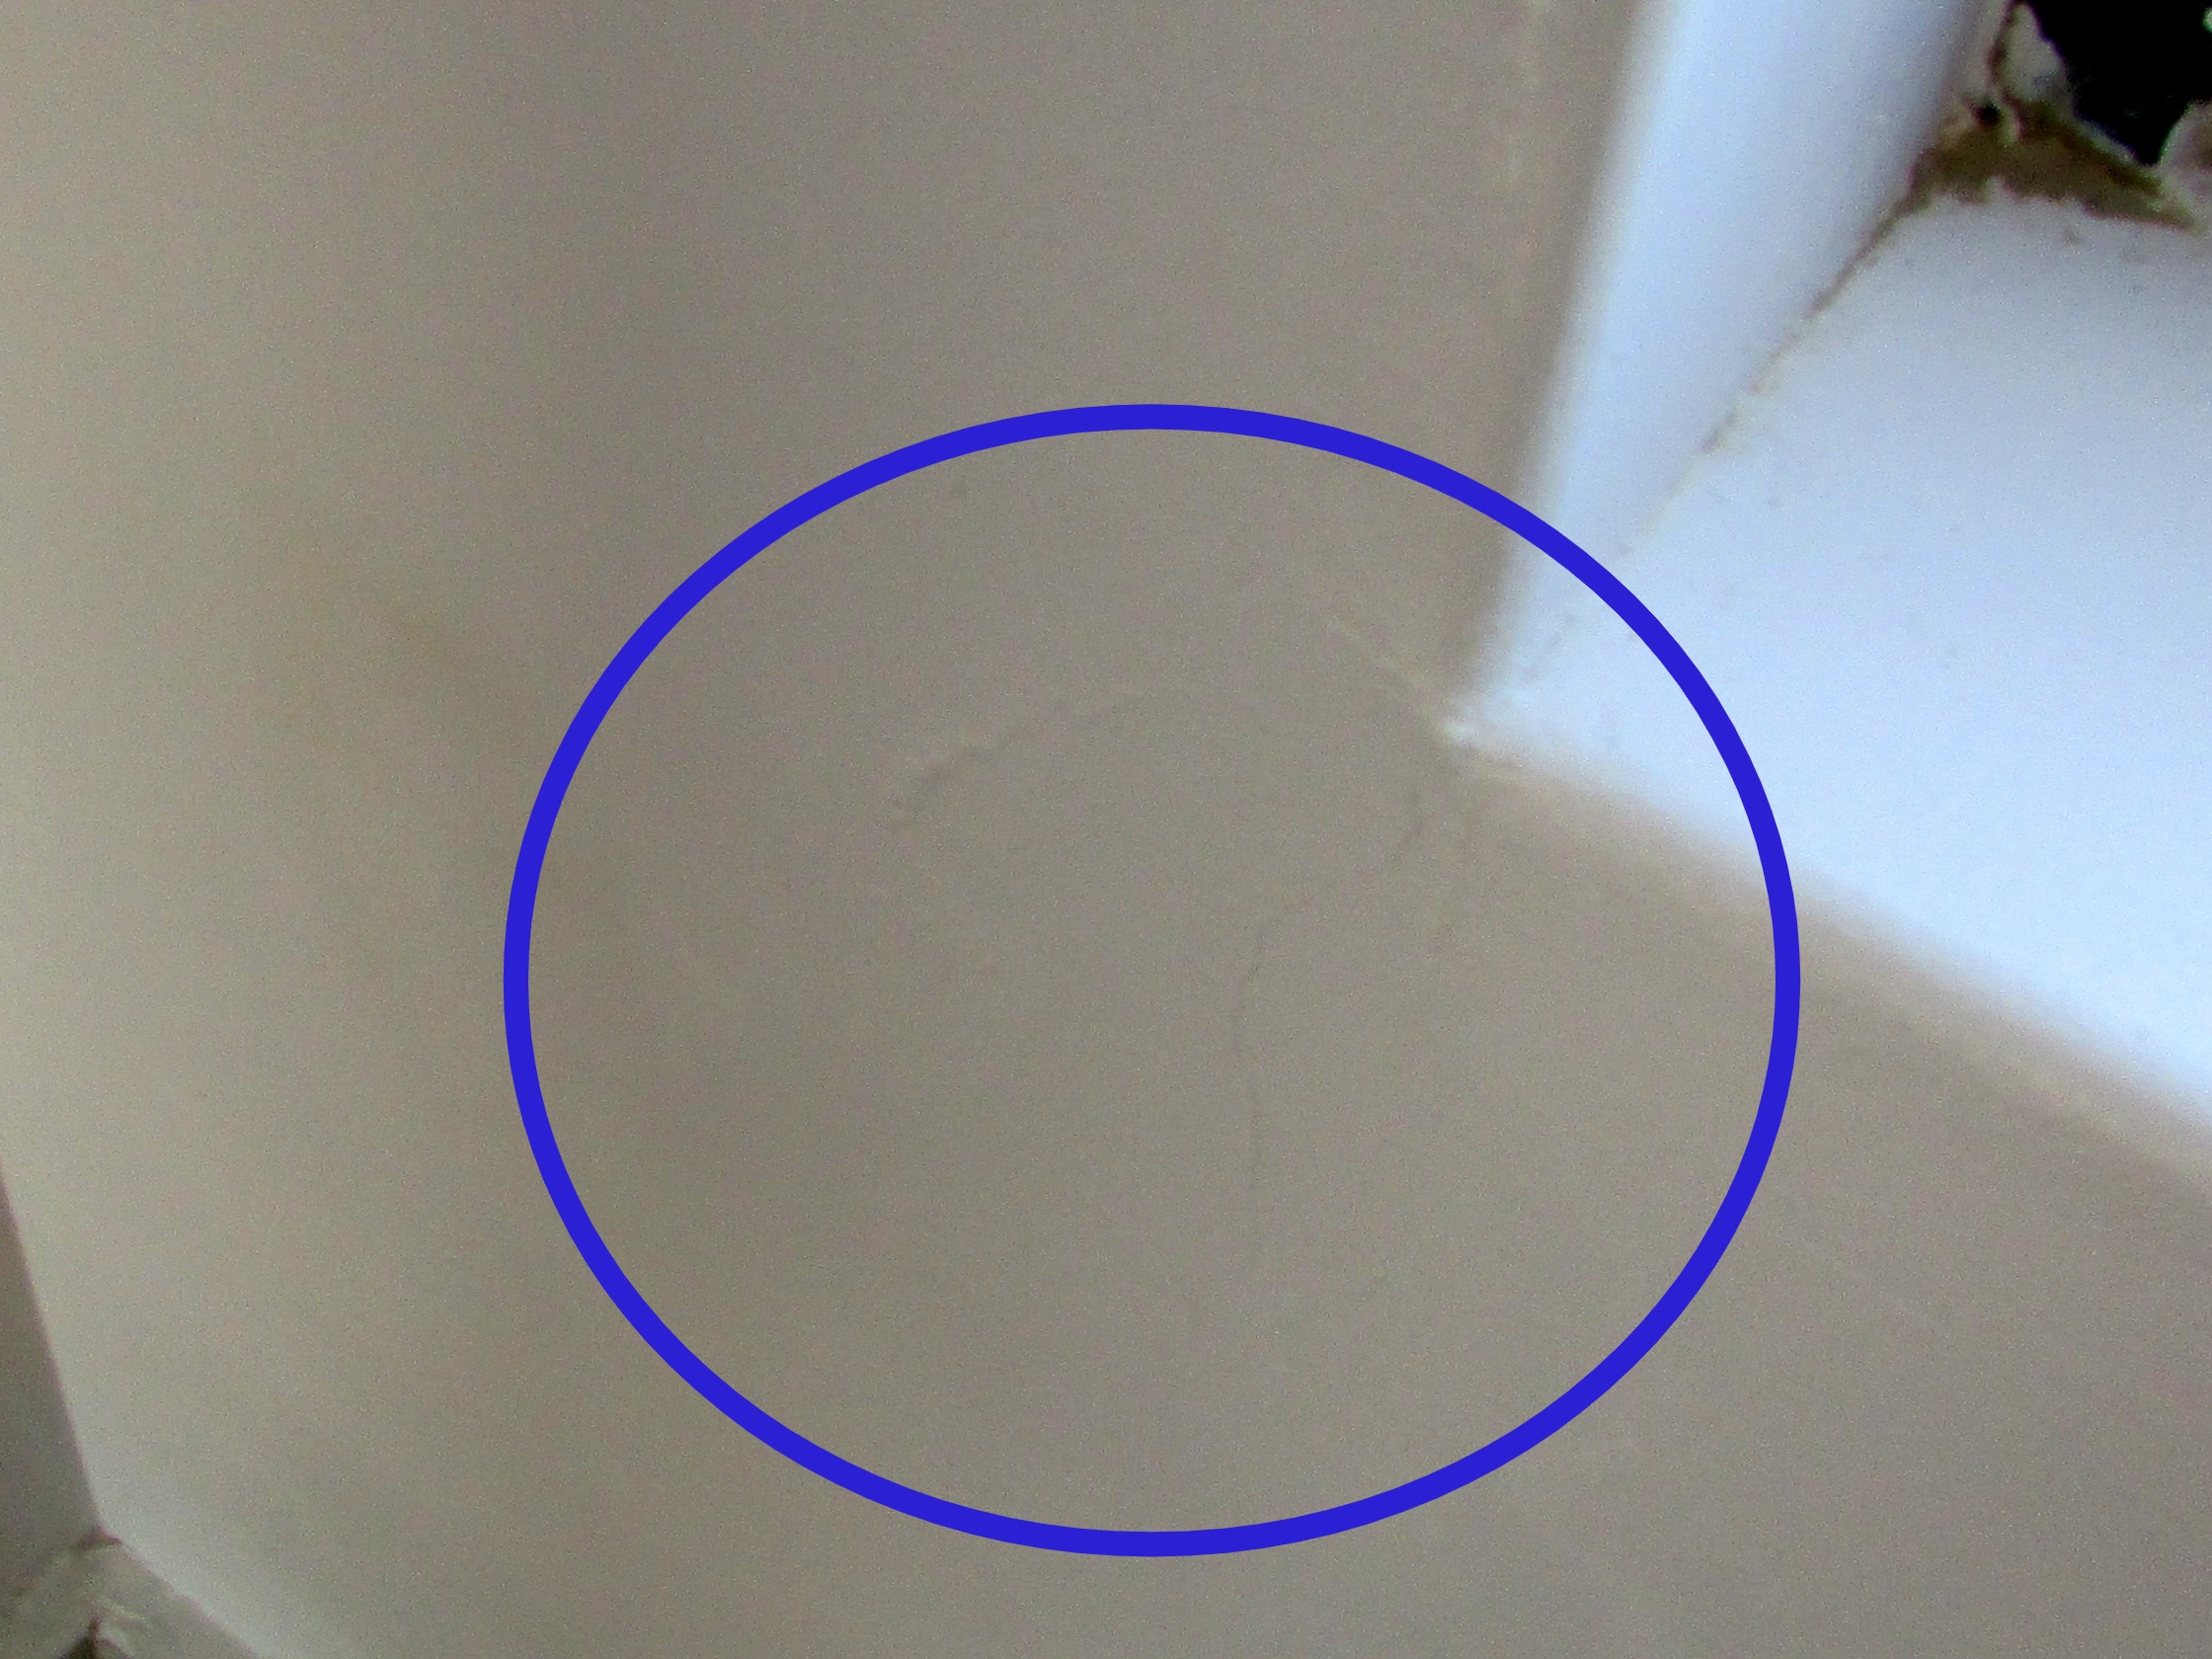 | 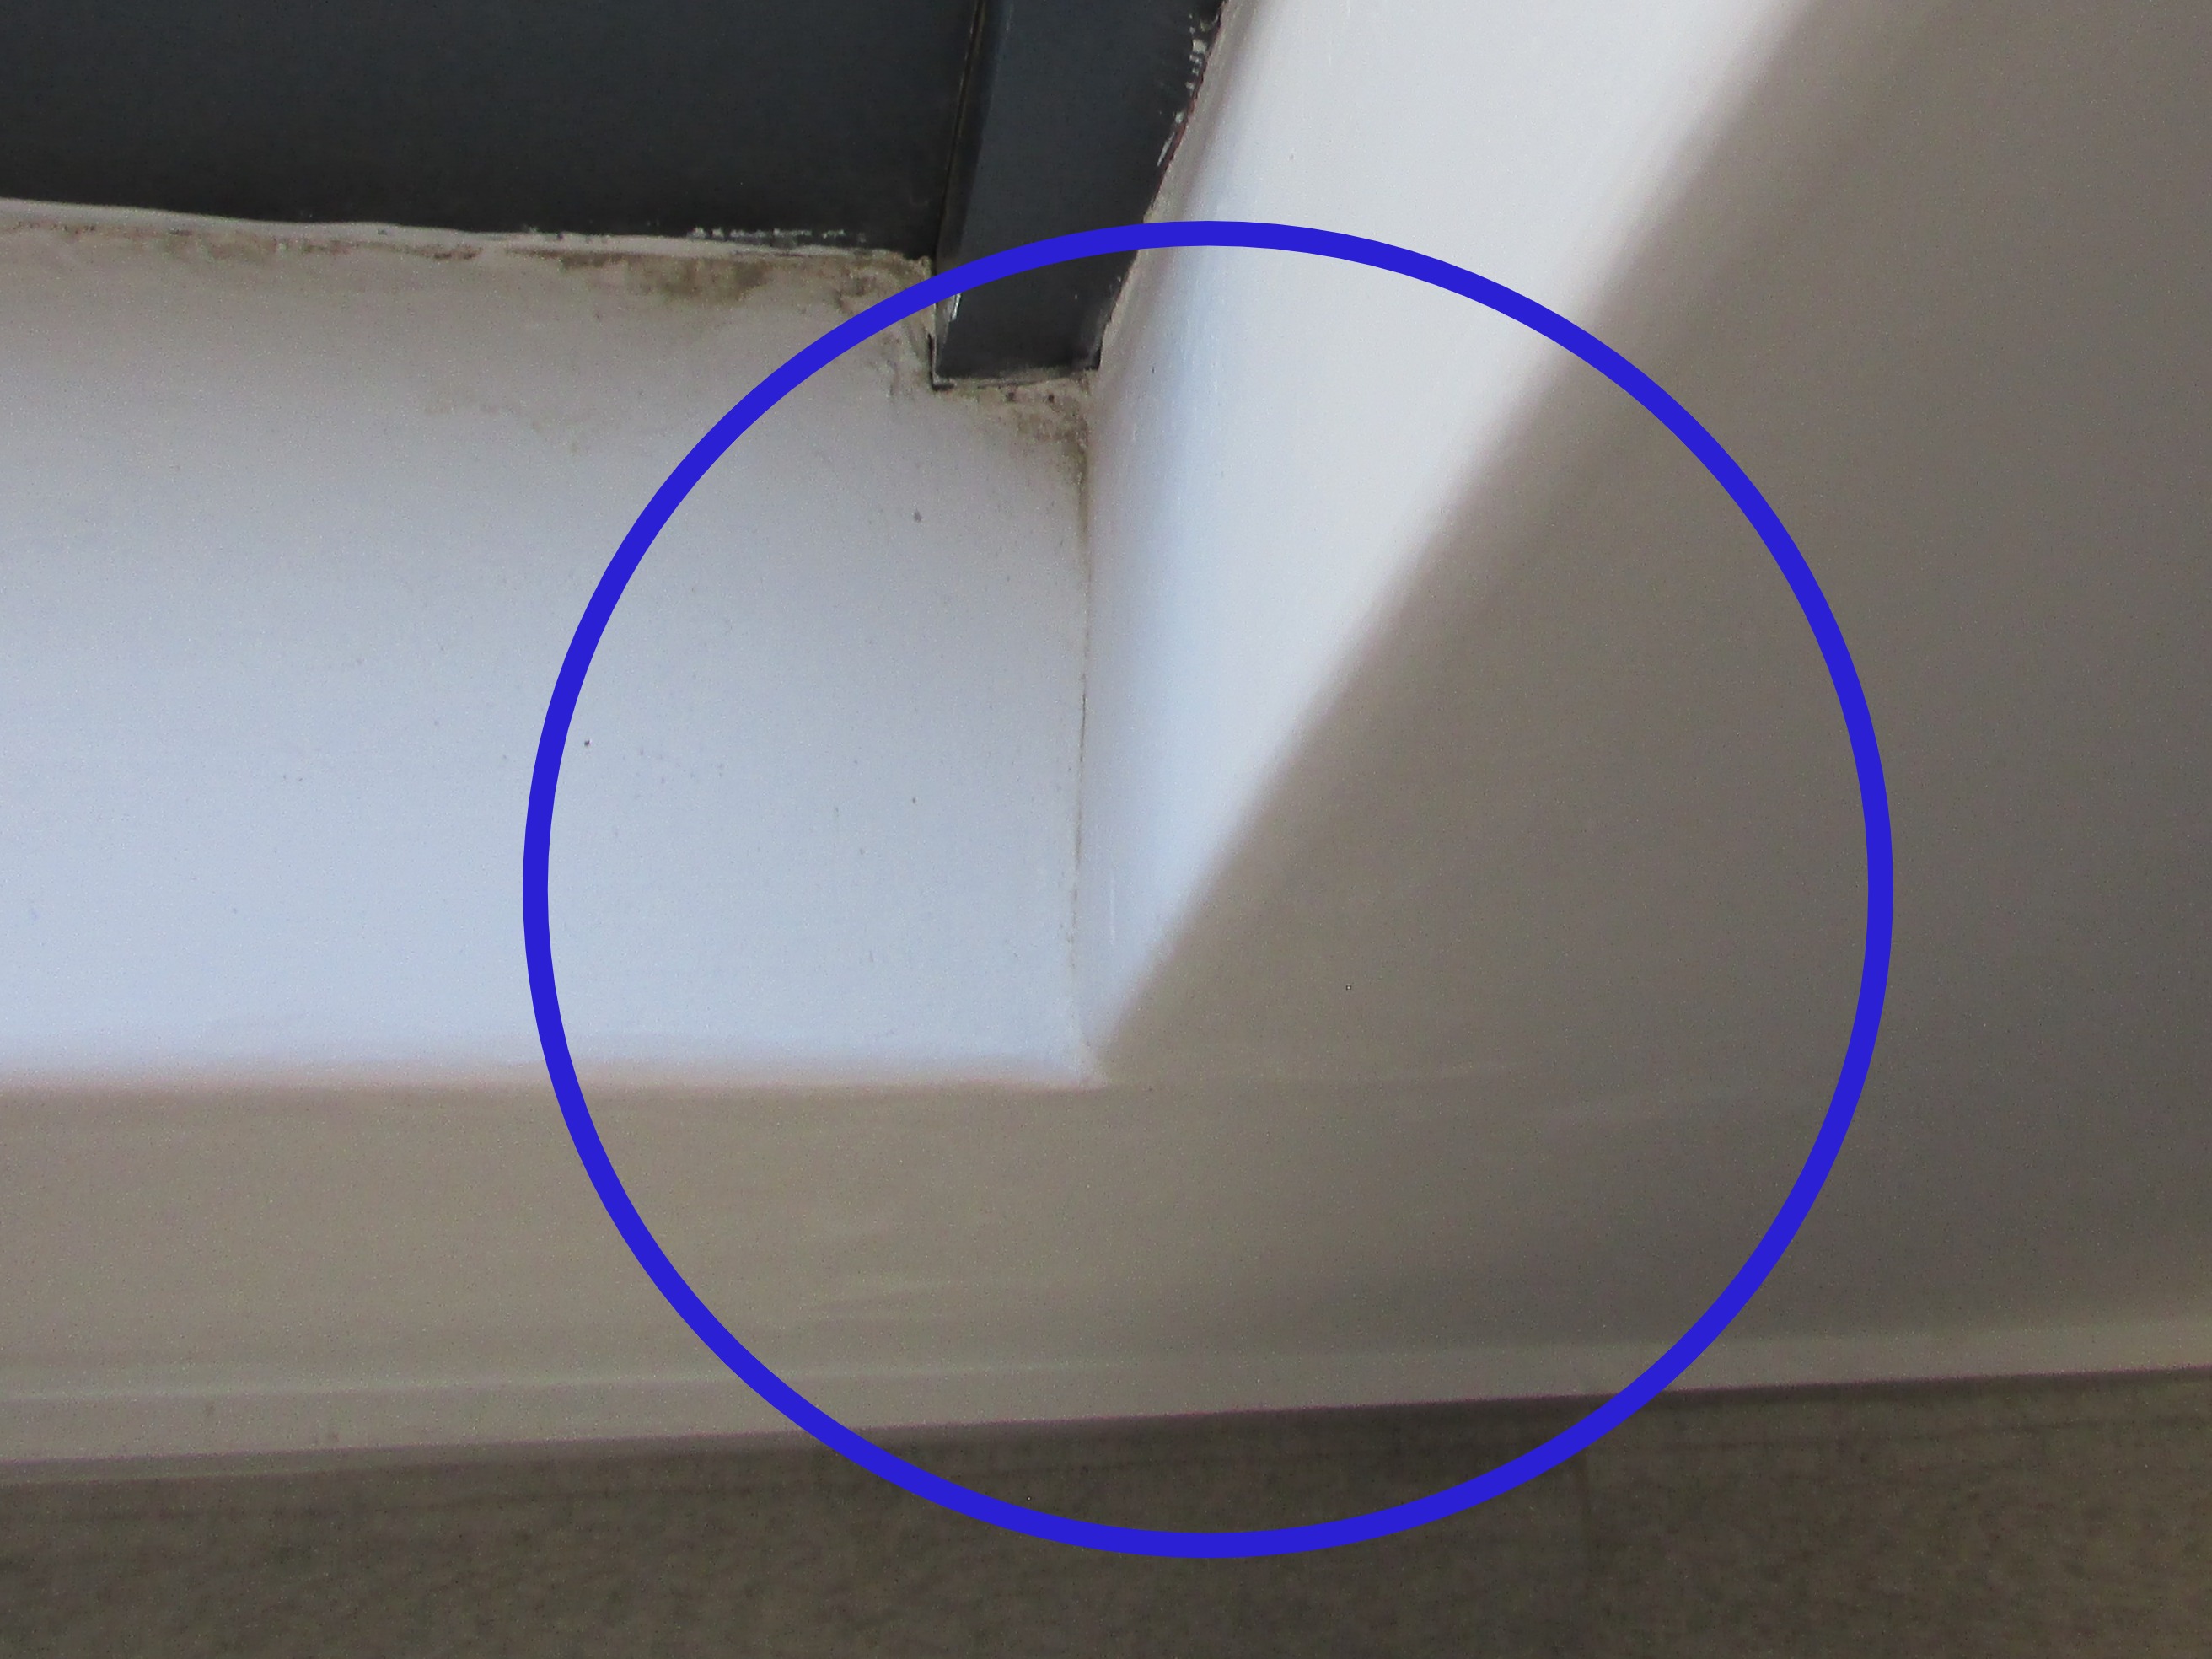 |
Interior Stairs and Landings
Standard
The stairs and landing leading up to the 1st floor of the house were functional.
End cap on the balustrading was missing on the 1st floor.
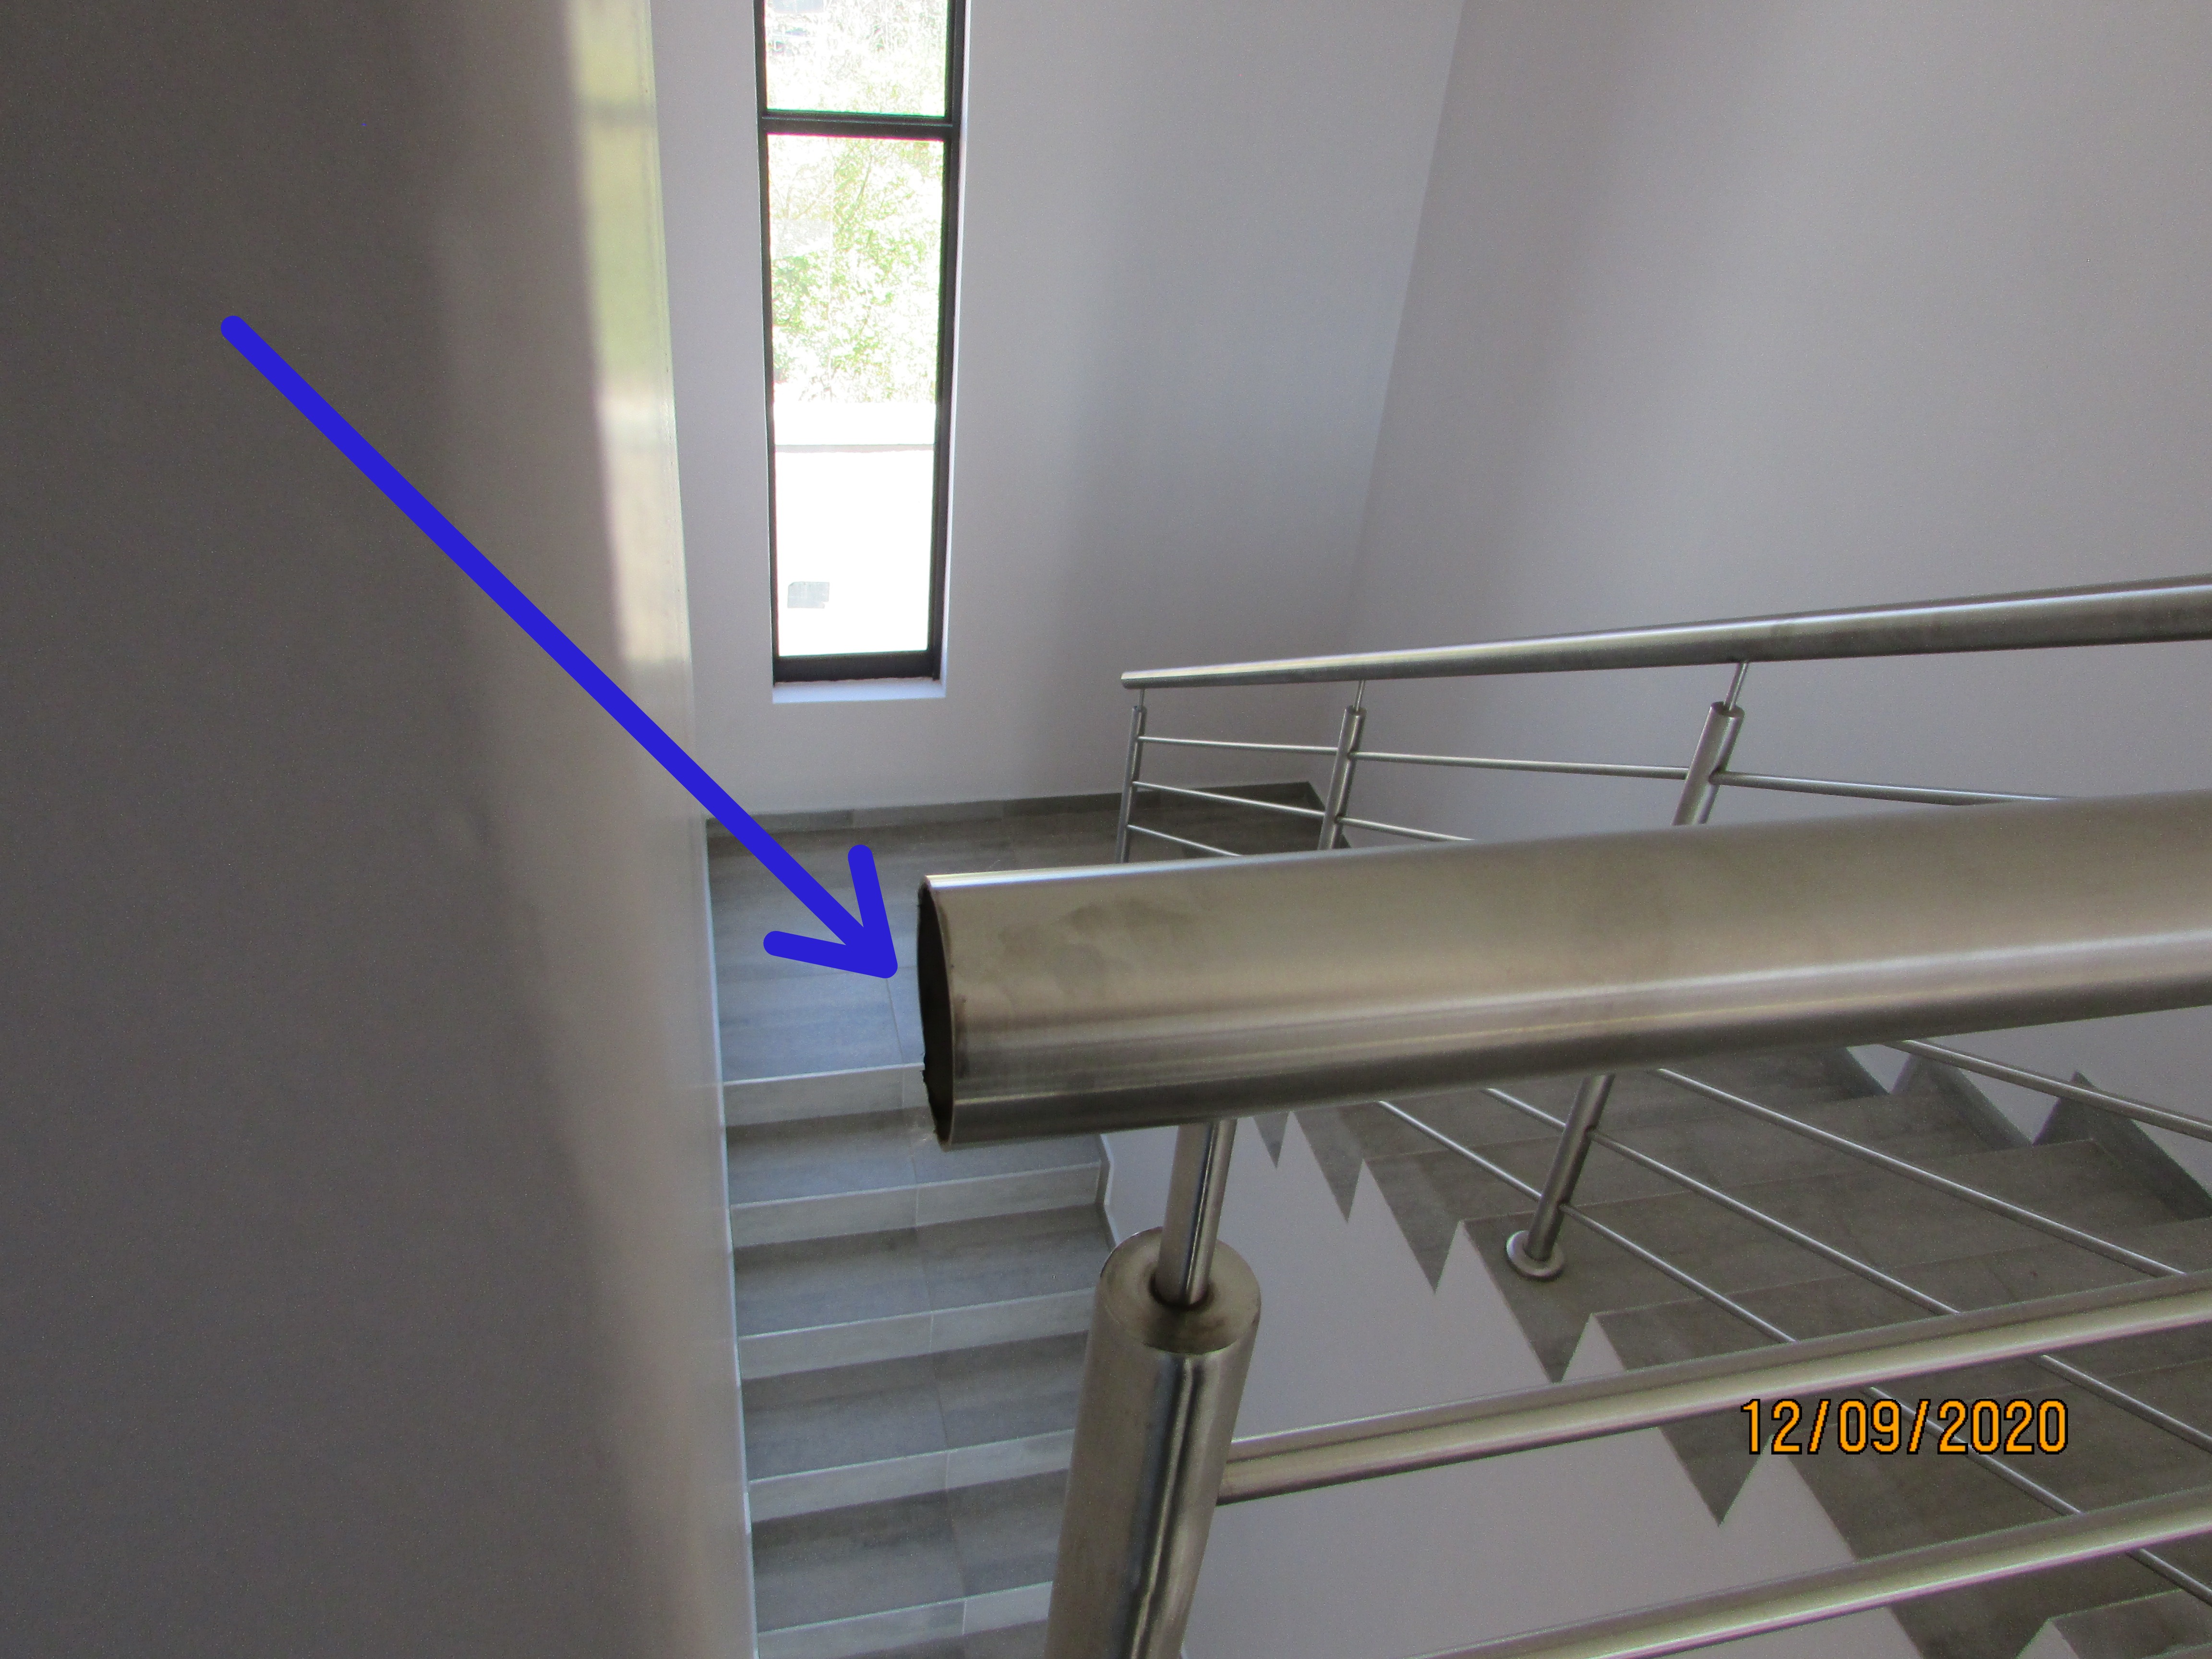 |
Kitchen
Sinks, Vegetable Bowls, Wash Troughs, Taps and Mixers
Kitchen Sinks, Vegetable Bowls and Wash Troughs: Vegetable bowl
The vegetable bowl, mixer and drain point appeared to be functional. The sink was filled and allowed to drain. No leaking was noticeable at the time of the inspection.
Cabinets and Counter Tops
Counter Top Material: Caesarstone
Cabinet Material: Plastic laminate
The kitchen cabinets were in a good condition. Additional items are specifically listed.
A combination door on the wall unit against the kitchen wall required adjustment to close properly. Other doors on the same row cabinets where damaged.
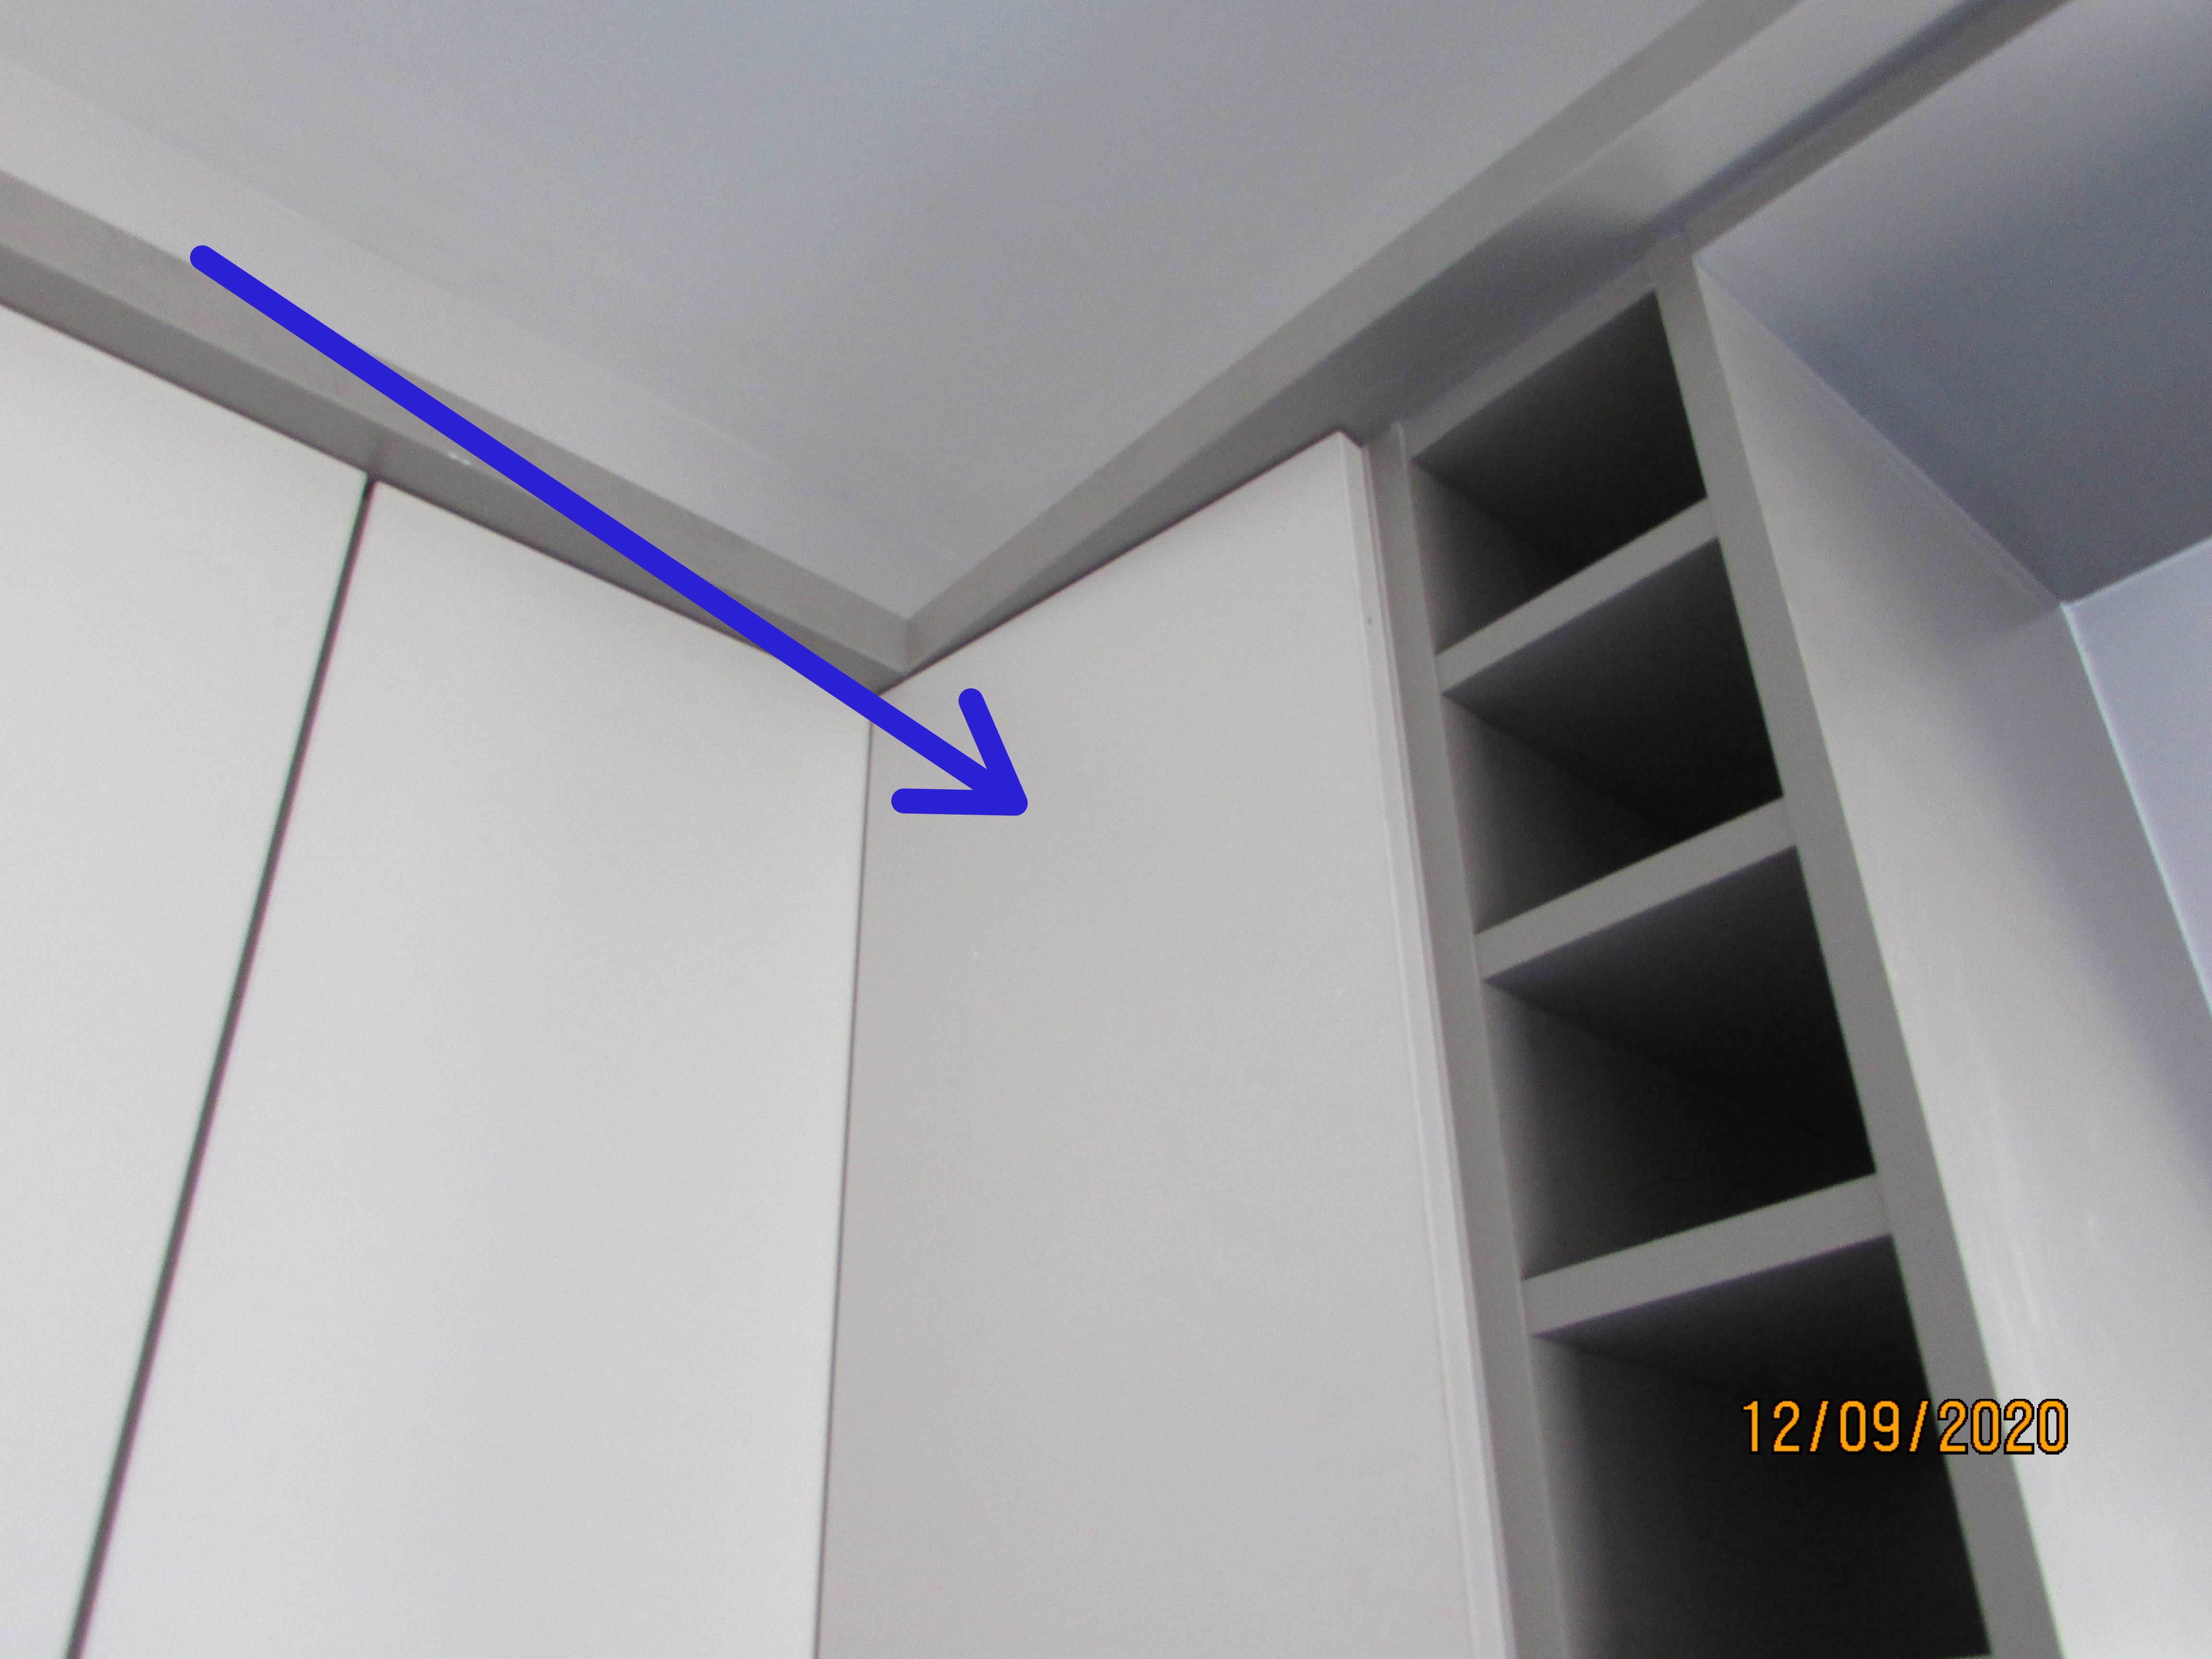 |
The joint between the counter top and tiled wall should be sealed with silicon to forestall possible moisture intrusion between the counter top and the wall.
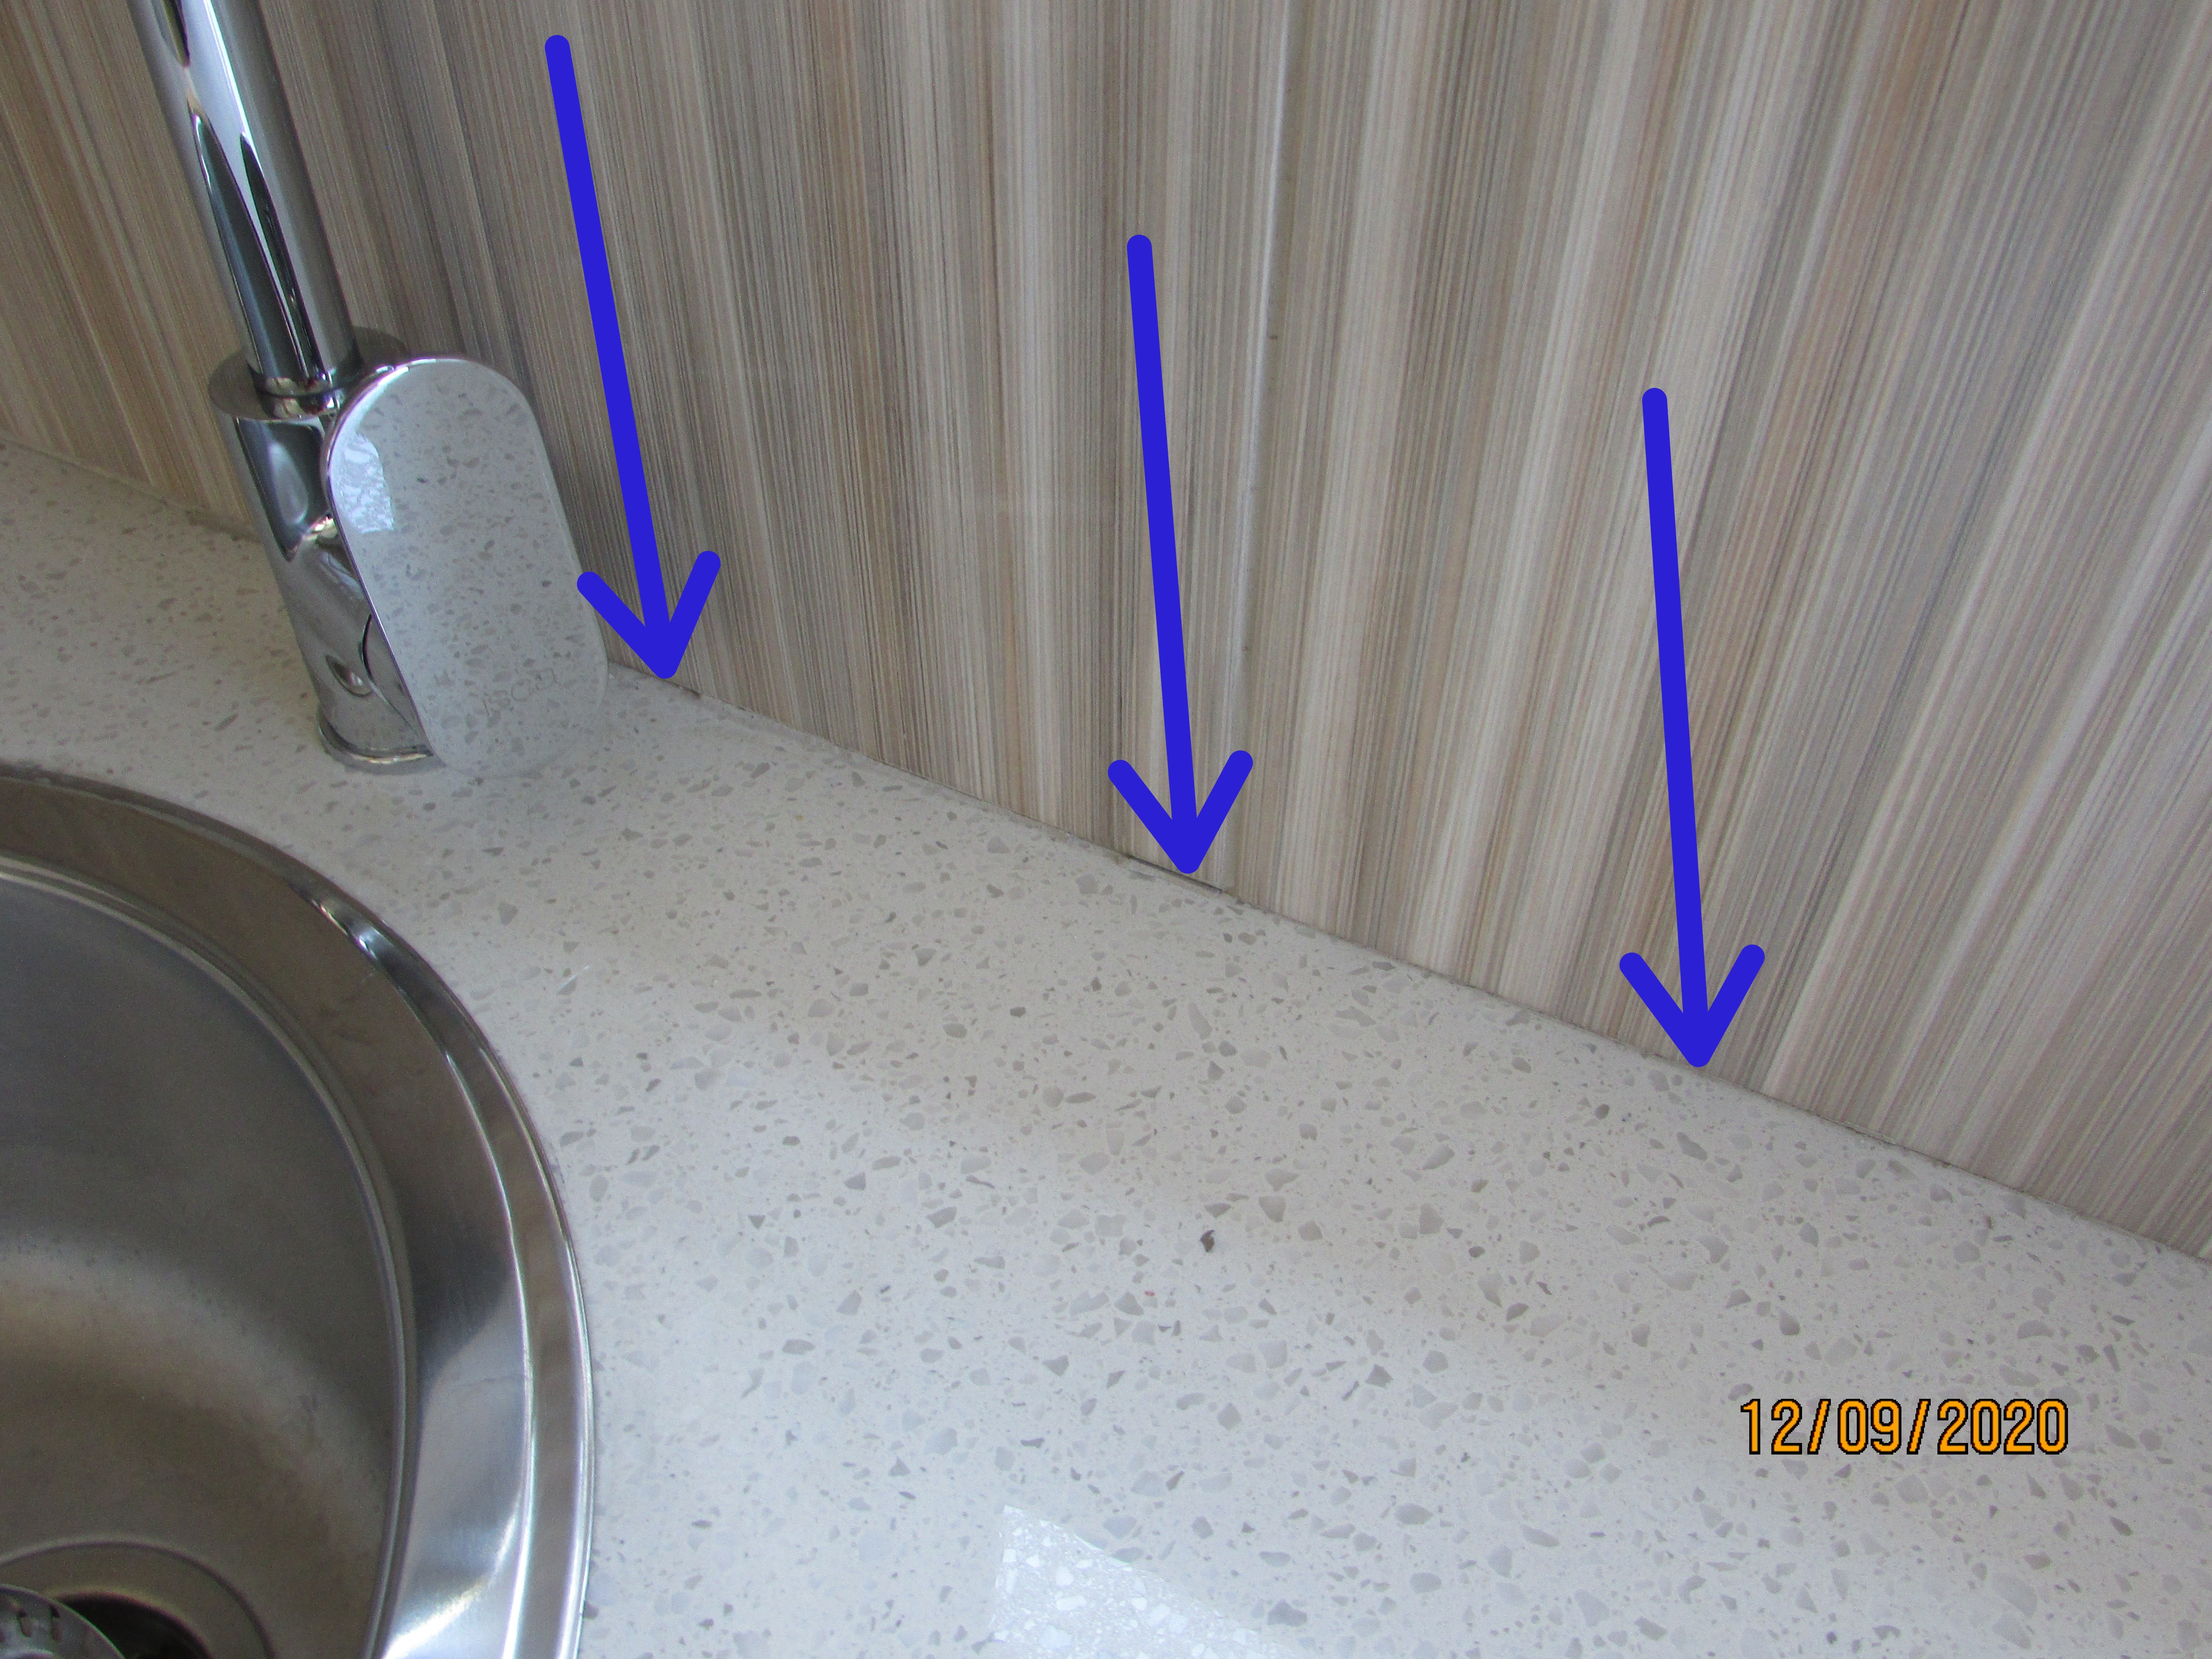 |
Tiled floors are normally cleaned with a mop. The result of this is that water will seep in under the kick plates if the cabinets have not been sealed at the junction of the kick plates and side panels resulting in moisture damage and possible mould. The sealing on the kitchen kick plates had not been done!
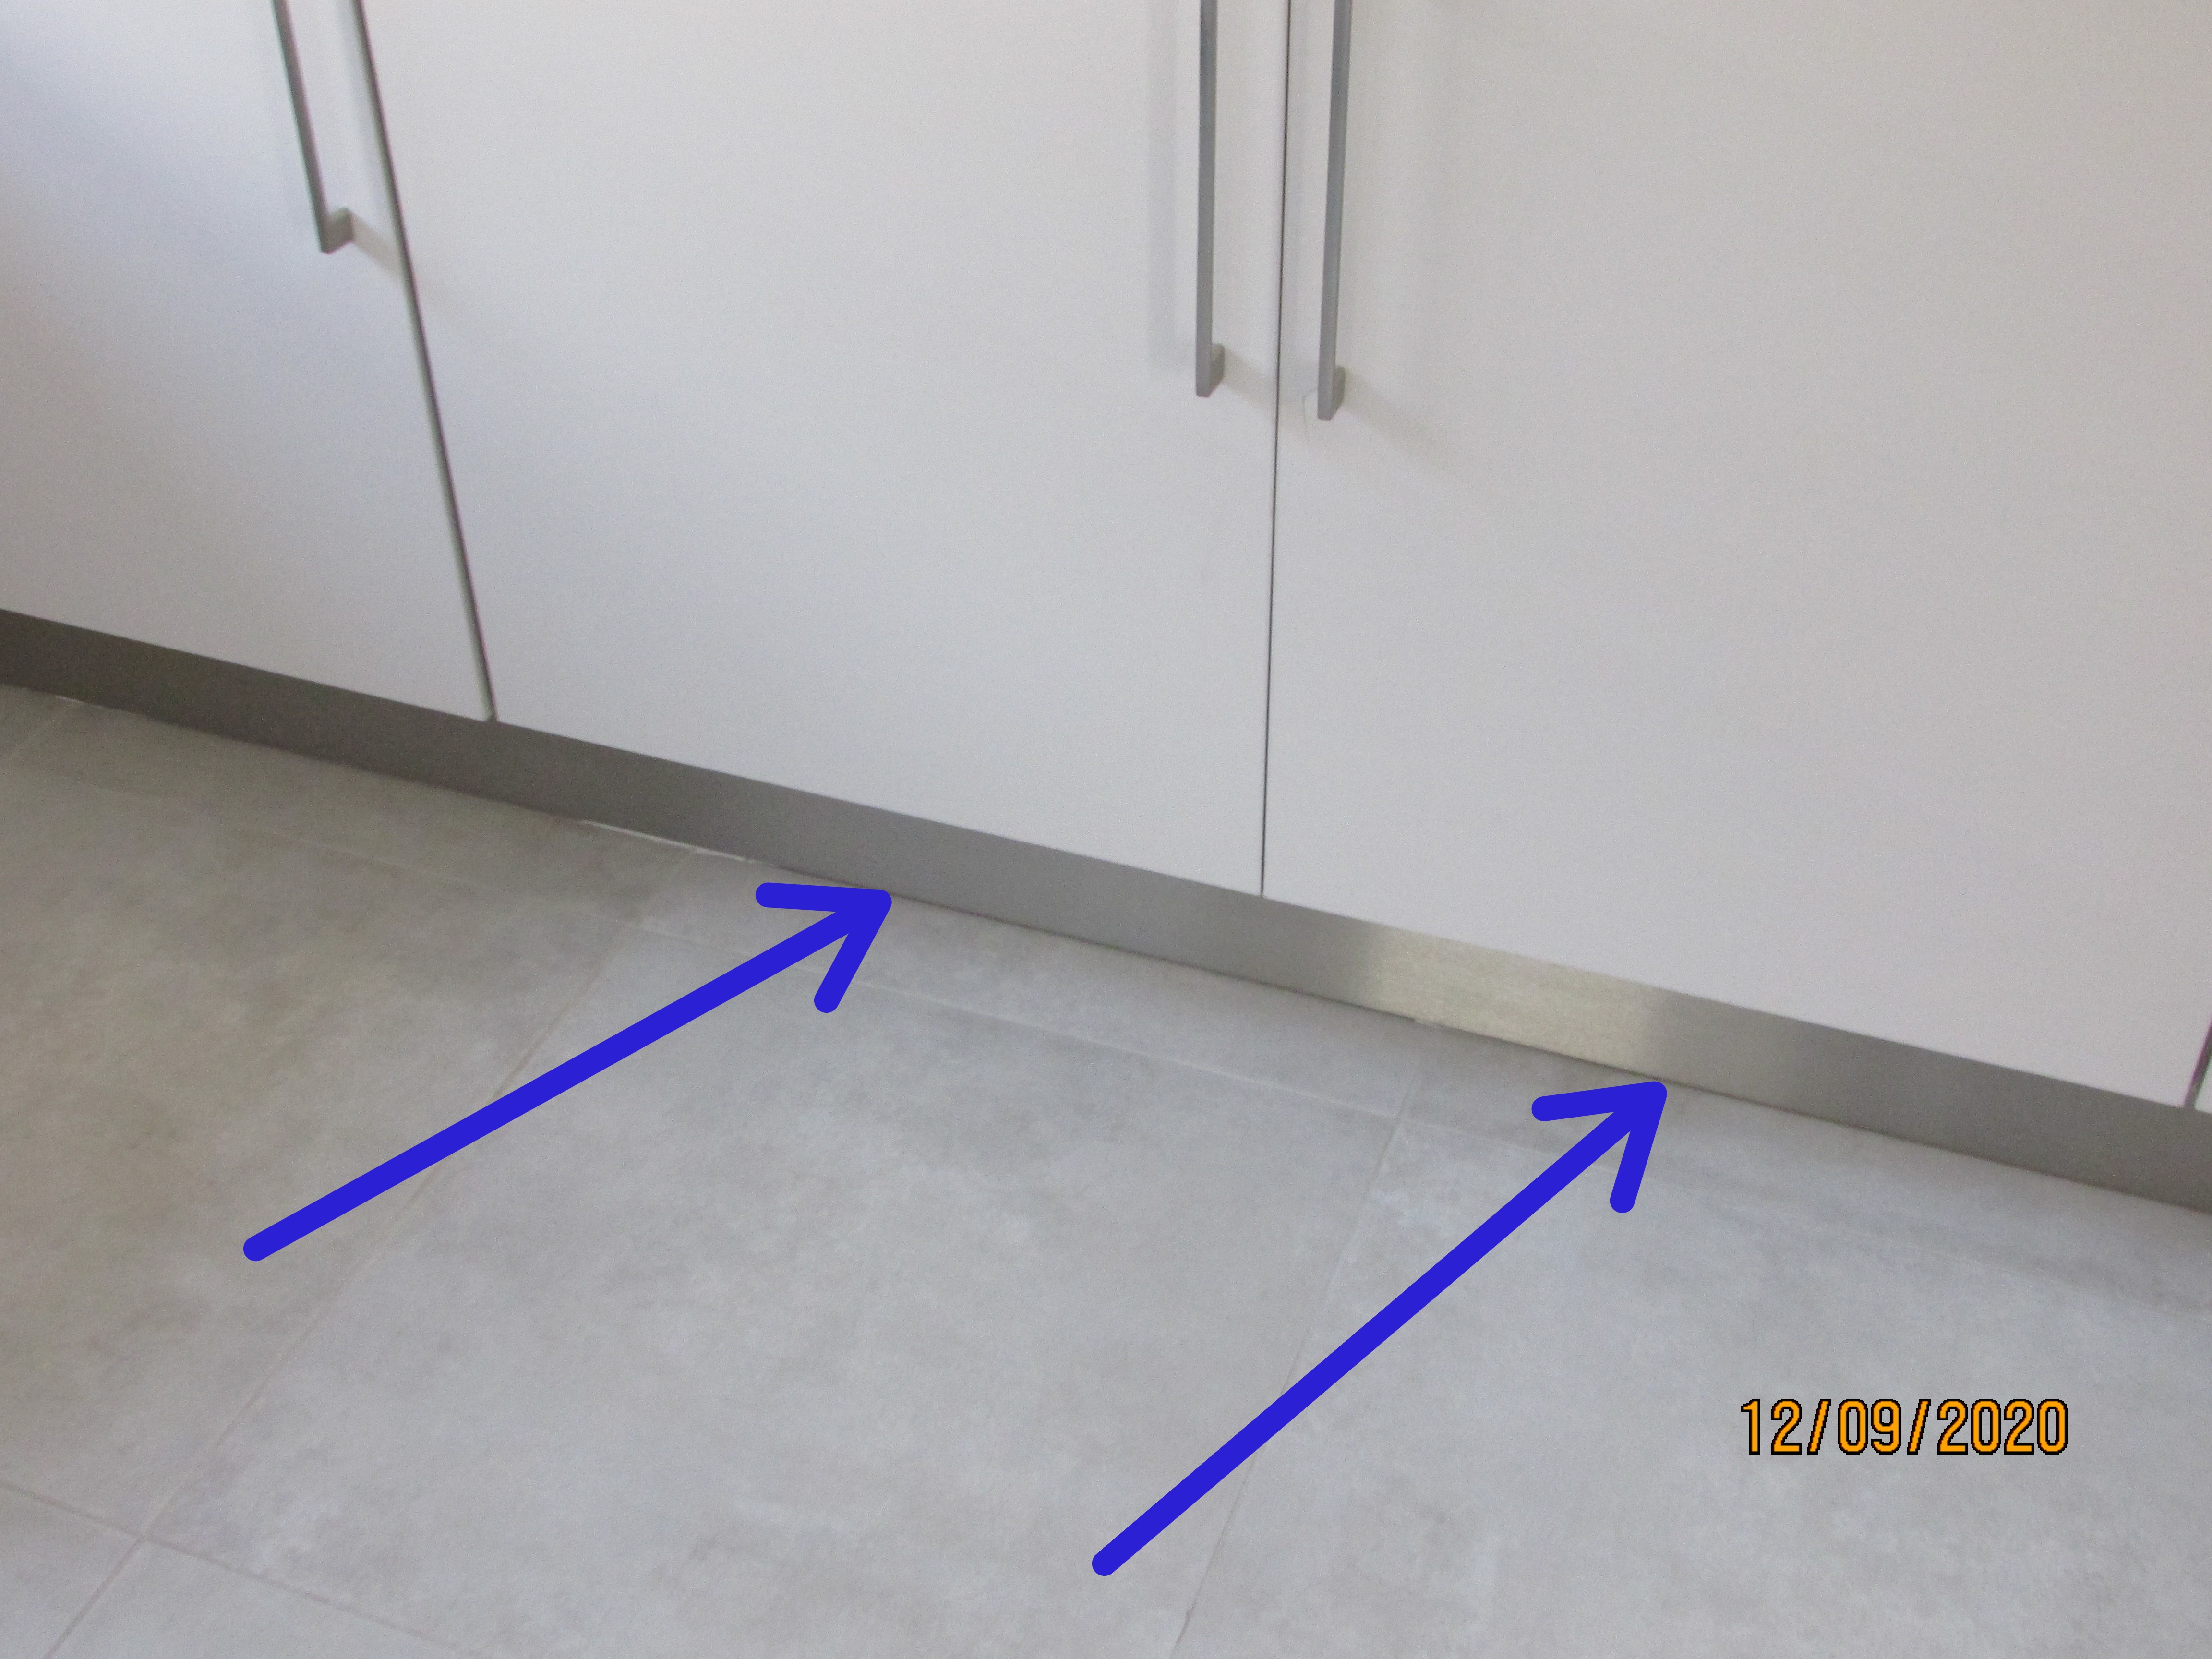 |
Ventilation Method
Windows
Appliances
Stove/Oven/Hobs: Gas and electric
The gas hob in the kitchen was not tested. The gas supply was not connected. The hob should be for safe operation once the gas is connected.
The electric oven was not tested. The original packaging was still in the oven. The oven should be tested for safe operation once the packaging is removed.
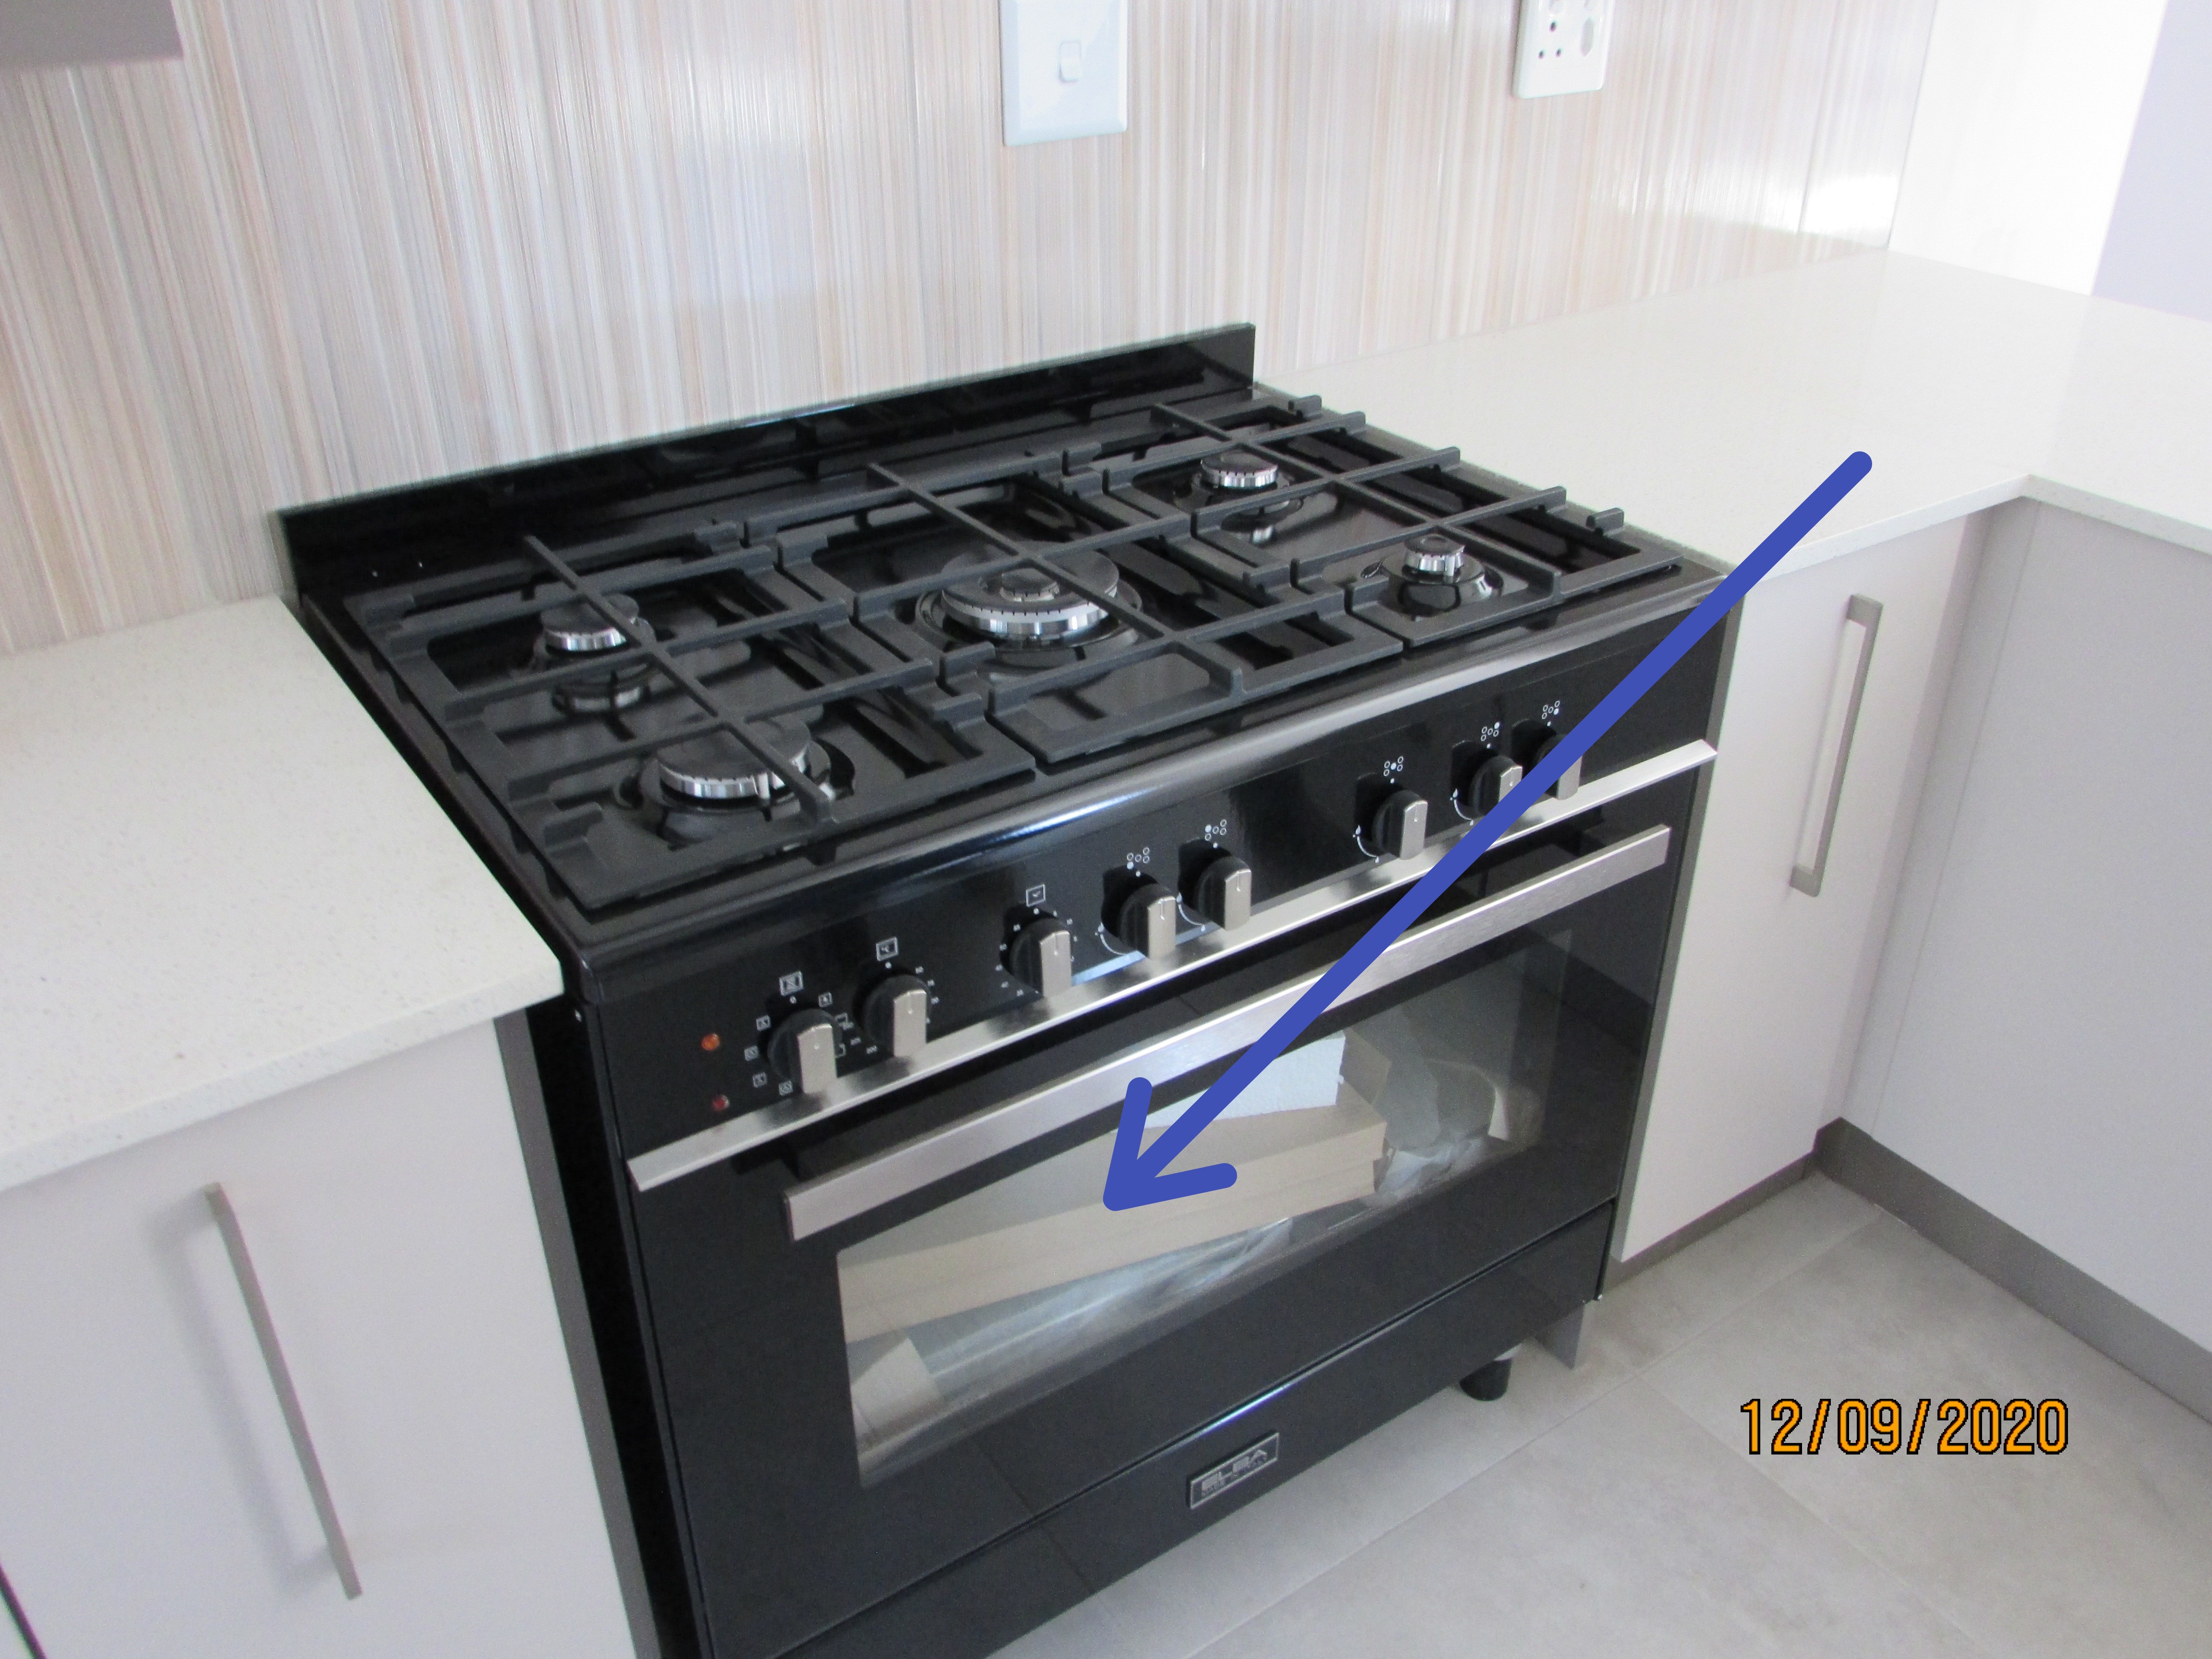 |
The gas installation to the hob did not conform. A gas shut-off valve or isolator valve is required within easy reach of the hob should a fire break out at the hob. This shut off valve is normally installed in a cupboard next to the hob. No shut off valve was installed! I suggest that the installation be checked and repaired by an installer who is registered with the Liquefied Petroleum Gas Safety Association of Southern Africa (LPGAS).
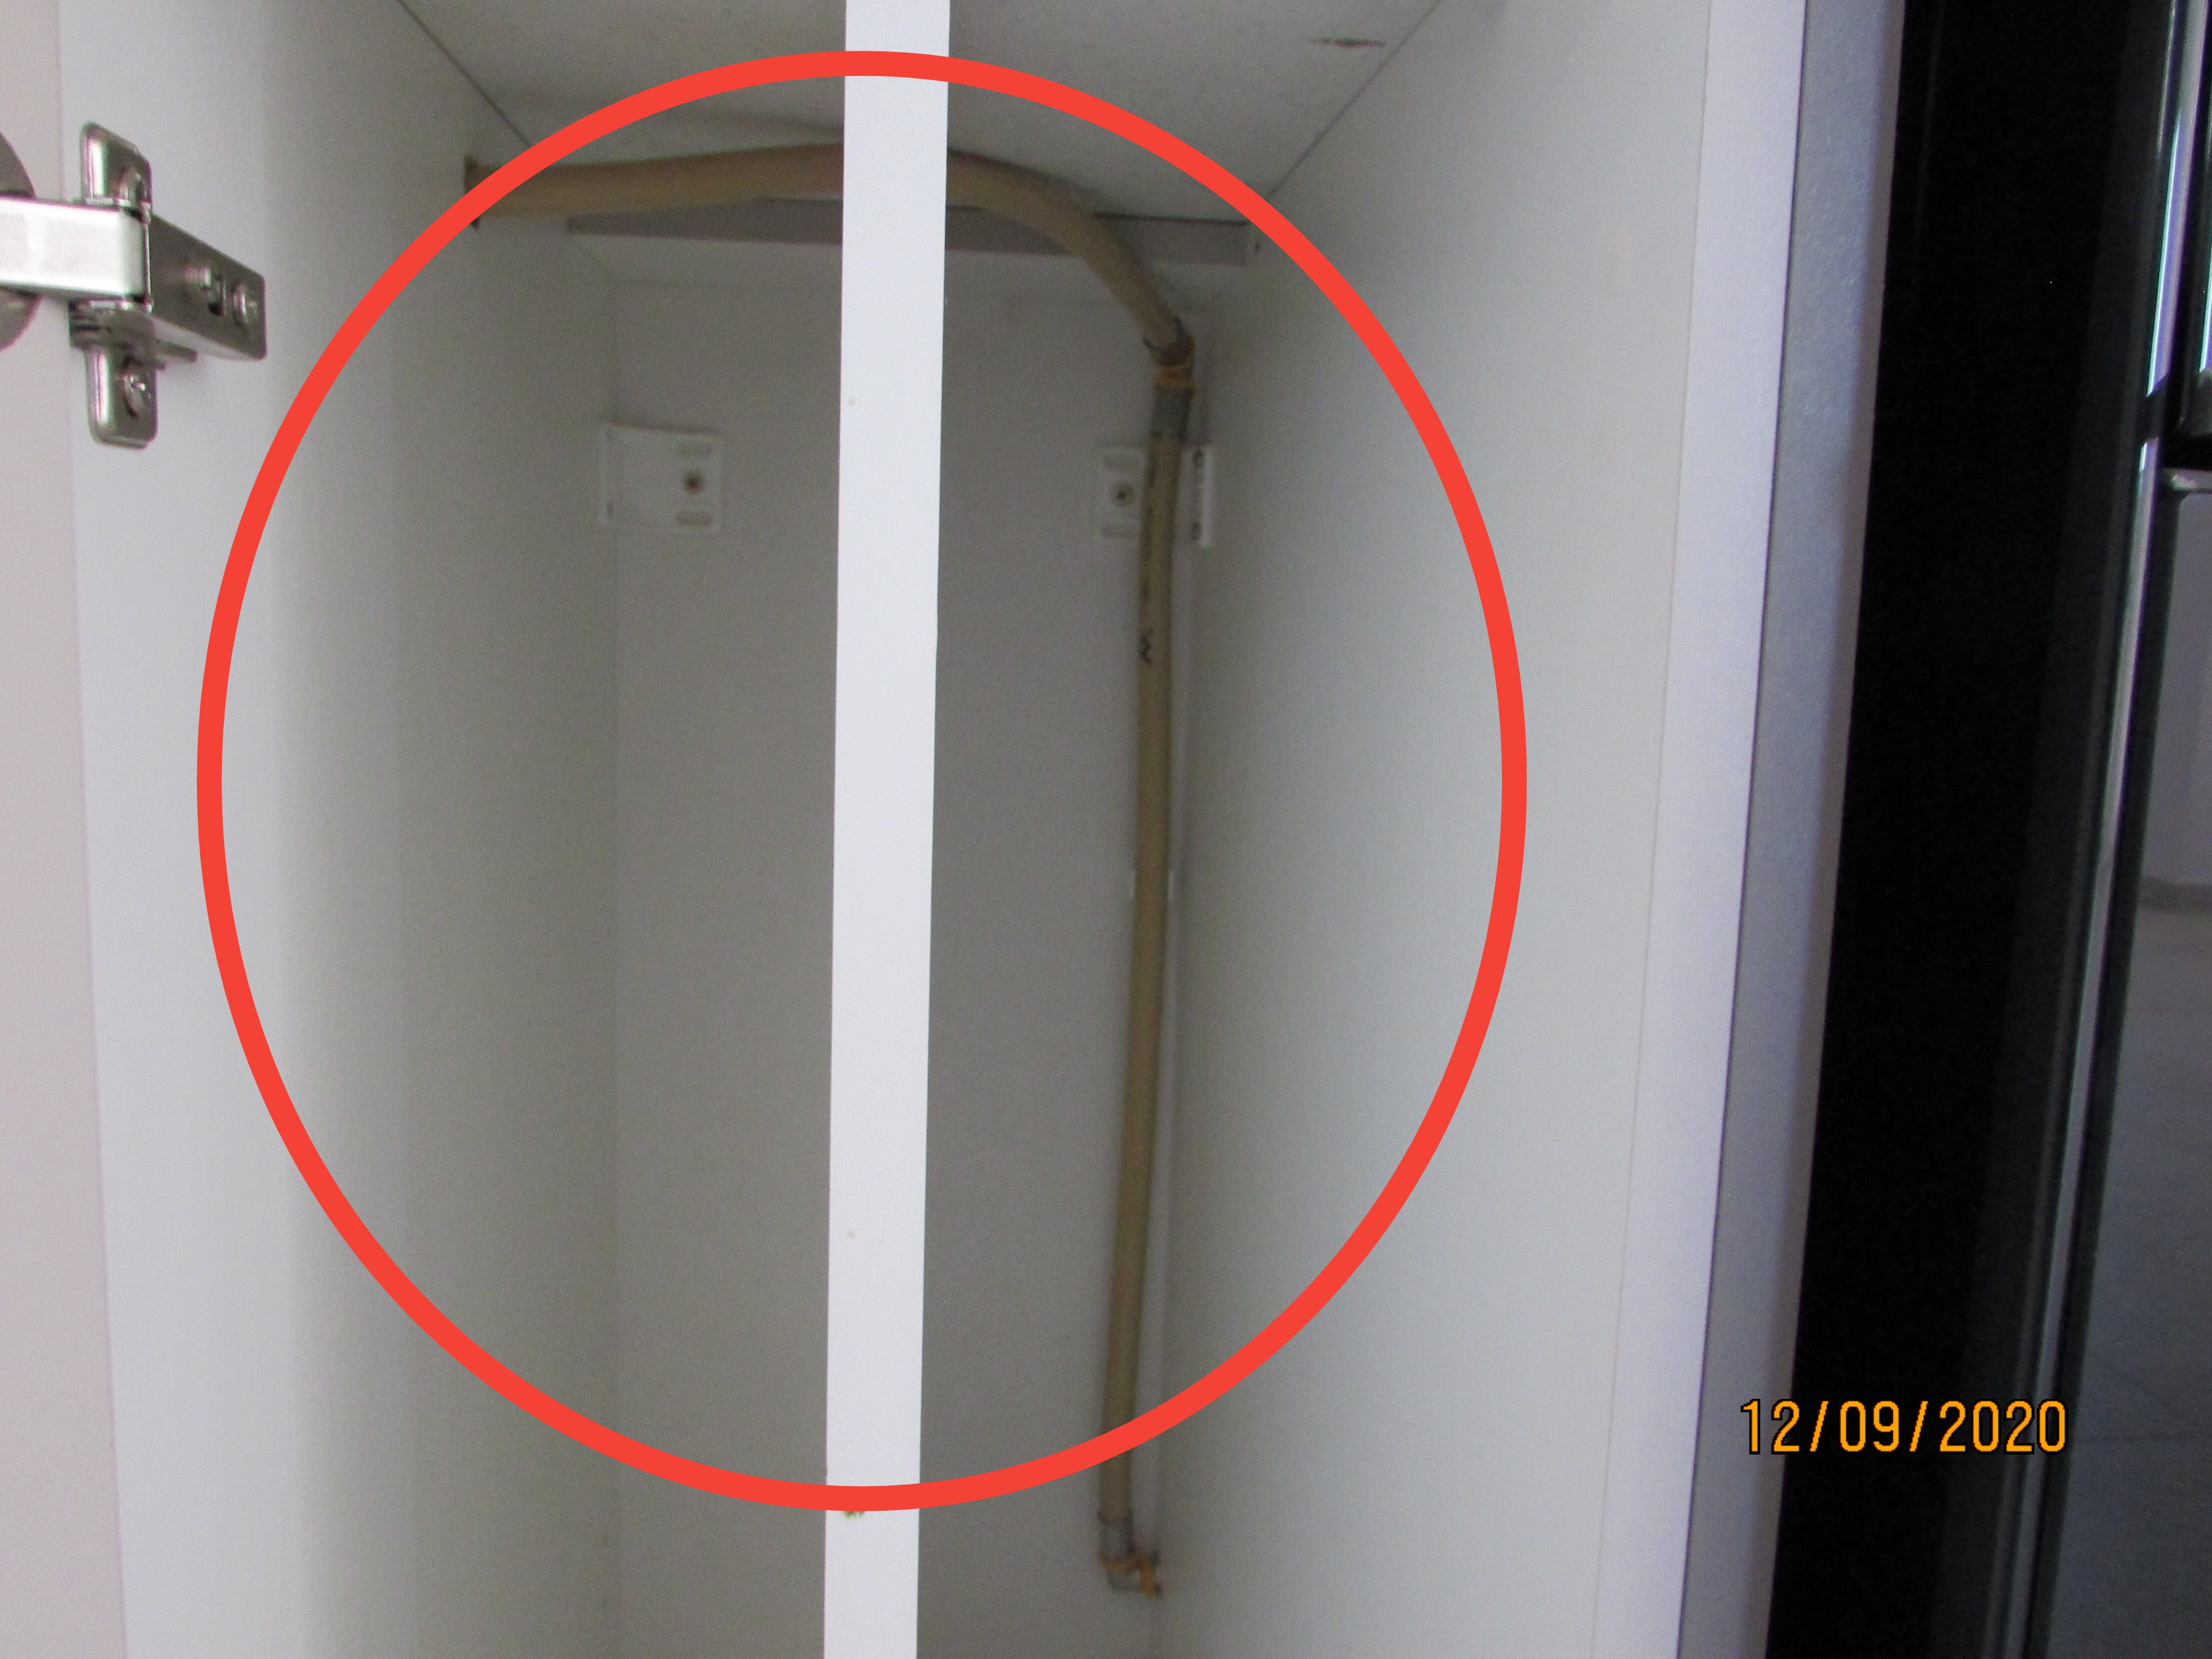 |
General Kitchen Condition
The kitchen was generally in a good condition with a few minor defects.
Scullery
Sinks, Vegetable Bowls, Wash Troughs, Taps and Mixers
Sinks, Vegetable Bowls and Wash Troughs: Scullery sink
The sink, mixer and drain point appeared to be functional. The sink was filled and allowed to drain. No leaking was noticeable at the time of the inspection.
Cabinets and Countertops
Countertop Material: Caesarstone
Cabinet Material: Plastic laminate
The scullery cabinets were in a good condition.
The counter tops in the scullery were in a good condition. Addition items are specifically listed..
The joint between the counter top and tiled wall should be sealed with silicon to forestall possible moisture intrusion between the counter top and the wall.
 |
Tiled floors are normally cleaned with a mop. The result of this is that water will seep in under the kick plates if the cabinets have not been sealed at the junction of the kick plates and side panels resulting in moisture damage and possible mould. The sealing on the kitchen kick plates had not been done!
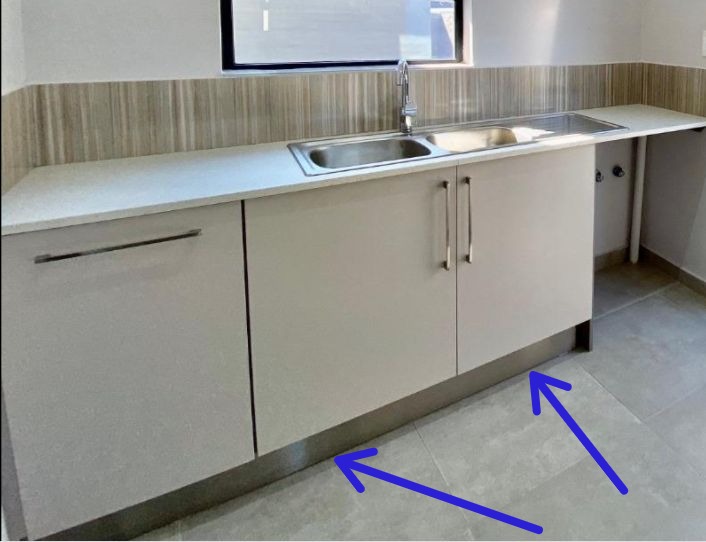 | 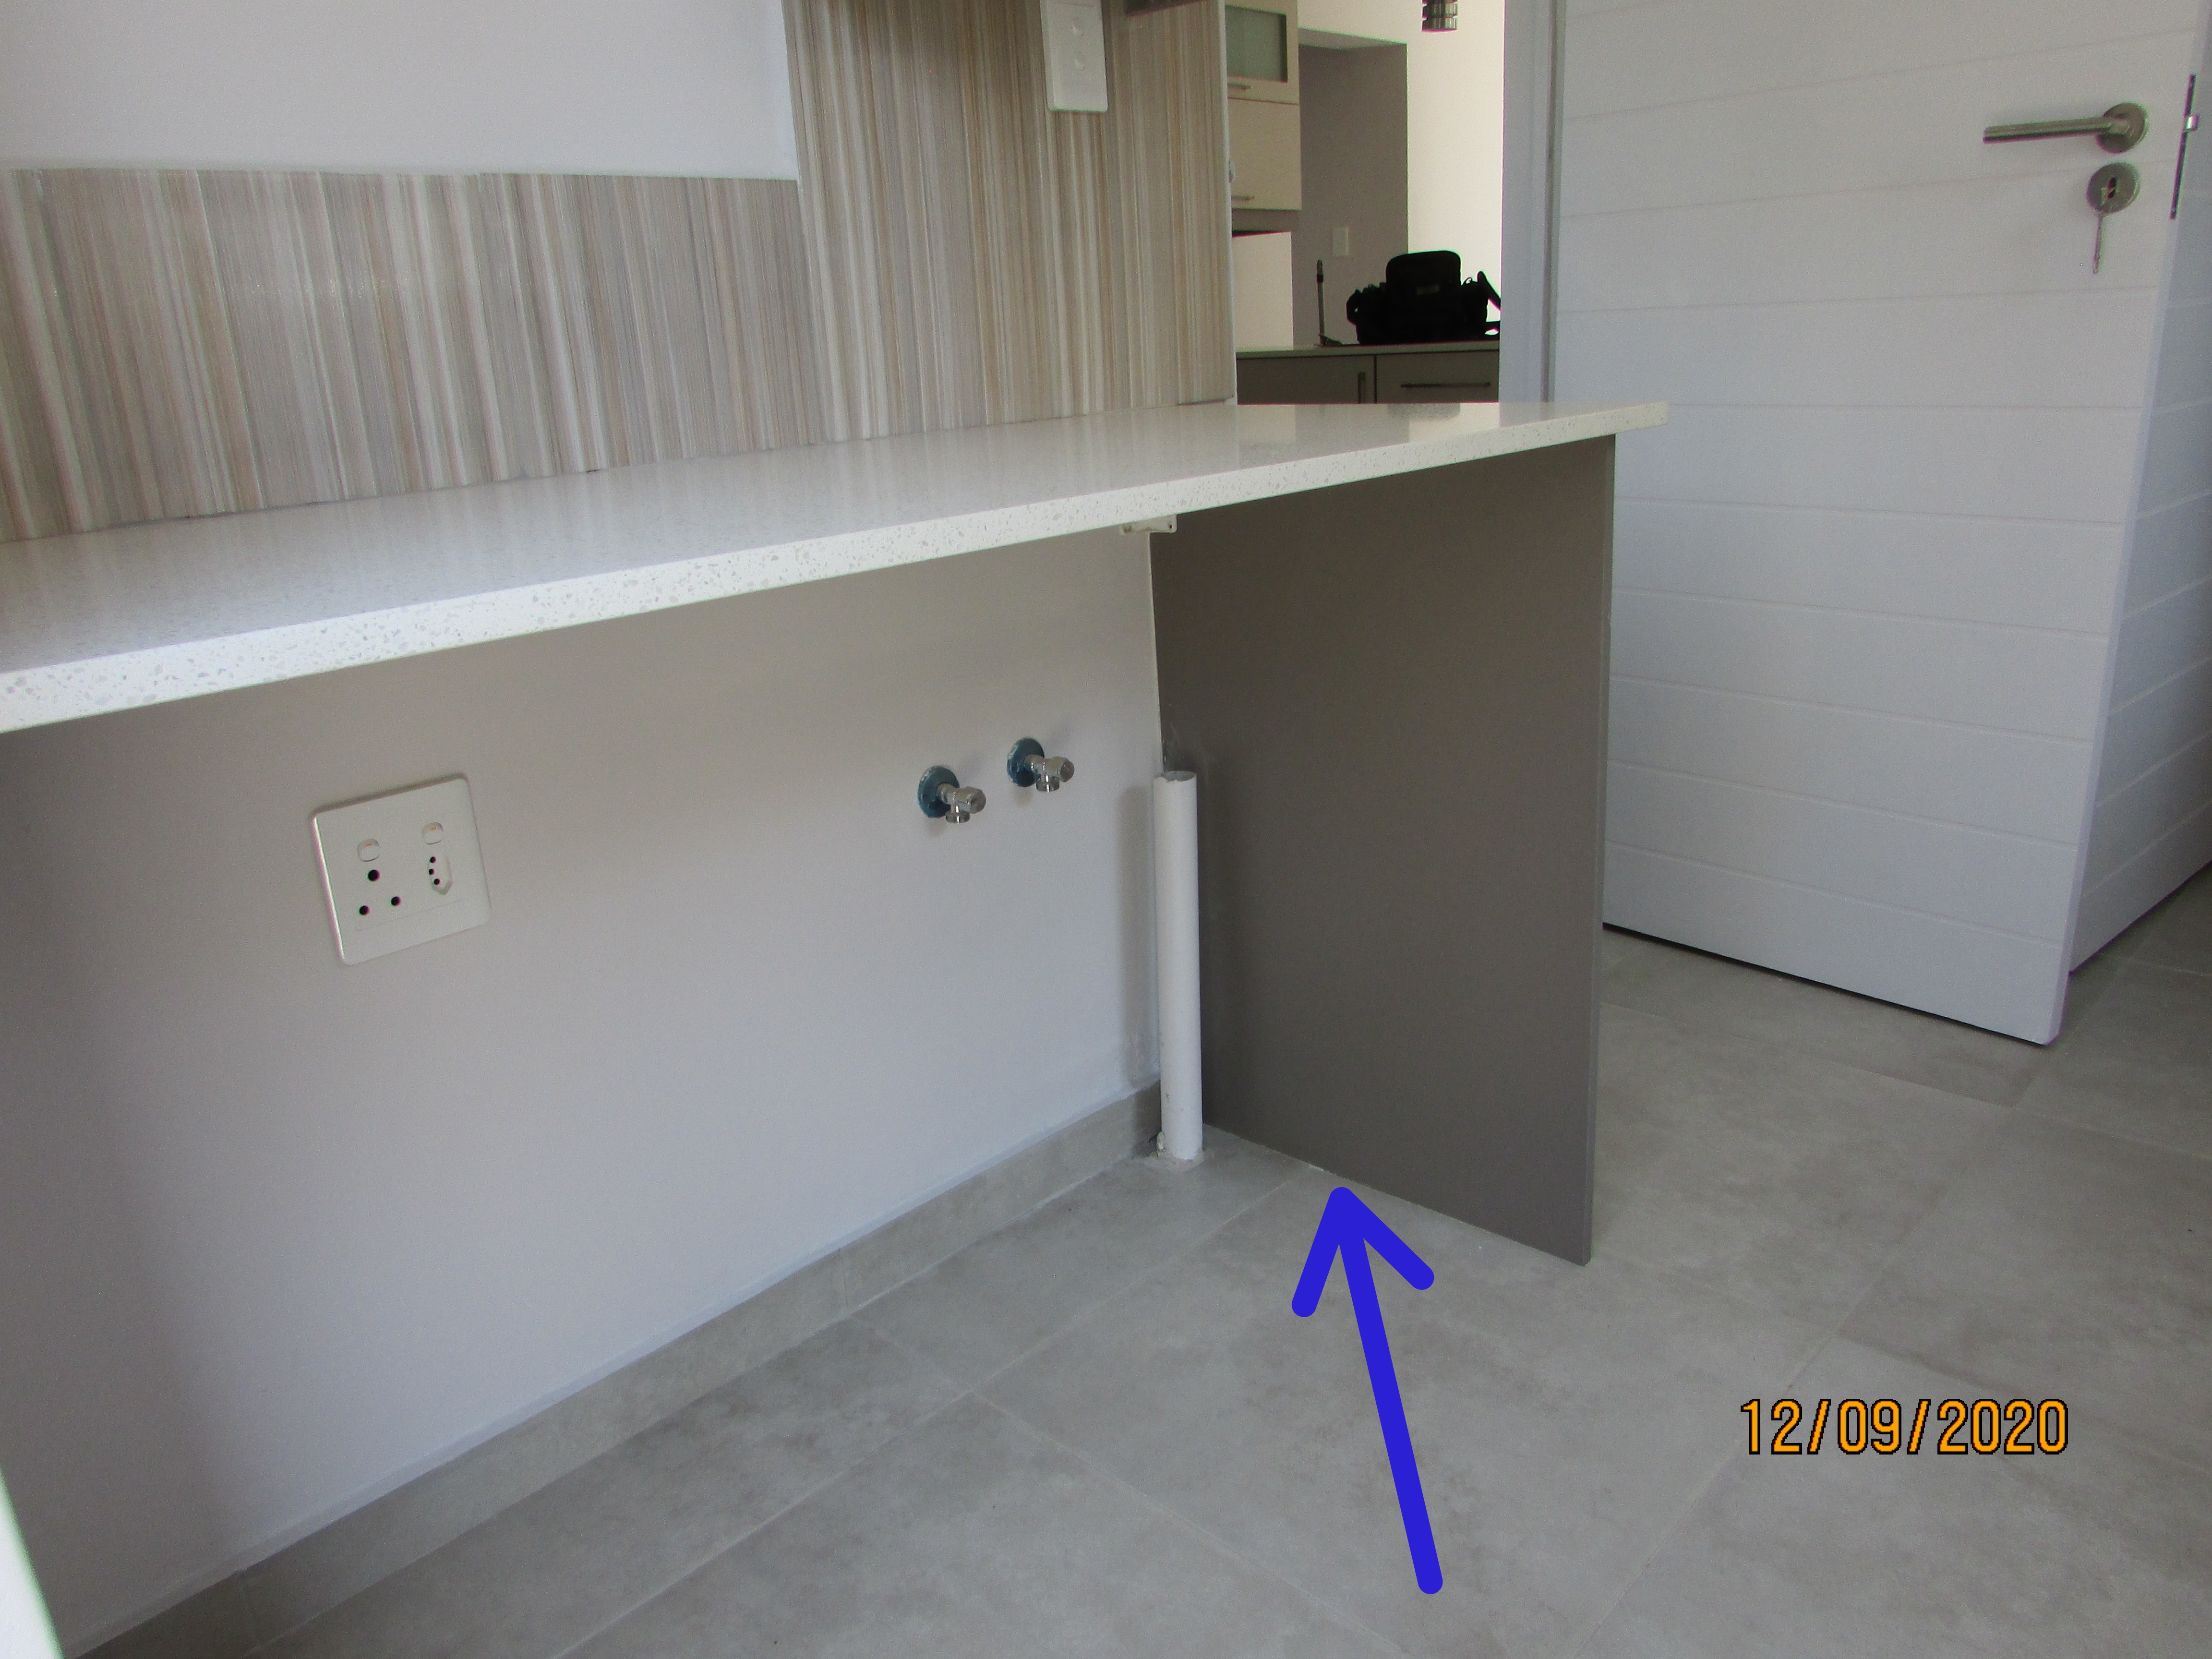 |
Ventilation Method
Windows
General Scullery Condition
The scullery was generally in a good condition with a few minor defects. The house was newly built.
Guest Bathroom
Basin and Cabinets
Basins: Tested
Cabinets: Checked
The basin, mixer tap and drain points were functional. The basin was filled and allowed to drain. No leaks were observed.
The plasterwork below the basin required repair and painting.
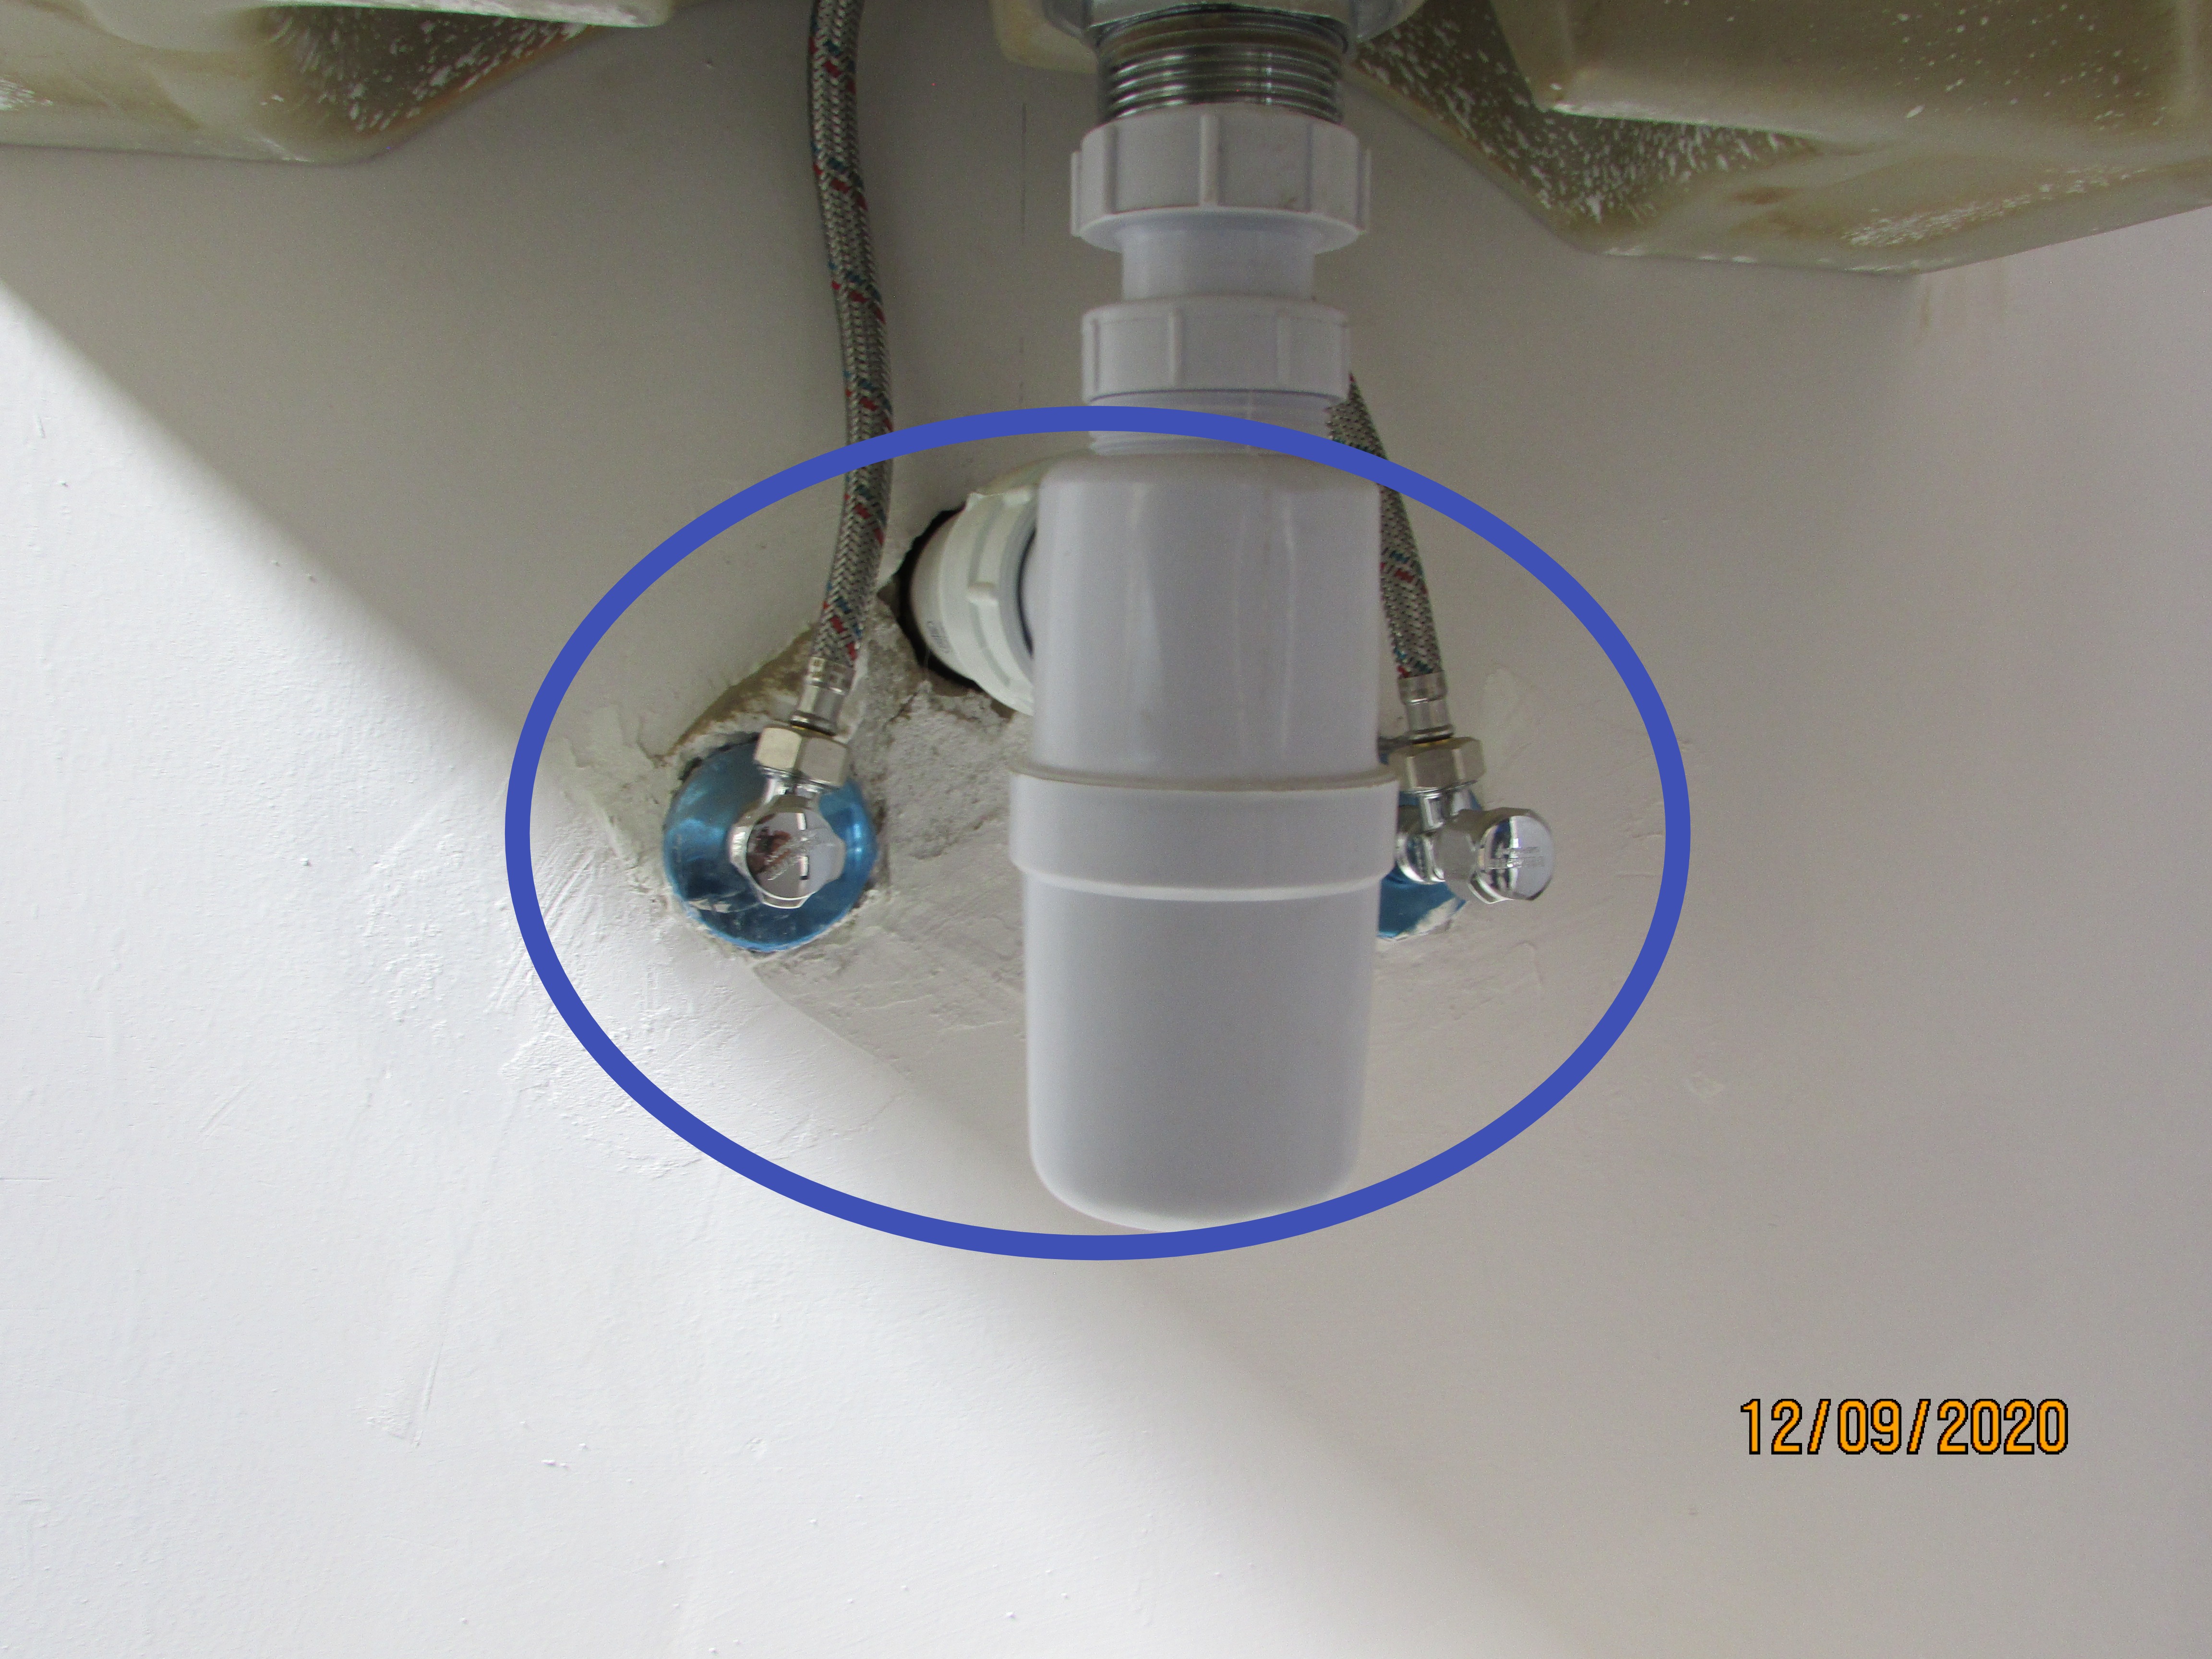 |
Toilet
Toilet: Tested
Toilet Seat: Checked
The toilet was functional and responded properly when flushed. No leaks were observed st the time of the inspection.
Bathroom Ventilation
Type: Operable window
General Bathroom Condition
The bathroom was in a good condition.
Ground Floor En-suite Bathroom
Basin and Cabinets
Basins: Tested
Cabinets: None
The basin, mixer tap and drain points were functional. The basin was filled and allowed to drain. No leaks were observed.
The plasterwork below the basin required repair and painting.
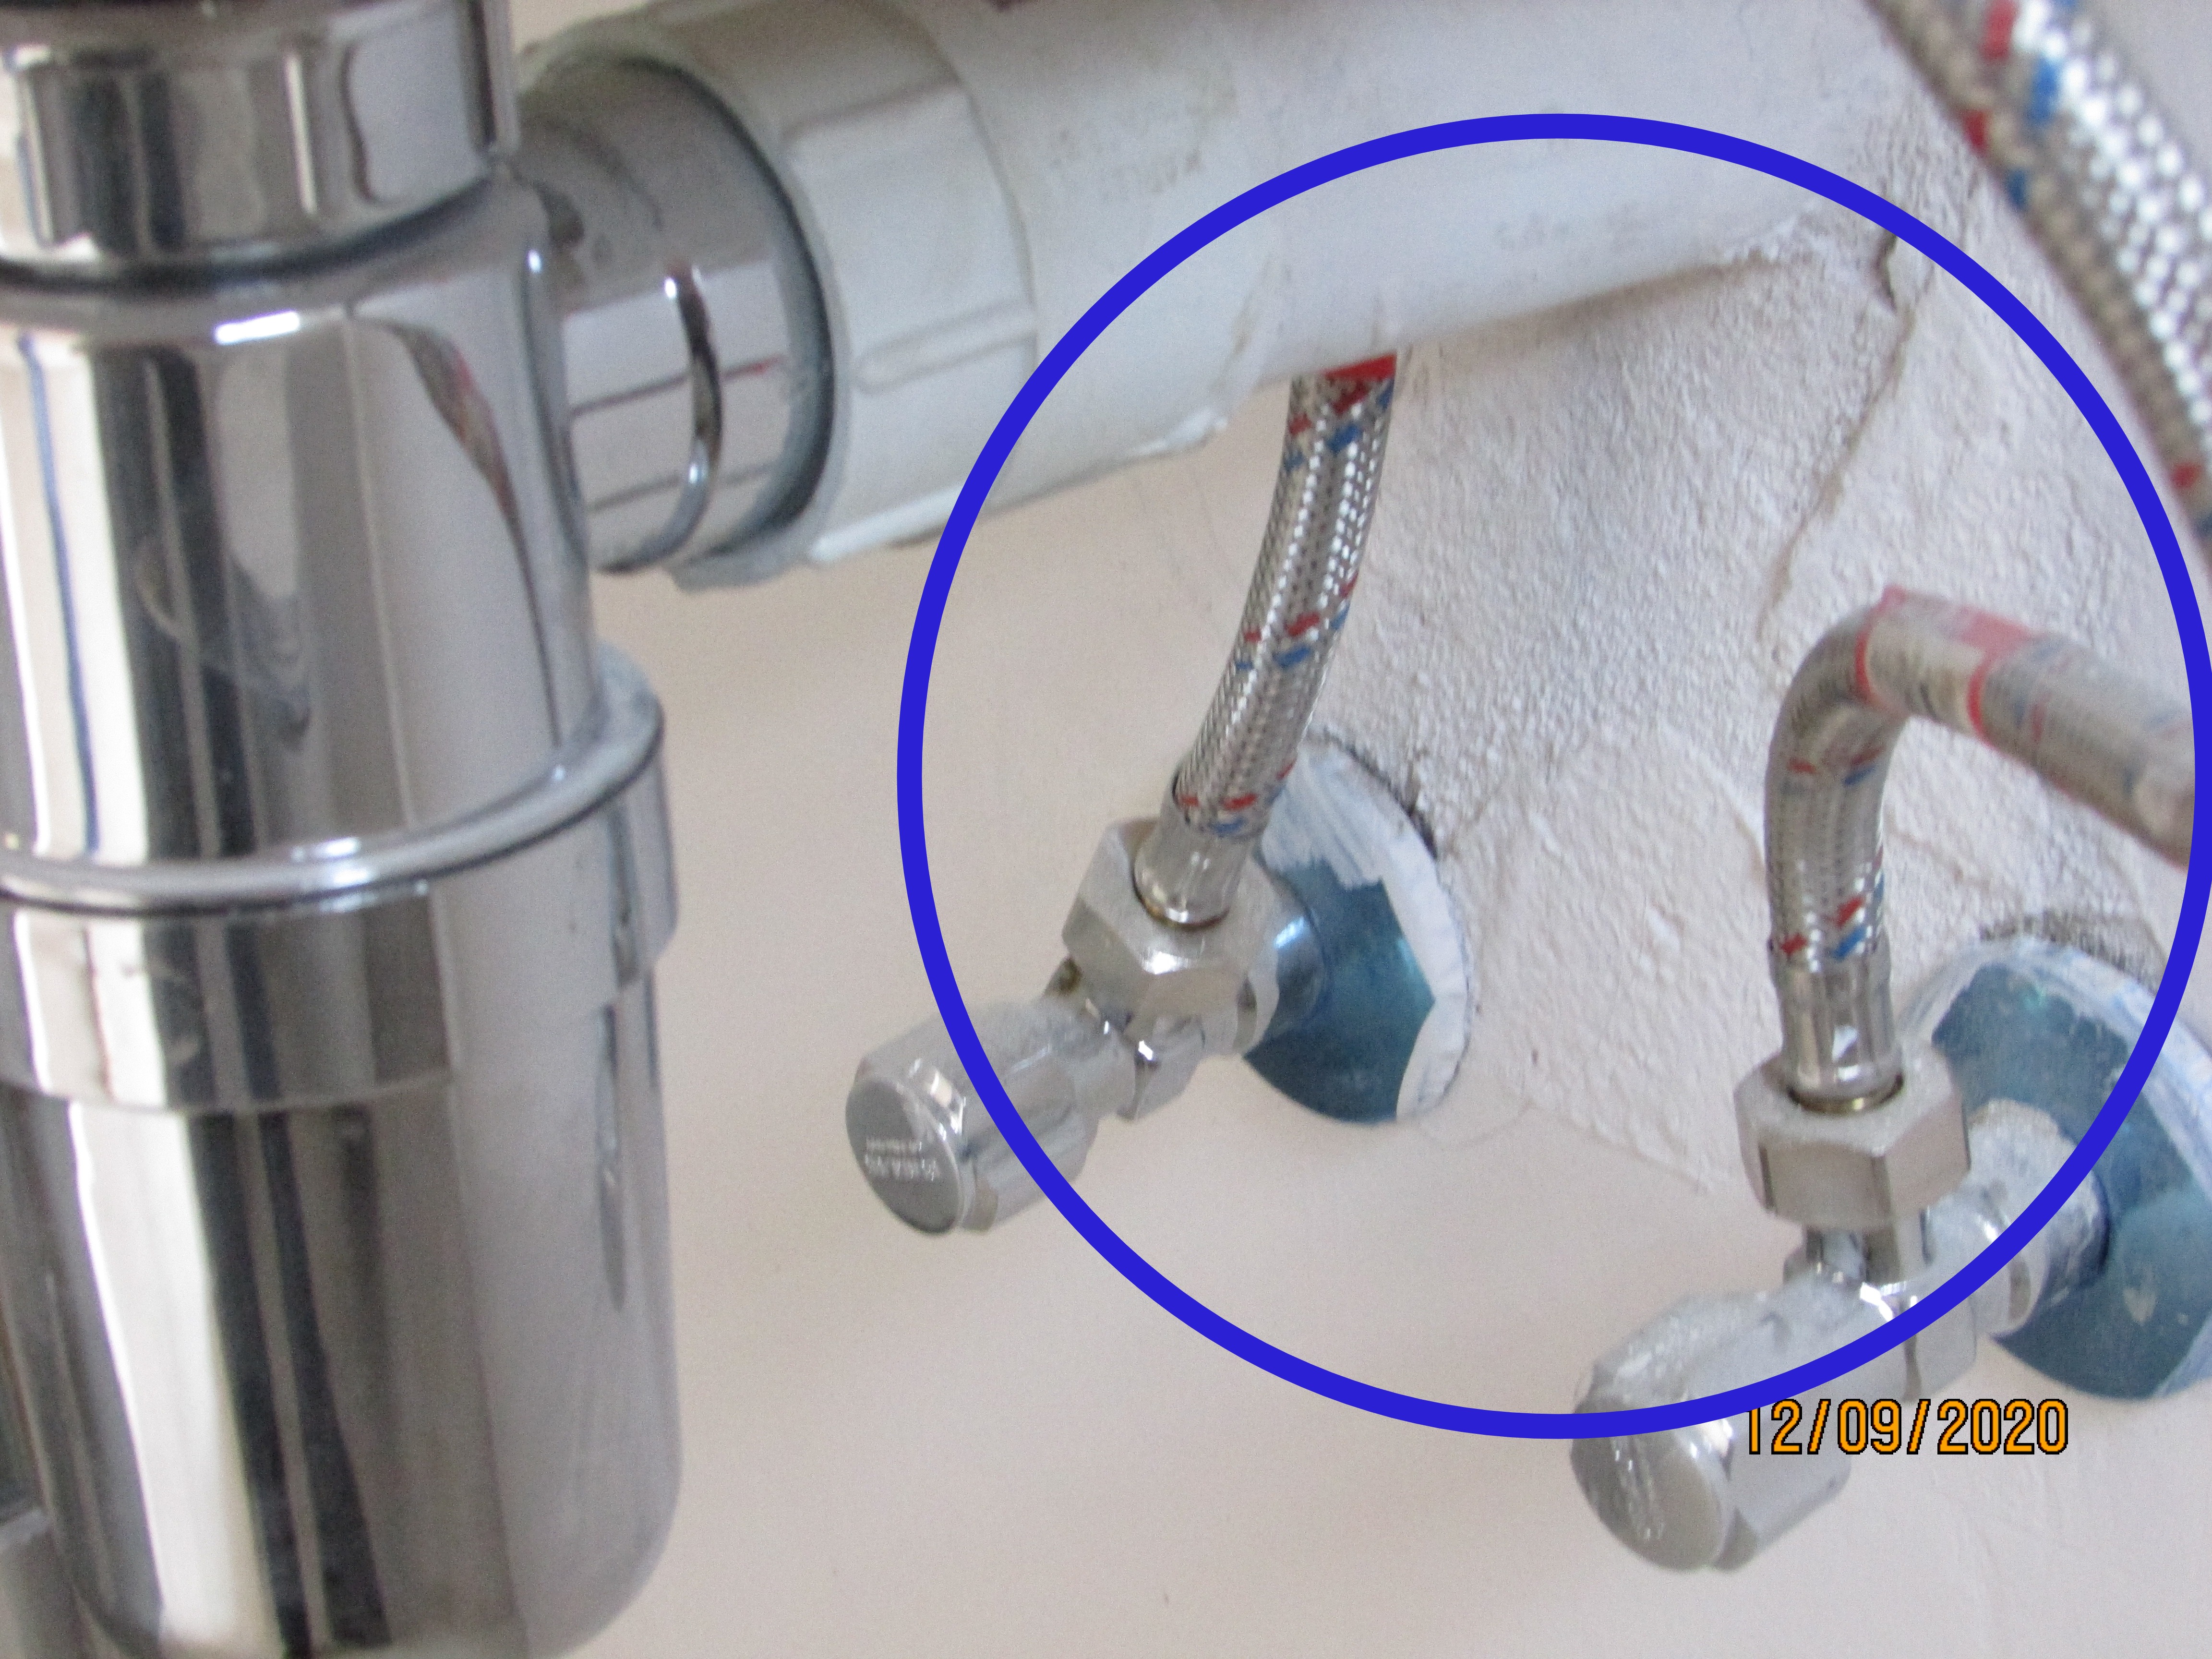 |
Toilet
Toilet: Tested
Toilet Seat: Checked
The toilet was functional and responded properly when flushed. No leaks were observed.
Shower and Bath
Shower: Tested
The shower mixer tap, shower heads appeared functional. The shower was allowed to run and allowed to drain. No leaking was noticeable at the time of the inspection.
The mixer valve covers will need to be sealed at covers and tiles or sealed at the supply behind the covers to help prevent moisture intrusion behind the covers and into the walls.
The shower surround appeared to be watertight and no leaking was observed at the time of the inspection.
The shower drain was slow to drain and appeared to be obstructed. A plumber should further evaluate this drain line and repair for adequate drainage.
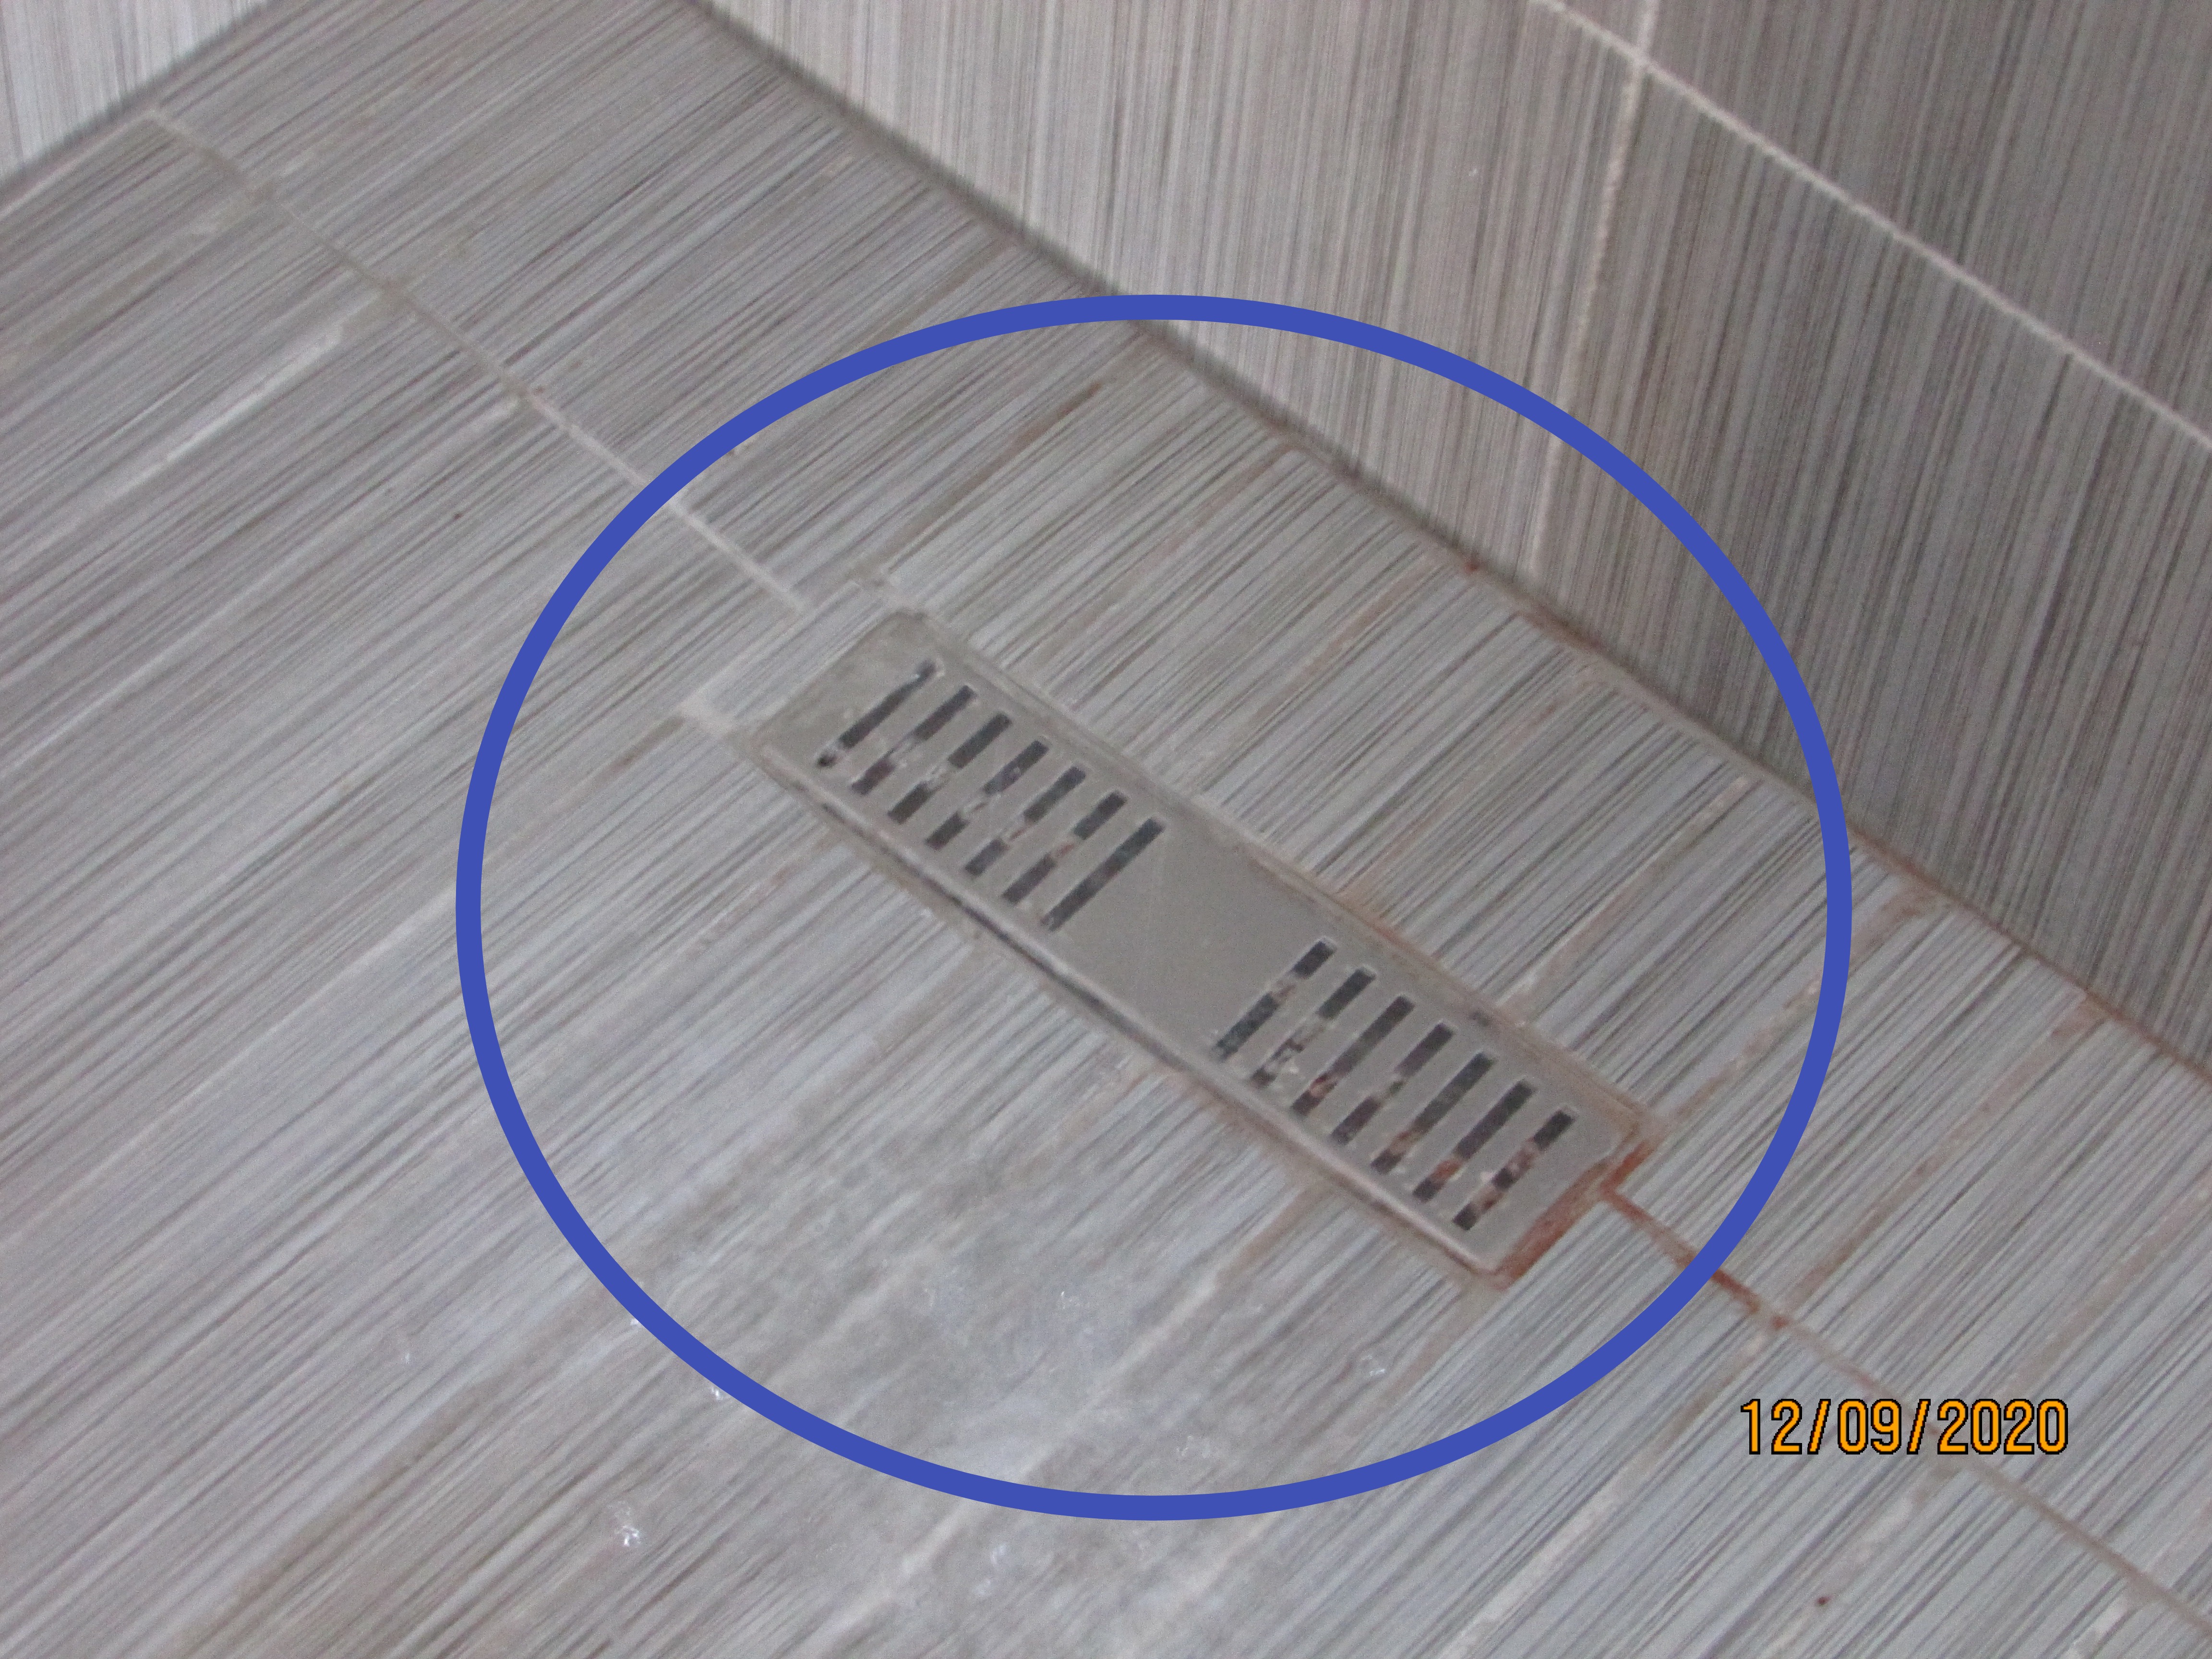 |
Bathroom Ventilation
Type: Operable window
Bathroom ventilation is important to prevent mould from forming. Moisture and condensation collects on the ceilings and walls from the lack of sufficient ventilation in bathrooms, creating an ideal situation for the formation of mould. I suggest that the door and windows be left open to provide through ventilation to disperse the steam and condensation resulting from showering.
General Bathroom Condition
The bathroom was in a good condition with some minor defects that will require attention.
Main En-suite Bathroom
Basins and Cabinets
Basins: Tested
Cabinets: Checked, Plastic laminate
The wall behind the bathroom basin was not adequately sealed to the counter top or the wall and could allow water to get behind the counter top. Moisture damage may result in the cabinet below. Seal with silicon.
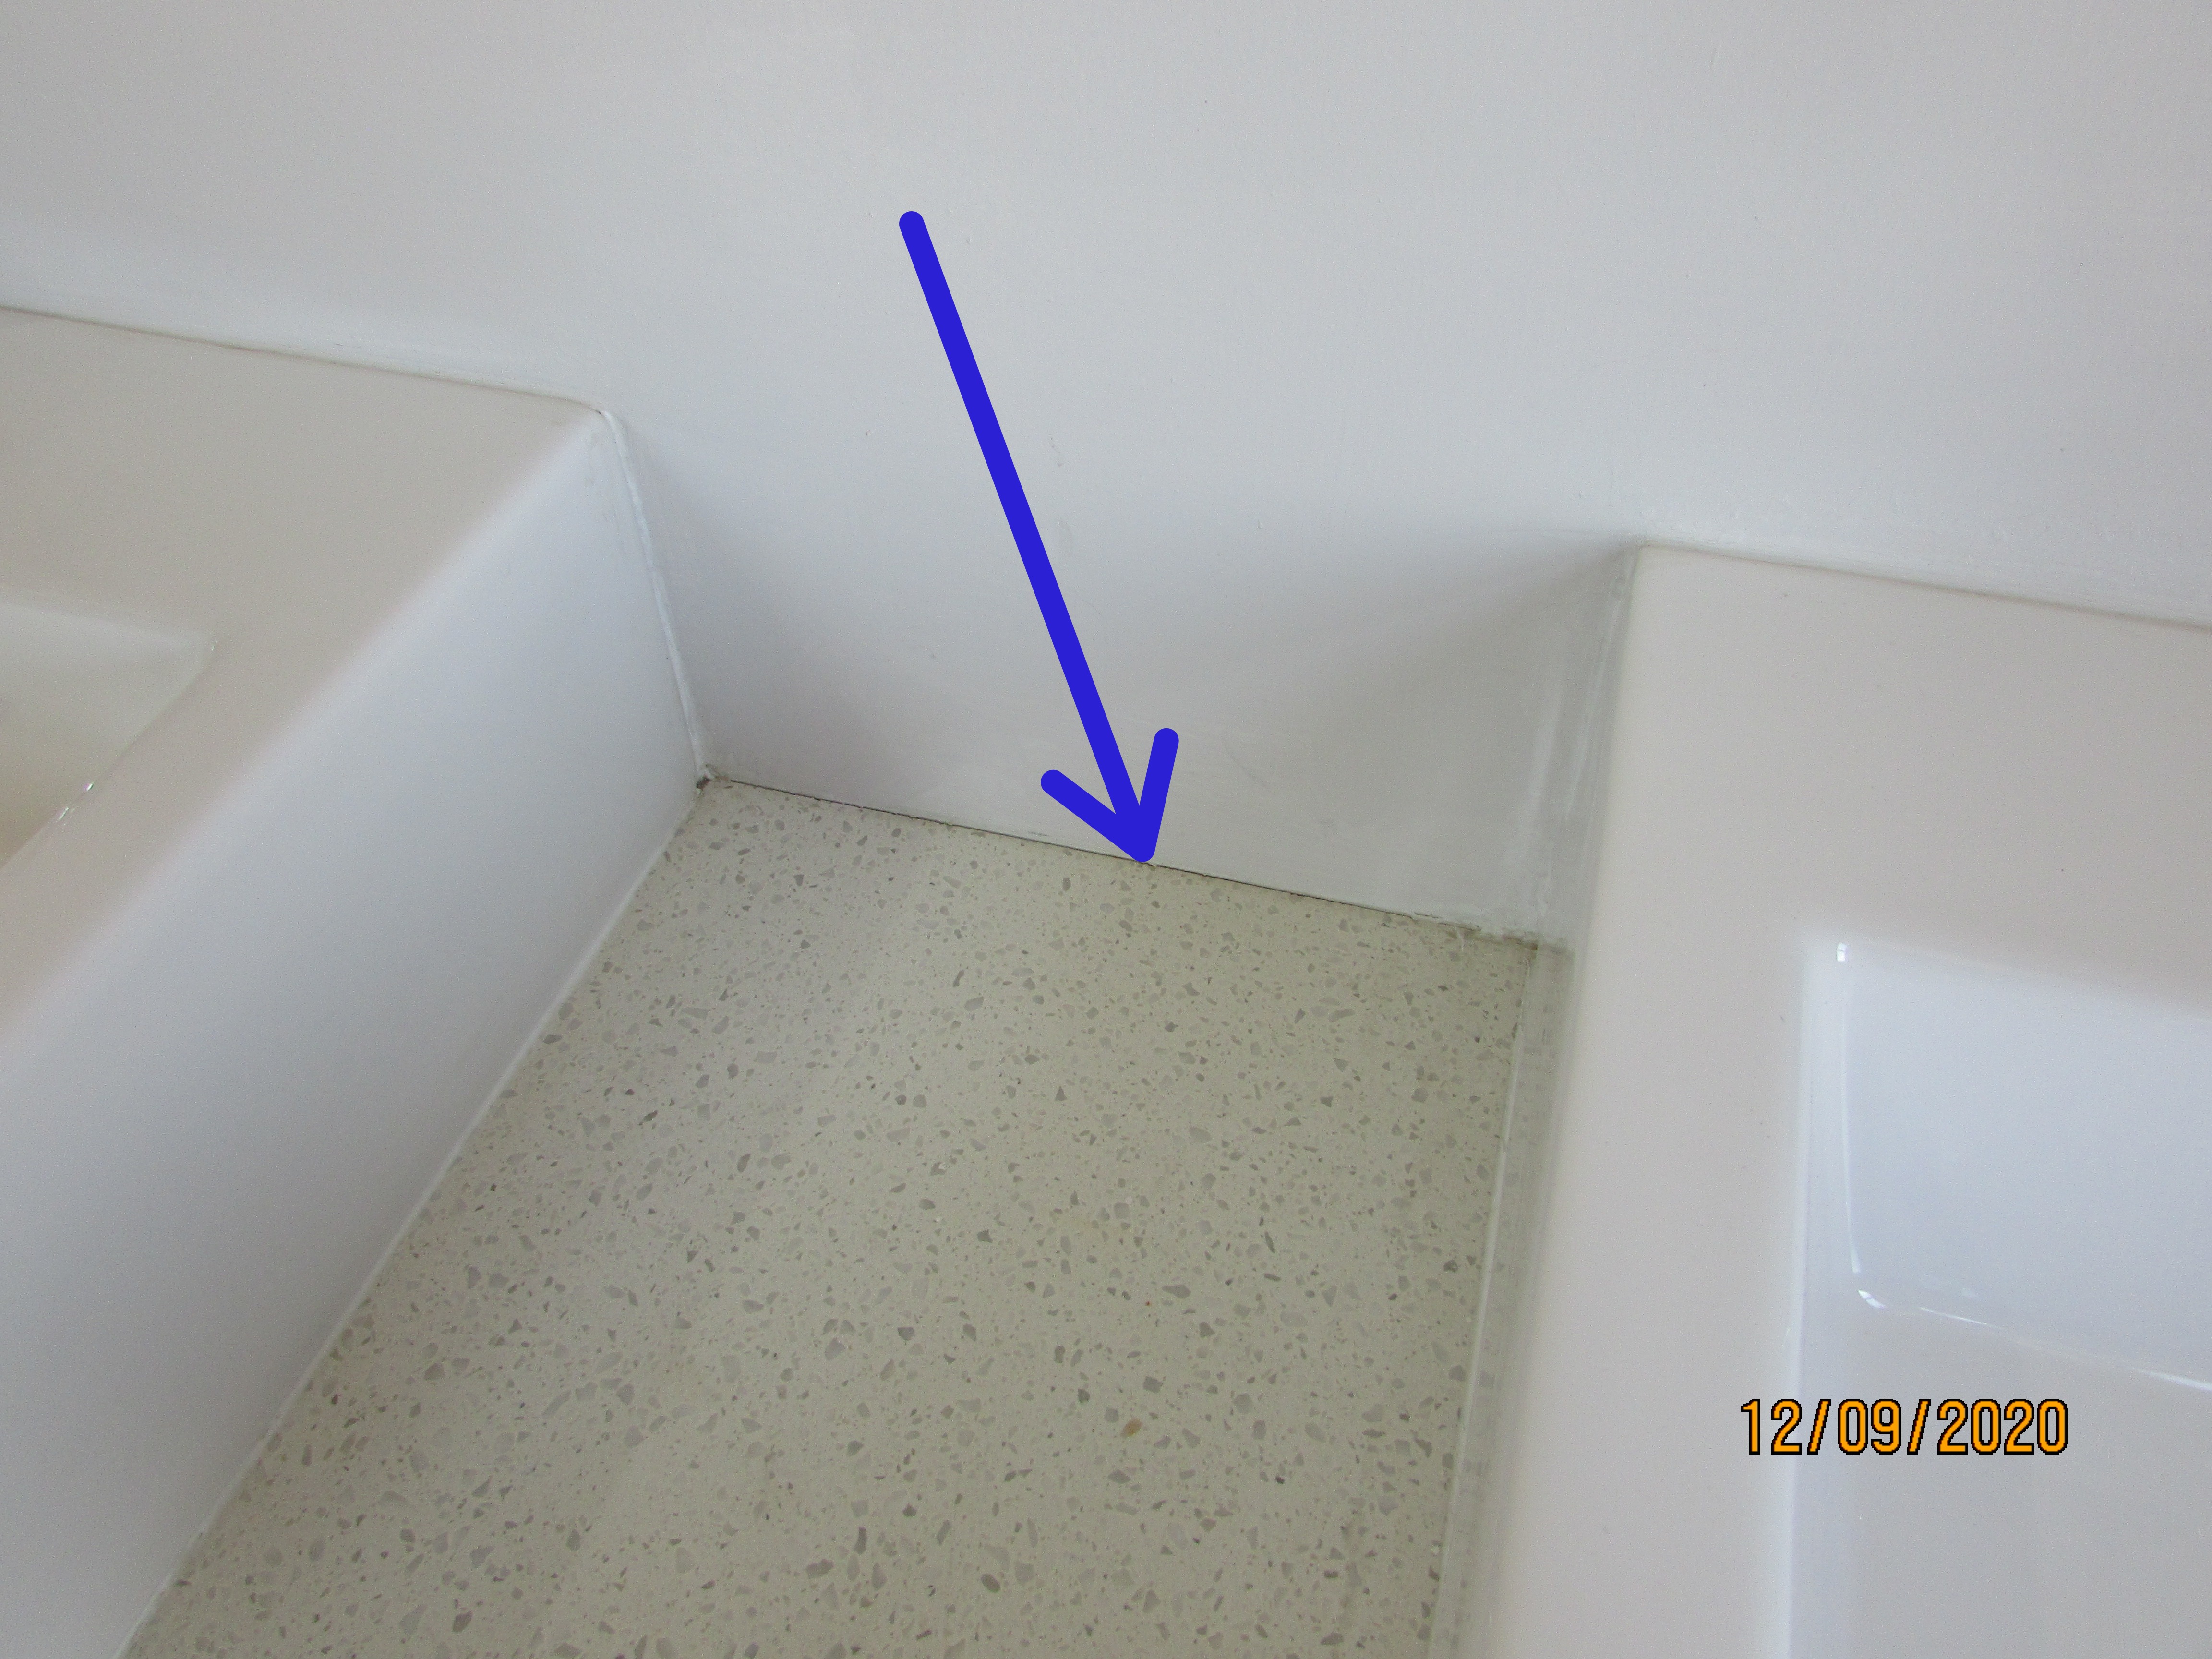 |  |
Toilet
Toilet: Tested
Toilet Seat: Checked
The toilet was functional and responded properly when flushed. No leaks were observed.
Cleaning off of grout was required under one side of the toilet tiling.
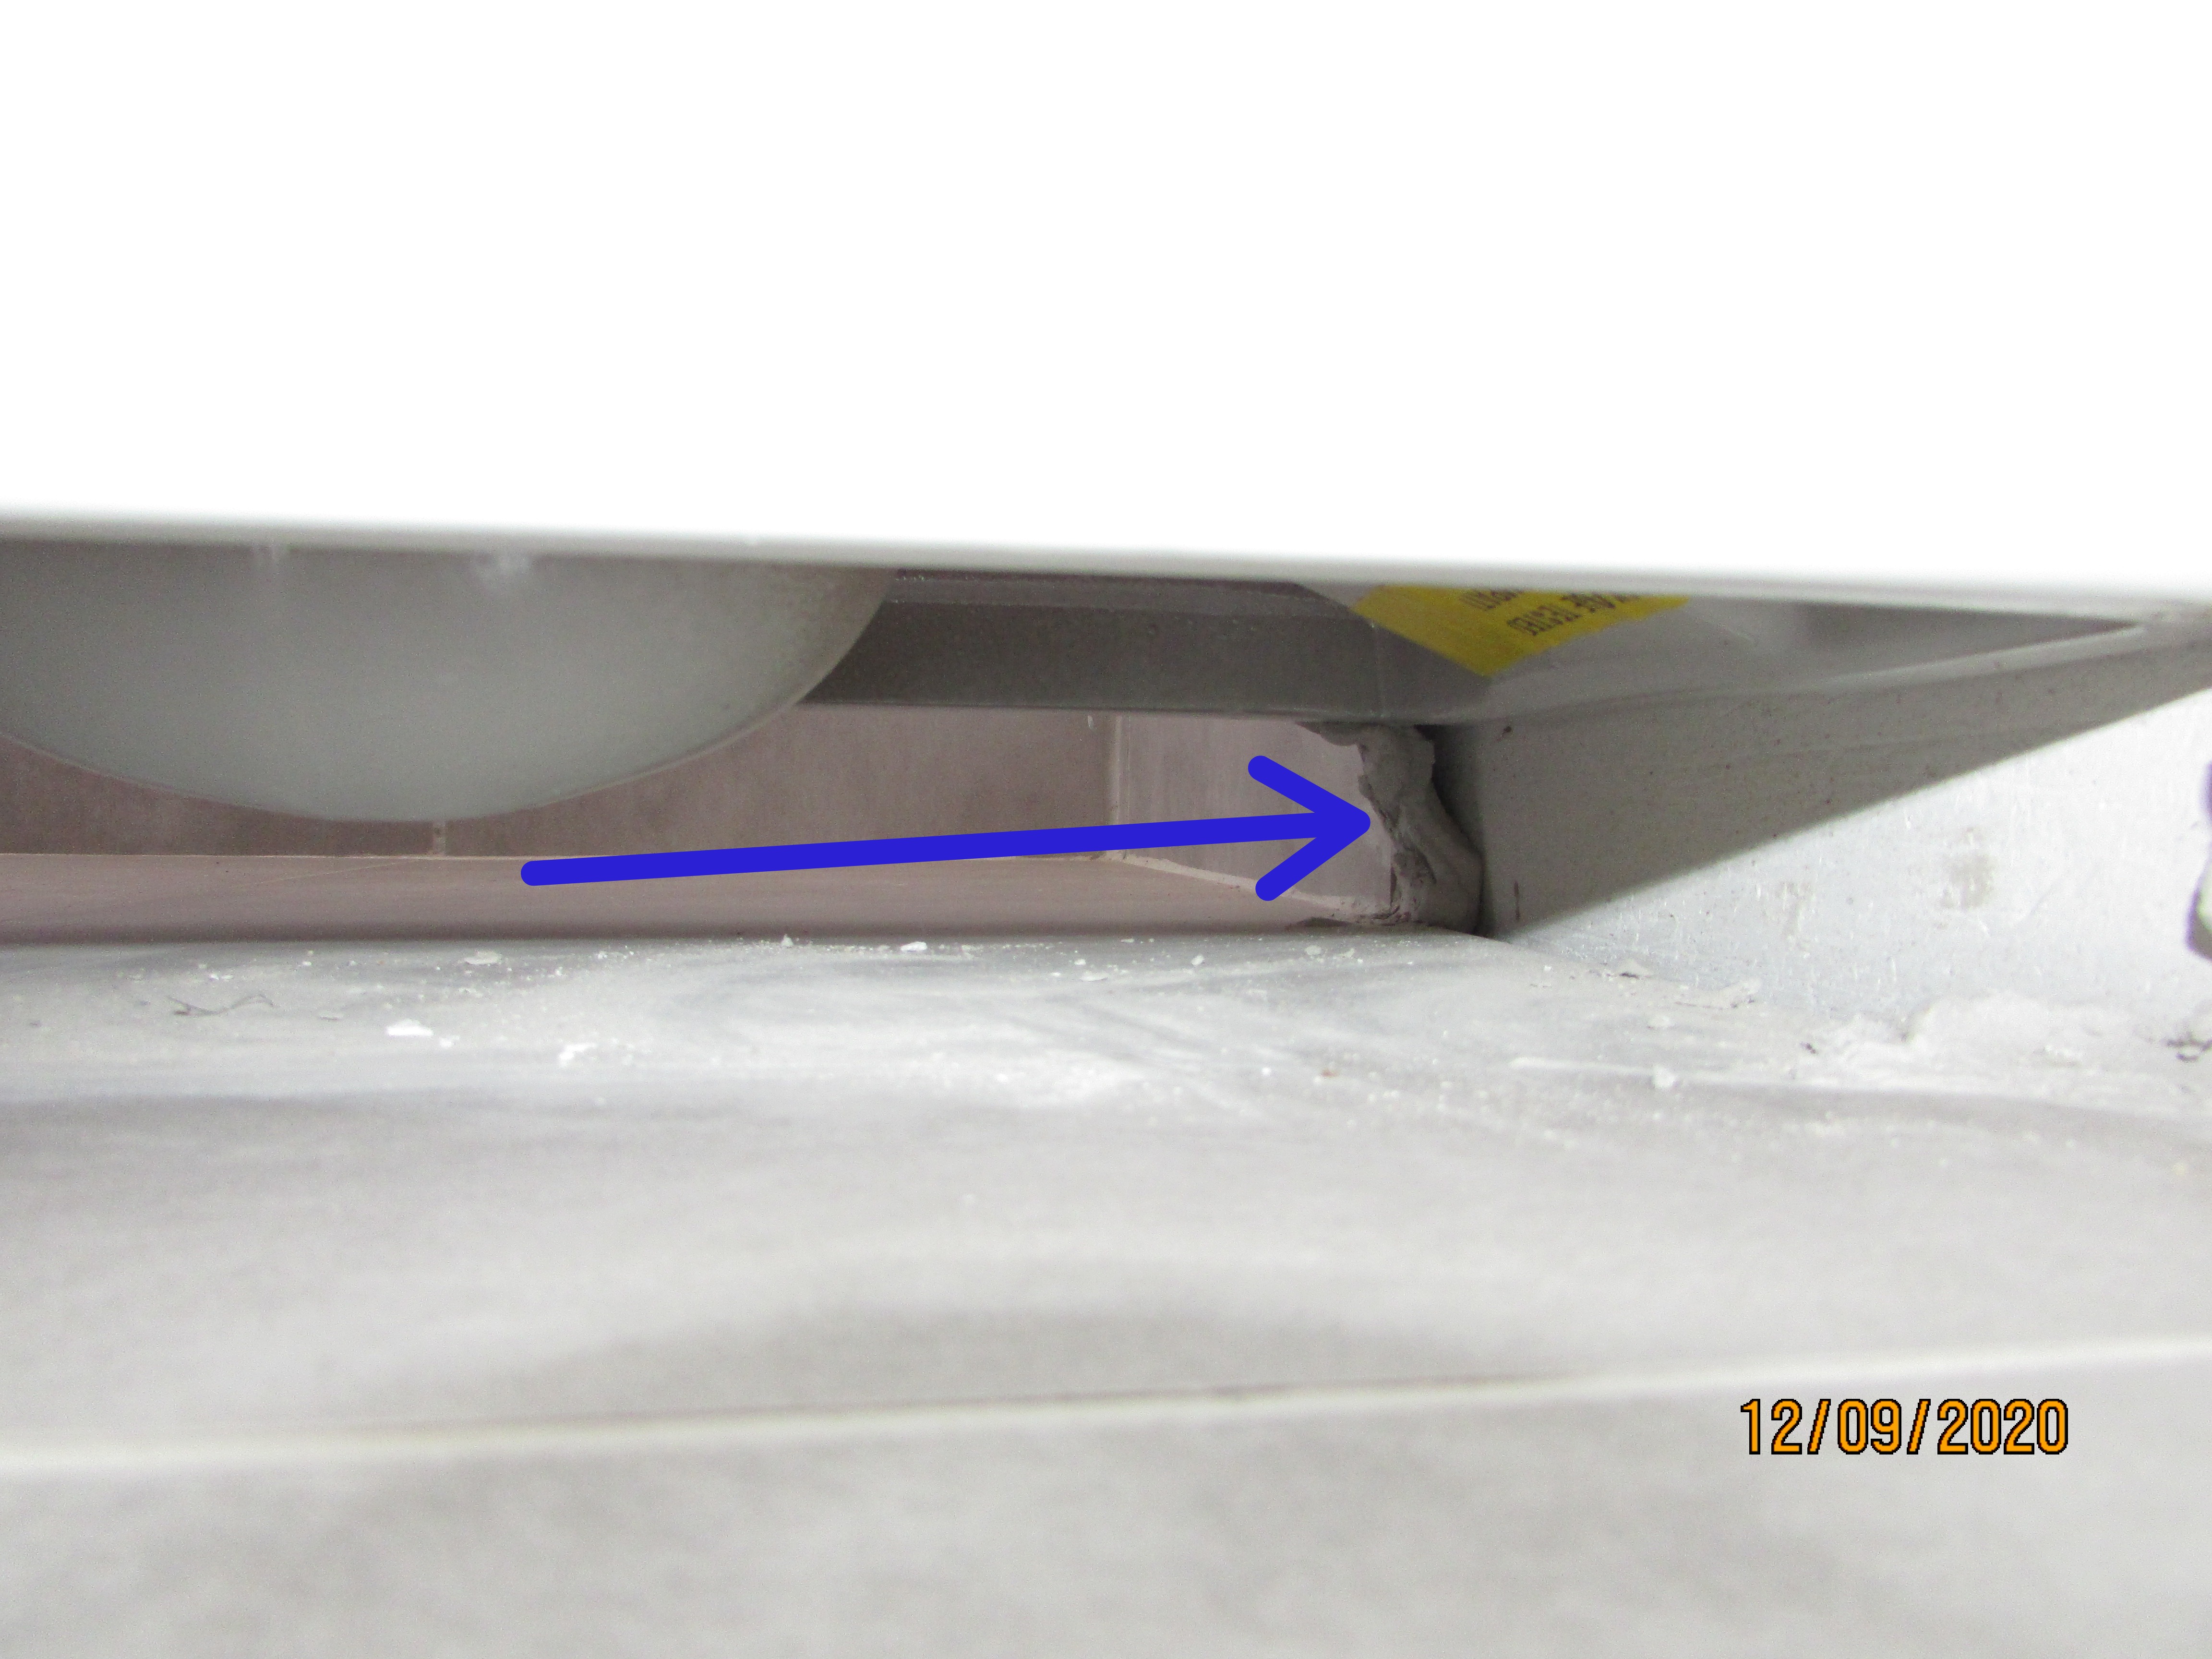 |
Bath and Shower
Bath: Tested
Shower: Tested
The bath, mixer taps, shower wand and pop-up drain plug and drain were functional. The bath was filled and allowed to drain. No leaking was noticeable at the time of the inspection.
The bath mixer valve covers will need to be sealed at covers and tiles or sealed at the supply behind the covers to help prevent moisture intrusion behind the covers and into the walls.
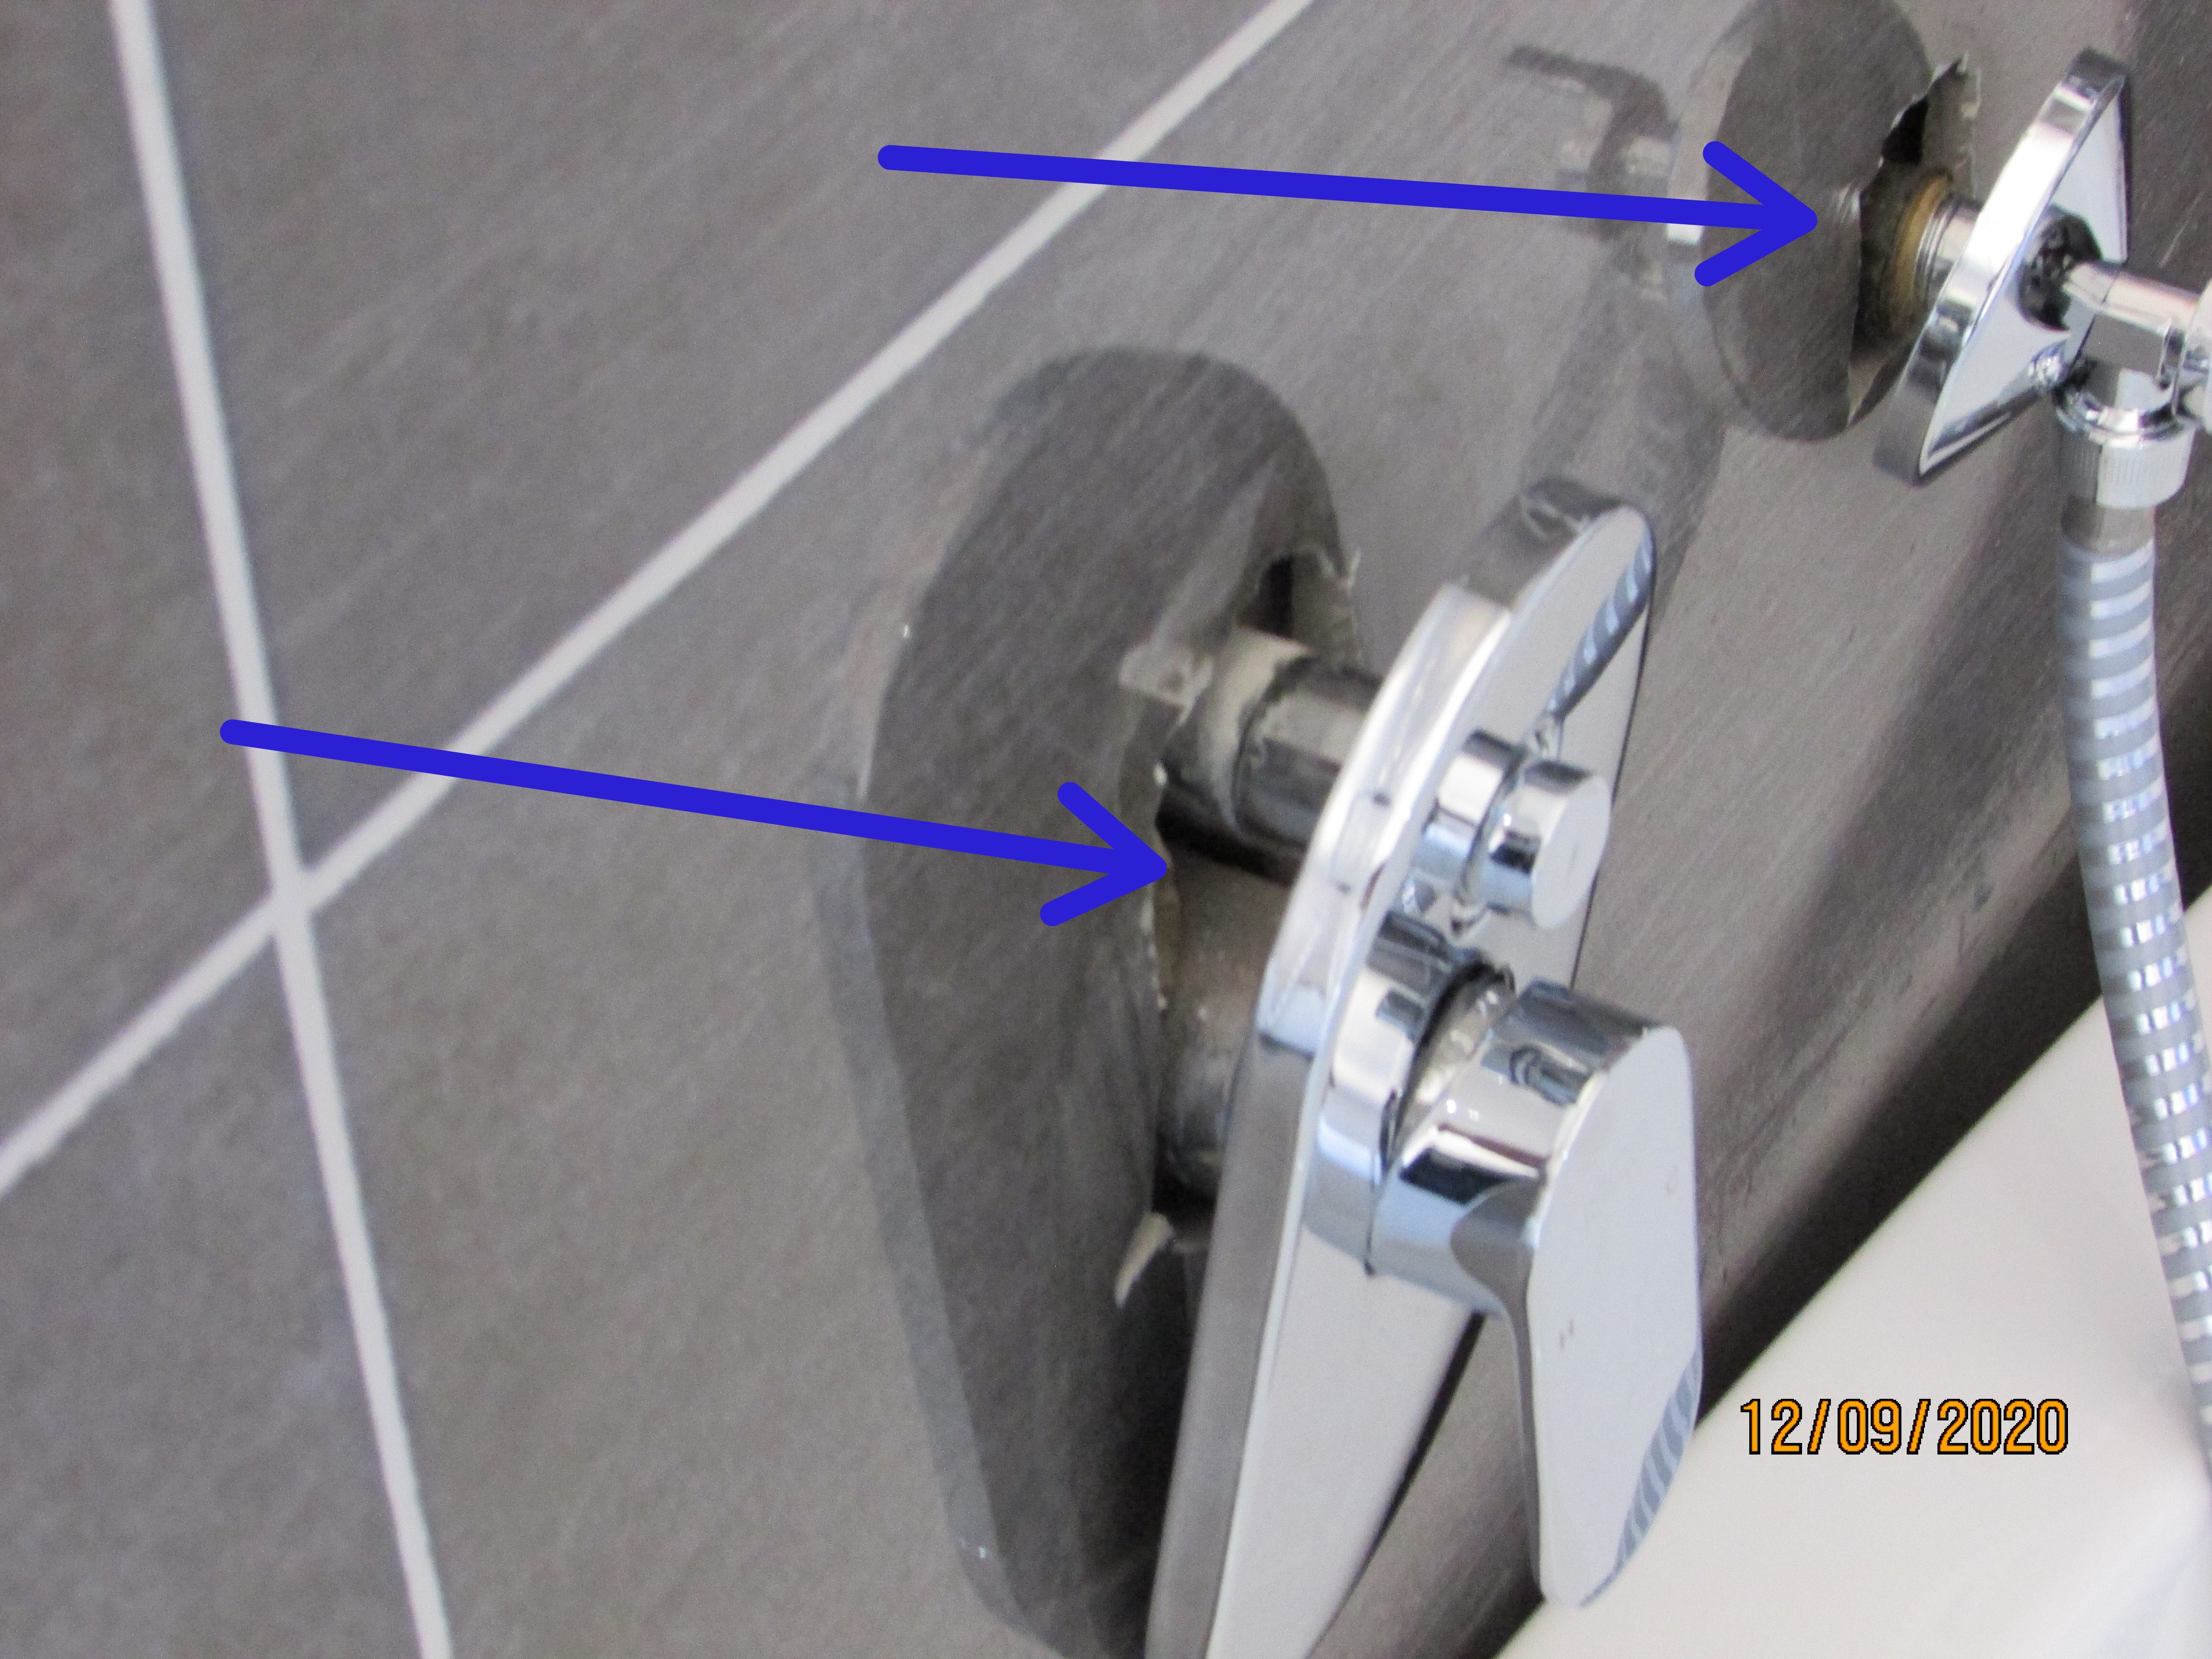 |
The shower mixer tap, shower heads and drain appeared functional. The shower was allowed to run and allowed to drain. No leaking was noticeable at the time of the inspection.
The shower mixer valve cover will need to be sealed at cover and tiles or sealed at the supply behind the covers to help prevent moisture intrusion behind the covers and into the walls.
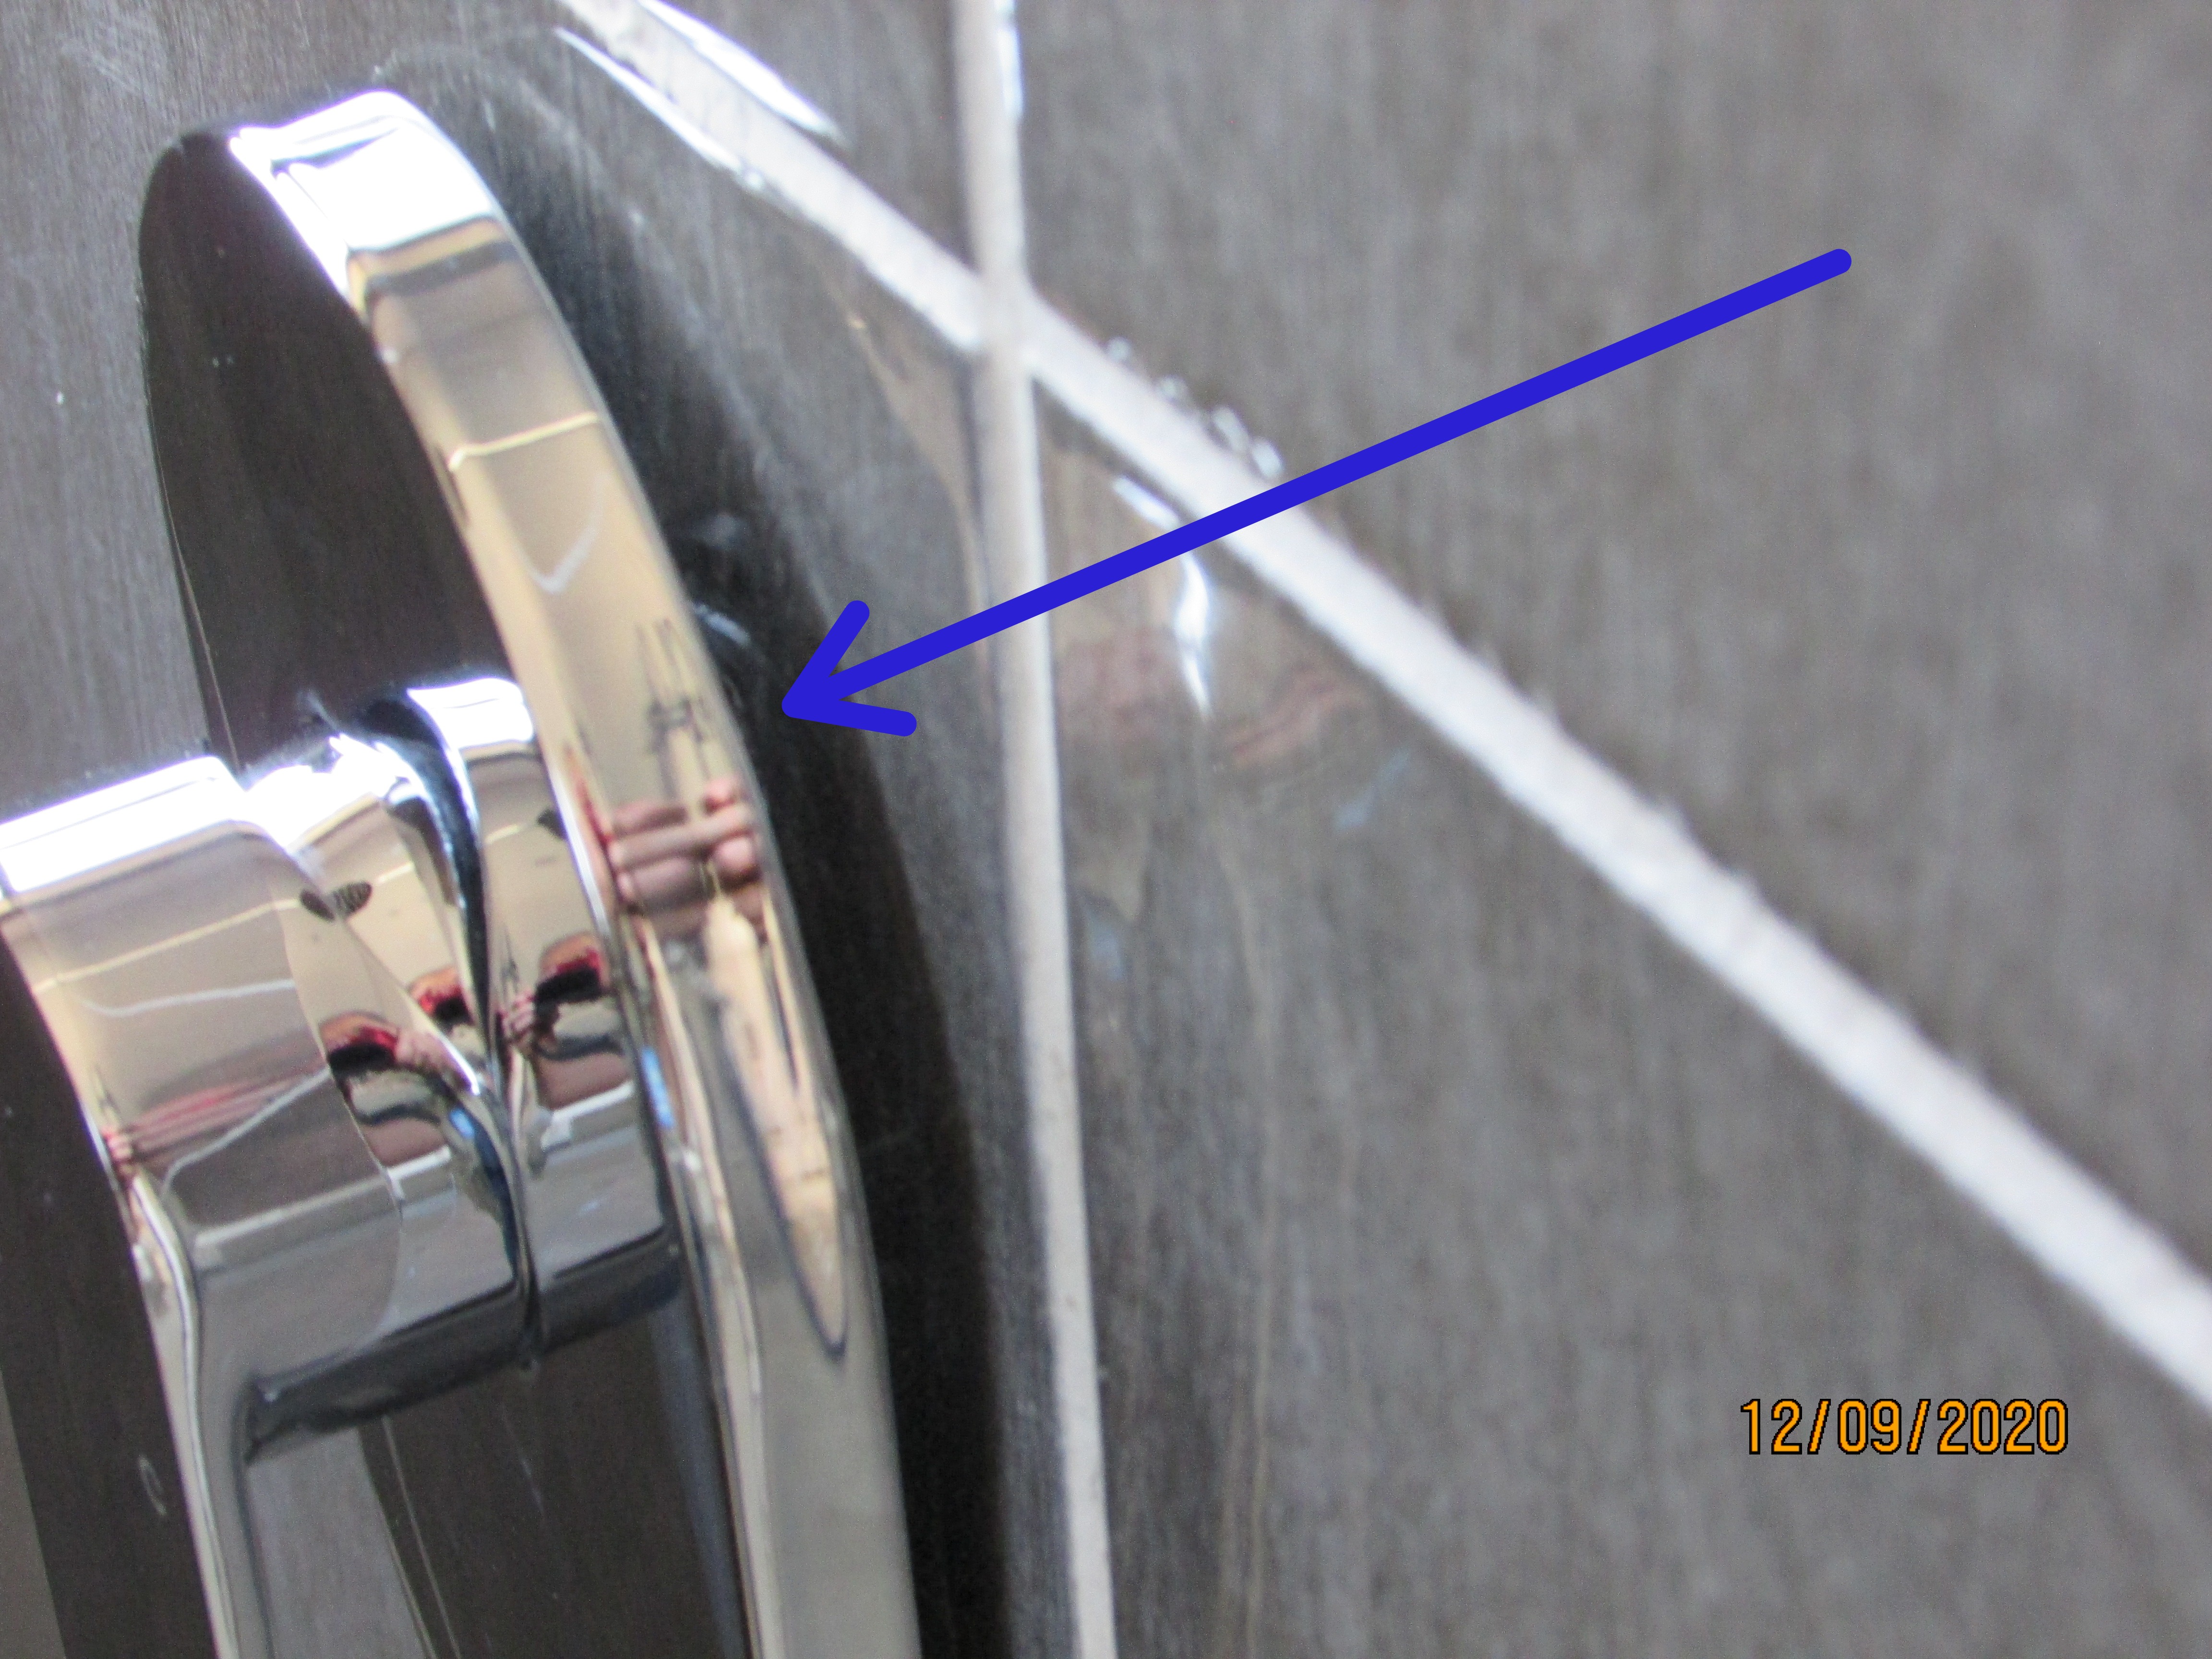 |
Bathroom Ventilation
Type: Operable window
Bathroom ventilation is important to prevent mould from forming. Moisture and condensation collects on the ceilings and walls from the lack of sufficient ventilation in bathrooms, creating an ideal situation for the formation of mould. I suggest that the door and windows be left open to provide through ventilation to disperse the steam and condensation resulting after showering and bathing.
General Bathroom Condition
The bathroom was in a good condition with some minor defects that will require attention.
Bedroom 1 En-suite Bathroom
Basins and Cabinets
Basins: Tested
The basin, taps and drain points were functional. The basin was filled and allowed to drain. No leaks were observed.
The plasterwork below the basin required repair and painting.
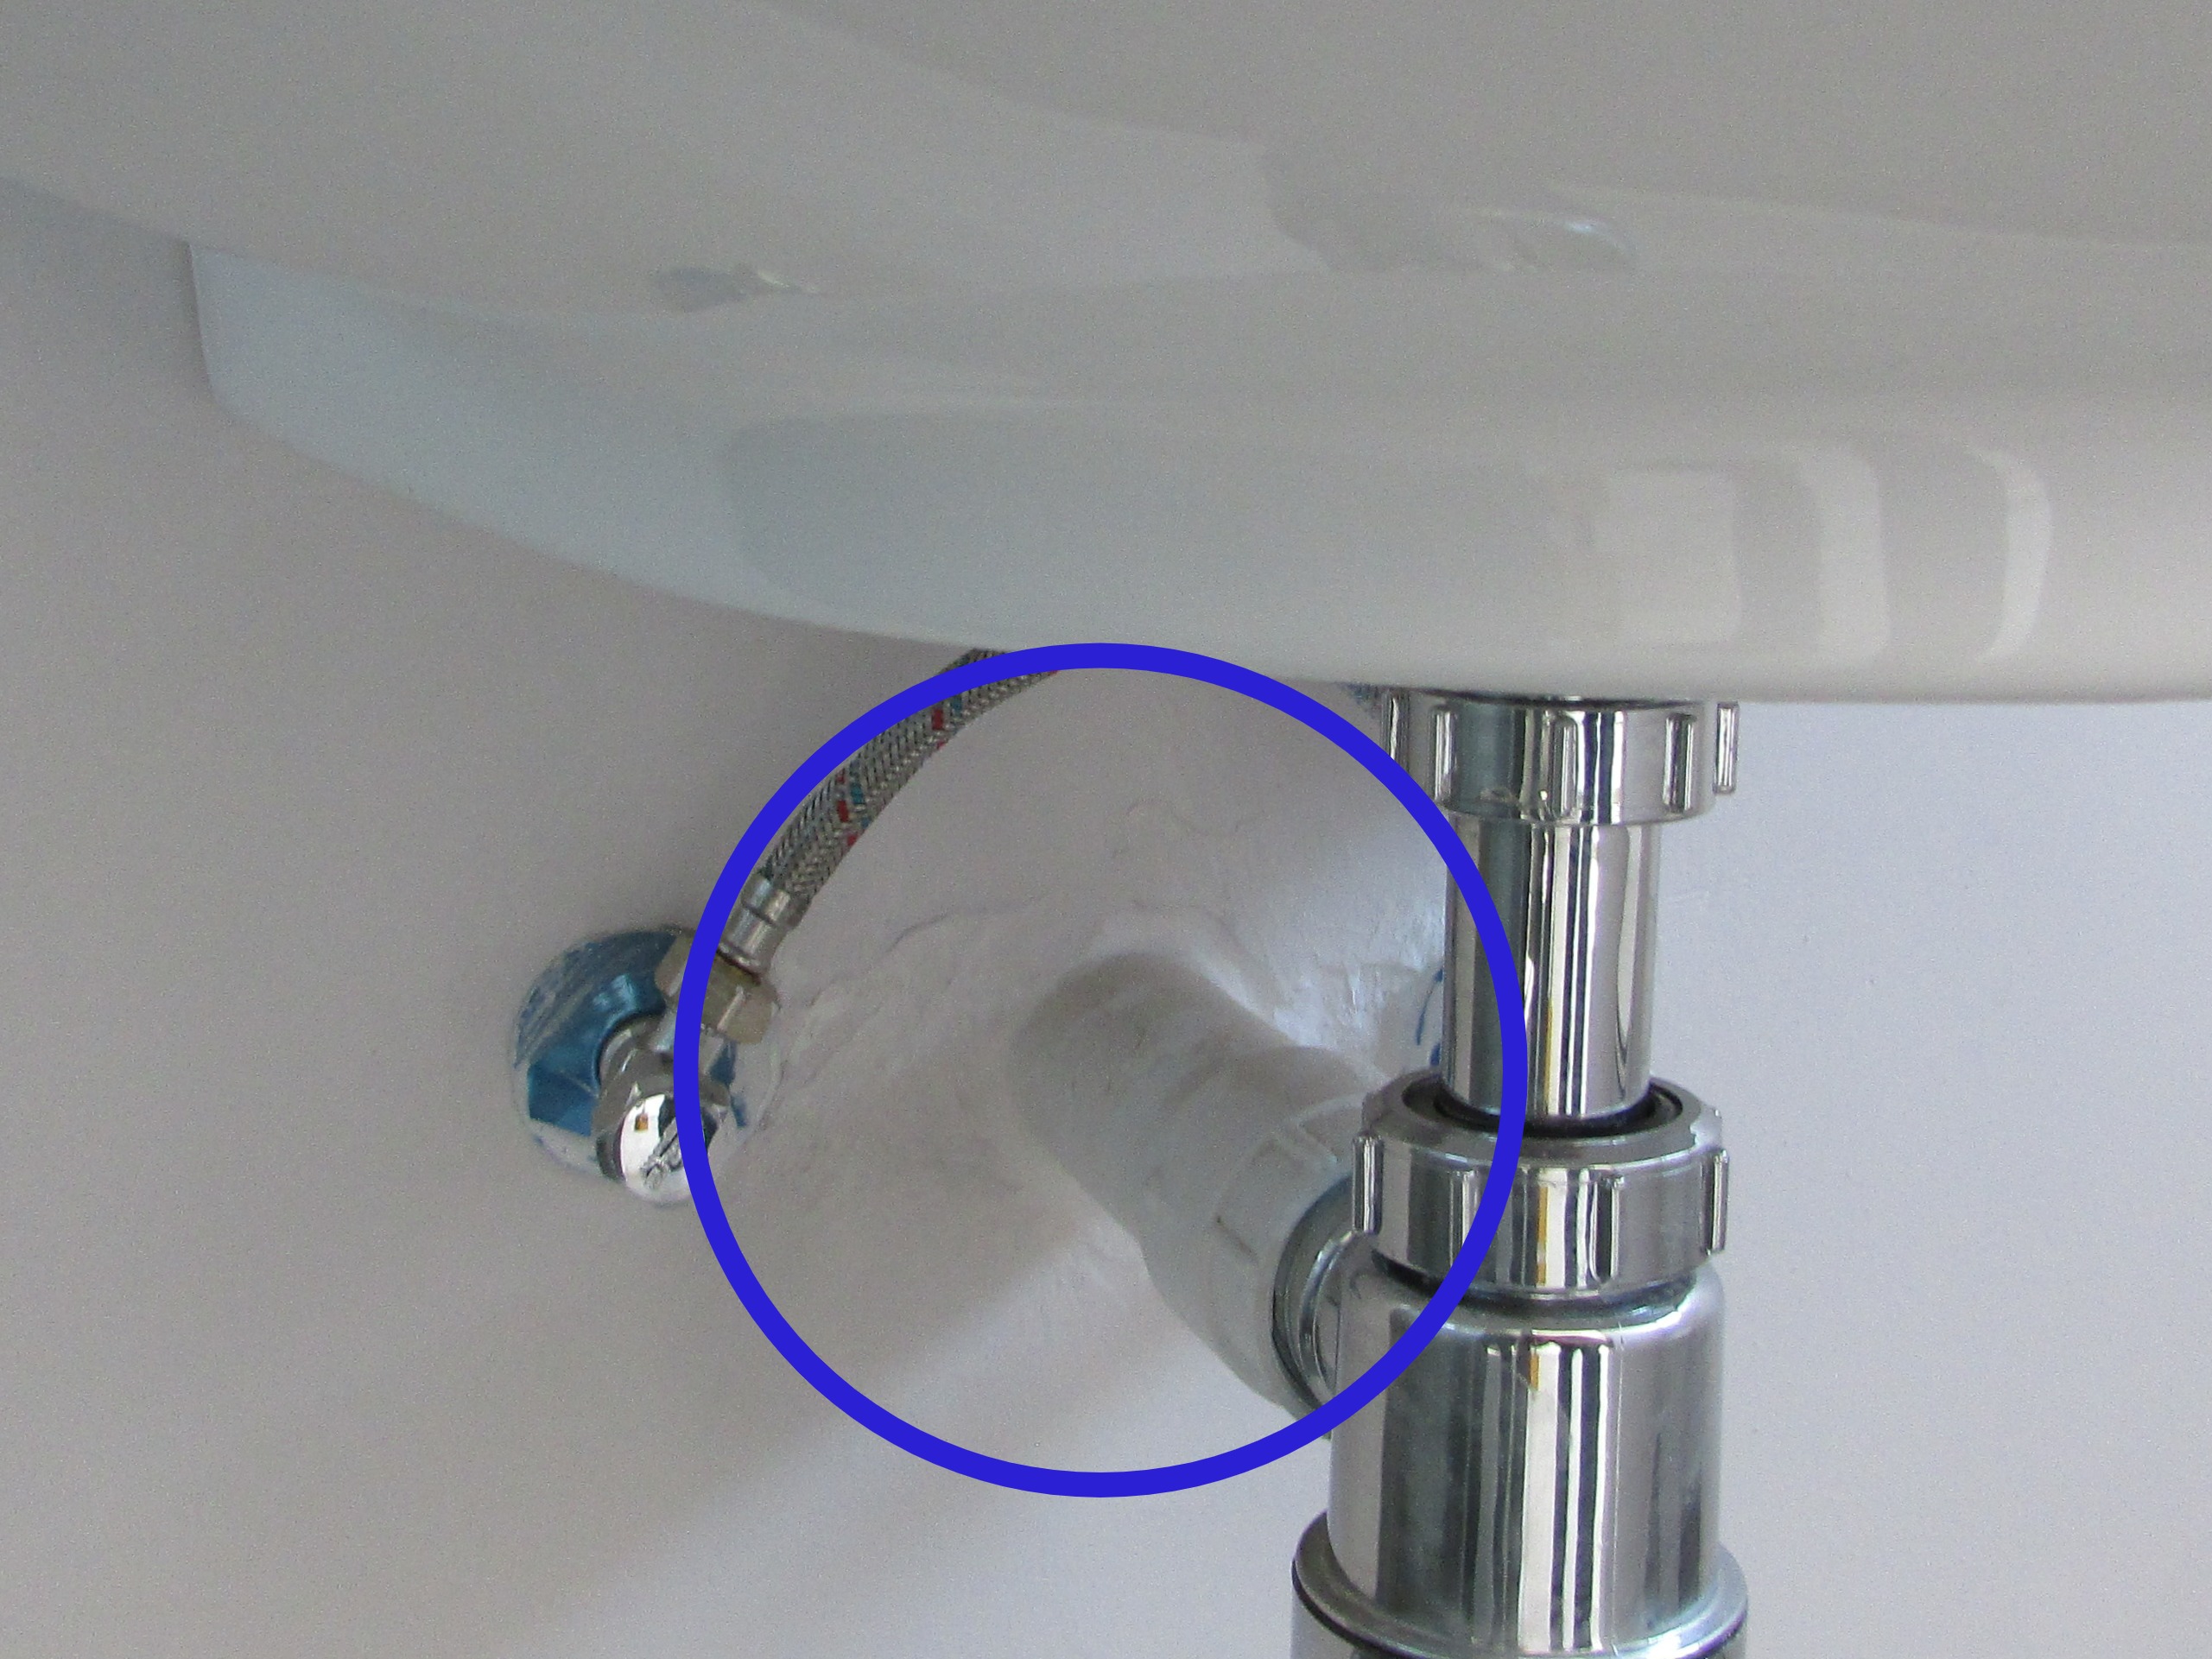 |
The cold and hot water supply side of the mixer on the basin had a weak supply. This may only be a blocked aerator sieve. The defect will need to be investigated and repaired.
 |
Toilet
Toilet: Tested
Toilet Seat: Tested
The toilet was functional and responded properly when flushed. No leaks were observed.
A grout repair was required under one side of the toilet tiling to prevent moisture intrusion should the toilet ever leak.
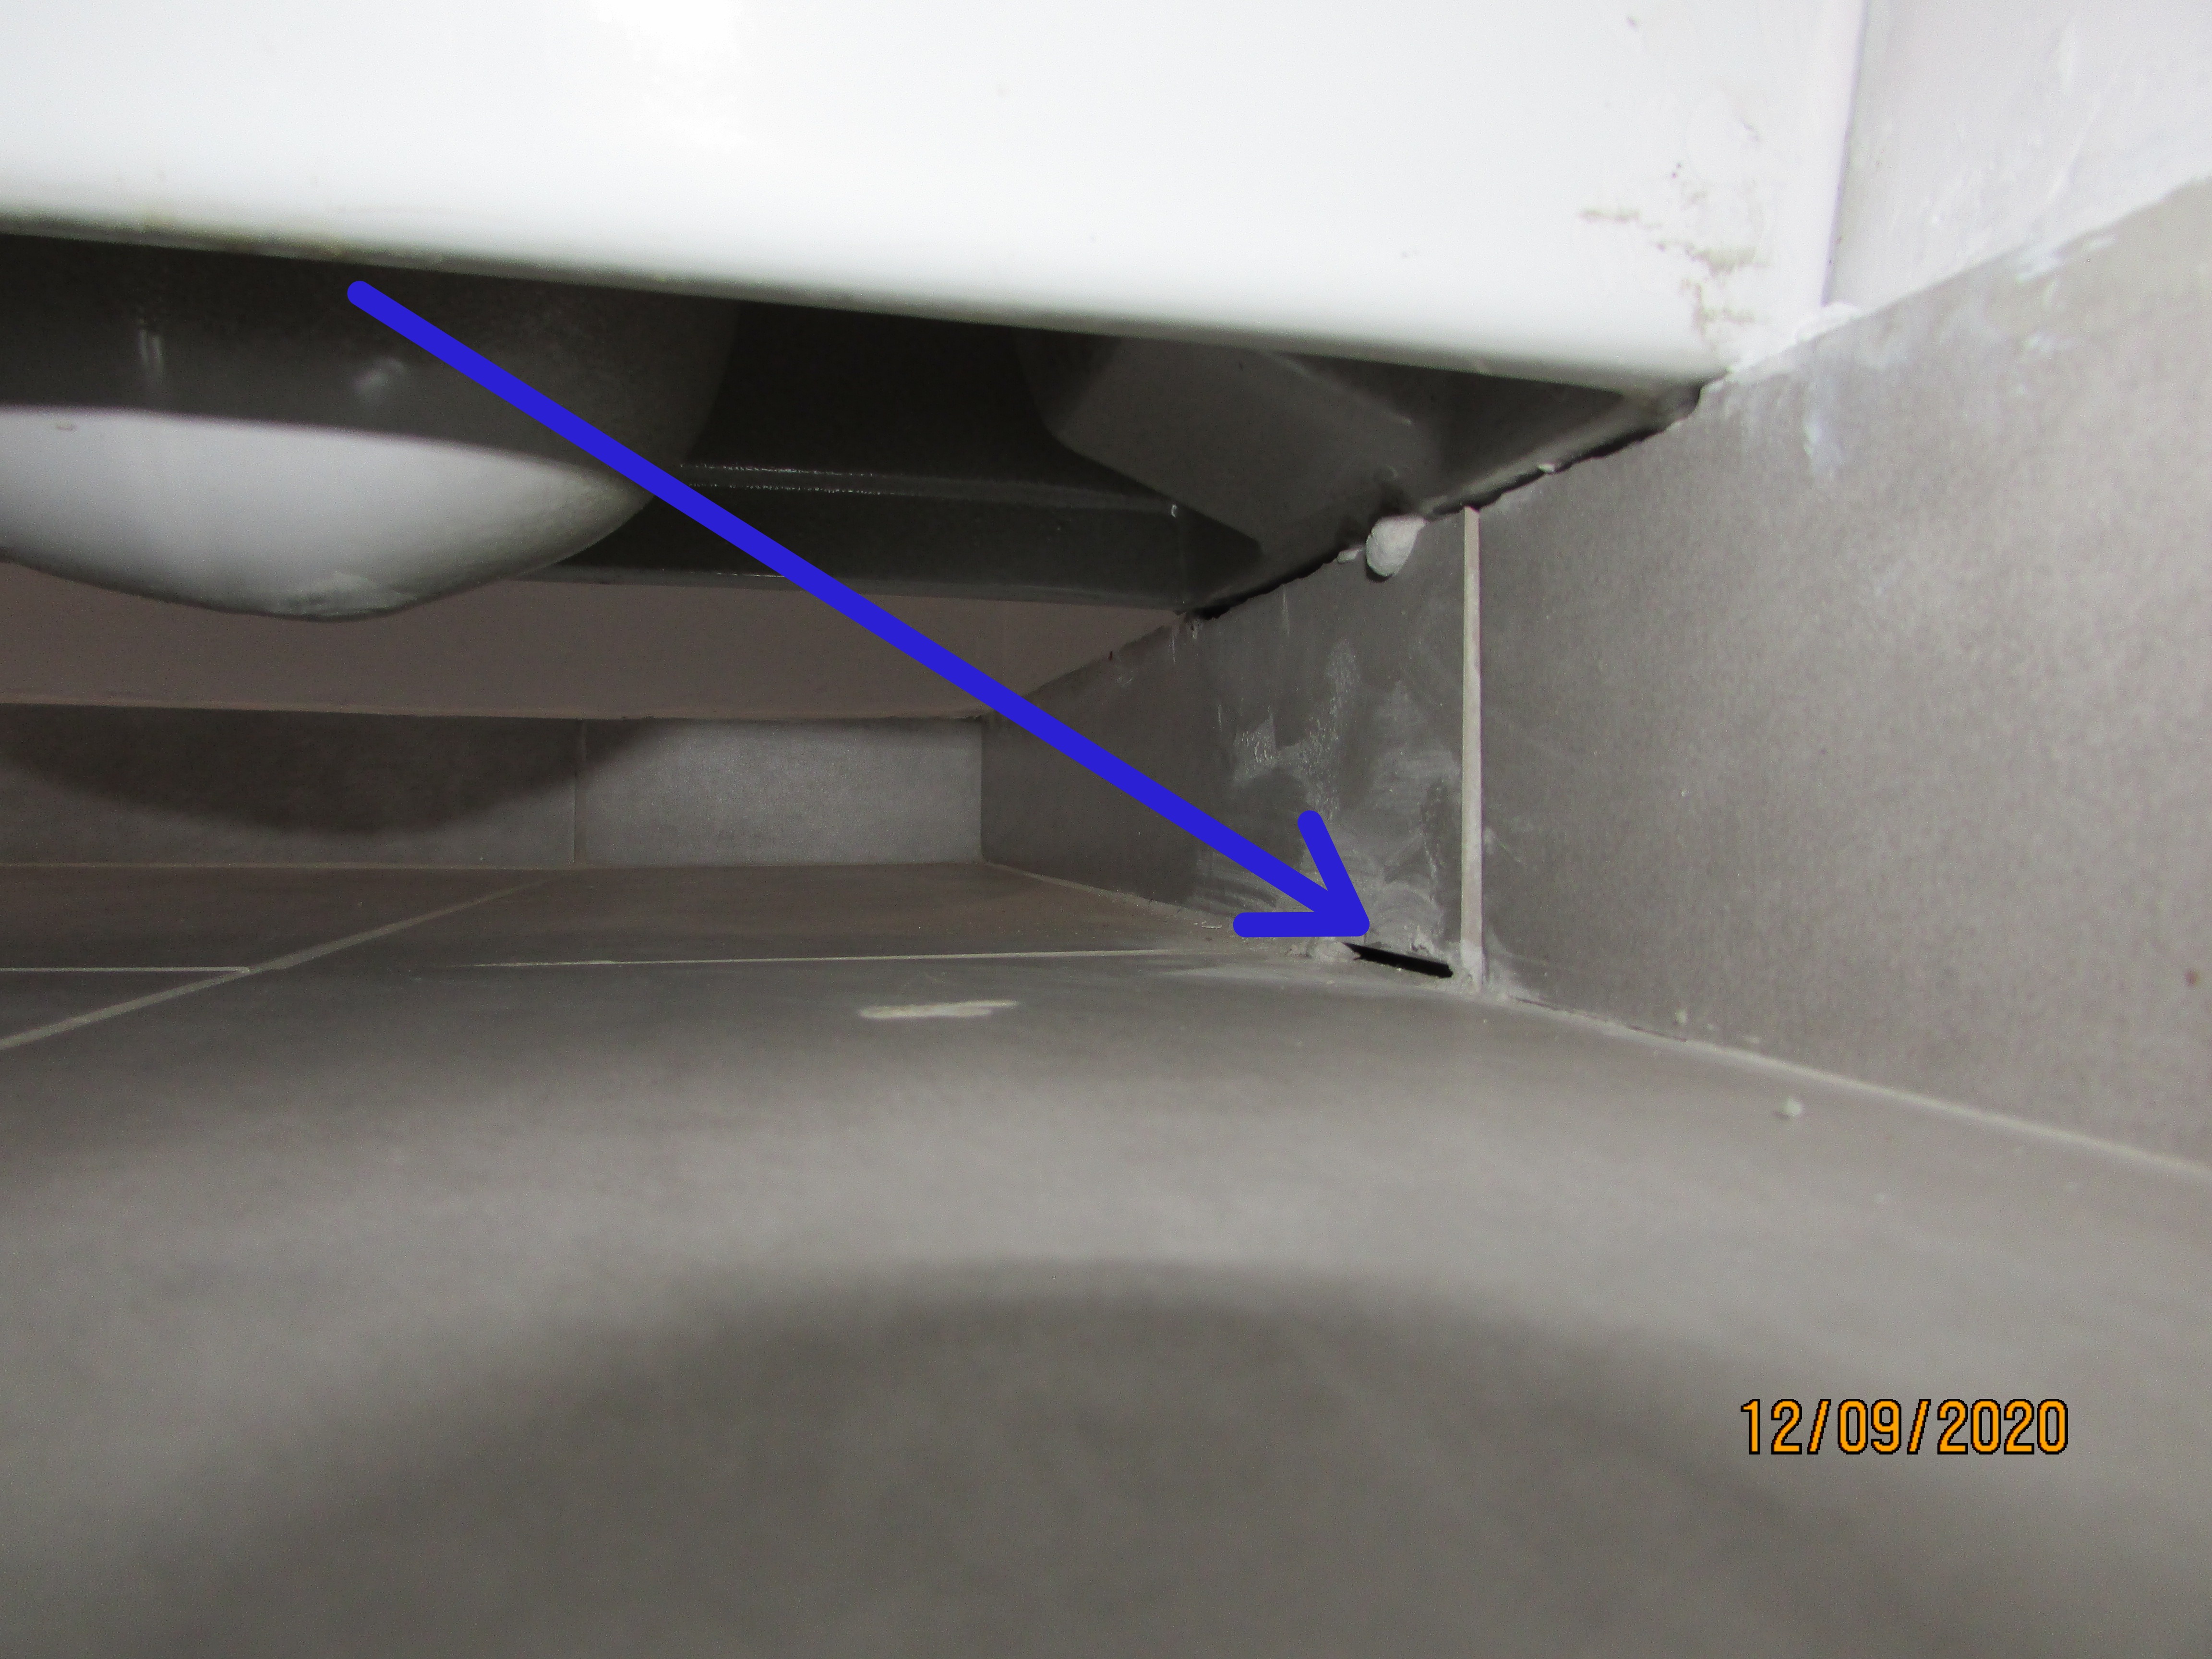 |
Bath and Shower
Shower: Tested
The shower mixer tap, shower heads and drain appeared functional. The shower was allowed to run and allowed to drain. No leaking was noticeable at the time of the inspection.
The shower surround appeared to be watertight and no leaking was observed at the time of the inspection.
The shower mixer valve cover will need to be sealed at cover and tiles or sealed at the supply behind the cover to help prevent moisture intrusion behind the cover and into the wall.
Bathroom Ventilation
Type: Operable window
Bathroom ventilation is important to prevent mould from forming. Moisture and condensation collects on the ceilings and walls from the lack of sufficient ventilation in bathrooms, creating an ideal situation for the formation of mould. I suggest that the door and windows be left open to provide through ventilation to disperse the steam and condensation resulting after showering.
General Bathroom Condition
The bathroom was in a good condition with some minor defects that will require attention.
Bedroom 2 En-suite Bathroom
Basins and Cabinets
Basins: Tested
Cabinet: Checked
The basin, mixer tap and drain points were functional. The basin was filled and allowed to drain. No leaks were observed.
The basin shelves and counter was in a good except where addition items or problems are specifically listed.
The wall behind the bathroom basin was not adequately sealed to the counter top or the wall and could allow water to get behind the counter top. Moisture damage may result in the cabinet below. Seal with silicon.
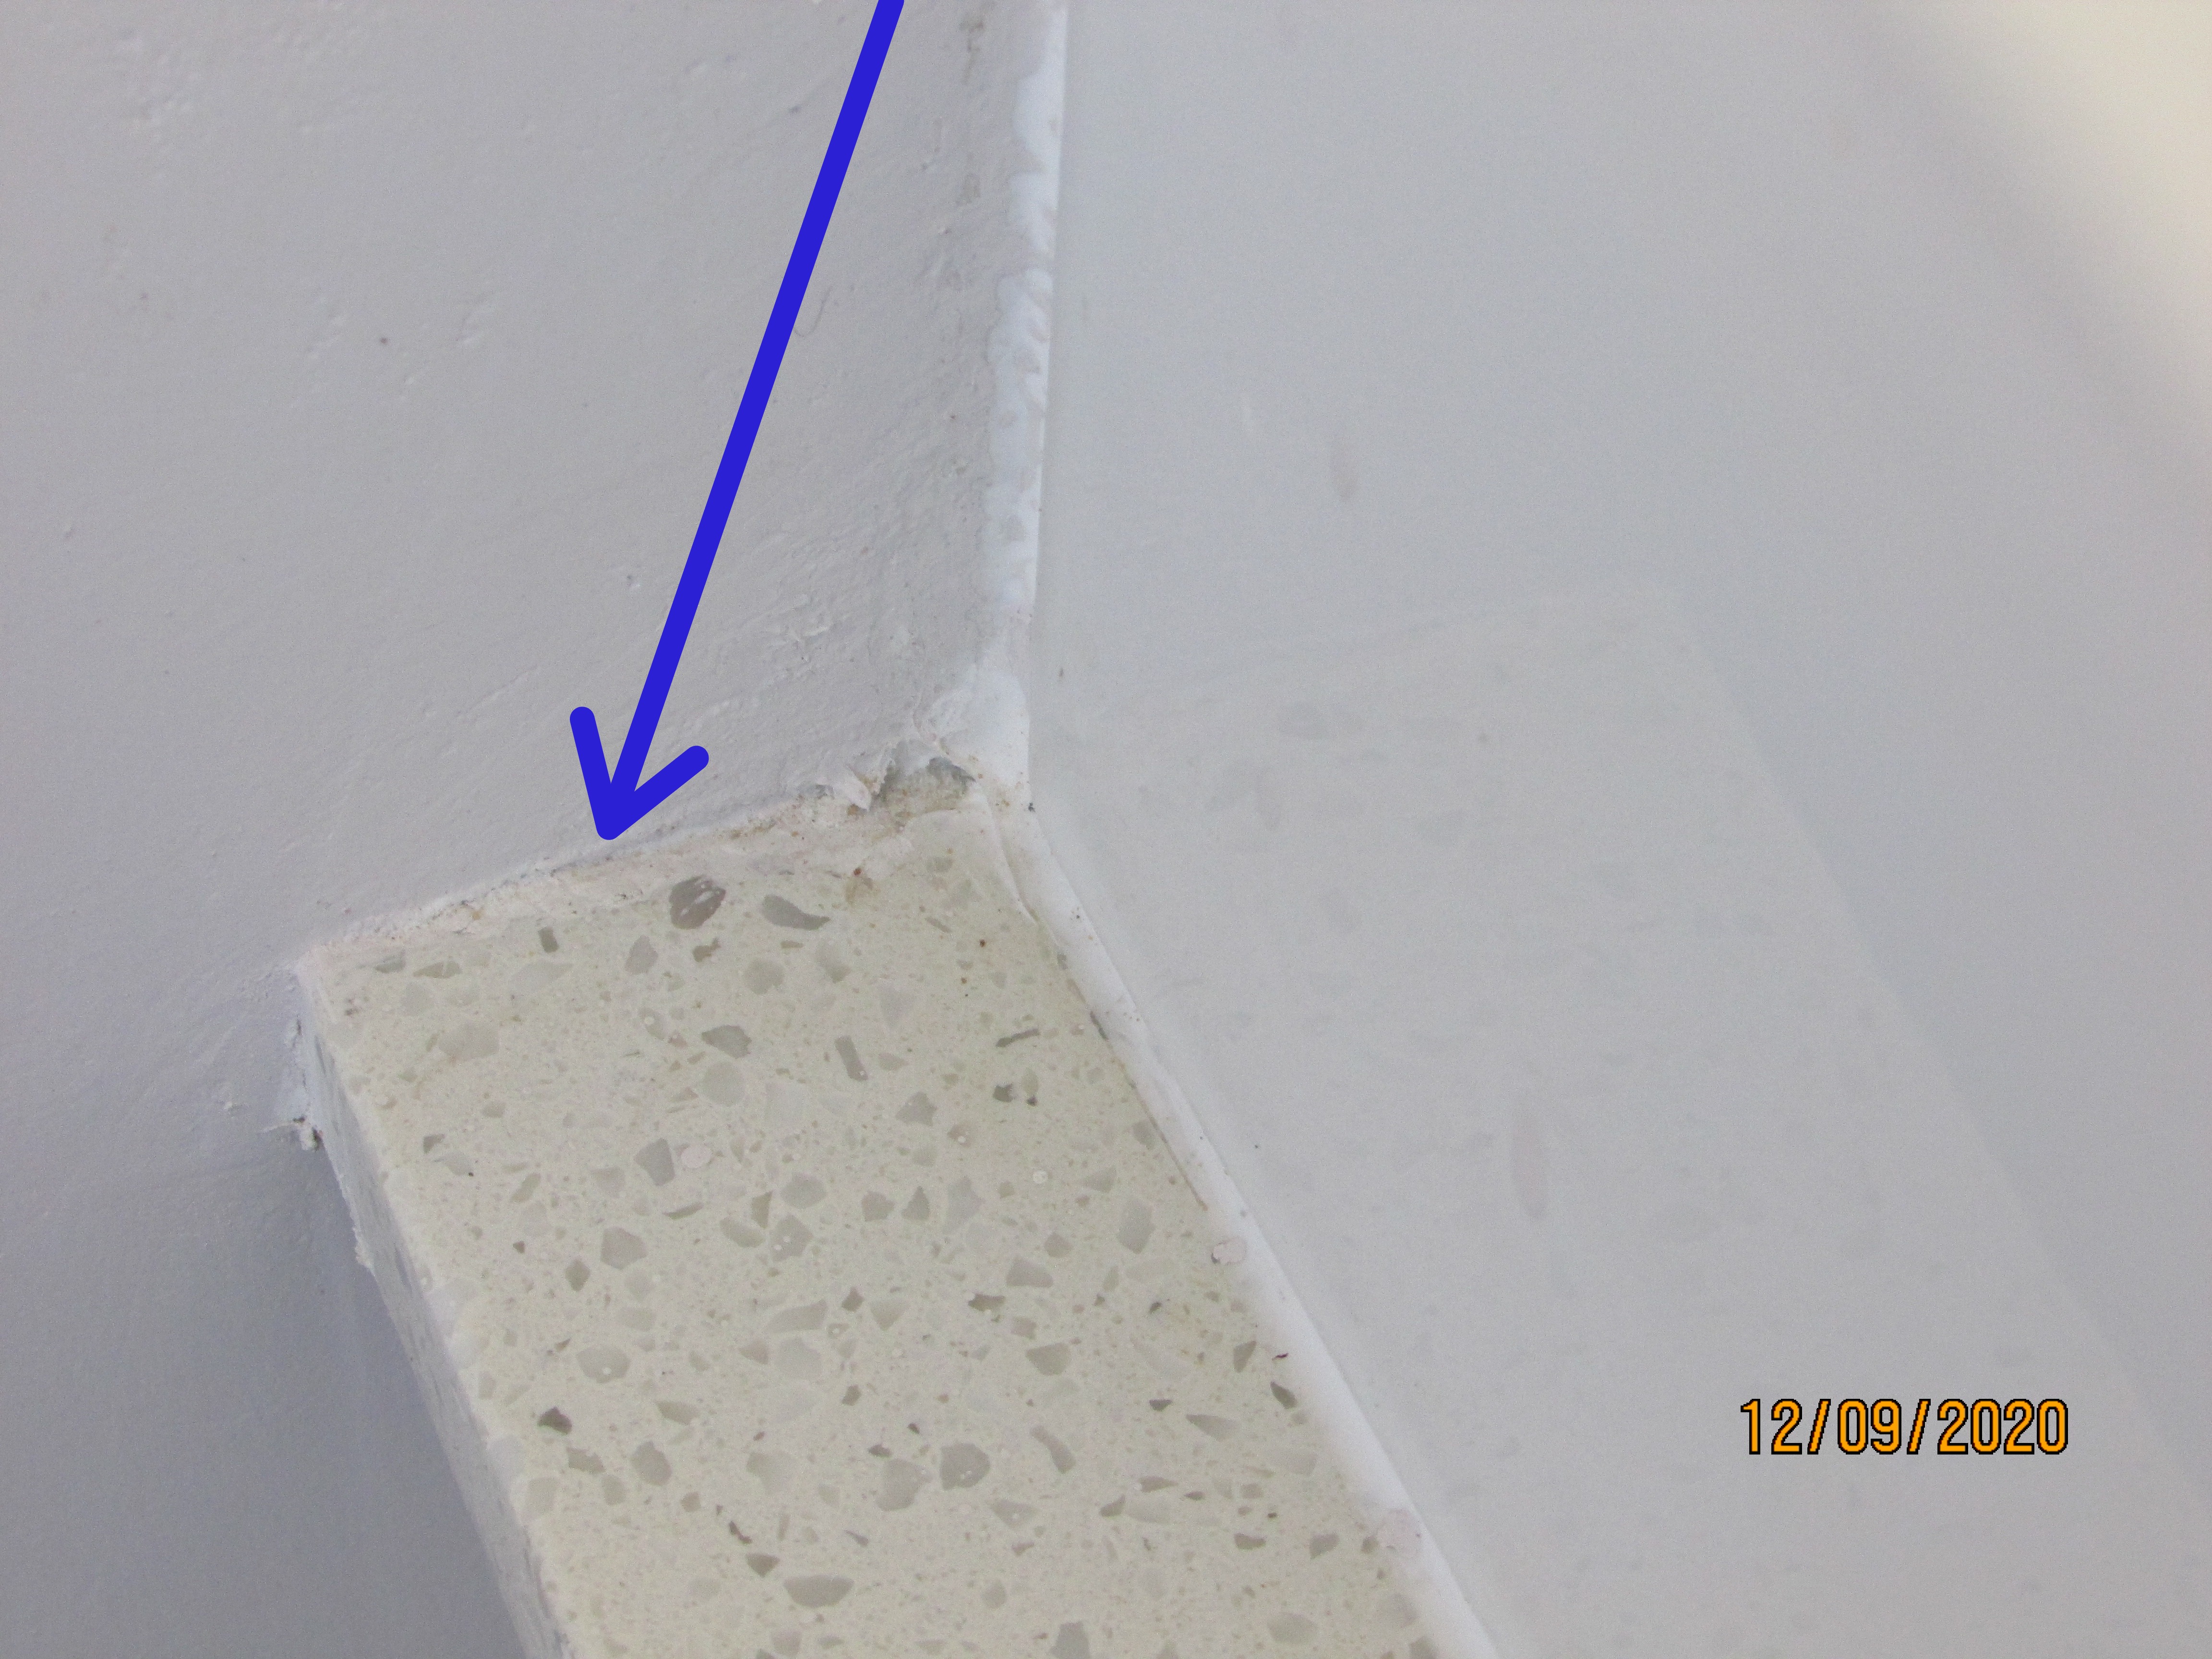 |
Toilet
Toilet: Tested
Toilet Seat: Checked
The toilet was functional and responded properly when flushed. No leaks were observed.
Cleaning off of grout was required under one side of the toilet tiling.
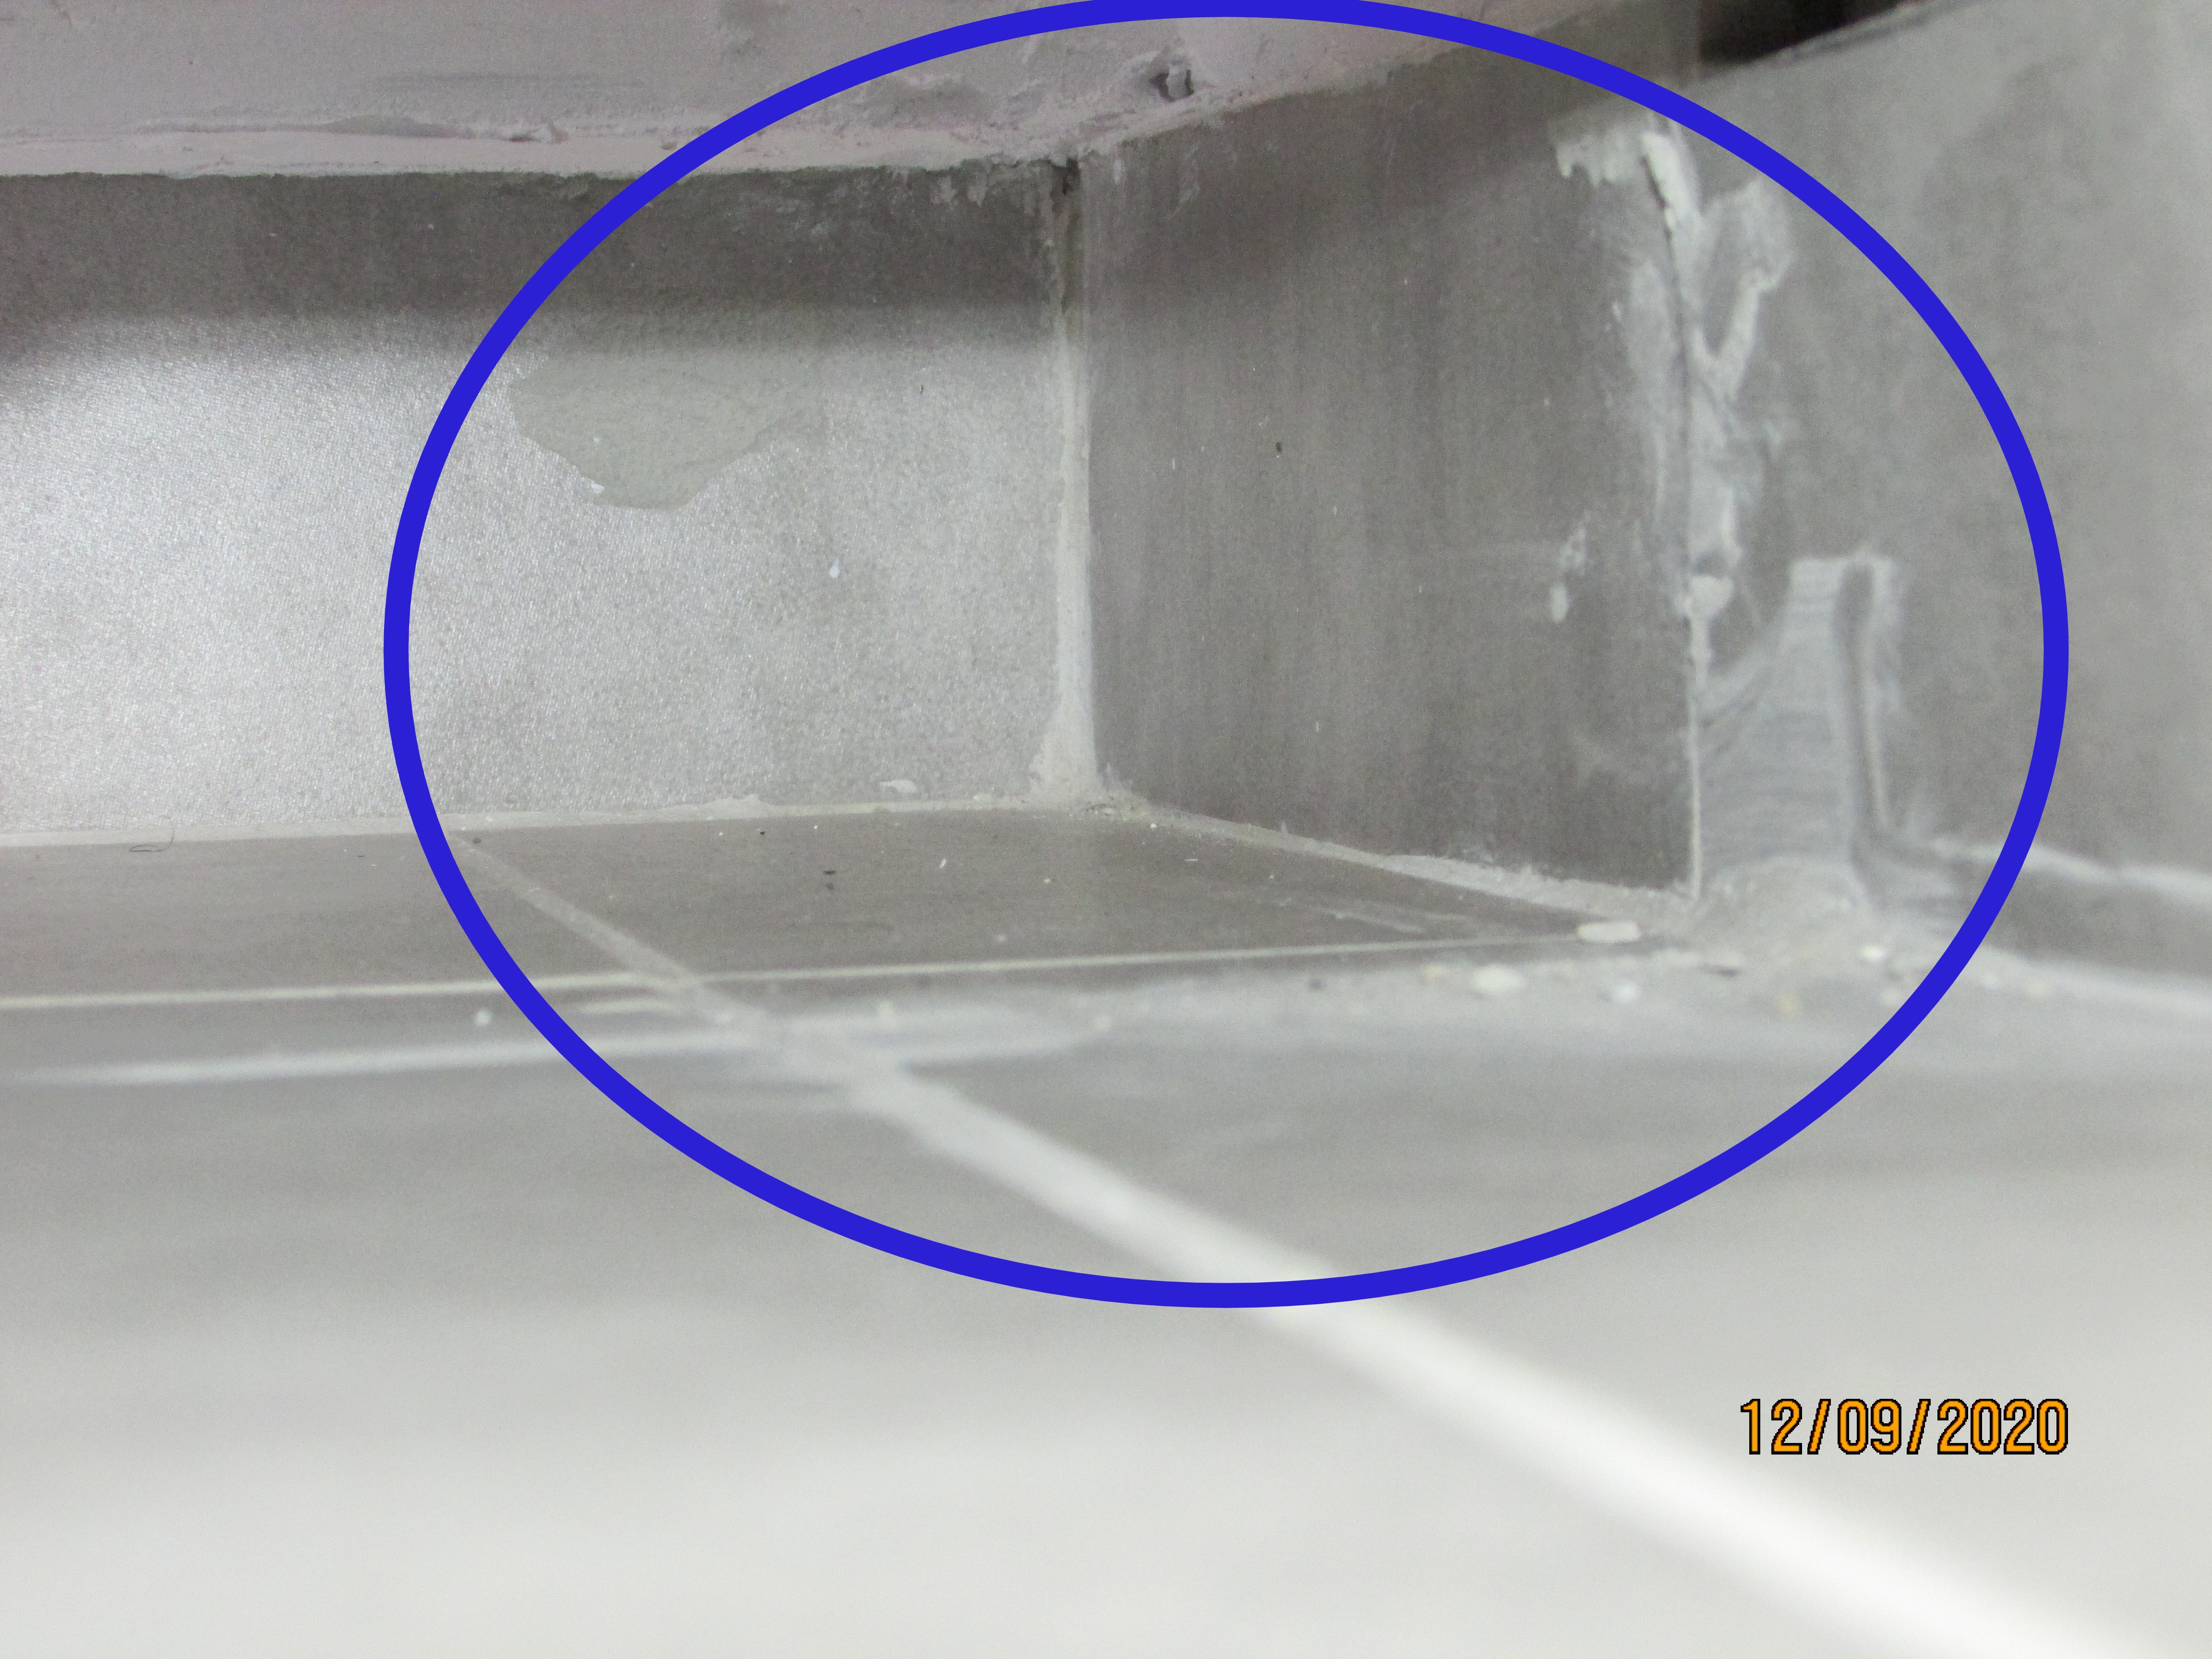 |
Bath and Shower
Bath: Tested
The bath, mixer tap and pop-up drain plug and drain were functional. The bath was filled and allowed to drain. No leaking was noticeable at the time of the inspection.
A the time of the inspection the shower wand and pipe were detached from the water supply and could not be tested.
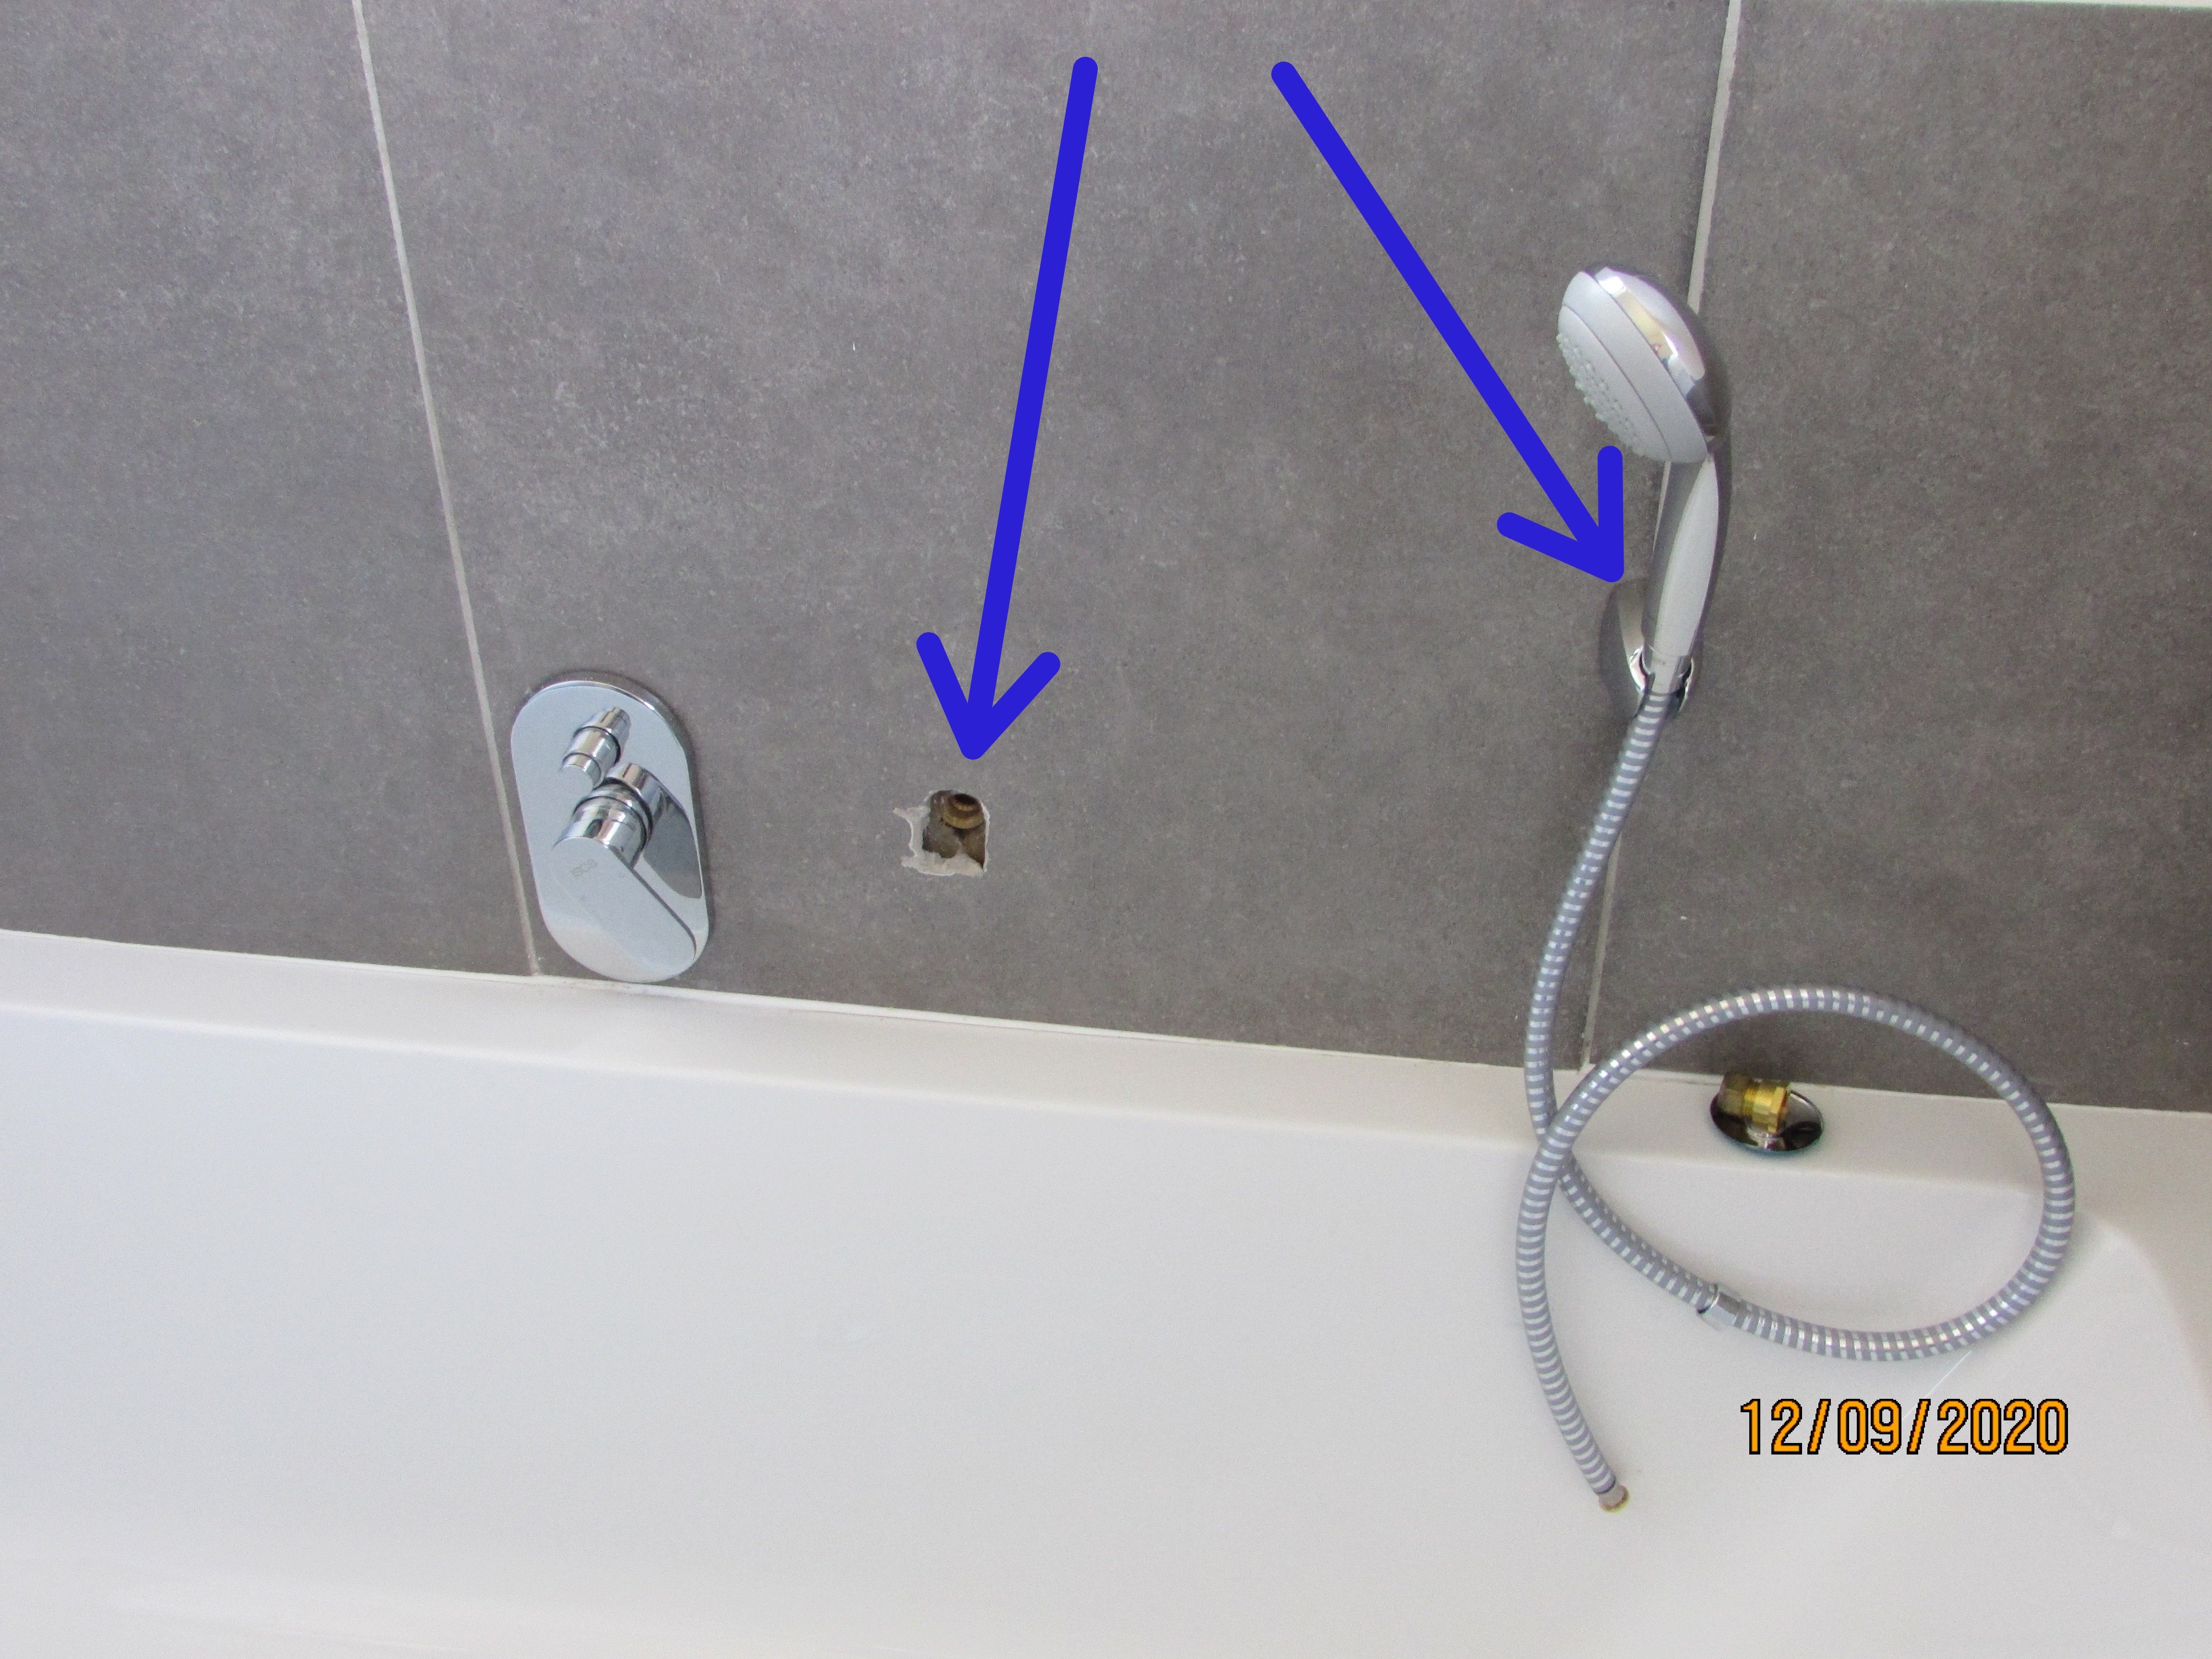 |
The bath mixer and bath wand valve cover will need to be sealed at cover and tiles or sealed at the supply behind the covers to help prevent moisture intrusion behind the covers and into the walls.
Bathroom Ventilation
Type: Operable window
Bathroom ventilation is important to prevent mould from forming. Moisture and condensation collects on the ceilings and walls from the lack of sufficient ventilation in bathrooms, creating an ideal situation for the formation of mould. I suggest that the door and windows be left open to provide through ventilation to disperse the steam and condensation resulting after showering.
General Bathroom Condition
The bathroom was in a good condition with some minor defects that will require attention.
Electrical
Electric Service Voltage Tested
Service Voltage: 220
Electric Service
Service Entrance: Below Ground
Service Equipment
Main Panel Amperage: 60 amps
Main Electric Panel Location: Garage
The main electricity disconnect circuit breaker is located on the distribution board.
.JPG) |
There were uncovered knockouts or openings in the cover of the main electrical panel that exposes those who have access to the panel to shock hazards. These openings will need to be covered with approved panel block out covers. This is a safety issue.
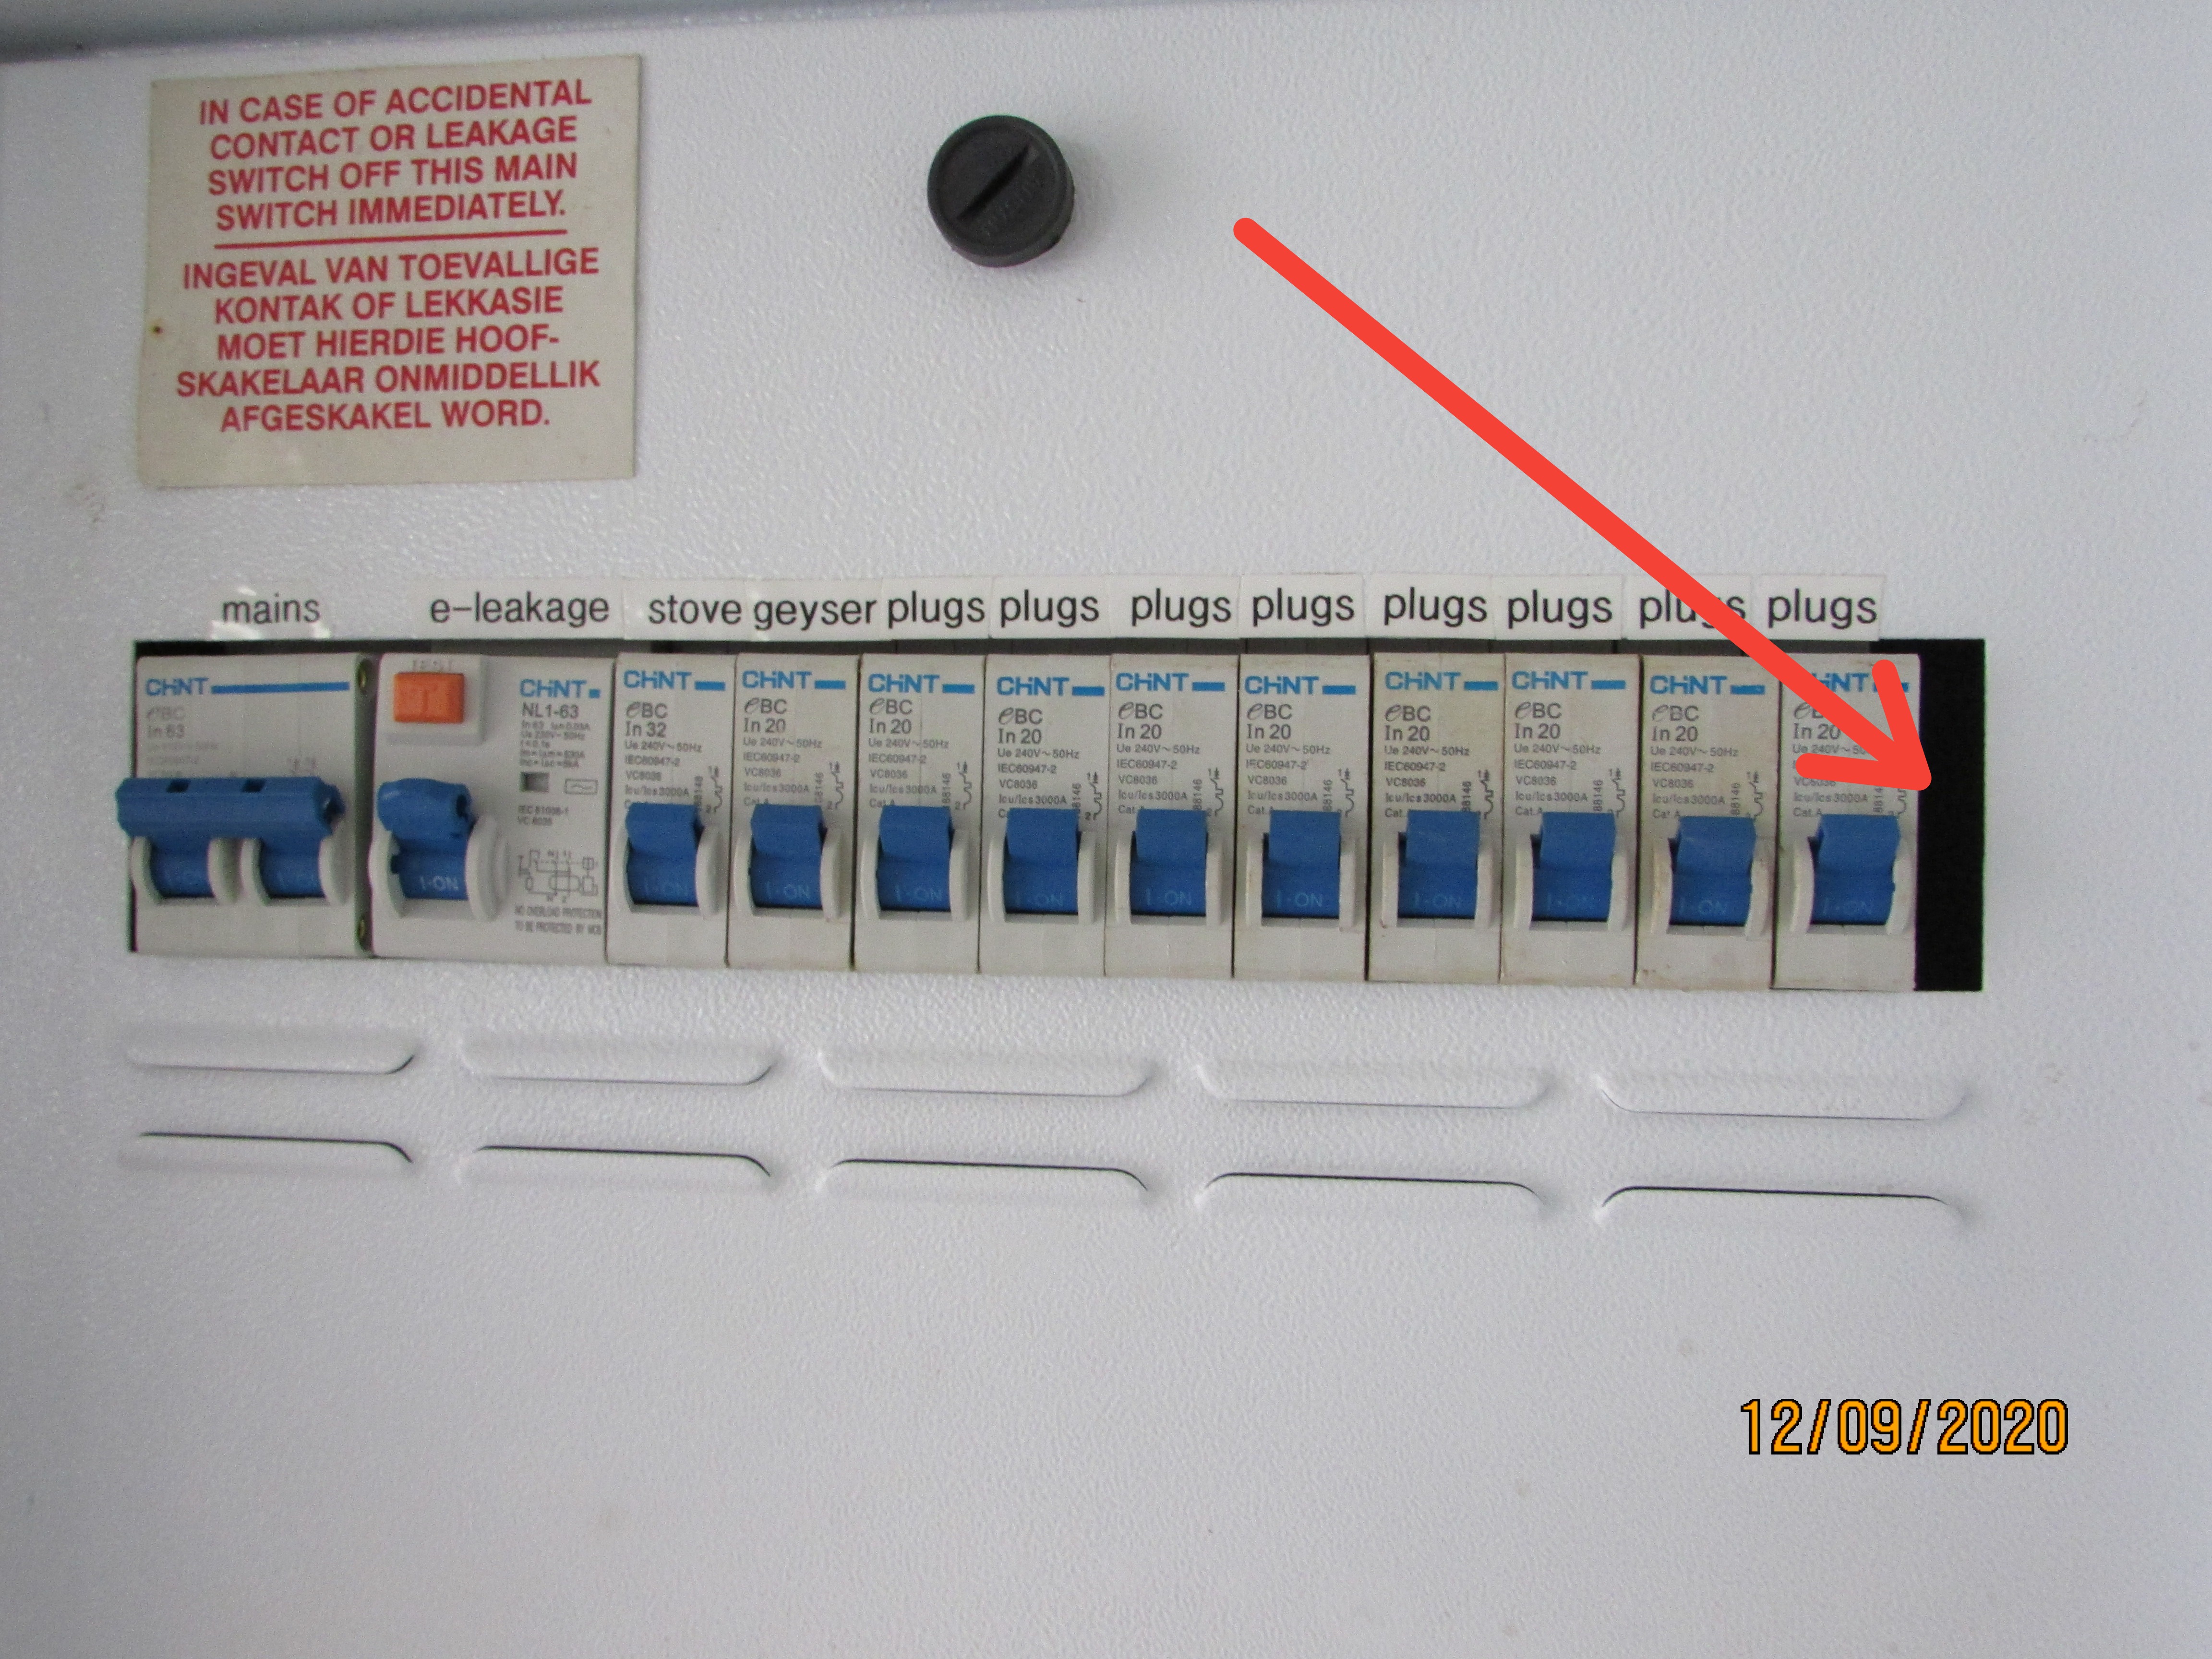 |
The exterior and interior covers of the main panel were functional.
Branch Wiring
Wire Material: Copper
Wiring Method: Non-metallic sheathed cable
The wiring in the roof spaces was mostly covered with insulation. Only parts of the wiring could be observed.
There was an open electrical junction box in the roof space at the ceiling that should be provided with a blank cover so that any arcing or sparking would be contained within the box, and to help keep pests and moisture out. No bushes were fitted through which the wires should enter the box to protect the wiring against damage from sharp edges. The connection of the wiring in the box was suspect as well. I recommend the wiring system be properly checked in its entirety by a suitable registered and qualified electrician to ensure that the system is compliant.
 |
Lights, Switches, Plug points and Fixtures
Inspection Method: All accessible points tested
Electric Plug Points: Three wire receptacles
All tested interior and exterior light fixtures and switches of the residence were functional except where additional items are reported.
An earth leakage circuit breaker (ELCB) socket tester was used to test plug points. All tested plug points were functional as far as the earthing, swapped phases and neutrals were concerned.
The line and level of light switches and plug points was generally poor. Some switches and covers were loose and needed to be fitted properly. A general check and repair of the plugs points and light switches was required.
- Switch cover out of plumb.
- Switch cover require refitting.
- Plug point and cover was loose and out of level.
- level and lining up of covers poor!
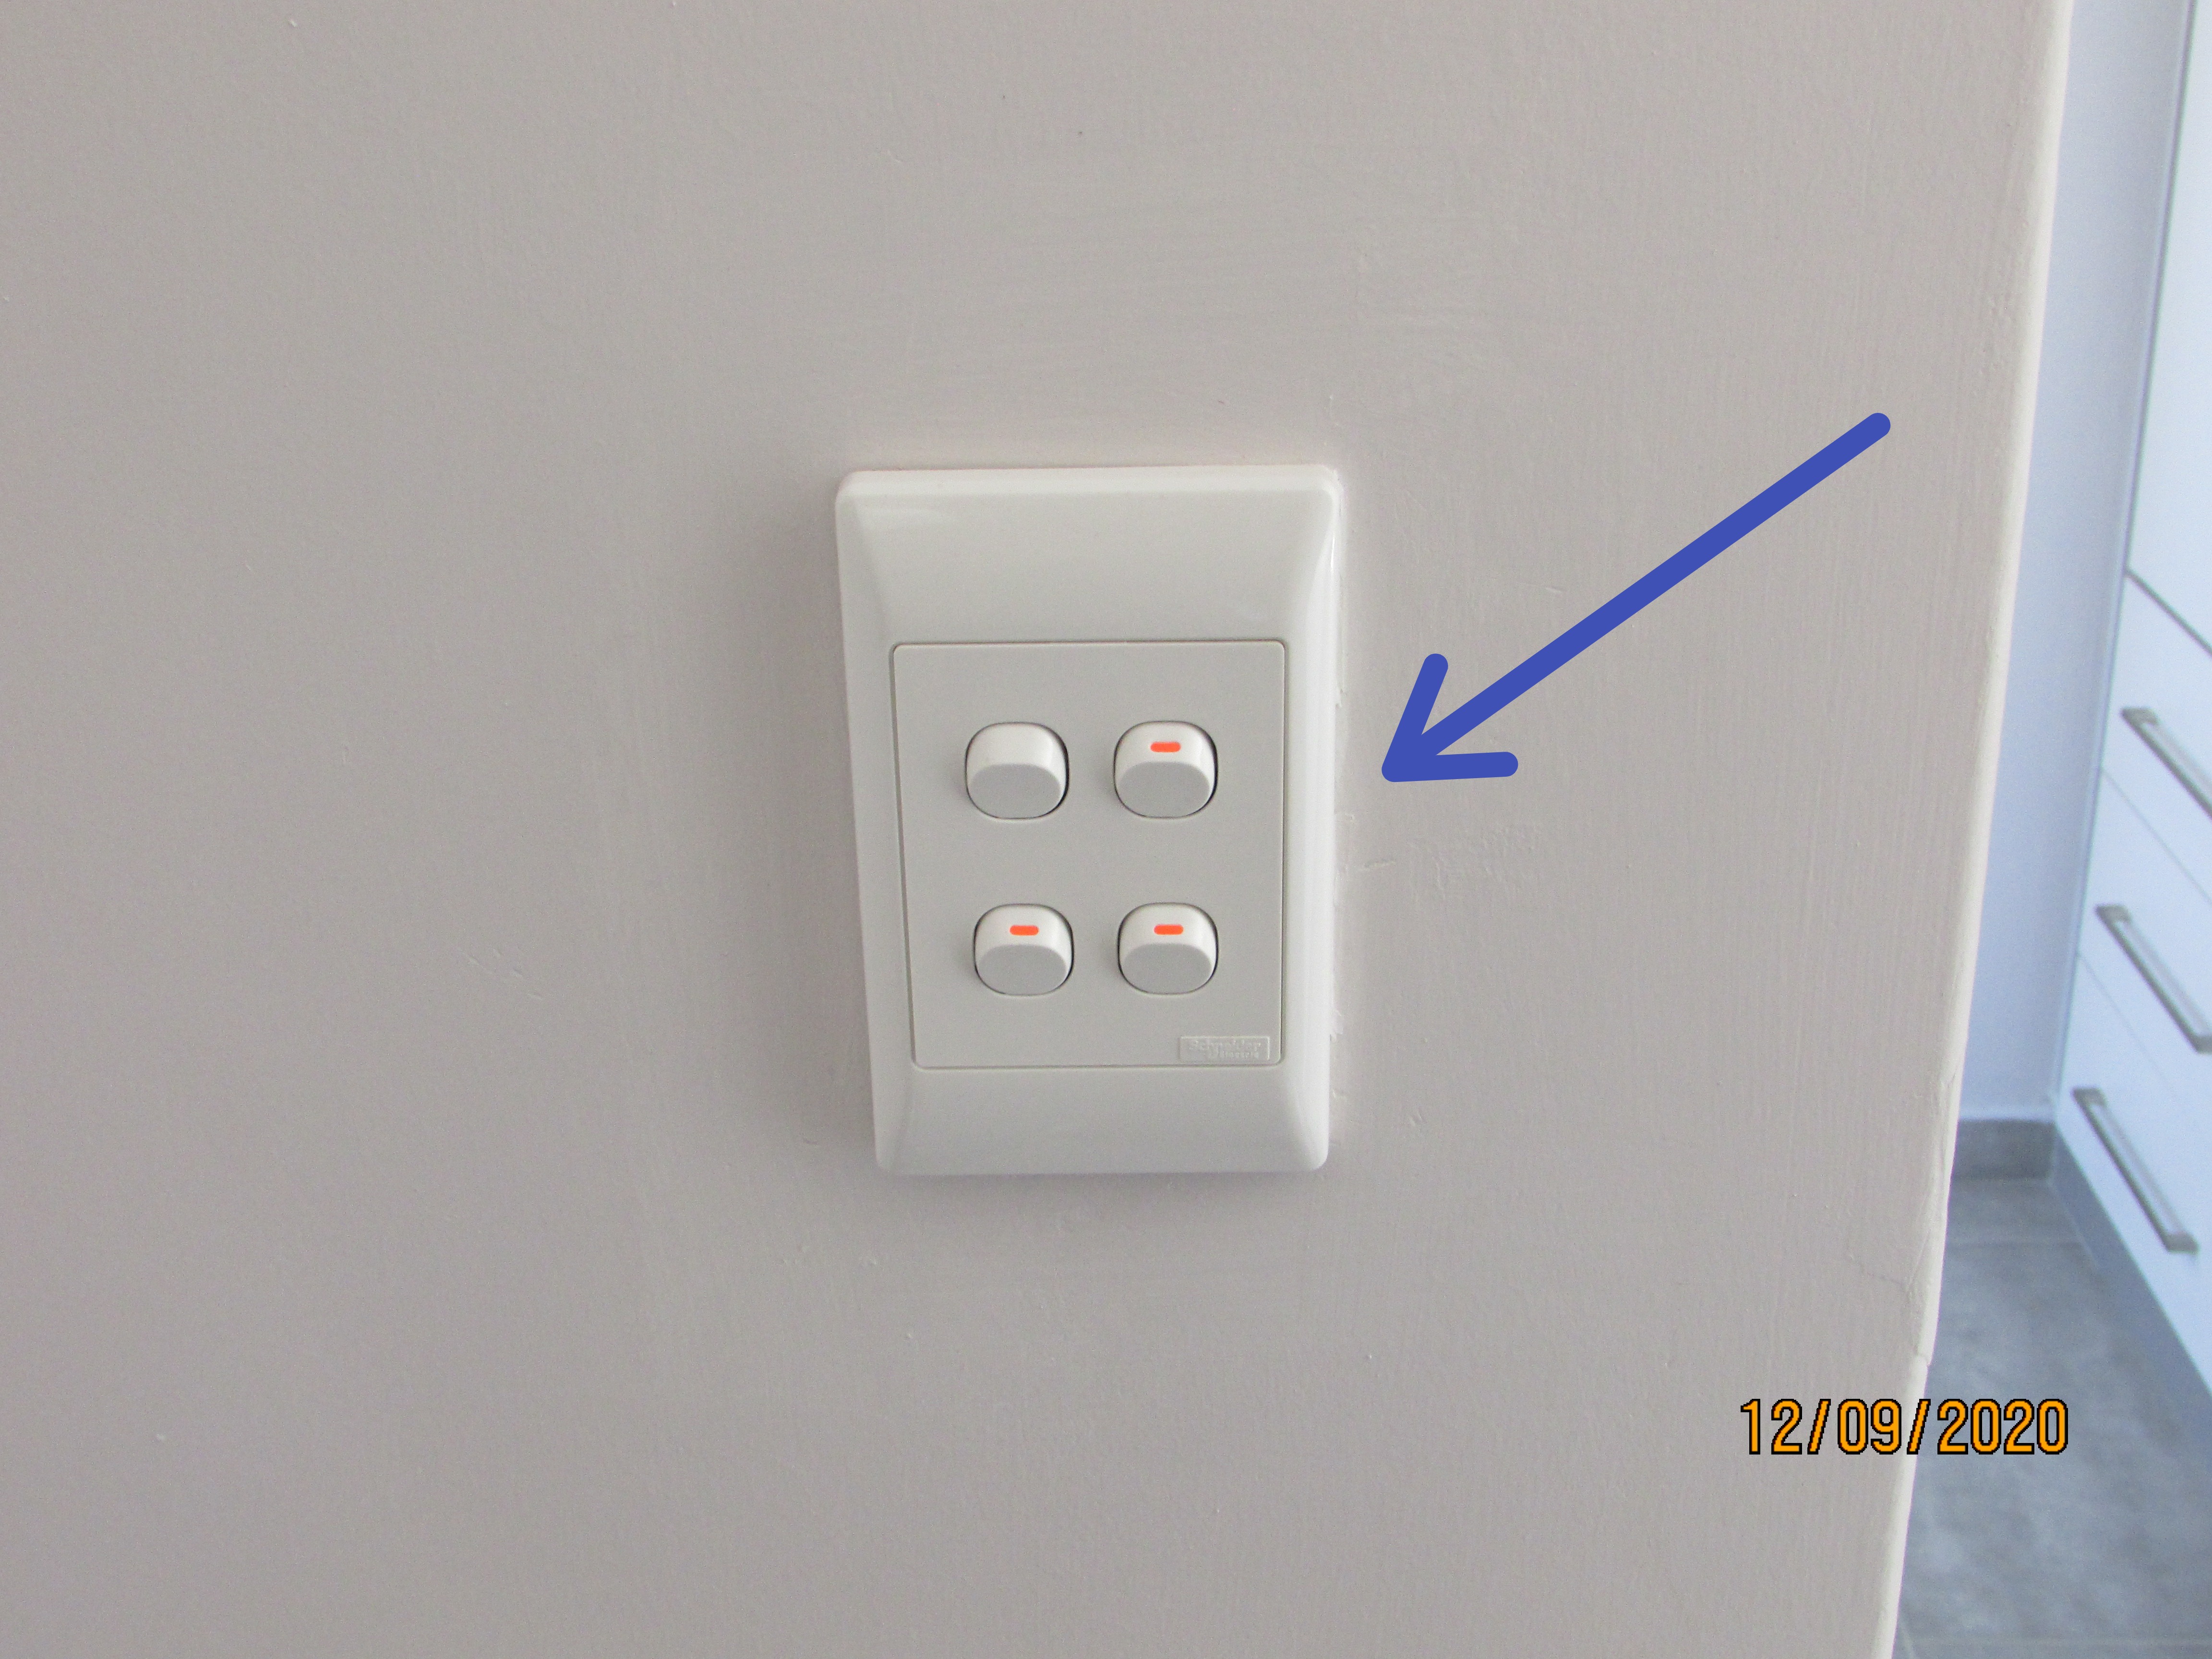
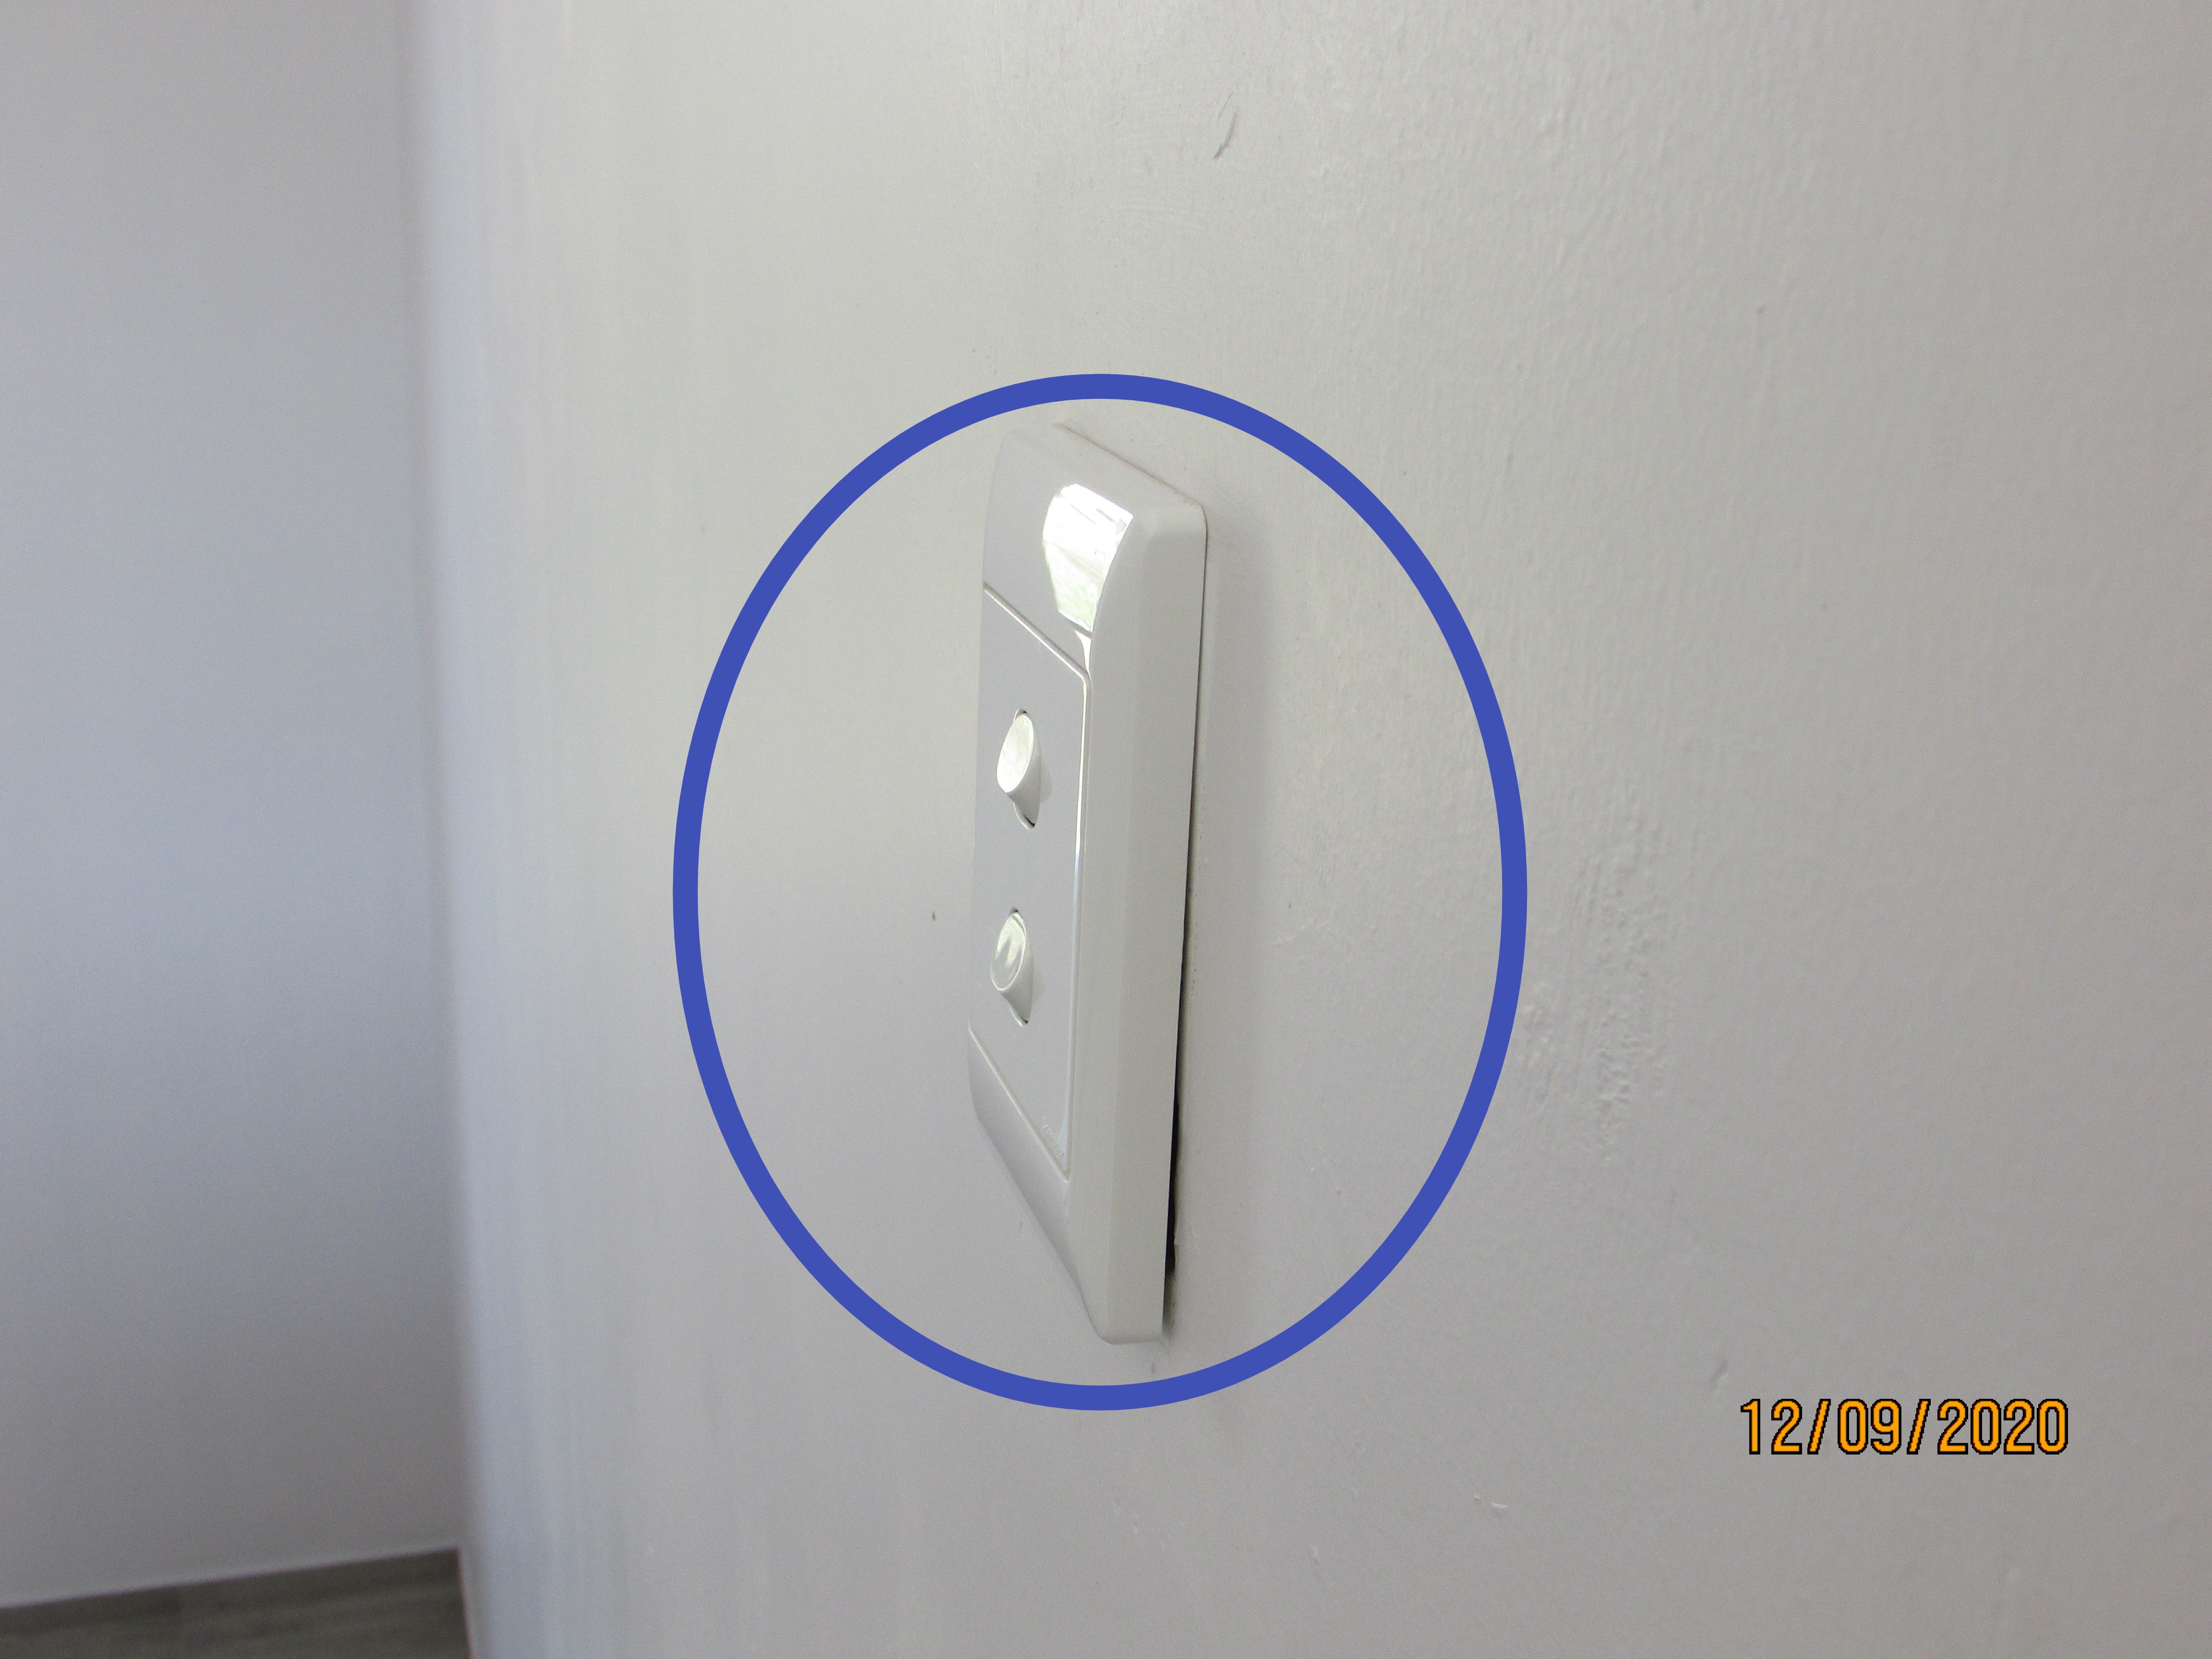
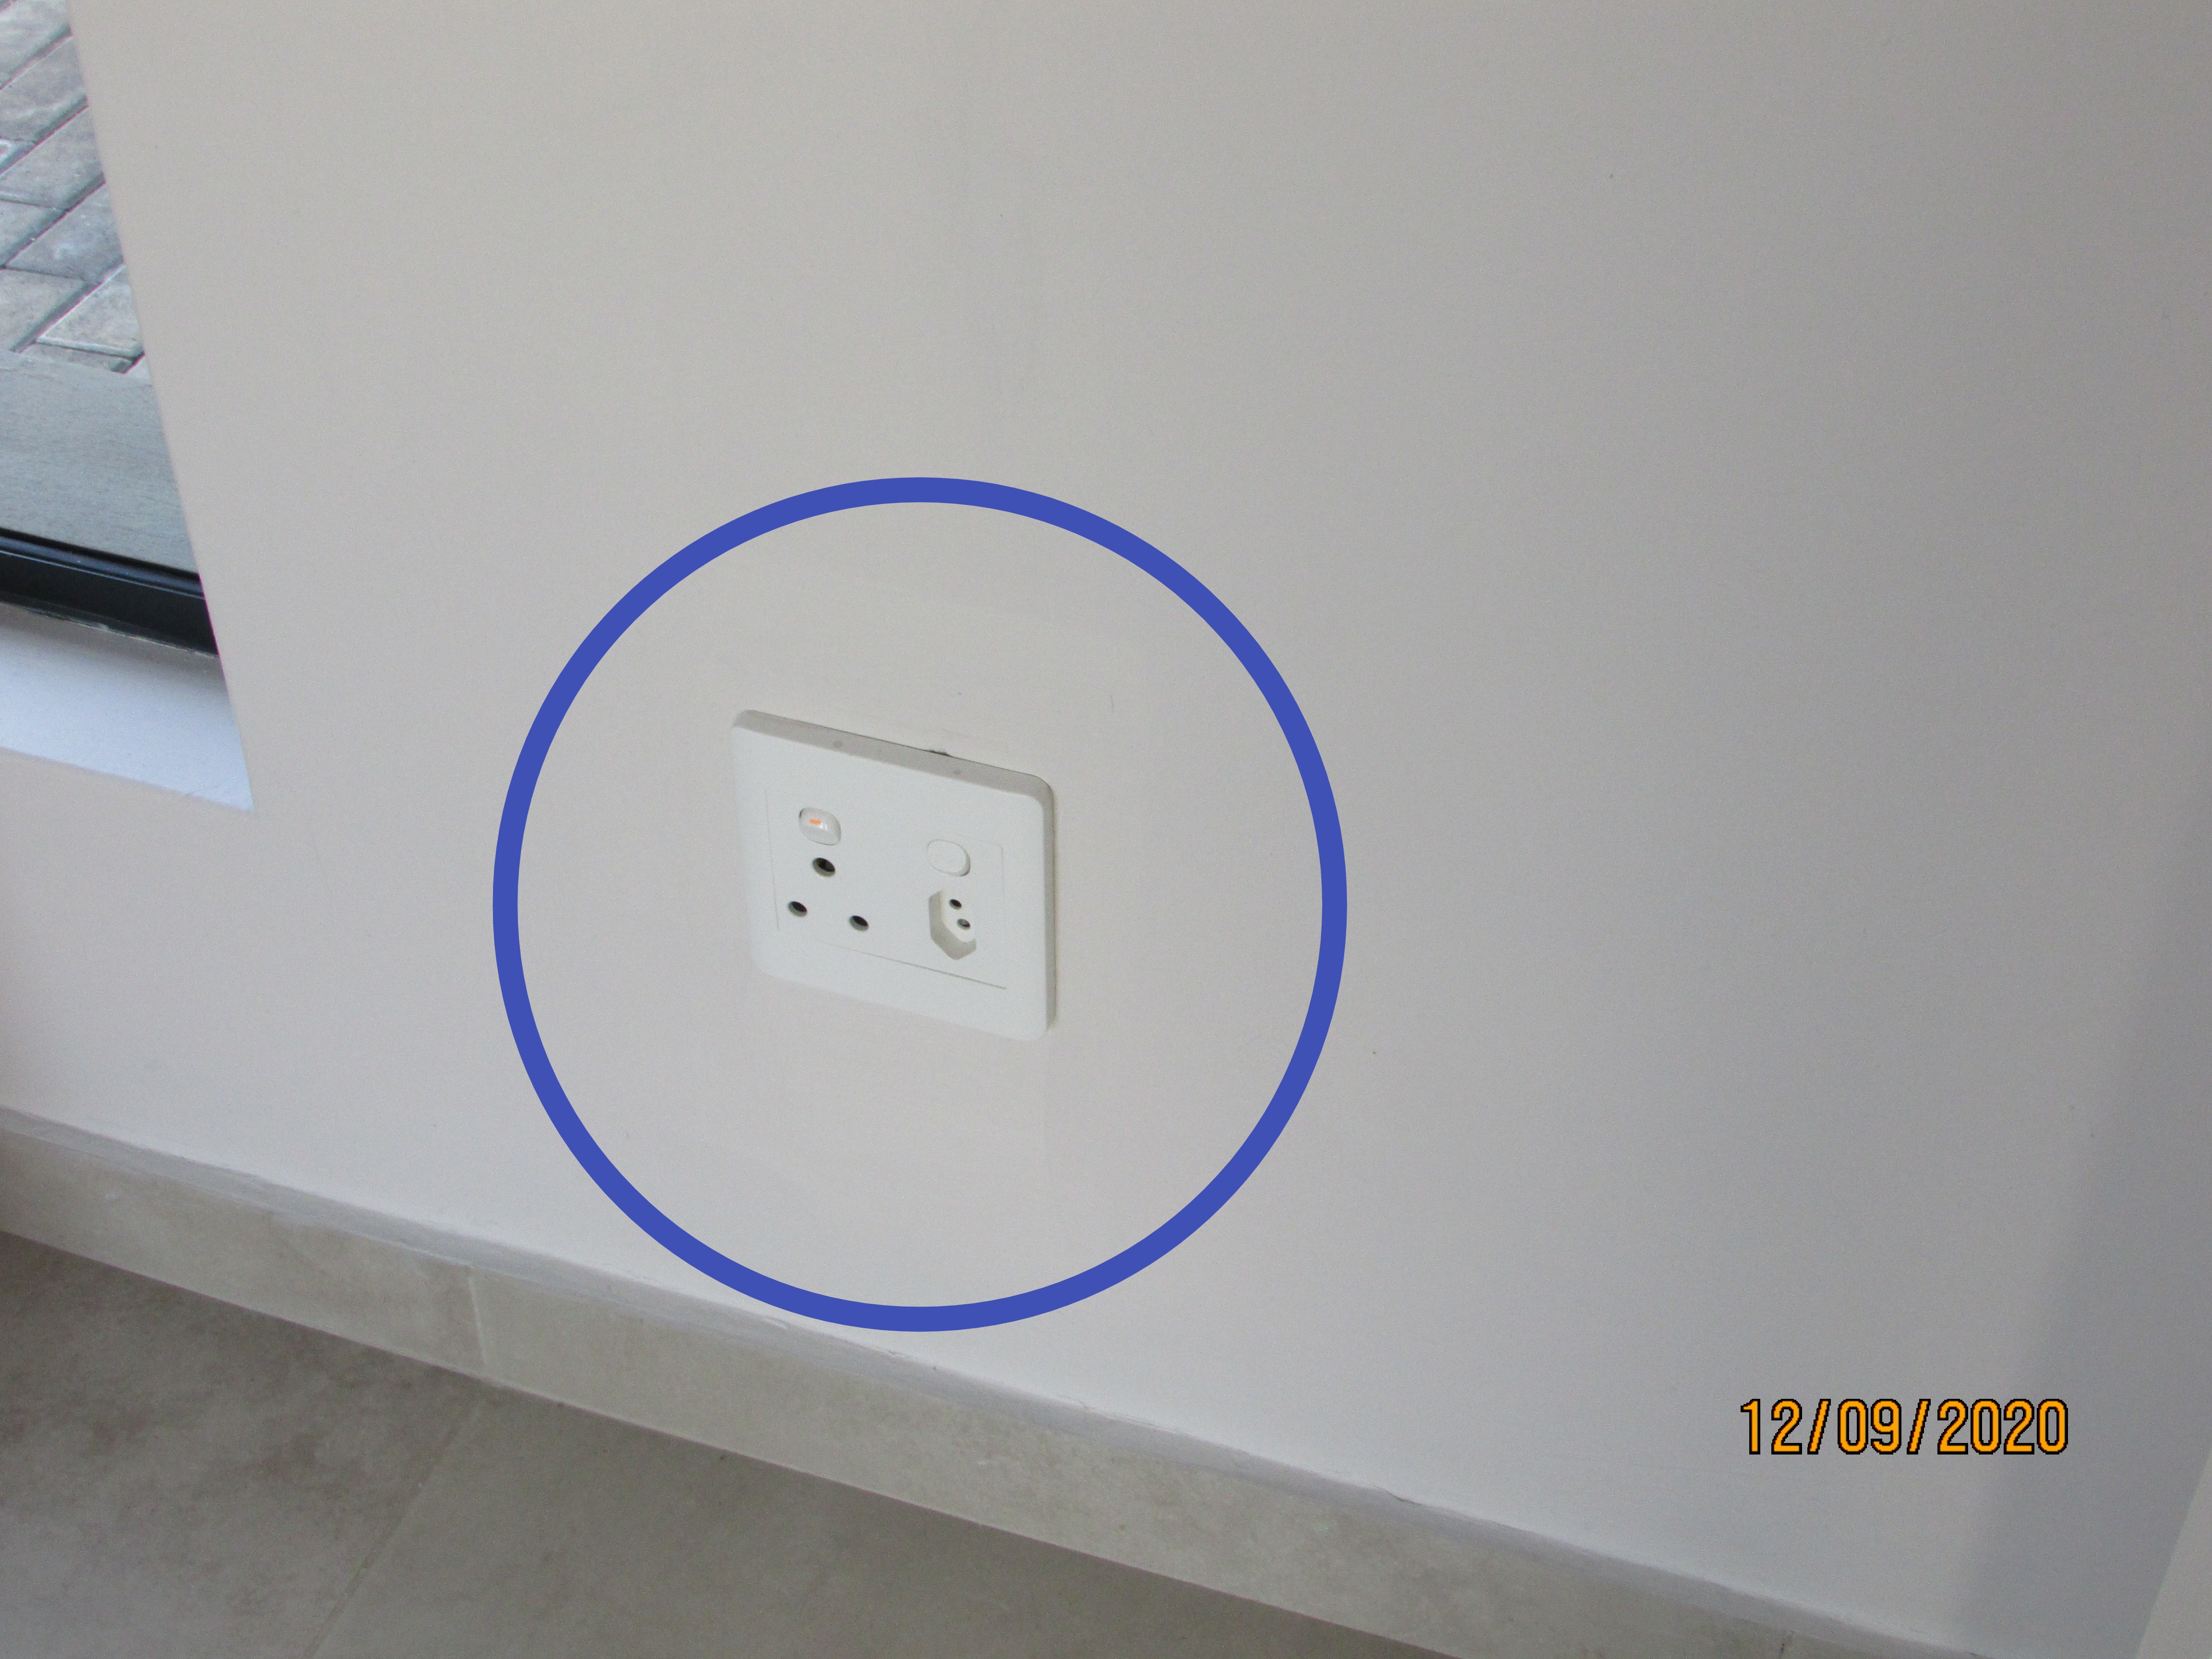

A loose ceiling light fixtures was noted in the 1st floor passage. Make sure these fixtures are well secured to prevent loose wires and physical damage. All the ceiling light fixtures in the hose required checking and correction by an appropriately qualified electrician.
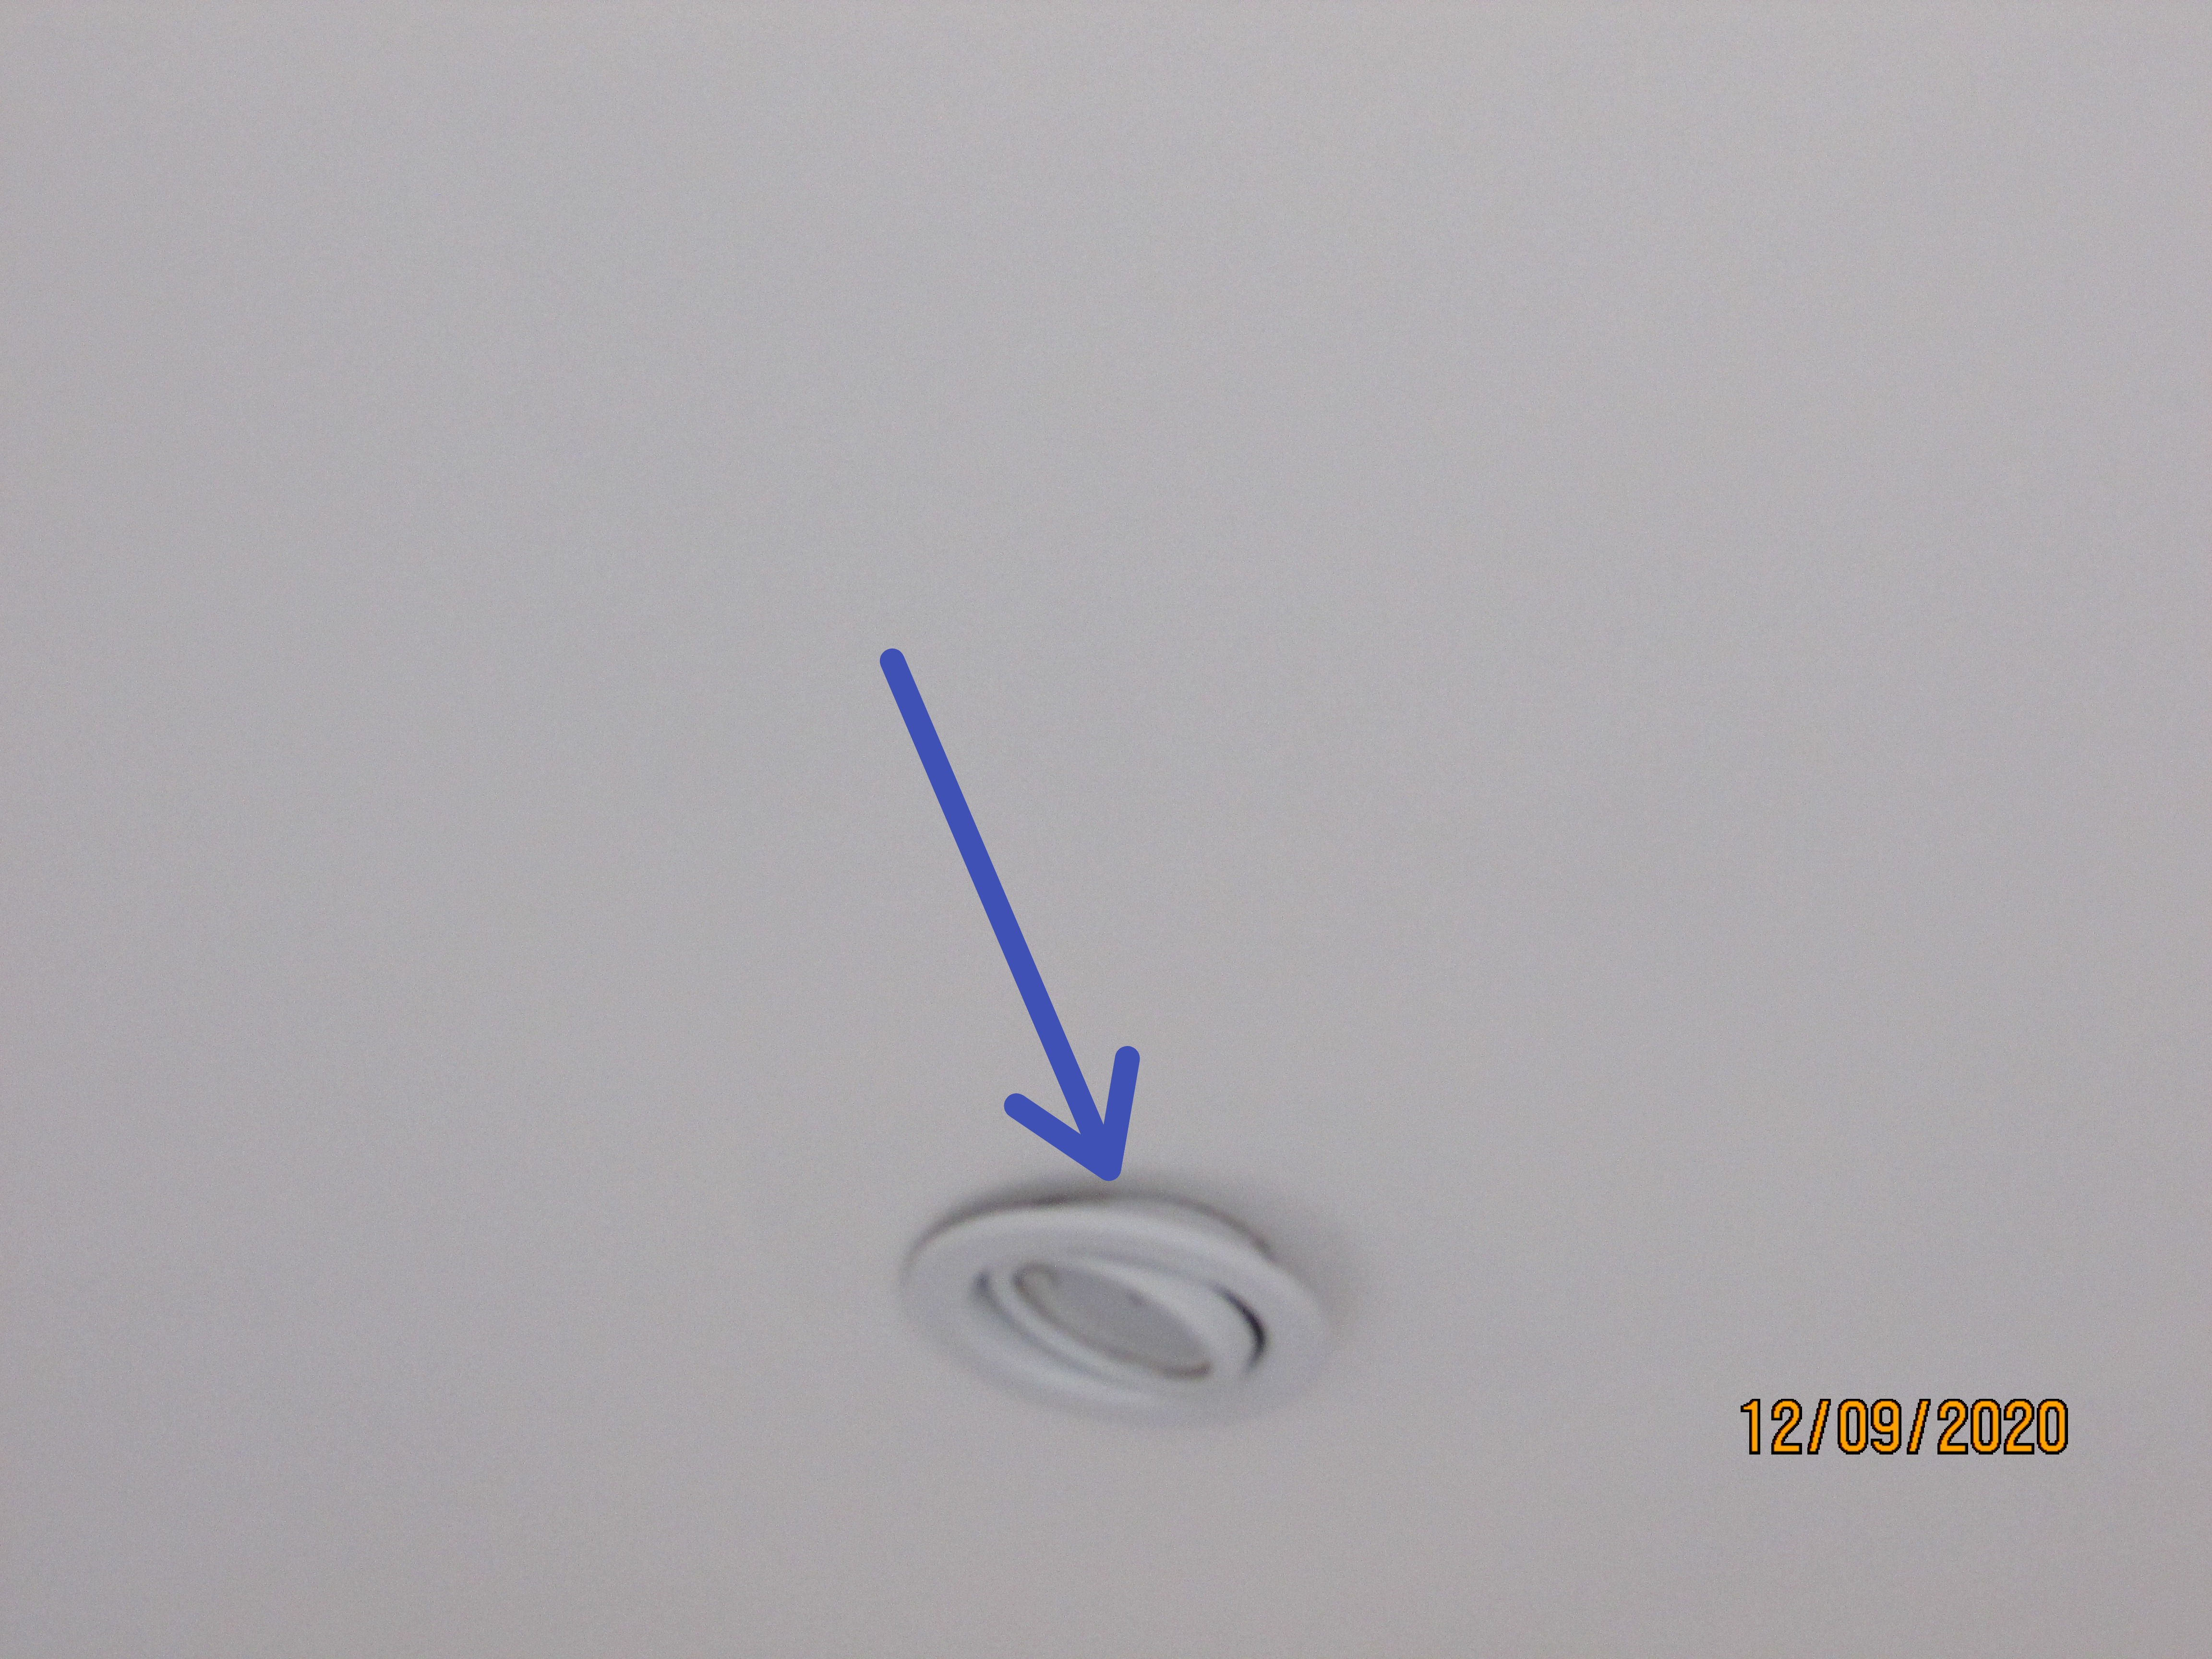 | 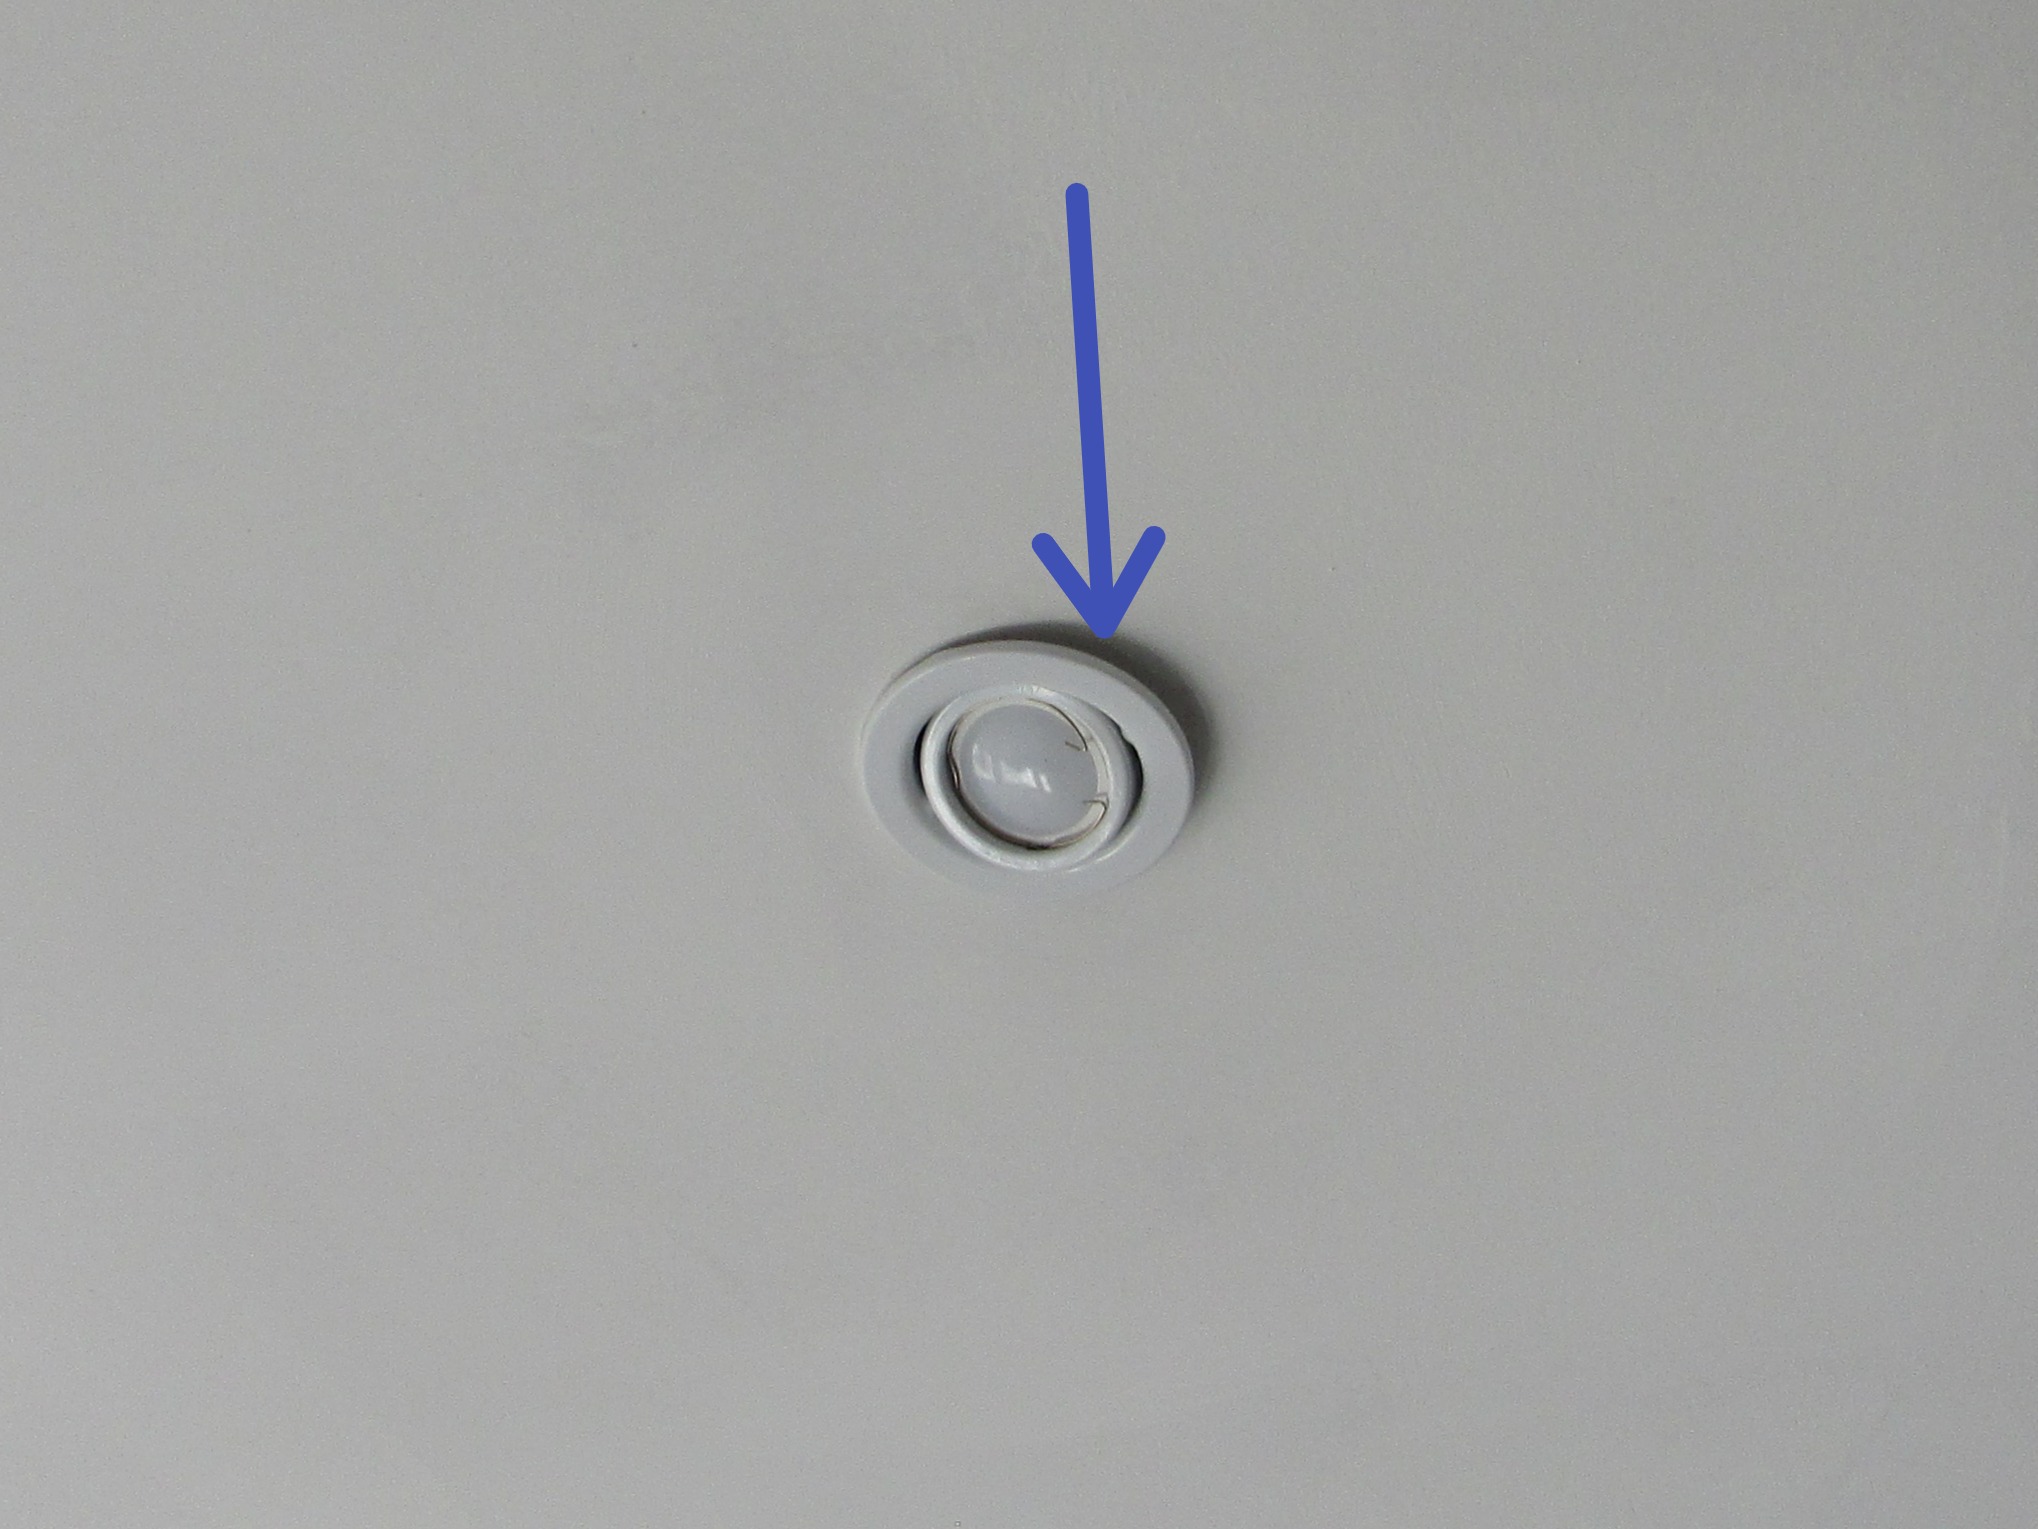 |
The earth leakage circuit breaker at the main panel responded to its test button. An earth leakage circuit breaker (ELCB) socket tester was used to trip the earth leakage circuit breaker. The breaker tripped at 30 mA as required.
Plumbing
Location of Main Water Shut Off
This shows the location of the main water shutoff located on the east side of the house.
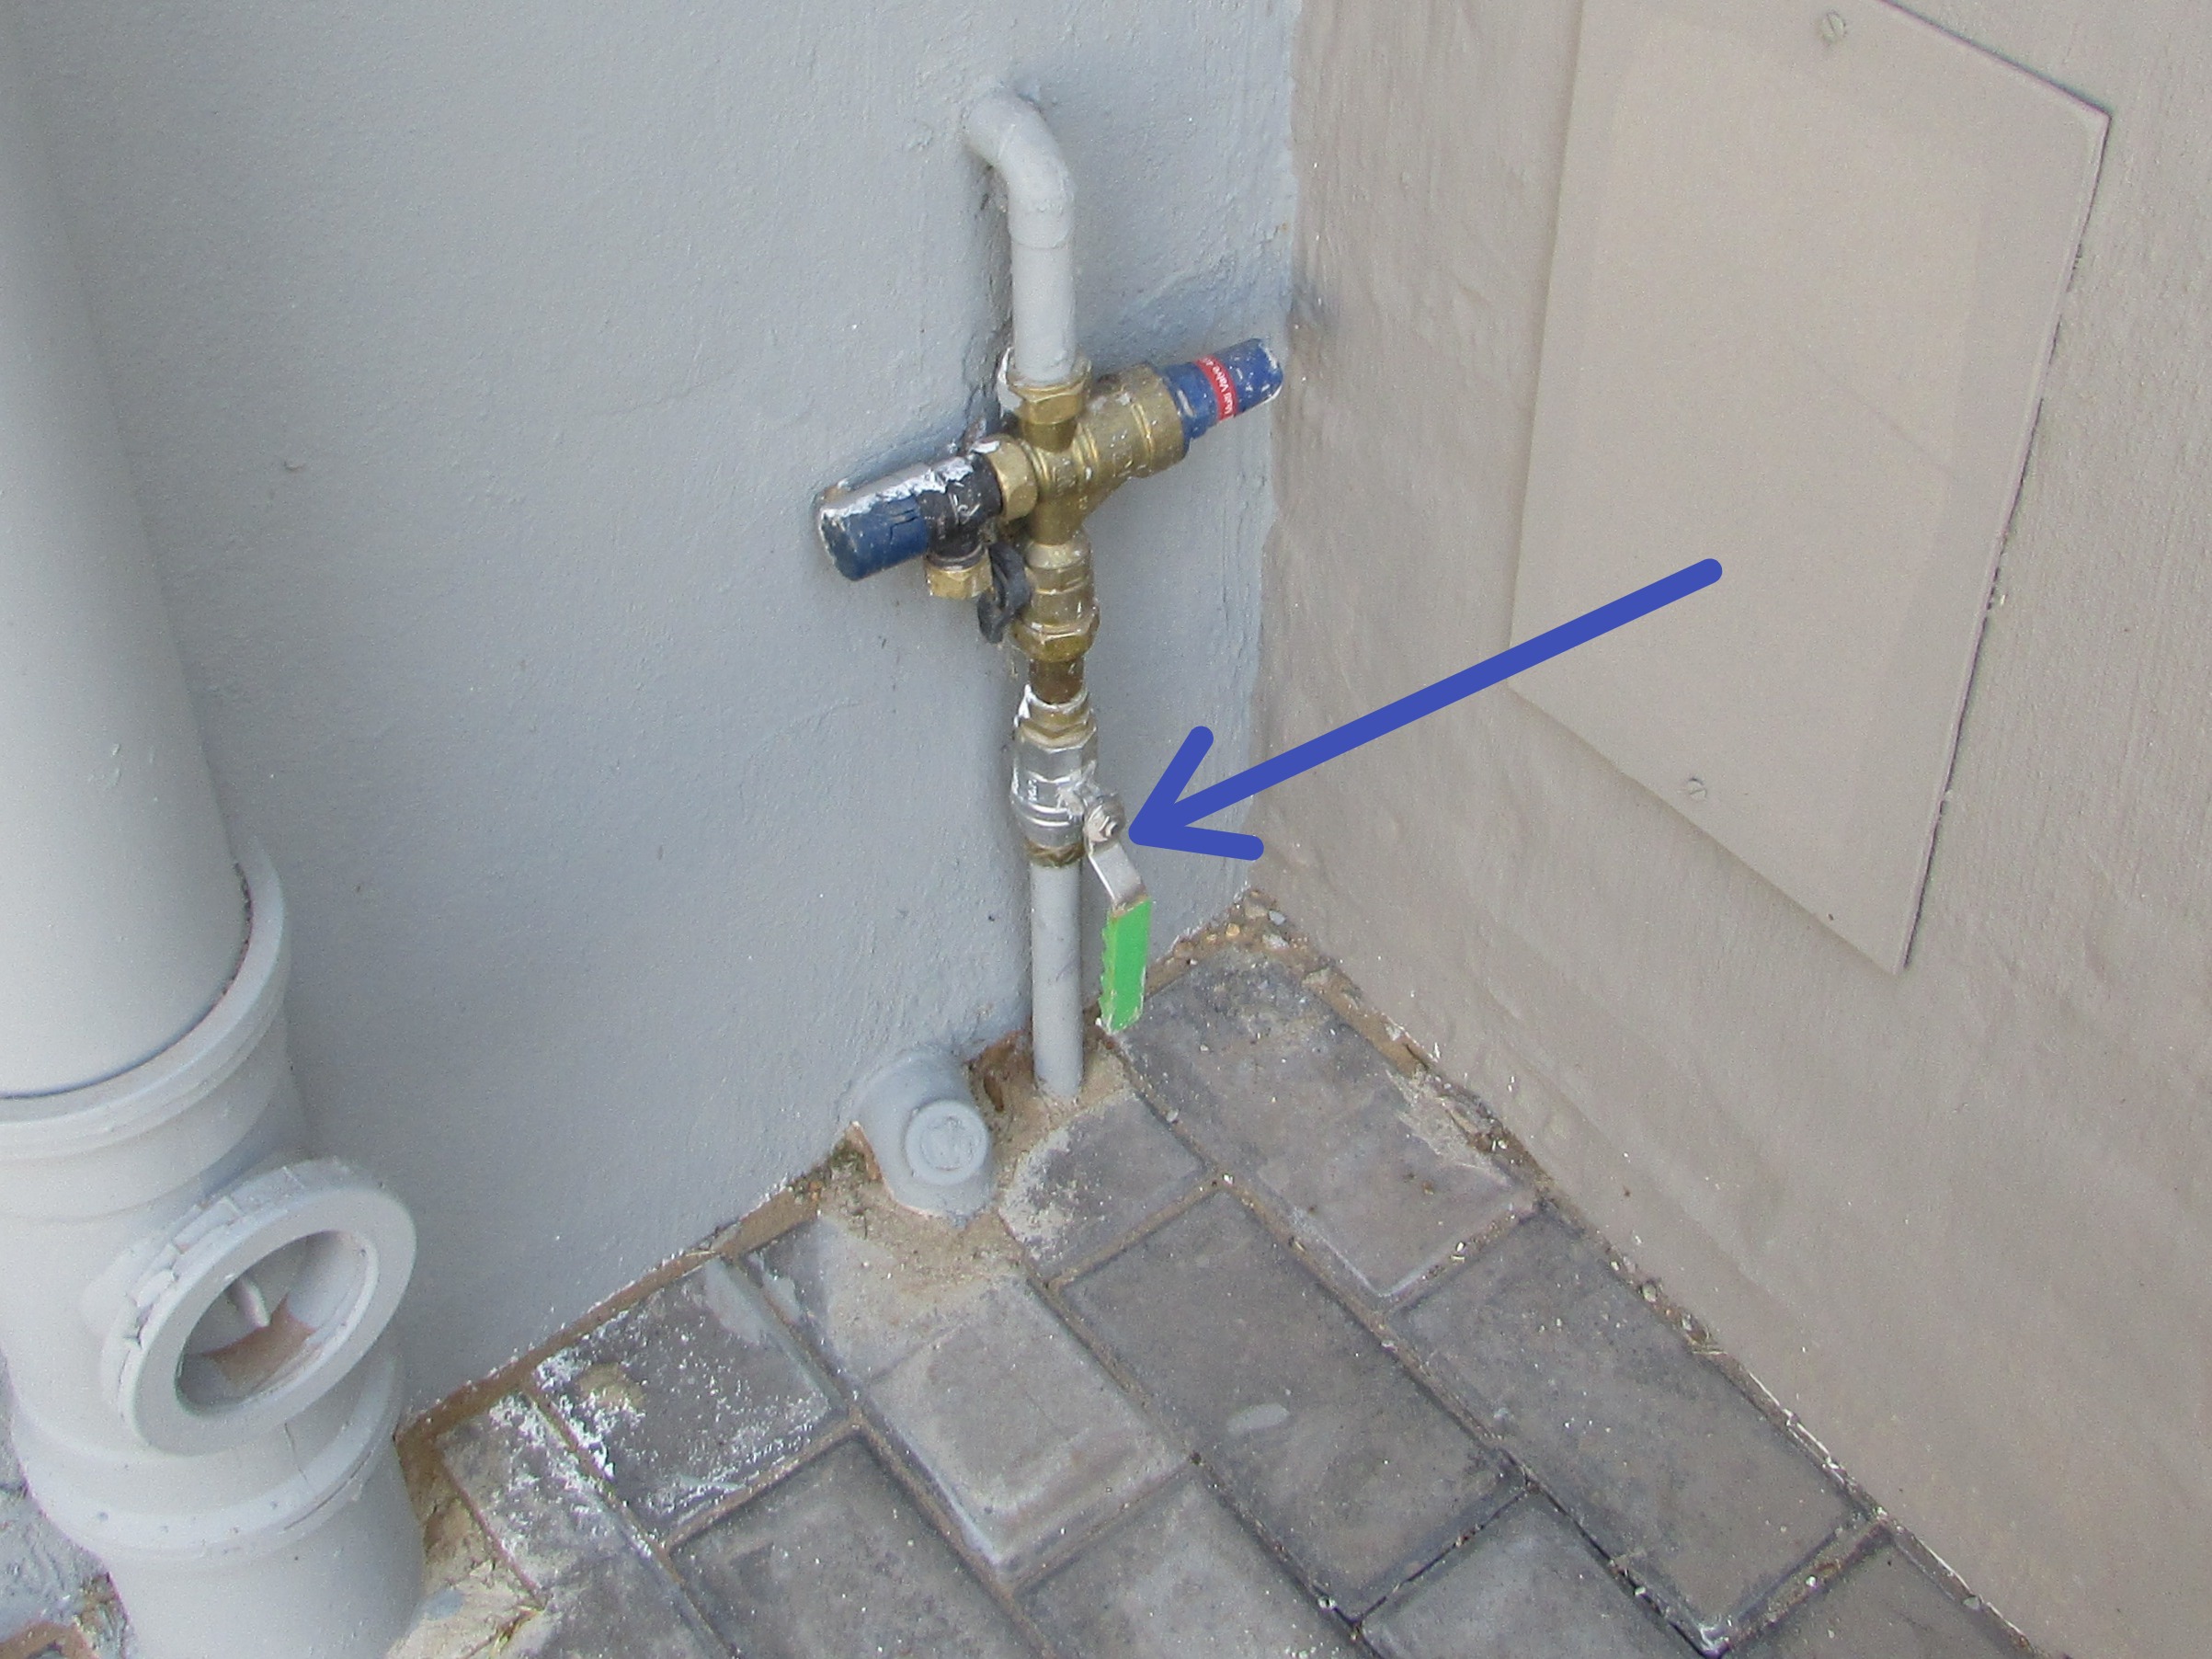 |
Water Service Supply
Pipe Material: Copper
Water Supply: Public water
Pressure Reducing Valve: Present
This house had a pressure reducing valve to control high water pressure where the water supply enters the building.
A drip pipe was not fitted to the pressure regulator. The drip pipe should discharge directly into a gulley or waste pipe. Water from the regulator was dripping close to the walls of the residence. If the regulator is working properly a certain amount of water is discharged from the drip of the pressure regulator during the course of normal operation. This discharge should be directed away from the foundation of the house.
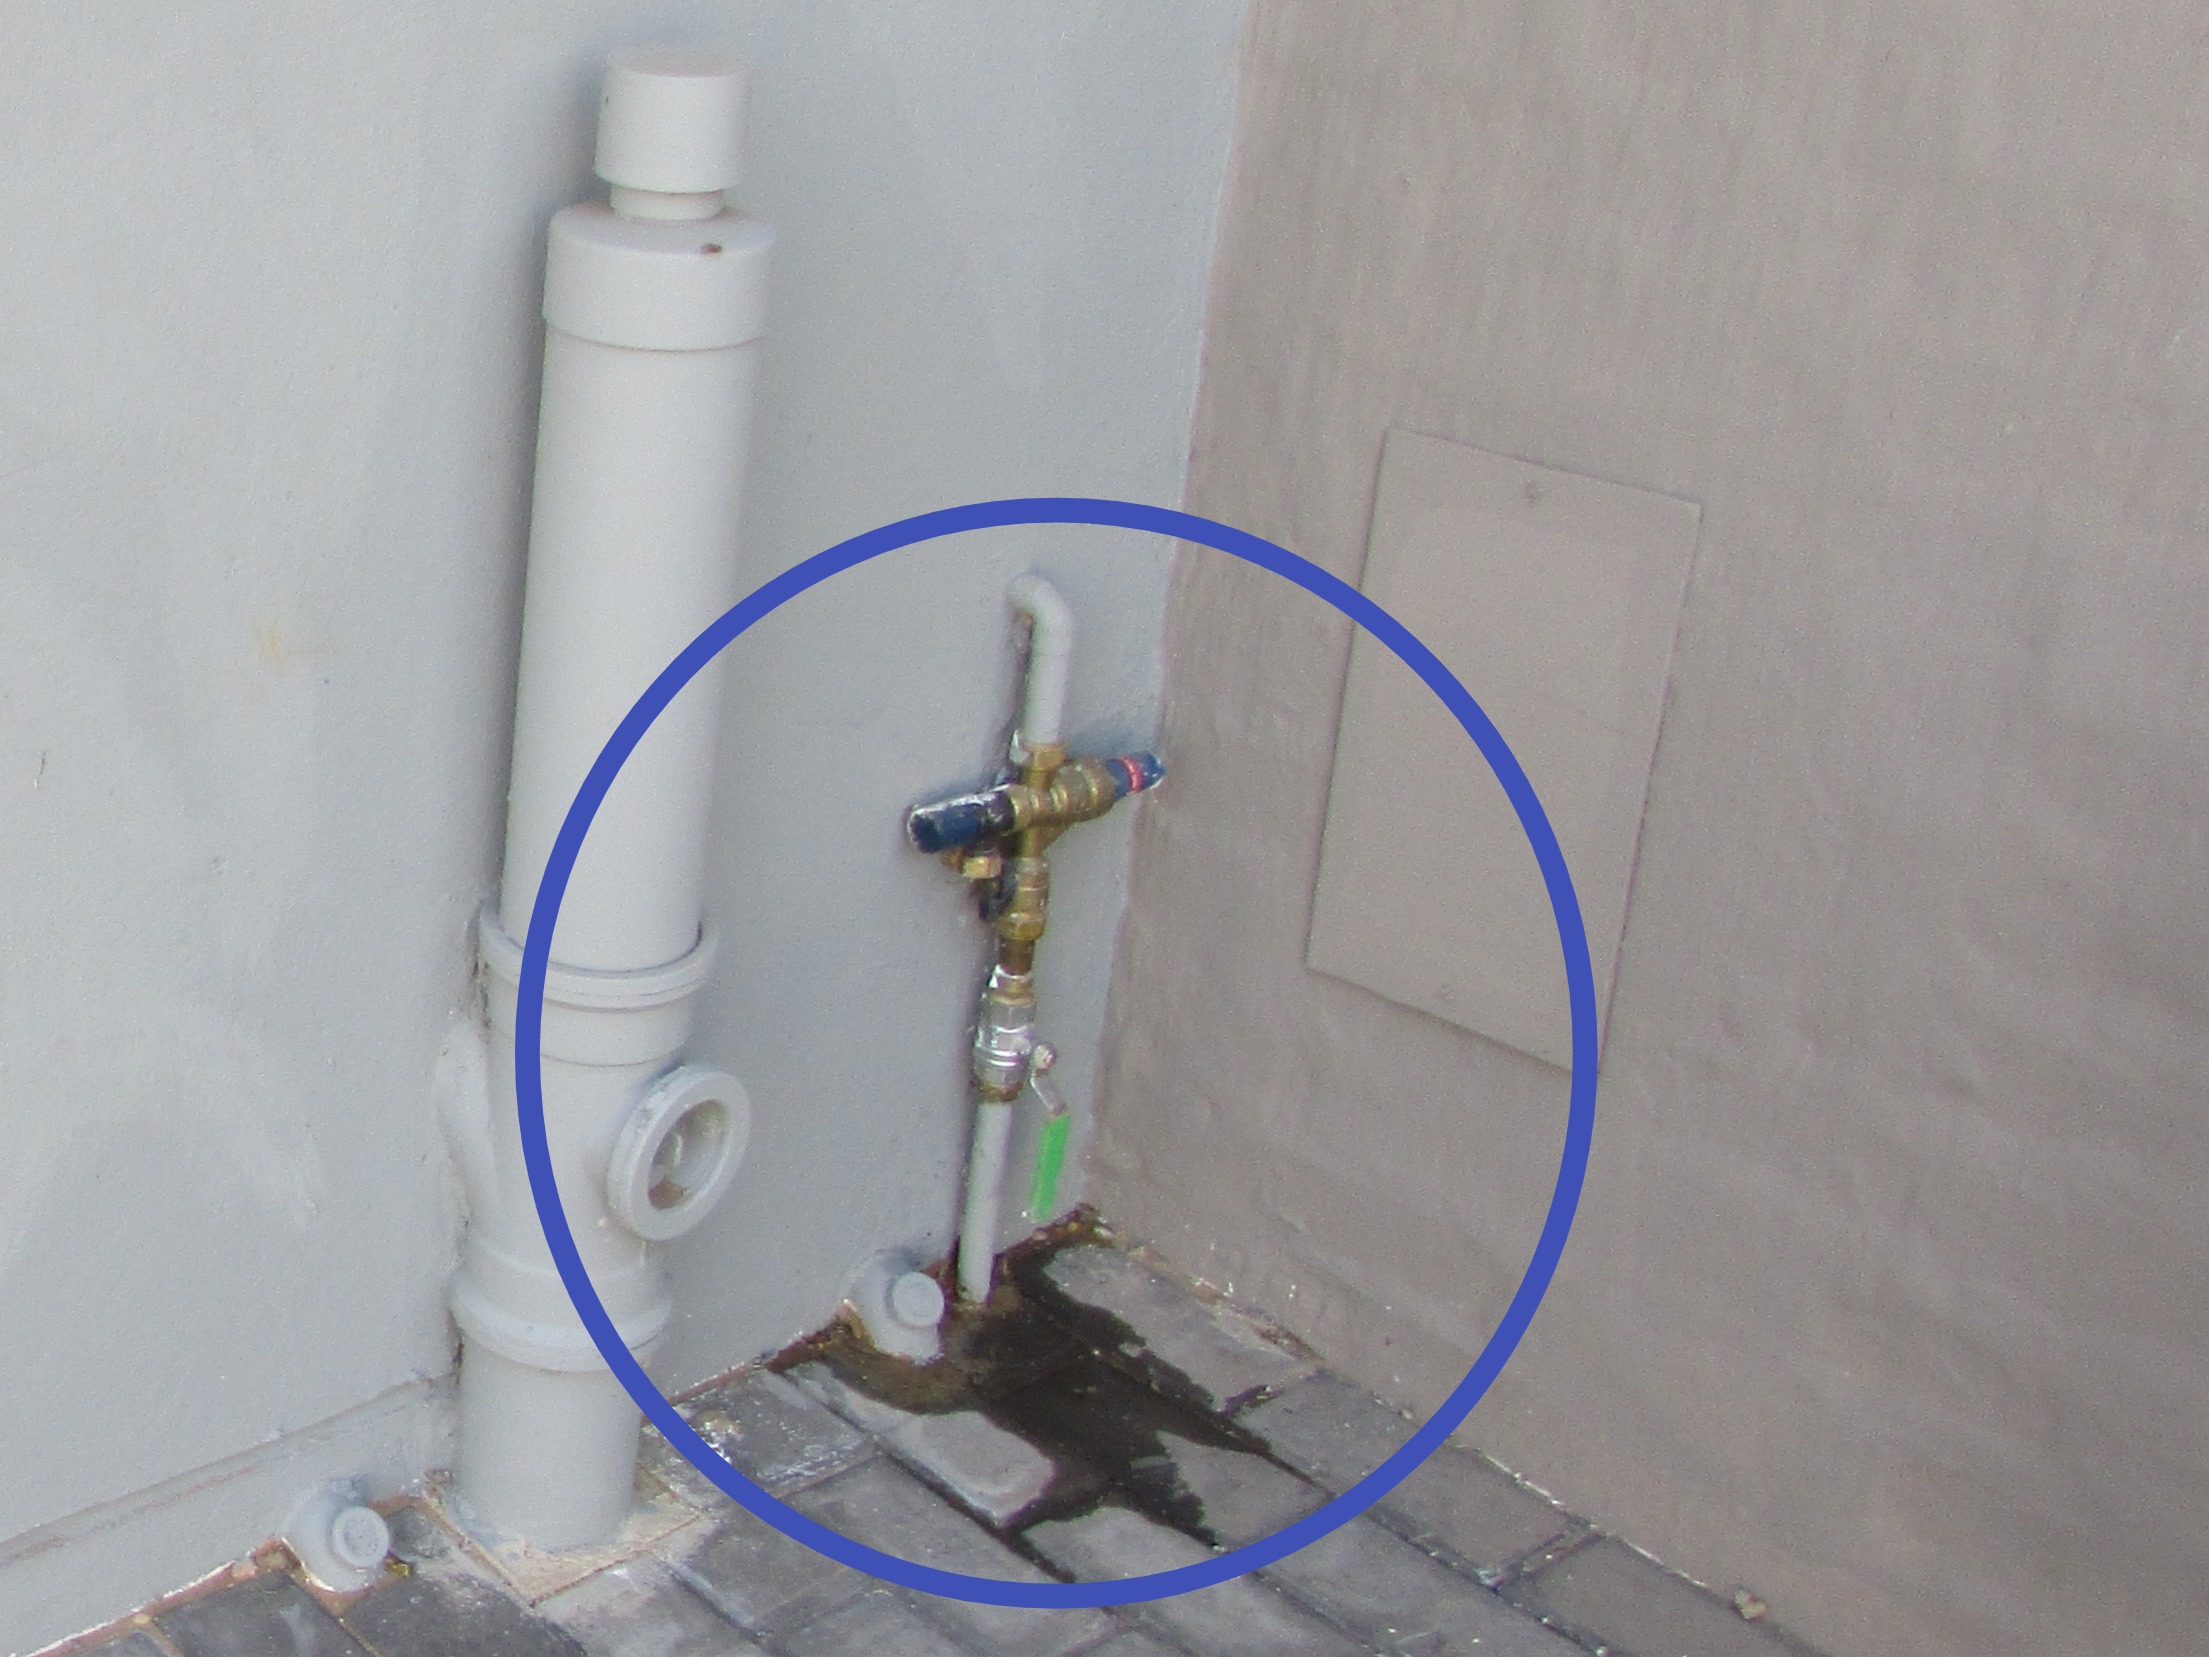 |
Distribution Pipe
Pipe Insulation: None provide in the roof space
Supply Pipe Materials: Copper
Functional Flow: Average
![]() Angle Stops Testing Note
Angle Stops Testing Note
The supply pipes were not insulated in the roof space. If you have frost in the area and the winter temperatures gets to 3°C and below, be sure all supply lines in unheated spaces and areas have been adequately insulated to protect pipes from freezing conditions that could damage the pipes.
- None of the supply pipes were insulated in the unheated roof space. Check local conditions for minimum temperatures.
- The supply and return pipes to the solar water heater panel are normally insulated. These were not!
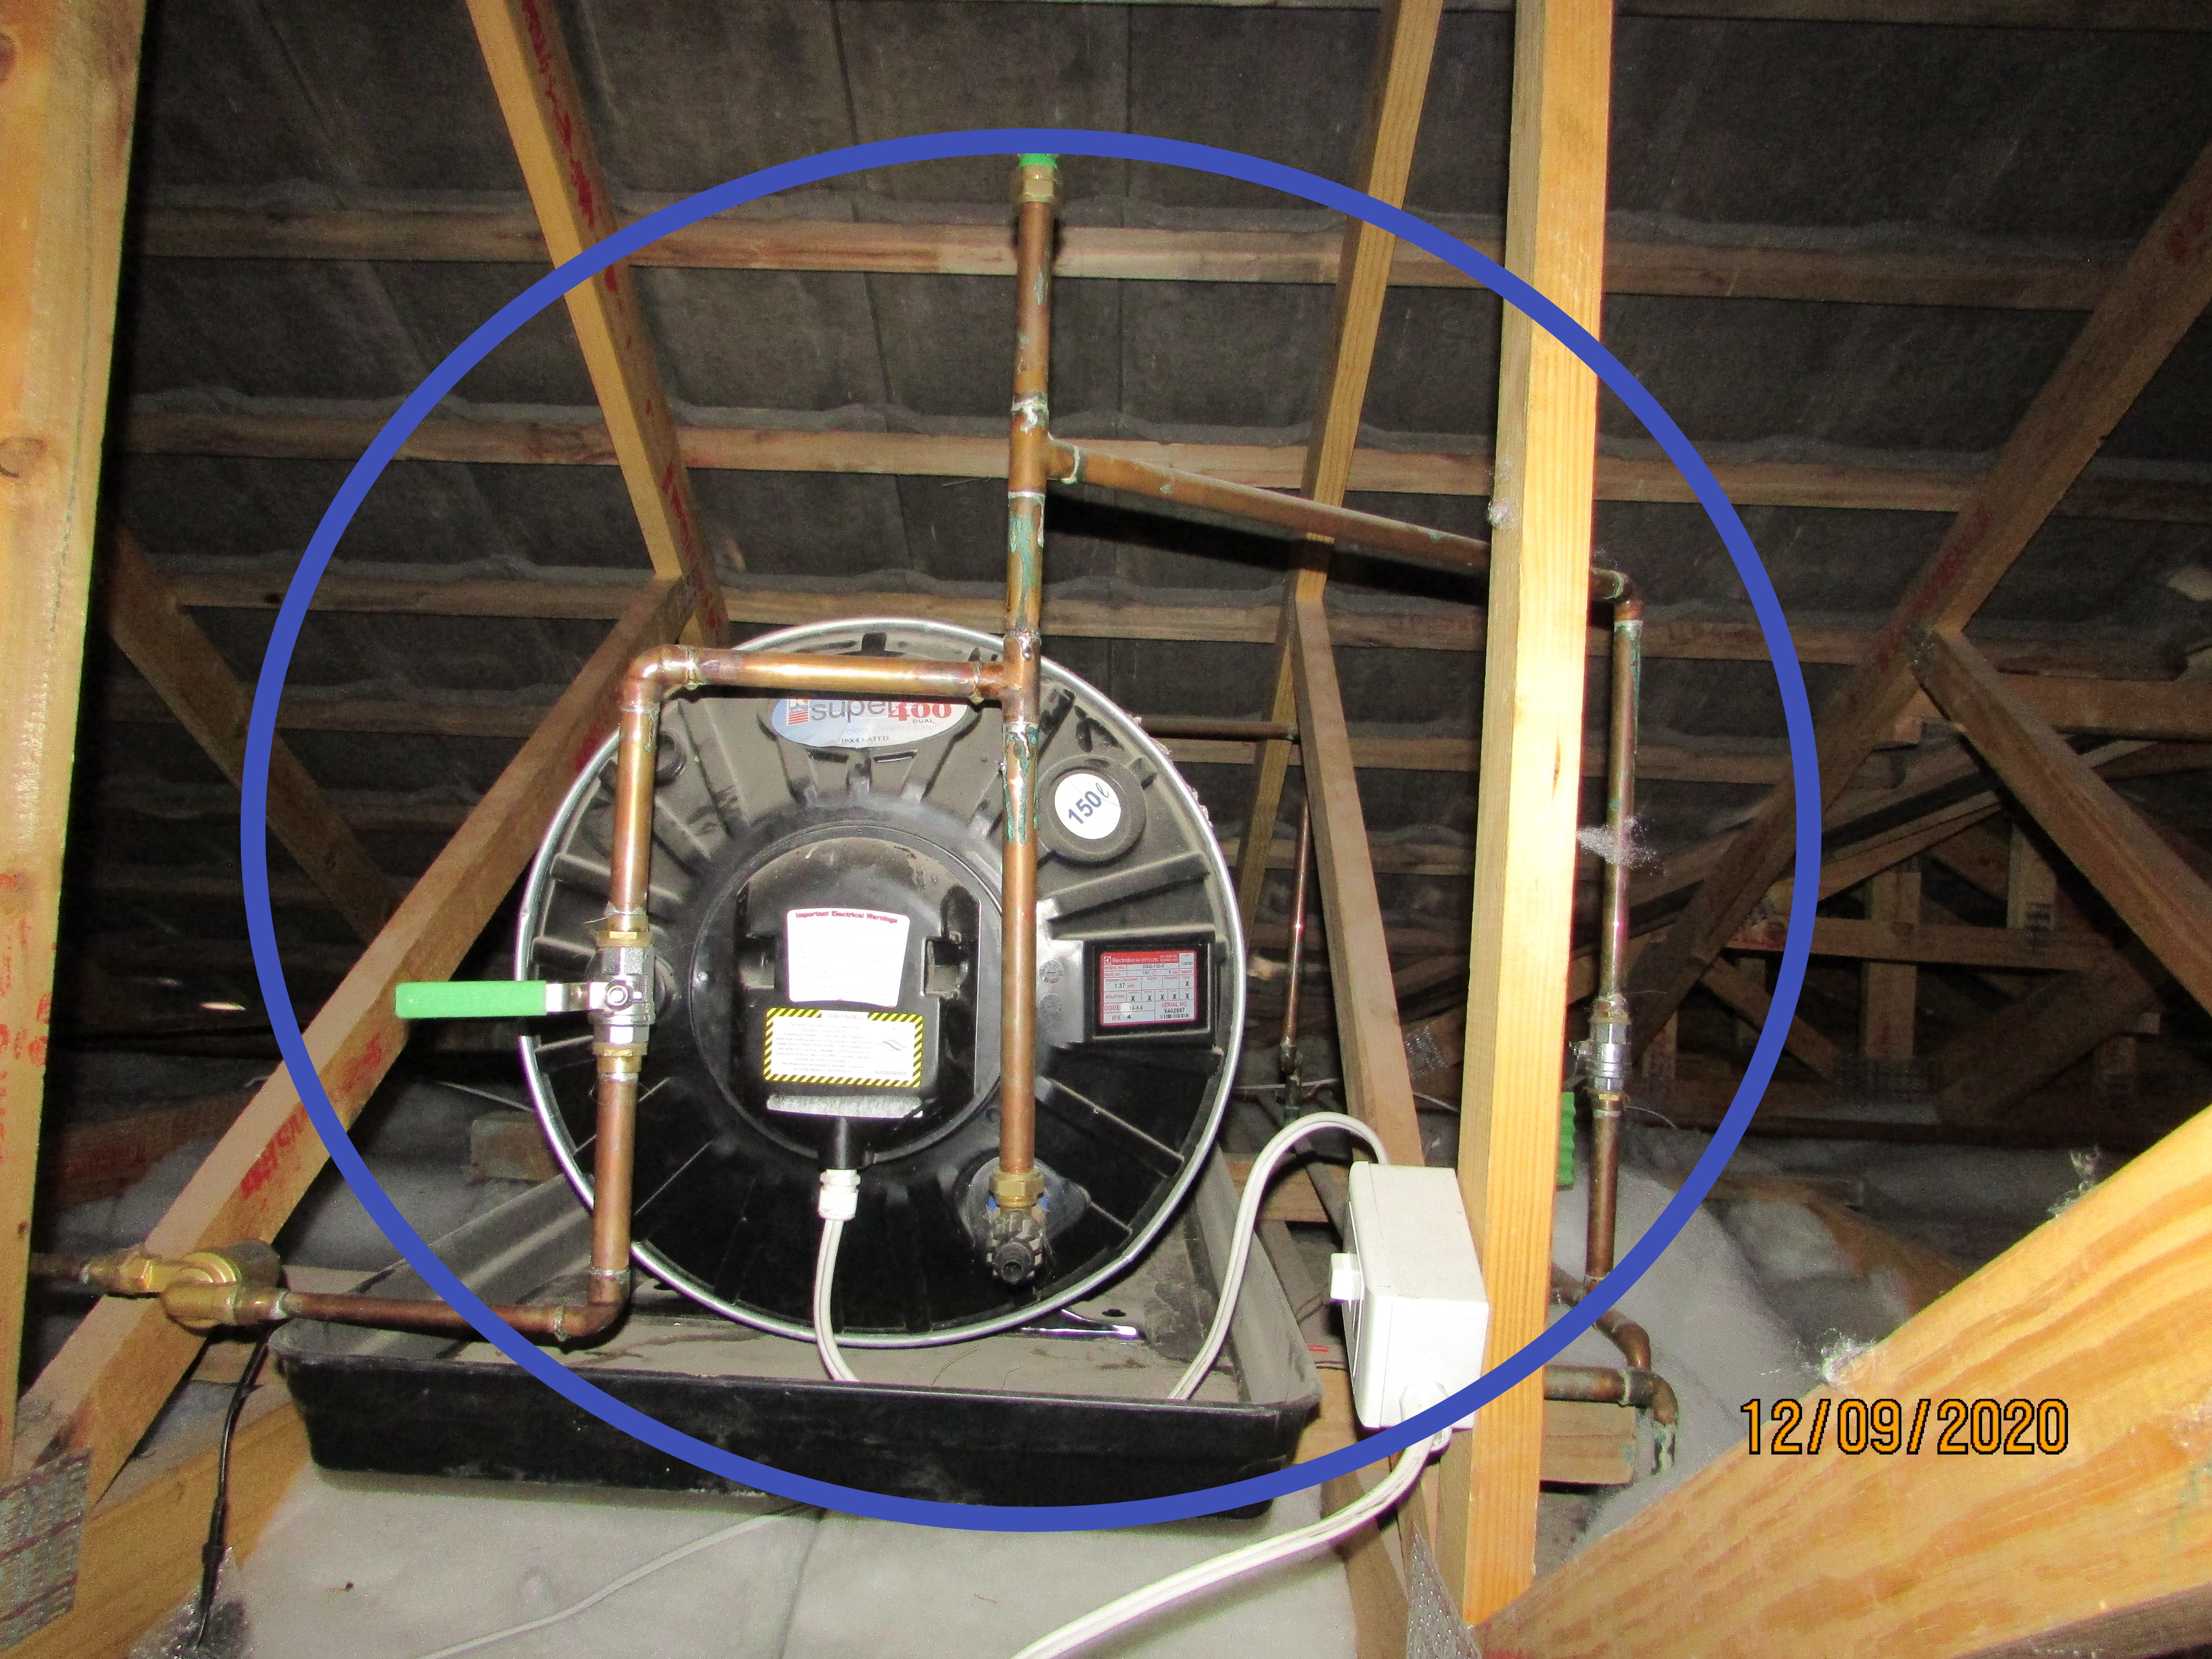
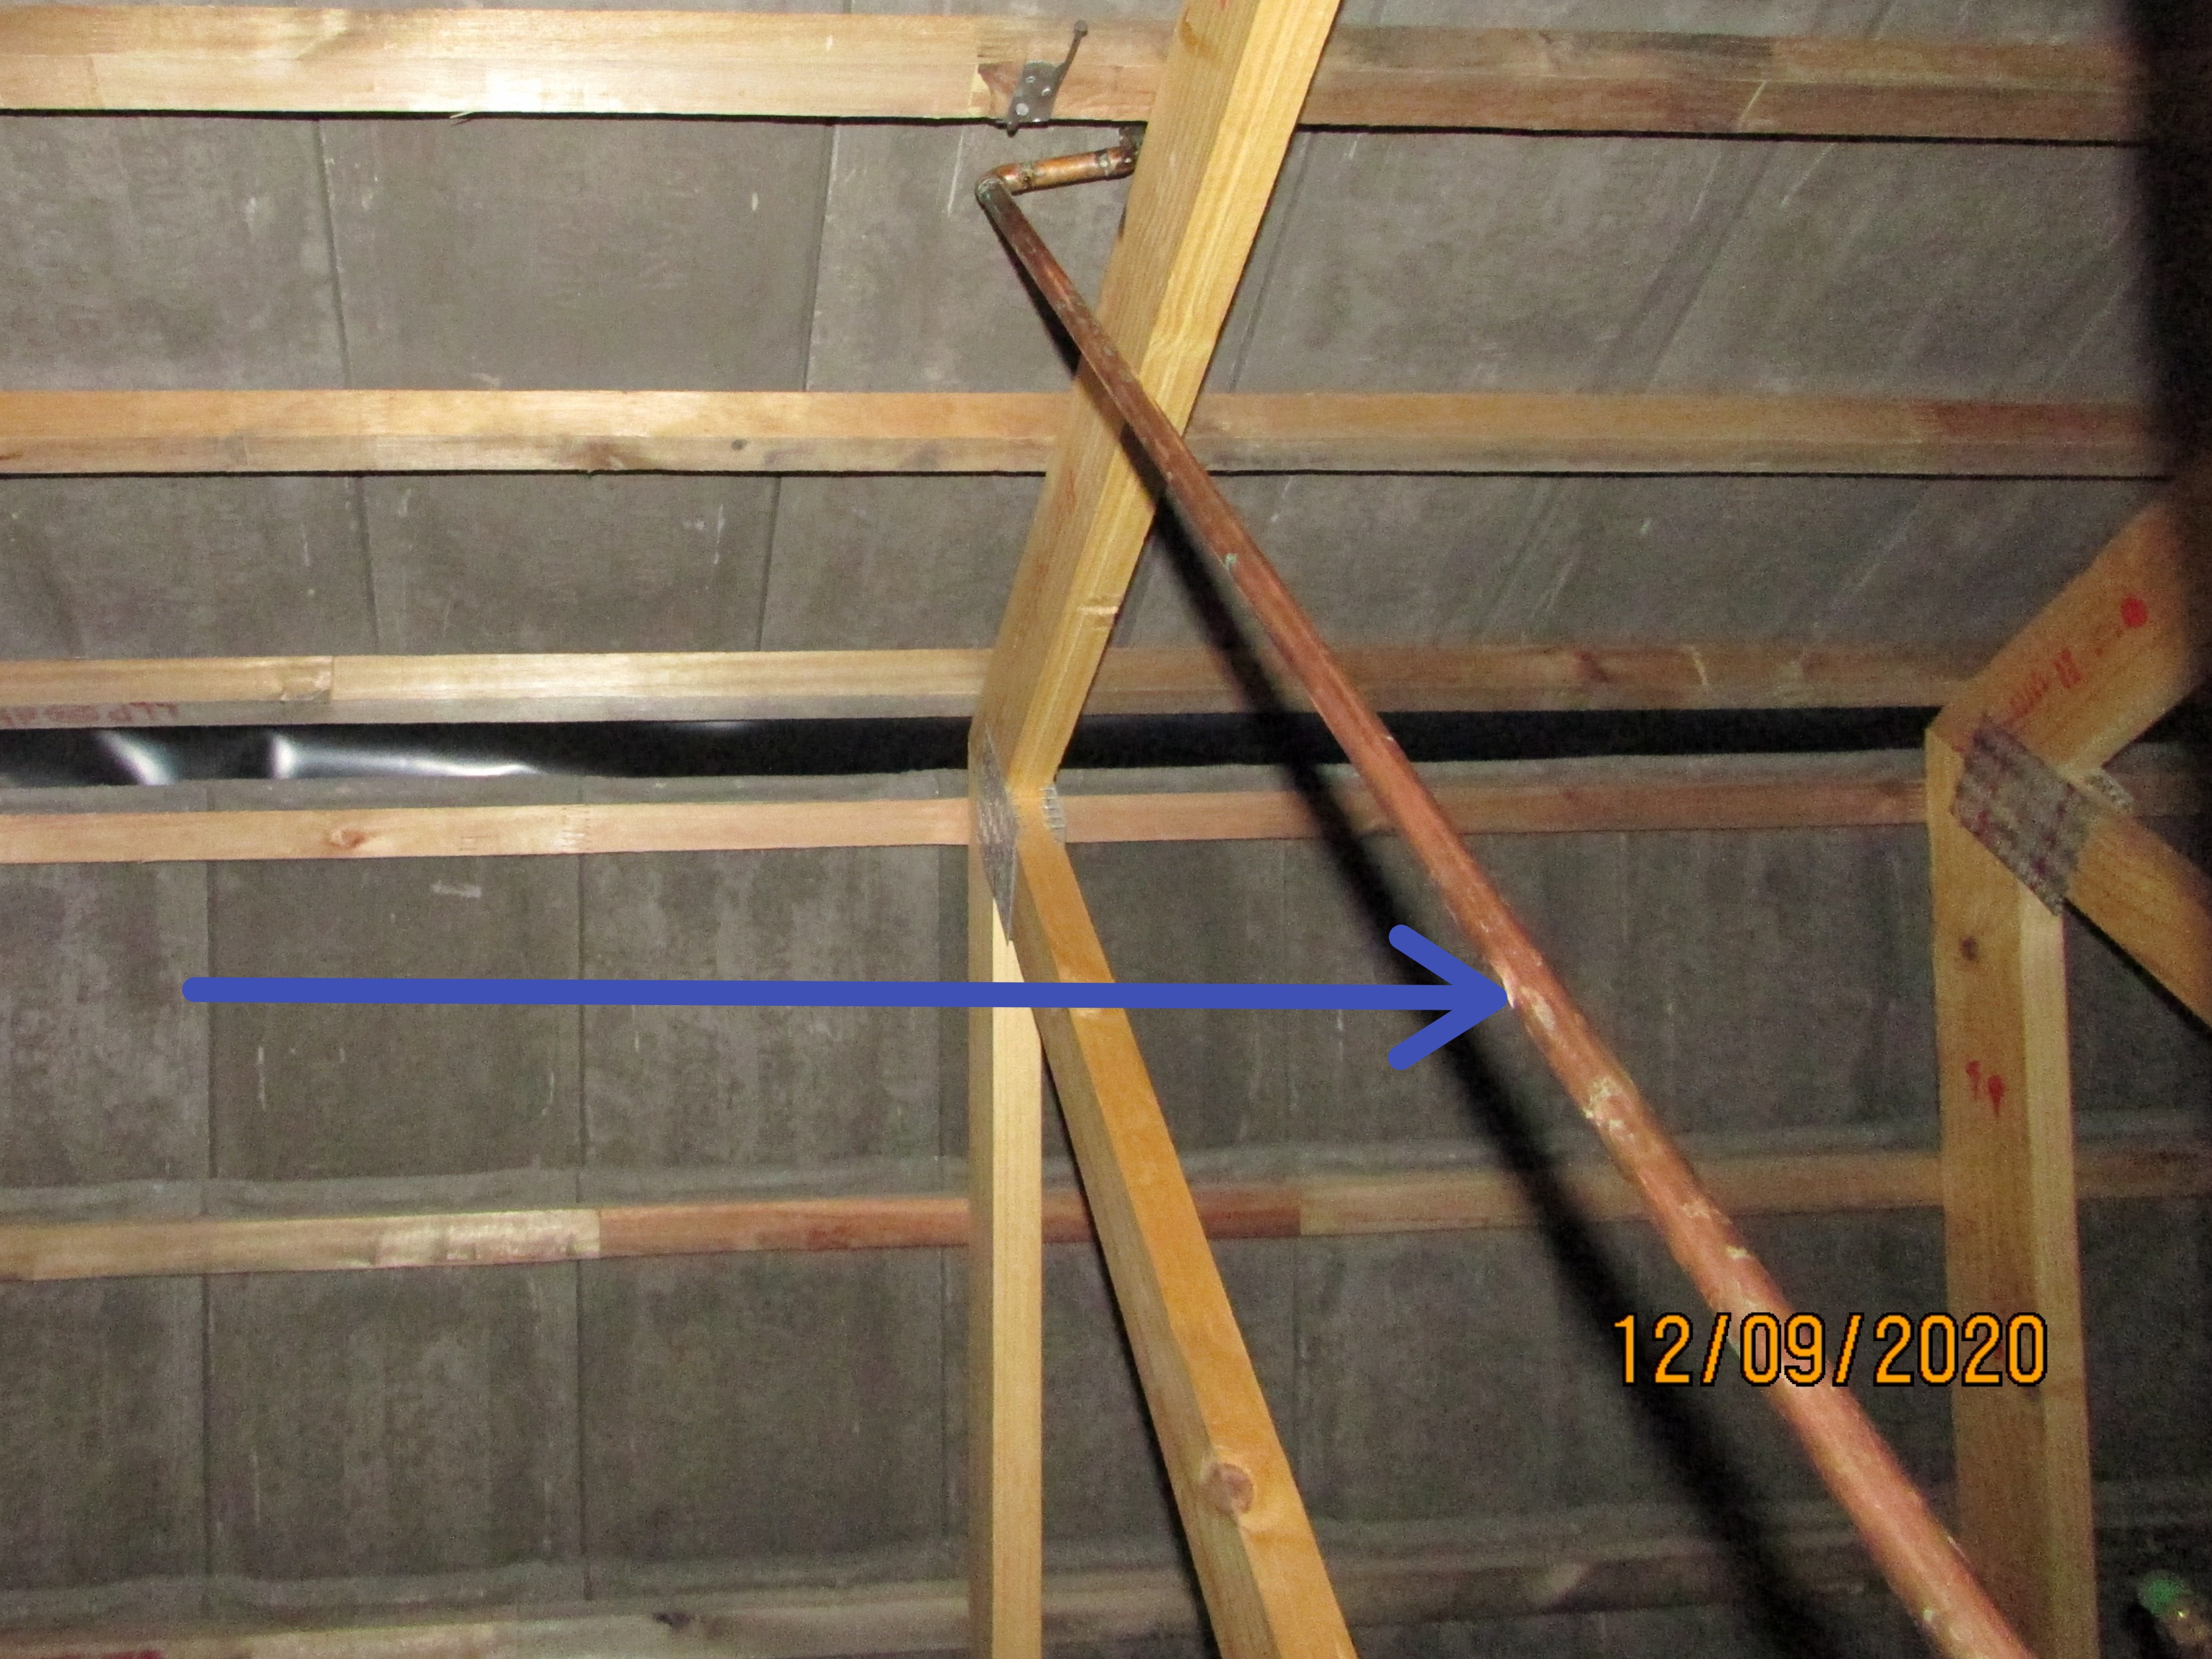
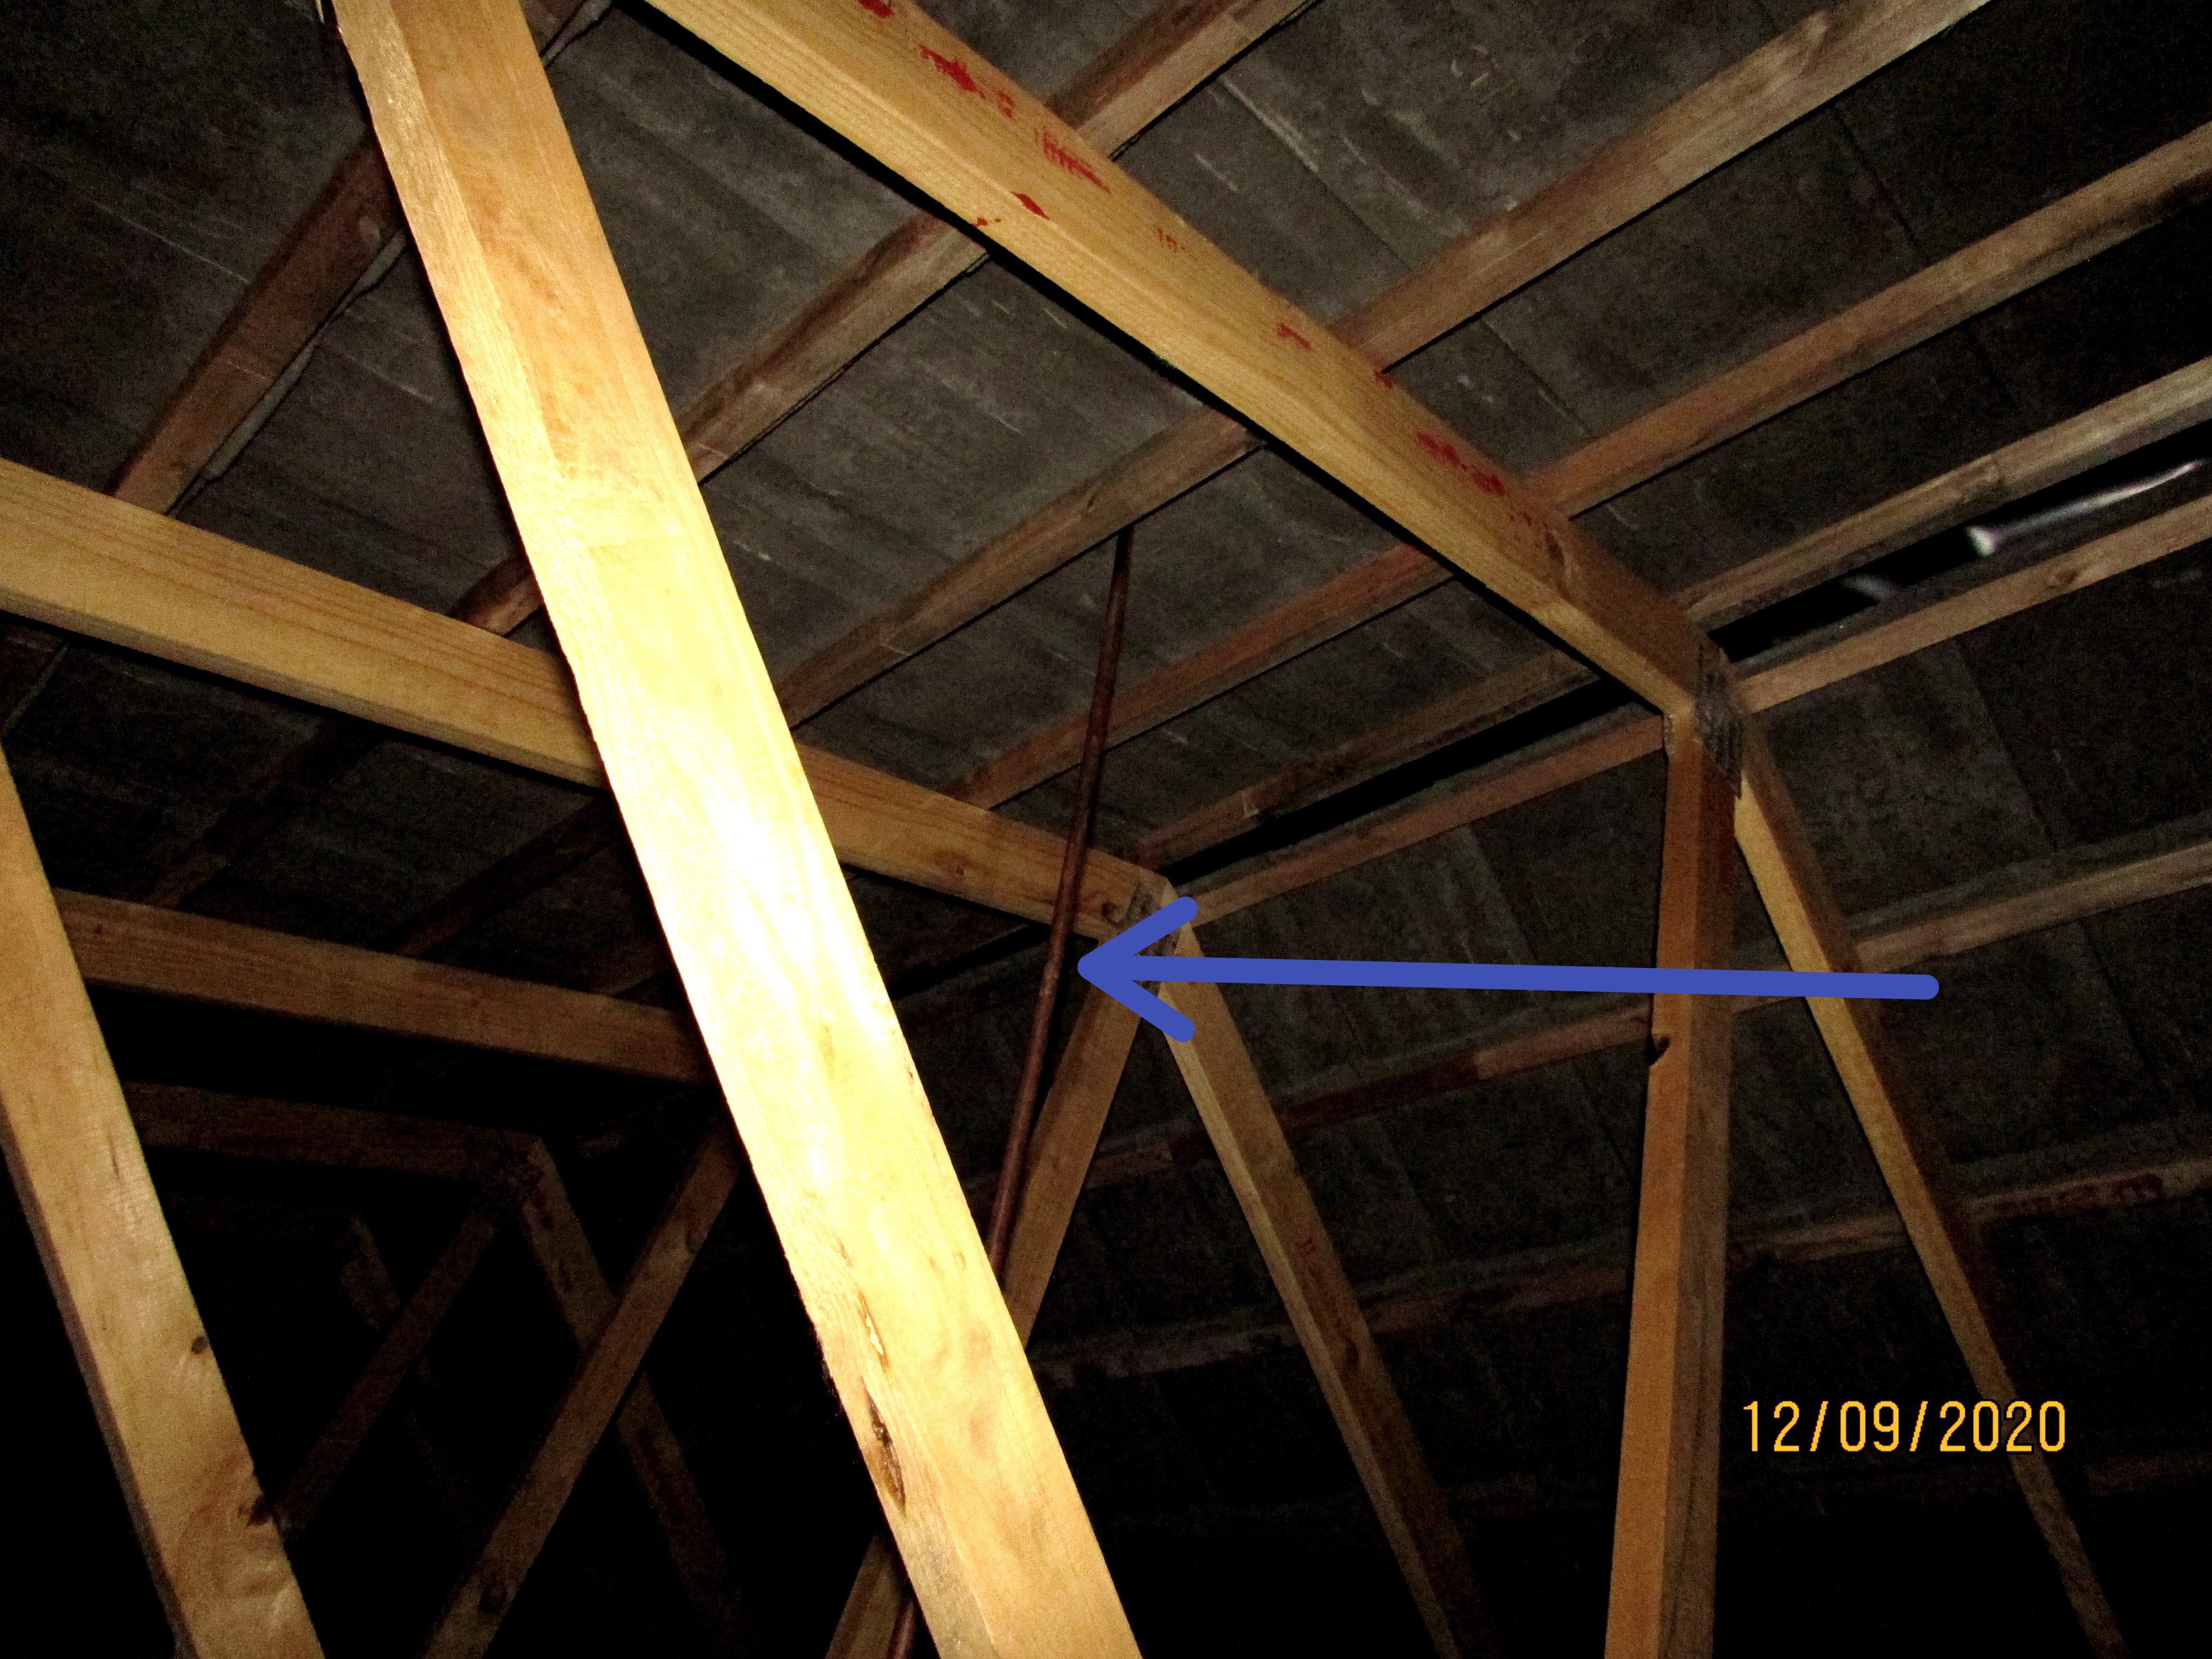
Waste Pipe and Discharge
Discharge Type: Public sewer
I test the drain, waste and vent (DWV) system by running water through every fixture drain and watching for blockages or slow drains. Fixture blockages become quickly evident and can usually be cured by clearing out the traps. However, if the main drain line is blocked or damaged, there is a very strong chance that it will not become apparent during the course of my inspection, and for this reason I strongly recommend that you have it checked by an appropriately qualified plumber to determine its present condition.
Where visible the drain and vent pipes outside the house appeared to be functional at the time of the inspection.
I could not access the sewer and the venting system components serving the 1st floor plumbing fixtures which were located in enclosed ducts and therefore these could not be evaluated. No venting was visible above the roof line so it is possible that the vent pipes terminate in the roof space or the ducts. The vents should have been provided with an air admittance valves. If you have sewer smells in your bathrooms and bedrooms you should have a plumber check the venting.
Water Heaters/Geysers
System Type: Solar/electric hybrid
Manufacturer: Kwikot
Size: 150 litre
Age: New
Energy Source: Electricity, Solar
Temperature Pressure Relief Value: Present - Not Tested
The temperature and pressure relief valve is arguably one of the most important safety devices in the house. Should the thermostats fail inside the geyser, this allows excess pressure to "blow off," which will prevent catastrophic build up of temperature and pressure which can make geysers explosive.
The TPR valve ( temperature and pressure release valve) at the geyser could not be viewed but a copper discharge pipe could be observed leading to the outside of the building. A discharge pipe could be viewed under the eaves of the house as required, projecting out from the wall. This means that the TPR valve and drain pipe were probably installed as required. The next time you have a plumber around for another job just have him check the TPR valve installation.
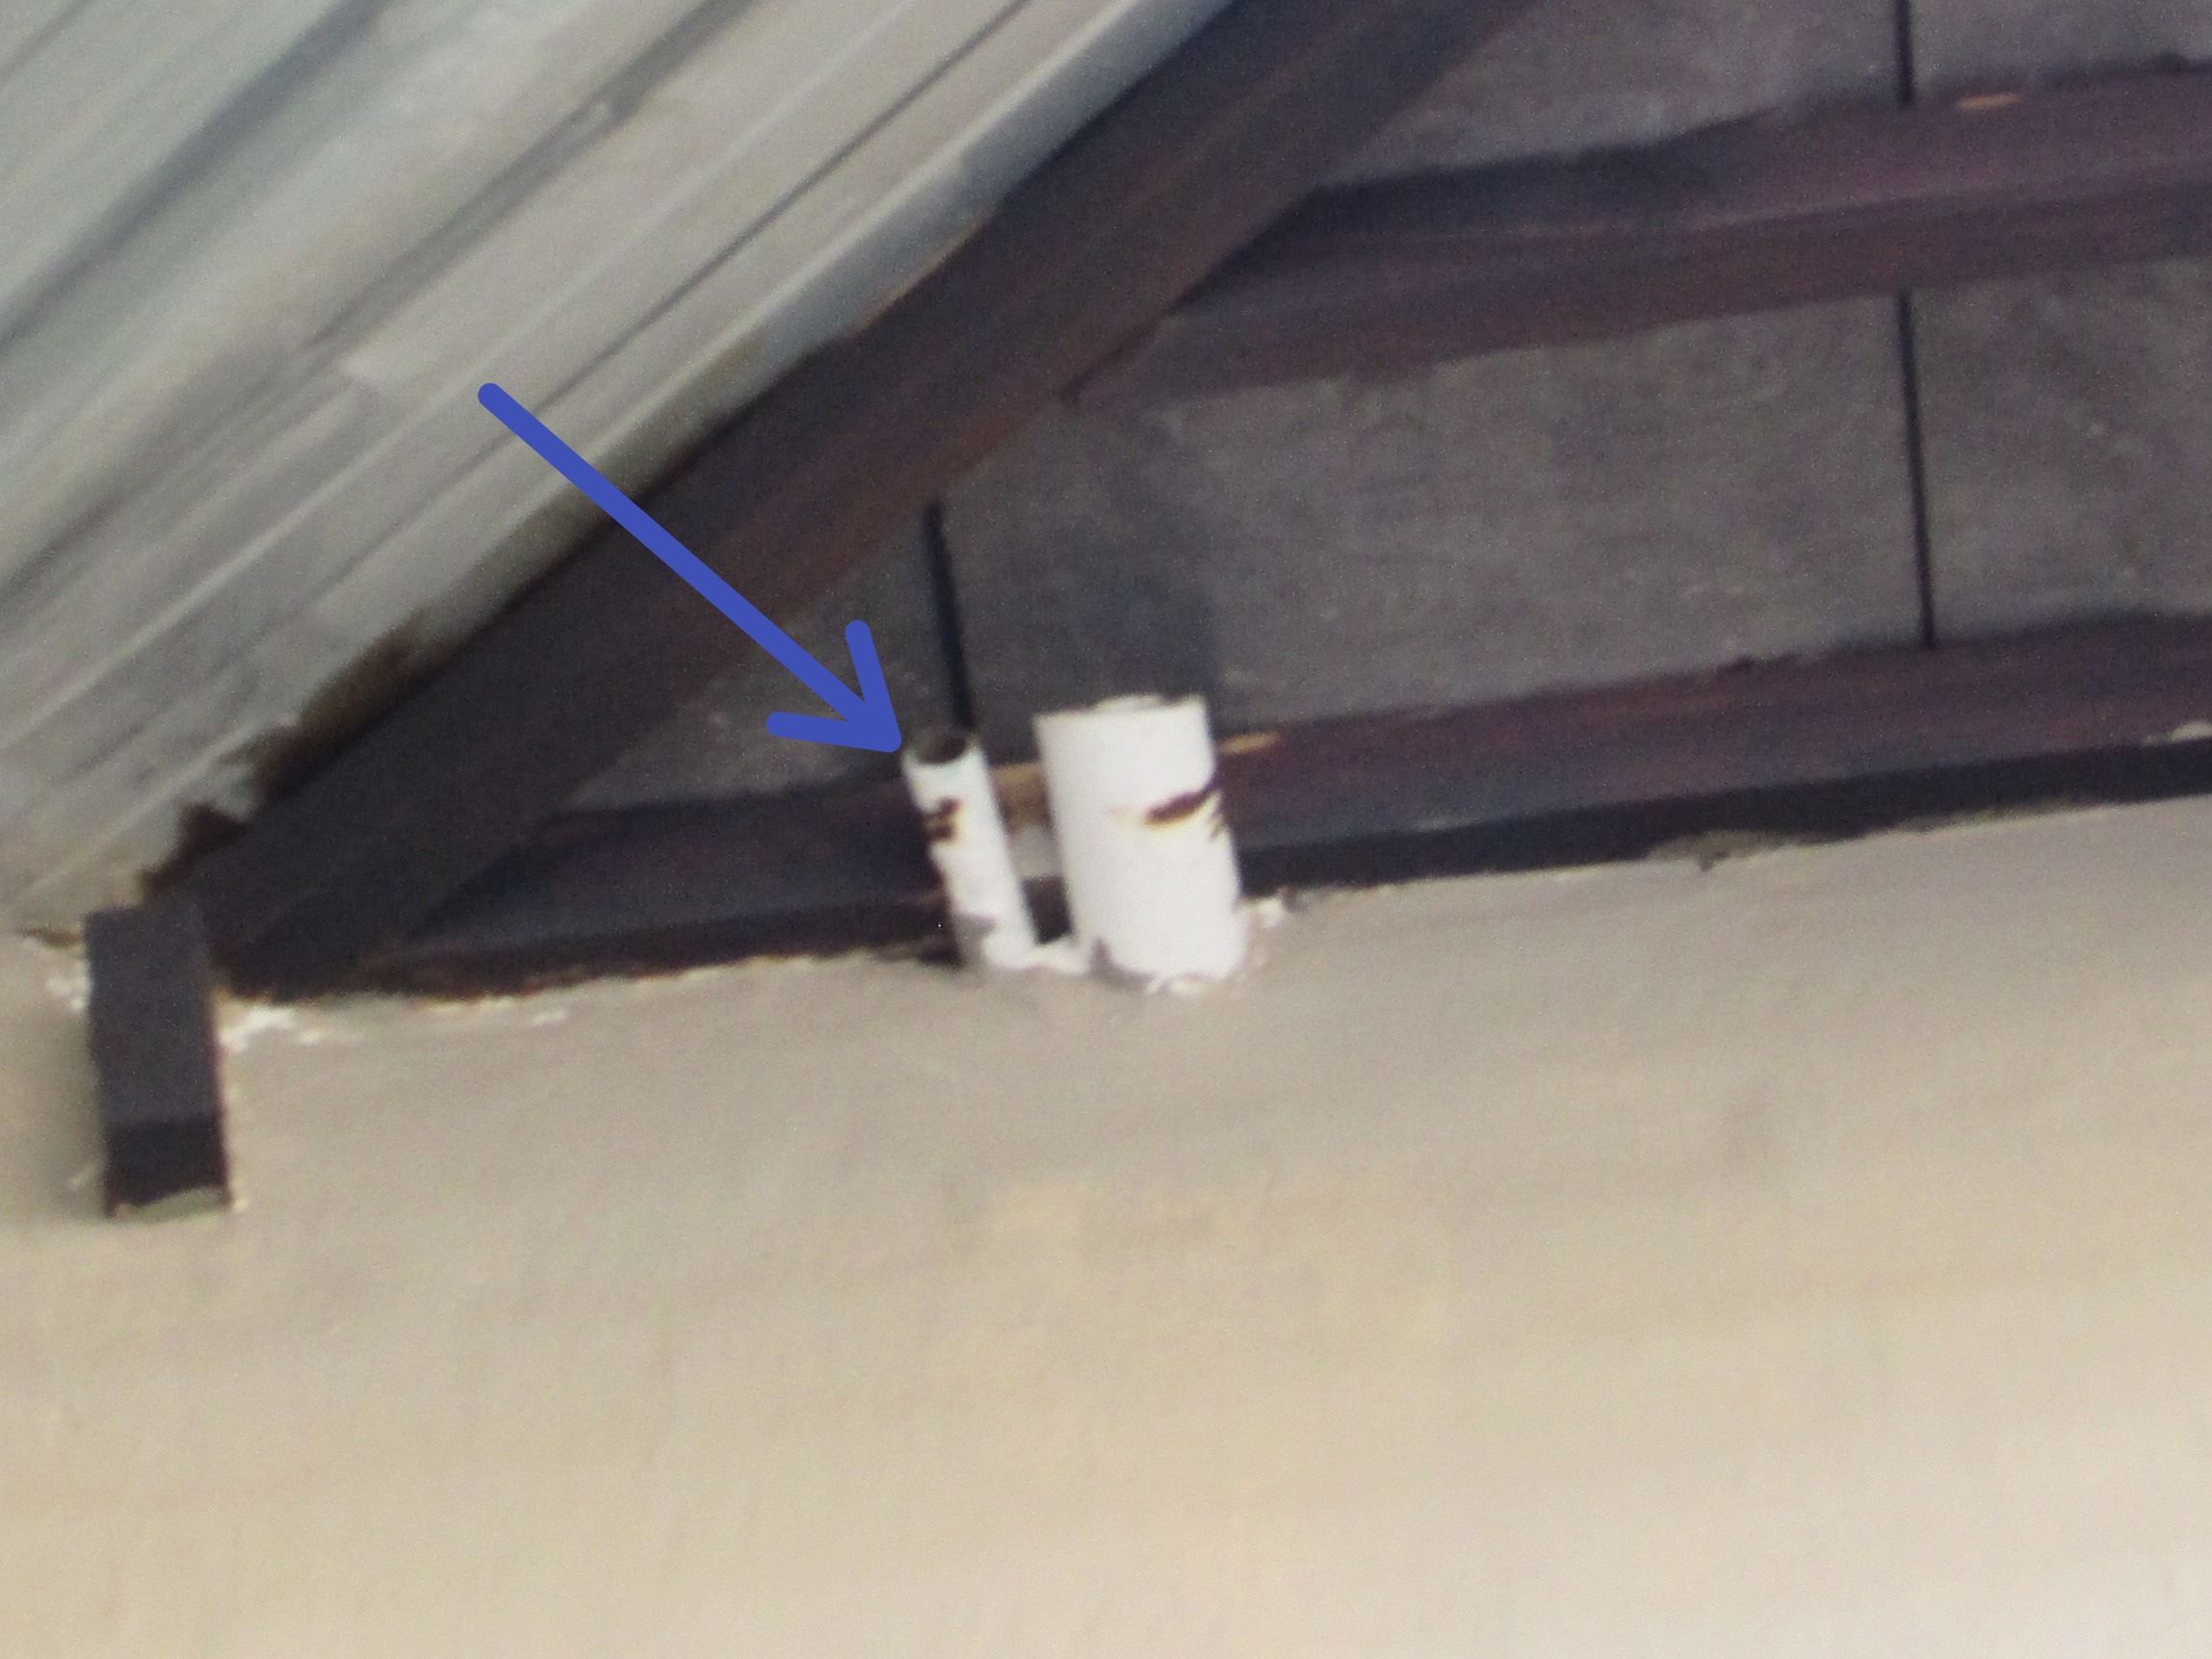 |
The geyser was equipped with a geyser tray that includes a PVC overflow line routed to an approved discharge location as needed to help prevent water damage from a leak.
.JPG) |
The vent pipes and vacuum breakers on the geyser were installed to the correct standard. The vent pipes and vacuum breakers on the incoming and discharge sides were visible at the time of the inspection.
A drain valve was installed on the geyser. No leakage was noted.
The hot water supply system included solar water heating equipment, which appeared to be functional.
The water line connectors at the geyser appeared functional. A shut-off valve on the cold water line was installed before the geyser with easy access. This valve which is required by law and is needed as an emergency shut-off.
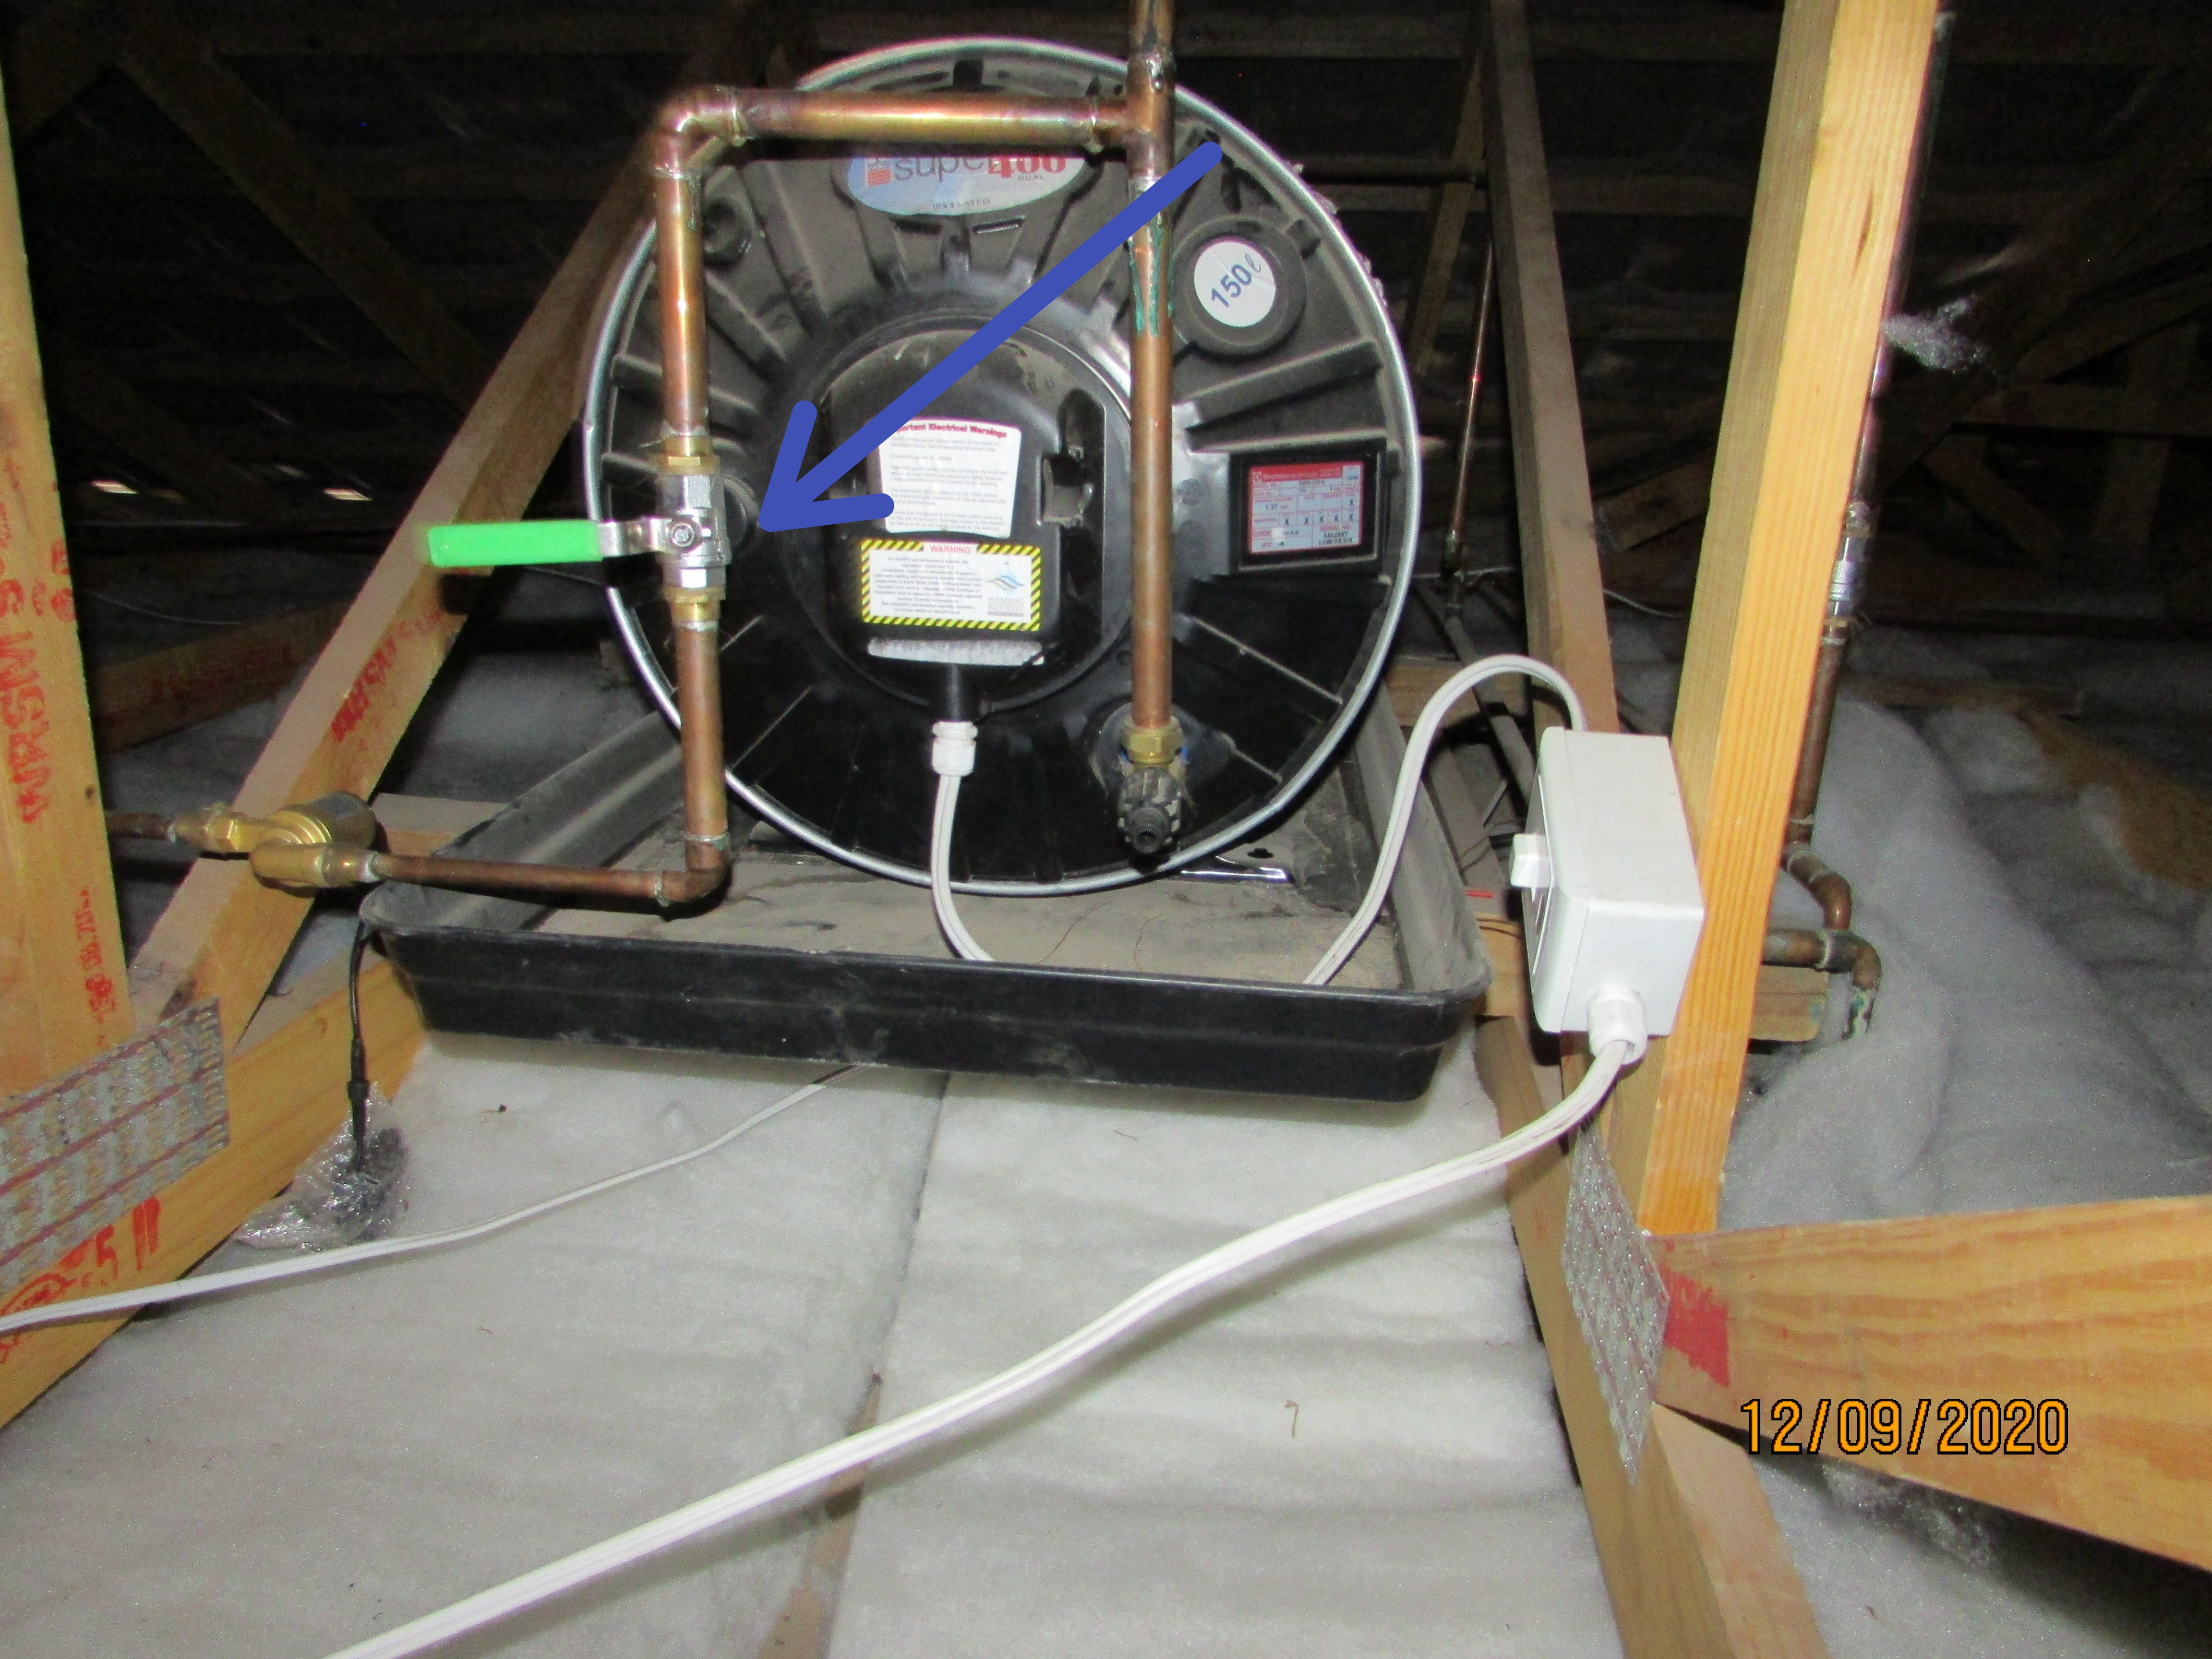 |
The geyser may not be adequately to supply hot water to a 4 bedroom house with 4 en-suite bathrooms, a kitchen and a scullery. The standard geyser for this sized house is 200 litres. A 150 litre geyser will often suffice but is at greater risk of inadequacy. This home had a 150 litre geyser. Another geyser may need to be fitted at a later stage.
.JPG) |
A geyser isolator could be observed within 1 m from the geyser as required for safety by the Building Regulations.
.JPG) |
The electrical connection to the geyser appeared to be satisfactory.
The geyser was not wrapped with an insulative blanket as recommended by Eskom to conserve energy.
Exterior Hose Taps
Not tested
The hose tap above the gulley at the scullery was functional.
A hose tap required drainage away from the structure. Normally hose bib taps are installed above gulleys or at a position on the stand away from the structure so that moisture intrusion into the structure and foundation is avoided.
.JPG) |
Heating, Cooling, Fireplaces and Ventilation
Fireplaces/Braais
The factory built wood or charcoal burning braai unit had no visible defects. It was a new installation.
Fuel Storage and Distribution
Gas Storage
Present
Storage Type: Above ground tank, Gas storage cage
Tank Size: 19 kg
Tank Location: Outside in a cage
Emergency Shutoff Location: Next to the cage
The gas bottle storage at the exterior on the east side of house appeared to conform to the required standards. The installation should have been fitted by an installer who is registered with the Liquefied Petroleum Gas Safety Association of Southern Africa (LPGAS) and a Gas Certificate of Conformance should be provided to you by the developer.
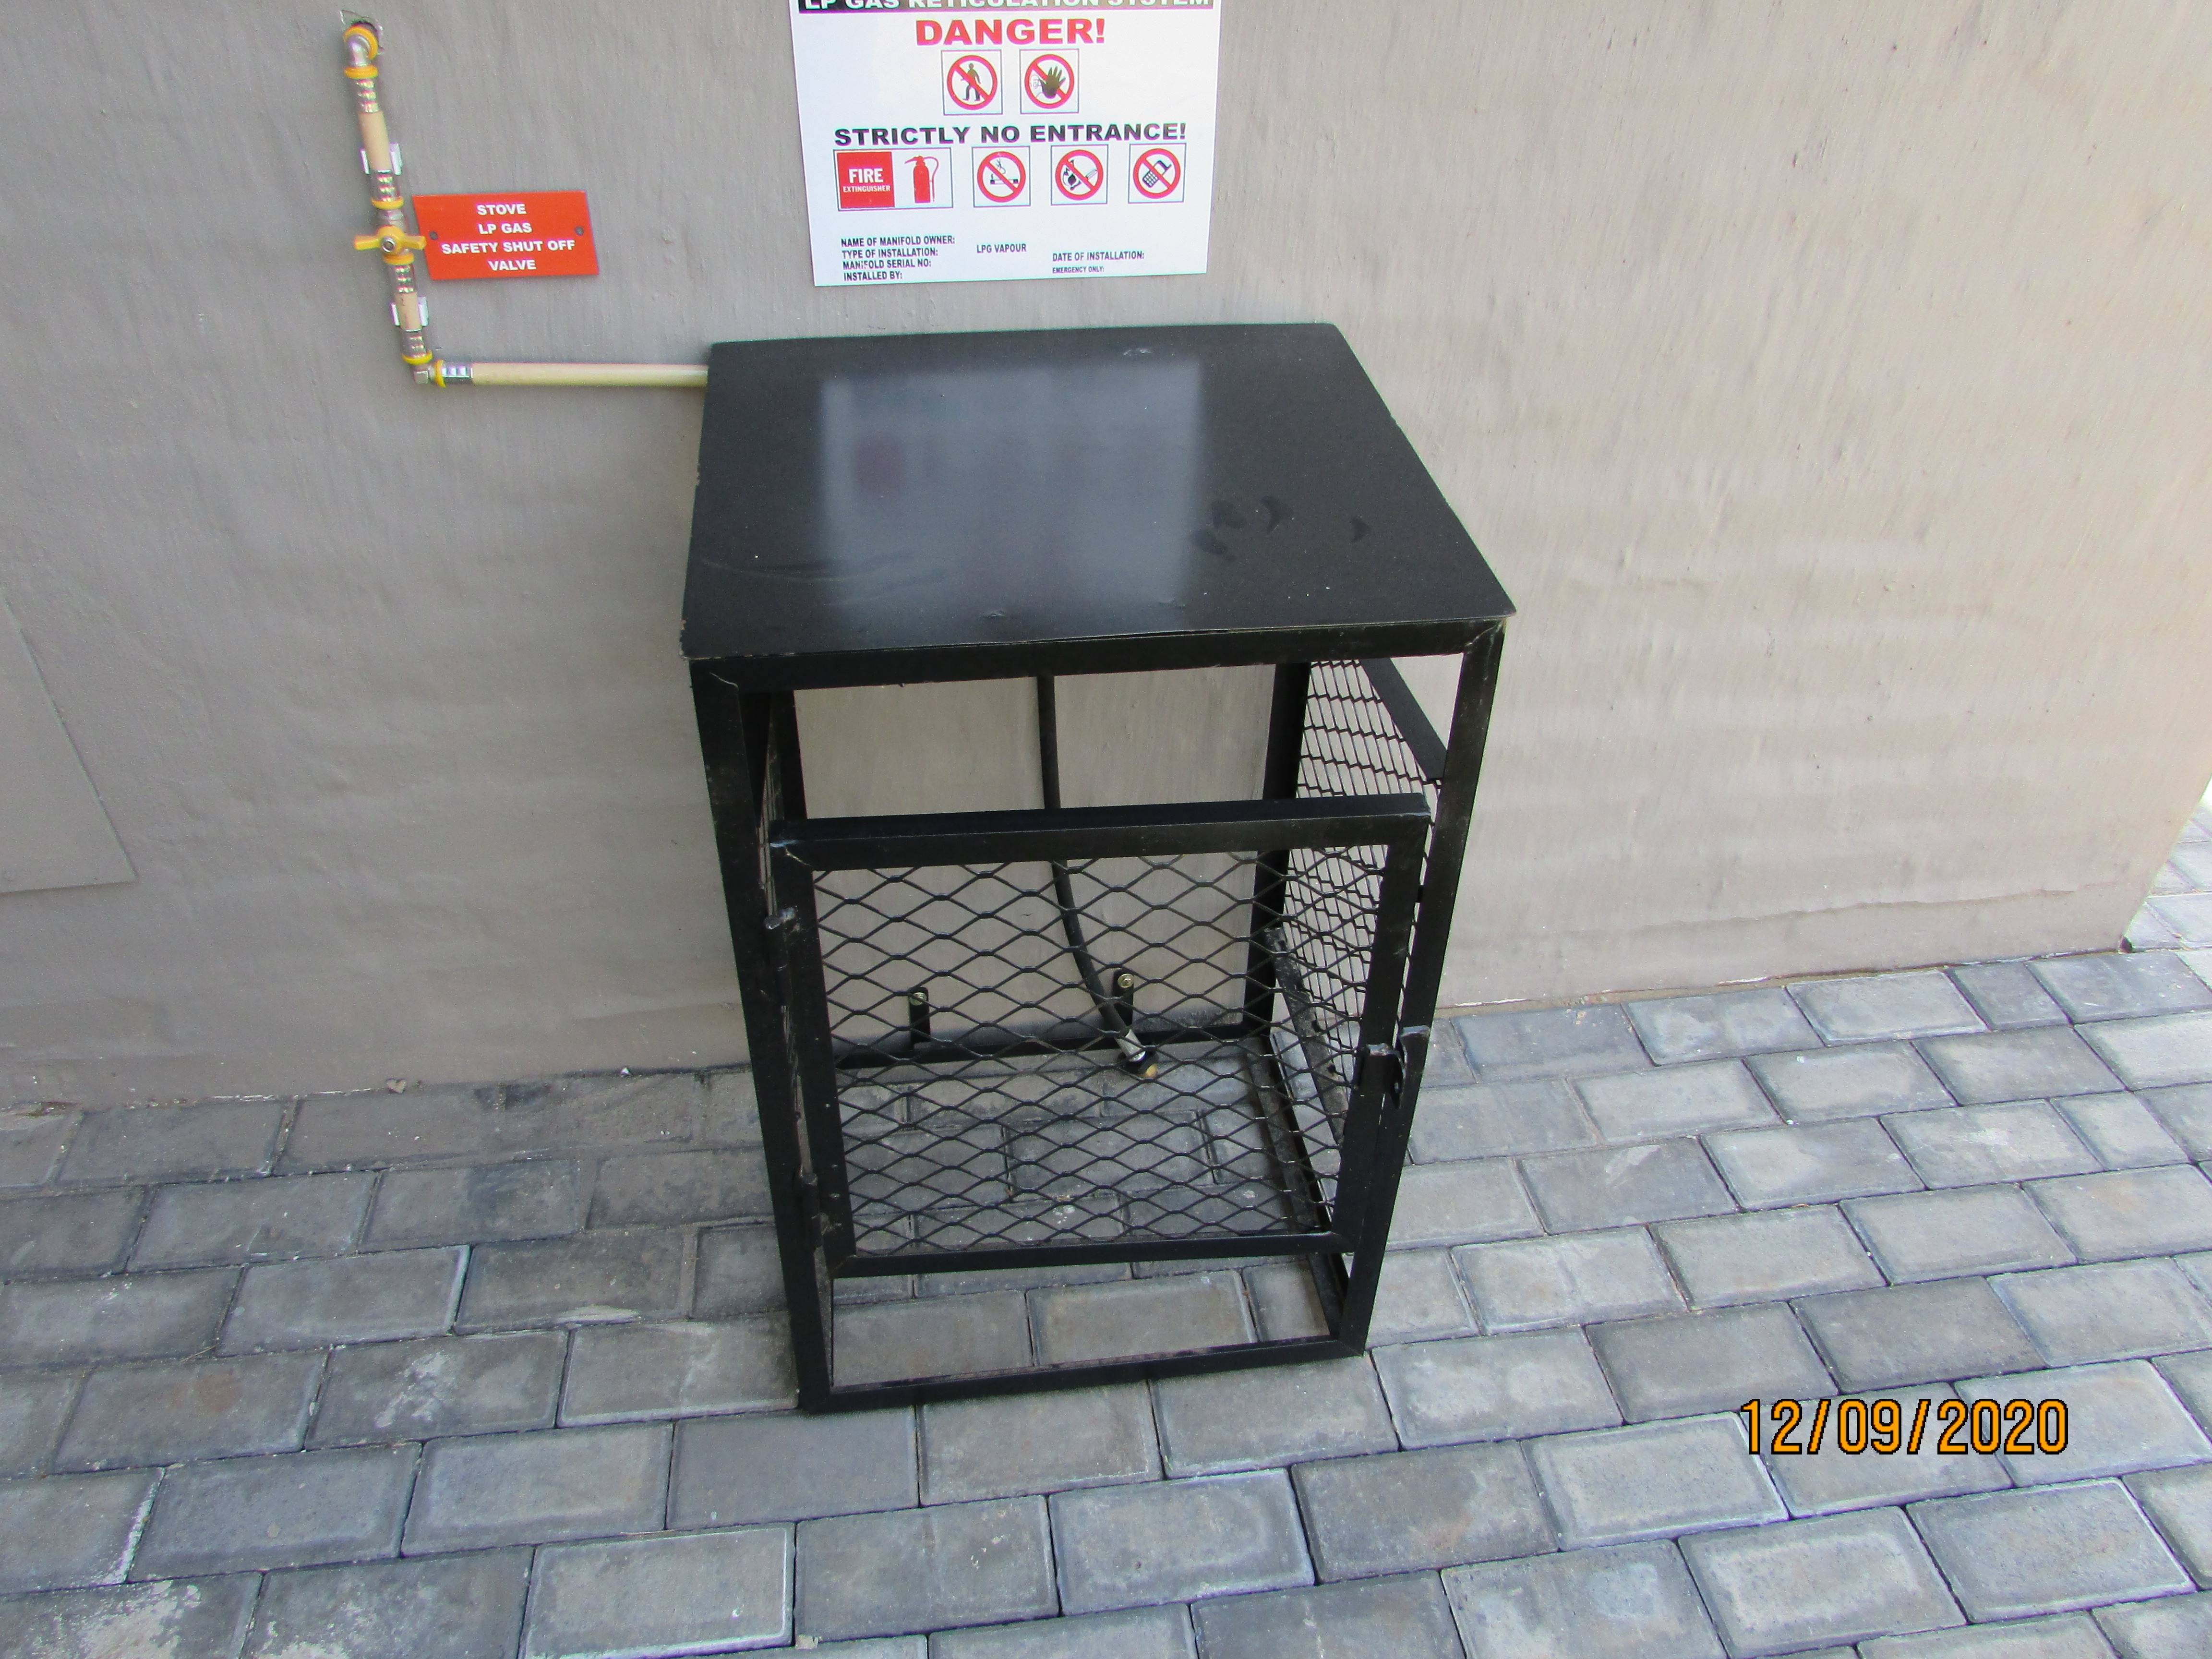 |
Invoice -- Comprehensive Property Report
805 Kingfisher Road, The Hills Game Reserve Estate, Pretoria
| $0.00 | |
| DUE |
THE HOME DETECTIVE
C/O Jurie Fourie
554 Alaska Road
Pretoria, South Africa, 0081
+27 74 892 2182
Signed Contracts

THE HOME DETECTIVE
+27 74 892 2182
http://www.inspectorhomes.co.za
Inspected by Jurie Fourie
State Home Inspector #: NACHI 14102004